

Page 1

®
VERITRACKS
1212 North Post Oak Road, Suite 100
USER MANUAL
Version 10.9.1
Satellite Tracking of People LLC
Houston, Texas 77055
Page 2

BluTag
RF Exposure (SAR) Statement for BluTag
S5E0906BT5)
This equipment complies with FCC RF radiation exposure limits set forth for an uncontrolled environment. It
was tested as an ankle worn device in accordance with OET Bulletin 65 Supplement C. The maximum SAR
value reported is 0.572W/Kg. The GSM and ISM tra nsmitters used in BluTag are not co-located. The ISM
transmitter is operational only when it is required to communicate with the associated equipment. The BluTag is
set up automatically to prevent simultaneous transmission between the GSM and ISM transmitters”
RF Exposure Statement for BluBox
This equipment complies with FCC RF radiation exposure limits set forth for an uncontrolled environment. The
antenna(s) used for this transmitter must be installed to provide a separation distance of at least 20 cm from all
persons and must not be co-located or operating in conjunction with any other antenna or transmitter.
WARNING – Changes or modifications to this unit not expressly approved by the party responsible for
compliance could void the user’s authority to operate the equipment.
®
complies with Part 15 of the FCC Rules. Operation is subject to the following two conditions:
This device may not cause harmful interference, and
This device must accept any interference received, including interference that may cause undesired
operation.
®
: (FCC ID S5EAA90048, FCC ID S5EAA70038 &
™
(FCC ID S5EAA90548) and BluHome™ (FCC ID S5EBH0107A)
B
ATTERY SAFETY
The Blutag Device contains a non-removable lithium-Ion battery. Do not attempt to remove the battery. Do not
dispose of The Blutag or the lithium-Ion battery in a fire. Please return the Device to Satellite Tracking of
People LLC for disposal otherwise only dispose of the battery or Blutag device in accordance with the laws and
regulations in your area governing disposal of this type of battery.
The lithium-Ion battery might present a fire or chemical burn hazard if mistreated. Do not disassemble, crush, or
puncture the lithium-Ion battery or the Blutag Device. Do not heat the battery or Blutag Device above 140°F
(60°C).
C
OPYRIGHT NOTICE
© 2008 Satellite Tracking of People LLC. All rights reserved.
Reproduction of this document is expressly forbidden without written approval from Satellite Tracking of
People LLC.
VeriTracks
of Satellite Tracking of People LLC (STOP).
The software described herein has U.S. and Foreign Patents Pending.
®
, BluBox™, BluTag®, BluHome™ and various software icons are worldwide registered trademarks
VeriTracks® 10.0 User Manual
Page 3

STOP provides this publication as is without warranty of any kind, expressed or implied, including, but not
limited to, the implied warranties of merchantability or fitness for a particular purpose.
This publication could include technical inaccuracies or typographical errors. Changes are periodically made to
the information contained herein; these changes will be incorporated in new editions of the publication. STOP
may make improvements and/or changes to the products described in this publication at any time.
Page 4

Page 5

TABLE OF CONTENTS
CHAPTER 1: ABOUT VERITRACKS
VERITRACKS ...................................................................................................................... 1
“BLU” HARDWARE DEVICES .............................................................................................. 2
®
AND “BLU” DEVICES ................................................ 1
CHAPTER 2: GETTING STARTED ........................................................................................ 6
BROWSER AND SYSTEM CONFIGURATION ........................................................................... 6
GETTING HELP ................................................................................................................... 6
LOGGING IN ....................................................................................................................... 7
VERITRACKS ORI HIERARCHY ............................................................................................ 8
VERITRACKS BROWSER LAYOUT ........................................................................................ 8
BASIC NAVIGATION ............................................................................................................ 9
DEFAULT SETTINGS .......................................................................................................... 12
CREATING “YOUR” VERITRACKS ...................................................................................... 13
UNDERSTANDING DATA ENTRY FEATURES ....................................................................... 13
UNDERSTANDING SEARCH WIDGETS ................................................................................ 15
CHAPTER 3: BLUTAG ENROLLMENT ................................................................................ 16
ENROLLING AN INDIVIDUAL ............................................................................................... 16
PREPARE BLUTAG FOR USE ............................................................................................. 16
CREAT E AN ENROLLEE RECORD ....................................................................................... 17
VERIFY BLUTAG CONT ACT AND GPS ACQUISITION ........................................................... 20
INSTALL BLUTAG ON THE ENROLLEE ................................................................................ 23
ASSIGN BLUTAG TO THE ENROLLEE IN VERITRACKS ........................................................ 24
COMPLETE ENROLLMENT PAPERWORK ............................................................................ 26
UNENROLLING A TRACKED ENROLLEE .............................................................................. 27
REMOVING THE STRAP ..................................................................................................... 28
CHANGING A DEVICE ON AN ENROLLEE ............................................................................ 28
STORING AND MAINTAINING BLUTAG ................................................................................ 28
CHAPTER 4: ZONES .......................................................................................................... 29
CREATING ZONES ............................................................................................................ 29
ZONE TYPES .................................................................................................................... 35
ASSIGNING EXISTING ZONES ............................................................................................ 36
VeriTracks® 10.0 User Manual i
Page 6

OTHER ZONE FUNCTIONALITY .......................................................................................... 37
EDITING ZONES ................................................................................................................ 38
C
HAPTER 5: ENROLLEE SCHEDULES ............................................................................... 40
SCHEDULE TERMINOLOGY ................................................................................................ 40
SETTING A RECURRING SCHEDULE VIA TEXT ENTRY ......................................................... 41
SETTING AN EXCEPTION SCHEDULE VIA TEXT ENTRY ....................................................... 43
SCHEDULING TIPS – USING MULTIPLE INCLUSION ZONE SCHEDULES ................................ 44
HAPTER 6: EVENTS AND NOTIFICATIONS ...................................................................... 45
C
BLUTAG EVENTS ............................................................................................................. 45
BLUTAG NOTIFICATIONS .................................................................................................. 47
THE DAILY SUMMARY REPORT ......................................................................................... 49
CHAPTER 7: SUPERVISING AN ENROLLEE ....................................................................... 51
ENROLLEE DETAILS WIDGET ............................................................................................ 51
MAPPING PROCEDURES ................................................................................................... 54
MAPPING TOOLS .............................................................................................................. 55
CHAPTER 8: MAINTENANCE ............................................................................................. 66
USER MANAGEMENT WIDGET ........................................................................................... 66
USER ACCOUNTS ............................................................................................................. 73
CHAPTER 9: INVENTORY MANAGEMENT .......................................................................... 76
INVENTORY DETAILS WIDGET – PRODUCTS TAB ............................................................... 76
INVENTORY MANAGEMENT REPORTS ................................................................................ 79
CHAPTER 10: USING VERITRACKS TO INVESTIGATE INCIDENTS ....................................... 80
METHODS FOR ENTERING INCIDENT DATA ........................................................................ 80
VIEWING INCIDENT SEARCH RESULTS ............................................................................... 81
THE INCIDENT HIT REPORT ............................................................................................... 84
ZONES FOR LAW ENFORCEMENT ...................................................................................... 85
A
PPENDIX A: BLUBOX™ ACCESSORY GUIDE .................................................................... 1
BLUBOX OVERVIEW ........................................................................................................... 3
HOW BLUBOX AND BLUTAG WORK TOGETHER .................................................................. 3
HOW BLUTAG BEHAVES IN A BLU BOX GROUP .................................................................... 3
ENROLLMENT: CREATING BLUBOX GROUPS ...................................................................... 4
ii VeriTracks® 10.0 User Manual
Page 7

ENROLLMENT: ADDING BLUBOXES AND ENROLLEES TO THE GROUP .................................. 5
MONITORING: VERIFYING CURRENT BLUTAG STATUS VIA ENROLLEE STATUS ..................... 7
SCHEDULES: SETTING A BLUBOX REGULAR SCHEDULE ..................................................... 8
EVENTS: UNDERSTANDING BLUBOX ACTIVITY ..................................................................... 9
EVENTS: UNDERSTANDING VIOLATIONS IN RANGE OF THE BLUBOX .................................. 10
EVENTS: UNDERSTANDING BLUBOX MOVEMENT OR TAMPERING ...................................... 10
APPENDIX B: BLUHOME™ ACCESSORY GUIDE ................................................................... 1
BLUHOME OVERVIEW......................................................................................................... 3
KEY BLUHOME TERMS ....................................................................................................... 3
BLUHOME KEY FEATURES ................................................................................................. 3
HOW BLUHOME, BLUTAG, AND VERITRACKS WORK TOGETHER .......................................... 4
PREPARATION: ACTIVATING BLUTAG AND BLUHOME ......................................................... 5
PREPARATION: VERIFYING BLUHOME HAS CALLED VERITRACKS ........................................ 5
INSTALLATION: PREPARING BLUHOME TO GIVE TO AN ENROLLEE ....................................... 5
INSTALLATION: ASSIGNING BLUTAG AND BLUHOME TO AN ENROLLEE IN VERITRACKS ....... 6
INSTALLATION: VERIFYING BLUTAG’S STATUS VIA ENROLLEE DETAILS ............................... 7
SCHEDULES: SETTING A BLUHOME REGULAR SCHEDULE ................................................... 8
EVENTS: UNDERSTANDING BLUHOME ACTIVITY ................................................................ 10
EVENTS: TEXT NOTIFICATIONS LIST .................................................................................. 11
UN-ENROLLING AN ENROLLEE IN VERITRACKS ................................................................. 11
UNINSTALLATION: REMOVING BLUTAG AND BLUHOME ..................................................... 13
VeriTracks® 10.0 User Manual iii
Page 8

Page 9
®
CHAPTER 1: ABOUT VERITRACKS
AND “BLU” DEVICES
VERITRACKS
®
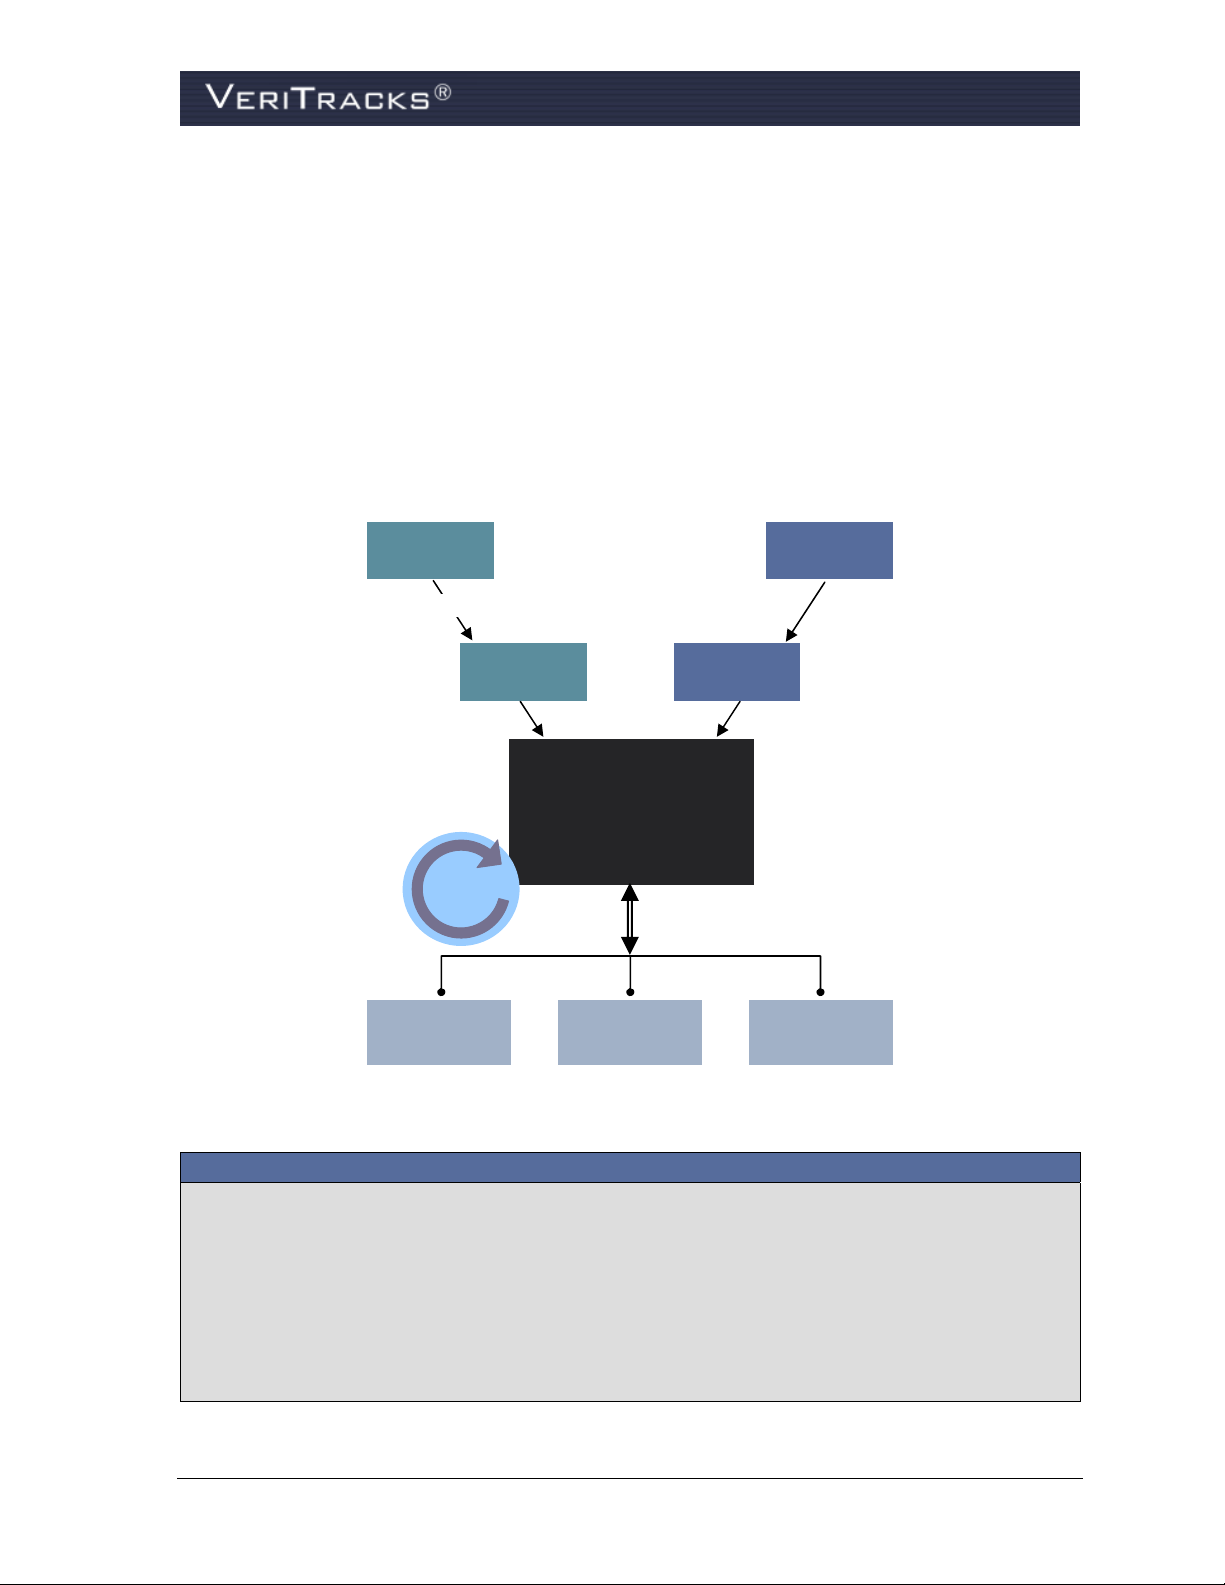
VeriTracks simplifies enrollee monitoring. This innovative, Internet-based public safety tool receives,
stores, and distributes monitoring data transmitted by BluTag
VeriTracks streamlines daily supervision tasks and, where applicable, crime solving data. Tabs and
widgets allow you to choose what to view and where to view it. VeriTracks is accessible 24/7 via any
computer with a high-speed Internet connection. Robust mapping can display and animate current or
historical tracks of multiple enrollees simultaneously. You determine which event and violation
notifications to receive, and how to receive them (email, fax, pager or text message).
Crime
Occurs
Crime Data
Agency
RMS
®
devices and BluHome™ units.
GPS
Satellite
Supervised
Individuals
Central
VeriTracks
Hit
Engine
Crime
Analysis
Figure 1 – VeriTracks 10.0 Browser Layout
Server
Pull Data Push Data
Investigation Probation
Interactive
GIS Query
& Analysis
With VeriTracks you can:
Analyze historical tracks for patterns and trends in the movements of enrollees.
Zoom down to closely examine a city block or zoom out to view an entire state.
Determine the nearest U.S. Postal Service address for any location on a map.
Use exclusion and inclusion zones to help modify an enrollee’s behavior by requiring them to
remain in or avoid certain locations for a specific length of time. Exclusion zones are
geographic areas an enrollee is prohibited from entering. Inclusion zones are geographic areas
in which an enrollee is required to enter and remain.
VeriTracks® 10.0 User Manual 1
Page 10
“BLU” HARDWARE DEVICES
STOP offers a range of hardware devices designed to meet the evolving demands of our diverse
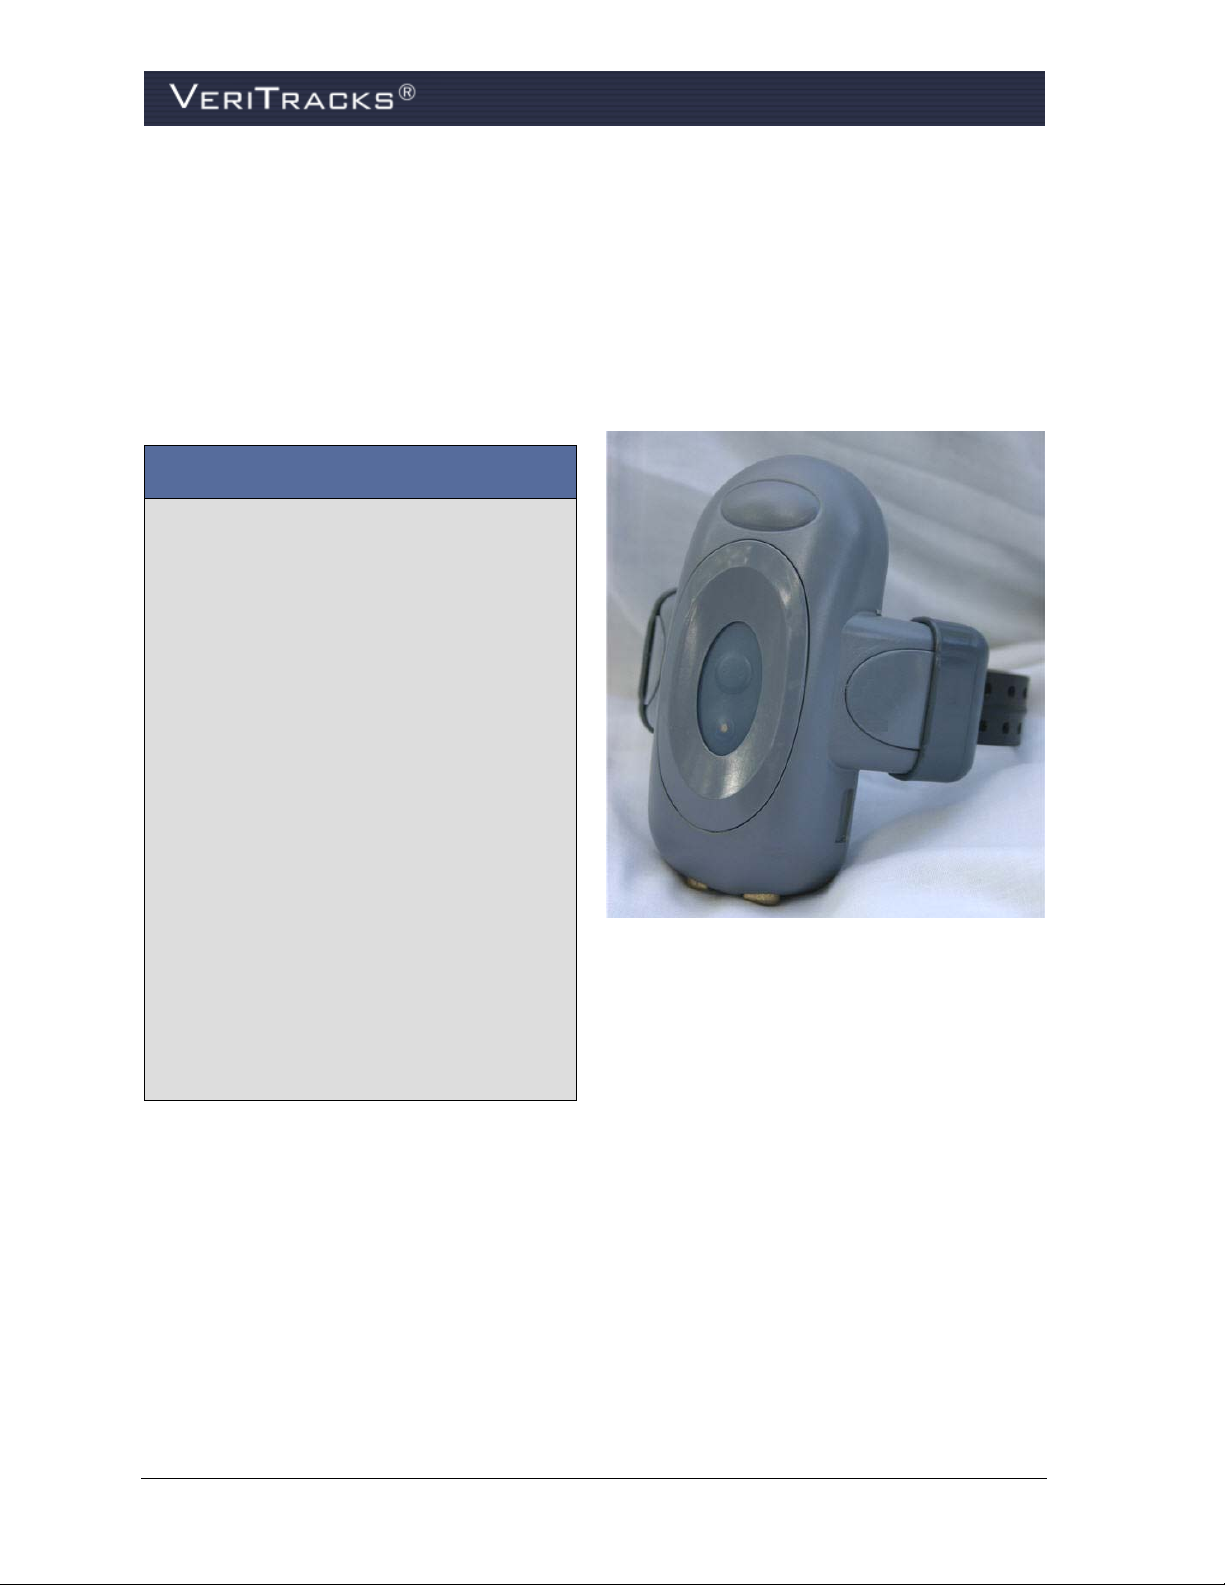
customer base. The center piece of these devices is BluTag, the world’s first one-piece Global
Positioning System (GPS) tracking device. It houses its receiver and transmitter in a single unit. This
eliminates the need for enrollees to always hand carry the monitoring component.
The BluHome and BluBox accessories link to BluTag devices via a radio frequency (RF) “tether”
enhance the monitoring of an enrollee’s curfews for his or her residence.
BluTag Active benefits and operations:
Single one-piece device, including GPS
and GSM/GPRS
Device settings are programmable over
the air
Remote programming of multiple
inclusion and exclusion zones
Layered location capability gives multiple
avenues for locating an individual
Battery life in excess of 30 hours
Low-battery notification by a vibrating
alarm
Weighs only six ounces
High temperature stability
Audible tone or vibration alarm can be
programmed and sent immediately
Performs exceptionally well under diverse
environmental/atmospheric conditions
Waterproof to a depth of 50 feet
Tamper resistant fiber optic strap
and
®
BluTag
BluTag
Active
Active monitors enrollees using active GPS technology, which generates immediate
notifications containing near real-time data. This allows supervising agents to quickly take the
appropriate action related to the notification.
Because BluTag is a one-piece monitoring device, it remains securely fastened to an enrollee’s ankle
at all times. No additional equipment is needed to effectively monitor an enrollee.
2 VeriTracks® 10.0 User Manual
Page 11

In its standard configuration, an active device contacts VeriTracks once every 10 minutes to transmit
its tracking data. However, the device calls in immediately in the event of a violation. This provides
near real-time violation notification and near real-time enrollee tracking.
BluTag
Passive
BluTag Passive is the only commercially proven one-piece passive GPS monitoring device on the
market today. An enrollee need not carry or plug into any other equipment.
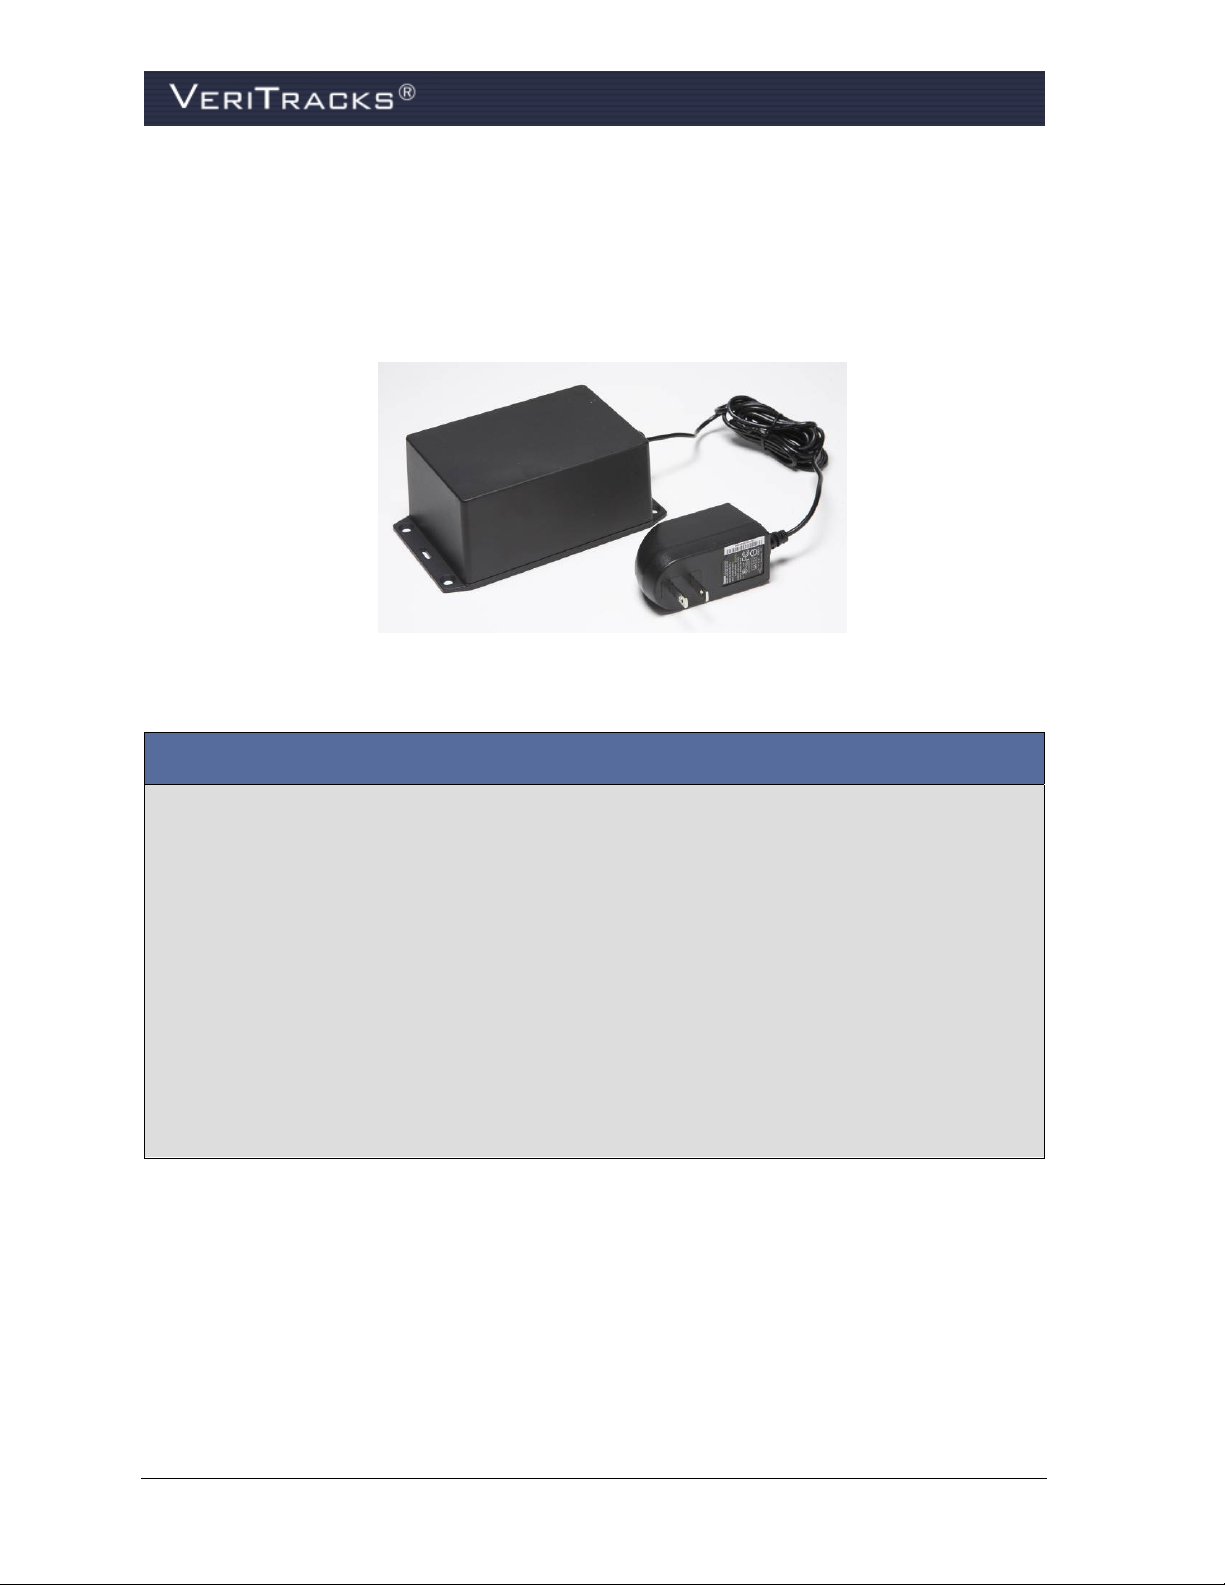
BluTag Passive transmits data through an RF tether to BluHome, a GPS accessory with
communication capability, while still attached to an enrollee’s ankle. Multi-piece passive GPS
devices require an enrollee to remove the transmitter (the component that actually tracks an enrollee’s
movements) every day for up to eight hours to recharge the battery and/or transmit monitoring data.
BluTag Passive receives and stores all monitoring data onboard until the enrollee enters the RF tether
range of BluHome, which is installed in an enrollee’s home. More information about BluHome is
included later in this chapter.
BluTag Passive immediately receives GPS coordinates when the RF tether between itself and
BluHome breaks. Because BluTag Passive remains securely attached to an enrollee’s ankle at all
times, public safety is enhanced because the movements of an enrollee are tracked 24/7, even when
an unscheduled exit from the residence occurs. BluHome sends VeriTracks a violation alert when
such an event occurs.
BluTag Hybrid
BluTag Hybrid communicates device tampering and inclusion zone violations with near real-time
data like BluTag Active. Supervising agents can also “ping” the device so it immediately transmits
the enrollee’s current location regardless of when the last GPS coordinates were transmitted to
VeriTracks.
A distinct advantage of BluTag Hybrid is its ability to easily and quickly convert to active GPS
monitoring without changing equipment. Supervising agents need only call, email, or fax our
Solutions Center any time of the day or night to switch the device to active GPS monitoring.
BluTag Hybrid transmits monitoring data using one of two cellular networks or through an RF tether
with BluHome. When BluTag Hybrid is used in conjunction with BluHome, the RF tether linking the
two units engages when the enrollee enters the tether’s range. More information about BluHome is
included later in this chapter. BluHome is an optional accessory for BluTag Hybrid and not required
for BluTag Hybrid’s normal operations.
In its standard configuration, a BluTag Hybrid device calls VeriTracks to transmit its tracking data
under the following conditions:
Enrollee charges the device
Enrollee enters the tether range of a BluHome unit
Enrollee violates a 911 Inclusion zone
BluTag records a bracelet strap tamper
Agent or officer “pings” the device while logged into VeriTracks
VeriTracks® 10.0 User Manual 3
Page 12
BluBox
BluBox is a GPS accessory designed for use in group residential facilities with multiple enrollees or
for a single enrollee without sufficient cellular telephone coverage. It emits an encrypted RF signal to
electronically tether multiple enrollees monitored with a BluTag device. BluBox does not transmit
monitoring data. The BluTag device attached to the enrollee’s ankle transmits monitoring data.
BluBox benefits and operations:
Enhance curfews with the RF signal regardless of layout or construction of facility
BluBox is installed in an inconspicuous location
Uses a standard AC electrical outlet for power
Back-up battery power lasts up to three days
Detects and transmits unauthorized movement or tampering to BluTag, which sends the data to
VeriTracks
When an enrollee enters the RF signal range and BluBox and BluTag are tethered together,
BluTag transmits a message to VeriTracks about the tether
When BluTag is tethered to BluBox, GPS tracking is curtailed. When the tether is broken, GPS
tracking returns to standard operations
4 VeriTracks® 10.0 User Manual
Page 13
BluHome
BluHome is a GPS accessory that transmits monitoring data through a digital or standard landline
telephone connection in an enrollee’s residence. When an enrollee enters BluHome’s RF signal range,
the unit immediately tethers itself to the BluTag device. GPS location data, violations, and other
monitoring data transmit to the BluHome through the tether. BluHome then transmits the data to
VeriTracks using the landline or digital telephone connection.
BluHome allows customized cut-off points for the RF tether regardless of the layout or construction
of the residence. This significantly enhances curfews since the tether can be programmed to cut off at
a specified location in or out of the enrollee’s residence.
BluHome benefits and operations:
Enhance curfews with customized cut-off points with the RF signal regardless of layout or
construction of the residence
No removal of BluTag from the enrollee’s ankle to transmit monitoring data to BluHome
BluHome installs in an inconspicuous location in the enrollee’s home
No enrollee interaction is required for normal operations or maintenance
Uses a standard AC electrical outlet for power
Back-up battery power lasts up to three days
Detects, records and transmits unauthorized movement and electrical or telephone service
interruptions
VeriTracks® 10.0 User Manual 5
Page 14

CHAPTER 2: GETTING STARTED
BROWSER AND SYSTEM CONFIGURATION
The following configuration requirements help maximize your connection to VeriTracks.
VeriTracks runs in a 128-bit encrypted browser (e.g., Microsoft Internet Explorer
or Mozilla Firefox 1.0 or higher). If a computer’s browser does not have sufficient encryption
capability, a message appears directing you to a browser upgrade website. For further
assistance, contact our Solutions Center toll free at 866.703.STOP (7867).
Cookies must be enabled on the browser (used for login identification purposes only; enabled
by default in Internet Explorer 6.0 or higher).
JavaScript must be enabled on the browser (enabled by default in Internet Explorer 6.0 or
higher).
The minimum screen resolution setting is 1024x768. The optimal resolution setting is
1280x1024.
TIP: If you have appropriate administrative rights on your computer, you may change
settings for cookies and JavaScript by selecting Tools > Internet Options in
Internet Explorer, and then selecting the Settings button in the Temporary
Internet Files section of the General tab.
Verify and change screen resolution by right-clicking on the Desktop and
selecting Properties > Settings tab.
®
6.0 or higher
GETTING HELP
The technical support staff at STOP’s Solutions Center is pleased to assist with any questions
regarding the operation of BluTag, BluBox, BluHome or VeriTracks.
Contacting STOP’s Solutions Center:
By Phone:
By Fax:
By Email:
By Mail:
6 VeriTracks® 10.0 User Manual
1-866-703-STOP (7867)
1-877-410-STOP (7867)
TechSupport@stopllc.com
Satellite Tracking of People, LLC
1212 North Post Oak Road, Suite 100
Houston, Texas 77055
Page 15
LOGGING IN
1. To start, open the Internet Explorer browser.
2. In the address line on the Home Page, enter the following address
https://www.veritracks.com
3. Accept the Security Certificate (if applicable). The VeriTracks login screen displays.
4. Enter your Username and Password.
TIP: If you forget your username or password, VeriTracks can email the information
to you. Simply click the “Forgot your username or password?” link and follow
the instructions.
5. Click Login. The VeriTracks browser will display. In organizations that have a hierarchy of
field and regional offices, select the office you wish to access from the list on the screen.
Figure 2 – VeriTracks Login Screen
VeriTracks® 10.0 User Manual 7
Page 16
VERITRACKS ORI HIERARCHY
An ORI is a unique nine-character identifier assigned by the FBI to law enforcement
agencies. VeriTracks uses this identifier when available to establish the unique identity of
each of its customers in the VeriTracks system. If an agency does not have an FBI ORI we
will create a VeriTracks ORI. Larger organizations that are divided into geographic regions,
functional branches, and field offices can be set up in VeriTracks to replicate their
organization’s hierarchy of offices. Additionally, organizations that have a reason to separate
two supervised populations like adults and juveniles can have their populations separated in
VeriTracks. For simplicity’s sake, all of these entities in the hierarchy are referred to as
ORIs.
For example, if an agency has a headquarters office and three field offices, the headquarters
office is set up as the “parent” ORI and the three field offices as “child” ORIs. Users with
access to the parent ORI can view enrollee information and tracking data, monitor inventory
lists, receive notifications, etc for all three child ORIs as well as the parent ORI. Users who
only have access to a child ORI only have rights to the above information for their own ORI.
VERITRACKS BROWSER LAYOUT
VeriTracks 10.0 consists of the Header Panel, the Tab Page Panel, the Widget Panel, and the Map
Panel. Figure 3 shows the location of each of these panels.
TIP: VeriTracks 10.0 uses tab pages and widgets to organize functionality. Widgets are the
small windows seen in each tab page.
Tab
Page
Panel
Widget
Panel
Map
Panel
Header
Panel
Figure 3 – VeriTracks 10.0 Browser Layout
8 VeriTracks® 10.0 User Manual
Page 17

BASIC NAVIGATION
WARNING: The Back button may produce unexpected results. Change from one tab
or widget to another by clicking that tab or widget.
Tab Pages
VeriTracks utilizes tab pages and widgets allowing you to view the information you want in the order
of your choosing. Select the tab pages to display in the Tab Page Panel. Add the same tab page
multiple times in the Tab Page Panel. Available tabs include the following:
General – view general system information and messages; available widgets include
Introduction and Messages. Note: This tab page displays when first logging into VeriTracks.
Use the feedback form to submit any questions or comments.
Supervision – view the most current information for an enrollee; available widgets include
Enrollee Details, Simple Enrollee Search, Advanced Enrollee Search, Browse Enrollees, and
Schedules
Enrollment – create and modify enrollee records; available widgets include Enrollment Entry,
Simple Enrollee Search, Advanced Enrollee Search, Browse Enrollees, Browse Inventory,
Schedules, Available Inventory, and BluBox Management
Inventory – manage devices and device inventory; available widgets include Inventory Details,
Browse Enrollees, and Browse Inventory
Maintenance – browse users and then maintain as necessary; available widgets include User
Management and Browse Users
Analysis – search for and view incident reports; available widgets include Simple Enrollee
Search, Advanced Enrollee Search, Incident Search, and Incident Entry
Reports – view report details; available widgets include Recent Reports and Report Viewer
To remove a tab page:
1. Click the tab page close icon on the tab you wish to close (Figure 4). This icon appears to the
right of the tab page label in the Tab Page Panel. This closes the tab page.
To add a tab page:
1. Click the tab page selection icon in the Tab Page Panel (Figure 4). A drop-down list appears
and displays all of the available tab pages.
2. Select the tab page you wish to add. This tab page will now appear in the Tab Page Panel.
The default widget(s) will appear on the tab page once it opens.
VeriTracks® 10.0 User Manual 9
Page 18

g
Tab Page
Selection
Icon
Tab Page
Close
Icon
Available
Tab Pa
es
Figure 4 – VeriTracks Tab Pages
Widgets
VeriTracks presents information as widgets, which represents a group of related information or
functions. Widgets display the information and functions that you choose in a manner that is most
useful to you. For example the Enrollment Widget contains data and functions used to enroll an
individual on a device in VeriTracks. Widgets can be added to or removed from a tab page and
arranged on the tab page in the order that makes the most sense to you.
Each tab page has a drop-down list of widgets available on that tab page. Available widgets are
organized into two sub-menus: function specific widgets and Generic Widgets.
When a widget is selected, the information is placed within a box on the tab page. These boxes may
be moved on the tab page as you wish. Each widget box has a toolbar that appears in the upper-right
corner of the widget box.
Function specific widgets – Function specific widgets present information or functions
specific to the topic of the tab. Function specific widgets will vary on each Tab Page Panel.
Generic Widgets – Generic widgets appear on many tab pages and include Clock, Calendar,
and Feedback.
To add widgets to a tab:
1. Click the widget icon (Figure 5) on the tab page to which you wish to add the widget. This
icon appears to the left of the tab page name in the tab page label. Each tab page has a unique
widget icon.
2. A drop-down menu listing the widgets available for that tab page appears. Navigate to and
select the widget you wish to add to the tab page.
10 VeriTracks® 10.0 User Manual
Page 19
Widget
Icon
Figure 5 – VeriTracks Widgets
To remove widgets from a tab page:
1. Click the widget close icon from the widget toolbar. The widget will close.
To move a widget:
Widgets can be repositioned on a tab page by clicking and dragging. When moving the widget, make
sure the mouse cursor is inside the box. VeriTracks will handle the proper positioning from that
point.
To use widget tools:
Each widget box in VeriTracks contains a toolbar with the following options:
Tool Function
The Reload icon redisplays the widget box using the most current data available.
The Minimize icon only minimizes the widget box, not close it. Note that when the
box is minimized, this icon is not available. Instead there is an icon that allows you to
restore the widget box to its original size.
This icon restores a widget box to its original size after it has been minimized. Note
that this icon is available only when the widget box is minimized.
The Maximize icon resizes the widget box so that it is the full width of the browser.
The Close icon closes the widget box.
This icon is used to refresh the data on the Enrollee Status tab in the Enrollee Details
widget.
Modal Pop-Ups
Throughout VeriTracks, modal Pop-ups are used to enter or view information. A modal popup is a
window which requires you to interact with and enter the requested information before returning to
the widget.
VeriTracks® 10.0 User Manual 11
Page 20
Map
The map is permanently displayed on the bottom of VeriTracks. Resize the map by clicking on the
header and dragging it up and down, or by clicking on the minimize, partial, or maximize icons on the
right side of the header. If you maximize the map, it will cover the currently displayed widgets, but
those widgets and their displayed information are available again as soon as the map is minimized or
partially minimized.
DEFAULT SETTINGS
The first time you log into VeriTracks® 10.0, certain default setting pages and widgets are displayed.
Change any or all of the default settings to a display order that is most logical for you.
The default pages and widgets for standard parole and probation users are:
Page Widgets
General Introduction, Feedback, Messages
Enrollment Browse Enrollees, Enrollment Entry, Available Inventory
Supervision Browse Enrollees, Enrollee Details
The default pages and widgets for law enforcement (crime scene correlation) users are:
Page Widgets
General Introduction, Feedback, Messages
Analysis Incident Entry, Incident Search
If you open too many different pages and widgets, and want to return to the default settings:
1. Click on the My Account link in the upper-right corner of the browser window.
Figure 6 – My Account link
2. A modal pop-up displays your account information. Select the General Settings tab in the
lower-left of the modal.
3. Check the Reset Default Settings box.
4. Click Save in the lower-right of the modal.
12 VeriTracks® 10.0 User Manual
Page 21
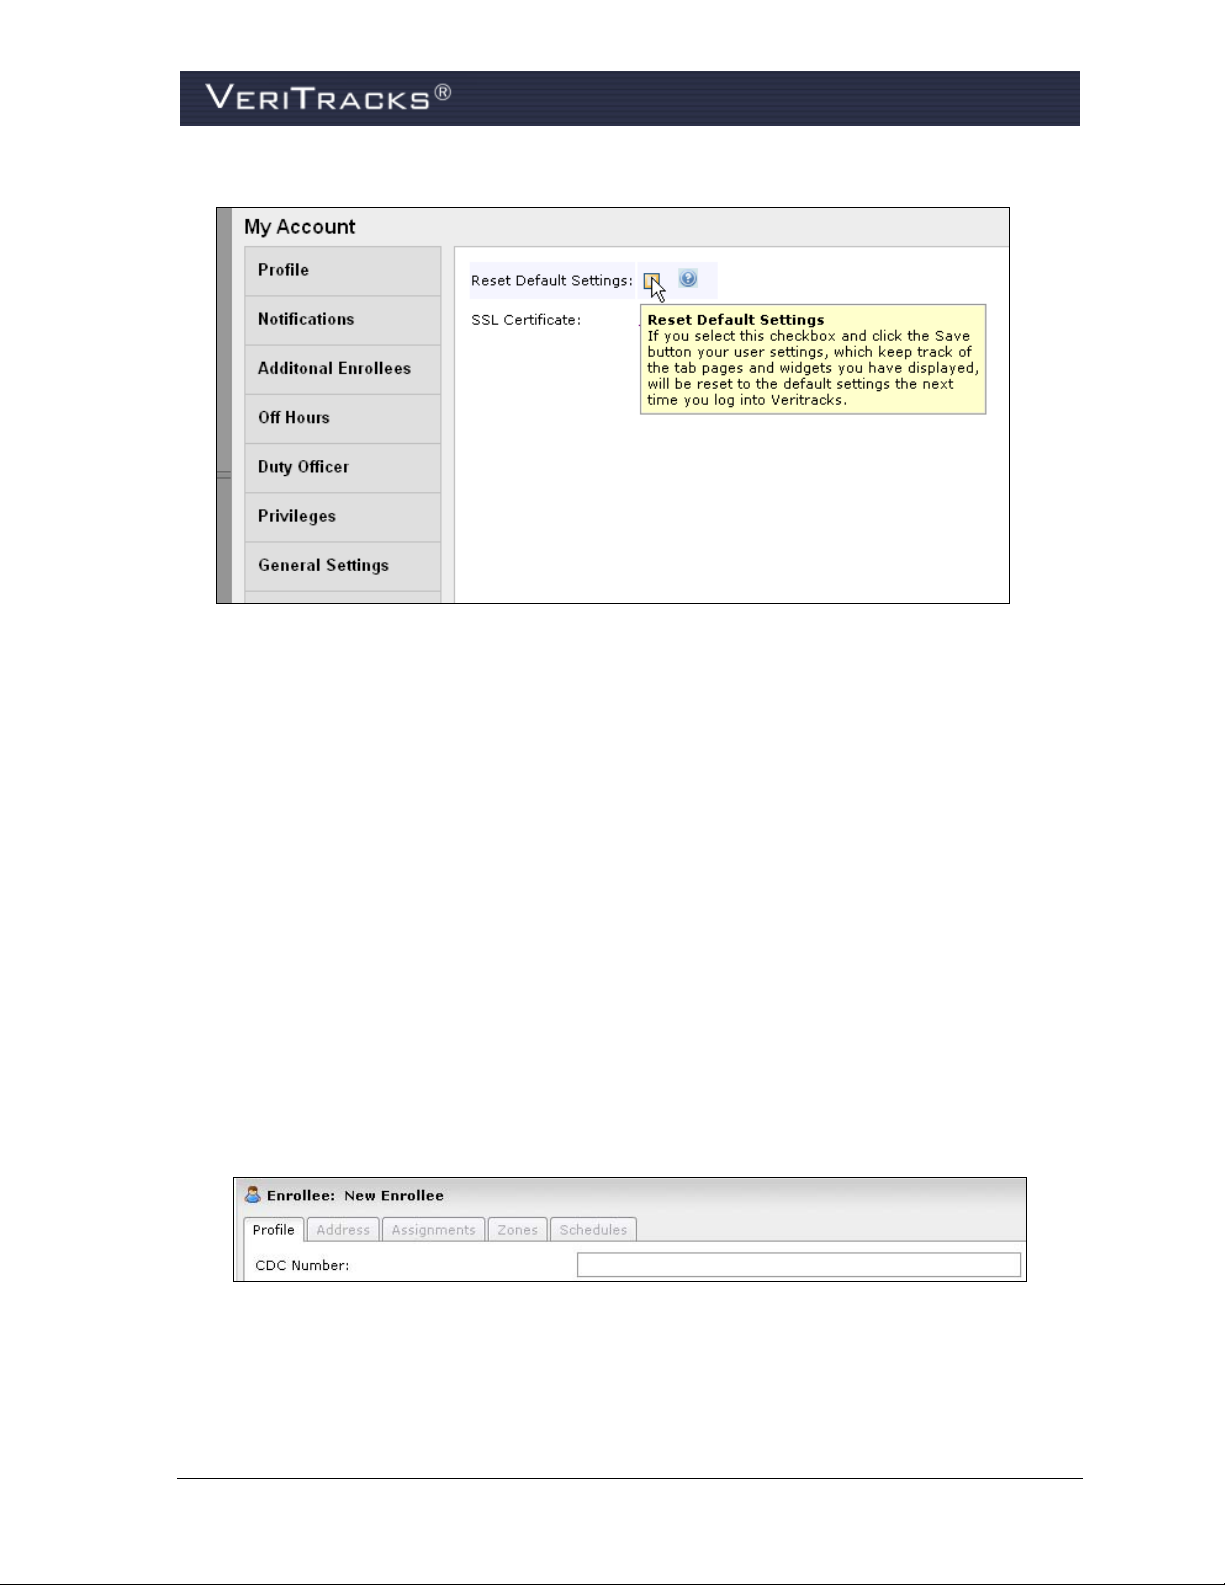
Figure 7 – My Account Modal
CREATING “YOUR” VERITRACKS
One of the unique advantages of VeriTracks® 10.0 is that the software remembers the pages, widgets,
and settings that you select to display. Each time you log out, VeriTracks
the current pages and widgets you had open. This makes it very convenient and shows the same
pages, widgets, and settings you use most.
Your settings are automatically saved by VeriTracks®. However, to ensure your configuration is
saved, use the log out link in the upper right corner.
®
10.0 takes a snapshot of
UNDERSTANDING DATA ENTRY FEATURES
Text Boxes
Text boxes allow direct data entry using the keyboard.
Figure 8 – Text Box
Date Fields
All dates can be input directly or picked off a calendar pop-up list.
VeriTracks® 10.0 User Manual 13
Page 22
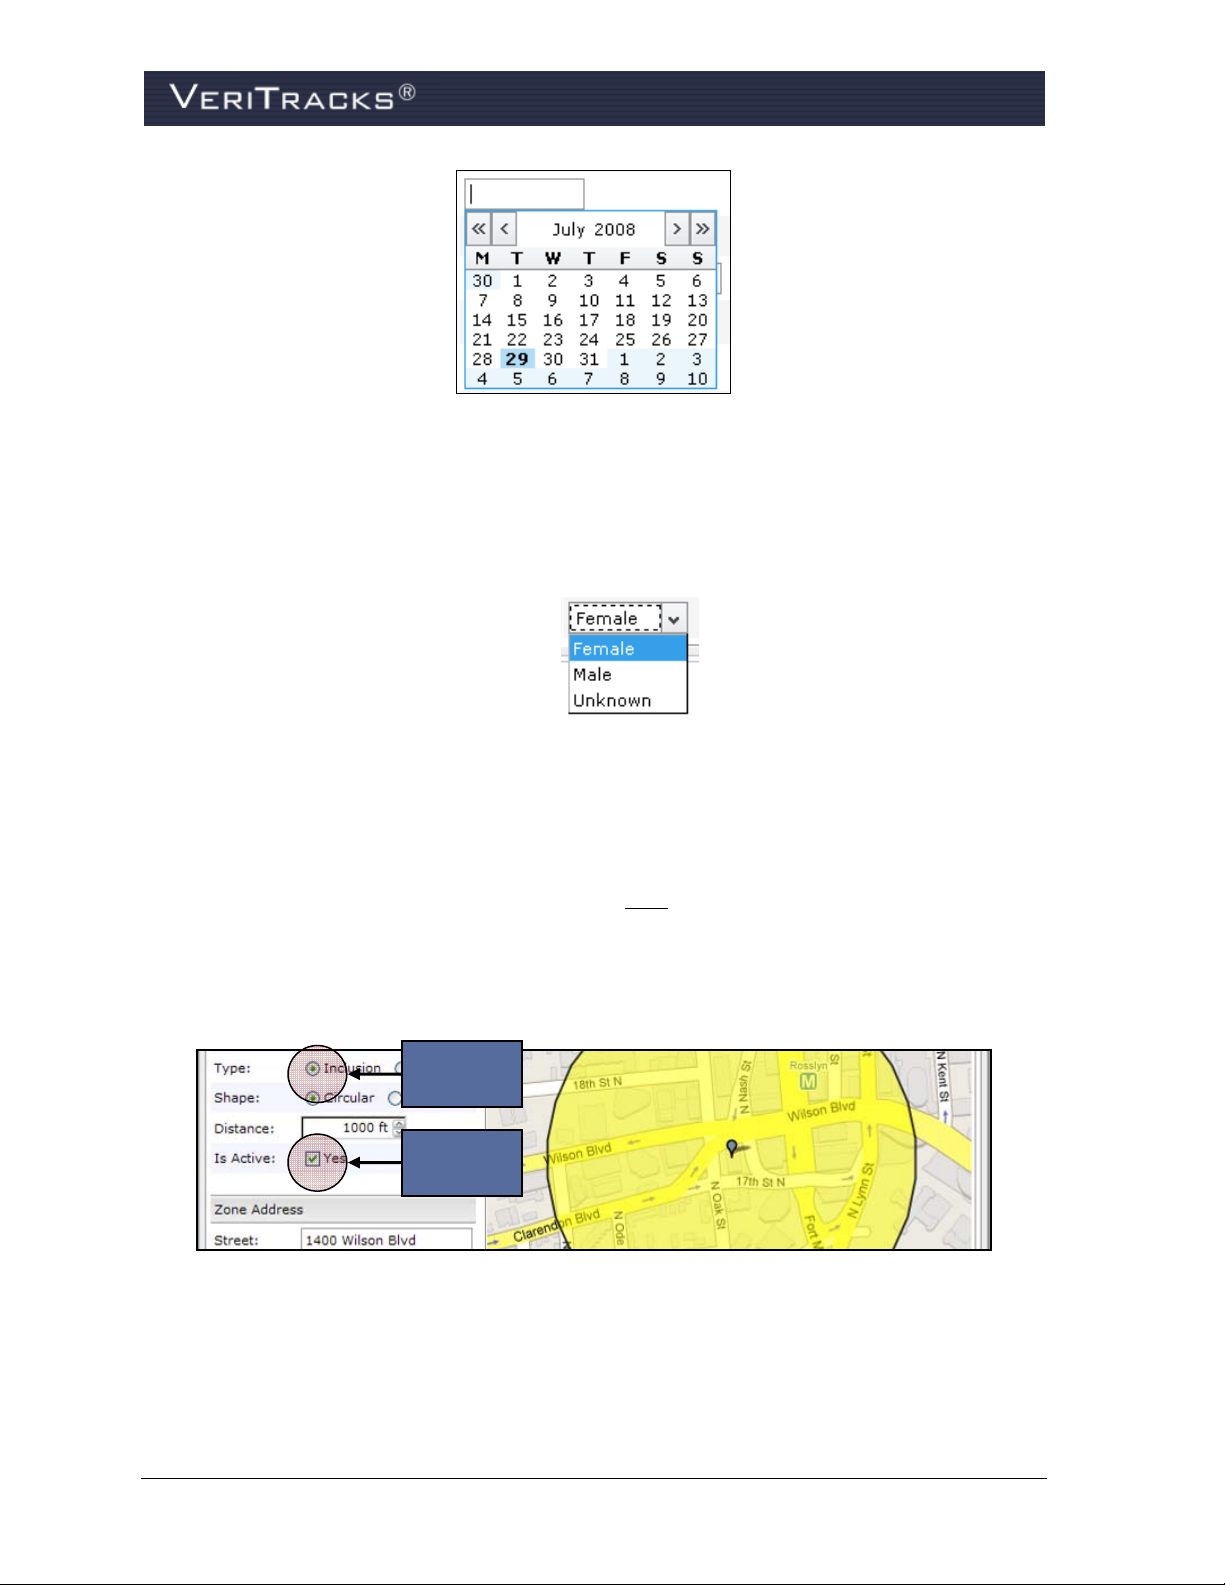
Figure 9(a) – Calendar
Drop-down Lists
Drop-down list boxes allow you to: (1) type information directly into the box, (2) search the list or (3)
pick an item off the drop-down list. You cannot select multiple values in these fields.
Figure 9(b) – Drop-Down List
Radio Buttons and Checkboxes
Radio buttons allow you to select a single entry in a list of options. When options are
presented in a list of radio buttons, a selection must
be made.
Checkboxes allow you to select multiple entries in a list. You also have the option of not
selecting any option.
Radio
Button
Checkbox
Figure 9(c) – Radio Buttons and Checkboxes
14 VeriTracks® 10.0 User Manual
Page 23
UNDERSTANDING SEARCH WIDGETS
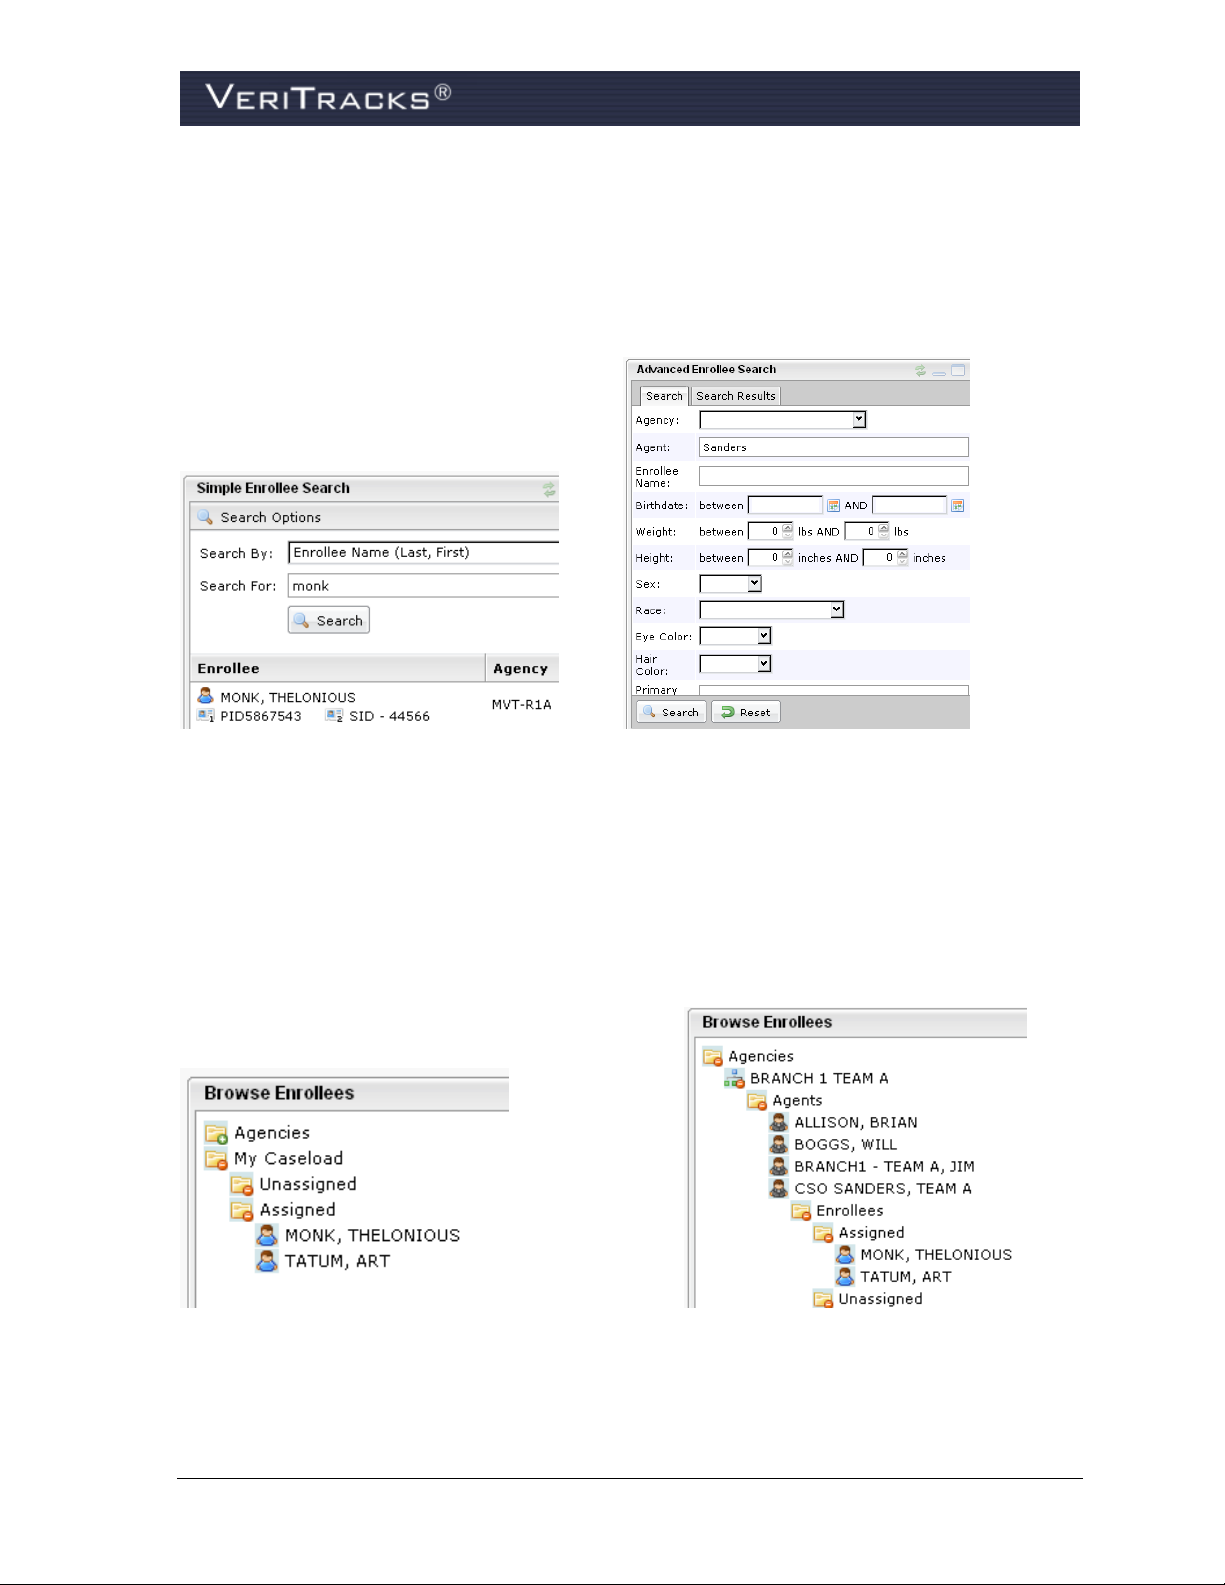
Search Widgets
The Simple Enrollee Search and Advanced Enrollee Search widgets allow you to find enrollees in
your caseload or for other officers by using easy to define search criteria.
Figure 10(a) – Browse Enrollees My Caseload Figure 10(b) – Browse Enrollees My Agency
Browse Widgets
Use the Browse Enrollee widget to locate enrollees in any ORI that your login has permission to
access. Enrollees are located in “folders”. Two main folders display in the widget—My Caseload
and Agencies. My Caseload opens to the defaults shown in Figure 11(a). To locate enrollees under
other officers or in other ORIs, use the Agencies folder. Figure 11(b) shows how to view your own
(or other officer’s) enrollees in the Agencies folder.
Figure 11(a) – Browse Enrollees My Caseload Figure 11(b) – Browse Enrollees My Agency
Use Browse Inventory and Browse User widgets to view inventory, BluBox Groups, and users.
VeriTracks® 10.0 User Manual 15
Page 24

CHAPTER 3: BLUTAG ENROLLMENT
ENROLLING AN INDIVIDUAL
Tracking individuals in the VeriTracks system begins with enrolling them in the system and
activating the assigned BluTag device. The recommended enrollment process is as follows:
1. Prepare BluTag for use.
2. Create an enrollee profile.
3. Verify BluTag contact and GPS acquisition.
4. Install BluTag on the enrollee.
5. Assign BluTag to the enrollee in VeriTracks.
6. Verify enrollment in Enrollee Status screen.
Alternative Enrollment Approach
The steps above are ordered to maximize efficiency while assuming you enter enrollee profile and
address data before the enrollee arrives. If you are completing the enrollment process with the
enrollee present, the following is a more efficient order:
1. Prepare BluTag for use.
2. Verify BluTag contact and GPS acquisition.
3. Install BluTag on the enrollee.
4. Create an enrollee profile.
5. Assign BluTag to the enrollee in VeriTracks.
6. Verify enrollment in Enrollee Status screen.
PREPARE BLUTAG FOR USE
Inspecting and Preparing Inventory
1. If the BluTag device is being re-assigned, remove and visually inspect the back plate, lenses,
and brass screw fittings on each wing of the device. (This should also be done during removal
and cleaning at un-enrollment.)
2. Locate the strap, clips, collars, and installation tools.
3. Inspect the ends of the strap, making sure each end is cut straight and on a sizing line. (If
necessary, re-cut each end on a sizing line.)
4. Place collars on each end of the device’s wings, making sure the notch is against the back
plate and the narrow ends are flush with the ends of the wings.
5. Attach a pair of clips to one end of the strap. The ends of the clips must align evenly with the
end of the strap (not shorter or longer) and snap into place.
16 VeriTracks® 10.0 User Manual
Page 25

6. Insert the clipped end of the strap into one wing of the device. Give the clips another firm
press to ensure they are secure. Pull on the strap firmly to confirm the clips have set and are
secure.
Activating the Device and Acquiring GPS
BluTag devices are shipped in a “deep sleep” mode. Un-enrolling an enrollee also places BluTag
in deep sleep mode. Before re-assigning the BluTag device:
1. Activate BluTag by placing it on the charger for at least four hours before an installation.
2. Place BluTag in a location with a clear view of the sky, preferably while it charges, to acquire
GPS (e.g., sitting in a window). This can take as little as 15 minutes, but it may take longer.
If possible, leave BluTag in this location for up to 45 minutes so that the BluTag can
download all satellite positions and other technical data that should be updated when a
BluTag is activated.
IMPORTANT: Do not charge devices more than two weeks without installing it.
When a device is ready for use, the cycle above can be repeated.
Avoid charging in the heat of direct sunlight. A piece of cardboard can be
placed over the device to reduce the effect.
CREATE AN ENROLLEE RECORD
To create an enrollee’s profile:
1. Open the Enrollment tab page.
2. Open the Enrollment Entry widget.
3. Click the Create a new Enrollee Record icon (Figure 12). The Enrollee: New Enrollee
screen opens and allows you to enter enrollee information (Figure 13).
Create New
Enrollee
Record
Figure 12 – Create a New Enrollee Icon
VeriTracks® 10.0 User Manual 17
Page 26
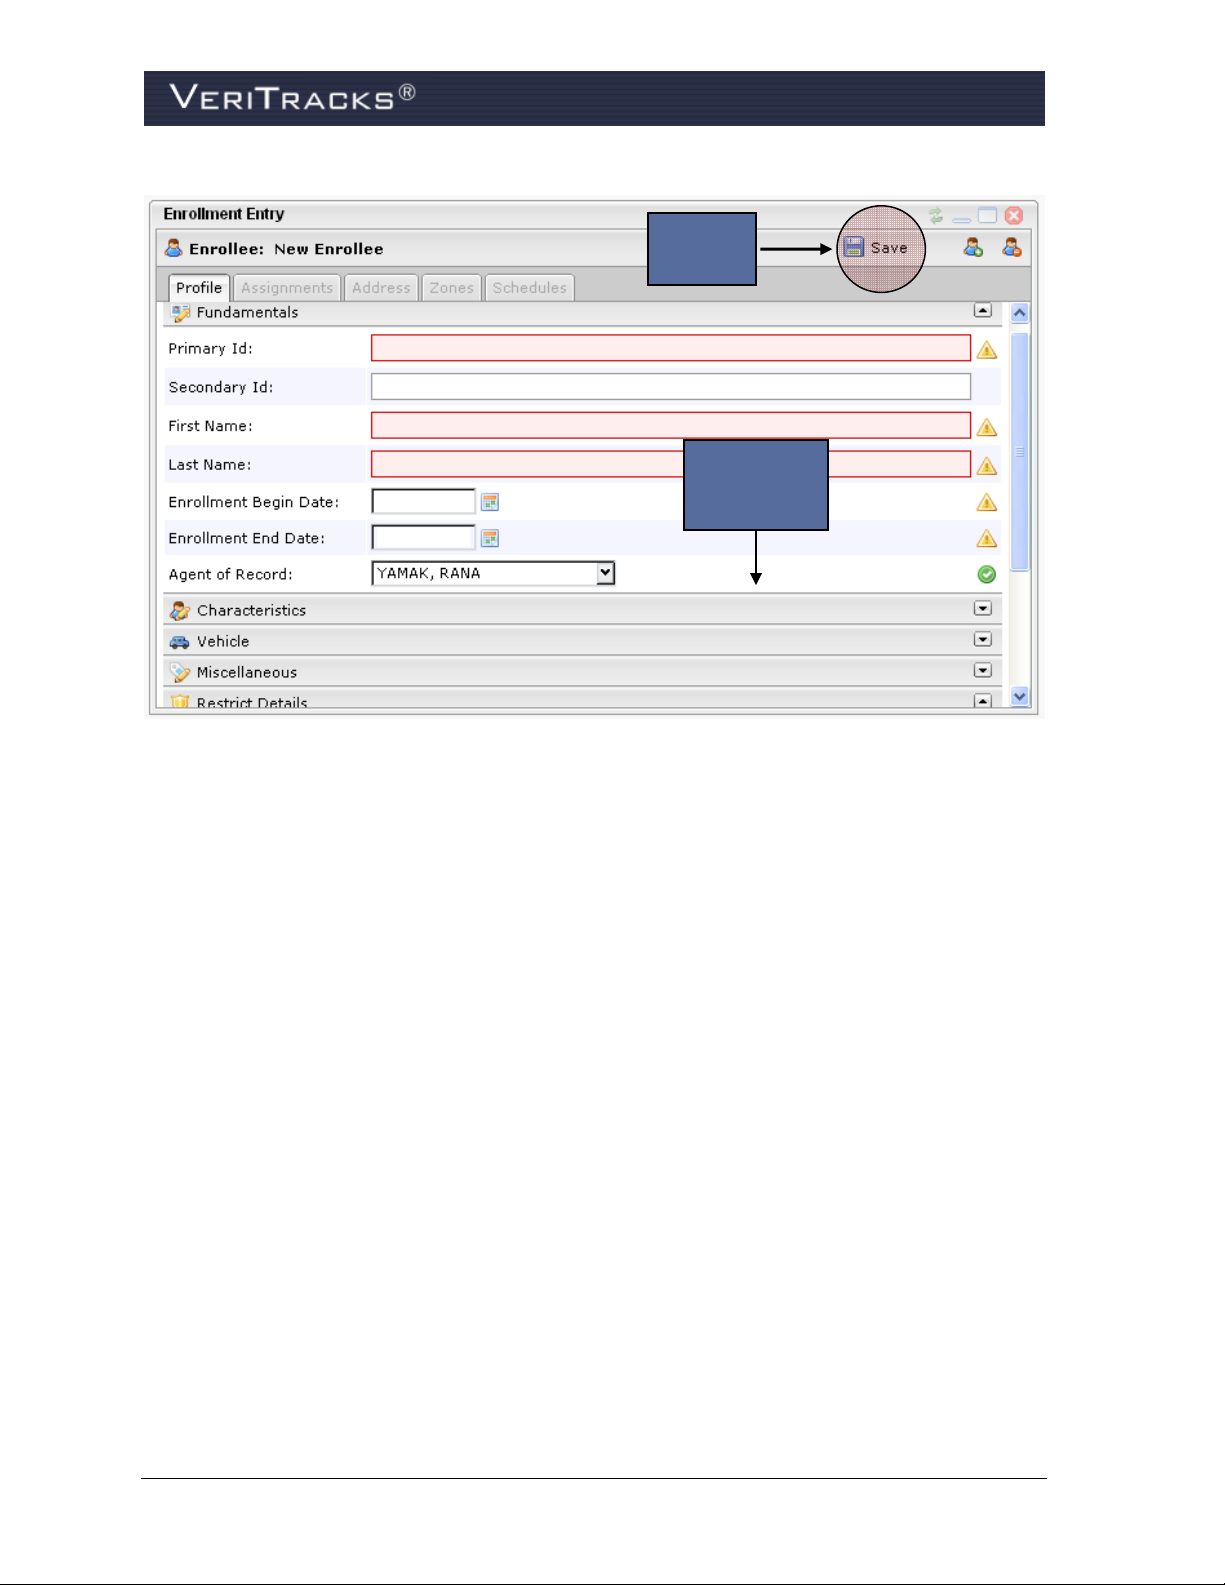
Save
Profile
Additional
Data
Sections
Figure 13 – Enrollee: New Enrollee Profile
4. Complete the enrollee profile. The following are required fields:
Primary Id
First Name
Last Name
Agent of Record
GPS Start & End Dates (MM/DD/YYYY; slashes only)
Note: the Secondary Id field is not required.
Additional data can be entered by clicking the bars at the bottom of the Fundamentals
section. The first three bars are labeled Characteristics, Vehicle, and Miscellaneous. They
contain all additional data fields such as hair color, eye color, etc. The final bar is labeled
Restrict Details. If the Restrict Details checkbox is checked, law enforcement users are
restricted from seeing this enrollee's details throughout the application. A note can be added
to enter information about who requested the restriction to be lifted.
5. After entering the necessary data fields, click Save in the top-right corner of the page.
To enter an enrollee’s home and work addresses:
1. Open the Address tab on the Enrollment Entry widget (Figure 14).
2. Enter the home street address (and work address, if applicable). Once the addresses are
entered, click Set Location to show the localization of that address. Zoom in or out and use
satellite photography to decide the precise placement of the icon. As necessary drag and drop
18 VeriTracks® 10.0 User Manual
Page 27
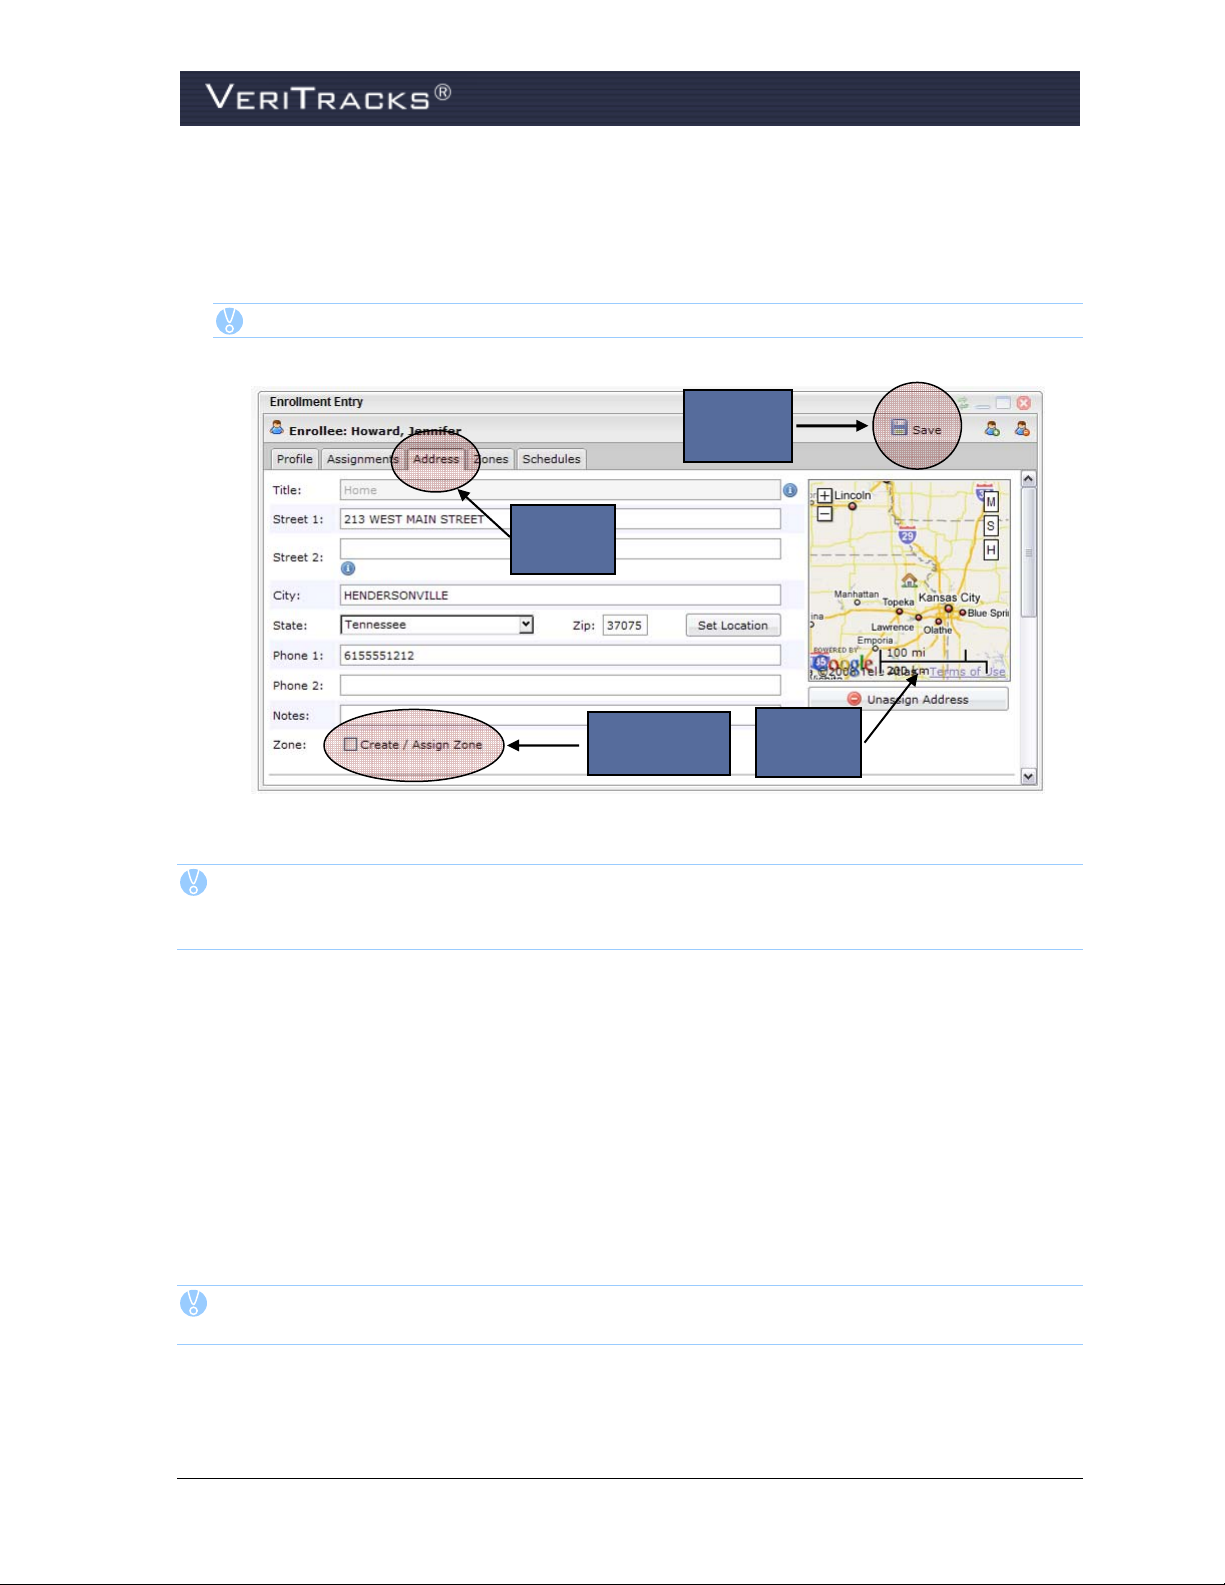
the icon to perfect the placement of the address icon. Note: The icon returns to the geo-coded
position if more address data is added after moving the icon.
3. After entering the necessary data fields, click Save in the top-right corner of the widget
(Figure 14).
TIP: Use the Street 2 field for non-geographic address data like apartment number.
Save
Address
Address
Tab
Create/
Assign Zone
Address
Map
Figure 14 – Enrollee: New Enrollee Address
TIP: VeriTracks has features for more efficient zone creation. While still in the Address
tab, select the Create / Assign Zone checkbox (Figure 14). The screen displays fields
for entering zone name and type. See Chapter 4 for additional details.
In addition to home and work addresses, VeriTracks can store an unlimited number of other addresses
for an enrollee.
To enter additional addresses for an enrollee:
1. Scroll down to the last existing address record for the enrollee. Beneath this record the Add
New Address button (Figure 15) appears.
2. Click this button and VeriTracks creates a new blank address record.
3. Fill in the desired data and click Save.
TIP: To set a location based on cross streets anywhere in VeriTracks, simply insert an “&”
between the two streets in the Street 1 field.
VeriTracks® 10.0 User Manual 19
Page 28
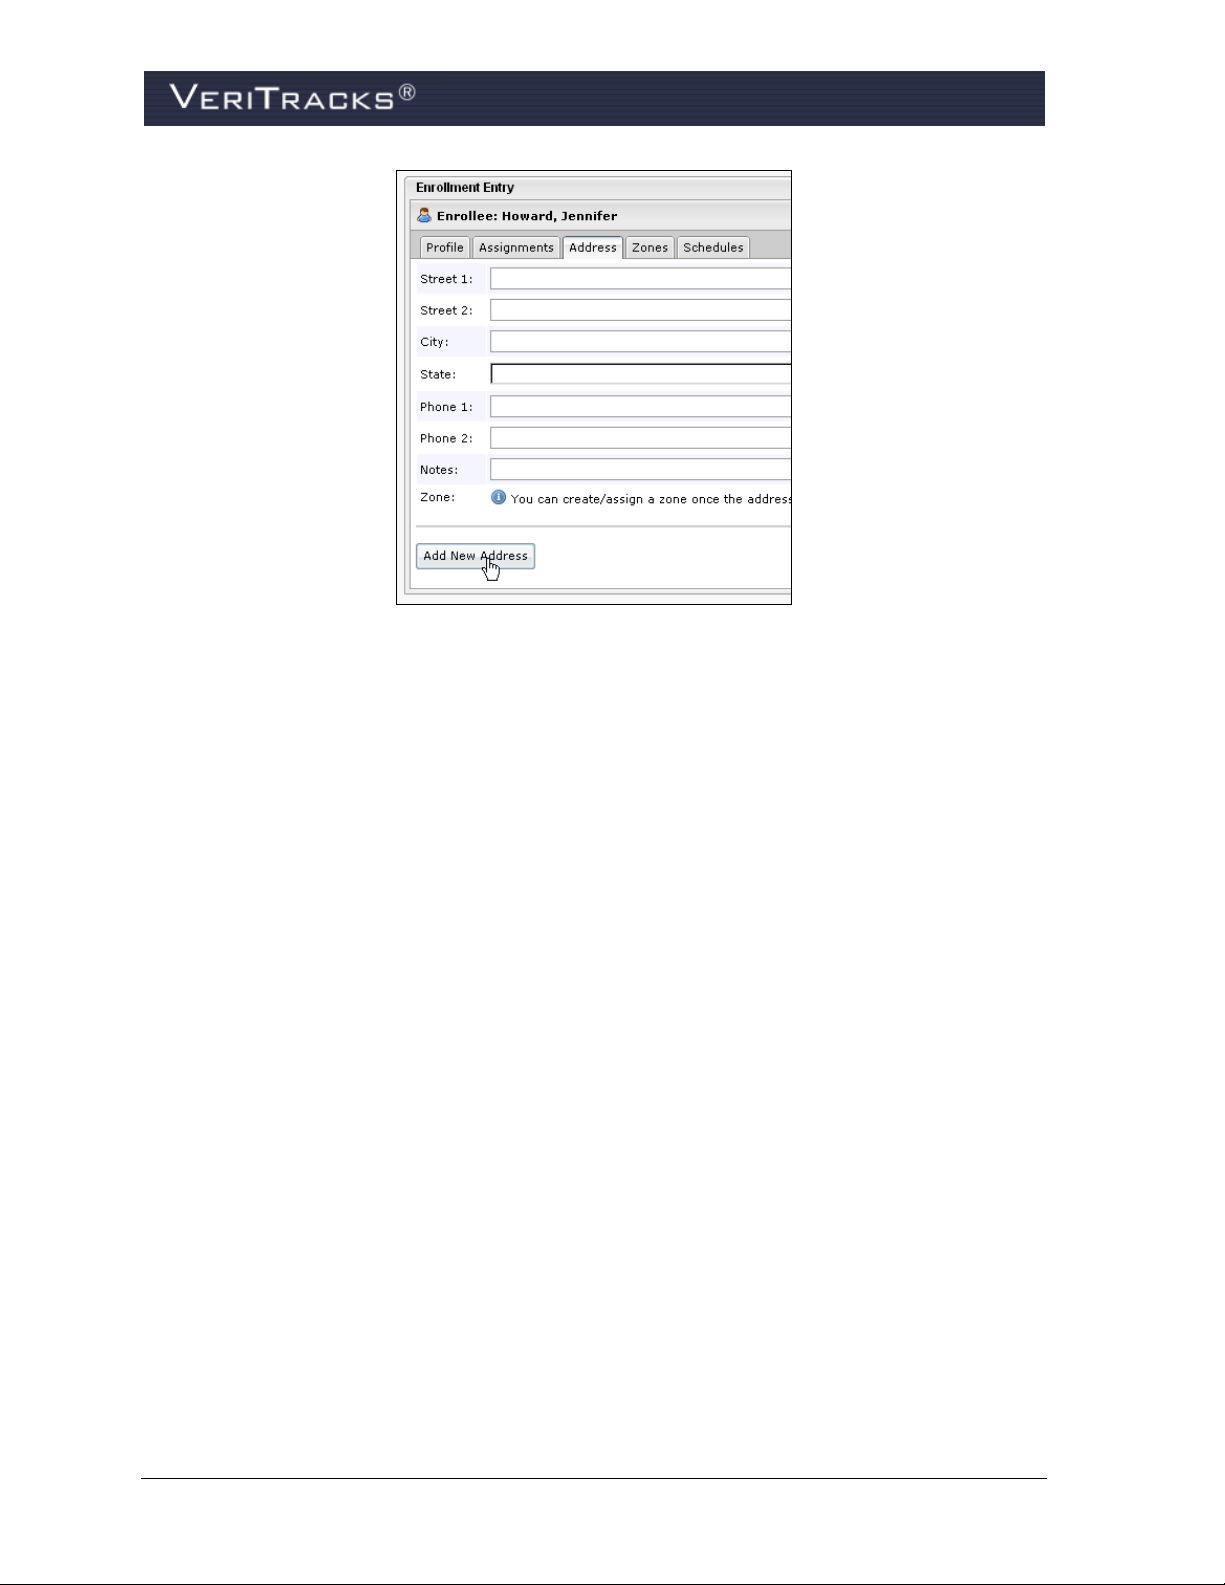
Figure 15 – Add New Address
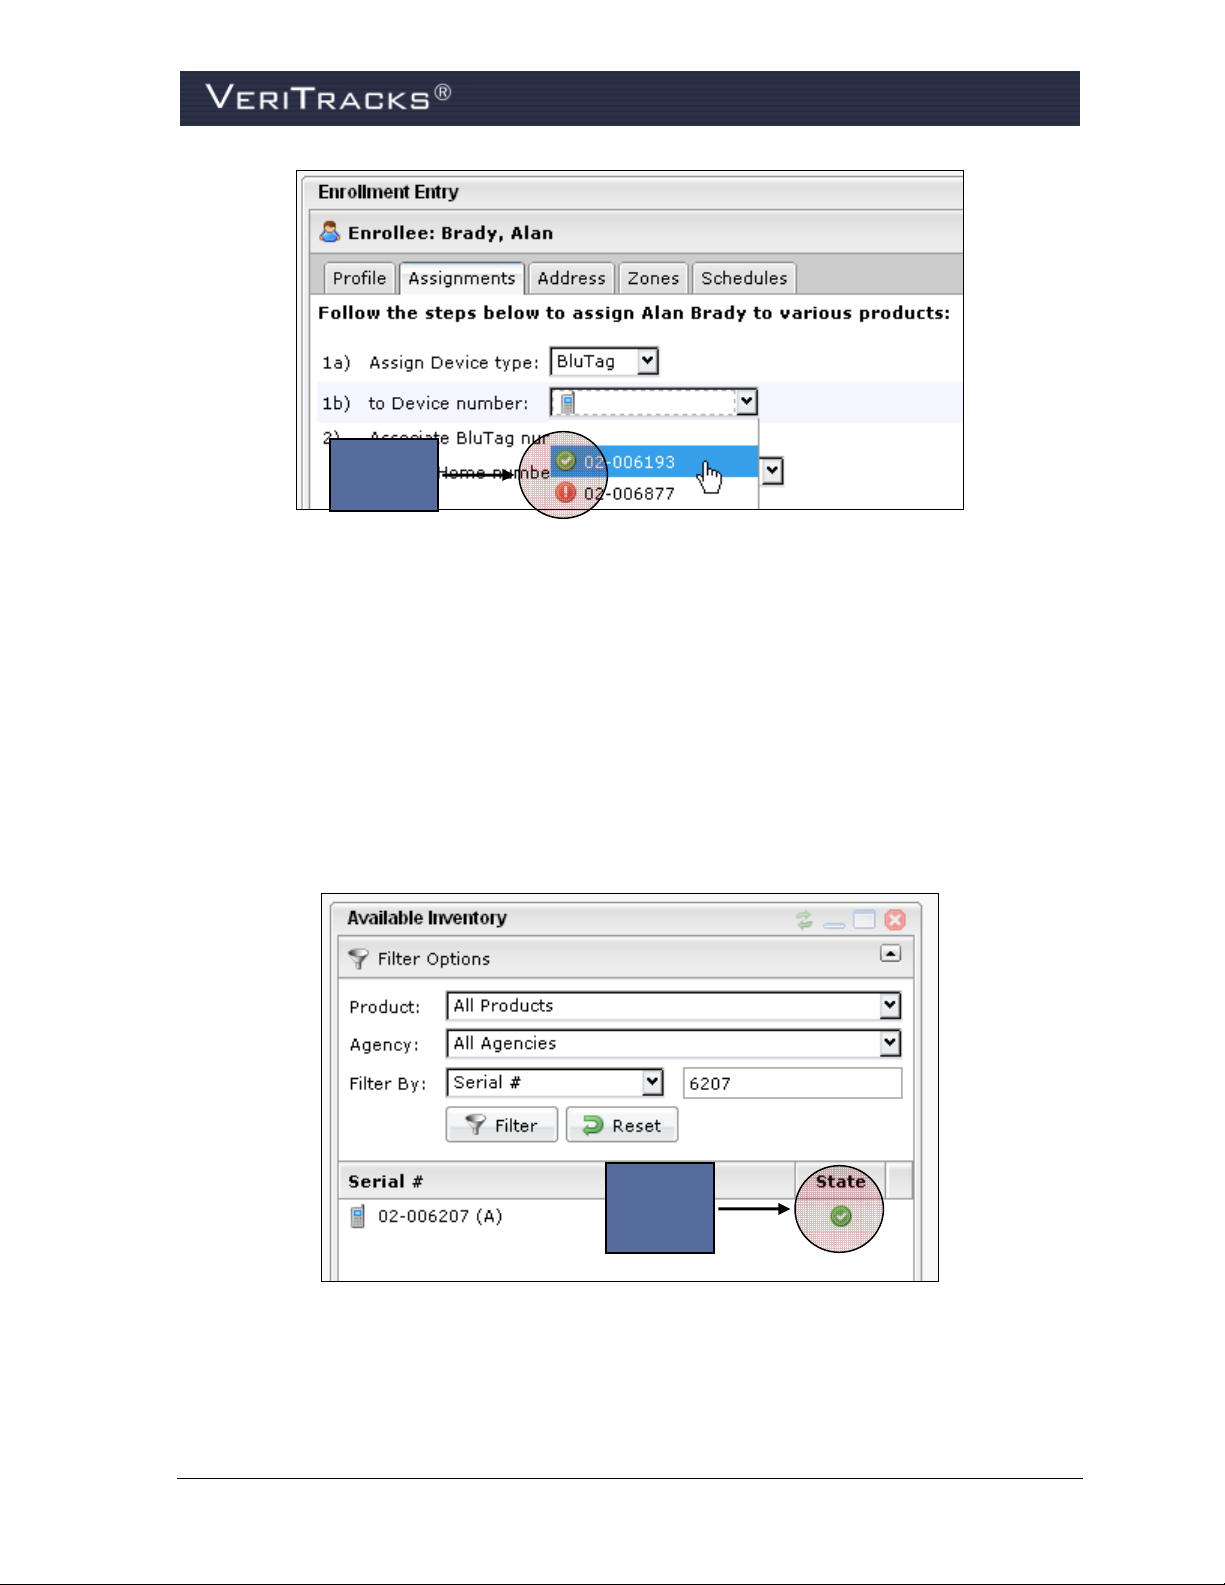
VERIFY BLUTAG CONTACT AND GPS ACQUISITION
After charging BluTag’s battery for at least four hours, verify the device is communicating with
VeriTracks and has an updated GPS Almanac. The best indication of an up to date GPS almanac is
the device receiving GPS continuously for 45 minutes. To verify the status of communication and the
acquisition of GPS, open the Assignments tab on the Enrollment Entry widget (Figure 16). A dropdown box shows the list of available BluTag devices. Next to each device serial number is an icon
indicating device readiness. If the icon is green, the device is ready to be placed on an enrollee.
An icon’s status is green if the device is (1) contacting the system regularly, (2) averaging 60% or
more GPS coordinates per call in during the previous two hours, and (3) averaging a battery level of
4.1 or higher during the previous two hours.
The GPS Almanac describes the orbits of the complete active fleet of satellites. GPS receivers use the
almanac to determine "approximately" the location of the satellites relative to the GPS receiver’s
location. The receiver uses the almanac to determine what satellites it should use to verify location.
Having an up-to-date almanac speeds acquisition time for the GPS receiver.
20 VeriTracks® 10.0 User Manual
Page 29
Device
Status
Figure 16 – Enrollee Assignments
View BluTag Status Details
If the BluTag device’s status icon is not green, it is recommended not to assign it to an enrollee. To
determine why a BluTag device’s status icon is not green, review the BluTag contacts described
below.
To view BluTag Status Details:
1. Open the Available Inventory widget in the Enrollment page.
2. Search for the device number by scrolling or by using one of the data filters.
Device
Status
Details
Figure 17 – Device Status Details Icon
3. Click the device status details icon in the State column in the device’s row. A pop-up window
displays a listing of the details for all of the most recent contacts made by the device. Use this
VeriTracks® 10.0 User Manual 21
Page 30
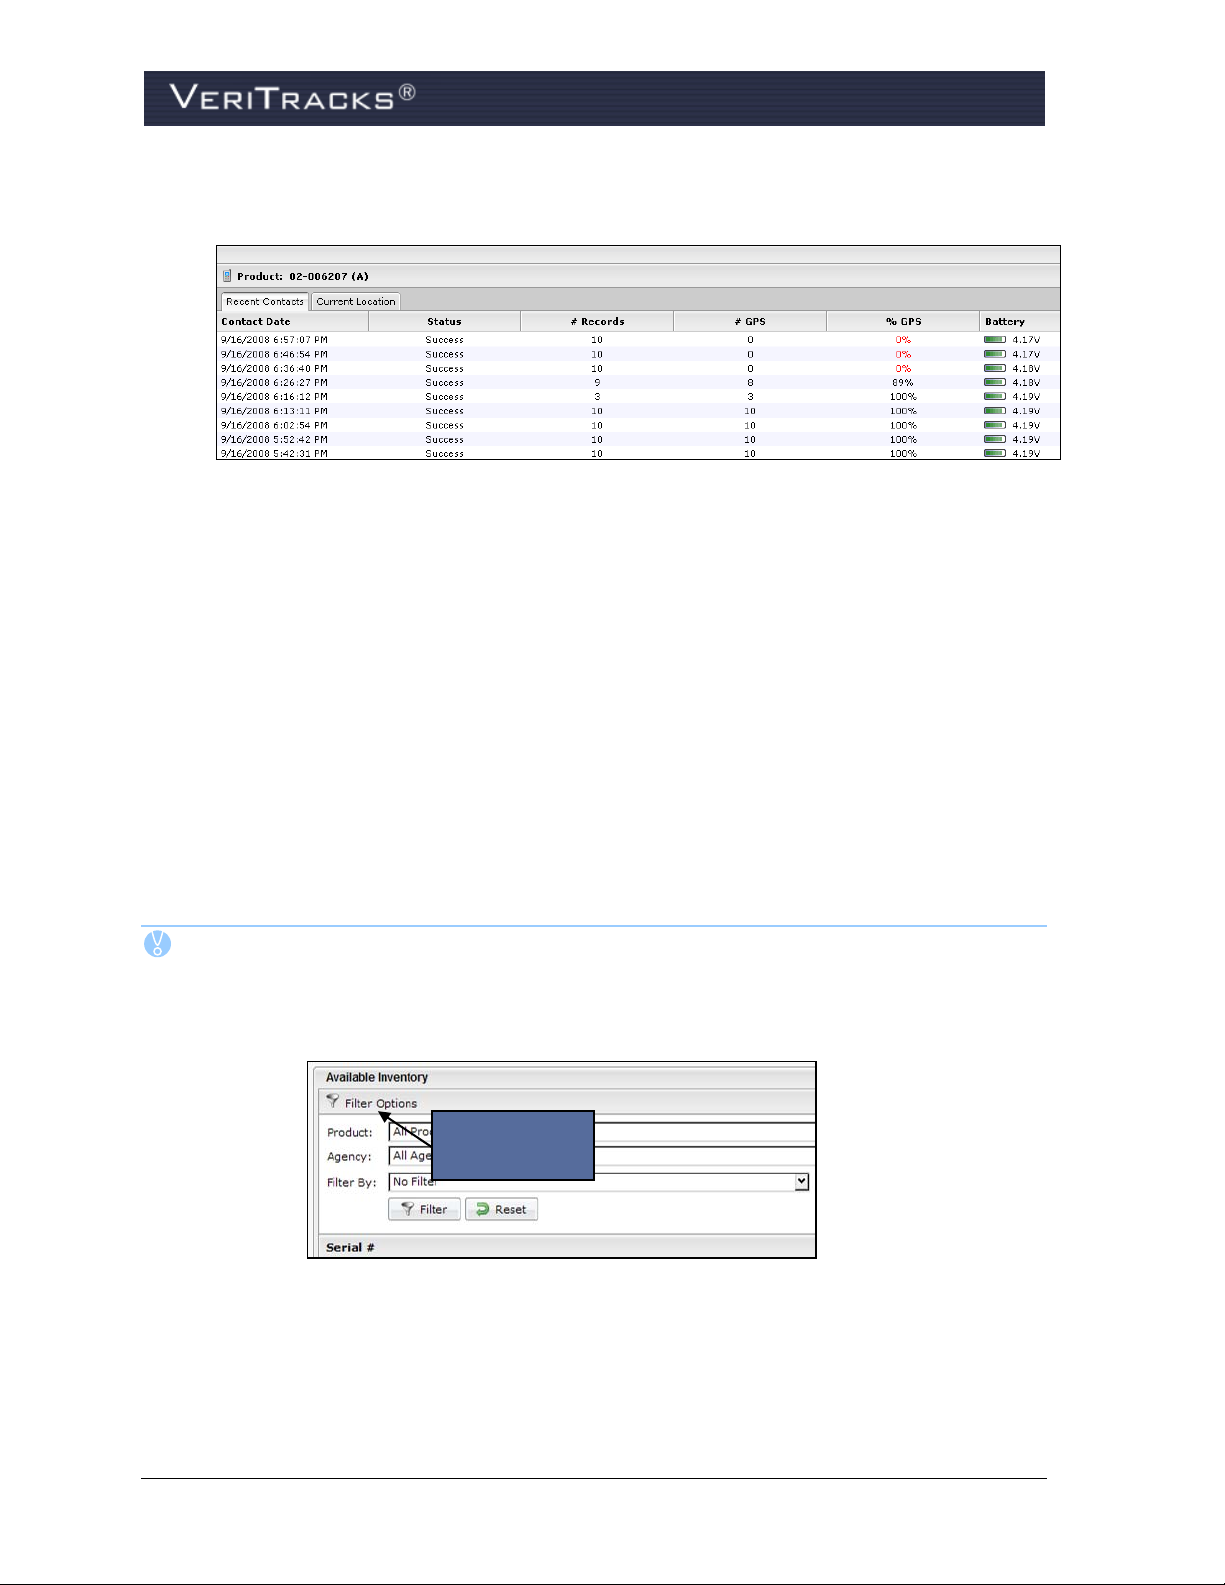
information to determine whether the device has a sufficiently frequent call-in, a high average
of GPS, and adequate battery charge.
Figure 18 – Device Status Details Pop-Up Window
If BluTag is not calling into VeriTracks, use these techniques to activate the device:
Attach the charger to BluTag and remove it after a few seconds to wake up the device.
Press and hold the Status Call button on the front of the device until it beeps.
If BluTag does not have a satisfactory number of current GPS coordinates (60% or more), place it
outside with a full view of the sky. It may require between 15 to 60 minutes for the device to acquire
initial GPS coordinates and download its almanac if it has been in storage or shipped a long distance
(e.g., new BluTag devices shipped from the manufacturing site in Houston).
If BluTag does not have an adequate charge, place a charger on it until icon turns green.
If any of these conditions are not resolved with these techniques, use a different BluTag and return
the first device to STOP’s manufacturing facility in Houston.
TIP: Available Inventory Widget Tips:
Click on a column heading to sort by Serial #, Product, or State.
Open or close the filter section by clicking anywhere on the Filter Options bar.
Filter Options
Bar
Figure 19 – Available Inventory
Move to the next page of the device listing by clicking the Next Page/Previous
Page buttons at the bottom of the widget.
22 VeriTracks® 10.0 User Manual
Page 31

Next Page/
Figure 20 – Next Page/Previous Page buttons
Previous Page
Buttons
INSTALL BLUTAG ON THE ENROLLEE
Once BluTag is ready for use, it must be physically attached around the enrollee’s ankle. Installation
on the left leg is recommended to improve tracking in automobiles. Follow these easy steps to install
BluTag on an enrollee.
1. Make note of the device’s serial number.
2. With clips, collars, and strap installed, place the device on the outside of the ankle and wrap
the strap around.
3. Place one clip on the outside of the strap where it will meet the collar.
4. Make a straight cut (using STOP cutting tools only) at the line where the clip ends. Straight
cuts prevent false strap tampers from occurring. The ends of the clips must align with the end
of the strap as shown in the photo below:
Correct alignment Incorrect alignment
Figure 21 – BluTag Alignment
5. Insert the unclipped end into the wing to test the fit. Cut again, if necessary.
6. Attach the clips to the end of the strap and press firmly into the wing.
WARNING: If the clipped end cannot be inserted without pulling or bending, the
strap has been cut too short. Do not attempt to use it, as the clips
may not fully attach to each side of the wing, causing false tamper
alerts and discomfort for the enrollee.
7. Check the fit. No more than two fingers should fit between the strap and the ankle.
VeriTracks® 10.0 User Manual 23
Page 32

8. Firmly press the clips into each wing again to ensure that each pair is secure.
Press and hold the Status Call button until BluTag beeps. This ensures the device’s operational status
and forces it to call right away.
ASSIGN BLUTAG TO THE ENROLLEE IN VERITRACKS
IMPORTANT: DO NOT assign a BluTag device to an enrollee in VeriTracks until it is
attached to the enrollee’s ankle.
1. To enroll a new enrollee in VeriTracks, open the Assignments tab on the Enrollment Entry
widget (Figure 22).
2. On the Assignments tab leave “BluTag” selected in the Assign Device Type field, and then
choose the device number from the serial number drop-down list in the to Device number
field (Figure 22). (See the instructions for swapping a device later in this chapter.)
TIP: Confirm the location of the device on the map prior to enrollment.
3. Click Save in the upper-right corner of the widget.
4. Verify that VeriTracks confirms the update.
5. Press and hold BluTag’s Status Call button until it beeps. This causes it to call VeriTracks.
Save
Assignment
Assign
Device
Figure 22 – BluTag Assignment
Verify Enrollment in Enrollee Status Screen
To verify that the device is properly assigned:
1. Open the Supervision tab > Enrollee Details widget.
24 VeriTracks® 10.0 User Manual
Page 33

2. All enrollees who currently have a device assigned should be visible in the Enrollee Details
widget. If the enrollee is not visible, click Advanced and make sure that both the “My
Caseload” and “Assigned” options are checked (Figure 23).
Verify
Assignment
Status
Figure 23 – Verify BluTag Assignment
3. Select the enrollee’s name from the list of enrollees and open the Status tab. Make sure the
following statuses are displayed, which confirms a successful and complete device
assignment. If not, click the Send Request Position binoculars icon (Figure 24) , which is to
the left of the map button, once every few minutes until the requirements below are met.
Last Contact: A date and time after installation.
Battery Level: 4.1 or above.
Events: “No Open Events.”
Verify
Assignment
Complete
Send
Request
Position
Icon
Figure 24 – Verify BluTag Assignment Complete
VeriTracks® 10.0 User Manual 25
Page 34

COMPLETE ENROLLMENT PAPERWORK
Each agency will have its own policies and procedures. As part of the enrollment process, each
agency should consider reviewing the following instructions with each enrollee.
Instructions to enrollees:
Attach the charging coupler by sliding it onto the bottom of BluTag. Slide the coupler on until
both sides of it “click” into the device.
Remove the charging coupler by gently detaching its clips from the device.
Charge twice a day , once every 12 hours, for 30 minutes (45 minutes for optimal performance),
or once per day for 2 hours, depending on agency procedures.
Do not charge the device while sleeping or driving.
BluTag is hypoallergenic and cannot overheat.
A sock can be worn over and/or under the device.
Do not tamper with the device (no pulling, striking or attempting to open).
Do not force a boot over the device.
Do not expose the device to extreme temperatures.
Do not take the device into an MRI machine.
Do not constantly submerge the device in water (baths, pools or large bodies of water).
Do not press the “status call button” unless instructed by the supervising agency.
If the device vibrates or the light blinks, place it on the charger for one hour.
If the device’s light turns red, contact the supervising agency immediately.
26 VeriTracks® 10.0 User Manual
Page 35

UNENROLLING A TRACKED ENROLLEE
To unenroll the enrollee:
1. Open the Enrollment tab > Enrollment Entry widget.
2. Highlight the enrollee or drag an enrollee from Browse Enrollees widget.
3. Click the unenroll icon (Figure 25).
4. A screen displays asking you to enter the reason for the unenrollment. Select the reason from
the drop-down list.
5. Click OK to unenroll the enrollee.
Unenroll
Icon
NOTES: Unenrollment Notes:
A. When an enrollee is unenrolled, VeriTracks sends a command to put BluTag into
“deep sleep” mode.
B. Attaching the charging coupler will reactivate BluTag.
Figure 25 – Unenroll Icon
Figure 26 – Confirm Unenrollment Reason
C. If a device will be reinstalled on an enrollee in the next 24 hours, it is
recommended to immediately place the device on a charger and put in a place
where it can continue to acquire GPS coordinates.
VeriTracks® 10.0 User Manual 27
Page 36

REMOVING THE STRAP
1. After unenrolling an enrollee, cut the strap to remove the
device from the ankle.
AFTER THE ENROLLEE LEAVES
2. Cut the collars off the device wings using the STOP-
provided cutting tools.
3. Use the supplied screwdriver to remove the four screws that
attach the back plate to the device.
4. Pry the back plate off the device.
5. Remove and discard the old straps, clips, and collars.
6. Clean the device with warm water, alcohol, or bleach wipes.
7. Visually inspect the back plate. If it is damaged, replace it.
8. Visually inspect the lenses and the brass fittings on each side of the device. If damage is
evident, return the device to STOP.
9. Replace the back plate using the four screws and washers.
CHANGING A DEVICE ON AN ENROLLEE
Occasionally you may need to remove a device from an enrollee’s ankle due to service issues or
damage and replace it with a new one.
Simply follow the complete instructions under the Un-enrolling a Tracked Enrollee section to
properly record the removal of the original device. Then follow the standard enrollment instructions
in the Assign the BluTag to the Enrollee in VeriTracks section to attach the new device to the
enrollee’s profile.
STORING AND MAINTAINING BLUTAG
1. Store unused BluTag devices in a secure and dry space.
2. Devices do not need to be charged while in storage.
3. Prior to re-assigning a device, follow the instructions for preparing a device for use and
enrolling an enrollee.
28 VeriTracks® 10.0 User Manual
Page 37

CHAPTER 4: ZONES
Zones are time-sensitive geographic locations that place limitations on an enrollee’s movements.
They allow you to require an enrollee’s presence at a certain place (Inclusion Zones) or prohibit an
enrollee’s presence from a certain place (Exclusion Zones). The system records an enrollee’s
violation of these movement restrictions.
Building a zone is a three-step process:
Create the geographic zone
Assign the zone to an enrollee
Set a schedule during which the movement restrictions apply to an individual enrollee.
This chapter discusses the creation of the geographic zone and the assignment of the zone to an
enrollee. Chapter 5 discusses zone schedules.
CREATING ZONES
There are three ways to create a geographic zone:
1. Enter a specific address in the Address tab of the Enrollee Details widget
2. Enter a specific address in the Zones tab of the Enrollee Details widget
3. Draw a zone directly on a map.
Create Zone in Enrollment Widget, Addresses Tab
As discussed in Chapter 3, enrollees can have multiple addresses listed in their profile under the
Address tab. These addresses can be anything pertaining to an enrollee’s situation including
residence, work place, guardian’s home, areas to stay away from, etc. You can create either an
inclusion or exclusion zone for enrollees in each address record.
To create a zone directly from an address record:
1. In the Enrollment tab page, open the Address tab in the Enrollment Entry widget.
2. Create an address record by entering the required fields, clicking Set Location, and clicking
Save.
3. The map to the right of the screen displays an icon that pinpoints the address. Adjust this icon
as desired in situations where the address on the map does not correspond precisely with the
desired location (e.g., apartment complexes, stores with large parking lots, etc.). If any
adjustments are made in the map, click Save again.
4. Select the Create/Assign Zone checkbox (Figure 27) at the bottom of the address record for
which a zone is to be created. When the box is checked, the screen refreshes and presents
zone name, type, and size options.
VeriTracks® 10.0 User Manual 29
Page 38

Save
Address
Address
Tab
Address
Map
Create/
Assign Zone
Zone
Information
Figure 27 – Create Zone from Enrollment Widget, Addresses Tab
5. Enter the zone Name, Type and Category, and then choose the desired zone Radius from
the list of preset zone sizes. If necessary you can refine the zone size later. This creates only a
circular zone. To create a polygon zone, refer to the next section.
6. Click Create / Assign Zone. The zone is automatically assigned to the enrollee. For
Inclusion Zones, you will be asked if the zone needs a schedule. If you click Yes, the
standard schedules screen displays. For Exclusion Zones, a 24x7 schedule is automatically
created for the enrollee and zone. See Chapter 5 for more information on zone schedules.
NOTE: Exclusion zones automatically default to a 24x7 schedule unless you indicate
otherwise.
30 VeriTracks® 10.0 User Manual
Page 39

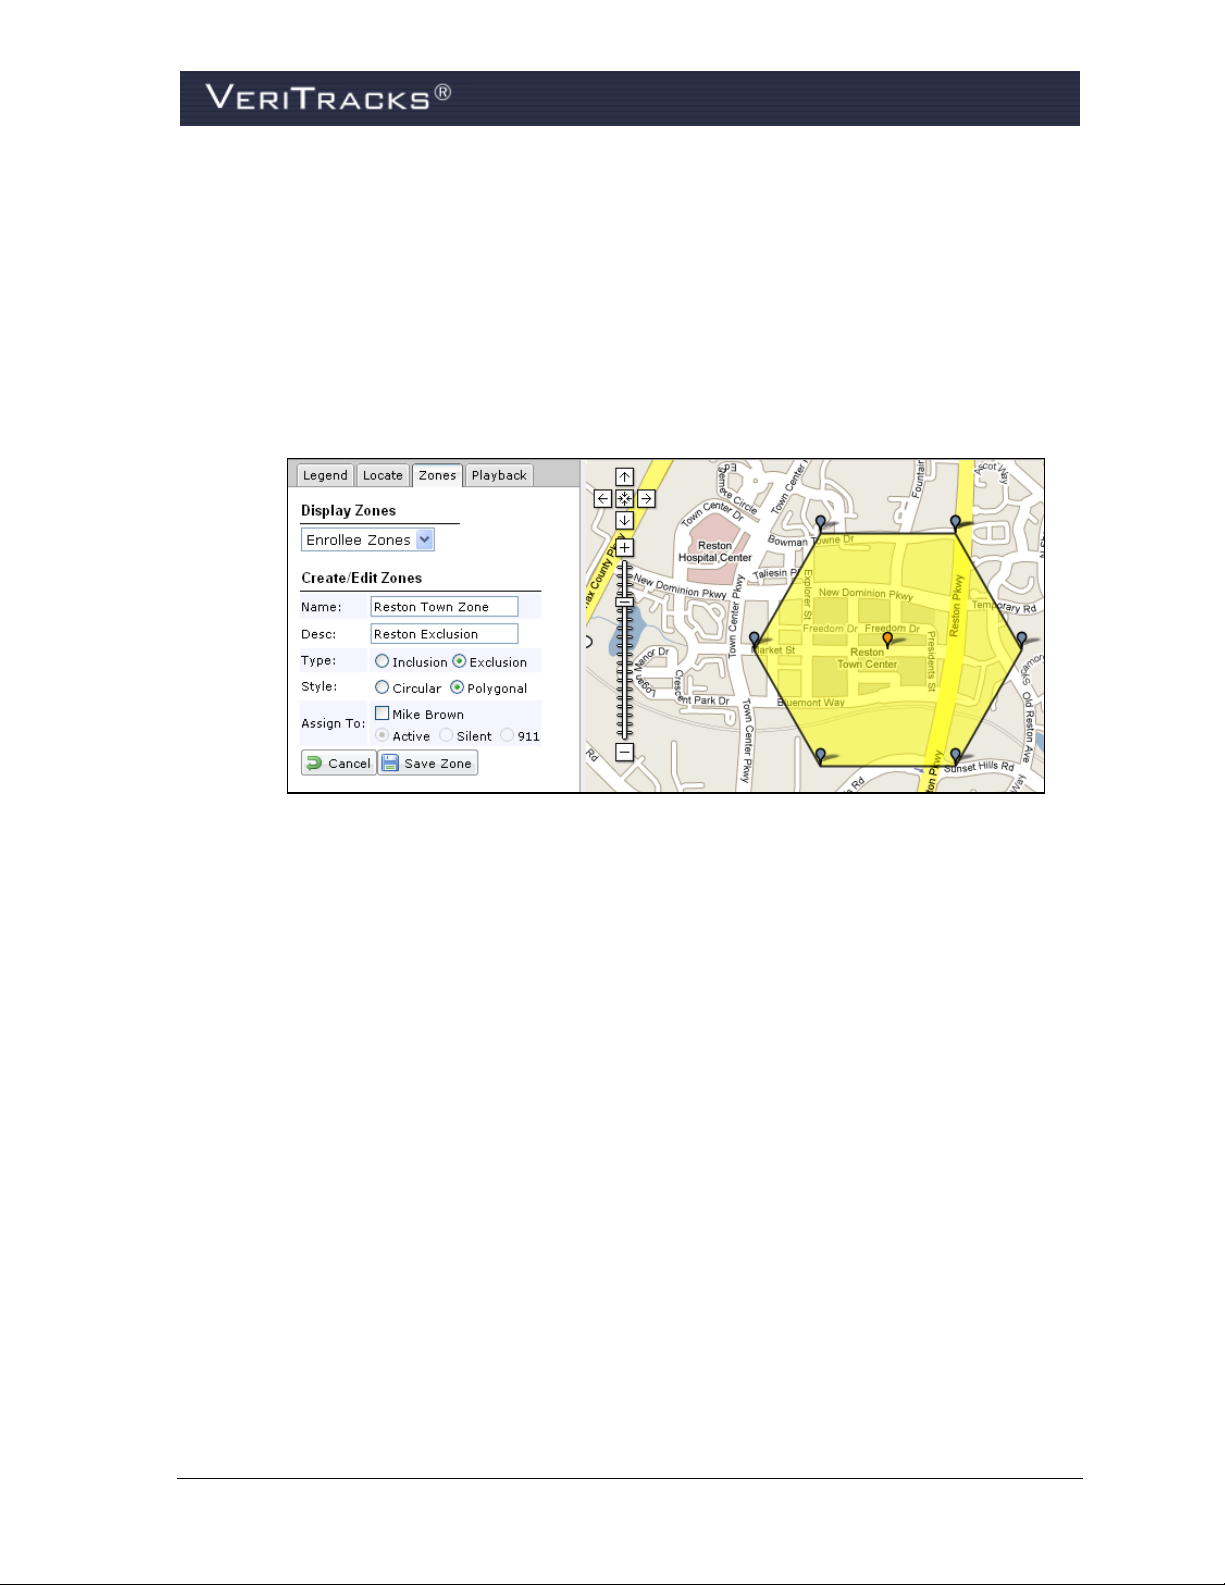
Create Zone in Enrollment Widget, Zones Tab
A zone can also be created from the Zones tab. Zones created within this tab can be circular or
polygonal in shape.
To create a zone from the Zones tab:
1. Open the Zones tab in the Enrollment Entry widget.
2. Click Create/Modify in the upper-right corner of the widget. A Zone Editor modal pops up.
Create/
Modify
Zones
Tab
Figure 28 – Create Zone from Enrollment Widget, Zones Tab
3. Create the zone:
a. For a circular zone: On the Zone Ed itor screen enter zone properties. Select the
“Circular” radio button in the Shape field. Enter the address and then click Set Zone
Location. The map refreshes to show a circular zone.
Use the push pins at the center and perimeter to change zone placement, size, and
shape. When the zone is displayed correctly, click Save.
VeriTracks® 10.0 User Manual 31
Page 40

Save
Zone
Select
Circular
Shape
Set Zone
Location
Figure 29 – Create Circular Zone
Push Pins
for Resizing
Circle
b. For a polygonal zone: If a zone situation requires a shape other than a circle, you
can create a polygon zone with up to six sides. On the Zone Editor screen enter zone
properties. Select the “Polygonal” radio button in the Shape field. Enter the address
and then click Set Zone Location. The map refreshes to show the center of a sixsided zone at that address.
Use the push pin at the center of the zone circle to change zone placement and the
push pins at the perimeter to change the size and shape. When the zone is placed
correctly, click Save.
Save
Select
Polygonal
Shape
Zone
Set Zone
Location
Push Pins
for Resizing
Circle
32 VeriTracks® 10.0 User Manual
Page 41

Figure 30 – Create Polygonal Zone
Suggested Naming Convention for Zones
Zone names must be unique. Below is the suggested format for naming zones. By using the scheme
below, you will know the zone’s location and schedule when alerts are received. The example below
is an inclusion (active) zone curfew from 8 p.m. to 6 a.m.
M12345
I A C
2000-0600
Category
Enrollee’s Primary
Identifier
Creating Zones – Draw On the Map
When opening a map through one of the VeriTracks mapping functions, you can immediately create a
zone on the map and assign it to an enrollee. This gives tremendous flexibility and efficiency since
you can create a zone while reviewing an enrollee’s tracks.
Zone Type
I = Inclusion
E = Exclusion
Figure 31 – Zone Naming Convention
A = Active
S = Silent
9 = 911
G = Global
Location
C = Curfew
V = Victim
G = General Conditions
S = Special Conditions
W = Work
Schedule
Represents when
the zone is active
When entering a map, you will see among other items, a Map Tool Panel, a Map Info Panel, and a
Map Panel (the map itself).
NOTE: The full set of VeriTracks mapping functions and tools are described in Chapter 7.
Map Tool Panel and Map Info Panel
The Map Tool Panel consists of the four tool tabs shown below.
Figure 32 – Map Tool Tabs
VeriTracks® 10.0 User Manual 33
Page 42

This section discusses the Zones tab, which allows the creation of zones directly on any map you are
reviewing. The Zones tab updates the Map Info Panel to (1) provide text that describes the Zones
tool and (2) create or edit zones. The Zones tab is shown below.
Figure 33 – Zones Tab
To create a zone on the map:
1. Map the track points of the enrollee for whom the zone is desired.
2. Open the Zones tab on the map.
3. Fill in the Name and Description fields and then select either “Inclusion” or “Exclusion” in
the Type field.
4. Define the shape of the zone by selecting either “Circular” or “Polygonal” in the Style field.
5. Click the square box next to the enrollee’s name to automatically assign the zone to that
enrollee.
6. Click Create New Zone. The map refreshes with an editable zone in the middle of the map,
and the Create New Zone button is replaced with a Cancel button and a Save Zone button.
7. Use the push pin at the center of the zone circle to change zone placement and the push pin(s)
at the perimeter of the zone to change the size and/or shape.
8. Once the size and placement of the zone is satisfactory, assign the zone to the enrollee whose
tracks are currently being viewed. Select the checkbox next to the enrollee’s name and then
select the category of assignment (Active, Silent, or 911).
When the zone is defined and placed correctly, click Save Zone. The zone is saved and
assigned to the enrollee.
For Inclusion Zones
A pop-up tells you that the zone was successfully created. At this point the zone is already
assigned if you checked the enrollee’s name. The pop-up asks if the zone requires a schedule.
34 VeriTracks® 10.0 User Manual
Page 43
If you click OK, the standard schedules screen displays (See Chapter 5 for more information
on zone schedules). If you click Cancel, the current map view remains and no schedule will
be created.
For Exclusion Zones
A pop-up tells you the zone was successfully created. At this point the zone is already
assigned if you checked the enrollee’s name and a 24x7 schedule has been created. The popup asks if the schedule requires any modifications. If you click OK, the standard schedules
screen displays. If you click Cancel, the current map view remains and the zone remains
completely assigned and scheduled.
Figure 34 – Create a Zone on a Map
ZONE TYPES
A zone assigned to an enrollee can be classified as one of three types of assignment: 911, Active, and
Silent.
911 Zones are actively monitored on a 24 hour/7 day-a-week basis within the BluTag device
itself. Notifications for 911 Zone violations can be set up according to your preferences and
sent for immediate response. 911 zone notifications are also sent to the Solutions Center for
human intervention and follow up (if stipulated in the agency’s contract).
Active Zones are actively monitored on a 24 hour/7 day-a-week basis within the BluTag
device itself. You receive Active Zone notifications but the Solutions Center does not
automatically follow up. Notifications for Active Zone violations can be set up according to
your preferences and sent for immediate response.
Silent Zones are not actively monitored within the BluTag device itself. However, if you
subscribed to receive the notification, it will still be sent. Silent Zones can be used like a
Passive Zone. If you do not subscribe to the immediate notification, the event only appears on
the daily summary report.
Global Zones apply to all enrollees in an agency monitored with BluTag. Only law
enforcement agencies can create them.
VeriTracks® 10.0 User Manual 35
Page 44

ASSIGNING EXISTING ZONES
In certain situations, a zone that was previously created may need to be assigned to another enrollee.
For example, a single zone may be used for multiple enrollees. The assignment of existing zones is
done in the Zones tab on the Enrollment Entry widget.
To assign an existing zone:
1. Open the Zones tab on the Enrollment Entry widget.
2. Click on the drop-down list at the top of the widget. This opens a list of all of the zones you
“own.” Click the Advanced link to determine whether the drop-down shows only the zones
you created, or all of the zones in your ORI. Select My Zones or deselect My Zones and
choose the ORI.
Figure 35 – Advanced Filter
3. Select the desired zone.
4. Click the type of assignment (Active, Silent, or 911) on the right side of the screen.
5. Click Assign. The zone will be listed in the main Zones tab along with a map of its position.
6. Click Save before exiting the screen.
Assign
Zones
Tab
Zones
Drop-Down
List
Button
Zones
Types
36 VeriTracks® 10.0 User Manual
Page 45

OTHER ZONE FUNCTIONALITY
Control Zone Availability
The zones shown on the Available Zones list are all active in the user’s ORI. To remove zones from
this list, the zone creator must uncheck the Is Active check box on the zone creation screen.
Active
Checkbox
Figure 36 – Assign Existing Zones
Figure 37 – Active Checkbox
Unassign a Zone
To unassign a zone, locate the zone in the list of the enrollee’s zones in the Zones tab and click
Unassign. Click Save prior to exiting the screen.
Save
Unassignment
VeriTracks® 10.0 User Manual 37
Page 46

Unassign
Zone
Figure 38 – Unassign Zones
EDITING ZONES
You can only edit a zone you created.
Edit Zones in the Zone Tab
1. In the Zones tab on the Enrollment Ent ry widget, select the zone from the drop-down list.
2. Click Create/Modify, and the Zone Editor modal will display containing the information for
that zone.
3. Edit the appropriate fields or use the push pins on the zone map and then click Save.
Edit Zones in a Map
You can also edit the size or location of a zone on a map.
1. Double-click anywhere in the zone, and a pop-up window appears with information about the
zone.
2. In the upper-right corner of the pop-up click Edit Zone. This displays push pins in the middle
of the zone (to change location) and on the perimeter of the zone (to change size).
3. Edit the zone as desired. When the zone editing is completed, click Save Zone in the
Create/Edit Zones panel.
38 VeriTracks® 10.0 User Manual
Page 47

Edit
Zone
Figure 39 – Edit Zone
Push Pins
for Editing
Zone
Figure 40 – Edit Zone Boundaries
VeriTracks® 10.0 User Manual 39
Page 48

CHAPTER 5: ENROLLEE SCHEDULES
Schedules can be set for any BluTag, BluHome or BluBox assigned to an enrollee.
You can assign time-sensitive zones to enrollees. Set the time an enrollee is required to enter an
inclusion zone and the time when the enrollee may exit it. Similarly, set the time period an enrollee is
prohibited from entering an exclusion zone, although this is usually 24x7. A single zone can be
assigned to many enrollees, and the zone can have a different schedule for each enrollee to which it is
assigned.
If enrollees are assigned a BluHome or BluBox unit, you can set the period of time enrollees must be
in the presence of their assigned unit.
An enrollee can have multiple schedules for a single zone, as long as the schedules do not overlap
Each schedule should be titled to describe its individual purpose. For example, an enrollee has a
recurring appointment each Thursday, which creates a different curfew from the rest of the week. The
curfew schedule for Thursday could be titled “Thursday’s Curfew for Appts” and curfew for the
remaining week days titled “Mon-Wed and Friday Curfew.”
.
SCHEDULE TERMINOLOGY
Schedule Types (BluHome, BluBox, Zones) – Each device can have its own set of regular
schedules and temporary overrides (exceptions).
Recurring – A permanent schedule that applies every week.
Exception – A pre-planned change that temporarily overrides a regular schedule.
Exception Dates – The start and end dates of an exception.
Times – Start and end times indicate the period of time the schedule is active. An inclusion
zone schedule determines the time the enrollee is expected to enter and remain in the zone.
An exclusion zone schedule determines the time the enrollee is restricted from entering the
zone. BluHome or BluBox schedules determine the period of time an enrollee is expected to
be within RF range of the device.
Entire Day – A button that sets the start and end times to 24 hours.
The Enrollee will have NO schedules – An exception schedule indicating that all schedules
for the selected device and dates are inactive.
Forced Leave – Creates an alert if the enrollee remains in the RF range of BluHome or
BluBox after the curfew ends. If an enrollee does not leave the RF range on time, an
Awaiting Leave event generates. If the enrollee is still in RF range 30 minutes after the
curfew ends, a Forced Leave Exceeded violation generates.
Days of Week – Indicates each day that the start time applies. If an evening start time and a
morning end time are chosen, the schedule automatically wraps around to end the next
morning. Choose only each day that the start time applies.
o For example, to create a schedule that starts at 8 p.m. (20:00) on Monday and ends at
8 a.m. (08:00) on Tuesday, you need only select Monday.
40 VeriTracks® 10.0 User Manual
Page 49
SETTING A RECURRING SCHEDULE VIA TEXT ENTRY
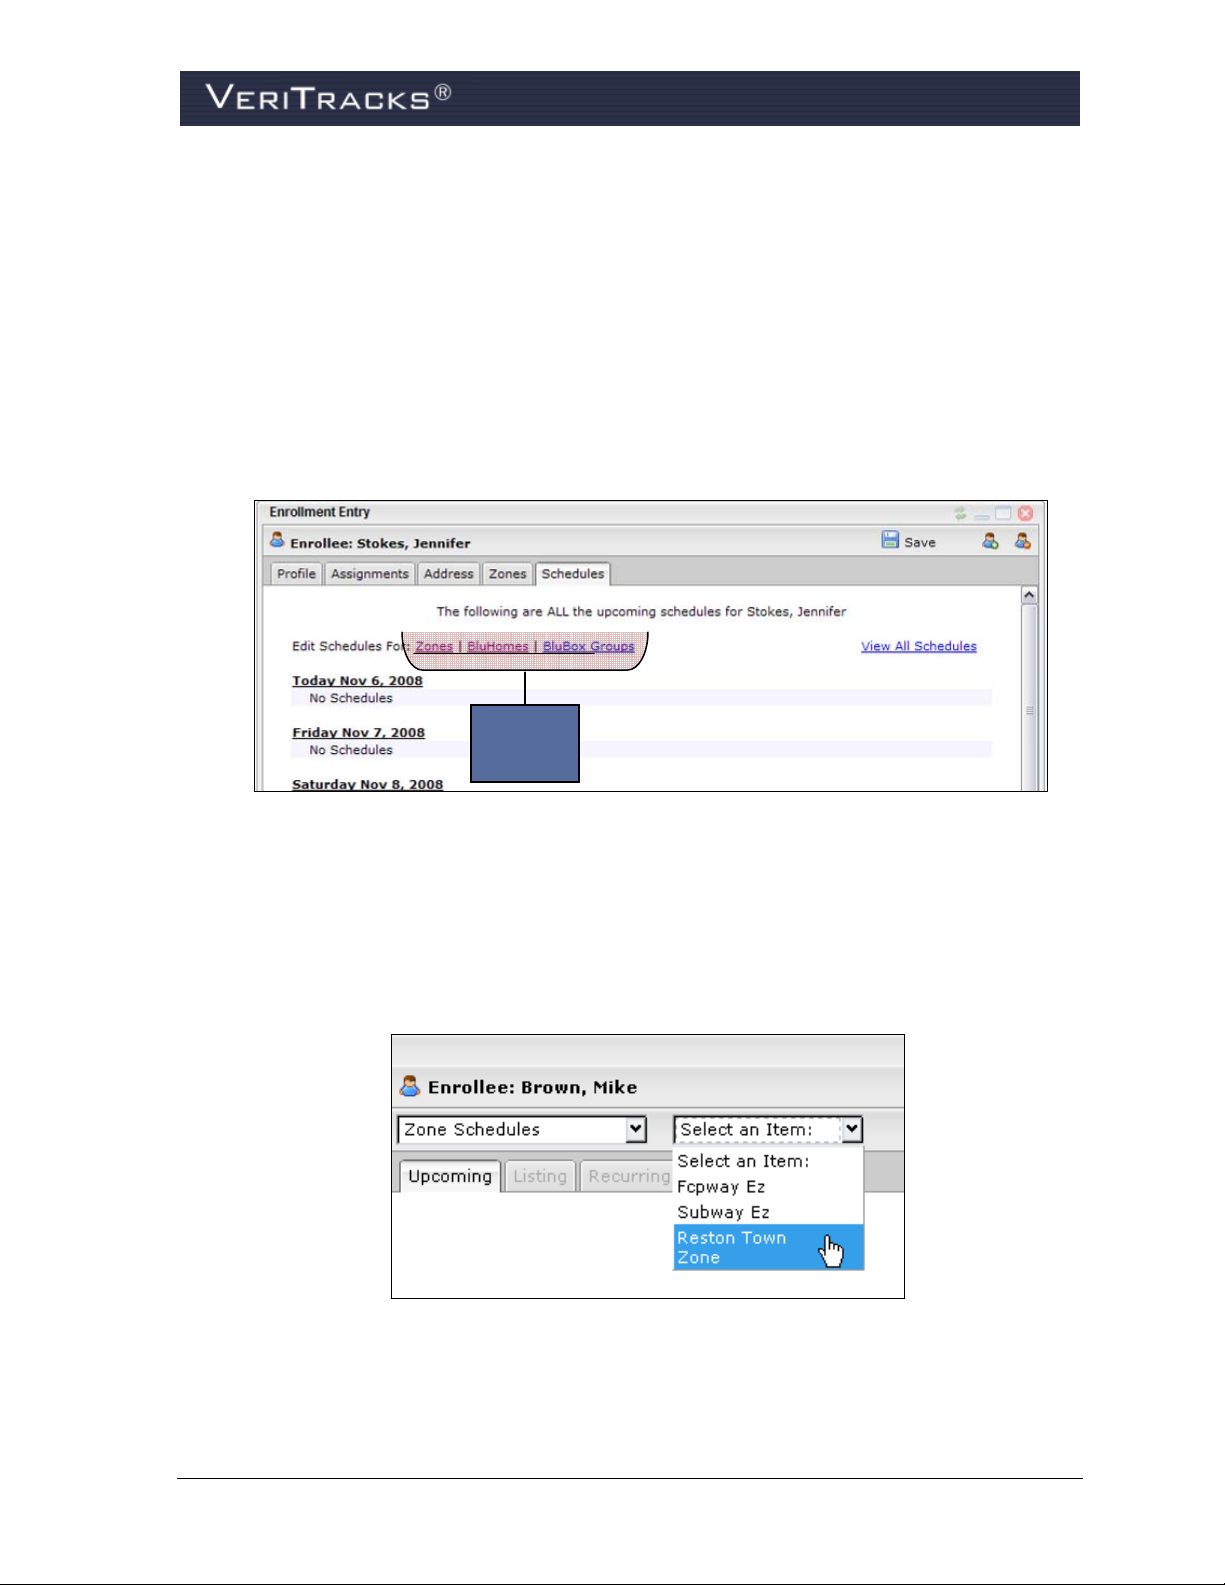
1. Drag the enrollee’s name from the Browse Enrollees widget or Search widget over to the
Enrollment Entry widget.
2. Select the Schedules tab in the Enrollment Entry widget. The tab displays a listing of the
schedules that apply to the next seven calendar days.
3. At the top of the schedule, click the appropriate link to create or change schedules for a zone,
a BluHome unit, or a BluBox unit (Figure 35).
Schedule
Types
Figure 41 – Create Schedule
4. When one of the links is clicked, a modal window pops up. If the zone link is clicked, the
modal will have a place to choose the name of the zone for which the schedule is being
created. If the BluBox link is clicked, the modal will have a place to choose the name of the
BluBox group for which the schedule is being created.
Figure 42 – Select Item
VeriTracks® 10.0 User Manual 41
Page 50

5. For zone schedules, choose a zone. For BluBox schedules choose a group name. The modal
refreshes to show the schedule for the next seven calendar days for that zone (or group) only.
In the case of a BluHome the listing shows up immediately on entering the modal.
Figure 43 – Schedule of Upcoming Events
6. To set a recurring schedule using keyboard input, open the Listing tab. The screen refreshes
to display links to create recurring and exception schedules.
Add New
Recurring
Figure 44 – Listing Tab
7. Click Add New Recurring to enter the parameters of a recurring (permanent) schedule.
These parameters include the schedule title (can be identical to a zone title or BluBox group
title), the start and stop date and time, and the days of the week.
42 VeriTracks® 10.0 User Manual
Page 51

Figure 45 – Edit Recurring Schedule
8. Click OK. The modal disappears taking you back to the Listing tab. This tab now shows the
new schedule.
9. Click Save in the upper-right corner of the modal and close the modal.
Figure 46 – Listing
S
ETTING AN EXCEPTION SCHEDULE VIA TEXT ENTRY
An Exception schedule is a one-time pre-planned change which overrides or replaces a recurring
schedule. To set an Exception, follow steps 1 through 5 in the section above. Then follow the steps
below:
1. Click Add New Exception to enter the parameters of the exception schedule.
VeriTracks® 10.0 User Manual 43
Page 52

Figure 47 – Edit Exception Schedule
2. Click OK. The modal disappears and returns to the Listing tab. This tab now shows the new
exception schedule. Click Save in the upper-right corner of the modal and close the modal.
Figure 48 – Schedule Listing
SCHEDULING TIPS – USING MULTIPLE INCLUSION ZONE SCHEDULES
If multiple inclusion zones are created, allow sufficient time for the enrollee to get from one zone to
the next. Do not overlap inclusion zone schedule times or the enrollee will stay in a constant state of
inclusion zone violation.
44 VeriTracks® 10.0 User Manual
Page 53

CHAPTER 6: EVENTS AND NOTIFICATIONS
An event is caused by a change in the status of an enrollee. An event can be generated either by the
actions of the enrollee, a change in the enrollee’s environment, or a change in the enrollee’s assigned
equipment. Some events indicate a violation of the restrictions imposed by the enrollee’s enrollment
in VeriTracks. Other events indicate compliance with the restrictions imposed by the enrollee’s
enrollment.
Events are visible in several VeriTracks screens as well as the VeriTracks daily summary report.
A notification is the method by which event information is presented to you. Notifications can be
received by e-mail or text message on a variety of communication platforms.
BLUTAG EVENTS
BluTag Event Definitions
BluTag and VeriTracks generate the following events:
Event Cause
Bracelet Strap
On Charger
Low Battery Alarm
Message Gap
No GPS
Device Unassigned
Button Press
Cell ID
Active Exclusion
Active Inclusion
Silent Exclusion Alarm
Silent Inclusion Alarm
The device’s strap may have been tampered with.
The device was placed on or taken off of the charger.
The device’s battery needs recharging.
The device failed to call into VeriTracks for a specified time period
(default is six hours).
The device did not receive GPS signals for a duration of time exceeding
the agency’s specified time period (default is six hours).
Start and end date reflect when the enrollee was assigned to and
unassigned from a device.
The status call button on the front of the device was pressed.
The device communicated with a different cell tower during each
scheduled call-in over a specified number of calls (optional).
The enrollee entered a geographical area where he or she is not
allowed. There is an option to notify the enrollee.
The enrollee exited a geographical area in which he or she is required
to stay. There is an option to notify the enrollee.
Same as the Active Exclusion event, but does not notify the enrollee.
Same as the Active Inclusion event, but does not notify the enrollee.
911 Exclusion Alarm
911 Inclusion Alarm
VeriTracks® 10.0 User Manual 45
Same as the Active Exclusion event, but STOP’s Solutions Center can
be contracted to notify the appropriate officials.
Same as the Active Inclusion event, but STOP’s Solutions Center can
be contracted to notify the appropriate officials.
Page 54

BluTag Event Visibility
There are three main places in which to see BluTag events:
Supervision Page, Enrollee Details widget, Status tab
Supervision Page, Enrollee Details widget, Events tab
VeriTracks daily summary report
Enrollee Details Widget Status Tab
This option displays any event that is presently occurring.
To see current events:
1. Open the Supervision tab > Enrollee Details widget
2. Click on the enrollee’s name.
3. Click on the Status tab.
Status
Tab
Events
Section
Figure 49 – Status Tab
4. Events are listed at the bottom of the Status tab.
46 VeriTracks® 10.0 User Manual
Page 55

Enrollee Details Widget Events Tab
This option defaults to displaying any event that has happened in the previous 48 hours from when
you entered the tab. To see the events of the past 48 hours:
1. Open the Supervision tab > Enrollee Details widget
2. Click on the enrollee’s name.
3. Click on the Events tab. The screen refreshes to show the listing of events for the previous 24
hours.
4. You have the option of changing the date to go back and review event history for any period
of time the enrollee was enrolled in VeriTracks. To view past events, click in the Start Date
and End Date fields, select the dates from the pop-up calendars, and then select Filter. The
screen refreshes to display all events that occurred within the selected date range.
Events
Tab
Filter
Events
Calendar
Figure 50 – Events Tab
BLUTAG NOTIFICATIONS
VeriTracks can send immediate notifications to you for certain BluTag events. To set up your
notification preferences see the “Notifications” section in Chapter 8.
The BluTag events for which you can receive notifications are listed below. Codes for each event
type shorten the message length for mobile messaging platforms.
You receive both open and closed event notifications for BluTag events. Open events start with a ‘+’
(plus sign). Closed event notifications start with a ‘-’ (minus sign).
VeriTracks® 10.0 User Manual 47
Page 56

Below is an example of an open notification for a Bracelet Strap violation:
Subject Line: +BSTP
From: techsupport@stopllc.com
STOP Marty Morris 555-555-1212 16:40 11/30/07 Brian Moran
ORI Enrollee
Enrollee’s Phone
Time Date Officer
Below is an example of a closed notification for an Exclusion Zone violation:
Subject Line: -EZS
From: techsupport@stopllc.com
STOP
ORI Zone Name Enrollee
45678_ESV_0000-
2359
Marty
Morris
555-555-
1212
Enrollee’s
Phone
18:25 12/01/07
Time Date Officer
The abbreviation codes for the standard BluTag event notifications are as follows:
Event Notification Abbreviation Event Notification Abbreviation
Bracelet Strap +BSTP Active Exclusion Clear -EZ
Bracelet Strap Clear -BSTP Active Inclusion Alarm +IZ
Low Battery Alarm +BATT Active Inclusion Clear -IZ
Low Battery Alarm Clear -BATT Silent Exclusion Alarm +EZS
Message Gap +MGAP Silent Exclusion Alarm Clear -EZS
Message Gap Clear -MGAP Silent Inclusion Alarm +IZS
No GPS +NGPS Silent Inclusion Alarm Clear -IZS
No GPS Clear -NGPS 911 Exclusion Alarm +E911
Cell ID Change (optional) +CELL 911 Exclusion Alarm Clear -E911
Cell ID Clear (optional) -CELL 911 Inclusion Alarm +I911
Active Exclusion Alarm +EZ 911 Inclusion Alarm Clear -I911
Brian
Moran
48 VeriTracks® 10.0 User Manual
Page 57

THE DAILY SUMMARY REPORT
The Daily Summary Report provides a quick overview of events or violations that occurred since the
last report was emailed to you. Simply click open the email to view the list. Logging into VeriTracks
is not required, but there are links within the report that take you to the VeriTracks login page to view
more information about an event or violation. The report covers 36 hours, so any delayed events
missed in today’s report will be covered in tomorrow’s report.
From this single report, you can see enrollees who generated events the previous day. The goal is to
focus quickly on non-compliant enrollees and to remind you of events that may still be open.
This report is emailed to you each morning and provides summary information for all supervised
enrollees in your caseload.
Part 1 – Enrollee Summary: This section displays the enrollee name, supervising officer or agent
name, last contact and other information.
Figure 51 – Daily Summary Report – Part 1
VeriTracks® 10.0 User Manual 49
Page 58

Part 2 – Zone Violation Activity Summary: Displays each zone violation’s type, number of points
in violation, zone size, and start and end time.
Figure 52 – Daily Summary Report – Part 2
Part 3 – Event Activity Summary: Displays a summary of the enrollee’s events.
Figure 53 – Daily Summary Report – Part 3
50 VeriTracks® 10.0 User Manual
Page 59

CHAPTER 7: SUPERVISING AN ENROLLEE
The Supervision tab provides the most current information for an enrollee. There are multiple
widgets available to locate the name of an enrollee. If you have a caseload, take advantage of the
Browse Enrollees widget or go directly into the Enrollee Details widget. Each of these widgets
defaults to displaying your caseload. Supervisory staff may wish to use one of the search widgets to
find enrollees in their office, region, or organization.
ENROLLEE DETAILS WIDGET
The primary source of information in the Supervision tab is the Enrollee Details widget. Access to
the enrollee information in the Enrollee Details widget is limited to users who have a login for that
ORI or the parent ORI in the organizational hierarchy.
Enrollee Details Widget – Enrollees Tab
The Enrollees tab provides a snapshot of the status of each enrollee in your caseload. This tab
displays a list of the enrollees by name. Next to each enrollee’s name is the time that has passed since
the last call, the time that has passed since the last GPS point, and an icon that indicates whether or
not BluTag has any open events.
Click on an enrollee’s name and then click on the Status or Events tabs to view more detailed
information.
Enrollees
Tab
Events
Icon
Figure 54 – Enrollee Details Widget – Enrollees Tab
In the upper-right corner of the tab there is an Advanced link (Figure 48). Use this link to:
1. See the enrollees for other officers in your ORI by un-checking the My Caseload box.
2. See your enrollees who are no longer assigned to devices by un-checking the Assigned box.
VeriTracks® 10.0 User Manual 51
Page 60

Advanced
Link
Figure 55 – Advanced Link
Enrollee Details Widget – Status Tab
The Status tab (Figure 49) provides a method of viewing the current events and most recent GPS
tracks for enrollees. This is the primary source of current enrollee information. The following
information displays on this screen:
Supervising officer’s or agent’s name
Device number
Date and time of the enrollee’s last recorded position
A link to a map in which you can view an enrollee’s most recent tracks. This map and its
capabilities are described later in this chapter.
A red “X” on the map represents the enrollee’s last reported position. The blue flag icon to
the left of the map displays the approximate address of the red “X” position.
Date and time of the last contact from the device
Device battery level
A link to a complete list of the enrollee’s zone and RF schedules
BluBox or BluHome assignments and status
Any open events
Three methods of contacting the enrollee: audible tone, vibrate, or silent position request. Use
the three icons to the left of the map
52 VeriTracks® 10.0 User Manual
Page 61

Status
Tab
Figure 56 – Enrollee Details Widget – Status Tab
Last
Reported
Position
VeriTracks® 10.0 User Manual 53
Page 62

TIP: The information provided in the Enrollee Status tab is current as of the last call by the
device. When an event occurs that causes you to receive an immediate notification, it is possible that
by the time you log in to VeriTracks
®
, the event may have cleared. Refresh the data on the Enrollee
Status page by pressing the Refresh Status button. The tab also automatically refreshes every three
minutes.
Enrollee Details Widget – Event Tab
The Event tab (Figure 57) lists all the violations for an enrollee within the last 24 hours. Change the
time range on the screen to show longer or shorter periods of time. You can record information about
events. Check the Confirm box and click OK on the resulting pop-up window to record that you
reviewed the event.
You can also capture notes about events. The notes are date and time stamped and attributed to you.
Each agency should adopt a standard for making notes. To add a note, click the Notes icon for the
event, enter note text, and click Save.
Events
Tab
Confirm
Checkbox
Figure 57 – Enrollee Details Widget – Events Tab
The Notes link allows you to enter as many date and time stamped notes as needed.
MAPPING PROCEDURES
Notes
Link
There are two ways to map an enrollee’s tracks:
1. Click the View on Main Map link in the Enrollee Details widget Status tab.
2. Drag the enrollee to the map from the Simple Enrollee Search, Advanced Enrollee Search, or
Browse Enrollees widgets.
54 VeriTracks® 10.0 User Manual
Page 63

TIP: To review an entire caseload on the map, bring up the points of the first enrollee in
your caseload. Adjust the start time on the map to the earliest time from which you
wish to view the enrollee’s tracks. Then click the Lock Start Time button in the map
legend tool. Drag the names of succeeding enrollees to the map and their tracks will
always start with the locked-in start time.
To unlock the start time, simply un-check the Lock Start Time box.
MAPPING TOOLS
The VeriTracks mapping function uses services provided by Google™ Maps. Both the Enrollee Status
menu option and the Search menu option provide access to the mapping function.
The map screen contains five areas: the Map Tool Panel, the Map Info Panel, the Map Time Scale
Panel, the Map Panel and the Map Footer Panel.
Figure 58 – Map Panel Layout
The Map Info Panel supplements the Map Tool Panel by displaying information pertaining to the
current tool selected. The Map Time Scale Panel shows the current time scale of the data displayed on
the map. The Map Panel is the Google Map itself. The Map Footer Panel displays additional
information about the map such as the current mouse map coordinates.
Map Tool Panel and Map Info Panel
The Map Tool Panel consists of four tabs to analyze an enrollee’s tracks on a map. The Map Info
Panel explains how a tool works or provides multiple options for the tool. When a tool button is
clicked from the Map Tool Panel, the Map Info Panel updates showing specific information about the
tool.
VeriTracks® 10.0 User Manual 55
Page 64

The four tabs on the Map Tool Panel are Legend, Locate, Zones and Playback. The mapping tool
panel has one icon for each of the four tools (Figure 52).
Figure 59 – Map Tools
Zones
When you click on the Zones tab, the Map Info Panel refreshes to show the details about the tab as
shown below:
Figure 60 – Map Zones Tab
The Zones tab gives the option to show enrollee zones, global zones or no zones at all. When you
select from the Display Zones drop-down list, the map automatically displays the chosen zones (e.g.,
enrollee zones, global zones, no zones). The selected option from the drop-down list remains in effect
throughout a mapping session until you change it.
The Zones tab also allows the creation of zones directly on the map you are currently reviewing. This
flexibility allows the creation of a zone as tracks are being reviewed. To create a zone, fill in the
fields and click Create New Zone, which draws an editable zone in the middle of the map.
The zone creation feature is covered in detail in Chapter 4.
Playback
The Playback tab displays an enrollee’s movement in sequence from the earliest point on the map to
the latest point on the map. When you initially open the Playback tab, the Map Info Panel refreshes to
display the Playback controls as shown below.
56 VeriTracks® 10.0 User Manual
Page 65

Figure 61 – Playback Tab
The Play button initiates the playback and causes a playback timeline to appear. The Pause button
stops the playback mid-stream. Resume the playback by clicking the Play button. The playback
timeline corresponds to the period of time displayed on the map for the enrollee. In addition, the
enrollee’s name and the current point in the playback are displayed.
To stop the playback and start over, click the Pause button and then click the Reset button. Step
forward or backward one point at a time using the left and right arrows. Increase or decrease the
speed of the playback using the up and down arrows.
Also, you will see a drop-down list of map actions such as Zoom to Current Point, Zoom to Previous
Point, Zoom to Next Point, Zoom to Entire Set, Zoom to First Point and Zoom to Last Point. These
actions provide an enhanced viewing experience and better follow along with the playback of an
enrollee’s tracks.
The Track point info window, which is discussed later in this chapter, allows you to start a play back
from a selected point.
Locate
When you open the Locate tab, the Map Info Panel refreshes to show the details about the tool
(Figure 62).
VeriTracks® 10.0 User Manual 57
Page 66

Figure 62 – Locate Tab
Show Address maps a specific address. Find Nearest Address provides the ability to click on the map
to retrieve the latitude and longitude, and then click on the Locate Address button to show the
corresponding street address for the point.
Legend
The Legend tab explains symbols and other features visible on the map.
In Google Maps, objects such as roads, cities, etc., are inherently shown on the map. The legend only
shows those additional objects overlaid by VeriTracks. These layers consist of, but are not limited to,
enrollee tracks, enrollee addresses, event and violation symbols and crime scene incidents.
When you open the Legend tab, the Map Info Panel refreshes to show the details about the tool
(Figure 63).
Figure 63 – Legend Tab
58 VeriTracks® 10.0 User Manual
Page 67

Enrollees Section
The most important feature of this tab is the ability to easily change which enrollee’s tracks are
displayed on the map. Multiple enrollees’ data can be requested through the VeriTracks Search
function, but only two enrollees’ tracks can be displayed on a Google Map at any given time.
In the “Selected” section, you see the name or names of the enrollees whose track points are
currently displayed on the map. Click the red “X” to the left of the enrollee’s name and the
enrollee’s track points are removed from the map and the enrollee’s name moves down to the
“Available” box. The dot to the right of an enrollee’s name shows the color of his/her tracks on
the map. Click this dot and the map zooms to only that enrollee’s tracks.
The “Available” section displays the name or names of any enrollees included in your search but
whose points are not currently displayed on the map. Click the green “+” to the left of the
enrollee’s name and the enrollee’s tracks display on the map and the enrollee’s name moves up to
the “Selected” box.
Events Section
The Events section contains a list of symbols that, when attached to a track point, correspond to
an event occurring at that time. Remove the symbols from the track points by un-clicking the
Show Events box.
Map Time Scale Panel
The Map Time Scale Panel (Figure 64) is used to control the time period of the data displayed on the
map. The Panel appears if there is data that needs a time scale, such as enrollee tracks or crime
incidents. It will not appear when mapping a zone.
In Google Maps, you can retrieve up to 24 hours of enrollee tracks in a single query. To retain peak
efficiency of the displayed tracks, VeriTracks shows data initially in two-hour increments.
IMPORTANT: It is strongly recommended that you view enrollee tracks in increments
no greater than four hours at a time.
The Panel has a calendar, date time range and a Quick Time Adjuster.
Figure 64 – Map Time Scale Panel
Calendar
You can change the entire date and time by clicking on the calendar icon next to the “Start:” text
(Figure 65). This displays a calendar from which you can select the start date and time. Once selected
the stop date and time automatically updates based on the selected time period with the Quick Time
Adjuster.
VeriTracks® 10.0 User Manual 59
Page 68

Figure 65 – Map Calendar
Date Time Range – Indicates the time range displayed on the map. Adjust the time range
with the calendar icon or the Quick Time Adjuster.
Quick Time Adjuster – Quick Time Adjuster (Figure 66) included in the Map Time Scale
Panel allows you to quickly modify the time scale of the map. It consists of two components,
the Interval Adjuster (the sliding scale) and the Start Time Adjuster (left and right arrows).
The Interval Adjuster changes the interval between the start and stop time and sets the
number of hours by which the Start Time Adjuster increments.
The Start Time Adjuster changes the start time forward or backward in increments
determined by the Interval Adjuster.
Figure 66 – Quick Time Adjuster
Shift the data’s time range displayed on the map by using the left-pointing arrows to shift
back in time and the right-pointing arrows to shift forward in time.
Example: You are viewing enrollee data on a certain day and its time range is 0800 to
1000. You select a sliding scale value of four hours. If you click on the clock,
the map refreshes to show 0800 to 1200. If you then click the right-pointing
arrows, the map refreshes to show the time range of 1200 to 1600.
60 VeriTracks® 10.0 User Manual
Page 69

Map Panel
The Map Panel contains the Google Map, which contains various mapping components such as an
overview map, map scale and map controls. These components are standard Google Maps
functionality.
Map Controls – Identify Feature
When you click on a particular feature (e.g., track point, zone, address, etc.), a pop-up window
appears with information about the feature.
After clicking on an enrollee’s track point, a pop-up window appears. It contains three tabs: Point,
Enrollee and Agent.
The Point tab shows information about the specific track point that was clicked on, such as
its GPS date and time and its latitude and longitude. Start playback from the selected point by
clicking on the link.
Figure 67 – Point tab
The Enrollee tab shows information about the enrollee, such as his or her name, the tracking
device assigned, the date the tracking device was assigned, his or her Primary ID number,
address, phone number, etc.
VeriTracks® 10.0 User Manual 61
Page 70

Figure 68 – Enrollee tab
The Agent tab shows information about the enrollee’s supervising officer or agent, such as
his or her name, the supervising agency’s name, e-mail address, phone etc.
Figure 69 – Agent tab
Identify Zone
When identifying a zone, the pop-up window displays information about the zone such as its
name, location, radius, and type. If you created the zone, a hyperlink inside the pop-up
window allows you to edit it.
62 VeriTracks® 10.0 User Manual
Page 71

Figure 70 – Zone Identifier
VeriTracks® 10.0 User Manual 63
Page 72

Navigation Controls – Pan and Zoom
Pan a Google Map using one of two methods. The first uses the panning buttons containing
directional arrows (north, south, east and west) located on the left side of the map. Click on one of
these buttons and the map pans in the direction indicated on the arrow (Figure 71).
The second method uses the drag/drop feature. Left-click to “grab” the map and then drag it in any
direction. The Map Panel automatically updates the map to include any data points or objects
currently displayed on the map.
The zoom tool is a standard component of a Google Map. The control allows you to drag a bar up and
down a scale to zoom the map in and out (Figure 71). Double click on the map to automatically zoom
to the point on which you clicked.
Figure 71 – Map Pan and Zoom
64 VeriTracks® 10.0 User Manual
Page 73

Map Controls – Map Types
The map contains a set of three controls located at the top right of the map, which determines the type
of data displayed on the base map (Figure 72). The three buttons are labeled Map, Satellite and
Hybrid. The Map button shows the typical base map data such as roads, parks etc. The Satellite
button shows the satellite imagery (also referred to as aerial photography), and the Hybrid button
shows the base map data overlaid on top of the satellite imagery.
Figure 72 – Map Types
Map Footer Panel
The Map Footer Panel shows information about the current status of the map, such as the mouse
coordinates. It also provides some unique features and tools such as measuring distances between two
points on the map.
Mouse Coordinates
In the lower-left corner of the Map Footer Panel, the current cursor map coordinates are displayed and
dynamically update as the cursor is moved around the map.
Figure 73 – Mouse Coordinates
Measuring Distances
To measure distances on the map, click on a beginning location point with the mouse. Click an
ending distance with the mouse. The footer automatically updates with the distance between the two
points. While you will not see anything on the map itself (e.g., the icon where the click occurred) you
will see the length between the two points in the Map Footer Panel.
VeriTracks® 10.0 User Manual 65
Page 74

CHAPTER 8: MAINTENANCE
IMPORTANT: There are two ways to access the information in your agency’s user accounts.
If you are an agency administrator and have access to all of your agency’s
user accounts, you can maintain the accounts through the User Management
widget in the Maintenance tab page. If you do not have access to other
officer’s user accounts you can still maintain your own account. Click on the
My Account link in the upper right corner of the VeriTracks screen, next to
the Logout link. The My Account link gives access to the Profile tab
described below and may give you access to additional tabs described in this
chapter depending on your agency’s policies.
The Maintenance tab page permits agencies to maintain user accounts, set user privileges, and create
duty officer profiles.
USER MANAGEMENT WIDGET
Profile Tab
The Profile tab allows you to modify your password, security question and answer, and primary and
secondary e-mail addresses at which notifications are received. The following fields are part of a user
profile. Make any changes and then click Save.
Field Description
First Name
Last Name
Primary E-mail
Secondary E-mail
Your first name.
Your last name.
This is the e-mail to which the following VeriTracks
communications will be sent:
The daily summary report (if the daily summary report is
selected in the Notifications tab)
Immediate notifications for enrollee violations (for violations
selected in the primary column in the Notifications tab)
Emails containing a user password when requested from the
Solutions Center.
This additional email address can receive immediate notifications on
enrollee violations and events. This can be a stationary email address
or a mobile one, such as a cell phone, Blackberry, etc.
Primary/Secondary
Phone
Time Zone
66 VeriTracks® 10.0 User Manual
The phone number at which you can be reached.
The Time Zone in which VeriTracks
®
will display time data.
Page 75

Is a Duty Officer
User Name
Password
Security Question
Security Answer
Phone Support ID
Phone Support Pin
Notifications Tab
Enrollee Daily Notifications
This box is checked if the user account is defined as the “duty
officer” for the agency.
The unique login string.
Your password. When a new profile is created, a password is
automatically generated and sent to the primary e-mail address in the
new user’s profile. You should modify your profile to contain a
personalized password.
STOP’s Solutions Center personnel use this question to verify your
identity when you call 866-703-STOP.
This is the response you must give when the Solutions Center staff
asks the Security Question.
In the future when you call STOP’s Solutions Center, you will be
prompted for this unique ID to quickly access your account.
In the future when you call STOP’s Solutions Center, you will be
prompted for your personal PIN number.
You can be notified about zone violations, equipment related violations or crime scene incident hits in
the daily summary report. Choose to receive notifications for enrollees to whom your name is
attached in the Enrollee profile or for your entire ORI. Both options should not be selected at the
same time.
To select a type of violation, click the type in the drop-down box and then click the green “+” to the
left of the drop-down box.
Figure 74(a) – Daily Notifications
VeriTracks® 10.0 User Manual 67
Page 76

Active, Hybrid, and Passive Immediate Notifications
The Immediate Notifications section offers significant flexibility in selecting the type of immediate
notifications you receive. Select each individual notification you want to receive for each device type,
as well as choose where to receive the notification (primary and/or secondary e-mail addresses).
To ensure you receive the selected notifications for each device type at the correct email address,
mark the desired choices in the Type, Events, Who For, and Send To drop-down lists and then click
the green “+” to the left of the Type drop-down box.
Figure 74(b) – Immediate Notifications
Additional Enrollees Tab
You can receive the notifications for individual enrollees who are not in your caseload. For example
if another officer goes on vacation or an enrollee in another officer’s caseload needs heightened
supervision, you can receive notifications for a specific period of time until the regular officer returns
to duty. To add another enrollee to your notifications regimen:
1. Click on the Additional Enrollees tab.
2. In sequence, select the agency in which that enrollee sits, click Update Agents; select the
officer to which the enrollee is assigned, click Update Enrollees.
3. The enrollee for that officer will appear in the Enrollees box.
4. Select the enrollee you wish to receive notifications for and click Add Enrollee.
5. Click Save.
68 VeriTracks® 10.0 User Manual
Page 77

Figure 75 – Additional Enrollees
Off-Hours Tab
You can create two immediate notification regimens. You can set immediate notifications as
described above. In addition you can create an off-hours schedule with a completely different set of
notifications.
For example, during your primary work hours, you may want to receive all of the standard immediate
alerts available in the VeriTracks system. However, when you are not on duty (i.e., off hours), you
want to receive some, but not all of the immediate notifications normally received during your
primary working hours. Or you may not want to receive any immediate notifications while off duty.
These scenarios are made possible by the User Off-Hours Schedule function.
Create an Off-Hours Schedule
1. Open the Off Hours tab in the User Management widget.
2. Click Off Hours.
Off Hours
Tab
Off Hours
Link
VeriTracks® 10.0 User Manual 69
Page 78

Figure 76 – Off Hours Tab
3. A modal pop-up appears showing any off-hours schedules currently in use. Click Add New
Recurring.
Add New
Recurring
Figure 77 – Add New Recurring Link
4. A modal pop-up appears. Enter the schedule name and the desired times and days. Click OK
when finished and close the modal pop-up.
Figure 78 – Edit Recurring Schedule
5. The schedule appears in the original pop-up. Click Save and close this pop-up.
70 VeriTracks® 10.0 User Manual
Page 79

Figure 79 – Listing Tab
6. The schedule is now displayed in the Off Hours tab.
Figure 80 – Off Hours Tab
Duty Officer Tab
The Duty Officer tab gives an agency more notification capabilities beyond those offered by the
individual user’s Notifications tab. The functions in this tab are based on the idea that supervising
officers or agents may require certain notification schemes during working hours and a different one
during off-hours. This tab also makes possible the use of the Duty Officer concept. In a Duty Officer
arrangement agencies may wish to have notifications sent to a third-party operations center, duty
desk, or even a rotating duty officer while supervising officers are not on duty. In the Duty Officer
tab you can:
1. Set your own off-hours notifications.
2. Turn off notifications during your off-hours.
3. Send notifications to a third party “Duty Officer.”
VeriTracks® 10.0 User Manual 71
Page 80

Before any notifications schemes can be put in effect, you must first set an off-hours schedule. The
“Off Hours Tab” section described previously in this chapter explains how to set an off-hours
schedule.
Set Off-Hours Notifications
If you want to receive a modified set of immediate notifications during off-hours that are different
than the immediate notifications received during working hours:
1. Open the Duty Officer tab on the User Management widget.
2. Select “Activate Off Hour Notifications.”
3. Mark the desired choices in the Type, Events, Who For, and Send To drop-down lists. Click
the green “+” to the left of the Type drop-down box.
4. Click Save in the upper-right corner of the widget.
Figure 81 – Duty Officer Tab
Turn Off Notifications During Off-Hours
To stop receiving any immediate notifications:
1. Open the Duty Officer tab on the User Management widget.
2. Uncheck “Activate My Off Hour Notifications.”
3. Click Save in the upper-right corner of the widget.
Send Notifications to a Third Party “Duty Officer”
You can designate a Duty Officer profile to receive immediate notifications during your off-hours. A
duty officer user account sends notifications to a centralized place or a single recipient during the off
hours of supervising officers or agents. The notifications received by the duty officer are in addition
to, and completely independent of, the notifications sent to the supervising officer or agent.
To set a Duty Officer for your account, open the Duty Officer tab, select a Duty Officer from the
drop-down list, and then click Save. The list of Duty Officers is populated by any user account that is
designated as a Duty Officer in your profile.
During your off-hours, a Duty Officer receives notifications based on the Duty Officer’s notification
profile, not based on your notification profile.
72 VeriTracks® 10.0 User Manual
Page 81

Figure 82 – Duty Officer Notification
Using a Duty Officer in Rotation
In situations where a person is on duty as opposed to stationary duty desk, there are several options to
rotate the routing of duty officer notifications:
1. Rotate the e-mail address in the Duty Officer profile – update the duty officer’s e-mail
address to that of the oncoming duty personnel.
2. Rotate the possession of a “duty phone” – permanently retain the e-mail address of the duty
phone in the Duty Officer profile and simply pass the phone from the off-going personnel to
the oncoming personnel.
USER ACCOUNTS
Each agency must have an administrator account assigned to manage user accounts. Only this
administrator can access the User Accounts menu option. Administrators can create new users and
modify the profiles of existing users with this menu option.
User accounts automatically deactivate if not used in six months. Accounts can be reactivated with
agency authorization by calling the Solutions Center.
Create New Accounts – General Data
1. Open the Profile tab on the User Maintenance widget.
2. Click Add New User in the upper-right corner of the widget.
VeriTracks® 10.0 User Manual 73
Page 82

Figure 83 – Add New User
3. Enter a unique username. For larger agencies, it might be appropriate to adopt a standard
username convention across the agency such as First name.last name.agency, e.g.,
JAMES.SMITH.STOP.
4. Enter the remaining data as described in the “Profile Tab” section on page 70.
5. Click on the Notifications tab as described in the “Notifications Tab” section on page 71 and
make the entries that support the agency’s notification requirements.
6. Click Save.
Create New Accounts – Privileges
In addition to entering the general data for a new user as described in the previous section, each user
must be granted privileges to access the various parts of VeriTracks.
Figure 84 – User Privileges
74 VeriTracks® 10.0 User Manual
Page 83

Create Duty Officer Accounts
VeriTracks
®
allows the creation of one or more Duty Officer profiles. This profile is an independent
entity with its own notification regimen. The notifications received by the Duty Officer are in
addition to, and completely independent of, the notifications sent to other ORI users.
Creating a Duty Officer
1. Complete the standard procedures as described above to create a user account.
2. Select the “Is a Duty Officer” checkbox.
Figure 85 – Create a Duty Officer
3. Set the notifications in the Notifications tab. The Duty Officer receives these notifications for
the enrollees supervised by officers or agents who sets their own off hours and designates a
duty officer in the Duty Officer tab.
VeriTracks® 10.0 User Manual 75
Page 84

CHAPTER 9: INVENTORY MANAGEMENT
The Inventory Details widget in the Inventory tab allows an agency to manage its device inventory,
change the status of a device, check the current function of a device, move the device from one ORI
to another, and review the assignment history of a device.
In agencies with a hierarchical relationship among ORIs, most of these tools and reports allow
“parent” ORIs to view the information in the “child” ORIs.
INVENTORY DETAILS WIDGET – PRODUCTS TAB
The Inventory Details widget’s Products tab lists the agency’s current inventory.
Device Filter
In large agencies, the list of devices can be very long. The Inventory Details widget has a filtering
option at the top of the screen. It allows you to more easily locate and view a specific device or
devices. The filter parameters are product type, agency or device number. All three parameters can be
used individually or simultaneously to narrow the search results.
Figure 86 – Inventory Details Widget – Products Tab
1. Product: Select the type of device by selecting it from the drop-down list.
2. Agency: Select the agency or ORI by selecting it from the drop-down list.
3. Device Number: Type in all or part of the device number. For example, by typing in
“258,” all devices with that number sequence will appear in the results.
Products Tab (Inventory List)
The Inventory List displays all of the devices within an agency’s inventory, including each device’s
serial number, the enrollee to whom it is assigned (if any) and the status of the device.
76 VeriTracks® 10.0 User Manual
Page 85

Figure 87 – Inventory List
Change Device Status
An agency can manage its inventory by assigning a status to a BluTag. The available statuses are:
Needs Repair
Pre-Shipping
Received
Shipped
Unassigned
Unrecoverable
If a device is given a status of Needs Repair or Unrecoverable, it is also considered inactive. This
means the device is no longer available for assignment to an enrollee in the enrollment process. The
device number will not appear in the Enrollment Entry widget Assignments tab.
To change the status of a device:
1. Click on that device number and select the new status in the drop-down list in the lower-left
corner of the widget.
2. Click the Go button, then click Save in the upper-right corner of the widget.
Figure 88 – Change Device Status
VeriTracks® 10.0 User Manual 77
Page 86

IMPORTANT: When a device is marked as inactive (Needs Repair or Unrecoverable) it
should be returned to STOP if available. It cannot be reactivated. In most
cases, devices marked as Unrecoverable have the wireless component
deactivated and are therefore no longer usable.
Change Device Owner
For agencies with multiple ORIs, including those in a hierarchical relationship, devices can be moved
around within these ORIs. In order to move devices from one ORI to another, you must be logged
into an ORI that is “parent” to both ORIs.
To reassign a device within an agency’s structure:
1. Click on the device number and select the new ORI in the drop-down list in the lower-right
corner of the widget.
2. Click Save in the upper-right corner of the widget.
Figure 89 – Change Device Owner
78 VeriTracks® 10.0 User Manual
Page 87

INVENTORY MANAGEMENT REPORTS
Device History Report
This report shows the history of any individual device in an agency’s inventory. To generate this
report:
1. Click on the Device number in the Products tab.
2. Click on the Assignment History tab.
3. The screen refreshes to show a list of the enrollees to whom the device has been assigned as
well as the start date and stop date for each of those assignments.
Figure 90 – Device History Report
VeriTracks® 10.0 User Manual 79
Page 88

CHAPTER 10: USING VERITRACKS TO INVESTIGATE
INCIDENTS
The incident capabilities described in this chapter apply to both supervising agencies and nonsupervising agencies using the VeriTracks Automated Crime Scene Correlation (ACSC) tool.
Agencies using ACSC to investigate enrollee movement can answer a question such as, “Was a
specific enrollee(s) at a designated location during a particular period of time on a certain date?”
Non-supervising agencies can set up the ACSC component of VeriTracks to receive crime incident
data from law enforcement agency databases or through manual entry.
Regardless of whether the data arrives in an automated process or is entered manually, ACSC
compares enrollee tracks with the locations of reported incidents. When an enrollee’s tracks are
within 1,500 feet of an incident location at or near the time of the incident, VeriTracks generates an
“incident hit.”
Incident hit information can be viewed in VeriTracks screens or e-mailed to users in a daily summary
report.
METHODS FOR ENTERING INCIDENT DATA
Data Import
VeriTracks
automated process. Law enforcement agencies can coordinate with STOP technical personnel to set
up the data interface. When the interface is complete, the agency can deliver its data in a nightly
import process. Each night VeriTracks runs the comparison process and generates the appropriate
incident hits report.
On-Screen Data Input
Supervising and non-supervising agencies can enter crime incident data in VeriTracks. While law
enforcement agencies generally use the data import capability described above, you can bypass the
data import and manually enter the data on the screen for immediate results. This functionality is
particularly useful for incidents that require a rapid resolution.
To enter incident data manually:
1. Open the Analysis tab > Incident Entry widget
2. Click New Entry.
has the ability to take data from law enforcement agencies and import it in a daily
80 VeriTracks® 10.0 User Manual
Page 89

Save
Incident
New
Entry
Figure 91 – Add New Incident
3. Enter a value in the Incident Number field. This is the unique identifier for the incident and
can be any standard unique identifier already used by the agency. If a standard incident
numbering scheme does not exist, the agency may want to develop one. In general, the use of
the date as part of the incident number helps guarantee uniqueness. Adding a counter may be
sufficient. An example is 031008-1 where the first 6 digits are the date, and the last two are
the dash and a counter. This field is restricted to 12 characters.
4. Enter the Date Occurred by entering the dates for the date range or selecting them from the
calendar and then entering the approximate begin and end time.
5. Enter the approximate address of the incident and then select Set Address. If you wish to
enter a cross street enter both streets in this field (e.g., Main Street and First Avenue)
6. Enter any additional fields desired. All remaining fields are optional.
7. Click Save.
8. Results will be available within five minutes.
VIEWING INCIDENT SEARCH RESULTS
To view incidents:
1. Open the Analysis tab > Incident Search widget.
2. Enter search criteria on the Search tab and then click Search in the lower-left corner of the
widget.
NOTE: Though all fields are available, the typical fields with which you will search
are Agency and Agency Case Number.
VeriTracks® 10.0 User Manual 81
Page 90

Search
Tab
Search
Button
Figure 92 – Incident Search
3. You will be notified that the search is in progress. When the search is completed, results
display in a list on the Incident Results tab.
Incident
Results Tab
Figure 93 – Incident Results
4. Click View Hits to view a list on the Hit Results tab of each enrollee whose proximity to the
incident was sufficient to generate a hit (Figure 94).
82 VeriTracks® 10.0 User Manual
Page 91

Figure 94 – Hit Results
5. Click the link in the Hit # column to view additional information on the hit in the Hit Details
tab (Figure 95). This tab provides information about the Incident Hit (Hit Number, Enrollee,
Agent, Duration, etc.), Incident (Offense, Duration, Address, etc.), and a map.
Figure 95 – Hit Details
TIP: The Analyzed Score is a rating of how close and how long the enrollee was near the
location of the incident. On a scale of 1 through 5, 1 has the greatest proximity.
VeriTracks® 10.0 User Manual 83
Page 92

THE INCIDENT HIT REPORT
The Incident Hit Report lists the hits from any incidents entered into VeriTracks within the last 24
hours.
How to Use the Hit Report
This report provides a summary of the hits and a list of enrollees at incidents without logging into the
system.
Incident
description
including: Type,
time and place of
the incident
Enrollee at the
scene of the
incident
Link to VeriTracks
®
Incident (crime)
description
including: Type,
time and place of
crime
Enrollee at the
scene of the
incident
Link to VeriTracks
®
Figure 96 – Incident Hit Report
84 VeriTracks® 10.0 User Manual
Page 93

This report is e-mailed every morning to each designated law enforcement officer. It provides
summary information for each incident hit and is sorted by the reported incidents. The e-mail report
contains links that direct the law enforcement officer(s) into VeriTracks
incident hit.
®
for further analysis of the
ZONES FOR LAW ENFORCEMENT
A law enforcement agency can set up global exclusion zones in its law enforcement ORI. A global
zone automatically applies to every enrollee in the entire database and is automatically set to a 24x7
schedule.
Zones are a useful way to enhance enrollee movement tracking. Law enforcement officers are notified
when an enrollee violates a zone. Working in an Incident ORI, a law enforcement officer can only
create a Global Exclusion zone.
Exclusion zones define an area(s) where an enrollee is prohibited from entering. For example, an
enrollee may be ordered to stay at least 500 feet from his or her former spouse’s home. A time
sensitive zone can be set up around the home and activated 24x7. When the enrollee enters this zone,
a violation generates.
For more information on creating zones, please see chapter 4. Note: Global Zones do not need to be
scheduled and do not need to be assigned to an enrollee. Global zones automatically apply to every
enrollee in the entire database.
VeriTracks® 10.0 User Manual 85
Page 94

Page 95

APPENDIX A: BLUBOX
™
ACCESSORY GUIDE
VeriTracks® 10.0 User Manual 1
Appendix A: BluBox™ Accessory Guide
Page 96

BluTag® complies with Part 15 of the FCC Rules. Operation is subject to the following two conditions:
This device may not cause harmful interference, and
This device must accept any interference received, including interference that may cause undesired
operation.
RF Exposure (SAR) Statement for BluTag
For body worn operation this tracking device has been tested and meets the FCC RF exposure guidelines The
highest reported SAR value is: 0.709 W/kg GSM850 and 0.967 W/Kg GSM1900.
RF Exposure Statement for BluBox
This equipment complies with FCC RF radiation exposure limits set forth for an uncontrolled environment. The
antenna(s) used for this transmitter must be installed to provide a separation distance of at least 20 cm from all
persons and must not be co-located or operating in conjunction with any other antenna or transmitter.
WARNING – Changes or modifications to this unit not expressly approved by the party responsible for
compliance could void the user’s authority to operate the equipment.
®
: (FCC ID S5EAA90048, FCC ID S5EAA70038)
™
(FCC ID S5EAA90548) and BluHome® (FCC ID S5EBH0107A)
COPYRIGHT NOTICE
© 2008 Satellite Tracking of People LLC. All rights reserved.
Reproduction of this document is expressly forbidden without written approval from Satellite Tracking of
People LLC.
VeriTracks
of Satellite Tracking of People LLC (STOP).
The software described herein has U.S. and Foreign Patents Pending.
STOP provides this publication as is without warranty of any kind, expressed or implied, including, but not
limited to, the implied warranties of merchantability or fitness for a particular purpose.
This publication could include technical inaccuracies or typographical errors. Changes are periodically made to
the information contained herein; these changes will be incorporated in new editions of the publication. STOP
may make improvements and/or changes to the products described in this publication at any time
2 VeriTracks® 10.0 User Manual
®
, BluBox™, BluTag®, BluHome™ and various software icons are worldwide registered trademarks
Appendix A: BluBox™ Accessory Guide
Page 97

BLUBOX
™
OVERVIEW
Accessory to BluTag® Active and BluTag® Hybrid.
Useful when GPS reception is limited.
More restrictive method of curfew monitoring than a zone.
Provides a radio frequency (RF) tether up to 100 meters (109 yards/328 feet) to BluBox.
Does not need communicate monitoring data. All data is reported by BluTag to VeriTracks.
Can extend the battery life of BluTag by allowing it to hibernate while in the RF tether range.
Multiple boxes may be used to cover an entire location.
Secure coded RF signal cannot be imitated or repeated.
HOW BLUBOX
™
AND BLUTAG® WORK TOGETHER
BluBox emits an RF signal that, when detected by BluTag, causes BluTag to:
Trigger an Enter (BluBox) event.
Go into a BluBox GPS Powersave mode if the following criteria is met:
– Can hear its BluBox
– Is not in violation
– Has just acquired a GPS point
– Can successfully contact VeriTracks to upload data
Constantly listen for the BluBox RF signal.
Awaken every two hours and attempt to acquire GPS and contact VeriTracks.
Acquire GPS faster when exiting the BluBox area, as it constantly updates its satellite data
while in power-save mode.
When out of the range of BluBox, BluTag resumes standard operation.
HOW BLUTAG BEHAVES IN A BLUBOX GROUP
BluTag will come out of Powersave mode if one of the following occurs:
– BluBox experiences a loss of RF signal, loss of power, movement, or tampering.
– BluTag is in low battery, the status call button is pressed, or it is on the charger.
BluTag will not go back in Powersave mode while a violation is in progress.
If BluTag is out of Powersave mode, but in range of its BluBox, VeriTracks will show Enter
(BluBox)
VeriTracks® 10.0 User Manual 3
Appendix A: BluBox™ Accessory Guide
Page 98

ENROLLMENT: CREATING BLUBOX GROUPS
To create a new BluBox Group:
1. Open the Enrollment tab > BluBox Management widget.
2. Click the Add New BluBox Group icon.
Add New
BluBox
Group
Figure 1 - Add New BluBox Group
3. Enter a group Name and Description. Click Save.
Name and
Description
Save
Group
Figure 2 - Create Group
4 VeriTracks® 10.0 User Manual
Appendix A: BluBox™ Accessory Guide
Page 99

4. Use the Assign BluBoxes and Assign Enrollees tabs to make assignments.
ENROLLMENT: ADDING BLUBOXES AND ENROLLEES TO THE GROUP
To add a BluBox to an existing BluBox Group:
1. Click on the Assign BluBoxes tab.
2. Locate the BluBox number in the Unassigned/BluBox folder in the Browse Inventory
widget.
3. Drag the device across to the BluBox Management widget.
4. Click the Save button.
Figure 3 – Assign BluBoxes
To add an enrollee to an existing BluBox Group:
1. Click on the Assign Enrollee tab.
2. Locate the enrollee name in the Simple Enrollee Search widget.
3. Drag the enrollee name across to the BluBox Management widget.
4. Click the Save button.
Figure 4 – Assign Enrollees
To modify an existing BluBox Group name or description:
VeriTracks® 10.0 User Manual 5
Appendix A: BluBox™ Accessory Guide
Page 100

1. Locate the Group in the BluBox Groups folder in the Browse Inventory widget
2. Drag the group over to the BluBox Management widget.
3. Change the Group name or description as needed.
4. Click the Save button after each transaction before proceeding to the next tab.
Figure 5 – Modify BluBox Group
To remove a BluBox or enrollee from an existing BluBox Group:
1. Locate the Group in the BluBox Groups folder in the Browse Inventory widget
2. Drag the group over to the BluBox Management widget.
3. Go to the Assign BluBoxes or Assign Enrollees tab depending on the desired transaction.
4. Click the Remove bar at the bottom of the widget.
5. Click the Save button.
Figure 6 – Remove Enrollee
6 VeriTracks® 10.0 User Manual
Appendix A: BluBox™ Accessory Guide
 Loading...