

Page 1

INSTALLATION MANUAL©
ST-PTZIR480-30X
High-Speed Intelligent Dome
IR PTZ Color Camera
Copyright North American Cable Equipment, Inc.
Page 2

PACKAGE CONTENTS
This package contains:
One ST-PTZIR480-30X high-speed intelligent dome color camera.
One mounting bracket.
One 24VAC 3A power supply.
One installation manual.
PRODUCT DESCRIPTION
The ST-PTZIR480-30X is a professional grade infrared intelligent dome color camera with pan, tilt and zoom (PTZ)
capability and 480TVL resolution. The camera’s non-volatile digital memory allows the saving of all settings. Its
200 preset positions provide versatility for cruise routes and tour functions. The ST-PTZIR480-30X’s mechanical
design permits continuous horizontal 360 rotation and 90 vertical flip. Temperature management is built-in.
Functions and Features
Non-volatile design ensures data will not be lost if power fails.
Recovery function allows the camera to continue previous functions after power is restored.
Support for 200 presets and 4 preset tours, each containing up to 32 presets.
4 patterns, each can be recorded for 1000 discrete PTZ controller moves.
Support for 4-auto scans.
Soft and hard ID settings can be edited on the DIP switch or via the OSD menu.
Integrated multi-protocol control: PELCO“P”, PELCO“D”.
2 ch alarm input; 2 ch alarm relay output.
Proportional zoom lens; P/T speed will decrease in proportion with depth of zoom.
Can be installed indoors or outdoors.
Horizontal pan speed 0.5º-82º/s.
Vertical tilt speed 0.5º-30º/s.
360º continuously horizontal rotation.
Complies with IP 66/CE standard.
Built-in surge protection circuitry.
Auto focus.
Auto iris.
Auto shift from Color to B/W.
Built-in OSD makes it easy to configure all settings of the camera.
Built-in display for the internal dome temperature, preset status and compass direction.
330ft IR distance for long-range surveillance.
Page 3

SPECIFICATIONS
1. Image Sensor
Samsung SDM-270 with ¼” SONY CCD
2. Resolution
480TVL
3. Lens
Auto Iris; F=3.5 to 105mm; 30X Optical Zoom, 10X Digital Zoom
4. Illumination
0.1 Lux
5. Pan Range
360º continuous
6. Tilt Rotation Range
0º - 90º flip
7. Manual Speed Pan
0.1º - 82º/sec
8. Manual Speed Tilt
0.1º - 30º/sec
9. Preset Speed
82º/sec
10. Preset Accuracy
±0.10°
11. Preset Positions
200
12. Function Display
Yes
14. Pan & Tilt Position Display
Yes
15. MAX IR Distance
330ft
19. Patterns
4 programmable (pan/tilt/zoom and each tour is 120 seconds)
20. Sequences (Tours)
4 programmable (dwell time speed preset point)
21. Protocol
Pelco-D, Pelco-P selectable
22. Auto Scan
With programmable variable speed
23. High Efficient 3-Dimension Scan
Yes
24. Long-Focus Speed Limited
Yes
26. Home Position
Yes
27. Camera Menu Operation
Yes
28. IP66 for Outdoor Use
Yes
29. Operating Humidity
95%
30. Heater Operation
42ºF on; 57ºF off
31. Operating Temperature
-40ºF - 122ºF
32. Video Connection
BNC coaxial
33. Power
24VAC @3A, 35W
34. Communication
RS485
ST-PTZIR480-30X
Specifications (Typical)
Page 4
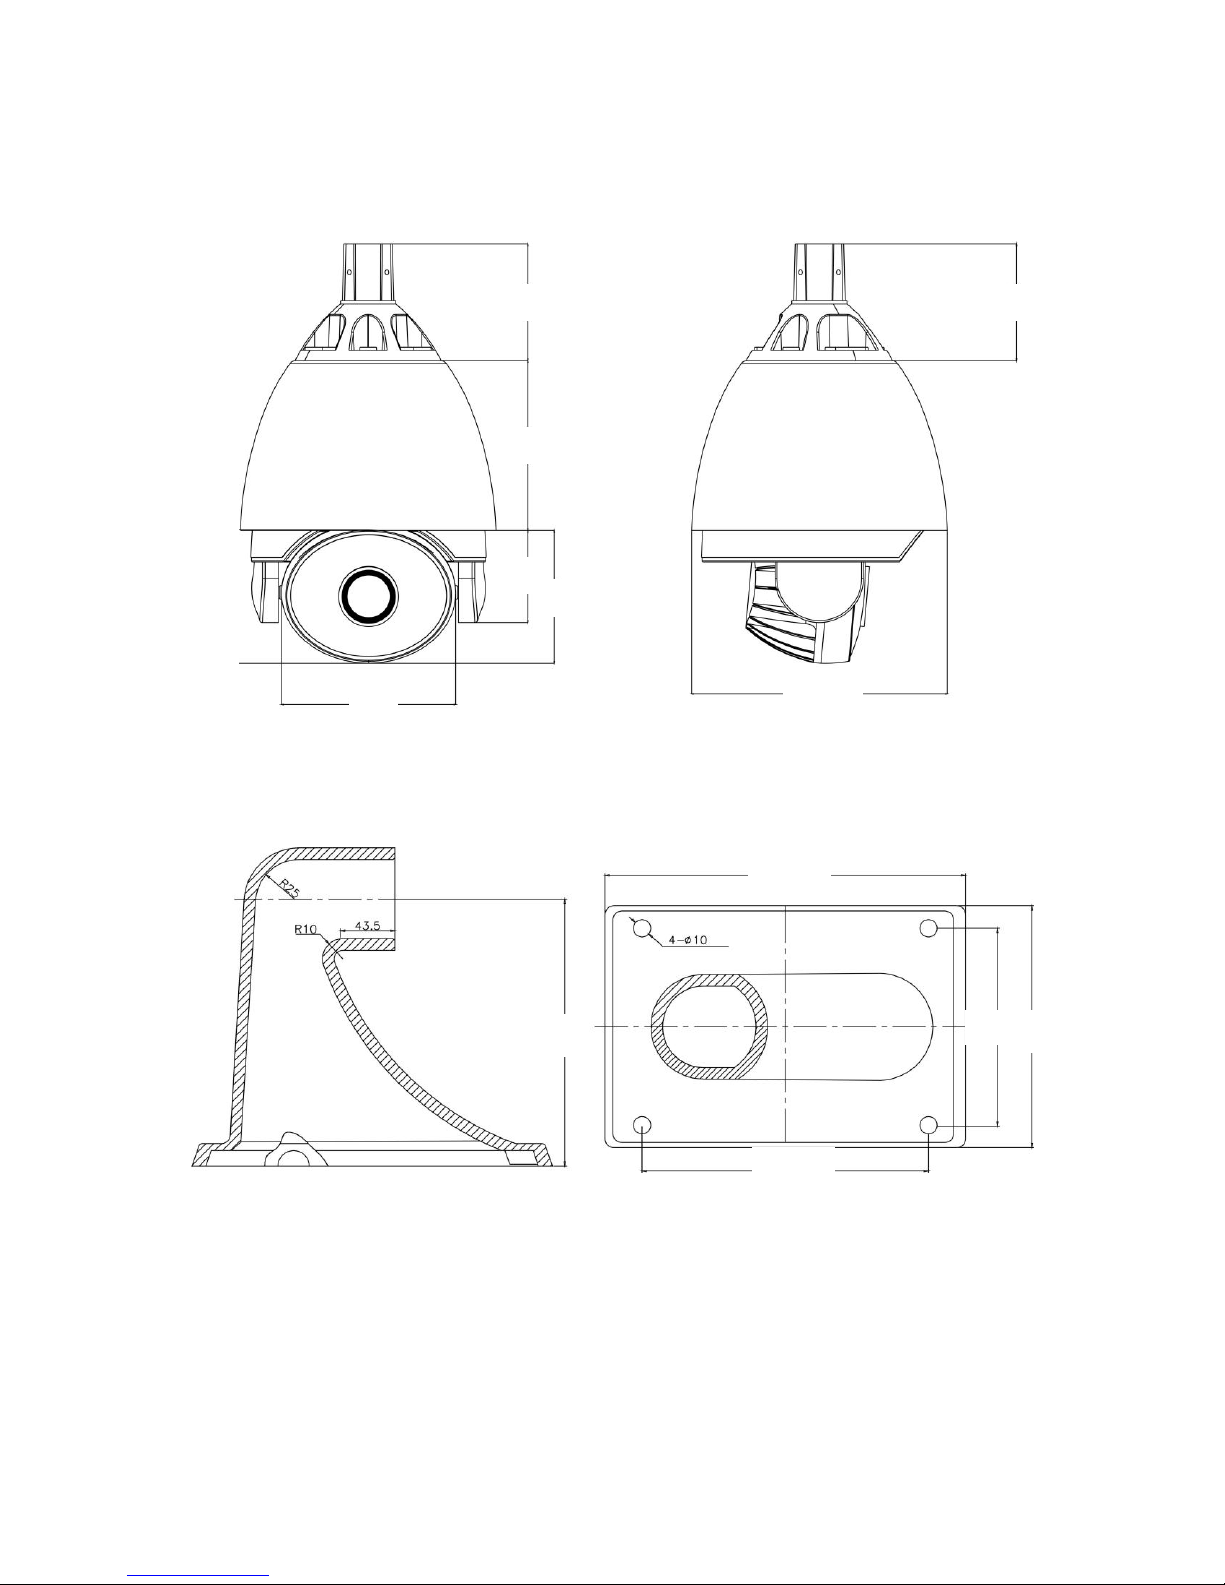
Dimensions
Picture 2
6 ½”
7 ¾”
5 ¼”
5 ½”
6”
10 1/8”
4 1/8”
6”
4 1/8”
6 1/8”
3 ¾”
5 ½”
Wall Mount Dimension
Page 5
INSTALLATION AND OPERATION
This symbol is intended to alert the user to the presence of important operating and
maintenance (servicing) instructions.
This symbol is intended to alert the user to the presence of uninsulated “dangerous
voltage” within the product’s enclosure that may be of sufficient magnitude to constitute a
risk of electrical shock.
CAUTION: To reduce the risk of electrical shock do not remove the cover or back of this unit. No user
serviceable parts are inside.
CAUTION: To prevent electric shocks and risk of fire hazards, do not use other than specified power
source.
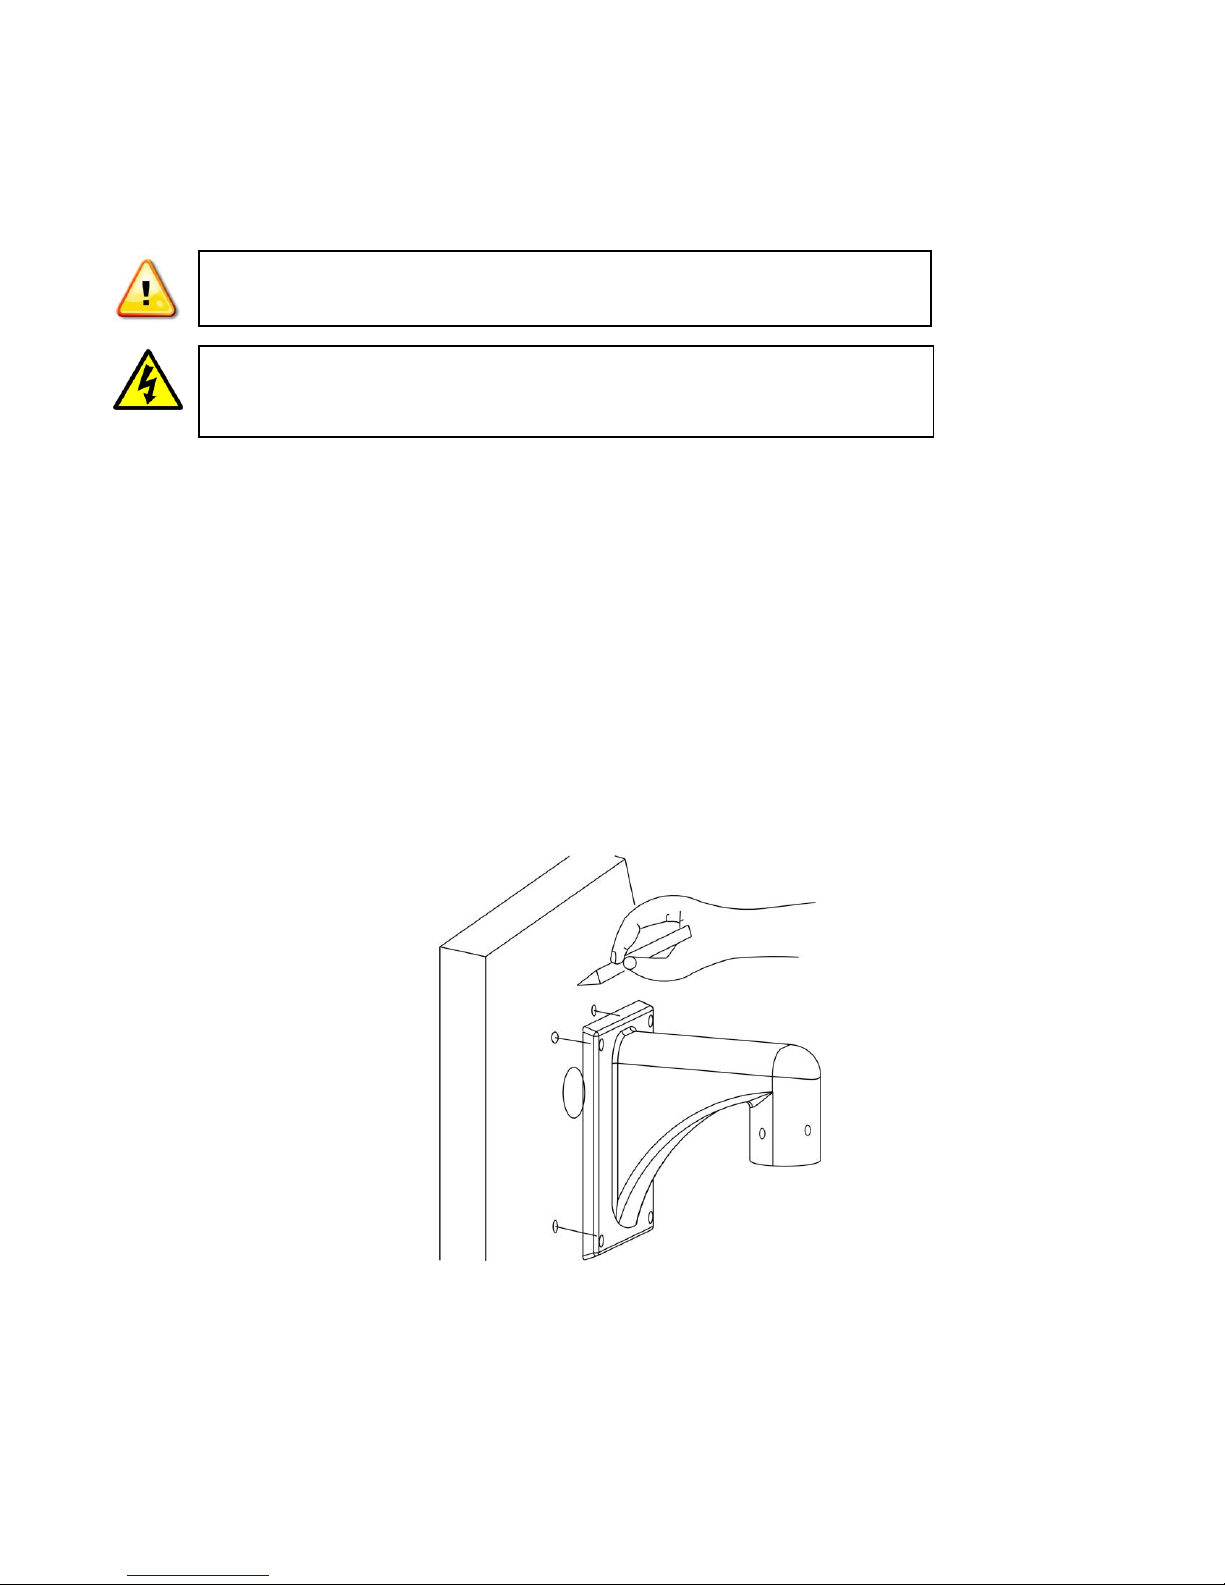
1. UNPACKING and HANDLING
Each unit is shipped partially assembled factory tested.
Ensure that all accessories are removed from the container before discarding packing materials.
a. Use the mounting arm as a template to mark the holes for your mounting hardware.
Page 6
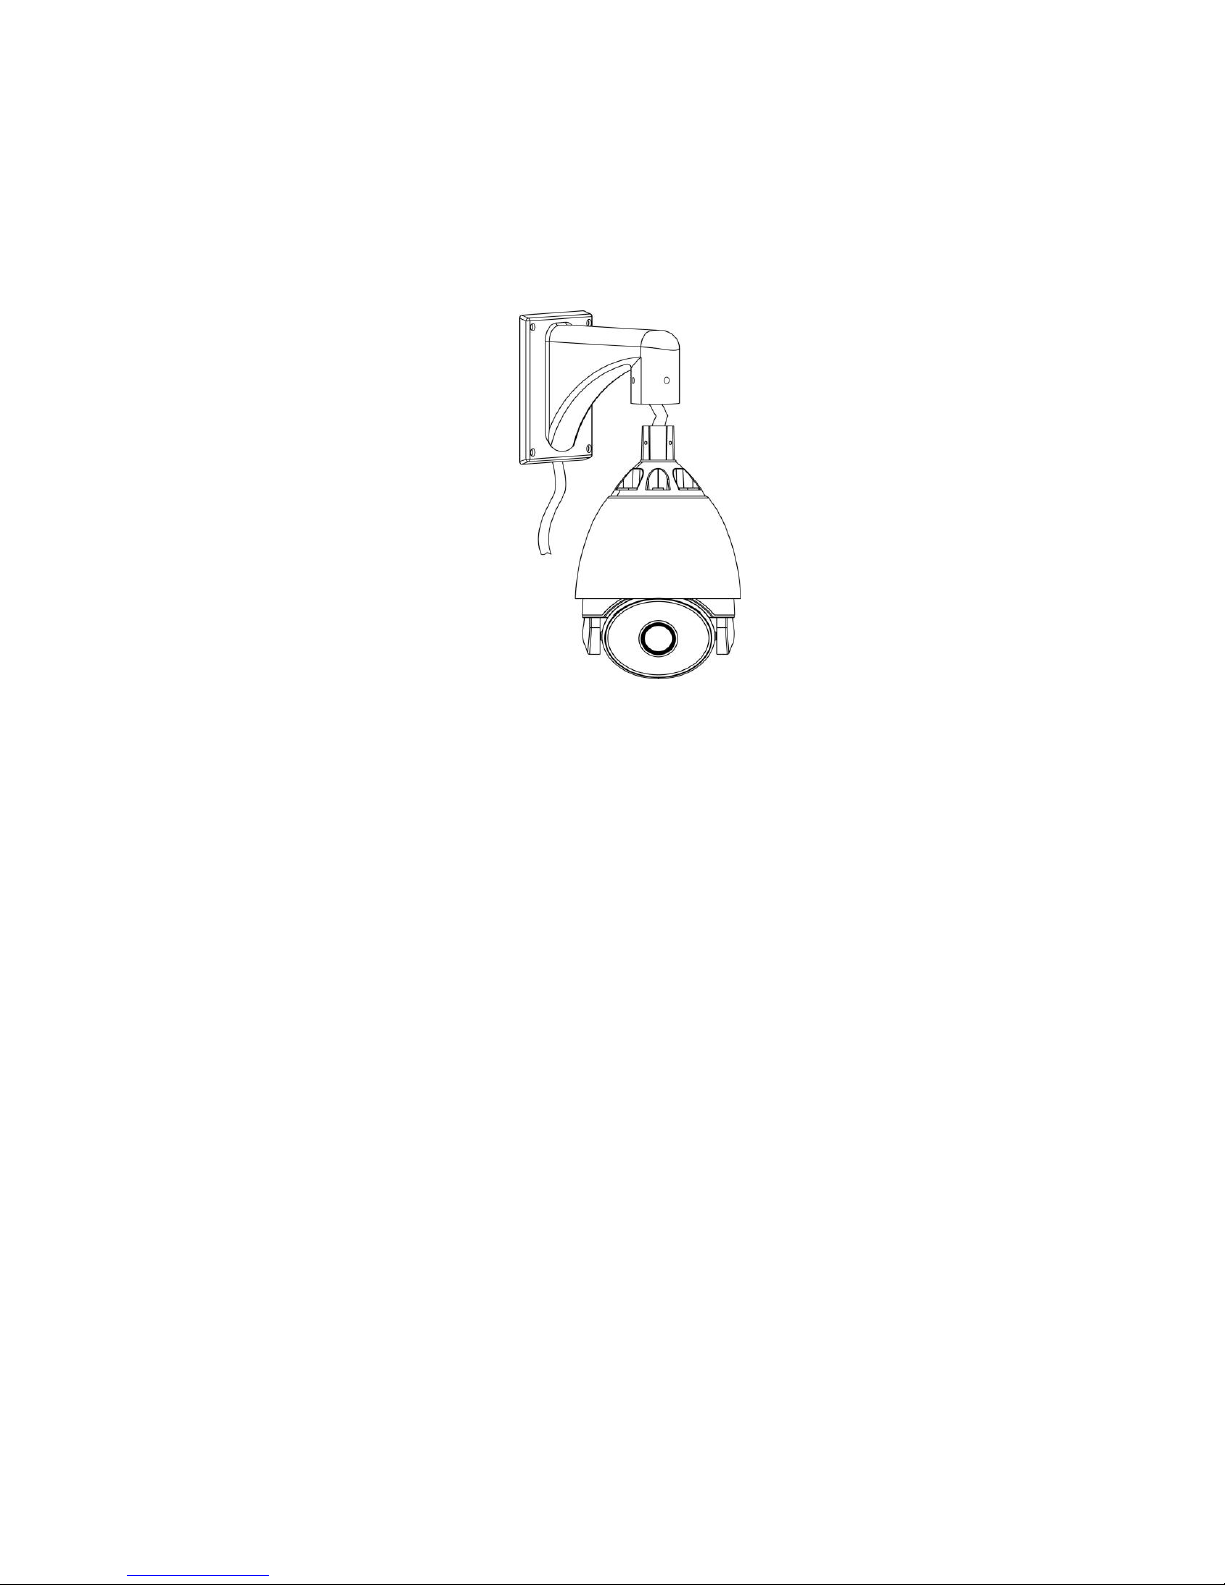
b. Feed the cable assembly up through the smaller end of the mount and out the rear opening.
c. Assemble the camera dome to the mounting arm using the 4 supplied allen-head cap screws and allen
wrench.
2. MECHANICAL INSPECTION
Inspect the entire camera for shipping damage. Make sure the equipment is clean, and no connectors are
broken, damaged, or loose. If equipment appears to be damaged or defective please contact your distributor
or SecurityTronix at 1-610-429-1511 for assistance.
3. SPECIAL ATTENTION
a. The installer must comply with electrical safety standards. There must be sufficient space between the
camera’s power supply and video line and any high voltage equipment and/or cables.
b. To help ensure the camera’s life and proper operation do not point the camera towards the sun or
strong light.
c. Do not install the camera in an environment where the temperature is above 122 F.
d. Do not install the camera near a magnetic field or a high-power motor.
e. Do not mount the camera near a radiator or heater.
f. The installation site and material must fully support the weight of the product.
g. Only use a dry cloth to clean the camera. If there is dirt that is difficult to remove wipe gently with a mild
detergent. Never use strong or abrasive detergents.
h. The included 24VAC at 3A power supply must be used. Using a DC or other incorrect power supply
will damage the camera.
i. Only qualified installers are allowed to install, test and disassemble the camera.
j. The camera is a low voltage product. If installed outdoors proper safety and lightning grounding are
required.
k. Before installing be sure the grounding, wiring, input power, voltage, DIP switches, communication
protocol and baud rate are correctly set prior to powering up and using.
Page 7
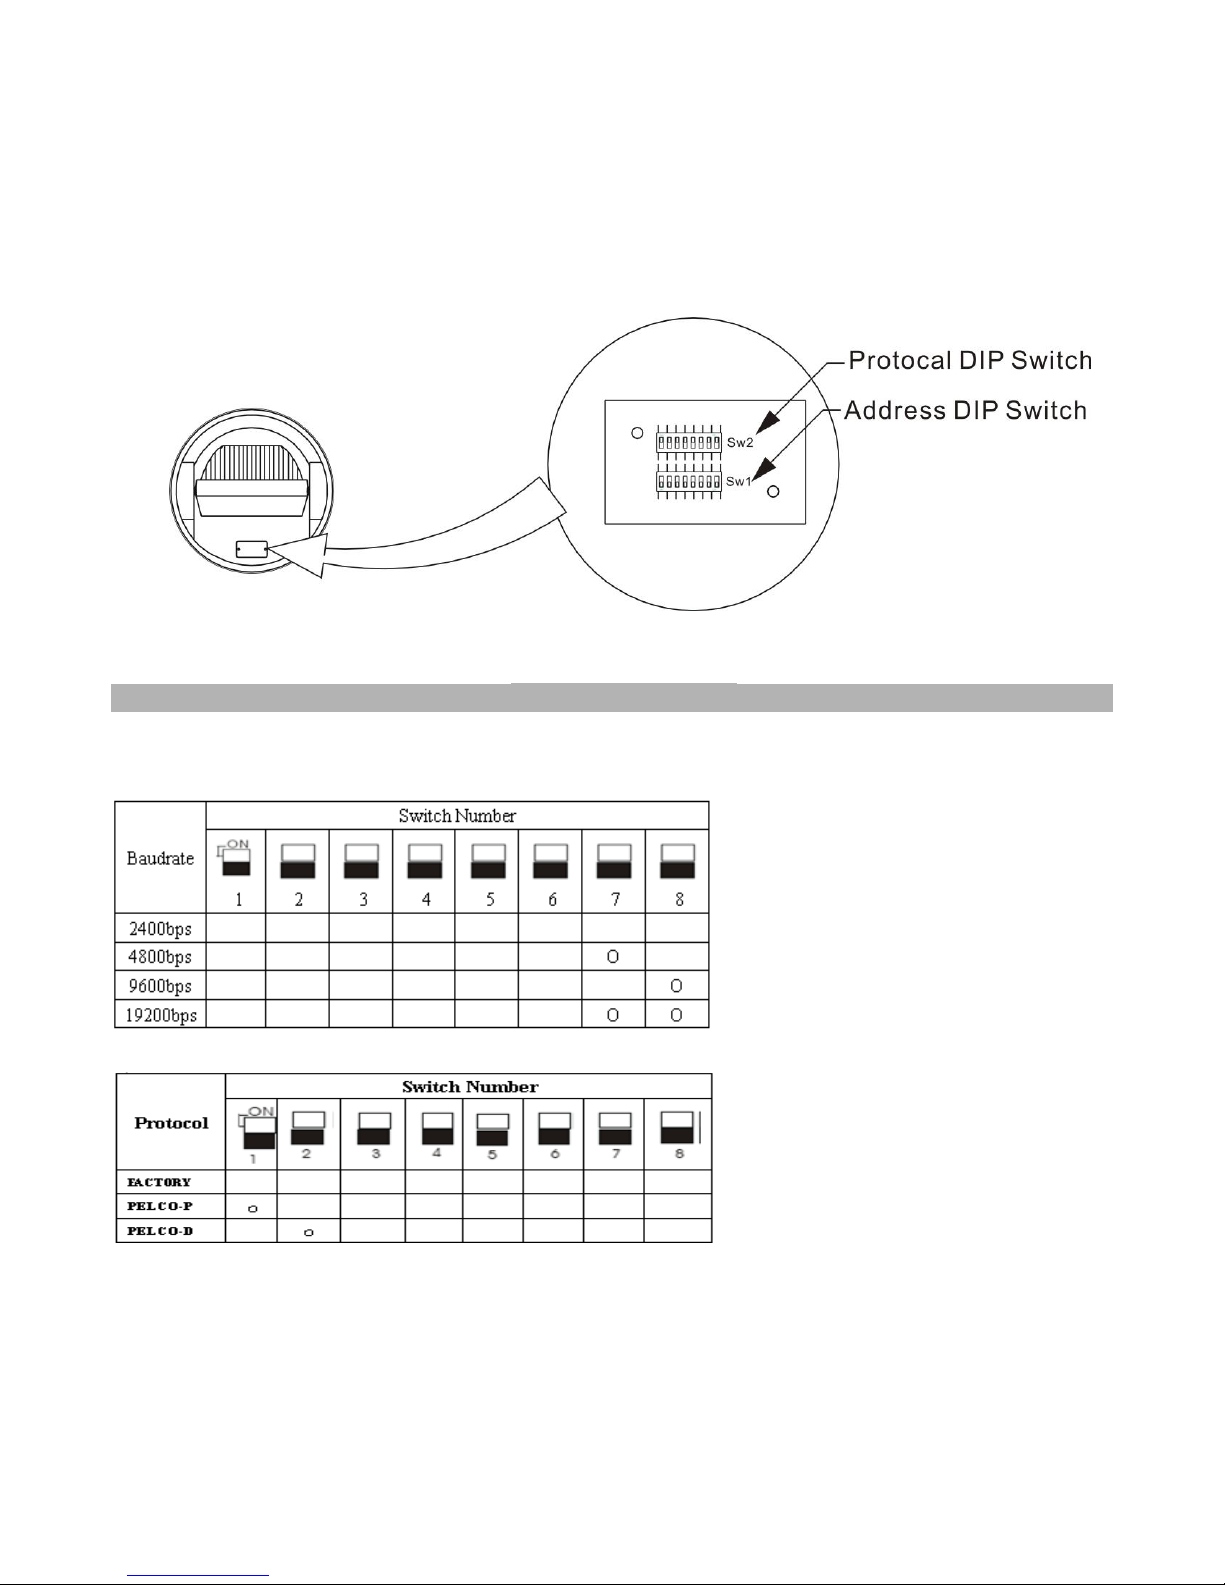
4. CAMERA SETUP
BAUD RATE & PROTOCOL SETUP
Baud rate Setting SW2(B7~B8)
DIP Switch Settings
Protocol Setting SW2(B1~B2)
Page 8
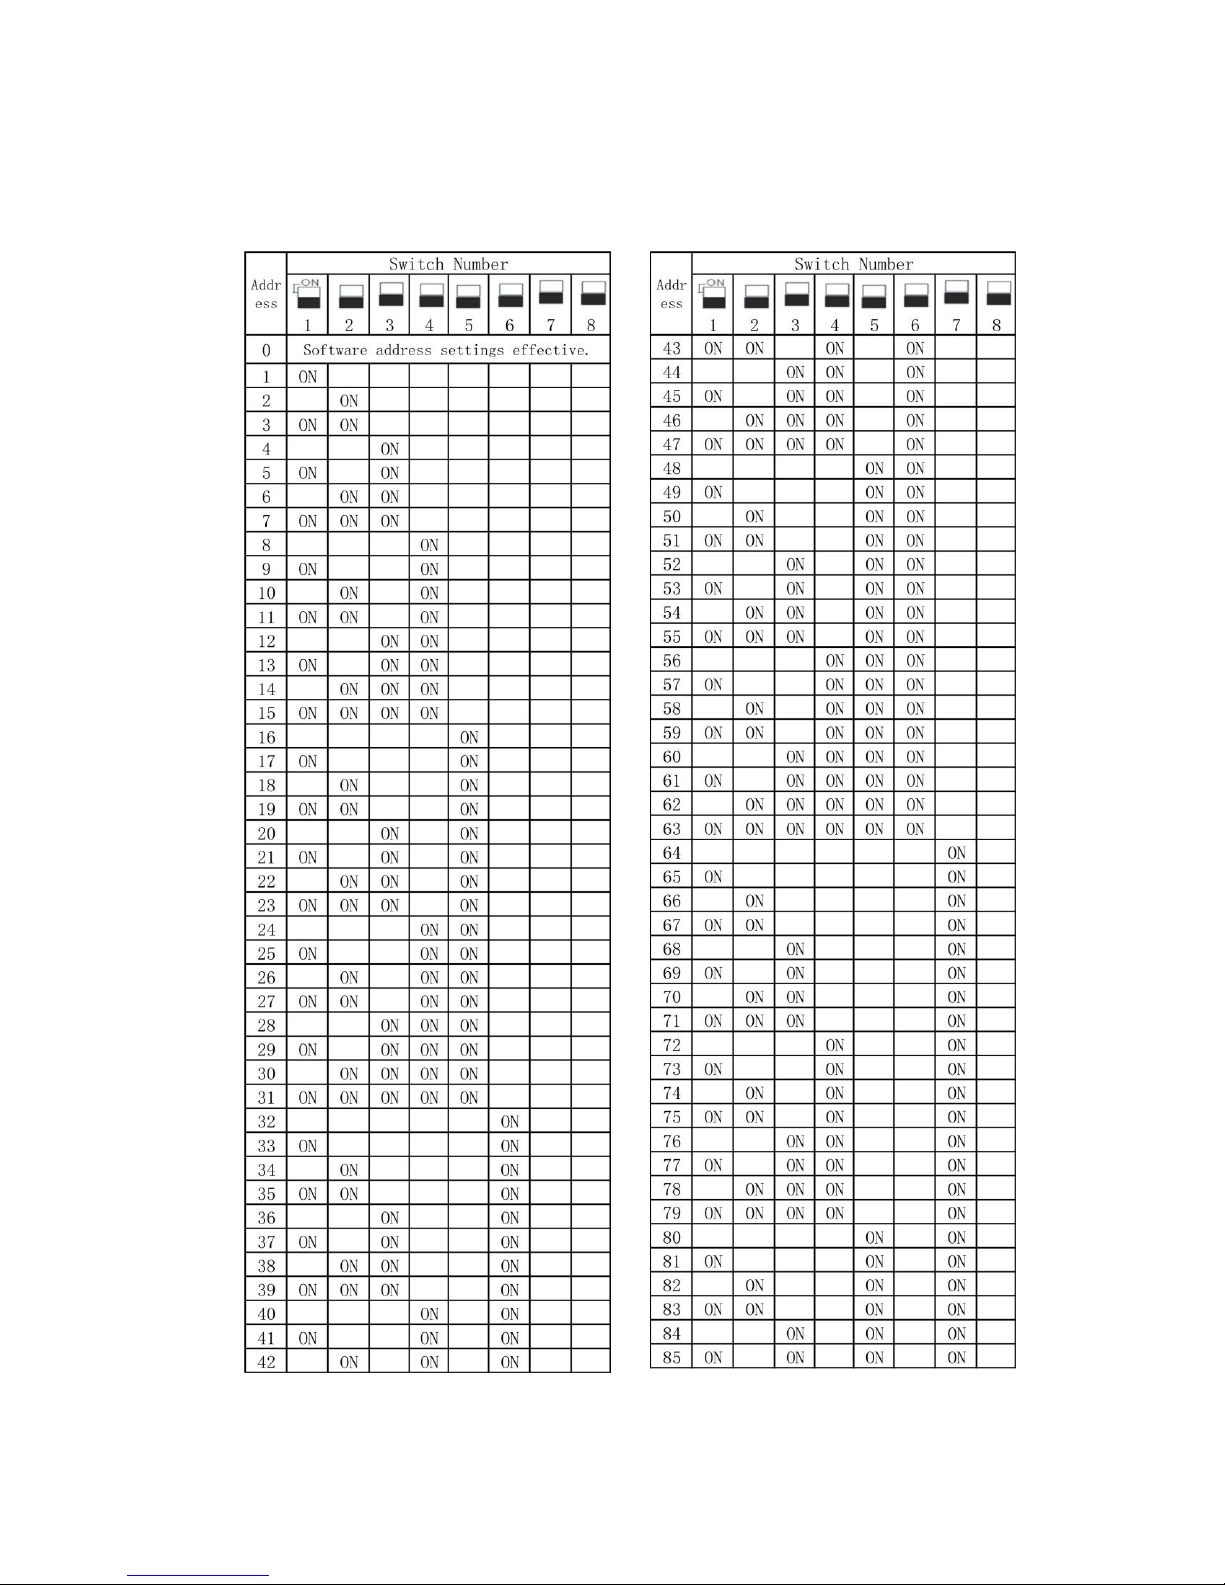
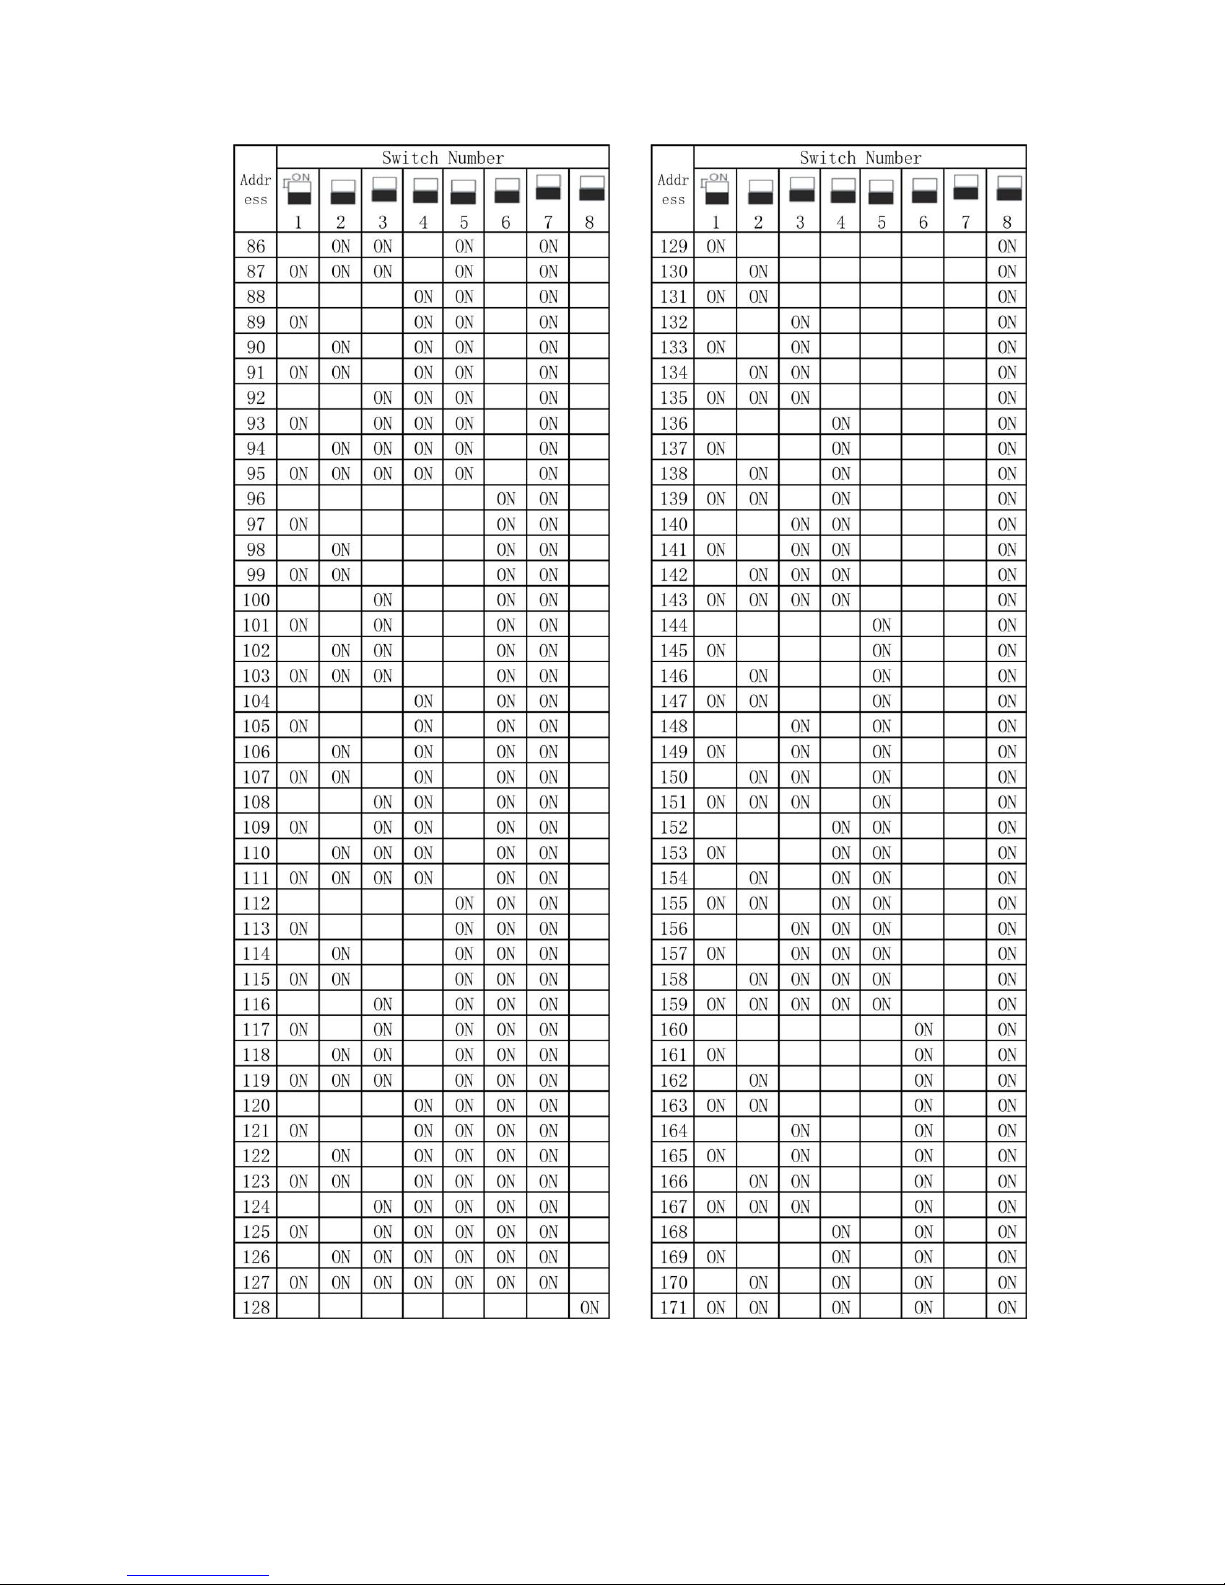
DOME ADDRESS SETUP
System Setup DIP Switch SW1 ON = 1 OFF = 0
Page 9
V2.0 7-31-12
9
Page 10

10
5. WIRING CONNECTIONS
6. FUNCTIONS and OPERATION
Menu Operation
Several functions can be accessed directly without using the camera’s on screen menu display.
Note the following dedicated preset functions:
Special Use Preset Numbers
Call PRESET 95 ―― Enter into main OSD menu
Call PRESET 96 ―― Run pattern 1
Call PRESET 97 ―― Run Sequence 1
Call PRESET 92 ―― Set Left limit point for L/R scan
Call PRESET 93 ―― Set Right limit point for L/R scan
Call PRESET 99 ―― Run Left-right scan
NOTE: If Left limit point and Right limit point are set to the same position, calling preset 99
will execute a 360° scan.
Call PRESET 33 ―― Swing 180°
Call PRESET 34 ―― Return to Zero point
The on screen menu provides access to all camera functions through the use of a standard RS485
connection and PTZ controller.
As shown above, use the PTZ controller to CALL PRESET 95 and the camera’s OSD menu will
appear overlaid upon the video output of the camera, as shown below.
V2.0 7-31-12
Page 11

11
Menu Guide
【SYSTEM SETTING】
【CAMERA PARAMETERS】
【PAN TILT SETTING】
【DISPLAY CONFIGURATION】
【ALARMS SETUP】
→DOME TITLE : OFF
PRESETS TITLE : OFF
ZOOM POSITION : OFF
DIRECTION INDICATOR : OFF
ENVIRONMNT INDICATORS: OFF
GLOBAL SETTING…
→ 【PAN TILT SETTING】
【PRESETS SETUP】
【SEQUENCE SETUP】
【PATTERN SETUP】
【AUTOSCAN SETUP】
【HOME ACTION】
→【LENS PARAMETER】
【EXPOSURE MODE】
【WHITE BALANCE】
【BACKLIGHT MODE】
→DOME ID
TITLE
LANGUAGE SELECT
CHANGE PASSWORD
FACTORY DEFAULT
SYSTEM RESTART
SYSTEM INFOMATION
→INPUT CHANNEL : 001
ALARM ACTION : DISARM
INPUT MODE : NO
ALARM LINKAGE : OFF
RELAY OUTPUT : OFF
RESET DELAY : 30
SYSTEM SETTING
MAIN MENU
CAMERA PARAMETERS
`
`
PANTILT SETTING
DISPLAY CONFIGURATION
ALARMS SETUP
V2.0 7-31-12
Page 12

12
【SYSTEM SETTING】
【CAMERA PARAMETERS】
【PAN TILT SETTING】
【DISPLAY CONFIGURATION】
【ALARMS SETUP】
【SYSTEM SETTING】
【CAMERA PARAMETERS】
【PAN TILT SETTING】
【DISPLAY CONFIGURATION】
【ALARMS SETUP】
Main Menu Function Setting
→DOME ID : 001
TITLE
LANGUAGE SELECT: ENGLISH
CHANGE PASSWORD
FACTORY DEFAULT
SYSTEM RESTART
SYSTEM INFORMATION
Main menu
System Setting
MAIN MENU SYSTEM SETTING
DOME ID
The camera supports both ‘hard’ addressing and ‘soft’ addressing.
Hard addressing is achieved by setting the address DIP switches to the desired address. When this
is done, soft addressing is disabled. When all address DIP switches are set to OFF, the
soft-addressing option becomes available in the OSD menu.
Procedure:
1. Set all ADDRESS DIP switches to zero (off).
2. Call preset 95 to enter the main menu.
3. Using the up & down PTZ controls, choose [SYSTEM SETTING] and press [OPEN] to confirm
and enter the system setting menu.
4. Under [SYSTEM SETTING] choose [DOME ID] and press [OPEN] to confirm.
5. Using the up/down and left/right PTZ controls, enter the 12 character serial number shown at
the top of the menu and press [OPEN] to move to the next menu.
6. Enter the new dome ID# and press [OPEN]. The menu will show the new dome ID and prompt
to press [OPEN] to accept.
7. Set your PTZ controller to the dome’s new address and press [OPEN] .
TITLE SETTING:
Procedure:
1. Call preset 95 to enter the main menu.
2. Using the up/down cursor, choose [SYSTEM SETTING]. Press [OPEN] to confirm the
selection.
3. Under [SYSTEM SETTING], choose [TITLE] and press [OPEN] to confirm the selection.
4. Use up/down to choose letters and numbers for the name, and L/R to navigate to the next
character of the name.
5. When the name is complete, press [OPEN] to save and exit the title menu. Press [CLOSE] to
exit without saving.
V2.0 7-31-12
Page 13

13
Notes: 20 characters can be set. Characters include: 0-9、A-Z、 :<>-. Other text-entry menus
follow this same procedure.
LANGUAGE SELECT
Procedure:
1. Call preset 95 to enter the main menu.
2. Use the up/down PTZ controls to choose [SYSTEM SETTING] and press [OPEN] to confirm
the selection.
3. Under [SYSTEM SETTING] choose [LANGUAGE SELECT] and Press [OPEN] to confirm
the selection. The language will be flashing.
4. Use up/down to choose a language.
5. Press [OPEN] to save and exit this menu item; Press the [CLOSE] key to exit immediately
without saving.
CHANGE PASSWORD
Procedure:
1. Call preset 95 to enter the main menu.
2. Use the up/down PTZ controls to choose [SYSTEM SETTING] and press [OPEN] to confirm
the selection and enter the system setting menu.
3. Under [SYSTEM SETTING] choose [CHANGE PASSWORD] and press [OPEN] to confirm
the selection.
4. Use the up/down controls to choose letters and numbers for the name, and L/R to navigate to
the next character of the name.
5. When the name is complete, press [OPEN] to confirm. This will save and exit the title menu.
Press [CLOSE] to exit without saving.
6. If there is already a password in place you will be prompted to enter it first. Input the old
password and press the [OPEN] key. “Input New Password” will be shown on the screen. Input
the new password, then re-enter it once more to confirm. “Password Modification Succeed” will
be shown on the screen.
7.
CAUTION: For security reasons, there is no way for users to bypass or reset the
password settings. If a password is entered incorrectly or forgotten it will be impossible to
access the camera’s OSD menu. In order to regain access in the event of a lost or forgotten
password, the camera must be re-initialized by the factory.
Note: The factory-set original password is“000000”. If you set the dome password as “000000”,
then no password will be required to access the camera.
FACTORY DEFAULT
1. Call preset 95 to enter the main menu.
2. Use the up/down PTZ controls to choose [SYSTEM SETTING] and press [OPEN] to confirm
the selection and enter the system setting menu.
3. Under [SYSTEM SETTING] choose [FACTORY DEFAULT] and press [OPEN] to reset the
camera to the factory default settings.
SYSTEM RESTART
1. Call preset 95 to enter the main menu.
2. Use the up/down PTZ controls to choose [SYSTEM SETTING] and press [OPEN] to enter the
system setting menu.
3. Under [SYSTEM SETTING] choose [SYSTEM RESTART] and press [OPEN] to begin the
reset. This process is the same as power-cycling the camera, so the camera will perform its
startup function check.
SYSTEM INFORMATON
Under [SYSTEM SETTING] choose [SYSTEM INFORMATION] and press [OPEN] to confirm the
V2.0 7-31-12
Page 14

14
【SYSTEM SETTING】
【CAMERA PARAMETERS】
【PAN TILT SETTING】
【DISPLAY]
[CONFIGURATION】
selection. The dome’s present system information will be shown on the screen。
→ZOOMING SPEED : HIGH
DIGITAL ZOOM : ON
FOCUS LIMIT : 30cm
→【LENS PARAMETER】
【EXPOSURE MODE】
【WHITE BALANCE】
【BACKLIGHT MODE】
→【LENS PARAMETER】
【EXPOSURE MODE】
【WHITE BALANCE】
【BACKLIGHT MODE】
CAMERA PARAMETERS
MAIN MENU CAMERA PARAMETERS
LENS PARAMETER
Use this menu to set the camera's zoom speed, electronic zoom, and focus and preset points limit.
CAMERA PARAMETERS LENS PARAMETER
ZOOMING SPEED
Procedure:
1. Call preset 95 to enter the main menu.
2. Use the up/down PTZ controls to choose [CAMERA PARAMETERS] item, press [OPEN] to
confirm the selection and enter [LENS PARAMETER] menu.
3. Under [LENS PARAMETER] choose [ZOOMING SPEED] item and press [OPEN] to confirm
the selection and the parameter setting will blink.
4. Up/Down P/T to change the value.
5. Press [OPEN] to save and exit this item setting; Press [CLOSE] to exit immediately without
saving.
DIGITAL ZOOM SETTING
Procedure:
1. Call preset 95 to enter the main menu.
2. Use the up/down PTZ controls to choose [CAMERA PARAMETERS] and press [OPEN] to
confirm the selection, then enter the [LENS PARAMETER] menu.
3. Under [LENS PARAMETER] choose [DIGITAL ZOOM] and press [OPEN] to confirm the
selection and enter electronic zoom set. The setting will blink.
4. Up/Down P/T to choose ON or OFF.
5. Press [OPEN] to save and exit this item setting; Press [CLOSE] to exit immediately without
saving.
FOCUS LIMIT SETTING
Use this to limit the focal distance of the camera in order to improve the performance of the lens
focus. For example: With a minimum focus distance of 1 meter, the camera will not try to focus on
dust, dirt, water etc. on the camera dome itself.
Procedure:
1. Call preset 95 to enter the main menu.
V2.0 7-31-12
Page 15

15
2. Use the up/down PTZ controls to choose [CAMERA PARAMETERS] and press [OPEN] to
【LENS PARAMETER】
→【EXPOSURE MODE】
【WHITE BALANCE】
【BACKLIGHT MODE】
→EXPOSURE MODE : AUTO
IRIS LEVEL : F5.6
SHUTTER SPEED : 1/60
AGC LEVEL : 0dB
BRIGHT LEVEL : 016
DIGI-SLOW SHUTTER: AUTO
DAY/NIGHT MODE : AUTO
confirm the selection, then enter [LENS PARAMETER] menu.
3. Under [LENS PARAMETER] choose [FOCUS LIMIT] and press [OPEN] to confirm the
selection and enter focus limit set. The setting will blink. Use up/Down P/T to change the
setting.
4. Press [OPEN] to save and exit this item setting; Press [CLOSE] to exit immediately without
saving.
EXPOSURE MODE
Use this menu to set exposure mode, shutter speed, aperture, gain, brightness, back light
compensation, fast/slow shutter, exposure compensation, wide dynamic range and other
parameters to maximize the camera’s image quality.
CAMERA PARAMETERS EXPOSURE MODE
Exposure Mode Setting
Procedure:
1. Call preset 95 to enter the main menu.
2. Use the up/down PTZ controls to choose [CAMERA PARAMETERS] and press [OPEN] to
confirm the selection.
3. Under [CAMERA PARAMETERS] choose [EXPOSURE MODE] and press [OPEN] to confirm
the selection which enters the exposure sub-menu set.
4. In the Exposure Mode menu choose the [EXPOSURE MODE] line item and press [OPEN] to
confirm the selection and enter the exposure mode selection setting.
EXPOSURE MODE:
The 5 available choices are: 1) IRIS, 2) SHUTTER, 3) BRIGHT, 4) USER and 5) AUTO.
When the exposure mode is set to AUTO, all exposure settings are handled by the camera
automatically. This is the recommended setting, as several parameters are dynamically
adjusted to obtain the best image output.
When the exposure mode is set to USER the IRIS, SHUTTER, and BRIGHT parameters can
be set manually to fixed values, which will all be used to control exposure.
When the exposure mode is set to IRIS, then the exposure will be set by the iris level ONLY
and the other values will be ignored.
When the exposure mode is set to SHUTTER, then the exposure will be set by the shutter
speed ONLY and the other values will be ignored.
When the exposure mode is set to BRIGHT, then the exposure will be set by the bright level
ONLY and the other values will be ignored.
AGC (Auto Gain Control):
V2.0 7-31-12
Page 16

16
→White Balance Mode : AUTO
Red Gain : 000
Green Gain : 000
This is set individually. There are 16 settings from -3dB through 28dB.
【LENS PARAMETER】
【EXPOSURE MODE】
→【WHITE BALANCE】
【BACKLIGHT MODE】
DIGI-SLOW SHUTTER:
This can be turned either on or off. Turning this ON allows the camera to increase gain by
slowing down the shutter digitally.
DAY/NIGHT MODE:
This can be set to either DAY, NIGHT or AUTO. The AUTO setting is recommended. In AUTO
mode the camera will change back and forth from day to night mode automatically, turning the
IR LEDs on or off as needed. The DAY setting manually turns off the IR LEDs and the camera
will produce a color image. The NIGHT setting manually turns on the IR LEDs and the camera
produces a black & white image.
WHITE BALANCE MENU:
Use this function to set various white balance modes, both auto and manual. The red gain and blue
gain settings can also be set manually.
CAMERA PARAMETERS WHITE BALANCE
WHITE BALANCE SETTING:
Procedure:
1. Call preset 95 to enter the main menu.
2. Choose [CAMERA PARAMETERS] and press [OPEN] to confirm the selection.
3. Choose [WHITE BALANCE] and press [OPEN] to confirm the selection and enter the white
balance menu settings.
4. The [WHITE BALANCE] parameters can be set as bellow:
[AUTO]: This is the default mode. White balance sensors automatically detect the environment
to restore the true color.
[USER]: The user manually adjusts Red Gain and Blue Gain values.
[ATW]: Automatic tracking modes
[OPW]: Single-lock mode
[Outdoor]: Outdoor mode, colder colors
[Indoor]: Indoor mode, warmer color
5. Use up/down to select the desired white balance mode.
6. Press [OPEN] to save and exit this item setting; Press [CLOSE] to exit immediately without
saving.
Attention: The Red Gain and Blue Gain values can only be changed when White
Balance mode is set to “USER”.
BACKLIGHT MODE SETTING
V2.0 7-31-12
Page 17

17
Use this setting to help compensate for lighting conditions where there is a strong light visible
【LENS PARAMETER】
【EXPOSURE MODE】
【WHITE BALANCE】
→【BACKLIGHT MODE】
→BACK LIGHT MODE : ON
【SYSTEM SETTING】
【CAMERA PARAMETERS】
【PAN TILT SETTING】
【DISPLAY CONFIGURATION】
【ALARMS SETUP】
→【PANTILT SETTING】
【PRESETS SETUP】
【SEQUENCE SETUP】
【PATTERN SETUP】
【AUTOSCAN SETUP】
【HOME ACTION】
→AUTO FLIP
JOYSTICK RECOVER
SPEED PROPORTIONAL
INFRARED LIGHTING
INFRARED ARRAY
SET NORTH DIRECTION
GOTO ZERO POSITON
→【PANTILT SETTING】
【PRESETS SETUP】
【SEQUENCE SETUP】
【PATTERN SETUP】
【AUTOSCAN SETUP】
【HOME ACTION】
behind the object you are trying to observe with the camera.
CAMERA PARAMETERS BACKLIGHT MODE
BACKLIGHT MODE
Procedure:
1. Under [CAMERA PARAMETERS] choose [BACKLIGHT MODE] and press [OPEN] to enter
BLC mode set.
2. Use up/down PT to choose ON or OFF.
3. Press the [OPEN] key to save and exit. Press the [CLOSE] key to exit directly without saving.
PAN TILT SETTING
MAIN MENU PANTILT SETTING
PANTILT Set Menu
PANTILT SETTING PANTILT SET
Auto-flip
Auto-flip allows the camera to rotate 180° horizontally and upward 90° vertically after the tilt is
positioned straight down. This allows the camera to operate as if it had 180° vertical tilt capability.
Procedure:
1. Call preset point 95 to enter the main menu.
2. Under [PANTILT SETTING] choose the [PANTILT SETTING] sub-menu and press [OPEN] to
confirm the selection.
3. Under [PANTILT SETTING] choose [AUTO FLIP] and press [OPEN] to confirm the selection
V2.0 7-31-12
Page 18

18
and enter auto flip set.
4. Use Up/down P/T to select and change this function to ON or OFF.
5. Press the [OPEN] key to save and exit. Press the [CLOSE] key to exit directly without saving.
JOYSTICK RECOVER
NOTE: This model of camera does not support manual focus or iris adjustments. The
settings may be made for joystick recover, but they will have no effect as there is no
manual iris or focus settings to recover from.
ALL: When ALL is selected, both the focus and iris will return to automatic operation after any
joystick command is received from the camera.
NONE: When NONE is selected, the focus and iris will remain under manual control only. The
camera will not attempt to auto-focus the camera or operate the iris automatically.
FOCUS: When FOCUS is selected, just the focus function will return to automatic mode when the
joystick is moved after a manual adjustment has been made. The iris will remain under manual
control.
IRIS: When IRIS is selected, just the iris function will return to automatic mode when the joystick is
moved after a manual adjustment has been made. The focus will remain under manual control.
Procedure:
1. Call preset point 95 to enter the main menu.
2. Under [PANTILT SETTING] choose the [PANTILT SETTING] sub-menu, press [OPEN] to
confirm the selection and enter pan parameter set.
3. Under [PANTILT SETTING] choose the [JOYSTICK RECOVER] menu and press [OPEN] to
confirm the selection.
4. Up/down P/T to change the setting.
5. Press the [OPEN] key to save and exit. Press the [CLOSE] key to exit directly without saving.
SPEED PROPORTIONAL
This function causes the speed at which the camera pans to decrease proportionately with the
amount of zoom applied; When the camera is zoomed out wide, it will pan at full speed. When the
camera is zoomed in far, the camera will pan slower.
Procedure:
1. Call preset point 95 to enter the main menu.
2. Under [PANTILT SETTING] choose the [PANTILT SETTING] sub-menu, press [OPEN] to
confirm the selection and enter pan parameter set.
3. Under [PANTILT SETTING] choose the [SPEED PROPORTIONAL] menu and press [OPEN]
to confirm the selection.
4. Up/down P/T to change the setting.
5. Press the [OPEN] key to save and exit. Press the [CLOSE] key to exit directly without saving.
INFRARED LIGHTING
The IR LEDs can either be turned on manually or set to turn on and off automatically as lighting
conditions change.
Procedure:
1. Call preset point 95 to enter the main menu.
2. Under [PANTILT SETTING] choose the [PANTILT SETTING] sub-menu, press [OPEN] to
confirm the selection and enter pan parameter set.
3. Under [PANTILT SETTING] choose the [INFRARED LIGHTING] menu and press [OPEN] to
confirm the selection.
4. Up/down P/T to change the setting.
5. Press the [OPEN] key to save and exit. Press the [CLOSE] key to exit directly without saving.
V2.0 7-31-12
Page 19

19
INFRARED ARRAY
【PANTILT SETTING】
→【PRESETS SETUP】
【SEQUENCE SETUP】
【PATTERN SETUP】
【AUTOSCAN SETUP】
【HOME ACTION】
→PRESET NUMBER : 001
TITLE :
SET NEW PRESET
SHOW NEXT PRESET
DELETE CURRENT
The IR LEDs can be set to switch from low power to high power when the zoom lens is zoomed to
a certain amount. For example, setting this to “3X” will change the LEDs to the higher power setting
when the lens is zoomed to 3X optical magnification or more.
Procedure:
6. Call preset point 95 to enter the main menu.
7. Under [PANTILT SETTING] choose the [PANTILT SETTING] sub-menu, press [OPEN] to
confirm the selection and enter pan parameter set.
8. Under [PANTILT SETTING] choose the [INFRARED ARRAY] menu and press [OPEN] to
confirm the selection.
9. Up/down P/T to change the setting.
10. Press the [OPEN] key to save and exit. Press the [CLOSE] key to exit directly without saving.
SET NORTH DIRECTION
By using this function, the system will automatically save the current position of the dome camera
as the north direction and it will be regarded as the zero point of direction, i.e. 0° level position.
Procedure:
1. Call preset point 95 to enter the main menu..
2. Under [PANTILT SETTING] choose the [PANTILT SETTING] menu, press [OPEN] to confirm
the selection and enter pan parameter set.
3. Under [PANTILT SETTING] choose [SET NORTH DIRECTION] menu and press [OPEN] to
confirm the selection and prepare to aim the camera.
4. Use the PTZ controller to aim the camera lens to the North.
5. Press the [OPEN] key to save and exit. Press the [CLOSE] key to exit directly without saving.
GOTO ZERO POSITON
This function causes the camera to calibrate itself to a “zero position” which can be used to realign
the camera to its original preset positions in the event of a physical misalignment or power failure.
Procedure:
1. Call preset point 95 to enter the main menu.
2. Under [PANTILT SETTING] choose [PANTILT SETTING] and press [OPEN] to confirm the
selection and enter pan parameter set.
3. Under [PANTILT SETTING] choose [GOTO ZERO POSITION] menu, press [OPEN] to
confirm the selection and enter to the zero point setting. The camera will move to the zero
position.
4. Press [CLOSE] to return to the previous menu.
Preset Point Setting Menu
PANTILT SETTING PRESETS SETUP
V2.0 7-31-12
Page 20

20
This camera supports 200 preset points.
【PANTILT SETTING】
【PRESETS SETUP】
→【SEQUENCE SETUP】
【PATTERN SETUP】
【AUTOSCAN SETUP】
【HOME ACTION】
→SEQUENCE NUMBER : 001
DEFAULT DWELL : 001
EDIT SEQUENCE
RUN CONTINUOUSLY
DELETE CURRENT
Preset Number Setting
Procedure:
1. Call preset point 95 to enter the main menu.
2. Use Up/Down P/T to choose [PANTILT SETTING] and press [OPEN] to confirm the selection
and enter preset set menu.
3. Under [PANTILT SETTING] choose the [PANTILT SETTING] sub-menu and press [OPEN]
to confirm the selection.
4. Under [PANTILT SETTING] choose [PRESET NUMBER] menu to enter to the preset point
setting, and the parameter will blink.
5. Use Up/Down P/T to choose a preset number.
6. Press the [OPEN] key to save and exit. Press the [CLOSE] key to exit directly without saving.
Note: If the preset point already contains data, the dome camera will call the position to
alert you that the preset will be written over.
TITLE SETTING
Procedure:
1. Under [PANTILT SETTING] choose [TITLE] for entering into the title change menu, “Edit title
of the preset point” will be shown on the screen and the parameter will blink.
2. Use Up/down P/T to set the characters of the preset name.
3. Press the [OPEN] key to save and exit. Press the [CLOSE] key to exit directly without saving.
SET NEW PRESET
Procedure:
1. Call preset point 95 to enter the main menu.
2. Up/Down cursor to choose [PANTILT SETTING], press [OPEN] to confirm the selection and
enter pan set menu.
3. Under [PANTILT SETTING] choose [PANTILT SETTING] menu, press [OPEN] to confirm the
selection.
4. Under [PANTILT SETTING] choose [SET NEW PRESET] to enter into the preset point
setting. The display will show “Press IRIS OPEN”. First move the camera to the position you
would like to set for the preset, and then press IRIS CLOSE.
Instruction: The preset point number should be selected first before defining, displaying
and deleting the preset point or editing the title.
SEQUENCE SETUP
Individual preset points can be strung together to create a sequence, also known as a “tour”. Each
sequence can contain up to 32 preset points and each preset can have the dwell time set
individually.
PANTILT SETTING SEQUENCE SETUP
V2.0 7-31-12
Page 21

21
SEQUENCE NUMBER
【PANTILT SETTING】
【PRESETS SETUP】
【SEQUENCE SETUP】
→【PATTERN SETUP】
【AUTOSCAN SETUP】
【HOME ACTION】
→ PATTERN NUMBER : 001
TITLE :PAT1
RECORD NEW PATTERN
RUN CONTINUOUSLY
DELETE CURRENT
Procedure:
1. Call preset point 95 to enter the main menu.
2. Use the Up/Down cursor to choose [PANTILT SETTING], press [OPEN] to confirm the
selection and enter sequence set menu.
3. Under [PANTILT SETTING] choose [SEQUENCE SETUP] and press [OPEN] to confirm the
selection.
4. Under [SEQUENCE SETUP] choose [SEQUENCE NUMBER] to enter the sequence number
setting and the parameter will blink.
5. Up/down P/T to choose a sequence number.
6. Press [OPEN] to confirm the selection.
7. Press the [OPEN] key to save and exit. Press the [CLOSE] key to exit directly without saving.
Note: The sequence number to be edited must be chosen prior to making any changes to the
sequence.
EDIT SEQUENCE
Procedure:
1. Call preset point 95 to enter the main menu.
2. Use the Up/Down cursor to choose [PANTILT SETTING] and press [OPEN] to confirm the
selection.
3. Under [PANTILT SETTING] choose [EDIT SEQUENCE] and press [OPEN] to confirm the
selection. The list of sequence steps will be shown on screen and the first point will blink,
indicating it can be changed.
4. Use the Up/down and L/R PTZ controls to assign a preset for each step of the sequence. If a
preset is not assigned to a step, the sequence will skip that step.
4. Once all steps are set, press the [OPEN] key to save and exit. Press the [CLOSE] key to exit
directly without saving.
Note: Each group of parameters has two numbers, the first represents the preset point number
and the second is the dwell time. The dwell time for every preset point is decided by the default time
when it is not changed. The user can also set the dwell time of every preset point individually. Each
sequence supports a maximum of 32 presets.
PATTERN SETUP
The dome camera can record 1000 different PTZ actions continuously, including pan, tilt and zoom
control, iris and focus settings etc. The dome will retrace those movements when the recorded
pattern is played back. 4 patterns can be stored.
PANTILT SETTING PATTERN SETUP
RECORD NEW PATTERN
Procedure:
1. Call preset point 95 to enter the main menu.
V2.0 7-31-12
Page 22

22
2. Use the Up/Down cursor to choose [PANTILT SETTING] and press [OPEN] to confirm the
【PANTILT SETTING】
【PRESETS SETUP】
【SEQUENCE SETUP】
【PATTERN SETUP】
→【AUTOSCAN SETUP】
【HOME ACTION】
→AUTOSCAN NUMBER : 001
TITLE :SCAN1
SET LEFT LIMIT
SET RIGHT LIMIT
DEFAULT SPEED
RUN CONTINOUSELY
DELETE CURRENT
selection and enter pan set menu.
3. Under [PANTILT SETTING] choose [PATTERN SETUP] and press [OPEN] to enter route
recording mode.
4. Under [PATTERN SETUP] choose [RECORD NEW PATTERN] and press [OPEN] to enter
mode route recording setting.
5. Press [OPEN] and pattern recording will begin immediately. “Recording Mode Route” will be
shown on the screen. Operate the dome camera following the desired route. All movements at
this time are being recorded.
6. To finish recording, press [OPEN] and the pattern recording will automatically be saved.
7. Press the [OPEN] key to save and exit. Press the [CLOSE] key to exit directly without saving.
AUTOSCAN SETUP
a) This cameral supports auto scan. The camera will scan horizontally between user-defined left
and right points, with steady speed and zoom levels.
b) The machine will scan a 360° rotation if the left and right points are set to the same position.
PANTILT SETTING AUTOSCAN SETUP
Auto Scan Number
Procedure:
1. Call preset point 95 to enter the main menu.
2. Use the Up/Down cursor to choose [PANTILT SETTING] and press [OPEN] to confirm the
selection and enter pan set menu.
3. Under [PANTILT SETTING] choose [AUTOSCAN SETUP] and press [OPEN] to confirm the
selection.
4. Under [AUTOSCAN SETUP] press [AUTOSCAN NUMBER] and choose 1 of the 4 autoscan
routes to be edited. Use the Up/down P/T to choose a scan route.
5. Press the [OPEN] key to save and exit. Press the [CLOSE] key to exit directly without saving.
SET LEFT LIMIT
Procedure:
1. Under [PANTILT SETTING] choose [SET LEFT LIMIT] and press [OPEN] to prepare for
setting the left limit point.
2. Operate the PTZ control to guide the camera to the location desired for the left limit point.
3. Press [OPEN] when the scan left point has been set and the system will automatically record
the current position as the left edge for scanning.
4. Press [CLOSE] to exit the left limit setting.
Note: The scan left limit point can be set at any point on the horizontal axis.
The right edge setting utilizes the same method as the left point.
V2.0 7-31-12
Page 23

23
DEFAULT SPEED
【PANTILT SETTING】
【PRESETS SETUP】
【SEQUENCE SETUP】
【PRESETS SETUP】
【AUTOSCAN SETUP】
→【HOME ACTION】
→HOME TIME : 255
HOME ACTION : OFF
Adjusts the L/R scan speed. The speed range is adjustable from 1 to 64.
Procedure:
1. Call preset point 95 to enter the main menu.
2. Move cursor to choose [PANTILT SETTING] choose [AUTOSCAN SETUP] and press
[OPEN] to confirm the selection to enter scan function set item.
3. Under [AUTOSCAN SETUP] choose [DEFAULT SPEED] item and press [OPEN] to confirm
the selection to enter default scan speed set item.
4. Up/down P/T to change speed value, the speed can be set from 1 to 64.
5. Press the [OPEN] key to save and exit. Press the [CLOSE] key to exit directly without saving.
HOME ACTION
If the camera does not receive any commands for a set time, it can perform a specific action set on
this screen. The time can be set from 5 to 255 and the action to perform can be to call any of the 200
presets, 4 sequences, 4 scans or 4 patterns.
PANTILT SETTING HOME ACTION
HOME TIME
Procedure:
1. Call preset point 95 to enter the main menu.
2. Use the Up/down cursor to choose [PANTILT SETTING] choose [HOME ACTION] item and
press [OPEN] to confirm the selection.
3. Under [HOME ACTION] choose [HOME TIME] item and press [OPEN] to confirm the
selection and enter into the home time setting item.
4. Use Up/down P/T to modify the delay time, from 5 to 255 seconds.
5. Press the [OPEN] key to save and exit. Press the [CLOSE] key to exit directly without saving.
HOME ACTION
Procedure:
6. Call preset point 95 to enter the main menu.
7. Use the Up/down cursor to choose [PANTILT SETTING] choose [HOME ACTION] item and
press [OPEN] to confirm the selection.
8. Under [HOME ACTION] choose [HOME ACTION] item and press [OPEN] to confirm the
selection and set the home action item.
9. Use Up/down P/T to modify the home action. The action to perform can be to call any of the
V2.0 7-31-12
Page 24

24
200 presets, 4 sequences, 4 scans or 4 patterns.
【SYSTEM SETTING】
【CAMERA PARAMETERS】
【PANTILT SETTING】
【DISPLAY CONFIGURATION】
【ALARMS SETUP】
→INPUT CHANNEL: 001
ALARM ACTION : DISARM
INPUT MODE : NO
ALARM LINKAGE: OFF
RELAY OUTPUT : OFF
RESET DELAY : 30
【SYSTEM SETTING】
【CAMERA PARAMETERS】
【PANTILT SETTING】
【DISPLAY CONFIGURATION】
【ALARMS SETUP】
→DOME TITLE : ON
PRESETS TITLE : ON
ZOOM POSITION : ON
DIRECTION INDICATOR : ON
ENVIRONMENTAL INDICATORS : ON
GLOBAL SETTING
10. Press the [OPEN] key to save and exit. Press the [CLOSE] key to exit directly without saving.
INFORMATION DISPLAY CONFIGURATION
This menu sets whether or not various information is displayed within the camera’s video output
and if so, the time duration of the display.
MAIN MENU DISPLAY CONFIGURATION
DOME TITLE
Procedure:
1. Call preset point 95 to enter the main menu.
2. Use the Up/Down cursor to choose [DISPLAY CONFIGURATION] and press [OPEN] to
confirm the selection. Under [DISPLAY CONFIGURATION] choose [DOME TITLE] and press
[OPEN] to confirm the selection.
3. Up/down P/T to modify Camera Title Display time. If OFF is chosen, the Dome Title will not be
displayed on the OSD. If ON is chosen, the title will always be displayed. If a time is chosen (in
seconds), the title will be displayed on the OSD for that amount of time, then it will stop being
displayed and not be displayed again until a PTZ command is received from a controller.
4. Press the [OPEN] key to save and exit. Press the [CLOSE] key to exit directly without saving.
Note: Preset Title, Zoom Position, Direction Indicator and Environmental Indicators are all set
using the same method as Dome Title.
GLOBAL SETTING
1. All of the OSD data displays can be set simultaneously by choosing this option and pressing
[OPEN] to engage the global setting to turn all data displays on or off.
Alarms setup
Alarm function setting menu.
MAIN MENU ALARMS SETUP
V2.0 7-31-12
Page 25

25
The camera supports 2 alarm inputs and 2 alarm outputs. When an alarm input is triggered, the
following actions can be executed:
An alarm input trigger can cause the dome to immediately go to any preset for surveillance.
Either alarm output channel relay can activate external alarm equipment.
Automatic alarm priority system (1st is the higher-priority the 2nd is the lower-priority).
The dome will automatically utilize the high and low priority to receive 2 alarm signals at the
same time.
Alarm inputs can be set either Normally Open or Normally Closed. For details please refer to
the procedure below.
ALARMS SETUP
Procedure:
1. Call preset point 95 to enter the main menu.
2. Use the Up/Down cursor to choose [ALARMS SETUP] and press [OPEN] to confirm the
selection and enter alarm set items.
3. Under [ALARMS SETUP] choose [ALARM ACTION] item, press [OPEN] to confirm the
selection.
4. Use the Left/right P/T controls to choose arming or disarming the alarm function.
5. Press the [OPEN] key to save and exit. Press the [CLOSE] key to exit directly without saving.
INPUT MODE
Setting Methods:
NC: Normally Closed. The normal alarm-off state of the input is a closed circuit. Opening the circuit
triggers the alarm.
NO: Normally Open. The normal alarm-off state of the input is an open circuit. Closing the circuit
triggers the alarm.
Note: This camera may be wired for 2 alarm inputs or 4 alarm inputs. This model supports 2
alarm inputs and the wiring for inputs 3 and 4 are not utilized on this model.
Procedure:
1. Call preset point 95 to enter the main menu.
2. Use the Up/Down cursor to choose [ALARMS SETUP] and press [OPEN] to confirm the
selection and enter alarm set items.
3. Under [ALARMS SETUP] choose [INPUT MODE] and press [OPEN] to confirm the selection.
Use the Left/right P/T controls to choose (normally) open or (normally) closed.
4. Press the [OPEN] key to save and exit. Press the [CLOSE] key to exit directly without saving.
V2.0 7-31-12
Page 26

26
ALARM LINKAGE
This function is used to select which action is taken by the camera when an alarm input is triggered.
E.g., Auto Scan 1 thru 4,Preset Point 1 thru 200, Sequence 1 thru 4 etc.
Procedure:
1. Call preset point 95 to enter the main menu.
2. Use the Up/Down cursor to choose [ALARMS SETUP] and press [OPEN] to confirm the
selection and enter Alarms Setup.
3. Under [ALARMS SETUP] choose [ALARM LINKAGE] and press [OPEN] to confirm the
selection.
4. Use the Left/right P/T controls to change alarm function linkage, E.g, Auto Scan 1 thru 4,
Preset Point 1 thru 200, Sequence 1 thru 4 etc
5. Press the [OPEN] key to save and exit. Press the [CLOSE] key to exit directly without saving.
RELAY (AUX) OUTPUT
This sets whether or not to link the alarm output relays to alarm events generated by the camera.
Note: The alarm output relays are configured for N.O. (Normally Open) operation. Please
ensure all equipment for use with the alarm outputs can be configured for N.O. operation.
Procedure:
1. Call preset point 95 to enter the main menu.
2. Use the Up/Down cursor to choose [ALARMS SETUP] and press [OPEN] to confirm the
selection and enter alarm set items.
3. Under [ALARMS SETUP] choose one of the 2 alarm inputs to link to a relay (AUX) output.
4. Select [RELAY OUTPUT] and press [OPEN] to confirm the selection.
5. Use the Up/Down P/T controls to choose relay output 1, 2 or off.
6. Press the [OPEN] key to save and exit. Press the [CLOSE] key to exit directly without saving.
RESET DELAY
This function sets how long an alarm takes to reset itself after it has been triggered. The time range
is 1-255 seconds.
Procedure:
1. Call preset point 95 to enter the main menu.
2. Use the Up/Down cursor to choose [ALARMS SETUP] and press [OPEN] to confirm the
selection and enter alarm set items.
3. Under [ALARMS SETUP] choose [RESET DELAY] and press [OPEN] to confirm the
selection.
4. Use the Left/right P/T controls to change the rest time. 1-255 seconds can be selected.
5. Press the [OPEN] key to save and exit. Press the [CLOSE] key to exit directly without saving.
V2.0 7-31-12
Page 27

27
TROUBLESHOOTING
a. No picture after applying power – (i) check all plugs and cables are connected to the
proper connectors: (ii) ensure your power supply is providing the correct voltage and
enough current.
b. The picture has ripples – (i) Check to see if the power supply is experiencing AC ripple.
If so, a filter may be required. (ii) Determine if the monitor is faulty. (iii) Determine if
other peripheral equipment is causing the ripple and if so make the necessary
adjustments.
c. The picture background continuously changes color – A fluorescent lamp’s magnetic
field may cause color roll. If possible, increase the distance between the camera and
any fluorescent lamps in the vicinity.
d. The picture appears smeared – (i) The power supply voltage level may be unstable.
Try another power supply. (ii) Ensure the cables are correctly connected and of the
right impedance.
e. Other interference may require the use of a SecurityTronix ground loop isolation filter.
f. Power is on but the controller does not work – (i) Check to make sure the DIP switches
are all set correctly for address, baud rate and protocol. (ii) Check that the RS485 wires
at the camera and controller have correct polarities. (iii) Check the integrity and
continuity of the Unshielded Twisted Pair (UTP) cable.
Additional troubleshooting assistance can be found online at www.securitytronix.com
or email us at support@securitytronix.com or call (610) 429-1511 on the east coast or
(702) 308-4220 on the west coast.
V2.0 7-31-12
 Loading...