

Page 1
ST-NVR4CH
ST-NVR8CH
ST-NVR16CH
USER’S MANUAL
Page 2

II
Safety Precautions
Notice:
Please do not place the NVR under direct sunlight or near heat source.
Please do not install equipment in a moist environment or place with dust
or soot exposure.
Please keep equipment installed horizontally, or install equipment in a
stable place.
Please install the device in a well-ventilated area, and do not block the
vents of the NVR.
Please only use the original power supply.
There are no internal user serviceable parts.
It is highly recommended to protect the NVR and any other critical
equipment with an uninterruptable power supply (UPS) with power
conditioning.
Page 3

Network Video Recorder Contents
III
Contents
Safety Precautions ..................................................................................... II
1 Outline and Features .............................................................................. 1
1.1 Outline ............................................................................................. 1
1.2 Function Features: ........................................................................ 1
2 NVR Appearance .................................................................................. 3
2.1 The Front Panel .............................................................................. 3
2.1.1 The Front Panel................................................................... 3
2.2 Rear Panel ...................................................................................... 4
2.2.1 Rear Panel ........................................................................... 4
2.3 Mouse Instructions ........................................................................ 4
2.4 Input Method Introduction ........................................................ 5
3 Connecting NVR .................................................................................... 6
3.1 Hard Disk Installation .................................................................... 6
3.2 Device Connection ..................................................................... 7
4 NVR Startup ............................................................................................... 8
4.1 System Initialization....................................................................... 8
4.2 Preview Interface ......................................................................... 8
5 NVR Menu .............................................................................................. 10
5.1 Menu Options .............................................................................. 10
5.2 Main Menu Navigation ............................................................. 12
5.3 Main Menu ................................................................................... 12
5.3.1 System Management..................................................... 13
5.3.1.1 Common Setup .................................................... 13
5.3.1.2 Network Setup ...................................................... 14
5.3.1.3 User Management ............................................... 15
5.3.2 Channel Management ................................................. 15
5.3.2.1 Channel Configuration ...................................... 16
5.3.2.2 Preview Configuration ........................................ 17
5.3.2.3 Encoding Parameters ......................................... 17
5.3.2.4 Video Configuration ........................................... 18
5.3.3 Record Management .................................................... 19
5.3.3.1 Record Setup ........................................................ 19
5.3.3.2 Record Playback ................................................. 20
5.3.4 Alarm Management ...................................................... 22
5.3.4.1 Motion Detection ................................................. 22
5.3.4.2 Alarm Input ............................................................ 23
5.3.5 System Maintain............................................................... 24
Page 4

Network Video Recorder Contents
IV
5.3.5.1 HDD Manage ........................................................ 25
5.3.5.2 Device Upgrade ................................................... 25
5.3.5.3 Restore Defaults .................................................... 26
5.3.5.4 Log Info ................................................................... 27
5.3.5.5 Version Information.............................................. 28
5.4 PTZ Controls .................................................................................. 29
5.5 Shut Down..................................................................................... 30
5.6 Quick adding function .............................................................. 31
5.7 Remote device ........................................................................... 32
6 Appendix ............................................................................................... 34
6.1 Q&A ................................................................................................ 34
6.2 Mobile Apps ................................. Error! Bookmark not defined.
Page 5

1
1 Outline and Features
1.1 Outline
The item is a high-performance network DVR, characterizing local
previewing, multi-picture division displaying & local real-time storage of
recorded files. It supports shortcut operating of mouse and remote
managing and controlling. It has two ways of storage--Front storage &
client-side storage. Front-end monitoring points can be located anywhere
on the network without geographical restrictions. Combined with other
front-end equipment such as network cameras, network video server
network, professional video surveillance system software to form a powerful
safety monitoring network, in its network deployment system, focal point
and monitoring points simply connect a network cable, no need to lay
monitor video cable, audio cable etc. from center to monitoring points,
easy construction, low cabling costs and low maintenance costs.
1.2 Function Features:
●H.264 video condensed format, Supports 1080P/720P/D1 resolution network
camera input.
●G.711U audio condensed format.
●Windows-style user interface, embedded real-time Linux3.0 operating system.
●Supports simultaneous preview, recording, play back, and backup.
●Supports dual stream.
●USB2.0 support for backup, software upgrading, and mouse operation.
Page 6

Network Video Recorder Outline and Feature
2
Function
Function Brief Introduction
Real-time
Two video outputs, VGA & HDMI.
Record
H.264 compression, motion and timing recording.
Storage
Supports SATA II Hard Drives.
Playback
Supports 1~4 channel playback and network
multi-channel play back.
Backup
Supports NVR backup to USB memory sticks, portable
hard drive or a network backup to a local disk.
Network
Operation
Support for remote/local client access.
Mouse
Operation
Supports USB mouse operation, easily and quickly set
system parameters.
Pan-tilt
Control
Though Onvif protocol
Page 7
3
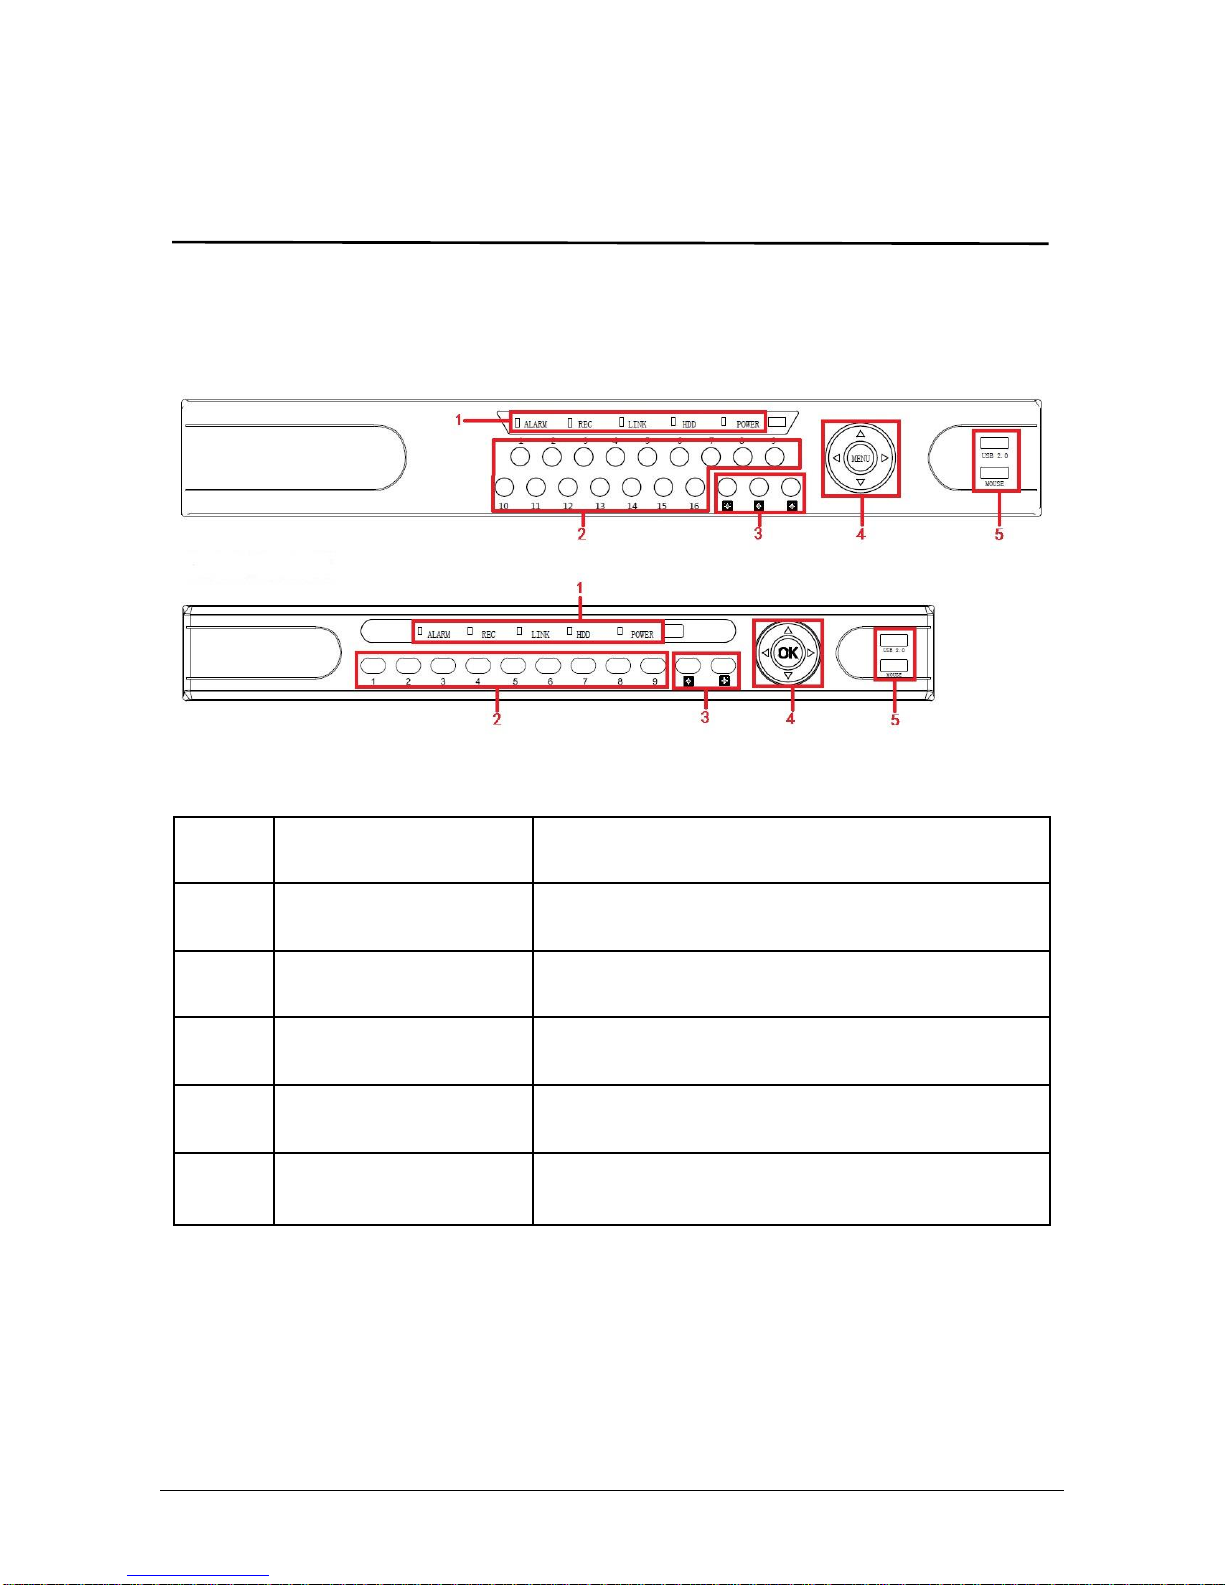
2 NVR Appearance
2.1 The Front Panel
2.1.1 The Front Panel
No.
Button or indicator
light
Function
1
Indicator light
Depicts the current status of the NVR
2
Channel button
Select single channel full screen display
3
Multi-channel preview
Switch and display to 4,9,or16 channel
4
Direction button
Menu navigation button
5
USB2.0
Connect mouse or USB memory stick for
backup and control
Page 8

Network Video Recorder NVR Appearance
4
2.2 Rear Panel
2.2.1 Rear Panel
2.3 Mouse Instructions
Mouse instruction
Operate the NVR through the mouse, and scroll wheel.
Mouse actions
Function
Click left
mouse button
1. Select one of the options; 2. Insertion cursor, enter or
modify the value of a parameter.
Click right
mouse button
1. When the interface is not locked, right click for
system menu pop-up; 2. When interface is locked,
right click on real-time preview interface for the login
pop-up.
Double-click
the mouse left
button
1. When in the preview multiple channels interface,
double-click to maximize a selected channel; 2.
mouse
movements
Select the menu or menu item.
Mouse drag
Drag progress bar to playback video.
Slide mouse
scroll wheel
1.Time setting; 2.Select the drop-down menu values;
No.
Interface
Connection instructions
1
HDMI
Connect HDMI display device
2
VGA
Connect VGA display device to a computer
3
RJ-45
Ethernet interface, for LAN/WAN connection
4
Alarm terminals
Three sets of alarm input,1 alarm output
5
Power supply
interface
DC12V, use provided power supply
6
Power switch
On/Off
Page 9
Network Video Recorder NVR Appearance
5
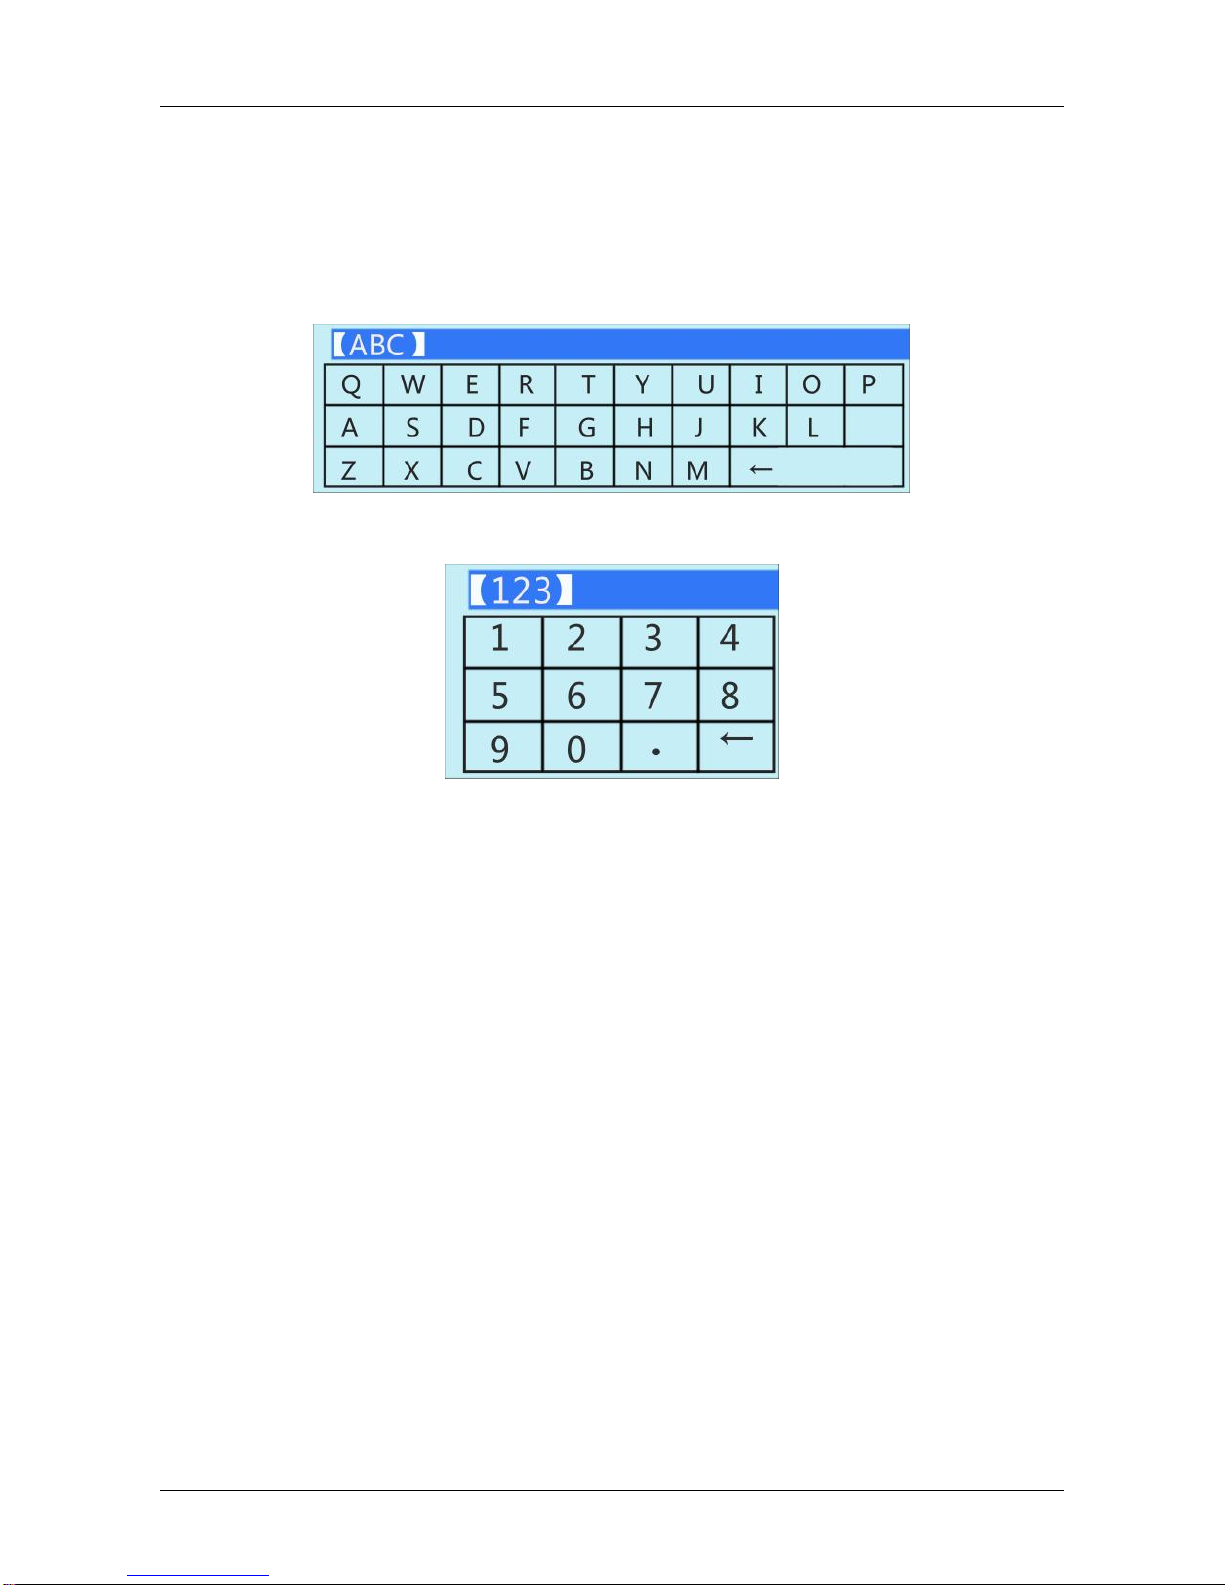
2.4 Input Method Introduction
Click〖XXX〗with left mouse button to change input method, “←”is to delete
mistyped symbols. Input methods include lower-case English, capital English
& numbers.
Capital English Input
Number Input
Page 10
6
3 Connecting the NVR
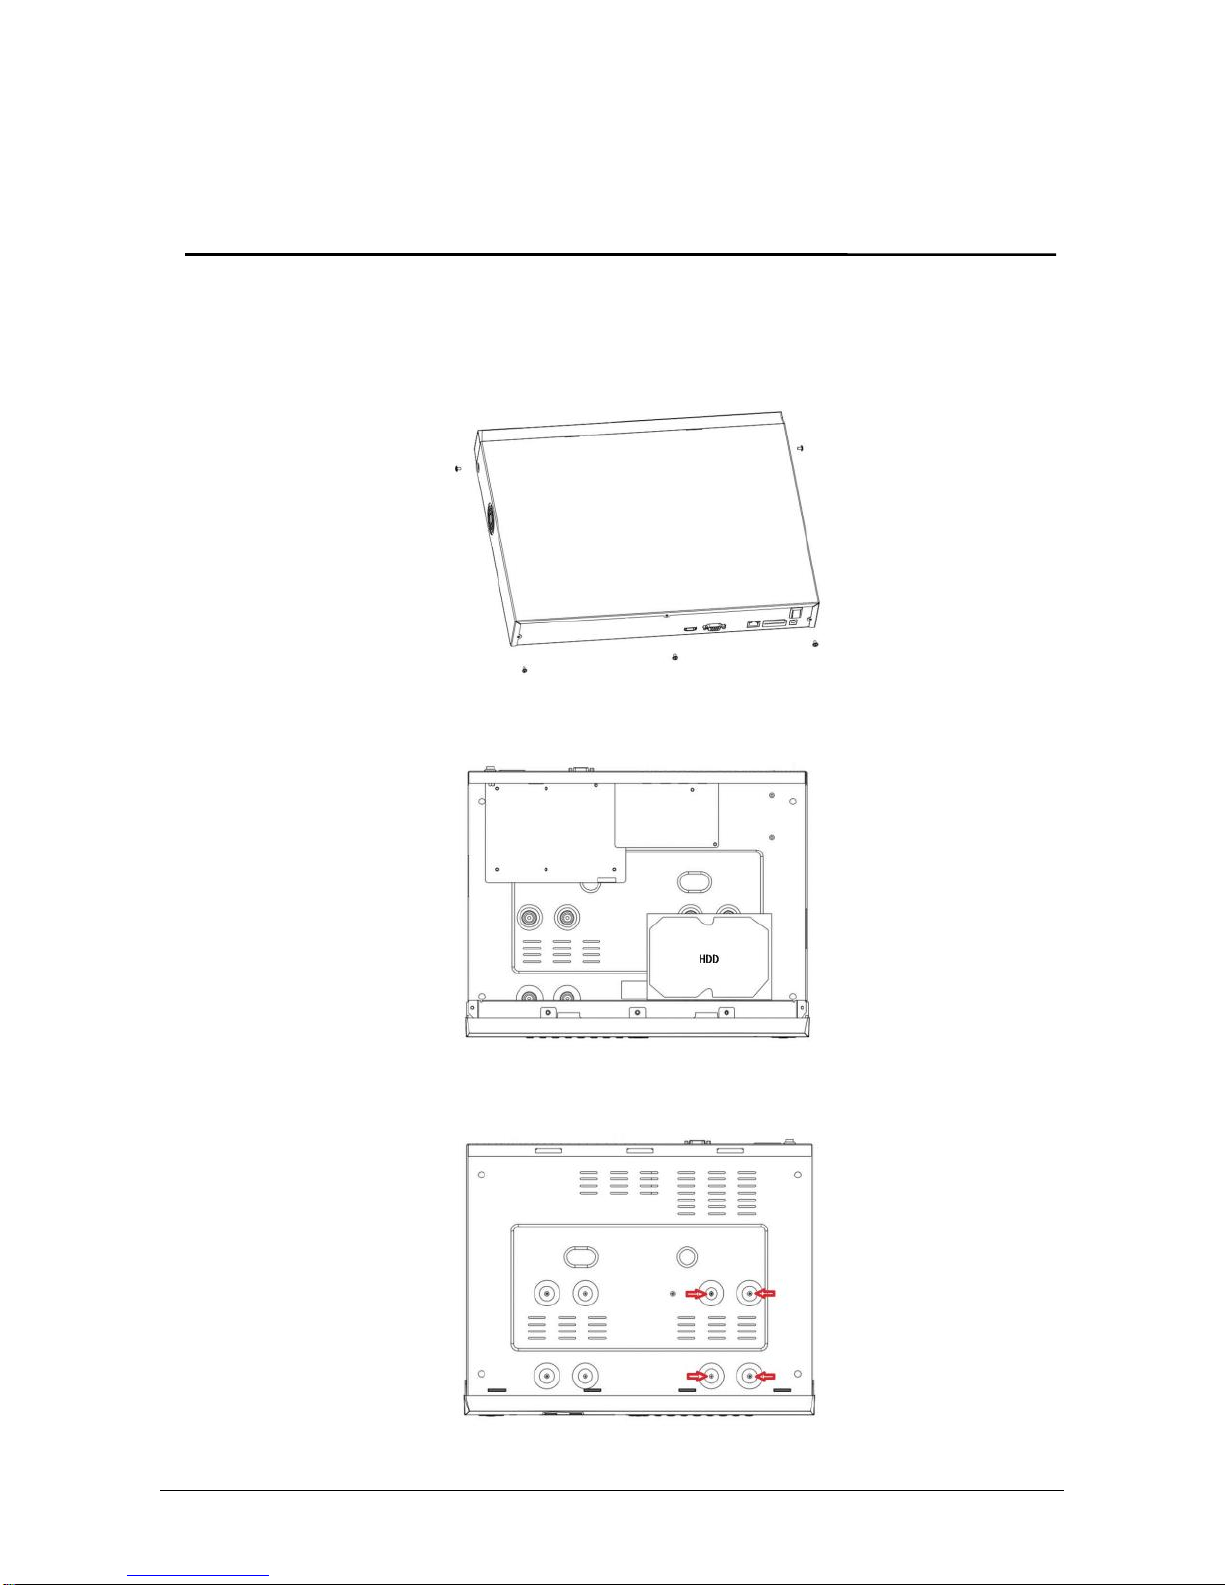
3.1 Hard Disk Installation
Hard Disk Installation:
⑴ Loosen the screw on the cover, to open the case.
⑵ Align the four holes of the HDD with the holes on the bottom of the
chassis.
⑶ Hold the hard disk with one hand, and turn over the chassis; secure
the HDD with screws at the indicated position.
Page 11
Network Video Recorder Connecting NVR
7
⑷ After the HDD is mounted, turn over the chassis, connect the SATA
power and Data Cables.
⑷ finally, replace the cover and tighten the case screws.
Note: 1. It is recommended to use Security Grade HDDs for longer
service life and reliability.
2. Before replacing the hard disk, please shut off the power first
and allow several minutes to discharge any remaining charge.
3. Always use anti-static protective equipment when working with
electronics.
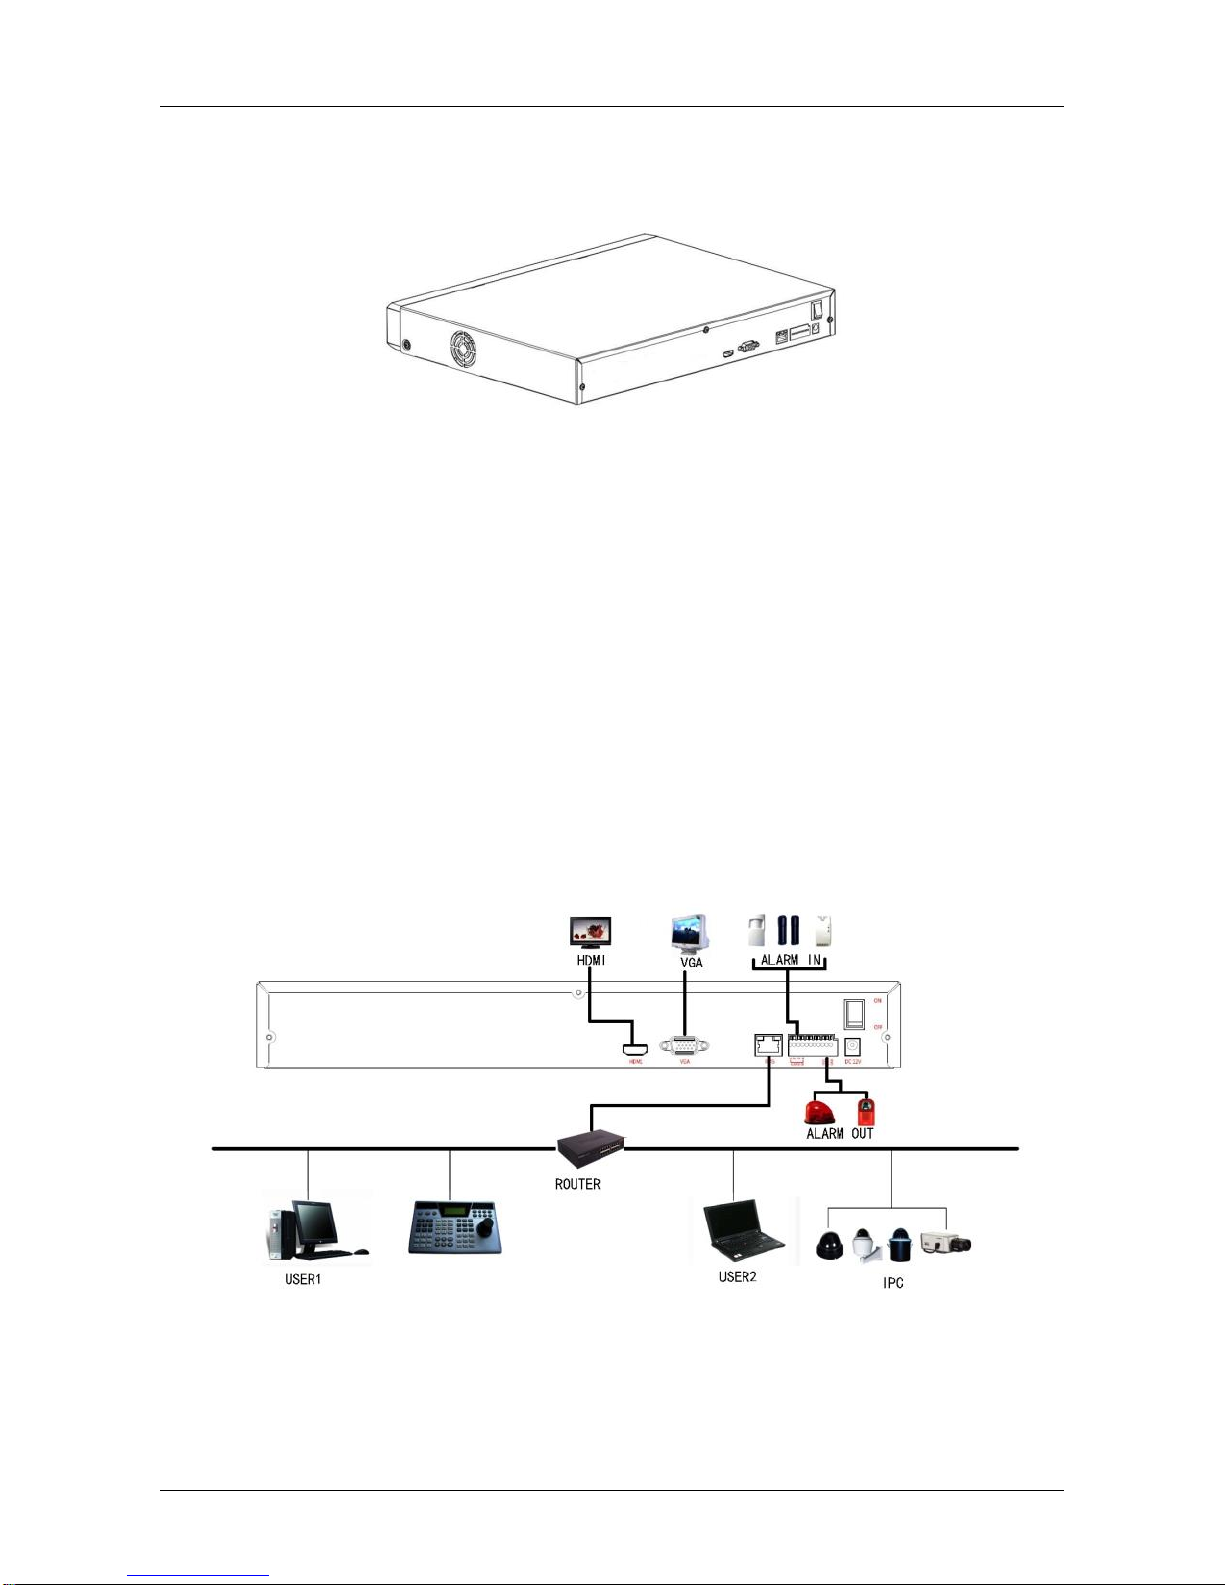
3.2 Device Connection
Use a VGA or HDMI cable to transmit the NVR signal to the display. If it is
a controllable PTZ, use UTP wire to connect the RS485 A cable and RS485 B
cable to the corresponding RS485 interface on the NVR.
Page 12
Network Video Recorder Connecting NVR
8
4 NVR Startup
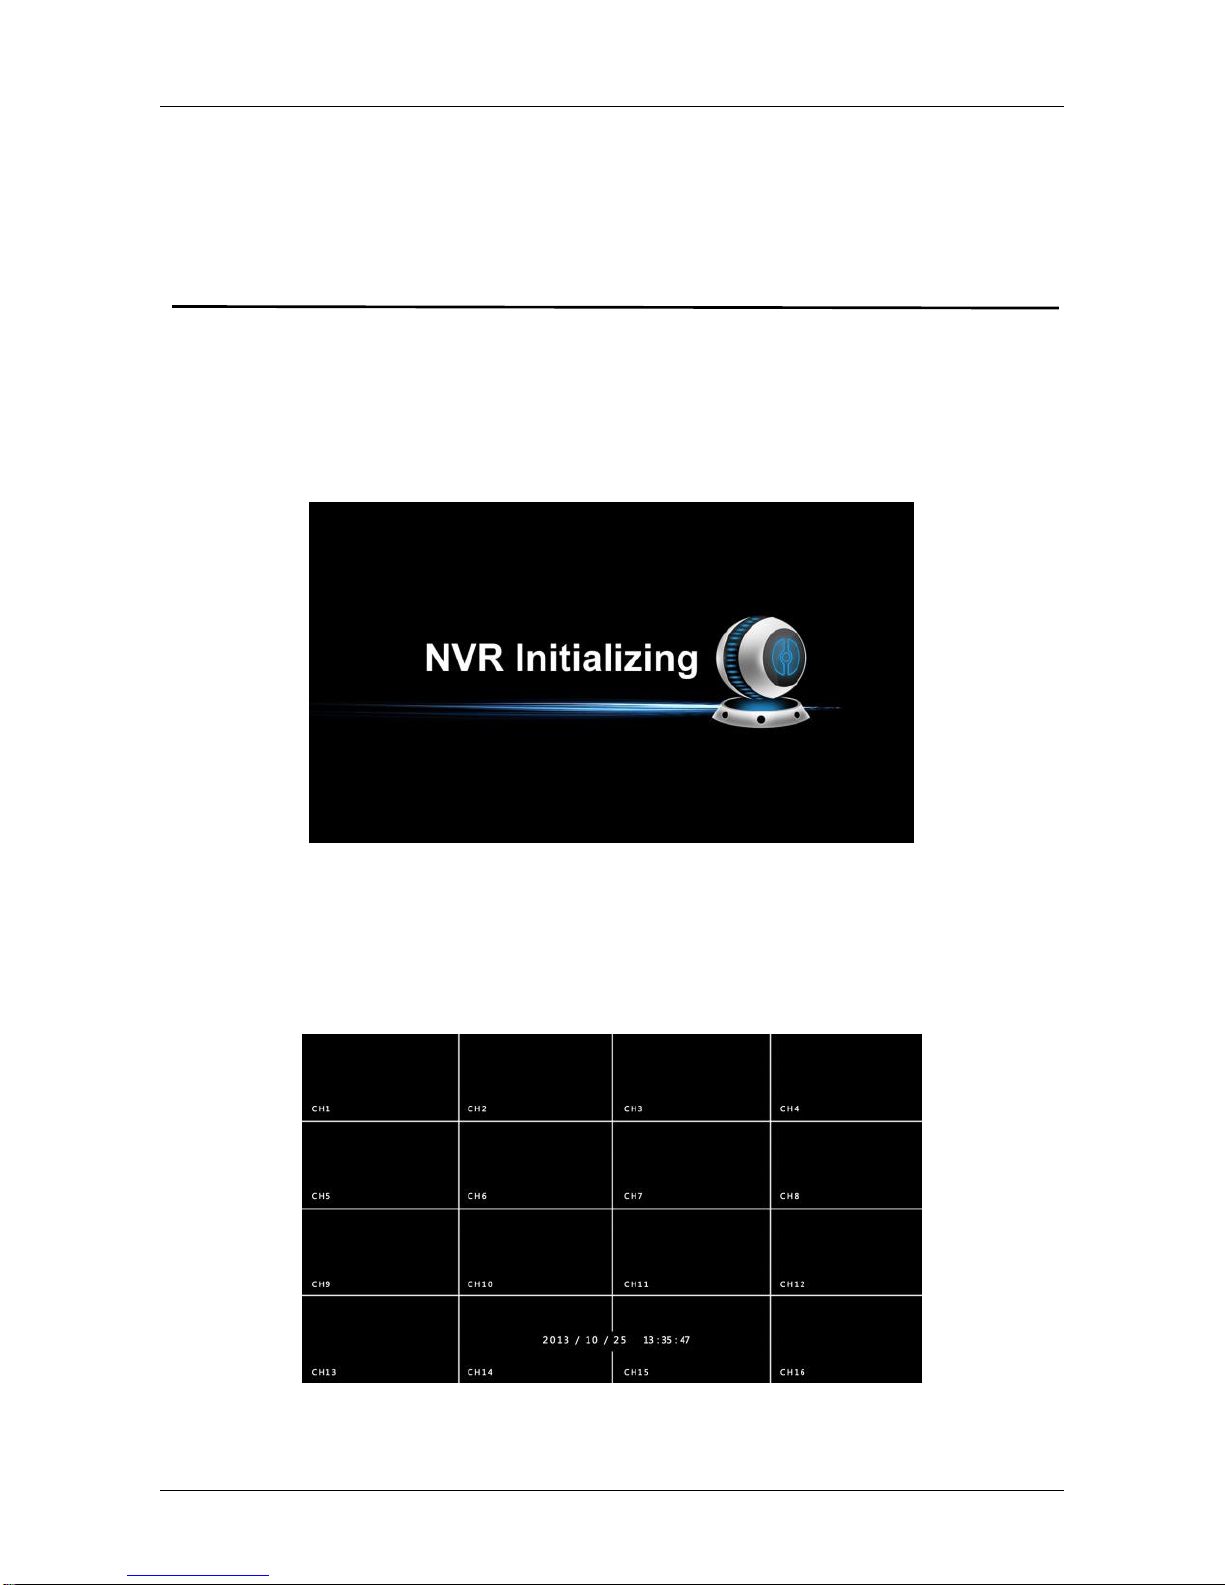
4.1 System Initialization
After connecting the NVR to a display, plug in the mouse, power cable
and turn on the power switch on the rear panel, then start up the NVR. The
system initialization interface is as shown in Picture 4-1:
Picture 4-1
4.2 Preview Interface
After the system is fully booted, it will enter into the default preview
interface, shown in Picture 4-2.
Picture 4-2
Page 13

Network Video Recorder NVR Startup
9
After the device starts up, the default setting is to preview in multi-screen
display mode. Products with different channels will have a different amount
of split screens to display. On the preview interface, you can set the
appropriate date and time. On the bottom left of the screen, it shows the
recording status of each video channel or alarm status icon.
: this icon means monitoring channel is recording;
: this icon means monitoring channel is in motion detection.
Page 14

10
5 NVR Menu
5.1 Menu Options
After the system is ready, right click the mouse button in the preview
interface and it will pop up a system login interface, shown in Picture 5-1.
Then select a user name, enter the user password, select the system
language and click on the login button to login to the system (the default
username is admin, password is admin);
Picture 5-1
After logging into the system and returning to the preview interface,
click the right mouse button and it will pop up the Menu Options, shown in
Picture 5-2. Then you can select options of the Main Menu, the Main Screen
Switch, Playback, PTZ Control and System Shutdown. In addition, you can
set the channel display as follows: single-screen display, four-screen display,
eight-screen display, nine-screen display, and sixteen-screen display.
Page 15

Network Video Recorder NVR Menu
11
Picture 5-2
Single-screen Display: Select one channel to display from CH1~CH16.
Four-screen Display: Divided into four groups to display (CH1~CH4、
CH5~CH8、CH9 ~CH12、CH13~CH16).
Eight-screen Display: Divided into two groups to display (CH1~CH8、
CH9 ~CH16).
Night-screen Display: Divided into two groups to display (CH1~CH9、
CH10~CH16).
Sixteen-screen Display: Display all channels (CH1 ~CH16).
Main Menu: Click and enter the main menu.
PTZ Control: Click and enter the PTZ Control menu, see chapter 5.4.
Playback: Click and enter the playback interface, see chapter 5.3.3.2.
Channel Settings: Click and enter the current channel configuration
menu.(Detailed operation as 5.3.2.1)
Shut Down: Logout the current user, restart the device and shut down
the device.
Remote Device: Click and enter the remote device configuration
menu.(Detailed operation as 5.7)
Motion Detection: Click and enter the current channel’s motion
detection settings menu.(Detailed operation as 5.3.4.1)
Page 16

Network Video Recorder NVR Menu
12
5.2 Main Menu Navigation
5.3 Main Menu
Main menu is divided into five parts, including system management,
channel management, video management, alarm management and
system maintenance, as shown in Picture 5-3.
Main
System
Record
Alarm
Channel
Maintain
REC Setup
Play back
Motion Detect
Alarm In
HDD
Upgrade
Default
Version
Preview
Enc Param
Video Config
Network
User
CH Setup
Common
Logout
Page 17

Network Video Recorder NVR Menu
13
Picture 5-3
5.3.1 System Management
5.3.1.1 Common Setup
Click “Common” in system management interface, then interface of
common setup will be out. As followed picture 5-4 shows:
Picture 5-4
System Time:System date and time of the NVR.
Language:English & Chinese. Default language is English.
Record Mode:Overwrite automatically, ie., The NVR will record over
the oldest files once it is full.
Device ID:Reserved.
Video Standard:PAL or NTSC.
Page 18

Network Video Recorder NVR Menu
14
Resolution: Optional resolution: 1024×768 、 1280×720 、 1280×1024 、
1920×1080. Default resolution is 1280×720. It will be valid only after the
NVR reboots with changes saved.
Standby Time: Default standby time is 30 minutes. And standby time
range is: 1 to 120 minutes.
Default: Restore all specifications or parameters of common setup to
be the factory default specifications.
Save:To save specifications or parameters of common setup.
Refresh:Return to the previous interface.
5.3.1.2 Network Setup
Click “Network” in system management interface, to change basic
network settings. That interface is As follows in picture 5-5:
Picture 5-5
IP Address:IP address of the NVR.
Subnet Mask:Subnet mask of the NVR.
Default Gateway:Default gateway of the NVR.
TCP Port:Reserved.
RTSP Port:RTSP data port of NVR.
HTTP Port:Port for accessing by IE browser.
Primary DNS:It is usually offered by your local ISP. Your IP address of the
domain name server is entered here.
Secondary DNS:Back up DNS server.
Broadcast:Reserved.
MAC Address:MAC address of the NVR.
Default:Restore all network parameters to default.
Save:Save parameters of the common setup interface.
Page 19

Network Video Recorder NVR Menu
15
Refresh:Return to the previous menu.
5.3.1.3 User Management
Click “User” in system management interface, to manage the user
accounts for the NVR. As follows in picture 5-6 shows:
Picture 5-6
User List:List added users. “admin” is super user/administrator, and we
cannot change its privilege, but only its password. Other general users
have no privilege of adding, modifying or deleting.
Privilege : Privilege list of users. It includes PTZ control, playback,
parameter setup, query log, advanced configuration, channel
management, query parameter, backup /shut down/ logout.
Add : To add a new user, which can be only done by super
administrator--admin. Click “Add”, then enter user name and
password, select privilege and save the parameters.
Modify:To change information of users, which can be only done by
super administrator--admin. First, choose a user, click “modify”, then
enter old password and new password, modify privilege, and finally
save the parameters.
Delete : To delete user, which can be only done by super
administrator--admin.
Return:Return to the previous interface.
5.3.2 Channel Management
Click “Channel” icon, to configure the NVR Channel config. It includes
4 sub-menus: channel setup, preview, encode parameter and Video
Config. As follows in picture 5-7:
Page 20

Network Video Recorder NVR Menu
16
Picture 5-7
5.3.2.1 Channel Configuration
Click “Ch setup” to configure the NVR’s channel mapping as shows in
Picture 5-8:
Picture 5-8
Channel:Channel choice of NVR. There are 2 choices: one is for only
one channel, and another is for all channels.
Vender Type:Onvif protocol.
Preview Stream:Sub-stream is defaulted. Double stream should be set
for IPC. Encode modes of both streams must be H.264 for normal
preview. Resolution of sub-stream can be D1 or CIF mode.
Protocol:TCP.
User Name:User name for IP CAM login. Use the credentials for direct
IP camera connections.
Page 21

Network Video Recorder NVR Menu
17
Password:Password to log into the IPC. (If default password is not
admin, please change to the correct password.)
IP Address:IP address of IPC that will be added in the NVR.
Port:Port for accessing IPC. Default port is 8999.
Enable:Enable switch. This function will ‘Activate’ a channel; it does
not delete the current channels settings when disabled.
Search: Click “Search”, NVR can search for IPC which support ONVIF in
the same LAN. The IPC that is searched will be listed. Double click any
IPC in the list, and the related channel info will populate.
PgUP/PgDn:To check all searched IPC by choosing PgUp/PgDn.
Save:To save current parameters.
Return:Return to the previous interface.
5.3.2.2 Preview Configuration
Click “Preview Config” in channel management interface, then the
interface of preview config will be displayed. It includes boot preview and
image preview config. As followed in picture 5-9:
Picture 5-9
Boot Preview:Supports image preview of window 1, 4, 6, 8, 9 and 16.
Preview Config:To set channel for preview. To show which window is
supported for preview channel.
Default:Restore all parameters of the preview config to default.
Save:Save parameters of preview config interface.
Return:Back to previous menu.
5.3.2.3 Encoding Parameters
This menu allows you to modify the specific encoding parameters for a
specific channel.
Page 22

Network Video Recorder NVR Menu
18
Picture 5-10
Channel:Select the target channel number
Enc Mode:Standard H.264.
Resolution:This is the primary recorded stream of the IP camera,
generally include D1/720P/1080P etc, the type of sub-stream resolution
includes D1/VGA/CIF.
Frame Rate:Modify the recorded framerate to optimize the system.
Stream type:Select video stream or audio stream.
Bit Rate: Setting the bitrate can be used to manage local bandwith
resources. Higher bitrates result in higher quality video, but can affect
network latency.
Default:Recover all the encoding parameter to default values.
Save:Save the parameters on preview configuration menu.
Return:Return to last management menu.
5.3.2.4 Video Configuration
Video configuration menu, As shown in Figure 5-11.
Picture 5-11
Page 23

Network Video Recorder NVR Menu
19
Channel: Select the Channel number.
Bright: Brightness adjustment.
Contrast: Contrast adjustment.
Saturation: Saturation adjustment.
Color: Color adjustment.
Default: Recover all the video configuration parameters to default
values.
Save: Save configured parameters.
Return: Return to last management menu.
5.3.3 Record Management
It includes 2 sub-menus: record setup and playback. As follows in
picture 5-12:
Picture 5-12
5.3.3.1 Record Setup
Click “Record Setup” under recording management interface to reach
record setup interface. As follows picture 5-13 shows:
Page 24

Network Video Recorder NVR Menu
20
Picture 5-13
Channel:Select a channel to record. There are 2 choices: single
channel and all channels.
Enable : Selecting enables a desired Channel. Default enable is
closed.
Week:Select a certain day in a week or every day to record.
All Day:Record the whole day. Default set is 24/7.
Period:If not all day record, then any four periods can be set to
customize the recording schedule.
Default:Restore parameters of record setup to default.
Save:Save parameters.
Cancel:Cancel the set parameters of current interface.
5.3.3.2 Record Playback
Click “record playback” under record management to skip to record
playback interface, as pictured below 5-14:
Page 25

Network Video Recorder NVR Menu
21
Picture 5-14
You can check record files according to date, time, channel and
record mode. If there are record files, they will be listed after being checked.
If there are not, then no record will be shown in this period.
Channel No.:Select channel that you are going to check.
Type: Select the video type. The selectable video type contains “All
type”, “Timing video” and “Detection video”.
Start time/ End time:Please pay attention that you cannot check files
beyond a 24 hour period. Record file list shows information of recorded
files.
Back up:Insert a USB disk, and select a record file, then you can
backup the file. The file type is “avi”.
Search : Set conditions for searching, and click “Search” to find
recorded files.
Number:Listed number of record files. They are listed chronologically.
Start time:Time for recorded files.
Size:File size of the recordings.
PgUp/ PgDn:Each page of record list contains 21 record files. You can
choose PgUp or PgDn to check all recorded files.
Multi-channel Playback : At most 4 channels can be chosen for
playback at the same time.
Play:Choose a certain record file, and click “Play” to start play. Or
double click the record file to play. During process of playback
(one-channel or multi-channel playback), when you move the mouse
to image area, the search bar and playback progress bar will be
hidden automatically.
Playback Control Bar
You can choose play, pause or fast forward under the playback control
bar.
Page 26

Network Video Recorder NVR Menu
22
Playback Progress Bar : Current play progress will be shown in
playback interface. You can click on the bar at any time to view
records of that time. If you choose multi-channel playback, and there
is no record in a certain channel, then this channel will not play any
record.
Play:Play in a normal speed.
Pause:To stop current record playback.
Fast Forward:Fast forward paly mode. Choices are as followed: 1×、
2×、4×、8×、16×. 1× is normal speed.
Close:Exit the record playback interface.
5.3.4 Alarm Management
Click “ Alarm” icon under main OSD interface, and click “Alarm in”. As
followed picture 5-15 shows:
Picture 5-15
5.3.4.1 Motion Detection
Click the “Motion Detection” icon to enter the motion detection
configuration menu. As shown in Figure 5-16.
Page 27

Network Video Recorder NVR Menu
23
Picture 5-16
Channel No: Select the motion detection channel. 2 option are
available: Single and All), for the Single channel, you need to choose
the particular channel.
Switch Link : Turn on or off the motion detection function.
Sensitivity:6 values can be set for the sensitivity.
Buzzer on The system will trigger the buzzer alarm when motion detect.
Buzzer time:Set the buzzer alarm duration.
Record channel: Select the target video channel, and the system will
trigger the video signal of the selected channel.
Record time:Set the trigger duration.
Default : Recover all the alarm setting parameters to the default
values.
Save:Save the set parameters of the current menu.
Cancel:Don’t save the set parameters of current menu.
5.3.4.2 Alarm Input
Click “Alarm in” icon to enter alarm setup interface, as follows in picture
5-17 below:
Page 28

Network Video Recorder NVR Menu
24
Picture 5-17
Alarm Input:Choose the channel of Alarm Input.
Switch Link: Turn on the Alarm input function.
Alarm Out:Set the channel Alarm Out,default setting is closed.
Alarm Time:Set the time of Alarm Output.
Default:Recover the setting of alarm to default value.
Save:Save the settings of current interface.
Cancel:Cancel the settings of current interface.
5.3.5 System Maintain
Left-click the Maintenance icon in the main menu, please refer to
Picture 5-18 below, including 5 submenu items, HDD, Default, Upgrade, Log
info, Version.
Picture 5-18
Page 29

Network Video Recorder NVR Menu
25
5.3.5.1 HDD Manage
HDD manage inteface, as shown in Picture 5-19.
Picture 5-19
If the devices has connected to the HDD successfully, the HDD manage
list will show the information of the HDD(s). If the system detects that you do
not need to format the hard disk, the HDD status will display as “normal”;
otherwise an HDD format will be needed.
HDD No.: The number of HDD(s) that are connected to the system.
State:Detects the current working status of HDD, you could use only
that displays “normal”; After formatting is completed, you need to
restart NVR, the status displays "in use".
Total Capacity:The total available HDD capacity, the single HDD
capacity cannot exceed the maximum capacity: 4TB.
Residual Capacity:Display the residual capacity of the current HDD;
Device Type:SATA.
Refresh:Refresh HDD information in the list;
Format:Format the HDD, select the HDD that needs to be formatted
first, and then click the "Format" button, pop-up warning dialog
"formatting will result in the selected HDD recording data loss, confirm
that you want to continue?", If confirmed ok to format then click on the
"OK" button, otherwise click "Cancel".
Return:Return to the former management interface.
Note: After formatting the HDD, you need to restart the device.
5.3.5.2 Device Upgrade
Left-click the Device Upgrade button in the menu of system maintain,
will switch to the interface of Device Upgrade, as shown in Picture 5-20:
Page 30

Network Video Recorder NVR Menu
26
Picture 5-20
If the device has detected upgrade files in the USB disk, the related
information of the upgrade package (number, name, size, date) will be
displayed.
USB disk Upgrade steps: Copy the upgrade file (named should be the
format update_nvr.tgz) to the root directory of USB disk, connect the disk to
the device's USB port, if it did not display the upgrade file in the list, please
refresh the interface (If the upgrade package still cannot be searched out,
please check whether the USB connection with the USB disk, and also
check whether the upgrade file name is correct). After the upgrade file
appears, select the upgrade file, click the "upgrade" button to upgrade; if
you don't want to upgrade, click cancel to return.
Note: During the upgrading process, please do not turn off the power or
take off the USB disk. After the upgrading, your system will restart
automatically. (This process will take about 3 to 5 minutes.) Here, we advise
you to restore factory Settings after upgrading.
5.3.5.3 Restore Defaults
Under the system maintenance menu, please click “restore default”,
and then switch to the interface of “restore default”. As shown in Picture
5-21:
Page 31

Network Video Recorder NVR Menu
27
Picture 5-21
According to user selection, you can set the parameters of restore
default for “General Settings”, “User manage”, “Channel configuration”,
“Record Setup” and “Alarm Input”.
5.3.5.4 Log Info
Under the system maintenance menu, please click “Log Info”, and then
switch to the interface of “Log Info”. As shown in Picture 5-22:
Picture 5-22
View System Logs to access the logs and search for the events on one day
for a specified time.
Type:Select the type of information you are requesting
Start Time/End Time:Enter the time to find the log info
Search:Search for logs according to criteria
Page 32

Network Video Recorder NVR Menu
28
PgUp/PgDn:You can view all logs through the PgUp/PgDn
Clear:Clear all information
Return:Return to the previous menu
Specific Steps:Enter the log search menu, set search parameters, click the
Search button to begin search, if logs matching the search criteria are
found, it will be displayed in a list, to view all logs through PgUp/PgDn
button.
5.3.5.5 Version Information
To view system Version information, Enter into the Main menu, shown in
Picture 5-23, by clicking Main Menu>Maintain>Vision Info.
Picture 5-23
Users can find system version, including serial No., model number, system
version, Version Date.
Serial No.:Shows the serial Number of the NVR.
Model number: Model Number of the main board.
Version:System version number.
Date:Program creation date.
Page 33

Network Video Recorder NVR Menu
29
5.4 PTZ Controls
Select a channel preview window, click the right mouse button and
click PTZ control options, the preview screen will switch to the single-channel
display, and PTZ control interface appears in the lower left corner, as shown
in Picture 5-24:
Picture 5-24
Adjusts the movement speed of the PTZ, (click middle button of the
wheel to set speed) Directional Buttons controls the movements and
directions of the PTZ. Zoom, focus, iris can be adjust by increase "+",
reducing the "-" button.
Presets position: Can select certain Presets to Configure Preset or Call
Preset, Clear Preset, range from 1 - 255.
Presets point: Click the Presets button, the pop-up screen shown in
Picture 5-25 will display, you can view the setting status of presets from
1-255;
Picture 5-25
Cruise Settings: Set the cruise, and related presets setting of cruise,
including dwell time and cruising speed. Shown in Picture 5-26 and
Picture 5-27;
Page 34

Network Video Recorder NVR Menu
30
Picture 5-26
Stay Time: Stay time on the Preset.
Picture 5-27
Cruise speed:Speed for Cruise.
Start Cruise:Start Cruise, and patrol in fixed path.
Auto Scan:Clear all preset points.
Notice: the NVR supports a maximum of 255 preset points, however, it is also
affected by the PTZ Camera itself, for different PTZ Cameras, the number of
preset points supported could vary.
5.5 Shut Down
Shut down the system interface. Therefore, the system can be
Page 35

Network Video Recorder NVR Menu
31
canceled, restarted, and shut down, Picture 5-28:
Picture 5-28
Logout:Logout the current user, switch to user login interface.
Reboot:Reboot the device.
Shut down:Shut down the device.
5.6 Quick adding function
At the preview menu, for the channel of unconnected IP Camera, you
can quickly click the “+” icon to add the camera as shown in picture 5-29
and 5-30.
Picture 5-29
Page 36

Network Video Recorder NVR Menu
32
Picture 5-30
Device search: Search the IP address of the IPC client device.
Filter: Filter the display of the searched device list.
Add: Click “search”, the NVR can search the IPC device which
supports the Onvif protocol in the same LAN (local area network); the
searched IPC devices can be displayed in the list. Select any IPC
device in the list, click “Add”, the selected IPC information can be
automatically added to the particular channel, then click “Save” to
complete.
Return: Return to the previous menu.
5.7 Remote device
Right click the “Remote device” option at the preview menu, to enter
the remote device management menu as shown in picture 5-31:
Picture 5-31
Device search: Search the IPC devices supported with Onvif protocol.
Page 37

Network Video Recorder NVR Menu
33
Add: Click , The “√” icon will appear which indicates you have
selected the IPC device of this column. If the “Device Added” list is not
full, click the “Add” button and you can put this device to the “Device
Added” list.
Select All: Click the “Select All” to select all available channels, and
group into the ‘Device Added’ List.
Filter: Filter the display of the searched devices.
Delete: Delete the selected IPC device at the “Device Added” list.
Click the icon to quickly delete the device.
Manual Add: If the “Added device” list is not full, click “Manual Add” to
pop up the channel setting menu and manually add the IPC.
Select All: Click “Select All” which below the “Device Added” list table
can select all the IPC devices, and click the “Select All” again to
cancel the selection. Then if you click “Delete”, all selected IPC
devices can be deleted.
Confirm: Accept changes.
Return: Return to last menu.
Page 38

34
6 Appendix
6.1 Q&A
1. What to do if my NVR will not detect the hard drive?
Answer: If the system does not detect the HDD, please check the SATA data
/ power connections of the HDD to see if they are connected properly. The
HDD may also need to be formatted if this is the first deployment.
2. What do I do, if we have lost the administrator password?
Answer: In certain circumstances, ST engineers may be able to reset the
password of the NVR, contact Securitytronix Tech support for more
information.
3. Can I use a computer HDD for the NVR?
Answer: The SATA HDDs for computers typically will be compatible, but it is
highly recommended to use CCTV grade HDDs for increased read/write
capacity and reliability.
4. Can I playback while still recording?
Answer: Yes. The device can perform playback/streaming/preview, all
while maintaining recording.
5. Why can’t I login into the NVR using the client software?
Answer: Check the LAN connection for continuity, performing a command
line ping test can rule out physical layer disconnects. Also make sure you
are trying to access the NVR using the correct port information/ user name
and password information.
6. Why can’t I find any recording information when I playback?
Answer: Double check the search criteria to confirm the correct playback
file request. It is also worth noting to check the system time for accuracy.
Lastly, check to see if the HDD is in operating condition.
Page 39

35
6.2 Mobile Apps
To view the NVR’s video stream from a mobile device (locally or remotely)
follow these 3 simple steps.
STEP 1.
Download ‘FREE IP’ from either the Google Play store, or Apple’s app store.
When signing in for the first time, you will need to create a new account. The
created account will store the server list for easy account migration to other
mobile devices.
STEP 2.
Connect your NVR to the internet, and enable ‘FREE IP’ from the P2P menu
STEP 3
From your mobile device with ‘FREE IP’ add a new device, and either enter
the P2P serial number or scan the QR code on the NVR to automatically
configure, and connect.
FOR ADDITIONAL SUPPORT, PLEASE CONTACT 1-800-688-9282, AND PRESS 3 FOR
SUPPORT, AND 2 FOR CCTV DEPT.
 Loading...