

Security Tronix ST-NVR4-EZ, ST-NVR8-EZ, ST-NVR16-EZ, ST-NVR4CH-I, ST-NVR16CH-I Quick Start Manual
...Page 1
QUICK START GUIDE
www.nacebrands.com www.securitytronix.com
EZ Connect Series
Professional Network Video Recorders
With Built In PoE
ST-NVR4/8/16-EZ
Page 2

1
Thank you for your purchase of this SecurityTronix Network Video
Recorder (NVR). This Quick Start Guide covers the most essential
information for getting the NVR up and running. For more in-depth
information on the NVR’s functions the full manual is available in PDF
format at http://www.securitytronix.com/products
Getting Started
MAKING CONNECTIONS.................................................pg02
POWERING ON and SHUTTING DOWN.............................pg03
FIRST STARTUP............................................................pg04
LOGGING IN and LOGGING OUT......................................pg05
General Settings
SETTING DATE AND TIME..............................................pg07
CHANGING PASSWORDS................................................pg08
Record Settings
CAMERA DISCOVERY.....................................................pg10
SCHEDULING RECORDING..............................................pg11
CHANGING RECORD MODES...........................................pg13
Motion Detection
SETTING UP MOTION DETECTION...................................pg15
ADJUSTING MOTION REGIONS.......................................pg16
Playback and Backup
PLAYING BACK VIDEO...................................................pg17
BACKING UP VIDEO FILES.............................................pg19
Networking
NETWORKING THE NVR.................................................pg21
HOW TO ENABLE P2P....................................................pg22
MOBILE APPS...............................................................pg23
SOFTWARE..................................................................pg26
Troubleshooting
CONTACTING SUPPORT................................................pg28
Page 3
2
Getting Started
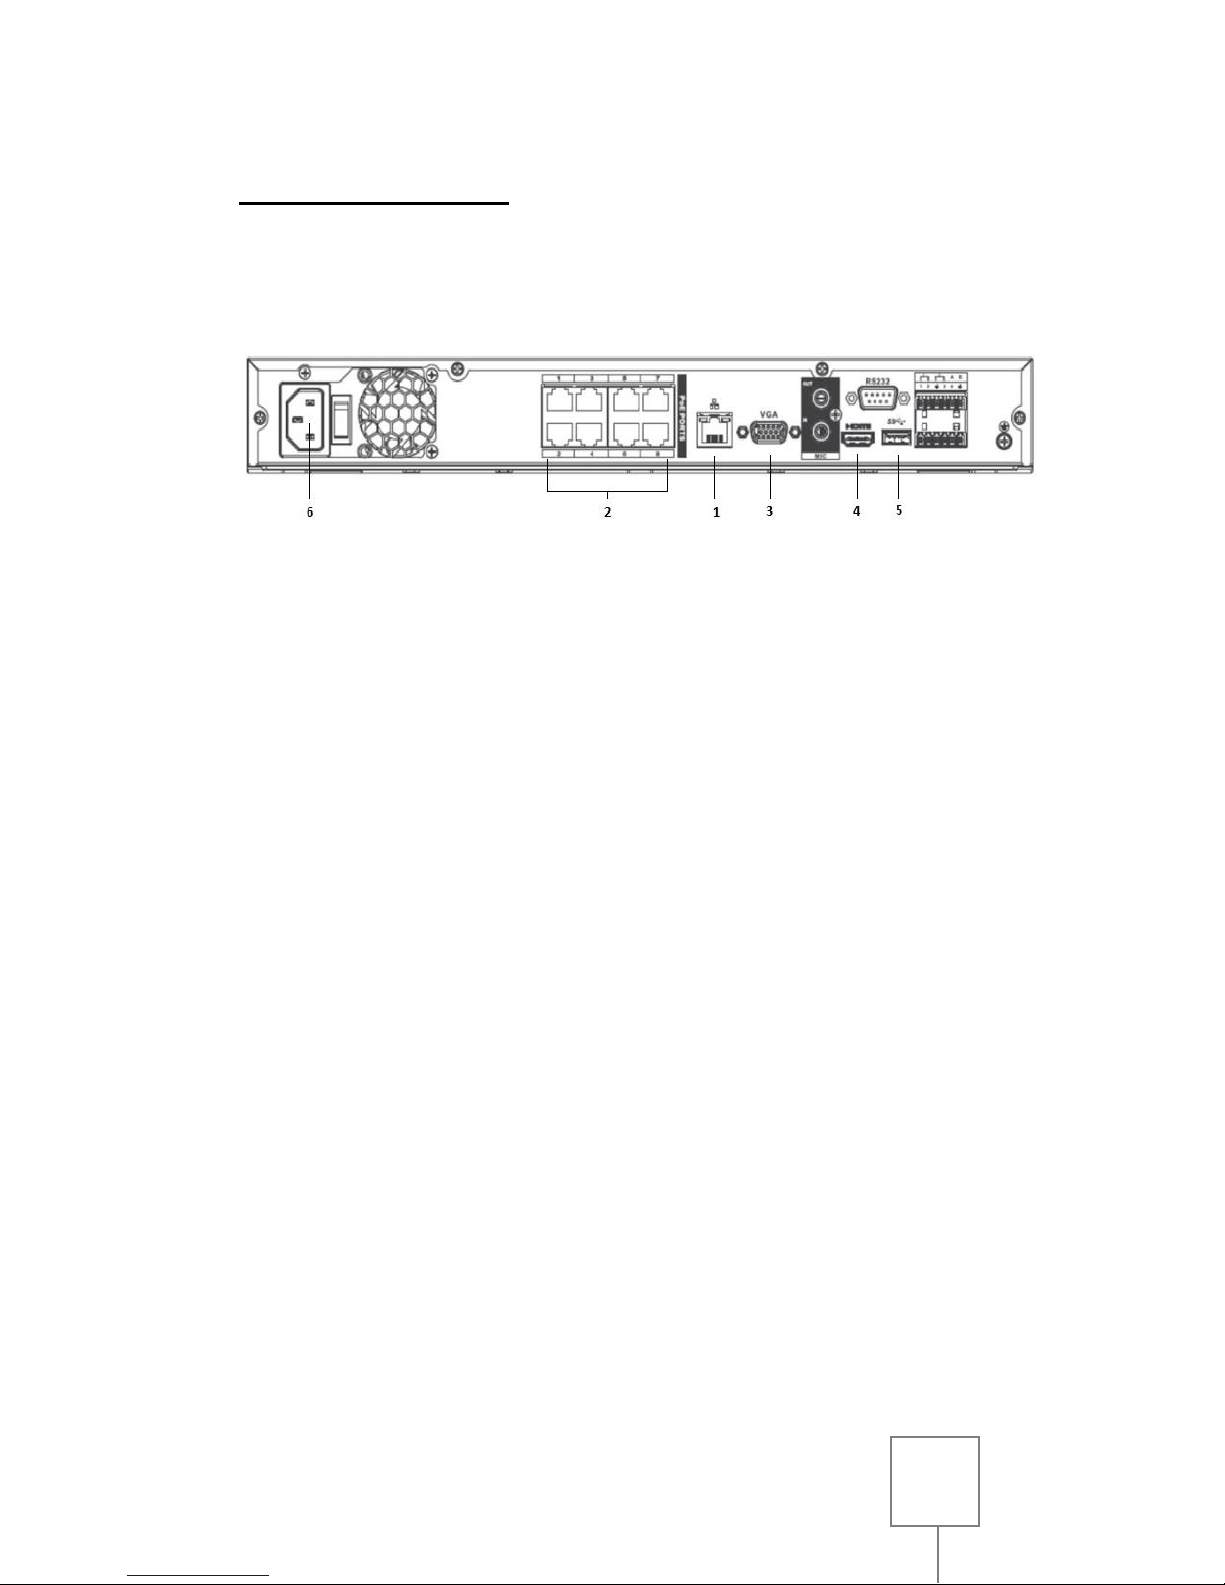
MAKING CONNECTIONS
8 channel PoE NVR shown. Similar configuration for 4/16 CH PoE NVR
1. Connect the network cable from the single CAT5 port of the
NVR to the Network. (#1 in the image above)
2. Connect the IP cameras to the PoE Ports on the back of the
NVR. (#2 in the image above)
3. Connect a monitor to the NVR using either the VGA port (#3 in
the image above) or the HDMI port (#4 in the image above) and the
appropriate cable.
4. Connect the included USB mouse to the rear USB port of the
NVR. (#5 in the image above)
5. Connect the supplied power cable from the 3 prong
receptacle on the back of the NVR to a suitable electrical
outlet (110-120VAC) (#6 in the image above)
6. The 4 port version of this NVR requires connecting both the
12V DC (NVR power supply), as well as the built in PoE (48VDC)
power supply.
NOTE: An uninterruptable power supply is recommended
for the NVR and any power supplies for the cameras, both
to protect against damage from sudden power loss, and to
maintain video surveillance in the event of a power outage.
Page 4
3
POWERING ON and SHUTTING DOWN
POWERING ON
Once all necessary connections to your NVR are made, toggle the
power switch on the back of the NVR to the ON position.
If the NVR does not automatically start, press the button on the
front panel of the NVR.
The POWER indicator light will be displayed on the NVR’s front panel.
It is normal for the NVR to sound a beep during startup.
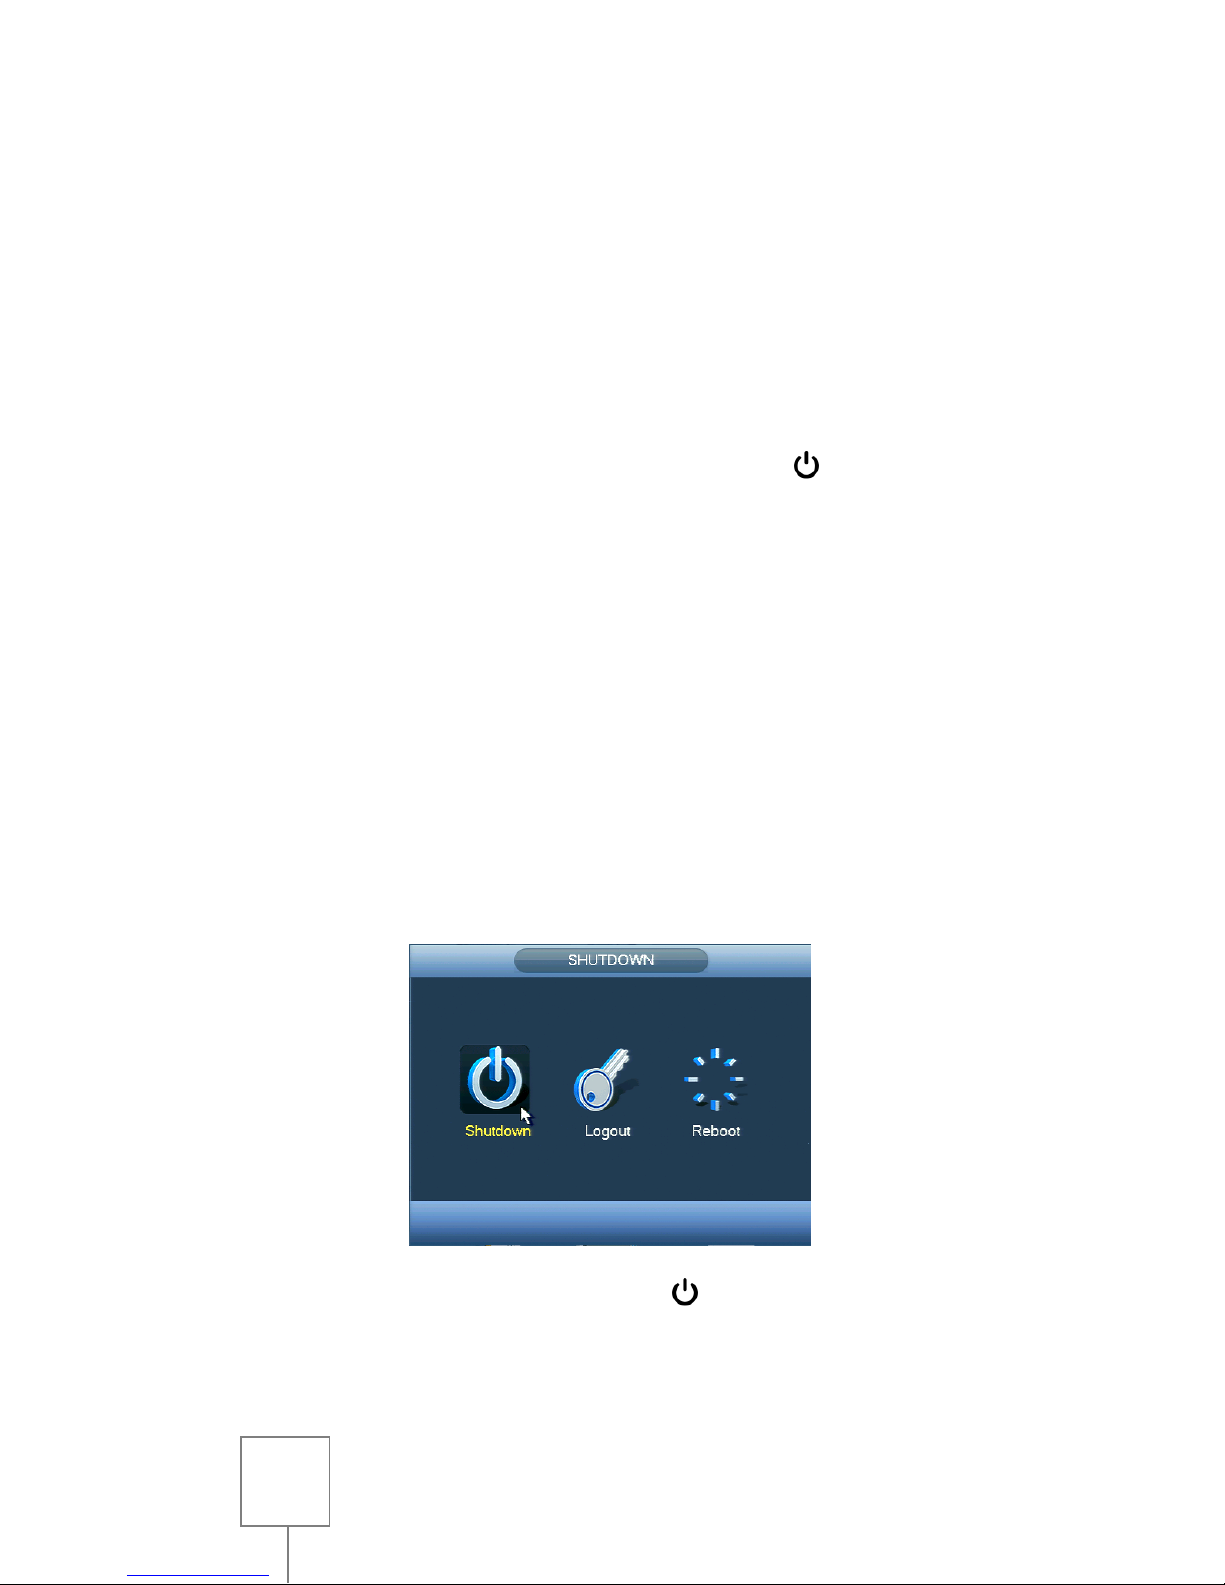
SHUTTING DOWN
In the event that the NVR needs to be powered down, perform one of
the following to ensure a safe shutdown:
1. Enter the MAIN MENU (see page 5), select SHUTDOWN in the
OPERATION section, then select SHUTDOWN from the popup
window.
2. Alternately, press and hold the button on the front panel
of the NVR. The screen will show a progress bar for
shutdown.
Page 5
4
Continue holding the button until the progress bar fills and
the NVR shuts off.
NOTE: In rare cases it may be necessary to remove power to the NVR
by disconnecting the power supply. However, this should be avoided
if possible, as removing power without properly shutting down the
NVR may corrupt and/or damage the hard drive. Only remove power
from the NVR if it will not respond to a shutdown through the
methods described.
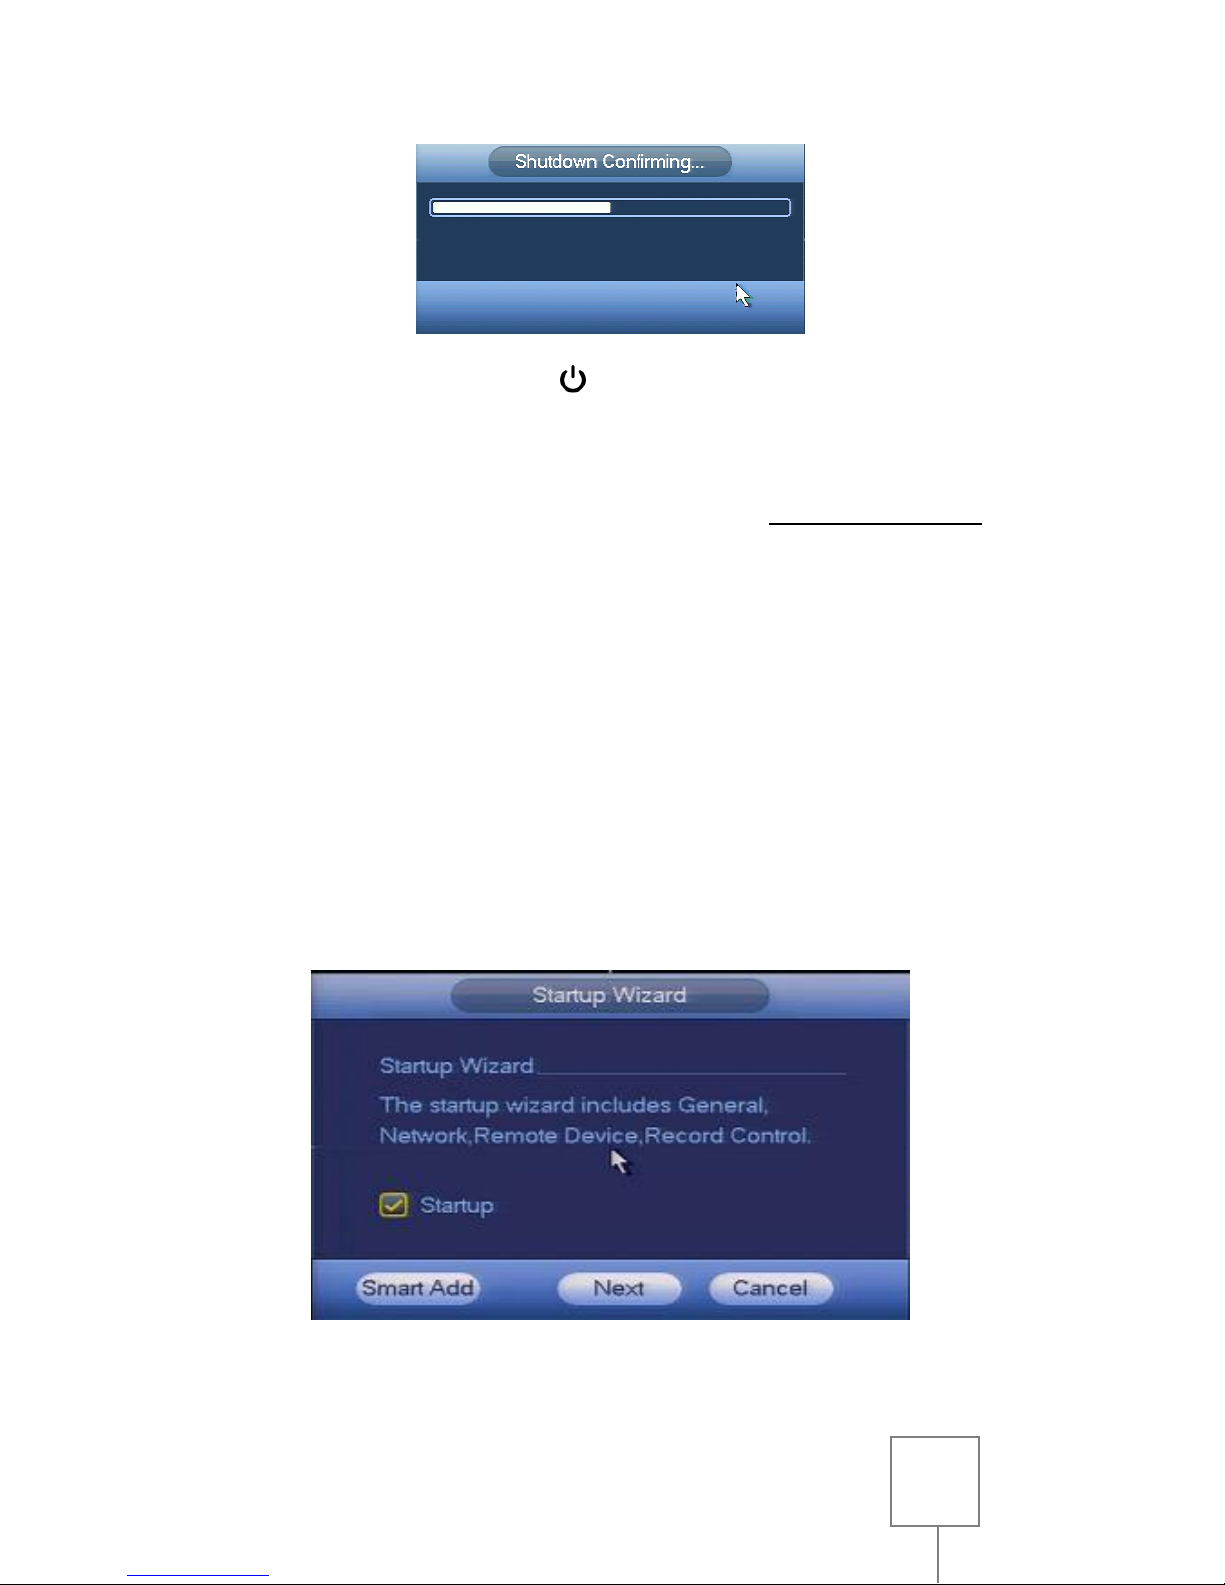
FIRST STARTUP
The first time that your NVR is powered on, it will perform necessary
functions, such as properly formatting an unformatted hard drive for
recording, and it will display the STARTUP WIZARD. It is recommended
that you follow the steps in the popup window to simplify the NVR’s
initial setup.
Page 6
5
The STARTUP WIZARD will take you through:
General Settings (more on page 7)
Network Settings (more on page 21)
Remote Device (IPCAM) Settings (more on page 10)
Recording Schedule (more on page 12)
The STARTUP WIZARD will be displayed each time the NVR is started.
If you do not wish for the STARTUP WIZARD to be displayed, click to
uncheck the STARTUP option before proceeding. You can also find this
option in the GENERAL SETTINGS (see page 7).
LOGGING IN and LOGGING OUT
LOGGING INTO THE NVR & MENU
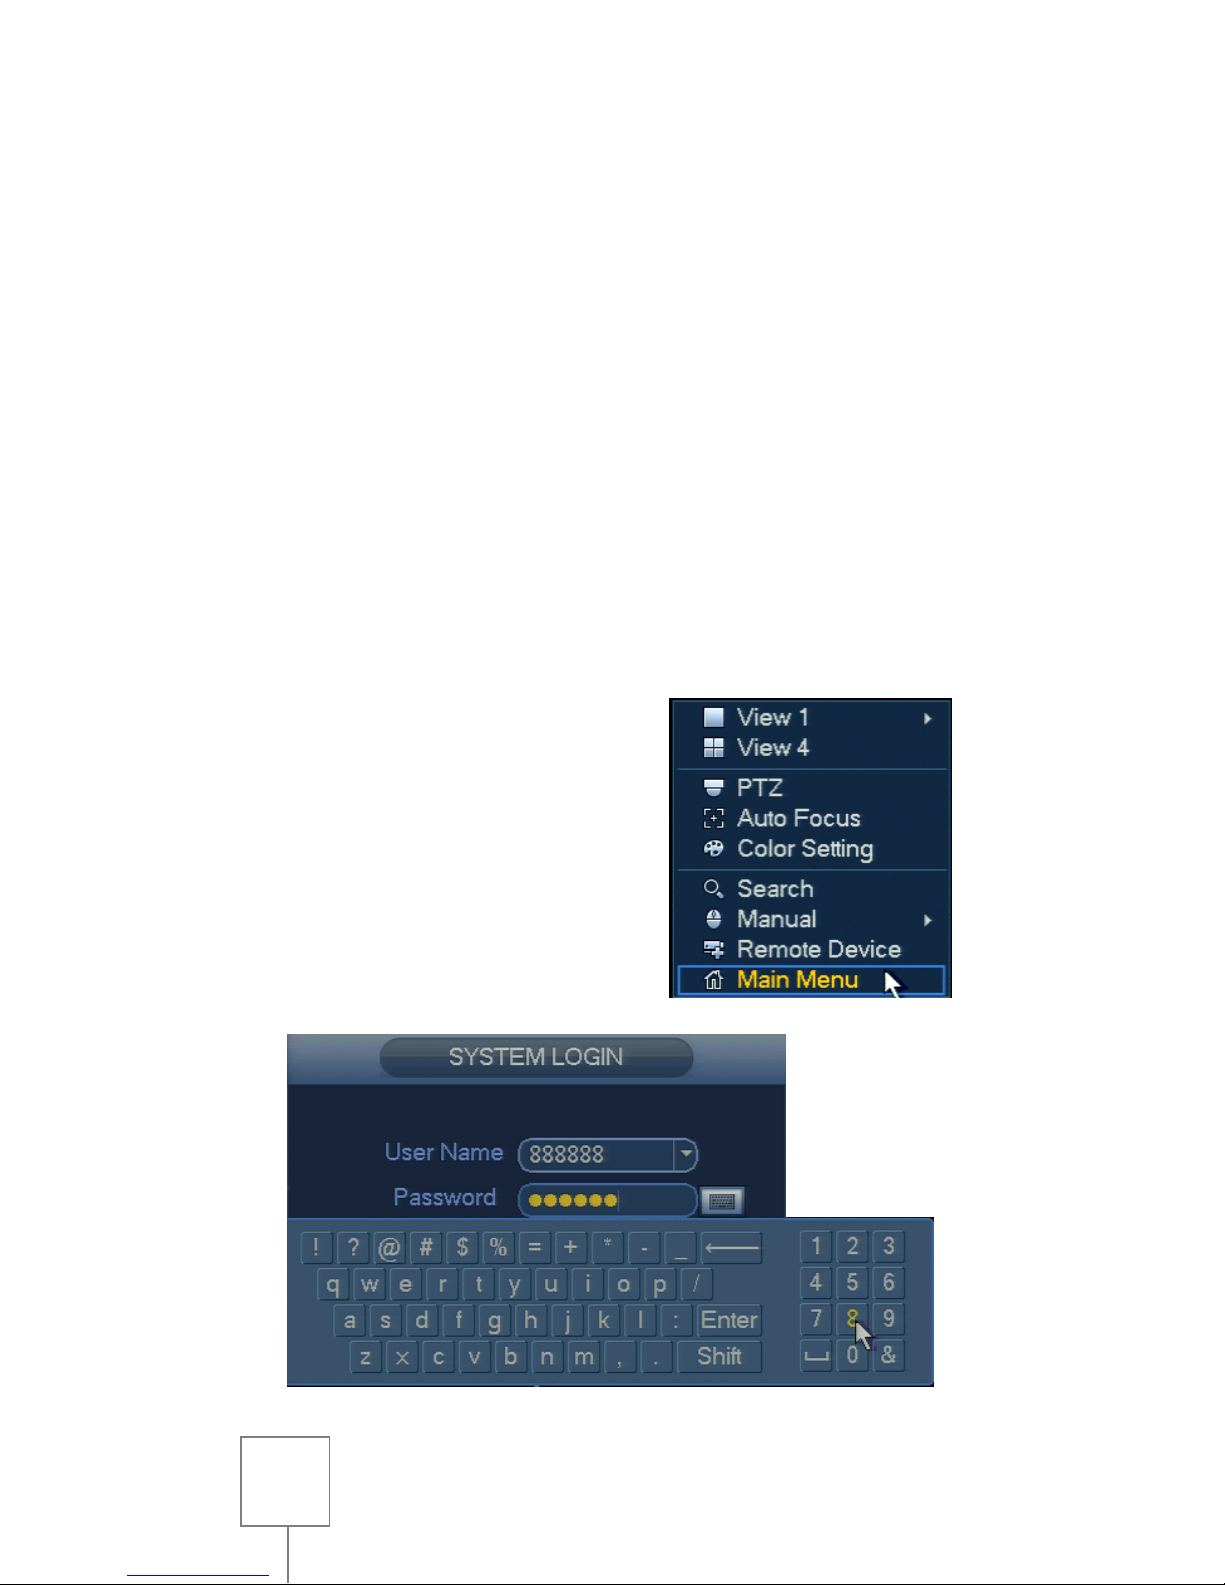
From the NVR’s main screen, rightclick the mouse and choose MAIN
MENU from the drop-down menu.
The SYSTEM LOGIN window will
appear to prompt you to log in. Click
in the PASSWORD field or on the
keyboard icon to bring up the input
keyboard.
Page 7
6
The default administrative accounts and passwords are:
USERNAME: admin PASSWORD: admin
USERNAME: 888888 PASSWORD: 888888
Using the mouse, enter the NVR’s password, then click ENTER or the
keyboard icon to close the input keyboard, then click OK to log in and
enter the menu.
It is strongly recommended to change the default passwords after
logging in the first time. (see page 8)
NOTE: If the password has been changed and forgotten or misplaced
it will be virtually impossible for the user to log into the NVR. In this
case please contact SecurityTronix at:
(610)429-1821, Press 3 for Tech Support, then press 2.
In order to use the password reset service you must provide
credentials to verify that you are the authorized installer of this NVR.
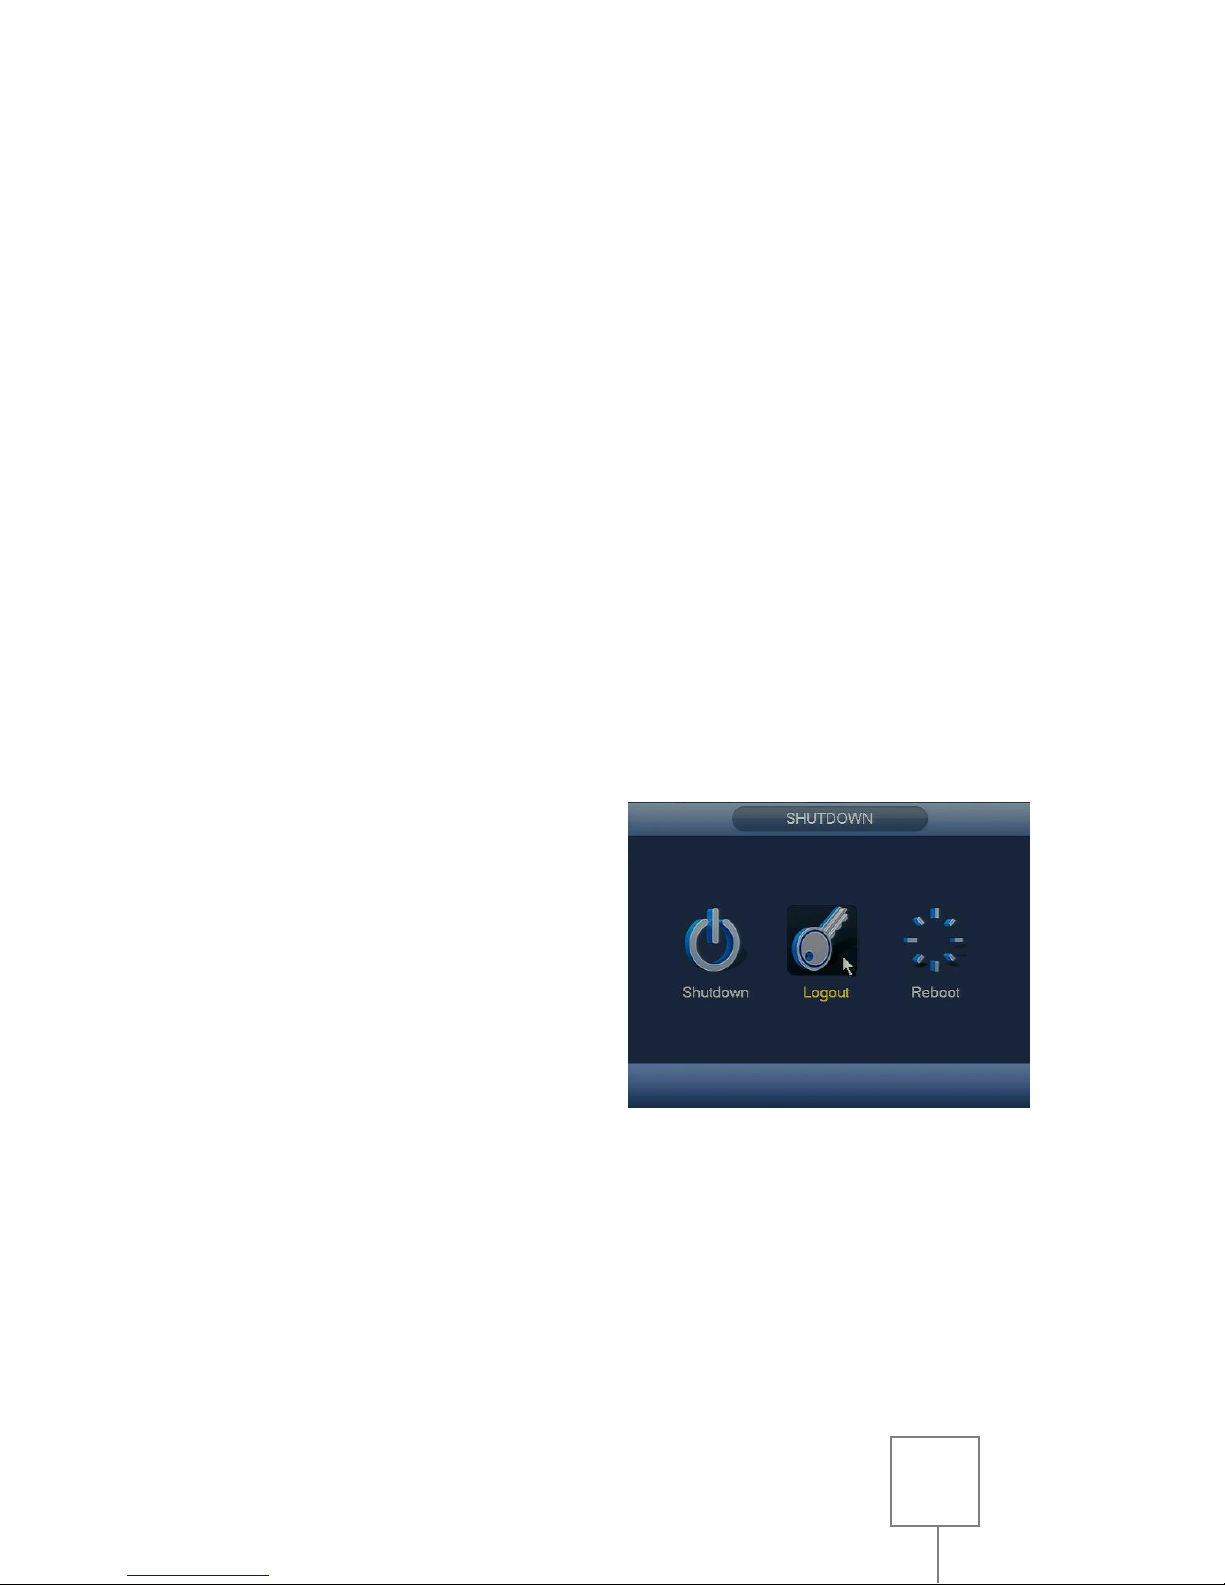
LOGGING OUT
It is recommended to log out of
the NVR each time after use, to
prevent unauthorized access or
tampering.
From the MAIN MENU, select
SHUTDOWN in the OPERATION
section, then select LOGOUT from
the popup window.
Page 8
7
General Settings
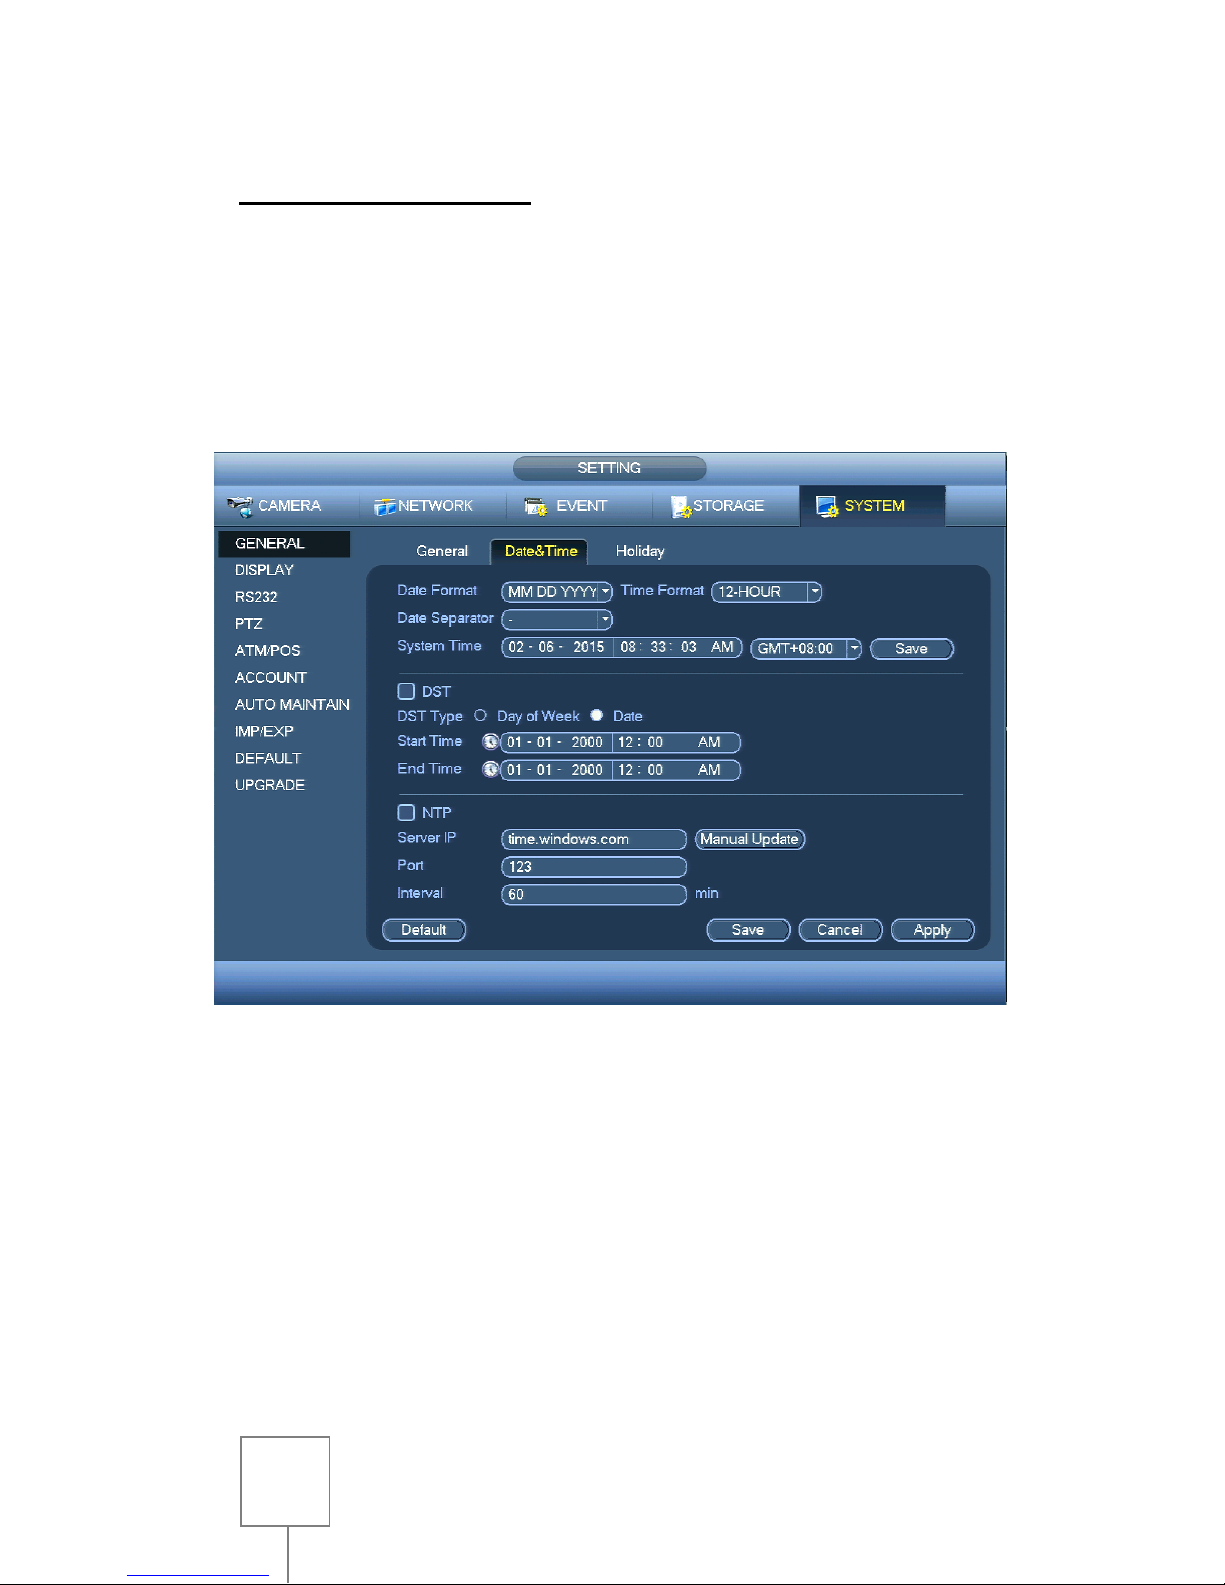
SETTING DATE AND TIME
From the MAIN MENU, select SYSTEM in the Setup section, then
select GENERAL from the options on the left side of the window, and
then select DATE&TIME from the tabs at the top.
Under SYSTEM TIME, click the Year to bring up the input keyboard,
then enter the current year using the mouse. When you are finished,
click outside the input keyboard to close it. Repeat these steps to set
the current Month and Day.
The same process is used to enter the current Hour, Minutes and
Seconds. This is necessary if video is ever offered up as evidence
against a corresponding cell phone tied to a global clock system.
Page 9

8
Be sure to click SAVE next to the SYSTEM TIME to save Date and Time
settings before navigating away from the DATE&TIME menu.
If desired, the NVR can be set to automatically adjust the time for
Daylight Savings Time if your locality uses it. This is done by clicking
DST checkbox, then entering the dates Daylight Savings Time becomes
active in your area using the method described to set Date and Time
above.
When finished, click APPLY and then SAVE at the bottom of the
screen. This will return you to the MAIN MENU.
CHANGING PASSWORDS
From the MAIN MENU, select SYSTEM in the SETUP section, then
select ACCOUNT from the options on the left side of the window.
Click the pencil icon in the MODIFY column for the user account you
wish to change. This will open the MODIFY USER menu, which enables
Page 10

9
you to make changes to an account’s permissions, name, group, and
password.
Click the MODIFY PASSWORD checkbox to select it, and then click in
the OLD PASSWORD field to bring up the input keyboard. Using the
mouse, enter the account’s current password, then click ENTER or the
keyboard icon to close the input keyboard.
Next, click in the NEW PASSWORD field, and enter a new password
using your mouse, then click ENTER or the keyboard icon. It is
recommended to use a combination of letters and numbers that is
hard to guess, easy to remember, and has not been previously used.
Once your new password has been created and entered, click in the
CONFIRM PASSWORD field and enter your new password once more
using the method above. The NEW PASSWORD and CONFIRM
PASSWORD fields must match exactly.
Page 11

10
Once the new password is entered and confirmed, click SAVE at the
bottom of the MODIFY USER window to lock in the new password and
return to the ACCOUNT menu.
NOTE: It is strongly recommended to write down the new password
and keep it in a secure location. If the password has been changed
and forgotten or misplaced it will be virtually impossible for the user
to log into the NVR. In this case please contact SecurityTronix at:
(610)429-1821, Press 3 for Tech Support, then press 2.
In order to use the password reset service you must provide
credentials to verify that you are the authorized installer of this NVR.
Record Settings
CAMERA DISCOVERY
NOTE: For this feature explanation, it is presumed that the NVR is
already properly connected to the network, and there are no data
restrictions in place preventing the NVR from communicating both
across the network, and outside to the WAN.
When connecting Securitytronix 4th Gen IP cameras directly to the
NVR’s built in PoE Switch, Simply connect the cameras and power on
the unit. The NVR will detect the cameras, and automatically configure
their network settings.
For Non Securitytronix Cameras, or for connecting to cameras not
directly connected to the built in PoE switch, refer to the steps below.
From the MAIN MENU, select CAMERA in the SETTING section, and
then select REMOTE on the left side of the window.
Page 12

11
From this menu, you can search across the network for available video
sources. When using Securitytronix 4th Gen IP cameras, devices not
within the NVR’s network segment will be detected, and simply need
to be re-addressed to communicate properly with the NVR.
Click on to begin the Search process.
Cameras detected on the network will begin to populate. Form here
you can either double click the Camera IP to add it to the NVR channel
lineup, or you can click on the button to modify that IP
camera’s network settings.
Once the device is attached, you will see a green dot on the STATUS
field.
Repeat these steps until all IP cameras have been added to your NVR.
When all desired changes have been made, click APPLY at the bottom
of the screen, and then click SAVE to return to the MAIN MENU.
Page 13

12
SCHEDULING RECORDING
From the MAIN MENU, select STORAGE in the SETTING section, then
select SCHEDULE on the left side of the window.
Select a channel number to edit using the CHANNEL drop-down menu,
or edit all channels at once by selecting ALL.
Select the type of recording you want to edit (REGULAR for constant
recording or MD for motion detection recording only), then click and
drag with the mouse to highlight the periods you want to add in the
24-hour timeline for each day.
If multiple days will share the same schedule, you may edit those days
all at once by clicking on the checkboxes to the left of the window. If
all days will share the same schedule, then select ALL. A chain link icon
will appear to confirm that the selected days are linked.
Once selections are made, any changes in one of the linked days’
timelines will affect all linked days.
Page 14

13
To erase sections of schedule, select a recording type as described
above, then click and drag of highlighted areas on the timeline to
remove.
Areas with colored lines will record in their designated modes. Areas
without any colored bars will not record at all. For example: in the
schedule pictured below, Sunday will record constantly, Monday
through Friday will record only motion between 9AM and 5PM while
recording constantly all other hours, and Saturday will not record at
all.
When all desired changes have been made, click APPLY at the bottom
of the screen, and then click OK to return to the MAIN MENU.
CHANGING RECORD MODES
From the MAIN MENU, select STORAGE in the SETTING section, then
select RECORD on the left side of the window.
Page 15

14
Use the mouse to select the desired recording type for each channel
number under the MAIN STREAM and SUB STREAM sections.
Alternately, you can select ALL next to the desired recording type to
set all channels to that record mode.
SCHEDULE will set cameras to record per a user-defined schedule. (see
page #)
MANUAL will set cameras to record constantly, regardless of any
recording schedule.
STOP will prevent recording altogether. Cameras will still be visible on
the main screen, or on remote live stream, but no data will be
recorded.
When all desired changes have been made, click APPLY at the bottom
of the screen, and then click OK to return to the MAIN MENU.
Page 16

15
Motion Detection
SETTING UP MOTION DETECTION
From the MAIN MENU, select EVENT in the SETTING section, then
select DETECT on the left side of the window.
Note: Changes in this menu must be made per channel to avoid
possible recording conflicts.
Select a channel number to edit using the CHANNEL drop-down menu,
then click the ENABLE checkbox. Next click the RECORD CHANNEL
checkbox, then click the corresponding RECORD CHANNEL number to
highlight it (ie: if editing channel 1, select RECORD CHANNEL 1).
Repeat this process for all channels on which motion detection is
desired. When finished, click APPLY at the bottom of the screen, and
then click SAVE to return to the MAIN MENU, or continue on to the
next section to edit motion detection regions.
Page 17

16
ADJUSTING MOTION REGIONS
From the DETECT menu (see page 15), select a channel number to edit
using the CHANNEL drop-down menu, then click the REGION SETUP
button.
Items in the REGION SETUP section will need to be adjusted to meet a
balance of recording needs and environment, and therefore no exact
numbers or recommendations will be given.
By default, the entire screen will be red (enabled for motion detection,
REGION1). You can turn off areas of motion detection by left-clicking
on grid squares to remove the region color in any areas of the
camera’s view where motion detection is not desired.
Note: motion will not be detected by any portion of the screen not
covered by one of the region colors (red, yellow, blue or green).
By moving the mouse to the top of the screen, the REGION tabs and
sensitivity settings can be accessed. Each color corresponds to a
separate motion detection zone.
If multiple regions are desired, be sure to remove any other region’s
color from the new region’s area before adding the new region’s color.
For example: left-click to remove red (REGION1) from an area before
Page 18

17
switching to yellow (REGION2) and filling in the new region. If regions
overlap, the region with the higher sensitivity setting will take priority
over the area.
Adjust SENSITIVITY (amount of change needed to trigger motion) by
left-clicking on the SENSITIVITY slider and moving left or right as
needed, with the left side being the lowest sensitivity, and the right
side being the highest sensitivity.
Adjust THRESHOLD (amount of time over which change must occur to
trigger motion) by left-clicking on the THRESHOLD slider and moving
left or right as needed, with the left side being the lowest amount of
time (instant), and the right side being the longest amount of time.
When all desired changes have been made, right-click to return to the
DETECT menu, click APPLY at the bottom of the screen, and then click
OK to return to the MAIN MENU.
Playback and Backup
PLAYING BACK VIDEO
From the NVR’s main screen, rightclick the mouse and choose SEARCH
from the drop-down menu OR from
the MAIN MENU, select SEARCH in
the OPERATION section.
At the top of the screen make sure
FROM R/W HDD is selected, then
click the button for REC.
Page 19

18
In the calendar on the right side of the screen, select the date of the
video you wish to view. Days that have recorded video available will
have a light-blue background.
Next, select a channel number to view from the drop-down menu
below the calendar. You can switch between single camera and
multiple camera views by clicking the tabs above the channel dropdown menu.
If there is recorded data on the selected day, portions of the timeline
at the bottom of the screen will appear colored according to the type
of recordings present.
Press the button to begin playback of the earliest recording in the
timeline.
Note: if viewing multiple channels, it is recommended to click the
SYNC checkbox, so that all channels always play the same time
periods.
Page 20

19
You can navigate to other portions of the timeline by left-clicking
along the colored portions of the timeline to skip to that time.
To zoom in on a specific time period, click the approximate period on
the timeline you wish to view, then click one of the ZOOM buttons on
the bottom-right of the bottom of the screen to switch to the 24HR,
2HR, 1HR or 30MIN views.
When finished, simply right-click anywhere on the screen to exit
PLAYBACK and return to the main screen or MAIN MENU.
BACKING UP VIDEO FILES
From the PLAYBACK screen, locate the video files that you wish to
back up (see page 17), then click the VIDEO CLIP button (#1 in the image
below).
Then left-click and drag the BEGINNING TIME INDICATOR (#2 in the
image above) until it is approximately at the beginning of the video clip
you want to save. Next, left-click and drag the ENDING TIME
INDICATOR (#3 in the image above) until it is approximately at the end of
the video clip.
Note: moving the BEGINNING TIME INDICATOR and ENDING TIME
INDICATOR is not necessary if you wish to backup larger portions of
time, such as 30-minute or hour-long clips. If this is desired, simply
click the desired ZOOM button before clicking the VIDEO CLIP
button, and the entire visible timeline will be selected for backup.
Next, insert a USB thumb drive with into the front USB port on the
NVR. It is recommended to use a USB thumb drive without any files on
it. Once this is completed, click the BACKUP button at the bottomright of the screen (#4 in the image above).
1 2 3
4
Page 21

20
On the BACKUP screen your USB thumb drive will be listed in the top
section, and your selected file(s) will be displayed below. Make sure
that the checkboxes next to your USB thumb drive and the listed files
contain check marks. If they do not, left-click the checkboxes to check
them. Then select BACKUP at the bottom of the window.
The next screen will show any files currently on your USB thumb drive,
and allow you to select a folder to save the video clip(s) to if desired.
Click the START button at the bottom of the screen to begin saving the
selected video clips to the inserted USB drive.
A progress bar will be displayed with an approximate time remaining.
When finished, a notification window will pop up to notify that backup
is now complete. Click OK, then right-click to return to the PLAYBACK
screen, and finally remove the USB thumb drive from the front of the
NVR.
Page 22

21
Networking
NETWORKING THE NVR
From the MAIN MENU, select NETWORK in the SETTING section, then
select TCP/IP on the left side of the window.
If the local network is DHCP-enabled, select DHCP in the MODE row,
then click APPLY and then SAVE at the bottom right of the screen.
Next, reboot the NVR (see page 3).
Once the NVR has rebooted, navigate back to the NETWORK MENU,
write down the newly assigned IP ADDRESS, then change MODE to
STATIC to prevent accidental readdressing of the NVR. When finished,
click APPLY and then SAVE to return to the MAIN MENU.
If the local network uses static addressing instead of DHCP, contact
the network administrator for IP addressing information, then enter
the provided information in the NETWORK MENU using the mouse
and on-screen input keyboard.
Page 23

22
If off-network access to the NVR is desired, you will need to forward
ports in the router. Due to the innumerable different routers on the
market, it is impossible to provide specific instructions. Refer to your
router’s manual or manufacturer for assistance. For simplicity, this
guide assumes the NVR’s default port numbers are being utilized.
Ports needing to be forwarded to the NVR’s IP address are as follows:
HTTP PORT: 80
TCP PORT: 37777
UDP PORT: 37778
WHAT IS P2P?
P2P, or Peer to Peer, technology elimates the need to
forward ports inside of your router and makes connecting to your
DVR/NVR as easy as scanning a QR Code on your mobile device. As
long as your DVR/NVR is connected to the internet, it can be accessed
from anywhere in the world using a mobile device or CMS software.
In traditional DVR systems, you need to forward ports and set
up a DDNS account but this is not nessesary any more. When you
enable P2P on your device, it connects to a centralized server and
registers it’s IP address in a reverse DVR-to-server style connection.
Your mobile device or software then connects to the same centralized
server and connects to your device directly so you can view and
playback video.
HOW TO ENABLE P2P
Once you have your NVR connected to your network, you can start the
P2P connection process.
From the MAIN MENU, select NETWORK in the SETTING or SETUP
section (depending on your model), then select P2P on the bottom left
side of the window:
Page 24

23
Make sure the box next to ENABLE checked. If you have a good
connection to the internet, the STATUS will show “Connect Success.”
If the STATUS shows “Disconnected”, try restarting your NVR after you
click the ENABLE checkbox. If you are still disconnected after
restarting, please check to make sure your network is connected to
the internet and checked that you have a good network cable from the
NVR to your switch/router.
MOBILE APPS
There are two different mobile apps, depending on whether you are
using an Android Device or an iPhone. For Android devices, use gDMSS
Lite. For iPhones, use iDMSS Lite:
Page 25

24
Once you have installed the DMSS Lite app, open it and you will see
the Live Preview screen below:
To add your NVR, you need to go to our Device Manager. Click on the
icon at the top left of the app and select Device Manager.
Page 26

25
Click on the + icon at the top right of the screen to Add a new device
and you will see the screen below:
You now have two options to connect to your NVR: You can scan the
QR CODE by pressing the SCAN QR CODE button on the app and
scanning the code found on your NVR under NETWORK -> P2P (see
image on pg. 4) or you can input the NVR’s SERIAL NUMBER (SN)
found under INFO -> VERSION. (See image below)
Page 27

26
Once you have entered your NVR’s SN or scanned the QR Code, you
may enter a Name for your device. This can be named whatever you
choose. The default username & password is admin/admin.
Once you have entered all of the information, you need to SAVE the
device info for future connections. Click on the icon at the top
right of the app to save the device in your device manager.
After the device has been saved, go back to the Live Preview screen
and click on the icon at the top right of the app to enter the
Device List menu. Select the check box next to your newly created
device name and then click on Start Live Preview at the bottom of the
app.
At this point, you should see your live video streams. If you cannot
connect to your cameras, please see Troubleshooting on pg. 27.
SOFTWARE
Once you have installed the SmartPSS software, you can make your
P2P connection to your NVR. From the HOME PAGE of SmartPSS, go to
the tab Labeled DEVICES. Click on the MANUAL ADD button at the
bottom of the page and you will see the screen below:
Page 28

27
The REGISTER MODE needs to be set to SN (FOR DEVICE WITH P2P).
The DEVICE NAME can be whatever you’d like to use. Just input the
NVR’s SN (see the image on pg. 7). Finally, enter your USERNAME and
PASSWORD. (Default is admin/admin).
Once you have everything filled out the INPUT INFO section, click on
ADD.
From the SmartPSS HOMEPAGE, click on the LIVEVIEW button:
Page 29

28
Once you are at the LIVEVIEW tab, you will see a DEVICE LIST on the
right hand side. Select the DEFAULT GROUP and you should see your
newly added Device. Right click on your device’s name and then click
MAIN STREAM to connect to the highest quality video or SUB STREAM
to connect to the lower quality video.
At this point, you should see your live video streams. If you cannot
connect to your cameras, please see Troubleshooting below.
Troubleshooting
For further assistance and troubleshooting, please contact
SecurityTronix tech support at:
(610)429-1821, press 3 for Tech Support, then press 2 for CCTV.
Version 1.0 (5/13/2015)
© 2015 North American Cable Equipment.
 Loading...