

Page 1
v2.0 11/8/11
1
USER MANUAL
ST-DVR7204G
4-Channel Digital Video Recorder
Page 2

v2.0 11/8/11
2
TABLE OF CONTENTS
PACKAGE'CONTENTS.................................................................................................... 4!
PRODUCT'DESCRIPTION ............................................................................................... 4!
SPECIFICATIONS ...........................................................................................................5!
INSTALLATION .............................................................................................................6!
1.! UNPACKING and HANDLING.................................................................................................................6!
2.! MECHANICAL INSPECTION...................................................................................................................6!
3.! SPECIAL ATTENTION................................................................................................................................. 6!
4.! WIRING CONNECTIONS and HARD DRIVE INSTALLATION..............................................7!
5.! HARD DRIVE (HDD) INSTALLATION.................................................................................................8!
HDD Storage Calculator ......................................................................................................................................8!
CONTROLS .................................................................................................................10!
1.! FRONT PANEL CONTROLS................................................................................................................. 10!
2.! INFRARED REMOTE................................................................................................................................ 11!
3.! MOUSE CONTROL.................................................................................................................................... 12!
Left Mouse Key – Single Click ......................................................................................................................12!
Right Mouse Key – Single Click ................................................................................................................... 12!
OPERATION ............................................................................................................... 13!
1.! POWERING ON and SHUTTING DOWN....................................................................................... 13!
Powering On............................................................................................................................................................ 13!
Shutting Down.........................................................................................................................................................13!
2.! ACCESSING SYSTEM MENU ............................................................................................................. 14!
3.! USER ACCESS RIGHTS ........................................................................................................................ 14!
4.! PREVIEW MODE......................................................................................................................................... 15!
5.! MAIN MENU ................................................................................................................................................... 15!
6.! RECORDING OPERATION ................................................................................................................... 17!
Manual Recording ................................................................................................................................................ 17!
Auto Recording....................................................................................................................................................... 18!
Auto Recording – Motion Detection Recording...................................................................................19!
Auto Recording – Video Blind........................................................................................................................ 22!
Auto Recording – Video Loss ........................................................................................................................ 23!
7.! PLAYBACK OPERATION ....................................................................................................................... 24!
8.! BACKING UP RECORDING FILES................................................................................................... 27!
File Backup – PlayBack/File Search Screen ........................................................................................ 27!
File Backup – Direct From Main Menu..................................................................................................... 28!
9.! PTZ CONTROL............................................................................................................................................. 29!
PTZ Camera Connection..................................................................................................................................29!
PTZ Camera Configuration.............................................................................................................................30!
PTZ Camera Control........................................................................................................................................... 31!
Setting Presets.......................................................................................................................................................31!
Tour Between Points...........................................................................................................................................33!
Pattern.........................................................................................................................................................................34!
Border Scan ............................................................................................................................................................. 35!
Auto Pan, Flip and Reset ................................................................................................................................. 37!
Other PTZ Control Functions.........................................................................................................................37!
Page 3

v2.0 11/8/11
3
10.! SYSTEM SETTINGS............................................................................................................................... 38!
General Settings.................................................................................................................................................... 38!
Encode Settings.....................................................................................................................................................40!
Network Settings ................................................................................................................................................... 40!
Network Service Settings.................................................................................................................................42!
GUI Display Settings........................................................................................................................................... 47!
PTZ Configuration Settings............................................................................................................................. 48!
Display Tour (Screen Sequencing) Settings......................................................................................... 48!
11.! ADVANCED FEATURES ...................................................................................................................... 49!
HDD Management................................................................................................................................................49!
User Account Management ............................................................................................................................ 50!
Online User...............................................................................................................................................................52!
Output Adjust........................................................................................................................................................... 52!
Auto Maintain .......................................................................................................................................................... 53!
Restore Defaults.................................................................................................................................................... 53!
Upgrade...................................................................................................................................................................... 54!
Device Information ............................................................................................................................................... 55!
12.! SYSTEM INFORMATION..................................................................................................................... 55!
Hard Disk Information......................................................................................................................................... 55!
BPS Code Stream Statistics........................................................................................................................... 56!
Log Information ...................................................................................................................................................... 56!
Version Information.............................................................................................................................................. 57!
13.! MISCELLANEOUS FUNCTIONS and SETTINGS.................................................................. 58!
Disk Event.................................................................................................................................................................58!
Color Settings.......................................................................................................................................................... 58!
REMOTE'MANAGEMENT'USING'CLIENT'SOFTWARE ...................................................60!
1.! CMS SOFTWARE INSTALLATION ................................................................................................... 60!
CONFIGURING and USING THE CMS CLIENT............................................................................... 62!
2.! SNS SOFTWARE INSTALLATION.................................................................................................... 74!
CONFIGURING and USING THE SNS CLIENT................................................................................76!
Page 4

v2.0 11/8/11
4
PACKAGE CONTENTS
This package contains:
One ST-DVR7204G 4-channel digital video recorder
One infrared remote control with 2 AAA batteries
One optical mouse
Two hard drive cables (inside the unit)
Eight hard drive screws
One power supply
One user manual
One CD with manufacturer documentation and remote management software
PRODUCT DESCRIPTION
The ST-DVR7204G is a cost-effective DVR designed for the security professional as a digital
surveillance product. Based on an embedded LINUX operating system the ST-DVR7204G
provides a very stable platform featuring standard H.264mp video compression and G.711A audio
compression to ensure high quality imaging, low error coding ratio and single frame playback. With
TCP/IP protocols this DVR offers remote network communications, surveillance and management
capabilities. The ST-DVR7204G can be deployed standalone or on a network and integrated into a
complete security surveillance network in residences, offices, banks, warehouses, factories,
prisons or any environment requiring surveillance monitoring.
Important Notes
The DVR’s embedded PTZ controller is designed to perform a wide variety of PTZ camera
control functions. However, the utility of any PTZ controller is highly dependant upon the
particular PTZ camera to be controlled as each camera has not only its own functions, but
specific methods of how those native functions are accessed and managed. Further, a
particular PTZ controller’s terminology may differ from that used by a particular PTZ
camera. Therefore, it will be necessary for the installer and/or user to consult BOTH the
DVR manual and PTZ camera’s user manual to ensure proper set-up, configuration and
application.
Securitytronix DVRs are capable of various levels of video quality as set by the user. It is
solely the user’s responsibility to determine the required video quality level during set up.
Should the user believe they will ever need the video quality to be used for evidentiary
purposes, then they should consult with their legal advisor to determine the video quality
level to set the DVR to.
Page 5

v2.0 11/8/11
5
SPECIFICATIONS
ST-DVR7204G
Specifications (Typical)
1. Compression
H.264
2. Video Signal
NTSC
3. Video Input
4 BNC Female
4. Video Output
1 VGA, 1 BNC
5. Audio Input
1 RCA Female
6 Audio Output
1 RCA Female
7. Record
D1, HD1, CIF, QCIF
8. Recording Modes
Manual, Motion Detect, Schedule
9. Local Playback
25fps for CIF, 12fps for HD1, 6fps for D1
10. Playback Options
Single or Multiple Channels
11. Record Search
Time Search, Calendar Search, Event Search, Channel Search
12. Display FPS
D1: 120fps (NTSC)
13. Record FPS
CIF:120fps, HD1: 120fps, D1: 120fps NTSC
14. Storage
2 pcs (SATA) HDD up to 2TB
15. Backup
Network and USB
16. HDD Capability/Channel
Audio: 28.8Mbytes/hr, Video: 25-450Mbytes/hr
17. Controller
Front Panel Buttons, Remote Controller, USB, Web
18. Operating System
Linux
19. Image Display
Full Screen, 4 Split
20. Network Port
RJ45 10M/100M Adaptive Ethernet Network Port
21. PTZ Control Port
1 RS485
22. USB Port
2 USB Ports
23. Web
DDNS, TCP/IP, PPPoE, IE, & Client Software
24. Operating Temperature
32°F - 130°F
25. Operating Humidity
10% - 90%
26. Dimensions
13” W x 10.5” D x 2 .8” H
27. Weight
3.3 lbs (without hard drive)
28. Power
DC12V @3.3A
Page 6
v2.0 11/8/11
6
INSTALLATION
CAUTION: To reduce the risk of electrical shock, only remove the cover after
disconnecting all power to the unit and only to install/remove the hard disk drive. There
are no user serviceable parts inside the unit.
CAUTION: To prevent electric shocks and risk of fire hazards, do not use other than
specified power source.
This DVR has been designed for indoor use only. Outdoor use voids warranty and poses
serious electrical and fire hazard risks to the installer, user and facility.
1. UNPACKING and HANDLING
Each unit is shipped assembled and factory tested.
Ensure that all accessories are removed from the container before discarding packing material
2. MECHANICAL INSPECTION
Inspect the front and rear of the equipment for shipping damage. Make sure the equipment is
clean, and no connectors are broken, damaged, or loose. If equipment appears to be
damaged or defective please contact your distributor or Securitytronix at 1-610-429-1511 for
assistance.
3. SPECIAL ATTENTION
a. The installer must comply with electrical safety standards.
b. This DVR is for indoor use only and must be installed in a safe, ventilated and dry area.
c. Open the DVR case only to install the hard drive(s). There are no serviceable parts inside
the unit.
d. If liquids spill inside the DVR’s case immediately turn off all power to the unit, disconnect
the unit from its power source and have a qualified technician check it for damage.
e. Do not install the DVR in an environment where the temperature is above 104° F.
f. Only use a dry cloth to clean the unit. If there is dirt that is difficult to remove wipe gently
with a mild detergent. Never use strong or abrasive detergents.
g. A minimum 12VDC 5A power supply must be used. AC power cannot be applied. Using
an AC or other incorrect power supply will damage the unit.
h. Only qualified installers are allowed to install, test and disassemble the DVR.
i. As the DVR is a sensitive device any shock or other shaking of the unit will cause damage
and void the warranty.
This symbol is intended to alert the user to the presence of important operating and
maintenance (servicing) instructions.
This symbol is intended to alert the user to the presence of uninsulated “dangerous
voltage” within the product’s enclosure that may be of sufficient magnitude to constitute a
risk of electrical shock.
Page 7

v2.0 11/8/11
7
4. WIRING CONNECTIONS and HARD DRIVE INSTALLATION
Item
Panel Key/Indicator
Description
1
1CH, 2CH, 3CH, 4CH
Video In BNC ports for cameras 1 through 4
2
V-OUT
Video Out BNC port for connection to a monitor
3
A-IN
Audio In RCA port
4
A-OUT
Audio Out RCA port
5
NET
Ethernet jack for connection to a local area network (LAN)
6
USB
USB ports for the optical mouse and back up drive/flash drive
7
AB 485
RS485 connections for controlling a PTZ camera
8
DC 12V
Port for connecting the included 12VDC power supply
a. Using a quality 75 ohm coaxial cable with a BNC connector, connect the camera(s) to the
DVR’s CAM In port(s).
b. Using a quality 75 ohm coax cable with a BNC connector, connect the video monitor to the
DVR’s MON Out port. If the display is a VGA monitor then connect the monitor’s VGA
cable to the DVR’s VGA port.
c. If audio monitoring is required, connect the audio monitoring device to the DVR’s RCA A-
OUT port.
d. To control a PTZ camera using the DRV’s embedded PTZ controller use the DVR’s
RS485 A and B connections. A is positive (+), B is negative (-). Be sure the polarities are
correct and consistent with the camera. You may also use the RS485 AB connections for
an external PTZ controller.
e. If the DVR is to be networked for remote monitoring and/or management connect the unit
to the network using the Ethernet jack.
f. USB ports – The DVR has 2 USB ports located on the back of the unit. One port is
intended for the optical mouse. The second USB port is can be used for backing up files to
a separate drive (e.g., flash drive, CD/DVD burner, etc.).
g. Hard Drive Installation – Unless ordered with and preconfigured at the factory, the DVR
requires a DVR hard drive to be installed. This unit will support a single hard drive up to
2TB. Secure the drive in the bottom of the case using the four included screws. Then
connect the drive to the SATA hard drive cable and power cable. Be sure the drive is
installed securely in the case. When applying power to the DVR the unit should
automatically (i) detect the drive, (ii) alert the user to confirm initialization and (iii) begin to
initialize it. Note that when the drive is initialized it will be formatted. Formatting the drive
will erase any existing data on the drive.
Important Note Regarding Hard Drives – Not all hard drives are fully compatible with
DVRs. If you have an existing hard drive you wish to use with the DVR you may install it at
your own risk and determine if the DVR recognizes the drive and correctly records data to
it. If you are considering the purchase of a hard drive, contact Securitytronix for
Page 8
v2.0 11/8/11
8
recommended manufacturers and models.
h. Connect the included power supply to the DVR’s power port. Then plug the power supply
to an appropriate AC outlet.
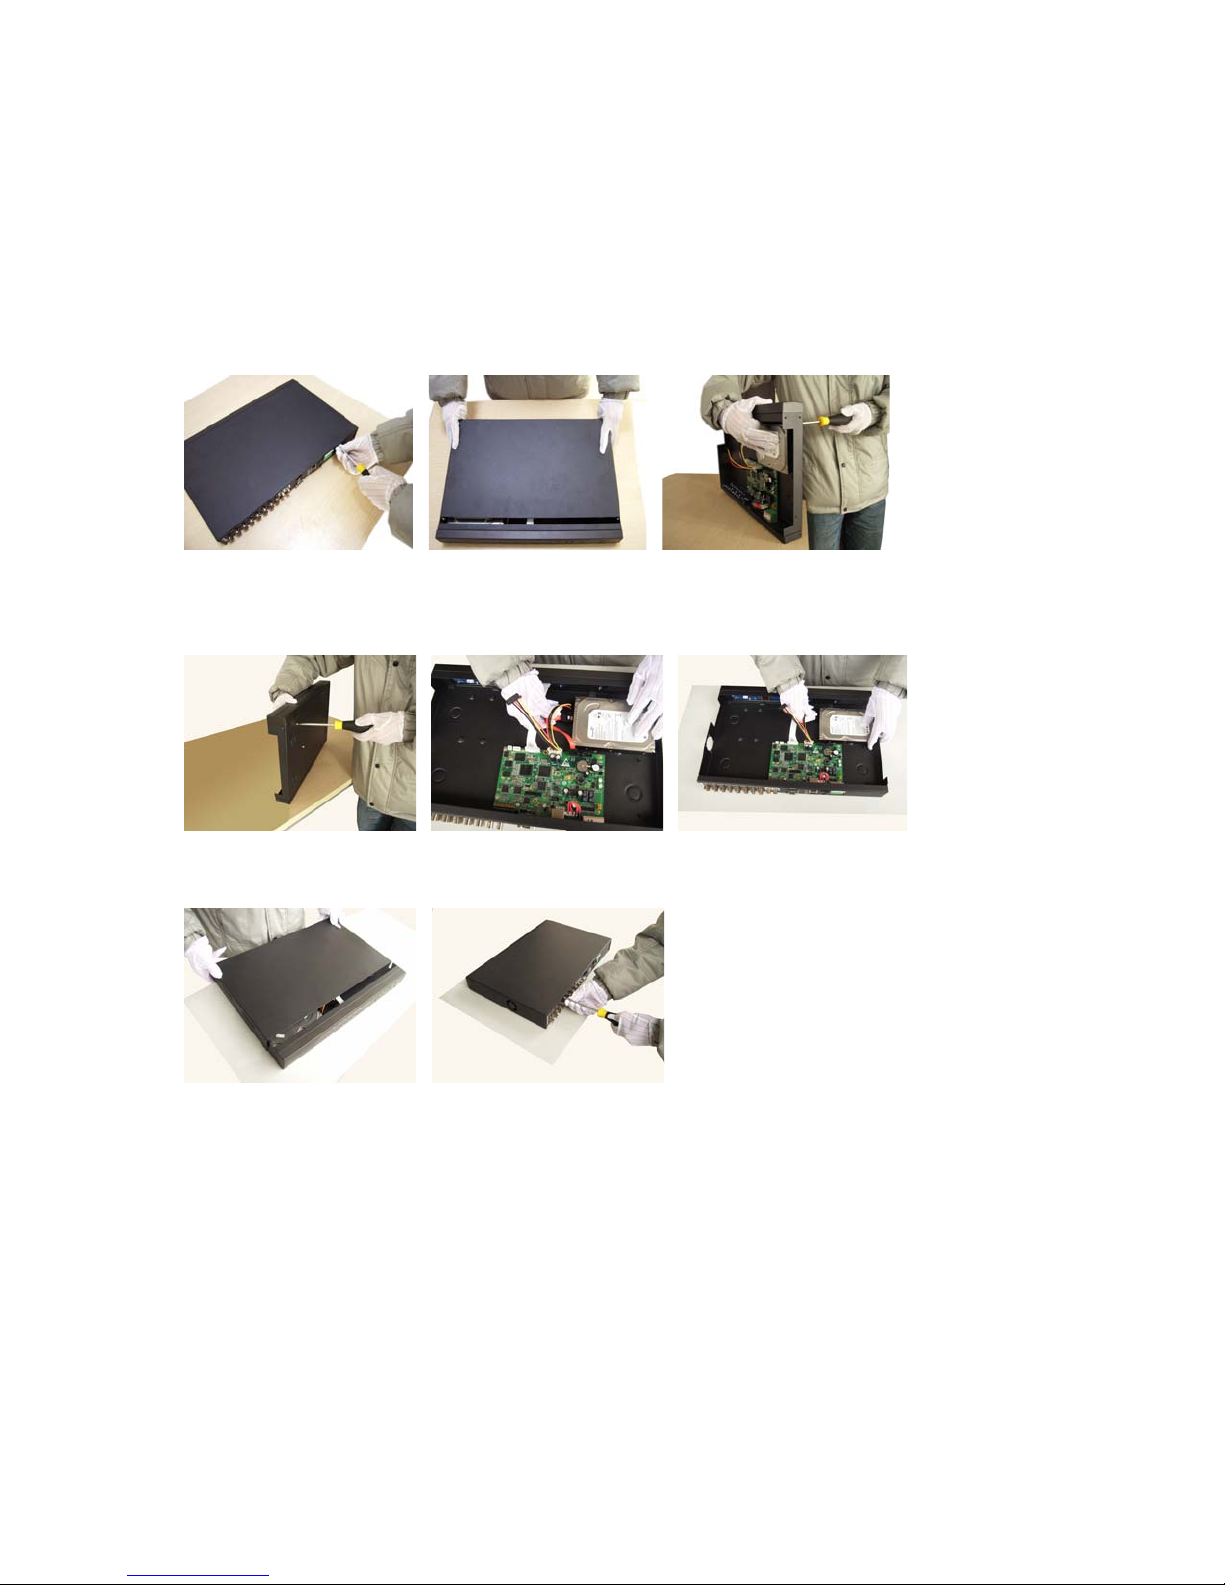
5. HARD DRIVE (HDD) INSTALLATION
Remove all cover screws Remove the cover
Install the HDD screws Connect the SATA cable Connect the power cable
Replace the cover Reinstall the cover screws
NOTE: Upon first powering up the DVR after installing the hard drive the DVR will prompt for HDD
formatting.
HDD Storage Calculator
Selecting the appropriate size hard disk drive is dependent upon a number of variables including:
Recording Mode: D1, HD1, CIF, QCIF
Recording Quality
Number of Cameras
Frames per Second
Hours per Day to Record
Using the
included HDD
screws,
install the
hard drive
through the
holes in the
bottom of the
DVR unit
Page 9

v2.0 11/8/11
9
Securitytronix provides a DVR Hard Disk Drive Storage Calculator to help determine the number
of days of recording are possible based upon HDD capacity. To access the calculator go to the
following link:
http://www.securitytronix.com/support.asp
Page 10
v2.0 11/8/11
10
CONTROLS
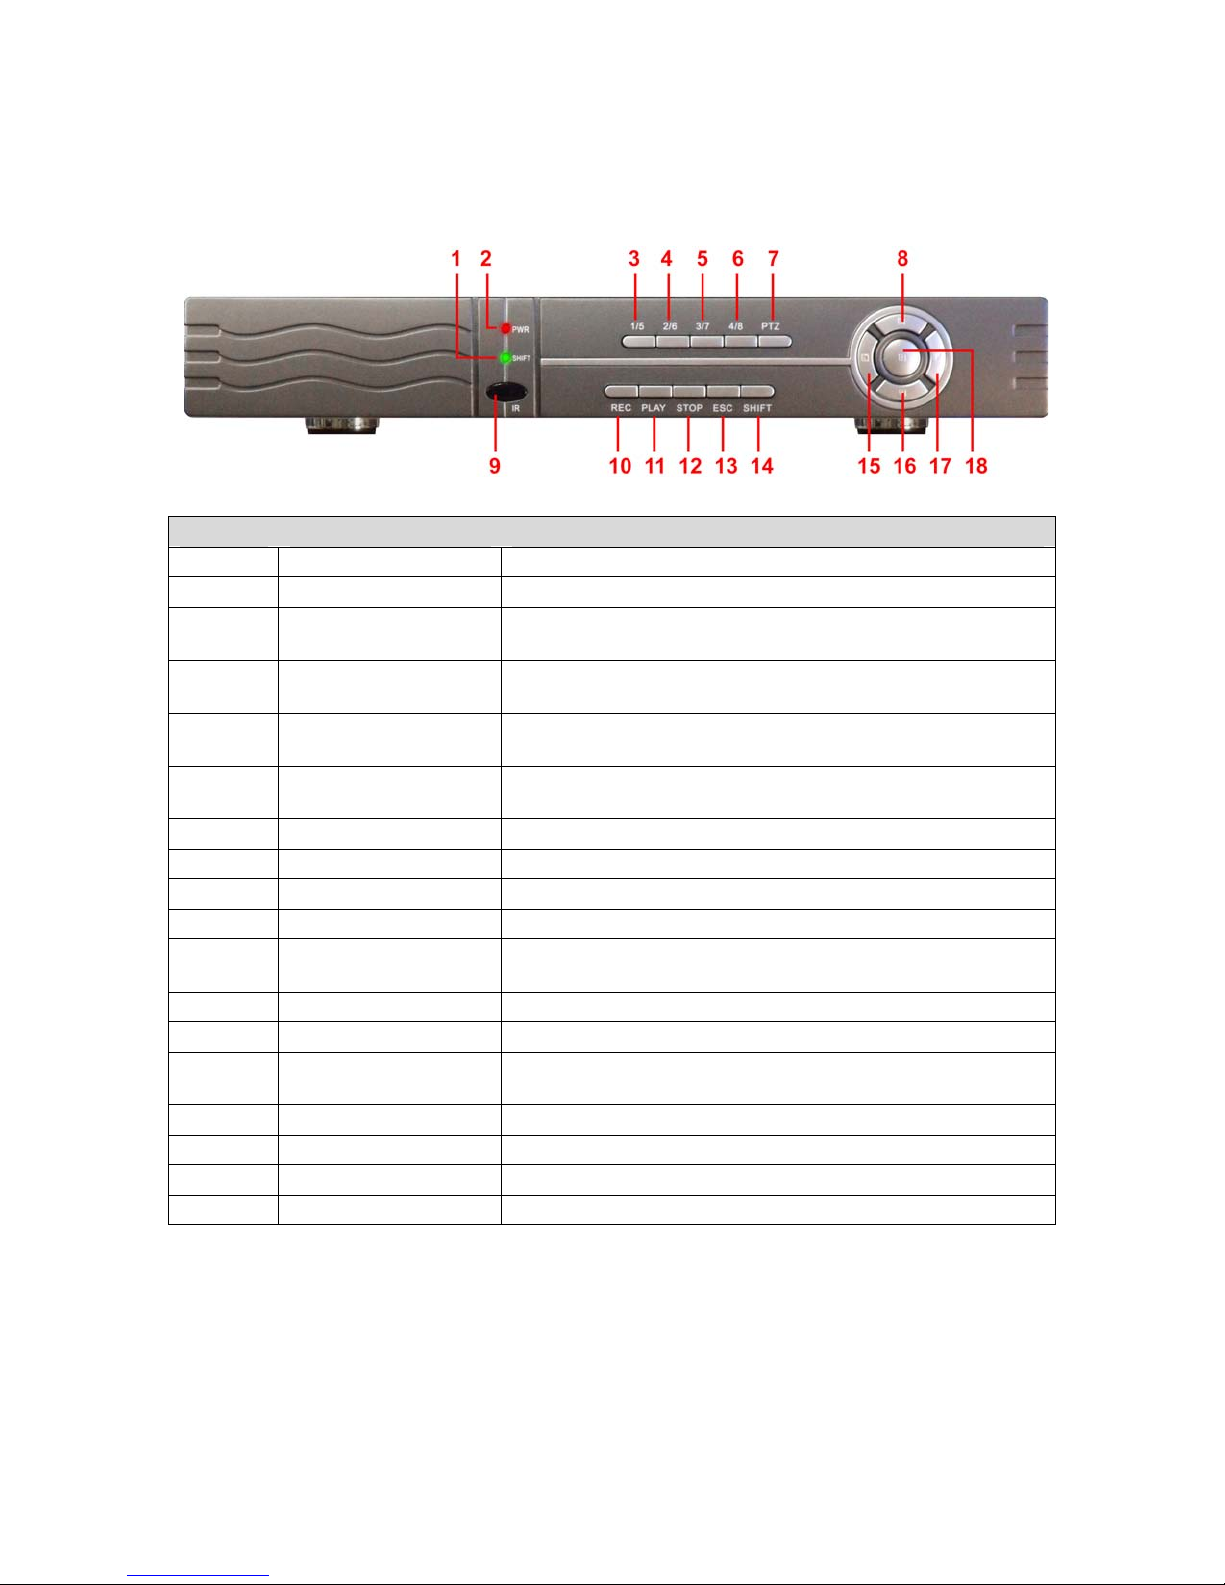
1. FRONT PANEL CONTROLS
Item
Panel Key/Indicator
Description
1
SHIFT LED
Indicates the SHIFT function is engaged
2
POWER LED
Indicates unit is powered.
3
1/5
Physical keypad for numbers 1 and 5. Select 5 by pressing
SHIFT.
4
2/6
Physical keypad for entering numbers 2 and 6. Select 6 by
pressing SHIFT.
5
3/7
Physical keypad for entering numbers 3 and 7. Select 7 by
pressing SHIFT.
6
4/8
Physical keypad for entering numbers 4 and 8. Select 8 by
pressing SHIFT.
7
PTZ
Display the PTZ Control Toolbar
8
UP
Up cursor key and pan up under PTZ Control
9
IR
Infrared remote receiver lens.
10
REC
Display the Recording Control Window
11
PLAY
Display the Record Search Window and Video Playback
Control Toolbar
12
STOP
Stop playback while in playback video mode
13
ESC
Exit the current function or operation
14
SHIFT
Allows for the selection of the second number of the
“slashed” pair: 1/5, 2/6, 3/7 and 4/8
15
LEFT
Left cursor key and pan left under PTZ Control
16
DOWN
Down cursor key and pan down under PTZ Control
17
RIGHT
Right cursor key and pan right under PTZ Control
18
ENTER
Switch between full frame and quad display; Enter function
Page 11
v2.0 11/8/11
11
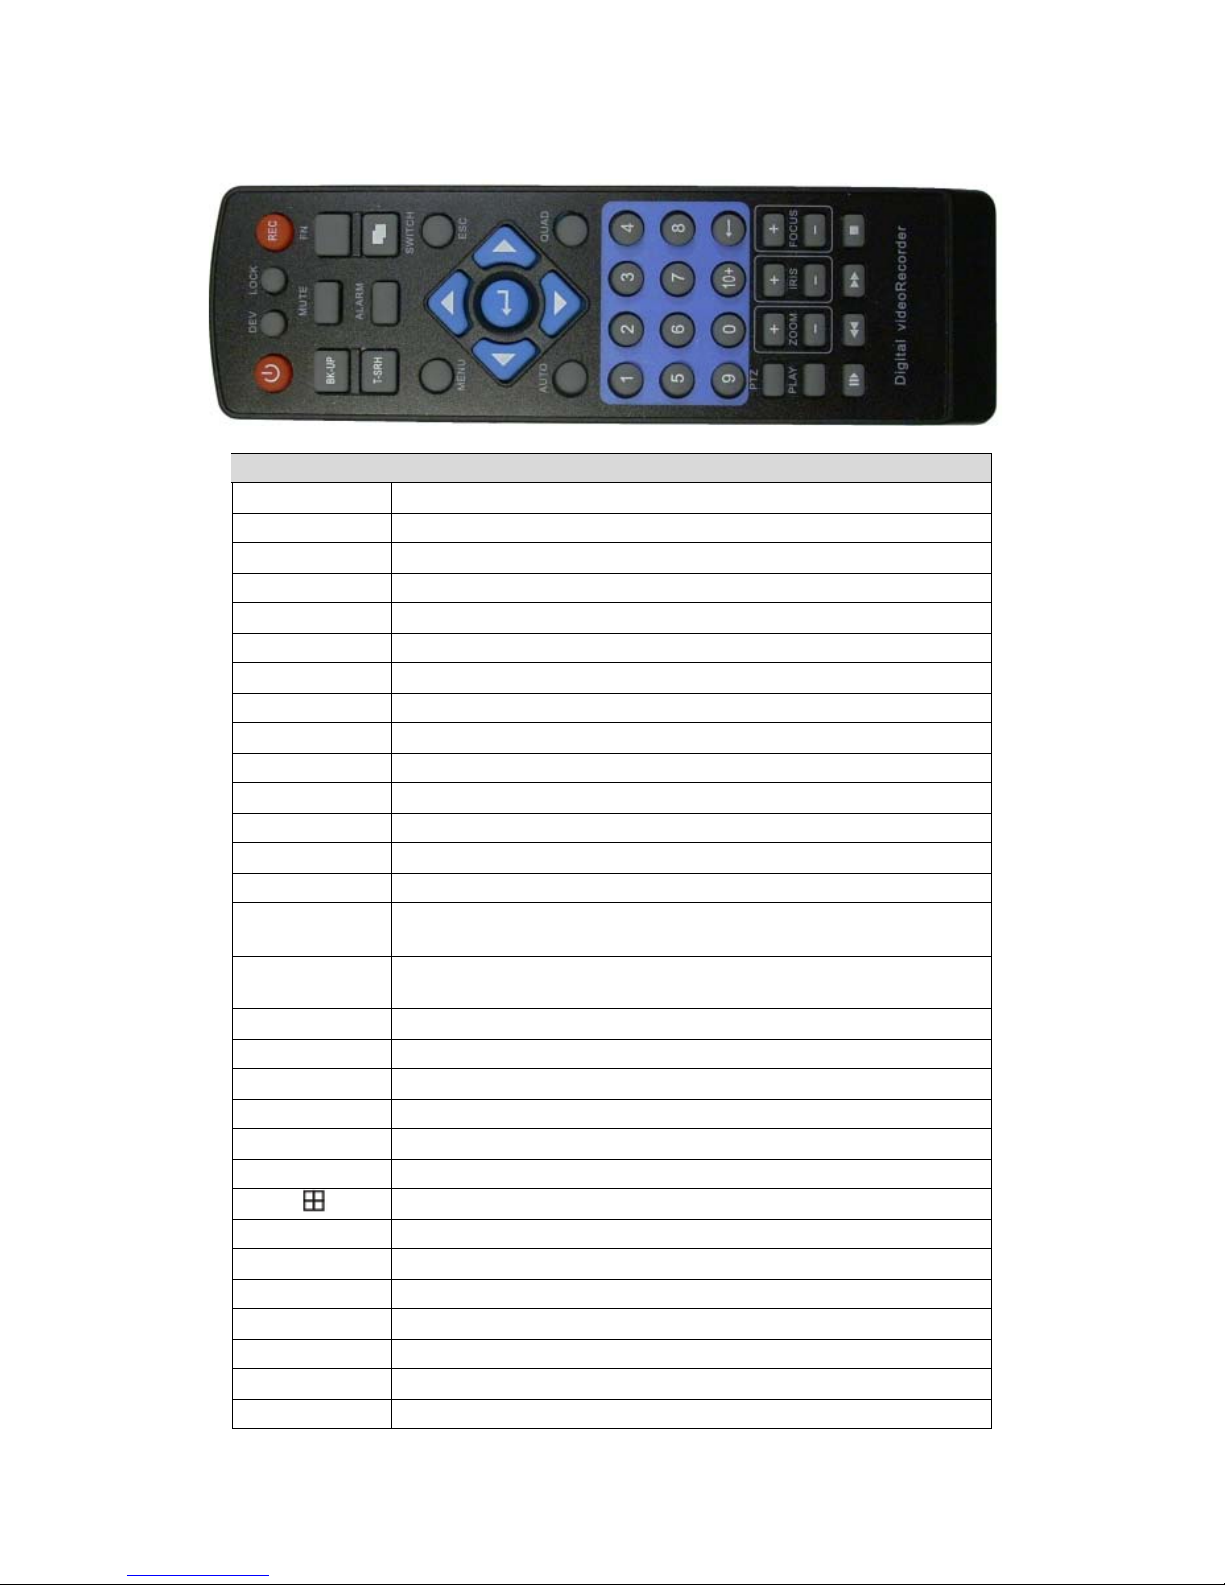
2. INFRARED REMOTE
Keypad Key
Description
POWER
Power DVR On/Off
DEV
If using multiple DVRs, select DVR1, DVR2, …
BK-UP
Displays the File Backup Screen
MUTE
Places audio into mute
T-SRH
VGA & BNC shift
MENU
Displays the Main Menu
UP
Up cursor key; pan up under PTZ Control
LEFT
Left cursor key; pan left under PTZ Control
RIGHT
Right cursor key; pan right under PTZ Control
DOWN
Down cursor key; pan down under PTZ Control
AUTO
Feature not implemented in this model
0-9
Numeric keypad
PTZ
Displays the PTZ Control Toolbar
ZOOM +/-
Camera zoom in and out under PTZ Control
PLAY
Display the Record Search Window and Video Playback Control
Toolbar
PLAYBACK
Initiates playback under the video playback mode. Also displays
the Record Search Window and Video Playback Control Toolbar
SLOW
Slow playback under video playback mode
REC
Displays the Recording Control Window
LOCK
DVR will lock the password
FN
Display the short-cut menu; function key
SWITCH
Change from single to quad view and back
ALARM
Alarm function not implemented
Selects multiple windows (1,4, 8, 9) in Preview mode
ESC
Exit the current function or operations
ENTER
Switch between full frame and quad display; Enter function
QUAD
Switch between full frame and quad display
FOCUS +/-
Camera focus adjustment under PTZ Control
IRIS +/-
Camera iris adjustment under PTZ Control
STOP
Stop playback while in video playback mode
FAST
Fast playback while in video playback mode
Page 12

v2.0 11/8/11
12
3. MOUSE CONTROL
Plug the optical mouse into a USB port on the DVR’s real panel. The DVR’s optical mouse
operates in the same manner as the typical computer mouse. The information below identifies key
mouse control functions using the mouse left and right keys.
Left Mouse Key – Single Click
Point the cursor to any menu icon and click the left key once to make a selection.
To select a drop-down menu and select an option in that menu.
To input data (e.g., login, camera name, etc.) This is accomplished using the soft
keyboard, moving the cursor to the appropriate character and clicking the left mouse
button.
Right Mouse Key – Single Click
The right mouse key is used to activate a pop-up menu. This menu is simply a short-cut menu for
select DVR functions. The Short-cut Menu is similar to the one displayed below.
Main Menu – Calls up the Main Menu
Record Mode – Calls up the Record Mode Screen
Play Back – Calls up the playback interface for playback control
PTZ Control – Calls up the PTZ Control Interface
HighSpeed PTZ – Allows the user to control PTZ functions with the
moue
Alarm Output – Alarm Output is not implemented in this model
Color Setting – Calls up the Color Setting window to adjust display per
camera
Output Adjust – Calls up the Output Adjust screen to set display borders
on monitor
Logout – Calls up the Logout screen to logout, shutdown or reboot the
DVR
View 1 – Calls up a short-cut menu to select a single channel display
View 4 – Calls up a short-cut menu to select a quad display
Page 13

v2.0 11/8/11
13
OPERATION
1. POWERING ON and SHUTTING DOWN
Powering On
a. Plug the included power supply into the DVR’s power port and into an appropriate AC
power outlet.
b. Once there is power to the DVR, POWER indicator light will be displayed on the DVR’s
front panel.
c. Press the Power button on the DVR’s infrared remote controller.
d. A multi-window display is the DVR’s default display setting once the unit powers up. The
user may configure the DVR so the Time Recording Setting is the default so the DVR will
automatically begin to start the Time Recording function once it is turned on.
e. If a hard disk drive has not been installed or has not been formatted prior to turning on the
DVR a “HARD DISK DRIVE NOT DETECTED” message will be displayed.
If no hard drive is installed power down the DVR, install the hard drive and turn on the
DVR. The system will then detect the drive and request to format if necessary.
If a hard drive is installed but the DVR issues the “not detected” message (i) the hard
drive could be faulty and require replacement and/or (ii) the power and SATA cable
connections between the hard drive and DVR motherboard came lose and need to be
reseated.
Shutting Down
There are two methods for shutting down the DVR:
a. Enter the MAIN MENU select LOGOUT then select SHUTDOWN or right-click the mouse
and from the Short-cut Menu select LOGOUT followed by SHUTDOWN. Note the user
must be logged in to shut down the DVR. A Logout/Shutdown screen similar to the one
below is displayed.
b. Remove power to the unit by simply disconnecting the power supply. This, however,
should not be done repeatedly as doing so may corrupt and/or damage the hard drive.
Only remove power from the unit if the DVR will not respond to a shutdown through the
Main Menu as described above.
Page 14

v2.0 11/8/11
14
If the DVR is recording (normal recording or time recording) at the time the unit is turned off the
DVR will automatically save the recording before shutting down. When the DVR is powered back
on it will automatically revert to that recording condition prior to it being turned off.
2. ACCESSING SYSTEM MENU
There are several methods for accessing the DVR’s menus:
a. Press the button on the DVR’s front panel for the Main Menu.
b. Click the Mouse’s Right Key for the pop-up Short-cut Menu.
c. Press the PLAY button on the DVR’s front panel for the Video Playback Toolbar and
Recording Search window.
d. Press REC on the DVR’s front panel or remote control for the Record Mode window.
e. Press PTZ
on the DVR’s front panel or remote control for the PTZ Control window.
Menus may also be accessed using the infrared remote controller’s buttons.
Use ESC to exit any operation.
The ability to access menus and make menu selections will depend upon the user’s access rights
as described below.
3. USER ACCESS RIGHTS
There are 2 default access settings from the factory:
Admin – Top authority with all privileges/permissions.
Guest – Privileges/permissions limited to preview and video playback.
Admin and User privileges/permissions cannot be changed. However, their passwords can be
modified.
In addition, there is a Default user whose privileges/permissions are initially limited to preview and
video playback. However, default privileges/permissions and passwords can be set and modified
on a user-by-user basis.
Out of the box, Admin, User and Default have no passwords. Passwords and
privileges/permissions by going to Main Menu, Advanced and Account.
After setting account passwords password protection goes into effect. If a password is wrong three
consecutive times an alarm will start. If the password is wrong five consecutive times the account
will be locked. Locked accounts will automatically be unlocked 30 minutes or manually unlocked
by rebooting the DVR.
User selection is done through the drop-down menu. Password input is accomplished using the
Mouse Left Key and soft keyboard.
Page 15

v2.0 11/8/11
15
4. PREVIEW MODE
Once logged into the system the DVR enters the Preview Mode. The Preview Mode displays
current monitoring activity in a single or multiple windows. The user may right click the mouse to
switch between preview windows. The date, time, channel name and channel status are
displayed. Key icons in the Preview Mode are:
Icon
Description
Recording taking place for that channel
Indicating motion detection if that channel has a motion detection alarm setting
No video or video loss for that channel
Camera lock – current user login does not have rights to view that channel
5. MAIN MENU
The Main Menu provides user access to all DVR functions and operations. This section will
highlight each Main Menu function with detailed operational instructions provided in subsequent
sections.
Accessing the Main Menu can be done by pressing MENU on the DVR’s front panel or by clicking
on the Right Mouse Button to display the pop-up Short-cut Menu. Note to enter the Main Menu
the user must have access privileges. Upon accessing the Main Menu the following graphical user
interface (GUI) will be displayed (note that due to software revisions the actual GUI may appear
slightly different that what is depicted in this manual).
Page 16

v2.0 11/8/11
16
When moving the mouse cursor to any of the above GUI’s icons, a brief description of that menu
function is displayed.
Each menu option (as represented by an icon) may have multiple functions in sub-menus. It is
important to remember that when making a menu or sub-menu setting, the user must SAVE or
CONFIRM that setting prior to exiting the menu or sub-menu. Failure to do so will keep the new
requested setting from taking effect. Further, some setting options can be selected via a
“checkbox”. If the checkbox is “filled” then the setting has been selected. Again, if prompted, the
user must click OK or CONFIRM so the new setting takes effect.
To exit the main menu click Cancel or click the right mouse button to display a pop-up menu
showing UpWindow (return to previous screen or menu) and Show Desktop (return to preview
display).
Main Menu
Sub-Menu
Description
Record Config
Set the recording configuration, recording type, time session
Playback
Playback a recorded file. Includes file search capability by
record mode, channel, time, etc.
Record
Backup
Detect or format backup storage; backup selected files
Motion
Detection
Configure and/or change video motion detection settings
Video Blind
Configure and/or change video blind detection settings
Video Loss
Configure and/or change video loss detection settings
Alarm Input
Not implemented for this model
Alarm Output
Not implemented for this model
Disk Event
Set alarm for no disk, disk error, no disk space
Alarm
General
Set system time, date, time format, language, DVR ID, etc.
Encoding
Encode mode, bit rate, quality parameters, etc. Can change
encode size, stream control, frame rates, etc.
Network
Set network parameters including network ID, video data
transmission protocols, etc.
System
System
Net Service
Network server settings.
Page 17

v2.0 11/8/11
17
GUI Display
Settings for menu GUI display
PTZ Config
Configure PTZ cameras per channel
Display Tour
Set sequential screen display by single or multiple windows
HDD
Management
Hard disk status and configuration settings
User Account
Management
Set and modify user accounts, permissions and passwords
Online User
Sever connection between an online user and the DVR
Output Adjust
Adjust monitor display borders
Automatic
Maintenance
Set conditions for DVR auto-reboot and auto file deletion
Restore
Restore specific settings to the DVR’s factory default
Upgrade
Interface for upgrading DVR software
Advanced
Device Info
Display DVR audio in, alarm in, alarm out configuration.
HDD Info
Hard disk capacity and free space. View recording times.
BPS Code
Stream
Statistics
Display code stream statistics
Log
Information
Select and display various log data
System
Information
Version
Information
DVR serial number, software version, build date, etc.
Logout
User logout, DVR shutdown and DVR reboot.
6. RECORDING OPERATION
Manual Recording
a. Right click the Mouse to display the pop-up Short-cut Menu and select Record Mode
or press the REC button on the DVR’s front panel. The Record Mode screen similar to
the one below will be displayed on the monitor.
!
Page 18
v2.0 11/8/11
18
b. There are three recording options under Record Mode:
Schedule – Recording to take place per a schedule created under Record Config
(Main Menu, click the Record icon, then the Record Config icon).
Manual – Under manual recording the DVR records regardless of any condition.
Recording begins once a channel is selected under Manual and confirmation is made.
Stop – All recording (manual or schedule) will cease or not begin once the channel is
selected and confirmation is made.
c. Independent settings can be made for each channel. White indicates the recording option
is selected for that channel; black indicates the recording function has been disabled for
that channel. If ALL is selected then the recording function is selected for all channels.
d. After settings are completed the user must click OK and exit.
Auto Recording
Automatic recording can take 3 forms:
Regular – The default setting is 24 hours, non-stop recording after the DVR’s initial boot.
Detection – Allows automatic recording when the camera detects motion in a given area,
the camera is blinded or there is video signal loss.
Alarm – Allows the automatic recording when an external event triggers an alarm (e.g., a
door opening). Note the alarm function is not implemented in this model DVR.
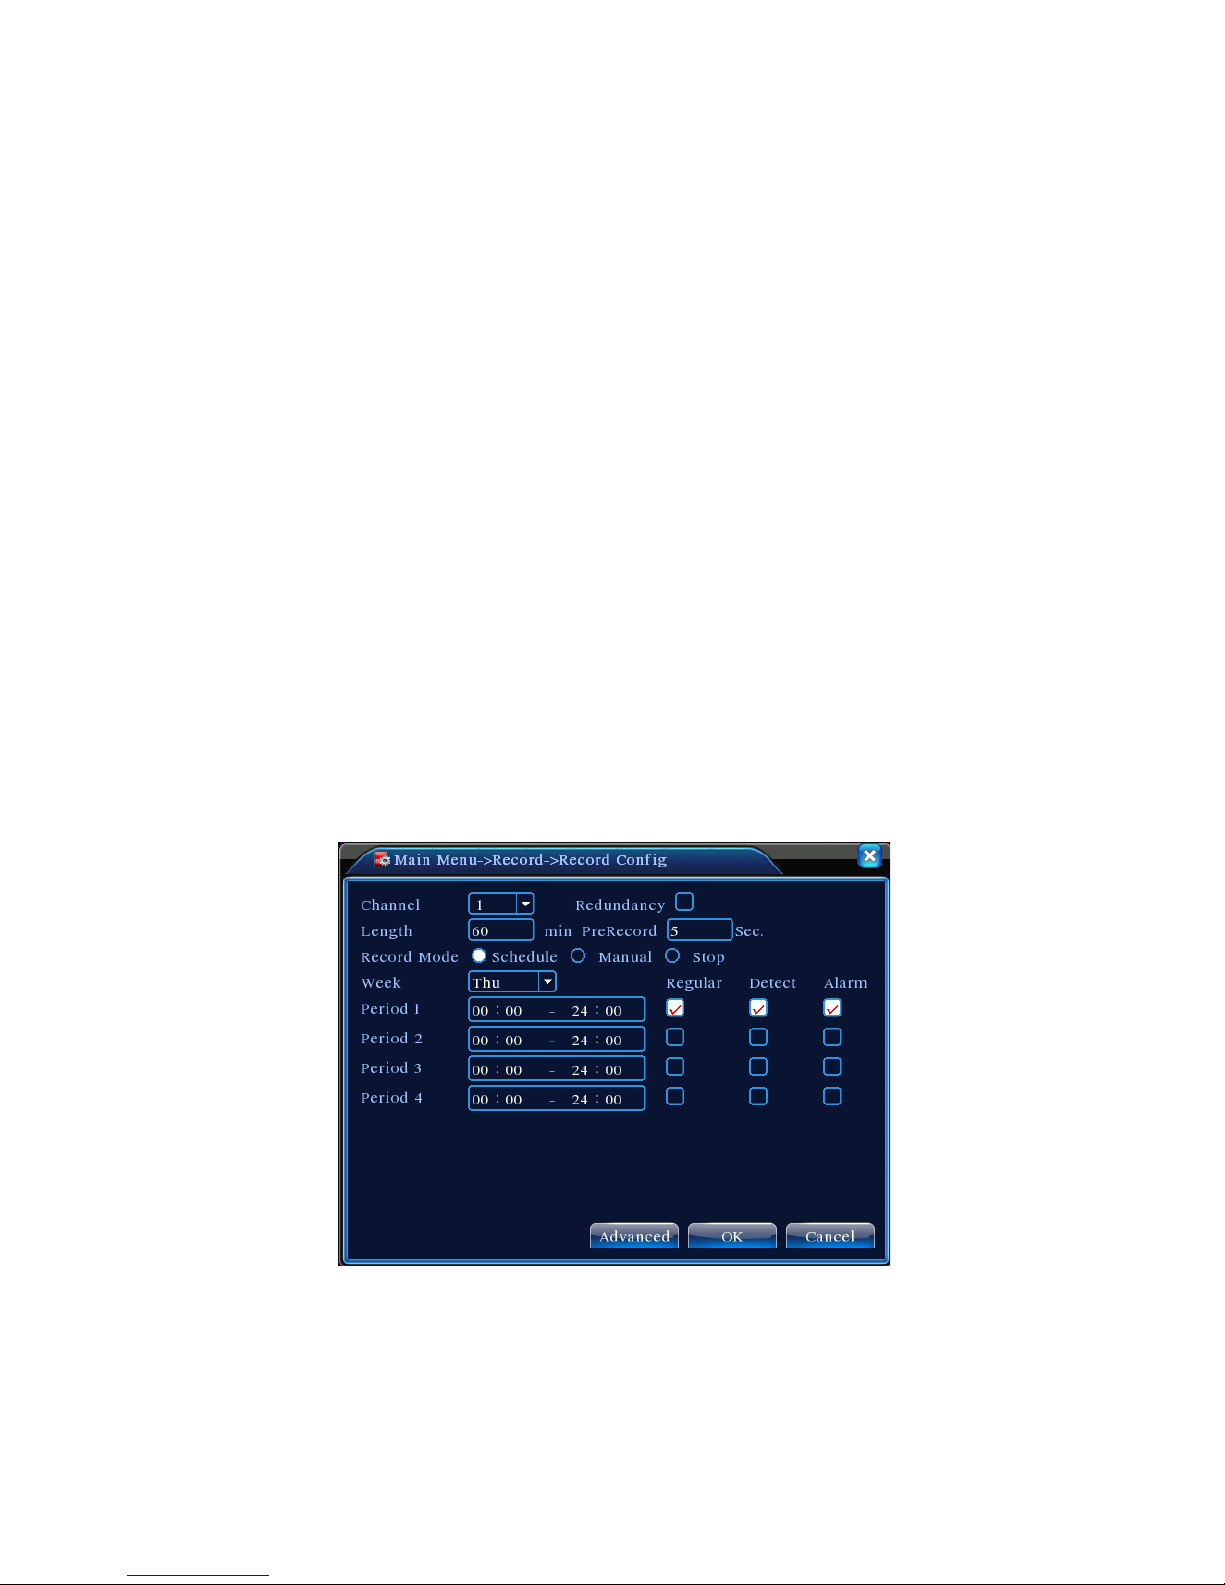
The setting of automatic recording conditions per channel is done via the Record Config screen.
Go to Main Menu, click the Record icon, then the Record Config icon and a screen similar to the
one below will be displayed.
a. CHANNEL – From the drop-down menu select the corresponding channel or select ALL if
the configuration is to be applied to all channels.
b. REDUNDANCY – If the DVR has two hard disk drives Redundancy allows the writing of
the video file to both drives. Click and highlight the Redundancy check box if desired.
Page 19
v2.0 11/8/11
19
NOTE: Using redundancy will double the hard disk usage, essentially cutting recording time
in half.
c. LENGTH – Using the mouse enter the duration of each video file. 60 minutes is the
default.
d. PRERECORD – If desired, the DVR can record from 1 to 30 seconds before an event
happens. The time length is determined by the code stream.
e. RECORD MODE – Set the recording condition: scheduled, manual or stop.
f. WEEK and PERIODS – Select the day and time slot the camera and DVR are to perform
the recording function. Select ALL for every day of the week.
g. REGULAR, DETECT AND ALARM RECORDING TYPE – Highlight the desired
checkbox for the desired recording type.
Regular – Common, non-stop recording (unless Period set for specific time slot).
Video file type is “R”
Detect – Recording is triggered by a motion detection, video blind or video loss event.
The video file type is “M”.
Alarm – Recording is triggered by an external alarm. The video file type is “A”. The
alarm function is not implemented in this model.
h. Upon completing all desired settings click SAVE.
Note: If the recording configuration requires Detection (Motion Detection, Video Blind or Video
Loss) and/or Alarm, additional settings must be made under the Alarm Menu by going to Main
Menu and clicking the Alarm icon.
Auto Recording – Motion Detection Recording
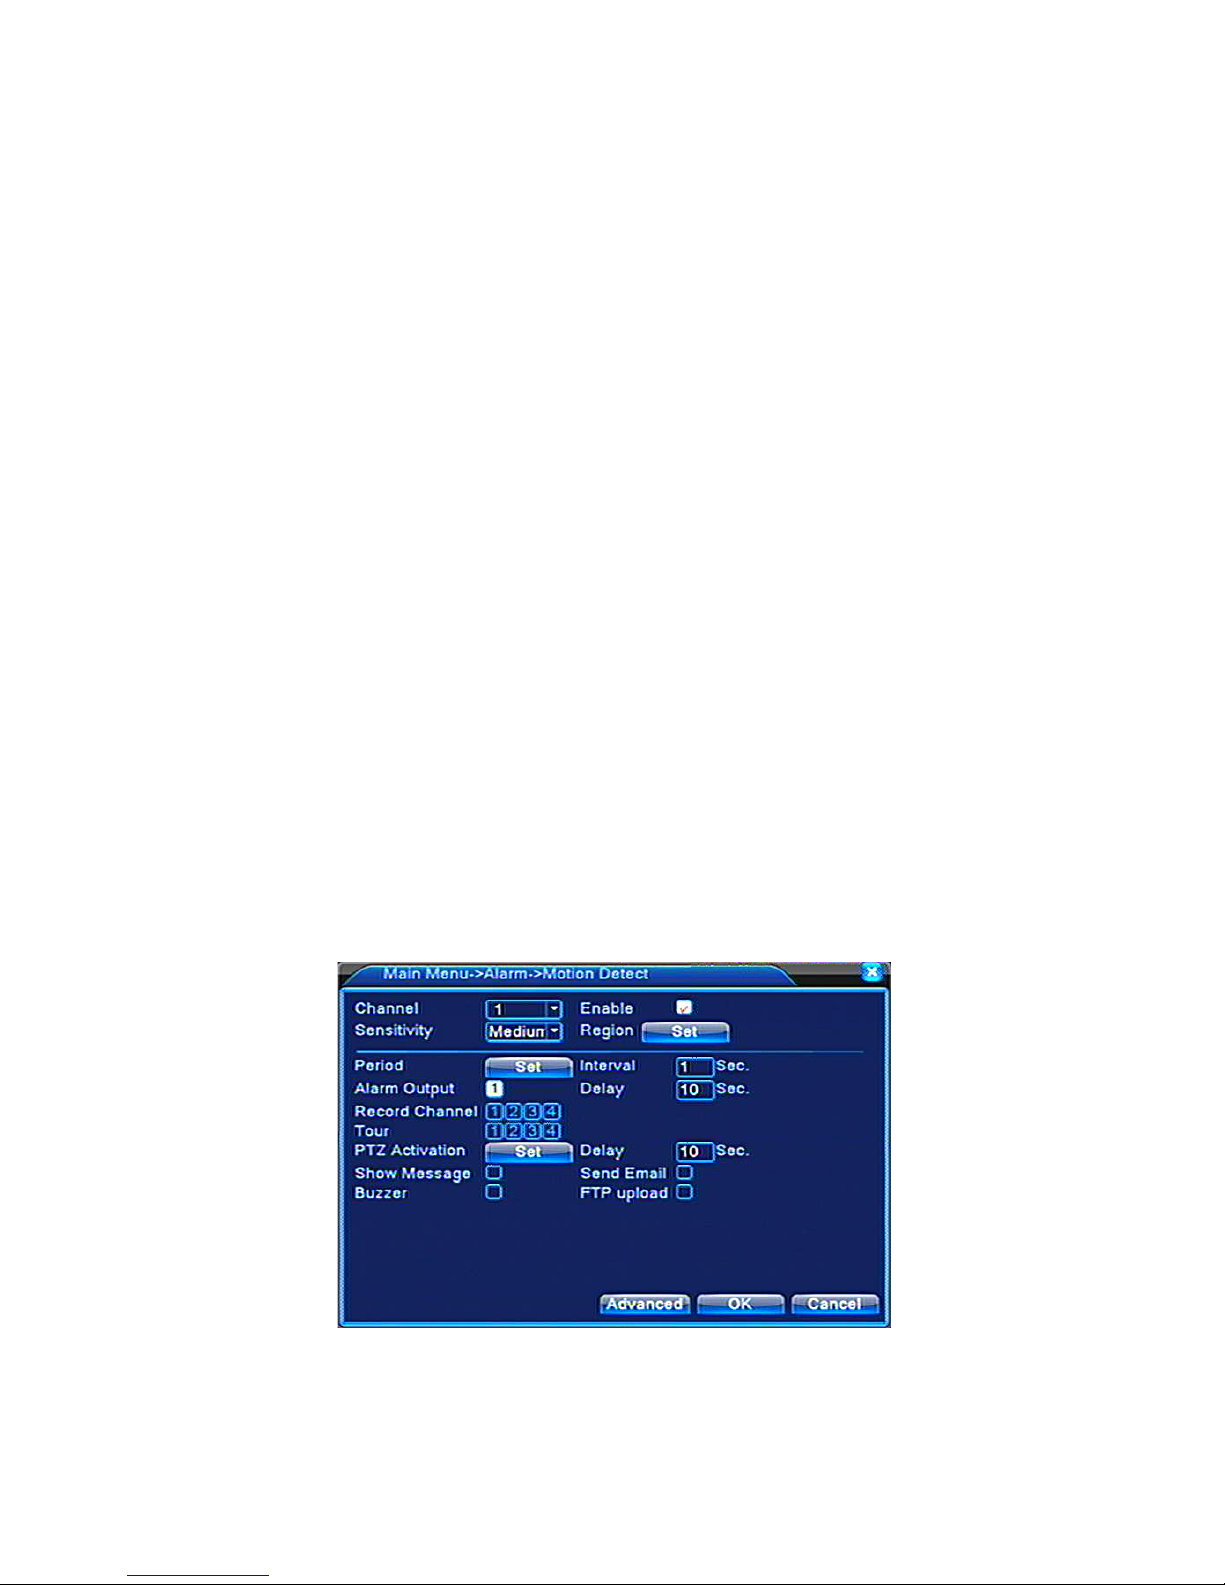
a. To setup Motion Detection Recording go to Main Menu, click the Alarm icon, then the
Motion Detection icon. The Motion Detect setup screen similar to the one below will
appear.
b. CHANNEL – Select the camera for the motion detection area from the drop-down
menu.
Page 20
v2.0 11/8/11
20
c. ENABLE – Highlight the checkbox if motion detection is to be enabled.
d. SENSITIVITY – Select from the six levels of motion sensitivity from the drop-down
menu.
e. REGION – The viewable area where the camera is to detect motion and the DVR is to
record. By setting a region it is possible to reduce intermittent and/or low priority
events that could trigger motion detection (e.g., a ceiling fan, a breeze moving
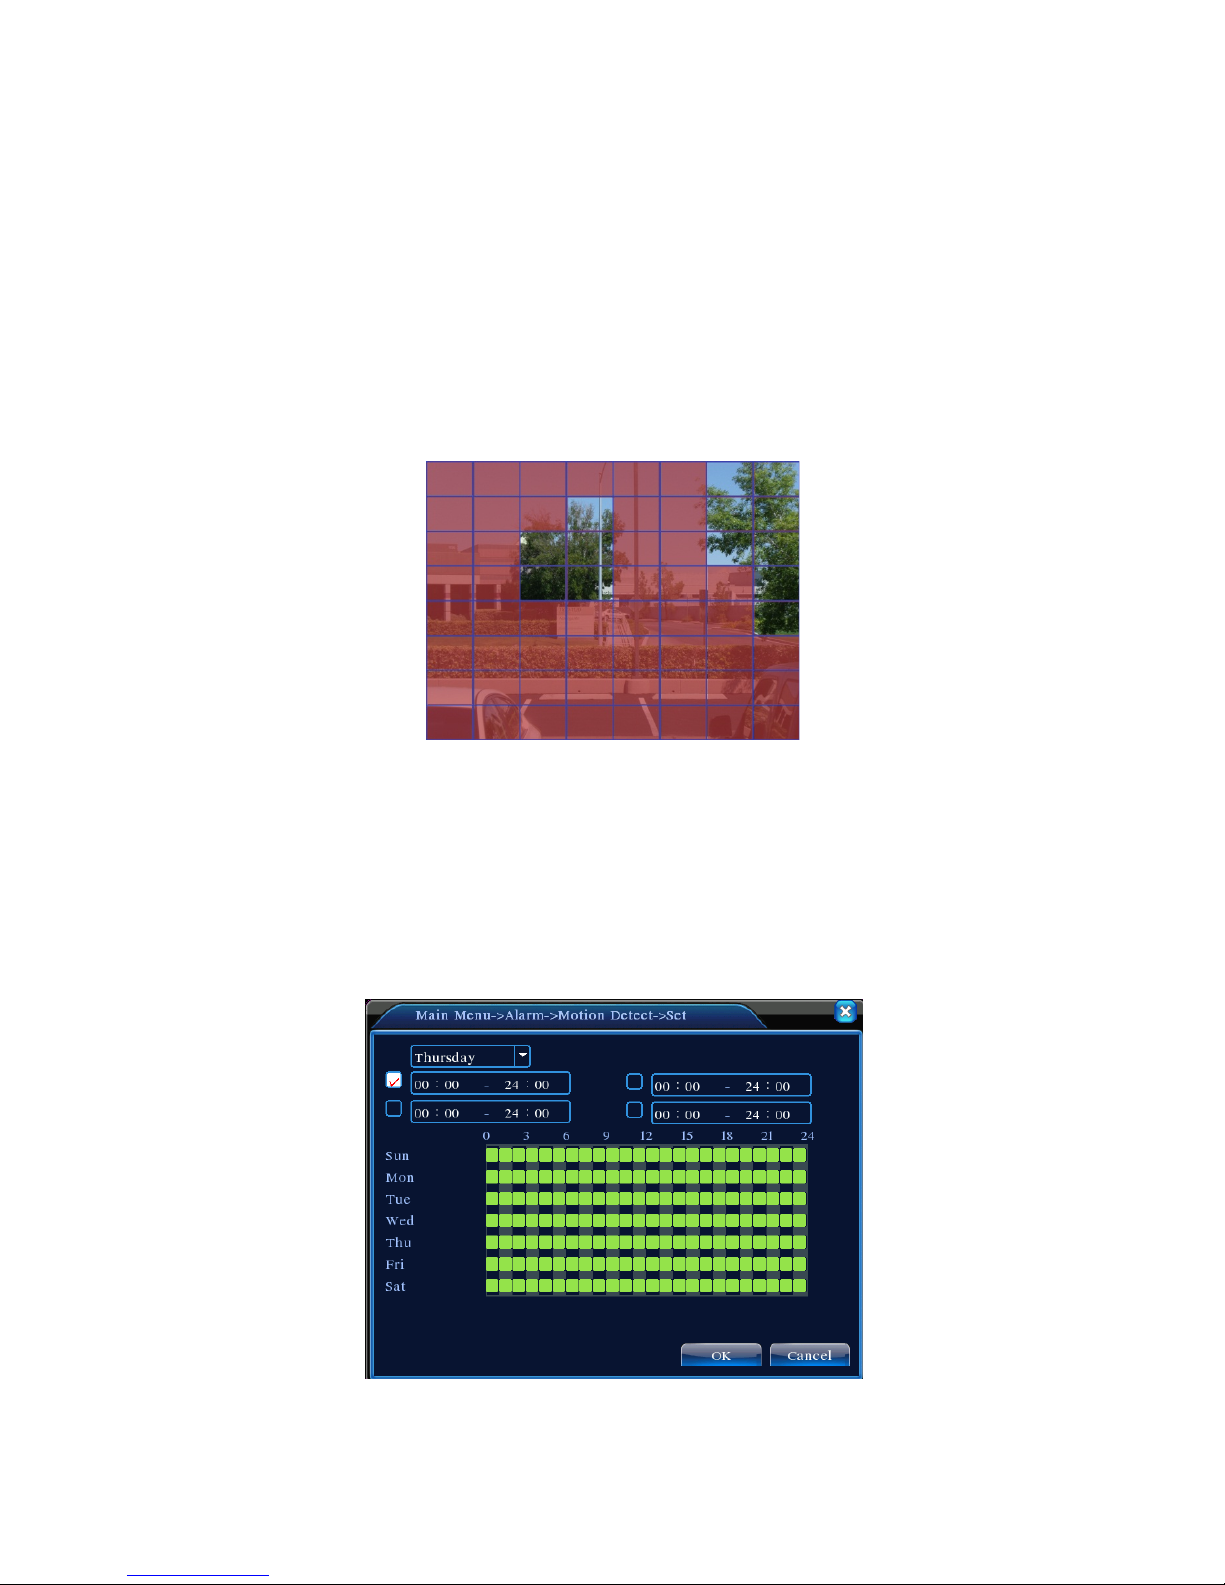
curtains). To define the motion detection region:
Click SET. This will present a display similar to the one below. The red blocks
represent the area where motion will be detected and recorded. The non-colored
boxes represent the regions where motion will not trigger recording.
To adjust the motion detection region position the mouse cursor on a block, click
the right mouse button and drag the mouse over the area to be defined. Use the
left mouse button to de-select.
Right click the mouse button and select UpWindow from the pop-up menu and
return to the Motion Detection setup screen.
f. PERIOD – To set the day and time period for the motion detection function to take
place click SET and a screen similar to the one below will appear:
Page 21
v2.0 11/8/11
21
Select the desired day from the drop-down menu or ALL for the entire week. Four
possible time slots are available for each day. Use the mouse and soft keyboard to
enter the required time periods. Upon doing so the graphic will adjust to indicate the
selected days and time periods. When done, click OK.
g. INTERVAL – Set an interval period in seconds. If there are several motion detection
signals occurring within the interval period only one alarm signal is turned on.
h. ALARM OUTPUT – There is no alarm function with this model DVR
i. DELAY – Period during which the alarm sounds after the alarm input returns to
standby status. Set a delay in the range of 10 to 300 seconds.
j. RECORDING CHANNEL – Select one or multiple recording channels for the video
signal when the alarm is activated.
k. TOUR – Upon a motion detection or other alarm event the monitor will display a single
window beginning with the channel on which the alarm took place. If desired,
additional single windows per channel will sequence. The sequence interval is set by
going to Main Menu, clicking on the System icon, clicking on the Tour icon and
entering the interval period in seconds.
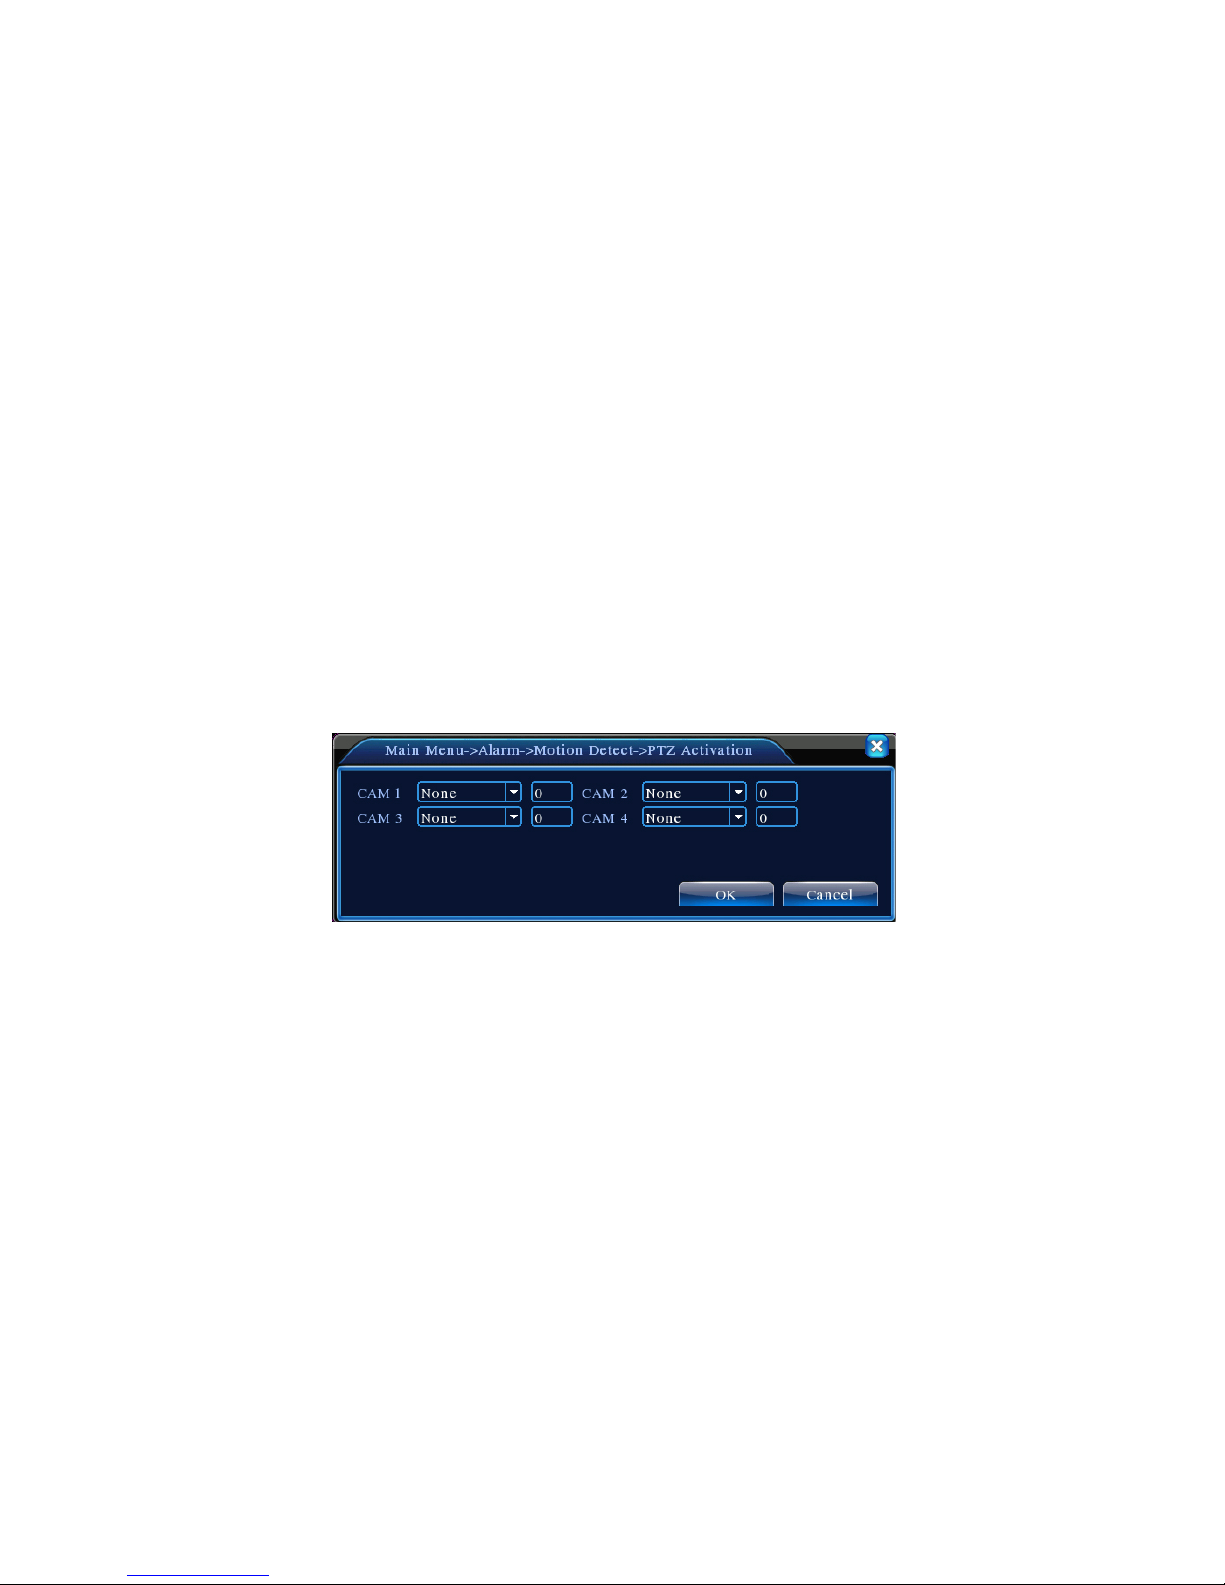
l. PTZ ACTIVATION – In the event of a motion detection or other alarm a PTZ camera
can be activated and set to automatically pan and or cruise among pre-determined
spots. By clicking on SET a PTZ Activation screen similar to the one below appears.
For each PTZ camera select the type of PTZ function desired from the drop-down
menu. When done, click OK. Note for PTZ activation to work, the PTZ camera has to
be configured by going to Main Menu, clicking the System icon, and clicking the PTZ
Config icon and entering the settings. Once done, the PTZ’s presets, pattern or cruise
settings must be created. This is done by calling up the PTZ Control through the
Short-cut Menu.
m. DELAY – Once the alarm stops the recording will continue for a set period of 10 to
300 seconds then stop.
n. SHOW MESSAGE – If the checkbox is highlighted an Alarm Status screen will appear
on the monitor when a motion detection event occurs.
o. BUZZER – If the checkbox is highlighted a beep will be heard when a motion
detection event occurs.
p. SEND EMAIL – If the checkbox is highlighted an email will be automatically sent to a
designated individual when a motion detection event occurs. Go to Main Menu, click
the System icon and then click the NetService icon to enter the desired email setting.
q. After all selections are made click OK.
Page 22
v2.0 11/8/11
22
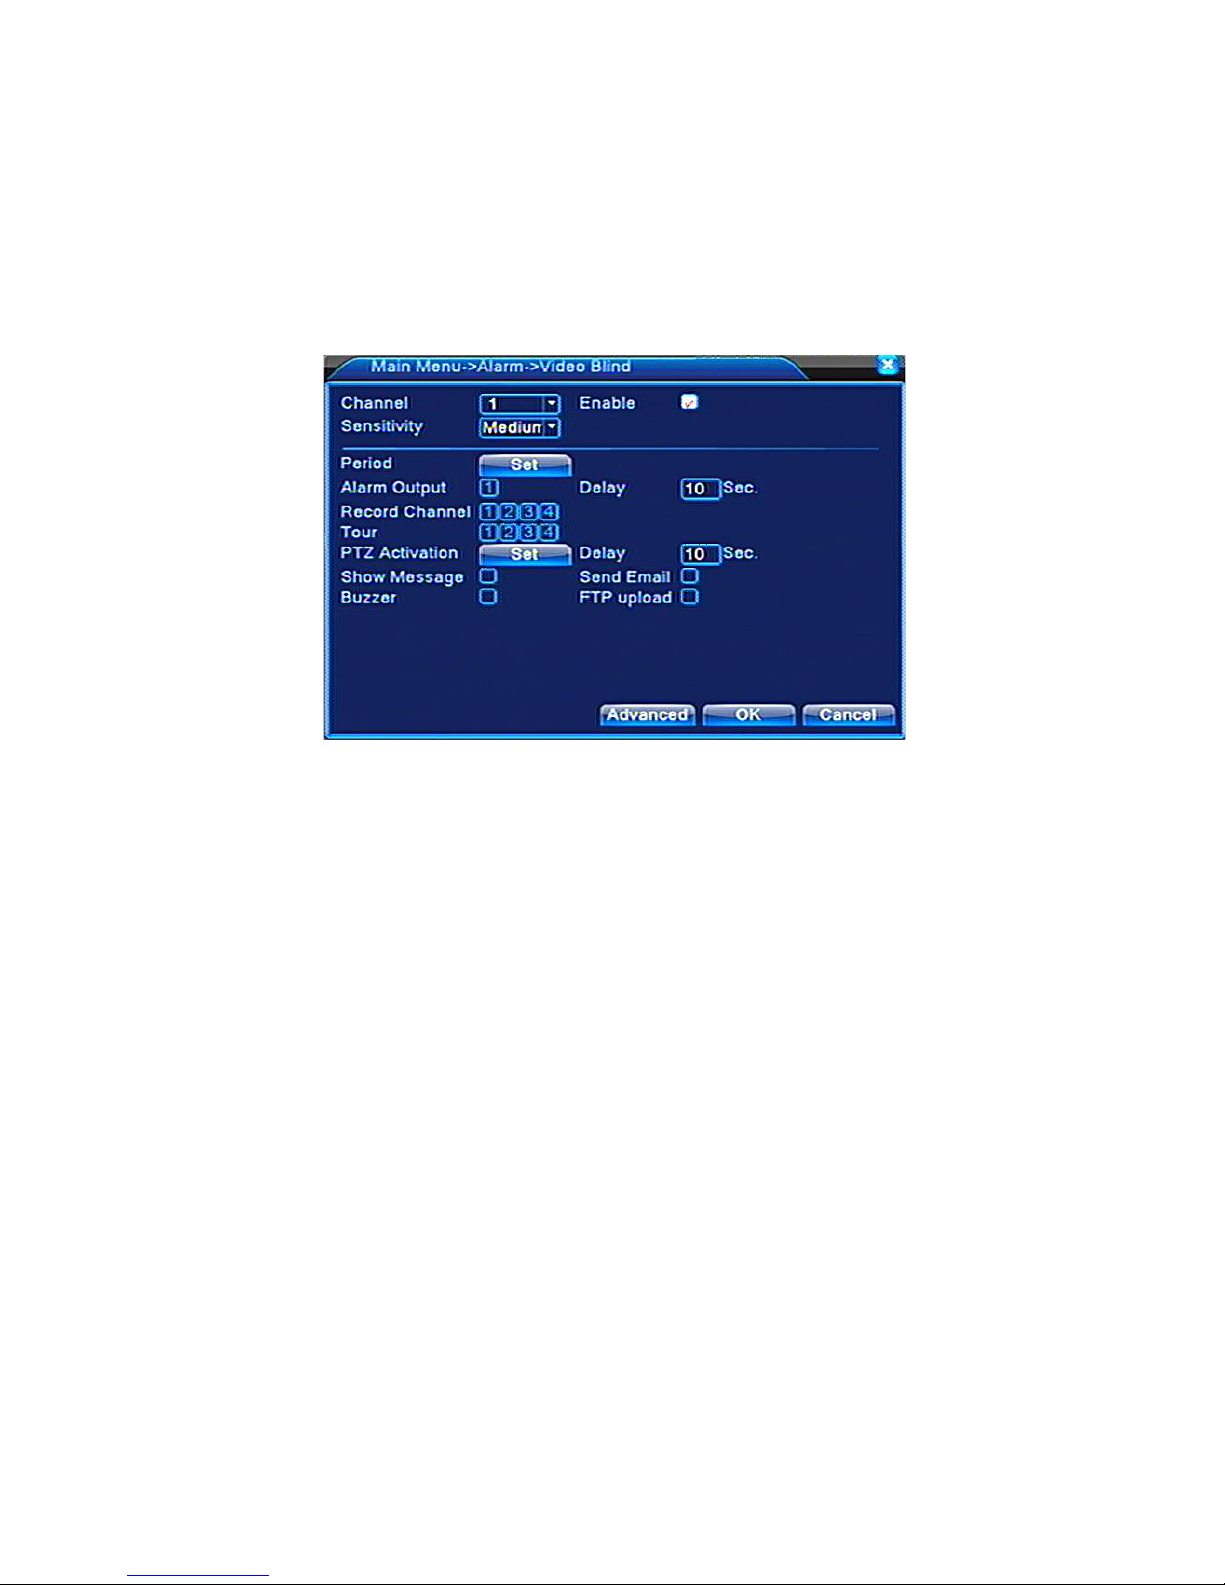
Auto Recording – Video Blind
When the video image is lost, such as the camera being covered, the Video Blind function can be
turned on and linked to an alarm function.
a. Go to Main Menu, click on the Alarm icon and then the Video Blind icon. A Video Blind
setup screen similar to the one below will appear. The Video Blind setup screen and
parameters are very similar to those for motion detection.
b. CHANNEL – Select the camera from the drop-down menu.
c. ENABLE – Highlight the checkbox if the Video Blind function is to be enabled.
d. SENSITIVITY – Select from the six levels of motion sensitivity from the drop-down menu.
e. PERIOD – To set the day and time period for the video blind to take place click SET and a
Set Screen will appear. Select the desired day from the drop-down menu or ALL for the
entire week. Four possible time slots are available for each day. Use the mouse and soft
keyboard to enter the required time periods. Upon doing so the graphic will adjust to
indicate the selected days and time periods. When done, click OK.
f. ALARM OUTPUT – There is no alarm function with this model DVR.
g. DELAY – Period during which the alarm sounds after the alarm input returns to standby
status. Set a delay in the range of 10 to 300 seconds.
h. RECORDING CHANNEL – Select one or multiple recording channels for the video signal
when the alarm is activated.
i. TOUR – Upon a video blind or other alarm event the monitor will display a single window
beginning with the channel on which the alarm took place. If desired, additional single
windows per channel will sequence. The sequence interval is set by going to Main Menu,
clicking on the System icon, clicking on the Tour icon and entering the interval period in
seconds.
j. PTZ ACTIVATION – In the event of a video blind or other alarm a PTZ camera can be
activated and set to automatically pan and or cruise among pre-determined spots. By
clicking on SET a PTZ Activation screen appears.
For each PTZ camera select the type of PTZ function desired from the drop-down menu.
When done, click OK. Note for PTZ activation to work, the PTZ camera has to be
configured by going to Main Menu, clicking the System icon, and clicking the PTZ Config
Page 23
v2.0 11/8/11
23
icon and entering the settings. Once done, the PTZ’s presets, pattern or cruise settings
must be created. This is done by calling up the PTZ Control through the Short-cut Menu.
k. DELAY - Once the alarm stops the recording will continue for a set period of 10 to 300
seconds then stop.
l. SHOW MESSAGE – If the checkbox is highlighted an Alarm Status screen will appear on
the monitor when a video blind event occurs.
m. BUZZER – If the checkbox is highlighted a beep will be heard when a video blind event
occurs.
n. SEND EMAIL – If the checkbox is highlighted an email will be automatically sent to a
designated individual when a video blind event occurs. Go to Main Menu, click the
System icon and then click the NetService icon to enter the desired email setting.
o. After all selections are made click OK.
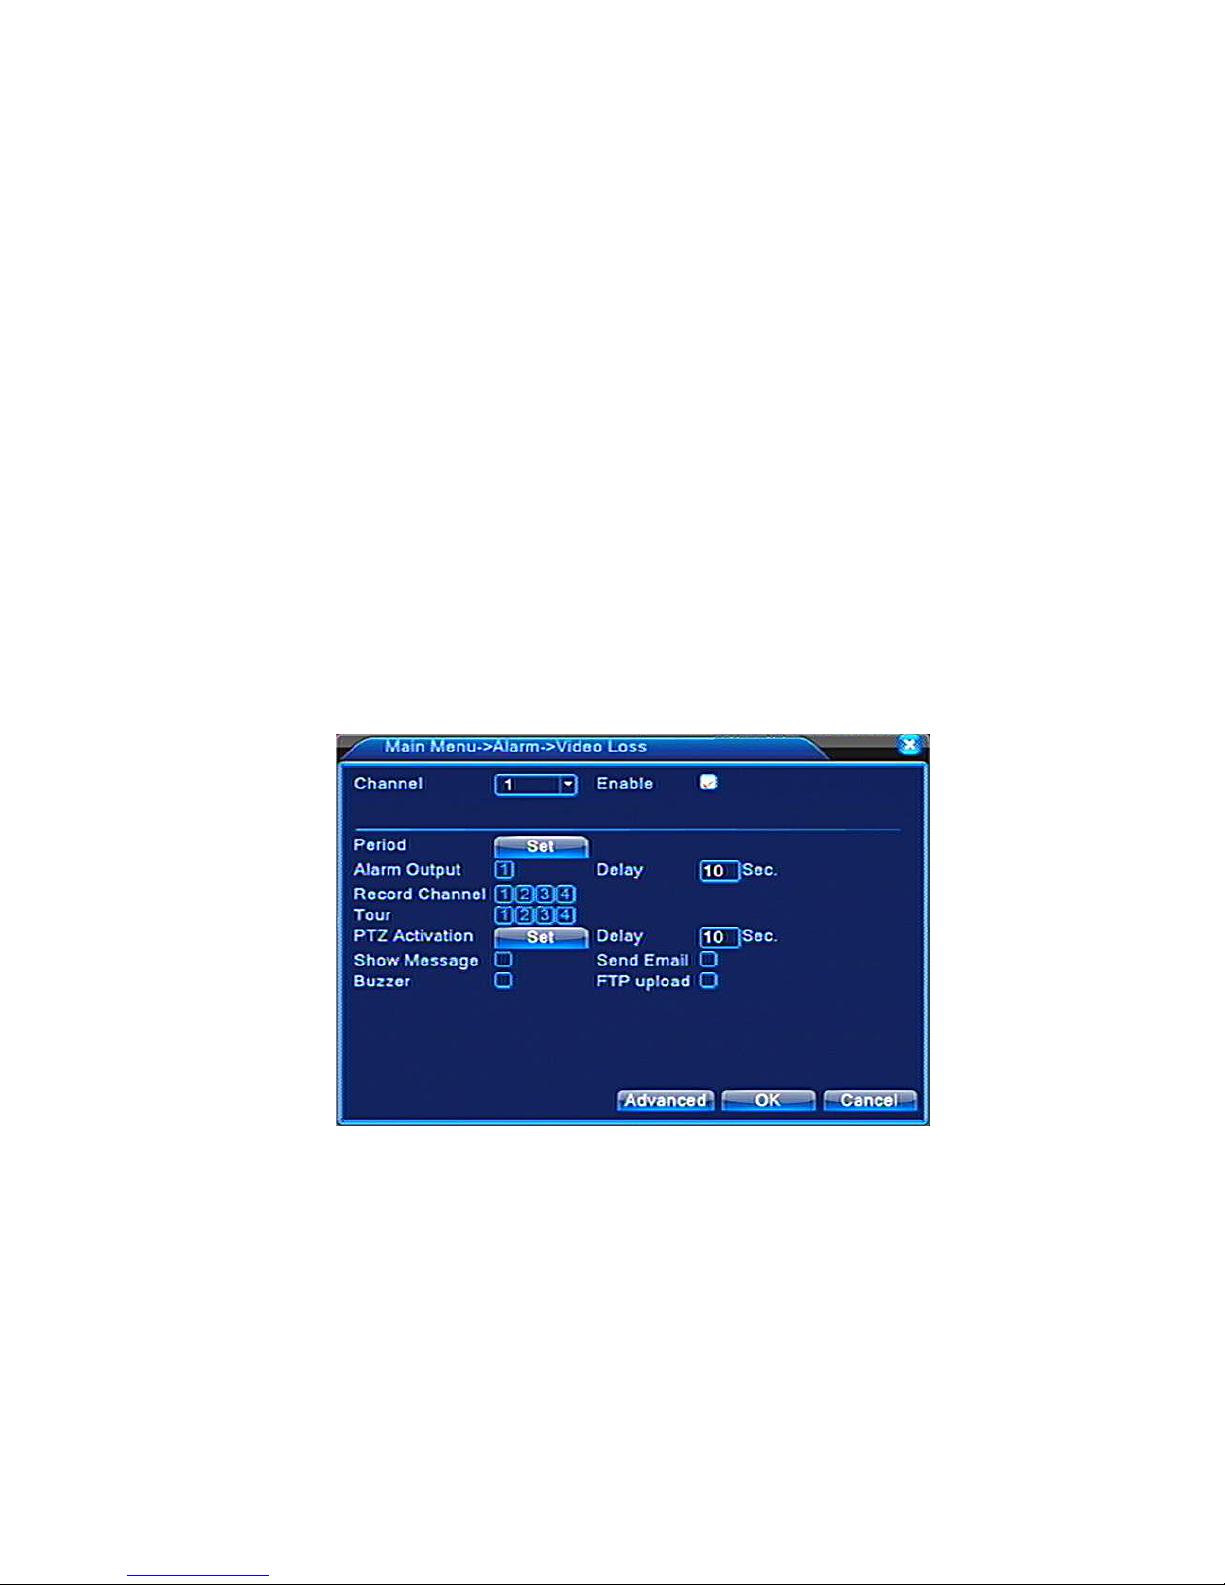
Auto Recording – Video Loss
When there is a video loss situation (such as a camera cable being cut) it is possible to create an
alarm and display a video loss message on the security monitor. The process of setting up auto
recording for video loss is similar to Motion Detection and Video Blind.
a. Go to Main Menu, click the Alarm icon and then click the Video Loss icon. . A Video
Loss setup screen similar to the one below will appear.
a. CHANNEL – Select the camera from the drop-down menu.
b. ENABLE – Highlight the checkbox if the Video Loss function is to be enabled.
c. SENSITIVITY – Select from the six levels of motion sensitivity from the drop-down menu.
d. PERIOD – To set the day and time period for the video loss to take place click SET and a
Set Screen appears. Select the desired day from the drop-down menu or ALL for the
entire week. Four possible time slots are available for each day. Use the mouse and soft
keyboard to enter the required time periods. Upon doing so the graphic will adjust to
indicate the selected days and time periods. When done, click OK.
e. ALARM OUTPUT – There is no alarm function with this model DVR.
Page 24

v2.0 11/8/11
24
f. DELAY – Period during which the alarm sounds after the alarm input returns to standby
status. Set a delay in the range of 10 to 300 seconds.
g. RECORDING CHANNEL – Select one or multiple recording channels for the video signal
when the alarm is activated.
h. TOUR – Upon a video loss or other alarm event the monitor will display a single window
beginning with the channel on which the alarm took place. If desired, additional single
windows per channel will sequence. The sequence interval is set by going to Main Menu,
clicking on the System icon, clicking on the Tour icon and entering the interval period in
seconds.
i. PTZ ACTIVATION – In the event of a video loss or other alarm a PTZ camera can be
activated and set to automatically pan and or cruise among pre-determined spots. By
clicking on SET a PTZ Activation screen appears.
For each PTZ camera select the type of PTZ function desired from the drop-down menu.
When done, click OK. Note for PTZ activation to work, the PTZ camera has to be
configured by going to Main Menu, clicking the System icon, and clicking the PTZ Config
icon and entering the settings. Once done, the PTZ’s presets, pattern or cruise settings
must be created. This is done by calling up the PTZ Control through the Short-cut Menu.
j. DELAY - Once the alarm stops the recording will continue for a set period of 10 to 300
seconds then stop.
k. SHOW MESSAGE – If the checkbox is highlighted an Alarm Status screen will appear on
the monitor when a video loss event occurs.
l. BUZZER – If the checkbox is highlighted a beep will be heard when a video loss event
occurs.
m. SEND EMAIL – If the checkbox is highlighted an email will be automatically sent to a
designated individual when a video loss event occurs. Go to Main Menu, click the
System icon and then click the NetService icon to enter the desired email setting.
n. After all selections are made click OK.
7. PLAYBACK OPERATION
a. Playback is accessed in one of three ways: (i) by clicking the right mouse button to
display the Short-cut Menu and selecting PlayBack, (ii) by going to Main Menu, clicking
the Record icon then clicking the PlayBack icon, or (iii) pressing the Play button on the
DVR’s front panel. Upon doing so a PlayBack/File Search screen similar to the one
below will appear.
Page 25
v2.0 11/8/11
25
NOTE: Icon #4 for file backup will not appear on screen until a search has been performed which
finds at least one file.
b. To locate a file for playback click the File Search icon (#3). Doing so will display a Search
Condition screen with the following search options or criteria:
FILE TYPE – Six file types are available selectable from the drop-down menu. Then
using the adjacent drop-down menu select from where the file is located: on the
DVR’s hard disk configured for Read/Write or from a Backup Device
1 = Listed Video Files 2 = File Information 3 = File Search
4 = File Backup 5 = Operation Hint/Status 6 = Playback Controls
Page 26

v2.0 11/8/11
26
CHANNEL – Select the appropriate channel by highlighting the channel checkbox.
START TIME and END TIME – Using the mouse and the soft keyboard enter the
requested dates and times. By clicking on the calendar icons a soft calendar will
appear to make date selection easier.
PLAY MODE – Using the drop-down menu select from among three options: Skip
Decode, Average Decode or Full Decode.
SYNC MODE – Forces all channels within one file to play in time synch with each
other. Used to synch up all channels to a time so the user can view the video from the
exact time on all recorded channels.
Once the search criteria are made click SEARCH to display the files or click PLAY for the
system to automatically play all files that satisfy the search criteria.
c. If individual files are to be played back click the checkbox for the desired files displayed in
the Listed Files area (#1) of the Playback/File Search screen.
d. Using the Playback Toolbar click the Play icon or other controls to manage the file.
Icon
Description
Icon
Description
II
Playback and pause
Repeat playback
Play backwards
Full screen
Stop
Fast playback
I
Slow playback
I
Next frame
I
Previous frame
I
Next file
I
Previous file
e. While in the Playback/File Search screen a click of the right mouse button will display a
pop-up menu with the following options:
UpWindow – Return to previous menu
Show Desktop – Return to preview
Stop Playing – Cease playback
Full Screen – Display full channel window
View 1 through View 4 – Display single or a quad window
f. While in the Playback/File Search screen it is also possible to backup a specific file or set
of files for which a search has been performed. This can be initiated by clicking the
Backup icon #4 and following the instructions outlined below in Section 8: Backing Up
Recording Files.
Page 27
v2.0 11/8/11
27
8. BACKING UP RECORDING FILES
Recording files can be backed up using USB storage devices (e.g., USB flash drive, USB
CD-R/RW, USB DVD-R/RW) or a LAN for storage.
There are two methods for backing up files: (i) through the PlayBack/File Search screen or (ii) by
going through Main Menu, clicking on the Record icon followed by the Backup icon. Both
methods are described below.
File Backup – PlayBack/File Search Screen
a. Access the PlayBack/File Search screen and search for recording files as described
above in Section 7: Playback Operation.
b. Select the desired files displayed in the Listed Video File Area (#1) by highlighting the
appropriate checkbox.
c. Upon doing so the Backup icon (#4) appears.
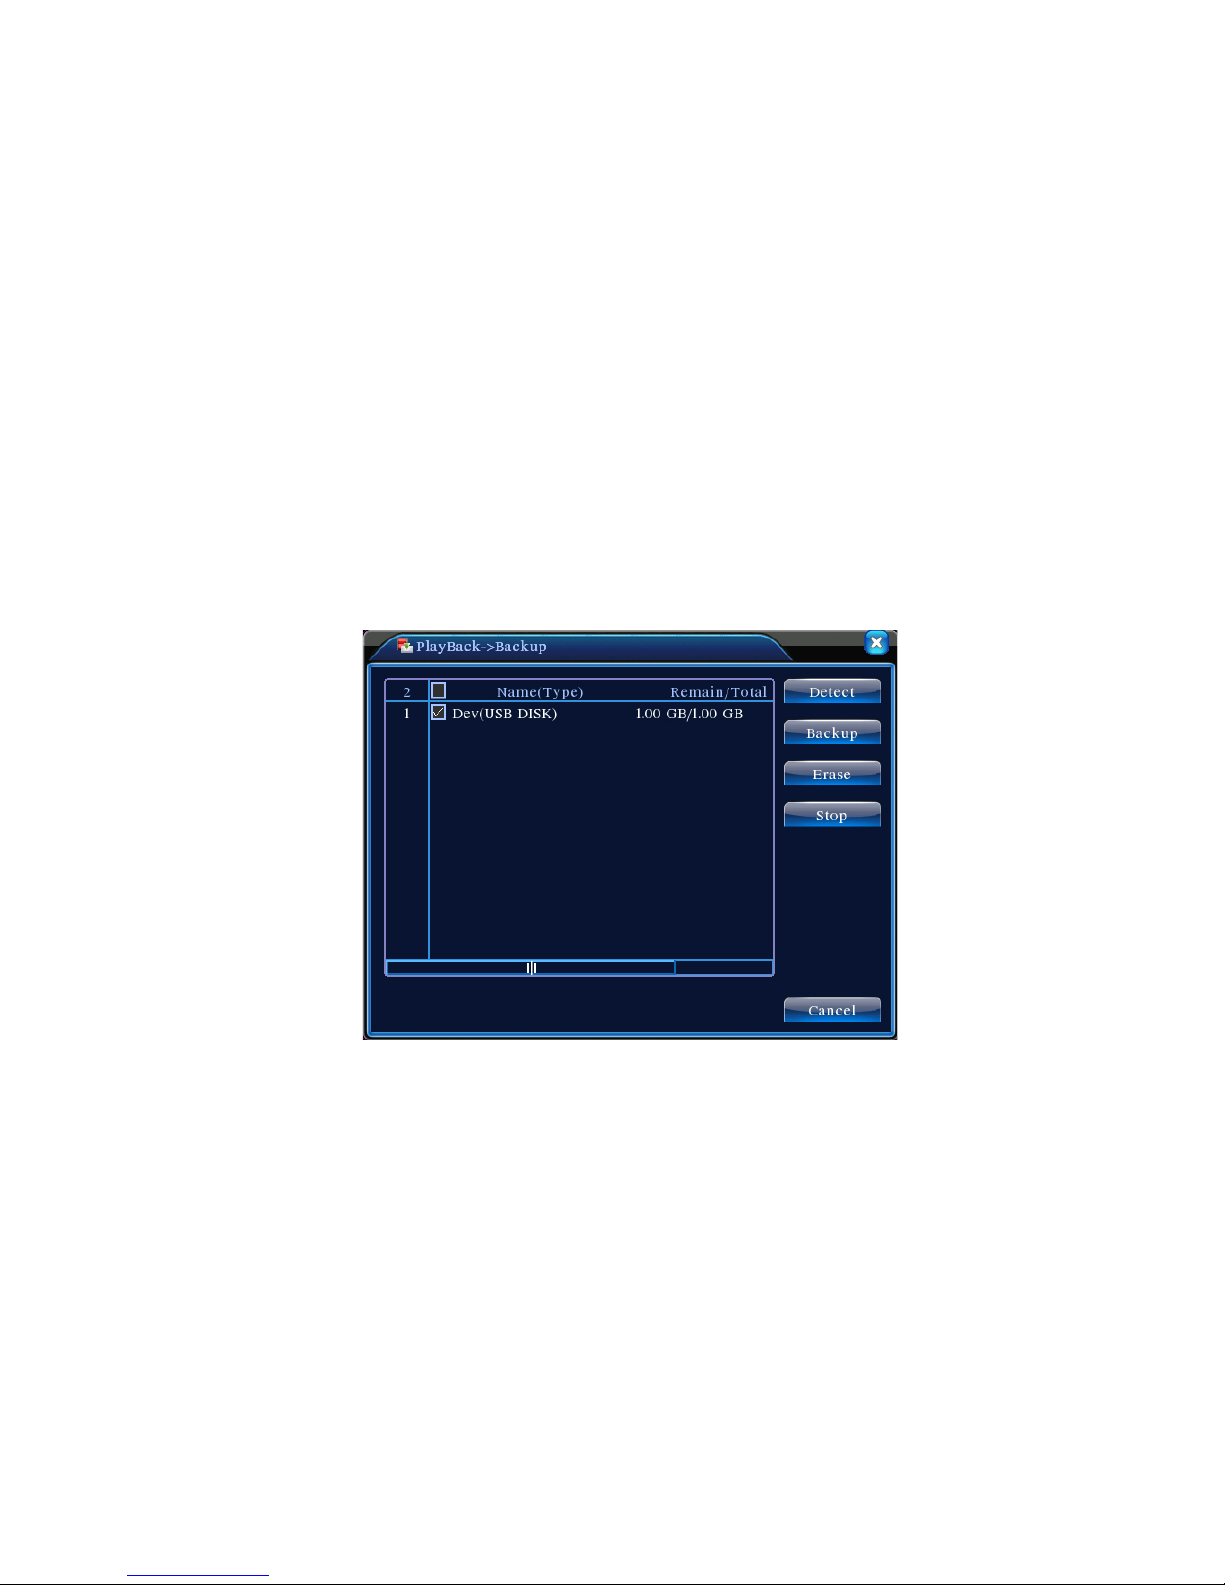
d. Upon clicking the Backup icon a Playback/Backup screen similar to the one below will be
displayed.
e. Install a backup storage device such as USB flash drive. The DVR should automatically
detect the device. If not, click the DETECT button. The detected device will appear in the
list box on the top portion of the screen. Select the desired device by highlighting the
device’s checkbox. ERASE erases data from the backup drive. STOP aborts the backup
process.
f. Click the BACKUP button. Doing so will display a Backup screen similar to the one below.
If files were selected in the Playback/File Search screen they will be displayed in the
Backup screen’s list box. If additional files need to be listed perform a file search using the
search criteria (Type, Channel, Start Time and End Time) in the Backup screen then click
ADD. Select the files to be backed up by highlighting the appropriate checkbox. Note:
clicking REMOVE will delete all files from the Backup screen’s list box.
Page 28

v2.0 11/8/11
28
g. Click the START button. Backup will begin and the screen will display backup progress.
When the backup is completed click the dialog box’s OK button.
File Backup – Direct From Main Menu
a. From Main Menu click the Record icon followed by the Backup icon. A Record/Backup
screen similar to the one below will appear.
b. Install a backup storage device such as USB flash drive. The DVR should automatically
detect the device. If not, click the DETECT button. The detected device will appear in the
list box on the top portion of the screen. If more than one backup device is listed, select
the desired device by highlighting the device’s checkbox. ERASE erases data from the
backup drive. STOP aborts the backup process. BURN CD formats the a CD / DVD in the
optional CD / DVD-RW drive.
Page 29

v2.0 11/8/11
29
c. Click the BACKUP button. Doing so will display a Backup screen similar to the one below.
Perform a file search using the search criteria (Type, Channel, Start Time and End Time)
in the Backup screen then click ADD. Select the files to be backed up by highlighting the
appropriate checkbox. Note: clicking REMOVE will delete all files from the Backup
screen’s list box.
d. Click the START button. Backup will begin and the screen will display backup progress.
When the backup is completed click the dialog box’s OK button.
9. PTZ CONTROL
The DVR’s embedded PTZ controller is designed to perform a wide variety of PTZ camera
control functions. However, the utility of any PTZ controller is highly dependant upon the
particular PTZ camera to be controlled as each camera has not only its own functions, but
specific methods of how those native functions are accessed and managed. Further, a
particular PTZ controller’s terminology may differ from that used by a particular PTZ
camera. Therefore, it will be necessary for the installer and/or user to consult BOTH the
DVR manual and PTZ camera’s user manual to ensure proper set-up, configuration and
application.
PTZ Camera Connection
The PTZ camera is connected to the DVR as follows:
a. Connect the PTZ camera’s RS-485 cables to the DVR’s RS-485 terminal. Note on the
DVR RS-485 A is positive (+) and RS-485 B is negative (-). Be sure the camera’s
connection polarities match those on the DVR.
Page 30

v2.0 11/8/11
30
b. Connect the PTZ camera’s video cable to the DVR’s video input port.
c. Power the PTZ camera after all connections are made.
PTZ Camera Configuration
Setting up the PTZ camera for DVR control is done by the following steps:
a. From Main Menu, click the System icon then the PTZ Config icon. A PTZ Config screen
similar to the one below will appear.
b. In the CHANNEL drop-down box select the DVR channel the PTZ camera is on.
c. In the PROTOCOL drop-down box select the PTZ camera’s protocol (e.g, PELCOD).
d. In the ADDRESS field input the PTZ camera’s device ID (e.g., 1).
e. In the BAUD RATE drop-down box select the PTZ camera’s baud rate.
f. In the DATA BIT, STOP BIT, and PARITY drop-down boxes select the parameters that
match those for the PTZ camera. Defaults are respectively 9600, 8, 1, and NONE.
g. MONITORS is not used in this DVR.
h. Repeat the above steps for each PTZ camera to be connected and controlled.
i. Once all settings are made click the OK button and exit.
Page 31

v2.0 11/8/11
31
PTZ Camera Control
To access the PTZ control functions click the right mouse button to display the pop-up
Short-cut Menu and select PTZ CONTROL or press the PTZ button on the DVR’s front panel.
Upon doing so a PTZ Control interface similar to the one below will appear.
a. SPEED – Using the left mouse button and soft keyboard enter a value from 1 to 8 for
camera pan speed with 1 being the slowest and 8 the fastest.
b. ZOOM – Click the
button to zoom in, the button to zoom out.
c. FOCUS – Click the and buttons to adjust the camera focus. Note: Not all
cameras support remote focus adjustment.
d. IRIS – Click the and buttons to adjust the camera’s iris. Note: Not all cameras
support remote iris adjustment.
e. DIRECTION CONTROL – Control the camera’s pan and tilt by clicking on any one of the 8
direction arrows.
f. PAGE SWITCH – Clicking this button presents consecutive pages for setting up PTZ
camera presets, scans, tours, etc.
g. SET – Provides access to a screen for creating presets used in PTZ camera tours,
patterns and border scan.
h. PTZ TRACE – Clicking this buttion displays a full channel for the PTZ camera. Position
the mouse cursor on the screen, hold down the left mouse button and drag the mouse in
the direction the camera is to follow.
i. Note that camera pan and tilt are also possible using the UP/DOWN/LEFT/RIGHT control
keys on the DVR’s front panel or the remote control.
Setting Presets
To set a location for the preset:
a. Use the direction controls on the PTZ Control interface to turn the camera to the desired
preset location.
Page 32

v2.0 11/8/11
32
b. Click the SET button on the PTZ Control interface. A screen similar to the one below will
appear.
c. Highlight PRESET and enter the preset number using the left mouse button and soft
keyboard.
d. Clicking the SET button on the above screen will return to the PTZ Control interface.
e. To remove a preset click the DEL PRESET button on the above screen.
f. To call a preset, from the PTZ Control interface screen click the PAGE SWITCH button
once to display a page for calling presets, patterns, tours, and scans. The control page
displayed will be similar to the one below.
g. Using the left mouse button and soft keyboard enter the desired preset number to be
called.
h. Click the PRESET button and the camera will travel to the preset point.
Page 33

v2.0 11/8/11
33
Tour Between Points
Multiple preset points can be connected to create “tour lines”. The PTZ camera can be
programmed to cruise a set of presets along a specified line.
a. Using the direction control buttons move the camera to a desired point.
b. Click the SET button on the PTZ Control interface screen.
c. Using the screen below as an example, click the TOUR button, and use the left mouse
button and soft keyboard to enter the preset point and the tour line number (PATROL
NO.). Then click ADD PRESET.
d. To set the interval or dwell time (time the camera will remain on a preset point before
moving to the next point) enter the desired value in the INTERVAL field.
e. Repeat the above steps until all presets are added for each tour line (Patrol Line) under
Tour.
f. To remove a preset, enter the preset value and click the DEL PRESET button.
g. To remove a tour line, enter the Patrol No. value and click the DEL TOUR button.
h. To call a tour from the PTZ Control interface screen click the PAGE SWITCH button once
to display a page for calling presets, patterns, tours, and scans. The control page
displayed will be similar to the one below.
Page 34

v2.0 11/8/11
34
i. Using the left mouse button and soft keyboard enter the desired tour number to be called.
j. Click the TOUR button and the camera will travel along the tour line’s preset points.
Pattern
A PTZ camera can be controlled to repeatedly scan tour lines.
a. Click the SET button on the PTZ Control interface screen.
b. Using the screen below as an example, click the PATTERN button and use the mouse
and soft keyboard to input the pattern value.
c. Click BEGIN. Doing so will return to the PTZ Control interface screen where zoom, focus,
iris, direction, etc. adjustments can be made.
d. Click SET on the PTZ Control interface screen.
e. Click END.
Page 35

v2.0 11/8/11
35
f. To call a pattern, from the PTZ Control interface screen click the PAGE SWITCH button
once to display a page for calling presets, patterns, tours, and scans. The control page
displayed will be similar to the one below.
g. Using the left mouse button and soft keyboard enter the desired pattern number to be
called.
h. Click the PATTERN button and the camera will travel along the configured line.
Border Scan
A scan between preset left and right positions is possible.
a. Using the direction buttons on the PTZ Control interface screen move the camera to the
desired left boundary point. Click the SET button on the PTZ Control interface screen.
b. Using the screen below as an example, click the BORDER button and use the mouse and
soft keyboard to input the pattern value.
Page 36

v2.0 11/8/11
36
c. Click the LEFT button. Doing so will return to the PTZ Control interface screen where the
direction buttons will be used to position the camera at the desired right boundary point.
Once done, press the SET button.
d. Click the RIGHT button.
e. To call a border scan, from the PTZ Control interface screen click the PAGE SWITCH
button once to display a page for calling presets, patterns, tours, and scans. The control
page displayed will be similar to the one below.
f. Using the left mouse button and soft keyboard enter the desired border scan number to be
called.
g. Click the AUTOSCAN button and the camera will travel between the left and right
boundary settings.
Page 37

v2.0 11/8/11
37
Auto Pan, Flip and Reset
a. From the PTZ Control interface screen click the PAGE SWITCH button. A screen similar
to the one below will be displayed.
b. For automatic horizontal camera rotation click the AUTOPAN button.
c. For automatic vertical camera rotation click the FLIP button.
d. To clear all PTZ data settings click the RESET button.
NOTE: If the FLIP and/or RESET buttons are grayed out on the PTZ Control screen those
functions are not supported by the DVR.
Other PTZ Control Functions
By clicking the PTZ Control interface screen’s PAGE SWITCH button twice an auxiliary function
screen similar to the one below appears. Auxiliary equipment can be controlled through this
interface. The user must consult the camera’s manual to properly configure the DVR and camera
for these functions.
Page 38

v2.0 11/8/11
38
a. DIRECT AUX OPER – From the drop-down menu select the auxiliary equipment
(e.g., a light) and click on ON or CLOSE to control.
b. AUX NUM OPER – The operation of the corresponding auxiliary switch according to
the PTZ agreement.
10. SYSTEM SETTINGS
The System Settings menu allows DVR configuration for date, time, encoding, network, network
servers, DVR GUI, PTZ cameras and monitor window sequencing. The System Settings menu is
accessed by going to Main Menu and clicking on the System icon. Upon doing so the System
Sub-menu will appear.
General Settings
Go to Main Menu, click on the System icon then the General icon. General settings include
system time and date, date format and separator, time format, language, hard drive full
management options, video format, etc. The General menu screen displayed is similar to the one
below.
a. SYSTEM TIME – Position the mouse cursor, click the left mouse button and use the soft
keyboard to enter date and time.
b. DST- If Daylight Savings Time needs to be incorporated as part of the DVR’s system time
click the DST button and a DST configuration screen will appear similar to the one below.
Page 39

v2.0 11/8/11
39
Highlight the ENABLE checkbox and complete the DST START and END settings. Click
OK when finished.
c. DATE FORMAT – From the drop-down menu select the desired format: year, month,
date; month, date, year; date month, year.
d. DATE SEPARATOR – From the drop-down menu select the date separator. Options are .
− ⁄
e. TIME FORMAT – From the drop-down menu select either the 12-HOUR or 24-HOUR
format.
f. LANGUAGE – From the drop-down menu select the desired language.
g. HDD FULL – If the hard disk becomes full the DVR can either overwrite the hard disk or
stop recording. Select the desired option from the drop-down menu.
h. DVR NO. – Assign a DVR address for the infrared remote. Used when the remote is to
control multiple DVRs.
i. VIDEO STANDARD – From the drop-down menu select either NTSC or PAL. Use NTSC
for operation in the U.S.A.
j. AUTO LOGOUT – If desired, for security purposes the DVR can automatically logout any
users after a specified period. Use the mouse cursor, left mouse button and soft keyboard
to enter the time from 0 to 60 minutes .
k. MACHINE NAME – The default DVR name is LocalHost. The machine name can be
changed as desired using the mouse and soft keyboard.
Page 40

v2.0 11/8/11
40
Encode Settings
From the Main Menu click the System icon then the Encode icon. An Encode settings screen
similar to the one below will be displayed. Note the second column of pull down menu options
beginning with “Extra Stream” consists of settings for mobile phone access. If “video” is not
checked below the column mobile monitoring will not be possible.
a. CHANNEL – Select the desired channel from the drop-down menu.
b. COMPRESSION – H.264 is the only compression and cannot be changed.
c. RESOLUTION – Resolution types are D1/HD1/CIF/QIF. For the main video stream it is
recommended D1 or HD1 be used. For extra video steams CIF and QIF are
recommended.
d. FRAME RATE – Selectable from 1 to 30 FPS using the drop-down menu.
e. BIT RATE TYPE – Select VBR (variable bit rate) or CBR (constant bit rate) from the
drop-down menu. When selecting VBR six image quality options are provided.
f. QUALITY – Six levels of video quality are available from the drop-down menu.
g. BIT RATE (Kb/S) – Not adjustable from the drop-down menu. Value changes as a result
of Frame Rate changes.
h. I FRAME INTERVAL – Selectable from 2 to 12 using the drop-down menu.
i. VIDEO/AUDIO – Highlight the AUDIO checkbox if audio encoding is desired.
Network Settings
From Main Menu click the System icon then the Network icon. A Network settings screen similar
to the one below will be displayed.
Page 41

v2.0 11/8/11
41
a. NET CARD – Wire Netcard is the fixed option.
b. DHCP ENABLE – Highlight the checkbox if the IP address is automatically obtained.
a. IP ADDRESS, SUBNET MASK, GATEWAY, PRIMARY DNS, SECONDARY DNS – The
addresses can be modified using the mouse and soft keyboard. Subnet Mask is a 32-bit
mask used to divide an IP address into subnets and specify the available networks.
Gateway is a network node serving as an entrance to another network. DNS (Domain
Name System) translates domain names into IP addresses as domain names.
The DVR must be set to an available IP address on the Local Network. The
default address is 192.168.1.10
The Subnet Mask address default is 255.255.255.0.
The Gateway default address is 192.168.1.1. The Gateway allows access to the
network and often is the same address as the network router.
The DNS IP address is provided by the ISP. Once the address is set the DVR
must be rebooted. A DNS is not often necessary. See the network administrator
regarding the specifics for setting the DNS.
c. MEDIA PORT – Default is 34567. Note 34567 is assigned for the UDP port and should not
be used for setting other ports.
d. HTTP PORT – Default is 80.
e. HS DOWNLOAD – Internet Explorer plug-ins installed when viewing via an IE browser.
f. TRANSFER POLICY – From the drop-down menu select one of three options: SELF
ADAPTION, IMAGE QUALITY PREFERRED, or FLUENCY PREFERRED. The code
stream adjusts according bandwidth/speed vs. image quality. Self Adaption is the tradeoff
between Image Quality Preferred and Fluency Preferred. Fluency Preferred and Self
Adaption are valid only when the assistant code stream is turned on. Otherwise Image
Quality Preferred is valid.
Page 42

v2.0 11/8/11
42
Network Service Settings
From the Main Menu click the System icon followed by the NetService icon. A NetService
settings screen similar to the one below will be displayed.
a. Choose the network service option by highlighting it with the mouse or front panel
UP/DOWN buttons. Then click the SET button to display a configuration screen for that
particular service. Once settings are entered into the configuration screen click OK then
OK on the NetService setting screen.
b. PPPOE - Point-to Point Protocol Over Ethernet. PPPoE is a specification for connecting
the users by Ethernet to the Internet through a common broadband medium. PPPoE
generally involves the use of a DSL modem or cable modem. If PPPoE is to be used the
IP address, account name and password are required. The system must be rebooted
after saving. After the reboot the DVR will automatically setup the PPPoE network
connection and the ISP will modify automatically the Internet dynamic IP address. This
new IP address is to be used for remote access to the DVR. The PPPOE configuration
screen is similar to the one below. Highlight the ENABLE checkbox.
c. NTP – The NTP server must be installed on the PC. The NTP configuration screen is
similar to the one below. Highlight the ENABLE checkbox.
Page 43

v2.0 11/8/11
43
SERVER IP – Use the mouse cursor, left mouse button and soft keypad to input the
IP address for the installed NTP server.
PORT – Default is 123. The port can be set according to the NTP server.
TIME ZONE – For the U.S. Hawaii Time is GMT-10, Alaska Time is GMT-9, Pacific
Time is GMT-8, Mountain Time is GMT-7, Central Time is GMT-6, Eastern Time is
GMT-5, and Atlantic Time is GMT-4.
UPDATE PERIOD – Default is 10 minutes.
d. EMAIL – An email can be sent to a designated recipient in the event an alarm event has
taken place. Note the DVR must be configured to identify an alarm caused by motion
detection, video loss, physical contact, etc. The Email configuration screen is similar to the
one below. Highlight the ENABLE checkbox.
SMTP SERVER – Use the mouse cursor, left mouse button and soft keyboard to
enter the email server’s IP address. This could be an IP address or a domain name.
Note a domain name can only be correctly translated using a DNS
Page 44

v2.0 11/8/11
44
configuration (this can be configured under the Main Menu, System, Network setup
screen) .
PORT – Email server port number.
NEED SSL – Highlight the checkbox if the Secure Socket Layer protocol is required.
USER NAME – Enter the email server user name.
PASSWORD – Enter the email user’s password.
SENDER – Set the email sender address.
RECEIVER – Send the email to appointed receivers when the alarm takes place.
There is a maximum of three receivers.
TITLE - Create a title for the email subject line.
e. IP FILTER – It is possible to create an IP address “white list” that identifies those IP
addresses allowed to connect to the DVR. When creating an IP address “black list”, the
listed IP addresses cannot connect to the DVR. 64-bit IP addresses are supported on both
“white” and “black” lists. If an IP address is on both the “white” and “black” list the “black”
list takes precedence. The IP Filter configuration screen is similar to the one below.
Highlight the ENABLE check box.
f. DDNS – Dynamic Domain Name Server. DDNS permits a DDS name to be synchronized
with a dynamic IP address. The DDNS configuration screen is similar to the one below.
Highlight the ENABLE checkbox. Note: DNS must also be configured correctly under
Network setup. When the DDNS is successfully configured and started the domain name
can be connected in an Internet Explorer address toolbar.
Page 45

v2.0 11/8/11
45
DOMAIN NAME – Input the domain name registered by DDNS.
USER NAME – Input the account registered by DDNS.
PASSWORD – Input the password registered by DDNS.
g. FTP – FTP is available only when an alarm takes place. If FTP is enabled the related
alarm event record and snapshot picture are uploaded to a FTP server. NOTE: if the DVR
does not support the snapshot feature the FTP function will not work. Highlight the
ENABLE checkbox.
SERVER IP – Input the IP address for the FTP server.
PORT – Input the Domain Port of the FTP server. The default is 21.
USER NAME – Input the FTP server’s user name.
PASSWORD – Input the user’s password.
MAX FILE LENGTH – Specifies the maximum length of the upload file.
DIR NAME – Specify the directory for the uploading files.
Page 46

v2.0 11/8/11
46
h. MOBILE MONITOR – The DVR can be configured to support smartphone access and
management. . Note a compatible remote client must be installed on the smartphone and
a router must direct the smartphone client to the mobile port. A Mobile configuration
screen similar to the one below will be displayed. Highlight the ENABLE checkbox
PORT – Input the port number. Be sure to forward this port in the network router.
i. UPNP (Universal Plug and Play) – The DVR support the UPNP protocol to allow the
DVR to appear as a plug and play network device. UPNP must be running on the
network router before implementing it on the DVR. A UPNP configuration screen
similar to the one below will be displayed. Highlight the ENABLE checkbox.
HTTP – The router will automatically distribute the HTTP port for the DVR when using
Internet Explorer for viewing.
TCP – The router will automatically distribute the TCP port for the DVR when
monitoring using remote management software such as CMS.
MOBILEPORT – The router will automatically distribute the Mobile Port for the DVR
when a smartphone is accessing and monitoring.
Page 47

v2.0 11/8/11
47
GUI Display Settings
The DVR’s GUI can be set to a number of configurations for displaying channel name, channel
title, time, alarm status, recording status and other information in Preview mode, Video File mode
and remote access mode. From Main Menu click the System icon then the GUI Display icon. A
GUI Display setting screen similar to the one below will appear. Note the alarm function is not
implemented in this model DVR.
a. CHANNEL TITLE – Click the SET button to modify the channel title. Use the mouse
cursor, left mouse button and soft keyboards to change the title.
b. TIME DISPLAY – Highlight the checkbox if the system time is to be displayed.
c. CHANNEL TITLE – Highlight the checkbox if the channel title is to be displayed.
d. RECORDING STATUS – Highlight the checkbox if the recording status is to be displayed.
e. ALARM STATUS – Highlight the checkbox if the alarm status is to be displayed.
f. TRANSPARENCY – Using the slider set the level of GUI transparency over the
background image. Range is 128 to 255.
g. RESOLUTION – Using the drop-down menu select one of five display resolutions.
h. CHANNEL – Using the drop-down menu select the set code output channel number (i.e.,
camera/DVR channel)
i. REGION COVER – If desired, a region in the camera’s image can be blacked out.
Highlight the Region Cover checkbox, click SET, then place and adjust the black out area
using the mouse. When done click the right mouse button and select UpWindow to return
to the GUI Display setting screen. Finally, highlight the corresponding channel window.
j. TIME DISPLAY, CHANNEL TITLE – The time display and/or the channel title can be
repositioned. Highlight the appropriate checkbox the click SET. Left click the mouse
button and drag the time display/channel title to the desired location. When done, click the
right mouse button and select UpWindow to return to the GUI Display setting screen.
Page 48

v2.0 11/8/11
48
PTZ Configuration Settings
See Section 9: PTZ Control.
Display Tour (Screen Sequencing) Settings
Each channel window can be displayed as a single window or one of four windows. By highlighting
the ENABLE TOUR checkbox each channel window can be sequenced according to a desired
time interval.
From Main Menu click the System icon followed by the Tour icon. A Tour settings screen similar
to the one below will appear.
Note the alarm function is not implemented in this model DVR.
a. INTERVAL – Using the mouse cursor, left mouse button and soft keypads enter the
sequence interval timing. Range is 5 to 120 seconds.
b. VIEW – View 1 refers to single window display. Highlight the channel numbers for
channels to be displayed. View 4 refers to a quad display where 4 channel windows will be
displayed at one time.
Page 49

v2.0 11/8/11
49
11. ADVANCED FEATURES
HDD Management
From Main Menu click the Advanced icon followed by the Hard Disk Management icon. The
HDD Manage settings screen similar to the one below will appear.
The screen displays current hard drive information including disk number, input port, type, status
and drive capacity. From the screen 6 drive operations are possible. Select the hard drive and
click on the desired button. NOTE the number of supported hard drives is DVR specific.
READ WRITE – Data can be written to and read from the drive.
READ ONLY – No data can be written to the disk.
REDUNDANCY – Double backup the video files to a ReadWrite disk. Note a second
hard drive is required.
FORMAT DISK – Hard drives need to be formatted to operate with the DVR. If a hard
drive is not formatted it will not be recognized by the DVR. Generally all hard drives
newly installed in the DVR will have to be formatted. On occasions there may be a
need to reformat an existing drive. Formatting a hard drive erases all information
on that drive. Be certain the drive requires formatting and backup data on the
drive to another storage device if that data are needed.
RECOVER – Used to salvage damaged files on a disk with errors.
PARTITION – A drive may be partition for file allocation.
Page 50

v2.0 11/8/11
50
User Account Management
Users can be added to and deleted from the system. Further, user privileges, permissions and
passwords can be modified.
From Main Menu click the Advanced icon followed by the User Account Management icon.
The Account settings screen similar to the one below will appear.
The maximum User Name length is 8 characters. A space counts as a character and is valid when
placed between characters in the string. However, a space before or after the string is invalid.
Acceptable characters are letters, numbers, underline, minus sign and dot.
The maximum password length is 6 characters.
Users can be assembled as a group. The group name and a user name cannot be the same.
Further, a user can belong only to one group.
a. MODIFY USER – Clicking this button displays the Modify User screen where group,
permissions and other attributes can be changed.
b. MODIFY GROUP – Clicking this button displays the Modify Group screen where group
permissions can be changed.
c. MODIFY PASSWORD – Clicking this button displays the Modify Password screen.
d. ADD USER – Clicking this button displays the Add User screen where a new user can be
added with a password. Group and permission attributes are assigned through this
screen.
Page 51

v2.0 11/8/11
51
e. ADD GROUP – Clicking this button displays the Add Group screen where the group name
is created and group permissions are set.
f. DELETE USER – Clicking this button deletes a user once a confirmation is made.
g. DELETE GROUP – Clicking this button displays a Delete Group screen for removing a
particular group.
Page 52

v2.0 11/8/11
52
Online User
Information on those users accessing the DVR through the network is displayed. Individual users
can be disconnected from the DVR and locked out until the DVR’s next reboot or change the
user’s permissions. From Main Menu click the Advanced icon followed by the Online User icon.
An Online User screen similar to the one below will be displayed.
Output Adjust
The monitor’s borders can be adjusted using the Output Adjust feature. From Main Menu click the
Advanced icon followed by the Output Adjust icon, or by clicking the right mouse button select
Output Adjust from the Short-cut Menu. The Output Adjust screen is similar to the one below.
Page 53

v2.0 11/8/11
53
Auto Maintain
Using the drop-down menus the DVR can be configured to automatically reboot and/or
automatically delete old files. From Main Menu click the Advanced icon followed by the
AutoMaintain icon. The displayed AutoMaintain screen is similar to the one below.
Restore Defaults
To restore the DVR settings to the factory defaults from Main Menu click the Advanced icon
followed by the Restore icon. The displayed Restore screen is similar to the one below.
Page 54

v2.0 11/8/11
54
To select the desired settings for restoring to the factory defaults highlight the appropriate
checkbox.
Upgrade
From time-to-time the factory will provide upgrades to the DVR’s system software. Securitytronix
will announce any upgrades and the upgraded software will be downloaded from a Securitytronix
site to a USB device (e.g., flash drive). That USB device will then be inserted into the DVR for
download to the unit.
NOTE: If a DVD burner is installed, upgrading must be done via the network.
From the Main Menu click the Advanced icon followed by the Upgrade icon. The displayed
Upgrade screen is similar to the one below.
a. UPGRADE POSITION – Using the drop-down menu select the source of the upgrade file
(e.g., USB port).
b. UPGRADE FILE – Using the drop-down menu select the specific folder and file containing
the upgraded software.
c. Click the UPGRADE button to begin the process. Do not interrupt the process until the
upgrade is complete – this includes power loss or powering down the DVR.
Page 55

v2.0 11/8/11
55
Device Information
From Main Menu click the Advanced icon followed by the Device info icon. A Device Info screen
will be displayed indicating the number of Audio In Channels, Alarm In Channels, Alarm Out
Channels and SD Card Record. Note the alarm function is not implemented in this model DVR.
12. SYSTEM INFORMATION
Hard Disk Information
From Main Menu click the System Information icon followed by the HDD Info icon. The HDD
Info screen displays hard drive(s) location(s) (i.e., position 1 and/or 2), hard drive type (e.g.,
read/write), disk capacity, remaining capacity and status. The user may also view recording times
per disk.
Page 56

v2.0 11/8/11
56
BPS Code Stream Statistics
To view the code stream by channel from Main Menu click the System Information icon followed
by the Code Stream Statistics icon. The display is updated in real-time.
Log Information
From Main Menu click the System Information icon followed by the Log Information icon. A Log
information screen similar to the one below will appear.
Page 57

v2.0 11/8/11
57
Log message types include system, configuration, storage, weekday, account and playback.
a. TYPE – Use the drop-down menu to select the specific message type or select ALL for all
message types.
b. START TIME and END TIME – If searching for log messages associated with a specific
date and time period use the mouse cursor, left mouse button and soft keyboards to enter
the desired date and time.
c. Click the SEARCH button.
d. NEXT PAGE – If the list of log messages exceeds a page click the NEXT PAGE button.
e. REMOVE – To delete all log messages click the REMOVE button.
Version Information
Hardware and software version numbers, build date and serial number can be viewed by going
from Main Menu, clicking the System Information icon followed by the Version Information
icon. Note the alarm function is not implemented in this model DVR.
Page 58

v2.0 11/8/11
58
13. MISCELLANEOUS FUNCTIONS and SETTINGS
Disk Event
The DVR may be configured to emit an audible speaker beep and display a message when no
disk is present, a disk error occurs or the disk is full.
To configure from Main Menu click the Alarm icon followed by the Disk Event icon. A Disk Event
settings screen similar to the one below will appear.
a. EVENT TYPE – From the drop-down menu select No Disk, Disk Error or No Disk Space.
b. ENABLE – To enable the function highlight the ENABLE checkbox.
c. SHOW MESSAGE and BUZZER – To notify the user of the abnormal event highlight the
desired checkboxes to display a message and/or activate a buzzer.
d. When done click the SAVE button.
Color Settings
For each channel display window it is possible to customize the color, brightness, contrast,
saturation, hue and gain settings. Further, these settings can be set fixed or set for two
user-defined time periods. This can be used, for example, to make an image less bright during
daylight and brighter with more contrast at night.
Position the mouse cursor in the desired channel display window and click the right mouse
button to call up the Short-cut Menu. From the menu select Color Setting. The Color Setting
screen similar to the one below will appear.
Page 59

v2.0 11/8/11
59
a. PERIOD – If settings for the desired channel display window are to be set for specific time
periods highlight the checkbox and use the mouse and soft keyboards to enter the time
periods.
b. SETTINGS SLIDER – Using the mouse cursor and left mouse button drag the slider(s) to
the desired position.
c. ADVANCED – By clicking the Advanced button a pop-up menu appears with the following
options: UpWindow (return), Show Desktop (return to preview mode), Cold Color, Warm
Color and Default Color. By selecting Warm, Cold or Default Color the sliders will
self-adjust.
d. When done click OK.
Page 60

v2.0 11/8/11
60
REMOTE MANAGEMENT USING CLIENT SOFTWARE
Using the included DVR client software it is possible to remotely configure and control the DVR
over a LAN, WAN or via the Internet. Although the guide below will provide the user with the basic
instructions for remote management, it is important to stress that success is dependent upon the
proper network settings and network access privileges associated with the DVR’s location. In
some instances a Virtual Private Network (VPN) may be necessary to gain access to the DVR
from a distant location.
Note: This DVR comes with two versions of Remote Management Client software: (a) Center
Manager System (CMS) and (b) Super NetSurveillance (SNS). Functionally, both are very similar.
It may be a matter of personal preference which software is selected.
1. CMS SOFTWARE INSTALLATION
To install the software on a Microsoft Windows PC:
a. Place the included CD in the PC’s CD or DVD drive and run. A screen similar to the one
below will appear.
b. Click the Software folder. A screen similar to the one below will appear. The folder
contains the following software:
CMS remote management software
SNS (Super NetSurveillance) remote management software
Player – A video file player
Active X plug-in
Mobile Monitor – Software for remote DVR access and management using Symbian
and Microsoft Windows Mobile Smartphones. This software has not been field-tested.
Video Converter Tool – Video file converter. Use this application to convert .lvf files to
a more standard .avi format for playback in most computers.
Page 61

v2.0 11/8/11
61
c. Click the General_CMS_ChnEng_ file. A Center Manager System setup screen and
dialog box appear. Read the information in the dialog box, follow the instructions and click
NEXT.
d. A Choose Destination Location dialog box appears and identifies a default location for the
application files. If acceptable, click NEXT or enter an alternate location and click NEXT.
e. A Select Program Folder dialog box appears displaying a default Program Folder name. If
acceptable, click NEXT or select an alternate name and click NEXT.
f. A series of screens will appear as part of the software installation.
g. Click the Center Manager System application icon to launch the application. It’s advisable
to place the CMS application icon on the desktop for easy access.
h. Upon clicking the CMS application icon the following dialog box will appear. Highlight
ENGLISH and click the action box on the left.
i. Upon doing so a Login box will appear as displayed below. Note at this time there is no
password to login. Simply click OK.
Page 62

v2.0 11/8/11
62
CONFIGURING and USING THE CMS CLIENT
a. After successful login the DVR Client application icon the DVR remote screen similar to
the one below will appear.
b. Click on the SYSTEM bar in the lower right corner. The Device Manager screen will
appear.
Page 63

v2.0 11/8/11
63
c. Click the DEVICE icon (appears as a computer accessory board) found in the center top
portion of the screen
d. An Edit entry box will appear. Enter the device name, IP address, port number, user name
and user password. Note: the IP address and port number should be the same as
configured under the Network setup on the DVR. User name and password must already
be registered in DVR under Accounts. When done click OK.
Page 64

v2.0 11/8/11
64
e. Once the information is entered and the OK button is clicked, the Device Manager screen
will list the new device both in the device list on the left side of the screen as well as the
device list in the center of the screen.
f. To connect to the DVR position the mouse cursor the device over name under the device
list on the left side of the screen. Double click the device name. Shortly thereafter the
DVR’s camera channel list will be displayed and the screen transitions to Monitor Mode.
Connection status will be displayed in the center bottom portion of the screen.
Note: If connection to the DVR is to be made over the Internet a Virtual Private Network
(VPN) connection may be necessary to direct the remote management software to the
DVR. A VPN may also be required with some Wide Area Networks (WANs). Consult with
the site’s IT department for more information.
Page 65

v2.0 11/8/11
65
g. To view any given channel simply double click on the desired camera under the device list
on the left side of the screen. Set the number of concurrent window displays using the
screen display configuration icons in the center lower portion of the screen.
h. For PTZ camera control click the PTZ bar in lower right portion of the screen. Using the
PTZ controls on the right side of the screen the camera can be panned, tilted and zoomed.
Focus and iris adjustments are possible as well.
Note: For the PTZ control function to work the PTZ camera(s) must be configured with the
DVR either through the DVR’s PTZ configuration setup menu or through the CMS system
configurator.
Page 66

v2.0 11/8/11
66
i. To adjust the image color, contrast, or brightness in any given channel window click the
Color bar in the lower right portion of the screen and use the sliders to make the desired
adjustments.
j. To Record position the cursor into the camera window to be recorded. Click the right
mouse button and a pop-up menu will appear with the following selections:
Close Window
Close All Windows
Audio
Local Record
Snapshot
Device Config
Select Local Record and the recording process will begin. To stop recording return to the
pop-up menu and deselect Local Record.
Page 67

v2.0 11/8/11
67
Recorded files are saved on the local PC (i.e., the PC running CMS). For example,
C:\Program Files\CMS\Record. The user may select the desired storage area by clicking
the System bar, clicking the Local Config icon and entering the relevant information (drive,
directory, sub-directory) – see I. System Settings and Configuration below.
j. To take a Snapshot of an image position the cursor into the camera window the snapshot
is to be taken. Click the right mouse button and Select Snapshot from pop-up menu. The
snapshot will appear in a viewer (e.g., Microsoft Windows Picture and Fax Viewer) and is
stored on the local PC (i.e., the PC running CMS). For example, C;\Program
Files\CMS\Picture. The user may select the desired storage area by clicking the System
bar, clicking the Local Config icon and entering the relevant information (drive, directory,
sub-directory) – see I. System Settings and Configuration below.
k. To Search for and Playback files click the Search bar in the lower right portion of the
screen. Upon doing so a Search screen with Remote Playback and Local Playback
tabs appear. Remote Playback refers to files residing on the DVR’s hard disk while Local
Playback are files that have been downloaded to the PC on which the remote
management software is operating.
Enter search criteria using the Remote Playback/Local Playback fields and drop-down
menus. When done click the SEARCH button. A list of files satisfying the search criteria
Page 68

v2.0 11/8/11
68
will appear. If the number of files exceeds a page then use the PAGE UP and PAGE
DOWN buttons to navigate through the list.
Upon locating the desired files highlight their respective checkboxes and click the
PLAY button. It is also possible to download those files to the PC by clicking the
DOWNLOAD button.
Use the Playback Control bar in the center of the screen to manage playback viewing.
By positioning the cursor over a given button a short description of that button’s function
will appear.
Specific local files can be backed up by clicking the Local Playback tab, performing a file
search, highlighting the file(s) and clicking the BACKUP button.
l. System Settings and Configurations. The CMS software allows for both local-based
(PC) settings as well as remote setting of the DVR. To begin click the System bar in the
lower right portion of the screen. Icons for the following will appear:
Device Manager – Add, modify and remove DVRs connected to the CMS software.
Local Config – The Base Config tab provides various settings for where recordings
are stored on the local PC, whether recordings are to overwrite existing files if the
local drive(s) is full, log maintenance, version info, etc.
Page 69

v2.0 11/8/11
69
The Alarm Setting tab provides for Alarm I/O Trigger, Video Motion Detection, Video
Blind and Video Loss alarm settings. Note the alarm function is not implemented in
this model DVR.
Page 70

v2.0 11/8/11
70
Page 71

v2.0 11/8/11
71
Remote Config – Allows the CMS remote configuration of the DVR’s settings for
o Recording;
o Alarms; Video Motion, Video Blind, Video Loss and Alarm Input. Note the alarm
function is not implemented in this model DVR.
o System Setup: General, Encode, Network, NetService, CAM Name and PTZ
Config
o Advanced: Account, AutoMaintain and Default
o Info: HDD Info, Log and Version
The settings process using CMS is very similar to using the DVR’s menus.
When done with each setting be sure to click OK or APPLY to save the configuration.
A sample of one of the Remote Config screens is below.
Page 72

v2.0 11/8/11
72
Account – Users can be added and deleted. User passwords can be modified. User
groups can also be added and deleted. Sample Account screens are below.
Page 73

v2.0 11/8/11
73
Local Log – CMS allows for the search and display of log messages. Log message
types include Operation and Alarm messages.
o Operation Messages Types – Video, Playback, Backup, User Manager, Map,
Client Config, Device Config and System Operation.
o Alarm Message Types - I/O Trigger, Video Motion, Video Loss, Video Blind, Disk
Error and Disk Full. Note the alarm function is not implemented in this model
DVR.
Page 74

v2.0 11/8/11
74
2. SNS SOFTWARE INSTALLATION
To install the software on a Microsoft Windows PC:
a. Place the included CD in the PC’s CD or DVD drive and run. A screen similar to the one
below will appear.
b. Click the Software folder. A screen similar to the one below will appear. The folder
contains the following software:
CMS remote management software
SNS (Super NetSurveillance) remote management software
Player – A video file player
Active X plug-in
Mobile Monitor – Software for remote DVR access and management using Symbian
and Microsoft Windows Mobile Smartphones. This software has not been field-tested.
Video Converter Tool – Video file converter. Note this software has not been
field-tested.
Page 75

v2.0 11/8/11
75
c. Click the SNS_ChnEng_file. A Super NetSurveillance setup screen and dialog box
appear. Read the information in the dialog box, follow the instructions and click NEXT.
d. A Choose Destination Location dialog box appears and identifies a default location for the
application files. If acceptable, click NEXT or enter an alternate location and click NEXT.
e. A Select Program Folder dialog box appears displaying a default Program Folder name. If
acceptable, click NEXT or select an alternate name and click NEXT.
f. A series of screens will appear as part of the software installation.
g. Click the Super NetSurveillance application icon to launch the application. It’s advisable to
place the SNS application icon on the desktop for easy access.
h. Upon clicking the SNS application icon the following dialog box will appear. Highlight
ENGLISH and click OK.
Page 76

v2.0 11/8/11
76
i. Upon doing so a Login box will appear as displayed below. The default password is
666666 to login. Click OK.
CONFIGURING and USING THE SNS CLIENT
a. After successful login the DVR Client application icon the DVR remote screen similar to
the one below will appear.
b. A Device Management screen will also appear. If not, click the
+ next to Device. As no
DVR is yet connected to the SNS client it will be necessary to add a device. Click ADD on
the Device Management screen.
Page 77

v2.0 11/8/11
77
c. An Edit entry box will appear. Enter the device name, IP address, port number, user
name, user password and channel number. Note: the IP address and port number should
be the same as configured under the Network setup on the DVR. User name and
password must already be registered in DVR under Accounts. When done click OK.
The Device Management screen will then be updated with the new device information.
Page 78

v2.0 11/8/11
78
d. The SNS screen will now have the new device name under the Device List on the right
side of the screen.
e. By double clicking on the Device Name the DVR’s camera channels will be listed.
Page 79

v2.0 11/8/11
79
f. Double clicking on cameras on the list will display the camera channel.
Page 80

v2.0 11/8/11
80
g. To adjust the number of windows displayed at one time simply click the SPLIT button in
the bottom left corner and select the desired number of windows to be visible.
h. For PTZ camera control click the PTZ button on the upper right side of the screen. Using
the PTZ controls on the right side of the screen the camera can be panned, tilted and
zoomed. Focus and iris adjustments are possible as well.
Note: For the PTZ control function to work the PTZ camera(s) must be configured with the
DVR either through the DVR’s PTZ configuration setup menu or through the SNS system
configurator.
Page 81

v2.0 11/8/11
81
i. To adjust the image color, contrast, or brightness in any given channel window click the
Color button in the upper right side of the screen and use the sliders to make the desired
adjustments.
Page 82

v2.0 11/8/11
82
j. To Record position the cursor into the camera window to be recorded. Click the right
mouse button and a pop-up menu will appear with the following selections:
Close Window
Close All Windows
Audio
Local Record
Snapshot
DeviceCFG
Select Local Record and the recording process will begin. Upon doing so a Change Path
screen will appear identifying where the local recording file will be stored on the PC. Click
OK.
To stop recording return to the pop-up menu and deselect Local Record.
k. To take a Snapshot of an image position the mouse cursor in the camera window, click
the right mouse button and select Snapshot from the pop-up menu. Upon doing so a
Change Path screen will appear identifying where the local image file will be stored on the
PC. Click OK. The image will then appear in a photo viewer such as Microsoft’s Windows
Photo Viewer.
Page 83

v2.0 11/8/11
83
l. To Playback a remote file (i.e., a recording residing on the DVR) click the Playback
button and a Playback screen will appear. Use the screen’s Search drop-down menus
to locate the file. Files will appear in a list window. To play those files highlight the
appropriate checkboxes and click the Play button. Use the screen’s Playback toolbar to
control the playback.
To save them to the local PC highlight the checkboxes and click the Download button. A
dialog box will appear and provide a file name for saving the file in the SNS Download
folder.
Page 84

v2.0 11/8/11
84
m. To Playback a recording saved as a local file on the PC click the Play button on the
Playback toolbar. A dialog window will appear listing files saved on the PC in the SNS
Download folder. Select the desired file, click the Open button and the recording will play
in the Playback screen.
n. To adjust Local Settings click the Local Config button and a Config Manager screen
will appear.
Page 85

v2.0 11/8/11
85
Alarm settings and alarm linkages can be created using the Alarm Setting
screens. Note the alarm function is not implemented in this mode DVR.
Page 86

v2.0 11/8/11
86
User passwords can be modified via the User Manager screen.
The System Settings screen is limited to the option of allowing auto connect to the
last monitoring channel.
Page 87

v2.0 11/8/11
87
The About screen displays SNS version information.
Page 88

v2.0 11/8/11
88
o. SNS log information is limited to Alarm Log messages and Operational Log messages.
Click the Log button and a Log screen with tabs for Alarm Log and Operational Log
appears.
p. For Remote Device Configuration click the DeviceCFG button. Allows the SNS remote
configuration of the DVR’s settings for
o Recording;
o Alarms; Video Motion, Video Blind, Video Loss and Alarm Input;
o System Setup: General, Encode, Network, NetService, CAM Name and PTZ
Config
o Advanced: Account, AutoMaintain, Default and Reboot
o Info: HDD Info, Log and Version
The settings process using SNS is very similar to using the DVR’s menus.
When done with each setting be sure to click OK or APPLY to save the configuration.
A sample of one of the Remote Config screens is below.
Page 89

v2.0 11/8/11
89
 Loading...