


User’s Guide
FULL HD CAR CAMERA WITH
GPS LOG
Model: CARCAMGPS ™

© Copyright 2017
This manual is furnished under license and may be used or copied only in accordance with the terms
of such license. Except as permitted by such license, no part of this publication may be reproduced,
stored in a retrieval system, or transmitted, in any form or any means, electronic, mechanical, recording, or otherwise, including translation to another language or format, without the prior written permission of SecurityMan. The content of this manual is furnished for informational use only, is subject to
change without notice, and should not be construed as a commitment by SecurityMan. SecurityMan
Inc assumes no responsibility or liability for any errors or inaccuracies that may appear in this book.
FCC Information
This device complies with part 15 of the FCC Rules. Operation is subject to the following two conditions:
(1) This device may not cause harmful interference.
(2) This device must accept any interference received, including interference that may cause undesired
operation.
Warranty
SecurityMan Inc warrants that this product will be free from defects in title, materials and manufacturing workmanship for one year or otherwise specified on the product packaging. This limited warranty
shall commence from the date of purchase. SecurityMan products warranty is not transferable and is
limited to the original purchaser. If the product is found to be defective then, as your sole remedy and
as the manufacturer’s only obligation, SecurityMan will repair or replace the product. This warranty
shall not apply to products that have been subjected to abuse, misuse, abnormal electrical or environmental conditions, normal wear and tear, or any condition other than what can be considered normal
use.
Warranty Disclaimer
SecurityMan Inc, makes no other warranties, express, implied or otherwise, regarding this product,
and specifically disclaims any warranty for merchantability or fitness for a particular purpose. The
exclusion of implied warranties is not permitted in some states and the exclusions specified herein may
not apply to you. This warranty provides you with specific legal rights. There may be other rights that
you have which vary from state to state.
Limitation of Liability
The liability of SecurityMan Inc, arising from this warranty and sale shall be limited to a refund of the
purchase price. In no event shall SecurityMan be liable for costs of procurement of substitute products
or services, or for any lost profits, or for any consequential, incidental, direct or indirect damages,
however caused and on any theory of liability, arising from this warranty and sale. These limitations
shall apply not withstanding any failure of essential purpose of any limited remedy.
For Customer Service: 888-977-3777
SecurityMan
4601 E. Airport Drive, Ontario, CA 91761, USA
Tel: 888-977-3777 Tel: 909-230-6668 Fax: 909-230-6889
Email: info@securitymaninc.com
Website: http://www.securitymaninc.com
Copyright 2017 by SecurityMan v2.2

Introduction
Features
Important
Restrictions
Disclaimers
Contents
Product Basics
Quick Start Guide
Hardware Setup & Installation
Inserting your memory card
Attaching the bracket
Mounting the camera
App Download
iPhone
Android
Connecting to your camera
Basic operations
Syncing the time and date
Hand gesture snapshots
Syncing GPS data
Syncing gesture and impact events
Formatting your memory card
Playing back events
From the App gallery
From the memory card
Transferring events from the memory card gallery to the App gallery
CARCAMGPS App
App section
Camera Tab
First time user’s tutorial
Connect
Travel Tab
Gallery Tab
Photos
Videos
Info Tab
Q&A
About
Camera section
Microphone icon
Orientation icon
Playback icon
Snapshot icon
Settings icon
SSID
Audible Alerts
1
1
1
2
2
3
4
5
5
5
6
6
8
8
8
8
10
11
11
11
12
13
13
13
14
15
15
16
16
17
17
17
19
19
20
21
21
21
22
22
23
23
24
25
26
26
Table of Contents

Connection Verification
Video With Snapshot
Audio Recording
Gesture Snapshots
Video Resolution
G-Sensor Sensitivity
Synchronize Time & Date
Volume
Storage Management
Version
Disconnect Form Camera
Live View Icons
Live View
Playback
App Download
iPhone
Android
Specifications
26
27
28
28
28
29
29
30
30
30
31
32
32
32
32
32
32
33

1
The SecurityMan CARCAMGPS lets you capture crystal clear HD footage with time, speed &
location data so you can easily keep track of scenic travel, traffic accidents and any unexpected
moments as they occur. Both video and audio are automatically recorded in an endless loop
and stored onto a Micro-SD card (not included) and if a vehicle collision occurs, the built-in
G-sensor automatically locks the files so they can be automatically synced to the Smartphone
app once connected, preventing them from being overwritten by the system providing an
accurate record of events. The CARCAMGPS is also equipped with “Hand Gesture” technology which allows you to save an instant snapshot along with a 25 second video clip (when
enabled) by simply moving your hand under the camera.
• 150 degree wide angle lens
• High denition 1080P Full HD video quality and real time recording (30fps)
• GPS data log pinpointing location (latitude/longitude) with date/time and speed
• Hand Gestured Triggering capturing instant snapshot and video
• App accessible via wi to iPhone and Android Smartphone
• Auto overwrite when memory card is full
• Smart impact sensing recording locks 5-sec pre-event and 20-sec after event (save events for
App synchronization)
• Records up to 16.5hr on Full HD resolution of videos on a 64GB memory card (not included)
• Audible voice prompts assisting in setup and usage
• Records 30 second continuous video clips
Introduction
Features
Important
The images/features shown throughout this manual are subject to change without notice due
to system and firmware upgrades. This guide provides important information on the use and
operation of your CARCAMGPS. Please read all the information carefully prior to using the
product for the best performance and to prevent any damage/injuries or misuse of the device(s).
Customers are entitled to have read through this complete user’s manual before using the CAR-
CAMGPS. Any unapproved changes or modifications will void your warranty. Please make
sure you have a complete understanding of the following restrictions.
Note: Please check your state laws and regulations to determine if windshield mounting is legal
in your state. Some jurisdictions regulate or prohibit use of these devices. It is your responsibility to know and comply with applicable laws and rights to privacy in jurisdictions where you
plan to use this device.

2
Restrictions
When using this product, the safety precautions below must be taken to avoid possible legal liabilities and damages. Retain and follow all product safety and operating instructions. Observe
all warnings in the product operating instructions. To reduce the risk of bodily injury, electric
shock, fire and damage to the equipment, observe the following precautions.
• Do not use this product to infringe on one’s privacy, spying intercepting and related activities
are illegal and punishable by law. Monitoring one’s private activities without consent is illegal
and this product is not designed or manufactured for these purposes.
• Do not use this product to carry out any illegal activities such as sneak preview, and etc.
SecurityMan shall not be responsible for any consequences of illegal conducts made by users.
• Do not put the plastic package bags in reach of children or babies. Young children can
choke on these items if they put them into their mouths.
• Do not plug the cigarette lighter adapter into the outlet with wet hands. Doing so may cause
electric shock and or fire.
• Do not disassemble or repair the camera, receiver or other relevant peripheral equipment
s by yourself. Improper disassembly might cause damages to the product or the peripheral
equipment.
Please note that under certain circumstances, audio/video recording may be PROHIBITED by
law. This device should be used only in compliance with all applicable federal, state and local
statutes.
• Please make sure that you are following the regulations and laws set by your states DMV
(Department of Motor Vehicles) prior to mounting your camera. This manual does not intent to
provide any specific legal advice.
• Always keep your eyes on the road and never take both hands of the steering wheel when
using the hand-gesture feature.
• In most vehicles, the camera will automatically turn on/off whenever the car does because the
power to the cigarette port is controlled by the ignition. Users with vehicles that cigarette ports
are always on will have to manually start and stop recording as needed.
• Please check your cameras features periodically to ensure that it is operating as required.
• Most memory cards have a temperature limitation which can create bad sectors (memory
card error) during use. Please re-format the card if such events should occur.
• During a car accident, the impact of the collision must be hard enough to trigger the G-Sensor
In order for the camera to lock the file being recorded.
• Please use the camera as a tool while driving and use driver’s safety while driving.
• SecurityMan Inc shall not be held responsible for any trafc violations related to the position-
ing or improper use of our product.
• Avoid mounting the camera outside of an airbag deployment zone.
Disclaimers

3
• All vehicles must use the included warning stickers when using the camera which must be
visible to all passengers.
• Due to cell phone hardware limitations, Android users may not be able use other apps when
connected to the camera.
• GPS connection time will vary depending on the signal strength and dongle positioning.
Please wait for the GPS connected voice prompt before moving the vehicle.
Mounting BracketCARCAMGPS
GPS Power Cable
Warning Stickers User’s Manual Quick Start Guide
2 Port USB Adapter
2.4A for CARCAMGPS
Package Contents
4
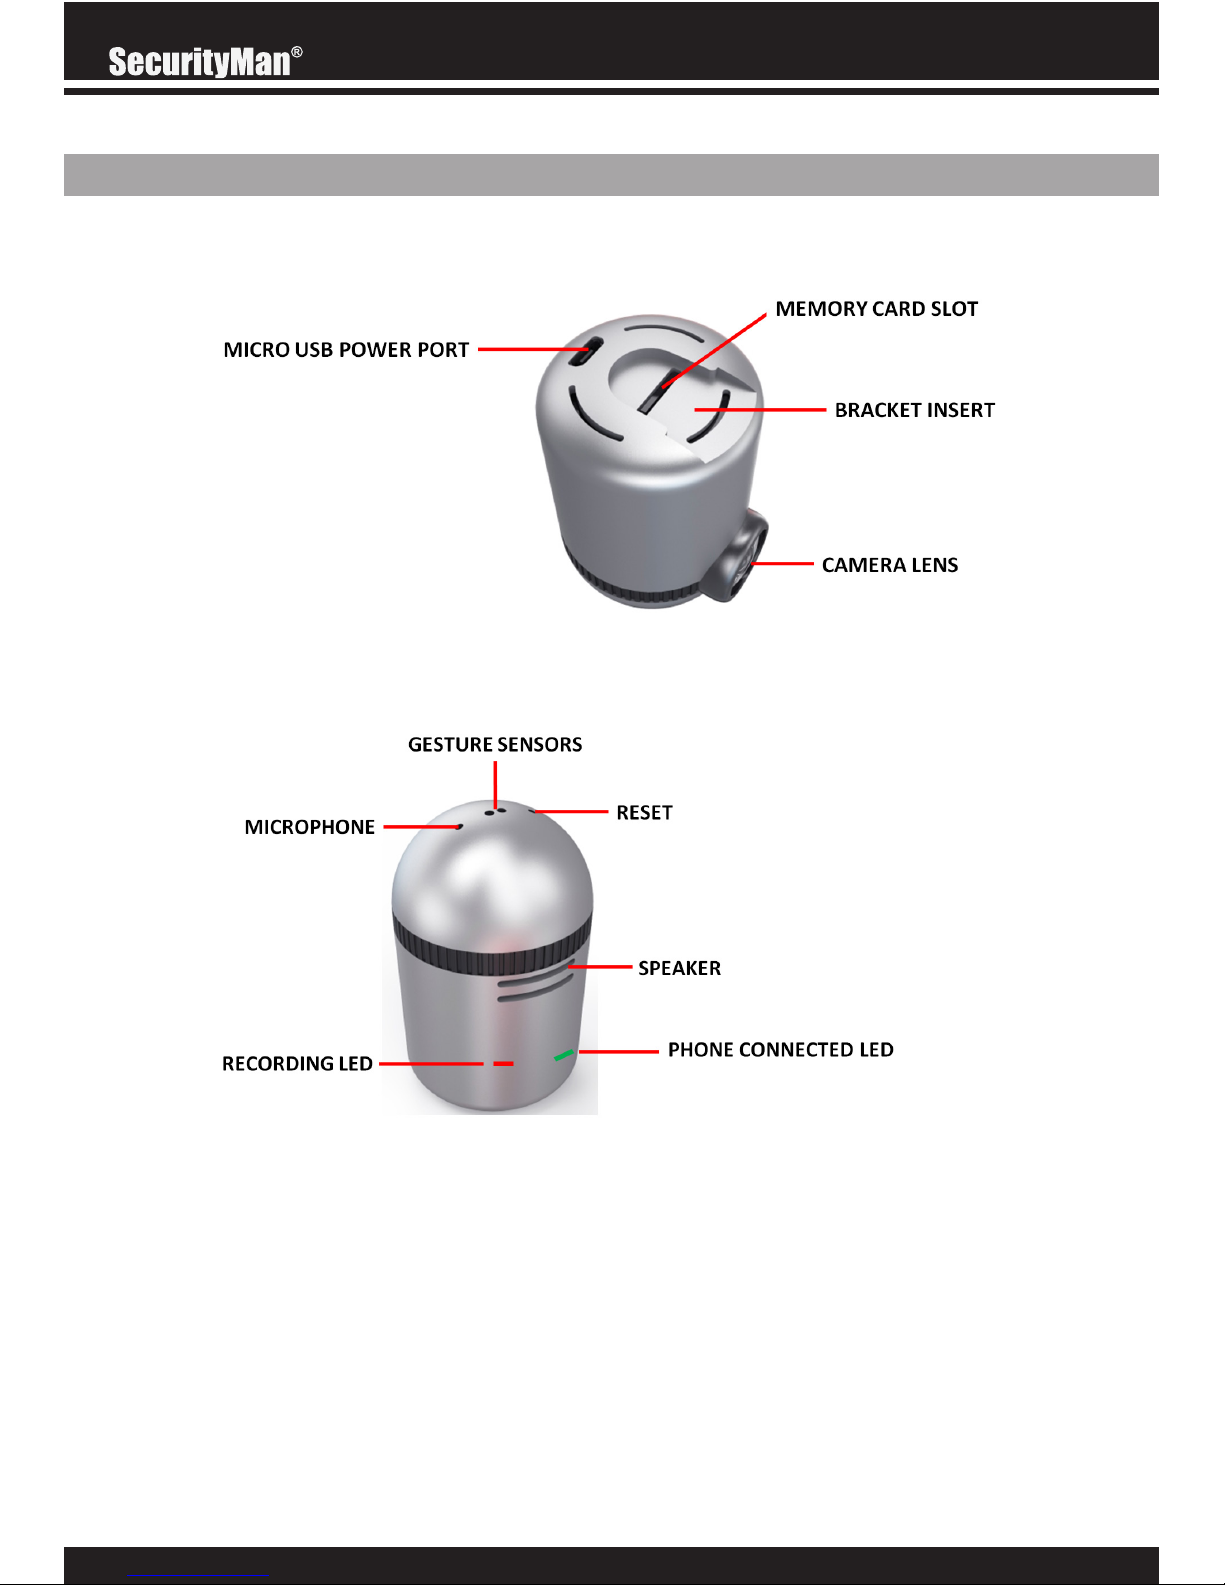
Product Basics
Phone connected LED (Green)
• Solid: Connected to a mobile device (Smartphone, Tablet, etc) via the SM CARCAMGPS app.
Recording LED (Red)
• Flashing steadily: Recording.
• Solid: No memory card present.
Reset
• Press and hold: Resets the camera to its factory default settings.
• Press and release: Restarts the camera.

5
Quick Start Guide
HARDWARE SETUP & INSTALLATION
The following will guide you through a quick setup process and a couple setting changes that
will need to be configured before using your camera.
IMPORTANT
• Always keep your eyes on the road and never take both hands off the steering wheel when
using the hand-gesture feature.
• After the initial setup, mobile devices will auto connect to the camera (when in range)
whenever the camera is on. You will still need to open the app to sync events at the end of your
commute.
• Due to cell phone hardware limitations, Android users may not be able use other apps or
sync maps and GPS data while connected to the camera.
• There are several “audible alerts” built into the camera which can be used to assure your
camera is working as advertised:
Please insert a memory card – Make sure you are using a memory card no bigger than
64GB and that its pushed in all the way.
Memory card error, please re-format – Bad/corrupt memory card. Re-format it at once.
GPS is connected – If you do not hear the GPS is connected prompt during boot up.
Please reposition the GPS dongle on your windshield.
INSERTING YOUR MEMORY CARD
Insert your memory card (64 GB max) into the Memory card slot until it locks/clicks into place.
Make sure that you insert the memory card with the teeth facing towards the camera’s micro
USB power port as shown in the images below.
NOTE: Please refrain from inserting the memory card backwards or upside down. Doing so
may cause the port to become damaged and inoperable. SD card not included.
6
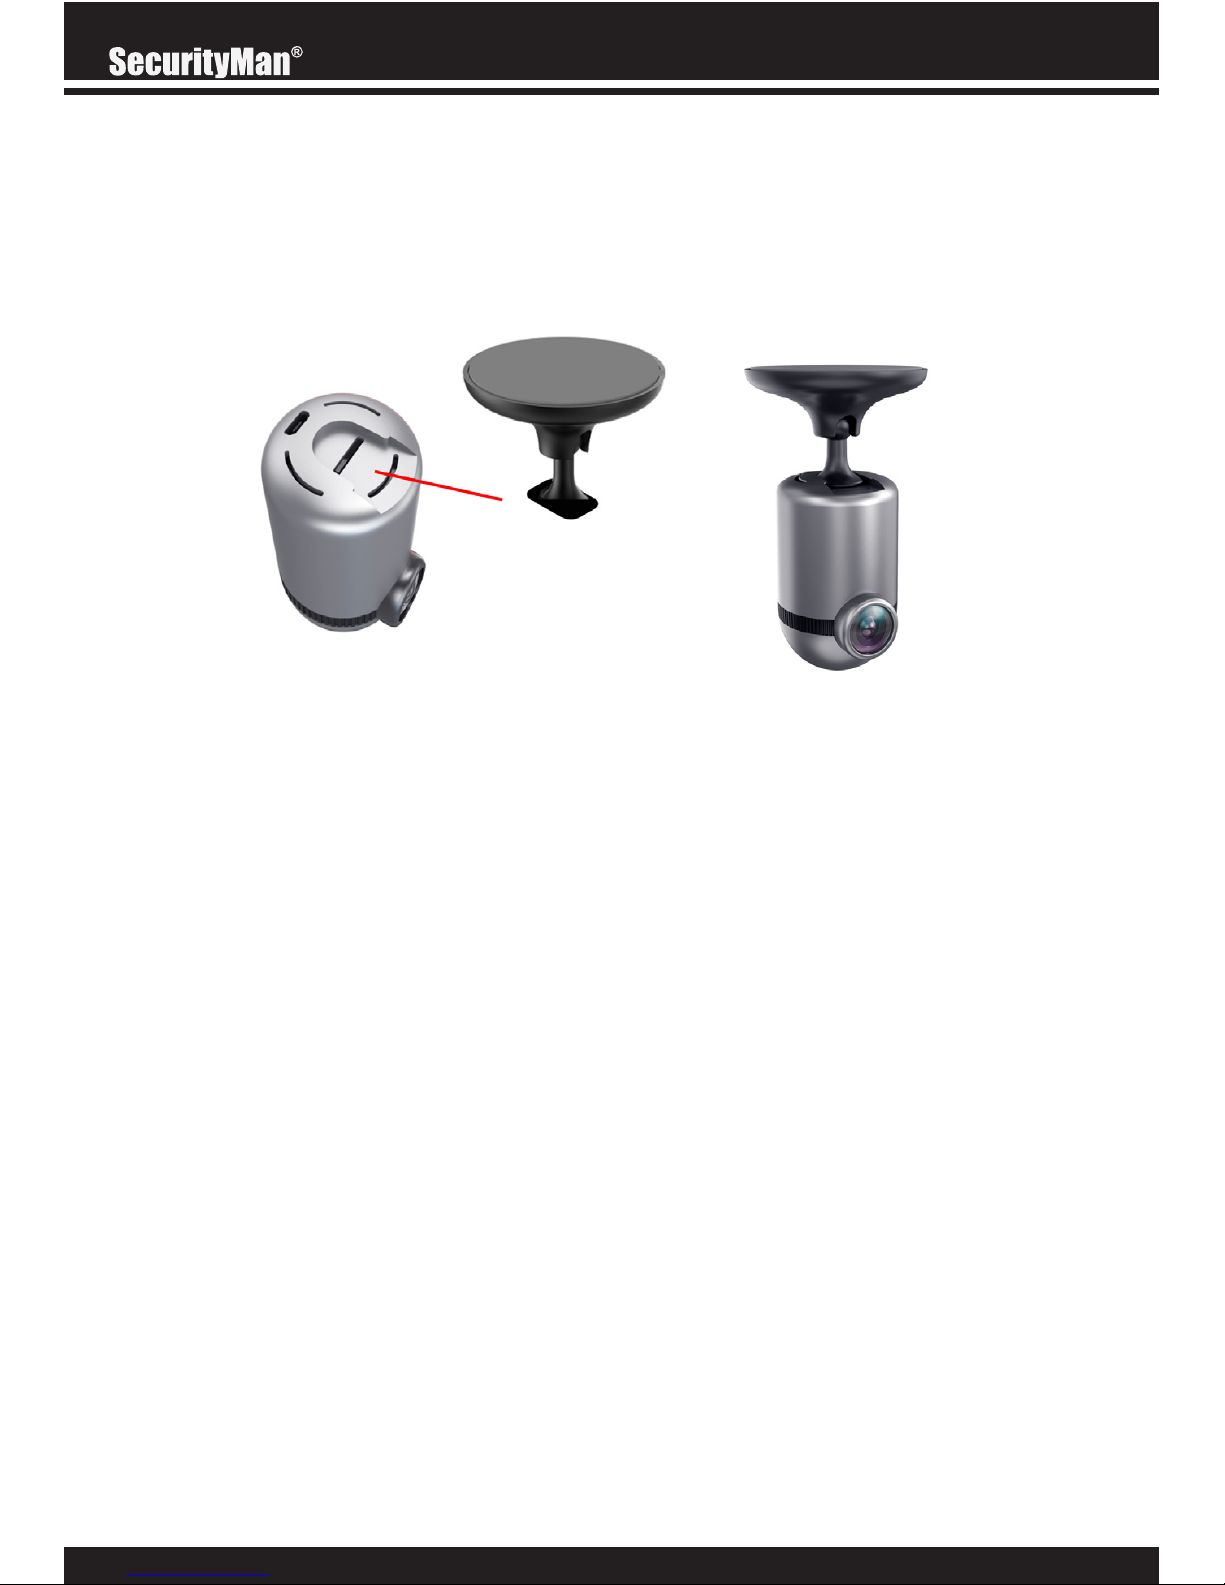
ATTACHING THE BRACKET
To attach the suction cup mounting bracket, slide the small square shaped tip of the bracket into
the small opening located at the top of the camera. You can easily detach the camera when
needed by reversing the step.
MOUNTING THE CAMERA
IMPORTANT
• Please make sure that you are following the regulations and laws set by your states DMV (Department of Motor Vehicles) prior to mounting your camera. This will avoid any accidents and
traffic violations that can occur if the camera is mounted in a location that is prohibited by law.
• If utilizing the hand-gesture feature please do not mount the camera too far from the driver. It
is very important that he/she always keep their eyes on the road and never takes both hands
off the steering wheel.
Note: According to CA VC Section 26708 (13) (A) “A video event recorder with the capability of monitoring driver performance to improve driver safety, which may be mounted in a
seven-inch square in the lower corner of the windshield farthest removed from the driver, in a
five-inch square in the lower corner of the windshield nearest to the driver and outside of an
airbag deployment zone, or in a five-inch square mounted to the center uppermost portion of
the interior of the windshield. As used in this section, “video event recorder” means a video
recorder that continuously records in a digital loop, recording audio, video, and G-force levels,
but saves video only when triggered by an unusual motion or crash or when operated by the
driver to monitor driver performance.”
The first thing you want to do is determine where you will be mounting the camera. The
following diagram depicts mounting locations on a vehicle based in the state of California and
its restrictions.

7
Remove the suction cup protected over lay. With the suction cup in the “unlocked” position,
place it on your windshield and lock it into place by moving the Suction Lever upwards towards
the windshield. Once the suction cup is securely mounted t o your windshield you can move
the camera up, down, left and right to adjust its view as needed.
Insert the USB power adapter into your vehicles cigarette lighter port. Then insert the USB end
of the GPS Power cable into the 2.4A USB port (not the 1.0A) and the Micro USB end of the
cable into the cameras power port.

8
Now that you have your mounting position set, run the excess power cable so that it doesn’t
disturb the drivers view or steering wheel while driving. This can be done by gently tucking
the cable into the seams of your vehicles upholstery and side panels. While hiding the cable
remove the adhesive backing of the GPS dongle (receiver) and stick it to your windshield.
Note: GPS connection time will vary depending on the signal strength location and dongle position. Please wait for the GPS connected voice prompt before moving the vehicle.
The SecurityMan SM CARCAMGPS app can be found on both IOS and Android platforms by
simply scanning the corresponding QR code below or searching for it in the Apple App-Store or
Google Play- Store.
The following steps will guide you on how to connect to the camera using your smart phone.
Please make sure you visit the basic operations section of the user’s manual for instructions on
how to sync events and other commonly used features.
With the GPS power cable connected to both the USB adapter and camera, turn your vehicle
on and the camera will automatically turn on and begin recording (flashing red LED).
Note: In most vehicles, the camera will automatically turn on/off whenever the car does because the power to the cigarette port is controlled by the ignition. *Vehicles with cigarette ports
that are always on will have to manually turn the camera on/off by unplugging the USB end of
the GPS Power cable from the USB power adapter to prevent the cars battery from draining.
IPHONE ANDROID
APP DOWNLOAD
CONNECTING TO YOUR CAMERA

9
Launch the SM CARCAMGPS on your cell phone and tap on “Connect”. Read the “No Camera Connected” prompt and tap on “Ok” to open your phones Wi-Fi settings.
On the Wi-Fi settings screen, tap on the cameras Wi-Fi name “M-XXXXX” (xxxxx varies on each
camera) using the default password 12345678. Once connected, return to the SM CARCAMGPS app.
Note: IOS users must tap on the Wi-Fi option on the settings screen to view the cameras SSID.

10
Once connected the background image should change from orange to the CARCAMGPS and
the green “Phone Connected LED” on the back of the camera will become solid. Tap on “View
Camera” to display the live view.
The final step is to update the current time and date by syncing them with your connected device. From the apps live view screen, tap on the gear icon located on the bottom right corner
of the screen. Then scroll down and tap on the “Synchronize Time & Date” option. You should
hear an audible confirmation from the camera and get a confirmation pop up on your phone
when synced.
Basic Operations
IMPORTANT
• Always keep your eyes on the road and never take both hands of the steering wheel when
using the hand-gesture feature.
• Due to cell phone hardware limitations, Android users may not be able use other apps or
sync maps and GPS data while connected to the camera.
• There are several “audible alerts” built into the camera which can be used to assure your
camera is working as advertised:
Please insert a memory card – Make sure you are using a memory card no bigger than
64GB and that its pushed in all the way.
Memory card error, please re-format – Bad/corrupt memory card. Re-format it at once.
GPS is connected – If you do not hear the GPS is connected prompt during boot up,
please reposition the GPS dongle (receiver) on your windshield.

11
From the apps live view screen, tap on the gear icon located on the bottom right corner of the
screen. Then scroll down and tap on the “Synchronize Time & Date” option. You should hear
an audible confirmation from the camera and get a confirmation pop up on your phone when
synced.
Hand Gestured snapshots (along with the current 25 second video clip when enabled) are
automatically marked for App synchronization and will be sent over to the App gallery when
you perform an event sync. To trigger the camera to take a snapshot, simply move your hand
under the camera until you hear the snapshot trigger sound. Default hand gesture detection is set
within 4 inches from the sensor.
IMPORTANT: Always keep your eyes on the road and never take both hands of the steering
wheel when using the hand-gesture feature.
GPS data (route, speed, rest time, drive time, etc) is recorded and stored on the Memory card
and needs to be synced to the App in order for you to view it. From the apps main screen (not
the live view), tap on the Travel tab located on the bottom of the App tool bar, then simply touch
the screen and pull down/release to begin the syncing process.
SYNCING THE TIME AND DATE
HAND GESTURE SNAPSHOTS
SYNCING GPS DATA

12
IMPORTANT: Android users will need to disconnect from the camera (from the phones Wi-Fi
settings) and repeat the sync process for the maps to come in after.
TIP: The same process is used to sync Gesture and Impact events from the memory card to the
App gallery.
IMPORTANT: iPhone users can only sync events from the “Photos” section of the App gallery.
TIP: The same process is used to sync GPS data from the memory card to the Travel tab.
Gesture and Impact events are saved to the Memory card and need to be synced to the App in
order for you to view them from the App Gallery (located on the App tool bar). From the apps
main screen (not the live view), tap on the Gallery tab located on the bottom of the App tool
bar, then simply touch the screen and pull down/release to begin the syncing process.
SYNCING GESTURE AND IMPACT EVENTS

13
Formatting your memory card wipes the card clean by removing all data and bad sectors which
may prevent the camera from recording properly (memory card error). From the apps live view
screen, tap on the gear icon located on the bottom right corner of the screen. Scroll down and
tap on the “Storage Management” option, tap on Format and then tap on Ok to confirm and
began the formatting process.
Note: Formatting will only erase events stored on the memory card. GPS data and events
synced to the app will not be affected.
There are several locations where you can payback recorded events, directly from the Memory
card, from the App Galley and those you have saved directly to your phone.
Note: Please refer to the CARCAMGPS App section for details on how to transfer events from
the memory card to the App gallery.
FROM THE APP GALLERY
The first thing you will need to do is sync events to the App gallery tab. From the apps main
screen (not the live view), tap on the Gallery tab located on the bottom of the App tool bar, then
simply touch the screen and pull down/release to begin the syncing process.
FORMATING YOUR MEMORY CARD
PLAYING BACK EVENTS

14
Once synced, you can tap on either the Photos (default screen) or Videos tab to view/playback
the categorized content. To make it easier to find and playback video events, each event is
marked by its event type:
• Normal (blue): Events that are manually transferred from the Memory card to the App gallery.
• Gesture (green): Hand Gesture events.
• G-Sensor (red): Impact triggered events.
The Memory card event gallery is divided up into 3 sections, Normal, Gesture and G-Sensor.
• Normal – Collection of all recorded events
• Gesture – Hand gestured events
• G-Sensor – Impact triggered events
Note: For the most part the Gesture and G-Sensor section of the memory card gallery will be
empty since they are automatically synced over to the App gallery.
DIRECTLY FROM THE MEMORY CARD
To playback recorded events directly from the Memory card card simply tap on the Playback
icon (located on the bottom left corner of the live view screen) to open the Memory card event
gallery.

15
To transfer events from the Memory card event gallery to the App Gallery tap on the Select
option (located on the top right corner of the Memory card gallery) and select the events you
want to download. When you are done, tap on the Download option and wait for the process
to complete.
TRANSFERRING EVENTS FROM THE MEMORY CARD GALLERY TO
THE APP GALLERY
CARCAMGPS App
IMPORTANT
• Always keep your eyes on the road and never take both hands of the steering wheel when
using the hand-gesture feature.
• Due to cell phone hardware limitations, Android users may not be able use other apps or
sync maps and GPS data while connected to the camera.
• The CARCAMGPS App is divided up into 2 sections:

16
APP – Does not require you to be connected to the camera and is used to view GPS logs
and playback Gesture & G-Sensor events.
CAMERA – Requires you to be connected and is used to live stream the video on your
connected device, change camera settings and to transfer events stored on the Memory card
to the App when needed for later playback.
The App section of the CARCAMGPS app has an easy to use App toolbar which is divided
into 4 tabs.
• Camera (default screen) – Used to connect to your CARCAMGPS dash cam.
• Travel – Used to view and delete travel log history.
• Gallery – Used to playback Gesture and G-Sensor events.
• Info – App info and general Q&A section on how to use the app.
CAMERA TAB
The camera tab is the default and will always be the first to see whenever you open the app.
When no camera is connected (orange background) you’ll have two options to select.
• First time users (How to connect tutorial)
• Connect
APP SECTION

17
TRAVEL TAB
The travel tab allows you to view detailed travel information such as travel time, rest time,
distance, etc along with a trace route map image of each drive you take.
Note: Don’t forget to connect to the camera and sync your travel log to keep it updated.
FIRST TIME USERS (HOW TO CONNECT TUTORIAL)
The “First time users” option provides you with a quick step by step tutorial on how to connect
to the camera for the first time. To view the tutorial simply tap on the “Tap here for instructions
text”, read the steps and tap on the back arrow when done.
CONNECT
The connect option does two things, it initiates the no camera connected process and launches
the cameras live view when a connection (connect to camera) has already been established.

18
To view a travel event, use your finger to scroll through the log and tap on the event you wish to
view. On the detailed event screen you can see thumbnails and location of all hand gestured
events along with detailed travel information.
Note: Due to hardware limitations, hand gestured thumbnails are not visible on Android
devices.
To delete a travel event simply swipe left on the event and tap on the delete option.

19
GALERY TAB
The gallery tab is divided into two sections Photos and Videos.
• Photos – Hand gestured snapshots.
• Videos – Hand gestured video, Impact videos and videos that are manually transferred over
from the SD card.
Note: Don’t forget to connect to the camera and sync your events to keep the App Gallery
updated.
PHOTOS
The photo section of the gallery tab stores all hand gestured snap shots. To view snapshots,
simply swipe down on the photo screen to sync your events and tap on any of the image
thumbnails to enlarge it.
Once an image is enlarged you can save it to your mobile device, share it or delete it.

20
VIDEOS
The videos section of the gallery tab stores all video events that have been synced over from the
memory card (hand gestured video, G-sensor and normal). To view video events, simply swipe
down on the photo screen to sync your events and tap on any of the image thumbnails to play
it back. To make it easier to find and playback video events, each event is marked by its event
type:
• Normal (blue): Events that are manually transferred from the Memory card to the App gallery.
• Gesture (green): Hand Gesture events.
• G-Sensor (red): Impact triggered events.
Once you have started playing a video you can share and save it to your mobile device, crop
the end/start points or delete it.

21
Q&A
The Q&A section of the info tab can be used to answer some of the most common questions
you may come across when using the CARCAMGPS and is broken up into 6 categories. To
view a category simply tap on any of the corresponding icons.
ABOUT
The About section of the info tab show App related information such as App version, Camera
firmware and also allows you to change the speed unit from MPH (default) to Km/h.
Equipment Installation App
Memory Card Recording General Q&A
INFO TAB
The info tab severs as a help tool too view common Q&A questions related to the CARCAMGPS and is divided into two sections Q&A and About.
• Q&A – General questions and answers related to the CARCAMGPS and SMCARCAMGPS
App.
• About – App Version information

22
The Camera section of the CARCAMGPS app is used to view the camera’s live view, transfer
events stored on the SD card, and change camera settings. To access the camera section, connect make sure you are connected to your cameras Wi-Fi signal and tap on the “View Camera”
option to bring up the live view. The live view consists of the following options:
• Microphone – Used to enable and disable audio recording.
• Orientation – Used to switch the live view from vertical and horizontal.
• Playback – Used to playback and transfer events stored on the memory card.
• Snapshot – Takes a quick snapshot of the live view screen.
• Settings – Used to change camera settings and features.
CAMERA SECTION
MICROPHONE
The Microphone icon on the live view screen is used to enable and disable audio recording.
To do so, simply tap on the microphone icon to enable/disable as needed.
23
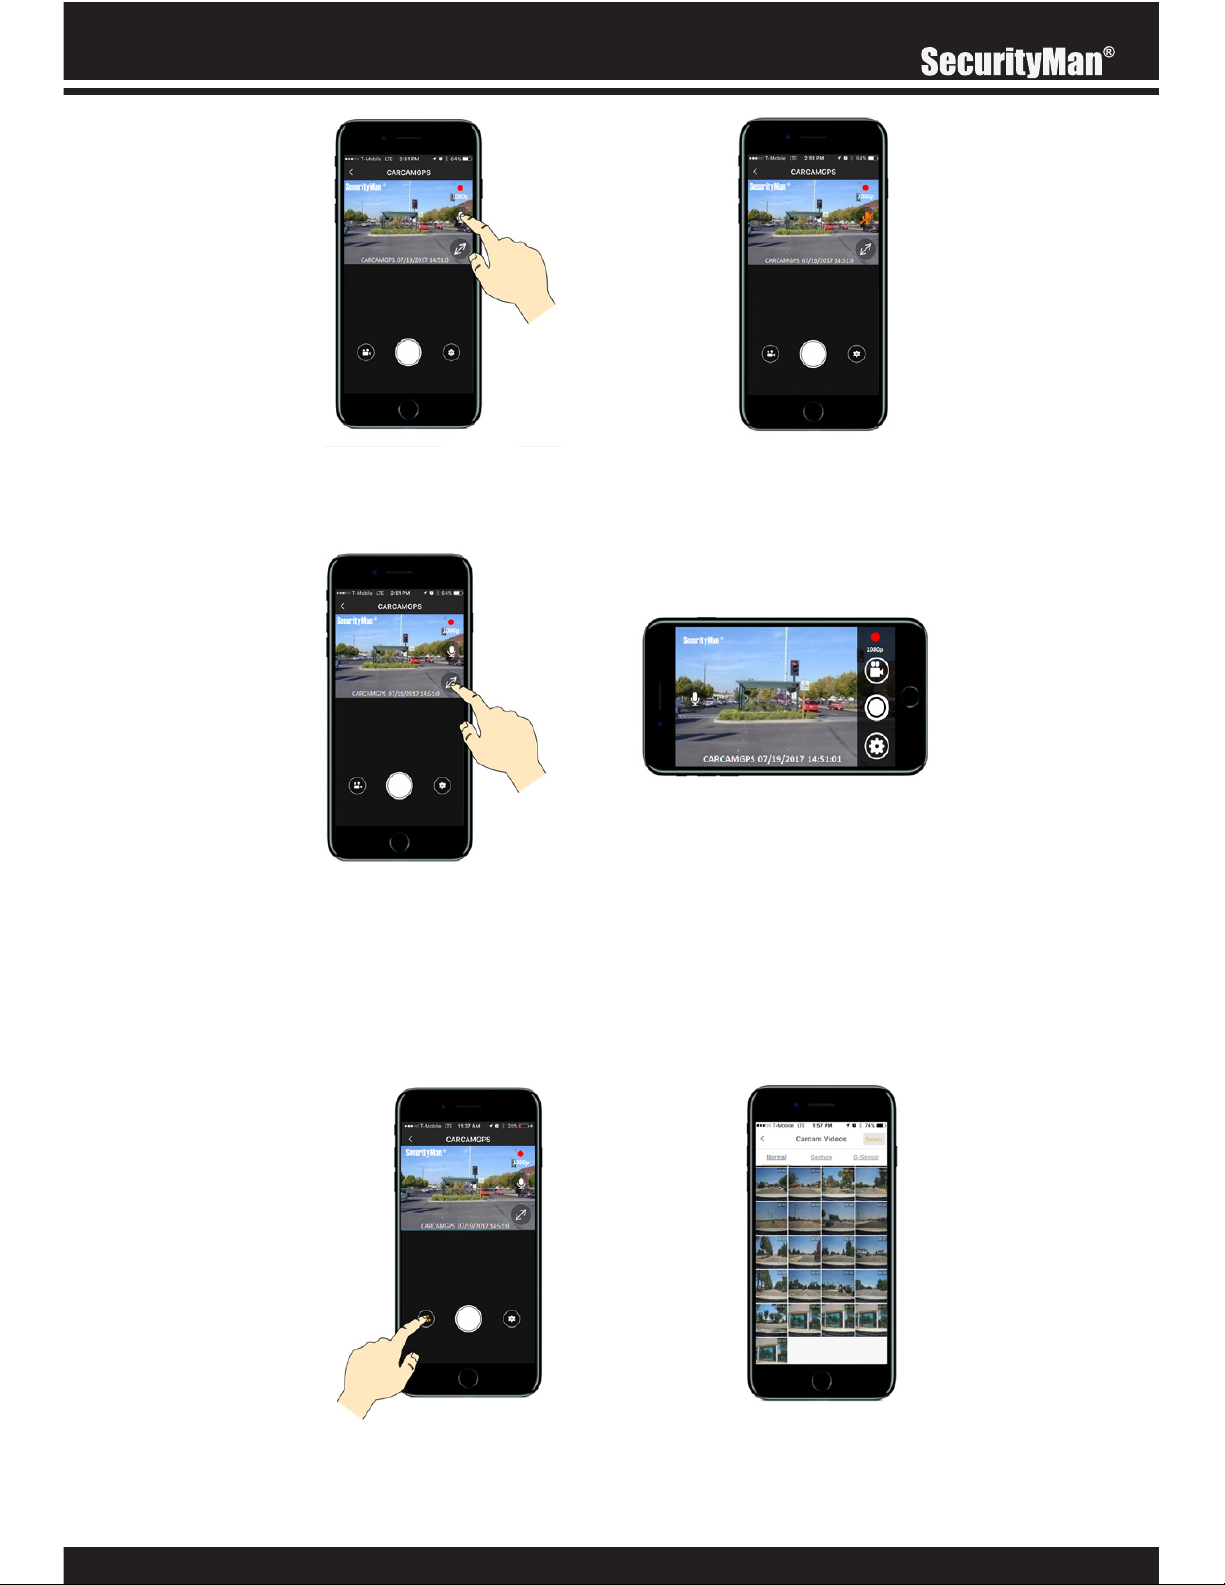
ORIENTATION
The Orientation icon on the live view screen is used to switch the live view from vertical to
horizontal. To do so, simply tap on the orientation icon to switch as needed.
PLAYBACK
The Playback icon on the live view screen is used to playback all normal recorded events that
are stored on the memory card. To playback recorded events directly from the memory card
simply tap on the Playback icon (located on the bottom left corner of the live view screen) to
open the memory card event gallery.

24
The Memory card event gallery is divided up into 3 sections, Normal, Gesture and G-Sensor.
• Normal – Collection of all recorded events
• Gesture – Hand gestured events
• G-Sensor – Impact triggered events
Note: For the most part the Gesture and G-Sensor section of the memory card gallery will be
empty since they are automatically synced over to the App gallery.
To transfer events from the Memory card event gallery to the App Gallery tap on the Select
option (located on the top right corner of the Memory card gallery) and select the events you
want to download. When you are done, tap on the Download option and wait for the process
to complete.
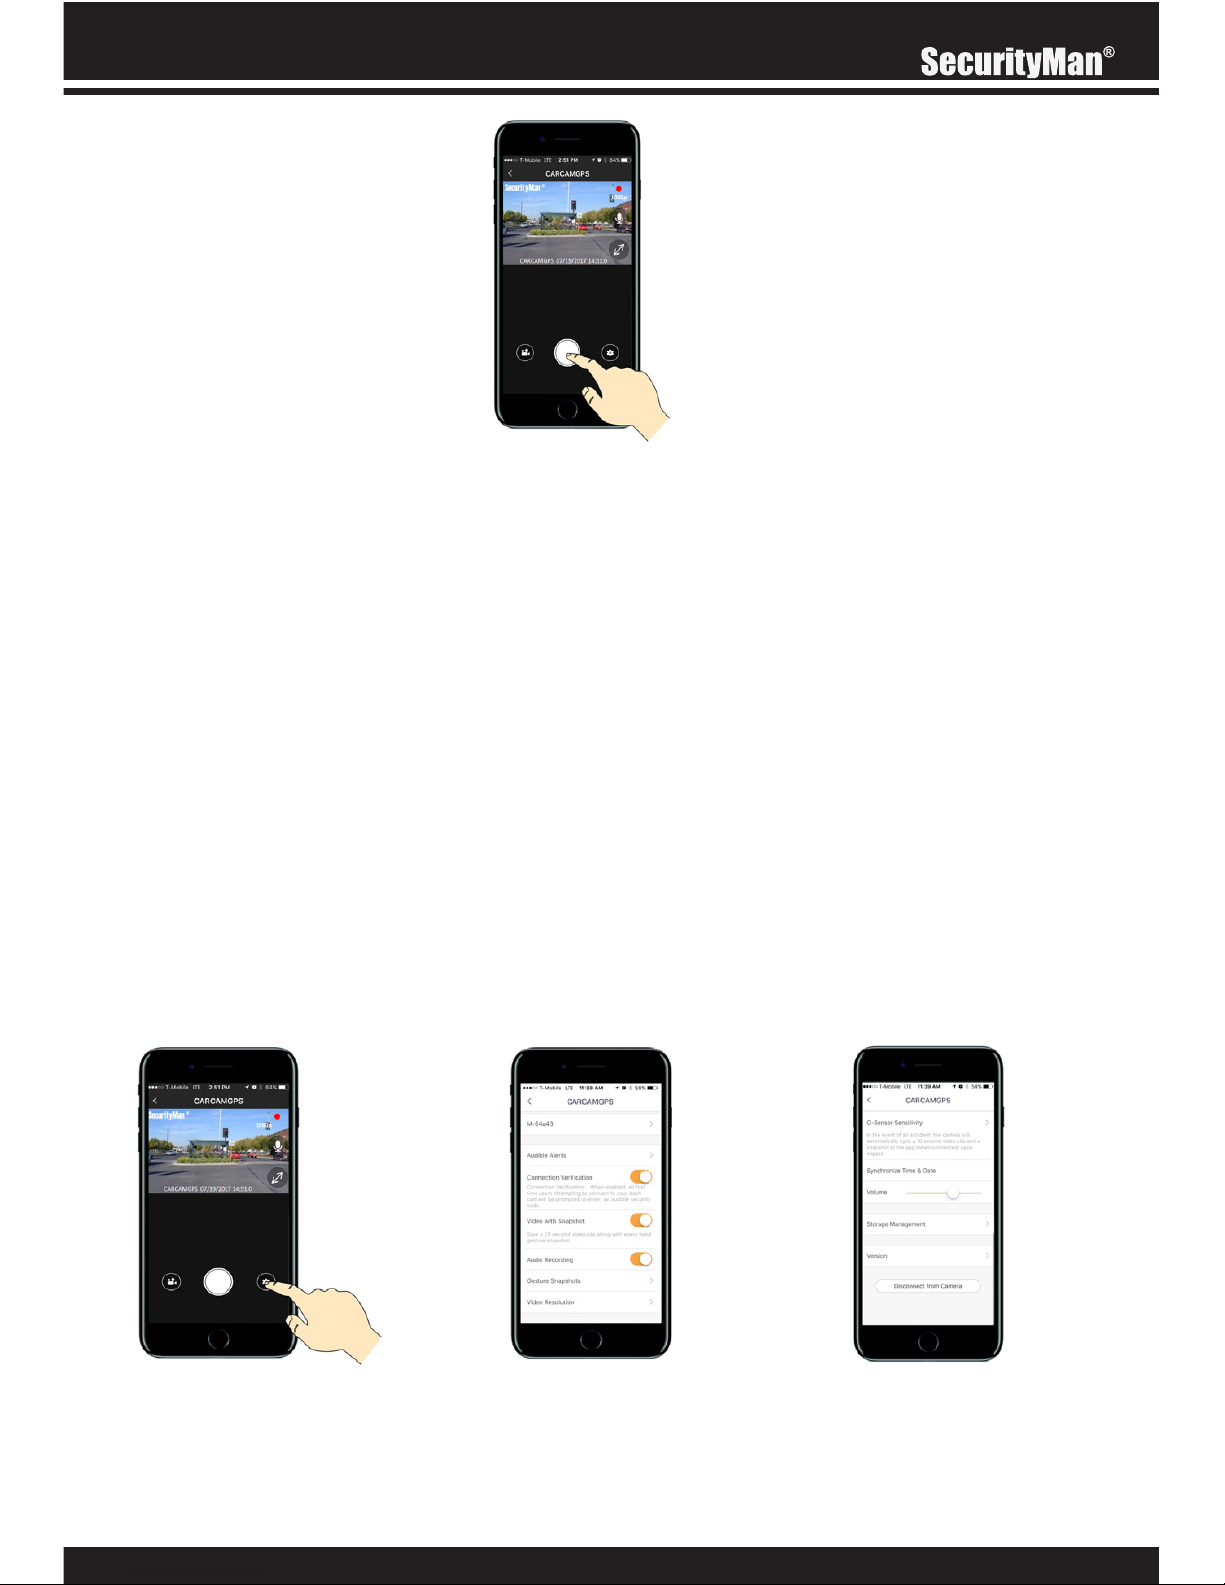
SNAPSHOT
The Snapshot icon on the live view screen is used to take an instant snapshot of the current live
view image which is sent directly to App photo gallery.
25
SETTINGS
The Settings icon on the live view screen is used to access the cameras settings page where
you can make changes and adjustments to your cameras features such as syncing time & date,
enabling voice prompts, etc. The settings page is simple to navigate through and consists of the
following:
• SSID – Displays the cameras Wi-Fi name and MAC address.
• Audible Alerts – Used to enable/disable audible alerts.
• Connection Verication - Enable/Disable connection verification.
• Video with snapshot - Enable/Disable video with hand gestured snapshots.
• Audio recording - Enable/Disable audio recording.
• Gesture Snapshots – Adjust Hand gesture sensitivity.
• Video Resolution – Adjust video resolution.
• G-Sensor sensitivity – Adjust G-Sensor sensitivity.
• Synchronize Time & Date - Update the cameras time and date.
• Volume - Adjust the cameras volume.
• Storage Management – Memory card management.
• Version - Displays the cameras firmware version.
• Disconnect from camera – Disconnects the mobile device from the camera.

26
SSID
The SSID section of the settings screen displays the cameras SSID (Wi-Fi name) and Mac
address. To view the Mac address simply tap on the SSID name.
AUDIBLE ALERTS
The Audible Alerts option is used to enable (on) or disable (off) the audible alerts that can be
heard during the operation and use of the camera. To make changes to these features, simply
tap on audible alert and tap on the on/off switch located at the end of each option. The
available options are:
• GPS (on by default)
• Impact Recording (on by default)
• App snapshots (on by default)
• Gesture Snapshots (on by default)
CONNECTION VERIFICATION
The Connection Verification option is used to enable (on) or disable (off/default) the audible 4
digit verification code that needs to inputted at the time you connect from a mobile device. To
make changes to this feature, simply tap on on/off switch located at the end of option.

27
VIDEO WITH SNAPSHOT
The Video With Snapshot option is used to enable (on/default) or disable (off) the camera to
save a 25 second video clip with every hand gestured snapshot. To make changes to this
feature, simply tap on on/off switch located at the end of option.
When enabled, you will be prompted to enter the 4 digit security code provided by the
camera. Simply tap on “Play code” when prompted, enter the code and tap on “Connect to
camera”.

28
AUDIO RECORDING
The Audio Recording is used to enable (on/default) or disable (off) the camera from recording
audio. To make changes to this feature, simply tap on on/off switch located at the end of
option.
VIDEO RESOLUTION
The Video Resolution option is used to change the resolution of the videos being recorded. To
make changes to this feature, simply tap on video resolution. The available options are:
• 720P
• 1080P (default)
GESTURE SNAPSHOTS
The Gesture Snapshots option is used to enable (on) or disable (off) the hand gesture feature
and adjust the sensitivity level. To make changes to these features, simply tap on gesture snapshots. The available options are:
• On (default)
• Off
• Low
• Med (default)
• High
• Reset Gesture Sensor

29
G-SENSOR SENSITIVITY
The G-Sensor Sensitivity option is used to change the sensitivity level of the cameras built in impact sensor. To make changes to this feature, simply tap on G-sensor sensitivity. The available
options are:
• High
• Med (default)
• Low
• Off
SYNCHRONIZE TIME & DATE
The Synchronize Time & Date option is used to update the cameras time and date by synchronizing it with your mobile device. To sync the time and date, simply tap on the “Synchronize
Time & Date” option. You should hear an audible conrmation from the camera and get a
confirmation pop up on your phone when synced.

30
VOLUME
The Volume control bar is used to adjust the cameras audible alert level. To adjust the volume,
simply tap on the volume control bar and move it right or left until the desired level has been
reached.
STORAGE MANAGEMENT
The Storage Management option allows you to view detailed information on the memory card
being used in the camera. To view and manage the storage space, simply tap on storage
management to bring up the information. Storage management options include:
• Total space
• Used space
• Videos (space used by normal videos)
• Gesture and impact videos (space used by gestured and impact videos)
• Gesture and impact images (space used by gesture and impact images)
• Format – Erases all data on the memory card.
VERSION
The Version option displays the current and latest firmware version for the CARCAMGPS. To
view the version information, simply tap on version to bring up the information. Storage management options include:
• Current Version
• Latest Version
• Send rmware & upgrade (used to upgrade the camera to the latest version).

31
DISCONNECT FROM CAMERA
The Disconnect from Camera option is used to quickly disconnect your phone from the CARCAMGPS. To disconnect from the camera, simply tap on the Disconnect from camera option.
Note: This option disconnects from the app and not from the cameras Wi-Fi (SSID).

32
Note: Icons displayed on the screen will vary depending on the features/settings that have
been enabled and may change without notice due to firmware updates and changes.
The SecurityMan SM CARCAMGPS app can be found on both IOS and Android platforms by
simply scanning the corresponding QR code below or searching for it in the Apple App-Store or
Google Play- Store.
IPHONE ANDROID
LIVE VIEW
PLAYBACK
LIVE VIEW ICONS
App Download

33
Specifications
Image Sensor
Chipset
Lens
Minimal Illumination
Video Resolution
Video Format
G-Sensor
WiFi Module
App Accessible
Recording Frame Rate
Photo Resolution
Photo Format
Motion detection
Loop Recording
Frequency
Storage
Overwrite
GPS Logging
GPS module
USB Port
Microphone
Speaker
Language
Power Requirements
Operating Temperature
Non-Operating Temperature
Operating Humidity
Camera Size (LxWxH)
Weight (net/gross)
Panasonic CMOS (MN34227)
Hisilicon (3516C_V200)
F1.8, 6G (150 degree wide angle)
1LUX (no IR)
1920x1080FHD (16:9)/720P
MP4
High (3G), Medium (2G), Low (1G), Off (locks 5-sec pre-event & 20-sec after event)
2.4GHz, 802.11b/g/n
Yes (app: SM CARCAMGPS)
30fps
2.1MP (1920x1080)
JPG
No
30 second continuous
60Hz/50Hz
Micro SD card (up to 64GB, Class 10 or above, memory card not included)
Yes
App displaying location, speed, distance and route
Built-in to GPS/Micro USB power cable (13ft long)
Micro USB2.0
Yes (8KHz, 2-ch, acc)
Yes
English/Chinese
Input: DC12~24V, Output: DC 5V, 3.10A (2.4A for CARCAMGPS, 1.0A)
4°F~140°F (-20°C to 60°C)
4°F~158°F (-20°C to 70°C)
≤85% RH
1.50” x 1.56 “ x 2.25” (without bracket)
.16 lb (with bracket) / .96 lb
If you encounter any difculty in the operation of this product after reading the manual, please feel
free to contact us. You can reach us by phone at 1-888-977-3777 from 8:30 AM to 5:30 PM Mon-
day through Friday (Pacic Standard Time) or by email techsupport@securitymaninc.com. We will be
happy to answer your questions and help you in any way we can.

www.securitymaninc.com
 Loading...