

Page 1
3G/4G Internet-Email
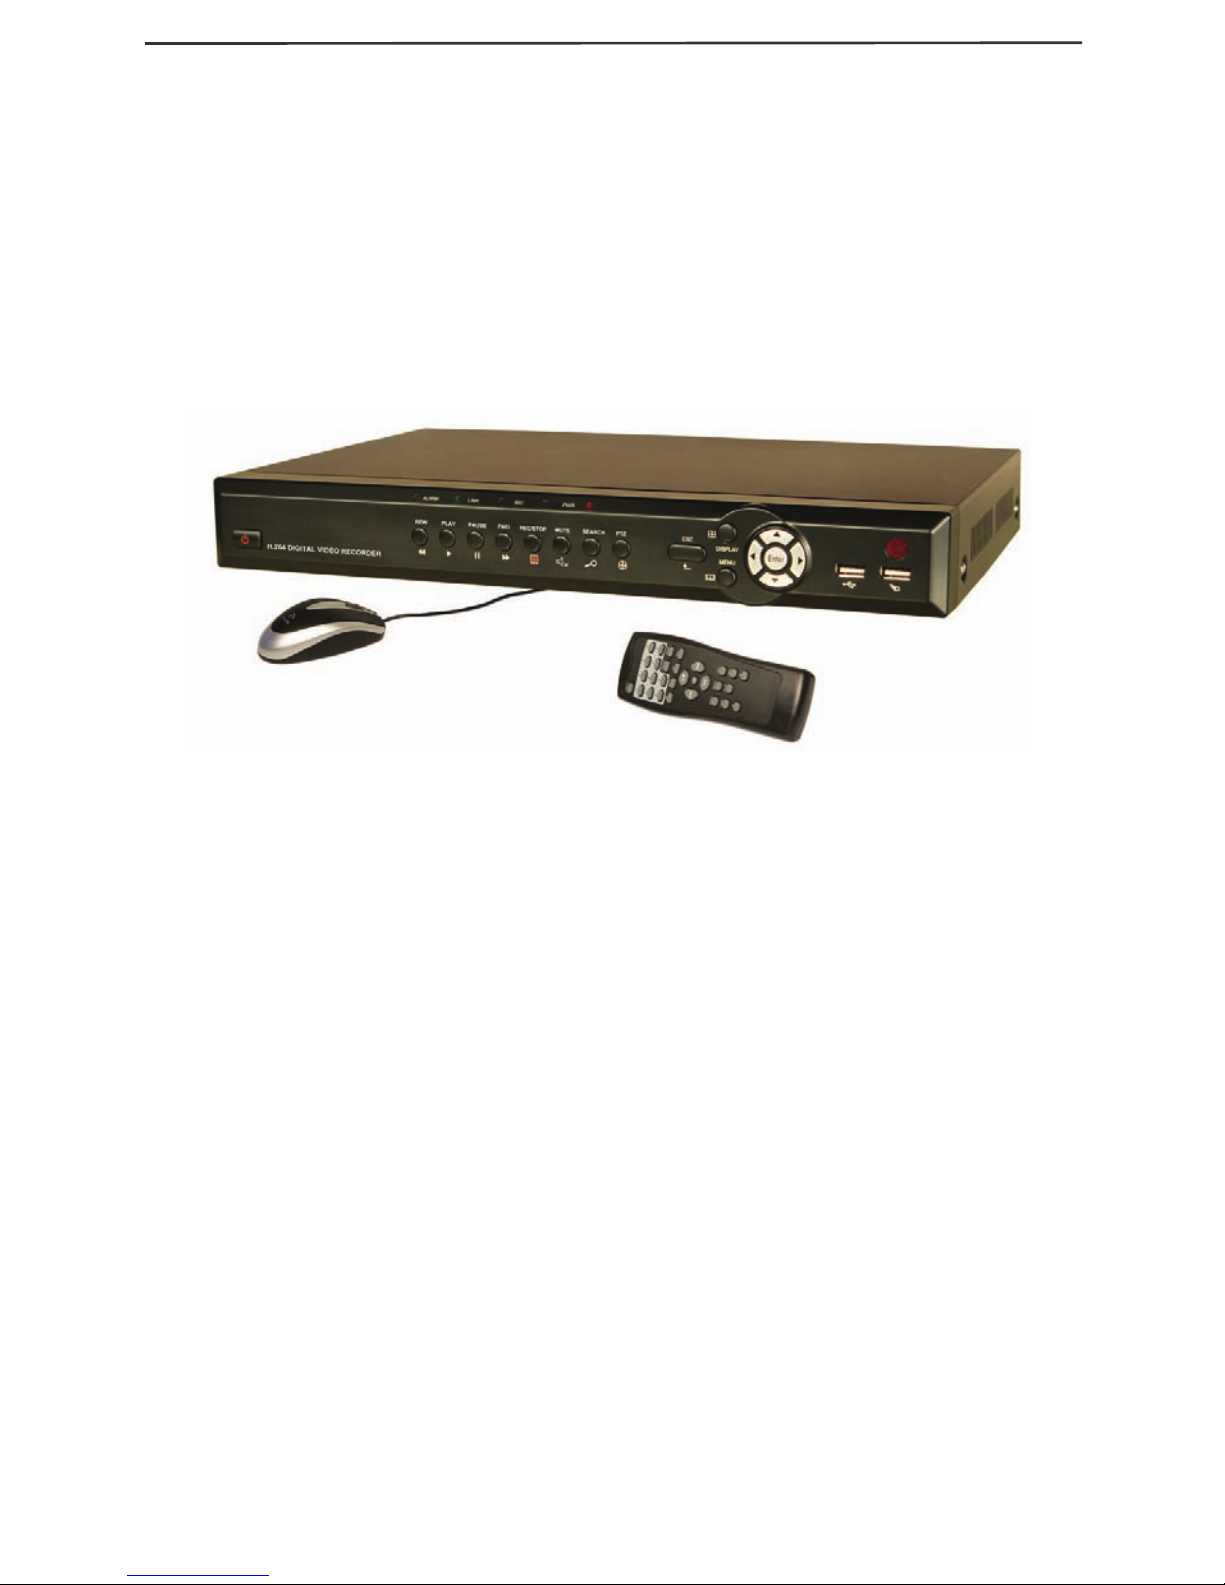
H.264 16 CH DVR
Owner’s Manual
15540 Herriman Blvd. Noblesville, IN 46060
Customer Support 1-800-774-0284
Page 2

16-channel H.264 DVR User Manual
2
Chapter 1 Overview .......................................................................................... 4
1.1 Introduction .......................................................................................... 4
1.2 Packaging and Accessories ................................................................ 4
1.3 Main features ....................................................................................... 4
1.4 Technical Parameters .......................................................................... 5
1.5 Product appearance and interface descriptions .................................. 6
1.6 Remote control .................................................................................... 7
1.7 Mouse .................................................................................................. 8
Chapter 2 Quick Overview ................................................................................ 8
2.1 HDD Installation ................................................................................... 8
2.2 Boot ..................................................................................................... 8
2.3 System login ........................................................................................ 9
2.4 Operation menu ................................................................................... 9
2.4.1 MAIN MENU ...................................................................................10
2.4.2 KEYLOCK .......................................................................................10
2.4.3 CHN SWITCH (Channel Switch) ....................................................10
2.4.4 VIDEO SEARCH ............................................................................10
2.4.5 START SEQUENCE .......................................................................10
2.4.6 START CRUISE .............................................................................. 11
2.4.7 PTZ ................................................................................................. 11
2.4.8 MUTE .............................................................................................12
2.4.9 MANUAL REC / STOP REC ...........................................................12
2.4.10 ZOOM ...........................................................................................12
2.4.11 PIP ................................................................................................12
Chapter 3 Advanced settings ..........................................................................13
3.1 MAIN MENU ......................................................................................13
3.2 Recording mode ................................................................................14
3.3 Video search ......................................................................................15
3.4 Backup ...............................................................................................16
3.5 Hard disk management .....................................................................17
3.6 Basic setup ........................................................................................18
3.6.1 System language ............................................................................18
3.6.2 Time setup ......................................................................................19
3.6.3 User password ................................................................................20
3.6.4 CAMERAS ......................................................................................20
3.6.5 VIDEO/AUDIO ................................................................................21
3.7 Advanced Options .............................................................................22
3.7.1 Alarm ..............................................................................................23
3.7.2 System info .....................................................................................25
3.7.3 Motion detection .............................................................................25
3.7.4 Mobile phone monitoring ................................................................27
MAIN MENU / ADVANCE D / MOBILE ....................................................27
3.7.5 System maintenance ......................................................................27
MAIN MENU / ADVANCED / MAINTAIN .................................................27
Page 3

16-channel H.264 DVR User Manual
3
3.7.6 PTZ Setup ......................................................................................28
3.7.7 Network setup .................................................................................29
3.8 DDNS account ...................................................................................32
3.9 Improving Internet Access .................................................................37
Port Forwarding .......................................................................................37
DMZ Setting .............................................................................................39
Chapter 4 DVR network ..................................................................................40
4.1 Functional characteristics ..................................................................40
4.2 Installation and download of controls ................................................40
4.3 Network log-in ....................................................................................41
4.4 Live View ...........................................................................................42
4.5 Playback ............................................................................................43
4.6 Record mode .....................................................................................44
4.7 Alarm setup ........................................................................................45
4.8 PTZ control ........................................................................................45
4.9 Network setup ....................................................................................46
4.10 System setup ...................................................................................46
4.11 Host Info...........................................................................................47
Chapter 5 Client Software & Player ................................................................48
5.1 Client software ...................................................................................48
5.2 Video Player ......................................................................................49
Appendix: Hard disk space used .............................................................53
Precautionar y Notes:
The power supply of t his D VR i s prov id ed t hr ou gh a regulated DC12V 5A adapter.
Please only use this power supply with your DVR.
Do not place the DVR in a place subject to rain or moisture.
Do not install the DVR in a place subject to violent vibration.
Do not install the DVR in a place subject to direct sunlight, or a high temperature
environment.
Do not block any vent openings in the case to allow for proper cooling.
The DVR shall work under temperature, humidity and voltage according to the
limits stated on the techn ic al s peci fic atio ns p ag e.
Please keep dust near the unit to a minimum.
Proper grounding shall be maintained for safe electrical oper ation .
Page 4

16-channel H.264 DVR User Manual
4
Chapter 1 Overview
1.1 Introduction
This highly featured DVR series is based on a space saving 1U Din Standard
case that is loaded with the latest features and technology. H.264
dual-stream video compression increases the ability of this DVR to hold up to
four times more video than previous models, and allows you to maximize the
speed of your internet transmission at the same time. View live video from a
remote location via the internet or with most Smartphones. Take advantage of
the unit’s full grid video motion detection with notifications that send you an
e-mail of the image of the event as it happens or a text message to your
mobile device. Backups or copies of selected video can be done via a USB
flash drive, or a PC connected via a network connection. The video outputs
on the DVR allow you to use a standard CCTV monitor, VGA cable directly to a
PC monitor, any TV with a video input jack, or view from a computer connected
to your network.
1.2 Packaging and accessories
Following parts are included in the package:
◎ IR remote control
◎ Remote control batteries
◎ LAN patch cable
◎ BNC patch cable
◎ USB Mouse
◎ Owner’s Manual / CD
◎ DC12V 5A power adapter
1.3 Main features
◎ H.264 video compression format
◎ 16-bit true-color semi-transparent graphical menu interface
◎ A variety of recording modes : manu al, timer, and alarm recording.
◎ Copy events to flash drive or PC on network
◎ One USB2.0 port for data backup, one USB1.1 for mouse connection.
◎ Multiplex operation: recording, playback, monitor, backup and network
transmission can be realized at the same time
◎ Dual stream technology
◎ Mobile phone monitoring
◎ Event classification and precise time search and playback
◎ Default parameters can be called for fast recovery
Page 5

16-channel H.264 DVR User Manual
5
◎ Versatile USB interface for mouse connection
1.4 Technical Parameters
Features
Description
Operating system
Embedded LINUX OS
Video compression
H.264
Video/Audio input
16 BNC Video / 2 RCA Audio
Video/ Audio output
1 VGA, 1 BNC Video / 1 RCA Audio
Display
1/4/9/16-channel(s)
Multiplex operation
Live view, record, network, backup, and mobile
phone surveillance.
Recording mode
Timer/ man ual/ mot ion dete cti o n/ alar m
Recording frame rate
480 ips global
Recording quality
High, Normal, Low
Recording resolution
CIF
Recording playback 4
channel playback simultaneously, FF & RW
x2, x4, x8, Pause/Step, remote file playback.
Recording backup
To flash drive, external driv e, o r netw ork.
Network transmission 16 channels real-time network transmission with
CIF resolution
Capture function
Snapshots = JPEG 3Meg Pixels@10fps
Email alarm
YES
PTZ control
Manual and tour control
PTZ protocol
PELCO-D,PELCO-P
PIP
Full screen plus 1 or 2 smaller views
Zoom
Digital – Size and drag with mouse
HDD
1 SATA HDD,capacity to 2TB
Network and protocol 1 RJ-45 10/100M via Et hernet ,supports TCP/IP,
DHCP、DNS、DDNS、NTP etc.
IE browser
YES
Client softwar e
INCLUDED
Dual stream
Main and secondary interchange
Multi - User
Online access up to 5 users
Multi-language
11 Languages
Mobile phone surveillance
Windows, Symbian, iPhone, Blackberry, Android
Alarm Inputs
Normally Closed, or Normally Open
Mouse interface
USB2.0
Backup interface
USB2.0
Remote control
IR
User authority
Multi-level user authority distribution
Power
DC12V/3A
Working temperat ure
0℃-50℃
Working humidity
10%-90%
Page 6
16-channel H.264 DVR User Manual
6
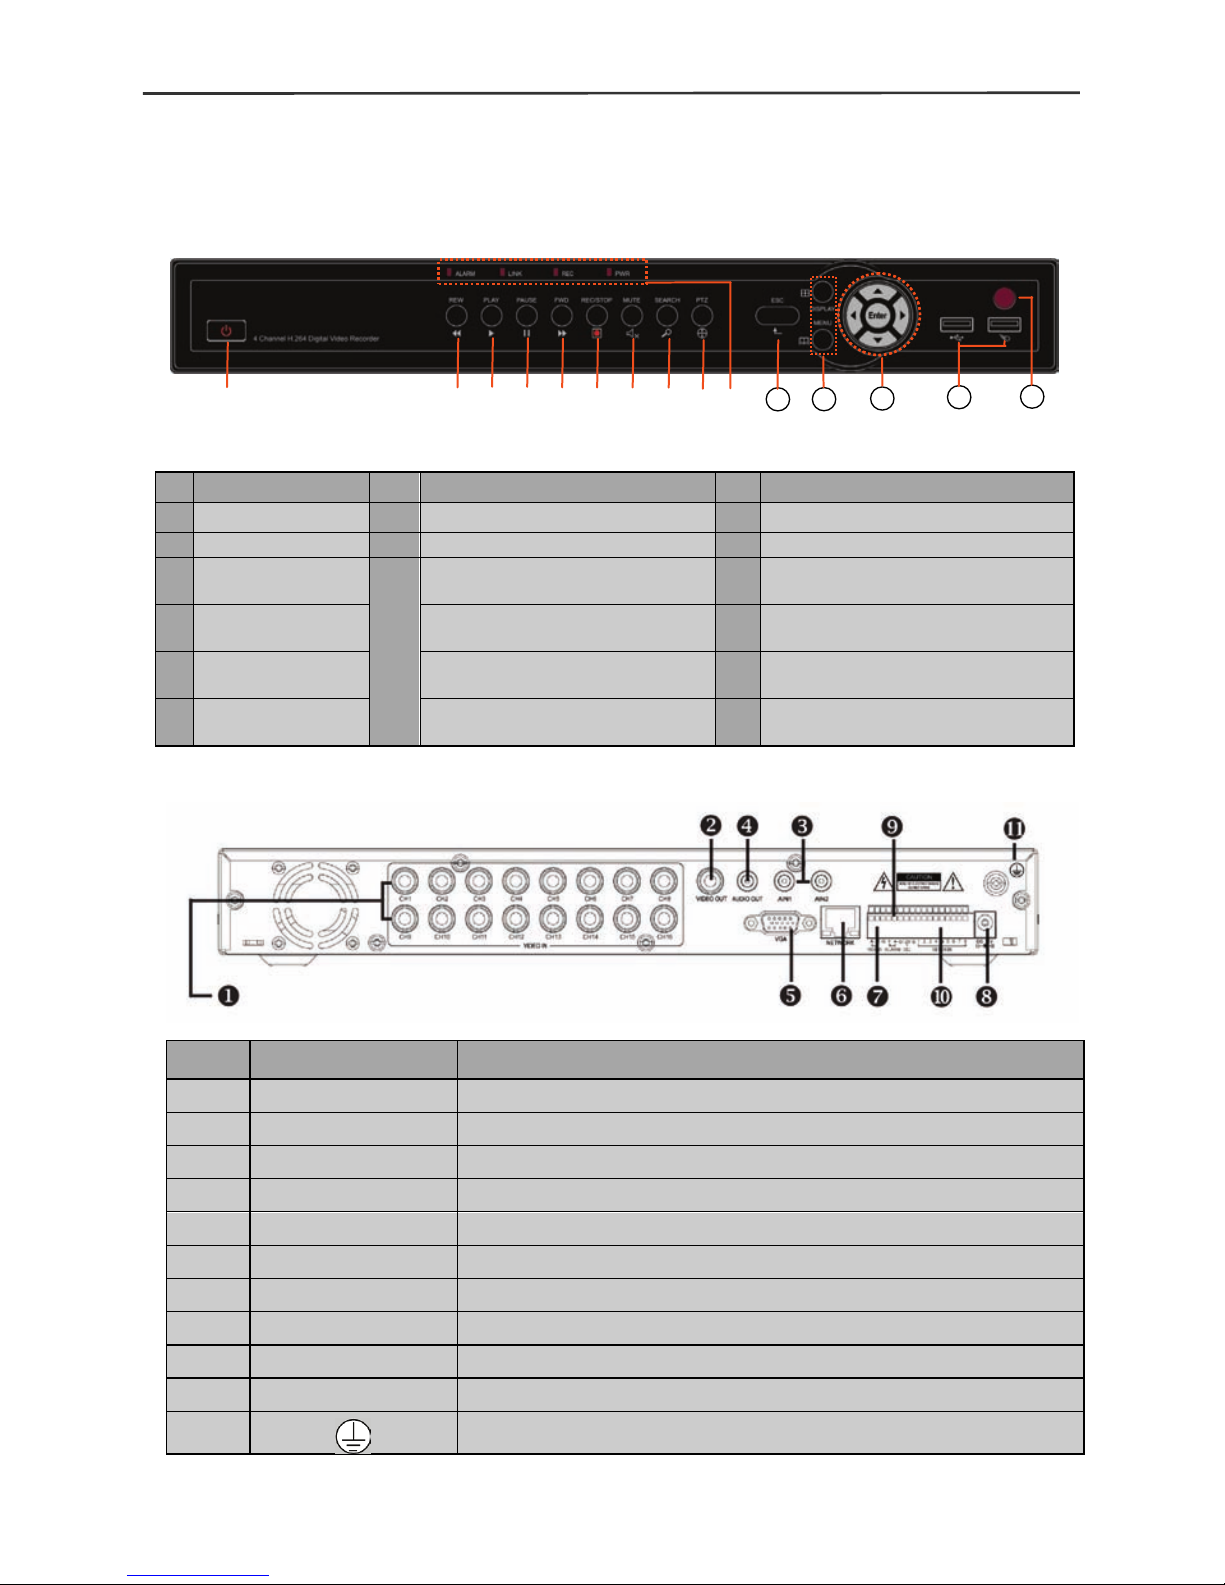
1.5 Product appearance and interface descriptions
1.5.1 Front panel
1.5.2 Back panel
No. Definition No. Definition No. Definition
1 Power switch 7 Mute 9 PTZ control
2
Rewind 8 Video search
11
ESC: Exit/Return
3 Play
10
ALARM: Alarm indicator 12
DISPLAY: Display mode
MENU: Main menu
4 Pause
LINK: Network connection
indicator
13 Up, Down, Left , Right and Enter
5 Forward REC: Video recording indicator 14
USB PORT: Backup port on left,
Mouse port on right
6
Manual start/stop
recording
PWR: Power LED 15 Remote control infrared receiver
No. Physical interface
Interface description
1 1~ 16CH Video In Connect analog video(camera) signal input, st andard BNC connector
2 Video Out Composite video output (to monitor’s video input).
3 2 CH audio IN Line level audio signal, standard RCA jacks
4 Audio Out T o monitor’s Audio In
5 VGA To connect a VGA mo nit or (such as co mputer mon itor)
6 NETWORK To connect to your network router or switch
7 RS485 PTZ camera control output
8 DC12V Power interface:DC 12V/3A
9 ALARM Alarm relay output
10 SENSOR 1~8 Normally Open or Normally Closed alarm contact inputs
11
Ground Terminal
⑩
⑥
⑦
⑧
⑨
①
②
③
④
⑤
11
13
12
15
14
Page 7

16-channel H.264 DVR User Manual
7
1.6 Remote control
Key Functional definition
Not used on this model
Not used on this model
0~9 Channel selection; number keys
PTZ PTZ Control
Single and multi-sp l it screen
Quit shortcut menu
Shortcut menu
Direction buttons: Next, on the left
and right
OK
ESC Exit / Return
MENU Enter the main menu
STARTREC Start recording (please refer to 2.4.6
for the method)
STOPREC Stop recording (please refer to 2.4.6
for the method)
Video search
Stop playback
Fast reverse
Fast forward
Frame advance
F1, F2
Not used on this model
Page 8

16-channel H.264 DVR User Manual
8
1.7 Mouse
This DVR incorporates a standard USB2.0 m ouse to m ake menu and co ntrol
functions as easy as operating a personal computer.
Chapter 2 Quick Overview
2.1 HDD Installation
Your DVR comes with a hard drive already installed. If you plan to upgrade in
the future, select a SATA type interface. We recommend Seagate brand hard
drives designed for surveillance use. Remember to always format a new
hard drive after it is installed in your machine.
2.2 Boot
After all camera and monitor connections have been made, connect the
12VDC 5A power adapter to the DC 12V soc ket on th e back panel, and pres s
the power butto n on the front panel. The p ower indicator will light, and the
monitor will display our company’s logo for approximately 25 seconds while
the system initial izes. If the recor d mode is set to be gin “W hen powered up”
the “REC” indic ator will t urn o n to indicate the s ystem is wor k ing norm ally. A
red “H” icon on the scr een indicates a potentia l problem with the hard dri ve’s
connections, or a need for the drive to be formatted.
Mouse
Action
Function
Right button
Open the system menu, return to the search menu dur ing p lay back, or
go to live screen view.
Left button
Double click during live view to display a channel full scre en. Double
click again to return to prior viewing mode.
Single click t
o activate any menu item, volume adjustment, color
adjustment, play function, or PTZ control.
Mouse
movement
Left click / h old / dra g th e m ouse to quickly adjust v olu me or t he active
grid squares in a motion detection zone.
Page 9
16-channel H.264 DVR User Manual
9
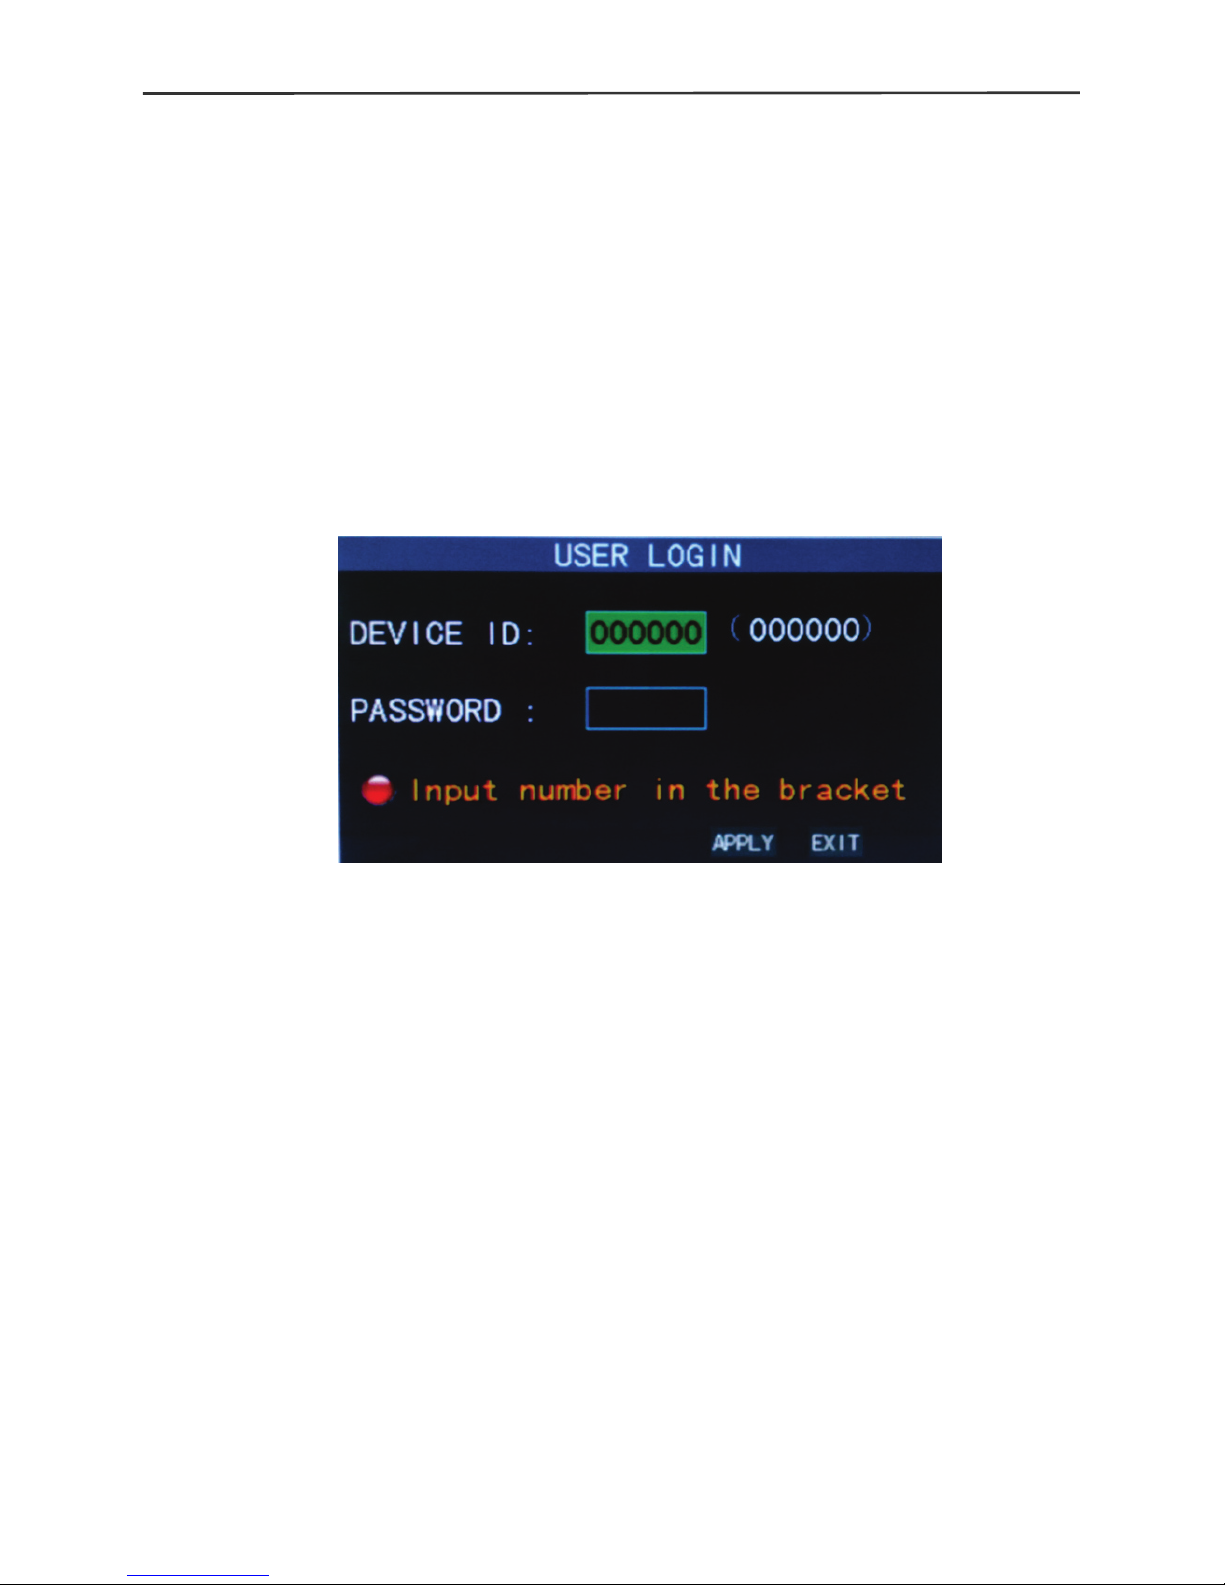
2.3 System login
The DVR’s default login na m e is 000000 without any password. You can s et
up your own private password by following the directions in chapter 3.6.3.
If a password has been initiated, the following login screen will appear
when you attempt to operate the DVR.
Device ID: Using the default Device ID (000000) with your password
works fine. When multiple DVRs are being controlled with the IR
remote in the same room, assign a unique ID and password to each
DVR.
2.4 Operation menu
Click the right mouse button to bring up the following menu. Each item is
described in detail below.
Page 10

16-channel H.264 DVR User Manual
10
2.4.1 MAIN MENU
Click "Main Menu" to access the advanced settings area for your DVR
(described in chapter 3.1).
2.4.2 KEYLOCK
The front panel function buttons and mouse can be locked to keep
unauthorized users from accessing control of the DVR. First, Admin and
User passwords sho uld be set up as in chapter 2.3. Clicking on KEYLOCK
will then cause the USER LOGIN screen to display when a front panel function
button is pushed. Clicking on KEYLOCK again will terminate the session
with the current user, and request a password for the next user.
2.4.3 CHN SWITCH (Channel Swit ch)
Selects the channels, or groups of channels that will be displayed.
2.4.4 VIDEO SEARCH
Use this selection to play back your video in a variety of ways. Please see
Chapter 3.3 for details.
2.4.5 START SEQUENCE
Shows each active video channel (full screen) in a sequential order . Click on
the screen to go back to normal viewing mode.
Page 11
16-channel H.264 DVR User Manual
11
2.4.6 START CRUIS E
Activates a memorized tour (group of preset positions) on a motorized pan / tilt
/ zoom camera.
Note: This feature can only be used after setting up a PTZ camera that is
compatible with this type of function such as a Security Labs SLC-171C or
Piczel 3505.
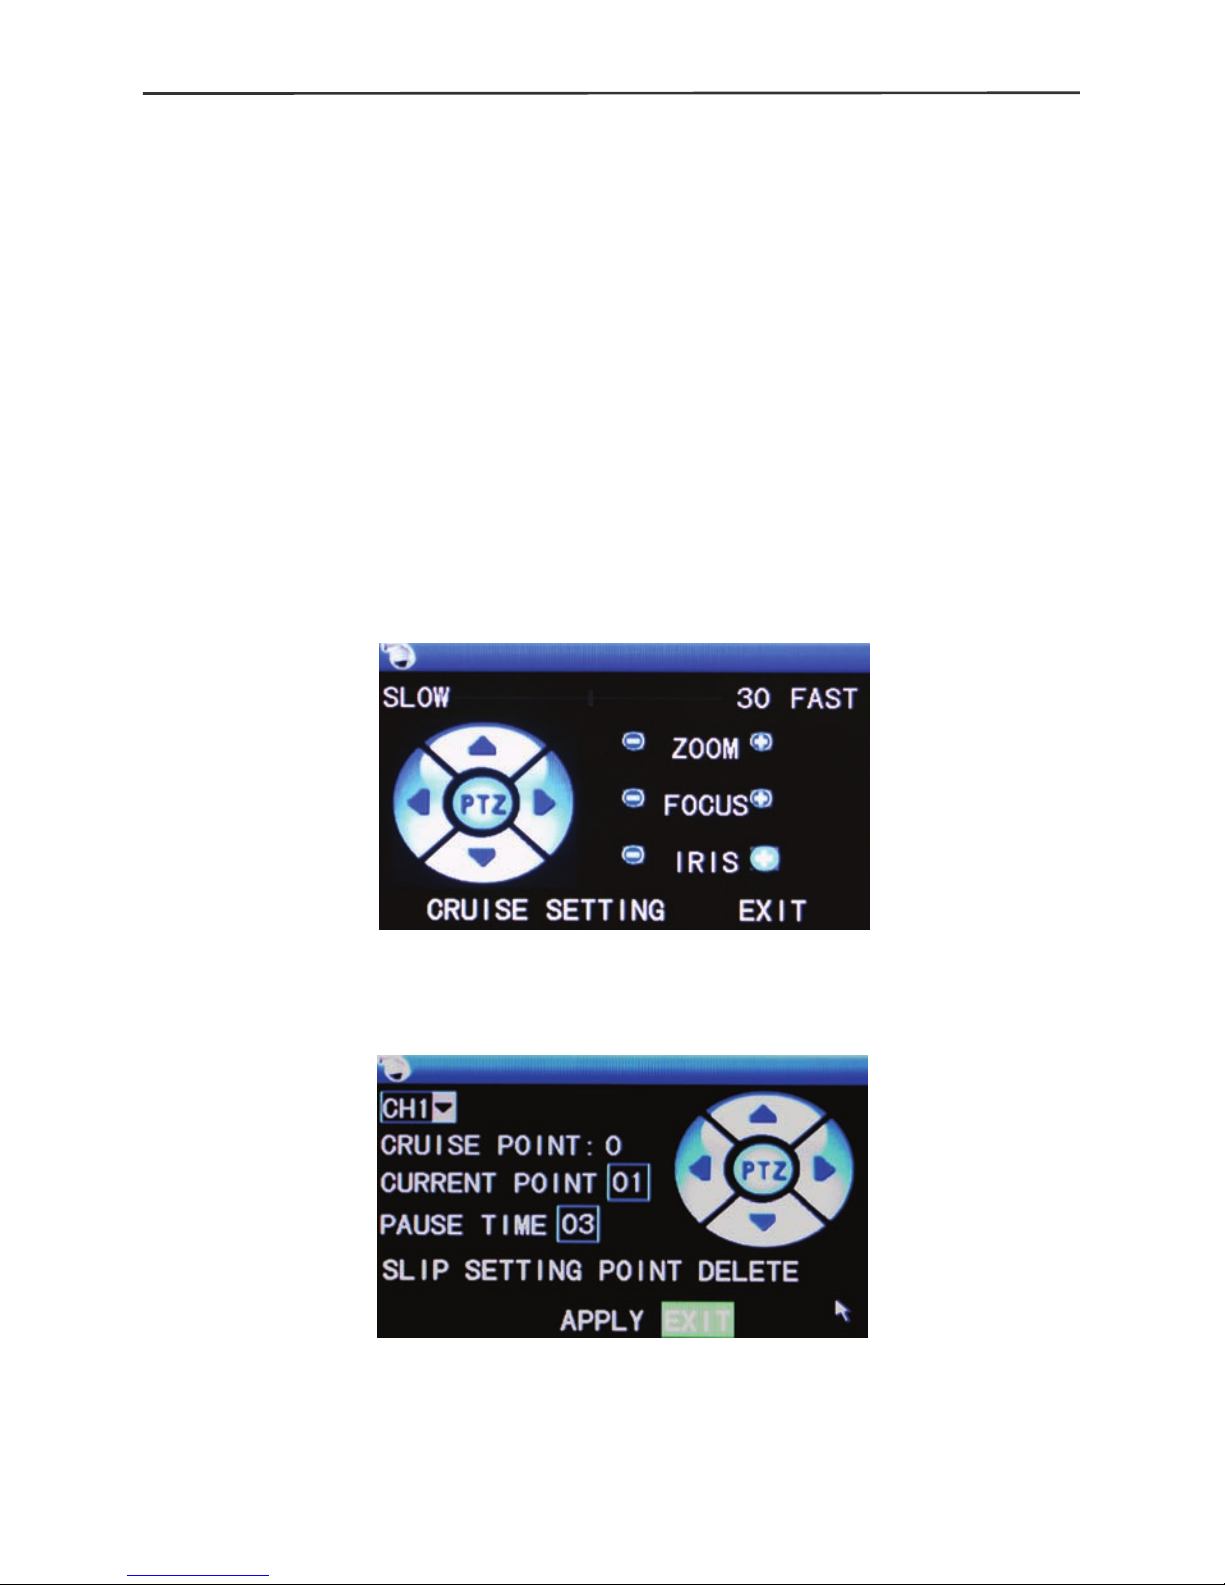
2.4.7 PTZ
Activates the control menu below to operate your compatible PTZ camera.
PTZ variable speed (fast ~slow), direction, zoom, focus and aperture are
available.
Manual Operation:
Cruise (Tour ) setting:
S tep 1 Select the PTZ channel
S tep 2 Pan/Tilt the camera to position desired.
S tep 3 Set pause time (time camera remains on object being viewed)
Step 4 Press SETTING POINT .Repeat steps 2-4 to set the next location
Page 12
16-channel H.264 DVR User Manual
12
S tep 5 Select the APPLY button to save your settings
----END
More points can be added later by repeating steps 2-5.
SLIP:
The SLIP button all ows you to go direc tly to a preset point. Stop the cruise
function if it is active, enter the pres et number you wish to view in the Current
Point box, click <Enter> on the yellow number drop list, click <SLIP>. The
camera will scan to the preset point, and stay until another command is sent.
Delete:
Clears the cruise settings (tour) from memory .
2.4.8 MUTE
Quickly mutes the audio feed from all channels.
2.4.9 MANU AL REC / STOP REC
Allows you to start and stop recording provided the DVR is not in
“When powered up” mode, or if a timer recording is in progress.
2.4.10 ZOOM
In the single-channel full-screen mode, click on ZOOM, then left click and drag
your mouse to outline the area you wish to enlarge. Double right click to exit.
2.4.11 PIP
In the single-channel full-screen mode, you can select 1x1 or 1x2 to
Page 13
16-channel H.264 DVR User Manual
13
superimpose one or two ot her smaller channel views over the m ain channel
view
Chapter 3 Advanced settings
3.1 MAIN MENU
The main menu has “PLAYBACK”, “RECORD”, “HDD”, “BASIC”,
“ADVANCED” and
“Exit” options, as shown below:
Note: The setup of all the submenus below will not be effective until “Enter” is
pressed. The setup of this menu will be invalid if you exit directly. A helpful
characteristic of this DVR is when you move the cursor to any option, a
message box describing the option is displayed automatically in the lower part
Page 14

16-channel H.264 DVR User Manual
14
of the screen.
3.2 Recording mode
MAIN MENU / RECORD
Enter the Recording Mode s cr een via MAIN MENU / RECORD:
CHANNEL: Enables the record mode for the corresponding channel.
REC.MODE: Two modes: “When powered up”, or “By Timer”.
When powered up: DVR starts recording when this unit is energized
(only if the corresponding channel is enabled in the “Channel” option.)
BY TIMER: When selected, a “SCHEDULE” button will appear on the
right. Move
the cursor here and press “Enter” or click the button to enter the Record
Time Configuration screen, as shown below:
Channel: You may choose either “ALL” or a single channel. “ALL” allows
you to batch edit the schedule of all cameras used at the same time.
Time configuration: First select one of the three modes recording; ALARM
(red), TIMED (green), or NO RECORD (blank). Then click each square (hour
Page 15

16-channel H.264 DVR User Manual
15
of the day) you wish to apply the selected record function to. 00 = Midnight
through 23 = 11:00PM.
FROM-TO-COPY: Allows you copy the schedule you set up to “ALL” days or
any specific day you select from the drop list.
FILE LENGTH: Left-c lick or press “Enter” to s elect the File leng th, with the 4
options of 15min, 30min, 45min and 60min. Sets the maximum file size of
continuous recordings for easier transfer or limits lost data due to a corrupt file
segment.
AUDIO: Allows you to quickly turn the audio function ON or Off.
VIDEO CHANNEL: Select a channel to set the attributes below:
RESOLUTION: Available in three levels of D1(704*576), HD1(704*288)
and CIF(352*288). D1 = Best detail, through CIF = Uses less hard drive
space
QUALITY: Three levels, High = Best detail, through Low = Uses less hard
drive space.
Frame rate: Us e a h igh er number when record ing f as ter moving objects,
or a lower num ber if you wish to ex tend the number o f days that will be
saved to the hard drive.
These three settings together use the available processing power of the DVR,
also referred t o as t he “ Gl o bal” avai lab il ity. By defau lt this DVR is set with a ll
channels: Resolution = CIF, Quality = Normal, and Frame Rate = 30 ips
(images per second). Not all channels can be adjusted to the highest
settings at the sam e time. Lowering the resolution, fram e rate, or quality of
less important chan nels, will a llow you to increase the r esolution, fr ame rate,
or quality of channels that have a higher priority of detail(s) required.
3.3 Video search
MAIN MENU / VIDEO SEARCH
Enter the Video Search screen from MAIN MENU / VIDEO SEARCH:
Page 16
16-channel H.264 DVR User Manual
16
Click on “SEARCH” to show all available recordings to view, or enter the
specific Channel, Date, and Time at the top of the page that you wish scan.
Dates and times with available ALARM recordings will turn RED, and TIMED
recordings will show as GREEN. Clicking on a “day” will display the “hours”
recordings have taken place.
Clicking on the “FILE LIST” button shows the detailed list of recordings
available for the selected day. You may further sort the list with the “TYPE”
(All, Alarm, or Normal –Timed) or with buttons on the right of the screen.
Click on any event listed to view it, or select the check box next to it to begin
the Backup process.
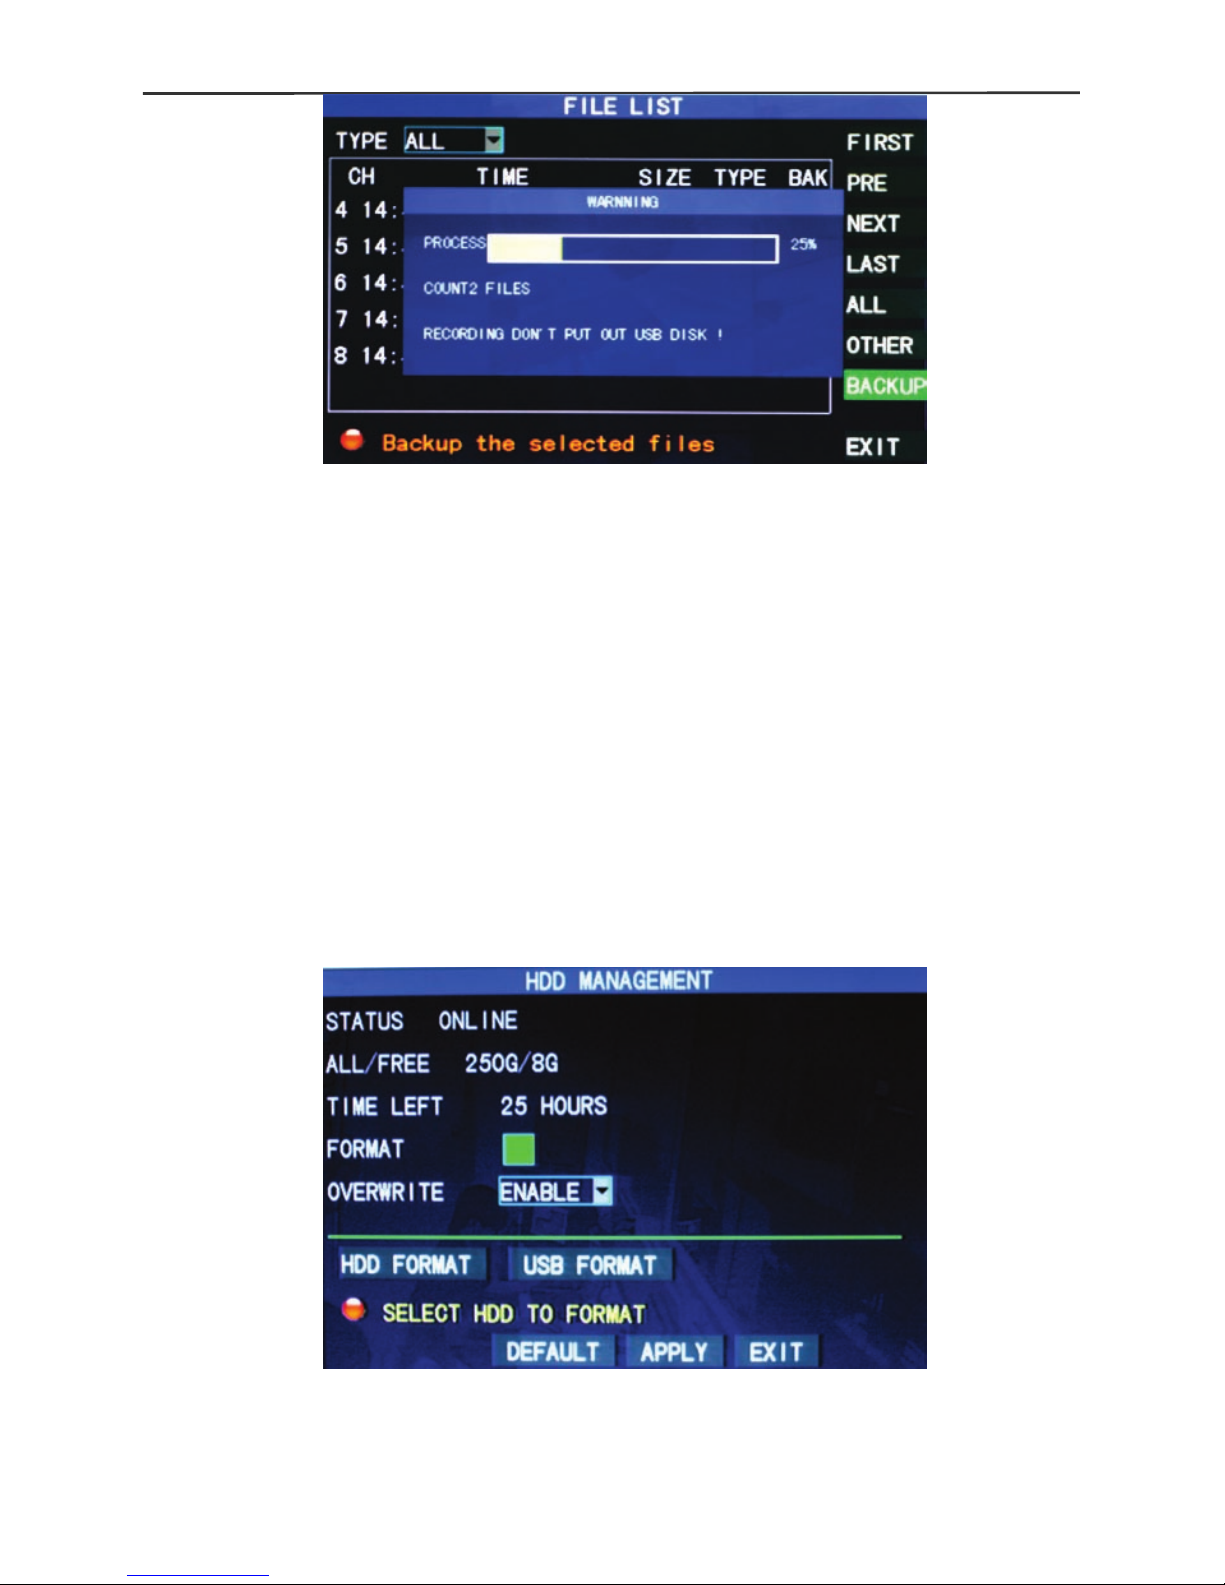
3.4 Backup
Enter into the file list as shown above by using the S EARCH button on front
panel or Click on the screen VIDEO SEARCH / SEARCH / Select Day of
Month / FILE LIST.
Page 17
16-channel H.264 DVR User Manual
17
Insert a flash drive with available space into the USB port marked with the
USB logo symbo l (E shape with an arro w), selec t the check box next to the
event to be copied, click on BACKUP.
Notes:
When the available space of the flash drive is less than the capacity of the
recorded file, the system will prompt you with the message “Not Enough
Space”. After the file has b een bac ked up, exit th e m enu and u nplug the flas h
drive. See Chapter 4 “DVR Network” for network backup instructions.
3.5 Hard disk management
MAIN MENU / HDD
Enter the Hard disk Management screen via MAIN MENU / HDD
STATUS: Shows if the hard disk is installed properly. If the hard disk needs
formatting, “Unformatted” will be displayed. If an working hard disk is
detected, the hard disk status will show “ONLINE”.
Page 18

16-channel H.264 DVR User Manual
18
ALL/FREE: Displays the total storage capacit y and current rem aining stora ge
capacity of the hard disk.
TIME LEFT : Displays the hours remaining for recording based o n the current
settings for picture resolution and quality set in the RECORD menu.
FORMAT: Click the check box, a “√” will appear in th is box , indicati ng that t he
HDD has been selected for formatting.
OVERWRITE: ENABLE: The hard disk will overwrite the earliest recording
when its mem ory is f ull; DISABLE: Recording will stop when th e memory of
the hard disk is full.
HDD FORMAT: When a new hard disk is used for the first time, it is necessary
to format it. Click the “Format HDD” button, and then click “Enter”. After
clicking “Format HDD”, the system will prompt “Formatting will erase your data.
Continue?” Press <Enter> or click OK, and the system will prompt
“Formatting…” and then “Formatted Successfully”. The system will restart
automatically.
USB FORMAT: Use this function if your DVR will not recognize or write to your
selected USB flash drive.
3.6 Basic setup
MAIN MENU / SETUP
Enter the Basic Setup screen via MAIN MENU / SETUP.
The Basic Setup sc reen includes the six opti ons of: System Language, Time
Setup, User Password, C amera Adjustments, Video/Audio Setup and Exit.
3.6.1 System language
MAIN MENU / SETUP / LANGUAGE
Move the cursor to the “LANGUAGE” option (the icon is enlarged and
Page 19

16-channel H.264 DVR User Manual
19
highlighted to indicate selection), and press <Ent er> or c lick the icon to enter
the setup screen of this option, as shown below:
The system has m ultiple languages to choose from . Select a language , and
click the "App ly" butt on to s ave. Your cha nges will tak e effec t after a system
restart.
3.6.2 Time setup
MAIN MENU / SETUP / DATE/TIME
Move the cursor to the “DATE/TIME” option (the icon is surrounded by a
yellow frame to indicate selection), and press “Enter” or click the icon with your
mouse to display the screen below:
The system time, date format, time format, and time zone can be set up in this
screen. Time zones are referenc ed to GMT (i.e. Eastern Time in the USA is
-5:00, Central -6: 00, Mou ntain -7:00, and Pacific -8:00).
Page 20

16-channel H.264 DVR User Manual
20
3.6.3 User password
MAIN MENU / SETUP / PASSWORD
1) You can setup a password by going to MAIN MENU / SETUP / PASSWORD, then
click <ENABLE> from the drop list. First generate a USER password for others,
then enter your own information in the ADMIN PASSWORD boxes, click
<APPLY>. Only the lock function, channel switching, video search, log search,
backup , PTZ control, mute, and manual recording functions are available to
people with a USER password.
3.6.4 CAMERAS
MAIN MENU / SETUP / CAMERAS
Move the cursor to the “CAMERAS” option (the icon is surrounded by a yellow
frame to indicate selection), and press “Enter” or click the icon to enter the
setup screen of this option, as shown below:
Page 21

16-channel H.264 DVR User Manual
21
Name: Move the cursor to each NAME box where a yellow alpha-numeric
table will appear. Cl ick on the letters/number s that you need, then click the
(left angle) ENTER icon. Click the top right corner of the yellow table to
change the fonts from numbers to letters.
Position: Use the drop list to locate the title of each channel on its display
screen.
Color: Move t he cursor to SETUP of the correspond ing chan nel, and press
<Enter> or click to enter the color setup screen, as shown below:
Press <Enter> or drag the cur s or direc tly to set the picture color, including the
4 options of chroma, brightness, contrast and saturation. Press <Enter> to exit
and save the set parameters.
Preview:
ON: Live video can be seen
OFF: Live video not seen, but recording is still possible.
Preview ti me O N: The current date and tim e are displayed at the top of the
live video screen.
Record Time ON: Time and Date are recorded on video from cameras.
Channel SEQ: Allows you to set the d well time for each cam era used in the
sequential viewing mode from 1-10 seconds or OFF. Sequential viewing
shows each camera full screen in a sequential or serial order. Start the
process from MAIN MENU / START SEQUENCE. Stop the process by
selecting another channel view such as quad mode.
3.6.5 VIDEO/AUDIO
MAIN MENU / SETUP / VIDEO/AUDIO
Move the cursor to the “VIDEO/AUDIO” option (the icon is surrounded by a
yellow frame to indicate selection), and press <Enter> or click the icon to enter
the setup screen of this option, shown below:
Page 22

16-channel H.264 DVR User Manual
22
MONITOR RESOLUTION: Use the drop list to select: 1280*1024 (High),
1024*768 (Medium), and 800*600 (Lo w) to best match the capabi lity of your
monitor.
Note: The system will restart when the monitor resolution is changed.
CAMERA SYSTEM: Chan ges between the two camera sync s ystems of PAL
and NTSC (NTSC is used in the USA).
Volume setup: Move the cursor to “Volume Setup”, left-click or press <Enter>
to enter the Volume Setup sc reen, and pr ess “ Left”, “R ight” or dra g the cursor
with the mouse to adjust the volume output level.
3.7 Advanced Options
MAIN MENU / ADVANCED
Enter the following screen from MAIN MENU / ADVANCED:
Page 23

16-channel H.264 DVR User Manual
23
The advanced functions include the 7 options of alarm setup, system
information, motion detection, mobile phone m onitori n g, system maintenance,
PTZ Setup and network setup.
3.7.1 Alarm
MAIN MENU / ADVANCED / ALARM
Move the cursor to the ALARM option (the icon is surrounded by a yellow
frame to indicate s election), and press <Enter> or c lick the icon to enter the
setup screen of this option, shown below:
I/O CHANNEL/ALARM: Each channe l corresponds to an I/O (Input / Output)
state alarm. When the alarm input of a channel is activated, the alarm record
of the corresponding channel will start.
NO (Normally Open): The external alarm circuit is open duri ng standby,
and closed when there is an alarm.
NC (Normally Closed) : The external alarm circuit is closed during
standby, and open when there is an alarm.
Page 24

16-channel H.264 DVR User Manual
24
Note: When an alarm is produced, a red letter “I” will be d isplayed abo ve
the corresponding channel.
HDD LOSS: ON: When the s ystem c annot id ent ify the hard disk, an alarm will
be generated, and a red mark “H” will be displa yed at the bot tom left corner of
Channel 1 on the live view screen.
HDD SPACE: ON: When the remaining space of the hard disk is less than
500M, the lower part of the Video Preview screen w ill display: “The space of
the hard disk is not enoug h. Please change the disk after shutdown.” This
condition is averted if the “OVERWRITE” feature is ENABLED in the HDD
menu.
VIDEO LOSS: ON: When the video of a certain channel is lost, “Video Loss” is
displayed on the screen for that channel.
ALARM MAN AGE OUTPUT: Sets the duration of the alarm output relay to
signal external devices with the options of 0sec (OFF), 10sec , 20sec, 40sec
and 60sec.
BUZZER: An internal buzzer can sound when an alarm is triggered.
Available options are; 0sec (OFF), 10sec, 20sec, 40sec and 60sec.
Post Alarm Recording: T he amount of time rec orded after an alarm can be
set here. Options are 30sec, 1min, 2min and 5min.
Email SETUP: Your DVR c an send an im age f rom an alarm trigger. Be sure
to select “ON” and “APPLY” after entering your e-mail account information.
The size of an image sent is approximately 11K.
SSL: A secure link transmission protocol, whose “Off” or “On” state is
determined by your mailbox server. “Off” is usually chosen.
SMTP PORT: T he mailing port of the mailbox server, usually being 25, with
the exception of a few mailboxes, such as the mailing port of the GMAIL server
whose port number is 465.
SMTP: The server address of the sending mail service used. For example, the
SMTP server of a Yahoo mailbox is smtp.mail.yahoo.com . Please check this
address with your e-mail service provider.
SEND EMAIL: The mailbox address used to send mail.
Page 25

16-channel H.264 DVR User Manual
25
SEND PW: The password of the mailbox used to send mail.
RECV EMAIL: The address used to receive the image transmitted from the
DVR after an alarm.
3.7.2 System info
MAIN MENU / ADVANCED / INFO
Enter the system information screen shown below from MAIN MENU /
ADVANCED / INFO.
You can view the DVR’s software / firmware version number, user interface
version number, MAC address and the serial number on this screen.
3.7.3 Motion detection
MAIN MENU / ADVANCED / MD
MD Channel and STATU S : Each c han ne l has a c orr e s pond ing s witc h. Se lec t
STATUS “On” or “Off” for each channel.
Page 26

16-channel H.264 DVR User Manual
26
SENSITIVITY: You can adjust th e sensiti vity of e ach c hannel. Select a level
of 1 (low) through 4 (high). Click on APPLY to save your settings.
M D AR EA: Each ch annel has a corres ponding motion det ection are a setting.
Using the mous e, clic k t he SETUP button to dis pla y the det ecti on grid. RED
= Active, Transparent = No a larm area. You can us e this extremely helpful
feature to protect points of interest, and avoid triggers from common activities.
Operating the prompt:
Mouse operation (recommended): Left-click the mouse and drag the m otion
box to set the area of dynamic detection.
Remote control operation: Use “
“ (display mode) to select full screen
activation or the arrow keys and ENTER button to select a cell.
Front panel buttons: Us e “
“ (display mode) to select full sc reen activa tion or
the arrow keys and ENTER button to select a cell.
Motion detection setup proce d u res:
A. Turn “On” the corresponding channel in the “STATUS” box;
B. Set the sensitivity level as needed, 1 (low) through 4 (high). Click APPLY.
C. Set the motion area of the corresponding channel in the “MD Area Setup”
option. Click APPL Y.
D. In the “RECOR D” m ode m enu; be sure to set the corr espondin g ch annel
to “ON”, set REC MODE to “BY TIMER”, and “ALARM” should be
selected in the SCHEDU LE for the hours you wish Motion Detec tion to
operate (further details Chapter 3.2).
A r ed letter “M” will appear on the live vi ew screen when a motion tr igger is
activated.
Page 27

16-channel H.264 DVR User Manual
27
3.7.4 Mobile phone m onitoring
MAIN MENU / ADVANCED / MOBILE
Apps for Android, Blackberry, Symbian, and W indows based mobile devices
can be found on the inc luded CD, or on our web s ite. i Phone us er s, d o wnloa d
the free app kMEye from the App Store. Full screen camera views and PTZ
controls are available.
Setup method of mobile phone monitoring at the DVR end:
Enter the following screen from
;
MAIN MENU / ADVANCED / MOBILE
Enter your preferred login user name and password.
Server port: Has a setting rang e of 1,024 to 65, 535. By default the mobile
device port is 15961. Be sure to match this port number to the setup menu in
your mobile device. Click APPLY when finished.
3.7.5 System maintenance
MAIN MENU / ADVANCED / MAINTAIN
Page 28

16-channel H.264 DVR User Manual
28
AUTO RESET: When this option is set to “ON”, you can set the restart
frequency and tim e for the DVR. Perform ing an occas ional restart or reb oot
of the system is a good practice to insure against power surges or static
discharges that may corrupt the DVR while you are away.
System update: Should it become necessary to update the operating
firmware in the DVR; Copy the firmware update file to a blank USB flash drive,
turn the DVR’s power OFF, insert the drive into the USB slot, then turn the
power back ON. Please wait a few minutes while the new firmware loads.
DO NOT TURN THE POWER OFF OR REMO VE THE FL ASH DRIVE UNT IL
THE DVR BOOTS UP AND SHOWS THE NORMAL CAMERA VIEWING
SCREEN ON YOUR MONITOR. NOTE: THE SCREEN WILL BE BLANK
DURING THE UPDATE PROCESS.
DEFAULT SETTING
: Quickly restores the system parameters to the
factory default
settings.
RESTART: Click to manually res tart (reb oot) the D VR. If the screen controls
are unresponsive, disconnect and reconnect the power to the back of the
DVR.
3.7.6 PTZ Setup
MAIN MENU / ADVANCED / PTZ
Page 29

16-channel H.264 DVR User Manual
29
Channel: Select the channel the dome camera is connected to (to select
channels 5-8 click “Next Page”) and match the param eters in the drop b oxes
to the settings in your PTZ camera.
Protocol: Pelco D and Pelco P are the m os t popu lar communication methods
used to control a PTZ camera. Pelco D is the default in the DVR.
Baud rate: Is the speed of the data (modem) that is used to communicate with
the PTZ. Options of 1200, 2400, 4800 and 9600 bps are ava ilable. 9600 is
the most popular.
Data bit: Options of 5, 6, 7 and 8, 8 by default
Stop bit: Options of 1 and 2, 1 by default
VERIFY: Options of None/Odd/Even/Mark/Space, None by default
Address : The address number is set to match the address number in the
camera (which is also adjustable). Most people will make the address
number in the camera and in the DVR the same as the DVR’s channel number
that the camera is attached to. Following this method makes it easier to
remember the camera’s address.
3.7.7 Network setup
MAIN MENU / ADVANCED / NETWORK
Before using your DVR on a network, there ar e three things that you should
know about the type of connection you are using.
Item 1 – Do you have a Static or Dynamic WAN IP address from your ISP
(Internet Service Provider)? A Static IP address does not change, it is
provided by your IS P for a minimal extra c harge. You can see your WAN IP
address displayed and test your internet connection speed by going to:
Page 30

16-channel H.264 DVR User Manual
30
http://www.security-labs.com/ip.shtml
Item 2 – Are you installing the D VR on a LAN connect ion (behind a rout er)
or on a WAN (Internet) connection (direct to modem)?
Glossary of terms:
LAN – Local Area Network WAN – Wide Area Network (Internet)
ISP – Internet Service Provider ADSL (or DSL) – Asymmetric Digital
Subscriber Line
DHCP – Dynamic Host Configuration Protocol
DNS- Domain Name System (supplied by your ISP)
DDNS – Dynamic Domain Name System
DMZ – An unprotected zone outside of your firewall
IP ADDRESS – A four segment number with up to three digits per segment (i.e.
173.15.11.129) assigned to a loca tion like your hom e via the internet (WAN)
and then typically another number (i.e. 192.168.1.50) to your DVR from a local
network (LAN) inside your home.
A broadband modem (such as DSL or Cable) will normally connect to a router.
Your router may have both wired and wir eless features. Typically, com puters
and your DVR connect to the ports (RJ45 type jacks) on the back of the router.
Please be sure your DVR is connected to your router or modem with the
supplied RJ45 type patch cable before proceeding
MAIN MENU / ADVANCED / NETWORK
TYPE: Three options: STATIC, DHCP, and PPPOE
Page 31

16-channel H.264 DVR User Manual
31
STATIC : Use this option when entering a known IP address manually. A
static IP address (one that never cha nges) can be supplied by your internet
service pr ovider, and offers the most reliable m ethod of c ontacting your DVR
from the internet. When connecting to router, log in to its setup or
administrator settings page to view the Subnet Mask, Gateway, and DNS
numbers for your network. Enter these same numbers into the boxes
of the menu above.
Note: There are (2) I P addresses to remember; the lo cal area network (LAN)
IP address (the one for the DVR) and the wide area network (WAN) or Internet
Address (the one to your Modem). The LAN address is used to op er ate your
DVR from com puters inside your network (at home or business). The WAN
address is used to operate your DVR from the internet (remote locations).
DHCP: The DHCP option is the easiest to use for the DVR’s network
connection. An IP address will be assigned by the router or modem
automatically after the DVR is co nnected to th e router or m odem. The router
or modem will act as a DHCP host a
nd assign an open l ocal IP address to the DV R.
This is perhaps the easiest way to assign an IP address to your DVR, but may make it
harder to contact via the internet later unless you plan to use a DDNS service.
PPPOE: If you have only one DVR connected to an ADSL line, you can use this mode.
After entering the broadband user name and password, click “APPLY” and the
system will restart. The DVR will establish a network connection in the PPPOE
mode automatic ally. After successful connectio n, the I P on the IP addr ess will
be modified to the acquired dynamic WAN IP address automatically.
Media port: The port number used in the private protocol communication
Page 32

16-channel H.264 DVR User Manual
32
between the DVR and your PC. The default port is 9000. If this port is
occupied by an y other service on your PC, pl ease change the number to an
unused port.
WEB port: The http port is 80 by default. If the administrator modifies the
WEB port to any other port, such as 88, please a dd the IP the port number to
the end of the IP address (i.e. “http://192.168.1.19:88” ) in the address bar
when accessing the DVR via Internet Explorer.
Subnet mask: Is filled in automatically when using the DHCP mode. The
default setting is 255.255.255.000
Gateway: The gateway is an address that directs devices to the WAN
(internet). The gateway is filled in automatically when using the DHCP mode.
The most common manual entry method is to keep the first three sets of
numbers the sam e as your IP address, and th e last set of number s as “001”.
The gateway address for your local network can be found on the administrator
settings home page for your router.
DNS: The Dynamic Name Server address for your internet connection can
also be found on the adm inistrator settings page of your router. M ake sure
this number is set correctly to avoid problems with your DVR being able to
send e-mail alerts.
UPNP: Universal Plug ‘N Play can expedite the process of seeking and
assigning an available IP address and port number if the feature is also
available and activated on your router.
DDNS Setup
Using a Static IP address from your ISP is a preferred method of operation. If
you are only able to get a Dynamic IP address (one that changes periodically),
you may consider using a DDNS provider.
DDNS (Dynamic Domain Name Service) is an internet service which allows
you to associate the IP address of your DVR with a name like
www.myDVR.com. Some companies such as
www.dyndns.org provide this
service free of c harge. To use the serv ice you must create an accou nt with a
DNS service. You may register at DDNS Server:
http://www.dyndns.org.
3.8 DDNS account
1) Create account
First open
www.dyndns.com, and click the Create Account option:
Fill in the account information.
Page 33

16-channel H.264 DVR User Manual
33
After confirmation, the system will prompt that the verification message has
been sent to the designated mailbox, as shown below:
2) Activate account
Log in your mailbox and open the confirmation link sent
from
support@dyndns.com, as shown below:
Click the link below and enter the website to activate the account.
3) Login
After successful activation, open the home page
http://www.dyndns.com/ to
log in. After successful login, click “Services” → “Dynamic DNS”, as shown
Page 34

16-channel H.264 DVR User Manual
34
below:
4) Application for free domain name
After entering the “Dynamic DNS Services ” sc r een, c lic k “Dynamic DNS Free”
to apply for a free dynamic domain name, as shown below:
Enter the “Dynamic DNS Free” screen, as shown below. Click
“ ”.
Page 35

16-channel H.264 DVR User Manual
35
Enter the hostname, select the service type and then enter the dynamic IP
address (usually being the dynamic IP address of the network of the DVR host)
to be tied in the Add Ne w Hostname screen, as shown be low. Complete the
application for the dynamic domain name as prompted.
Page 36

16-channel H.264 DVR User Manual
36
MAIN MENU / ADVANCED / NETWORK / DDNS SETTING S
Page 37

16-channel H.264 DVR User Manual
37
DDNS: With the two options of “ON” and “OFF”; when DDNS operation is
desired, please select DDNS "ON".
SERVICE: You m ay select provider options of 3322, dyndns (most popular),
and perfecteyes.
Host name: Enter the host name registered with your chosen DDNS server.
User name: Enter the user name registered with your chosen DDNS server.
Password: Enter the password registered with your chosen DDNS server.
3.9 Improving Internet Access
Port Forwarding
Port Forwarding is used to dir ect inbound tr affic to t he appropr iate d evices o n
a network. In this case, a PC from a remote location can be easily directed to
your DVR’s login page.
Port forwarding procedures showing a popular brand router’s menus:
1) Enter the IP address of your router into the address bar of your web
browser.
2) Log into the router.
Page 38

16-channel H.264 DVR User Manual
38
Click “OK” to enter the main screen of the router, as shown below
:
Click Applications& Gaming, as shown below:
Page 39

16-channel H.264 DVR User Manual
39
Fill in the IP and the port number in the corresponding boxes, and select
“Both” in [Protocol]. In this case, 80 stands for the W EB port, 9000 for the
media port and 6000 for the mobile phone port.
DMZ Setting
Your router may also contain a feature called DMZ (demilitarized zone).
Entering the LAN IP address of your DVR in the DMZ places your DVR outside
of the router’s firewall, and allows access to the DVR with less security
restrictions normally required for a PC.
Page 40

40
Chapter 4 DVR network
4.1 Functional char ac t er istics
A graphical user interface (GUI) based on an ActiveX control, can be
downloaded from the DVR to your PC via Internet Explorer. This GUI will
provide you with a scr een displ ay of m enus and controls t o operat e your D VR
over a network. As an option to d o wnlo adi ng t he ActiveX control program, you
can install the c lient vie wer program on the i ncluded CD (see Cha pter 5). The
majority of users do both.
4.2 Installa ti on a nd dow nload of controls
The use of ActiveX controls may be blocked by the security settings in your
Windows based PC. Adjusting the security settings in Internet Explorer may
be necessary.
INTERNET EXPLORER / TOOLS / INTERNET OPTIONS / SECURITY
First add the local IP addre ss of the DVR as a “ Trusted Site”. Click t o highlight
“Trusted Sites”, click “Sites”, enter the DVR’s IP address in the “Add this
website to the zone”, click “Add”. Be sure box for Requiring Server Verification
is no
t checked, click OK or Close.
Page 41

16-channel H.264 DVR User Manual
41
Click on Custom Level for Trusted Sites and click on “Prompt” for “ Download
unsigned ActiveX controls”, and “Initialize and script AciveX controls not
marked as safe for scripting”.
Further adjustm ents ma y be needed, but m ake all adj ustm ents in the Trusted
Sites section. This will keep your security settings higher for general web
browsing. Click OK when finished.
Enter the IP address of the DVR in the IE address bar, and accept the controls
as prompted.
4.3 Network log-in
Log into the DVR after the ActiveX progr am has been installed . Select “LAN”
or “INTERNET” depending on the net work environment, and click “Login” to
connect.
Page 42

16-channel H.264 DVR User Manual
42
Note: Selectin g the LAN optio n when the DVR an d PC are on the s ame local
network will increase the viewing frame rate.
4.4 Live View
Play control:
: OPEN or CLOSE live viewing mode.
: SNAPSHOT CAPTURE
Clicking on the Snapshot icon during a live viewing session will save an image
to your hard dr ive C:/DVR folder b y default. You can change th e destinatio n
folder by going to: SETUP / SETTING / FILE SAVE PATH
: RECORD
Clicking on the record icon saves live video streams to your hard drive,
C:/DVR folder b y default. Yo u can c hange t he des tination f older b y going to :
SETUP / SETTING / FILE SAVE PATH Click the icon once again to stop
recording to your hard drive.
: Display channel modes1, 4, 9 and 16 (depending on your model).
PTZ control: Intuitive controls for a connected PTZ camera (Chapter 3.7.6).
Page 43

16-channel H.264 DVR User Manual
43
4.5 Playback
Click Playback, then Refresh, to enter the screen shown below:
Page 44

16-channel H.264 DVR User Manual
44
Click the date, channel, record type, and then click “Search”. The eligible
recorded fi les w ill ap pear in the f il e list, with the high li g hted c alend ar numbers
denoting dates with record data, as shown in the figur e above. Selec t the file
to be played back , and double-click this file or click “Playback” to view it. A
control bar will appear at the bottom of the picture for pause, stop, fast forward,
slow play and next frame control. Click “Backup” to save the file in the
designated folder(see Figure 4.10 for setting the destination folder).
4.6 Record mode
Click “Setup” →“RECOR D” to enter the remote record scheduling mode, as
shown below:
Provides network access to the record setup screen, same as described in
Page 45

16-channel H.264 DVR User Manual
45
Chapter 3.2.
Note: “Detail” can be set in 4-channel DVRs only.
4.7 Alarm setup
Click “Setup” →“Alarm ” to enter the Alarm Setup screen, as shown below:
Provides network setup access for each channel as described in Chapters
3.7.1 and 3.7.3.
4.8 PTZ control
Click “Setup” →“PTZ ” to enter the PTZ Control mode.
Page 46

16-channel H.264 DVR User Manual
46
Provides network access to the PTZ setup as described in Chapter 3.7.6.
4.9 Network setup
Click “Setup” →“Network Setup” to enter the Network Setup mode, as shown
below:
Provides network access to make changes to the network settings as
described in Chapter 3.7.7.
4.10 System setup
Click “Setup” →“Setting” to enter the Setting screen, as shown below:
Page 47

16-channel H.264 DVR User Manual
47
INTERNET: Adjusts the data stream of the DVR to b est match your internet
connection spee d. T he highest s etting (1024K) will p roduce the best p icture
quality, but s ome delay may be noticeable if the b and w idth of your c o nnection
is too low. This setting is best done while vi e wing a moving object(s).
Note: You can check your internet connection speed by going to:
http://www.security-labs.com/ip.shtml
File SAV E P AT H : Allows you to ch oose the destination f older for snapshots
and video recorded to your hard drive.
IE password: Create and store a login password for network access (Note:
This password may be cleared in the main menu of the DVR.)
4.11 Host Info
Click “DVR HO ST” to view the Hos t Info screen. T he operating state of the
hard disk, the tim e remaining and th e software version and MA C address of
this system are displayed. Client Soft shows the version of the viewer in use.
Page 48

16-channel H.264 DVR User Manual
48
Chapter 5 Client Software & Player
A CD containing client software and a file pla yer is included with your DVR.
The client software gives you all of the menu and control functions available to
the DVR without the need to use Internet Explorer.
5.1 Client software
Click on Client software on the enclosed CD.
Click on setup.exe.
Click
on the desktop after the installatio n. T hen the s ame login screen as
using IE shows as below:
IP ADDRESS:Enter IP address or DDNS domain name
Page 49

16-channel H.264 DVR User Manual
49
MEDIA PORT:Enter the port number, the default is 9000
PASSWORD:Enter network password if you create d one earl ier.
NETWORK:Select LAN is the l ocal area net work, or INTERNET is the wide
area network
Note: After a succ essful login, the inter face shown is the sam e as that of IE.
Please refer to the instructions in Chapter 4 if needed.
5.2 Video Player
Videos saved to your PC hard drive from the DVR are in a 264 file format.
The player on the inc luded CD will s how thes e files o n your PC. A converter
to change the files to an AVI format is also included.
Click on the Player folder
Click on PlaybackSetup.exe
Page 50

16-channel H.264 DVR User Manual
50
Select: Open Local File to play a video from your PC hard drive
Select: 264 Files from the drop list at the bottom.
Double click or OPEN the file you wish to view.
Page 51

16-channel H.264 DVR User Manual
51
After playback begins, an arrow icon appears at the bottom of the
screen. Clicking on the arrow icon disp lays additional controls shown below.
Function
Icon
Definition
Function
Icon
Definition
①
Recording Schedule
All video
Play Forward, Play backward
Increase video
①
Page 52

16-channel H.264 DVR User Manual
52
Pause, STOP ST Start Operation
Backward /forward frame
File Cut
<< >>
Slow/Normal/Fast
File Deletion
Next Hour
avi
AVI Format transmission
Capture bitmap
OSD
Decrease video
Volume Control
Note:1.Double click a channel image to enlarge, double click again to return to
quad view.
2.When converting to an AVI format, click the ST button, then click the
AVI button to select required time periods.
Audio Selection:
To play the audio from a particular channel:
Click ‘SET T ING ’→‘AUD IO CHANN EL SETUP’→‘Normal Video B ar ‘as shown
in the
screen shot below:
Select the channel audio to be played, then click 'OK'
Page 53

16-channel H.264 DVR User Manual
53
Appendix: Hard disk space used
Unit: Megabyte /Channel/Hour
Record quality best fine normal
Capacity(MB/CH/HR) 200 150 100
Page 54

16-channel H.264 DVR User Manual
54
Limited Product Warranty
ONE YEAR PARTS AND LABOR;
HARD DRIVE: MAY VARY WITH MODEL
Should this product prove to be defective in material or workmanship under
normal usage, we will prov ide without charg e to the consumer, parts and/or labo r
necessary to remedy the defect for the period of ONE YEAR from the date of
purchase. The warranty period commences on the date that the product is
purchased by the consumer. Any implied warranty is also limited to the duration
above.
THIS WARRANTY DOES NOT COVER THE FOLLOW ING: FLUCTUATIONS IN THE
POWER SOURCE OR LIGHTNING-RELATED DAMAGE; ATTACHED OR
UNATTACHED ACCESSORIES; COSMETIC PARTS SUCH AS KNOBS AND
ACCESS DOORS; CABINET DAMAGE, INCLUDING DAMAGE IN TRANSIT;
ACCIDENTAL DAMAGE; MISUSE; ABUSE ; UNAUTHORI ZED PARTS USAGE OR
REPAIRS; RECEPTION PROBLEMS DUE TO INADEQUATE SIGNAL;
UNAUTHORIZED INTERNAL CONTROL OF ADJUSTMENTS; INSTALLATION;
ADJUSTMENT OF CONSUMER CONTROLS; EXCEEDING THE MAXIMUM OR
MINIMUM RATED LIMITATIO NS OF THE PRODUCT AS OUTLINED; OR ANY USE
OF THE PRODUCT OTHER THAN THAT SPECIFICALLY PRESCRIBED IN THE
OWNER'S MANUAL. THIS WARRANTY APPLIES TO PRODUCT SOLD AS NEW
AND NOT REMANUFACTURED, RECERTIFIED, OR B STOCK PRODUCTS.
THE M ANUFACTURER’S OB LIGATION UNDER T HIS WARRANTY SHALL BE TO
REPLACE SUCH PARTS AND PROVIDE LABOR AS STATED. THE
MANUFACTURER WILL NOT BE LIABLE FOR ANY LOSSES OR
INCONVENIENCES DIRECT OR INDIRECT, OR CONSEQUENTIAL PROPERTY
DAMAGES.
To obtain warranty service, the consumer must provide the product, along with
evidence that will positively identify the date that the product was purchased, from an
authorized product representative, dealer, retailer, or distributor. Prior to shipment, a
RETURN AUTHORIZATION mus t be obtained; this will assist us in efficient ser vice on
your unit, and possibly avoid shipment if the adjustment can be made over the phone.
If shipment is made, the cost for postage, insurance and shipping of the product is the
responsibility of the owner.
To obtain a warranty return authorization number, contact our Customer Service
at: 1-800-774-0284 or 15540 Herriman Blvd. Noblesville, IN 46060.
 Loading...