

Page 1

SCS317
User Instructions
SCS317 7 Day Wireless Programmable
Room Thermostat
Programmable room thermostats are widely recognised as one
of the best ways in which to control central heating. The SCS317
programmable room thermostat has a large display and intuitive
user interface, making it easy to set up and use. SCS317 uses a
sophisticated time proportional integral (TPI) algorithm for
accurate temperature control and energy efficiency.
1
Page 2

Actual Room
Temperature
Day of
Week
Time of
Day
Until (Time)
Then (Temp)
Enter
Button
+ Button- ButtonBack
Button
Set
Temperature
DISPLAY
SCS317
2
Page 3

DISPLAY
Actual Room Temperature This is the actual room temperature
measured by the SCS317
Set Temperature This is the temperature that the SCS317
will allow the room to reach. The
temperature range can be set between
5°C and 30°C
When the temperature shown in the
display is achieved the SCS317 will
switch the heating OFF.
If the temperature in the room falls below
the setting the SCS317 will switch the
heating ON.
Until (time) This is the time that the next
temperature setting is due to operate
Then (temp) This is the temperature setting that is
due to operate next
Day of the week It is important that the correct day of the
week shows in the display
Time of day This is the current time of day
Setting Buttons Press any button to illuminate the
display.
The message 'To override press -/+ To
see menu press ENTER' will appear
No Radio waves Wireless connection not set up
Solid Radio Antenna Z-Wave co mmunication pr esent
– Flashing Radio Antenna – Temporary
loss of Z-Wave communication
ACTIVATING THE BACK-LIT DISPLAY
Press any button to illuminate the display. This will remain illuminated for
10 seconds
GENERAL INFORMATION
During programming please note that the display will return to its normal
operating screen if the last button press exceeds 10 seconds.
3
Page 4

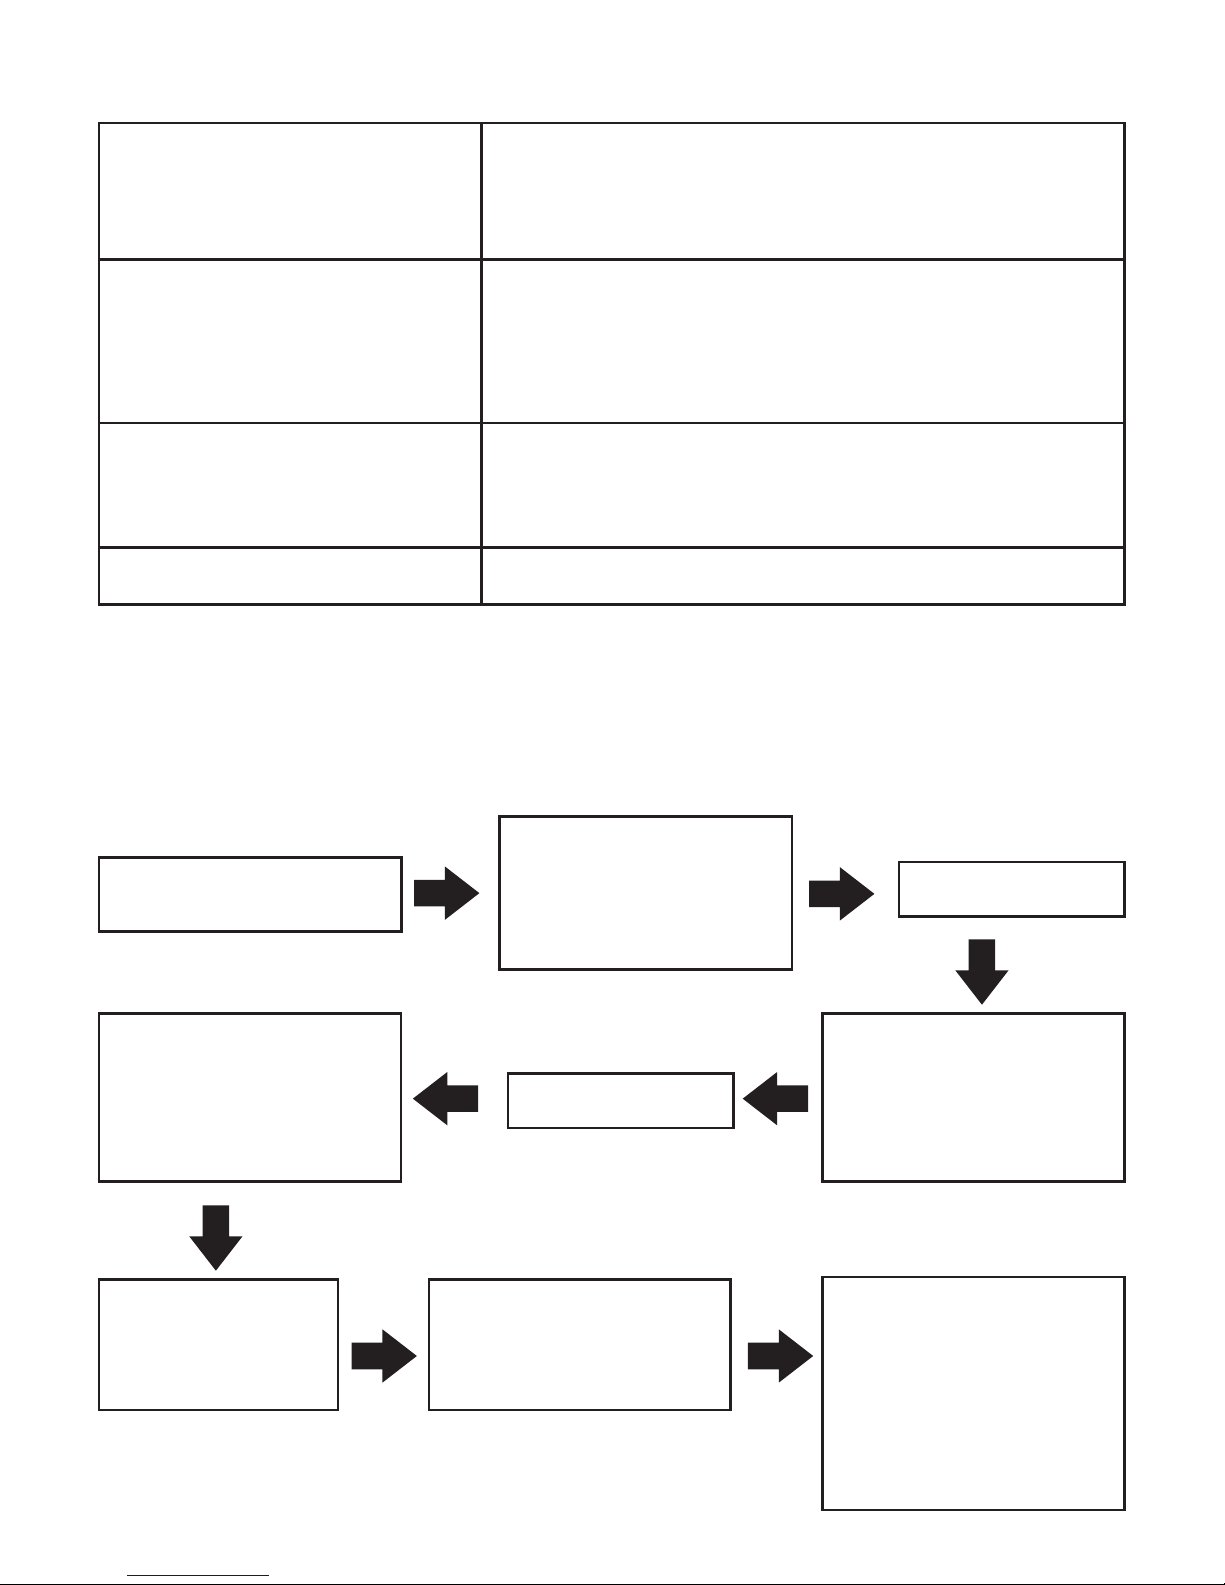
TEMPORARY OVERRIDE
A temporary temperature change can be made at any time. It is
also possible to extend how long this temperature override is in
operation.
The temperature will revert to its normal programmed setting at
the next timed temperature change
TEMPORARY OVERRIDE WITH TIME EXTENSION
(Maximum of 4 hours)
The temperature will revert to its normal programmed setting
at the next timed temperature change.
Press ‘-’ or ‘+’ to
adjust temperature
New temperature
setting will be shown
on the display
Press ‘-’ or ‘+’ to
adjust temperature
New temperature
setting will be
shown on the
display
Press ENTER
Press ‘+’ to
adjust the time
Press ENTER
The hours of
the UNTIL time
will flash
4
Page 5

PERMANENT OVERRIDE
In the 'HOLD' position the temperature can be overridden by
pressing either the '-' or '+' buttons. This will then become the
new 'HOLD' temperature
PERMANENT OVERRIDE – CANCELLATION
Press ‘-’ or ‘+’ to
adjust temperature
New temperature
setting will be
shown on the
display
Press ENTER
The hours of
the UNTIL time
will flash
Press ENTER
Press the '+'
repeatedly until
HOLD appears in
the display
Message will
appear briefly
confirming
'Temperature set
until manual
release'
Press BACK
Press ENTER
5
Page 6

SETTING UP THE SCS317
Upon initial installation the SCS317 has the following factory
default settings
Settings – Monday to Friday
Time Target Temperature
Period 1 06:00 am 20 °C
Period 2 08:30 am 18 °C
Period 3 11:30 am 20 °C
Period 4 01:30 pm 18 °C
Period 5 05:00 pm 21 °C
Period 6 10:00 pm 15 °C
Settings – Saturday and Sunday
Time Target Temperature
Period 1 07:00 am 20 °C
Period 2 10:00 am 19 °C
Period 3 11:30 am 21 °C
Period 4 01:30 pm 18 °C
Period 5 05:00 pm 21 °C
Period 6 11:00 pm 15 °C
These can be changed by the installer or the end user at any
time by accessing the MAIN MENU
6
Page 7

MAIN MENU
To access the MAIN MENU take the following steps:
MENU OPTIONS
Press ENTER twice
Press '-' or '+' to
toggle between the
menu options
Programme This allows the user to adjust the different
time and temperature settings from the
factory default settings shown in the table on
page 6.
Up to six different temperature levels can be
set in any 24 hour period
Standby This puts the SCS317 into Frost protection or
Standby condition and allows the heating to
be permanently switched off but will activate
and switch the heating on if the temperature
in the house falls below the standby
temperature set.
All programme settings are overridden and
the unit will not return to normal operation
until the standby period has ended by
pressing the ENTER button.
Holiday This puts the SCS317 into a temporary
standby mode with a start and end date
which can be set to coincide with a holiday
period. At the end of the set period the
SCS317 will resume normal operation
Time / Date The SCS317 has a built in clock and
calendar. This will require setting on initial
installation. If this has not been set on
installation please go to Setting the TIME and
DATE section on page 12 before continuing
Set Up Enables the programming of various options
outlined in the SET UP MENU on page 13 of
these instructions – These should be set on
installation.
7
Page 8

Setting the PROGRAMME
Six time and temperature settings are available in each 24 hour period.
Pressing BACK at any time in this process will return you to normal
operating mode.
If only two different temperature settings are required in 24 hours then set
the first time and temperature using programme one (P1) and the second
time and temperature setting using programme setting two (P2). The
remaining programmes (P3 to P6) should all be set to the same time and
temperature as P2.
This same method can be used if three, four or five temperature levels are
required, always using the first settings to provide the temperature change
commands with the remaining settings that are not required set to the same
time and temperature as the last required setting.
Press ENTER three
times
The day of the week
will flash
Press '-' or '+'
to select day to
programme
Press ENTER
Press ENTER
Time / Temperature
setting P1 will flash
Press '-' or '+' to
select time /
temperature period
you wish to set (P1
to P6)
Temperature will
flash, use the '-' or
'+' to select the
required
temperature
Press ENTER
The hours START
time will flash
Press '-' or '+' to
adjust the hours
then press ENTER.
The minutes will
then flash.
Press '-' or '+' to
adjust the minutes
then press ENTER.
If you require to set further periods for
the same day, the next period will now
automatically flash. Follow this process
again to programme as required
On completion of period 6
(P6) go to the copy
process on Page 9 of this
booklet
8
Page 9

To copy the same programmes to other days of the week,
please follow the process below
Setting the STANDBY
To exit STANDBY mode, press ENTER TWICE
When you have set
P6 the message 'To
Copy press ENTER'
will appear.
Press '-' or '+' to select the
days you wish to copy the
set programmes. Pressing
ENTER after each day to
confirm
The next
sequential day
will now flash.
When complete press BACK
to return to normal operating
mode
Press ENTER
To programme remaining
days please go to the start of
the process 'Setting the
PROGRAMME'
Press ENTER Twice
The words STANDBY and
Standby Enabled will appear
on the display
Press ENTER
After a short period Standby
Enabled will disappear from
the display
Press '-' or '+' until
STANDBY
appears on the
display
9
Page 10

Setting the HOLIDAY programme
Pressing BACK at any time in this process will return you to
normal operating mode
Press ENTER twice
The START date
will now flash
Press ENTER
Press the '-' or '+' to
adjust to the date you
wish the holiday
programme to start.
Pressing ENTER to
change between Day,
Month and Year
Press '-' or '+' until
HOLIDAY appears
on the display
The BACK date
will now flash
Again, Press the '-' or '+' to
adjust to the date you wish
the holiday programme to
end. Pressing ENTER to
change between Day,
Month and Year
HOLIDAY
programme is now
set
10
Page 11
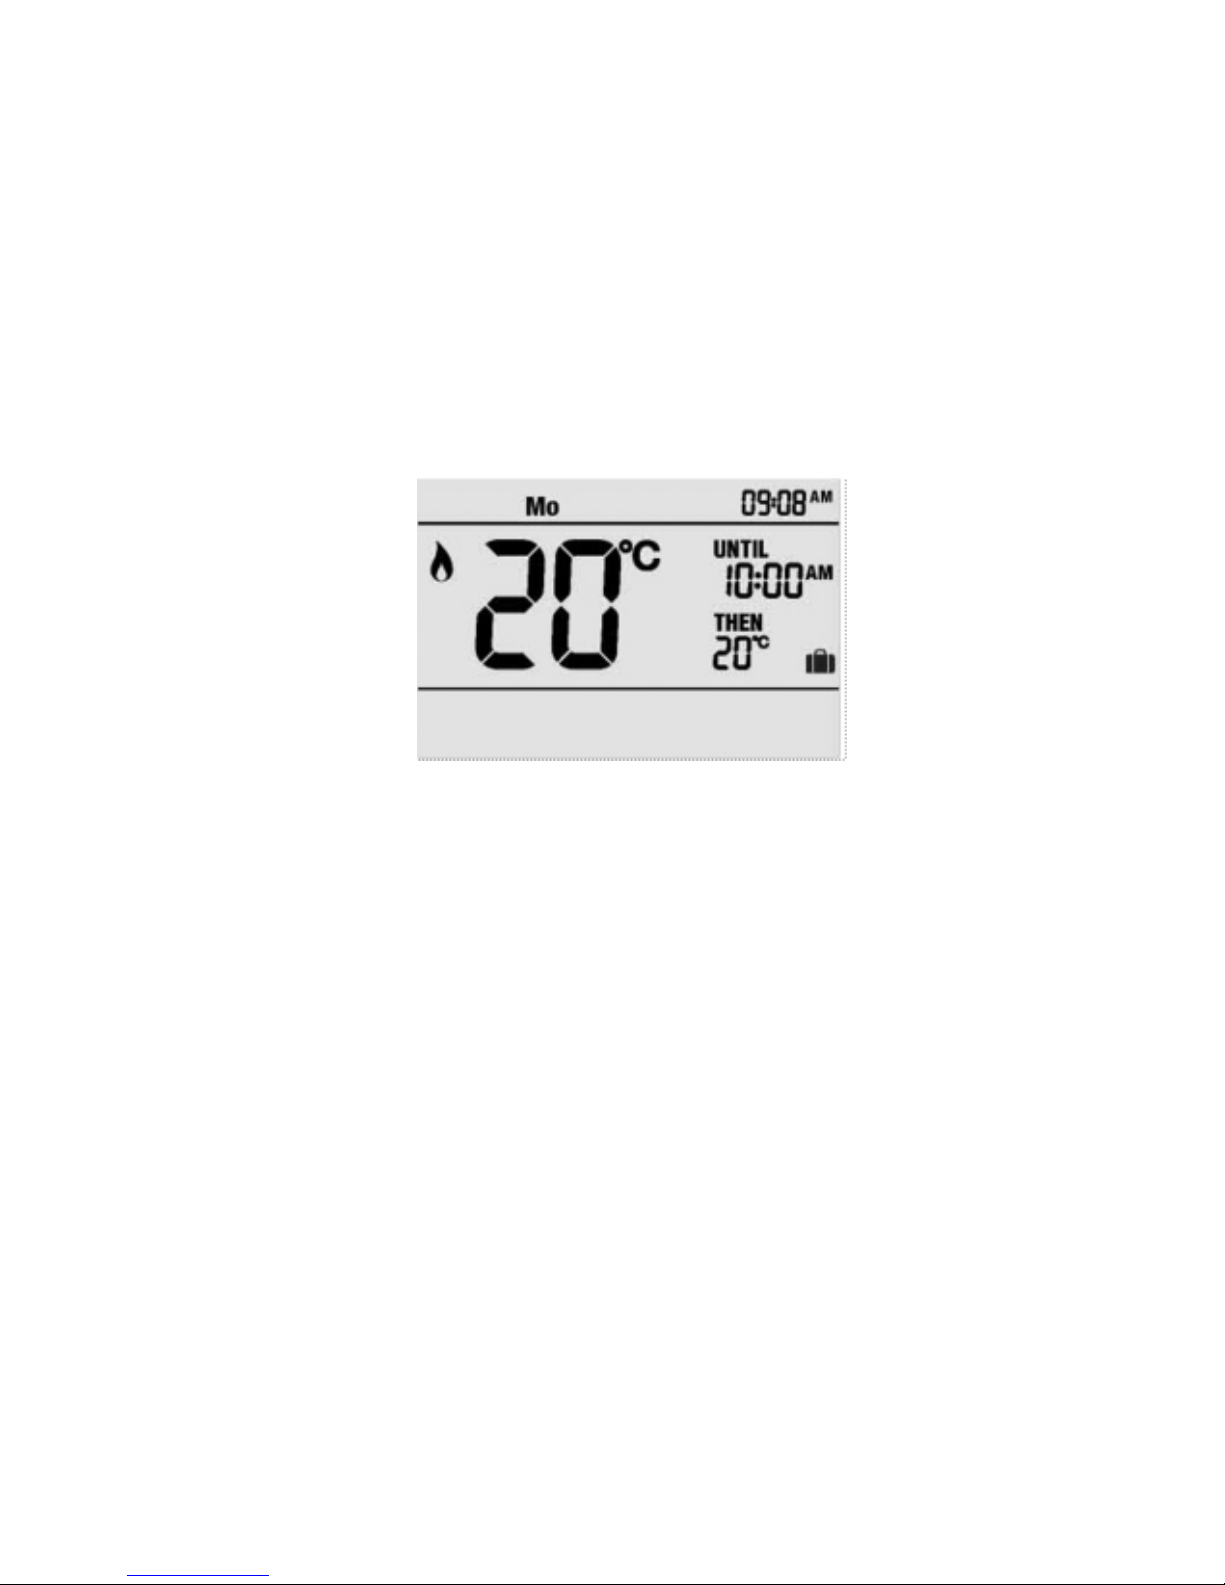
If the holiday period START date matches today's date, the
STANDBY temperature will be shown on the display together
with the suitcase icon.
If the holiday period START date does not match today's date
the display will remain in normal operating mode but with the
suitcase icon appearing on the right of the display. Indicating a
holiday period is pending
To cancel a set holiday programme in ADVANCE of its
activation, re-programme using the above procedure and set
the START date and BACK date to today's date.
To cancel a set holiday programme during activation press
ENTER button twice, the unit will return to normal operating
mode and the suitcase icon will disappear.
THE DATES SPECIFIED BECOME EFFECTIVE FROM
MIDNIGHT OF THE DAY ENTERED
11
Page 12

Setting the TIME and DATE
Pressing BACK at any time in this process will return you to
normal operating mode
If an incorrect date is entered the wrong day will appear in the
normal operating screen.
Press ENTER twice
The hours for
the time of day
will flash
Press ENTER
Press '-' or '+' to
adjust hours then
press ENTER
Press '-' or '+' until
Time/Date appears
on the display
The minutes for
the time of day
will flash
Press '-' or '+' to
adjust minutes
then press
ENTER
The day of the
date will now
flash
Press '-' or '+' to adjust
the day to match
today's date Pressing
ENTER to change
between Day, Month
and Year
Time and Date are
both set and the unit
will return to normal
operating mode
12
Page 13

SETUP MENU
To access the SET UP MENU take the following steps:
MENU OPTIONS
Press ENTER twice
Press ENTER
Press '-' or '+' to
toggle between the
menu options
detailed below
Press '-' or '+' until
Set Up appears on
the display
Select clock format This allows the display to show the time in
24 hour or AM/PM format
Daylight saving This is the adjustment made in the UK when
the clocks go back or forward in the Autumn
and Spring.
Default setting ON
Standby temperature This is the temperature setting used when in
Standby or Holiday mode (Min 5°C / Max
30°C)
In cold weather the heating will activate if
the temperature being measured falls below
this temperature setting.
Lower temperature limit This sets the lowest temperature setting the
SCS317 will allow to be programmed.
The default setting is 5°C
Upper temperature limit This sets the highest temperature setting
the SCS317 will allow to be programmed
The default setting is 30°C
13
Page 14
TPI cycles per hour This setting helps the TPI energy saving
software to operate correctly depending on
the type of heating system you have
Optimum start This calculates the amount of time the
SCS317 may need to switch on in advance
of the next target temperature setting in
order to meet the requirement.
Tamper setting This setting allows a 4 digit release code to
be set up to stop unauthorised adjustments
being made in multi occupancy buildings.
Set up Z-Wave Wireless connection to receiver
MENU OPTIONS (Contd...)
Setting the SELECT CLOCK FORMAT
Pressing BACK at any time in the process will return you to
normal operating mode
Press ENTER twice
Press ENTER
Press '-' or '+' until
Select clock format
appears on the
display
Press '-' or '+' until
Set Up appears on
the display
Press ENTER
Either 'Select clock
24 hr' or 'Select
clock AM/PM' will
appear
Press '-' or '+' to
toggle between
the two options
Select your choice
by pressing ENTER
The unit will now
return to the Set up
position, simply
press BACK to
return to normal
operating mode
14
Page 15

Setting the DAYLIGHT SAVING
Pressing BACK at any time in this process will return you to
normal operating mode
The default factory setting is for the Daylight saving to be ON.
Press ENTER twice
Press ENTER
Press '-' or '+' until
Daylight saving
appears on the
display
Press '-' or '+' until
Set Up appears on
the display
Press ENTER
Either 'Daylight
Saving Off' or
'Daylight Saving On'
will appear on the
display
Press '-' or '+' to
toggle between
the two options
Select your choice
by pressing ENTER
The unit will now
return to the Set up
position, simply
press BACK to
return to normal
operating mode
15
Page 16

Se tting th e STANDBY TEMPE RATURE, LOWER
TEMPERATURE LIMIT or UPPER TEMPERATURE LIMIT
Pressing BACK at any time in this process will return you to
normal operating mode
Press ENTER twice
Press ENTER
Press '-' or '+' until
the required option
appears on the
display
Press '-' or '+' until
Set Up appears on
the display
Press ENTER
The temperature
setting will now
flash
Press '-' or '+' to
adjust temperature
then press ENTER
The unit will now return to the
Set Up position, simply press
BACK to return to normal
operating mode
16
Page 17

Setting the TPI cycles
Pressing BACK at any time in this process will return you to
normal operating mode
Oil Boilers 3 cycles per hour
Gas Boilers 6 cycles per hour
Not used 9 cycles per hour
Electric Heating 12 cycles per hour
This feature would normally be set by your installer
Press ENTER twice
Press ENTER
Press '-' or '+' until
TPI Cycles per hour
appears on the
display
Press '-' or '+' until
Set Up appears on
the display
Press ENTER
The current setting
will now flash
Press '-' or '+' to
adjust to the correct
setting for your
heating system.
(Please refer to
table below)
The unit will now
return to the Set Up
position, simply press
BACK to return to
normal operating
mode
Press ENTER
17
Page 18

Setting the OPTIMUM START
This setting will allow the SCS317 to anticipate the next set
temperature and switch on up to two hours in advance to ensure
room temperature has been reached by the time the new set
temperature applies.
As a consequence the switch on time could take place anywhere
between 2 hours and zero before the set time and temperature.
With the optimum start set to OFF the user will need to anticipate
the warm up time needed in the programme settings. (Typically
the set temperature will be set approx. 1 hour in advance of
when it is required)
Pressing BACK at any time in this process will return you to
normal operating mode
This feature would normally be set by your installer.
Press ENTER twice
Press ENTER
Press '-' or '+' until
Optimum Start
appears on the
display
Press '-' or '+' until
Set Up appears on
the display
Select YES or NO
and press ENTER
to confirm
18
Page 19

Setting the TAMPER SETTING
This setting allows the unit to be locked to the programmes set
and can only be reactivated by entering the pin code.
None of the buttons will operate until the security code is entered
Pressing BACK at any time in this process will return you to
normal operating mode
19
Press ENTER twice
Press ENTER
Press '-' or '+' until
Tamper Setting
appears on the
display
Press '-' or '+' until
Set Up appears on
the display
The first digit of
FOUR will now flash
Press ENTER
Press '-' or '+' to
adjust to a
number of your
choice (0-9),
then press
ENTER
PLEASE MAKE A NOTE
OF THIS CODE AND
KEEP IN A SAFE
PLACE. THIS WILL BE
REQUIRED TO MAKE
ANY CHANGES IN THE
FUTURE
A message will
appear briefly
confirming 'Tamper
code set when this
message clears'
Repeat the
previous step
for the second,
third and fourth
digits
Page 20

Cancelling the TAMPER SETTING
Pressing BACK at any time in this process will return you to
normal operating mode
Press ENTER twice
Press ENTER
The following
message will appear
'Enter first digit'
The following
message will
appear 'To enter
release code press
ENTER'
Repeat the
previous step for
the second, third
and fourth digits
Press '-' or '+' to
confirm the first
digit of the release
code, then press
ENTER
The following
message will appear
'Tamper Code
Cleared'
20
Page 21

RESETTING THE SCS317 THERMOSTAT
Electronic equipment can in some circumstances be affected by
electrical interference.
If the display becomes frozen or scrambled simply press both
the BACK and ENTER button simultaneously.
Using this procedure will restore the SCS317 to the original
factory settings, the Time and Date will remain correct.
BATTERY
The SCS317 thermostat runs on 2 standard AA (Alkaline) non
rechargeable batteries and is designed to give a battery life of
approximately two years.
There are three stages of warning as the batteries become low
in power.
BACK ENTER
21
Stage 1 – The battery low symbol will appear in the display
Stage 2 – The words 'Low Battery' will appear in the display for 1
second each time a button is operated
Stage 3 – The unit will switch itself OFF and the message
'Replace Batteries' will appear permanently in the display.
The batteries should be changed at Stage 2 at the latest.
Page 22

To replace the batteries of the S , please carefully pull
down the hinged battery cover on the front of the unit. Ensure
they are fitted correctly as indicated by the terminal markings in
the battery compartment.
Please dispose the old batteries responsibly
SERVICE AND REPAIR
This programmer is NOT user serviceable. Please do not
dismantle the unit. In the unlikely event of a fault developing
please refer to the RESETTING THE SCS317 THERMOSTAT
on page 21. If this fails to resolve the problem please contact a
local heating engineer or a qualified electrician.
CS317
Part Number P85163 Issue 1
Cewe Instrument AB
Box 1006
611 29 Nykoping
Tel: +46 8 600 80 60
Email: info@securetogether.eu
Web Site: www.securetogether.eu
22
 Loading...