

Page 1
®
EV-Y2201-AMWAQ
Features:
• Select between multiple formats:
•
•
•
• Two-axis gimbal rotation
•
•
•
•
4-in-1 HD TVI, CVI, AHD, Analog
Vandal Dome Camera
Manual
TVI, CVI, AHD, and Analog
Joystick OSD control
1080p Resolution
1/
" 2MP Sony CMOS
2.9
24 IR LEDs
2.8~12mm Lens
Rugged, weatherproof (IP65) construction
Supports UTC programming
Page 2
ENFORCER 4-in-1 HD TVI, CVI, AHD, Analog Vandal Dome Camera
1x
Camera
3x
Mounting screws
1x
Allen wrench
1x
Manual
1x
DC Plug with terminal block
3x
Screw anchors
1x
OSD Manual
1x
Mounting plate
Type
Vandal Dome Camera
Formats
TVI (Default) / CVI / AHD / Analog
CMOS
1
/
2.9
" 2MP Sony CMOS
Resolution (HD)
1920x1080
TV Lines (Analog)
1200TVL
2D-NR
Yes
3D-NR
Yes
DWDR
Yes
OSD (On-Screen Display)
Yes
Cable OSD control
Yes
Video output
1.0Vp-p Complex video o utput
Megapixels
2MP
Lens
2.8~12mm IC R
Viewing angle
30°~90°
# of IR LEDs
24 (850nm)
IR Range
Up to 100ft (30m)
FPS
30
F Stop
F1.4-F1.6
Minimum illumination (IR On)
0Lux
Gamma correction
0-1
S/N Ratio
50dB
Gain control
Yes
White balance
Auto, Day & Night
Shutter control
Yes
(IR On)
270mA
(IR Off)
90mA
IP Rating
IP65
Operating voltage
12VDC
Operating temperature
-4°~131° F (-20°~55° C)
Dimensions
53/16"x41/2" (132x114 mm)
Weight
1-lb, 9.3-oz (717g)
Parts List:
Specifications:
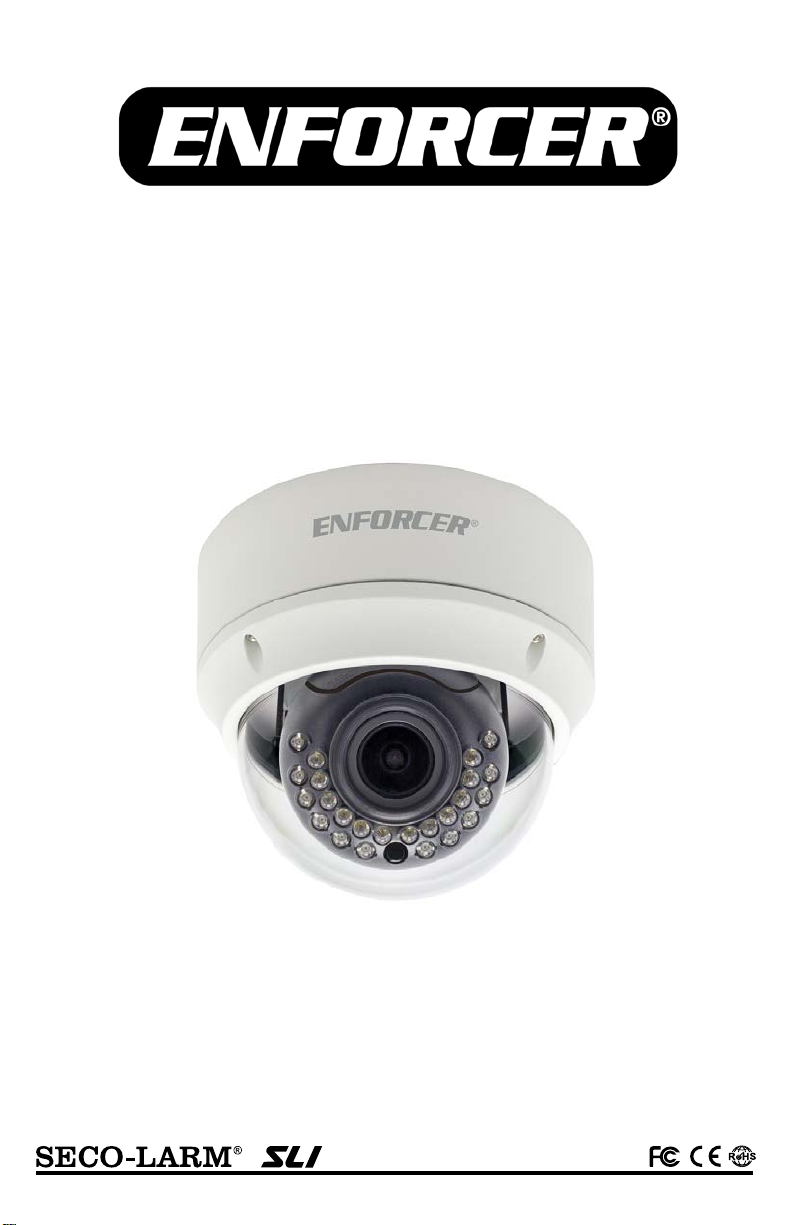
Dimensions:
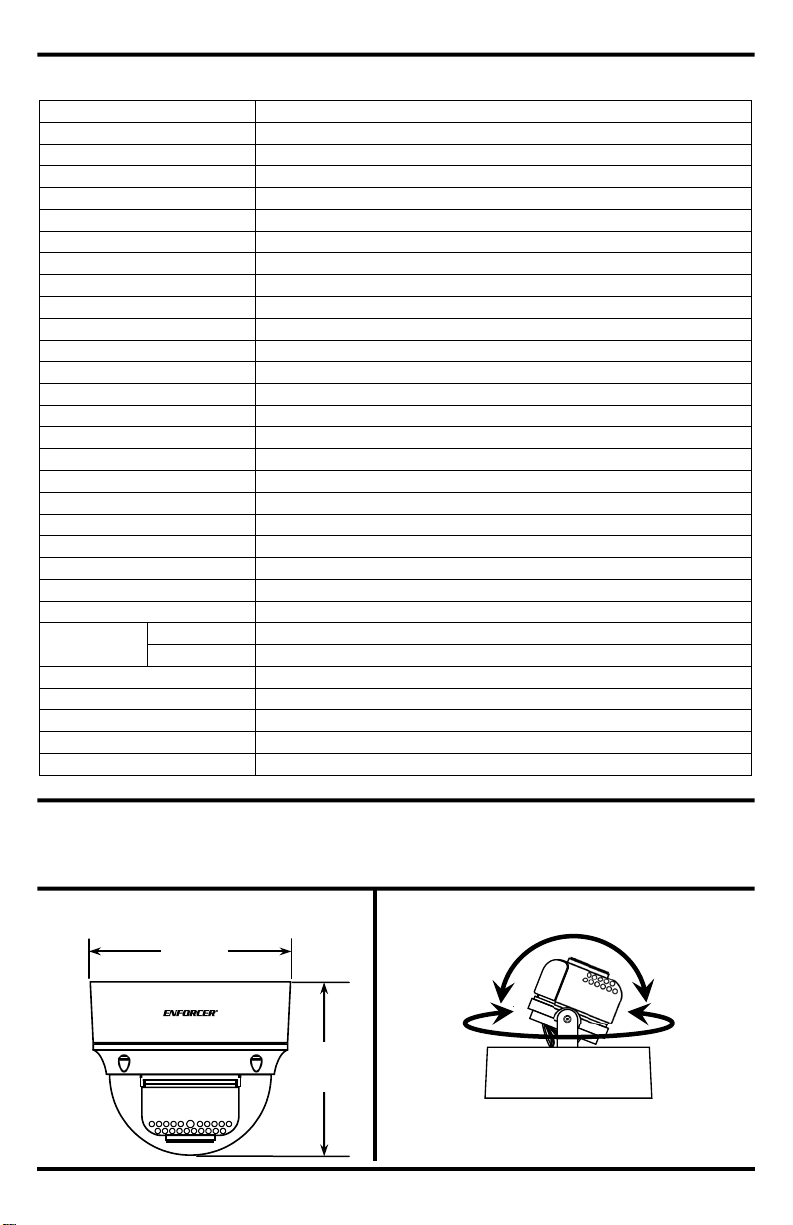
Adjusting the 2-Axis Gimbal:
Move the camera vertically up and down or
rotate the camera to change the lens angle.
41/2"
(114mm)
53/16"
(132mm)
Current draw
2 SECO-LARM U.S.A., Inc.
Page 3

ENFORCER 4-in-1 HD TVI, CVI, AHD, Analog Vandal Dome Camera
Overview:
OSD Controller Settings:
Zoom and Focus Adjustment:
Before Starting:
Installation:
Important: Do not cut any wires as the warranty will be voided.
DC jack
Cover screw
Female BNC
connector
Zoom/Focus
Mounting bas e
To set format via the OSD controller, pres s the
Direction
Format Setting
Up
CVI
Down
TVI
Left
CVBS
Right
AHD
UP
DN
Dome cover
To adjust the zoom and focus, open the Zoom/Focus c ompartment
1. Undo the 4 screws on the side of the dome cover
the plate sits flush against the wall.
Twist the camera mounting base to secure and lock the
base onto the m ounting bracket's outer ri ng by screwing
1. Use the camera wi thin the given temperature and
3. Do not subject the camera to st rong vibrations.
radiation,
OSD Controller
Mounting plate
Retaining wire
Wiring notch
Zoom
Focus
Power
Camera
DC Plug with
terminal block
compartment
located in th e camera body. Use the provided flathead sc rewdriver
to loosen the zoom and focus screws to allow for adjustment.
Focus
To focus in on close objects, push
the focus screw right towards "N".
To focus out on far objects, push
the screw right towards "F".
Zoom
To zoom in, push the zoom screw
left towards "T". To zoom out, push
the screw right towards "W".
controller in the direction of the desired setting,
hold for 5 seconds, and rele ase when the
camera restarts.
See chart below.
voltage limits.
2. Do not point the camera at the sun. Heat can
damage the camera even when not in use.
4. Do not mount the camera in areas exposed to
strong magn etic fields, or strong electrical signals.
using the incl uded allen wrench.
2. Re mov e t he dom e cover from the base.
3. Temporarily connect the camera's female BNC
connector to a monitor.
4. Temporarily connect the camera's DC jack to a
12VDC power supply.
5. While watching the monitor, hold the camera against
the wall or cei ling by hand where it is to be mounted,
then adjust the camera until it is certain that the
mounting location is correct. Mark that location with
a pencil.
6. Adjust the zoom and focus to desired settings.
See "Zoom and Focus Adjustment".
7. Use the OSD controller's joyst ick to adjust the camera
settings. See "OSD Controller Settings". (For more
informatio n, see separate OSD manual).
8. Mount the camera mounting plate to the wall us ing the
included mounting screws, making sure t he bottom of
SECO-LARM U.S.A., Inc. 3
9. Run a hidden, per m anent video cable from the monitor
to the camera.
10. Run a hidden, permanent pow er cable from a 1 2VDC
power supply to the camera.
11. If the installation involves surface wiring, use the
wiring notch located on the side of the mount ing base.
12. Reattach and secure the do m e to the mounti ng base.
13. Test the cam era again under t he exact lighting
conditions which it is expected to be used.
14. Fit the camera mounting base onto the mounting
bracket's outer ring.
15.
in the set scr ew located on the m ounting base.
16. Make any necessary adjustments to the camera angle
by gently twisting the camera on its axes.
17. Do a final test of the video cam era and monitor.
Page 4

ENFORCER 4-in-1 HD TVI, CVI, AHD, Analog Vandal Dome Camera
IMPORTANT:
with all national,
not be
held responsible for the use of this product in violation of any current laws or statute s.
FCC COMPLIANCE STATEMENT
THIS DEVICE COMPLIES WITH PART 15 OF THE FCC RULES. OPERATI ON IS SUBJECT TO THE FOLLOWING TWO
THIS DEVICE MUST ACCEPT
oid the user’s
IMPORTANT NOTE: To comply with the FCC RF exposure compliance requirements, no change to the antenna or the
the RF exposure
requirements and void user ’s authority to operate the dev ice.
NOTICE: Th e SECO-LARM policy is one of continual development and improvement. For that reason, SECO-LARM
LARM U.S.A., Inc. All rights reserved. This material may n ot be reproduced or copied, in whole or
in part, without the written permission of SECO-LARM.
WARRANTY: This SECO-LARM product is warranted against defects in material and workmanship while used in normal
LARM’s obligation is limit ed to the repair or
This Warranty is void if
damage is caused by or attributed to acts of God, physical or electrical misuse or abuse, neglect, repair or alteration,
LARM determines that such equipment
The sole obligation of
’s
LARM be liable for any special, collateral, incidental, or consequential personal or property
damage of any kind to the purchaser or anyone else.
Troubleshooting:
The screen is black
The image is foggy or washed out at night
The screen im age is dim
The screen im age has poor contrast
The screen im age flickers
The screen im age is distorted
The camera case is hot
IR LEDs do not t urn on
WARNING: Stop using the camera if you see a malf unction such as smoke or unusual heat, as it could cause fi re or electric
shock.
Do not cut
SECO-LARM
®
U.S.A., Inc.
16842 Millikan Avenue, Irvine, CA 92606
Website: www.seco-larm.com
Phone: (949) 261-2999 | (800) 662-0800
Email: sales@seco-larm.com
®
PICSN4
MI_EV-Y2201-AMWAQ_161128.docx
Do not open the case of this device, as there are no user-ser viceable components inside.
any wires as the warranty will b e voided.
state, and local laws and statutes related to monitoring and recording audio and video signals. SECO-LARM will
Users and installers of this product are responsible for ensuring this product complies
• Check that the camera is powered up
• Check that the power supply’s polarity is correct
• Check that the monitor is po wered up
• Check that the video cable c onnecting the camera to the monitor is
connected properly
• Check that there are no objec ts very clos e to the camera
• Check that there are no highly reflective objects in the scene
• Clean the lens using a soft, clean cloth
• Check that the light source is adequate
• Adjust the monitor’s contrast knob
• Change the position of the c amera
• Change the position of the c amera, check cables and format setting
• Change the position of the c amera, check cables and format setting
• Check that the correct power supply is in use
• Check that the correct power supply is in use
CONDITIONS: (1) THIS DEVICE MAY NOT CAUSE HARMFUL INTERFERENCE AND (2)
ANY INTERFERENCE RECEIVED, INCLUDING INTERFERENCE THAT MAY CAUSE UNDESIRED OPERATION.
Notice: The changes or modifi cations not expressly approved by the party responsible for compliance could v
authority t o operate the equipment.
device is permitted. Any change to the antenna or the device could result in the device exceeding
service for three (3) years from the dat e of sale to the origi nal customer. SECOreplacement of any defective part if the unit is returned, transportation prepaid, to SECO-LARM.
improper or abnormal usage, or faulty installation, or if for any other reason SECOis not operating properly as a result of causes other than defects in material and workmanship.
SECO-LARM and the purchaser’s exclusive remedy, shall be limited to the replacement or repair only, at SECO-LARM
option. In no event shall SECO-
reserves the right to change specifications without notice. SECO-LARM is al so not responsi ble for misprints.
Copyright © 2016 SECO-
4 SECO-LARM U.S.A., Inc.
 Loading...