

Seco-Larm EV-Y2201-AMWQ, EV-Y2201-AMWAQ, EV-Y1201-A2WQ, EV-Y1201-AMWQ, EV-Y2201-A2WQ User Manual
...Page 1

For the following models:
Model #
Lens
Resolution
Voltage
Style
Color
EV-Y1201-A2WQ
2.8mm
1080p
12VDC
Bullet
White
EV-Y1201-AMWQ
2.8~12mm
1080p
12VDC
Bullet
White
EV-Y2201-A2WQ
2.8mm
1080p
12VDC
Rollerball
White
EV-Y2201-A2GQ
2.8mm
1080p
12VDC
Rollerball
Gray
EV-Y2201-AMWQ
2.8~12mm
1080p
12VDC
Rollerball
White
EV-Y2201-AMGQ
2.8~12mm
1080p
12VDC
Rollerball
Gray
EV-Y2201-AMWAQ
2.8~12mm
1080p
12VDC
Dome
White
EV-Y6201-A3WQ
3.7mm
1080p
12VDC
UFO
White
4-in-1 HD TVI, CVI, AHD,
and Analog Cameras
On-Screen Display
Manual
Page 2
ENFORCER 4-in-1 HD Cameras (TVI, CVI, AHD, Analog) OSD
Programmable Features................................... 2
How to use the OSD Controller ........................ 3
Switching between HD Analog Outputs ........... 3
Navigating the OSD.......................................... 3
Menu Diagram .............................................. 4~6
Lens.................................................................. 7
Exposure ...................................................... 7~9
Backlight ..................................................... 9~10
Table of Contents:
Multiple Output Formats
Select between multiple different formats:
AHD, CVI, TVI, and CVBS
Exposure
Adjust the shutter speed, automatic gain
control (AGC), and defog settings
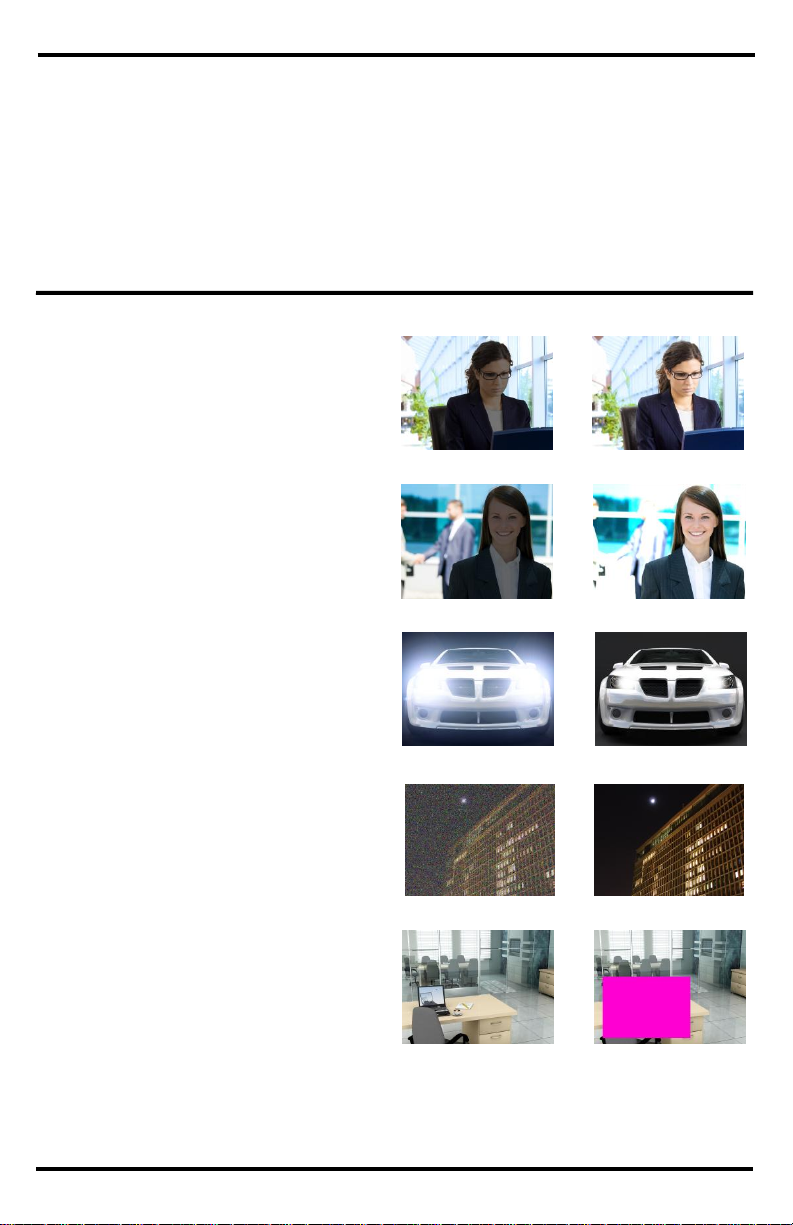
Digital Wide Dynamic Range (D-WDR)
Provide clear images even under
circumstances where backlight illumination
can vary
Back Light Compensation (BLC)
Adjust the exposure to properly display the
subject in front of bright light sources
Highlight Suppression Back Light
Compensation (HSBLC)
Define target areas and remove spotlights to
make certain objects visible
White Balance
Adjust the picture’s color temperature/image
color
Day & Night
Adjust the level of ambient light that triggers
the camera to switch between color and B/W
modes
Noise Reduction (DNR)
Adjust for less interference on the screen in
an area with low illumination
Privacy
Block out or distort a portion of the image
Motion Detection
Detect and highlight motion in the scene
Programmable Features:
White Balance ................................................. 11
Day & Night ............................................... 12~13
Noise Reduction (NR) ..................................... 13
Special ...................................................... 14~17
Adjust .............................................................. 18
Exit .................................................................. 19
Troubleshooting .............................................. 20
Warranty ......................................................... 20
Note: All screen images in this manual are simulated.
D-WDR OFF
D-WDR ON
BLC OFF
BLC ON
HSBLC ON
HSBLC OFF
DNR OFF
DNR ON
Privacy OFF
Privacy ON
2 SECO-LARM U.S.A., Inc.
Page 3
ENFORCER 4-in-1 HD Cameras (TVI, CVI, AHD, Analog) OSD
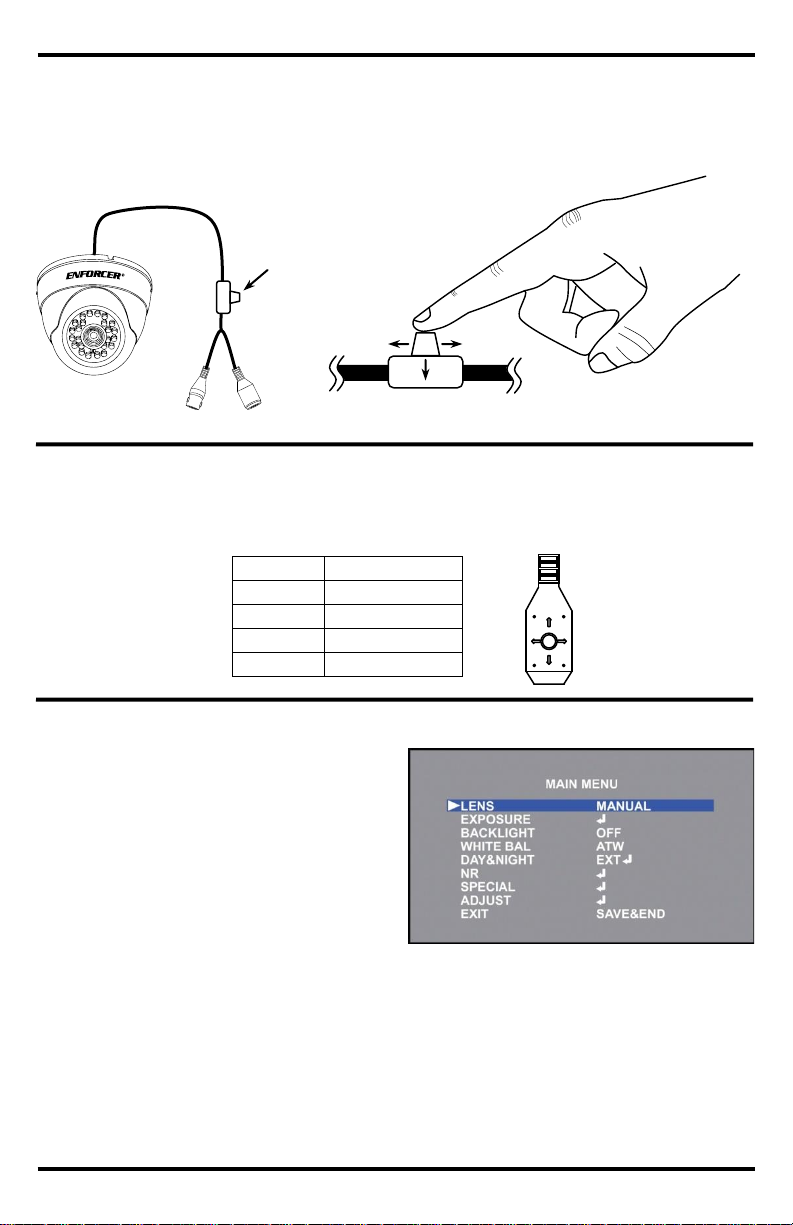
How to use the OSD Controller:
Switching between HD Analog Outputs:
Navigating the OSD:
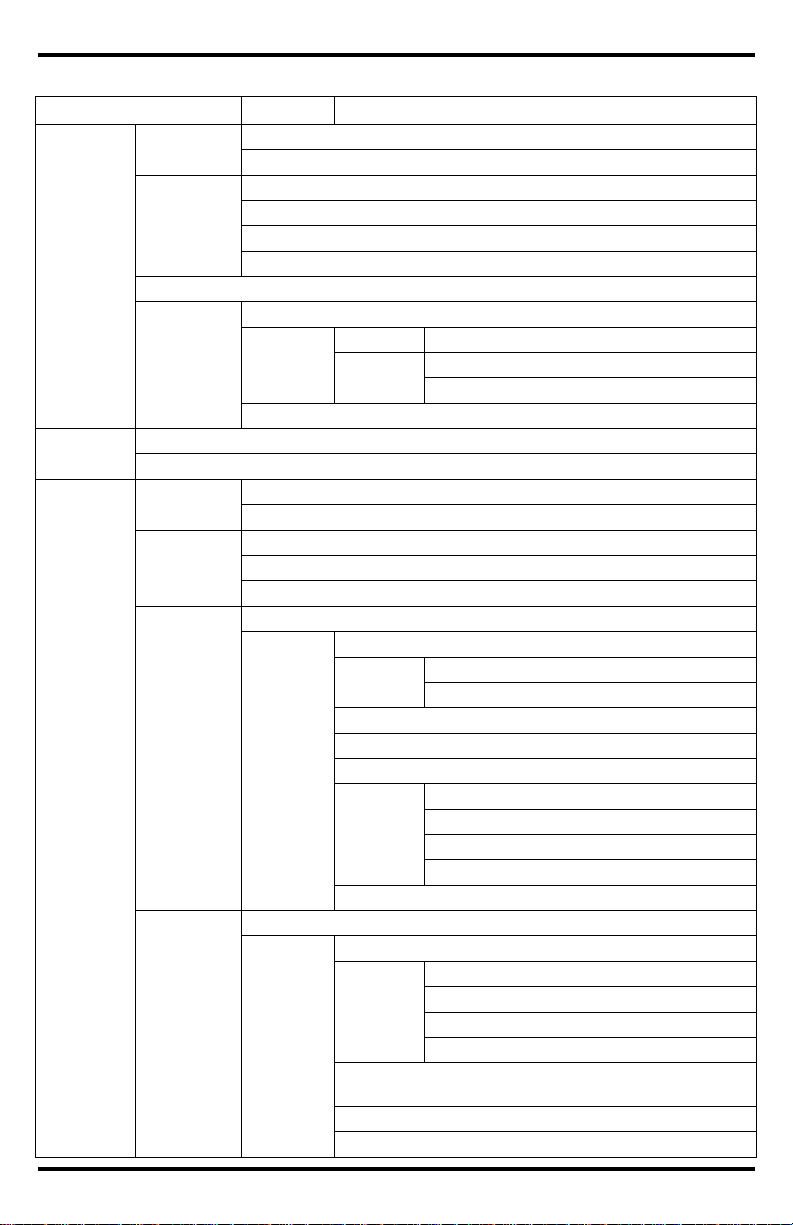
1. Press down (enter) on the joystick.
The Main Menu will be displayed on the
monitor.
2. Move to and highlight the required function by
moving the joystick up and down.
3. Select the required function by pressing enter
on the joystick.
4. Change the menu setting by moving the
joystick left or right.
5. After choosing the settings, move the cursor to EXIT and select the option to SAVE & END,
RESET, or NOT SAVE.
6. Press enter on the joystick to make the selection and leave the OSD menu.
NOTE: A submenu is available where the menu displays .
1. Press down on the joystick to open the on-screen display (OSD) menu.
2. Use the joystick to navigate the OSD menu.
3. To select an item, press down (enter) on the joystick.
To set format via the OSD controller, press the controller in the direction of the desired setting,
hold for 5 seconds, and release when the camera restarts. See chart below.
OSD
Controller
UP
Direction
Format Setting
Up
CVI
Down
TVI
Left
CVBS
Right
AHD
SECO-LARM U.S.A., Inc. 3
Page 4

ENFORCER 4-in-1 HD Cameras (TVI, CVI, AHD, Analog) OSD
Menu Diagram:
MAIN MENU
SETTING
SETTING OPTIONS
LENS
(PAGE 7)
MANUAL
SET FOR FIXED LENS CAMERAS
DC
MODE
INDOOR
OUTDOOR
MIN SHUTTER: 1/30
MAX SHUTTER: 1/60, FLK, 1/240, 1/480, 1/1000,
1/2000, 1/5000, 1/10000, 1/50000
IRIS SPEED: 0~15
EXPOSURE
(PAGES 7~9)
SHUTTER
AUTO, 1/30, 1/60, FLK, 1/240, 1/480, 1/1000, 1/2000, 1/5000, 1/10000, 1/50000, X2,
X4, X6, X8, X10, X15, X20, X25, X30
AGC: 0~15
SENS-UP
OFF
AUTO
SENS-UP: X2, X4, X6, X8, X10, X15, X20, X25, X30
BRIGHTNESS: 1~100
D-WDR
OFF
ON
LEVEL: 0~8
AUTO
DEFOG
OFF
AUTO
POS/SIZE: ADJUST POSITION AND SIZE OF BOX
GRADATION: 0~2
DEFAULT: RESET TO DEFAULT SETTINGS
BACKLIGHT
(PAGES 9~10)
OFF
BLC
LEVEL: LOW / MIDDLE / HIGH
AREA: ADJUST POSITION AND SIZE OF BOX
DEFAULT: RESET TO DEFAULT SETTINGS
HSBLC
SELECT: AREA 1 / AREA 2 / AREA 3 / AREA 4
DISPLAY
ON: ADJUST POSITION AND SIZE OF BOX
OFF
BLACK MASK: ON / OFF
LEVEL: 0~100
MODE
ALL DAY
NIGHT
AGC LEVEL: 0~255
DEFAULT: RESET TO DEFAULT SETTINGS
WHITE BAL
(PAGE 11)
ATW
AWC-> SET: PRESS ENTER TO SET
INDOOR
OUTDOOR
MANUAL
BLUE: 0~100
RED: 0~100
AWB
4 SECO-LARM U.S.A., Inc.
Page 5
ENFORCER 4-in-1 HD Cameras (TVI, CVI, AHD, Analog) OSD
Menu Diagram (continued):
MAIN MENU
SETTING
SETTING OPTION
DAY&NIGHT
(PAGES 12~13)
EXT
D->N (DELAY): 0~60
N->D (DELAY): 0~60
AUTO
D->N (AGC): 1~255
D->N (DELAY): 0~60
N->D (AGC): 1~255
N->D (DELAY): 0~60
COLOR
B/W
BURST: OFF / ON
IR SMART
OFF
ON
LEVEL: 0~15
AREA: ADJUST POSITION AND SIZE OF BOX
IR PWM: OFF / 1~100
NR
(PAGE 13)
2DNR: OFF / LOW / MIDDLE / HIGH
3DNR: OFF / LOW / MIDDLE / HIGH
SPECIAL
(PAGES 14~17)
CAM TITLE
OFF
ON: A/B/C… 1/2/3…
D-EFFECT
FREEZE: OFF / ON
MIRROR: OFF / MIRROR / V-FLIP / ROTATE
NEG. IMAGE: OFF / ON
MOTION
OFF
ON
SELECT: AREA 1 / AREA 2 / AREA 3 / AREA 4
DISPLAY
ON: ADJUST POSITION AND SIZE OF BOX
OFF
SENSITIVITY: 0~100
COLOR: GREEN / BLUE / WHITE / RED
TRANS: 0.00 / 0.25 / 0.50 / 0.75 / 1.00
ALARM
VIEW TYPE: ALL / OFF / BLOCK / OUTLINE
OSD VIEW: ON / OFF
ALARM OUT.: ON / OFF
TIME: 0~15
DEFAULT: RESET TO DEFAULT SETTINGS
PRIVACY
OFF
ON
SELECT: AREA 1 / AREA 2 / AREA 3 / AREA 4
DISPLAY
OFF
MOSIAC: ADJUST POSITION AND SIZE OF BOX
INV.: ADJUST POSITION AND SIZE OF BOX
COLOR: ADJUST POSITION AND SIZE OF BOX
COLOR: WHITE / BLACK / RED / BLUE / YELLOW / GREEN /
CYAN / USER
TRANS: 0.25 / 0.50 / 0.75 / 1.00
DEFAULT: RESET TO DEFAULT SETTINGS
SECO-LARM U.S.A., Inc. 5
Page 6

ENFORCER 4-in-1 HD Cameras (TVI, CVI, AHD, Analog) OSD
Menu Diagram (continued):
MAIN MENU
SETTING
SETTING OPTION
SPECIAL
(PAGES 14~17)
LANGUAGE: ENG / CHN1 / CHN2 / GER / FRA / ITA / SPA / POL / RUS / POR / NED / TUR
DEFECT
LIVE DPC
OFF
ON
AGC LEVEL: 0~255
LEVEL: 0~100
WHITE
DPC
OFF
ON
POS/SIZE: ADJUST POSITION AND SIZE OF BOX
START: CLOSE THE IRIS THEN PRESS ENTER
DPC VIEW: OFF / ON
LEVEL: 0~100
AGC: 0~14
SENS-UP: X2, X4, X6, X8, X10, X15, X20, X25, X30
BLACK
DPC
OFF
ON
POS/SIZE: ADJUST POSITION AND SIZE OF BOX
START: PRESS ENTER
DPC VIEW: OFF / ON
LEVEL: 0~100
RS485
CAMID: 0~255
ID DISPLAY: OFF / ON
BAUD RATE: 2400 / 4800 / 9600 / 19200 / 38400
ADJUST
(PAGE 18)
SHARPNESS
AUTO
LEVEL: 0~10
START AGC: 0~255
END AGC: 0~255
OFF
MONITOR
LCD
BLACK LEVEL: 0~60
GAMMA: USER / 0.45 / 0.50 / 0.55 / 0.55 / 0.60 / 0.65 / 0.70 / 0.75 /
0.80 / 0.85 / 0.90 / 0.95 / 1.00
BLUE GAIN: 0~100
RED GAIN: 0~100
CRT
BLACK LEVEL: 0~60
BLUE GAIN: 0~100
RED GAIN: 0~100
LSC: OFF / ON
VIDEO OUT: NTSC / PAL
COMET: OFF / ON
EXIT
(PAGE 19)
SAVE & END
RESET
NOT SAVE
6 SECO-LARM U.S.A., Inc.
Page 7

ENFORCER 4-in-1 HD Cameras (TVI, CVI, AHD, Analog) OSD
Exposure:
This function is used to select the camera’s lens operation.
1. Select LENS on the Main Menu screen.
2. Select the desired Lens operation by moving the joystick to the left or right and pressing enter
to enter the sub-menu (if applicable).
3. Use the joystick to adjust the settings.
4. Select RETURN to return to the Main Menu screen.
- MANUAL: Select MANUAL mode for manual
or fixed lens.
- DC: Select DC mode for DC Auto Iris lens.
o MODE: Select INDOOR or OUTDOOR
mode
INDOOR: Use for indoor installations.
OUTDOOR: Use for outdoor
installations. Enter menu to adjust
settings.
MIN SHUT: The minimum shutter speed is preset to 1/30.
MAX SHUT: Set the maximum shutter speed to FLK, 1/60~1/50000 (Default:
1/5000).
o IRIS SPEED: Set the reaction speed of the iris from 0~15 (Default: 0).
o RETURN: Return to the Main Menu screen.
Lens:
This function is used to select the camera’s exposure settings, including shutter speed, AGC,
Sens-Up, brightness, WDR, and defog settings.
1. Select EXPOSURE on the Main Menu screen.
2. Press enter to enter the Exposure menu screen.
3. Select the desired Exposure operation by moving the joystick up or down, and select the
desired setting by moving the joystick left or right and pressing enter to enter the sub-menu (if
applicable).
4. Select RETURN to return to the Main Menu screen.
- SHUTTER: Set the shutter speed to AUTO,
1/30~1/5000, x2~x30 (Default: AUTO).
NOTE: If LENS is set to DC AUTO IRIS then
SHUTTER is not available in this menu.
- AGC: Adjust the Auto Gain Control (AGC) for
better picture brightness in low light
conditions. Adjust from 0~15 (Default: 15).
SECO-LARM U.S.A., Inc. 7
Page 8

ENFORCER 4-in-1 HD Cameras (TVI, CVI, AHD, Analog) OSD
- SENS-UP: Activates the digital slow shutter
for use in darker images.
o OFF: Turn SENS-UP off.
o AUTO: Turn SENS-UP to automatic mode.
Enter menu to adjust settings.
SENS-UP: Higher values increase the
brightness of the image but also
potentially increase after images.
Adjust from x2~x30 (Default: x4).
RETURN: Return to the EXPOSURE
menu screen.
NOTE: This option is only available if SHUTTER is set to AUTO or 1/30 and if AGC is not set
to 0.
- BRIGHTNESS: Adjust the camera’s brightness from 0~100 (Default: 40).
- D-WDR: Adjust the camera’s digital wide
dynamic range (D-WDR) settings to provide
clear images even under intense back light
conditions.
o OFF: Turn D-WDR off.
o ON: Turn D-WDR on. Enter menu to
adjust settings.
LEVEL: Higher values increase the
D-WDR effect. Adjust from 0~8
(Default: 5).
RETURN: Return to the EXPOSURE
menu screen.
o AUTO: Turn D-WDR to automatic mode.
Exposure (continued):
D-WDR OFF
D-WDR HIGH
8 SECO-LARM U.S.A., Inc.
Page 9

ENFORCER 4-in-1 HD Cameras (TVI, CVI, AHD, Analog) OSD
Backlight:
- DEFOG: Adjust the camera’s defog settings
for clearer images in environments with fog or
mist.
o OFF: Turn DEFOG off.
o AUTO: Turn DEFOG to automatic mode.
Enter menu to adjust settings.
POS/SIZE: Adjust the position and
size of the defog mask.
GRADATION: Higher values increase
the effect of the defog mask. Adjust
from 0~2 (Default: 0).
DEFAULT: Return the DEFOG settings to their default values.
RETURN: Return to the EXPOSURE menu screen.
- RETURN: Return to the Main Menu screen.
Exposure (continued):
This function is used to control the light level to overcome strong backlight conditions.
1. Select BACKLIGHT on the Main Menu screen.
2. Select the desired Backlight operation by moving the joystick to the left or right and pressing
enter to enter the sub-menu (if applicable).
3. Use the joystick to adjust the settings.
4. Select RETURN to return to the Main Menu screen.
- OFF: Turn the BLC or HSBLC functions off.
- BLC: Select Back Light Compensation (BLC)
to correct the exposure of the subjects that
are in front of a strong backlight. Enter menu
to adjust settings.
o LEVEL: Set the BLC level between LOW,
MIDDLE, or HIGH (Default: MIDDLE).
o AREA: Adjust the position and size of the
BLC zone.
o DEFAULT: Return the BLC settings to their
default values.
o RETURN: Return to the MAIN MENU screen.
BLC OFF
BLC ON
SECO-LARM U.S.A., Inc. 9
Page 10

ENFORCER 4-in-1 HD Cameras (TVI, CVI, AHD, Analog) OSD
Backlight (continued):
- HSBLC: Select Highlight Suppression Back
Light Compensation (HSBLC) to improve the
clarity of the picture by blocking a strong
backlight. Enter menu to adjust settings.
o SELECT: Select the HSBLC area to be
modified. Up to 4 areas can be used.
o DISPLAY: Turn the selected HSBLC area
ON or OFF (Default: ON).
o BLACK MASK: Select whether the HSBLC
areas will display a black mask or not
(Default: ON).
o LEVEL: Adjust the sensitivity of the HSBLC area. Adjust from 0~100 (Default: 70).
o MODE: Select whether the HSBLC will be appear ALL DAY or only during the NIGHT
(Default: ALL DAY).
ALL DAY: The HSBLC areas are active at all times.
NIGHT: The HSBLC areas are only active when a given AGC level is reached.
AGC LEVEL: Higher values will block out stronger light sources. Adjust from 0~255
(Default: 48).
RETURN: Return to the HSBLC menu.
o DEFAULT: Return the HSBLC settings to their default values.
o RETURN: Return to the MAIN MENU screen.
HSBLC OFF
HSBLC ON
10 SECO-LARM U.S.A., Inc.
Page 11

ENFORCER 4-in-1 HD Cameras (TVI, CVI, AHD, Analog) OSD
This function is used to adjust the color temperature and image color of the picture.
1. Select WHITE BAL on the Main Menu screen.
2. Select the desired White Balance operation by moving the joystick to the left or right and
pressing enter to enter the sub-menu (if applicable).
3. Use the joystick to adjust the settings.
4. Select RETURN to return to the Main Menu screen.
- ATW: Select Automatic Tracking White Balance (ATW) to automatically adjust the white
balance color temperature range from 3,200°K~9,200°K when the image color temperature
changes.
- AWC SET: Select Automatic White balance Control (AWC) SET to manually adjust the
white balance for the current area. Point the camera towards a blank white sheet of paper and
press enter to set the white balance.
- INDOOR: Select INDOOR for general indoor applications. Use this mode for color
temperature ranges from 2,800°K~5,600°K.
- OUTDOOR: Select OUTDOOR for general outdoor applications. Use this mode for color
temperature ranges from 3,200°K~6,400°K.
- MANUAL: Select MANUAL to manually adjust the blue and red color temperature values for
the area.
o BLUE: Set the blue gain value. Adjust from 0~100 (Default: 50).
o RED: Set the red gain value. Adjust from 0~100 (Default: 50).
o RETURN: Return to the MAIN MENU screen.
- AWB: Select Auto White Balance (AWB) to automatically adjust the white balance color
temperature range from 2,800°K~6,400°K when the image color temperature changes.
White Balance:
SECO-LARM U.S.A., Inc. 11
Page 12

ENFORCER 4-in-1 HD Cameras (TVI, CVI, AHD, Analog) OSD
Day & Night:
This function is used to adjust the transition between color and black & white modes automatically
based on the current lighting conditions.
1. Select DAY & NIGHT on the Main Menu screen.
2. Select the desired Day & Night operation by moving the joystick to the left or right and
pressing enter to enter the sub-menu (if applicable).
3. Use the joystick to adjust the settings.
4. Select RETURN to return to the Main Menu screen.
- EXT: Select External (EXT) mode to
automatically switch between Color and B/W
modes by using the integrated IR CDS sensor.
o DN (DELAY): Set the delay time for
switching between day and night modes.
Adjust from 0~60 (Default: 1).
o ND (DELAY): Set the delay time for
switching between night and day modes.
Adjust from 0~60 (Default: 1).
o RETURN: Return to the MAIN MENU
screen.
- AUTO: Select AUTO mode to automatically
switch between Color and B/W modes by
using AGC values set by the camera.
o DN (AGC): Set the AGC threshold for
the camera. When the threshold is
reached the camera will switch between
day and night modes. Adjust from 1~255
(Default: 240).
o DN (DELAY): Set the delay time for
switching between day and night modes.
Adjust from 0~60 (Default: 1).
o ND (AGC): Set the AGC threshold for the camera. When the threshold is reached the
camera will switch between night and day modes. Adjust from 1~255 (Default: 100).
o ND (DELAY): Set the delay time for switching between night and day modes. Adjust
from 0~60 (Default: 3).
o RETURN: Return to the MAIN MENU screen.
12 SECO-LARM U.S.A., Inc.
Page 13

ENFORCER 4-in-1 HD Cameras (TVI, CVI, AHD, Analog) OSD
Day & Night (continued):
Noise Reduction (NR):
- COLOR: Select COLOR to force the camera to display in color mode at all times.
- B/W: Select B/W to force the camera to display in B/W mode at all times.
o BURST: Enable or disable the color burst when the camera switches from Color to B/W.
o IR SMART: The Smart IR feature adjusts the electronic shutter to adjust the IR exposure.
OFF: Turn the Smart IR function off.
ON: Turn the Smart IR function on.
LEVEL: Adjust the level of the Smart IR. Adjust from 0~15 (Default: 1).
AREA: Adjust the position and size of the Smart IR area.
RETURN: Return to the B/W menu screen.
o IR PWM: Not used.
o RETURN: Return to the EXPOSURE menu screen.
NOTE: If DAY & NIGHT is set to B/W then WHITE BAL is not available.
DNR OFF
DNR ON
This function is used to reduce the noise on the screen and allows for clearer images in low light
conditions.
1. Select NR on the Main Menu screen.
2. Press enter to enter the Noise Reduction
menu screen.
3. Select the desired Noise Reduction operation
by moving the joystick up or down, and select
the desired setting by moving the joystick left
or right.
4. Select RETURN to return to the Main Menu
screen.
- 2DNR: Select the 2D Digital Noise Reduction (2DNR) for general lighting conditions. Higher
levels of DNR will decrease the noise in the image but also potentially affect the sharpness.
Adjust from OFF~HIGH (Default: MIDDLE).
- 3DNR: Select the 3D Digital Noise Reduction (3DNR) for low lighting conditions. Higher levels
of DNR will decrease the noise in the image but also potentially increase after images. Adjust
from OFF~HIGH (Default: MIDDLE).
- RETURN: Return to the MAIN MENU screen.
SECO-LARM U.S.A., Inc. 13
Page 14

ENFORCER 4-in-1 HD Cameras (TVI, CVI, AHD, Analog) OSD
Special:
This function accesses the special features of the camera including the camera title, digital effects,
motion detection, privacy masks, OSD language, and defective pixel correction (DPC).
1. Select SPECIAL on the Main Menu screen.
2. Select the desired menu operation by moving the joystick to the left or right and pressing enter
to enter the sub-menu (if applicable).
3. Use the joystick to adjust the settings.
4. Select RETURN to return to the Main Menu screen.
- CAM TITLE: Set the camera title to on or off.
The default camera title is the firmware
version.
o OFF: Camera title off.
o ON: Camera title on. Use the joystick to
select the camera title. Up to 15
alphanumeric characters can be used.
- D-EFFECT: Select to choose a digital effect to
apply to the camera.
o FREEZE: Freeze the camera image at the
selected moment.
o MIRROR: Flip the camera image horizontally, vertically, or horizontally and vertically.
o NEG IMAGE: Invert the camera image colors.
o RETURN: Return to the SPECIAL menu screen.
14 SECO-LARM U.S.A., Inc.
Page 15

ENFORCER 4-in-1 HD Cameras (TVI, CVI, AHD, Analog) OSD
Special (continued):
- MOTION: This function is used to detect
moving objects on-screen.
o OFF: Turn motion detection off.
o ON: Turn motion detection on.
SELECT: Select which of the four
motion detection zones to modify.
DISPLAY: Turn the selected motion
detection zone on or off.
OFF: The selected motion detection
zone is turned off.
ON: Adjust the position and size of the selected motion detection zone.
SENSITIVITY: Adjust the sensitivity of the selected motion detection zone. Adjust from
0~100 (Default: 64).
COLOR: Select the color of the selected motion detection zone. Select from Green,
Blue, White, and Red.
TRANS: Set the selected motion detection zone’s transparency. Adjust from 0.00~1.00
(Default: 1.00).
ALARM: Adjust settings for the motion detection notifications.
VIEW TYPE: Select between different view modes for motion detection.
o OFF: Does not give any indication when motion is detected.
o BLOCK: Shows small blocks over the motion in the detection zone that is
triggered.
o OUTLINE: Shows an outline around the motion in the detection zone that is
triggered.
o ALL: Shows blocks and an outline of all motion detection zones when motion is
detected.
OSD VIEW: When turned on, MOTION DETECTED will display when any of the
motion detection zones are triggered.
ALARM OUT: Not used.
TIME: Set the amount of time that the motion detection alerts remain on the screen.
Adjust from 0~15 seconds (Default: 3).
RETURN: Return to the MOTION menu screen.
DEFAULT: Return the MOTION settings to their default values.
RETURN: Return to the MAIN MENU screen.
Motion Detection OFF
Motion Detection ON
SECO-LARM U.S.A., Inc. 15
Page 16

ENFORCER 4-in-1 HD Cameras (TVI, CVI, AHD, Analog) OSD
Special (continued):
- PRIVACY: This function is used to distort or
block out certain portions of the image for
privacy reasons.
o OFF: Turn the privacy feature off.
o ON: Turn the privacy feature on.
SELECT: Select which of the four
privacy screens to modify.
DISPLAY: Select how to display the
selected privacy screen.
OFF: Turn the selected privacy
screen off.
MOSAIC: Shows the privacy screen as distorted blocks.
INV: Shows the privacy screen as a negative image.
COLOR: Shows the privacy screen as a solid color.
COLOR: Select the color of the selected privacy screen. Select from White, Black,
Red, Blue, Yellow, Green, Cyan, or User (Dark Green).
TRANS: Set the selected privacy screen’s transparency. Adjust from 0.00~1.00
(Default: 1.00).
DEFAULT: Return the PRIVACY settings to their default values.
RETURN: Return to the MAIN MENU screen.
Privacy OFF
Privacy ON
with Color Screen
Privacy ON
with Mosaic Screen
- LANGUAGE: Set the desired OSD menu language. Select from English, Chinese (Simplified),
Chinese (Traditional), German, French, Italian, Spanish, Polish, Russian, Portuguese, Dutch,
or Turkish.
16 SECO-LARM U.S.A., Inc.
Page 17

ENFORCER 4-in-1 HD Cameras (TVI, CVI, AHD, Analog) OSD
Special (continued):
- DEFECT: The camera can compensate for
defective white or black pixels with defective
pixel correction (DPC).
o LIVE DPC: The camera will automatically
compensate for false white or black pixels.
OFF: Turn Live DPC off.
ON: Turn Live DPC on.
AGC LEVEL: Adjust from 0~255
(Default: 64).
LEVEL: Adjust from 0~100 (Default: 100).
RETURN: Return to the DEFECT menu.
o WHITE DPC: The camera will compensate for false white pixels.
OFF: Turn White DPC off.
ON: Turn White DPC on.
POS/SIZE: Adjust the position and size of the White DPC area.
START: Close the iris then press enter to start.
DPC VIEW: Turn on to view any existing defective pixels.
LEVEL: Adjust from 0~100 (Default: 3).
AGC: Adjust from 0~14 (Default: 13).
SENS-UP: Adjust from x2~x30 (Default: x8).
RETURN: Return to the DEFECT menu.
o BLACK DPC: The camera will compensate for false black pixels.
OFF: Turn Black DPC off.
ON: Turn Black DPC on.
POS/SIZE: Adjust the position and size of the Black DPC area.
START: Press enter to start.
DPC VIEW: Turn on to view any existing defective pixels.
LEVEL: Adjust from 0~100 (Default: 100).
RETURN: Return to the DEFECT menu.
o RETURN: Return to the SPECIAL menu screen.
- RS485: Not used.
- RETURN: Return to the MAIN MENU screen.
SECO-LARM U.S.A., Inc. 17
Page 18

ENFORCER 4-in-1 HD Cameras (TVI, CVI, AHD, Analog) OSD
Adjust:
This function access video output functions such as sharpness, monitor type, and video output.
1. Select ADJUST on the Main Menu screen.
2. Select the desired menu operation by moving the joystick to the left or right and pressing
enter to enter the sub-menu (if applicable).
3. Use the joystick to adjust the settings.
4. Select RETURN to return to the Main Menu screen.
- SHARPNESS: Adjust the sharpness of the
image.
o OFF: No sharpness adjustment.
o AUTO: Adjust the level at which the
sharpness adjustments will take place.
LEVEL: Higher values will result in a
sharper image. Adjust from 0~10
(Default: 6).
START AGC: Select the AGC value
where the sharpness adjustments will
start. Adjust from 0~255 (Default:
120).
END AGC: Select the AGC value where the sharpness adjustment will end. Adjust
from 0~255 (Default: 255).
RETURN: Return to the ADJUST menu screen.
- MONITOR: Adjust the camera’s image according to the type of monitor being used.
o LCD: Select for LCD monitors.
BLACK LEVEL: Adjust the black level of the image. Adjust from 0~60 (Default: 58).
GAMMA: Adjust the gamma level of the image. Adjust from USER, 0.45~1.00
(Default: USER).
BLUE GAIN: Adjust the blue gain of the image. Adjust from 0~100 (Default: 50).
RED GAIN: Adjust the red gain of the image. Adjust from 0~100 (Default: 50).
RETURN: Return to the ADJUST menu screen.
o CRT: Select for CRT monitors.
BLACK LEVEL: Adjust the black level of the image. Adjust from 0~60 (Default: 58).
BLUE GAIN: Adjust the blue gain of the image. Adjust from 0~100 (Default: 50).
RED GAIN: Adjust the red gain of the image. Adjust from 0~100 (Default: 50).
RETURN: Return to the ADJUST menu screen.
- LSC: Lens Shading Correction (LSC) adjust the shading of the outside of the image.
- VIDEO OUT: Select between NTSC and PAL outputs.
- COMET: Switches the camera image to black & white mode.
- RETURN: Return to the Main Menu screen.
18 SECO-LARM U.S.A., Inc.
Page 19

ENFORCER 4-in-1 HD Cameras (TVI, CVI, AHD, Analog) OSD
Exit:
This function is used to save all OSD changes and exit the menu screen, reset all values to their
factory defaults, or exit the menu screen without saving any changes.
1. Select EXIT on the Main Menu screen.
2. Select the desired operation by moving the joystick to the left or right and pressing enter.
- SAVE & END: Save all OSD changes and exit the OSD menu.
- RESET: Restore all OSD settings to factory defaults and exit the OSD menu.
- NOT SAVE: Exit the OSD menu without saving any changes.
SECO-LARM U.S.A., Inc. 19
Page 20

ENFORCER 4-in-1 HD Cameras (TVI, CVI, AHD, Analog) OSD
Troubleshooting:
The screen is blank.
Check that the camera is powered up.
Check that the power supply’s polarity is correct.
Check that the monitor is powered up.
Check that the video cable connecting the camera
to the monitor is connected properly.
The screen image is dim.
Clean the lens using a soft, clean cloth.
Check that the light source is adequate.
Strong backlight is overpowering the
image.
Change the D-WDR or Backlight settings.
Image has too much digital noise.
Change the DNR settings.
The screen image is distorted.
Change the position of the camera.
Motion detection is not activated.
Activate MOTION DET in the Setup Menu.
Properly define the motion detection area.
IR LEDs do not turn on.
Check that the correct power supply is in use.
IMPORTANT: Users and installers of this product are responsible for ensuring this product complies with all national,
state, and local laws and statutes related to monitoring and recording audio and video signals. SECO-LARM will not be
held responsible for the use of this product in violation of any current laws or statutes.
®
PICSN4
MI_EV-Yx201-AxxxQ_OSD_170120.docx
FCC COMPLIANCE STATEMENT
Information to the user: This equipment has been tested and found to comply with the limits for a class B digital device,
pursuant to part 15 of the FCC rules. These limits are designed to provide reasonable protection against harmful
interference when the equipment is operated in a commercial environment. This equipment generates, uses, and can
radiate radio frequency energy and, if not installed and used in accordance with the instruction manual, may cause harmful
interference to radio communications. Operation of this equipment in a residential area is likely to cause harmful
interference in which case the user will be required to correct the interference at his or her own expense.
SECO-LARM
®
U.S.A., Inc.
16842 Millikan Avenue, Irvine, CA 92606
Website: www.seco-larm.com
Phone: (949) 261-2999 | (800) 662-0800
Email: sales@seco-larm.com
NOTICE: The SECO-LARM policy is one of continual development and improvement. For that reason, SECO-LARM
reserves the right to change specifications without notice. SECO-LARM is also not responsible for misprints.
Copyright © 2017 SECO-LARM U.S.A., Inc. All rights reserved. This material may not be reproduced or copied, in whole or
in part, without the written permission of SECO-LARM.
WARRANTY: This SECO-LARM product is warranted against defects in material and workmanship while used in normal
service for three (3) years from the date of sale to the original customer. SECO-LARM’s obligation is limited to the repair or
replacement of any defective part if the unit is returned, transportation prepaid, to SECO-LARM. This Warranty is void if
damage is caused by or attributed to acts of God, physical or electrical misuse or abuse, neglect, repair or alteration,
improper or abnormal usage, or faulty installation, or if for any other reason SECO-LARM determines that such equipment
is not operating properly as a result of causes other than defects in material and workmanship. The sole obligation of
SECO-LARM and the purchaser’s exclusive remedy, shall be limited to the replacement or repair only, at SECO-LARM’s
option. In no event shall SECO-LARM be liable for any special, collateral, incidental, or consequential personal or property
damage of any kind to the purchaser or anyone else.
20 SECO-LARM U.S.A., Inc.
 Loading...