

Sebo G-Series User Manual
SEBO essential G-Series
ENGLISH
For Household Use Only
© Copyright SEBO America, LLC • All rights reserved.
SEBO automatic G Series Owner’s Manual
Table of Contents
Technical Details 2
iring Diagram 2
W
Important Safety Instructions 3
Special SEBO Product Features 4
S-Class Filtration 4
Brush Roller Obstruction – Auto Shut-Off 4
Brush Roller Deterioration Warning 4
Stationary Use Warning 4
Bag Full or Clog Warning – Auto Shut-Off 4
Identification of Parts 5
Assembly 5
Optional Attachments 5
Standard Attachments 5
Operating Instructions 6
Starting the Machine 6
Operating Positions 6
Using the Attachment Tube, Hose & Attachments 7
The Display Panel 7
The Adjustment Wheel 7
Maintenance 8
Changing the Dust Bag 8
Changing the Micro-Hygiene Filter 8
Changing the Exhaust Filter 8
Changing the Brush Roller 8
Clog Removal 9
Clogs in the Airflow Pathway 9
Clogs in the Attachment Hose 9
Clogs in the Attachment Tube 9
Clogs in Entrance to Dust Bag 9
Clogs in the Swivel Neck 9
Trouble-Shooting Guide 10
G Series Filter Bag Housing and Handle Schematic and Part Numbers 11
G Series Base Schematic and Part Numbers 12
Warranty 13
How To Contact SEBO 13
Technical Details
Vacuum motor 1300 watts (10.8 amps)
Water lift (at motor) 92.5 in. H2O
Airflow (at motor) 103.8 CFM
Filter bag capacity 1.4 gal.
Sound level 69 dBA
Body weight G1-16.9 lbs / G2-17.1 lbs
Motor protection electronic cut-out
Working width G1-12 inches / G2-15 inches
Brush drive toothed belt
Brush speed 3100 rpm
Floor adjustment manual
Cord length 40 feet
Radio suppression EN 55014 Verf. 242/91
Page 2
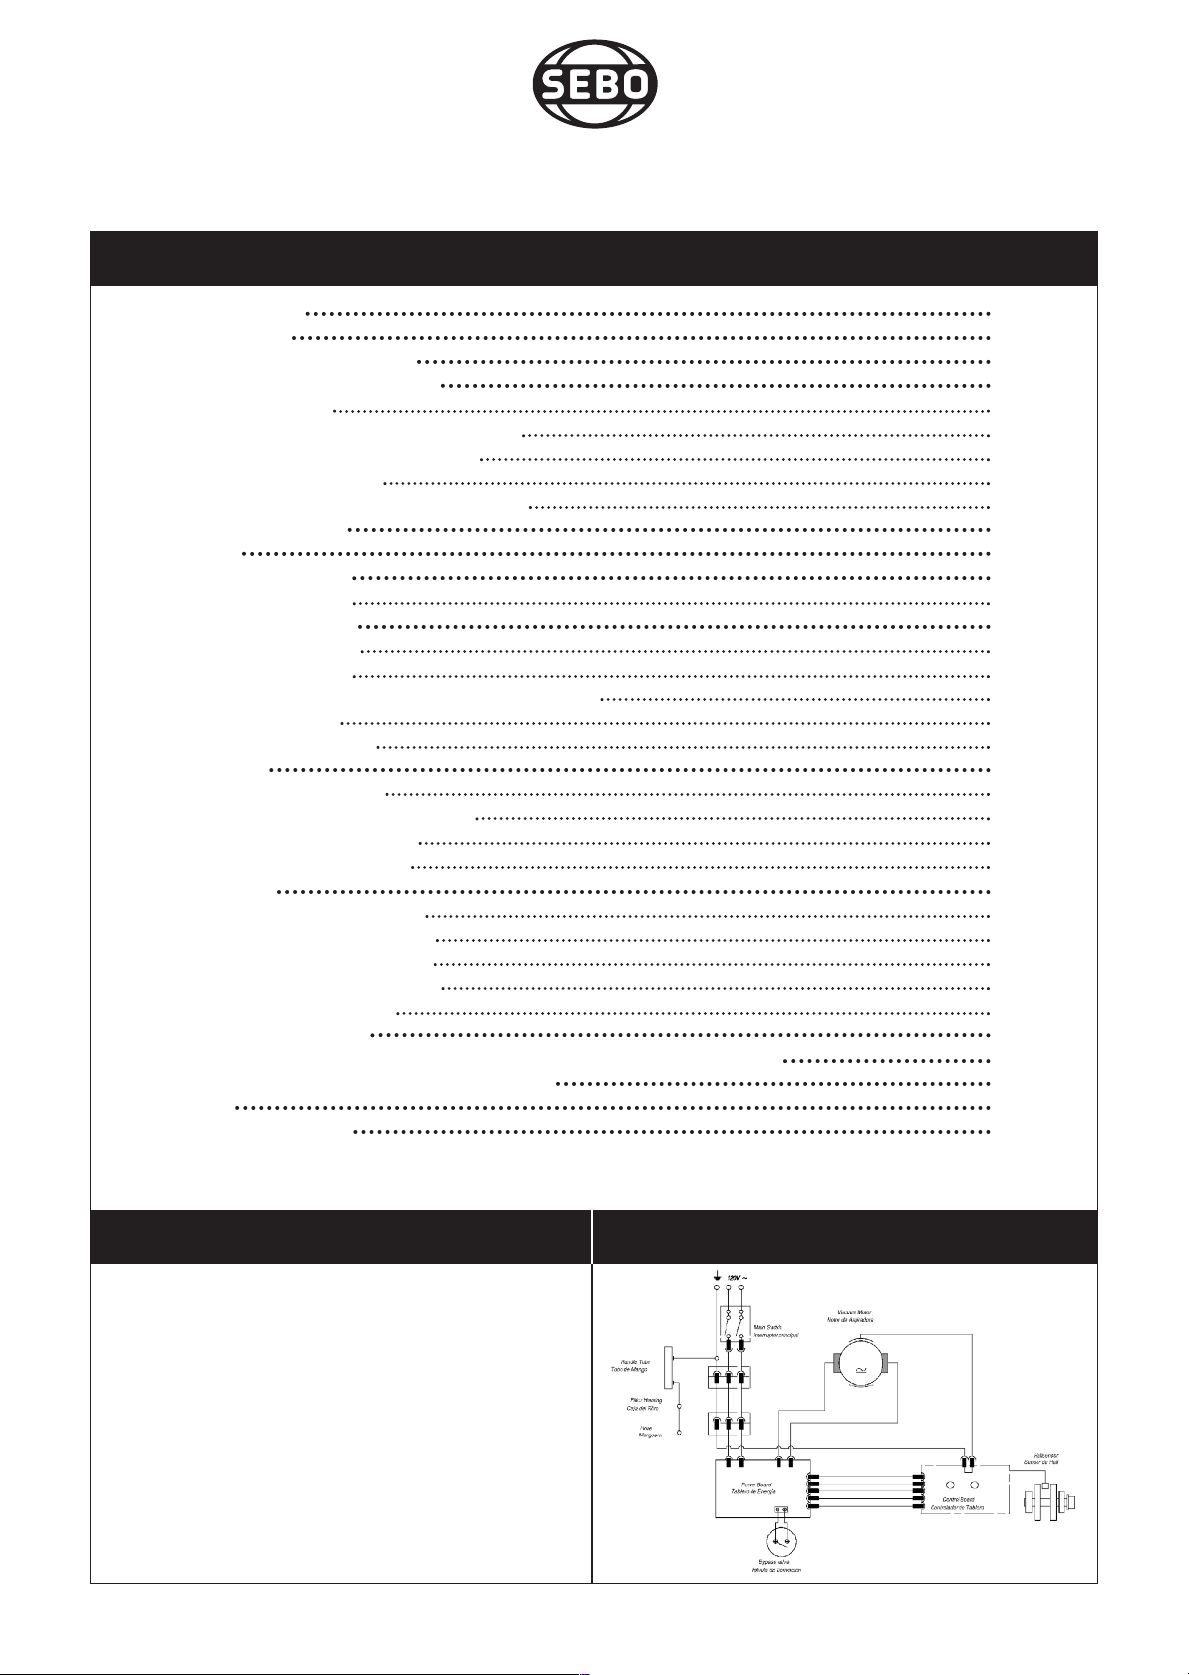
Wiring Diagram
U.S. Patents: 5,056,175
4,955,106
5,028,245

!
IMPORTANT SAFETY INSTRUCTIONS
READ ALL INSTRUCTIONS BEFORE USING THIS MACHINE
When using an electrical appliance, basic precautions must always be followed.
To reduce the risk of electric shock, this vacuum cleaner has a polarized plug; one blade is wider than the other.
This plug will fit in a polarized outlet only one way. If the plug does not fit fully in the outlet, reverse the plug. If
it still does not fit, contact a qualified electrician to install the proper outlet. Do not change the plug in any way.
Connect only to the outlet type specified on the serial number plate underneath the machine.
SAVE THESE INSTRUCTIONS.
WARNING: To reduce the risk of fire, electric shock, or injury:
1. Do not leave vacuum while plugged in. Unplug from
outlet when not in use and before servicing.
2. Do not use outdoors or on wet surfaces.
3. Do not use near small children or pets. Do not allow
to be used as a toy. Use of this product by children
should always be supervised by an adult.
4. Use only as described in this manual. Use only
manufacturer-recommended attachments.
5. Do not use with a damaged cord or plug. If vacuum
is not working as it should, has been dropped,
damaged, left out-doors, or dropped into water, take
it to a SEBO service center.
6. Do not pull or carry by cord, use cord as a handle,
close a door on cord, or pull cord around sharp
edges or corners. Do not run vacuum over cord.
Keep cord away from heated surfaces.
7. Do not unplug by pulling on cord. To unplug, grasp
the plug – not the cord.
8. Do not plug in if switch is in the “I” (ON) position.
9. Do not use outlets above counters to plug in vacuum –
damage to items in the surrounding area could occur.
10. Always carry the vacuum over steps and sills.
11. Do not handle plug or vacuum handle with wet hands.
12. Do not put any object into vacuum openings. Do not use
machine with any openings blocked. Keep openings
free of lint, hair, and anything that may reduce air flow.
13. Do not re-use filter (dust) bags or wash the filters.
14. Do not remove any screws from vacuum.
15. Do not vacuum up anything that is burning or
smoking, such as cigarettes, matches, or hot ashes.
16. Do not use vacuum without dust bag and/or filters in
place.
17. Turn off all machine controls before unplugging.
18. Use extra care when cleaning on stairs.
19. Do not use machine to vacuum up flammable or
combustible liquids such as gasoline or use in areas
where they may be present.
20. Machines can cause a fire when operated near
flammable vapors or materials. Do not operate this
vacuum near flammable fluids, dust or vapors.
21. Maintenance and repairs must be done by qualified
personnel.
22. Use only original SEBO replacement parts.
23. Do not use vacuum as a step.
24. If vacuum is used on plush carpet or carpet with thick
padding, do not leave machine standing in one place
with machine turned on.
25. Do not use the operator’s handle, which inserts into the
top of the dust bag housing, to carry the machine. The
carrying handle is located on the backside of the
machine’s bag housing.
26. Keep hair, loose clothing, fingers, and all parts of body
away from vacuum openings and moving parts. Do not
place fingers or other body parts under vacuum unless
it is unplugged.
27. Do not place the power head over rug or carpet edges.
28. The vacuum has a manual reset thermal protector. The
protector is reset by switching off the vacuum. The
thermal protector needs some time to cool down after
switching off! Check the vacuum for air blockages or
mechanical failures before switching on.
29. Store the vacuum in a dry place at room temperature.
When the vacuum is not in use, you should wrap the
cord on the cable hooks.
30. Any other servicing should be performed by an
authorized service representative.
Page 3

SPECIAL SEBO PRODUCT FEATURES
Your SEBO essential G series vacuum cleaner is the most technically advanced upright vacuum cleaner in
the world. Along with its excellent filtration system (99.9% to 0.3 microns), the machine has warning systems
and automatic shut-off capabilities that are designed to alert the user to machine problems that, if ignored,
will damage the machine or diminish performance. Some of your SEBO essential’s most
unique features are:
1.
S-Class Filtration. Certified by leading Allergy foundations in Europe, the essential
G-Series vacuum provides the user with S-Class filtration of 99.9% of particles to 0.3
microns. This is accomplished by the SEBO three-step filtration system. First, the
three-layer full-size filter bag (a) collects the vast majority of the debris. Then, the
remainder of the particles are collected by the hospital-grade microfilter (b). Finally,
the micro-exhaust filter (c) cleans the exhaust air that the vacuum emits. SEBO’s
unwavering attention to the complete sealing of the machine ensures no dust or dirt
escapes around the microfilters. If the microfilters are changed regularly (every 1020 bags), the essential G is perfect for allergy or asthma sufferers.
2.
Brush Roller Obstruction – Auto Shut-Off. If the brush roller is obstructed, the
machine will shut off in 3 seconds and the red “CHECK BRUSH” light located on top
of the power head will flash. The user should turn the switch off, unplug the machine
and immediately remove the obstruction. If the user restarts the machine without
removing the obstruction, the machine will again shut off in 3 seconds and the
“CHECK BRUSH” light will flash.
a.
b.
c.
3.
Brush Roller Deterioration Warning. If the red “CHECK BRUSH” light is illuminated continuously
while the head is in position 1 (after a 10 second delay) it is signalling the user that the brush roller is
too worn and, therefore, should be replaced. The light will remain illuminated until the worn brush roller
is replaced, but the machine will continue to operate in the meantime.
4.
Stationary Use Warning. When the machine has its handle in the upright-locked position, it is
designed to disengage the brush roller from the floor by raising the height of the power head. If the
power head is in position 1 (the highest setting) but is still engaged in the carpet, the “CHECK BRUSH”
light will slowly flash to alert the user. This can occur on extremely high-nap carpet, such as loose-pile
shag, or on carpets with extraordinarily thick padding underneath. However, it is typically caused by the
user pulling forward on the machine while using the attachment hose or active wand. This feature was
designed to be an alert to the user to “take care” while the machine is stationary. An operating machine
should not stand stationary on the floor for inappropriate periods of time.
Bag Full or Clog Warning – Auto Shut-Off. If the vacuum’s air flow pathway becomes restricted
5.
due to a full bag or the existence of a clog, the red “BAG FULL OR CLOG” light located on top of the
power head will illuminate. If the user ignores this warning for approximately 30 seconds, the machine
will shut off and the “BAG FULL OR CLOG” light will flash. The user should turn the switch off, unplug
the machine and immediately insert a new bag or remove the clog (to remove a clog, refer to the Clog
Removal section on page 9). If the user restarts the machine without having solved the problem, the
“BAG FULL OR CLOG” light will again illuminate and the machine will shut off in 30 seconds.
Page 4
The control panel is located on the power head.

Identification of Parts
17
25
16
26
. Handle grip
1
2. On/Off switch
3. Handle assembly
4. Retaining ring
. Cover release flap
5
6. Dust bag housing
7. Front cover
8. Housing release button
. Power head with brush
9
10. Cable (cord)
11. Attachment tube handle
12. Attachment hose
13. Carrying handle
41
46
42
43
45
44
Standard Attachments
16. Crevice nozzle
17. Upholstery nozzle
25. Dusting brush clamp
26. Dusting brush
4. Cable (cord) hook
1
15. Attachment tube (active wand)
16. Crevice nozzle
17. Upholstery nozzle
8. Pile adjustment knob
1
19. Foot pedal
20. Swivel neck
21. Support lever
2. Handle release catch
2
23. Projection tab
24. Connecting tube
25. Dusting brush clamp
Optional Attachments
41. Wall and floor brush - Part # 1325 HG
42. Turbo brush for stairs - Part # 6179 AM
43. Radiator brush - Part # 1496 HG
44. Extension hose (9’3”) - Part # 1495 AM
45. Straight tube - Part # 1084 HG
46. Flat upholstery nozzle - Part # 1090 HG
Also available for odor control - the combined
micro/charcoal filter - Part # 5425 AM
Assembly
26
Attach dusting
brush clamp
with screw
25
Note
All illustrations shown
in this manual represent the G1 model
except where part
numbers and instructions are
different for each
model. In those
instances, illustrations
for both the G1 and
G2 will be shown.
Place the power head (9) on the floor with
the swivel neck (20) and the support lever
(21) upright. Hold the dust bag housing (6)
vertically and place it over the swivel neck
and support lever. Push firmly and evenly
down so that the housing release button (8)
snaps outward to its “locked” position.
Slide the dusting brush clamp (25) onto the
handle tube (3) and tighten the screw. The
handle of the dusting brush (26) will now
snap into the clamp.
To insert the handle tube (3) into the housing, lift the catch (22), slide the handle in,
making sure that the handle is all the way in
and cannot go any further. Push the catch
(22) down to lock handle in place. If the handle is not pushed fully down, the vacuum will
not work.
Push the black end of the attachment hose
(12) into the connecting tube (24) so that it
clicks into place. Insert the attachment tube
(15) into the swivel neck and push the handle (11) over the projection tab (23).
Insert crevice nozzle (16) and upholstery
nozzle (17) into the recesses in the back of
the machine.
Page 5
 Loading...