

Page 1

MADE IN GERMANY
MADE IN GERMANY
SEBO
EVOLUTION 320 / 370 / 470
CHECK
BRUSH
ON/OFF
2
CHECK
BRUSH
ON/OFF
2
CHECK
BRUSH
ON/OFF
2
KÄYTTÖOHJE / INSTRUCTION MANUAL
Page 2

Table of contents
Page
1. Attachments .....................................................................3
2. Technical Details .............................................................3
3. Safety Instructions ........................................................... 4
4. Note on Disposal ..............................................................6
5. Product Description ........................................................ 7
6. Assembly .......................................................................... 7
7. Operating Instructions ..................................................... 8
8. Maintenance and Service .................................................9
Sisällysluettelo
Sivu
1. Liitteet ..............................................................................3
2. Tekniset tiedot..................................................................3
3. Turvallisuustiedotteet ......................................................4
4. Kierrätysohje ...................................................................6
5. Imurin kuvaus ..................................................................7
6. Kokoaminen .....................................................................7
7. Käyttöohjeet .....................................................................8
8. Ylläpito ja huolto ..............................................................9
2
Page 3

Lisävarusteet
1 1495 Imuletku 2800 mm
2 1084 Jatkoputki 490 mm
3 1094 Harjasuulake
5 1325 Lattia- ja seinäsuulake
6 7290 Yhdistelmäsuulake
7 1496 Patteriharja
8 1081 Pidin
Huoltotarvikkeet
1 5093N Pölypussi
2 5036ER Mikrosuodatin
3 20170ER Poistoilmasuodatin
4 50169ER Poistoilmasuodatin HEPA
5 50415 Harja 300
2046 Harja 350/360/370
4028 Harja 450/460/470
Optional Attachments
1 1495 Extension Hose 2800mm
2 1084 Straight Tube 490mm
3 1094 Dusting Brush
5 1325 Wall- and Floor Brush
6 7290 Combination Nozzle
7 1496 Radiator Brush
8 1081 Attachment Clip
Service Parts
1 5093N Paper Bag
2 5036ER Microfilter
3 50170ER Exhaust Filter
4 50169ER Exhaust Filter HEPA
5 50415 Brush strip 300
5 2046 Brush strip 350/360/370
5 4028 Brush strip 450/460/470
6
5
3
2
7
1
8
1 2 4
3
5
2. Tekniset tiedot
Imuri:
Imurin moottori .....................................890 W
Imuteho .................................................243 mbar
Ilmavirtaus ............................................43,3 l/s
Pölypussin tilavuus ................................5l 3-kerroksinen
Työleveys ...............................................300/360/460 mm
Harja ......................................................Vaihdettavissa
Harjan pyöritys ......................................Hammashihna
Verkkojohdon pituus ..............................12 m
Paino ......................................................8,2/8.3/8.7 kg
IP suojausluokka ...................................II
Arvot EN 60335-2-69:
Äänitaso Lpa ..........................................< 67 dB(A)
Epävarmuus Kpa ...................................0,2 dB(A)
Värinä kahvassa.....................................<= 2,5 m/s2
Epävarmuus KpA ...................................2 dB(A)
Varaosat ja huolto
CC-tukku Oy
Hyttimestarinkuja 2
02780 Espoo
Puh 0207 313 313
Vacuum Cleaner:
Vacuum Motor ......................................890 Watt
Suction .................................................243 mbar
(2476 mm H2O)
Air Flow ...............................................43,3 l/s
Filter Bag .............................................5.0 liter, 3-layer
Working width ......................................300mm/360mm/460mm
Brush strip ...........................................Replaceable
Brush drive ..........................................Non-slip drive belt
Cable ....................................................12 m
Weight ..................................................8,2/8.3/8.7 kg
Protection ............................................Double insulated
Values determined to EN 60335-2-69:
Sound pressure level LpA ..................... <67 dB(A)
Uncertainty KpA: ................................... 2 dB(A)
Hand-arm vibraion value .................... < 2.5 m/s
2
Uncertainty K ....................................... 0.2 m/s
2
For Service please contact your supplier or the address on the
rear of this manual.
2. Technical Details
2
1. Liitteet / Attachments
3
Page 4

Lukekaa nämä käyttöohjeet sekä lattianhoito-ohjeet
huolellisesti ennen imurin käyttöä.
Varoitus: laiminlyömällä turvallisuusohjeet voi tuottaa
vaaran.
Kiitos, että valitsitte SEBO -mattoimurin. Olemme
varmoja, että tulette olemaan tyytyväisiä valintaanne. Me
kuuntelemme asiakkaitamme ja palautteenne on meille
tervetullutta ja toivomme sitä osoitteeseen palvelu@cctukku.com.
Teidän uusi SEBOnne on korkealaatuinen, luotettava
ja innovoiva tuote, joka on kehitetty Saksassa uuden
teknologian avulla. S-Class suodatus ja tehokas imuteho
tuottavat korkeimman laadun siivouksen tehokkuudessa.
3. Turvallisuusohjeita
Säilytä nämä ohjeet. Jos luovutat koneen uudelle
käyttäjälle, niin anna myös nämä ohjeet. Käyttäjät käyttävät
imuria omalla vastuullaan. Valmistaja tai toimittaja eivät
vastaa mistään vahingoista, jotka syntyvät imurin väärästä
käytöstä.
VAROITUS: käyttäjän tulee saada käyttöopastus
ennen käyttöä.
Tämä imuri on suunniteltu ammattisiivoukseen,
esimerkiksi
Tämä imuri on suunniteltu ammattisiivoukseen, esimerkiksi
hotelleissa, kouluissa, päiväkodeissa, sairaaloissa,
tehtaissa, kaupoissa, toimistoissa tai konevuokraamoissa.
Tätä imuria ei ole suunniteltu henkilöille, joilla on rajalliset
henkiset tai fyysiset ominaisuudet tai puutteellinen
kokemus tai tieto.
Lapsia tulisi valvoa, jotta he eivät leiki imurin kanssa.
Imurointi tai huoltotyö lasten toimesta tulee olla tarkasti
valvottua.
Ennen imurin käyttöä tulee tarkistaa, että johto ja letku ovat
ehjiä.
Jos jokin osa on viallinen, se tulee korvata alkuperäisellä
SEBO -osalla. Turvallisuussyistä korjauksen tulee
tehdä SEBOn valtuuttama huoltohenkilö. Kopio-osien
käyttö lakkauttaa imurin takuun ja saattaa aiheuttaa
vaaran käyttäjälle. Takuuaikana SEBOn valtuuttaman
huoltohenkilön tulee suorittaa kaikki korjaukset.
Älä käytä viallista imuria.
Älä imuroi ihmisiä tai eläimiä.
Tällä imurilla ei saa imuroida nesteitä, teräviä esineitä,
kuumia asioita, kuten tuhkaa tai haitallista pölyä.
Älä käytä tilassa, jossa on syttyviä, räjähtäviä tai
haitallisia esineitä tai kaasuja.
Please read these instructions carefully before using.
CAUTION! Failure to follow the safety instructions
marked with this symbol can pose a hazard.
Thank you for choosing SEBO. We have made every effort
to ensure that you will be highly satisfied with our products.
This SEBO is a quality product that has been designed and
made in Germany using the most modern technology and
materials. The S-Class filtration and the effective cleaning
power give you the highest standards of cleaning efficiency.
If you have any feedback, please contact us at www.sebo.de.
3. Safety Instructions
Please save these instructions. If you pass the machine to
a third party, please pass these on as well. The use of the
machine is at your own risk. The manufacturer / supplier
is not liable for any injury or damage caused by incorrect
usage of the machine.
WARNING: Operator must receive instructions
on how to use the device.
Safe Use
This appliance is suitable for commercial use, e.g. in hotels,
schools, hospitals, factories, shops, offices, and rental companies.
This machine is not intended for use by persons (including
children) with reduced physical, sensory or mental capabilities or lack of experience and knowledge.
Children should be supervised to ensure that they do not
play with the appliance. Cleaning and user maintenance
should not be done by children without strict supervision.
Before using the vacuum cleaner, always check for any
signs of damage, especially to the mains cable and hose.
If a component is damaged, it must be replaced with a
genuine SEBO part. For safety reasons internal components
must be fitted by a SEBO Service Representative or an
Authorised Service Technician. The use of non-genuine
parts will waive the warranty for this product and could
pose a serious safety risk. All repairs within the guarantee
period should be performed by an authorised SEBO Service
representative.
Electrical appliance, do not expose to liquid, moisture or
heat.
Always turn off and unplug the machine before
undertaking any maintenance.
Do not use a damaged machine.
Do not use on people or animals.
This machine must not be used for picking up liquid,
sharp objects, hot material, such as fire ash, or haz-
ardous/ harmful dust.
4
Page 5
Älä koske pyörivään harjaan, tämä voi aiheuttaa vammoja
sormille.
Tätä imuria tulee käyttää vain toimivassa ja luotettavassa
sähköverkossa.
Älä kytke viallista imuria sähköverkkoon.
Pidä sähköjohto pois terävistä esineistä ja estä sen vioit-
tuminen, painautuminen, ylivenyminen (voi tapahtua esimerkiksi rullaamalla johto liian tiukasti).
Käytä vain kuivilla pinnoilla. Älä säilytä tai käytä ulkona
tai kosteissa olosuhteissa.
Kun lopetat imuroinnin, sammuta imuri, irrota töpseli ja
varmista, että harja pysähtyy. Kanna imuria vain kantokahvasta. Pidä imuria kahvasta kiinni aina imuroinnin aikana.
Pidä imuri aina vakaalla tasolla.
Kelaa johto, kun imuri ei ole käytössä, vähentääksesi kom-
pastusvaaraa.
Varmista, että imurin tyyppikilpeen merkitty nimellisjännite
vastaa verkkojännitettä.
Älä kanna imuria johdosta tai letkusta.
Irrota pistokkeesta pitämällä kiinni töpselistä.
Älä imuroi johtoa.
Älä venytä johtoa, kun kelaat johtoa. Varmista, että se jää
hieman löysälle.
Älä käytä imuria ilman pölypussia tai suodattimia. Jos pölypussi ei ole paikallaan, kansi ei sulkeudu. Älä sulje kantta
väkisin. Tarkista ‘pölypussin tila’ valo säännöllisesti ja tarvittaessa vaihda pölypussi. Suosittelemme suodattimien
vaihtoa säännöllisesti, aina kun ne ovat likaisia tai kun 20
pölypussia on käytetty.
Älä altista märälle tai kuumalle. Pyyhi kuivalla tai nihkeällä
pyyhkeellä.
Sammuta aina imuri ja irrota töpseli ennen puhdistus- tai huoltotöitä.
Tässä imurissa tulee käyttää vain aitoja SEBO pölypusseja, suodattimia, tarvikkeita ja varaosia. Kopiotarvikkeiden käyttö lakkauttaa takuun ja saattaa aiheuttaa
vaaran käyttäjälle.
Do not use in the presence of flammable, explosive or
harmful materials and gases.
Do not touch the brush when it is turning as this will cause
a risk of injury to the fingers.
The machine should only be connected to a fault-free and
appropriate electricity supply systems.
Do not connect a damaged appliance to the power supply.
Keep the cable away from sharp edges and prevent it be-
coming trapped, crushed, or over-stretched (e.g. by winding on too tightly).
Use on dry surfaces only. Do not store and use out-
doors or in damp conditions.
When you finish or interrupt your work, always turn off,
unplug the machine and ensure the rotating brush has
stopped.
Only carry the vacuum cleaner by the appropriate carrying
handle. Always hold the handle grip when operating the
vacuum cleaner.
Always stand the machine on a stable surface.
Rewind the mains cable if the machine is not in use to re-
duce the risk of tripping.
Ensure that the connection data on the data label (voltage
and frequency) match the mains electricity supply.
Do not carry the vacuum cleaner by the cable or hose.
Only disconnect from the socket by pulling the plug.
Do not run over the cable.
Do not over stretch the cable. When winding it on the
machine ensure there is some slack where it enters the
handle grip.
Do not use the vacuum cleaner without the filter bag or filters. If a filter bag is not fitted, the cover will not close. Never
force it.
Inspect the filter bag indicator regularly and change the filter bag when necessary. We recommend changing all filters regularly, either when they have become dirty, or once
20 filter bags have been used.
Only clean with a dry or slightly damp cloth.
This machine should only be operated with genuine
SEBO filter bags, filters and replacement parts. The
use of non-genuine parts will waive the warranty for
this product and could pose a serious safety risk.
Use only genuine SEBO attachments.
5
Page 6

Lisätiedot ja huomiot
Ilmoitetut arvot tämän sarjan imureissa on arvioitu komission säännöksen (EU) no. 665/2013 ja
komission säännöksen (EU) no. 666/2013 mukaan,
käyttäen harmonisoituja standardeja EN60312-1
ja soveltuvia osia EN 60335:sta.
Tämän sarjan imurit on luokiteltu mattoimureiksi
yllä olevien standardien mukaisesti ja on testattu
sellaisina. Tämän sarjan imurit eivät sovellu kovien lattioiden imureiksi.
4. Käytöstä poistaminen
Käytöstä poistettu imuri tulee toimittaa sille tarkoitetulle jäteasemalle.
Miscellaneous provisions
The declared values of this series has been evaluated according to the commission delegated regulation (EU) No. 665/2013 and commission regulation (EU) No. 666/2013 applying the harmonized
standards EN 60312-1, and the applicable parts of
the EN 60335.
The series is classified as carpet vacuum cleaners
according to the named regulations above and has
to be tested as such. For high energy efficiency
and a deep and intensive cleaning performance
we recommend using Position 1 of the height adjustment knob. The series is not suitable for use
on hard floors.
4. Note on Disposal
For advice on disposal of used appliances,
please contact your local authority .
6
Page 7
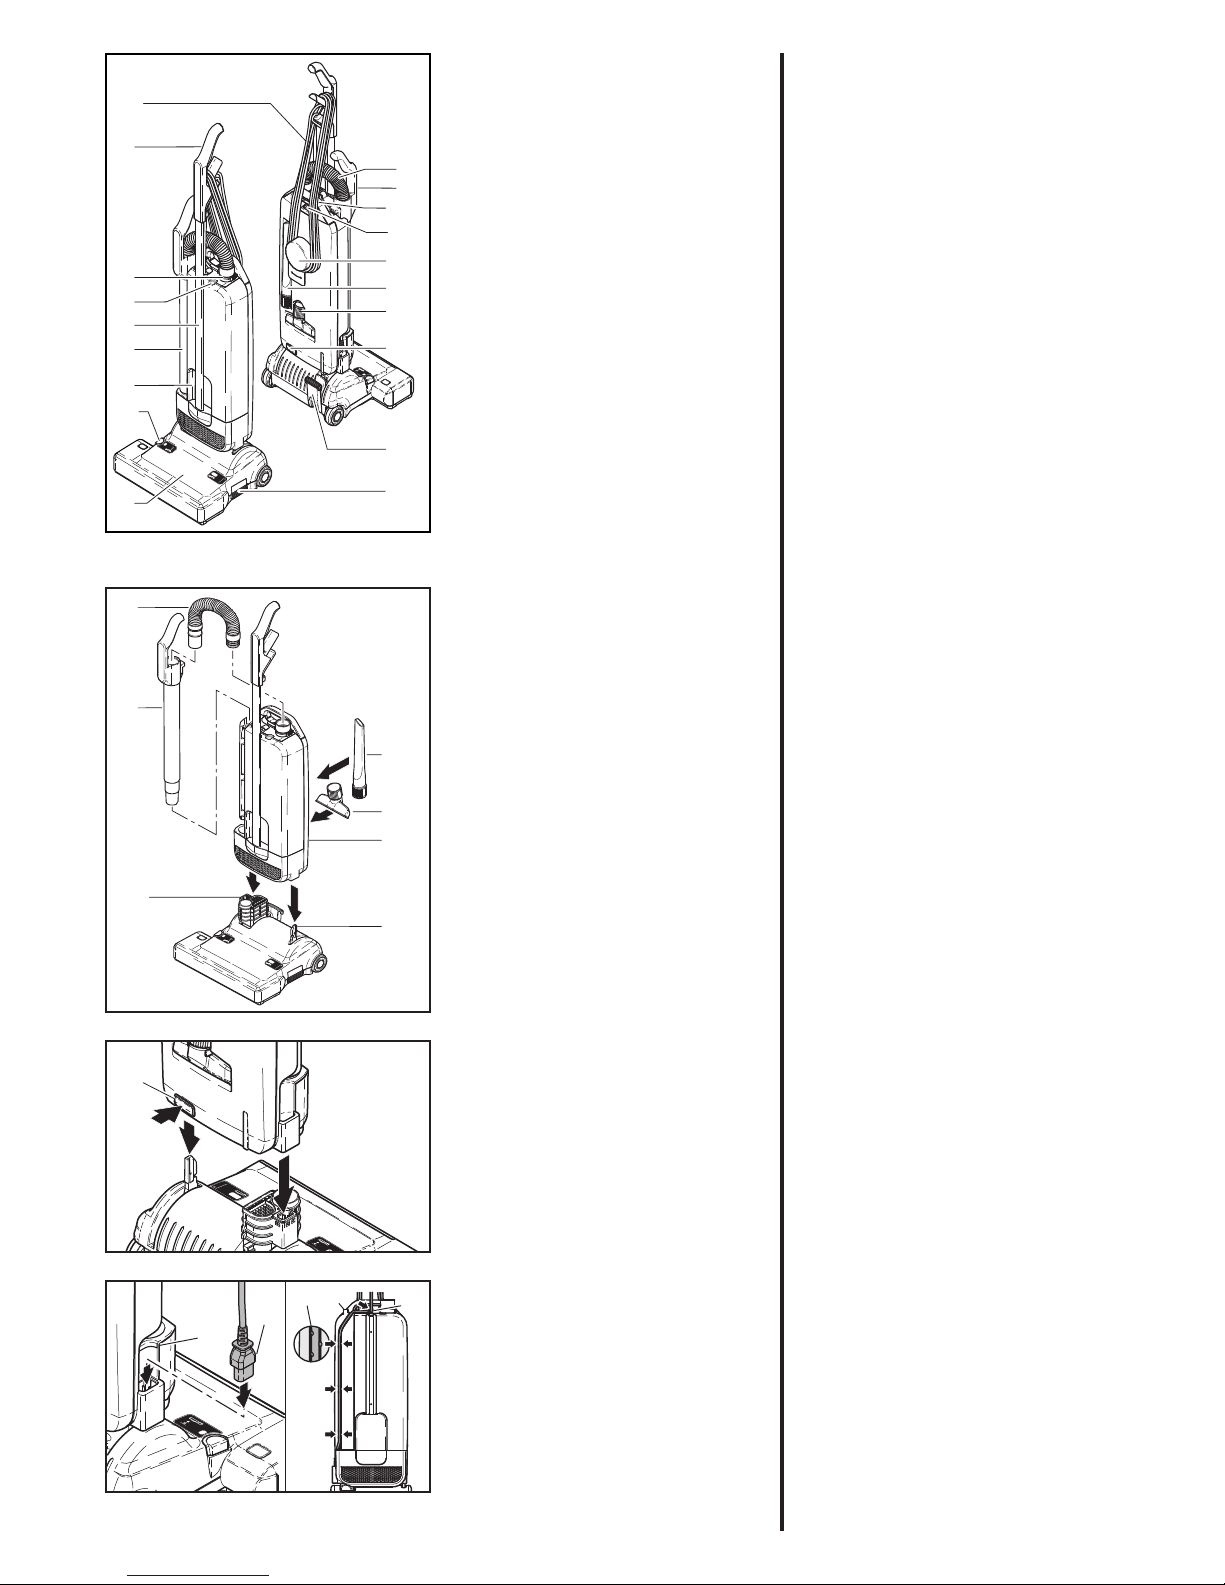
6. Imurin kokoaminen
Aseta imurin runko huolellisesti (20)
pystyasennossa
taittonivelen (21) ja tukivivun (46) päälle
ja työnnä kunnes vapautinpainike (12)
loksahtaa.
Purkaminen. Paina vapautinpainiketta
(12) ja nosta imurin runko irti harjapesästä.
Verkkojohdon kiinnitys. Työnnä pistoke
(33) pistorasiaan (20). Työnnä verkkojohto
varren uraan (22) aina pölypussin suojan
yläosaan ja kahvaan asti.
1. käsikahva
2. kannatinkahva
3. pidikerengas
4. täyden pölypussin ilmaisin
5. imuputken kahva
6. teleskooppiletku
7. putki
8. kantokahva
9. harjapesä
10. päällä/pois kytkin
11. harjan korkeudensäädin
12. vapautinpainike
13. verkkokaapeli
14. takakantokahva
15. kannen vapautin
16. johdonpidin
17. rakosuulake
18. kalustesuulake
19. jalkapoljin
Lue nämä ohjeet.
Älä käytä imuria ennen kuin olet
lukenut ohjeet.
6. Assembly
Assembling the Vacuum Cleaner
Carefully place the dust bag housing(20) in the vertical position and fit
it over the swivel neck(21) and support
lever(46) of the power head(9) until the
release button(12) locks.
To dismantle, press the release button(12) and remove the dust bag housing(20) from the power head(9).
To fit the mains cable to the machine,
push the rubber plug(33) of the cable
into the socket on the swivel neck(21)
when the vacuum cleaner is assembled. Please ensure the rubber plug is
fully inserted into the socket.
Fit the mains cable into the groove(22)
in the dust bag housing located in the
attachment wand recess, then to the
clamps on the top of the dust bag housing and on the rear of the handle.
1 Handle grip
2 Handle tube
3 Retaining ring
4 Bag full indicator
5 Attachment tube handle
6 Hose
7 Attachment tube
8 Recessed grip
9 Power head
10 On/Off switch
11 Pile adjustment knob
12 Release button
13 Mains cable
14 Rear carrying handle
15 Cover release latch
16 Cable hook
17 Crevice nozzle
18 Upholstery nozzle
19 Foot pedal
Please read all of this instruction
manual. Do not use the machine before
understanding the CAUTIONS.
5. Product Description5. Imurin kuvaus
CHECK
BRUSH
ON/OFF
2
2
PUSH
1
10
2
7
3
4
11
8
9
5
13
6
14
15
16
19
17
18
12
2
CHECK
BRUSH
ON/OFF
12
CHECK
BRUSH
ON/OFF
2
7
21
6
17
18
20
46
2
22
22
35
33
20
7
Page 8
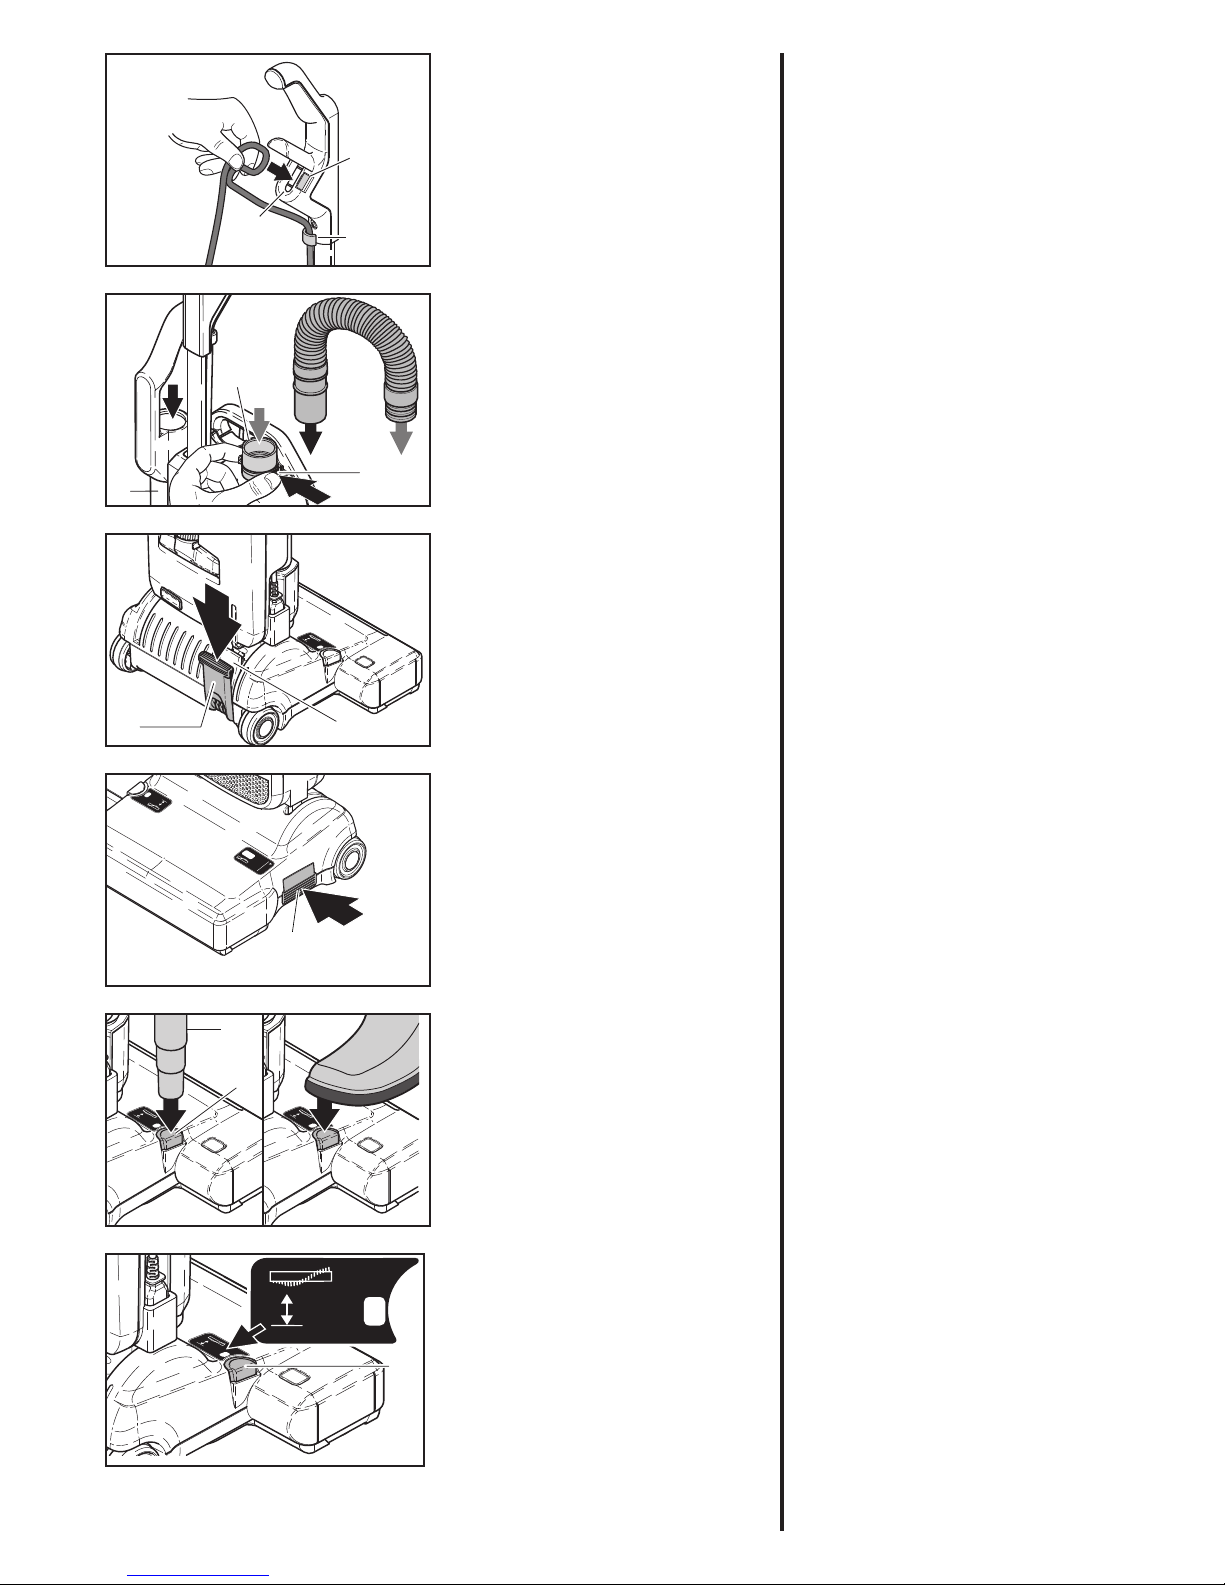
SEBO Evolution 320/370/470 imurit on
suunniteltu korkealaatuisiksi, luotettaviksi ja helppokäyttöisiksi. Pyörivä harja ja sen manuaalinen korkeudensäätö
puhdistaa matot ja muut lattiat turvallisesti ja tehokkaasti. Teleskooppiletku
ja putki mahdollistavat kattavan toiminnan.
SEBO Evolution imureissa on mikrosuodattimet, jotka vastaavat tämän päivän
hygieniavaatimuksia.
Jalkapolkimen salpa (25) lukitsee imurin pystyasentoon. Vapauttaaksesi imurin käyttöasentoon paina jalkapoljinta
(19) ja laske runkoa alaspäin.
Päälle/pois kytkin (10) on sijoitettu ergonomisesti harjapesän sivuun ja se
toimii jalalla napauttamalla.
Harjan korkeutta voi säätää jalalla tai
putken päällä painamalla. Aseta imuri
pystyasentoon, paina putken (7) päällä uria (26), jotka ovat harjakorkeuden
säädössä (11). Painamalla painiketta
(11) harjan korkeutta voi säätää välillä 1 matalin- 4 korkein. Kun harja on
uusi, laita se asentoon 2. Jos imurointi
on raskasta, muuta se asentoon 3 tai 4.
Tehokkaaseen ja syväpuhdistukseen EU
asetuksen 665/2013 mukaisesti suosittelemme asentoa 1.
7
3
24
2
19
25
CHECK
BRUSH
ON/OFF
2
10
Lopuksi työnnä verkkojohto rakoon (23).
Kun verkkojohto on työnnetty riittävän
syvälle, kuuluu ’naps’. Irrottaaksesi paina
painiketta (34) ja vedä verkkojohto pois
raosta.
Sovita putki (7) taittonivelen aukkoon (21)
ja työnnä putken pidin (5) ulokkeeseen
(35). Työnnä letkun pää ulostulevaan putkeen (24), kunnes se napsahtaa paikalleen. Letku voidaan vapauttaa painamalla
pidikerengasta (3) ja vetämällä letku ulos.
Letkun toinen pää sopii putkeen (7).
JOS IMURI EI TOIMI, YLLÄOLEVIA TOIMIA
EI OLE SUORITETTU OIKEIN. VARMISTA,
ETTÄ KAIKKI OSAT OVAT KYTKETTY
TOISIINSA OIKEIN JA VERKKOJOHTO ON
KYTKETTY KUNNOLLA.
7. Käyttöohjeet
The SEBO EVOLUTION 320/370/470
upright vacuum cleaner is designed
for high performance, usability and
durability. The rotating brush with
manual height adjustment cleans your
carpets and other floors safely and
thoroughly. The hose and attachment
tube allow all round cleaning.
The SEBO Evolution features SEBO
S-Class filter technology to meet
modern hygiene requirements.
The foot pedal latch(25) locks the
machine in the upright position. To
release the machine from the upright
position depress the foot pedal (19) and
lower the dust bag housing.
The On/Off switch (10) is ergonomically
located on the side of the power head
and can be operated with a tap of the
foot.
Brush height adjustment can be
changed by foot or with the attachment
tube. To do this, put the machine into
the upright position, then lift the
attachment tube from the machine. The
end of the attachment tube (7) fits into
the groove (26) of the height adjustment
button (11). By pressing the button (11),
the brush can be adjusted from position
1 (lowest setting) to 4 (highest setting)
and back. When the brush is new, set it
to position 2. If it is hard to push, change
to position 3 or 4. For high energy
efficiency and a deep and intensive
cleaning performance in accordance
with the EU Regulation 665/2013 we
recommend to using setting 1.
Finally insert the mains cable into the
cable cleat(23). You can hear a “click”
when the mains cable is fully inserted.
To take off the mains cable push the
button(34) next to the cable cleat(23)
and remove the mains cable.
Fit the attachment tube(7) into the swivel neck(21) and then push the attachment tube handle(5) over the projection(35). Push the black end of the hose
into the connecting tube(24) so that it
clicks into place. The hose can be taken
off by squeezing the retaining ring(3).
The other end of the hose fits into the
attachment tube(7) only one way.
IF THE MACHINE DOES NOT WORK,
THEN THE STEPS ABOVE HAVE NOT
BEEN EXECUTED CORRECTLY. PLEASE
ENSURE THE PARTS ARE PROPERLY
PUSHED TOGETHER, ESPECIALLY THE
CABLE PLUG AND SWIVEL NECK.
7. Operating Instruction
11
1
1
2
2
7
26
PUSH
23
22
34
8
Page 9
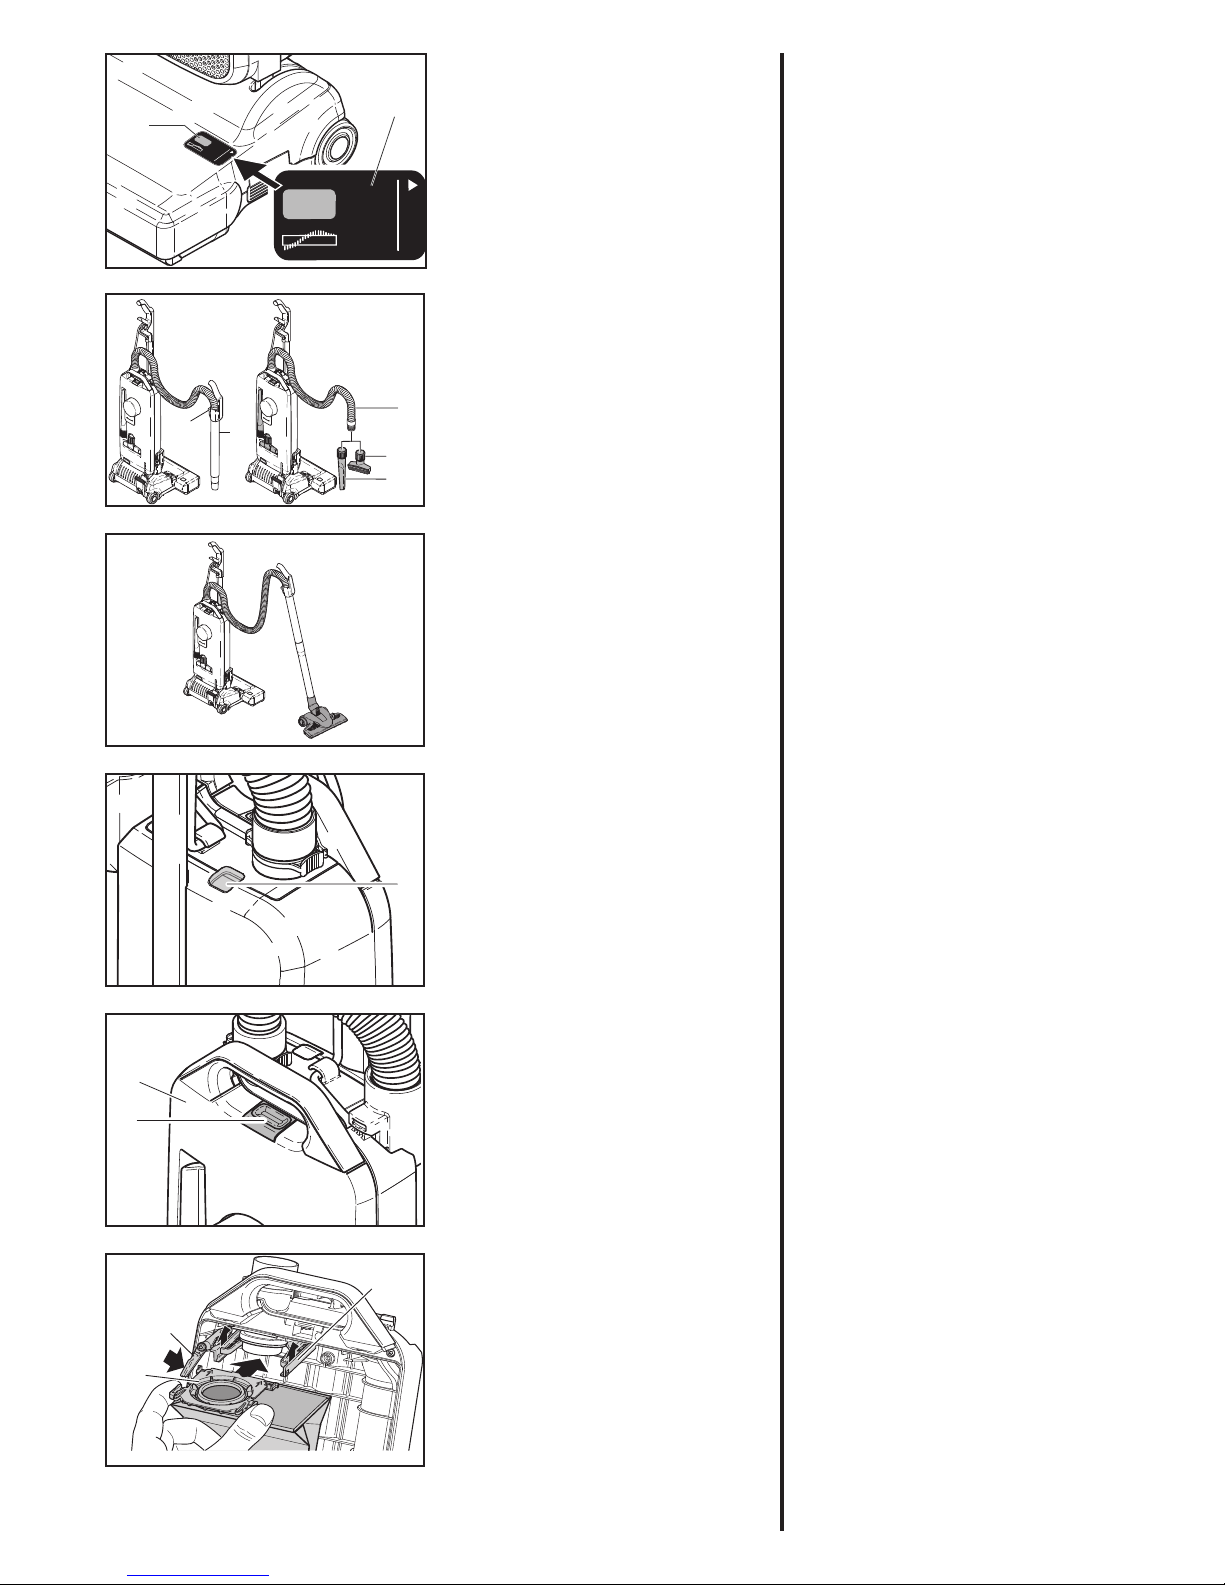
Tässä imurissa on ’harja jumissa’
-ilmaisin (27). Jos harja on jumissa tai
ylikuormitettu, imuri sammuu automaattisesti ja oranssi varoitin näkyy
näytössä (36). Jos näin käy, irrota töpseli seinästä ja puhdista harja tai harjan
pesä.
Varoitus! Irrota kone aina sähköverkosta ennen kuin irrotat minkään koneen osan.
Käyttääksesi teleskooppiletkua (7) tai
putkea, aseta imuri pystyasentoon, irrota putki imurin varresta ja venytä letku
pitkäksi. Varmista, että putki palautuu
paikalleen käytön jälkeen.
Teleskooppiletkua voidaan käyttää itsenäisesti. Paina painiketta (28) putken
takapuolella ja irrota letku (6) putkesta
(7). Käytön jälkeen palauta letku putkeen. Lisäsuulakkeet (17 ja 18) voidaan
kiinnittää letkun tai putken päähän.
8 Ylläpito ja huolto
Pölypussi täynnä -ilmaisin.
Jos vaaran ilmaisin (4) muuttu oranssiksi, imurissa on ilmanvirtaus vähentynyt.
Se johtuu joko täydestä pölypussista,
likaisista suodattimista tai tukoksesta letkussa (12) tai harjapesässä (9).
(Etsiäksesi tukoksen katso osio Tukosten selvittäminen). Pussin sisältö
vaikuttaa siihen, missä vaiheessa pölypussi pitää vaihtaa. Hieno pöly saattaa
vaatia vaihtamista, vaikka pussi ei ole
ihan täynnä. Nöyhtä ja hiukset päästävät ilmaa lävitseen helposti, joten pussi
saattaa tulla liian täyteen.
Pölypussin vaihtaminen
Vaihtaaksesi paperipussin paina painiketta (15) ja poista pussin suoja (29).
Paina vipua (30) oikealle. Sitten vaihda
pussi, kuten kuvattu pussin edessä.
Varmista, että pussin yläosa (47) on oikein molemmilla puolilla pidikettä (46) ja
painettu loksahdukseen asti. Käytetty
pussi voidaan sulkea korkilla, joka tulee
jokaisen pussin mukana SEBO -suodatinlaatikossa ja huoltolaatikossa
ÄLÄ KÄYTÄ PAPERIPUSSEJA UUDELLEEN
This vacuum cleaner has a brush
jammed indicator (27). If the brush is
jammed or overloaded the machine
will automatically switch-off and the
orange indicator shows in the display
(36). If this occurs, unplug the machine
and clear the obstruction.
CAUTION - ALWAYS unplug from the
mains socket before dismantling any
part of the machine.
To use the attachment tube (7) or hose
(6) put the machine in the upright
position, then lift the tube from the
machine and stretch out the hose until
it locks. When the tube is returned to
the machine, ensure it is pushed down
over the projection (35) on the housing.
The hose(6) can be used on its own. For
these purposes, please push the button
(28) on the backside of the tube (7) and
extracted the hose(6) out of the tube (7).
After using put the hose back into the
tube. The attachments (17,18) fit either
to the end of the hose or the end of the
tube.
8. Maintenance and Service
Bag full indicator
If the warning indicator(4) turns orange,
it indicates that there is a reduced air
flow.
This is caused either by dirty filters,
a blockage in the hose or base of the
machine. (To clear, refer to blockage
section), or a full paper bag. Picking up
fine dust may require an earlier change
even when the bag is not full. Fluff or
hair lets air pass through easily, so in
this case the bag may overfill.
Changing the paper bag
To change the paper bag, lift the catch
(15) and remove the bag cover (29).
Push the lever (30) over to the right.
Then change the bag, as illustrated on
its front.
Please ensure that the bag top (47) is
located properly on both sides of the
holder (46) and pushed in until it locks.
The used paper bag can be sealed with
a cap, which is included with each bag
in the SEBO Filterbox and Service-Box.
DO NOT RE-USE PAPER BAGS.
CHECK
BRUSH
ON/OFF
CHECK
BRUSH
ON/OFF
27
36
18
6
17
2
PUSH
2
PUSH
7
28
2
PUSH
4
15
29
30
46
47
9
Page 10
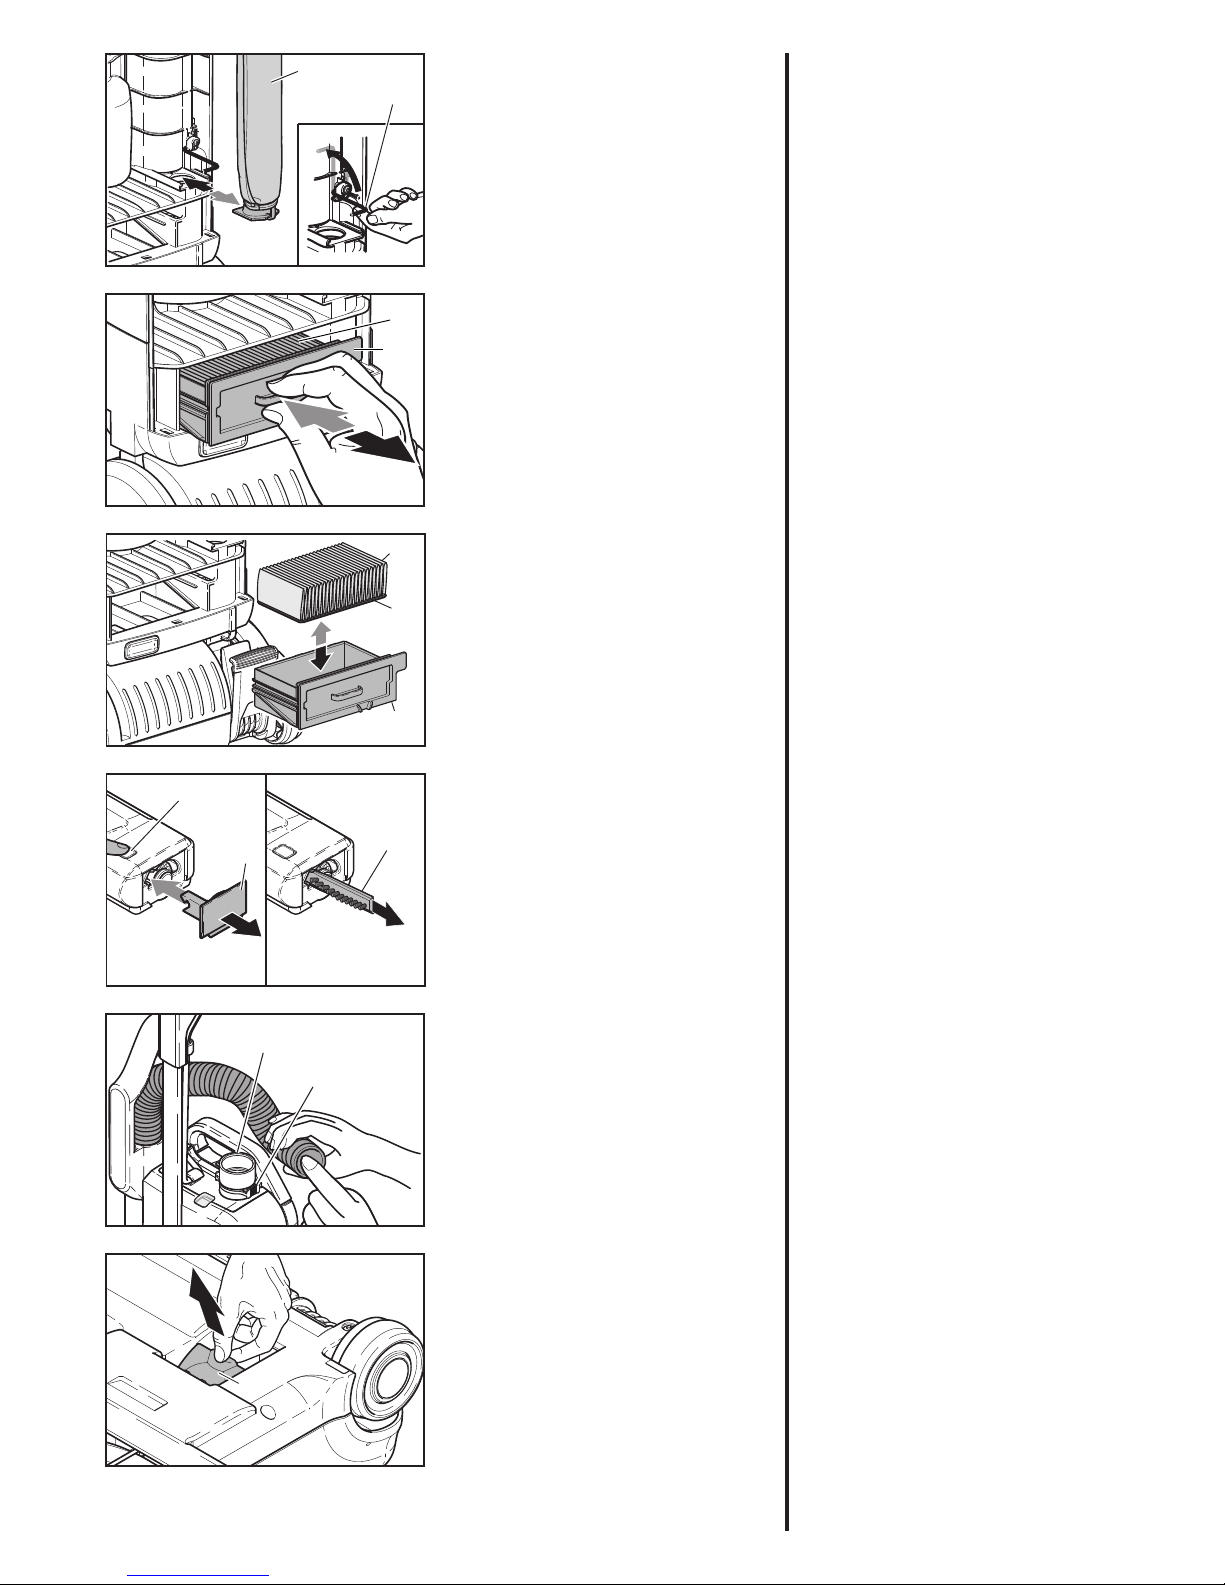
Suodattimien vaihto
Mikrosuodatin (37) on pölypussiosastossa.
Kansi voidaan sulkea vain, kun suodatin
on oikein paikoillaan. Nosta metallitanko
(31) liu’uttaaksesi suodatin paikalleen.
Poistoilmasuodatin (39) sijaitsee erillisessä suodatinpidikkeessä (40). Vaihtaaksesi poistoilmasuodattimen (39)
vedä suodatinpidike (40) ulos. Irrota suodatin pidikkeestä. Laita uusi suodatin
(39) pidikkeeseen tiiviste (41) alaspäin ja
laita pidike paikalleen.
Mikrosuodatin pitää vaihtaa, kun se on
likainen tai kun on käytetty 20 pölypussia.
Suosittelemme poistoilmasuodattimen
vaihtamista samalla, kun mikrosuodatin
vaihdetaan.
Suodattimia ei saa pestä.
Älä käytä pölypusseja uudelleen.
Kansi (29) voidaan sulkea vain kun
suodattimet ovat paikoillaan.
Harjan vaihtaminen
Vaihtaaksesi harjan (42), paina painiketta
(43), irrota sivulevy (44) ja käännä harja
siten, että voit vetää harjan (42) ulos. Varmista, että uusi harja on kokonaan paikallaan ja työnnä sivuseinä (44) paikalleen. Varmista, että sivuseinä on lukkiutunut paikalleen ennen imurin käyttöä.
Tukosten selvittäminen
Tukoksia letkussa voi puhdistaa painamalla pidikerengasta (3) ja irrottamalla
letku koneesta. Tarkista letkun kummatkin päät. Jos tukoksen aiheuttajaa ei ole
näkyvissä, laita letku väärin päin aukkoon (24) ja nosta toinen pää suoraan ylös
ja tuki letkun yläpää toisella kädellä ja
käynnistä imuri. Tarvittaessa peitä ja vapauta imuletkun tukittu pää nopeasti toistaen.
VAROITUS! Älä koskaan puhdista letkua
millään terävällä.
Jos letku ja putki ovat puhtaita, tarkista
taittonivel katsomalla kohtaan, johon
putki laitetaan. Tarkista myös oranssi luukku (45) koneen alapuolella. Varmista,
että kulku luukusta putkeen on esteetön
Changing the filters
The Microfilter (37) is located in the
dust bag compartment. To change the
Microfilter slide it out. Please ensure no
particles fall down into the swivel neck.
To insert a new Microfilter (37) lift the
metal bar (38) to slide the filter in.
The Exhaust Filter (39) is located inside the separate Filter holder(40). To
change the Exhaust Filter (39) pull out
the Exhaust Filter holder (40). The internal filter can be the easily taken out.
Replace the Exhaust Filter (39) with the
sealing gasket(41) downwards and insert the filter holder back into the dust
bag housing.
Replace the Microfilter and Exhaust Filter when it becomes dirty or at the latest after 20 paper bags have been used.
Do not wash filters.
Do not re-use bags.
The bag cover (29) can only be closed
when the filters are fitted properly.
Changing the brush strip
To replace the brush strip(42), push the
button(43), remove the side plate(44)
and turn the brush so that the brush
strip(42) can be pulled out of the
opening. Ensure that the new brush
strip(42) is fully inserted and press the
side plate(44) back into place.
Please ensure that the side plate(44)
is fully pushed home so that it locks in
place.
Clearing blockages
Blockages in the hose can be cleared
by squeezing the retaining ring (3) and
taking the hose off the machine. Please
check both ends of the hose.
If there isn’t a visible blockage please
replace it the wrong way round in the
connecting tube (24), holding it upright
with one hand blocking the top and
switching on the machine. If necessary
lift your hand on and off the end of the
hose rapidly.
CAUTION! Never use anything sharp
to clear the hose.
Also check for a blockage in the swivel
neck of the power head and under the
orange trap-door(45) on the bottom of
the power head. Please also ensure
that the passage between these two
openings in the power head is clear.
37
38
39
40
39
41
40
43
44
42
24
3
45
10
Page 11
11
Page 12

Art.-No. 06922XSF- 03/2018
MADE IN GERMANY
SEBO Stein & Co. GmbH, Wülfrather Straße 47-49, 42553 Velbert, Germany
Telefon +49(0) 20 53 / 89 81, Telefax +49(0) 20 53 / 89 85, www.sebo.de
© 2018 SEBO Stein & Co. GmbH ® Eingetragenes Warenzeichen Technische Änderungen vorbehalten
CC-tukku Oy
Hyttimestarinkuja 2, 02780 Espoo
Puh 0207 313 313, [email protected]
©2018 SEBO Stein&Co. GmbH ®Registered Trademark. Subject to change.
 Loading...