

Page 1

SEBO essential G-Series
For Household Use Only
© Copyright SEBO America, LLC • All rights reserved.
ENGLISH
Page 2
U.S. Patents: 5,056,175
4,955,106
5,028,245
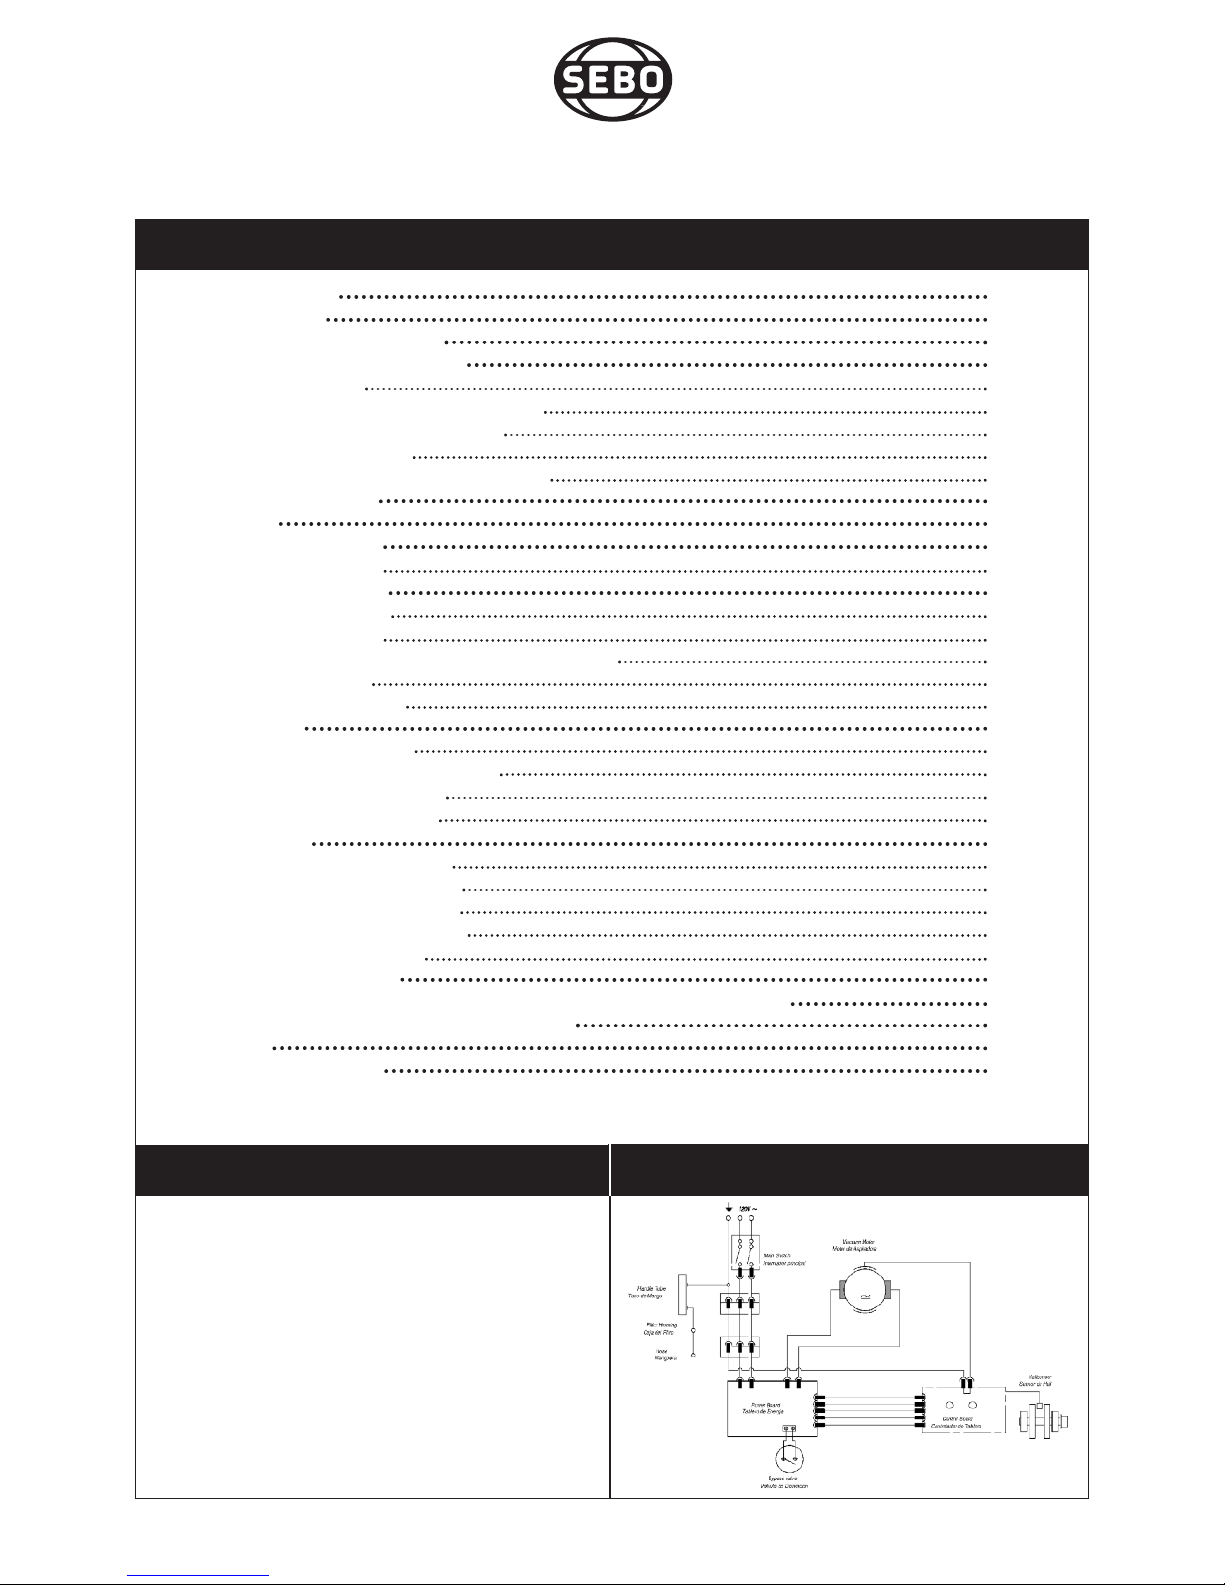
Wiring Diagram
Vacuum motor 1300 watts (10.8 amps)
Water lift (at motor) 92.5 in. H2O
Airflow (at motor) 103.8 CFM
Filter bag capacity 1.4 gal.
Sound level 69 dBA
Body weight G1-16.9 lbs / G2-17.1 lbs
Motor protection electronic cut-out
Working width G1-12 inches / G2-15 inches
Brush drive toothed belt
Brush speed 3100 rpm
Floor adjustment manual
Cord length 40 feet
Radio suppression EN 55014 Verf. 242/91
Technical Details
Technical Details 2
W
iring Diagram 2
Important Safety Instructions 3
Special SEBO Product Features 4
S-Class Filtration 4
Brush Roller Obstruction – Auto Shut-Off 4
Brush Roller Deterioration Warning 4
Stationary Use Warning 4
Bag Full or Clog Warning – Auto Shut-Off 4
Identification of Parts 5
Assembly 5
Optional Attachments 5
Standard Attachments 5
Operating Instructions 6
Starting the Machine 6
Operating Positions 6
Using the Attachment Tube, Hose & Attachments 7
The Display Panel 7
The Adjustment Wheel 7
Maintenance 8
Changing the Dust Bag 8
Changing the Micro-Hygiene Filter 8
Changing the Exhaust Filter 8
Changing the Brush Roller 8
Clog Removal 9
Clogs in the Airflow Pathway 9
Clogs in the Attachment Hose 9
Clogs in the Attachment Tube 9
Clogs in Entrance to Dust Bag 9
Clogs in the Swivel Neck 9
Trouble-Shooting Guide 10
G Series Filter Bag Housing and Handle Schematic and Part Numbers 11
G Series Base Schematic and Part Numbers 12
Warranty 13
How To Contact SEBO 13
Page 2
SEBO automatic G Series Owner’s Manual
Table of Contents
Page 3

Page 3
1. Do not leave vacuum while plugged in. Unplug from
outlet when not in use and before servicing.
2. Do not use outdoors or on wet surfaces.
3. Do not use near small children or pets. Do not allow
to be used as a toy. Use of this product by children
should always be supervised by an adult.
4. Use only as described in this manual. Use only
manufacturer-recommended attachments.
5. Do not use with a damaged cord or plug. If vacuum
is not working as it should, has been dropped,
damaged, left out-doors, or dropped into water, take
it to a SEBO service center.
6. Do not pull or carry by cord, use cord as a handle,
close a door on cord, or pull cord around sharp
edges or corners. Do not run vacuum over cord.
Keep cord away from heated surfaces.
7. Do not unplug by pulling on cord. To unplug, grasp
the plug – not the cord.
8. Do not plug in if switch is in the “I” (ON) position.
9. Do not use outlets above counters to plug in vacuum –
damage to items in the surrounding area could occur.
10. Always carry the vacuum over steps and sills.
11. Do not handle plug or vacuum handle with wet hands.
12. Do not put any object into vacuum openings. Do not use
machine with any openings blocked. Keep openings
free of lint, hair, and anything that may reduce air flow.
13. Do not re-use filter (dust) bags or wash the filters.
14. Do not remove any screws from vacuum.
15. Do not vacuum up anything that is burning or
smoking, such as cigarettes, matches, or hot ashes.
16. Do not use vacuum without dust bag and/or filters in
place.
IMPORTANT SAFETY INSTRUCTIONS
READ ALL INSTRUCTIONS BEFORE USING THIS MACHINE
!
When using an electrical appliance, basic precautions must always be followed.
To reduce the risk of electric shock, this vacuum cleaner has a polarized plug; one blade is wider than the other.
This plug will fit in a polarized outlet only one way. If the plug does not fit fully in the outlet, reverse the plug. If
it still does not fit, contact a qualified electrician to install the proper outlet. Do not change the plug in any way.
Connect only to the outlet type specified on the serial number plate underneath the machine.
SAVE THESE INSTRUCTIONS.
WARNING: To reduce the risk of fire, electric shock, or injury:
17. Turn off all machine controls before unplugging.
18. Use extra care when cleaning on stairs.
19. Do not use machine to vacuum up flammable or
combustible liquids such as gasoline or use in areas
where they may be present.
20. Machines can cause a fire when operated near
flammable vapors or materials. Do not operate this
vacuum near flammable fluids, dust or vapors.
21. Maintenance and repairs must be done by qualified
personnel.
22. Use only original SEBO replacement parts.
23. Do not use vacuum as a step.
24. If vacuum is used on plush carpet or carpet with thick
padding, do not leave machine standing in one place
with machine turned on.
25. Do not use the operator’s handle, which inserts into the
top of the dust bag housing, to carry the machine. The
carrying handle is located on the backside of the
machine’s bag housing.
26. Keep hair, loose clothing, fingers, and all parts of body
away from vacuum openings and moving parts. Do not
place fingers or other body parts under vacuum unless
it is unplugged.
27. Do not place the power head over rug or carpet edges.
28. The vacuum has a manual reset thermal protector. The
protector is reset by switching off the vacuum. The
thermal protector needs some time to cool down after
switching off! Check the vacuum for air blockages or
mechanical failures before switching on.
29. Store the vacuum in a dry place at room temperature.
When the vacuum is not in use, you should wrap the
cord on the cable hooks.
30. Any other servicing should be performed by an
authorized service representative.
Page 4
Page 4
Your SEBO essential G series vacuum cleaner is the most technically advanced upright vacuum cleaner in
the world. Along with its excellent filtration system (99.9% to 0.3 microns), the machine has warning systems
and automatic shut-off capabilities that are designed to alert the user to machine problems that, if ignored,
will damage the machine or diminish performance. Some of your SEBO essential’s most
unique features are:
1.
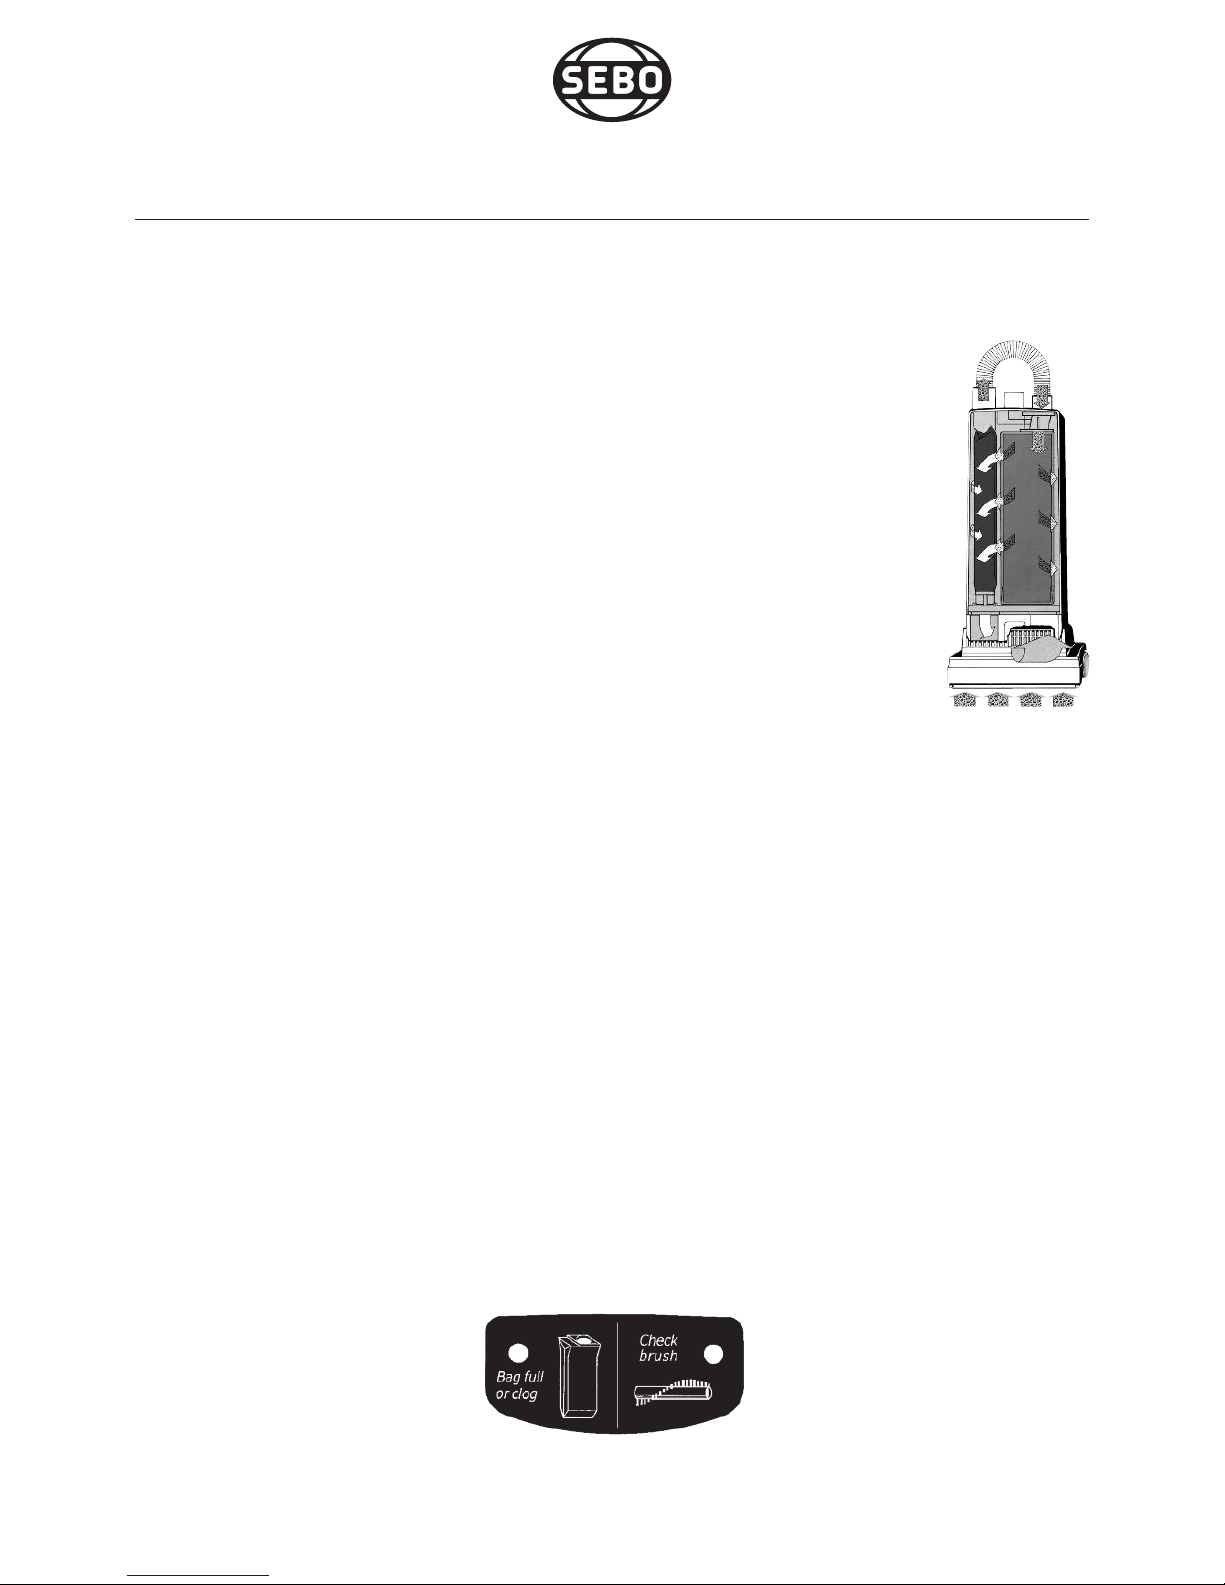
S-Class Filtration. Certified by leading Allergy foundations in Europe, the essential
G-Series vacuum provides the user with S-Class filtration of 99.9% of particles to 0.3
microns. This is accomplished by the SEBO three-step filtration system. First, the
three-layer full-size filter bag (a) collects the vast majority of the debris. Then, the
remainder of the particles are collected by the hospital-grade microfilter (b). Finally,
the micro-exhaust filter (c) cleans the exhaust air that the vacuum emits. SEBO’s
unwavering attention to the complete sealing of the machine ensures no dust or dirt
escapes around the microfilters. If the microfilters are changed regularly (every 1020 bags), the essential G is perfect for allergy or asthma sufferers.
2.
Brush Roller Obstruction – Auto Shut-Off. If the brush roller is obstructed, the
machine will shut off in 3 seconds and the red “CHECK BRUSH” light located on top
of the power head will flash. The user should turn the switch off, unplug the machine
and immediately remove the obstruction. If the user restarts the machine without
removing the obstruction, the machine will again shut off in 3 seconds and the
“CHECK BRUSH” light will flash.
3.
Brush Roller Deterioration Warning. If the red “CHECK BRUSH” light is illuminated continuously
while the head is in position 1 (after a 10 second delay) it is signalling the user that the brush roller is
too worn and, therefore, should be replaced. The light will remain illuminated until the worn brush roller
is replaced, but the machine will continue to operate in the meantime.
4.
Stationary Use Warning. When the machine has its handle in the upright-locked position, it is
designed to disengage the brush roller from the floor by raising the height of the power head. If the
power head is in position 1 (the highest setting) but is still engaged in the carpet, the “CHECK BRUSH”
light will slowly flash to alert the user. This can occur on extremely high-nap carpet, such as loose-pile
shag, or on carpets with extraordinarily thick padding underneath. However, it is typically caused by the
user pulling forward on the machine while using the attachment hose or active wand. This feature was
designed to be an alert to the user to “take care” while the machine is stationary. An operating machine
should not stand stationary on the floor for inappropriate periods of time.
5.
Bag Full or Clog Warning – Auto Shut-Off. If the vacuum’s air flow pathway becomes restricted
due to a full bag or the existence of a clog, the red “BAG FULL OR CLOG” light located on top of the
power head will illuminate. If the user ignores this warning for approximately 30 seconds, the machine
will shut off and the “BAG FULL OR CLOG” light will flash. The user should turn the switch off, unplug
the machine and immediately insert a new bag or remove the clog (to remove a clog, refer to the Clog
Removal section on page 9). If the user restarts the machine without having solved the problem, the
“BAG FULL OR CLOG” light will again illuminate and the machine will shut off in 30 seconds.
SPECIAL SEBO PRODUCT FEATURES
The control panel is located on the power head.
a.
b.
c.
Page 5

Page 5
1
. Handle grip
2. On/Off switch
3. Handle assembly
4. Retaining ring
5
. Cover release flap
6. Dust bag housing
7. Front cover
8. Housing release button
9
. Power head with brush
10. Cable (cord)
11. Attachment tube handle
12. Attachment hose
13. Carrying handle
1
4. Cable (cord) hook
15. Attachment tube (active wand)
16. Crevice nozzle
17. Upholstery nozzle
1
8. Pile adjustment knob
19. Foot pedal
20. Swivel neck
21. Support lever
2
2. Handle release catch
23. Projection tab
24. Connecting tube
25. Dusting brush clamp
Identification of Parts
Place the power head (9) on the floor with
the swivel neck (20) and the support lever
(21) upright. Hold the dust bag housing (6)
vertically and place it over the swivel neck
and support lever. Push firmly and evenly
down so that the housing release button (8)
snaps outward to its “locked” position.
Slide the dusting brush clamp (25) onto the
handle tube (3) and tighten the screw. The
handle of the dusting brush (26) will now
snap into the clamp.
To insert the handle tube (3) into the housing, lift the catch (22), slide the handle in,
making sure that the handle is all the way in
and cannot go any further. Push the catch
(22) down to lock handle in place. If the handle is not pushed fully down, the vacuum will
not work.
Push the black end of the attachment hose
(12) into the connecting tube (24) so that it
clicks into place. Insert the attachment tube
(15) into the swivel neck and push the handle (11) over the projection tab (23).
Insert crevice nozzle (16) and upholstery
nozzle (17) into the recesses in the back of
the machine.
Attach dusting
brush clamp
with screw
25
26
26
17
16
25
Optional Attachments
41. Wall and floor brush - Part # 1325 HG
42. Turbo brush for stairs - Part # 6179 AM
43. Radiator brush - Part # 1496 HG
44. Extension hose (9’3”) - Part # 1495 AM
45. Straight tube - Part # 1084 HG
46. Flat upholstery nozzle - Part # 1090 HG
Also available for odor control - the combined
micro/charcoal filter - Part # 5425 AM
45
Standard Attachments
16. Crevice nozzle
17. Upholstery nozzle
25. Dusting brush clamp
26. Dusting brush
Assembly
42
43
46
44
41
Note
All illustrations shown
in this manual represent the G1 model
except where part
numbers and instructions are
different for each
model. In those
instances, illustrations
for both the G1 and
G2 will be shown.
Page 6
Page 6
Starting The Machine
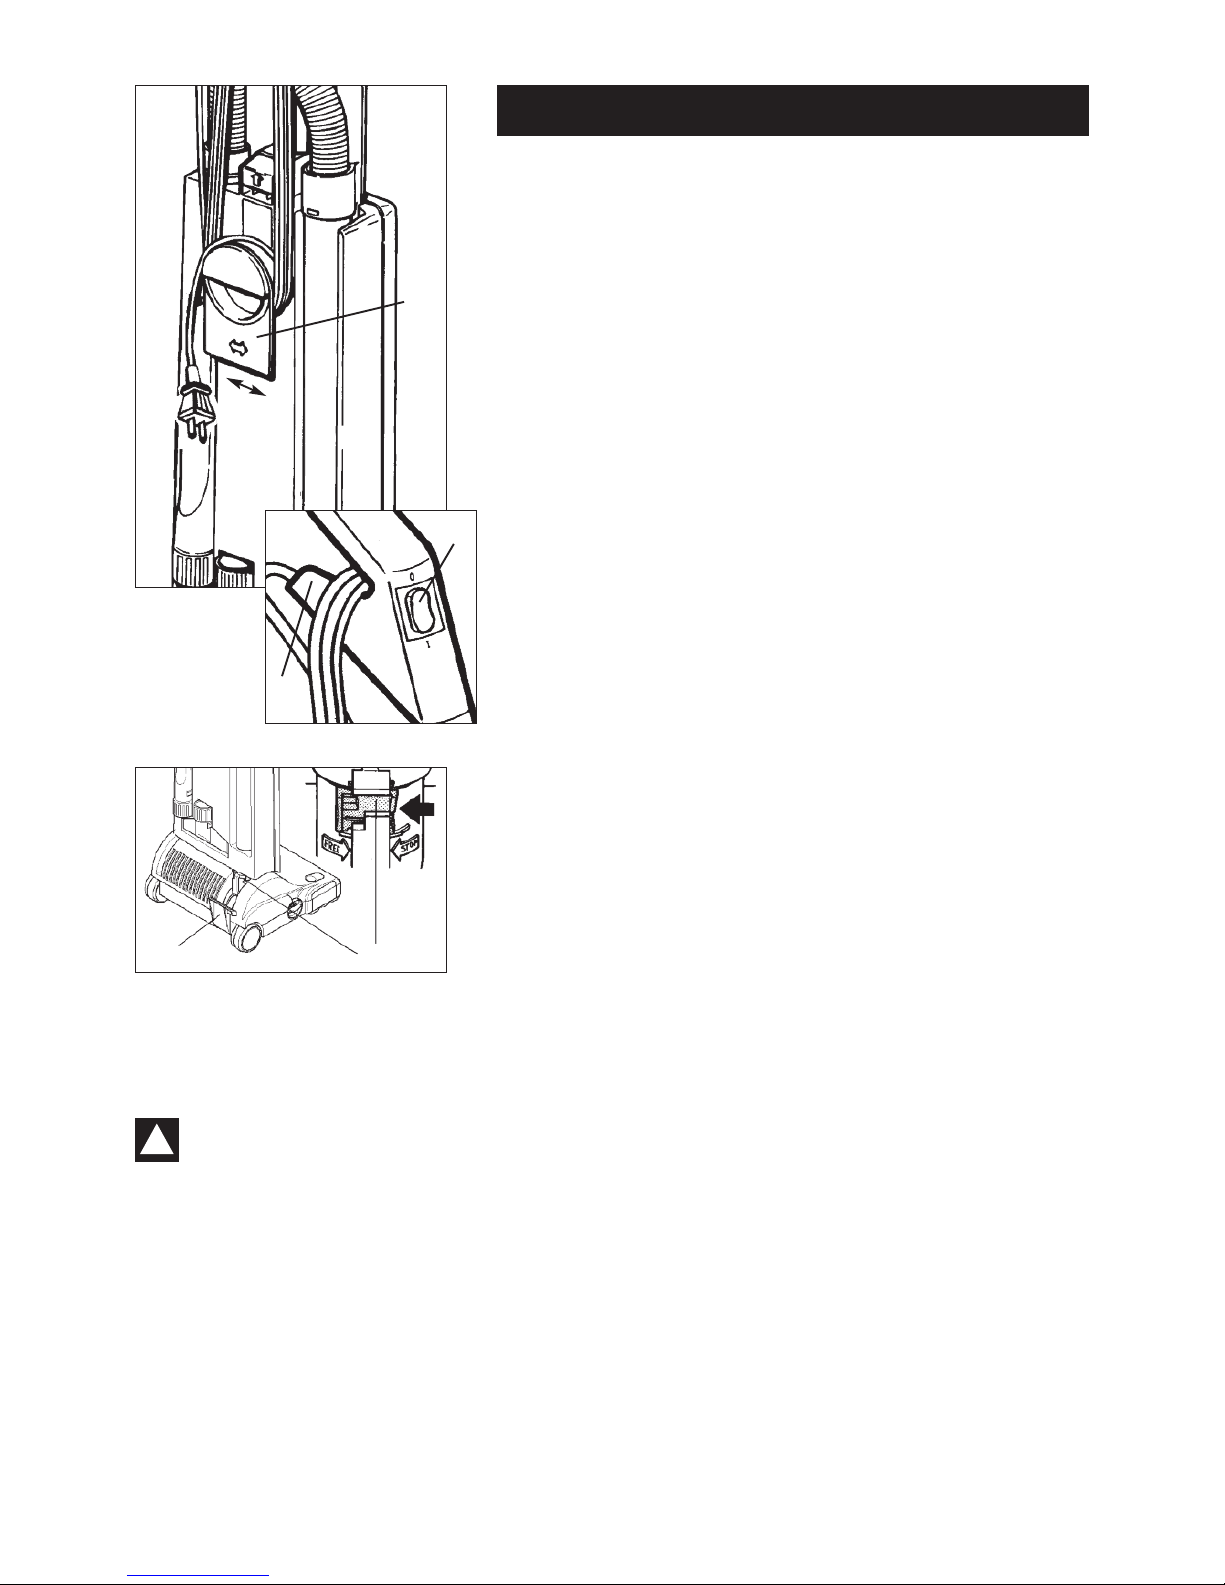
- Figures 1 & 2
A
. Before turning on your vacuum cleaner, make sure that the
vacuum handle is in its upright locked position and that you have a firm
hold on the handle grip to keep the machine from moving forward.
1. Turn the quick release cable hook (14) to the up position
by moving it to the left or right (figure 1).
2. Release the power cord plug from the power cord
and lift the cord off of the upper cord hook (27 - figure 2).
3. With the switch (2) in the “O” (OFF) position (figure 2), plug the
polarized power cord into a 120 volt outlet located
near the floor.
Switch Position
O = OFF
I = ON
Operating Positions
- Figure 3
B. When the machine is switched on with the handle in the upright locked
position (see A above), the power head and brush automatically rise from
the carpet. To release the machine from the upright locked position, press
down on the foot pedal (19) and lower the handle into the normal operating position. The brush will automatically lower.
The handle can be lowered to an intermediate stop position in order to lift
up the brush head for maneuvering over rugs, etc. To lower the handle to
a horizontal position useful for vacuuming under beds, the foot pedal must
be pressed a second time. The intermediate stop position can be closed
off by the orange-colored slider (28) on the back of the swivel neck (20),
so that the handle will go from vertical to horizontal in one movement.
WARNING! The quality, condition, coating, texture, age and manufacturing technique of all floor surfaces vary.
Therefore, upright vacuums with rotating brushes, including your SEBO, may damage some floor coverings or surfaces.
Some types of high-gloss hardwood floors, cushion vinyl, berber carpets, long shag, and delicate or hand-woven carpets are
particularly vulnerable to damage by rotating brushes. When possible, consult the materials supplied by your floor’s manufacturer for information on proper upkeep and cleaning. To ensure that your new SEBO vacuum cleaner is compati-
ble with your floor, please test the vacuum cleaner on each type of flooring surface in a small inconspicuous
area to determine if any damage occurs. If damage occurs, stop using the vacuum cleaner immediately!
Care must be taken to ensure that the bottom of the machine does not contact the floor. If this happens, damage
to the floor could occur. If damage occurs, stop using the vacuum cleaner immediately!
14
2
27
!
28
Operating Instructions
19
Figure 1
Figure 2
Figure 3
Page 7
Page 7
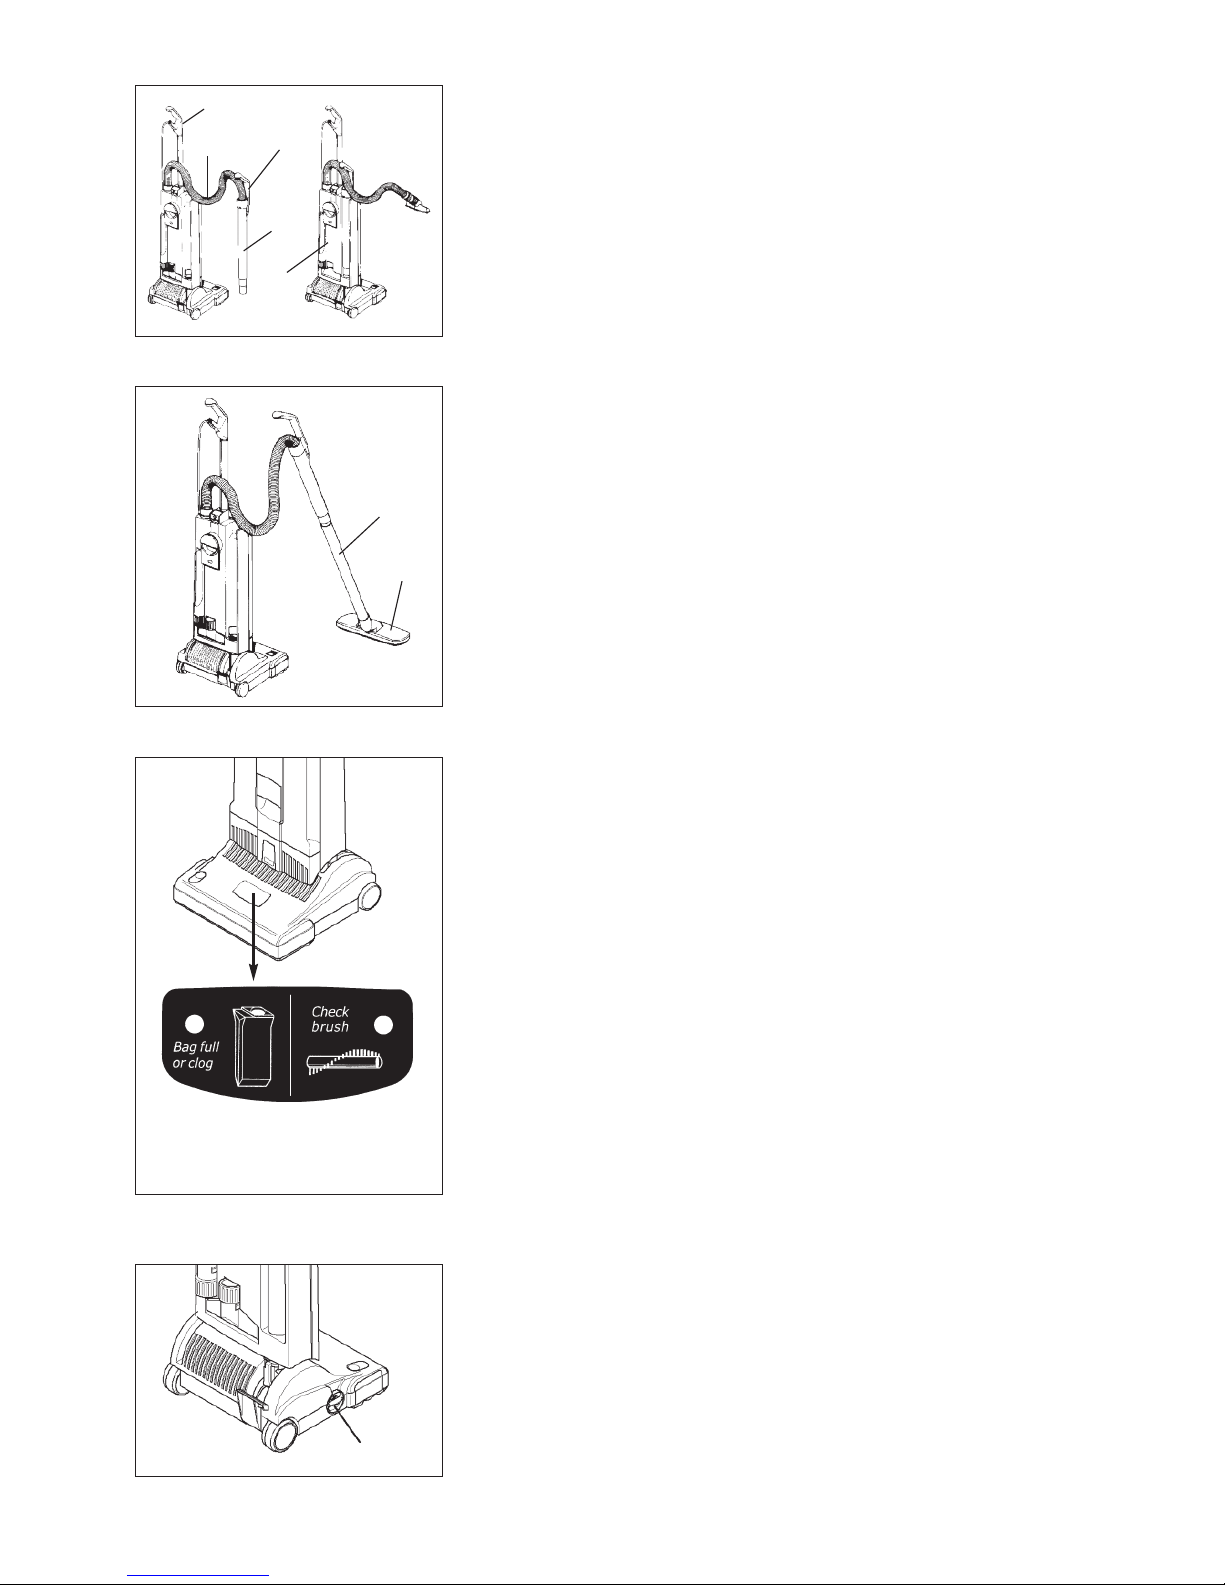
The attachment tube (15) is useful for vacuuming corners and hard-to-reach
areas.The handle grip (1) should be in the upright, locked position (as shown
in figure 1). Grip the attachment tube handle (11), pull it up and away from
the machine and stretch out the hose (12) until it locks to the back of the tube
(this locking action will prevent the hose from retracting back into the attachment tube while it is in use). Various attachments may be inserted onto the
end of the tube. After use, remove attachment and re-insert the attachment
tube into the back of the machine. Be sure that the attachment tube han-
dle (11) is inserted over the projection tab (see #23, page 5). If the attachment tube handle is properly seated over the projection tab, the hose will
automatically retract and you may resume vacuuming. There is no need to
turn off the vacuum while switching from upright vacuuming to using the
attachment tube or hose.
To use the hose without the attachment tube (as shown in figure 2), pull the
hose out of the attachment tube while the tube is still attached to the machine
and securely seated over the projection tab (23). Insert an attachment tool, if
desired, onto the end of the flexible hose.You may also release the hose while
the attachment tube is disengaged from the machine by pressing the release
button (2) at the base of the handle (11).
While using attachment tools, if the the power head brush roller is not able to
disengage from the floor surface, you may keep the brush roller off the carpet by placing the handle (1) in its upright locked position and lowering the
handle with one hand to raise the brush roller off of the floor. Operate attachment accessories with the other hand. Or, with the handle in the upright
locked position, the machine may be tipped backward so that it rests on the
back side of the bag housing (6), and the power head is locked in a perpendicular position to the floor.
To vacuum walls, under beds, or higher-reach areas, etc., the SEBO essential
G can be fitted with an additional straight tube (45) and the wall and floor
brush (41). The machine will then perform as a canister vacuum (as shown
in figure 3).
The pile adjustment wheel (18) has 4 brush height settings.Setting 1 is the lowest brush setting and setting 4 is the highest brush setting. When starting the
vacuum, always start with the knob set at 4, then lower knob settings until the
brush reaches the proper height. The red brush light on the display panel will
light after 6 seconds if the brush is too high. Adjust the knob down. If after 6
seconds, the brush light stays unlit, the brush is at the proper setting for the pile.
The red brush light will also illuminate if the setting is too low. Adjust the knob
up until the light stays unlit after 6 seconds.
The Adjustment Wheel - Figure 8
Red light (A): Off – Operation of machine is normal
Red light (A): Continuous – change bag or clear clog in the hose or
power head.
Red light (A): Flashing and motor off – dust bag is full, or clog in the hose
or power head due to ignoring the continuous red warning
light for full bag or clog (see above)
Red light (B): Off – Operation of brush is normal
Red light (B): Continuous while in position 1 on the pile adjustment knob
(18) – brush is worn - change brush roller
Red light (B): Continuous while in positions 1-4 – incorrect brush setting-
adjust the brush by turning the pile adjustment knob (18) to
a higher or lower position
Red light (B): Flashing and motor switched off – clogged brush
Red light (B): Flashing and motor switched off with no blockage – raise
brush to a higher position
For additional information on the display panel, see page 4
The Display Panel - Figure 7
Figure 4
Figure 5
Figure 6
Figure 7
Figure 8
45
41
1
11
15
12
6
18
Using the Attachment Tube,
Hose & Attachments -
Figures 4, 5 & 6
B
A
A – Bag full or clog indicator
B – Brush clog or incorrect pile
setting monitor
Page 8
Page 8
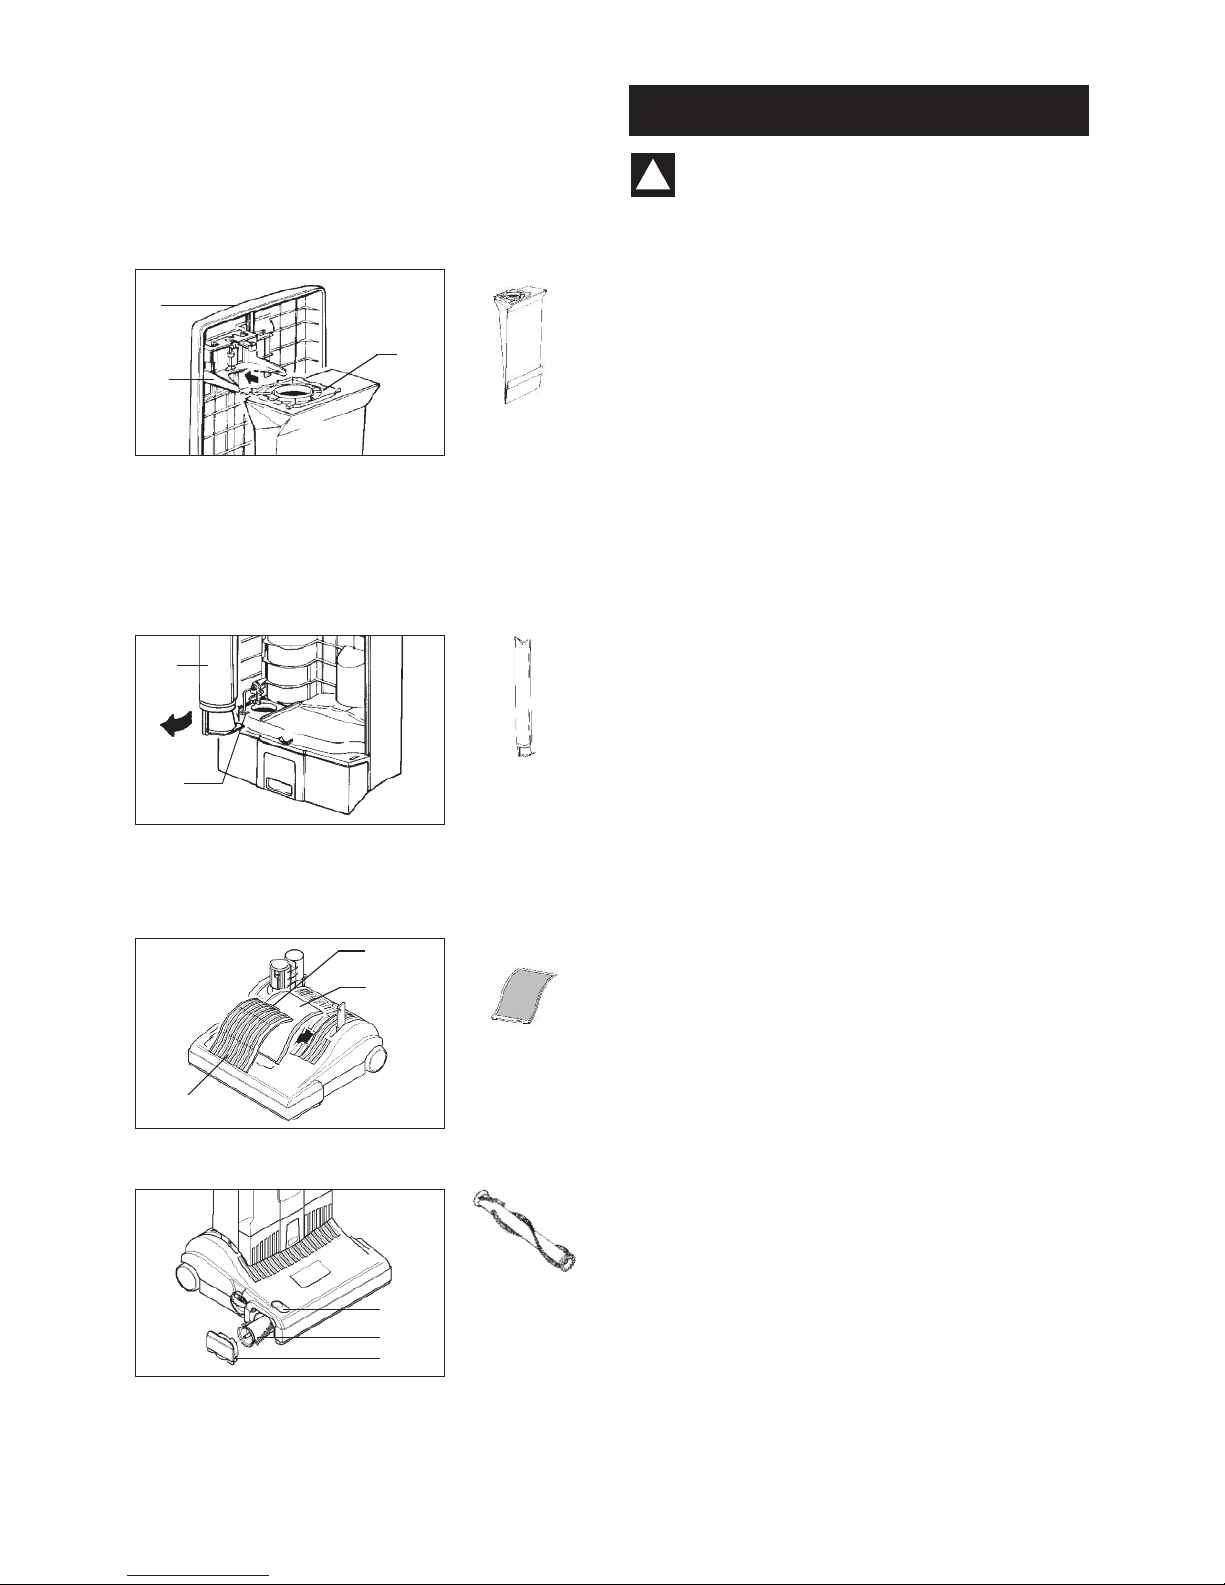
Changing the Micro-Hygiene Filter -
Figure 10
The micro-hygiene filter (31) needs to be changed when
it becomes extremely dirty or clogged with dust, or after
approximately 20 dust bags have been used. To change
the micro-hygiene filter, pull the cover release flap (#5 on
page 5) forward and lift the cover (7) from the dust bag
housing. Then, slide the filter out at the bottom. To
replace, lift the safety lever (32) and slide the new filter in
using the tracks as guides.
Changing the Brush Roller - Figure 12
To change the brush roller (37), push the button (36),
remove the side plate (38), turn the brush clockwise a
quarter of a turn, and pull the old brush roller out. Slide
the new brush roller into the brush housing and turn it
until it locks into position. While slightly pushing the button (36), press the side plate (38) back into the locked
position.
F
igure 9
Figure 10
Figure 11
Figure 12
Always unplug vacuum from outlet
before dismantling any part of the
machine!
!
Dust Bag
Part #5093 AM
Micro-Hygiene
Filter
Part #5036AM
Exhaust Filter
Part #2846
Brush Roller G1
Part #5010AM
Brush Roller G2
Part #2838AM
Changing the Exhaust Filter - Figure 11
After 20 bags have been used, change the exhaust filter
(33). Remove the dust bag housing (6) from the power
head by pressing the housing release button (8). To
remove the exhaust filter, push the catch (34) and remove
the filter cover (35) and exhaust filter. Insert the new filter,
replace the filter cover then insert the dust bag housing
back into the power head.
Maintenance
29
30
7
31
32
35
33
34
Changing the Dust Bag - Figure 9
To change the dust bag, pull the cover release flap forward
(#5 on page 5) and lift the cover (7) from the dust bag
housing. The cover release flap must remain in a for-
ward “pulled-out” position to change dust bags and
lock them into place. Squeeze the clamps on both sides
of the dust bag sealing plate (29), slide the plate from the
holder (30) and push the cap on to seal the bag. Slide the
sealing plate (29) of a new bag into the holder and push it
in firmly. Re-insert cover into dust bag housing, push it forward, then lock it in place by pushing down the cover
release flap. You may find it convenient to store the bag
cap inside the dust bag housing below the dust bag.
36
37
38
Page 9
Page 9
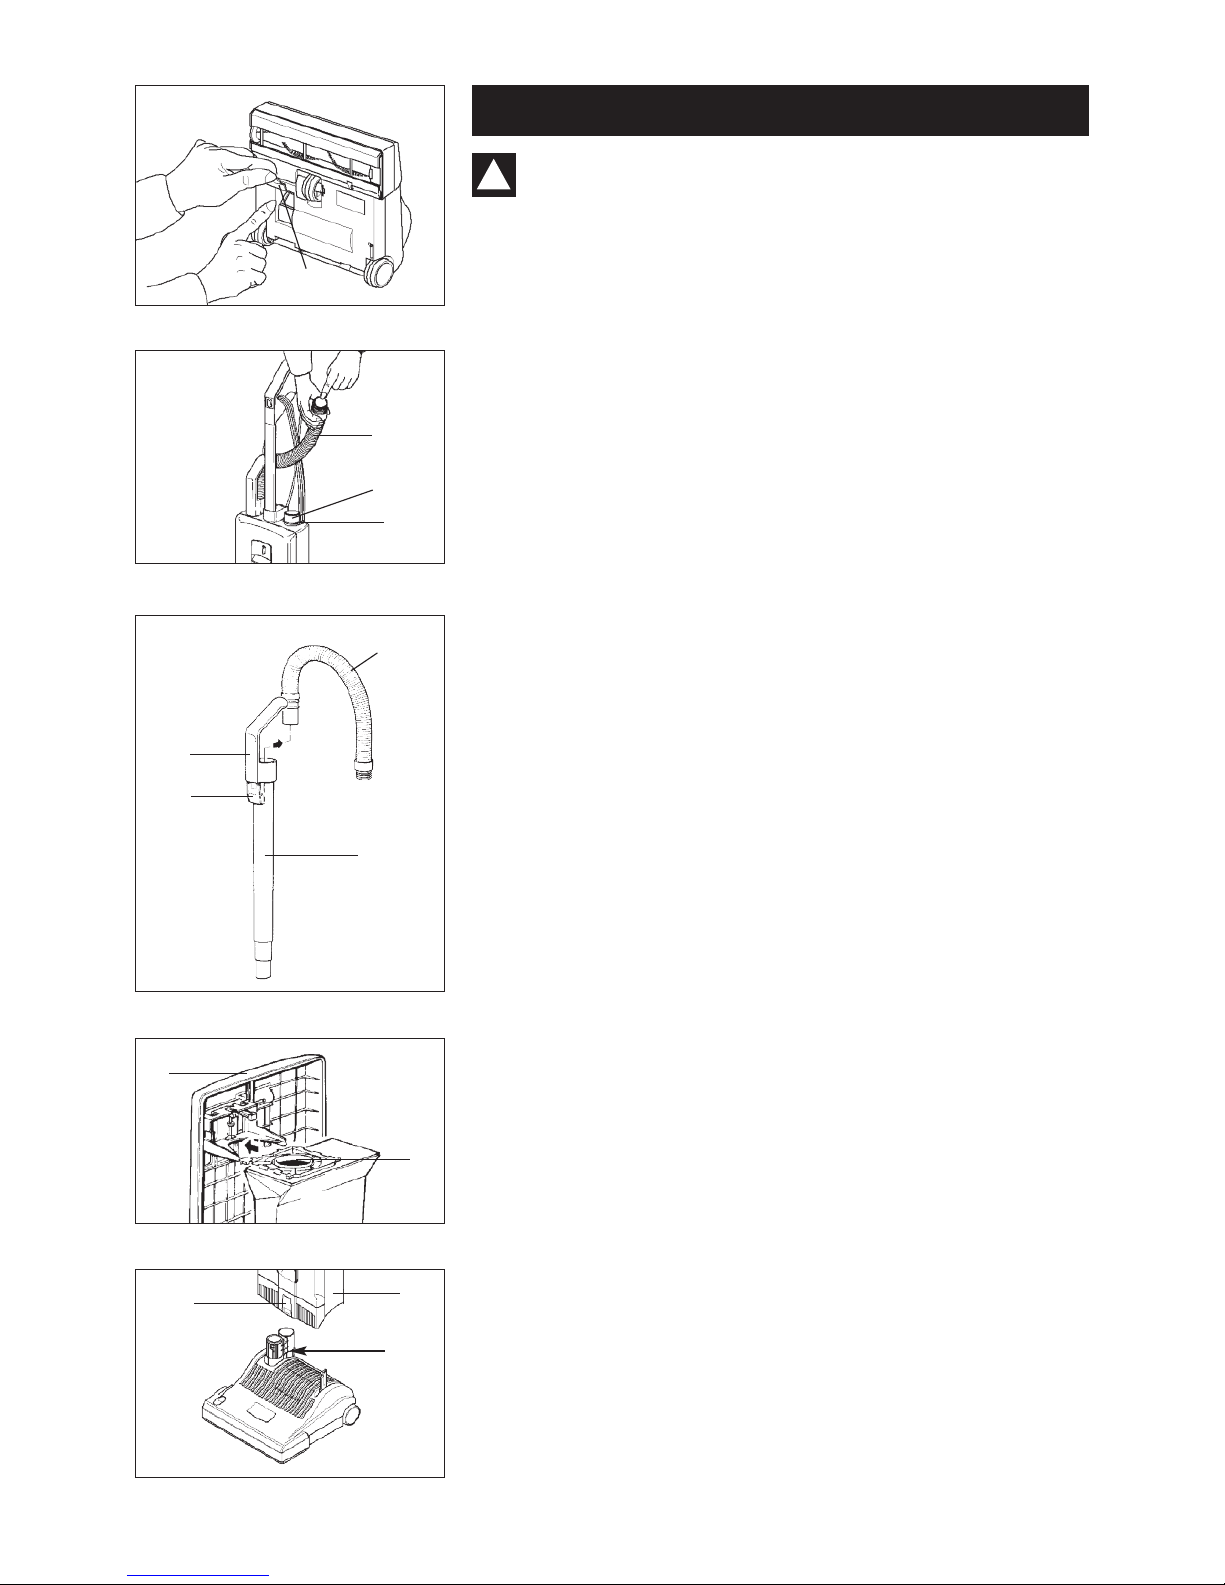
Clogs in the Attachment Hose - Figure 14
Blockages in the hose can be cleared by removing the attachment hose (12)
from the machine by squeezing the retaining ring (4) and inserting the opposite end of the hose in the connecting tube (24). Hold the hose upright with
one hand blocking the top end and switch on the machine. If necessary,
quickly lift your hand on and off the end of the hose. If this procedure does
not clear the clog, a straight wire can be inserted into the hose to push out
the clog. Take care not to puncture the hose with the wire.
Clogs in the Airflow Pathway - Figure 13
M
ost clogs can be removed by accessing the airflow pathway via the orange
colored access door (39) located on the underside of the power head.
However, other clogs may only be removed by accessing the airflow pathway
by disassembling the machine in the opposite sequence of the machine’s
original assembly (see assembly, page 5).
Figure 17
Figure 14
Figure 13
Clogs in the Attachment Tube (Active Wand) - Figure 15
Remove attachment hose (12) from the attachment tube (15) by pressing the
hose release button (27). Then, grip attachment tube handle (11) and remove
tube from the machine. A straight wire can be inserted into the tube to push
out the clog.
Always unplug vacuum from outlet before removing
any clogs!
!
Clogs in the Swivel Neck - Figure 17
Clogs in the swivel neck (20) can be removed by first pressing the housing
release button (8) and lifting off the dust bag housing (6). Lift upward firmly
and evenly to properly remove the dust bag housing. Then, release the foot
pedal (19), lower the swivel neck, check inside the swivel neck channel closest to the foot pedal (see arrow), and clean out pathway.
Clogs in Entrance to Dust Bag - Figure 16
Remove attachment hose (12) from vacuum cleaner (see figure 14) and remove
front cover (7). Clean out connecting tube (24) and/or entrance to bag (40).
Figure 16
Figure 15
Clog Removal
39
4
12
24
12
15
11
27
7
40
8
20
6
Page 10
Page 10
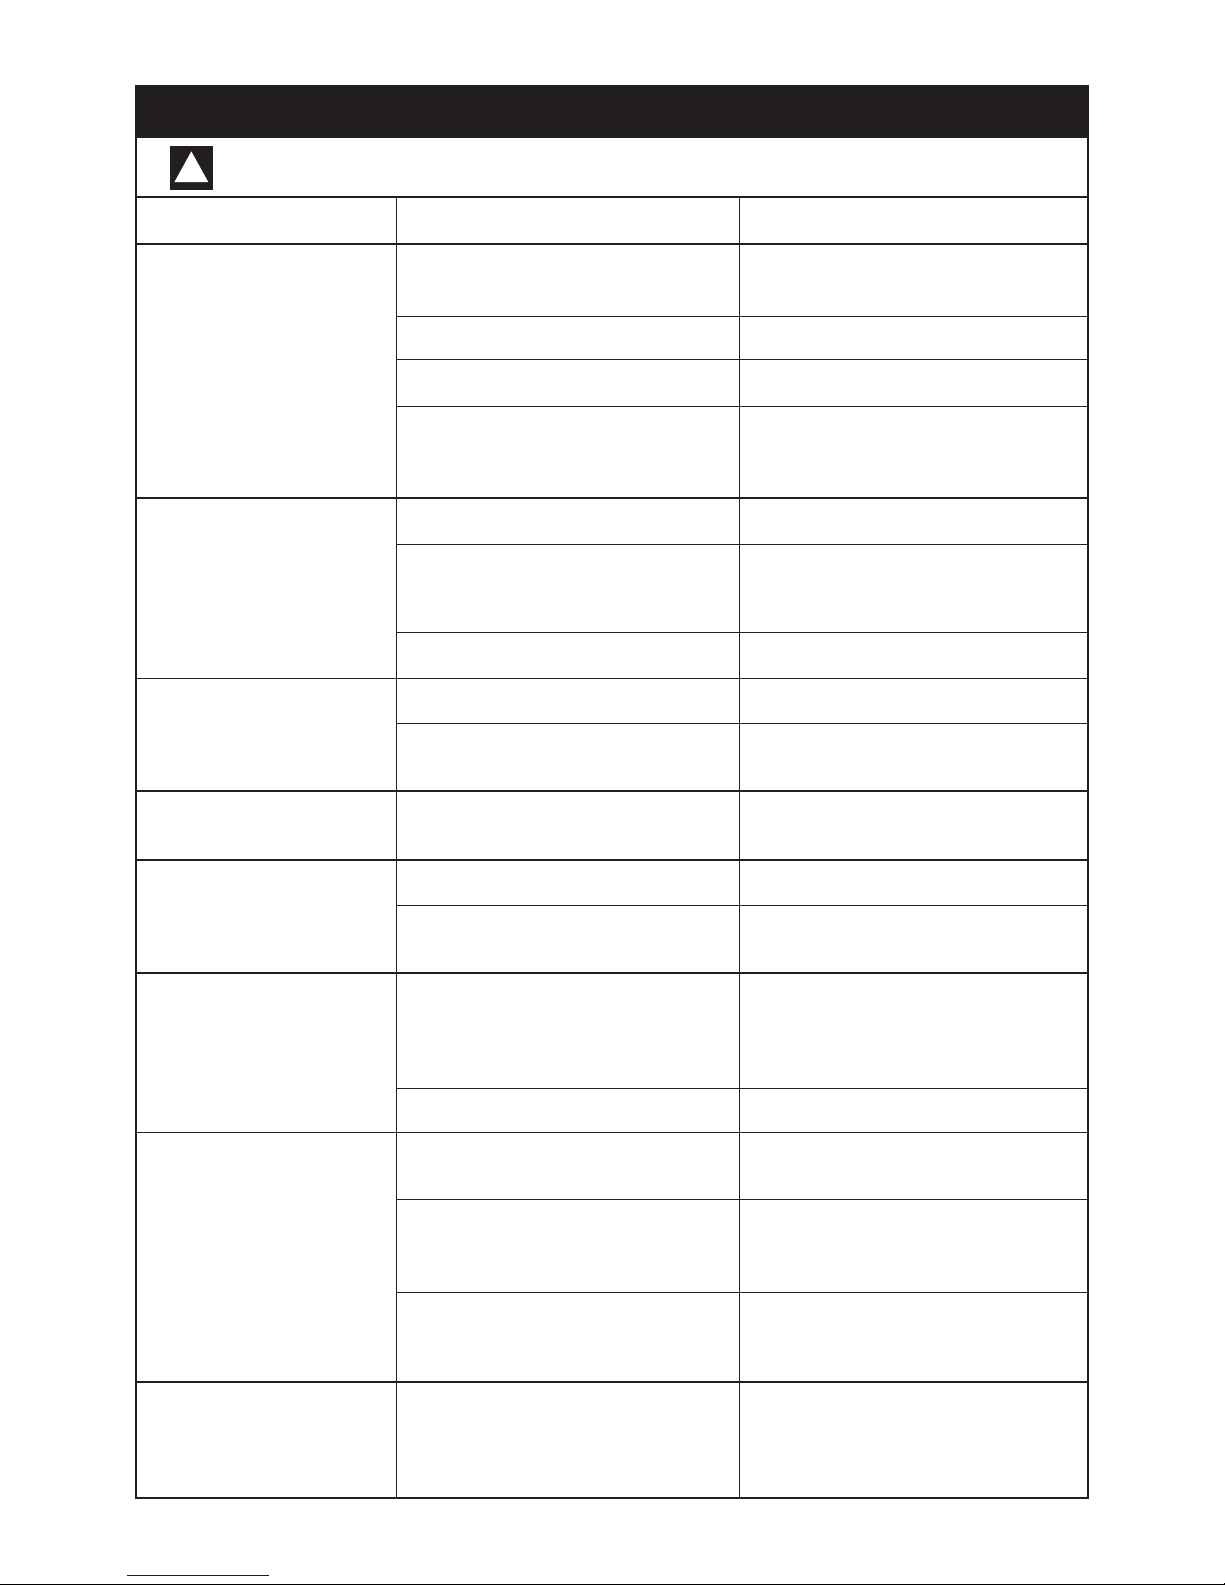
PROBLEM
Does not turn on
or machine shuts off
intermittently
Bag full or clog light on
or flashing &
machine shuts off
(red light A see page 7,
figure 7)
Brush light on
(red light B see page 7,
figure 7)
Brush light slowly
flashing (red light B)
Brush light flashing &
machine shuts off
(red light B)
Does not pick up
Front bag door won’t
fully close
Hose doesn’t retract
after attachment tube is
inserted
REASON
1. Handle not fully inserted into the bag
housing, causing a faulty connection.
2. Not plugged into good outlet.
3. Cable worn.
4. Dust bag housing (6) not seated
fully into proper “locked” position
on top of power head.
1. Bag full.
2. Clog in airflow pathway, attachment hose, attachment tube, swivel
neck or entrance to dust bag.
3. Microfilter dirty.
1. Brush worn.
2. Incorrect brush setting
1. Vacuum is stationary and in
upright locked position.
1. Brush jammed or clogged.
2. Brush is too low for the surface
being vacuumed.
1. Attachment tube not
correctly inserted.
2. Front cover not closed.
1. Cover release flap not fully closed.
2. Bag not inserted properly
3. Microfilter not properly inserted.
1. Attachment tube not properly
inserted.
S
OLUTION
1. Release handle catch, push handle
down, close handle catch.
2. Use another outlet.
3. Replace cable.
4. Housing release button (8) should
be snapped outward to its locked
position.
1. Replace bag. See #5 on page 4.
2. See Clog Removal on page 9.
Also, see #5 on page 4.
3. Replace microfilter.
1. Replace brush. See #3 on page 4.
2. Adjust the brush by turning the pile
adjustment knob up or down.
1. See #4 on page 4.
1. Clear jam. See #2 on page 4.
2. Raise the brush by turning the pile
adjustment knob up.
1. Reinsert attachment tube, making
sure lower end of tube is in the
lower hole and handle is properly
seated over the projection tab (23).
2. See below.
1. Reinsert bag. Lock the cover
release flap down firmly.
2. Reinsert bag with cover release
flap (5) up, until firmly latched in
bag holder (see pg. 8, figure 9).
3. Lift safety lever and insert filter with
vertical plastic ridge on filter facing
you (see pg. 8, figure 10).
1. Reinsert making sure top of handle
is pointing back and tube is fully
seated on the protruding tab (23)
on top of the dust bag housing.
Trouble-Shooting Guide
Always unplug vacuum from outlet before dismantling any part of the machine!
!
Page 11
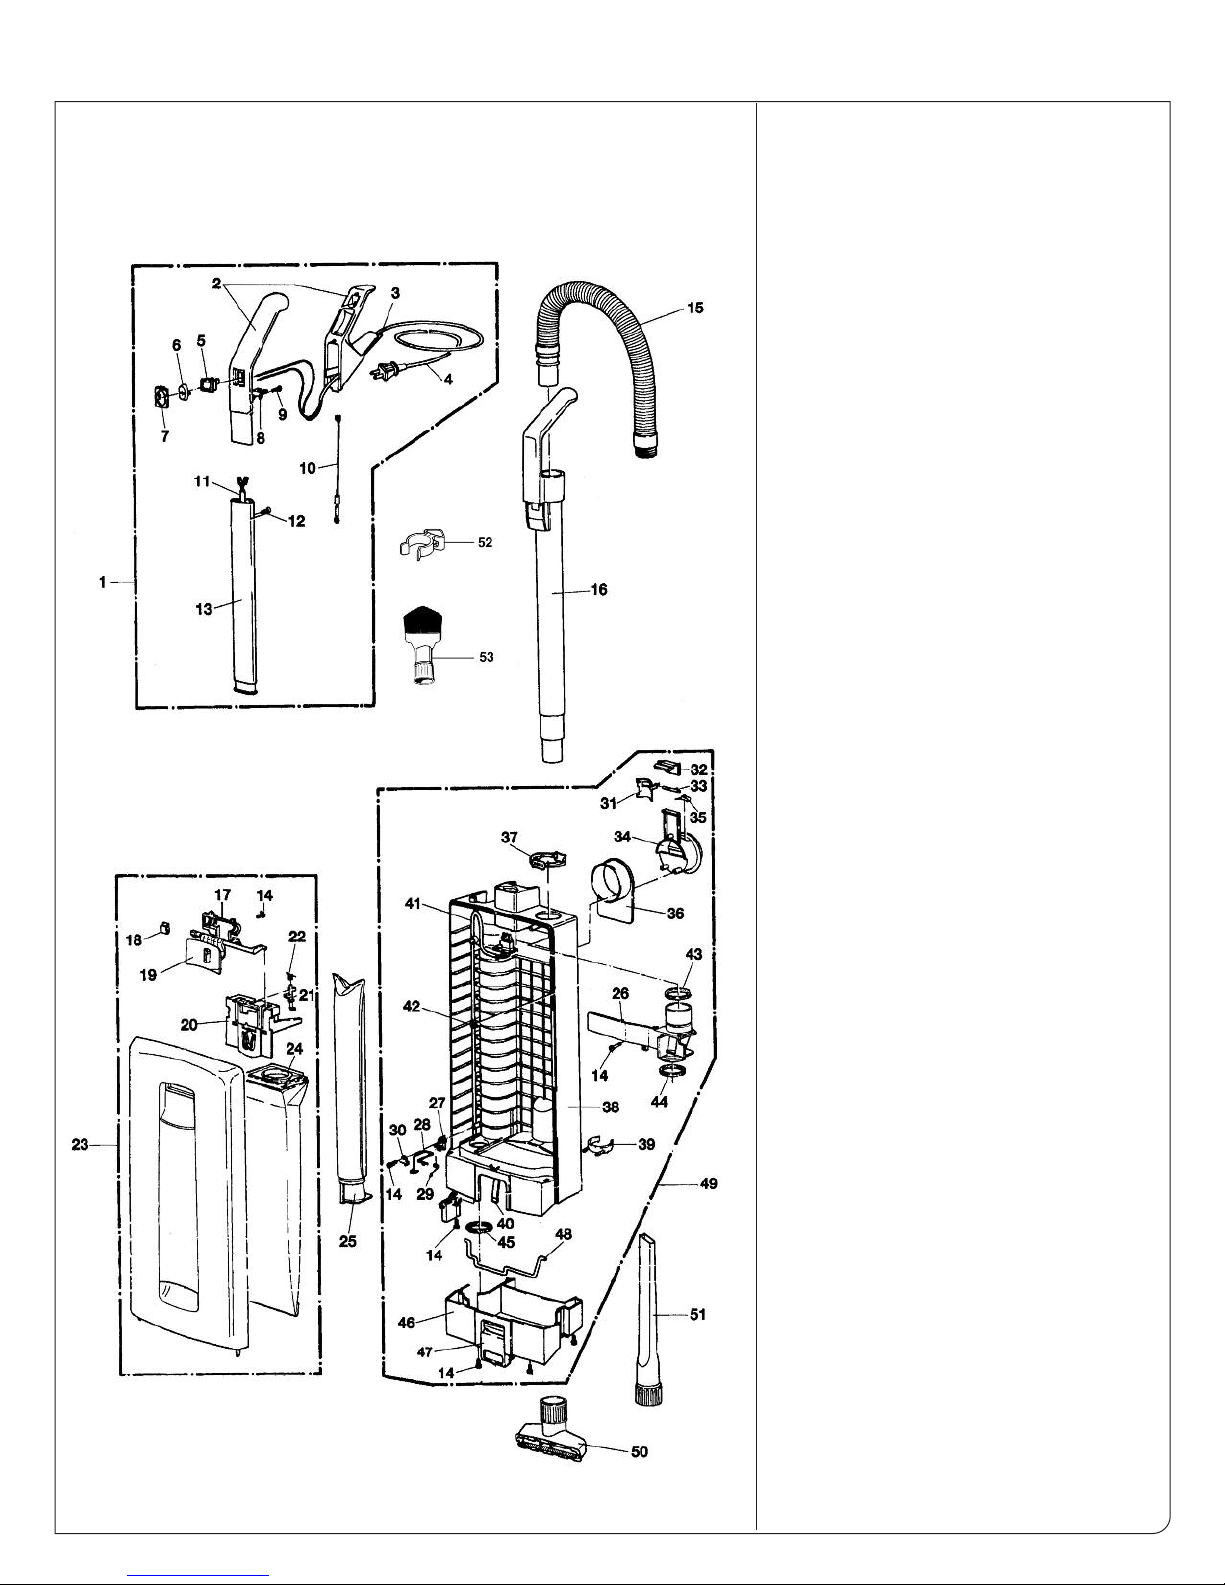
SEBO ESSENTIAL G1 / G2
#9591AT G1 - Teal/Light Gray
#9591AM G1 - Light Gray/Dark Gray
#9592AT G2 - Teal/Light Gray
#9592AM G2 - Light Gray/Dark Gray
Bag Housing with Handle
9591AT G1 and #9592AT G2 Teal/Light Gray Machines
#
os. Part # Description
P
1
11
12
13
1
1
16
17
18
19
2
21
22
2
2
2
26
27
28
29
30
31
32
33
34
35
36
37
38
39
40
41
42
43
44
45
46
47
48
49
50
51
52
53
1
2
3
4
5
6
7
8
9
0
4
5
0
3
4
5
5624 AT
5296 ES
5359 HG
450 DG
5
5113
0
160 TK
5
161 HG
5
5162
0103
5253 UL
298 ER
5
129
0
187
5
0102
5040 HG
5045 HG
5803 HG
319
5
706 TK
5
324
5
360
5
091
5
5805 TK
5093 AM
5036 AM
5380 HG
5164
5208
5210
1073
5099
5098 HG
0187
5145 HG
5146
5144 HG
5424 DG
5280 HG
1823 HG
5084
5299 ER
5266
5842
5289
5163
5085 HG
5082TK
5083
5214 AT
1491 JE
1092 JE
5460 DG
1329 DG
andle with cable,teal, complete
H
andle grip (incl. pos. 3, 7 & 10)
H
rommet
G
Power supply cord
Switch
Switch cap - teal
witch cap holder - light gray
S
able clamp
C
crew C 3.9 x 16
S
ntistatic-wire, cpl.
A
Handle cable
Screw, M4 x 12
Handle tube
crew F 3.9 x 13
S
ose, complete
H
xtension tube
E
Cover
Bag holder spring
Cover release - teal
Bag holder, complete
incl. pos. 21 & 22)
(
afety catch
S
afety catch spring
S
Front cover, complete - gray/teal
Filter bag
Micro hygiene filter
Internal cover, complete
incl. pos. 43 & 44)
(
Cable clamp
Filter safety catch
Return spring
Clamp
Handle lock plate
Lock catch
Lock pin 4 x 33.5
Carrying handle
Stop spring
Cable hook
Retaining ring
Dust bag housing
Attachment clip
Spring for locking rod
Internal cable
Cable clamp
Seal
Seal
Seal
Dust bag housing bumper base
Dust bag housing locking catch - teal
Locking rod
Dust bag housing - light gray/teal
Upholstery nozzle - light gray
Crevice nozzle - light gray
Mounting clip with screw - dark gray
Dusting brush
#9591AM G1
Light Gray/Dark Gray Machine Exceptions
1 5624 AM Handle with cable, complete
6 5160 DG Switch cap - dark gray
7 5161 DG Switch cap holder - dark gray
16 5045 DG Extension tube - dark gray
19 5706 DG Cover release - dark gray
23 5805 SE Front cover, cpl. - light gray/dark gray
47 5082 DG Lock button - dark gray
49 5214 HG Dust bag housing, complete - light gray
50 1491 DG Upholstery nozzle - dark gray
51 1092 DG Crevice nozzle - dark gray
1
Page 12
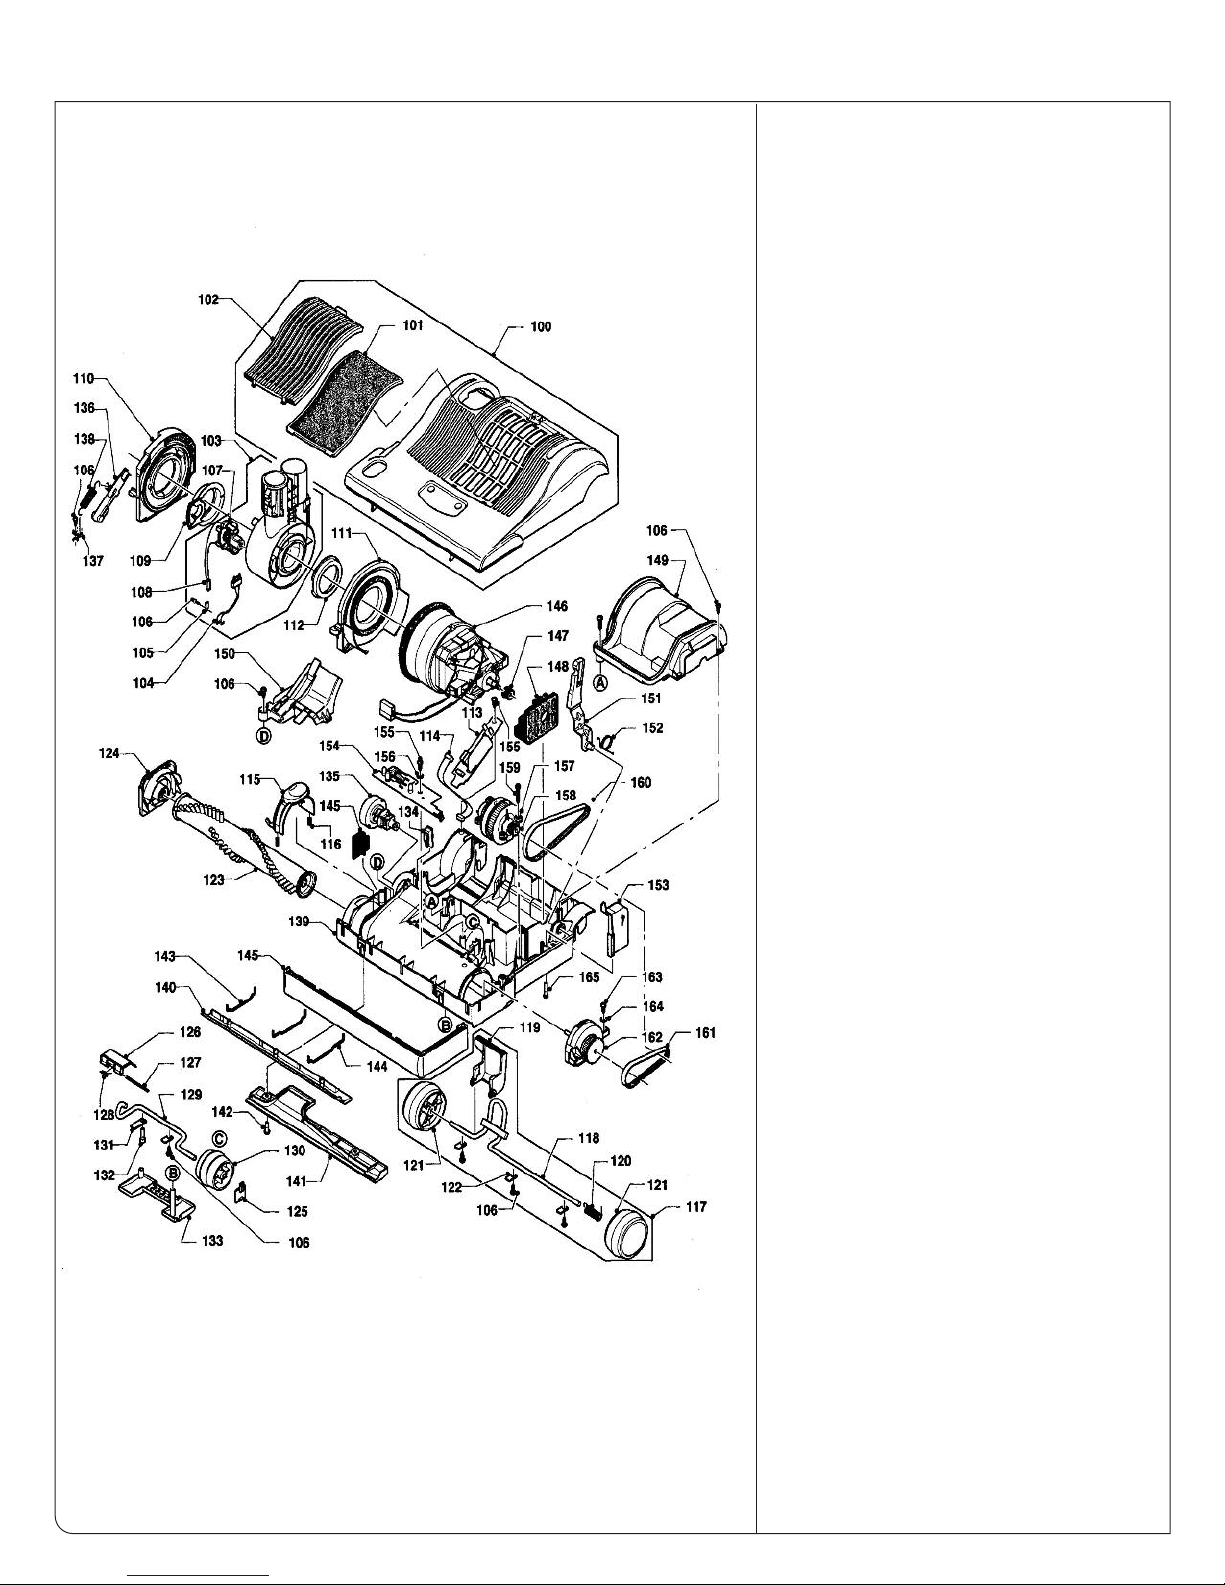
SEBO ESSENTIAL G1
Power Head
#9591AT G1 - Teal/Light Gray
#9591AM G1 - Light Gray/Dark Gray
9591AT G1 Teal/Light Gray Machine
os. Part # Description
P
00
1
1
102
1
104
1
106
1
1
109
1
111
1
113
114
1
116
1
118
119
1
121
1
123
124
1
126
127
1
129
1
131
132
133
134
135
136
137
138
139
140
141
142
143
144
145
146
147
148
149
150
151
152
153
154
155
156
157
158
159
160
161
162
163
164
165
831AT
2
01
2846
820TK
2
03
2823UL
883
2
05
494
2
0102
07
835
2
08
0869
825
2
10
2824
479
5
12
717
5
2890ER
864
0
15
5713TK
103
5
17
5051HG
5053
059OR
5
20
2010
819HG
5
22
2014
010AM
5
031TK
5
25
2869HG
2868OR
303
5
28
5304
861
2
30
5174HG
849
2
01010
2860HG
2833
2862HG
2834
2856
2867
2821HG
5411HG
2829HG
0197
5401
5402
5005HG
5468
05117S
5462
5100
2826TK
2839SW
5129
5107-1
5112SW
2881ER
0107
0143
5464
5117/1
0104
5463
5110
5766HG
0103
0140
0176TL
ower head cover, complete - teal
P
Exhaust filter
xhaust filter cover - teal
E
wivel neck assembly
S
Male contact holder
able clamp
C
Screw F 3.9 x 13
ypass valve
B
Internal cable
wivel neck bearing r.h.
S
wivel neck support r.h.
S
Swivel neck support l.h.
wivel neck bearing l.h.
S
PCB Power supply
nternal Cable
I
Brush roller release - teal
Spring
xle assembly
A
Axle
oot pedal - orange
F
Axle spring
heel, complete
W
Axle clamp
Brush roller
earing block, r.h. - teal/light gray
B
Rubbing plate
ccess door (incl. pos. 127 & 128)
A
Access door axle
ccess door spring
A
Pile adjustment axle
Pile adjustment wheel
xle clamp
A
Screw AM4 x 16
Cover
Thrust member
Pile adjustment knob
Thrust member
Clamp
Spring
Chassis, complete
Front bottom plate, complete
Rear bottom plate, complete
(incl. pos. 142)
Screw M4 x 12
Wire tie
Wire tie
Bumper, set
Motor 1300W / 120V
Carbon brush set
Vacuum motor pulley 2MR
Rubber mounting
Motor cover - teal
Cover for air channel
Support lever
Support spring
Motor pulley cover
Computer controller
Screw C 2.9 x 13
Washer 3.2 DIN 125
Sensor
Sensor pulley
Screw C 3.9 x 25
Belt 2MR-310-6
Belt 219 3M HTDII-6
Bearing block l.h., complete
Screw C 3.9 x 16
Washer 4.3
Screw AM4 x 30
#9591AM G1 Light Gray/Dark Gray Machine Exceptions
100 2831SE Power head cover, complete - light gray/dark gray
102 2820DG Exhaust filter cover - dark gray
115 5713DG Brush roller release - dark gray
124 5031DG Bearing Block, right hand - light gray/dark gray
149 2826 Motor cover
2
Page 13
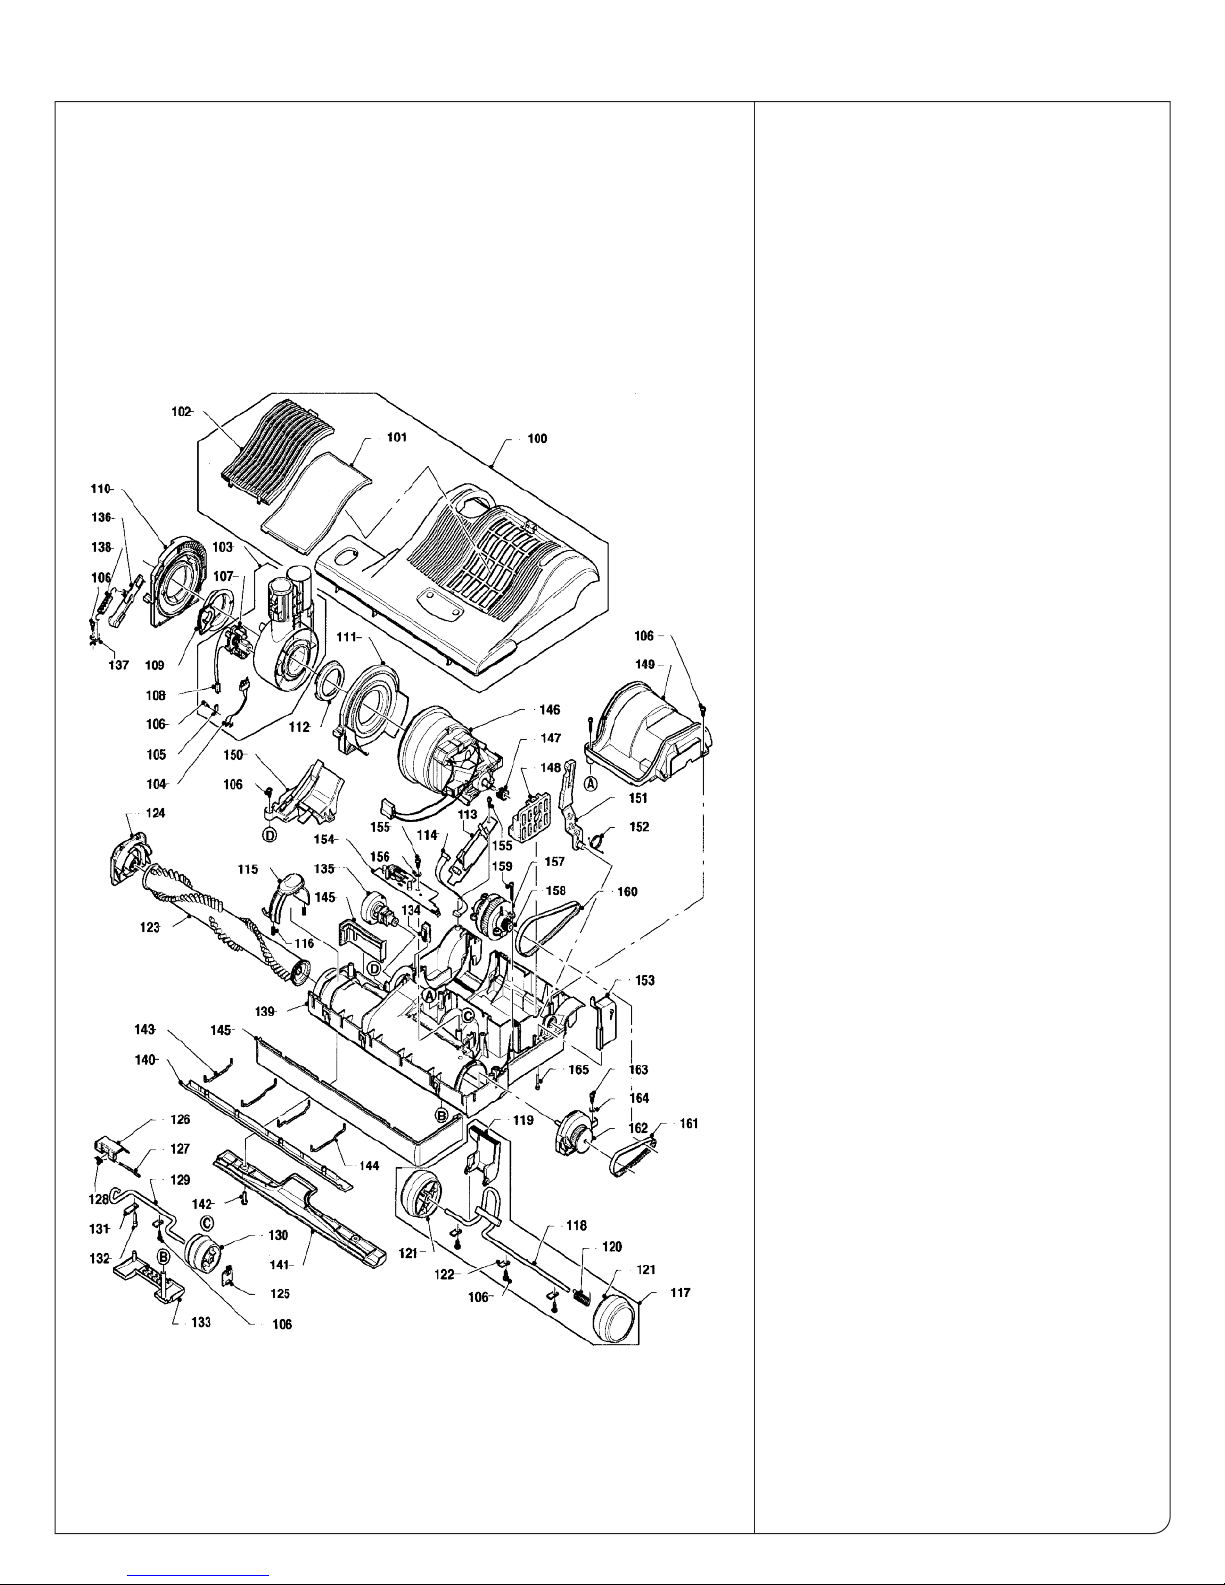
SEBO ESSENTIAL G2
#9592AT G2 - Teal/Light Gray
#9592AM G2 - Light Gray/Dark Gray
Power Head
9592AT G2 Teal/Light Gray Machine
#
os. Part # Description
P
00
1
101
1
1
104
1
106
1
108
1
1
111
1
113
1
115
116
1
118
1
120
1
122
123
1
125
1
127
1
129
130
131
132
133
134
135
136
137
138
139
140
141
142
143
144
145
146
147
148
149
150
151
152
153
154
155
156
157
158
159
160
161
162
163
164
165
2832AT
846
2
02
2820TK
03
823UL
2
2883
05
494
2
102
0
07
2835
869
0
09
2825
10
824
2
5479
12
5717
890ER
2
14
0864
843TK
2
5103
17
051HG
5
5053
19
5059OR
010
2
21
5819HG
014
2
2838AM
24
031TK
5
2869HG
26
2868OR
303
5
28
5304
861
2
5174HG
2849
01010
2860HG
2833
2862HG
2834
2856
2867
2822HG
2828HG
2830HG
0197
5401
5402
2842HG
5468
05117S
5462
5100
2826TK
2839SW
5129
5107-1
5112SW
2881ER
0107
0143
5465
5117/1
0104
5463
5110
5766HG
0103
0140
0176TL
Power head cover, complete - teal
E
E
Swivel neck assembly
M
Cable clamp
S
Bypass valve
nternal cable
I
S
Swivel neck support r.h.
S
Swivel neck bearing l.h.
P
Internal Cable
Brush roller release - teal
S
Axle assembly
Axle
F
Axle spring
W
Axle clamp
Brush roller
B
Rubbing plate
Access door (incl. pos. 127 & 128)
A
Access door spring
P
Pile adjustment wheel
Axle clamp
Screw AM4 x 16
Cover
Thrust member
Pile adjustment knob
Thrust member
Clamp
Spring
Chassis, complete, G2
Front bottom plate, complete
Rear bottom plate, complete
(incl. pos. 142)
Screw M4 x 12
Wire tie
Wire tie
Bumper, set
Motor 1300W / 120V
Carbon brush set
Vacuum motor pulley 2MR
Rubber mounting
Motor cover - teal
Cover for air channel
Support lever
Support spring
Motor pulley cover
Computer controller
Screw C 2.9 x 13
Washer 3.2 DIN 125
Sensor
Sensor pulley
Screw C 3.9 x 25
Belt 2MR-310-6
Belt 219 3M HTDII-6
Bearing block l.h., complete
Screw C 3.9 x 16
Washer 4.3
Screw AM4 x 30
xhaust filter
xhaust filter cover - teal
ale contact holder
crew F 3.9 x 13
wivel neck bearing r.h.
wivel neck support l.h.
CB Power supply
pring
oot pedal - orange
heel, complete
earing block r.h. - teal/light gray
ccess door axle
ile adjustment axle
3
Page 14
Page 13
SEBO VACUUM CLEANER WARRANTY
Five Years Non-Wear Parts - Five Years Motor - One Year Labor
1. Your authorized SEBO dealer or SEBO will provide the
original product purchaser with replacement of NonWear Parts which fail due to a material or workmanship defect for a period of five (5) years from the origi
nal date of purchase of new product. SEBO America
will provide a five (5) year warranty on suction motors
and brush drive motors.
2. Your authorized SEBO dealer or SEBO will repair (or will
cover labor charges associated with repair) a defective
SEBO vacuum cleaner at no cost to the original purchaser, within one (1) year of original purchase of new
product.
3. SEBO America or an authorized SEBO dealer must
complete all warranty repairs.
4. To locate an authorized SEBO dealer in your area, or to
register a warranty claim in the United States of
America, please visit our website at www.sebo.us.
5. To locate an authorized SEBO dealer in your area, or to
register a warranty claim in Canada, please call Floor
Care Equipment, Ltd. at (403) 250-5005.
6. The warranties provided for above apply exclusively to
SEBO Vacuum Cleaners which are used residentially.
No warranty is provided for SEBO vacuum cleaners
used commercially.
7. The Wear Parts excluded from warranty coverage
include filter bags, micro-hygiene filters, exhaust
filters, the cable (external cord), the attachment hose,
the brush rollers, the front bottom plate, the rear
bottom plate, the telescopic tube, the crevice nozzle,
the upholstery nozzle, the dusting brush and all of the
o
ptional attachments. (See “Optional Attachments” on
page 5 of this manual).
8. This warranty applies only while your SEBO Vacuum
Cleaner is physically located within the United States of
America and its territories or Canada.
9. The purchase receipt showing the date, price, and item
of purchase is the initial document of proof of purchase
and determines the validity of warranty. To be certain
that your warranty claim can be processed as quickly
and efficiently as possible, please retain your original
purchase receipt and mail in the warranty card provided
with your new SEBO vacuum cleaner. You may also register on our website at www.sebo.us.
10. This warranty gives you specific legal rights. You may
also have other legal rights, which vary from
state/province to state/province.
11. SEBO America will not process nor will it accept
responsibility for warranty claims for machines purchased from dealers located in Canada. Floor Care
Equipment, Ltd. will not process nor will it accept
responsibility for warranty claims for machines purchased from dealers located in the United States.
EXCLUSIVE REMEDY: The remedies provided under the terms of this Warranty are the purchaser’s exclusive remedies
and are in lieu of any other remedies otherwise available.
THE WARRANTY DOES NOT COVER:
• Used or secondhand products.
• Products outside of the warranty period.
• Items not manufactured by SEBO.
• Normal maintenance service.
• Equipment damaged by improper use, accident,
other casualty or negligence.
• Machines equipped with nonauthorized
attachments or modifications.
• Machines on which the serial number has been
altered or removed.
LIMITATIONS AND EXCLUSIONS:
SEBO MAKES NO OTHER REPRESENTATIONS OR WARRANTIES,
EXPRESSED OR IMPLIED AND SPECIFICALLY EXCLUDES THE
IMPLIED WARRANTIES OF MERCHANTABILITY AND FITNESS
FOR A PARTICULAR PURPOSE.
SEBO WILL NOT BE LIABLE FOR INCIDENTAL OR CONSEQUENTIAL DAMAGES OF ANY KIND OR NATURE.
THIS DISCLAIMER OF IMPLIED WARRANTIES SHALL NOT
APPLY TO THE EXTENT SAID DISCLAIMER IS NOT ALLOWED BY
APPLICABLE STATE/PROVINCIAL LAW.
To contact SEBO in the United States of America:
SEBO America, LLC
Telephone: (800) 334-6614 • (303) 792-9181
Fax: (303) 792-9196
Website: www.sebo.us
To contact SEBO in Canada:
Floor Care Equipment, Ltd.
Telephone: (800) 661-8687 • (403) 250-5005
Fax: (403) 250-5057
Website: www.sebocanada.ca
© Copyright SEBO America, LLC • All rights reserved.
 Loading...