

Page 1
Seben-Racing
Instructions for RC cars with nitro engine
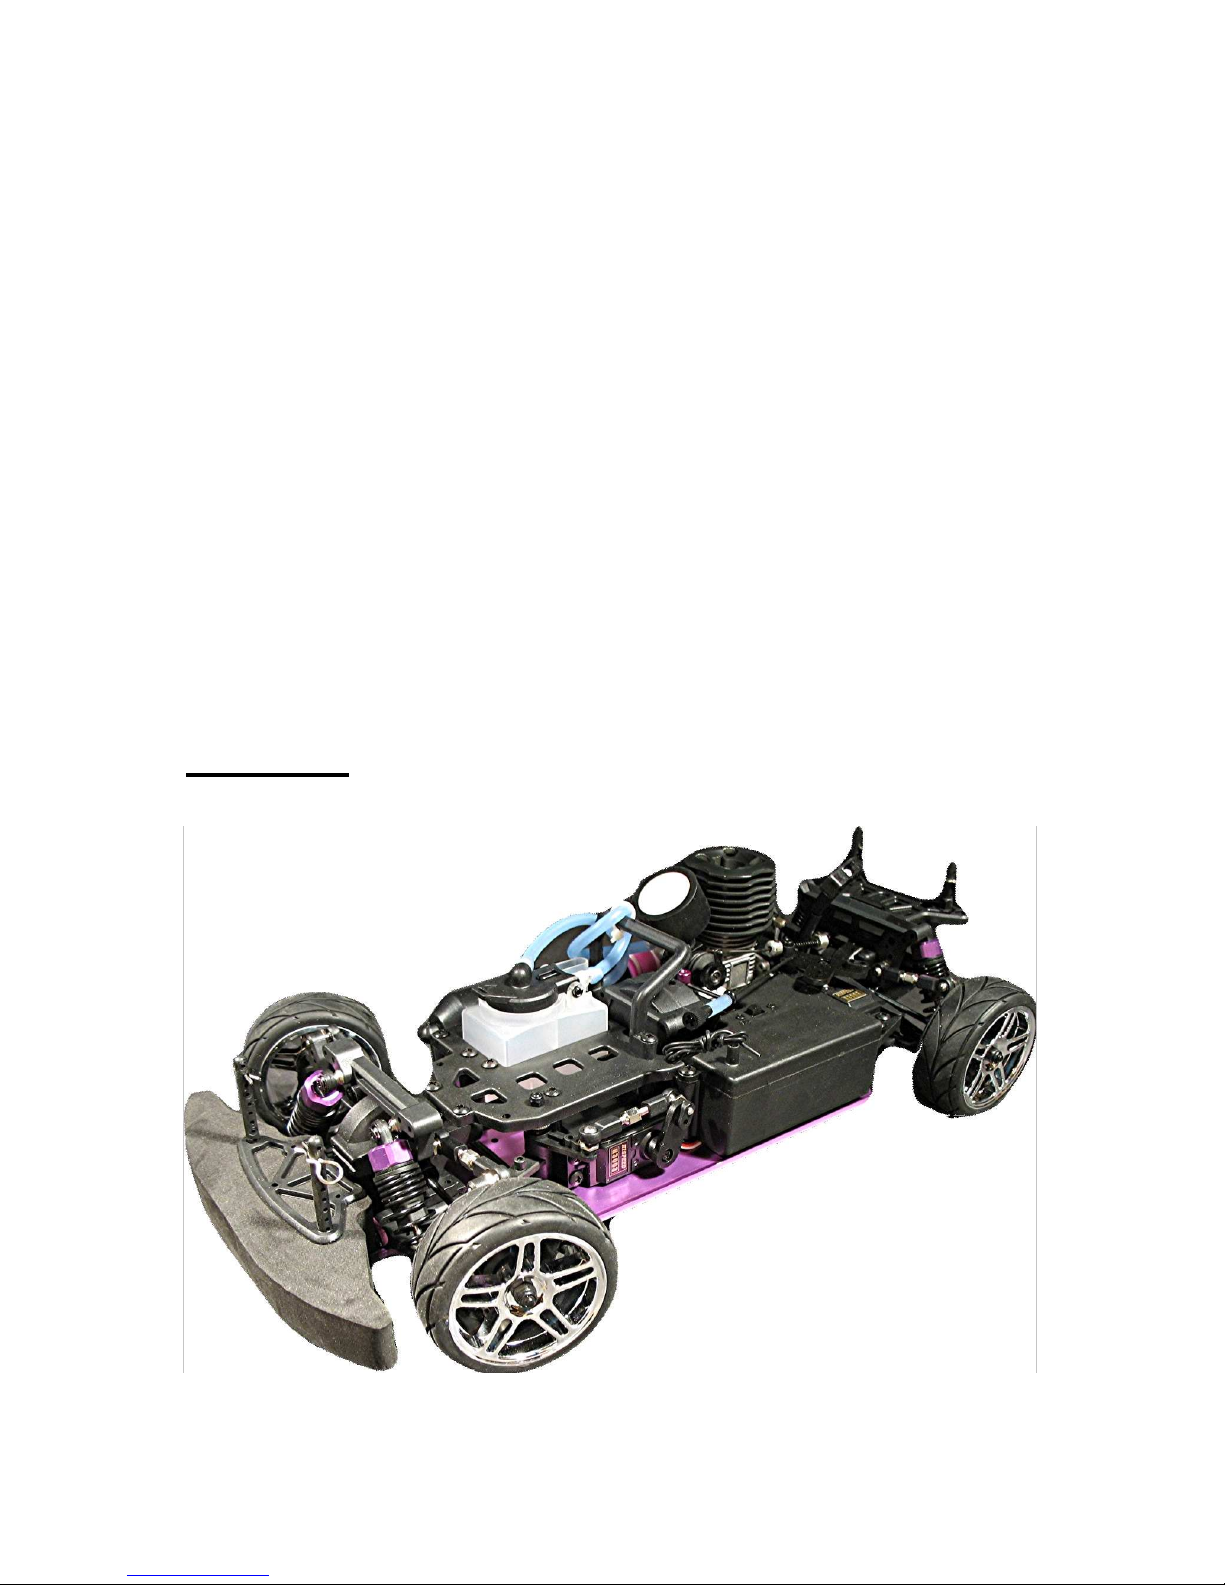
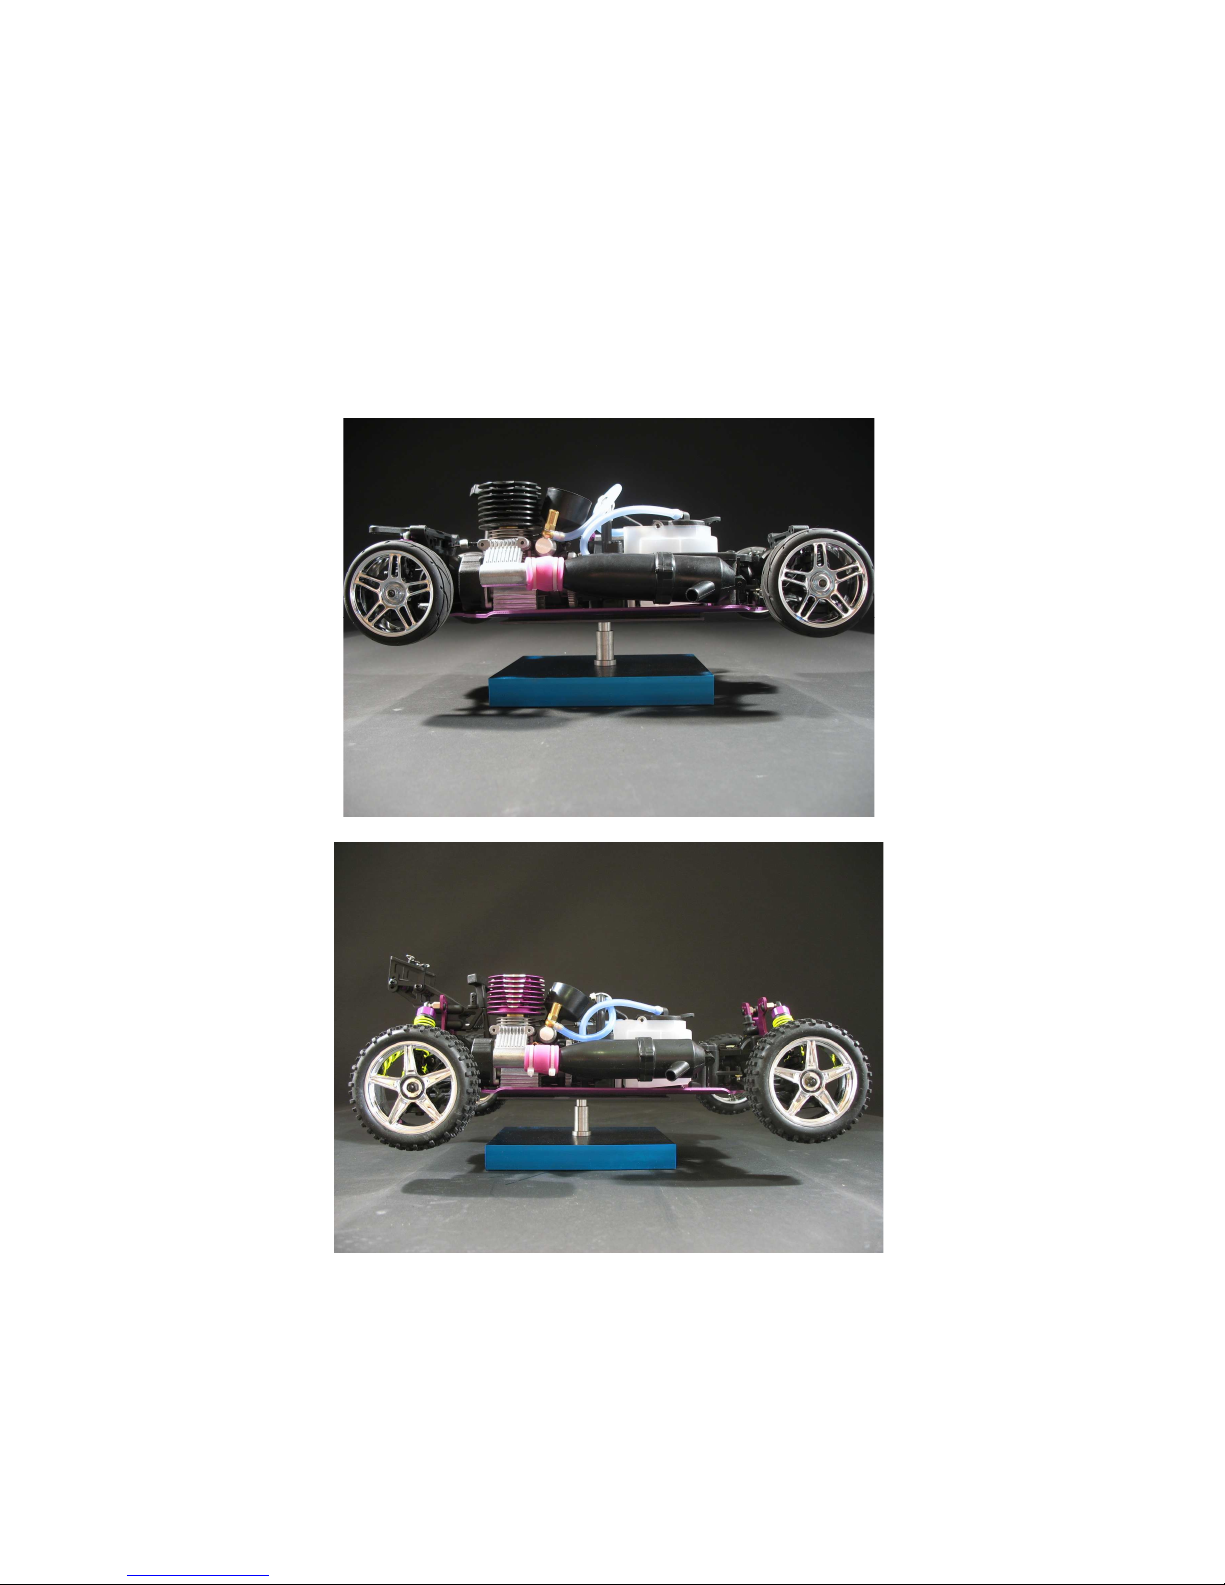
On-Road
Page 2
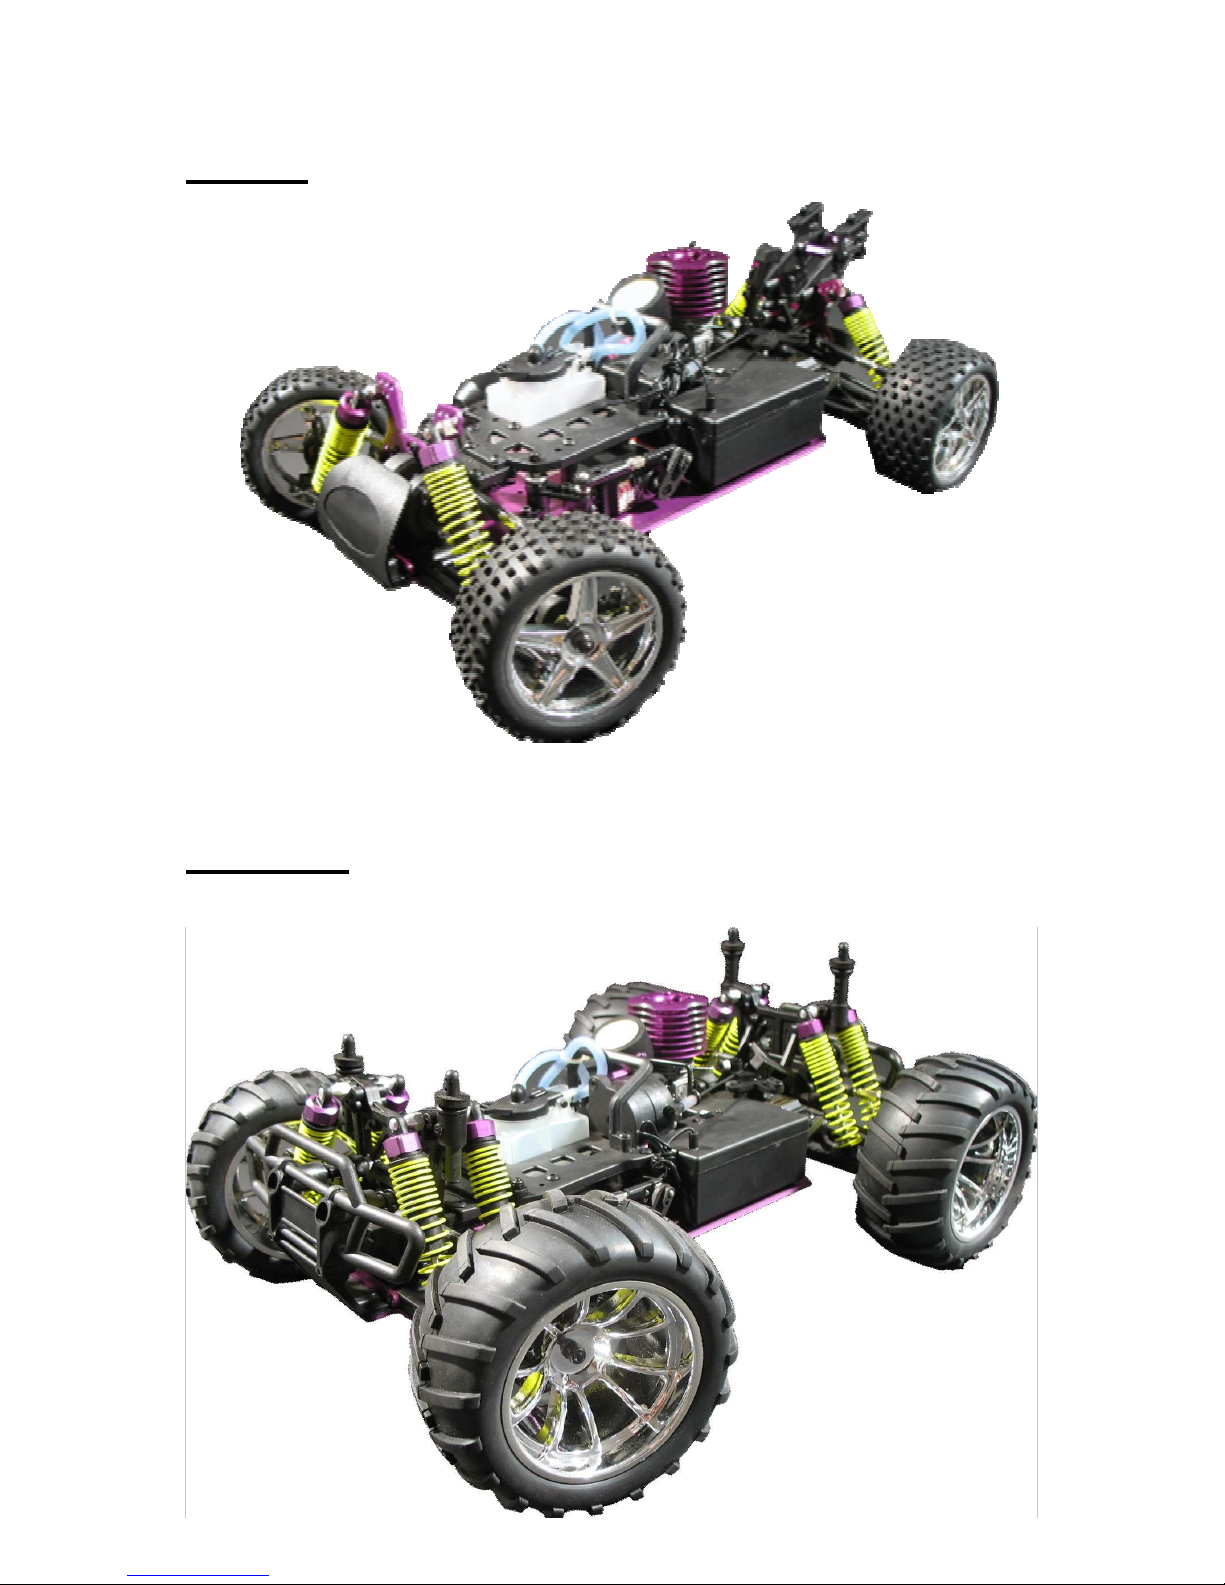
Buggy
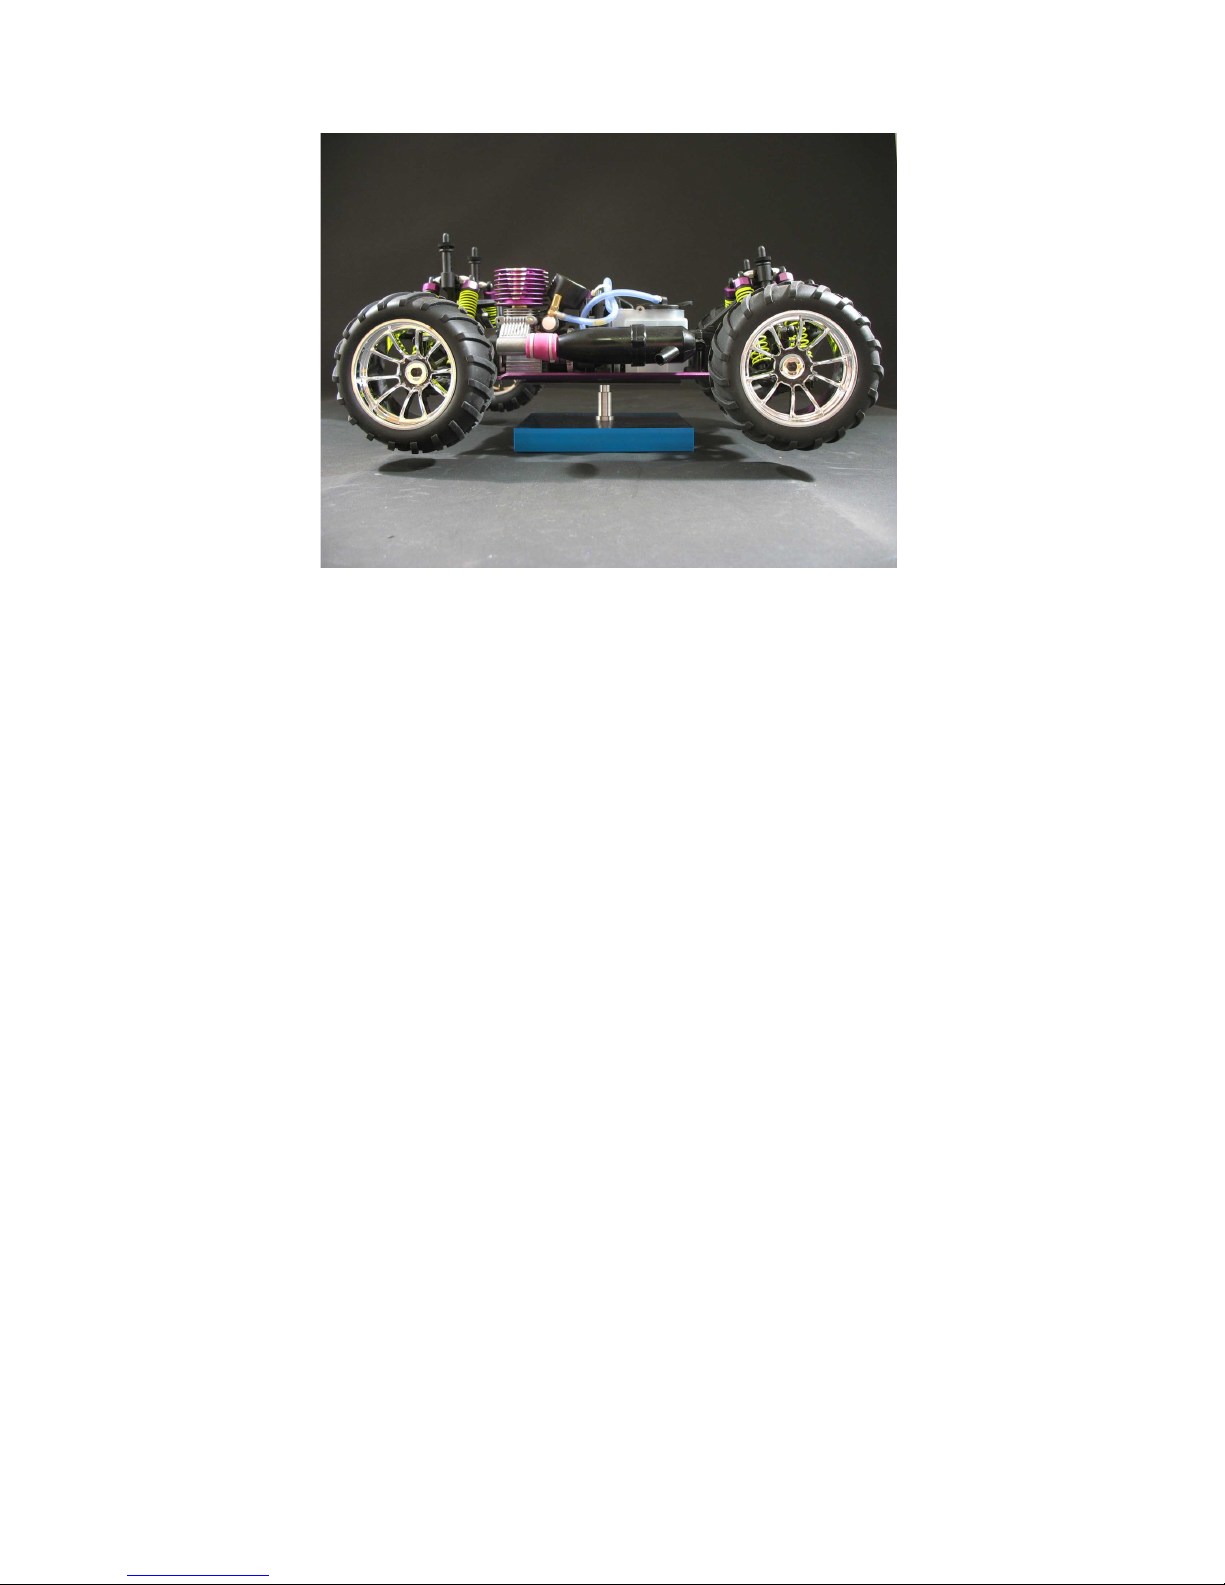
Monster
Page 3

Warnings
Choose an appropriate racing area:
Please be aware, that this RC car is not a toy. Please use it with the necessary care to prevent
personal injury and material damage. Special attention should be given to the speed of the RC
car, as it can run very fast, depending on the version you bought up to 60mph. Don’t use the
RC car on public roads/streets, in pedestrian areas or close to other people and animals. You
could cause an accident with damages to people and/or material. Don’t use the RC car near
tenements, retirement homes or hospitals, the noise could disturb the residents. Never use the
RC car inside at home, as you could damage your interior. Never use the RC car in closed
rooms, the fumes can cause severe irritations of the human respiratory tract. Recommendable
for the use of your RC car are specially marked racing areas of RC clubs, or other huge, free
areas on which the RC car can be used without allowance and without danger.
Check the RC car thoroughly, before running it:
Check in advance to each operation, if all screws are screwed in tightly. Pay special attention
to metal screws which screw into a metal thread, e.g. the engine mount. Our advice: Use thread
lock fluid for such screws to prevent an unintended loss of screws and parts during action.
Make sure that the batteries or rechargeable batteries of the remote control are full or fully
charged. Low batteries can be the cause of transmission failures between the remote control
and your RC car. In consequence you could loose control over your RC car. Check the functioning of the brakes and the throttle lever before you start the engine. Make sure that the air
filter is clean and greased. Never let your RC car run without air filter. If the engine is polluted
by dust and dirt, stop your RC car immediately and clean it. Otherwise such pollution can
cause severe material damage to your RC car. Before you turn on the remote control, assure
yourself that no other person nearby uses the same frequency as you do.
Take precautions handling the nitro fuel:
You mustn’t use normal car fuel for your RC car. There exists specially developed fuel for RC
cars, which must be used. You must use 16% nitromethane. The usage of wrong fuel can cause
explosions. You mustn’t smoke and must avoid open flames near the nitro fuel. Noncompliance can cause an unintended combustion. Store the nitro fuel cool and out of the reach
of children. Please be aware that some parts of the RC car, especially the engine and the exhaust become very hot during action (up to 170°C). Never touch these parts, before they were
given enough time to cool down.
Nitro fuel is highly combustible and toxic. Always pay attention to the warnings of the
manufacturer and to the security information on the labels of the packaging. RC engines
emit toxic fumes and gases, which can cause irritations of the eyes and the human respiratory tract. Always wear protective clothing like rubber gloves when handling nitro fuel.
Page 4

Introduction
The following pages contain all necessary information required to use the product in a safe way
and to ensure a long-lasting performance of your RC car. Please study these instructions with
great attention prior to first usage!
The owner of the RC model commits himself to take over responsibility for the safe usage of the vehicle in consideration of the warnings of these instructions.
Parents or supervisors are responsible to sufficiently instruct minors about the usage of
the vehicle and to supervise while the RC car is in use!
If problems should occur whilst using the RC car, it is the duty of the user to stop the
RC car immediately, to search for the failure and to repair it before continuing to run it
(as the damage might worsen like that).
Our RC car is a sophisticated model and should be handled with caution and respect!
Only recommended accessories and materials should be used. That includes batteries,
battery chargers, spare parts, tool, as well as other necessary materials. We clearly point
out, that only the explicitly recommended fuel (16% nitromethane) should be used. If
other fuel is used, all guarantee rights expire immediately.
If you use the car in bad weather conditions, make sure to maintain the car more frequently.
Seben-Racing or distributors of Seben-Racing are not responsible for any damage or
losses, which result directly or indirectly by the usage, inappropriate usage or abuse of
this product.
Page 5

Legal guarantee of 2 years
Seben-Racing stands up for the quality of their products; therefore they are tested thoroughly
during all single production sequences, in order to avoid faults during production. The same is
valid for the finished product which we have supplied you. All products go through a further
quality test before dispatch. At the same time Seben-Racing puts emphasise on highly educated
staff in order to ensure qualified responses to your questions at any time.
EU law sets a minimum legal guarantee of two years on all products that are bought in the EU.
That kind of protection applies in order to ensure that when you buy a product, it is a good buy.
Once you buy a product, you should not then find out that it cannot really be used for its intended purpose, either because it is of poor quality or poor performance. Nor should the product turn out not to be what it was made out to be when it was sold to you. Important is the condition of the product at the time of purchase / delivery. Upon delivery it must be free of any
faults. In cases where the problem is discovered within six months of purchase, the consumer’s
remedy is easier to obtain because one does not have to prove that the product was defective at
the time of purchase. In this case the product is presumed to have been defective when it was
bought and it would be up to the seller to prove the contrary. However, the legal guarantee
does not cover problems that are caused by mishandling, breakage or normal wear-and-tear of
the product that are basically your fault.
Faults/Damages which are not covered by guarantee:
Damages caused by mishandling, crashes or consequential damages of crashes
Normal wear-and-tear regarding:
• break discs
• brake shoes
• drive shaft
• cog wheels / gear wheels
• bearings
• straps, belts
• accumulator, batteries
• wheels
• normal wear-and-tear
Damages of electronic parts caused by intrusion of moisture
Fallen off components and consequential damages caused by screws which were not tight-
ened properly
Pull starter: Don’t pull out the cord more than 20cm (8”) to avoid damages
All parts of this vehicle can be purchased from us for replacement purposes, either separate or
in small assortments. The availability of all spare parts and the ability to repair all parts of the
RC car ensures you to have fun and joy with it for a long time. If your RC car needs a repair,
which is absolutely common in this hobby, we can offer you the following: All parts can be
replaced in order to guarantee you a long-term usage and enjoyment of your hobby. RC cars
from Seben-Racing aren’t any toys which have to be thrown away after first usage.
You want to self-repair your RC car? Seben-Racing offers all spare parts for very good prices!
Please simply place an order on our customer-friendly website www.seben-racing.com
.
You want to let it repair by us? Please contact us and we will try to give you an estimate prior
to return shipment.
Page 6

How can I make a guarantee claim?
If your RC car shows a defect or fault upon delivery, which was not caused by mishandling,
breakage whilst racing or normal wear-and-tear, first of all please send us an email and describe us the problem. Please do not return us the product without having talked to us. If we
request specific parts or the complete car to be returned, please enclose a copy of the invoice
and a problem description to the parcel. This will help us to treat your return quickly and it
helps avoiding delays.
If the fault can be corrected by replacing single parts of the RC car in self-repair, we count on
your cooperation and will simply send you the necessary replacement parts. In most cases this
is the fastest and most convenient solution for both parties.
Please note: If returned items are to be found not faulty at all, or if the fault is not covered by
guarantee, we have to charge a handling fee for our service plus the return shipping costs to
you. All repairs necessary because of mishandling, breakage or normal wear-and-tear are at the
costs of the owner.
Page 7
Instructions
Necessary accessories
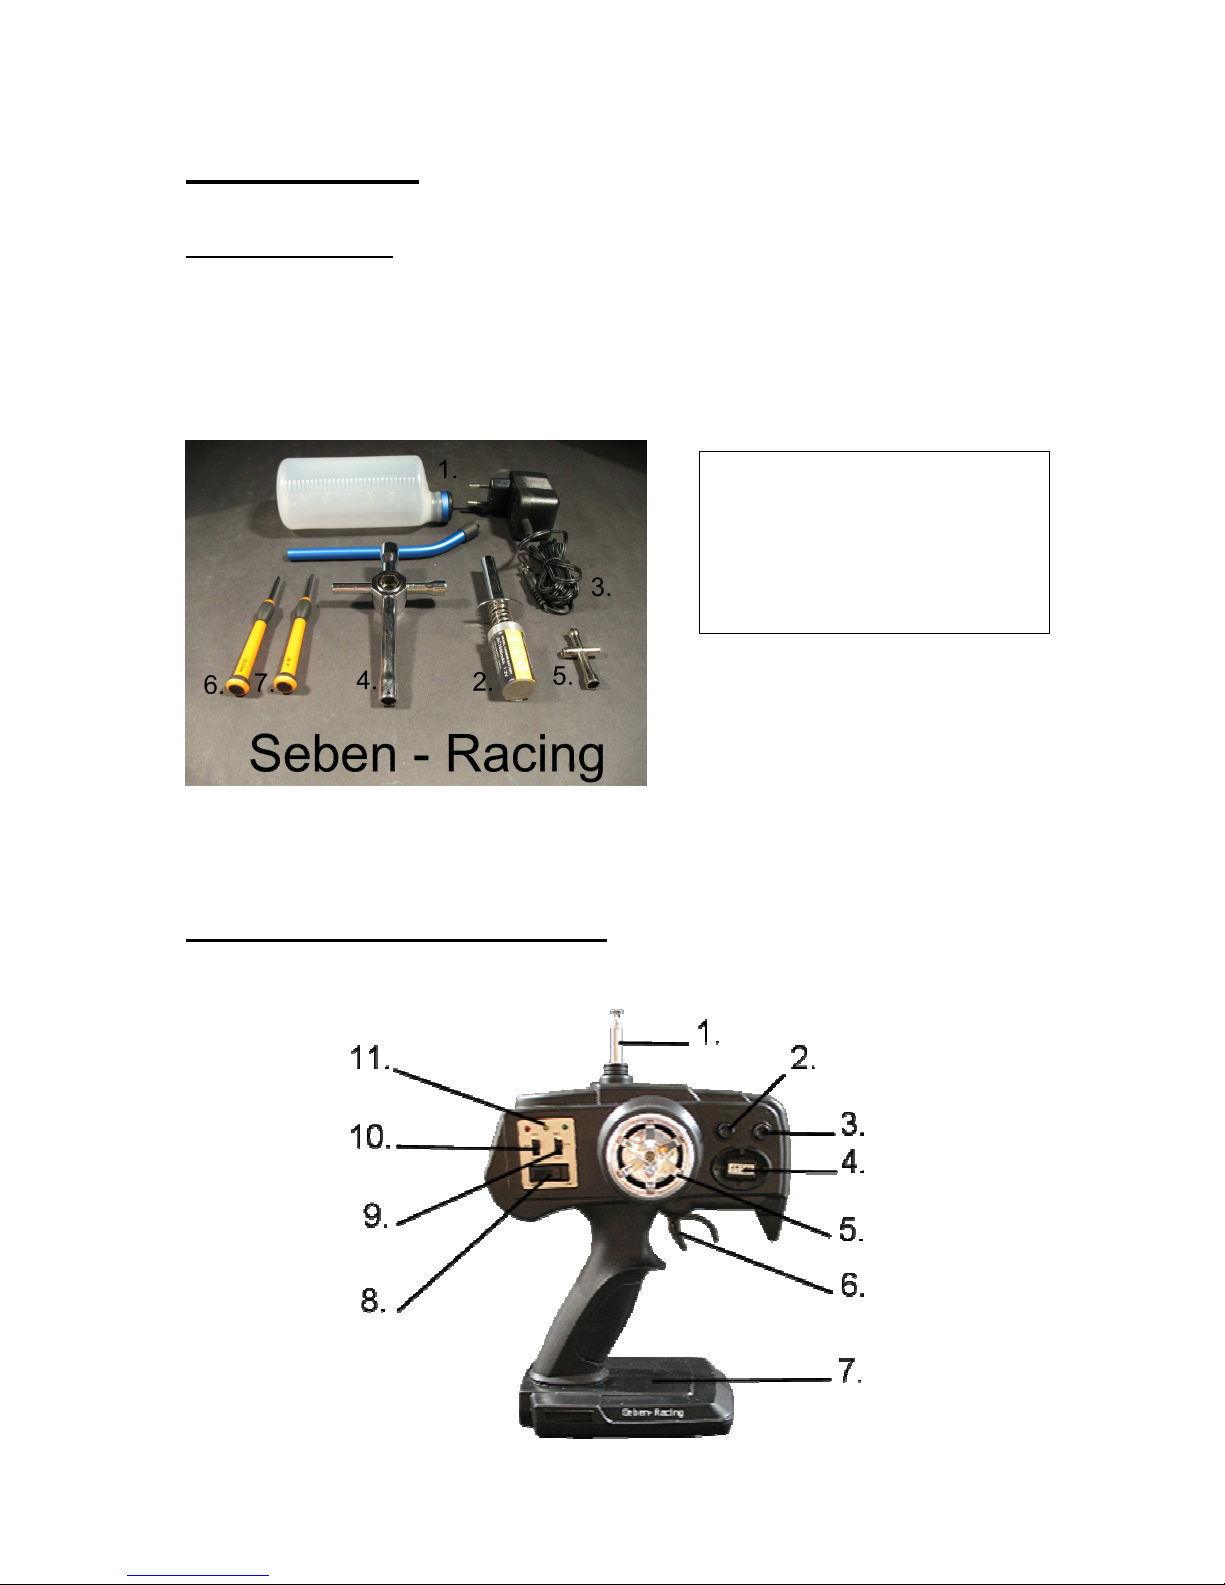
You need the following accessories to take your car into action: a fuel bottle incl. filler, a
glow plug igniter, a charger for the glow plug igniter, a glow plug spanner, a cross wrench, a
slot-head screwdriver and a cross-head screwdriver. Furthermore you need 12 AA Mignon
accumulators or batteries; 8 of them for the remote control and 4 of them for the battery box
of the car.
Pay attention to the correct nitro engine fuel: Only 16% nitromethane fuel must be!
Settings and functions of the remote control
1. fuel bottle
2. glow plug igniter
3. charger
4. glow plug spanner
5. cross wrench
6. slot-head screwdriver
7. cross-head screwdriver
Page 8
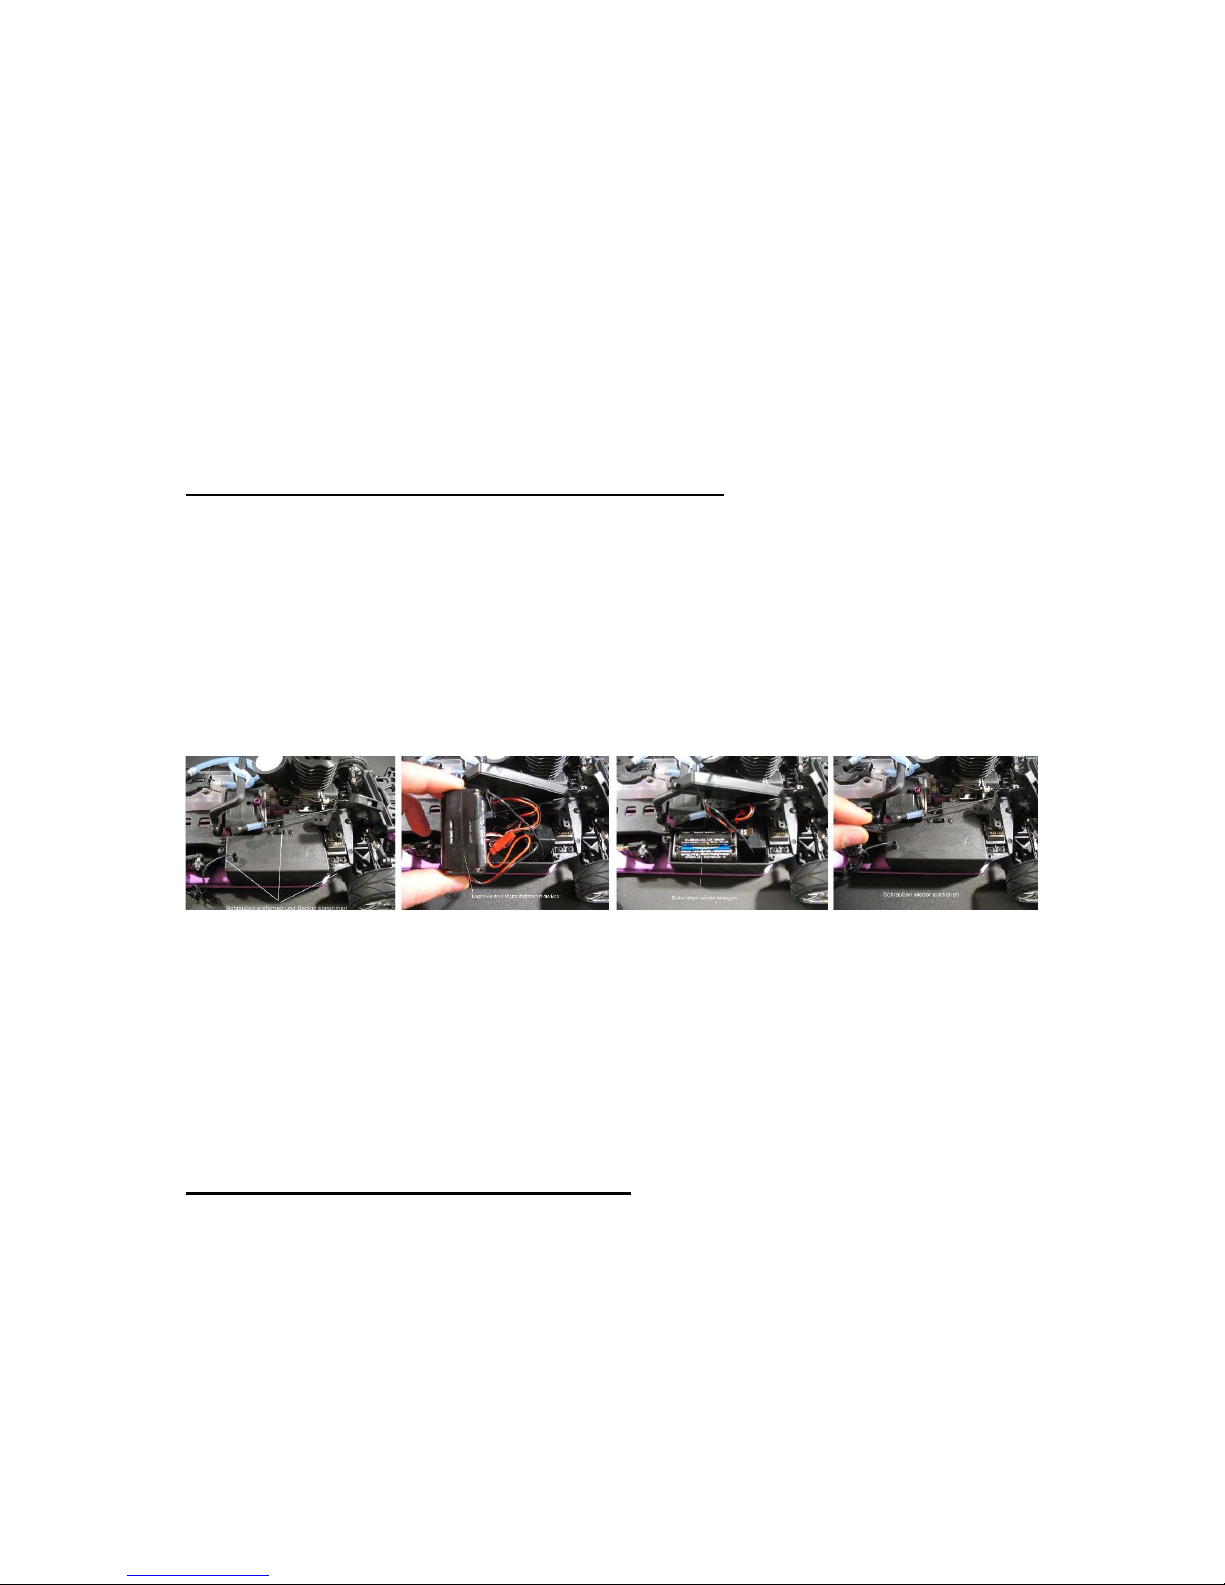
1. Antenna
2. Throttle control
3. Steering control
4. Quarz crystal (it determines the frequency)
5. Steering wheel
6. Throttel lever
7. Battery compartment for 8 AA Mignon batteries
8. On/Off switch
9. Throttle TH: reverse direction switch for throttle control servo
10. Steering ST: reverse direction switch for steering servo
11. Battery capacity display: If all three diodes shine, the batteries are fully charged; if
only the red diode shines, the batteries are empty
Insertion of the batteries / accumulators for the receiver
Please loosen the three screws of the battery compartment with the cross-head screwdriver
and remove the cover. Then take out the internal battery box and deposit four Mignon AA
batteries in it according to the markings. Please only insert fully charged accumulators or
batteries, to ensure a reliable performance of the remote control and to avoid transmission
failures. Afterwards restore the battery box and close the battery compartment with the cover.
Watch out that no cable runs accidentally between compartment and cover, if it gets stuck, it
might break. If you can rule this out, you can fix the cover at its place by screwing in tight
the three screws.
The battery compartment is not waterproof; therefore defects of electronic parts caused by humidity or moisture are not covered by guarantee! The receiver, which is also integrated in the
battery compartment, can be damaged by moisture as well. Please take the necessary precautions to prevent these parts from becoming wet, otherwise you might loose control over the RC
car and unintended consequential damages might be the result. Such are not covered by guarantee. Please also pay attention that no water intrudes the engine through the air filter, as this
could damage the engine from the inside. Water, especially salt water, furthermore causes corrosion.
Important tests prior to running your RC car:
Always turn on the remote control (transmitter) first, then the receiver on the RC car! When
finished running your RC car, always turn off the receiver first, then the remote control!
Never turn on your RC car without the remote control being turned on first and vice versa
when turning them off! This sequence will keep your RC car from running amok. Please proceed as described: turn on the remote control and then turn on the receiver on the RC car.
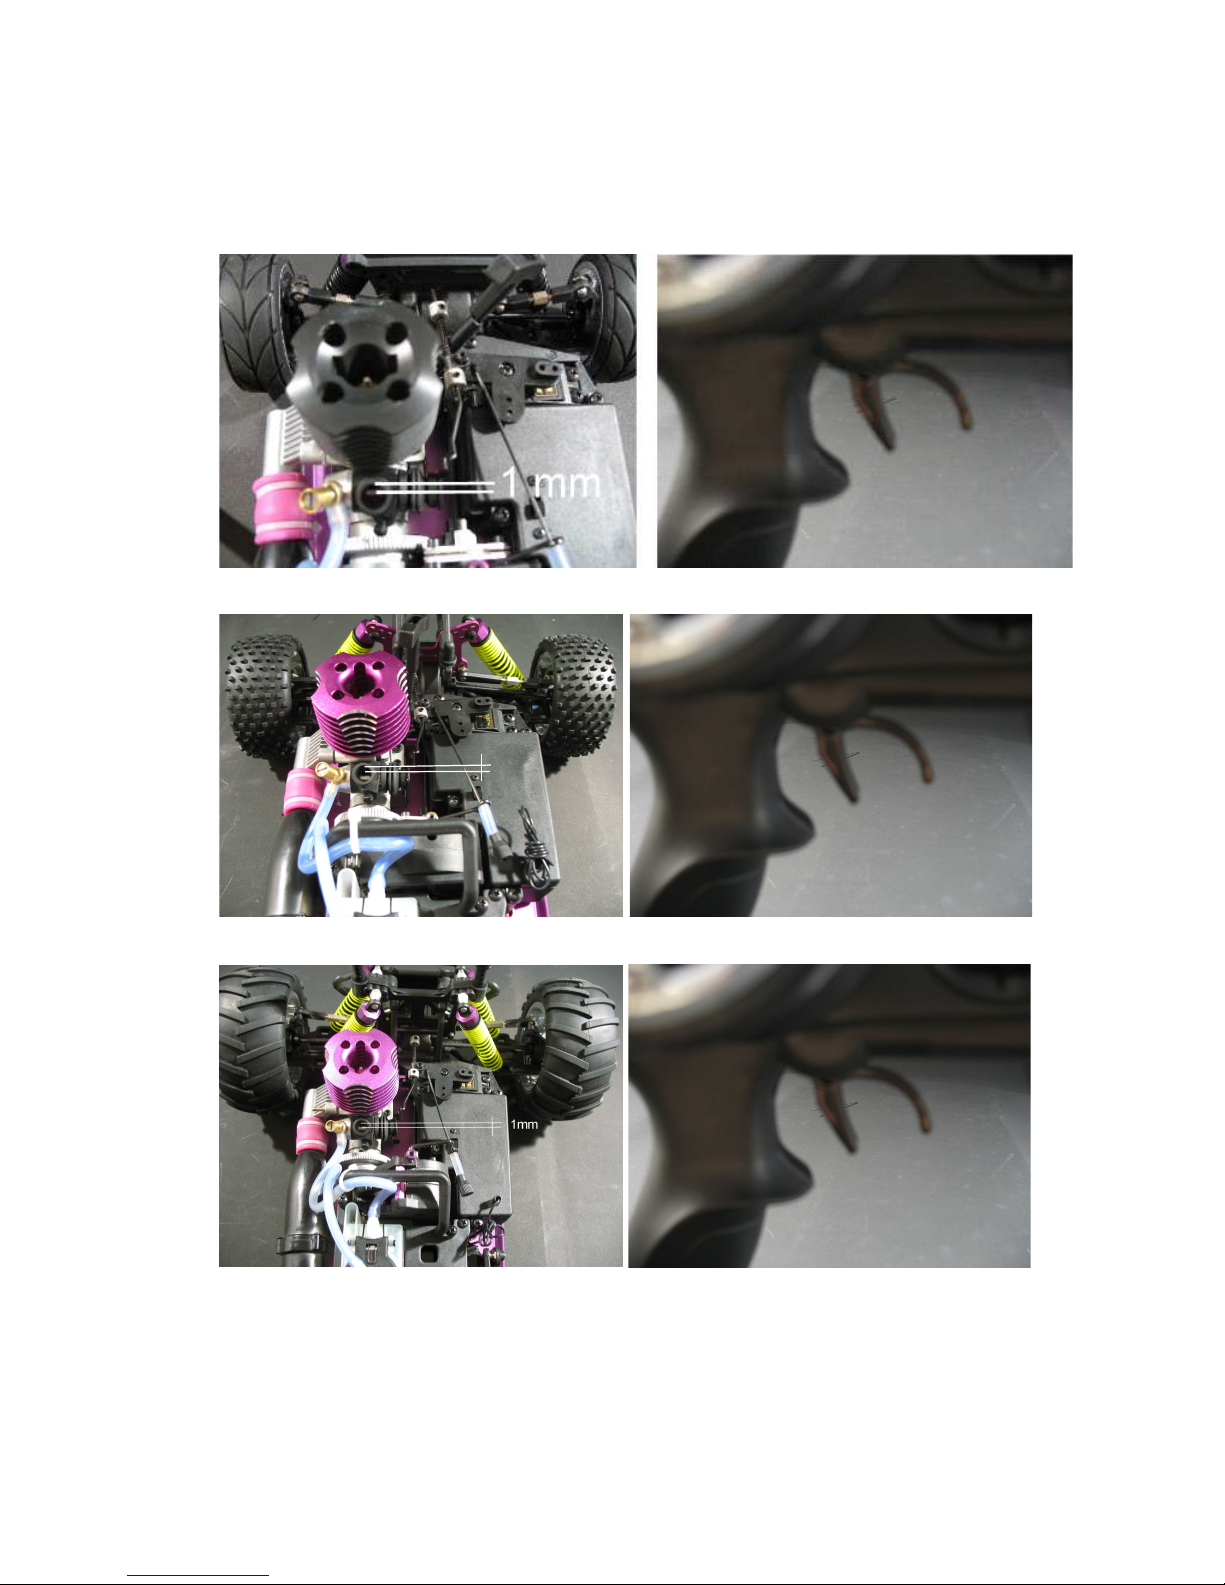
1. Remove the air filter from the carburetor. The remote control remains in a neutral po-
sition doing so, as shown in the right picture below. You can now look into the carburetor and see the carburetor valve which regulates the air/fuel mixture. It should have
an aperture of 1mm (see picture below on the left). Should this aperture be larger or
smaller than 1mm, it has to be reset, either with the throttle control of the remote control, or by the idle adjustment screw on the carburetor (see chapter carburetor settings).
Page 9
.
On-Road:
Buggy:
1 mm
Monster:
2. The brake linkage on the servo should be set to a neutral position; you should be able to move
the car back and forth easily. If this is not possible, you have to loosen the screw on the backend of the brake linkage until you can do so.
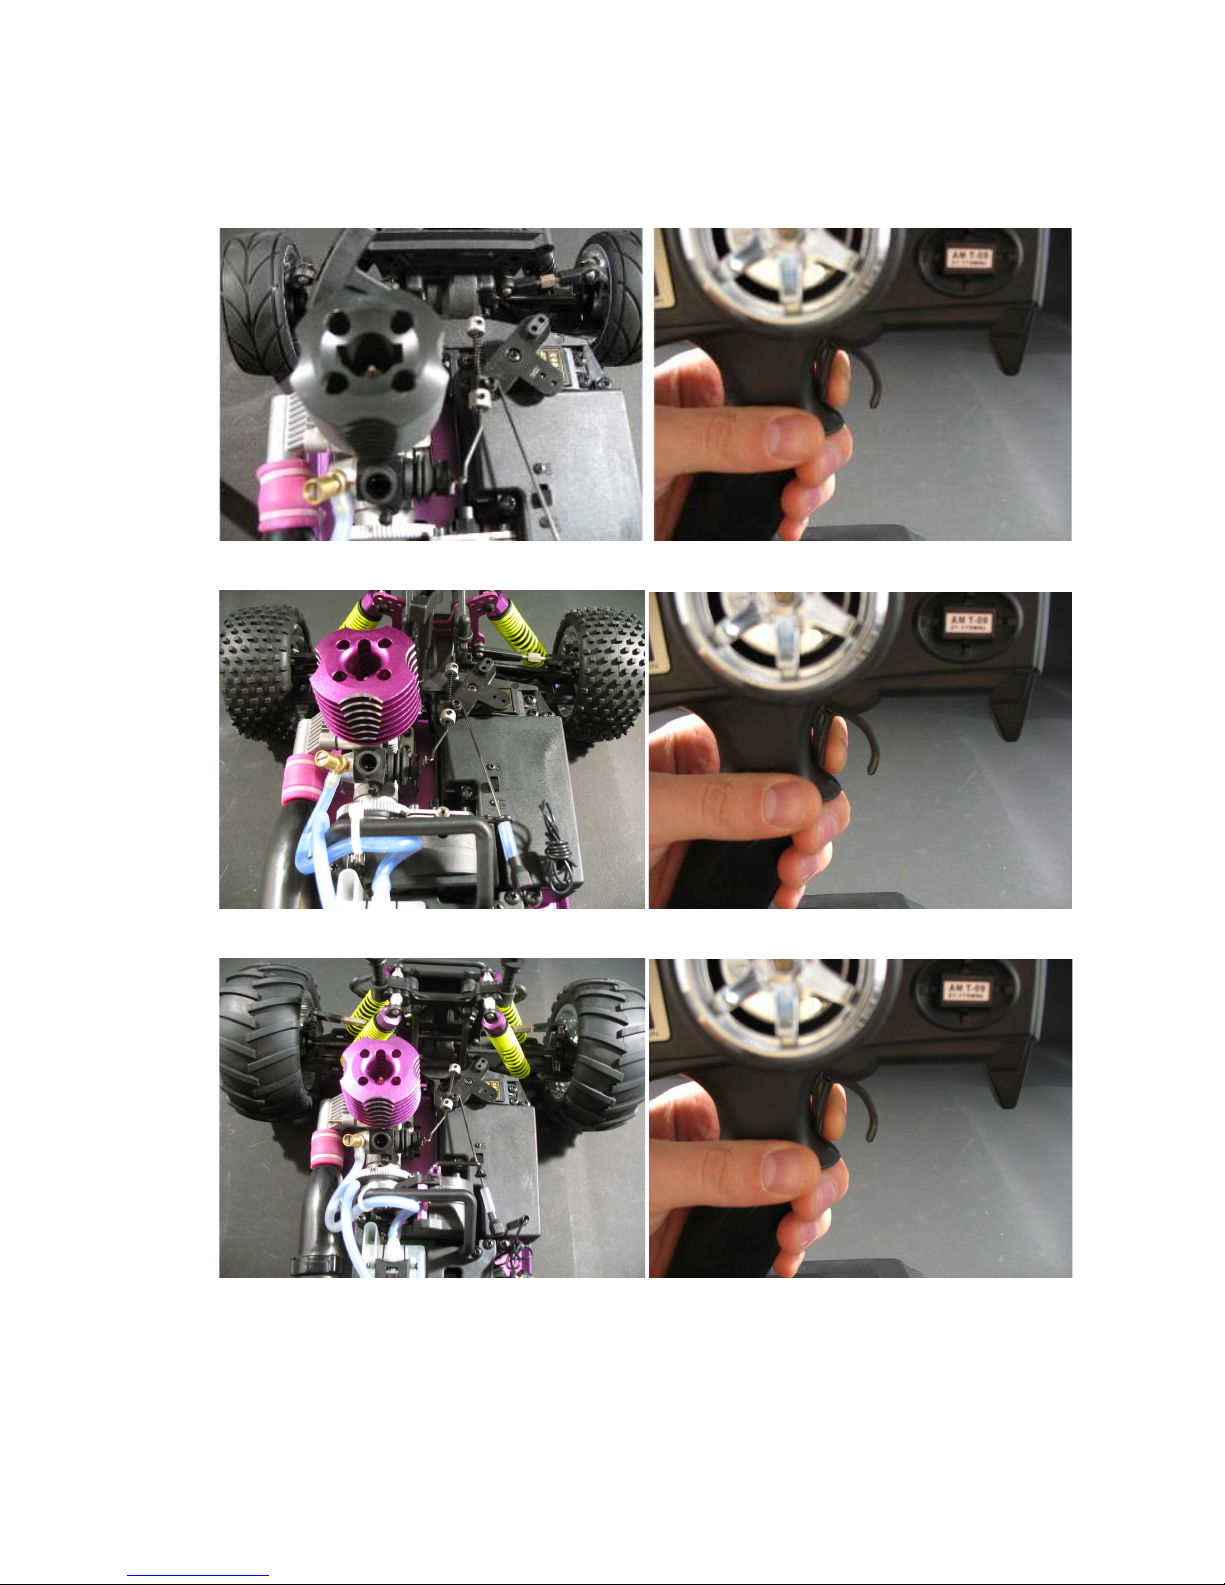
3. If everything works all right so far, fully pull the throttle lever (see picture
below
on the
right). This is supposed to open the carburetor completely, which can be validated by checking the aperture of the carburetor, it should be fully open now (see picture
below
on the left).
If it is not the case, please correct the settings of the carburettor linkage. If you are finished
with this step, please proceed with the next.
Page 10
On-Road:
Buggy:
Monster:
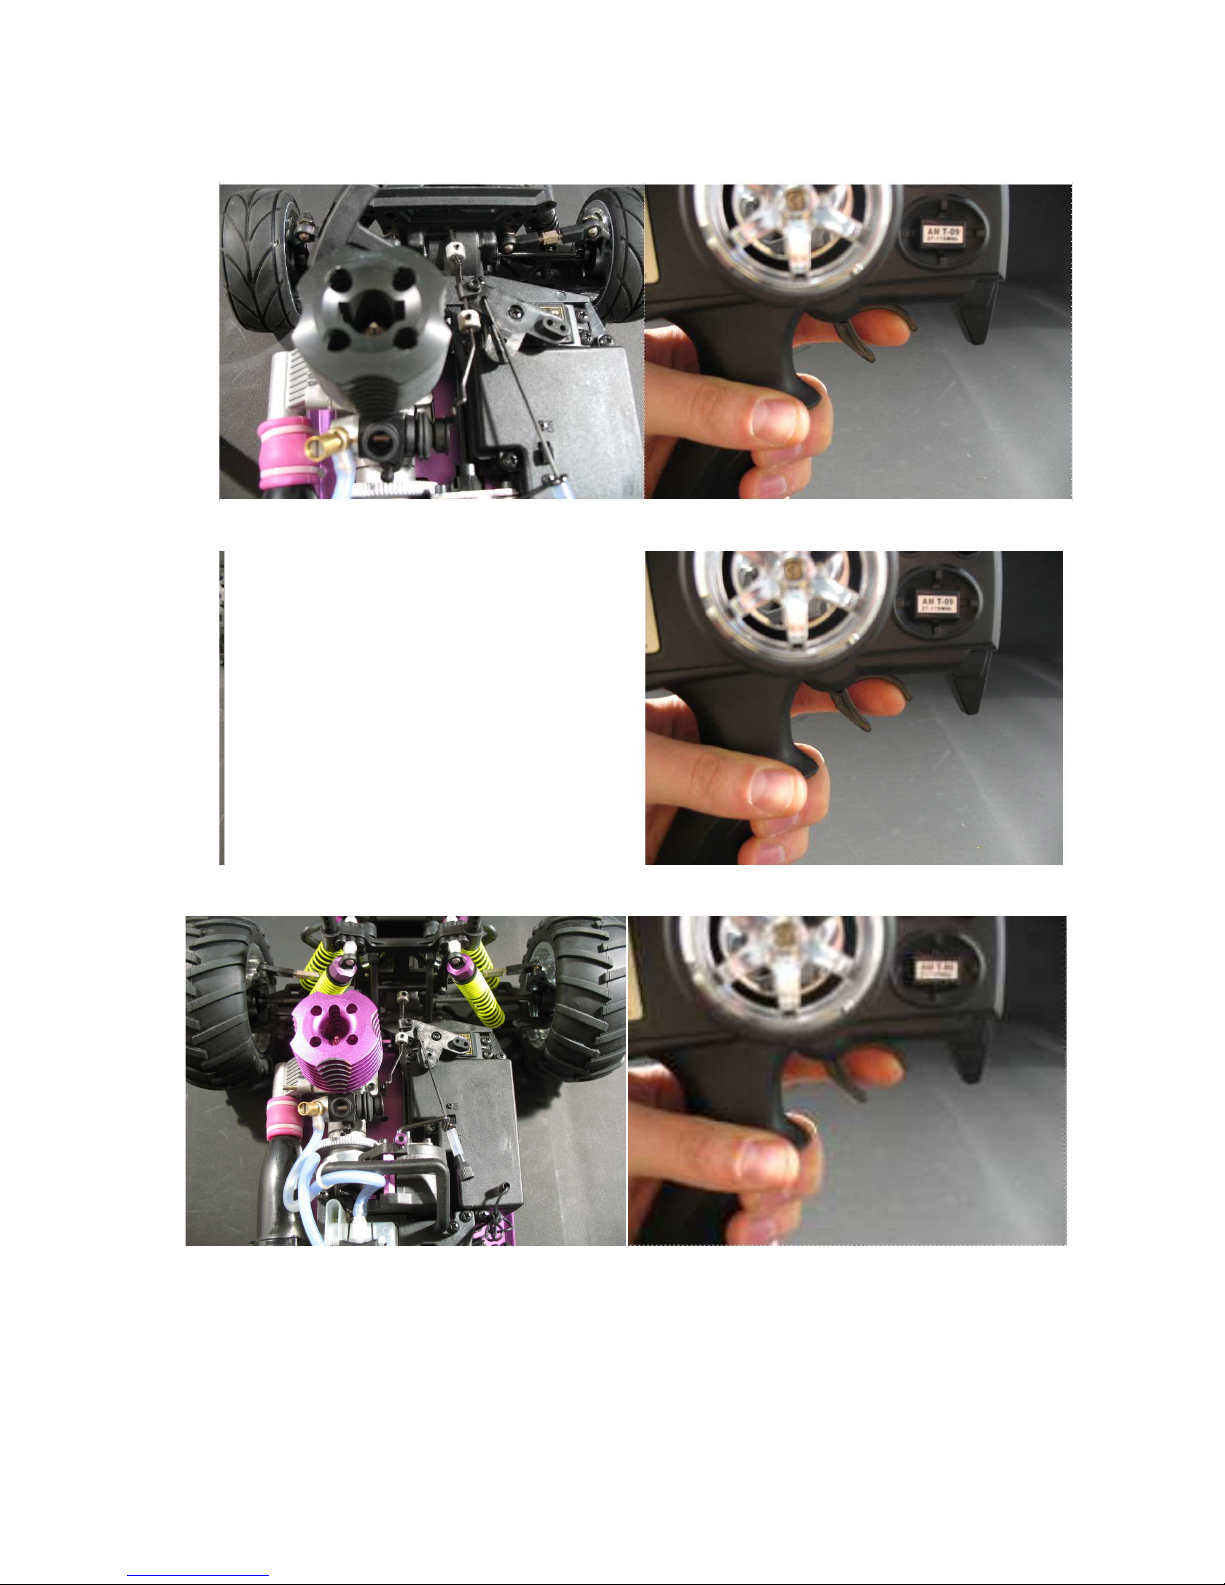
4. Push the throttle lever fully in opposite direction now (see picture
below
on the right); as a
result the carburetor will close except for a 1mm gap. Furthermore the brake should be activated by this. The brake linkage pulls on the brake (see picture
below
on the left). If everything is set up correctly, it should be difficult to move the car back or forth now. If this is not
the case and you are still able to move the car back and forth easily, you have to adjust the
settings of the brake linkage again. When you have checked all settings (1.-4.) and finished
all possibly necessary adjustments, please immediately remount the air filter again.
Page 11
On-Road:
Buggy:
Monster:
Page 12

Safety check of the remote control
Prior to each run the correct functioning and range of the remote control has to be checked.
We recommend doing this together with a second person. Please make sure to follow these
steps: First of all switch on the remote control, then the RC car. Let the second person carry
the RC car, but keep the remote control yourself. The second person should walk a couple of
steps away. The first test consists of trying to send signals from the remote control to the RC
car. The RC car should receive them without problems. This can be controlled by the second
person who carries the RC car. If you are steering leftwards, the wheels of the RC car should
move in this direction. If no commands are transmitted, the RC car should remain inactive;
otherwise this is an indication for interferences. Please pursue with this procedure until the
complete area where you want to drive the RC car has been tested. If you notice any problems and/or if interferences occur during the test, we must advise you to not run your RC car
in this area!
Page 13
Nitro engine break-in procedure
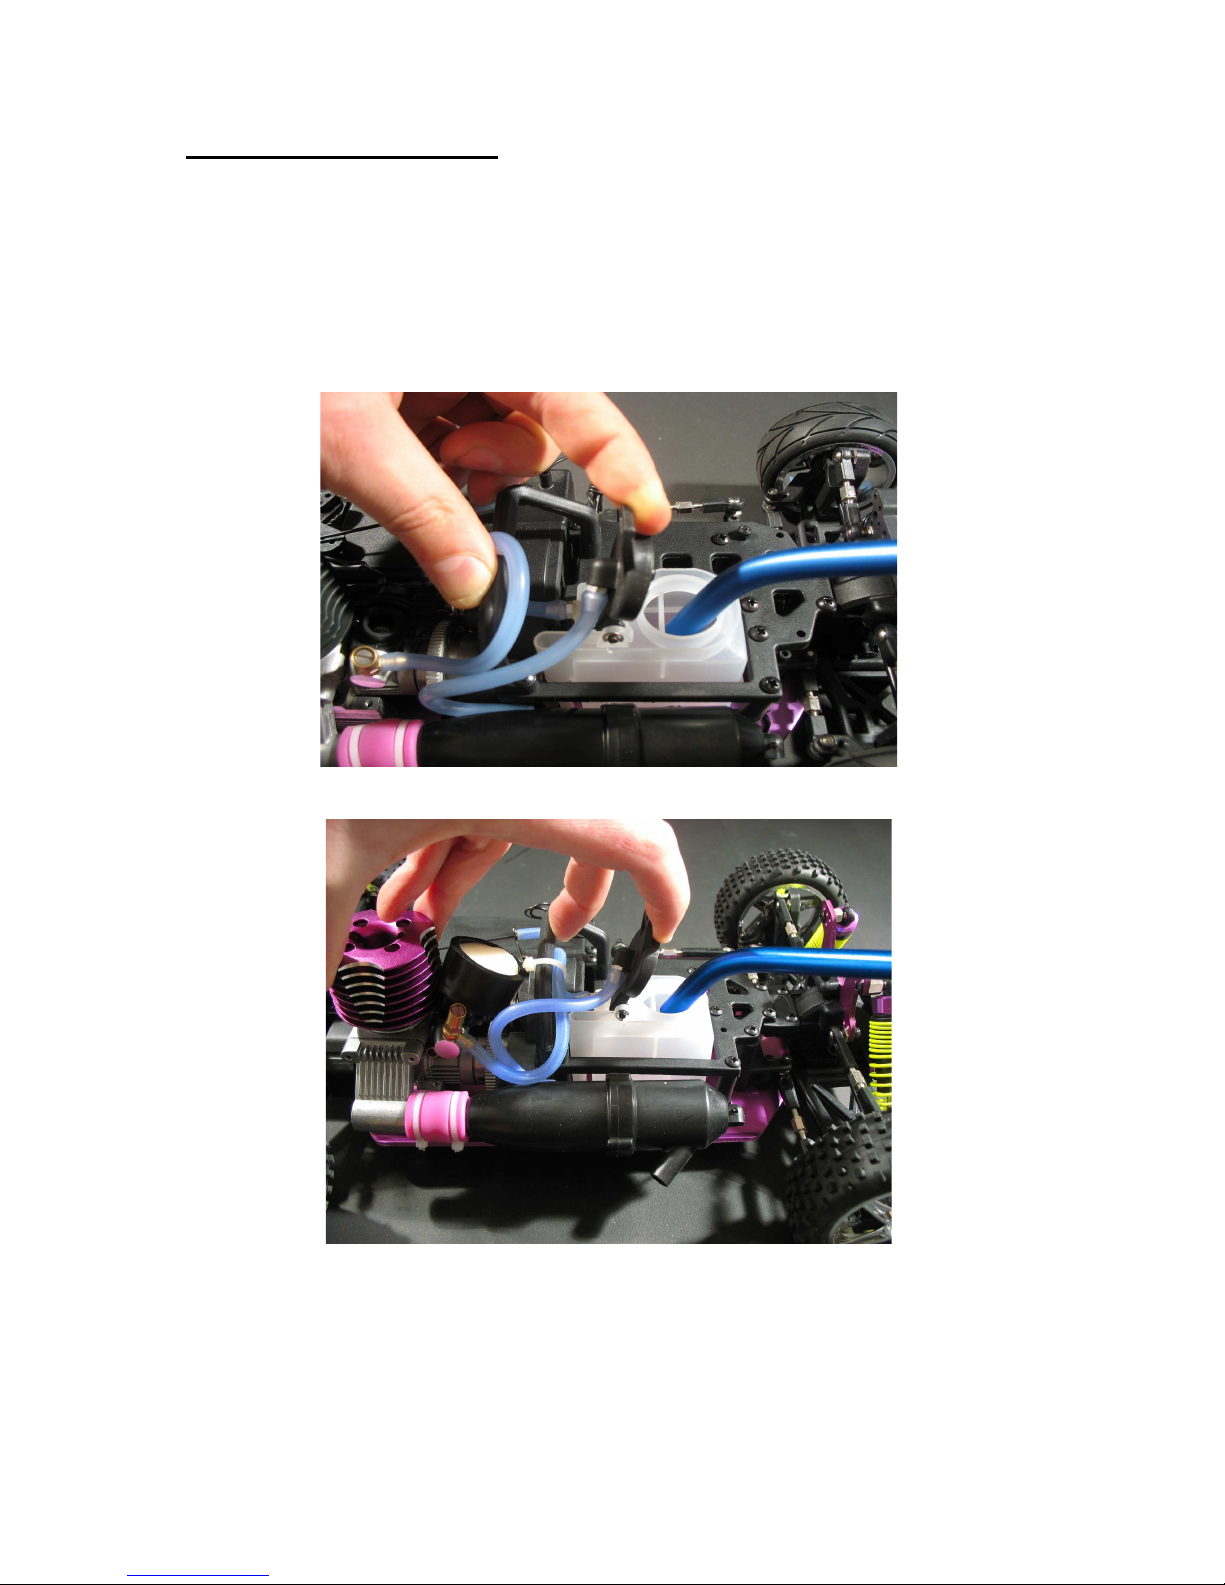
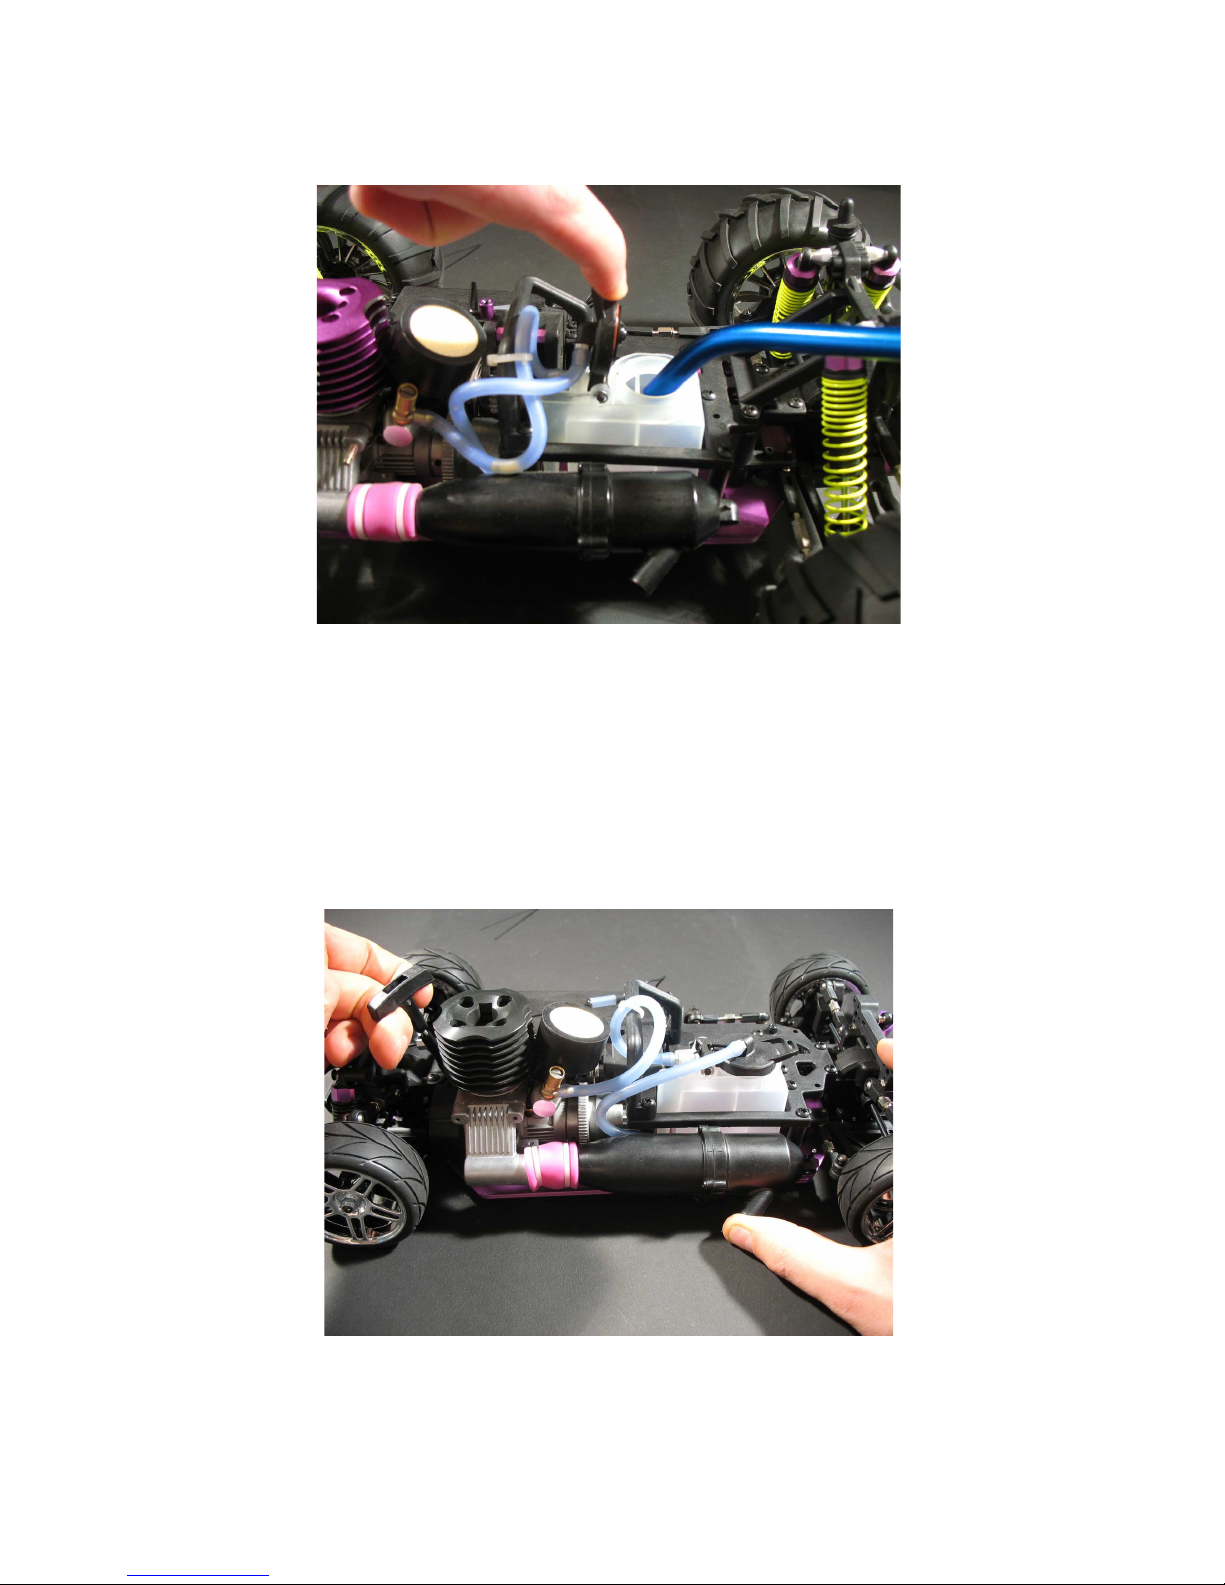
After the foregoing tests, you can “prime” the engine. Using it for the first time requires
some special steps. First of all remove the lid of the tank and fill in high quality 16% nitromethane as engine fuel. Take care not to spill any nitro fuel! If this should happen anyways,
try to remove the spilled nitro fuel with a dry cloth and dispose it environmentally friendly.
Please always be cautious and carefully with the nitro fuel, as it is easily combustible and
toxic.
On-Road:
Buggy:
Page 14
Monster:
Please now follow the steps below:
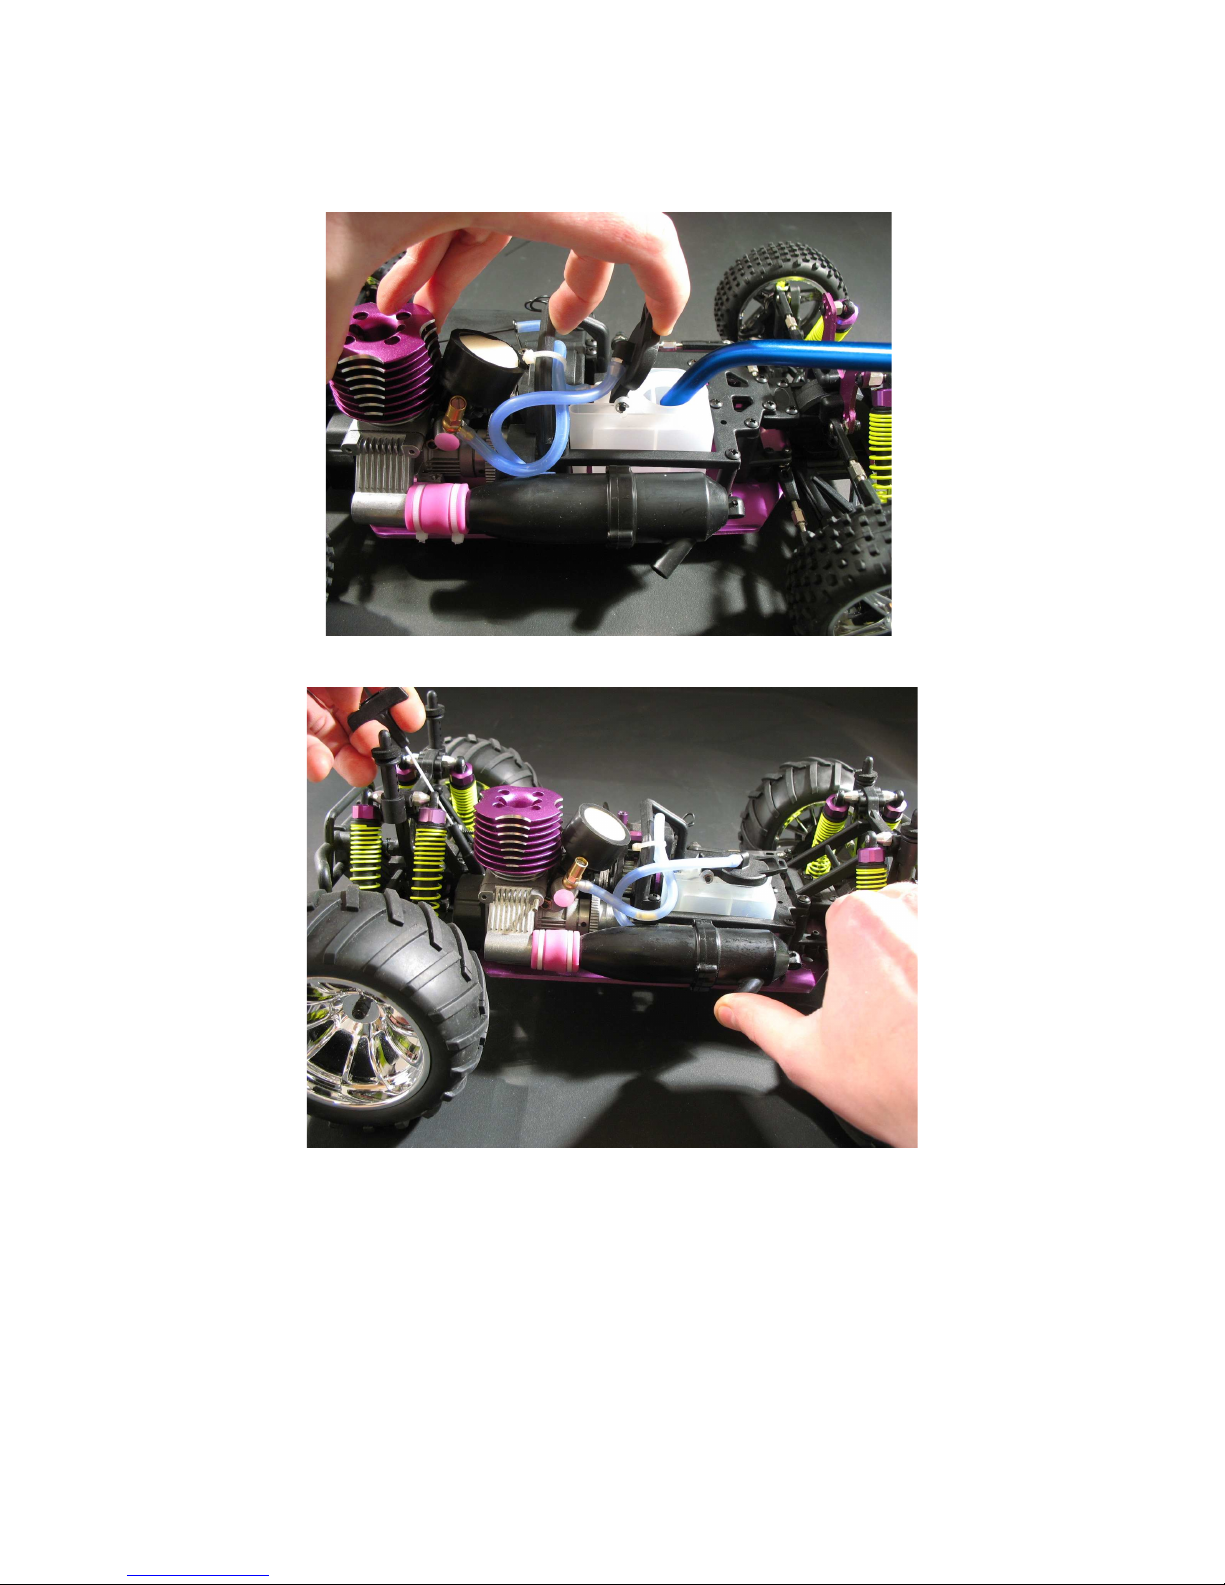
To prime the engine, place your finger over the tip of the exhaust and pull the T-handle attached to the starter cord assembly to spin the flywheel and start the engine. Please do not
pull the starter cord out more than 20cm, as this will damage it. Watch to see if nitro fuel is
moving through the lines and continue until the nitro fuel reaches the carburetor. When the
fuel reached the carburetor, pull the starter cord twice more. Then you finished priming the
engine.
On-Road:
Page 15
Buggy:
Monster:
Page 16
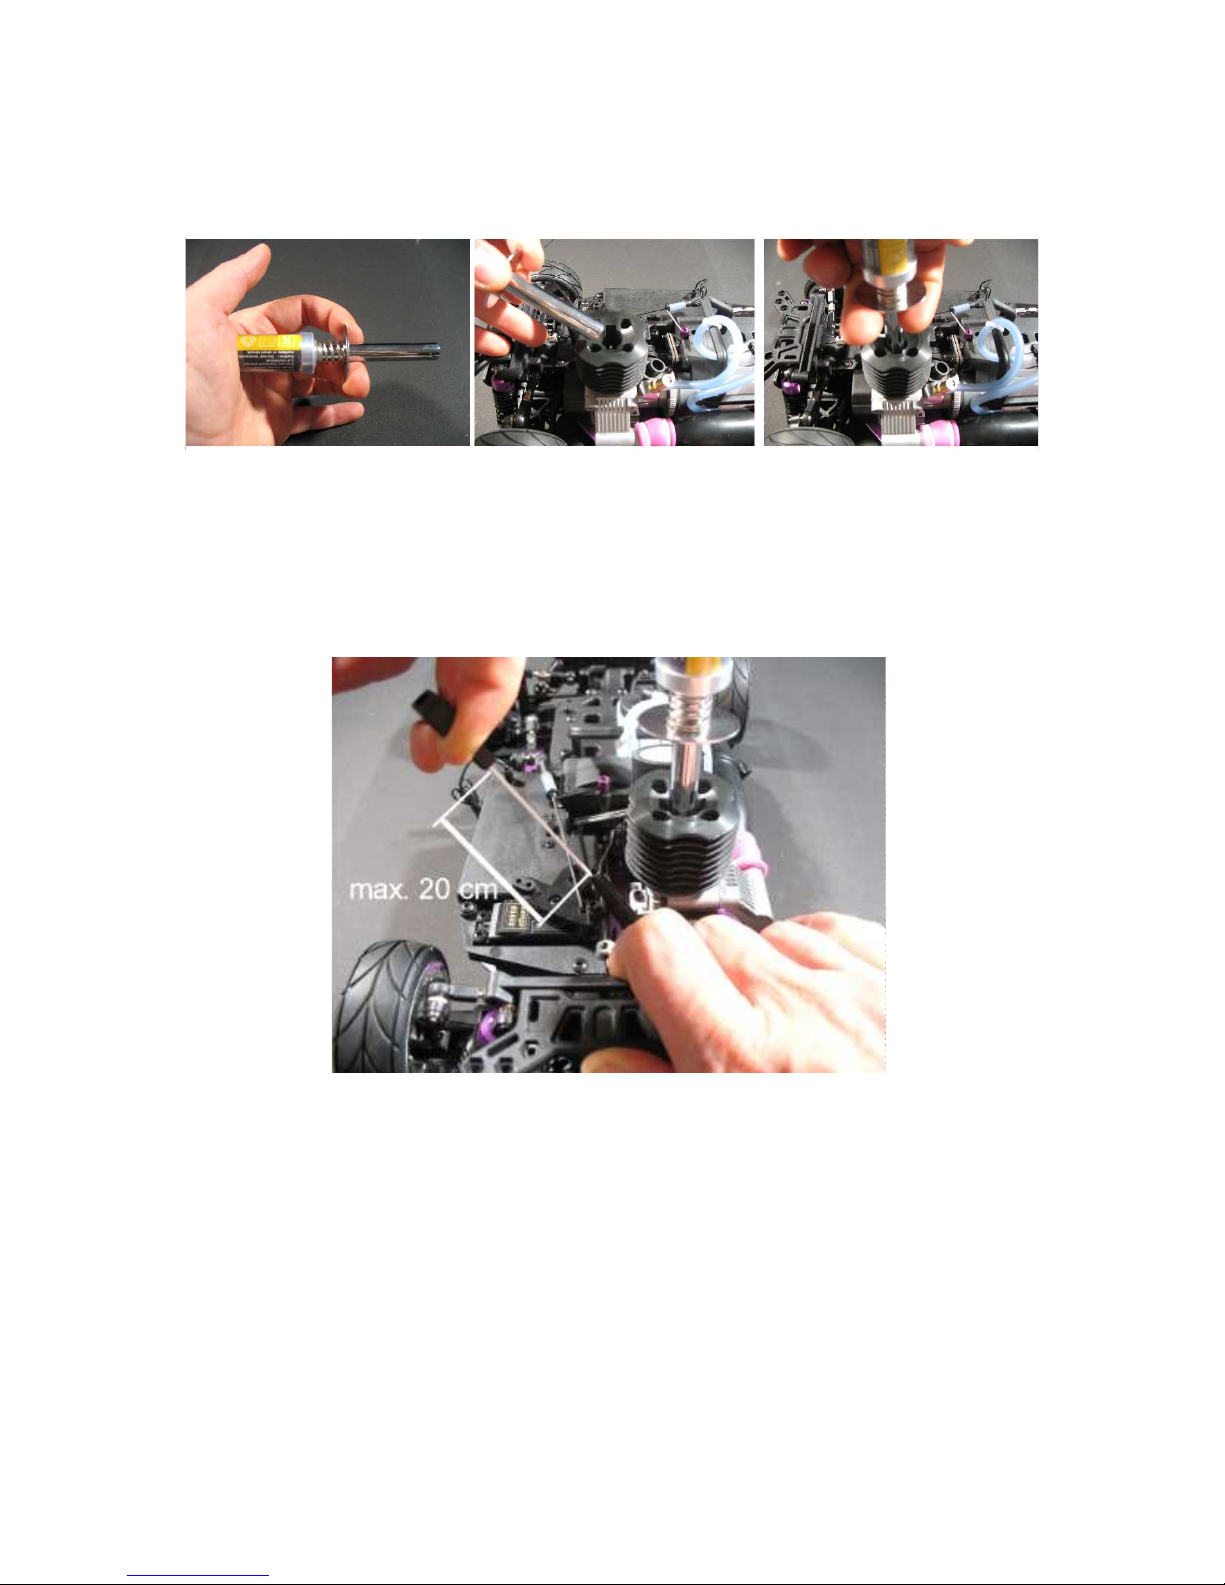
Please take the glow plug igniter now and make sure that it is fully charged. Attach it to the
glow plug in the middle of the engine radiator. Assure that the glow plug igniter is attached
tightly to the glow plug.
When the glow plug igniter has been attached correctly, you can start the engine by pulling
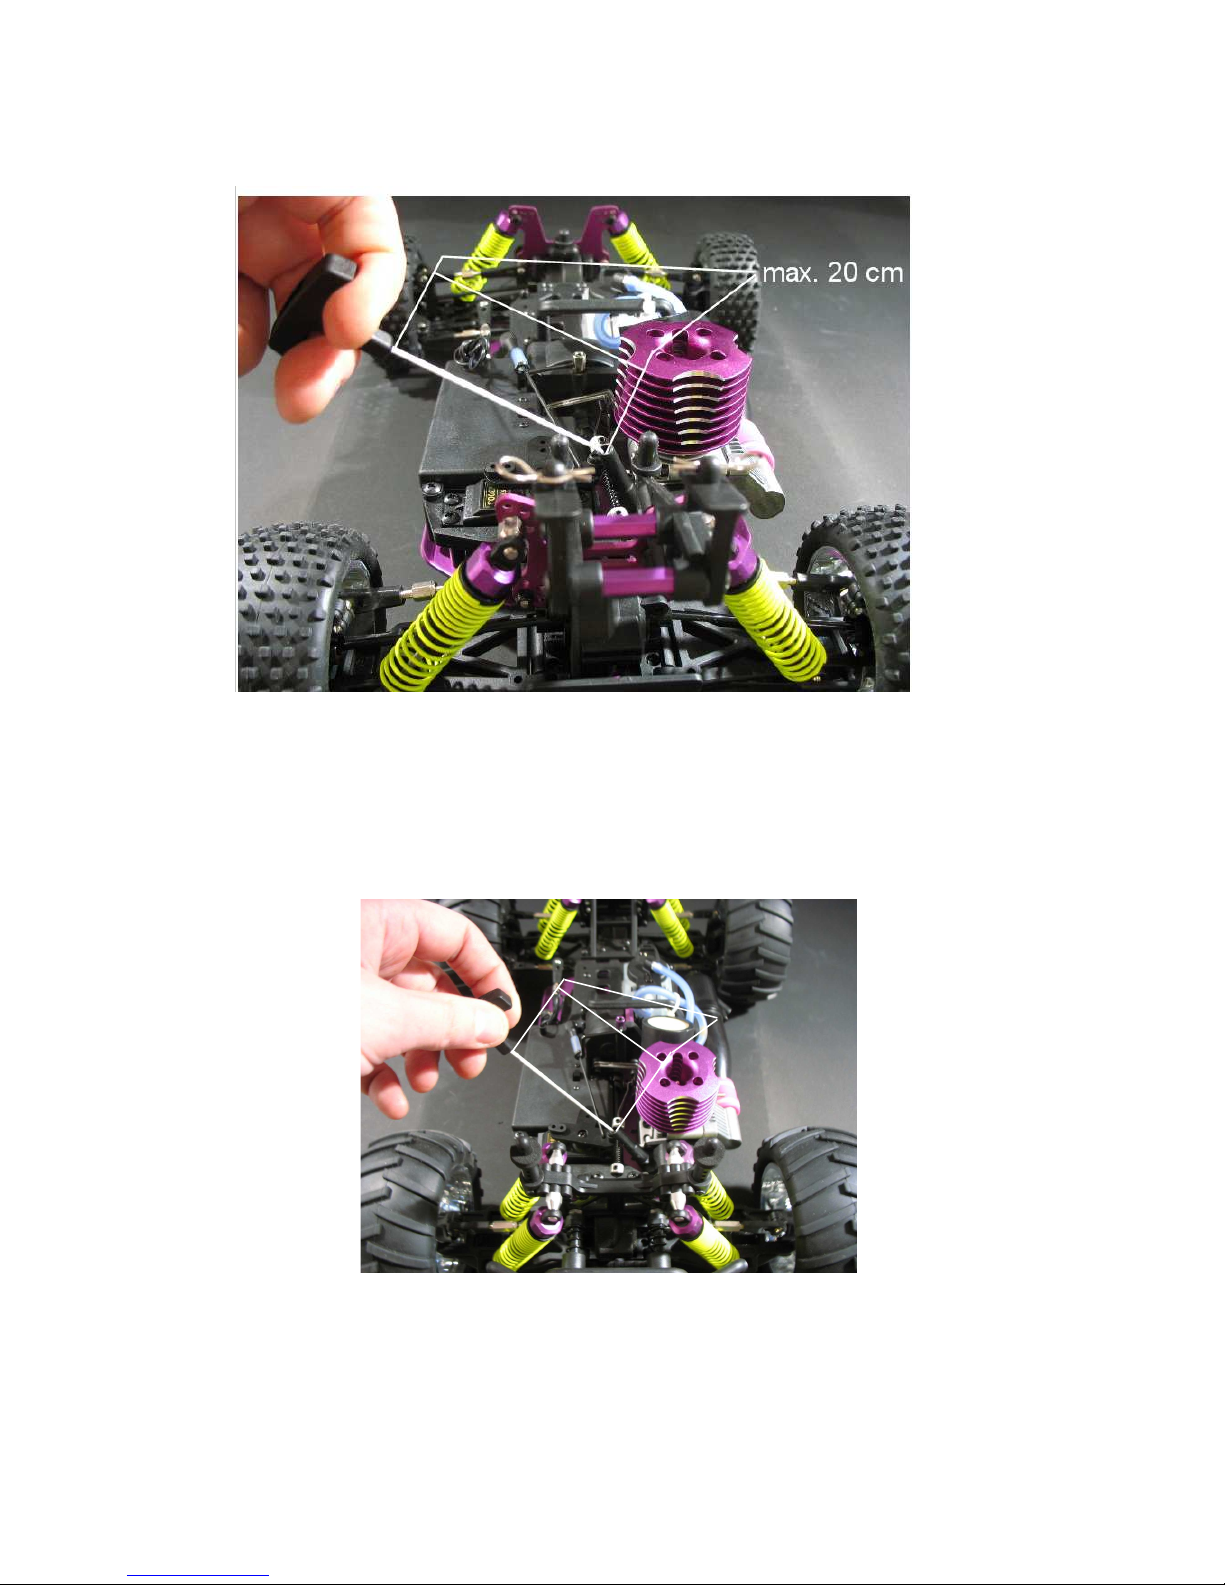
the starter cord (quick short pulls). Don’t pull out the starter cord more than 20cm, as it could
get damaged! If the engine does not start after three attempts, please consult the troubleshooting guide on the last page before continuing. Solve the problem and try to start the engine
again.
On-Road:
Make sure not to pull out the pull starter cord further than 20cm to avoid that it gets
damaged. If it is difficult to pull on the pull starter, the reason might be that the engine
is flooded with fuel. Do not proceed pulling on the pull starter then, as you could cause
damages.
Page 17
Buggy:
Make sure not to pull out the pull starter cord further than 20cm to avoid that it gets
damaged. If it is difficult to pull on the pull starter, the reason might be that the engine
is flooded with fuel. Do not proceed pulling on the pull starter then, as you could cause
damages.
Monster:
max. 20 cm
Make sure not to pull out the pull starter cord further than 20cm to avoid that it gets
damaged. If it is difficult to pull on the pull starter, the reason might be that the engine
is flooded with fuel. Do not proceed pulling on the pull starter then, as you could cause
damages.
Page 18
To shut off the engine, cover the tip of the exhaust with a towel, then it will stop. If an emergency shut off is necessary, shut off the engine by pinching the fuel line to the carburetor.
You should apply this technique only in case of emergency, as temporary pinched off fuel
lines could cause the engine running too lean which could then damage the engine. Therefore
use this method only for emergencies.
You should always use a mounting rack when starting the RC car. The wheels should move
freely, in order to avoid damages. If the engine runs at high revs (number of revolutions per
minute) and the clutch engages accidentally because of that, it could inadvertently start without you being in control over it.
Page 19
If the car is new and used for the first time, or if you have installed a new engine, it is
important to break-in the engine. Don’t run the car immediately after starting it. Without breaking-in the engine, performance and durability of the RC car will be severely
affected.
Break-in procedure:
Let the engine run at idle after starting until one tank of fuel is empty. Let the engine cool
down and repeat this procedure once more. When the second tank is done repeat the shut-off
and cool-down steps as you did in the first tank of fuel.
Now you can start the engine and begin to run the car slowly with the remote control. But
only let it run on low and mid revs. Absolutely avoid driving the car at full speed at this point.
This could damage the engine and it won’t achieve maximum performance any more. Please
repeat this procedure also until two tanks of fuel have been emptied. Let your engine cool
down sufficiently between break-in runs.
Don’t worry about the trail of blue smoke coming from the exhaust during break-in, it is normal as the carburetor still runs with a very rich air/fuel mixture at this point and the fuel can’t
be burned completely yet by the new engine. Also don’t worry, if brown fluid drips from the
exhaust. It is only unburned lube.
Make sure that the engine gets enough cooling with the body shell mounted; if necessary drill additional holes in the body shell in order to guarantee a sufficient air supply.
When you finished the break-in process, you can continue with the fine tuning of the carburetor as described in the next part of the instruction manual. But please take enough time for
breaking-in your nitro engine and carry it out with attention and care. Don’t rush the break-in
process. The better you treat your nitro engine during break-in, the better your nitro engine
will treat you.
Page 20
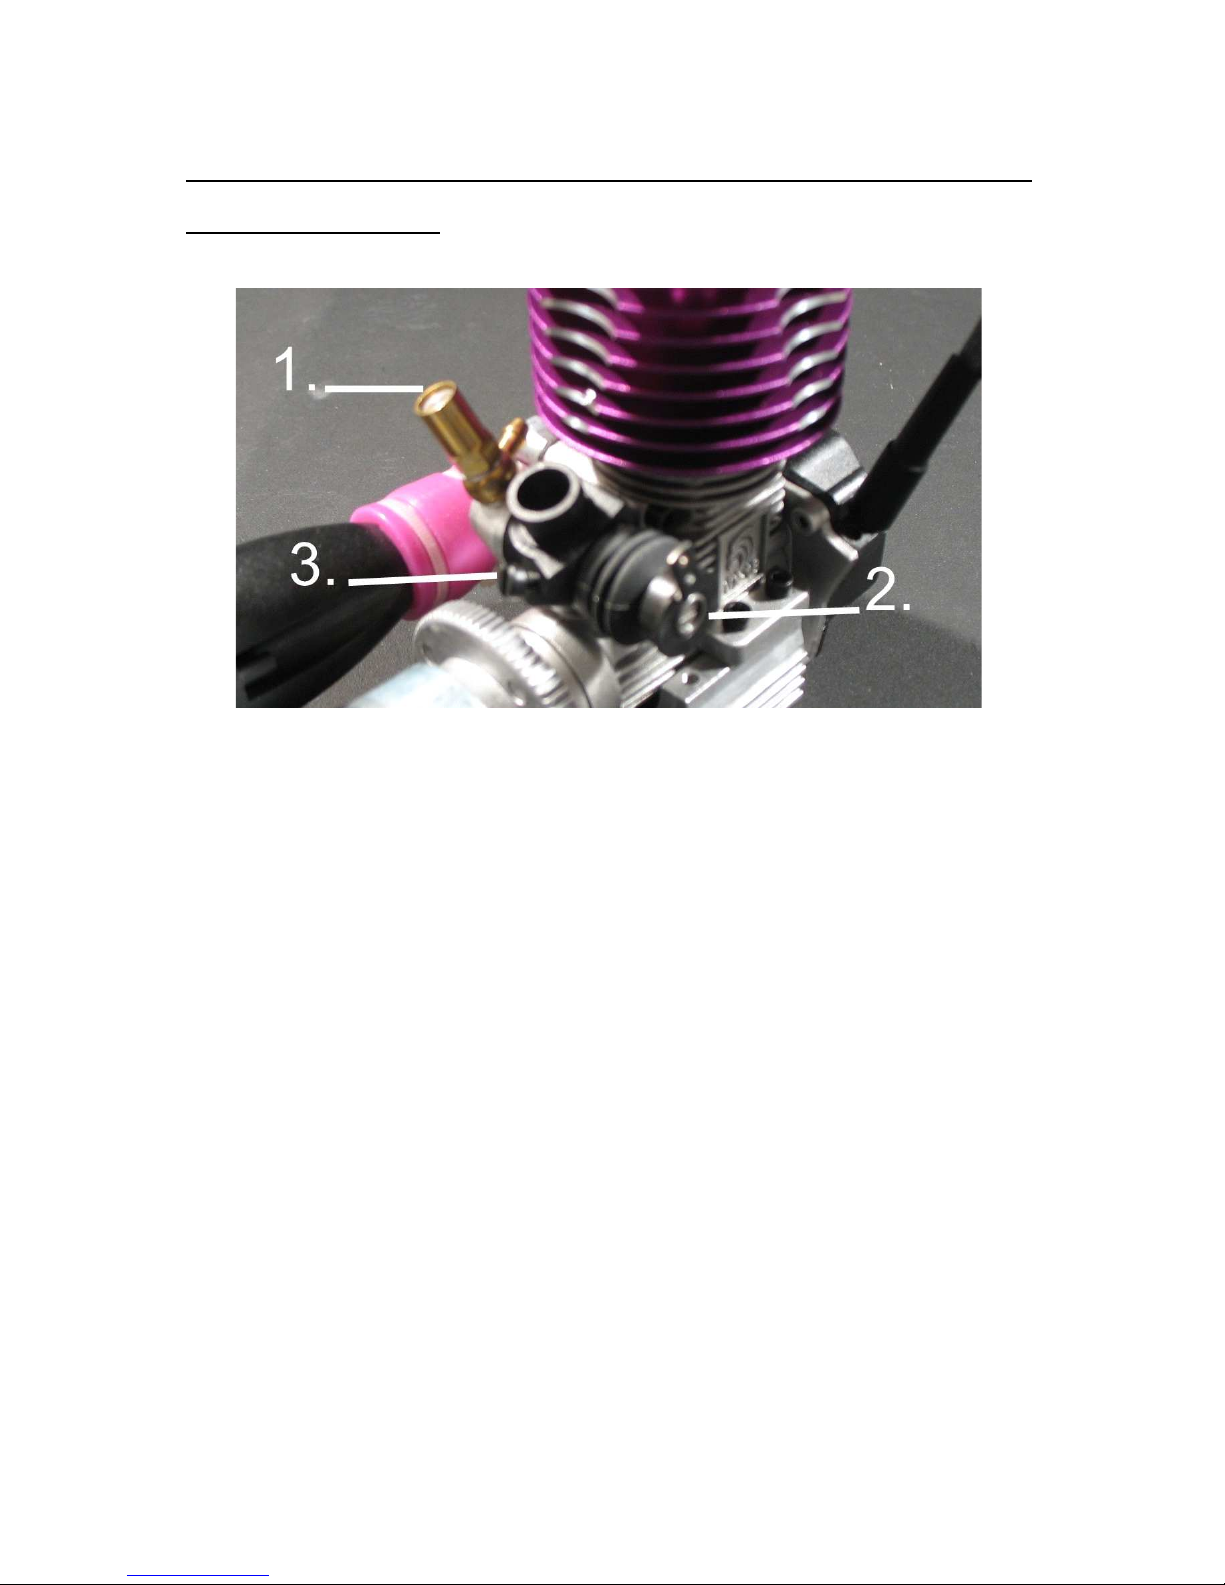
Carburetor settings / How to lean out or richen
a nitro RC car
Engine tuning and adjusting the air/fuel mixture involves adjusting the high-end (high
speed / engine temperature) and low-end (low speed / idle speed) needles on the carburetor. This is also called dialling in your engine. There are base-line settings for your nitro
engine that provide a good starting point for adjusting the needle settings. You'll turn
each needle in very small increments to lean out or richen the fuel.
Turn clockwise to lean out or add air and counterclockwise to richen or add fuel. The
low-end needle controls idling and low speeds. The high-end needle controls how the engine accelerates and runs at high speed and has a greater effect on engine temperature.
1. This is the high-end needle: Turn the needle clockwise until it is not possible to turn it
any further, and then give it three counter-clockwise turns. This is the base-line setting. In order to reach the ideal high speed, turn the needle clockwise in steps of a 1/8
turn, till the car is not stalling and runs properly at high revs. If the engine begins to
stall though when accelerating, richen the air/fuel mixture by turning the needle counter-clockwise in steps of a 1/8 turn, till the RC car shows a consistent performance
again.
2. This is the low-end needle: This needle should be exactly even with the edge of its
frame. This is the base-line setting. Tighten the needle by turning it clockwise in steps
of a ½ turn, till you reach an ideal setting in the low revs.
3. This is the idle adjustment screw to raise or lower the idle revs (idle screw). Tighten-
ing the screw clockwise raises the revs, loosening the screw counter-clockwise lowers
the revs.
Page 21

Experts advice: Flooded engine
If your engine doesn’t start, the reason could be that it is flooded with nitro fuel. That
means that there is too much fuel in the combustion chamber. How to proceed to solve
this: Remove the glow plug with the glow plug spanner, turn the RC car upside down and
quickly pull the pull starter a couple of times to drain any excessive fuel out of the engine
and carburetor. Make sure to have a rag at hand to catch the draining off fuel. Then clean
and dry the glow plug and reinstall it. The engine should start without problems now.
Another indication for a flooded engine is, if the pull starter becomes harder to pull than
usually.
Experts advice: Glow plug
To check the function of the glow plug, remove the glow plug from the engine radiator
and simply attach the glow plug to the igniter. The heating wire of the glow plug should
glow now. If not, replace the glow plug.
Page 22

Troubleshooting Guide
Problem Cause Solution
Tank is empty or the fuel
doesn’t reach the carburetor
Refill fuel tank and pump
fuel to the carburetor
Glow Plug is defective or the
glow plug igniter is not
charged
Exchange glow plugs or
charge glow plug igniter
Fuel lines, air filter or exhaust blocked up
Clean or exchange concerned parts
Engine flooded Screw off the glow plug and
pump the fuel from the cylinder.
Carburetor needles not adjusted correctly
Adjust them to the base-line
setting
Engine doesn’t start
Carburetor linkage not adjusted correctly
Put the servo into neutral and
adjust newly
Tank is empty Refill fuel tank and pump
fuel to the carburetor
Fuel lines, air filter or exhaust clogged
Clean or replace clogged
parts
Carburetor needles not adjusted correctly
Adjust them to the base-line
setting
Engine starts,
then stalls
Engine overheated Allow engine to cool down
and adjust carburetor needles
to the base-line setting
Carburetor needles not adjusted correctly
Adjust them to the base-line
setting
Engine responds weak to
acceleration commands of
the remote control
Low muffler/exhaust pressure
Check the fuel lines
Weak transmitter or receiver
batteries
Charge accumulators or replace batteries
Weak radio remote control
Extend transmitter and receiver antennas fully
RC car is difficult to control
Carburetor linkage not adjusted correctly
Put servo into neutral and
readjust carburetor linkage
Molten clutch discs
Brake stalls when running
the RC car
Adjust brake-linkage in neutral in order that all four
wheels move freely
 Loading...