

Page 1
PHOENIX
Operation Manual &
Product Specification
™
Page 2
June 2019
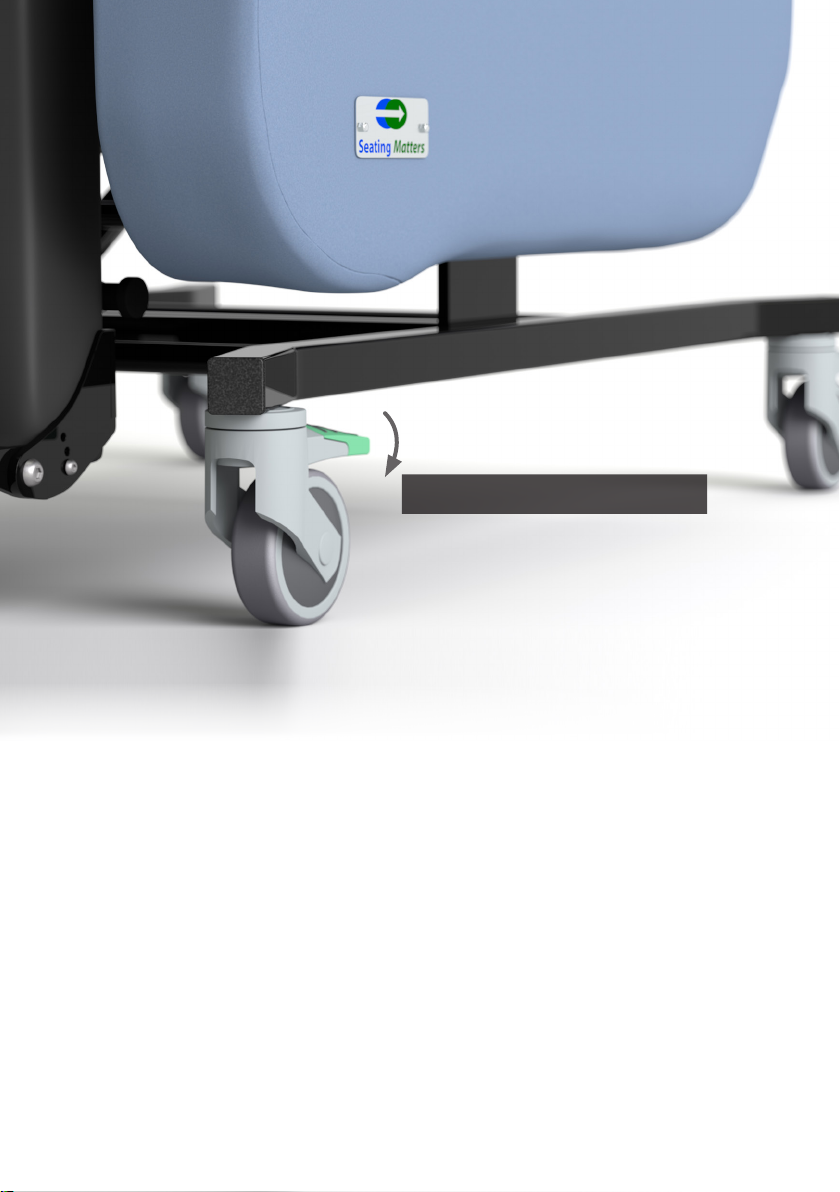
WANT TO GO STRAIGHT?
Ensure to engage directional
lock castor at front left of chair
Page 3

This Operation Manual is frequently updated to ensure safe use of your product. Visit
www.seatingmatters.com where you can find a free copy of the most up to date version.
CONTENTS
2. Safety Instructions
4. Technical Specification
5. User Guide and Operating Instructions
13. Working Environment
14. Seating Matters Recycling Policy
15. Intellectual Property
16. Maintenance and Servicing
Page 4

SAFETY
INSTRUCTIONS
All instructions must be read and understood before the product
may be used.
Terminologies
Patient: The person sitting in the chair.
User: Competent person with responsibility for the persons sitting in the chair as
well as the suitability of the equipment for the Patient. The User is responsible for
checking the chair for faults during the course of its use.
Assembly, Installation, Warnings & Hazards.
1. This chair should be fully assembled, all fixings secured and the chair checked for
safety by a competent person before use.
2. The User must ensure that the product is in good condition before use (check all nuts
and bolts are fastened, fabric in good condition etc). If there are any problems, these
must be reported to your Seating Matters provider and corrected before the chair is
put into use.
3. Keep all body parts away from the mechanisms under the chair. Repairs and
maintenance should only be carried out by fully trained technicians.
4. Exercise care in using the release lever for the reclining mechanisms and adjustments
to avoid injury.
5. Pressure ulcer or pressure injury reduction is not a guarantee with this equipment.
The User must ensure that the Patient has a period out of the chair after prolonged
sitting to raise tissue oxygenation levels. Although the chair oers pressure
management, the body tissue still needs time to recover. In many places, local or
national guidelines recommend a maximum of 2 hours sitting at any one time. You
must also observe Patient specific recommendations and guidelines as set by their
health professional with regard to the use of tilt and recline for appropriate pressure
management.
6. The product must be used on a level, plain, hard surface with the brakes engaged to
avoid it moving during use and to ensure stability. When the chair is not in transit, all
the braking castors on the product must be engaged to prevent risk of injury when
being used.
www.seatingmatters.com
2
Page 5

7. The product may not be left in an outdoor environment. More information on fabrics
and their environment can be found later in this manual.
8. A competent person, trained in the use of the chair, should make adjustments
and set it up according to the User requirements and Patient dimensions before
the Patient sits in the chair. Where possible, adjustments should be made when the
Patient is not in the chair to avoid injury to the User and Patient.
9. Ensure there is more than one competent person there when making adjustments
to ensure they are correct and safe for the Patient.
10. If in doubt as to any the adjustments, feel free to contact Seating Matters direct
at [email protected].
11. Under no circumstances must the User or Patient stand or sit on the footplate of
the chair.
12. The chair should not be transported in a vehicle while the Patient is seated on the
chair.
13. This product should not be lifted at any time unless by competent persons trained in
such manual handling.
14. When operating the leg rest and recline features on the chair please ensure there
is a 450mm gap around the chair to prevent the back or leg rest coming into contact
with a wall or any other object.
15. On powered options, please ensure that your chair is charged daily.
Please call your Seating Matters provider if you have any questions on these points.
PHOENIX™ Instruction Manual
3
Page 6
PHOENIX
TECHNICAL SPECIFICATION
F
E
G
H
L
D
iii
iv
TM
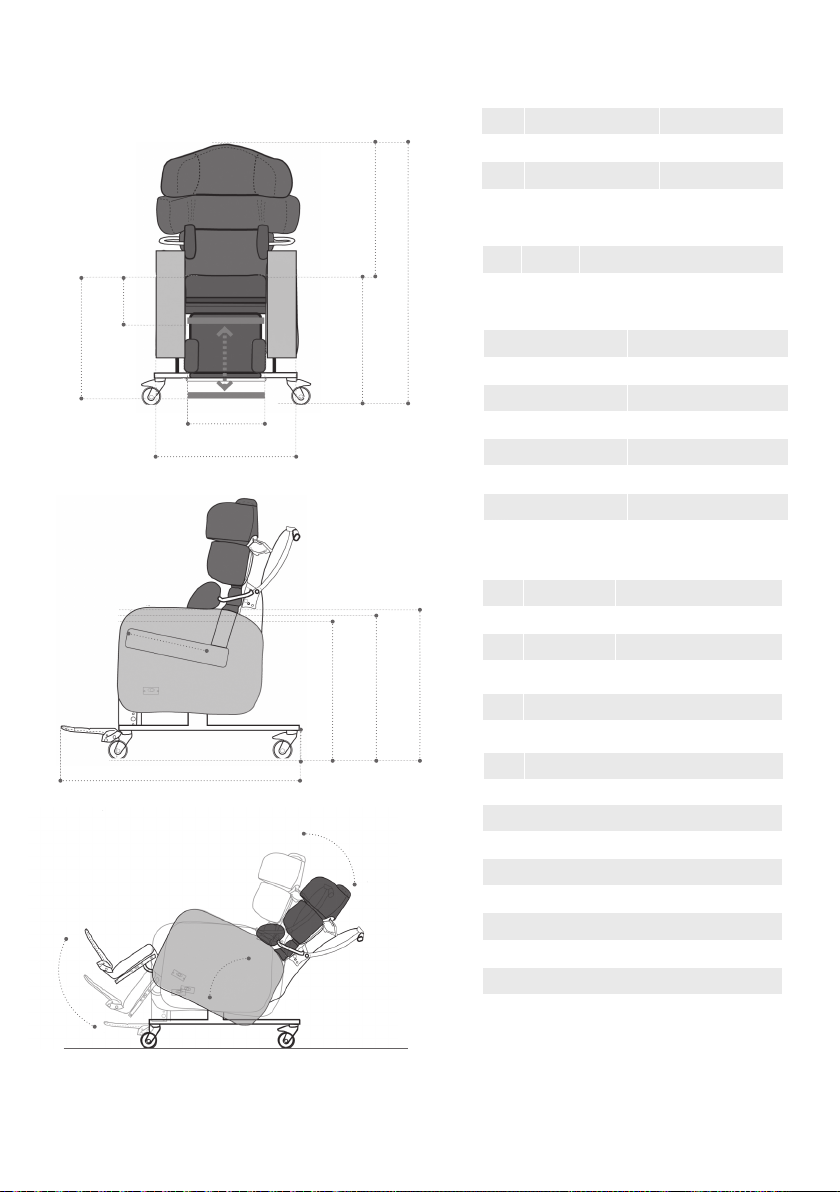
Basic dimensions
A Overall height 1320mm/52in
B Back height 850mm/33in
C Seat height 600mm/24in
B
D Overall Length 1200mm/47in
Footplate height adjustments
A
E High 300mm/12in from seat
F Low 510mm/20in from seat
Available seat and overall widths
C
G (Seat width) H (Overall width)
350mm/14in* 640mm/25in
400mm/16in 640mm/25in
450mm/18in 670mm/26in
500mm/20in 720mm/28in
550mm/22in 770mm/30in
600mm/24in 820mm/32in
* This seat width is achieved using a 400mm/16in seat
and a set of 25mm/1in padded arm covers.
Arm height options
I Low 715mm/28in
J Medium 740mm/29in
K High 765mm/30in
I J
K
Seat depth
L 390-480mm/15-19in (see page 9)
M
Clearance Height
M 130mm/5in
Recline and tilt angles
ii Back angle recline
ii
90° - 130°
40° range
iii Leg rest angle
90° - 125°
35° range
iv Tilt in space
From 5° forward, or anterior, tilt to 30° or
45° backward tilt (dependent on chair
model).
Chair weight unloaded is 67 Kg/147.71 lb/10.56 Stone.
Chair user weight limit is 159 Kg/364 lb/25 Stone.
PHOENIX™ Instruction Manual
4
Page 7
USER GUIDE AND
OPERATING INSTRUCTIONS
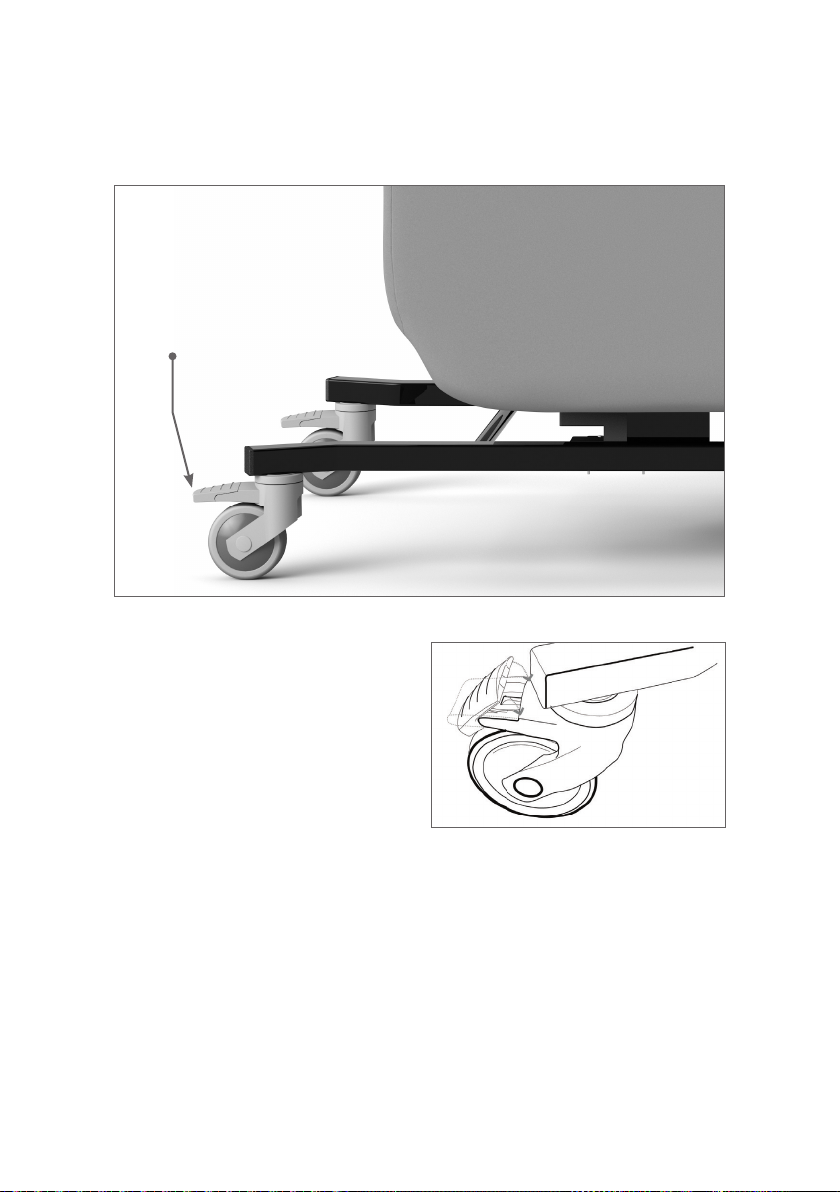
Braking Castors
(fig.1)
• Braking castors: The PHOENIX™ chair must
be used on a plain, hard surface with the
brakes engaged to ensure stability and to
avoid the device moving undesirably
during use. Braking castors, where provided,
must be in the braked position while in use.
(fig.1) A competent person, trained in the
use of the chair, should make adjustments
and set it up according to the User
requirements and Patient dimensions
before the Patient sits in the chair. Ensure there is more than one competent person
present when making adjustments to ensure they are correct and safe for the Patient.
Ensure all fixings are secure before allowing the Patient to sit in the chair. This includes
lateral supports, arm adjustments, seat adjustment and footplate.
Please call your Seating Matters provider if you have any questions on these points.
This product should not be lifted at any time unless by competent persons trained in
such manual handling.
PHOENIX™ Instruction Manual
5
Page 8
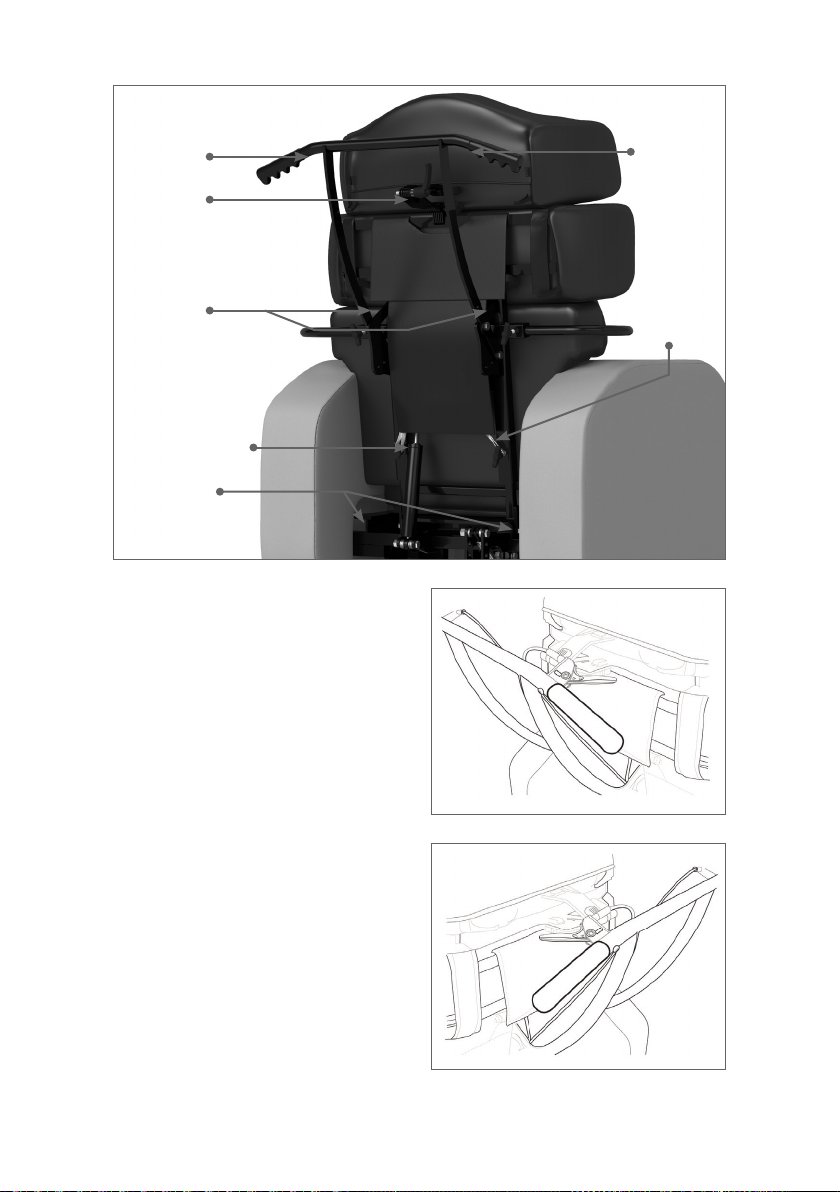
Tilt in
Space
Head Rest
Adjustment
Back Angle
Adjustment
Shoulder
Support
Adjustment
Spring Plunger
Seat Belt
Loops
• Back angle adjustment:
To recline the
back of the chair, the User must inform
the Patient then stand behind the chair
and with two hands, firmly hold the push
handle while closing the release lever (fig.
2a). Move the back of the chair slowly
until it is in the required position and allow
the release lever to move to its relaxed
position before letting go of the push
handles. (fig.2) In powered options this
function is adjusted using the handset.
Exercise care in case of injury to Patient
or damage to surrounding environment.
Adjustments are performed according to
the buttons on the handset.
(see page 12).
Back Angle Adjustment
Adjustable
Wing Knob
(fig.2)
(fig.2a)
• Tilt in space: To tilt the chair, the user
must first inform the Patient then stand
behind the chair and with two hands,
firmly hold the push handle while closing
the release lever. (fig.2b) Tilt the chair
to the required position then let go of
the release lever. In powered options,
exercise care in case of injury
PHOENIX™ Instruction Manual
Tilt in Space
(fig.2b)
6
Page 9
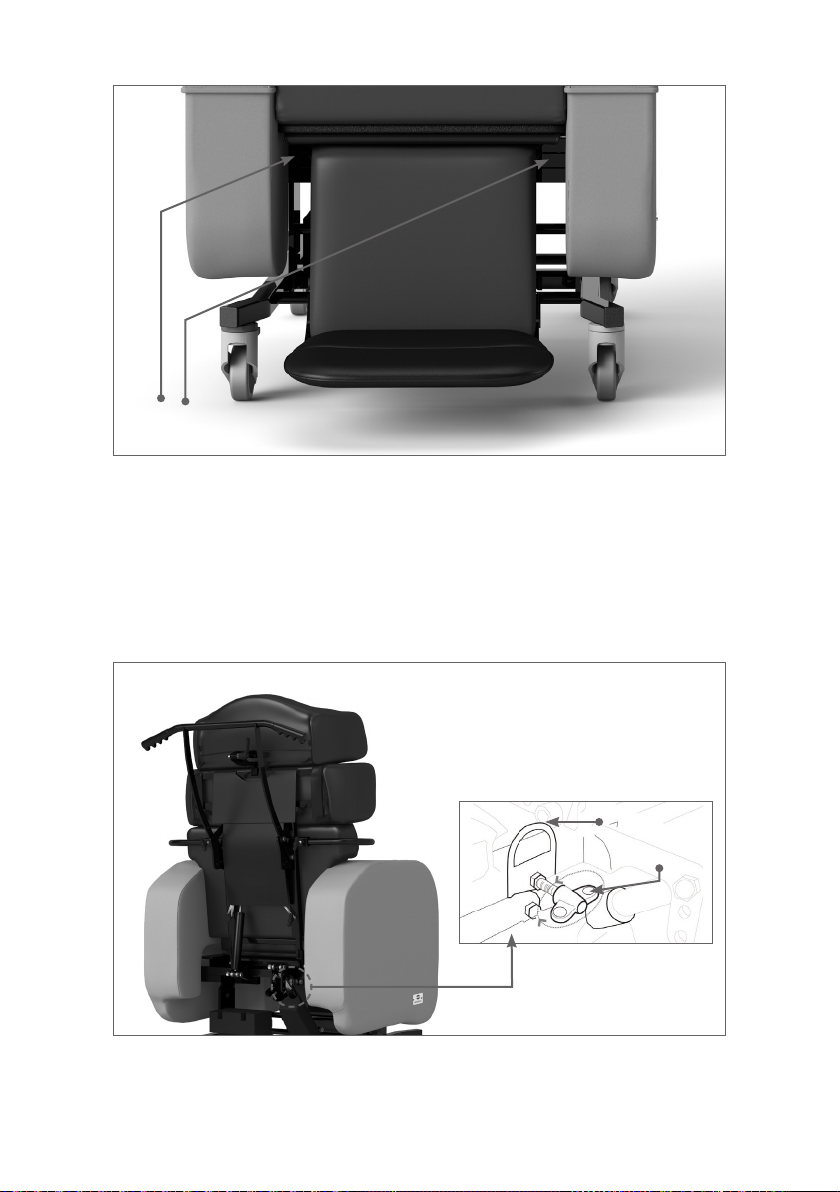
Thumb screws
for seat depth
(fig.3)
to Patient or damage to surrounding environment. Powered adjustment is controlled
via the handset. (see page 12)
• Seat depth: To increase or decrease seat depth, loosen the thumb screws set at 45
degrees under the seat. (fig.3 & fig.3b) Adjust the seat to the required depth by
carefully pulling the seat out. Tighten the screws again to ensure the seat depth
doesn’t unintentionally change. (fig.3b)
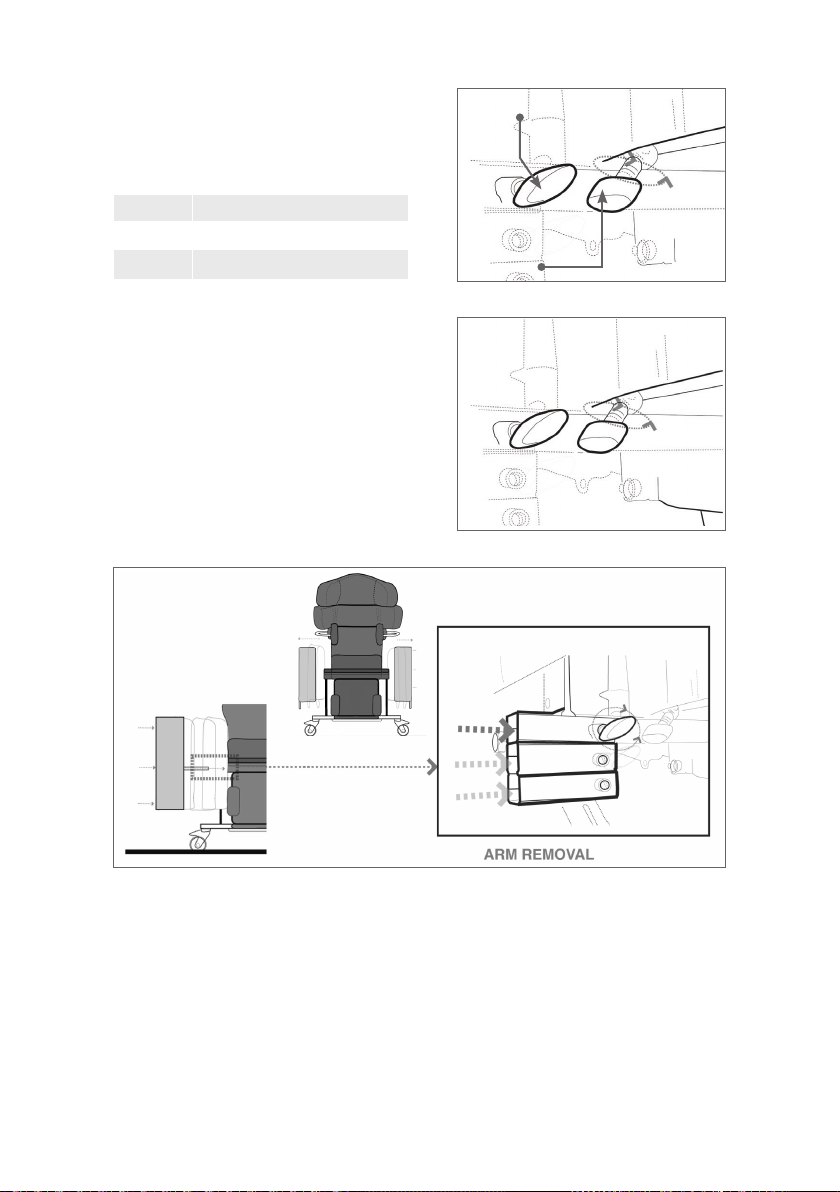
Seat belt loop
Arm removal
PHOENIX™ Instruction Manual
(fig.3a)
7
Page 10
There are also four options for seat depth
labelled A,B,C and D. (fig.3c) These
adjustments should only be made by a
Seating Matters approved provider.
A 450-480mm/18-19.5in
B 430-460mm/17-18.5in
C 410-440mm/16.5-17.5in
D 390-420mm/15.5-17in
480-500mm available on request
• Arm removal: To remove the arms,
loosen the thumb screws behind and
in front of the arm (fig.3a,b & d) and
carefully pull the arm out, leaving it in a
safe place to avoid tripping hazards or
other injuries. When replacing the arms,
ensure the thumb screws are tightened
against the frame of the arm.
Arm removal
Seat depth
(fig.3b)
(fig.3c)
(fig.3d)
• Seat width adjustment: To adjust the seat width, loosen the thumb screws behind and
in front of the arm (fig.3a,b & d) and carefully pull the arm out to the desired width (see
seat width table on page 4), secure the arms in place and ensure the thumb screws are
tightened against the frame of the arm.
• Arm height adjustment: To adjust the arm height, loosen the thumb screws behind and
in front of the arm (fig.3a, b & d) and carefully remove the arm and insert it into the
desired height option on the frame of the chair (fig.3d). Secure the arms in place and
ensure the thumb screws are tightened against the frame of the arm.
PHOENIX™ Instruction Manual
8
Page 11
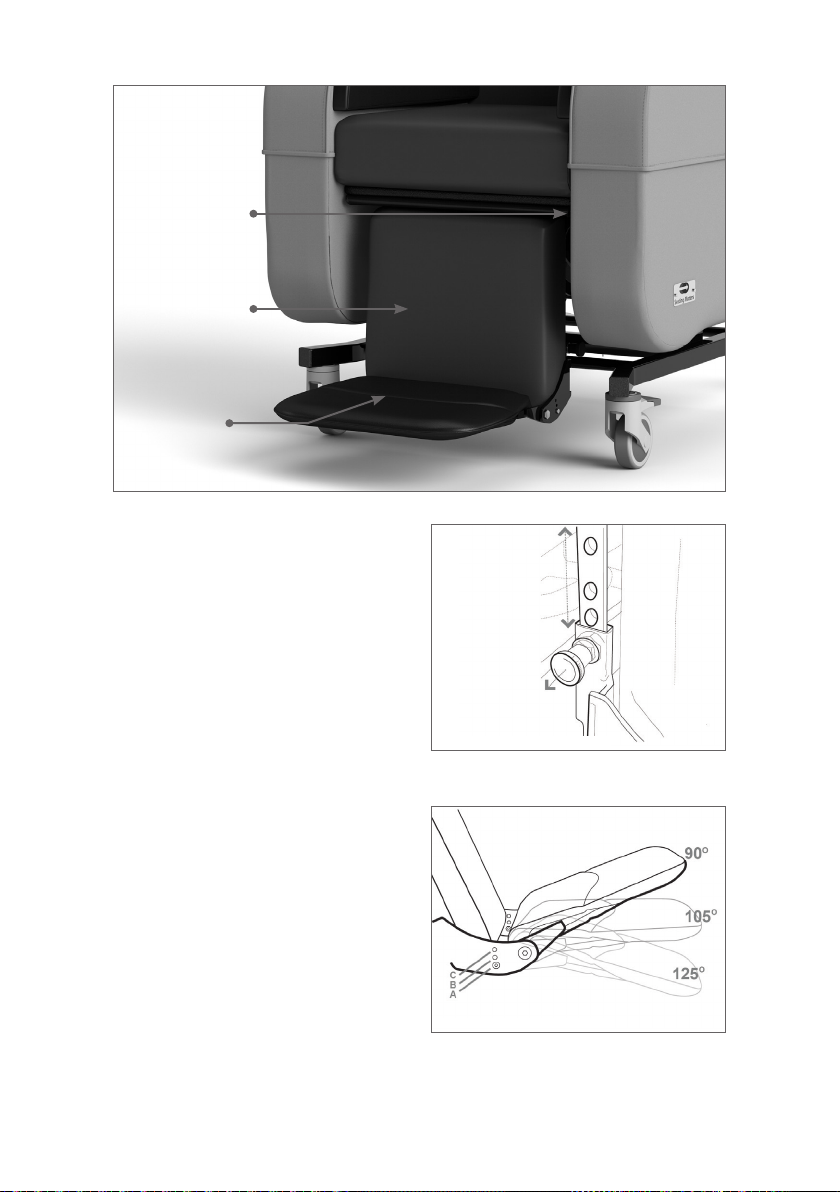
Manual Lever
to elevate leg rest
Elevating Leg Rest
Footplate
• Leg elevation: Before changing
the angle of the elevating leg rest, the
User or Patient must ensure there are
no objects in the immediate environment
that could obstruct the leg rest elevation
or come into contact with the Patient's
legs. Using the manual lever located
under the front of the seat, move the leg
rest until it is in the required position
and allow the release lever to move to
its relaxed position. In powered options,
use the handset control to move the leg
rest until it is in the required position and
release the button. Ensure that only the
weight of the Patient's legs are placed on
this leg rest. (See page 12 for motorised
elevation instructions).
Footplate height adjustment
(fig.4)
(fig.4a)
• Footplate height: The foot plate can
be adjusted in height by pulling out the
spring plungers, located on each
side and sliding it up and down on
the glide rail. (fig.4a) When the spring
plungers are released, they will catch
into the nearest hole immediately below
the pins. The foot plate can also be
removed by dropping it o the bottom
of the chair.
PHOENIX™ Instruction Manual
Footplate angle adjustment
(fig.4b)
9
Page 12
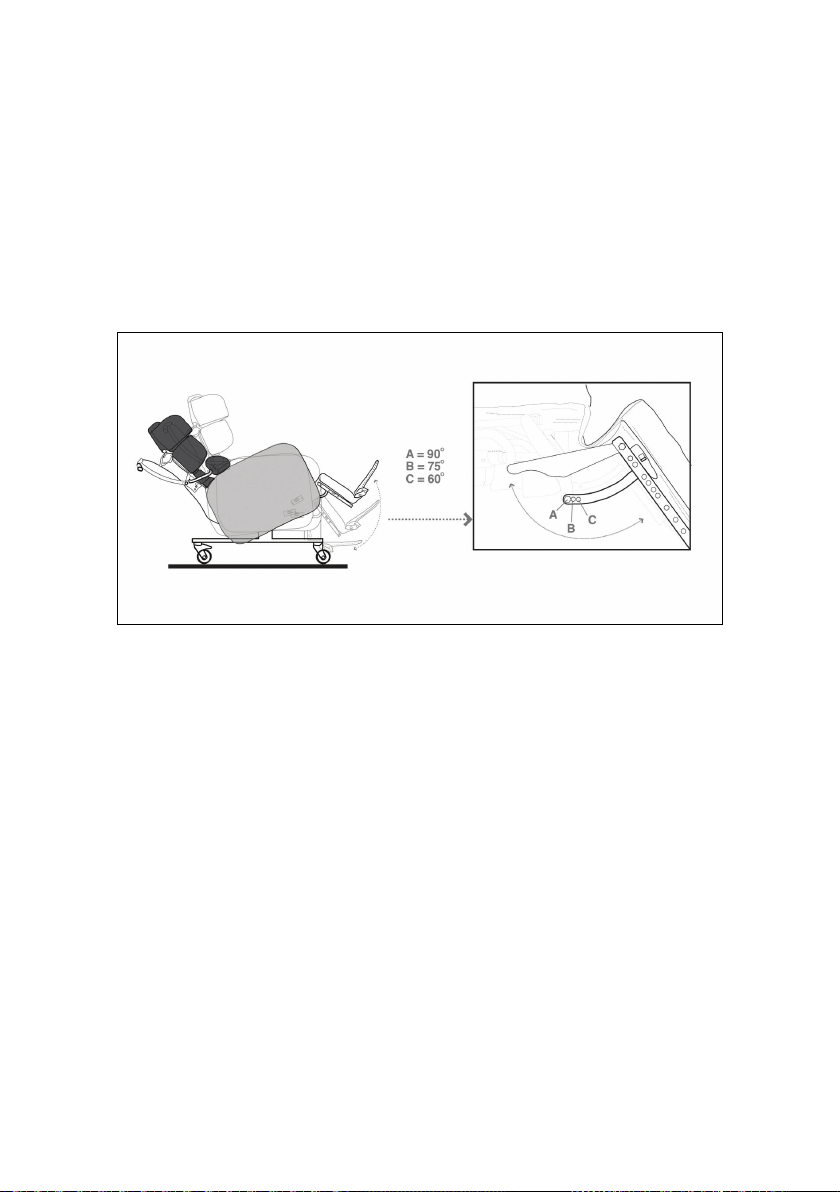
• Footplate angle: There are three angle settings on the footplate labelled A, B and
C. (fig.4b) To change the angle of the footplate loosen the bolts at each side of the
footplate (left and right), remove the bolts, set the footplate to the desired angle (A,B
or C, fig.4b) and insert and tighten the bolts in the new bolt hole. Please Note: when
getting out of the chair, simply fold up the footplate so that it is parallel with the calf pad.
Do not stand on the footplate when getting out of the chair.
• Negative angle leg rest: The leg rest on the chair can be set at a negative angle setting
for clients with tight hamstrings. See diagram below showing positions A, B and C.
To change the setting loosen the bolts at each side of the leg rest (left and right),
remove the bolts, move the leg rest to the desired setting and insert and tighten
the bolts.
• Chair movement: To move the chair around, ensure that the back is in a fully upright
position, the brakes are disengaged and push using the push handle on the back.
Only a competent person should move this chair. Engage the directional lock castor
on the front left of the chair to control the direction of the chair and for ease of
maneuverability.
• Seat cushion: The seat cushion on the PHOENIX™ is a waterproof, pressure
redistributing breathable medium foam cushion providing pressure management and
comfort. The seat cushion will have non-slip material on one face and a zip closure on
one side.
To fit the seat cushion to the chair, ensure the non-slip material is on the bottom
and makes contact with the non-slip material already on the baseboard, with the zip
closure at the rear. This is important as the foam's structure allows good immersion
and envelopment of the body ONLY when fitted as instructed.
PHOENIX™ Instruction Manual
10
Page 13
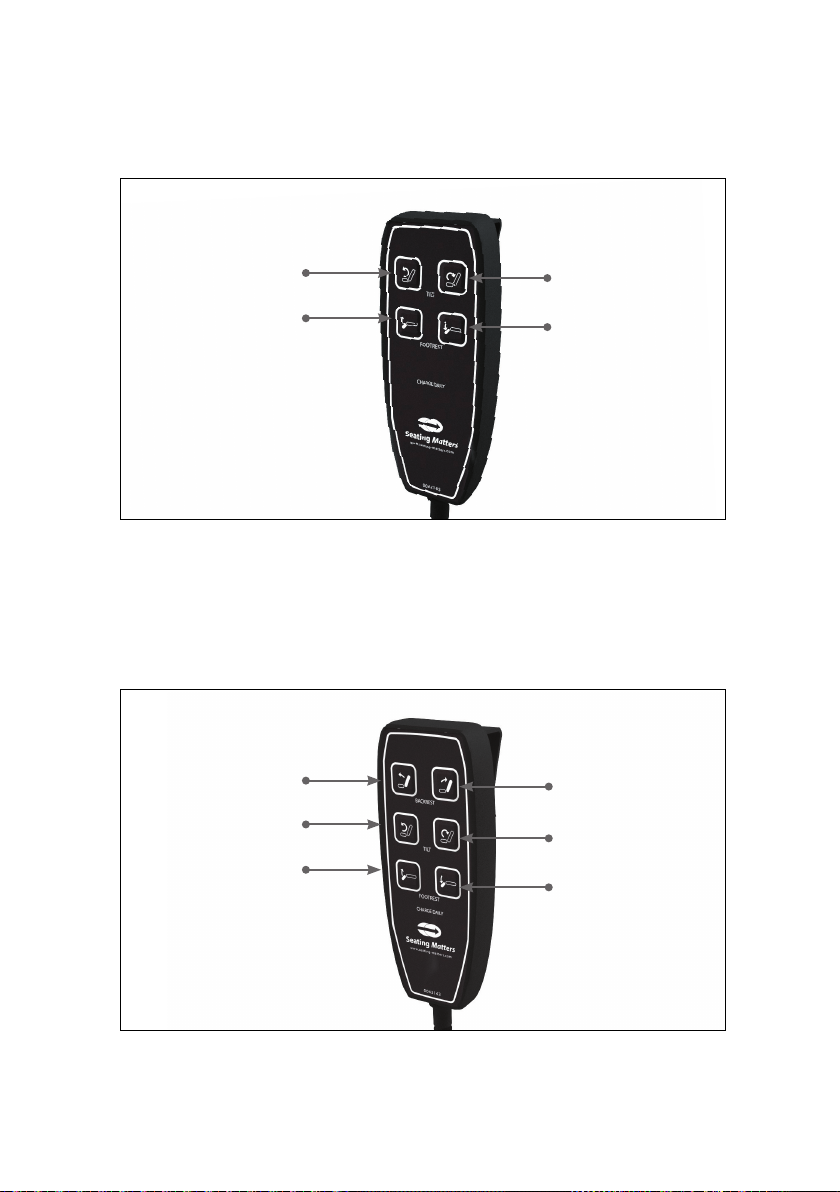
• Partially motorised hand control: If your chair is a partially motorised model the Tilt
In Space and Leg rest are controlled by the electric handset, simply push the button
to operate the desired function.
Tilt Up
Leg Rest Up
Tilt Down
Leg Rest Down
• Fully motorised hand control: If your chair is a fully motorised model the Tilt In Space,
Leg rest and Back angle recline are controlled by the electric handset
simply push the button to operate the desired function.
Back Up
Tilt Up
Leg Rest Up
Back Down
Tilt Down
Leg Rest Down
PHOENIX™ Instruction Manual
11
Page 14
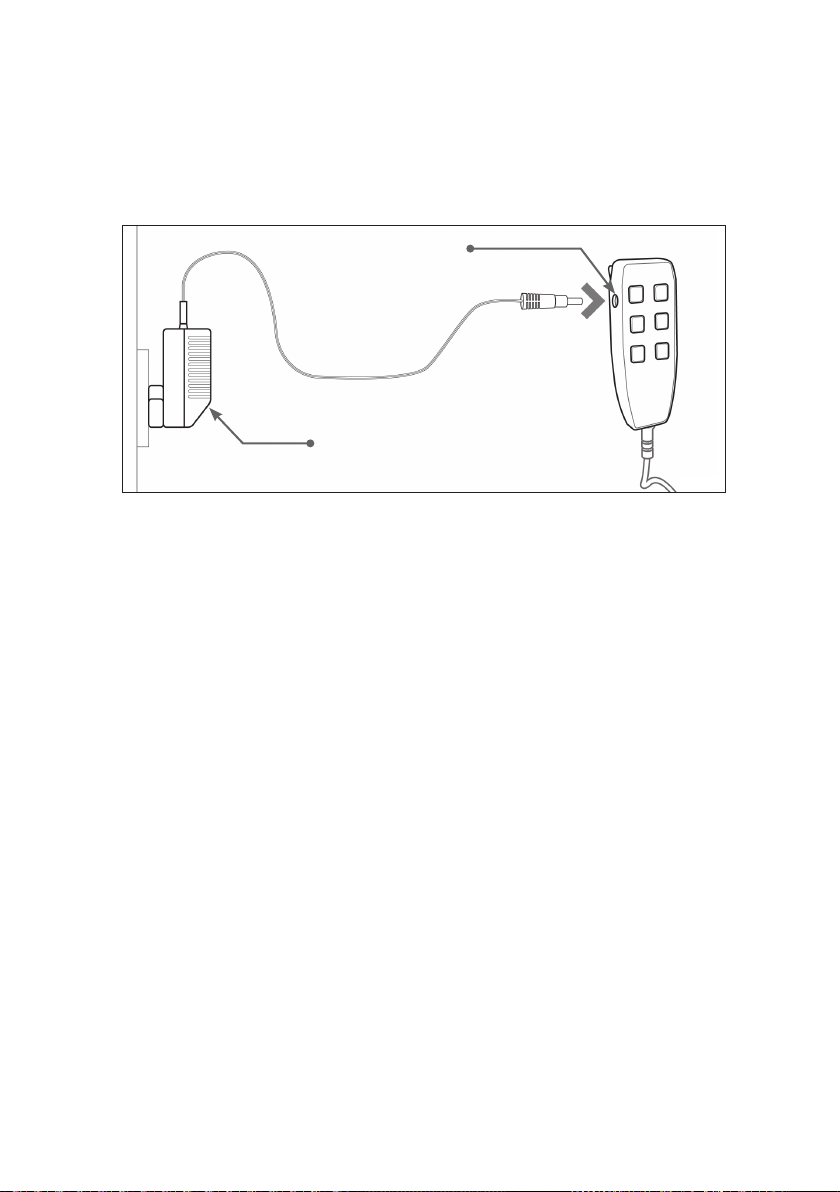
• Charging your chair (For partially motorised and fully motorised models only):
To charge your chair, plug the charger into a wall socket and plug the connector end
of the charger into the charging socket on the side of the handset (fig.5) Charge
the chair until the yellow light on the charger turns green. Do not operate the chair
during charging.
IMPORTANT: PLEASE CHARGE YOUR CHAIR DAILY.
Charging Socket
Charger connected to mains
(fig.5)
• Headrest: The PHOENIX™ telescopic, vertically and horizontally adjustable headrest
has pressure redistributing padding and will adjust away on both sides. This is
especially useful for those will low tone in the upper body, head and neck.
User guide and operating instructions: To adjust the PHOENIX™ headrest, first
ensure the Patient is well supported and safe. Adjustment is easiest when the chair
is in a neutral tilt position, with the seat level or in a slight posterior tilt. Loosen
the three adjustable handles (fig.2) and carefully move the headrest to the desired
position. Lock these handles in place to ensure this section of the headrest will not
move. Check the two adjustable handles below the shoulder support are locked and
secured also. To change the position of the sections at the side of the Patient's head,
loosen the adjustable handles and carefully move this into the desired position
Lock these handles in place to ensure this section of the headrest will not move.
• Back: This height adjustable, pressure redistributing, padded backrest with features
to support kyphotic curve and integrated shoulder supports is a fundamental aspect
of this chair.
User guide and operating instructions: Adjust the back height on this chair before
seating the Patient. Loosen the adjustable wing knob to the right of the back and
ensure your fingers are clear of any areas of entrapment. (fig.2) You can then pull
out the spring plunger and lift and lower the back to the desired height. The spring
plunger (fig.2) will drop into the closest available hole. Ensure the adjustable wing
knob is retightened against the frame. Do not lift the back o the chair or beyond
the 9 inch adjustment in height from the lowest position. To adjust the angle of the
shoulder supports, first ensure the Patient is well supported and safe. Adjustment
is easiest when the chair is in a neutral tilt position, with the seat level or in a slight
posterior tilt. Loosen the two adjustable handles (fig.2) and carefully move the
shoulder support to the desired position. Lock these handles in place to ensure this
section of the headrest will not move. Ensure the three adjustable handles on the
head support are secured also.
www.seatingmatters.com
12
Page 15

WORKING ENVIRONMENT
• Dartex Multi-stretch: Waterproof, stain resistant, flame retardant, multidirectional
stretch for pressure redistribution i.e. seat cushion, calf panels, lateral supports and
seat back.
• Vinyl: Non-absorbent, anti-bacterial, flame retardant, strong, durable material for
outer arms, outside back etc.
Cleaning and Maintenance of Fabrics
• Vinyl: (Arms and outside back)Vinyl is resistant to urine, most household stains, mild
acids/alkalis, drinks and beverages as they are not absorbed and can be wiped o
without any problem or lasting damage. Some dicult substances such as lipstick,
ball point pen ink and food colourings should be cleaned o immediately to avoid
permanent staining.
• Cleaning: To ensure proper cleaning and longevity of the fabrics, the chairs should
be cleaned with warm soapy water followed by a clean water rinse to help retain
the attractive appearance and durability. Heavy, ingrained soiling may be removed
by scrubbing with a soft brush. Strong detergents, solvent cleaners, polishes or
patent chemical cleaners should not be used as they are unnecessary and may cause
embrittlement and cracking of the material. Additional Care – special attention
should be given to head rest and arm rest areas, as build-up of body oils in these
areas will gradually cause the vinyl to harden.
Dartex Multi Stretch Fabric (Patient contact surface)
Properties: This fabric is waterproof, has the ability to be wiped clean and has
biostatic (anti-mycotic) coatings to provide an impenetrable barrier to virus and
bacteria. Superficial dirt may be removed by wiping with a soft cloth moistened
with water containing a neutral detergent. More persistent contamination may be
treated by wiping with alcohols or turpentine substitute, followed by hot water and
detergent. Routine cleaning and disinfection may be carried out on the coating
with hand hot water and a neutral detergent or with a sodium hypochlorite solution
(0.1% or 1000 parts per million available chlorine). The material is compatible with
the 10,000ppm available chlorine in solution required for the decontamination of
blood spills. Excess solution must be removed and the surface thoroughly rinsed
and dried prior to reuse or storage. Proprietary disinfectants may be used provided
manufacturer's instructions are followed. All cleaning agents, and disinfectants, must
be thoroughly rinsed o and the item dried before storage.
Failure to do this may result in damage to the polyurethane coating, react with the
chair frame, or negate the biocompatibility results of the fabric. It is essential that
articles be thoroughly dried after all cleaning procedures and before storage.
PHOENIX™ Instruction Manual
13
Page 16
SEATING MATTERS RECYCLING POLICY
Seating Matters are committed to reducing waste and improving our care for the
environment. We aimed to construct our chairs with as many recyclable materials as
possible that could be repurposed indefinitely.
The WEEE Directive
The WEEE Directive, 2012/19/EC, urges producers of Electrical and Electronic
Equipment (EEE) to provide information on how these products can be treated,
reused or recycled.
In order to comply with this directive in the European Union, Seating Matters
electrical components are marked with a crossed out wheelie bin. This indicates
that the electrical components should be treated in accordance with the WEEE
regulations after their useful life.
Advice on Recycling
• Your Seating Matters product may contain batteries which
should not be disposed of in household waste.
• Never dispose of the battery in a fire. This may cause an
explosion.
• The product may contain substances that could be harmful to
the environment.
• Electrical components must be taken to a proper recycling
facility.
• Your Seating Matters product contains component parts which
can be recycled.
• We thank you for being environmentally responsible and for making eorts to recycle
your Seating Matters product at the end of its’ safe and useful life.
• Contact your local authority or governmental agency for the regulations that apply
in your area.
• If you wish to have Seating Matters recycle your product and your behalf, you are
welcome to return the product to our company.
Plastic Components
Many of our plastic components are made from polypropylene and can
be recycled as long as they are recycled with other polypropylene resin
materials. Polypropylene sheets can be recycled with any other materials
that have this symbol.
Plastic Trays
Our plastic tray tables are made from Polyethylene Terephthalate Glycol
(PETG) which is a sturdy, transparent, easily cleaned material. Like
acrylic, PETG is 100% recyclable and can be recycled and repurposed
indefinitely. Capable of being sterilized, it's a renowned food-safe
www.seatingmatters.com
14
Page 17

material and will help us meet a higher standard towards infection prevention &
control. PETG's damage resistance is far higher than that of acrylic & has an impact
resistance 30 times that of glass. PETG can be recycled with any other materials that
have this symbol.
Safety
The PHOENIX™ is CE marked to show conformance to the Medical Devices Directive
93/42/EEC and conforms to BS ISO 7176 at medium hazard.
Regional Variations
The device referred to as a "Phoenix™" is a Seating Matters product category and
the information included in this document reflects common features of this group
of products. In some regions of the world, we supply product design variations
of equivalent function and ease-of-use but with alternative specifications or
reinforcements.
INTELLECTUAL PROPERTY
Seating Matters are at the forefront of seating research and design, therefore we
take the protection of our intellectual property very seriously and have our designs,
patents and trademarks protected in many jurisdictions throughout the world.
• The Seating Matters Trademark is registered throughout the European Union and
various countries globally.
• Patient Pending: No. GB1915470.7
• US Design Patent: No. 601360S, No. D611718; No. 600932, No. D602704S.
• Australian Design Registration: No. 325536, No. 324011, No. 325537, No. 324012.
• Community Design Registration: No. 001016364-002, No. 000942180-0004, No.
002428813-0001, No. 001016364-001, No. 012673018.
• Canadian Design Registration: No. 130224, No. 128763, No. 130217, No. 128764.
PHOENIX™ Instruction Manual
15
Page 18

PHOENIX™
MAINTENANCE AND SERVICING
Regularly servicing your Seating Matters chair will prevent untimely and inconvenient
breakdowns, reduce repair costs and extend the chair's life. Damage to the chair can
also cause excess strain for the User and Patient.
Important
Parts can only be changed by service persons trained in Seating Matters products and
use only Seating Matters parts. We recommend that your chair is serviced every year by
a Seating Matters approved provider for any running repairs and maintenance.
Maintenance
Carry out the following regular checks to ensure the operation and safety of the chair.
If you are in any doubt about the functioning of your chair contact your Seating
Matters approved provider immediately.
Daily
• Check that the castors are not damaged.
• Check that the castors turn freely.
• Make sure that the castor forks run free and are not bent.
• Check all fabrics for damage or contamination and replace where necessary.
• See Cleaning and Maintenance of Fabrics section in manual for cleaning instructions.
• Check batteries and electrical connections are secure.
Weekly
• Check the castor fittings for hair and dirt etc. which could restrict the castor
movement.
• Pick out any such material with tweezers or take the spindle out, clean it and then
replace it.
• If it is still not free (one continuous turn without it sticking) contact your Seating
Matters approved provider for replacement.
Monthly
• Castors: Make sure the top of the castor housing is parallel with the floor. Any
variation will cause restricted movement. If it is damaged contact your Seating
Matters approved provider for replacement.
• Mechanisms:
Check all tilting mechanisms are working smoothly.
Check that cables are not kinked or frayed.
Check that all nuts and bolts are present.
Check that all nuts and bolts are secure.
www.seatingmatters.com
16
Page 19

Note: If nuts or bolts need attention, contact your Seating Matters approved provider
IMMEDIATELY and DO NOT USE the chair until it has been serviced.
• Leg rest: Check that all leg rests are easily removed/swung-away and replaced or
repositioned easily. Ensure that parts lock in place securely. If parts are not locking
try lubricating. If the problem still remains contact your Seating Matters approved
provider.
• Frame: Check the visible parts of the frame for cracks, splits, large dents or other
damage. If you find any of these things DO NOT USE. Contact your Seating Matters
approved provider immediately.
WE ARE HERE TO HELP
For any questions or queries regarding your Seating Matters chair please contact:
contact@seatingmatters.com
PHOENIX™ Instruction Manual
17
Page 20
18
Page 21
WE ARE HERE TO HELP
For any questions or queries
regarding your Seating Matters
chair please contact:
19
Page 22

VIEW OUR FULL
RANGE OF CHAIRS
& ACCESSORIES
ONLINE
WWW.SEATINGMATTERS.COM
Page 23

Page 24
N
T
U
R
E
O
O
T
D
D
I
.
S
E
C
C
N
E
R
E
F
R
U
F
R
O
A
R
D
T
H
I
S
B
O
O
K
M
U
F
S
T
D
B
E
E
N
I
R
A
E
T
Australia
2/6 St James Place
Seven Hills,
NSW 2147
Australia
Tel: +61 1300 001 050
australia@seatingmatters.com
UK & Europe
1st Floor
239 High Street Kensington
London, UK
W8 6SN
Tel: +44 (0) 20 3982 2900
london@seatingmatters.com
Canada
269 Maplegrove Rd
Colborne
ON, Canada
K0K 1S0
Tel: +1 (905) 507 9007
canada@seatingmatters.com
USA
300 International Drive
Suite 100
Bualo, NY 14221
USA
Tel: +1 (315) 466 8973
usa@seatingmatters.com
N.Ireland & ROI
131 Carnamu Road
Limavady
Northern Ireland
BT49 9JG
Tel: +44 (0) 28 777 666 24
contact@seatingmatters.com
www.seatingmatters.com
 Loading...