

Page 1

PARTS LI
i2 INCH
-- Model Number 103.24280 ......................._......
This _ the mode! number of your Band Saw. It will be
found on a plate on the back cover, mention
model number when communicatJ-ng wlth us _ga._g
"four Band _w or when o_ering parts.
- InS_cfions for Ordering Parts-
All p_s listed herein must be ordered through a Sears
retail store or mali order house_ Parts are shipped p_-
paid. _en ordering repair par_s, always _ve _e _ollow-
ing information:
t. The Part Nun'Lber.
2. The Part Name and Price.
3. _e Mode! Number 103.24_3.
_ l_t _ v_u_le. It w_l _u_ your being _le to'
obta_ proof parts _ice_ We sugg_t you _ep it _th
oth_ v_u_le paper.
SEARS, ROEBUCK and CO.
Page 2
BAND SAW
MODEL NUMBER
LIST FOR
You now own a Band Saw which is the product of
extensive engineering research and thorough test_
ing_ Accurately machined parts built to high in-
spection standards are carefully assembled to make
sure this Band Saw will deliver top quality perform_
ance. These features have all been combined with
an attractive appearance to create a tool that is a
pleasure to operate and a welcome addition to your
shop. This Band Saw can be used for cutting curves,
circles, or any irregular shape as well as straight rip-
ping or cutoff.
To prevent damage in shipment some of the parts
were disassembled from the tool, These parts are
listed below, Be sure they are all accounted for be-
fore discarding any of the packing material.
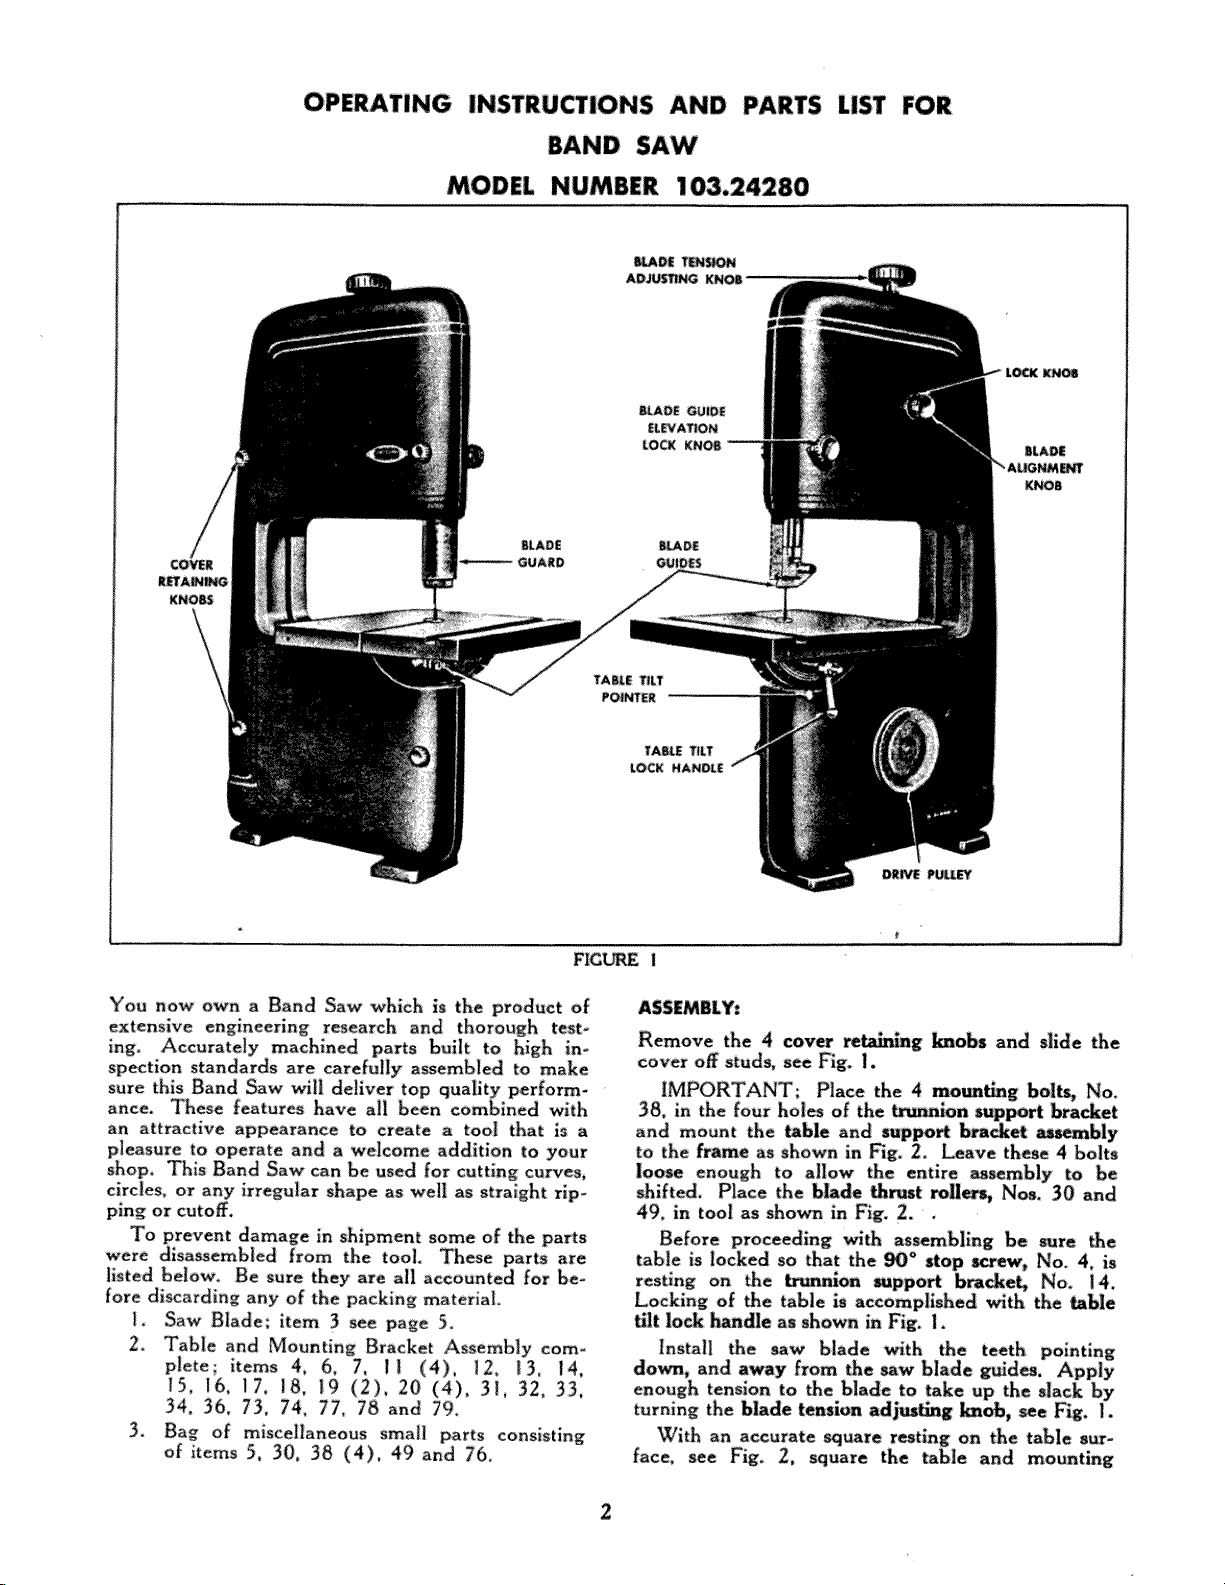
I. Saw Blade; item 3 see page 5_
2. Table and Mounting Bracket Assembly com-
plete; items 4, 6, 7, 11 (4), 12, 13, 14,
15, I6, 17, 18, 19 (2), 20 (4), 31, 32, 33,
34, 36, 73, 74, 77, 78 and 79,
3. Bag of miscellaneous small parts consisting
of items 5, 30_ 38 (4), 49 and 76,
FIGURE i
ASSEMBLY:
Remove the 4 cover knobs and slMe the
cover off studs, see Fig. I,
Place the 4 mounting bol_, No.
38_ in the four holes of the trunnion support bracket
and mount the _bh and suppo_ bracket assembly
to the frame as shown in Fig_ 2. Leave thee 4 bolts
loose enough to a|Iow the entire assembly to be
shifted. Place the blade _ntst rolle_ Nos. 30 and
49, in tool as shown in Fig. 2_ .
Before proceeding wi_ ass_bllng be sure the
table is locked so that the _ stop v:.rew, No_ 4, is
resting on the support bracket, No_ 14.
Locking of _e table h accomplished _th the _ble
flit lock handle as shown in Fig. I.
install the saw blade with the teeth pointing
down_ and away from d_e saw blade guides. Apply
enough tension to the blade to take up the slack by
turning the blade adjus_ kn_, see Fig. I.
With an accurate _uare resting on the table sur_
face, see Fig_ 2, square the ruble and mounting
Page 3

bracketassemblywith the sawblade,and finish
tighteningthemounting_lts, Nor 3&
Placetheknurledscrew,No. 5, in thetablesaw
slot.
Beforereplacingthe coverchecktheblade for
"Tension'"and"Tracking"asexplainedunder"Ad-
INSTALLATION=
Securely "bolt the Band Saw to a solidly "built bench
checking each foot and adding spacers if necessary
to provide good contact with the bench, it is sug-
gested that the bench be of sufficient height to bring
the saw table about elbow level.
Three holes have been provided to secure Band
Saw to bench. There are two holes in the front foot
on the outside of the tool. The rear foot has one: hole
accessible from inside the:cover.
We suggest that a 3-inch square hole be cut in the
bench top directly back of the front foot to prevent
the accumulation of saw dust,
The motor may be installed behind or below toot.
termined after the motor position has been selected
by measuring with a steel tape around the outside
of the pulleys, not in the grooves,
LUBRICATION:
A special double row bail bearing built into the drive
shaft and the two single row ball beatings in the idler
wheel have been packed with lubricant and sealed at
the factory_ They require no further attention.
The blade thr_troiled, as shown in Fig. 2, should
be lubricated occasionally. Other moving and slid-
ing parts such as the guide slide bar, No. 46, and
table trunnions_ Nos. 12 and 16, may require occa_
sional lubrication to maintain smooth operation.
CONTROLS=
The table tilt lock handle locks the table in any posi-
tion from 90* to 45* with _w blade.
The table _t pointer indi_tes the: table angle on
the calibrated trunnion scale.
The blade back up the blade: for both lateral
and direct thrust.
The blade guide el lo_k knob controls the
upper assembly in relation _ table surface for vari-
ous work piece thicknesses.
The blade ali_ment knob provides a means of
tilting the upper wheel for correct _w blade tracing.
BOLTS
FIGURE 2
MOTOR:
A I/3 horsepower 1750 R.P,M. motor is recom-
mended for general usage.
Install the motor so that the direction of rotation
of the drive pulley, see Fig. I, is counter-clockwise
when viewed from the drive pulley side of the tool.
SPEED=
The above motor equipped with a 2-inch diameter
pulley .will give an arbor speed of approximately
640 R,P,M, This is recommended for general use
with wood and similar matetial.
When purchasing the motor pulley be sure to spe-
cify the shaft diameter of your motor and that the
pulley is for a l/2-inch V-belt,
BELT:
The drive pulley is designed for use with a standard
N-inch V_belt, The length of this belt may be de-
ADJUSTMENTS:
This tool was completely checked and tested under
power at the factory. Rough handling in shipment
may have caused some misa]ignmenL Check the fol-
lowing points to insure proper operation.
Proper Made tension may be _t by raising or
lowering the upper wheal assembly. This is done by
turning the bhde tension adjusfmg knob as shown in
Fig. |. When properly adjusted the blade should de_
press the rubber facings on the wheels slightly and
also may be deflected by thumb pressure exerted be-
tween the first two fingers.
The saw blade must run consistently on the approx-
imate center of the wheals. The wheels are c_owned
to accomplish this, with the upper wheel being tilt-
able. Rotate the mechanism by hand and if the saw
blade tends to ride off d-_e wheels loosen the lock
_ob, as shown in Fig. I. Turn the blade _gnment
knob slightly in or out until _e blade returns to its
proper position.
When blade tracks consistently 6ghten the lock
knob.
Saw guide _emMies are provided both above
and below the table to support the blade against
lateral and direct thrust,
_'_e upper saw guide a_mbly, Fig. 3, m_t operate
so that the distance from the back of the saw blade
to the _rust roller remains the same throughout the
entire up and down movement of the a_embly. If
3
Page 4

adjustment is nece_ remove the cover and _rn
the upp_ _w ra_de _ g _, Fg. 3,
either in or out as required._ When adjustment is
completed lock the adju_.ing screw log nut, Fig. 3,
to maintain adjustment.
NOTE: After a f_€ hou_ of op_a_on tighten all
pulley set screws.
Following are several common _es of Band _w
blade br_kag_ Avoid thee _tuafions by fr_uenfly
and _mce from your blade.
F1GUFt£ 3
Adjust the saw guide as_mblies so that the hte_l
saw g-_des_ see Fig. 2, when adjusted, will contact the
blade on the solid portion only, not on the: teeth or
necessary. Lock the saw guide assemblies in position.
The hteral saw gmd_ must be set as dose as pos-
sible to the blade without binding it at any point or
deflecting it sideways. Lock _e set screws securing
the lateral saw guides.
The bhde thrust rollers _ shown h Fig. 2 should
be set the thickness of a piece of newspaper, _e Fig.
3, from the back edge of _e blade. Adjustment of
the blade thrust rollers may be accomplished by
loosening the holder set _ews (Fig, 2) and
moving both _e holder bearing and thr_t taller in
or out by turning the back Up scrcw_ Fig. 3, until the
roller is in the correct position. Re-lock the holder
tighten the hold_ b_.ng s_ _ _e Fig. 2, only
slightly in bo_ the upper and lower saw _ide hrack-.
eta as any undue pressure may _use the thrust roller
to bind,
T'he above adjustments shodd result in a free run-
sing saw blade when no cut6ng is being done_
The table h square _ h Wtade and at
the _me time the pointer indicate zero on the _le.
If correction is necessary it may be made _th an
accurate square resting on the table surface: and
a_inst the saw blade. Adjust the _o slop sc-rew_see
Fig, 2, until co has been made,
The _ble _t polnte_, _ shown in F_g. l, may now
be readjusted to the zero mark on the s_le by loosen-
ing the screw which holds _e pointer to the tool
After' making adjustments on the Band Saw, check
_refuily by turning the mechanism by hand several
revolutions before appl_ng power.
Failure to bring the upper g_a_de _ y down
" 1
dose to _e work allo_ dhto_on of _e blade
which encourag_ brae,
_xce-_ve feed pressure C_US_ _e blade to _de
hard on _e thPa_ rolle_ _u_ng cra&ing and _en-
t_l br_k_e. A dull blade, or one that has been
Both of _e gdd_ and _e blade _I1 be dan,aged
if _e _id_ touch the tee_ rather than _e _ooth
_d_ of the blade.
If the blade is allowed to _ tither on the tool or
F_.na!ly, one of t,he most common _ of blade
difficulty is the practice of cutting too sha_ a radius
or turning the work pi_e too f_t when catting a
rad.i_ thus binding or twisting _e blade, Follow_
ing h a table _owing _e approximate minimum
diameters which _ould be cut _th vario_ wid_
binds,
WIDTH iNCH_
DIAMETER INCH_
I/8
I/4
i/2
OP|RAIIOH:
Hold the work pie_ firmly ag_-_st _e table surface
during cutting operatior, s.
Do not force the -.-cork aga_st the blade beyond
the cutting _pad_ of the bhde _ thi_ will make
the following of the _ttem extremely difficul_
A few practice cuts h ad'dsable tO get the hd of
Band
SAFe:
operator proteete& It _ a good practice to stop the
tool before raising or lowering the upp_ blade wade.
ACC _-_S for this rod are a fence for ripping
and a miter gage for angular cuts. _ acc_ori_
are list_ in our catalog and may be purchased _m
your nearest _rs retail store or _l order hou_e_
Page 5

Q
%
55
0
\
7
I
Page 6

PARTS LIST
No_
i0
l|
12
13
!4
t5
16
!7
18
19
2O
21
22
23
24
25
26
27
28
29
30
31
32
33
34
35
36
37
38
39
40
41
I
2
3
4
5
6
7
8
Oi-d_r
P_rt: No_
18619
4 {230
41716
_X-309
4{628
_X-4 i 7
41260
X437
412!4
41215
X,746
41150
38416
41421
41616
41417
X-606
X-432
41813
x-!o0
41625
41220
_X-383
41213
41718
38716
41711
41624
38812
18232
41130
41416
X-162
_X-420
'_X-377
41621
41130
)(-745
41414
X-736
X-607
SsUfn*
Knob ............................................................ ............ $ ,45
Cover ................................................... ........ 14.00
Band Saw Blade---avai|able in widths of l./S"+
PART NAME _eh
I/_" 3,_" and ½" x 80" long_ Purchase from
nearest Sears retail store or mail order house.
Ask for catalog No. 9-262 $, State width wanted.
Machine _rew 5/16+ 18x1 square head .............. 10
Knurhd s_:rew ................................... _....................... ! 5
H_, nut 5/16-18 ...................................................... |0
Table .................................................................... {4.50
Machine screw 5/16-! 8x3/4 hew head _th _-
temal !ock washer .................................................. 10
Right foot ...........................................................1.20
_ft foot .............................................................. t.20
Machine screw 5/16-1 8x3/4 round head with ex-
ternal lock washer ............................................. 10
Table trunnion with scale ....................................... 1.50
Table inert .....................................................................15
Trunnion support bracket ...................................... 2.50
Guide: holder stud ................................................. 20
Table trunnion plain ............................................ !.30 6! 41612
Plain w_her 3/8 I.D. x 7/80.D ......................10 62 41611
Hex, nut: 3/8-24 ................................................... 10 63 41419
Saw _ide .................................................................. 15 64 38715
Set screw 1/4-20xl/4 slotted head cup point ...... 10 66 41619
Cover stud_lower fight ................................... 20 67 38120
Bearing and key assembly_rive wheel .......... 5.00 68 X-182
Machine _rew 1/4_20x3/8 slotted truss head ...... 10 69 4 | 811
Lower wheel .............................................................. 8,00 70 41413
Lower wheel retaining ring .................................. 15 71 41250
Retaining ring ................................................. 15 72 41210
Spring washer .! 5 7 3 18922
Cover stud left .......................................................... l 5 75 X- 179
Drive shaft key ...................................................... 15 76 *X-1403
Blade thrust roller ................................................. 35 77 X-606
Holder beating ........................................................... 25 78 384 {7
Lower _w guide bracket .................................... 60 79 384{4
Set screw 1/4-20x5/8 slotted head half dog point ,10 80 41140
Hex. nut 1/4-20, ................................................... 10
Much, _rew No, ! _24x3/8 slot'd binding hd, , I 0
%unnion l_k screw ........................................ 30
Holder bearing ...................................................... 25 81 41715
........................................................ 74 *X-516
llt_t*
tl+atlorl Order
No. Part No,
42 41813
43 X.162
44 *X-420
45 41816
46 41617
47 41050
48 X.100
49 18232
50 )(-193
5 ! _X-420
52 *X-382
53 41712
54 18211
55 41812
56 41270
_8 41815
59 _X-417
60 X-745
41020
Ms&, _rew 5/|6-18x! hew hd. with ext. lock 82 41030
washer ................................................................... 10 83 41004
Upper s_w guide bracket ....................................65
Much. _rew 1/4-20x I l hex. hd. with ex- 84 4 i 005
ternal !ock washer .....................................................! 0
Plain washer 17/64 I.D, x 19/32 O,D ................ 10
S,_llinS
PART NAME _h
Saw guide ...................................................... $ .15
Set screw I !4-20x518 slotted hd. half dog point , ! 0
H_ nut 1/4_20 ...............................................10
" Guide bar tension spring .......................................... l 5
Upper mW _ide bar .............................................1. I 0
_ver stud a_embly--upper right .......................40
Set screw 1/4-20x!/4 slotted head cup point ...... 10
Blade thrust roller ..................................................35
Set _r_ 1/4-20xl/2 slotted hd. round point .10
Hex nut l/4-20 ..................................................10
Prt_s
Much, screw 1/4-20x3/8 slotted binding hd ........ 10
Blade guard 35
Bearing---upper wheel I_80
Beating spacing ring =........................................... 15
Upper Wheel and beafing assembly ...................i2.00
_'heel tire ........................................................ 75
Upper wheel fulcrum assembly ..........................1,85
Hex, nut 5/!6-18 10
Much. screw 5/16.18x1 hex, hd. with external
lock washer ........................................................ 10
Upper wheel guide rod .......................................20
Upper wh_l ten_oner rod ...................................25
Upper wheel bracket ........................................1.50
Upper wheel guide rod retaining ring ............ 15
Tension knob bushing ..2.o.._+.......................35
Hand wheel with set screw ................. _............. 2.25
_t screw 5116-18x5116 socket head cone point +10
_w blade tension spring .......................... 35
Wh_l adj, lock knob 40
Upper wheel adL knob with stud .................. 85
Upper saw _ide lock knob ...................................75
Protractor pointer ............................................. ! 5
Much. screw No. _32x I/4 slotted round hd. oI 0
Set screw 5/16-|8x5/16 socket head cup point _10
Allen v,_ench_5i32 ..........................................15
Plain washer 3/8 LD, x 7/80.D .........................!0
Trunnion lock nut. ................................................35
Table ti!t lock handle ..........................................75
Pulley _th set screw_5 inch single groove V-
pulley 5/8 in_ bore. Purchase from your n_r-
_t _ars re_ii store or mail order house, Ask
for Catalog No. 9-2805_5/8 inch hare, ...........
Driva wheel bearing retaining ring .................20
Frame ......................................................25.00
Upper _w guide assembly complete consisting
of: 37, 39, 42, 43, 44, 48, and 49. .....................1.50
Lower saw guide a_embiy complete consisting
of; t9, 20, 30, 3t, 32, 33, and 34 .................... 1.40
35Z
 Loading...