

INSTALLATION INSTRUCTIONS FOR REPLACEMENT CUTTING KNIVES FOR 4-1/8 IN., 4-3/8 IN. AND 6-1/8 IN. CRAFTSMAN JOINTER/PLANERS
general safety instructions for power tools
1. KNOW YOUR POWER TOOL
Read the owner's manual carefully. Learn its application and limitations as well as the specific potential hazards peculiar to this tool.
2. GROUND ALL TOOLS
This tool is equipped with an approved 3-conductor cord and a 3-prong grounding type plug to fit the proper grounding type receptacle. The green conductor in the cord is the grounding wire. Never connect the green wire to a live terminal.
3. KEEP GUARDS IN PLACE
- in working order, and in proper adjustment and alignment.
4. REMOVE ADJUSTING KEYS AND WRENCHES
Form habit of checking to see that keys and adjusting wrenches are removed from tool before turning it on.
5. KEEP WORK AREA CLEAN
Cluttered areas and benches invite accidents. Floor must not be slippery due to wax or sawdust.
6. AVOID DANGEROUS ENVIRONMENT
Don't use power tools in damp or wet locations or expose them to rain. Keep work area well lighted Provide adequate surrounding work space.
7. KEEP CHILDREN AWAY
All visitors should be kept a safe distance from work area.
8. MAKE WORKSHOP KID-PROOF
- with padlocks, master switches, or by removing starter keys.
9. DON'T FORCE TOOL
It will do the job better and safer at the rate for which it was designed.
10. USE RIGHT TOOL
Don't force tool or attachment to do a job it was not designed for.
11. WEAR PROPER APPAREL
Do not wear loose clothing, gloves, neckties or jewelry (rings, wristwatches) to get caught in moving parts. NONSLIP footwear is recommended. Wear protective hair covering to contain long hair. Roll long sleeves above the elbow.
12. USE SAFETY GOGGLES (Head Protection)
Wear safety goggles (must comply with ANS Z87.1) at all times. Also, use face or dust mask if cutting operation is dusty, and ear protectors (plugs or muffs) during extended periods of operation.
13. SECURE WORK
Use clamps or a vise to hold work when practical. It's safer than using your hand, frees both hands to operate tool.
14. DON'T OVERREACH
Keep proper footing and balance at all times.
15. MAINTAIN TOOLS WITH CARE
Keep tools sharp and clean for best and safest performance. Follow instructions for lubricating and changing accessories.
16. DISCONNECT TOOLS
before servicing; when changing accessories such as blades, bits, cutters, etc.
17. AVOID ACCIDENTAL STARTING
Make sure switch is in "OFF" position before plugging in.
18. USE RECOMMENDED ACCESSORIES
Consult the owner's manual for recommended accessories. Follow the instructions that accompany the accessories. The use of improper accessories may cause hazards.
19. NEVER STAND ON TOOL
Serious injury could occur if the tool is tipped or if the cutting tool is accidentally contacted.
Do not store materials above or near the tool such that it is necessary to stand on the tool to reach them.
20. CHECK DAMAGED PARTS
Before further use of the tool, a guard or other part that is damaged should be carefully checked to ensure that it will operate properly and perform its intended function. Check for alignment of moving parts, binding of moving parts, breakage of parts, mounting, and any other conditions that may affect its operation. A guard or other part that is damaged should be properly repaired or replaced.
21. DIRECTION OF FEED
Feed work into a blade or cutter against the direction of rotation of the blade or cutter only.
22. NEVER LEAVE TOOL RUNNING UNATTENDED
Turn power off. Don't leave tool until it comes to a complete stop.

The operation of any power tool can result in foreign objects being thrown into the eyes, which can result in severe eye damage. Always wear safety goggles complying with ANSI Z87.1 (shown on Package) before commencing power tool operation. Safety Goggles are available at Sears retail or catalog stores.
NOTE: If your jointer/planer is not equipped with LIFTER SCREWS underneath the knives, ignore any portion of the following instructions that refer to them.
When installing knives in jointers not equipped with lifter screws, use a small screw driver to pry the knives up and/or small block of wood to push them down.
WARNING: FOR YOUR OWN SAFETY, TURN SWITCH "OFF" AND REMOVE PLUG FROM POWER SOURCE OUTLET BEFORE ADJUSTING REMOVING OR IN-STALLING KNIVES.
- 1. Remove belt guard.
- 2. Position fence to right . approximately-1/4 in. beyond knives . lock it in place.
- 3. Lower infeed table all the way down.
- 4. Place block of wood between cutterguard and fence only long enough to hold guard so that it just clears the end of the cutterhead.

Hold cutterhead pulley firmly with one hand and completely loosen lockscrews in each wedge using a 5/32 in, setscrew wrench.

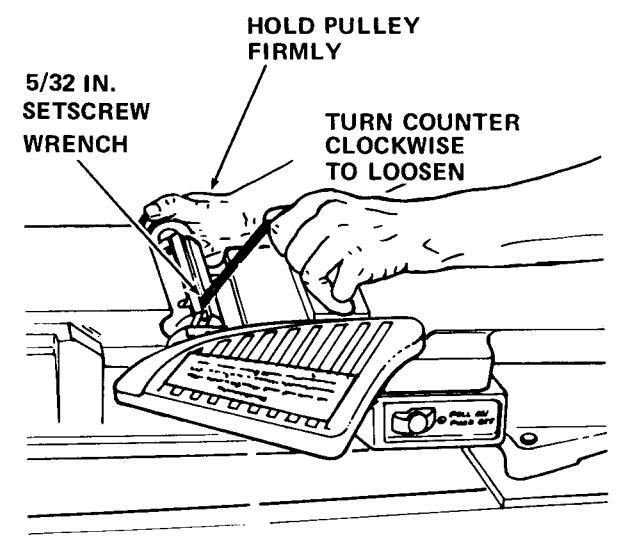
FENCE NOT SHOWN FOR PICTURE CLARITY
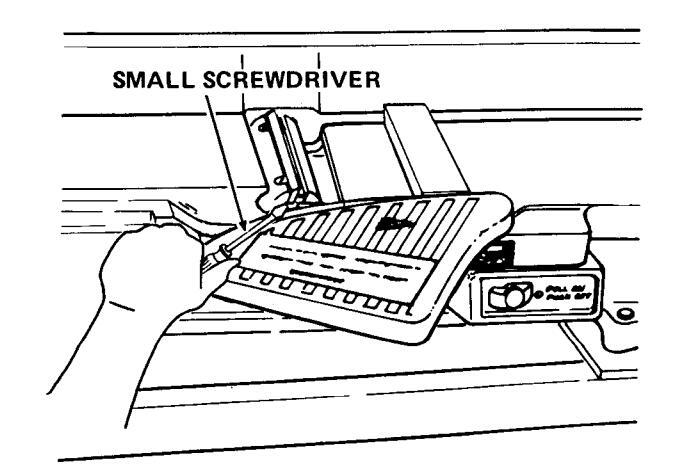
6. While holding cutterhead pulley firmly with one hand, gently pry up each wedge using a screwdriver . . remove wedges and knives.
- 7. Remove the six lifter screws. (Two under each knife) using an 1/8 in. setscrew wrench.
- 8. Clean cutterhead, wedges and screws thoroughly with Craftsman Gum and Pitch Remover. Remove the oil from new knives.
- 9. Replace the six lifter screws and screw them in all the way, but do not tighten. Mark each slot 1, 2, and 3. This will help you in setting the knives.

Insert a knife in slot marked 1 so that the cutting edge is pointing toward the infeed table. Position the knife so that it projects 1/16 in. beyond end of cutterhead.

- 11. Insert a wedge next to knife so the flat side of the wedge is against the blade. Push wedge in manually do not install two locking setscrews at this time.
- 12. Place head of square on outfeed table. Loosen lifter screws to raise knife until it just touches square and slightly raises it. Gently turn cutterhead back and forth with the pulley while raising knife. The knives should be adjusted just slightly above the outfeed table, by approximately .003 in. (thickness of an average piece of paper).
- NOTE: Sears has a knife setting gauge for this purpose. CAT. 9-26497.

- 13. Now install both locking setscrews and tighten (with the 5/32" setscrew wrench) alternately a little at a time. Tighten both screws securely. Recheck the knife to make sure it did not change position.
- 14. Install other two knives the same way.

SHARPENING KNIVES
The knives can be honed individually with an ordinary oilstone.
Make sure your oilstone is not worn in the center. It must be flat.
Be sure to remove the burr on the flat side.
Never attempt to sharpen knives while installed in cutterhead — either manually or with power "ON".
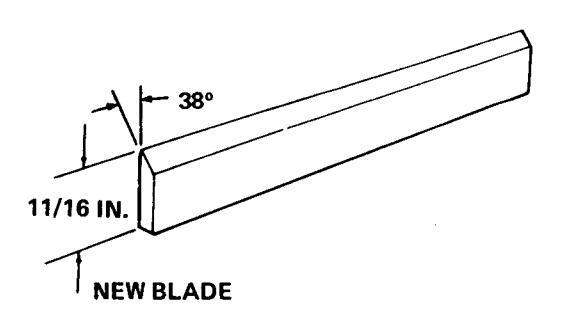
If the knives are nicked, they must be replaced or reground. They can be reground several times until they become 9/16 in. wide. Never install reground knives less than 9/16 in. wide.
Have your knives reground by someone who is competent. Look in the "Yellow Pages" of your telephone directory . . see "Sharpening Services".

Sold by SEARS, ROEBUCK AND CO., Chicago, IL. 60684 U.S.A.


 Loading...