

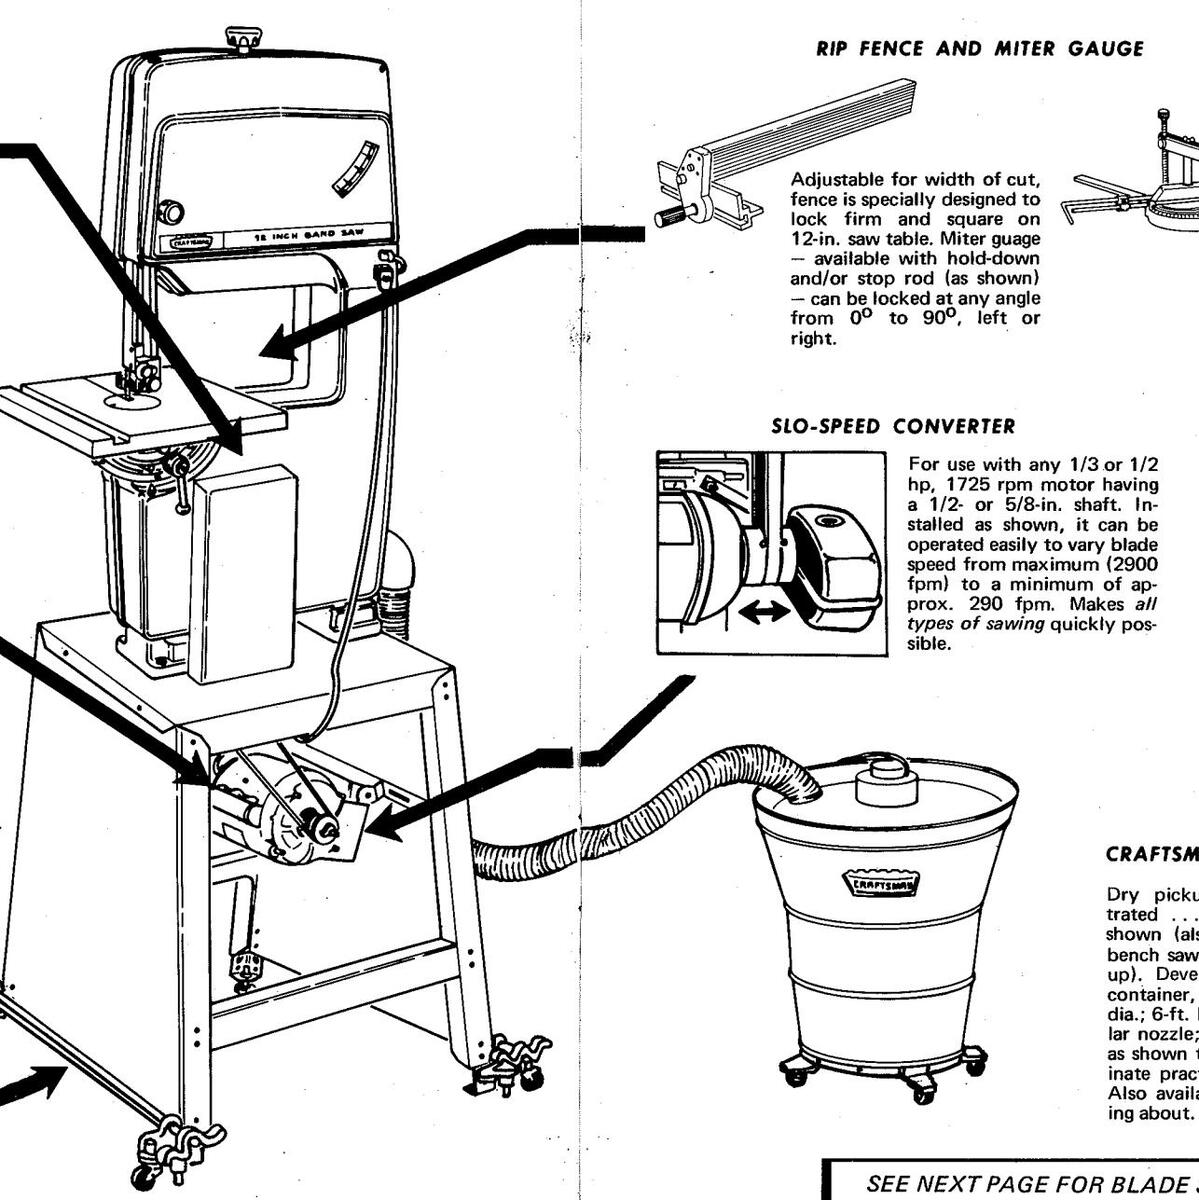
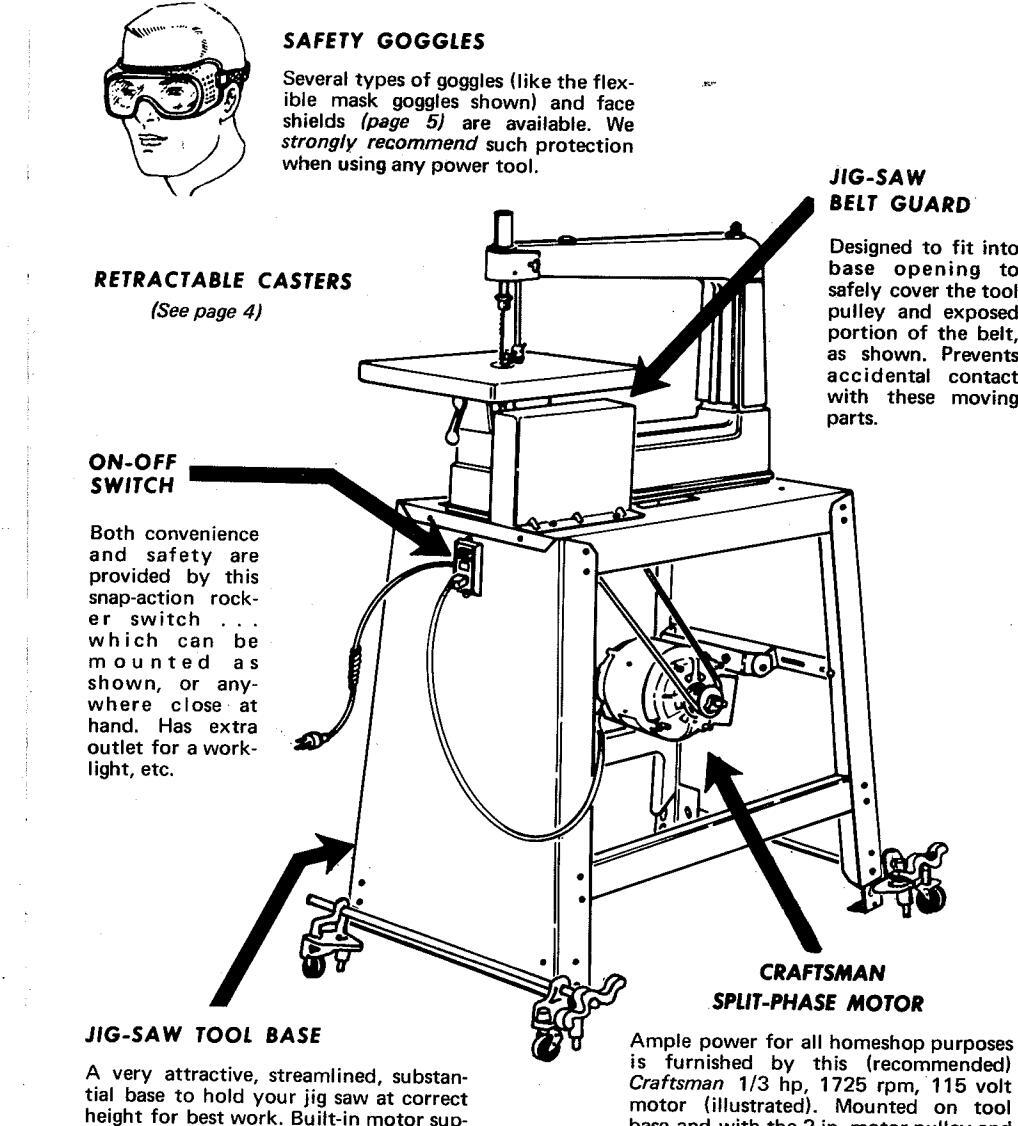
Accessories Increase Scope and Quality of Work

HE RIGHT MOTOR
You wouldn't expect a child to lift a man's loadthen why expect an undersize motor to run your tool with the speed and power needed for smooth, clean cutting? Power Your tool with the Craftsman Motor designed for the iob.
THE RIGHT TOOL BASE
If your tool is mounted so it wobbles or is awkward to reach, it may produce more mishaps than good work. Sears offers a Craftsman Tool Base designed especially for each bench tool ... a firm, substantial, proper height base that occupies a minimum space and is easy to move when necessary.
AN ON-OFF SWITCH
uit-of-the-way switch? If your tool doesn't hav uilt-in switch you can easily attach this Craftsm 0n-Off Switch to your tool or the base
A BELT GUARD
Speeding belts and pulleys have grabby habits they can grab anything that flaps or floats too near. Use the Craftsman Belt Guard designed fo your tool, and save yourself from such grabby cotton-picking "hands".

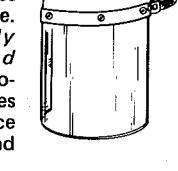
A FACE SHIELD
No sensible knight ever faced a javelin thrust barefaced. Why should you go barefaced into the shower of flying missels tossed off by a high-speed tool? With a Craftsman Face Shield you can see better than yee olden knight – and won't perspire
WHY LIMIT YOUR TOOL'S CAPACITY TO A "ONE-ARM" JOE

Wades your BAND SAW will cut plastics, heetmetal, non-ferrous and ferrous metals – is well as wood? That wider, coarser blades to faster work through thick pieces; but harrower, finer blades make sharper turns? That a SIo-Speed Converter makes it possible o saw through steel bars? That you can uide workpieces more easily and make truer, moother cuts with a Miter Gauge and/or a Rip Fence? That you can even use your tool or sanding – using a Sanding Belt? And the IG SAW also can cut wood, plastic or metal - with the proper Blades.
This book tells you how to get the mo from your tool and the accessories.
HOW
Band Saw and Jig Saw
OVER 75 OPERATIONS DESCRIBED AND ILLUSTRATED
A ERHEIMAN HANDBOOK
Page THE BAND SAW GENERAL INFORMATION . 2-3 SET UP AND ACCESSORIES Motor and Mounting Requirements -Useful Accessories ALL ABOUT BLADES Plastic Cutting – Maintenance OPERATING TECHNIQUES . STRAIGHT-CUTTING OPER. . . 9-12 General – Crosscutting – Ripping – Resawing – Uses of Fence, Miter Gauge, Cut-Off Board - Bevel Bioping OTHER STANDARD OPER. . Cuts - Slots, Openings, Difficult Designs – Arcs – Compound Sawing – A Cabriole Leg SPECIAL SAWING OPERATIONS , 16 Circles - Multiple Sawing - Pattern Guides – Duplicate Curves – Perfect Arcs – Beveled Curves – A Guide Arm - Dowels - Taper Cuts - Spiral Dowels – A Stop Gauge – Circular Bails – Facing Strips – Preparing Lathe SAWING METALS PLASTICS ETC. AND SANDING . Blade Selection – Speeds – Techniques GENERAL INFORMATION . 24 Descriptive Data – Selection SET-UP AND ACCESSORIES . 25 Motor and Mounting Requirements – Useful Accessories ALL ABOUT BLADES . GENERAL INFORMATION ..... 27 Starting Work – Blade Rotation IG SAW OPERATIONS 28.22 Patterns – Templates – Starting and Feeding Work - Straight, Circle and Angle Cutting — Fitting Pieces — Inlay Work - Signs - Coped and Tubular Joints – Using Files
BEVISED 1969
INDEX
The Band Saw and Jig Saw
An Illustrated Manual of Operation for the...
HOME CRAFTSMAN SHOP OWNER
USAGE -- ACCESSORIES -- OPERATING INSTRUCTIONS -- BLADE SELECTIONS CROSSCUTTING -- RIPPING -- RESAWING CUTTING CIRCLES -- MULTIPLE SAWING METAL CUTTING -- PATTERN TRANSFER FILING -- SANDING -- INLAYS
OVER 150 OPERATIONS

CRAFTSMAN HANDBOOK
A MIDWEST TECHNICAL PUBLICATION
Copyrighted 1969 SEARS, ROEBUCK and CO.
Catalog No. 9-2919
ADVANCED FEATURES OF
Although the principal woodworking use of a saw will also do additional types of work which connet (or connet as easily) he done with other shop tools. For instance, it will cut through in one operation - a much thicker workpiece than can be cut through by a circular blade. This makes it useful for reserving of wide boards ... and exceptionally advantageous for simultaneous sawing of multiple layers of wood for inlay or duplicate pattern work. The fact that a band-saw blade leaves a very narrow kerf also makes it practical to cut inlay pieces in this simple manner, then match the cut pieces from various lavers.
Other special uses of a properly accessoried band saw are the sawing of soft materials (foam plastic cardboard, etc.), all kinds of plastics sheetmetal and all metals and the belt sanding of wood, plastic or metal. As with wood these other materials can be straight-line or contour cut ... and at miter and/or bevel angles (up to 450) if desired. All cuts are extremely clean and smooth, requiring a minimum of sanding or polishing.
When selecting a band saw for woodworking the first consideration is the maximum size of workpiece that can be cut. Maximum work thickness (depth of cut) is determined by the
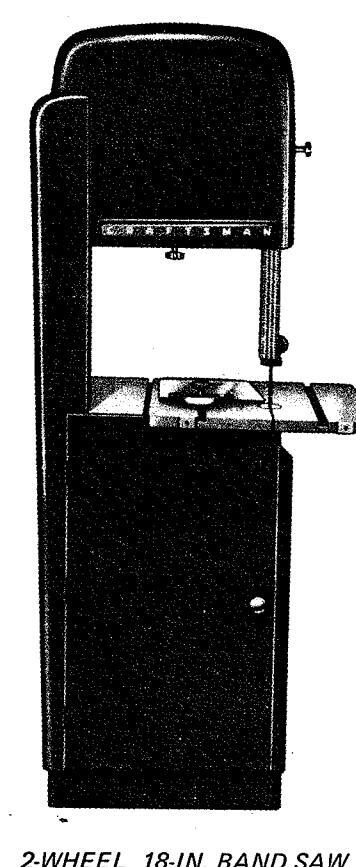
TENSION SCALE CORD OUTI FT UDIDE-DAN SWITCH WORK LIGHT COVER -OUTLET ELROW 2-WHEEL 12-IN BAND SAW
SEARS MODERN BAND SAWS
vertical distance between the table and the upper blade guide, when the blade guard is fully elevated. Maximum width at left of blade is determined by the distance (called depth of throat) between the blade and the frame. and this is the rated size (12-in, 18-in, etc.) of the tool. For cutting wood, the optimum blade speed is 2900-3000 ft, per min.
If you will also use the band saw for cutting plastics, metals, etc., different blade speeds must be available. The Craftsman 18-In. Model has a built-in gear reduction unit with which you can obtain four different speeds ranging
from 118 up to 3550 ft. per min. The Craftsman 12 In Model can be fitted with a Slo progressively down to about 295 ft. per min And the *11-in. Model has dual pulleys – for wood and metal cutting respectively
To do bevel-angle cutting the saw table must be tiltable: and for accurate miter-angle cutting, there must be a miter gauge. The Craftsman 12. and 18-In. Models both have tables that can be tilted up to 45° and locked; both have a miter gauge available: and both also have a fence available for fast, accurate ripping of long boards.
Other exceptional features of the Craftsman 12-In. Band Saw are: A built-in Work Light A built-in, conveniently located ON-OFF Switch A built-in Sawdust Election System can be used with a Shon Vac (page 4) to eliminate most of the sawdust. Plus such other advantages as all ball-bearing construction microadjust blade quards with quide sights for easy setting: quick, foolproof blade tensioning; a non-rotating table insert a specially designed sanding attachment: and color-code controls
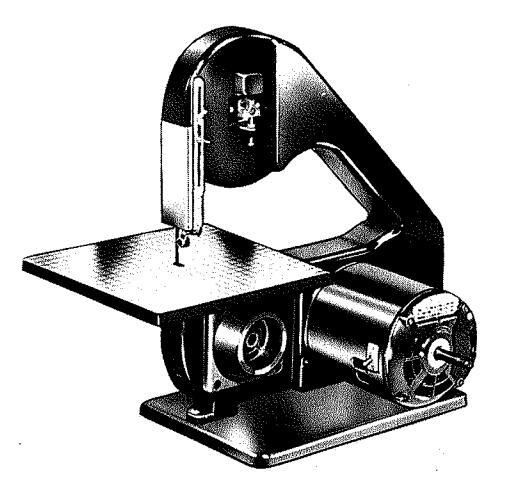
3 WHEEL 11-IN BAND SAW
ACCESSORIES FOR MAXIMUM SAF WITH THE CRAFTSMAN 12-IN. BAND SAW
ETY WORK AND CONVENIENCE ----
BAND SAW RELT GUARD
Designed to fit into base opening, this guard covers the band-saw pulley and all the exnosed portion of the belt (above base top) for absolute safety from accidental contact with these moving parts.
CDAETSMAN POWED TOOL MOTOR
A general-purpose motor of 1/2 ho 1725 rom 115 volts only is recommended for this 12-in. band saw. Your best buy is the Craftsman capacitor-start motor designed for this purnose. This motor, together with the motor pulley and V-belt furnished with the tool will provide the approx. 2900 ft per min, blade travel recommended for woodcutting.
BAND SAW TOOL BASE
A handsomely streamlined, sturdy all-steel "individual bench" for your tool Has built-in motor mount and belt-quard opening. Supnorts tool at best beight for operations ... can easily be moved into any position required for handling
PETPACTARIE CASTER SET
Set includes two 2-caster assemblies each with a foot lever Simply step on lever either to lower casters for rolling
Several models saféty googles are available. We strongly recommend that you protect your eves or whole face whenever band
Parts for co version of 12 in, saw for
sanding are fur-
nished with
tool. Extra
helts are avail
able as replace-
various sanding
CRAFTSMAN HOME-N-SHOP VAC
Dry pickup, 3-bushel model is illustrated ... and recommended for use shown (also for attachment to 12-in. bench saw and general homeshop cleanup). Develops 1 hp: Permanex durable container, 27-1/4 high by 22-7/8-in. dia.: 6-ft, hose with detachable triangular nozzle: and an 8-ft cord Connected as shown to 12-in, band saw, will eliminate practically all sawdust problems. Also available with dolly for easy rolling about. Also several other models.
SEE NEXT PAGE FOR BLADE SELECTIONS
—— BAND SAW BLADE SELECTION
TYPES OF BLADES
Wood cutting and metal cutting require different types of blades ... moreover, blades come in various widths – from 1/8 in. to 1/2 in. for standard replacement blades, and up to 1-1/2 in. for special blades. There is no allaround, general-purpose blade. If you wish to do a variety of work – and do it well, without damage to the blade – you should have a selection of blades suited to your various materials and operations.
WOOD-CUTTING BLADES
Because a wider blade obviously is stiffer and stouter than a narrower one, fast, rough work normally is done with the wider blades (1/2 in. up). For this reason, the coarseness of the teeth - number of teeth per inch of blade - unless specified to the contrary, is relative to the blade width. That is, the narrowest (1/8-in.) blade has the finest teeth, and the teeth are progressively coarser on the wider blades.
A coarse-tooth blade will cut faster than a finetooth one ... especially in damp or gummy wood. However, to obtain a smooth finish cut, a finer-tooth blade must be used. Some suppliers carry special wide blades with fine teeth - for production-type cabinet work - but for average use a 1/4-in. blade will do excellent, smooth cutting.
Another consideration affecting blade choice is the tightness and intricacy or any turns that are to be sawed. A narrow blade will make a sharp turn, but is difficult to saw a true, straight line with because of the ease with which it will


follow a curve. The wider the blade, the easier it is to saw straight . and the bigger in radius any turns must be.
When selecting wood-cutting blades, choose the widest you will have use for – for fast, straight, rough cutting ... then also choose the narrowest you will need for intricate pattern work. If this selection does not include a suitable straight-cutting finish-type blade, also include a 1/4 or 3/8-in. size. You needn't be concerned with blade thickness as this has been standardized in relation to the blade length and type saw it is to be used on. Also, practically all standard wood-cutting blades have the same tooth set ... alternate teeth are set at opposite sides.
METAL-CUTTING BLADES
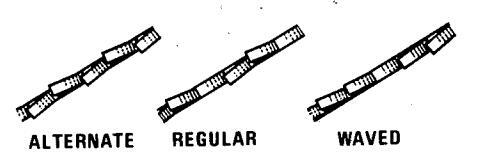
TYPES OF BLADE SETS
These differ from wood-cutting blades in several ways. They are made of tougher, harder-tempered tool steel. The teeth are finer. Different types of tooth-set are used. In general, there are three types: 1) Blades with alternate-set, slightly coarser teeth ... designed for the non-ferrous metals. 2) Those with finer teeth and a "regular" set (like the first except that every third tooth is not set, to act as a raker) ... designed for iron and steel. 3) "Wave set" blades (fine teeth set 4 or 5 in a row to first one side, then the other) ... designed for cutting tubing and sheetmetal.
Though widths to 5/8 in. and more are available, 1/4 in. is a popular all-purpose width. Select the type of tooth-set needed for the kind of work.
AND BLADE CARE -
PLASTIC CUTTING
There are no standard blades designed especially for cutting plastics. Thermo-setting plastics (which soften when sufficiently heated) are likely to gum and bind a blade that has fine teeth ... so should be cut with a coarser-tooth wood-cutting blade whenever this is practical. Other plastics cut best with the finer-tooth blades.
BLADE MAINTENANCE
NOTE
For sharpening refer to Craftsman Handbook "How to Sharpen", Catalog No. 9-2924.
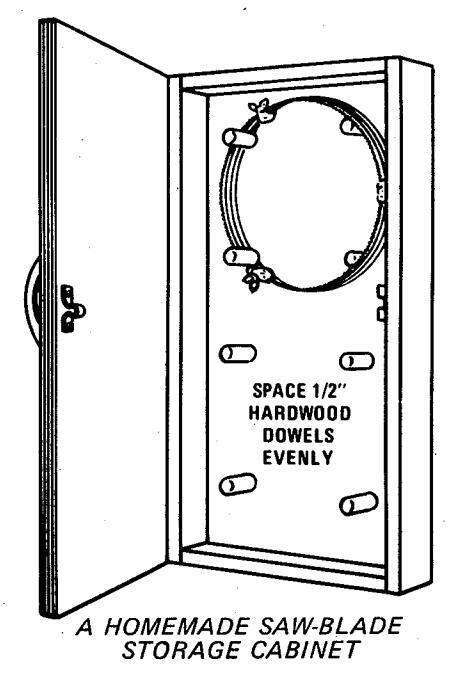
Storage
A blade that is not in use should be wiped with an oily rag – to prevent rusting – and stored in such a way as to protect the teeth. A handy type cabinet (easily made) is shown.
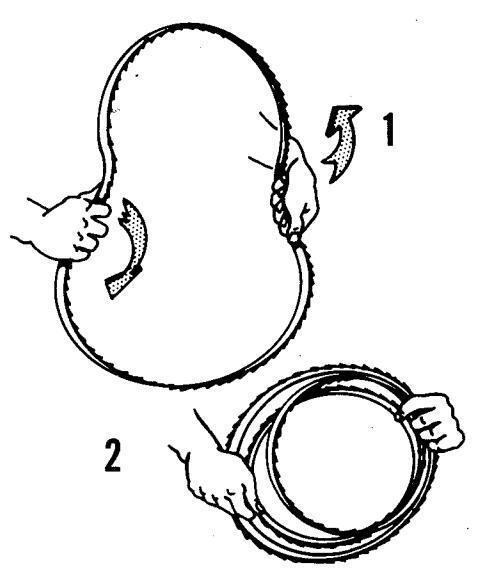
FOLDING A BAND-SAW BLADE
To fold the blade, grip it with back toward you, left hand with thumb up and right hand with thumb down. Hold firmly . (1) Simultaneously rotate left wrist to turn thumb down and right wrist to turn thumb up ... allowing hands to move toward each other as pulled by the blade. As you twist, blade will coil into a tight, triple loop. (2) Tie loops with string or tape.
To unfold a blade drop it on a flat surface . do not twist it as this might break the weld.
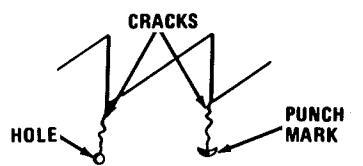
A Cracked Blade
If a crack does not extend across more than 1/6 the blade width, it can be stopped by drilling a small (No. 60 drill) hole at the bottom of the crack. Crescent-shaped punch marks, one at each side of blade, instead of the hole, will sometimes work. However, if crack is deeper – or if blade is only 1/4 in. or less wide – blade should be broken and mended. Mending is done by brazing or silver-soldering... requires an expert.
5
OPERATING TECHNIQUES
GENERAL INFORMATION
With a little experience, and by following a few simple operating rules, any home craftsman can quickly acquire the knack of turning out first class work. There is little danger involved in the use of the band saw, but a few safety precautions should be followed.
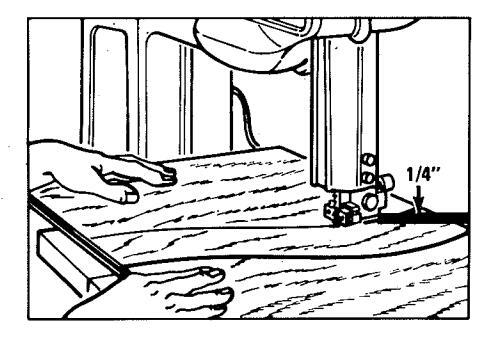
Before using the saw, make sure that it is in good operating condition, and that all adjustments have been correctly made (refer to the instruction sheet packaged with your tool). The saw table and the floor space around the saw should be kept free of pieces of wood and other objects. Onlookers should not be allowed to stand on the right-hand side of the saw, since a breakage of the saw blade might possibly result in their being injured. The cutting area should be well illuminated. Before feeding work to the blade, the upper guide and guard should always be adjusted so that it is within 1/4-inch of the work.
CORRECT PROCEDURE
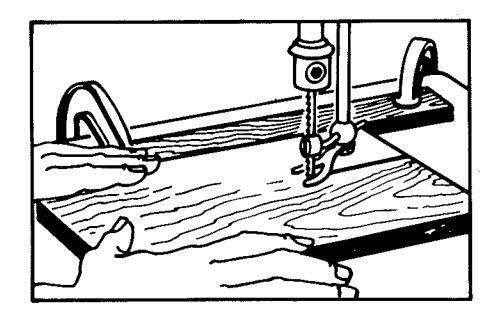
To operate the band saw, stand at the left-hand side of the table in a comfortable position. Use your right hand to feed the work to the saw blade, and your left hand to operate the switch and help guide the work. Never shove the work at the saw; feed it forward with even, gentle pressure. If it seems necessary to force the work into the saw, the saw blade is dull and must be resharpened. Your right hand should guide the work firmly, but should be kept a safe distance from the saw blade at all times. However, avoid
Before starting the saw, place the work next to the blade and adjust the upper guide so that it is approximately 1/4-inch above the work. After turning the saw on, do not feed the work to the blade until the blade is moving at full speed. Avoid, as much as possible, having to back work off of the blade in order to remove it ... but if this should be necessary, hold the kerf carefully parallel to the blade while backing the work off.
OVERCOMING LEAD
When feeding a workpiece straight to the blade, the saw should cut a straight line – it should never be necessary to feed work at an angle in order to saw a straight line.
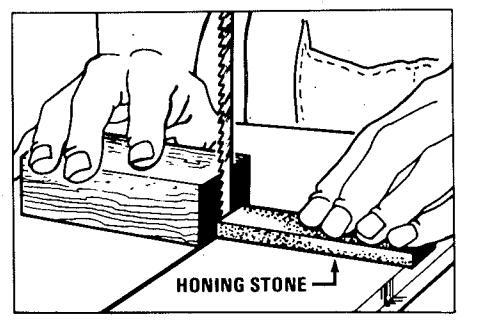
If the cut tends to run toward one side – that is, to "lead" – either the blade guides are improperly adjusted, or the saw blade is improperly sharpened. Check the guides first. If these are properly set, then the blade teeth are either set too far toward one side or are incorrectly sharpened.
If teeth set is at fault, the side toward which the work turns will be the side at which there is excessive set. This usually can be corrected by holding a fine honing stone lightly against the teeth on this side with the blade running ... just enough to wear off the slight excess tooth projections. If teeth are not correctly sharpened, however, the only remedy is to resharpen and reset them properly.
STRAIGHT CUTTING OPERATIONS
GENERAL INFORMATION
There are two big advantages of the band saw over a circular saw. First, much thicker workpieces can be cut. Second, since there is so much less blade inside the kerf while cutting, there is much less (in fact, practically no) tendency for the blade to bind and kickback the work ... unless you deliberately squeeze the kerf closed around the blade, or twist the work.
Prior to making any cut, set the upper guide assembly to about 1/4 in. above workpiece top. The thicker and/or "tougher" the workpiece, the more important this is.
NOTE
Some illustrations in this book show the upper guide assembly set too high. This has been done in order to keep it from obstructing the view ... is not intended to okay such practice.
CROSSCUTTING
Freehand
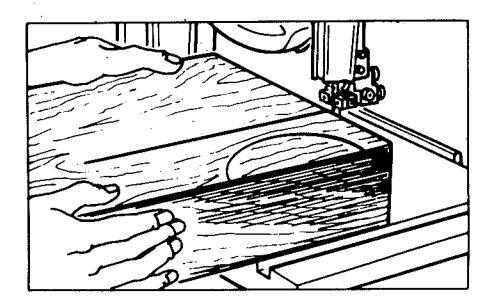
A satisfactorily straight line can be sawed if: 1) You first draw a straight guide line on the workpiece top, and 2) You carefully guide the workpiece with both hands – at equal distances each side of this line – so as to feed the work straight to the blade. If workpiece is shaped so that you can do so, draw your guide line all around the workpiece... then grasp workpiece in both hands and rotate it into the blade to form a kerf clear around it, before finishing the cut.
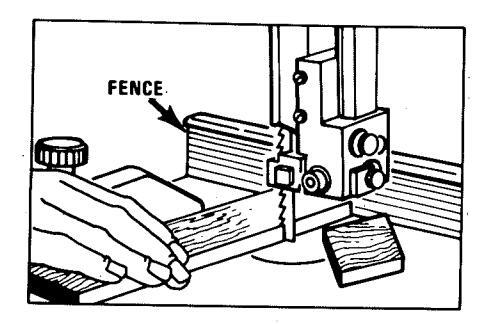
Using Fence
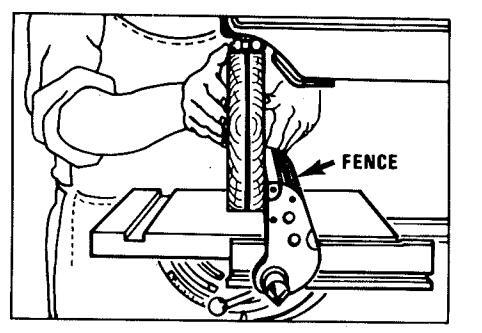
The fence can guide work for a true 900 straight crosscut if the end against the fence is straight and square ... and if this end is long enough to provide a steady (non-wobbling) support. Use your left hand – placed to the left of the blade – to guide and advance the work. If edge of work is too narrow, use a backing block (as shown) to ride against the fence. In either case, fence must be placed so that work touches it when blade contacts the work at desired location of the cut. A straightedge can be clamped to the table to serve as a fence if you don't have one.
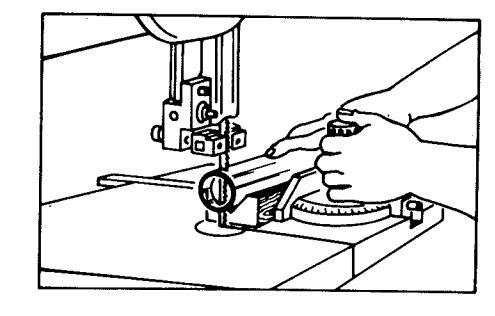
Using Miter Gauge
The miter gauge can be adjusted to feed work at a true 900 angle, or at any desired angle to back edge of work ... and will guide the work straight to the blade. When using the miter gauge, use right hand to push the gauge and to
simultaneously hold work squarely against it. Use left hand, only if needed, to help hold work against the gauge. Do not use it to help the feeding.
If your miter gauge is equipped with a holddown and/or a stop rod ( page 5 ) these will greatly increase the accuracy and ease with which you can feed (with right hand alone). Use the stop rod at the right side of the gauge.

If work is too wide or long to start the miter gauge in its slot behind the work, turn the gauge around so that it is in front of the work, as shown. Stand at front of saw. Hold work against gauge with right hand; use left hand, placed directly in line with right hand, to feed the work. When gauge rides out of its slot, stop, reposition it behind the work ... then finish.
Uniform Cut-Offs
If a number of identical pieces are to be cut off, there are several ways to set up a quick, accurate means of measuring them.
One method is to use the stop-rod attachment on the miter gauge. This rod can be adjusted to hold right-hand end of workpiece at a set distance from the blade, so that a series of workpieces can be trimmed off to the same length (or width).
Another method is to set up the fence at a fixed distance from the blade to slide left end
of work against ... then guide work with the miter gauge. This is a quick way to cut many identical pieces from a single workpiece. If a fence is not available, clamp a stop block to the table to serve in place of fence to fix starting position of work left end.
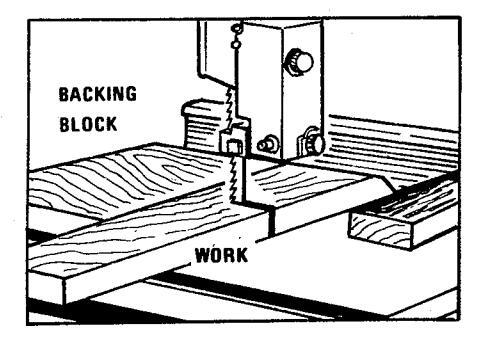
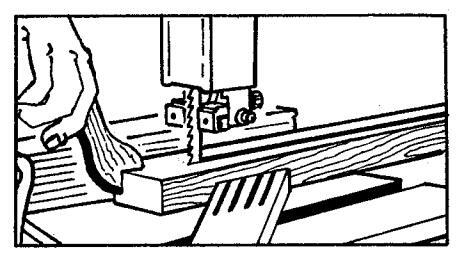
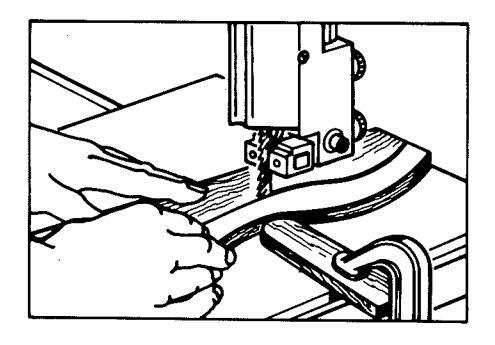
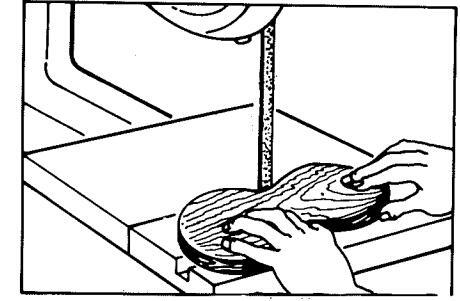
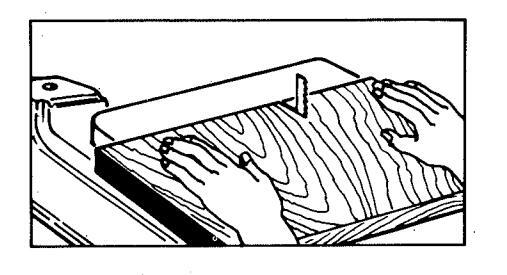
RIPPING AND RESAWING
Freehand
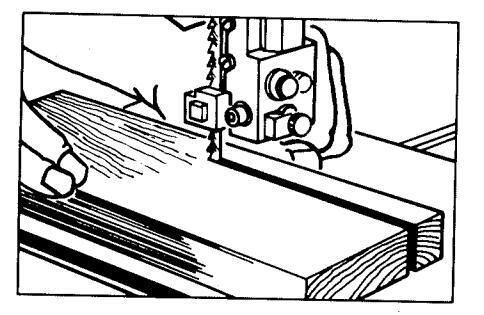
Short boards can be ripped (or resawed) along a satisfactorily straight line without a guide; although some type of guide (as explained later) is recommended for accuracy. Use your left hand, as illustrated, to guide the work against, while feeding with right hand. Best have a straight line drawn on workpiece to guide by. If resawing a wide board and a circular saw is available, first groove each edge an inch or more deep ... the band-saw blade will then be guided by the grooves. Never try to freehand resaw a wide, thin board! This is practically impossible ... and could endanger your hands.
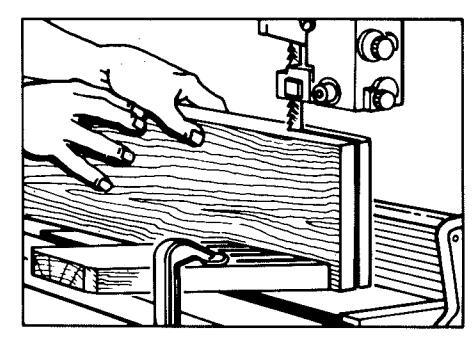
Using Fence
The proper way to rip a straight line - or, especially, to resaw - is to use the fence. If fence isn't available, clamp a straightedge to the table to serve instead. When board is short
enough, you can use your right hand to hold the board against the fence, while feeding with your left hand. If work is too long for this, best use a hold-in.
You can make a simple wood-spring hold-in (shown) to clamp to the table top. This must be positioned to contact the right side of the workpiece — either directly opposite or a bit ahead of the blade — to hold workpiece firmly over against the fence. Never position a hold-in to contact work behind the blade (in area where work has already been sawed), as this would tend to close the kerf and bind the blade.
Narrow Work
When ripping or resawing a narrow board, a hold-in is especially desirable since it takes the place of your right hand, which otherwise must be held close to the blade for guiding the work. Also, to prevent the feeding hand from moving too close to the blade, preferably use a push stick, as shown. Or, walk around and pull the work through to finish the cut; but be careful not to squeeze the kerf closed.
Long Work
Never leave a long board unsupported at its end(s) so that it can bounce on the table top and spoil your cut (or, possibly, break the blade). Preferably place one support at the start, between table and end of board you grasp

for feeding ... and a second support at other side of table to catch board as it is sawed. Wooden horses of correct height, a drill-press table (which can be adjusted to proper height), another movable tool, etc. are suggested supports. The best, however, is a roller support, as shown, which you can devise yourself.
Untrue, Long Work
If ripping or resawing a board with sides out of true (so that it won't stand upright on the table and/or won't slide evenly against a fence) you have little choice except to use a "semifreehand" method. Position your fence (at inner side) and a wood spring or wood block (at outer side opposite the blade) so that work will slide between them with no more side play than necessary. Now feed the work between these guides as carefully as possible.
Odd-Shaped Small Work
It is often necessary to make a straight cut on an odd-shaped board that cannot be guided by the fence or miter gauge. A cut-off board is very useful for jobs of this kind. The board, as illustrated ( page 12 ), is easily made. Make the guide strip at bottom a good sliding fit in the table groove. Two matched V-grooves in the faces of the boards are useful for holding dowels and similar round stock. If both boards are countersunk to receive the bolt heads, the fixture can be turned upside down (by reversing the bolts) for freehand use.
A CUT-OFF BOARD

Bevel Ripping
When ripping work with the saw table tilted, use the miter gauge and miter-gauge hold down,
as illustrated, to firmly support the work. If you do not have this accessory, then you must clamp a straightedge to the table, instead, to prevent work from sliding down toward the right.
OTHER STANDARD OPERATIONS
GENERAL INFORMATION
Plan ahead before making any unusual cuts. Useless and/or difficult work may thus be avoided. First, lay out the work on the stock to be sawed, drawing lines so that sawing will be done consistently in the waste areas along outer sides of your lines. Now examine your stock and lay-out to determine whether or not you can swing the workpiece freely within the throat area of the saw to make each cut continuously (without having to back out and start elsewhere to finish it). By starting a cut at the proper place — or by first trimming off waste corners or ends — you may be able to simplify the final sawing operations.
If there are many cuts which will require special set-ups (like tilting the table, adjusting the fence, or use of a jig), try to group these so as to eliminate unnecessary resetting-up.
THE USE OF AUXILIARY CUTS
If your general operation calls for use of a fairly wide blade, but includes a few turns too sharp for this blade to make, there are two methods of avoiding having to change blades.
The first, and best, method is to make preliminary radial cuts as illustrated. Have the small ends of the wedges, where these touch the curve to be sawed, smaller than the width of your blade. Thus, when you are sawing the curve and the wedges drop off one by one, there will be clearance for the blade to make a sharper than normal turn.
A second method (p. 13) is to make a number of tangent cuts to approach the final curve in gentle turns that the blade can make. Unless you are very careful, however, this will produce a rougher finish cut than the first method.
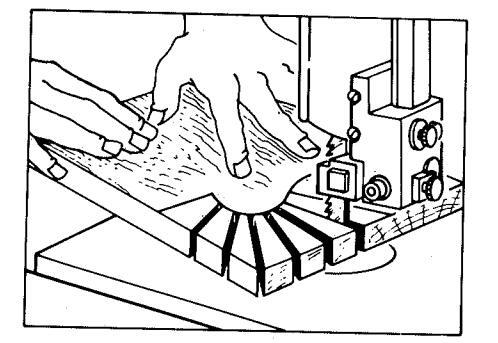
PLANNING MULTIPLE CUTS

Whenever work requires the making of several cuts, always make the shorter ones first. This will often eliminate the necessity of having to back the work out through a long kerf. With the short cuts made first, the large pieces of waste stock will be freed at the ends of the long cuts.
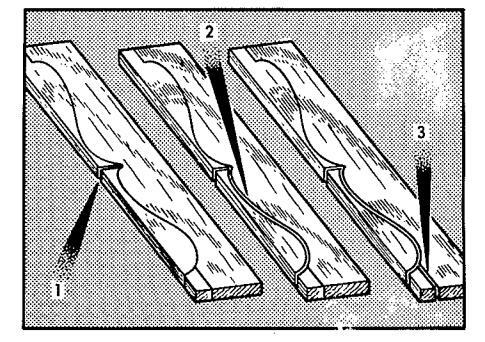
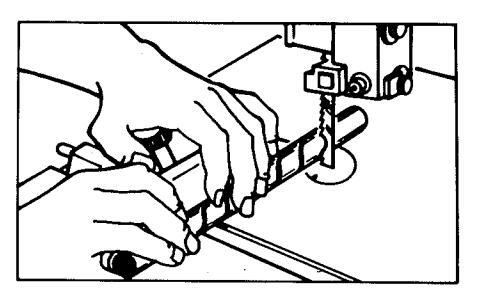
SAWING A NARROW SLOT
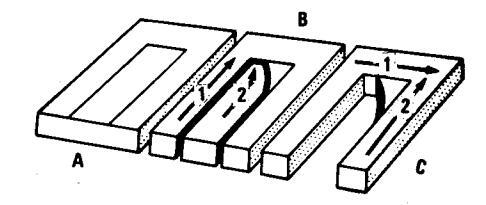
The steps involved in sawing out long narrow slots are illustrated. "A" shows the layout of the slot. "B" shows the two cuts needed to remove the first section of waste. "C" shows the two cuts used to remove the remaining waste piece.
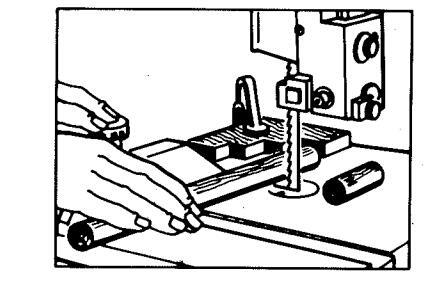
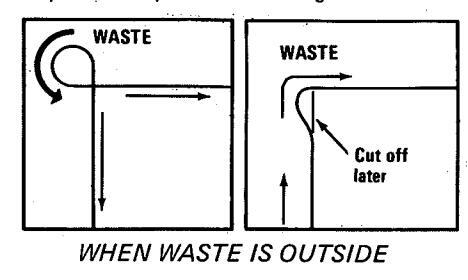
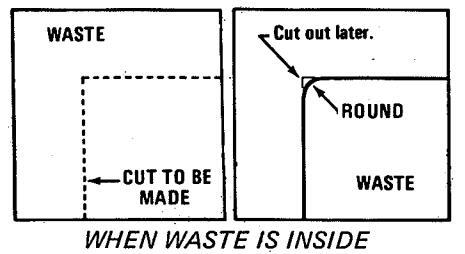
SAWING A RECTANGULAR OPENING
A rectangular opening is sawed as illustrated. Make one side cut and back the work out
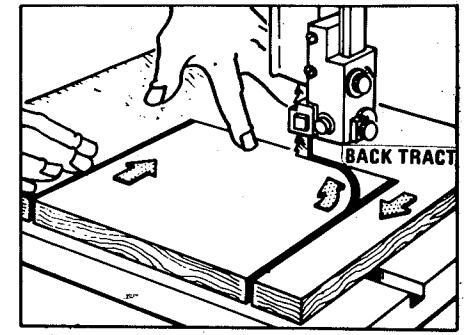
through the kerf. Then make the other side cut, back out to provide turning radius, then cut over to the inside line and continue on to meet the first cut at the corner. Cut out the remaining corner.
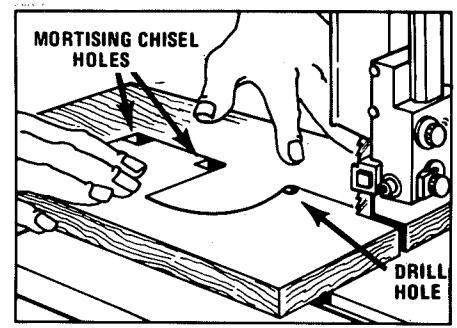
Another method is to drill large enough holes at the two corners to provide turning radius ... then make one continuous cut. Square the corners afterwards.
DIFFICULT DESIGN
Each design has its own peculiarities, so there is no general rule to cover all situations. Two typical problems – and their solutions – are illustrated.
In the first problem, the sharp angle at center of the design cannot be turned cleanly by your
blade. 1) You make your first cut straight in to center of angle. 2) Now, by cutting the curve in two cuts, one from each end, the result will be the cleanest, sharpest angle that you could want. 3) The two end cuts are made in one continuous ripping operation, using straight edge of work to slide against fence ... to secure straightness and equal width at each end.

In the second problem, even though your blade will follow all the curves, you would have to swing the work considerably to make this all in one cut. Your accuracy might be impared. So you first cut the general outline and leave the details to be cut out one at a time, later.
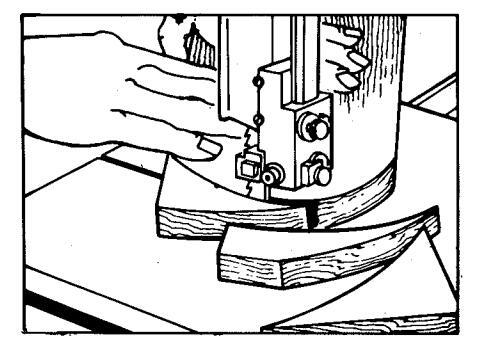
PARALLEL ARCS
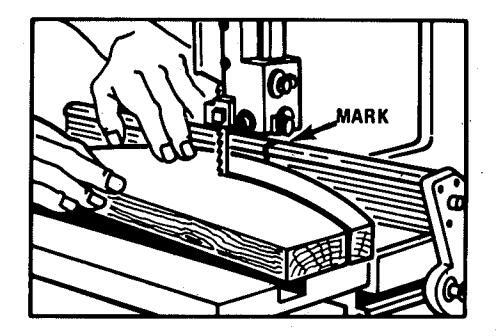
Chair rockers and similar arc-shaped pieces can be cut in this manner. Scribe the left-side arc on your workpiece and freehand cut it. Move fence over against blade and make a vertical mark where it touches blade teeth. Reset fence at distance from blade equal to desired finished width. Cut the right-side arc by feeding work so that it is continuously in contact with mark on fence.
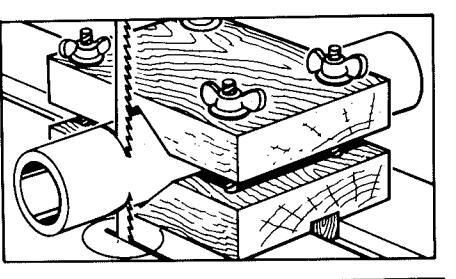
COMPOUND SAWING
This is the sawing of profiles on any two adjacent faces of square or rectangular stock.
Two, three or all four faces may be sawed to profile. The problem is this: In order to have the profiles accurate — especially if they are to be identical, each profile must be drawn on a flat surface. Yet, after cutting the first profile (drawn on one face of the stock) the adjacent face(s) where cut has been made is no longer flat. Its curved surface would distort the original profile pattern if profile were drawn on it ... and an endeavor to compensate would be difficult.

The problem is solved by planning the layout so there will be enough waste — at each side of each profile — to be removed all in one piece. This waste can then be temporarily nailed back in place (with nails out in the waste portion of main workpiece) so that the profile drawn on its flat surface can still be used to guide the next cuts. If preferred, instead of nailing you can leave the waste attached by not quite completing the first cut.
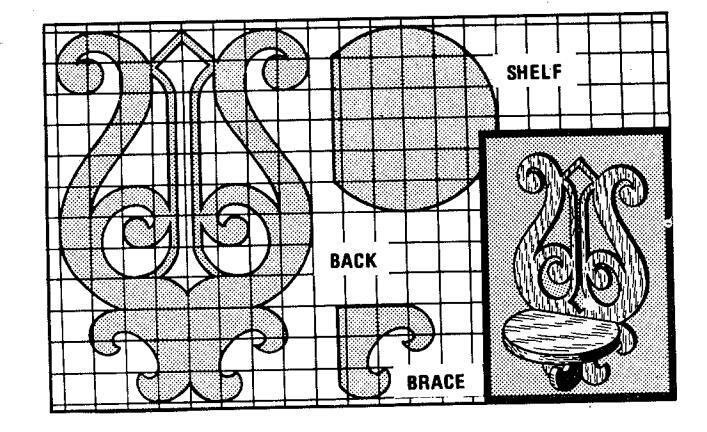
Compound sawing is often used in making chair or table legs, posts, curved railings, etc. A good example of its use – and the technique – is a cabriole leg, described below.
MAKING A CABRIOLE LEG
This popular chair or table leg has a square top — with or without side "ears", a curved "knee", and a shaped, flat-bottom "foot".
Preparing the Stock
The easiest way to prepare the leg stock is to use one large-enough piece cut square with trued sides. Since hardwoods generally are expensive, however, you can save money by post blocking. That is, use one piece the full length required, but only large enough on the sides to contain the square top, and on down to the flat bottom of the foot. Glue small pieces to this to take care of the protruding knee, foot and ear portions. If you do a good job of
matching the grain and jointing, the glued-on parts will be hardly noticeable in the finished leg. The ears can be cut separately and attached to finished leg, if desired (but this will be more noticeable).
Pattern Layout
With the stock completely trued up, use cardboard patterns to draw the desired profiles on two adjoining sides of the stock. (Various other
methods of transferring patterns to the stock are discussed in the "Jig Saw" section of this book.) Remember to center the pattern on the stock so that the waste stock will be cut off in one piece – this will make later operations easier. The two profile patterns do not have to be laid out with a common center line.
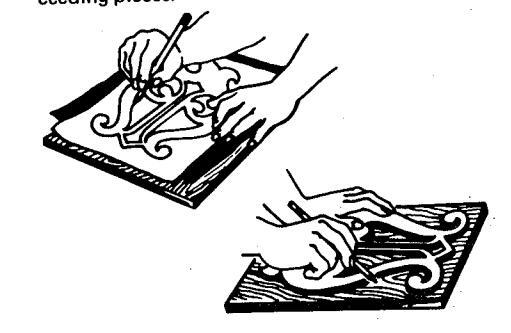
Cutting Operations
Make the two saw cuts which will form one profile. Make each cut in one uninterrupted operation to leave the piece cut off matching perfectly. Or, instead of cutting it off entirely, leave it attached by about 1/4 in. of unfinished cut at the foot end. To provide a working surface and the original profile lines for the adjacent side profile cuts, nail the removed waste back into place (unless left attached as suggested above). When nailing, take care not to drive the nails into that portion of the stock which will become the finished leg.
Now make the remaining profile cuts all the way to completion. Remove the waste stock which has been nailed in place. Use hand tools to complete the shaping of the leg.
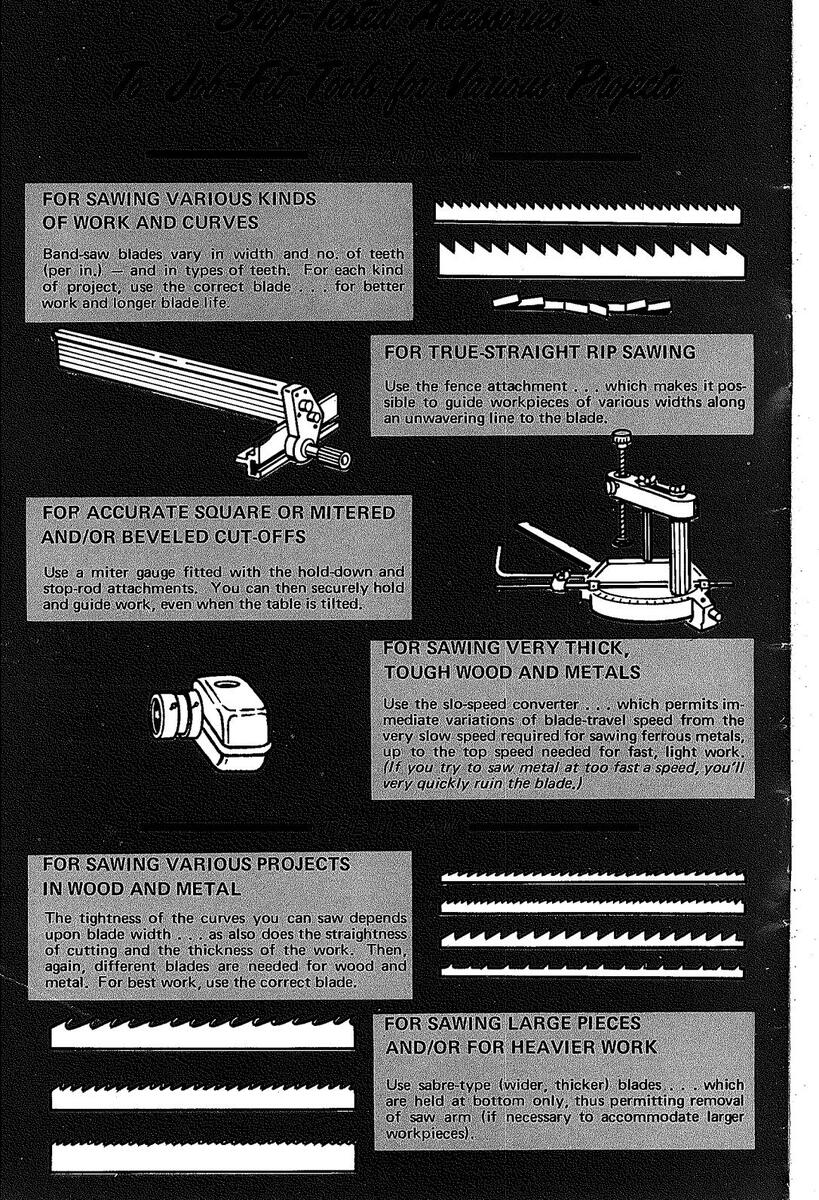
USE SEARS SHOP-TESTED ACCESSORIES TO DO MORE WITH YOUR BAND SAW
SPECIAL SAWING OPERATIONS
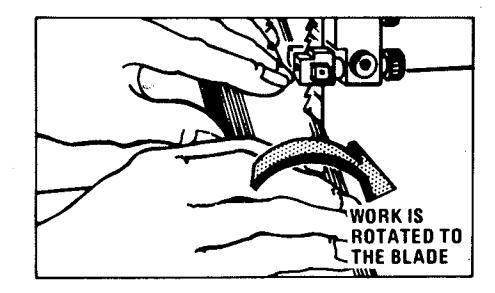
CUTTING CIRCLES
Freehand
This method requires a steady hand and some experience. Simply scribe the desired circle on your workpiece with a compass (or a pencil and string) ... then saw around the line.
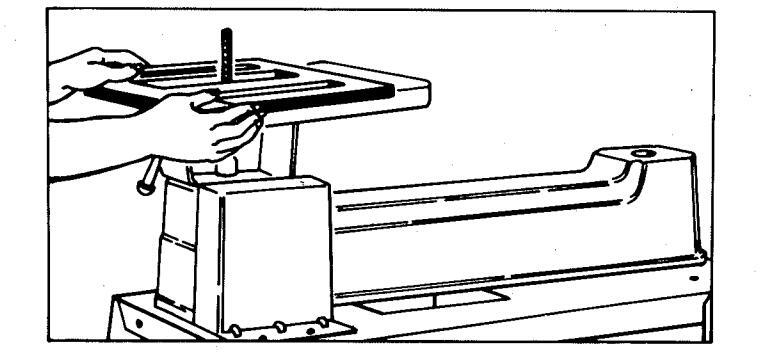
Using a Simple Jig
By setting up a pivot point on which to rotate the workpiece to the blade, you can eliminate the need for a steady hand and good eye. Any number of circles — sized as desired — can be cut quickly and easily . and perfectly.

The wooden jig illustrated is made to fit snuggly against the table sides by means of straightedge strips nailed to the bottom at the edges of the top board. There is a slot for the blade; and a pivot point as shown. The pivot point can be a nail or sharpened screw ... must be exactly aligned with the teeth of the blade. Different diameter circles can be sawed by sliding the jig to place the pivot point a distance from the blade equal to the radius of the desired circle. Use C-clamps to hold the jig in place once it is correctly positioned.
To cut a circle, first cut off one side of the workpiece along a line tangent to the circle to be cut. This will leave a "flat" spot on circle edge where blade can be positioned for starting around the circle. Center the workpiece on the pivot point with blade at above starting posi-
tion ... then rotate work slowly into the blade to cut the circle.
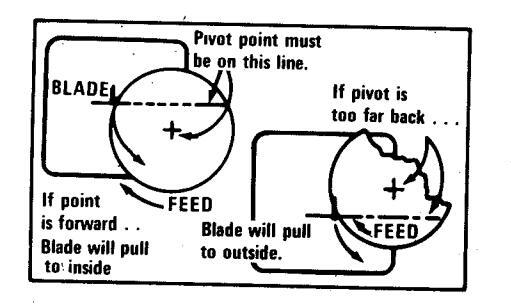
NOTE
Whatever type jig you use, the pivot point must be exactly aligned with blade teeth cutting edges. If alignment is incorrect, blade will tend to lead either to the outside or the inside of the circular cutting line.
Another Circle Jig
One other useful type jig is shown.

This jig is very similar to the first (simple) one described in that it also consists of a board, with bottom edging, designed to fit snuggly on the saw table. Instead of a fixed pivot point, however, it has a slide with the point in it. Several holes can be drilled in the slide for relocating the pivot point ... and movement of the slide will further vary the setting.
A jig like the last one above described is especially useful for very large circles. It can be clamped to a bench or table of proper height placed at desired (radius) distance from the saw blade. The slide should be positioned parallel to the blade. Then slide movement can be used, not to vary circle radius, but to perfectly align pivot point with blade teeth.
MULTIPLE SAWING
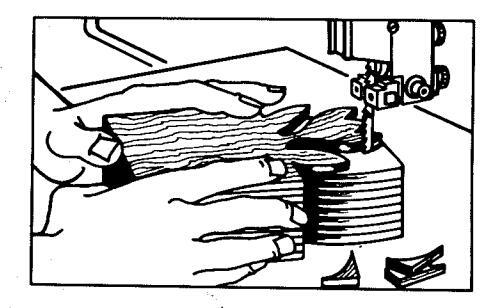
When a number of identical pieces are to be cut out, much time can be saved by sawing a number of them stacked together. The outline of the cut to be made is drawn on the top piece, only. After cutting, the pieces must be separated. They will, of course, be identical.
There are several ways of stacking the stock and holding it firmly enough to prevent slippage while cutting. The simplest method is to nail all pieces together at points which will cut away and become waste. Nails must be located so pieces aren't freed until last minute.
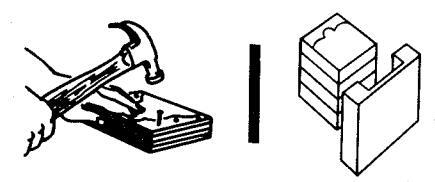
Another method utilizes a spring block. This is a wood block with a channel into which ends of the stock pieces can be wedged to hold them steady. All pieces must be pre-sized to fit into the channel ... and, of course, the ends wedged in the channel cannot be cut during the multiple sawing operation.
When the pieces of stock have a large waste area they can be held together by wedges. Stack them together and cut two or three deep kerfs in the edges at two or three different sides. Use thin wood or sheetmetal wedges hammered into these kerfs to bind the pieces together.

If a large number of pieces are to be cut, a box jig will prove useful. This is like the spring block, except that sides are added to make it a complete enclosure. The top side is also a template ... that is, it has previously been sawed to the pattern desired so that its outline will serve to guide the multiple sawing operation. Stock pieces should fit snuggly into the box for best results.
RESAWING IDENTICAL PIECES
Another way of cutting out a number of identical pieces is to saw out the desired shape from stock of considerable thickness. This piece can then be turned on one edge and resawed into a number of identical thinner pieces.
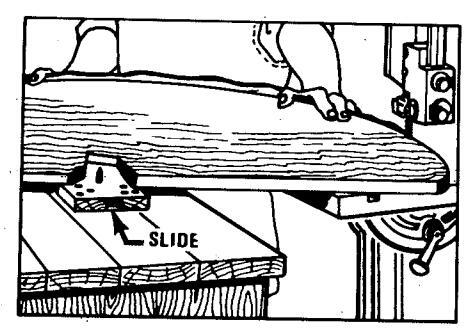
SAWING WITH PATTERN GUIDES
Another method of cutting duplicates is to use a pattern guide. Only work which has broad curves can, however, be sawed by this method. As shown, a guide arm is clamped to the inner side of the saw table so that one end of this arm is located at the saw blade. An opening on the underside of the arm permits the passage of the waste portion of the stock. The end of the arm is curved so as to mate with the broadest curve of the pattern. A small slot in the end of the arm permits the recessing of the blade so that the outer side of the blade is flush with the end surface of the guide arm.
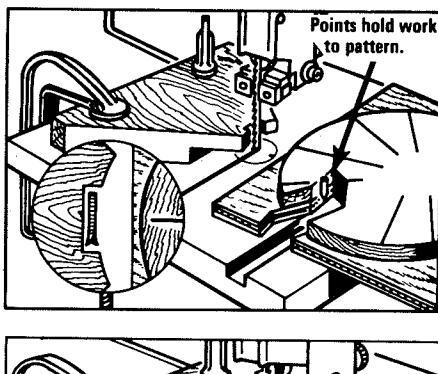

The stock is secured to the underside of the wood pattern by suitable anchor points. To make the cut, saw through the waste stock so as to locate the edge of the pattern firmly against the end of the guide arm. Keeping the side of the pattern squarely against the arm, feed the work around to complete the cut. The pattern must be kept at 90° to the end of the arm at all times. This is made easier by marking radial lines on the face of the pattern. In making the cut there is no danger of cutting too far into the stock.
CUTTING DUPLICATE CURVES
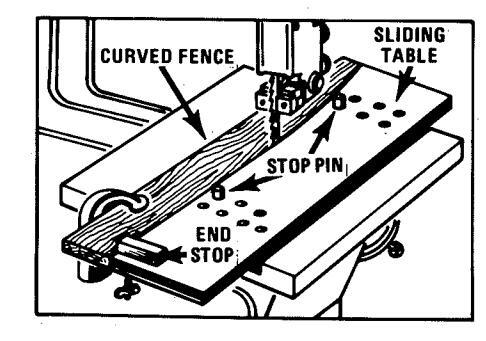
Several types of jigs can be used to cut a number of duplicate curved pieces of work rapidly. One type can be made by cutting the desired curve through the length of a wide
board. One of the cut pieces is then clamped to the inner side of the saw table so that the curved side is located next to the saw blade. This piece then serves as a curved fence. The other piece is used as a sliding table.
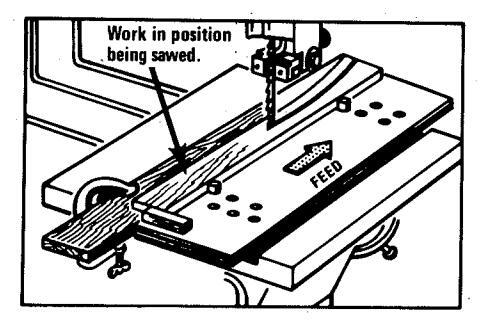
The stock to be sawed is located on the sliding table, being properly positioned by an end stop block and two dowel pins inserted in locating holes arranged so that the proper width of stock will be cut. To make the cut, slide the table forward, tracking it against the curved fence clamped to the table. As each successive piece is cut, move the dowels over to compensate. This will give the proper width to the next piece to be cut.
CUTTING PERFECT ARCS
A simple set-up is as shown. This consists of an auxiliary table on which a "T" shaped arm is pivoted. As in the cutting of circles, the pivot point of the "T" must be exactly in line with the cutting edge of the saw blade. The work is cut by securing the stock to the "T", to feed it to the blade.
BEVELED CURVES
Beveled curves can be cut with the jig illustrated. This consists of a curved fence and a sliding block. The fence must have the desired
curve, and the face of the block is curved to match it. A slot in the block holds the workpiece at the desired bevel angle. Slide the block along the fence to make the cut.
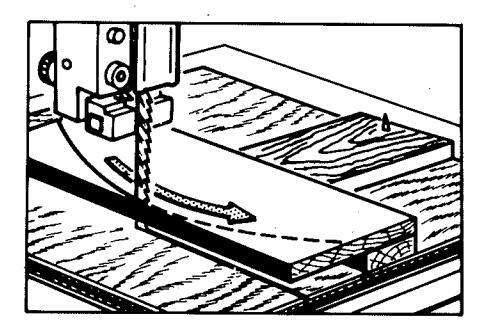
RIPPING CURVES WITH A GUIDE ARM
When one edge of a workpiece has been cut to any curve, an identical curve can be cut along the opposite edge by the use of a guide arm. The guide arm is a wood strip with a small rounded end. Clamp it to the table, as shown, with its center directly aligned with the blade teeth ... and at desired distance from the blade. Guide the workpiece by pressing the finished edge against the guide arm, turning as needed to keep the edge at a right angle to the arm.
HALVING DOWEL STOCK
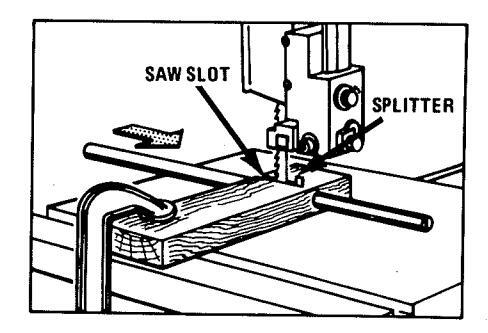
A simple device for splitting dowels consists of a block of wood with a horizontal hole of the right diameter to hold the dowel. Draw a diameter perpendicular to the bottom of the block at one end of the hole. Now feed the block to the saw to cut along this mark about halfway into the block — then clamp the block to the table as shown.
When dowels are fed through the hole to the blade, they will be neatly halved. To keep dowels from rotating while feeding, place a small metal strip (splitter) in the block, in back of and in line with the blade, so that it will guide the dowel kerf.
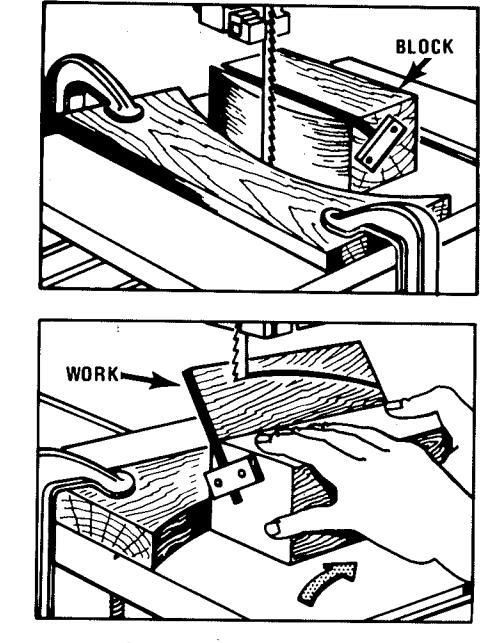
MAKING TAPER CUTS
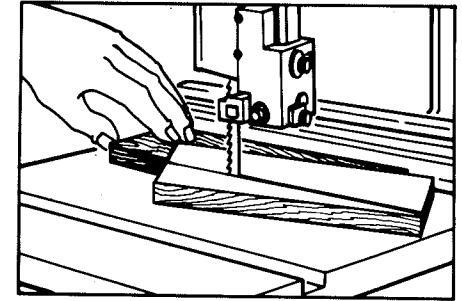
Duplicate taper cuts can be made on a number of pieces simply by using a block in which the desired taper has been cut. The cut is made by holding the work and block together, as shown, while sliding the block forward along the saw fence.
If you plan to do much tapering — especially the tapering of opposite sides (as on a table or chair leg) which requires accurate resetting of the amount of taper — we recommend the
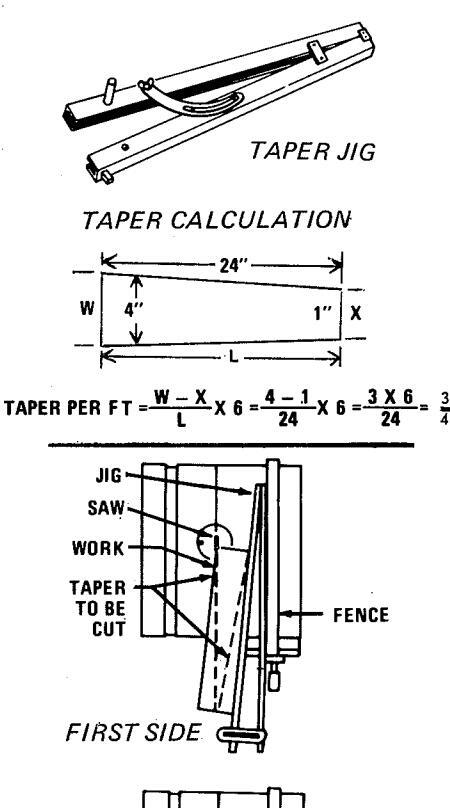

Taper Jig illustrated. Calculate the taper per foot as shown (multiplying by 12 instead of 6 if taper is all on one side). Open the jig so distance between the two arms at the 12-in. mark is same as taper per foot. Lock the jig, then slide it and the work together along the fence to feed work to the blade. To cut opposite side, double the jig opening before using it.
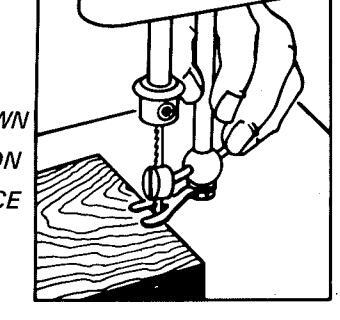
MAKING SPIRAL-CUT DOWELS
It is surprisingly easy to cut spirals on dowel stock. Tilt the saw table to about 150 to 200 and position the miter gauge near the cutting
edge of the saw blade. The depth of the spiral cut is determined by the distance the gauge is positioned from the front of the saw blade. Hold the dowel against the face of the gauge and start the cut on the end of the dowel. The saw blade will automatically pull the dowel forward and rotate it at the same time. However, the dowel must be held to prevent too rapid cutting.
USING A STEP GAUGE
A step gauge (like the one illustrated) can be used to quickly cut off short pieces of stock to different lengths, such as dowel stock.
MAKING CIRCULAR RAILS
Illustrated is an economical method of cutting circular rails. As indicated, a curved cut is first made to remove a part of the stock. This piece is then glued to the straight edge of the larger piece. The inside curve can then be recut to shape it as necessary.
CURVED FACING STRIPS

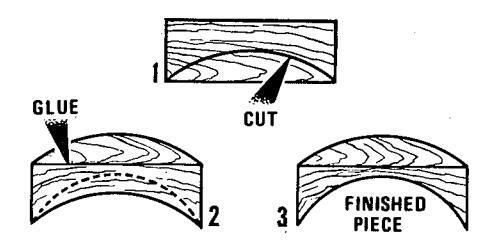
Curved corner facing strips (inside or outside) can be made in one continuous piece, without having to steam the wood, by the method illustrated. The backing block is sawed to the curvature desired ... then the thinnly cut strip is bent and glued on. Small wedges driven and glued into the corners help to make the finished piece very solid.
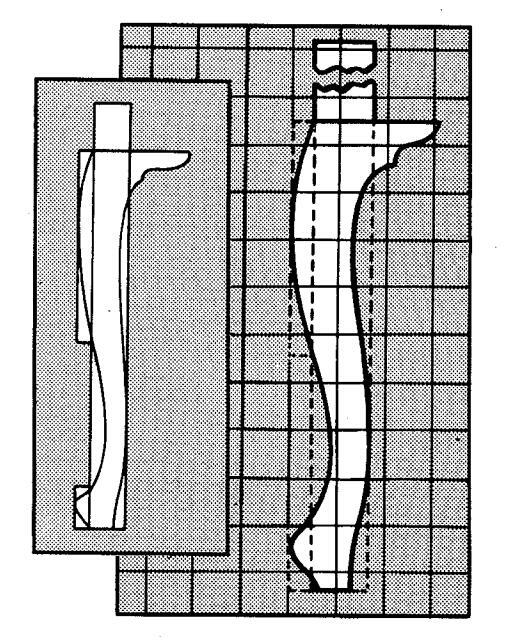
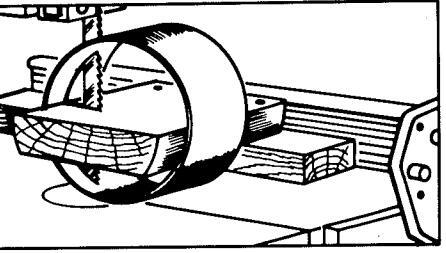
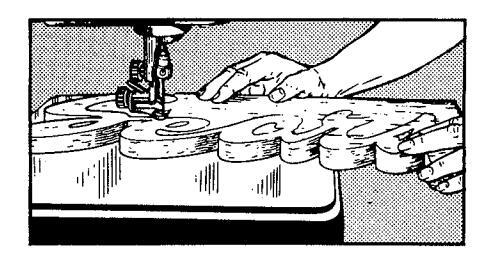
USING BAND SAW TO SPEED LATHE WORK
Preliminary band sawing of spherical shaped work will considerably simplify later lathe turn-
ing operations. Removal of the waste or excessive stock can be quickly done on the band saw. Sawing will also outline the finished contours or profile of the work so as to provide an excellent guide for the turning operations.
The sawing of a ball is typical of this type of work. First, carefully square the stock to be used. Using cardboard patterns, carefully lay out the profile of the ball on two adjoining sides of the stock. When laying out the pattern, make sure that the center lines on the adjoining faces are lined up perfectly. In addition, also outline — on two ends of the stock — stubs which will permit the work to be mounted in the lathe.
Now compound saw the profiles in the manner already explained. Mount the sawed work in the lathe. Draw ridge lines at the approximate centers of the four sides of the ball. The work can now be turned down into a ball by watching the ridge lines. When these lines have almost disappeared the finished contour will have been obtained. At this point mount the stock in a cup chuck and complete the turning operation in a standard manner. (See "The Wood Lathe" Craftsman Handbook, Cat. No. 9-2920 )
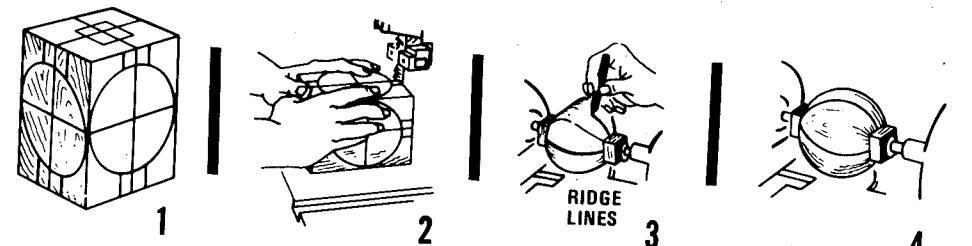
A TYPICAL BAND-SAW LATHE OPERATION
CRAFTSMAN TOOLS AND ACCESSORIES GIVE YOU THE MOST
CUTTING METALS, PLASTICS, OTHER MATERIALS...AND SANDING
METAL CUTTING OPERATIONS
Blade Selection
Always use the type of blade designed for the kind of workpiece (ferrous, non-ferrous or sheetmetal) to be sawed. This is important because different materials require different tooth designs. If a too-coarse tooth blade is used on ferrous metals, the teeth will be quickly dulled ... or, if the teeth are too coarse for cutting sheetmetal, they will be stripped off of the blade. On the other hand, teeth that are too fine for a non-ferrous metal will become clogged and fail to cut.

For general use the blades which have a regular set will give the best results. Although these blades are intended for cutting the harder type metals, they will do a fair job of cutting the softer metals. Blades having every tooth set, although ideal for cutting the softer metals, will not cut iron or steel.
Metal-Cutting Speeds
Metal cutting should be done at about 1/6 to 1/10 the speed of wood cutting. If a great deal of metal cutting is to be done – and your saw does not have variable speeds – either equip it with the Slo-Speed Converter ( page 4 ), or a step-down pulley on a countershaft. Do not cut metal at wood-cutting speeds – the blade will burn up.
Metal-Cutting Technique
Generally, metal-cutting operations are done in the same manner used for wood-cutting operations. The biggest difference is that a metal workpiece must be held very steady and be fed to the blade on a true, straight line (without wobble or shifting). For this reason it is exceptionally desirable to use either the miter gauge or the fence.
Also shown are a V-block and a makeshift method of holding stove pipe and large tubing. The shaped wood block (to fit inside) braces the work, preventing it from being distorted. This block is nailed to a wood base, to slide against the fence, which is positioned so that the stock will be cut off to the proper width.
To prevent thin stock from burring when it is cut, the metal can be supported on the underside by a strip of wood. Burring of thin-walled tubing can be avoided by plugging the tubing with dowel stock. As in wood cutting, multiple sawing of metal can be done. The metal stock can be secured together by solder tacking or sweating.
CUTTING PLASTICS
Most plastics tend to chip easily ... and some can be cracked or shattered (like glass) if the cutting action is too coarse and rough. On the other hand, some plastics tend to soften and gum-up when being sawed ... so that if the teeth are too fine they will become clogged and cease to cut. It follows that the only general rule for all plastics is to select the finest toothed, narrowest blade that can be used, without being clogged. And the amount of clogging depends somewhat on the speed of cutting — as well as on the type of plastic. If
your pattern permits, use a wood-cutting blade speed, and feed the work as rapidly as possible. But, if you must saw slowly, preferably reduce the blade speed accordingly so that it won't generate any more heat than necessary at one spot on the plastic. Tooth size is also relative to speed; the higher the blade speed, the coarser the teeth can be without chipping.
Block and sheet plastics are handled like wood; extruded and tubular plastics are handled (with V-blocks, etc.) like similar metal shapes. Just remember that it is best to feed any plastic as fast as possible ... to lessen the risk of overheating.
OTHER MATERIALS
A fine-tooth blade operated at wood-cutting speed will cleanly and quickly saw such "soft" materials as plasterboard, cardboard and corrugated paper ... will also saw bone and meat (raw or frozen). For hardboards use a medium-tooth blade, at wood-cutting speed.
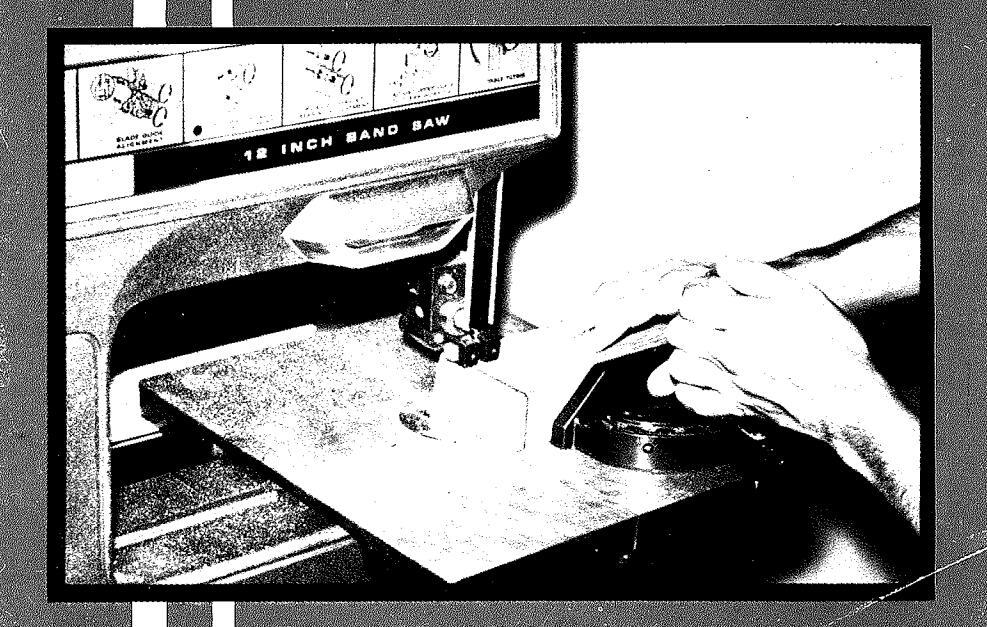
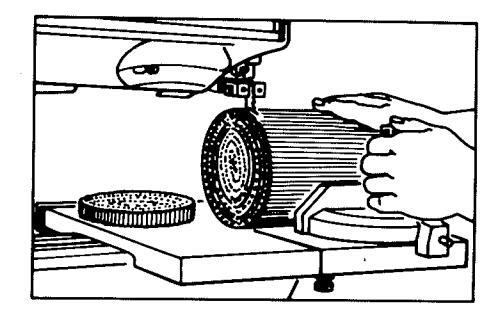
SANDING OPERATIONS
Set-Up
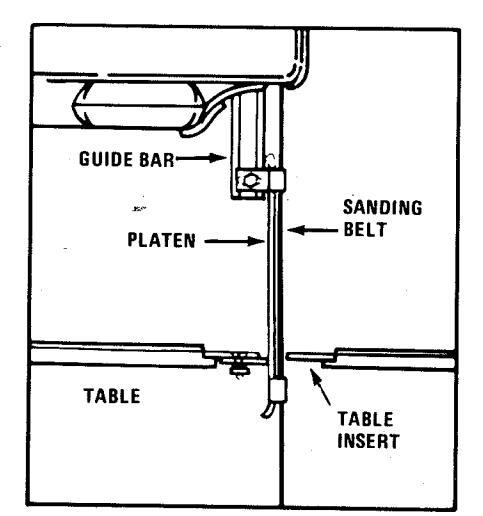
For sanding with the 12-in. band saw (only) you will substitute one of the various-grit sanding belts available, in place of the blade. You will also attach the Sanding Platen to the tool guide bar, and substitute the sanding Table Insert (both items are furnished with tool) per information in the instruction sheet furnished with your tool. Operate at a wood-cutting speed.
Feeding Work
All work must be fed along the right-hand side of the table to contact the outer (grit-side) of the belt. For straightedge sanding you can use the miter gauge to guide the work; but all curved and odd-shaped edges must be fed freehand. Do not force the work against the belt; press it in as lightly as possible ... and keep advancing it at a steady pace (to avoid overcutting at one spot).
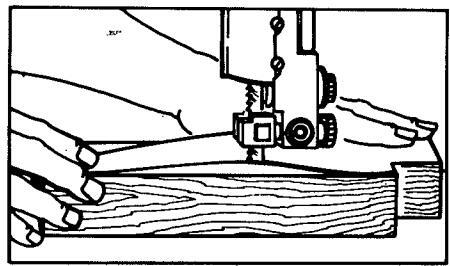
THE JIG SAW IS UNIQUE BLADE CHUCK SAW GUIDE ROD UPPER SAW GUIDE HOLD-DOWN FOOT TABLE INSERT TABLE LOCK NUT PROTRACTOR POINT RELT-DRIVEN IIG SAW
SELECTING A JIG SAW
A bench or tool-base mounted, powered jig saw is the best of all tools for sawing intricate designs in workpieces that can be fed to the tool This is so because a jun-saw blade will cut the tightest possible curves and angles leaving a very parrow kerf.... and since you are bolding and guiding the workpiece to the (stationary) tool, you have the best possible control of the cutting action. Because you can start cutting either from the outside or from a hole drilled on the inside, there is practically no limit to the intricacies of the designs and patterns that you can accomplish.
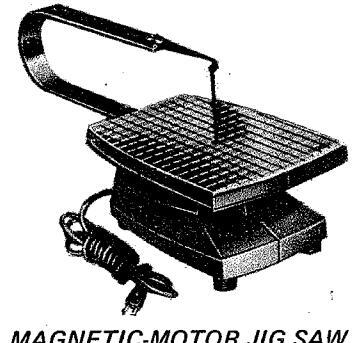
Two types of its saws are illustrated. The motor-driven type (at top) is a powerful home shop tool canable of doing any cabinetry work the serious hobbyist could wish The magnetic type (below) is a less powerful tool best adapted to cutting out jig-saw puzzles and similar workpieces When selecting your tool remember that it is the applied power that determines the toughness and thickness of the workpieces which can be sawed easily.
Two very desirable features of the motor-driven tool are: 1) A tilting table (tilts up to 45° to left and locks at selected angle), which permits bevel sawing of wood up to 2-in. thick. 2) A deen (18-in) throat that allows you to saw to the center of a 3-ft. wide workpiece, using standard jig-saw blades (held at both top and bottom) ... or, you can remove the arm and use sabre-saw blades (held in bottom nowerdriven chuck alone), and saw workpieces of any size you can quide to the blade.
Other advantages of this tool are a built-in sawdust blower, a hold-down foot (to keep work flat and steady for accurate sawing), reduced-friction blade guides, and very guiet operation.
SHOP-TESTED ACCESSORIES FOR BETTER WORK
height for best work. Built-in motor supnort self tensions the drive belt. Easy to reposition in shop as desired ... won't tilt or wobble while you work.
Ample power for all homeshop purposes is furnished by this (recommended) Craftsman 1/3 hp. 1725 rpm. 115 volt motor (illustrated) Mounted on tool have and with the 2-in motor pulley and V-belt furnished with ilg saw, this motor provides the proper operating speed for
SEE NEXT PAGE FOR BLADES
REPLACEMENT BLADES AND THEIR USES
JIG-SAW TYPE BLADES
Standard jig-saw (scroll-type) blades are available in different lengths and with different types of ends (plain, loop or pin) for fitting the chucks of various model saws. The Craftsman Motor-Driven Jig Saw uses 6-in., plain-end blades; thé Magnetic Jig Saw uses 5-in. pin-end blades. Blades are sold in packages, labeled as to length, end-type and number of teeth per inch. Use only the blades designed for your tool.
| Z | ||||
|---|---|---|---|---|
| munny | mun | |||
| Mar and | mymm | mumm | minun | 27 |
| ann | mm | mm | mm | |
| June | man | mun | mai |
The type of cutting a blade will do is determined by the no. of teeth (per in.) and the blade width. The no. of teeth vary from 10 (coarse) to 20 (extra fine) ... and widths vary from .062 to .110 in. Blade thickness is relative to the no. of teeth. Generally speaking, the narrower, finer-toothed blades are best for cutting plywood or any material requiring extremely smooth cutting ... and the wider (stronger) blades are best for heavy woods and non-ferrous metals. For either wood or metal sawing, the desirable no. of teeth is best determined by the likelihood of clogging ... any "gummy" material will clog fine teeth faster than coarse ones.
SABRE-SAW TYPE BLADES
The Craftsman motor-driven saw can, as explained (page 24), use the sabre-type blades
illustrated. These are 6-in. blades. The 7-tooth blade is for wood only; the 10 and 20-tooth blades will saw wood or non-ferrous metals.
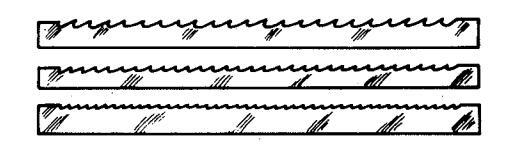
Because these blades are necessarily wider and thicker (being held at bottom only), they will not cut as intricately as standard blades...but are better for straight-line and gentle-curve sawing.

FOR BEST PERFORMANCE WITH ANY CRAFTSMAN TOOL ALWAYS USE CRAFTSMAN SHOP-TESTED ACCESSORIES AND COMPLY WITH ALL THE SAFETY RULES PRINTED ON THE INSIDE BACK COVER
GENERAL INFORMATION
SELECTING A BLADE
Most blade packages are printed to indicate type of work for which contents are intended Failing this be guided as follows: The coarson toothed blades (7 to 10 teeth per inch) are for fast rougher cutting in wood (soft wood generally) but also for plastic and/or soft metals (if of properly hardened steel). Blades having 12 to 14 teeth per inch generally are for hardwoods plywood, composition board, the "non dumming " plastics and soft metals. Very finetoothed blades (up to 20 or more teeth per inch) are for veneers sheetmetals and very thin plastics. Tooth selection should be such insofar as possible, that at least two teeth contact the edge being cut simultaneously: if teeth straddle the edge (one above one below) they are likely to be broken off in the sawing operation
Blade width should be determined, if you have a choice, by the kind of design to be cut. The narrower the blade, the tighter the curve it will turn; and the wider the blade, the more easily it can be made to follow a straight line. Being stouter, the wider blades are less likely to weave. drift or break.
Always remember, a sharp blade cuts faster and smoother . is easier on you and your tool.
INSTALLING A BLADE
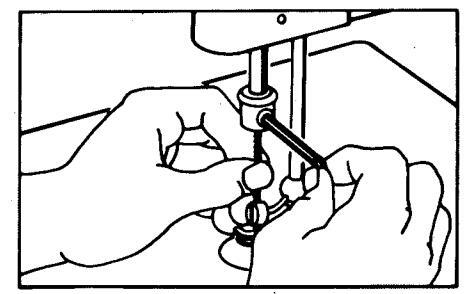
TEETH MUST POINT DOWN
All jig saws are designed to cut on the down stroke ... blade teeth must point down. If you have a locking, adjustable type chuck, be sure to install blade tightly ... then check it for straightness, etc. An easy way to check is to
hold a pencil horizontally with point against side of blade. When moved up and down (by hand) blade should not deflect the pencil or move away from it. Afterward, set the blade guide(s) so that back of blade rides in guide slot against the guide ball (refer to instructions packaged with your tool).
STARTING WORK
If tool has a hold-down, adjust this to just ride on workpiece surface ... so that work cannot chatter while being cut. Should table be tilted for bevel cutting, only one side of the holddown foot should contact the work (on the high side). The hold-down will prevent blade breakage ... always use it!
ADJUST HOLD-DOWN TO RIDE ON WORKPIECE TOP
ROTATING THE BLADE
If tool has this feature, position the blade with teeth at front, at 90° left or at 90° right — whichever suits you best — then leave it this way unless you have to change it. You may have to change to swing a long or wide work-piece away from bumping into the rear of the arm. When you do, loosen both chucks and rotate the entire blade (together with work-piece, if in middle of an operation). Do not rotate one end only at a time as this necessitates twisting the blade (which may not spring back into true straightness).
JIG SAW OPERATIONS
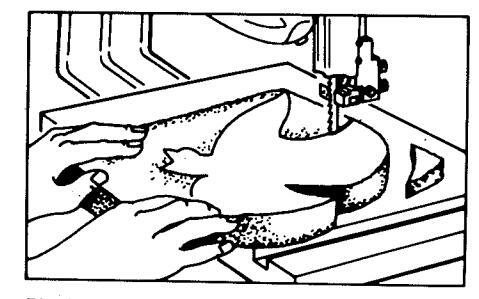
USING PATTERNS
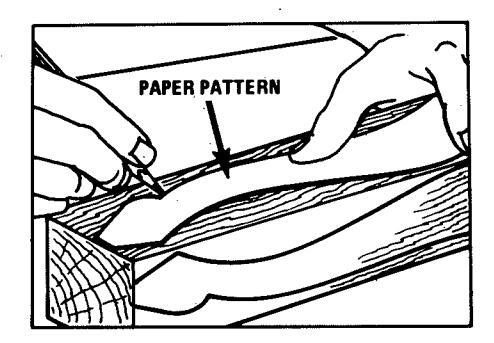
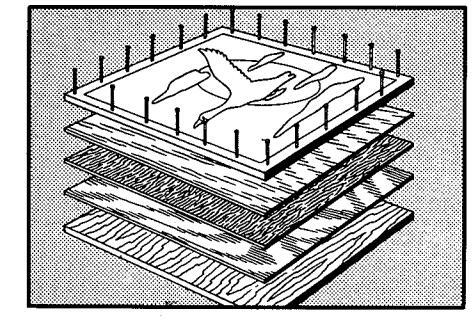
Whenever intricate work is to be done and/or duplicate pieces will be needed, you will find it advisable to begin with a pattern. Many excellent commercial patterns — printed on paper in full size — are available, or you may create your own. In the latter case, preferably use paper with printed or drawn squares of uniform size to make your plotting easier. Draw your pattern clearly and accurately ... then transfer it to the workpiece(s).
The simplest and surest way to transfer a pattern to a workpiece is to paste it on — with rubber cement or a water-soluble glue that can be cleaned off later. In this case, if duplicate pieces are to be cut, the first piece (after being cut to the pattern pasted on it) will serve as a template for drawing the same pattern on succeeding pieces.
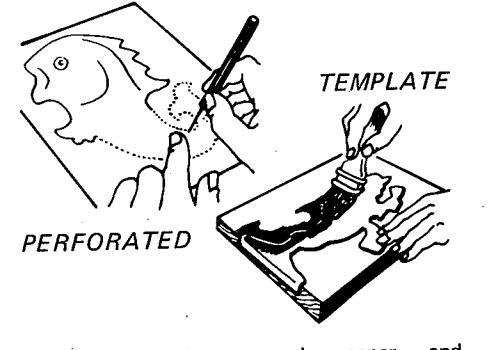
Another method is to use carbon paper – and trace the pattern onto each piece to be cut. Still another method is to use cardboard or heavy construction paper for your pattern, and to perforate it with a needle or awl all along each line. If perforations are carefully done, a transfer ink, patted by sponge or cloth on the pattern surface, will soak through to mark the workpiece. A suitable transfer ink can be made by thinning asphaltum paint with benzine. This last method is excellent for metals otherwise difficult to mark; but don't use it on any plastic that might be softened by the paint or benzine.
OTHER TEMPLATES
When a great many duplicates are to be made, very accurately, the best method of transfering the design to each workpiece - quickly and
precisely — is to use a template. This can be of very thin hardwood or plastic; but thin sheetmetal is best. Transfer your initial paper pattern to the template material and cut the template.
Clean all edges as required to make them true. Now, use the template either to trace around with a pencil ... or, for faster use, as a stencil. To use it as a stencil, lay it on workpiece and paint all surfaces of workpiece which remain visible. Any paint or ink that won't run under the stencil edges can be used. All painted areas now represent waste which is to be cut away.
STARTING A CUT
Examine your design and workpiece, before starting, with thought about saving work. Often, if you cut away excessively large waste areas (or ones which awkwardly protrude) first, this will enable you to handle the workpiece more readily for later, more delicate cutting. Also, by starting at one point instead of another, you may save much excessive twisting and turning of the work to follow the pattern lines ... may even avoid having to rotate the blade in order to clear the arm (if work is large).
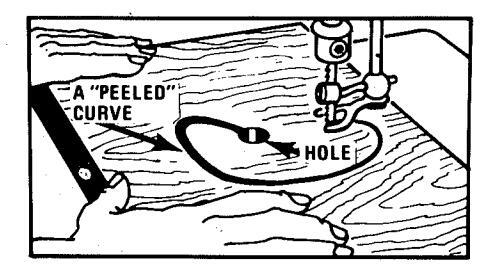
When a cut must be started inside the workpiece, drill a hole just big enough to slip the blade freely through. If there is a choice, it is best not to drill alongside a pattern line, but out away from it far enough so that when cutting is started you will be able to watch the path the blade takes and correct the line of cutting before reaching the pattern line. Then, too, it is always better to start cutting at a tangent to the edge being entered — rather than at a very sharp angle to it — as this is less likely to twist the blade or give it a tendency to drift.
If you do have to start into an edge at an angle, do so very slowly until certain the blade is following the pattern line instead of being pushed aside by the slope of the edge. The finer the blade, the more difficult this becomes. If work-
piece is thick and/or hard and angle of blade approach is very acute, you may have to file a notch in the waste portion of the edge to provide a starting position in which the blade teeth can be aligned with the cut line.
FEEDING WORK

Never feed so fast that blade is jammed backward against its guide (or bent backward, if there is no guide) ... nor so that blade is appreciably slowed in its movement. Generally, the first indication of too much feed pressure will be jerky return (up) strokes of the blade. since this spring-powered stroke is weaker than the motor-powered down stroke. Feed slowly enough for blade to travel smoothly both down and up. Always feed straight against blade teeth, even when turning a curve ... never with a sideways movement of the workpiece. On a tight curve, remember that the blade must advance rapidly enough to avoid being ninched and twisted in the kerf . never stop advancing the blade while swinging the workpiece. If an even pace while swinging the workpiece, keep cutting out into the waste area then backtracking ... so as to provide a wide enough kerf to turn the blade in freely (in short "neel" around the curve as you would with a chisel)
STRAIGHT-LINE CUTTING
It is exceedingly difficult to cut a long, true straight line on a jig saw that does not have a blade guide, especially with a narrow blade and/or in a too-thick workpiece. Even when there is a guide, you should use a wide blade ... or advance very slowly. If straight line is long (over 4 ins. in 1-in. stock, for instance) clamp a straightedge board to the table top to serve as a fence to slide workpiece along. Try to arrange set-up so that any prominent grain lines in the workpiece will curve or slant in direction from blade away from fence (rather than to-
ward fence) as workpiece is fed. This will eliminate tendency of blade to stray off straight line to follow a grainline since, to do so, it would have to shift the workpiece and the fence.
PERFECT-CIRCLE CUTTING
For same reason as above, use the widest blade that will turn freely in the radius desired. Use an auxiliary table jig such as described on page 16.
SQUARE-CORNER CUTTING
Even the narrowest blade cannot turn a perfect square corner. Any attempt to force it will twist (and possibly break) the blade, and result in a rounded (however slightly) corner, probably with a sloped side following the turn.
If corner is an outside one, use one of the two methods illustrated; if it is an inside one, use the one method illustrated.
ACUTE-ANGLE CUTTING
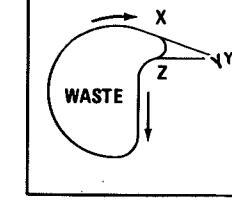
A true inside angle of any acuteness desired can be cut easily by the method illustrated. Cut all the way into the angle (Y) along one side, then backtrack to some point (such as X) where you can turn a curve to come out on the pattern line again at another point (such as Z). Finish the cut to remove enclosed piece of waste ... then start at X and again at Z and cut up to Y to remove remaining waste.
FITTING PIECES TIGHTLY
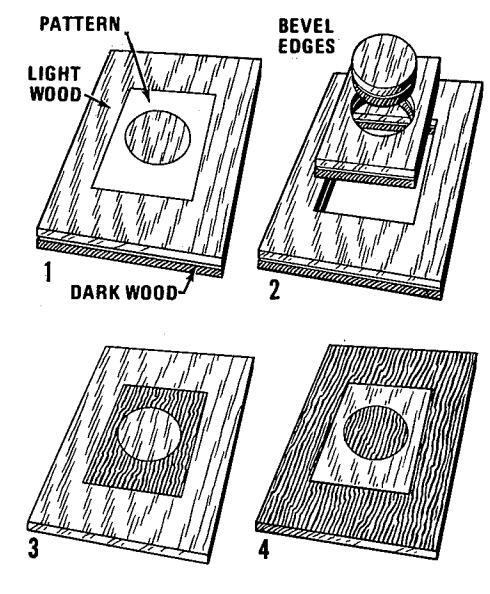
When workpieces are to be fitted together tightly to form practically invisible joints – as for inlay work – it is advisable to bevel cut the edges. If edges are cut at 90° to surface, any slight imperfection will leave a crack straight down through the joint. But if a bevel of 10° or more is used, one piece will lap over the other to hide slight imperfections. Surface sanding will then tend to blend the edges even better.
PREPARING INLAYS

Inlaying is the process of piecing together a number of pattern-cut pieces to form a design. The design can be entirely geometrical — like a checkerboard or series of concentric circles or artistic — like a copy of a drawing or a photograph. Pieces can be large, small or a combination; and, though usually all the same height to make a flat surface, some can be raised or depressed to give a third dimension to the design.
The most used material is 1/28th-in. veneer, which is available in many fine and rare woods from firms (in the biggest cities, generally) that specialize in such products. Such sheetmetals as bronze, copper, brass or aluminum are also often used. Then there are an infinite variety of colored sheet plastics and composition materials, all of which provide subtle colorings and variety enough to create any desired design.
The quality of work produced depends upon: 1) The artistry with which you create or copy a design and select materials for color effect, and 2) The care with which you cut and fit the various pieces. Best use a simple design with only three to five different kinds of woods or other material for your first attempt.
If you do not mind having slight visible cracks (the width of saw-blade thickness) between pieces, the quickest, easiest way to cut-out identical pieces is to stack them and cut all simultaneously. In this case, transfer design to top sheet of material only, for cutting. Use the thinnest blade possible. One advantage of this method is that any error in cutting will affect all pieces, which will still fit together correctly even though original design may be slightly altered by the error. It has the disadvantage of wasting much material.
To eliminate all cracks, it is necessary to cut each piece separately, cutting along the outside of your pattern line. This requires a steady, experienced hand. The design must be accurately transferred to every sheet of material used.
After cutting (either method) select pieces to be used and assemble them, face down, on a sheet of cardboard (or flat-laid paper) that has been coated with rubber cement (enough to stick them on). A reversed tracing of the design on this cardboard will help. Sand bottom surface flat, then glue assembly to its permanent backing. When dry, strip off the cardboard and sand top surface smooth. However, if top is to have raised or depressed areas, you will have to assemble pieces with glue directly onto backing (after trial fitting them, of course). If uniform, visible cracks exist, a nice effect can often be achieved by rubbing in a contrasting-color wood filler.
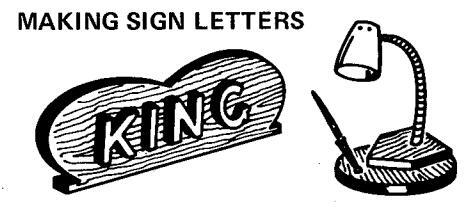
One of the most popular uses of a jig saw is the creating of lettered signs. Individual letters to be assembled on a backing are the easiest; but connected, script type words also can be sawed
with a little practice. Select non-warping materials and letter designs which have been carefully drawn or traced.
SAWING COPED JOINTS
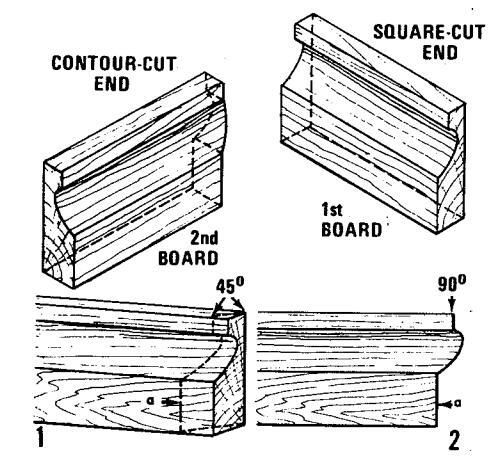
In a coped joint one board is cut off square at end and the other is contour cut to butt against face of first board. To establish the correct contour, if boards are identical, simply bevel the second board end at 45°... then jig-saw the end off (at 90°) following the contour created on the board face by the bevel cut. If boards are not identical, make a template of the first board end and transfer this to face of second board to obtain contour.
CUTTING TUBULAR JOINTS
The jig saw is very useful for joining – at right angles – any two tubes, of same or different
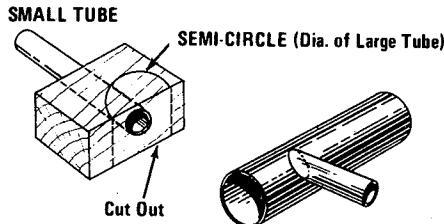
diameters. Drill a hole through a block of scrap wood into which smaller (or, if equal, one) tube can be tightly inserted. Insert tube. Scribe a semi-circle having same radius as other tube on face of block to cross over small tube where joint is desired. Saw out the block and small tube along drawn line.
If joining is to be other than 90o up and down, tilt table to the bevel angle equal to angle of joint. If other than 90o side-to-side, draw diameter of larger tube at proper angle on face of block before drawing the semi-circle.
FILING WITH JIG SAW
Small round, half-round, flat and triangle files can be used to great advantage in any jig saw that can use sabre-saw blades. Grind the file tang end so it can be held in the lower chuck. Remove regular table insert and substitute a suitable one made of metal or plastic. Reduce saw speed (by changing motor or saw pulley size) to about 1/3 to 1/2 normal speed. (Too fast a speed will glaze the file, especially if teeth are fine and/or work is inclined to be "gummy".)
Use light feed pressure. Avoid any twisting that would bind the file. Difficult interstices and pattern lines can be neatly smoothed to save much hand labor.
POWER TOOL INSTITUTE, INC. SAFETY RULES FOR POWER TOOLS
Read owner's manual carefully Learn its No loose clothing or jewelry to get caught in moving parts. Rubber gloves and footspecific potential hazards peculiar to this wear are recommended when working out-2. GROUND ALL TOOLS - UNLESS DOUBLE-INSULATED with most tools. Also face or dust mask if If tool is equipped with three-prong plug, cutting operation is dusty 12 DON'T ABUSE CORD commodate two-prong receptacle, the adapt-Never carry tool by cord or yank it to diser wire must be attached to a known connect from receptacle. Keep cord from heat, oil and sharp edges 3. KEEP GUARDS IN PLACE Use clamps or a vise to hold work. It's safe than using your hand and it frees both 14 DON'T OVEBBEACH Don't use power tool in damp or wet locabest and safest performance. Follow instruc-All visitors should be kept safe distance When not in use, before servicing; when 7 STORE IDLE TOOLS dry, high or locked-up place - out of reach 17. REMOVE ADJUSTING KEYS Form babit of checking to see that keys and It will do the job better and safer at the adjusting wrenches are removed from tool 18 AVOID ACCIDENTAL STARTING Don't force small tool or attachment to do Don't carry plugged in tool with finger on the job of a heavy duty tool. switch. SOLD BY SEARS, ROEBUCK AND CO. - CHICAGO, ILL, 60607 - U.S.A. AND SIMPSONS-SEARS LIMITED - TOBONTO
32


 Loading...