

Sears | Craftsman How to care for your new Craftsman Circular Saws and Dado Heads Instruction Guides

HOW TO REFIT CRAFTSMAN CIRCULAR SAWS AND DADO HEADS
This instruction booklet will help you obtain the maximum service from your Craftsman Circular Saws and Dado Heads.
Your Craftsman saw is made of the best saw steel available, carefully heat treated and tempered to hold a sharp cutting edge. It has been carefully set and filed at the factory. If you will keep this saw sharp and round, it will repay you in better work and your blade will last longer.
For best possible service use the blade that fits the job. This will result in much longer blade life and more satisfaction in the use of your saw table or electric hand saw.
The following directions will help you keep your saws sharp:
Examine your saw carefully before attempting to file it. If the blade is to be filed for the first time, probably all that is required is a touching up of the points with a file. Set the teeth only when necessary—not every time the saw is filed. Follow these steps when refitting your saw:
- 1. JOINTING 2. SHAPING
- 4. SHARPENING
- IG 4. SH
- 5. GUMMING (when necessary)
SAW TOOLS
In refitting your saw, use only the best of tools. These you will find in Sears General Catalog or in Sears Retail Stores, including files, saw sets, etc. Always clean and oil saws when not in use. This will prolong the life of the saw by preventing rust and consequent binding or burning. Sears pitch and gum remover, catalog No. 9-4918, is very effective in removing gum and keeping the blade clean and free running.
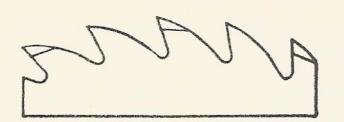
JOINTING SAWS AND DADO HEADS
Jointing means getting all teeth to the same height, so all will cut alike—jointing is easy, but it is important because it determines the
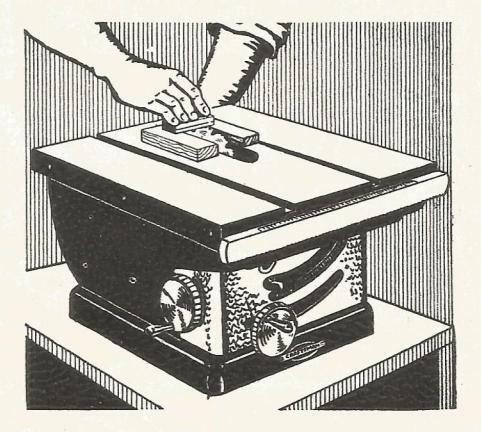
Fig. 1
behavior of the saw in the cut. See Fig. 1. Make a set up like this: then with saw mounted on mandrel turn the saw slowly backward by hand, holding the emery stone lightly against the tips of the teeth. A flat file will serve as well as a stone. Continue turning until all teeth show they have touched the stone or file—do not take off more metal than necessary
SHAPING THE TEETH
After jointing, put saw in a clamp, Fig. 2, and file teeth as near to original shape as possible. Do not use a common metal work vise to hold saws in refitting because of the danger of ruining the tension in the blade; marring the finish or bending the teeth. Make all teeth the same shape with gullets the same width and depth. There are two general types of teeth—chisel point for ripping and needle or spear point for cut-off or cross cut saws. The master-combination blade combines the features of both. See Sharpening Circular Saws, for recommended files to use and catalog numbers.
SETTING CIRCULAR SAWS
After shaping the teeth, they should be set. To set is to bend tips of the saw teeth, alternately, right and left, to provide clearance for the blade in going through the cut. The setting of the blade should be done before sharpening. Setting can be done with a hand set, catalog No. 9-4873, or with a setting stake or anvil, fig. 3.
A hand set is best adjusted by placing it over a tooth while blade is on saw arbor. Fig. 4 shows the normal set for various saw types. In cases where a blade is to be used almost entirely in soft wood, the amount of set can be slightly greater; that is, the tooth should be bent out more. If saw is to be used mostly for seasoned hardwood, you can use less set than shown in fig. 4. Blades for use on electric hand saws should be set slightly more than blades

Fig. 2

for saw tables. After adjusting saw set to give desired set, bend each alternate tooth tip in same direction, so that adjacent teeth are set in opposite directions. Be sure to reset teeth on which trial was made, so they will be in line with the rest. Be sure adjustment of tool does not shift while setting, and that it does not slip when pressure is applied.

When setting a master combination blade, omit setting of raker teeth. No set is required on the hollow ground master combination blades, as hollow grinding provides proper clearance. When setting the wood and nail cutter saws, reset as nearly as possible, the same as originally set. Setting should be done carefully with a setting stake and anvil, as this blade is very hard. Normal set is shown in fig. 4.
The normal set for the standard combination blade and the utility combination blade is shown in fig. 4. This set is for electric hand saw use. If the blade is to be used on saw tables, the set should be
the blade is to be used on saw tables, the set should be less, approximately that shown for rip saws. Blades are carefully set at the factory for average use
Blades are carefully set at the factory for average use. All blades are set for saw table use in average woods except for the wood and nail cutter and the standard combination and the utility combination; these are set for use on electric hand saws.
GUMMING
Gumming is deepening of the gullets between ripping teeth. After the first two or three filings of a ripping blade, gullets should be filed with a round file of suitable diameter, catalog No. 9-6760, fig. 5. Make strokes straight across. Two or three strokes in each gullet should be sufficient. Cutting teeth of master combination and cross cut blades are more or less automatically gummed by each filing.

SHARPENING CRAFTSMAN CIRCULAR SAWS
After setting comes sharpening. Place saw in a clamp as shown in fig. 2. Don't try to hold saw in an ordinary metal vise. Always use a good fine cutting file of the proper size and shape. The Sears files obtainable in the retail stores or mail order stores are recommended. Always file carefully, never removing more metal than necessary, as this will cause a reduction in tooth height and possibly result in an out of round blade. The normal filing for the different types of blades are as follows:
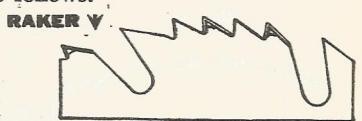
MASTER COMBINATION AND HOLLOW GROUND COMBINATION
The master combination and hollow ground combination saws are normally filed with a slight bevel on the front of the scoring tooth and a larger bevel on the back. This gives a "spear point" type of tooth. The softer the wood, the more pointed the tooth can be. The raker teeth are filed straight across, keeping the rakers 1/64" to 1/32" lower than the scoring teeth. Normal filing is shown in fig. 6. The chip space or gullet depth is increased when necessary by filing with a round file, catalog No. 9-6760, of the proper diameter to fit radius of gullet. For filing the scoring teeth, use slim taper file, catalog No. 9-6758, and grind one edge to prevent damage to the leading scoring tooth.
Hollow ground blades can be used on electric hand saws as well as table saws. They will give better service when kept sharp and clean.
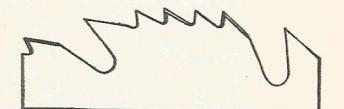
STANDARD COMBINATION
The standard combination is normally filed with a straight filed front and a bevel filed back. The normal filing is shown in fig. 7. For very hard woods, the bevel should be less than normal, and on very soft woods or where most of the cutting is cross grain, the bevel can be advantageously increased to more than normal. Fig. 7 also shows the correct back angle for normal conditions. For best filing results, use Sears file, catalog No. 9-6756.
UTILITY (COMBINATION RIP AND CROSS CUT)
The Utility (Combination Rip and Cross Cut) is normally filed with a straight filed front and a bevel filed back on the teeth. The normal filing is shown in fig. 7A. For
MASTER COMBINATION
HOLLOW GROUND
Fig. 6


UTILITY (COMBINATION RIP AND CROSS CUT)
Fig. 7A
RIP Fig. 2
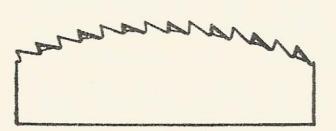
Fig. 9

Fig. 10
very hard woods, the bevel can be reduced slightly, and on very soft woods, or where most of the cutting is cross grain, the back bevel can be increased to more than normal, or a slight bevel added to the front of the tooth is also advantageous when cross grain cutting soft woods. For best filing results, use Sears file, catalog No. 9-6756.
RIP
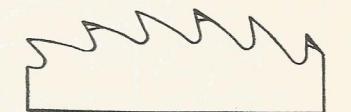
The rip saw is normally filed straight across the front and straight across the back. The correct filing is shown in fig. 8 for normal wood cutting. For very soft and tough fiber woods, a slight bevel on the back of the tooth is advantageous The rip saw tooth should cut like a chisel point, particularly in hard woods. For best filing results, use Sears file No. 9-6756 for teeth and No. 9-6760 for gullets.
CROSS CUT
The cross cut saw is filed with as light bevel on the front and a larger bevel on the back. This gives a 'spear point" type of tooth. The softer the wood, the more pointed the tooth should be. In filing, it is best to file every other tooth and then reverse saw in the clamp and file the remaining teeth. The normal filing is shown in fig. 9 For best results use Sears saim taper files, catalog No. 9-6743.
WOOD AND NAIL CUTTER
Your Craftsman nail cutting saw is made of finest special steel, heat treated and tempered for hard and rugged service by an exclusive newly developed process. It has been carefully set and sharpened at the factory. It is very important that you keep this blade sharp and round for the best service. This nail cutting blade will cut wood of all kinds fast and clean, and will give satisfactory service in cutting occasional nails encountered in wood sawing, if it is kept properly fitted and sharpened. It is not intended to continuously cut nails without an occasional sharpening.
The sharpening of the nail cutting blade must be done carefully, as the bevel angles are very important. Templates, fig. 10, can be used as a guide to get the correct back angle and the bevel on the back. The front of the tooth should not be beveled. The back bevel should be slightly more than one half of the thickness of the blade for best results. It is always best to file every other tooth, then turn blade around and file every other tooth from opposite side. For best results use Sears mill file, catalog No. 9-6764.
CRAFTSMAN DADO HEADS
A dado head, sometimes called a dado saw, is a device for cutting grooves. Complete head consists of two solid outside saws and a number of chipper blades, fig. 11. accurate work. The set will cut grooves crosscut, diagonal, or rip from 1/8" width to 13/16" widths. Different onal, or np from 1/6 when to 10/10 when s. Different tion of outside and inside cutters for the required widths The outside cutters are "blocked" or "set"; that is, each dividual bank of cutting teeth is set so that the cutting edges are out past the flat of the blade in the same manthat individual teeth are set on a circular saw, see fig. 3. This is done to provide clearance and prevent binding on deep cuts or in cutting damp or kiln dried hard woods. This is a new practice on dado heads as the individual blades are ground thinner so that the blocked ide will cut a 1/8" groove. When two blades are used with no inside cutters to make a 1/4" groove the use of the paper washers furnished is necessary to adjust the
The dado heads are matched to give a smooth flat groove with slight "glue pockets" in the corners; that is, the outside cutters cut slightly deeper than the inside cutters, fig. 12. This is done to give clearance for "glue" flow around the corners of the inletted part and also to insure sharp corners so that the inletted part will fit snugly against the flat center section of the groove.

A small dado head may be sharpened by using same method described for saw blade.
Fig. 11

Fig. 12
In arranging inside cutters between the outside cutters, be careful to place the inside cutters so that the swaged portions will fit in the gullets of the outside cutters, fig. 11. When more than one inside cutter is used, arrange so that their cutting edges are evenly distributed around the circumference of the dado head. The paper washers are supplied to adjust the groove to the desired width. If grooves wider than 13/16" are desired, purchase additional inside cutters from your Sears store to make up any width you require.

Fig. 13
BLOCKING DADO OUTSIDE CUTTERS
Blocking is the bending of banks of cutting teeth , alternately, to provide clearance for the blade in going through the cut. Fig. 13 shows the normal amount of blocking required. This can be done with a setting stake or anvil as shown in fig. 3, setting teeth separately, being very careful to get all the teeth the same in the individual banks, as well as having the same set in all banks. Another method is to make an anvil wide enough to accommodate the complete bank of teeth and having a radius the same as the outside cutter with a bevel on the edge, and bend the teeth to conform to the anvil, using a smooth flat head hammer. The blocking should never be more than necessary to prevent binding, as this will increase the width of groove cut by the cutter, and the flexibility of the head to cut different width grooves will be sacrificed.
SHARPENING DADO HEADS
A dado head may be jointed and filed by using practically the same method as for a saw blade. To joint the head, use strips clamped to saw table described under jointing of circular saws and illustrated in fig. 1, and assemble all separate cutters on arbor, so they run backward. Use coarse side of stone in jointing. If this is carefully done, no harm will result to stone. Next, remove head and carefully file outside cutters. In filing be sure to maintain original shape of teeth. When filing is complete, give each raker tooth an additional stroke with a flat file. Assemble all inside cutters on arbor, and joint them again with dado running backward. Then remove and file top of each tooth straight across, just back of cutting edge, to remove rounded portion caused by jointing.
Circular saws and dado heads will not carry the regular Sears satisfaction guarantee if the original tooth shapes have been altered in any way.
CRAFTSMAN TOOLS SOLD ONLY BY SEARS, ROEBUCK AND CO.
Printed in U. S. A.


 Loading...