

Sears | Craftsman Handbook of Circular Saw Blades and Power Tool Accessories Instruction Guides

HANDBOOK OF CIRCULAR SAW BLADES AND POWER TOOL ACCESSORIES
CONTENTS
| Circular Saw Blades 1- ( | 5 |
|---|---|
| Dado Sets | 4 |
| Molding Head and Cutter Bits | 1 |
| Hold Downs | 4 |
| Universal Jig for Bench Saws | 5 |
| Miter Vise for Radial Saws | 7 |
| Taper Jig for Taper and Angle Cutting | 3 |
| Sanding Wheels | ÷ |
| Karbo Grit Abrasive Wheels 30 | ) |
| Jointer Sander Wheel 31 | Ĺ |
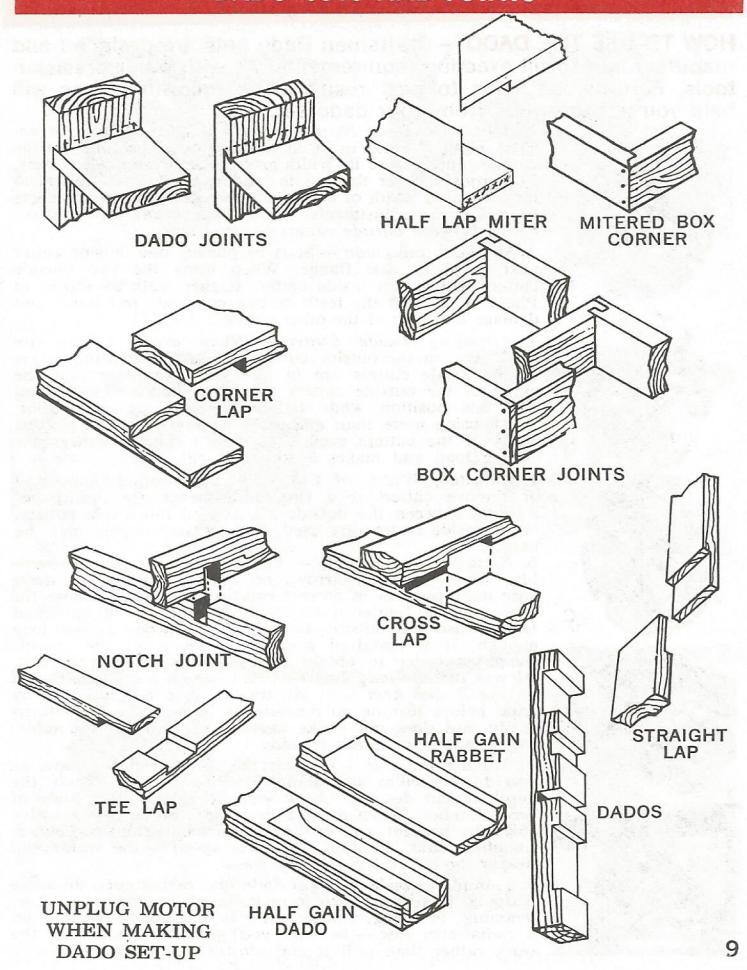
| Typical Wood Joints | 2 |
| Molding Head and Dado Guards | 3 |
| Rotary Planer Heads | 1 |
| Shaper and Molding Fence | 5 |
| Refitting Circular Saw Blades | , |
SEADS CHADANTEE
Craftsman tools are unconditionally guaranteed to be free from defects in materials or workmanship. Any tool that fails to give you complete satisfaction will be replaced free of charge.
FOR QUALITY WORK USE CRAFTSMAN TOOLS
©Copyright 1971 Sears Roebuck and Co.
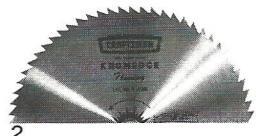
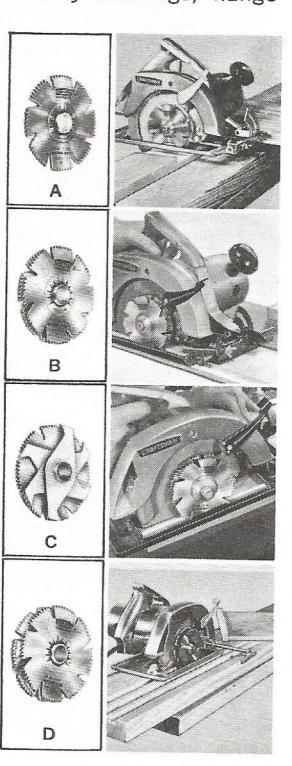
THERE'S A CRAFTSMAN SAW BLADE FOR EVERY JOB
Whatever your cutting requirements the broad line of quality Craftsman Kromedge Circular Blades can meet them. They are made of the finest chrome nickel-molybdenum saw steel and are Kromedge treated to increase the hardness of the surface and cutting edges. Available in all popular diameters and arbors. Blades are provided with center hole knockout. Pry out smaller bushing with screwdriver if necessary to fit your arbor. On some operations a smaller diameter blade will do the job as well as a larger blade. An example of this would be the use of a 9" thin rim veneer blade on a 10" or 12" saw to cut plywood and veneered paneling.
CHISEL TOOTH COMBINATION — All purpose blade. For fast cutting of all woods . ripping, crosscutting, and mitering. Excellent contractor's framing blade. Recommended especially for use with power hand saws, radial-arm saws and bench saws.

CABINET COMBINATION — For general cabinetwork. Rips, crosscuts, and miters hard and soft woods. For trim and finish work. This blade can be used on power hand, bench, and radial-arm saws.

PLYTOOTH BLADE — For smooth cutting of plywood, plus crosscutting and mitering all hard and soft wood. Use for squaring, trimming — excellent for cutting celotex and other wood fiber materials. For power hand, bench and radial-arm saws.

MASONITE SIDING BLADE — Especially made for cutting Masonite siding, decorative hardboard, and waterproof plywood. Kromedge treated blade with flame-hardened teeth — outlasts ordinary steel saw blades many times. For all electric hand, bench, and radial-arm saws.
USE THE RIGHT BLADE FOR THE JOE

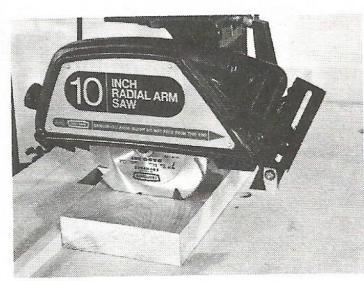
FOR METAL SAWING, CHOOSE THE RIGHT BLADES
Cutting ferrous metals always produces sparks which could start a fire. All sawdust and combustible materials should be removed from the area before sawing ferrous metals.
STEEL SLICER BLADES MUST ALWAYS EXTEND BEYOND WORK

CUT SHEET METAL, ROOFING, GUTTERING, PIPE
KROMEDGE METAL CUTTING BLADES

STEEL SLICER — cuts sheet iron and steel by burning the material with heat generated by friction of the edge of the blade. For electric hand, bench, and radial-arm saws. This cutting process produces sparks. SAFETY GLASSES SHOULD BE WORN TO PROTECT YOUR EYES. The Steel Slicer is not recommended for cutting aluminum, copper, brass, and other non-ferrous metals.

NON-FERROUS METAL CUTTING BLADE — For cutting aluminum, brass, bronze, copper, zinc and other non-ferrous metals. A professional blade, taper-ground, made of extra-hard alloy steel. For best results use a lubricant, such as a tallow candle-Moderate feeding rate of material to blade will produce smooth cut. For power hand, bench, and radial-arm saws. ALWAYS WEAR SAFETY GLASSES TO PROTECT YOUR EYES.
FLOORING BLADE — Ideal for flooring, lumber salvage, and rough timber that may contain an occasional nail or wire. Rip or crosscut. Made of extra-hard alloy steel . . outlasts ordinary woodsawing blades. Use with power hand, bench, and radial-arm saws.
PROFESSIONAL CABINETMAKER'S BLADES
For The Home-Workshop and Master Craftsman
Craftsman Kromedge Free-Cut blades have been developed to meet the exacting needs of master craftsmen. They are made to the most rigid manufacturing standards. Made in all popular diameters to fit electric hand, bench, and radial-arm saws.
FREE-CUT RIP BLADE — For clean, faster cutting of all solid woods with the grain. Binding is practically eliminated. Extra deep gullets between the teeth remove sawdust so that each tooth has a free path for cutting. Used also for re-sawing. Cuts both hard and soft woods. Free Cut blades have a heavy hub for greater stability — minimized vibration and wobble. Taper ground for extra cutting clearance, with teeth set for fast, free, and accurate cutting.

FREE-CUT COMBINATION BLADE — Crosscuts, rips or miters hard and soft woods, trims stock, etc. Taper Ground and set — a great improvement over the popular flat ground combination. Cuts without binding — cuts cleaner, faster, more accurately. Leaves a smooth square cut. Heavy center minimizes vibration and wobble.

UNPLUG MOTOR WHEN CHANGING BLADES
TWO-SIZE PUSH STICK FOR BENCH SAWS
The handiest "extra" you can have at the circular saw table is the simple push stick. You can safely handle stock in a wide range of thicknesses by having two notches in the end instead of the usual one. Make one notch for handling stock up to 1/4" thick. Turn the stick over and you have a 1/2" notch for stock up to 2" thick.
USE ¾"x¾" FLAT PUSH STICK FOR RADIAL SAWS
KEEP HANDS AWAY FROM CUTTING TOO
PROFESSIONAL CABINETMAKER'S BLADES
CRAFTSMAN THIN-RIM BLADES — The Craftsman Thin-Rim blade is made especially for fine finish work. Taper ground with extra heavy body for stability. Teeth need no set. Kromedge treated for longer life; to resist tars, pitch, rust. Practically no splintering.

FREE-SMOOTH CUT COMBINATION BLADE — Our finest professional combination blade. Makes precision "glue-joint" cuts — rip, crosscut, miter. Extra-heavy center makes blade run truer. Expansion holes and slots insure free, true, quiet operation, even when cutting hard, tough woods or plastics. Leaves a smooth square cut.

THIN-RIM SATIN-CUT VENEER BLADE — Best blade for precision cutting of plywood, veneers and other sensitive materials without splintering. Use also for mitering and cutting laminates, plastics. For extra fine sawing. Blades for power hand, bench and radialarm saws

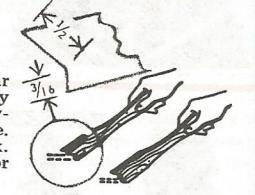
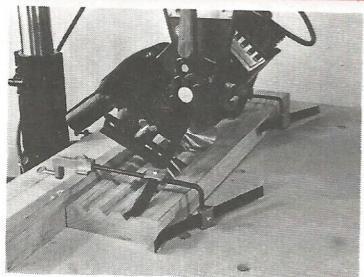
8-IN. KROMEDGE TENONING BLADE — Thicker than all-purpose blades. Cuts square bottom grooves ¼-in. wide in one cut . assures hair-line joints. Especially useful in making box joints, mortises, splines, tenons, etc. Use on any radial-arm or bench saw with ½-½-in. arbor. For best results on bench saw use with Craftsman Universal Jig fixture (page 25). Use on all woods.
CRAFTSMAN SAW BLADE STABI-LIZER — Reduces wobble for truer, smoother cuts, and longer blade life. Tapered steel disc stabilizes the blade, reduces rim vibration. Ideal for carbidetipped and all flat ground blades. Not recommended for hollow-ground or freecut style blades. Stabilizers are 4 in. diameter with center hole bushed for %k-i%2 in. Use with 7 in., 8 in., 9 in., 10 in, and larger diameter blades.
CRAFTSMAN CARBIDE TIPPED BLADE
THE MOST VERSATILE BLADE MADE


Composition Board Masonite Flake Board Gypsum Board Wallboard Unaleum
Woodrock Transite Cement Board Asbestos Board Asbestos Siding Asphalt Tile
Asphalt Roofing All kinds of wood Formica Fiberglass Cork Asbestos Installation Non-ferrous Metals
FOLLOW THESE DIRECTIONS FOR YOUR OWN SAFETY, AND FOR BEST POSSIBLE RESULTS!
- Be sure that your machine is in perfect alignment.
- Saw blade must run true on arbor and in perfect line with fence or saw guide.
- For truest, smoothest cuts and longest cutting life use Craftsman Saw Stabilizers.
- SAFETY GLASSES SHOULD BE WORN TO PROTECT YOUR EYES.
Tungsten carbide is the hardest, most abrasive material ever used in saws, but it can be broken. Protect carbide tips from sharp blows.
With proper use and care, your Craftsman Carbide-Tipped Saw Blade will give you many times the life of conventional blades between sharpenings. Prompt resharpening and repair service is available through any SEARS retail or mail order store.
CAUTION: DO NOT USE ON NAILS, IRON OR STEEL and other ferrous materials. DO NOT USE ON MASONRY, CONCRETE, STONE, BRICK, FLAGSTONES, CERAMIC TILE, ETC. 5
CRAFTSMAN CARBIDE-TIPPED BLADES
Outlast ordinary steel blades up to 20 times. Use them to rip, crosscut, miter, and bevel all woods, most plastics, Masonite, Formica, aluminum, brass, transite, asphalt, asbestos, wallboard, plywood. Not for masonry or ferrous metals. Kromedge finish for rust resistance, less gumming, faster cutting, easier feeding . use less power.
8-TOOTH CARBIDE - TIPPED BLADE SAFE SAW — Excellent for contractors' use on-site and for home owners who do a lot of sawing. Gives many more cuts between blade changes than ordinary blades, cutting almost any material. Blade sizes for electric hand, bench, and radial-arm saws. (12-in. diameter blade has 12 teeth.)

MASONITE CARBIDE-TIPPED BLADE — Make fast straight cuts with this long-lasting industrial quality blade. Designed for smooth cutting of Masonite and other similar abrasive materials. Blades have alternate top-bevel grind — recommended for all crosscutting and mitering of hard and soft woods, plywoods, veneers, Celotex, plastics, Formica and plastic laminates.

SPECIAL, ALL PURPOSE CARBIDE TIPPED BLADE — Sears finest, smoothest cutting carbide tipped industrial blade for sawing wood, plywood, plastic laminates, plastics, veneers, aluminum, brass, bronze, lead, etc. Not for ferrous metals or masonry. 10" diameter, 48 teeth.

CRAFTSMAN KROMEDGE DADO SETS
For grooving, dadoing, ploughing, tenoning and decorative cutting on bench, radial-arm and power hand saws
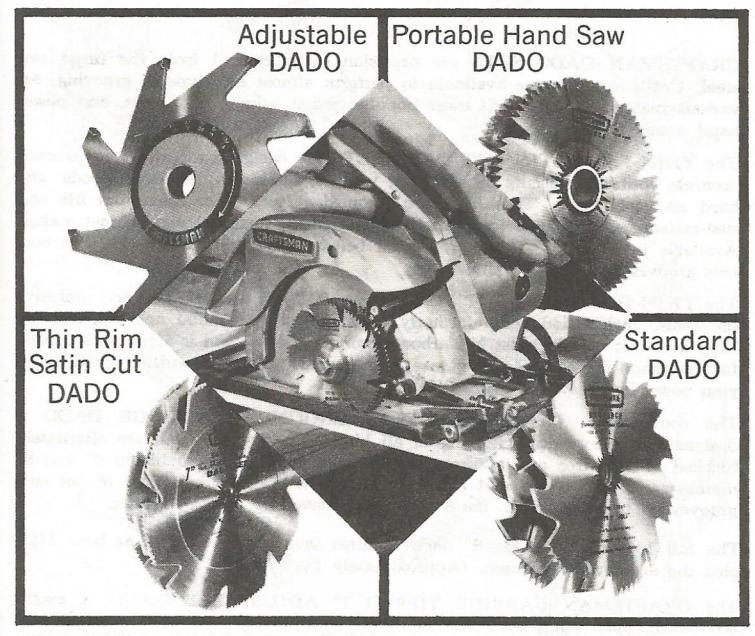
The most common use of the dado is for cutting grooves: across the grain, diagonally, and with the grain. Craftsman Dado Sets are available to make cuts from 1/8 in. up to 11/8 in. wide. The dado is a work-saver in making wide tenons for lap joints, rabbets for dado and rabbet joints, box or drawer joints, decorative cuts, etc.
Craftsman Dado Sets are Kromedge treated and will outlast ordinary dado sets 5 to 1. Sets are professional quality with precision ground blades and perfectly matched chippers. Dado sets are available to fit most popular bench, radial-arm, and power hand saws. For plywood, fine veneers, mosaics, and other sensitive materials we recommend the Thin-Rim Satin-Cut Dado Set illustrated. 7
CRAFTSMEN DADO SETS
DADO CUTS AND JOINTS
CRAFTSMAN DADO SETS are precision manufactured from the finest saw steel. Craftsman sets are available to perform almost any type of grooving, for various materials, and to fit most popular radial saws, bench saws, and power hand saws.
The THIN RIM SATIN CUT DADO SETS are designed especially for smooth accurate splinter free cuts on plywood, veneers, laminates, furniture woods, and hard and soft wood. These sets are Kromedge treated for maximum life and rust-resistance. The dado for the master craftsman, furniture and cabinet maker. Available in 7" and 8" diameter, fits all bench and radial saws with 5%" arbor, cuts grooves up to 13/16" width.
The THIN RIM SATIN CUT POWER HAND SAW DADO, new and exclusive for Sears, makes dado cuts formerly only possible on radial and bench saws. This dado set will fit most 5%" arbor power hand saws and is Kromedge treated for maximum life and rust resistance, cuts grooves up to 9/16" width. It will make your power hand saw more versatile.
The conventional CRAFTSMAN FLAT GROUND KROMEDGE DADO is designed for heavy duty dadoing of all kinds. The cutting teeth are alternately blocked to give free and accurate cuts without binding. Available in 6" and 8" diameter, fits all bench and radial arm saws with 5%" arbor. The 6" set cuts grooves up to 1346" width, the 8" set cuts grooves up to 1346" widths.
The full 11%" cut with the 8" dado requires saw arbor length of at least 11%" plus the arbor nut thickness. (Approximately 11%" total.)
The CRAFTSMAN CARBIDE TIPPED 7" ADJUSTABLE DADO is exclusive with Sears. This dado fits all bench and radial arm saws with 5/8" or 3/4" arbors. The long lasting tungsten carbide tips will last up to 20 times as long as steel dado blades. Cuts plastic, formica, plywood and all hard and soft woods. The width of the groove is adjustable from 1/4" to 1/3/6" by DIAL THE CUT. It is not necessary to remove the dado from the machine to change the width of cut. MAX. R.P.M. 4500. USE PROPER HOLD DOWN WHEN PLOUGHING ON RADIAL ARM SAWS.
See following pages for "how to use" information and typical dado uses. PURCHASE YOUR DADO SET AT SEARS, SATISFACTION GUARANTEED.
8 UNPLUG MOTOR WHEN MAKING DADO SET-UP.
HOW TO USE THE DADO
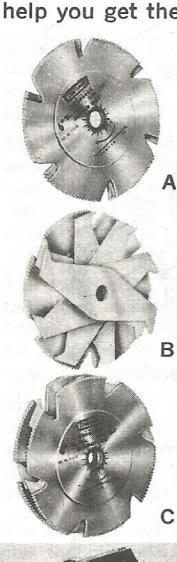
HOW TO USE THE DADO — Craftsman Dado Sets are designed and manufactured to fill exacting requirements. As with other precision tools, correct use leads to best results. The following steps will help you get the most from your dado set.
1. Setting the Data Head — Select the correct parts for desired width of cut. For ¼ in, width groove, use one outside cutter alone. For ¼ in, width groove use two outside cutters, For grooves wider than ¼ in, add enough inside cutters to make desired width of cut. Use paper or cardboard washers to make fine adjustments. Always use inside cutters positioned between outside cutters — never alone.
2. Mounting the Dado — Start by placing one outside cutter next to inside saw flange. When using the two outside cutters without an inside cutter, stagger teeth as shown in Photo A, so that the teeth of one cutter do not touch and damage the teeth of the other cutter.
3. Arranging Inside Cutters — When inside cutters are used between the outside cutters, be sure the cutting edges of the inside cutters are in line with the bottom of the gullet of the outside cutters as shown in Photo B. Maintain this position while tightening dado on saw arbor. When using more than one inside cutter, space the cutting edges of the cutters evenly, as shown. This equalizes the cutting load and makes a smoother cut.
A. Adjusting Width of Cut —For large adjustments add or remove cutters. For fine adjustments use thin paper washers between the outside blades and the inside cutters. When inside cutters are used, both outside cutters must be used.
5. Securing the Assembly — Photo C shows complete assembly. Check rotation arrows on outside cutters, to make sure dado head is in correct rotating position. Be sure the arbor nut is tightened securely. If arbor is of sufficient length, use the outside flange. If the arbor is not long enough, it is standard practice to leave off the outside flange in order to obtain maximum thread for the nut. Always Install Dado Insert on Bench Saw and Blade Guard on the Radial-Arm Saw. Rotate the dado one full turn by hand before turning on machine to be sure the dado turns freely and does not strike against any part of the table, insert, guard, or motor housing.
6. Making the Cut — Operate the dado head the same as you do a circular saw blade. Position head to obtain the depth of cut desired. Check your settings with a piece of scrap lumber. When making deep cuts. do so in successive steps to prevent overloading of machine and to obtain smoother cuts. Feed at moderate speed — the wider and deeper the cut, the slower the speed.
It's simple to make straight dado and rabbet cuts, do angle dadoing, ploughing; also to make bevel, tongue-and-groove, tenoning, grooving, fluting cuts. In making heavy cuts on a radial-arm saw — be sure you push the dado over the work rather than pull it and always use blade guard .
HOW TO USE THE DADO
DADO CUT
FLUTING
GAIN CUT

LAP

e sh. Jd-dc PLOUGH
RABBET PLOUG ALWAYS USE BLADE OR MOLDING GUARD
HOW TO USE THE DADO
ORNAMENTAL CUTS

DOOR PANEL


2 LAP-MITER JOINT MULTIPLE GROOVES UNPLUG MOTOR WHEN MAKING ADJUSTMENT AND SET-UPS
CRAFTSMAN ADJUSTABLE CARBIDE-TIPPED DADO

Just dial the hub for exact-size laps, grooves, joints, rabbets, other cuts
The Craftsman Carbide Tipped Adjustable Dado for radial-arm and bench saws will dado, plough, or rabbet any width from ¼ in. up to 13% in. Simply dial the width of groove desired. Once the dado is set, the cut will not vary. No need to remove dado from machine to reset for new width cut.
Depth of cut is normally limited only by the machine used. The maximum depth of cut is 2 inches. Fits any bench or radial-arm saw canable of using 7-inch or larger blade.
Long-lasting carbide tips are face bevel ground and permanently brazed to blade. Cut plastics, Formica, plywood and all solid woods.
How To Install the Adjustable Dado
Mount the Adjustable Dado on a radial-arm or bench saw the same way as a circular saw blade. Bushing is furnished for use on 5%-in.-round arbors. Place bushing on arbor next to the arbor flange and position the dado. Check arrow for correct direction of rotation. Mount the outside saw flange and follow with the arbor nut, but do not tighten. If the arbor is not of sufficient length to admit the flange, place the arbor nut directly next to the dado head, omitting flange
Dial the outer hub to the width of cut desired. Any desired width of cut between 1/4 in. and 13/16 in. can be dialed. Select width to make joint fit either loose or tight, depending on type of joint required. Tighten arbor nut after setting desired width of cut.
Install dado insert on bench saw, or blade guard on radial-arm saw. Rotate the dado one full turn by hand before turning on machine to be sure the dado turns freely and does not strike against any part of the table, insert, guard, or motor housing.
To make a change in width of cut, loosen arbor nut, dial the outer hub to width desired, and re-tighten arbor nut. Always rotate by hand to check clearance; and check each new setting on scrap word before cutting your work piece.
For the smoothest cut and safest operation, use the hold-down or Universal Jig described on pages 22 to 25. Observe all safety rules as practiced with conventional dado head, molding head, and saw blades. MAX. R.P.M. 4500. USE PROPER HOLD DOWN WHEN PLOUGH-ING ON RADIAL SAWS. BEWARE OF WARPED LUMBER.
SPECIAL DADO SET FOR ELECTRIC HAND SAWS
Use your electric hand saw with this specially designed Craftsman dado. Cut grooves up to %16-in. wide and up to 1-in. deep, depending on the machine used. (About %16-in. deep on your Craftsman Electric Hand Saw.) Make wide tenons for lap, dado, and rabbet joints; plough, bevel, and make decorative cuts formerly possible only on bench and radial-arm saws. Fits most popular electric hand saws with 5%-in. round arbor. Dado set comes complete with two outside cutters, three inside cutters, necessary bushings, flange washer, and arbor screws.
Mounting — Always use a bushing, selecting correct bushing for desired width of cut. Place desired assembly on saw arbor, making sure the bushing extends into the recess of the flange washer. For 1%-in.-width groove, use the shortest bushing and one outside cutter as in Photo A. Place on machine as you would a circular saw blade.
To make a 1/4-in.-wide groove, use next larger bushing and the two outside cutters as in Photo B. Rotate these cutters as shown, so that the teeth of one cutter does not touch and damage the teeth of the other cutter.
For grooves wider than 1/4 in., place largest bushing on saw arbor and add enough inside cutters to make desired width of cut. As shown in Photo C, position the cutting edges of the inside cutters so that they are evenly spaced. This equalizes the cutting load and makes a smoother cut.
USE INSIDE CUTTERS ONLY BETWEEN TWO OUTSIDE CUTTERS! Photo D shows complete assembly. After mounting outside blades, add flange washer, then tighten the arbor screw securely. Before starting machine, be sure the dado is installed in the correct rotating direction and clears all parts of the machine.
To adjust depth of cut, raise or lower the base plate the same as you do when using a circular saw blade.
Cutting — The dado operates the same way as your circular saw blade. Do not feed too fast. The wider and deeper the groove, the slower you push the machine. Do not twist or bind the dado. We strongly recommend that you use the Craftsman Portable Saw Guide or a straight edge to insure straight cuts. Check your settings by making a cut on scrap lumber.
CRAFTSMAN MOLDING HEAD AND CUTTER BITS
Make Your Own Moldings and Trim
Convert your bench or radial-arm saw to a jointer, or shaper with the Craftsman Molding Cutter Head. Make picture frames, interior trim, moldings, etc. Copy a variety of designs or create your own. Each cutter bit is made of selected tool steel, and properly heat treated for maximum toughness and long life. Patented Safety Screw Lock aligns cutter bits and locks them securely in position. Each set comes complete with wrench, spacer washer and bushings in a sturdy plastic package.
The Craftsman Mono-Cutter Molding Head Set. Made especially for the Craftsman Radial-Arm Saw, but fits any bench or radial-arm saw with 1/2-in. or 5/2-in. arbor. Comes with 18 bits. Operates chatterfree and is designed to stay in perfect alignment turns out trim or moldings uniform in size and shape.

OVE OPPOSITE
Fig. B
Fig. A.
Three-Bit Cutterhead Sets. Our best, most efficient cutter heads. Get professional results. Use your bench or radial-arm saw as a jointer-planer or shaper. Packaged in plastic case with storage space for six sets of cutter bits. Wrench, spacer washer, bushing included. Fits most bench and radial-arm saws with ½ in., 3% in., or 34 in. round arbors. Available in 434" cutting diameter and 7" cutting diameter. For 10" and 12" saws.
INSERTING CUTTERS IN MOLDING HEAD. Insert the cutter bit into your Craftsman molding head as shown in Figs. A and B and tighten the Safety Lock Screws with wrench provided. Be sure cutters are seated squarely and lock screws tightened securely before starting saw.
CAUTION: Be sure the groove in back side of cutter bit is opposite the lock screw and that the rotation is correct. Running the molding head backwards or with bits installed backwards will permanently damage the bits and head. 15
CRAFTSMAN MOLDING HEADS AND CUTTER BITS
CRAFTSMAN MOLDING HEADS AND CUTTER BITS
he started accidentally before changing cutters
MOUNTING MOUDING HEAD ON DENCH SAW ARROR Always use a molding head table insert If bushing is needed it goes on saw arbor first. Next slip spacer washer on the bushing or flange place solid side next to arbor flange Slide head into place with cutters pointing in the direcand put If saw arbor is too short leave off the and nut, it saw arour is too short, leave out the aggement of the arbor threads Tighten the saw arbor nut securely Before starting machine revolve hind on any part of the table or insert. It is not necessary to remove head to insert other autor shapes However unplug the saw or otherwise make sure that the power cannot accidentally be turned on while you are making cutter changes
MOUNTING MOIDING WEAD ON PADIAL ARM SAW If bushing is required, it should go on arbor first Then place spacer washer over the Figs. D and E. If space permits, use both flange washers on the machine spindle. Be sure the cutter the arbor nut securely and replace guard Before It is not necessary to remove the head to change

HELPEUL HINTS FOR MOLDING CUTTER AND DADO OPERATION
- 1. Never operate molding head on bench saw without molding head insert 2. Use wood auxiliary fence, pages 17 and 22, instead of metal rin fence.
- Ose wood auxiliary fence, pages 17 and 22, instead of metal up rence. Whenever possible use at least a 4-in-wide board and then rip to desired width after making molding cut. 4. Use Craftsman Universal Jig. (page 25), on Bench Saws, for all strips
- Never turn on power until you revolve the molding head by hand to be sure
- the cutters are tight and the head is running true Feed material into the molding cutters slowly and steadily for smooth, even
- On large moldings take two or three shallow cuts rather than one deep cut.
- Remember that the best work requires sharp cutters
- Never stop being careful
- Do not use warped lumber


MAKING AN AUXILIARY FENCE IS TOTAL not have a molding head auxiliary fence like the one illustrated in Fig. F, you can easily adapt
Make two 1-in thick facings to fit your fend Straight-grained hardwood is best. Cut a semi-circular noich in the pottom euge of the facing in like menner and mount the two facings on opposite sides of your fence with countersunk bolts and nuts.
wice that holds the work against the fence or saw table is called a "hold-down." The hold-down and rable is called a fibid-down. The fibid-down and It supports the work at an times against the impact
Fig. H shows a type of hold-down for use in mak ing edge cuts on wide poards where it is difficult to control the depth of cut. The strip of wood clamped on the work slides on the auxiliary fence do not strike the table saw bed, or insert
guide or hold-down like the one shown in Fig. I is best for strip holding. The groove is just large is best for strip holding. The gloove is just large you do not use a stripping guide cut the moldings on wood at least 4 inches wide using hold-down and guide as in Fig. G, then cut off strips the
See the Craftsman Hold-Down for bench and radial-arm saws and jointers on page 22.
USING THE CUTTER FOR VARIOUS MOLDING IORS With certain exceptions, feed the work as you would to a saw Make your deep cuts in easy stages, raising the molding head a little at a time Always use the fence as a guide When work must be placed on edge, move the fence back so that cutting is done on the side away from the fence so that cutting is done on the side away from the fence. This leaves a square edge against the fence for better support, be sure the cut will not be true. If work is to be molded all around, make the cross-grain cuts first - preferably with a backup of scrap wood, to minimize splintering
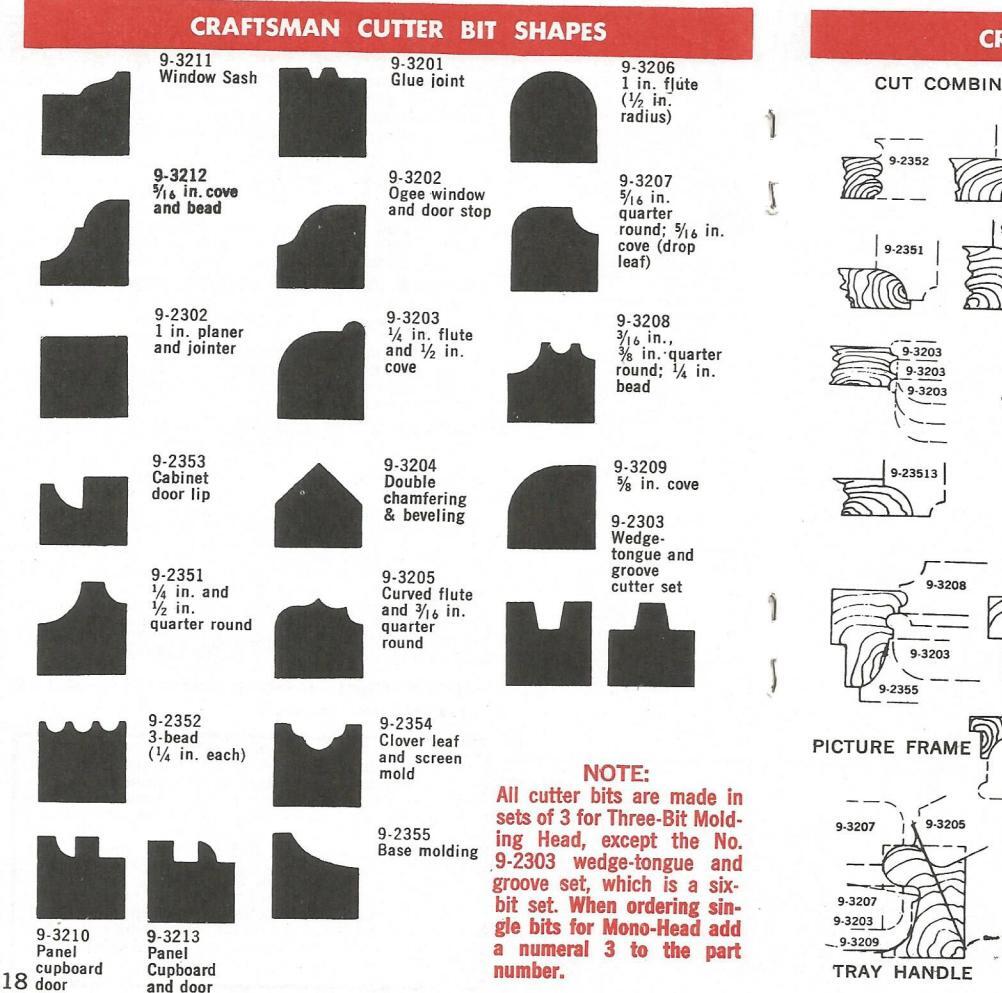
CRAFTSMAN CUTTER BIT SHAPES CUT COMBINATIONS WITH CRAFTSMAN MOLDING CUTTERS 9.3203 9-3207 9-2351 5) 9-3207 9-3207 7_ VARIOUS TARLE EDGES 9-2352 ---
DRAWER & BOX CORNERS

9-3203
CRAFTSMAN CUTTER BIT SHAPES
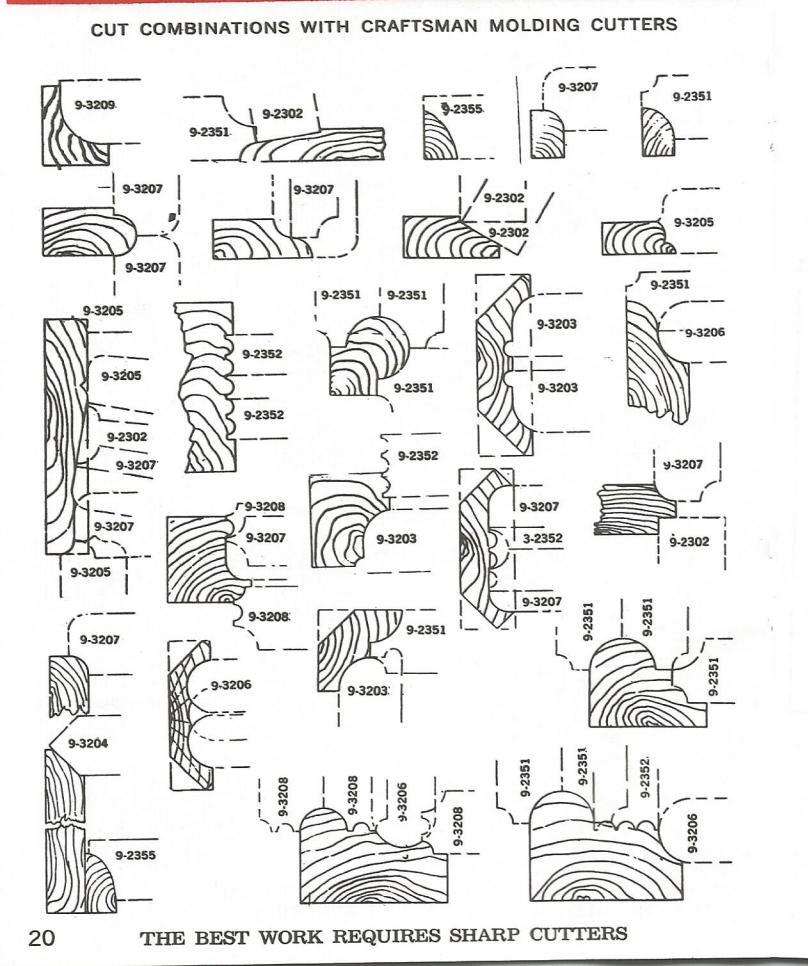
CRAFTSMAN CUTTER BIT SHAPES
The possibilities are endless - just use your imagination


EQUALS CRAFTSMAN
CRAFTSMAN HOLD-DOWNS
A satisfactory hold-down for any single job can be devised with boards and clamps as described on page 17. However, the man who makes a variety of molding and jointing cuts will want the time-saving convenience offered by the Craftsman Hold-Down, which is easily adjustable to many widths and thicknesses of material.
The Craftsman Hold-Down consists of four adjustable spring steel "fingers" attaching to the auxiliary fence that you apply to your saw. It fits most bench saws, radial-arm saws, shapers and jointers. It provides constant pressure on the work-piece the entire length of cut, to assure uniform contact with the cutters and prevent chattering and jumping. It also helps keep your hands away from the cutters. Use with molding cutter, dado, and tenoning blades. The photos show a few of the endless variety of uses on jointer, bench and radial-arm saws.
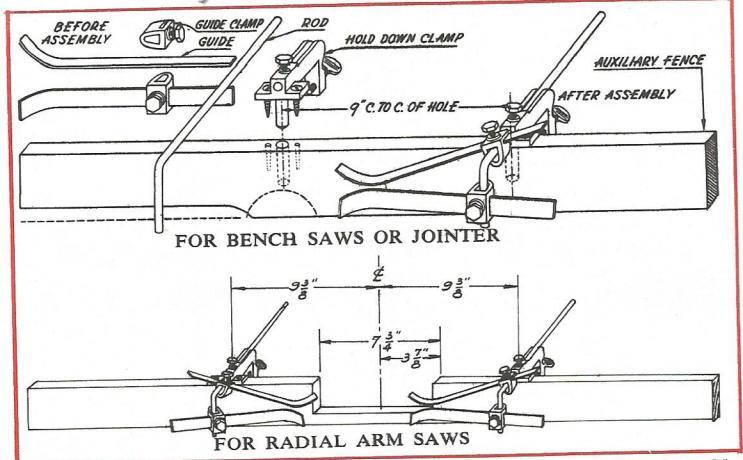
Construct an auxiliary fence for your tool as described on page 23. Assemble as shown in the illustration above. Mount the auxiliary fence on your saw or jointer. You are ready to position fingers to hold material being cut.
Usually the hold-down fingers are positioned to hold work firmly against table and auxiliary fence. However, in some cases, it is desirable to face all four steel fingers down to hold material against saw or jointer table.
Be sure the fingers holding material down are adjusted so that the pressure point of guide is not directly over table opening. Always adjust fingers so they will not touch edge of cutting tool when no material is being cut.
CRAFTSMAN HOLD-DOWNS
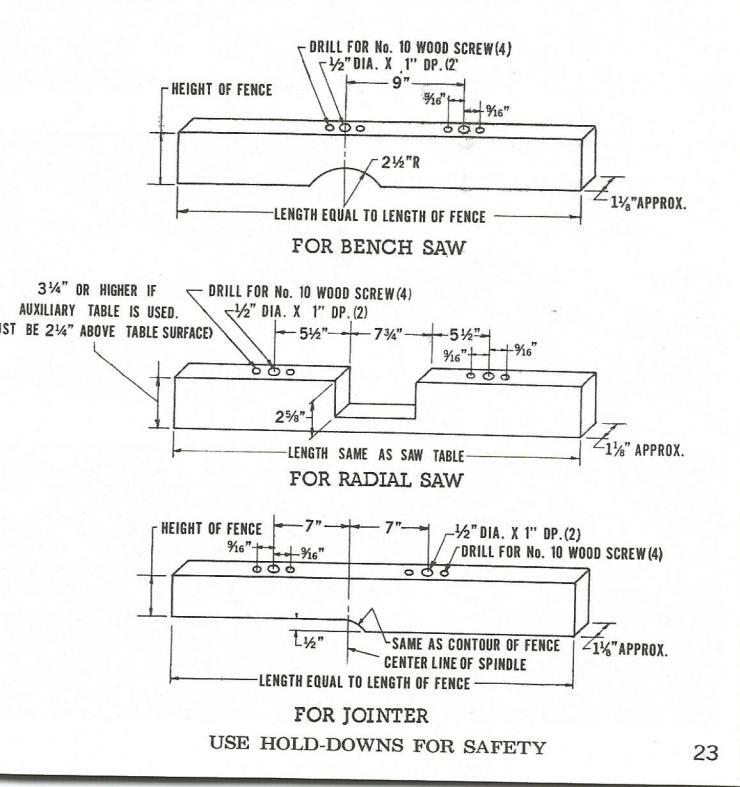
MAKE AN AUXILIARY FENCE FOR YOUR MACHINE — The Hold Down must be assembled on auxiliary wood fence that can be easily attached to the fence on your jointer or bench saw. Cut auxiliary fence from straight grained hard wood with a smooth finish. Length and height same as fence on your bench saw or jointer. Radial saw auxiliary fence should be 3¼" high. Thickness should be about 1½". The following sketches show how to make your auxiliary fence for Molding Heads and Dadoes. For use with saw blades the center cutout must be larger.
CRAFTSMAN HOLD-DOWNS


BEADING ON RADIAL SAW
JOINTER
AISED DOOR PANEL

FLUTING

BEADING ON BENCH SAV
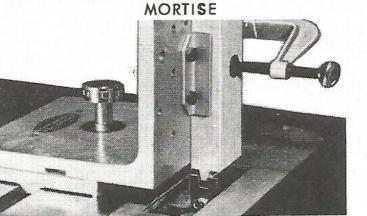
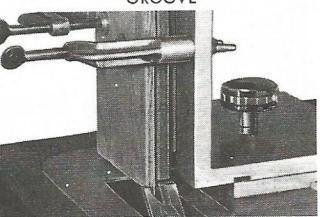
CRAFTSMAN UNIVERSAL JIG FOR DIFFICULT CUTS
For Use on Bench Saw Tables and Shapers
The Universal Jig has been designed to safely hold material for making difficult cuts for wood jointing, tenoning, molding, dadoing, etc. This attachment slides in the miter slot on your saw table in the same position as the miter gauge. Fits all saws with 3/4 in. miter slot. The positioning plate can be accurately positioned on the base by using the scale. By means of the different combinations of holes in the positioning plate, the locating guides and clamps can be adjusted to hold material in any desired position. Complete with two C Clamps, two locating guides and necessary clamping bolts and nuts. The Universal Jig Blade, molding head cutters, and dados. The tenoning blade, shown on page 4, fits 1/8 in -1/8 in . saw arbors. Thicker than general purpose blades, it cuts square bottom grooves 1/8 in . wide to form hairline joints.
BASIC CUTS USED IN WOOD JOINTING WITH THE UNIVERSAL JIG Following illustrations show how to make basic cuts simply, CAUTION: In making some cuts guards must be removed. Use extra care.

LAP JOINT


TENON MORTISE SPLINE 25 Scrapboard behind wood being cut keeps cutter away from Universal Jig
CRAFTSMAN UNIVERSAL JIG FOR DIFFICULT CUTS
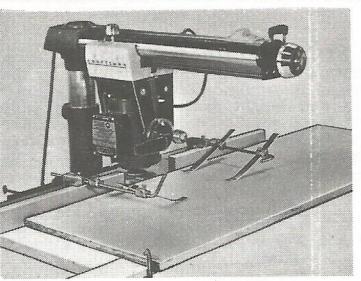
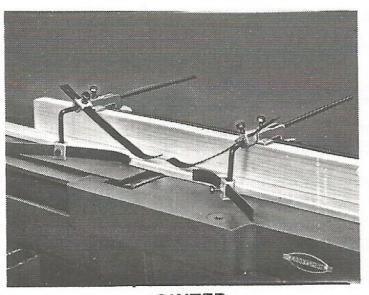
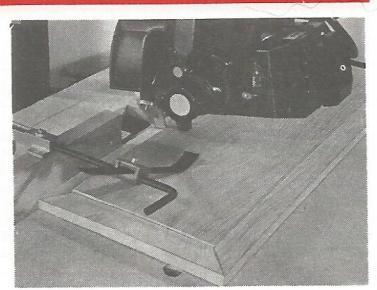
CRAFTSMAN MITER VISE


feet mitered corners.
- Make feather spline Make feather spline miters for extra-strong
- Cut widths up to 3 in., any length pieces.
- Cut all wood, plus
- Fits all radial-arm

MAKE YOUR OWN FRAMES AND SCREENS WITH PERFECT JOINTS


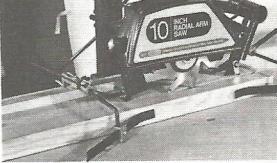
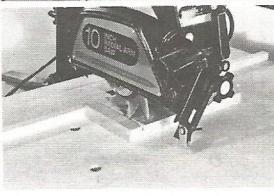
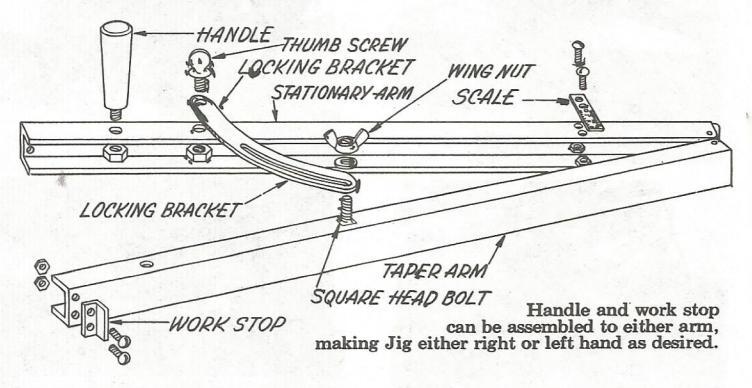
CRAFTSMAN TAPER UG FOR ANGLE TAPER CUTS
Makes accurate taper cutting and sanding easy on any bench or radial arm saw Simplifies making molding or dado cuts on tapered nieces The ideal in for making Hepplewhite tapered table legs tapared wasta baskets magazing racks ato Easy to adjust and use. Cuts tapers up to 3 in. per foot or 15 degrees. Has easy-to-read scale Made of sturdy aluminum.

Taper Cutting On Radial-Arm Saw
HOW TO ASSEMBLE AND LISE THE TAPER LIC
CRAETSMANI CANDING WHEEL
Converts your radial-arm or bench saw to a disc sander
Use the Craftsman Sanding Wheel for easier, better results in finish sanding and shaping. The wheel has medium grit on one side, coarse grit on the other. and shaping. The wheel has medium g
When using the Sanding Wheel on bench saw, hold work flat on table. Feed work to the "down-side" of the turning disc. To shape a curve, take many light cuts. Light, smooth feeding is best in all uses of the wheel.


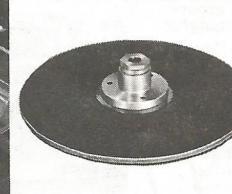
Adapter Hub
surface sanding


28
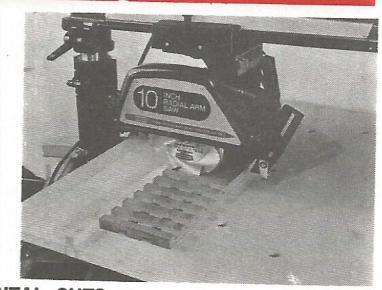
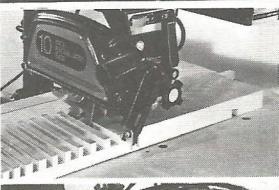
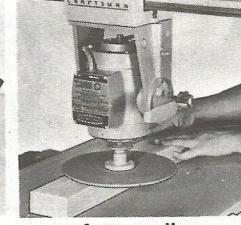
KARBO-GRIT ABRASIVE WHEEL
Saws, sands, grooves, shapes and dadoes without changing wheel. Actually 5-tools-in-1! Outlasts . outperforms sandpaper 40 to 1 . . Cuts and sands in one operation. You can saw, groove, shape, dado, and plough without changing the wheel. Cuts and smooths all woods, plastics, Formica, plywood, plaster, composition, hardboard, fiberglass, laminates, etc. Easy to clean with wire brush or gum remover.
Tough carbide grits are permanently brazed to steel wheel — will not work loose. One side and edge coarse grit; other side medium grit. Safe in operation — no teeth to snag or drag.
Operation:
Bench Saw. Mount as you would a circular saw blade. Operate as you would a disc sander. Saw, groove, shape and sand without changing wheels.
Radial Arm Saw: Mount as you would a circular saw blade. Operate as you would a disc sander. Saw, groove, shape and sand without changing wheels.
NOTE:
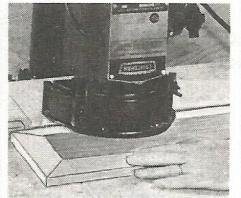
For surface sanding on radial arm saws, use the adapter hub as shown on Page 29 and rotate motor to vertical position as shown in the photo below and lock friction guide.

Grooves or shapes


CRAFTSMAN JOINTER-SANDER
The JOINTER-SANDER is for the cabinet maker, furniture maker, the Craftsman that requires the finest in straight, smooth finishes.
Convert your bench or radial saw into a jointer-sander or disc sander. One side of the jointer-sander disc is conical shape for true straight line sanding. Other side is conventional flat disc sander for the sanding of curves, shapes, free hand sanding, etc.

Sanded with jointer sander. All sanding marks are straight and parallel. Requires little if any additional hand sanding before applying finish.

Sanded with conventional sanding disc. Sanding marks are curved and overlapping. Requires hand sanding before applying finish.

SMOOTHER SANDING — LONG LIFE WITH JOINTER-SANDER
TYPICAL WOOD JOINTS

CRAFTSMAN MOLDING HEAD AND DADO GUARDS

Made of high strength A.B.S. Resin. Will not damage cutters.
Use Craftman Guards with Dados, Molding Heads and Rotary Planers on Craftsman Radial Arm Saws.
The Special Guard is primarily for use when the saw arbor is in a vertical position for edge operations when the standard saw guard can not be used. Such as dadoing, panel raising, edge molding, etc. As shown in photos.

ALWAYS UNPLUG MOTOR BEFORE MAKING ADJUSTMENTS.
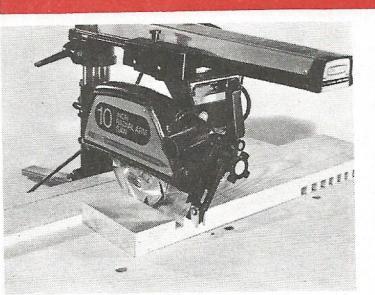
CRAFTSMAN ROTARY PLANERS
FOD ALL & CDAFTSMAN RADIAL ARM SAWS Available With Carbide Tipped Blades or *Frcent Model 2930 PLANES - BEVELS - RABBETS LONG SERVICE BLADES

Remove back arbor flange and place planer on shaft insert arnut in hex recess in planer as shown, start nut and rotate
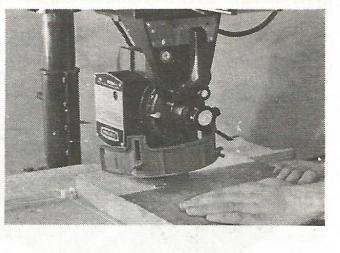
to left Start with planer near fence and move

es are ground on an angle flush with straight edge. Blac


FOR MITERED FRAME CUTS - Position and lock one section of the fence at 45 degree angle to assure a perfect 90 degree angle between the fance sections position the other fence section with a carpenters square as shown in Fig. D. Miter cut both ends of each frame member, one end with the piece against the right force costion and the other end with the niece against
FOR SINGLE MITER CUTS --- Use the left fence section only. Use the miter gauge on the Fence to establish the desired angle.
FITS ALL RADIAL ARM SAWS
NICKEL --- CHROME FINIS
MAKE PROFESSIONAL CUTS -EAST ACCUDATE EASY
- EDGE JOINTING
CRAFTSMAN SHAPER AND MOLDING FENCE
- ANGLE CUTTING
- CIRCULAR EDGE SHAPING
- PLANING
ACCURATE EDGE JOINTING
For perfect cabinet door edges, jointing and similar cuts not right form section keeps work feeding straight
Remove back arbor flange and


REVEL CUT OFF END
RABBETING
USE CRAFTSMAN SHOP TESTED TOOLS
DESITTING CIDCUI AD SAW PLADES AND DADOES
UNPLUG MOTOR WHEN IOINTING PLADE
Crafteman Circular Saw Blades are preset and filed To obtain best results when blade is dulled from prolonged
SHARPENING OPERATIONS_Umul 1) Jointing (2) Setting (3) Filing Jointing is re-grinding of the blade to a perfect circle. Setting is bending the tips. (only) of the teeth alternately Filing restores the proper edges, bevels
hand turn the blade backward. Lower the blade, place an oilstone on two blocks over table insert and raise blade
until the tips of teeth harely brush the stone. Botate blade by hand until all theth have touched the stone Do not take off more metal than is necessary. When tons of teeth have "shine", jointing operation is finished. Similar prowhen tops of teeth have shine, jointing operation is inished. Similar pro-
To joint a Dado Set place the entire set on the arbor and joint all cutters together
THE CRAFTSMAN CIRCULAR SAW SETTER, shown in Photo A, is designed for quick, accurate setting of blades with 1/4 in., 5/4 in., 3/4 in., and 1 in. center hole. The tool consists of a steel anvil. zinc die-cast body and centering block hole. The tool consists of a steel anyli, and the cast body and centering block, teach). Saw Setter fits into any bench saw miter slot 5% in to 3% in in width. In order to use the saw setter, the proper bushing to fit the circular saw arbor each her can screw to the left until the unit is held tightly in the slot. Place the centering block the proper distance from the body so that each tooth extends under the striking pin for the proper depth of set, and lock in place. Diagram B
The teeth are set by tapping striker pin with a light hammer, using enough force to set tooth without damaging it. Rotate blade to set every other tooth to
When setting the Free-Cut Combination Blade, do not set raker teeth. Setting procedure for 6 in Flat Ground Dado Sets differs in that you are bending groups of teeth: this is called blocking. Exercise caution to achieve the same sout within each group or hank of teach and the same set for all banks. For Craftsman 8 in. Dadoes, set teeth in alternate directions. same as chiseltooth combination blade. The teeth on the Thin Rim Satin Cut Dadoes and the Free-
IMPOPTANT --- SAFETY ADVICE
- Wear eve and face protectio
- Do not wear loose clothing, jewelry or gloves.
- C. Read and understand the instructions prior to using an accessory
- F Always unplug the power tool when changing tools, accessories or making
- Never edge mold on a radial arm saw (with saw arbor vertical) with the nevel edge mold on a radial arm saw (with saw ar
- Always position the molding head guard on a radial arm saw to just clear
- P. Whenever tonside molding on a radial arm saw (molding head in hevel rin position), lock rip and bevel clamps securely, position sawhade guard at infeed and to just clear the workniece use a push-stick on narrow worknieces and support workpiece to prevent "kick-back" (since anti-kickback
| Filing Instructions | |||||
|---|---|---|---|---|---|
| Type of Blade | Top of Teeth | Face of Tooth | Recommended File | ||
| Chisel Tooth | Bevel Filed | Straight Filed |
Mill File (Round edges)
Round Bastard for gullets |
||
| Rip |
Straight Filed
or Low Bevel |
Straight Filed |
Mill File (round edges)
for teeth Round Bastard for gullets |
||
| Cross Cut | Bevel Filed | Slightly Beveled | Slim Taper | ||
| Tenoning Blade | Straight Filed | Straight Filed | Slim Taper | ||
|
Plytooth and
Fine Tooth Blade |
Bevel Filed | Slightly Beveled | Slim Taper | ||
| Cabinet Combination | Bevel Filed | Straight Filed |
Slim Taper for teeth
Round Bastard for gullets |
||
|
Free Cut,
Free-Smooth Cut, Master Combination. |
Straight File
Rakers |
Straight File
Rakers |
Round Bastard for gullets
Slim Taper for cutting teeth |
||
|
and Hollow Ground
Combination* |
Bevel Filed
Cutting Teeth |
Slightly Beveled
Cutting Teeth |
Flat Bastard for raker
teeth |
||
| Non-Ferrous | Straight Filed | Straight Filed | Slim Taper | ||
| Flooring Blade | Reverse Bevel | Reverse Bevel | Slim Taper | ||
|
*The raker teeth must be filed 164 in. to 162 in. lower than the cutting teeth
**Reverse bevel means to file the teeth perpendicular to the "set" of the teeth. |
|||||

PLYTOOTH RIP CABINET NAIL
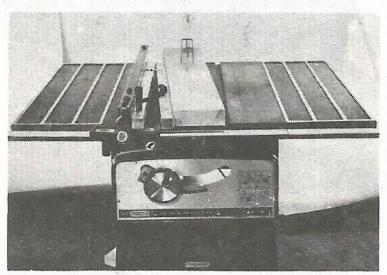
ACCESSORIES AND ATTACHMENTS FOR BENCH AND RADIAL ARM SAWS
For Bench Saws KROMERCE SAW RIADES
- Cross Cut Blades
- Rip Blades
- Eree Cut Combination
- Free Smooth Cut Combination Carbide Tipped Blades
- Carbide Tipped Blades
- Flooring Blades
- Non-Ferrous Metal Blades
- · Plywood and Veneer Blades
- Steel Cutting Blades
- Dado Heads
- Molding Heads
- Universal Jig
- Hold Down
- Sanding Discs
- Taper Jig
- Bench Saw Manual
For Radial Saws
KROMEDGE SAW BLADES
- Cross Cut Blades
- Rip Blades
- Free Cut Combination
- Free Smooth Cut Combination
- Flooring Blades
- Non-Ferrous Metal Blades
- Plywood and Veneer Blades
- Steel Cutting Blades
- Dado Heads
- Molding Heads
- Hold Down
- Sanding Discs
- Molding Head and Dado Head Guards
- Taner lig
- Planer Heads
- Mitor Viso
- Shaper Fence
- Sanding Drum
- Radial Saw Manual
RUY CRAFTSMAN SHOP TESTED ACCESSORIES


 Loading...