

Sears | Craftsman Grinder-Bench: 09-19495 Craftsman Tool Sharpening Attachment(older version) Accessories
ASSEMBLY, OPERATING INSTRUCTIONS
AND PARTS LIST FOR
GRINDER ATTACHMENT
MODEL NUMBER 335.19495
Always mention the Model Number in all correspondence regarding your Grinding Attachment when ordering repair parts.
-HOW TO ORDER REPAIR PARTS
All parts listed herein may be ordered through SEARS, ROEBUCK AND CO. or SIMPSONS-SEARS LIMITED. When ordering parts by mail from the mail order house which serves the territory in which you live, selling prices will be furnished on request or parts will be shipped at prevailing prices and you will be billed accordingly.
WHEN ORDERING REPAIR PARTS, ALWAYS GIVE THE FOLLOWING INFORMATION AS SHOWN IN THIS LIST:
- 1. The PART NUMBER.
- 2. The PART NAME.
- 3. The MODEL NUMBER 4. The NAME of item
COAST TO COAST NATION-WIDE SERVICE FROM SEARS

SEARS, ROEBUCK AND CO. and SIMPSONS-SEARS LIMITED in Canada back up your investment with quick, expert mechanical service and genuine CRAFTSMAN replacement parts.
If and when you need repairs or service, call on us to protect your investment in this fine piece of equipment.
SOLD BY: SEARS, ROEBUCK AND CO., CHICAGO, ILLINOIS. 60607 U.S.A. and SIMPSONS-SEARS LIMITED, TORONTO
Printed in U.S.A.
OPERATING INSTRUCTIONS
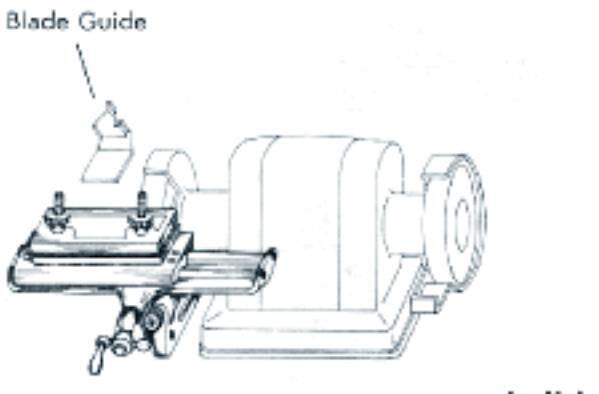
bell housing
adaptor plate
bench mounting
Mount attachment on left side of Grinder by selecting the adaptor plate position that fits to your bell housing.
When using bench mounting , attachment may be mounted on either side.
(You may have to shim bench mounting or unit.)
Your Grinding Attachment has a tool clamp that provides angle slots of different sizes and angles to hold a large variety of tools. The other side of the tool clamp is used mostly for flat work. The attachment has a four inch travel with tilt adjustment. Using a dresser in the tool clamp will align your wheel true with your attachment.
HOLLOW GRINDING is done on the face of the wheel. The length of the grind is regulated by the position of the tool on the wheel. Tools such as screw drivers and cold chisels that are ground on both sides, are put in fixture and trued by pressing flat side of the tool against the standing wheel with finger or thumb, while tightening the tool clamp . Back tool away from wheel slightly with the pivot screw . Start the motor, then feed the tool lightly into the wheel with the pivot screw at the same time keep an even back and forth motion, traveling past the wheel each time. When sharpened, turn the tool over and repeat the process. To avoid softening the steel, do not feed the work into wheel so it overheats. Smoking the cutting edge with a match or die makers blue is helpful to see where you are grinding. A mirror is helpful in seeing the underside of the tool, before removing.
WEAR SAFETY GOGGLES WHEN GRINDING
The art of grinding is to hold the work at the exact angle (desired degree). Then move the work freely across the wheel, removing a slight amount of material at a time. By maintaining a well dressed, trued and shaped wheel; grinding is a simple task.
SAFETY RULES
- Do not grind on side of wheels
- Use guard and shatterproof glass shield.
- For all wheels, never exceed RPM shown
- Stand aside one minute after starting wheel
- Follow safety instructions shown on grinding wheels

DRESSING is the cleaning of the grinding wheel, the picking, shearing or crushing action of a dresser. This removes the loaded material from the cutting face of the wheel, exposing the new sharp abrasive grains in the wheel.
TRUING is the truing of out of balance wheels. Dresser edge must be true and at right angle to the grinding face of the wheel when dressing.
SHAPING is accomplished by the use of a dresser and a template shaped the same as the grinding wheel is to be shaped. Some convex and concave shapes can be created free hand.
PARTS LIST MODEL 19495

 Accessories")


 Loading...