


| INDEX | |
|---|---|
|
Page
GENERAL INFORMATION 2-3 Descriptive Data — Selection of Saw and Motor — Atlachments and Accessories. |
|
| SET UP AND ADJUSTMENTS | |
|
PROPER OPERATING PROCEDURES 6-7
General information about proper actions and handling of workpieces on circular saws. |
|
| STANDARD SAWING OPERATIONS | |
| MAKING ANGLE CUTS | |
|
USES OF CUT-OFF BOARD AND
PATTERNS 13 Handling Odd-Shaped Work — Cutting Straight Edges — Matching Edges of Offset Work. |
|
| SPECIAL SAWING OPERATIONS | |
| DADO AND GROOVER SAWS | |
|
THE MOULDING HEAD AND CUTTERS 21-22
Set-Up — Patterns — Straight Edges — Strip Mouldings — Circular and Curved Work — Tenons and Raised Panels — Dowels — Ornamental Work — Spiral Turnings — Coves. |
|
| ABRASIVE WHEELS | |
|
30 DIFFERENT WOOD JOINTS 24-27
Completely illustrated instructions for mak- ing thirty different wood joints. |
|
| RADIAL SAWS | |
| SWING SAWS | |
| POWER HACK SAW | |
| TABLES | |
Catalog No. 9-2926

A CRAFTSMAN POWER TOOL HANDBOOK
Copyrighted 1954 SEARS, ROEBUCK and CO. REVISED 1954
For Sharpening Data Get "How To Sharpen" Booklet, Cat. No. 9–2924.
ADVANTAGES OF MODERN BENCH SAW
THE Circular Saw
RIP
TILT GAGE
LOCK
HEIGHT & TILT
CONTROL KNOB
CARPTER
HEIGHT CONTROL
FENCE
MITER GAGE
PULLEY
MITER
THT
HEIGHT LOCK
B-INCH TILT TABLE SAWS
8-INCH TILT ARBOR SAW
POWR-PANL
A safe, convenient way to hook
up your saw, tool light and
other accessories. Two plug-in
outlets, power-line receptacle and an ON-OFF switch. Fits
tool bench.
We would like to show you how, with your bench saw, you can produce the quality and variety of work which most people believe to be only possible for highly experienced cabinet makers and craftsmen. Take full advantage of your bench saw. It is a precision tool. Learn the many adjustments. Make good use of the different blades and accessories. There is practically no limit to the quality and variety of work you can then do.
Originally, the bench saw was simply a boxlike base inside of which there was a shaft (arbor or spindle) to hold the circular saw blade. The blade was mounted at one end of the arbor, and a power drive was connected to the other end. The top of the base was the worktable; and the saw blade projected up through a slot near the center of this worktable.
Modern saws are like this, but nearly all have several important added features. The saw blades can be raised or lowered through the table slot by a hand lever, and can be locked in any position. The table is fitted with an adjustable position rip fence and has one or two grooves for a sliding miter gage, both the fence and gage being used to guide work accurately to the saw blade. Either the table (tilting table type) or the saw blade (tilting arbor type) can be tilted and locked at any angle up to 45 degrees. Also, nearly all modern bench saws use a V-belt drive; some having the motor in the base, most with the motor outside. Most have a saw guard and a splitter. Antikickback pawls give added safety.
TOOL BENCHES
Solid, all-steel benches for mounting saw and motor. Sizes 30x16¼ and 18x16¼ inches — just the right height for best work. Can be equipped with casters.

SELECTION OF A SAW AND MOTOR
The named size of any circular saw is based on the diameter of the saw blade which it will swing. Sizes generally run from 6-inch up to 10-inch. With the blade as high as possible, a 7-inch saw will make a 2-inch cut; an 8inch will make a 2-1/2-i1 ch cut; and a 10-inch will make a 3-1/4-inch cut; on an average. Motors should be at least 1/3, 1/2 and 3/4 h.p. minimum for the 7-, 8- and 10-inch saws, respectively, for home workshop use. Arbor rpms are given in the table on page 32.
It is a mistake to underpower a saw or to run it slower or faster than the manufacturer recommends, because saw blades are designed to operate at certain speeds.
Other than size, a choice must be made on the basis of refinements built into the better saws. The more precision adjustments there are for changing the height and angle of the blade in the table, and for positioning the fence and miter gage, the better the quality of work that can be done. Tilting arbor saws offer the greatest amount of safety and ease of operation when making bevel cuts; but tilting table saws are equally good for the straight cuts which represent 90 percent of all general sawing operations. Whether the saw base is a bench type, or a full height cabinet type, makes no difference in its efficiency; and table size is not too important as most better quality saws can be fitted with table extensions to increase table

bench saw set-up, adjustments and care

MOUNTING THE SAW
If not already built onto a cabinet, the bench saw can be mounted on a bench or any solid stand which will place the table top a few inches above your belt line. As freedom of movement around the saw is desirable, a moveable type stand that can be placed in the center of the workshop (for use) is preferable. Bolt the saw firmly to the stand; and provide an opening through the stand under the blade, so that sawdust can fall out.
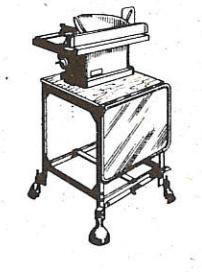
A serviceable wooden stand like the one illustrated can easily be made. Typewriter or laundry tub stands can also be used with some
types of saws; and the rollers are handy for moving the saw about. It is advisable to make some arrangement for catching the sawdust. One way is to enclose the top part of the stand and place a container under the chute thus formed.


IMPORTANCE OF ACCURATE ADJUSTMENTS
Accurate work cannot be done on a saw that is not trued-up in every respect. On the other hand, even inexpensive saws can be made to produce excellent work, if properly adjusted. Moreover, the setting of the blade, table and fence in proper alignment is necessary for safe ty, to prevent possible binding of wood and kickbacks. (Wood can be thrown like an arrow by the whirling blade if it binds the blade.)
ADJUSTING SAW BLADE PARALLEL TO TABLE GROOVES
Set saw blade for deepest cut. Make a pencil mark on the tooth that is just above the table top at the front of the blade. Measure distance above table top at the rear, then again measure distance from tooth to same groove. If the two measurements are not exactly equal, make that hold table top to base and shift the table

top (the screw holes in top are slotted so that it can be shifted). On a tilting arbor secure each of the two table trunnions to the table, and shift entire arbor assembly. Re-check measurements and securely tighten all screws.
ADJUSTING FENCE PARALLEL TO SAW BLADE
On saws which have a fence guide bar and screw feed, align the fence parallel to the right hand table groove. To do this, loosen the bolts that secure the fence to the guide bar slide.

On saws without a precision fence guide bar and/or a non-adjustable table top, it is necessary to align fence with saw blade, each time the fence is used. To do this guickly, keep on hand a suitable length of board with
perfectly parallel edges. Lay board on table pressed firmly against side of saw blade, and
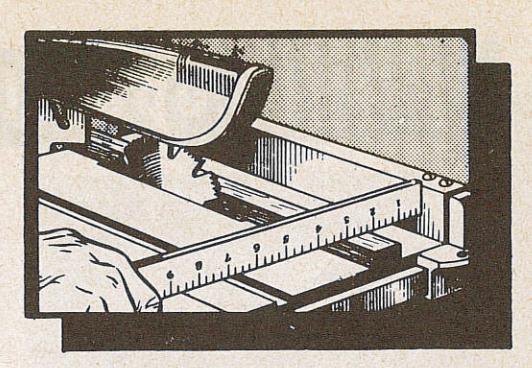
set fence parallel to outer edge of board by measuring with a ruler at each end. ADJUSTING TILT SCALE

Using an accurate square, set the saw blade at right angles to the table top. Then adjust the pointer on the tilt scale to zero. Also, if saw has a stop screw which automatically stops it at zero; adjust this screw to the proper position.
ADJUSTING MITER GAGE SCALE
Using an accurate square, lock the miter gage at the square position. Make a trial cut on a fairly wide board, then check this cut with the square. If cut is accurate,

set the pointer on the miter gage to the 90-degree mark on the scale. When table edge is suitable, gage can be side down and aligning it with table edge.
ADJUSTING FENCE SCALE

Run the fence over until it lightly touches the blade, then set the pointer to zero on the graduated guide bar.
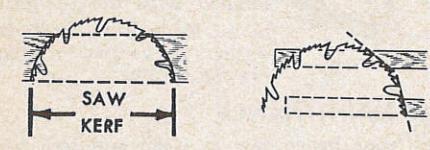
ADJUSTING THE SPLITTER

The splitter serves to keep the saw cut (kerf) open to prevent binding of blade in the wood. Obviously, the splitter must be perfectly aligned with the cut made by the blade. Thin cardboard washers can be used for aligning the splitter.
SAW MAINTENANCE
Keep your bench saw as clean and free from sawdust accumulations as possible. Wipe off the table top, blade and other exposed metal parts with an oily rag; dust other parts with a dry rag. Keep bearings lubricated as instructed by the manufacturer.
proper operating procedure

DRESS PROPERLY
Floppy sleeves and loose ties are an invitation to danger, and are easily caught by whirling saw blade to pull operator into contact with the blade. Sleeves should be down with cuffs fastened; or wear short sleeves. Do not wear a tie or other loose article. A work apron is excellent. Also, if a quantity of work is to be done, some type of goggles or face shield to keep sawdust out of the eyes (especially if working in close quarters) will be helpful.
NEVER STOP BEING CAREFUL
One moment of inattention can cost you a painful injury. Most sawing operations are so simple, and so quickly and easily done, that some operators become careless and inattentive. Do not fall into this unsafe habit. Always be alert!
A LOW BLADE IS THE SAFEST
Equally good cuts can be made with the blade elevated to full height, or with it raised just enough to clear the top of the workpiece by approximately 1/4 inch. When the blade is in the second position, a little more power is required to drive the saw, because of the long
cutting angle of the blade. Also, a little more feed pressure may be needed. But this second position is the safer one, and any saw that is properly powered will operate, with little noticeable difference, in any blade position.

The lower position is safer because the blade enters the wood at an angle more nearly parallel with the direction of feed, and there is better opportunity to hold the work against kickback.
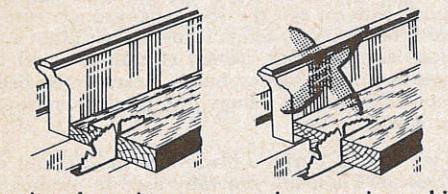
AVOID KICKBACKS
Anything that will cause the blade to bind in the work will cause a kickback. Under certain circumstances, the work can be thrown from the saw with extreme force endangering the operator. Most common causes of

TWISTING WORK


kickbacks are: 1. Twisting the workpiece out of line when freehand feeding. 2. Misalignment of fence and blade so that work is twisted or wedged between fence and blade during feeding. 3. Failure to use splitter (or to otherwise hold the kerf open) so that a long kerf closes around saw blade. It is best to use the splitter, and if the splitter is fitted with antikickback pawls, so much the better. If for any reason splitter is not used, and you are making a long cut, stop and put a wedge into the cut as soon as possible to hold the kerf open.
Too rapid a feed, knots or sap in the workpiece, a dull or rusty blade can also be causes of kickback. Hold work extra firmly to table when starting a cut, passing
-6-
STRAIGHT EDGE BOARD NAILED TO WORKPIECE

a knot or during special operations. Avoid using damp or warped lumber without special precautions (page 8).
Warped and crooked workpieces can also cause kickback, especially if placed on the table or
against fence in a manner that permits rocking or twisting during the feeding process. Always make certain that work will slide on table and along fence without tendency to bind the saw blade
KEEP HANDS CLEAR OF THE BLADE
Always be certain that there is ample room between the blade and the fence, before getting your hand into this position. To be on the safe side, make it a rule not to use your hand to push work through, unless the space available is equal to the maximum width of your palm. For added safety,
when using your hand for the push through, hook the two outer fingers over the fence to keep hand steady, and tuck the thumb in behind the palmi and anchor it against the end of the workpiece.
If work is too narrow for hand to be safely used, use a push stick (page 9), or walk around the saw and pull the work through from behind to finish the cut. Hold work as you walk around the saw.
AVOID AWKWARD HAND POSITIONS
When crosscutting, use the miter gage, even for straight cuts. Freehand crosscutting involves more risk because kickbacks are especially likely to occur in this type of operation. If using the left-hand groove, stand at the left

side of blade. Place left hand on workpiece with thumb hooked behind gage at center of gage. Use this hand to hold work against gage, and to push gage and work to the saw. If right hand is used, keep it as close to center of gage as possible.
ALWAYS SUPPORT WORK WHEN END CUTTING
Never advance an unwieldy workpiece to the saw without first providing a good support to keep it from being upset. It takes but a few minutes to arrange some safe support that will allow work to slide on table without danger of being upset or kicked back..

NEVER BIND FREE END OF WORK BETWEEN BLADE AND A STOP

When using a miter gage extension (illustrated), the fence or a stop (p. 11), always arrange it so that the piece being cut off will be free to fall away from the blade. That is: Do all the holding on one side of the work only.
TWO OBVIOUS "DON'TS"
Don't reach up to saw blade to grab a piece of free wood—until blade has stopped. Don't let floor become littered so that your feet might slip. Sawdust is a definite fire hazard, especially after being damp, and should not be allowed to accumulate.
standard saw operations
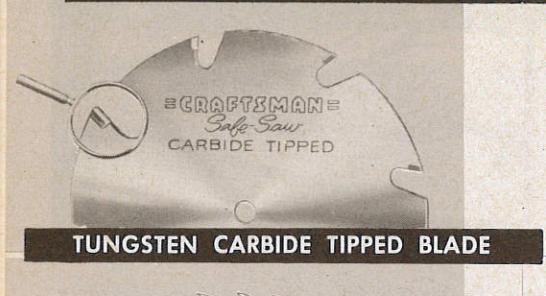


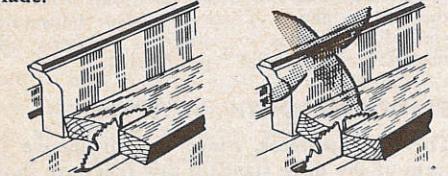
SELECTION OF SAW BLADES
For average home shop use there are three good all purpose blades: 1) The new, extra-safe tungsten carbide tipped, 8-tooth blade (which seldom needs sharpening if properly used); 2) The fancy-tooth combination; and 3) The hollowground planer blade. All will rip, crosscut and miter equally well. The carbide tips of (1) are diamond ground for smooth fast cutting — cut their own clearances (being slightly larger than the blade). The other two have an identical tooth pattern; but the short, flat-ground cutting teeth of the fancy-tooth blade are set alternately right and left (for cutting clearance)—and the hollow-ground blade obtains clearance by being tapered from the center out (and is more expensive).
Two special purpose blades are the rip and the crosscut. These are generally used in production work because of the greater speeds obtainable by each at its own special job. Another popular special purpose blade is the one designed for nail cutting. It is very useful when sawing up old used lumber containing nails that would ruin the other blades. There are also many other specialized blades for different lumbers, other materials, and special types of cuts.
STANDARD TOOTH PATTERNS
The tooth patterns, names and distinctive features of the three standard saw types are shown in the illustration. Each tooth should conform as nearly as possible to the pattern of the blade, if a blade is to cut smooth and fast. For this reason, it is good practice to make a paper pattern of each new blade so that, when sharpening becomes necessary, you can refer back to the original pattern for proper reshaping of the teeth. Note on the pattern the degree of tooth set, filing angles, and other useful information.
RIPPING
Ripping is the sawing of wood with the grain. It is generally done with the help of the fence as a guide to position and maintain the work at the correct width for the cut. Because the work is pushed along the fence, it must have a reasonably straight edge to make sliding contact with the fence. Also, work must make solid contact with the table, so that it will not wobble during the operation. Provide a straight edge to go against the fence, even if this means temporary nailing of an auxiliary straight edge board to the work to serve as a guide. If a moulding fence (with cut-out near center) is used, clamp an auxiliary guide board to the fence. If workpiece is warped, turn the hollow side down.
Use of the saw guard is recommended; but the splitter should always be used in ripping op-
-8-

erations. Wood cut with the grain tends to spring closed behind the saw and bind the saw blade. If, for any reason, splitter is not used, stop and insert a wedge in the kerf just as soon as cut is long enough to do so.
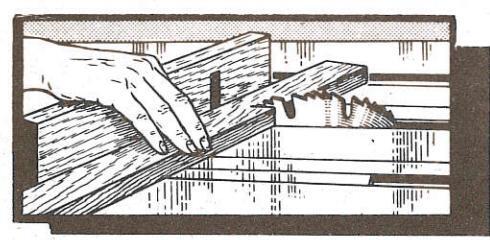
Set fence to desired width of cut, either by using the scale on the fence guide bar, or by measuring distance between blade and fence. Fence is almost always used on right-hand side of blade. Stand a little to the right of center to avoid being sprayed with sawdust and to be clear of work in case of a kickback. Start saw and advance work to the blade, using left hand to hold it down against tendency to kickback, and right hand to push it into blade. As cut nears completion, move left hand to safe distance from blade, and
push work through with right hand alone. Weight of cut portion of board will generally hold it down on table; but if work is so light that blade will tend to kick it up, clamp a hold-down in place before starting the

cut, or stop and place a weight on end of board to keep workpiece down on table. (If splitter has antikickback pawls, this is not necessary.) Never reach in back of the blade with either hand to hold work down.
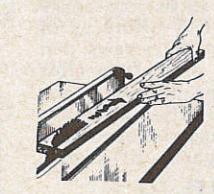
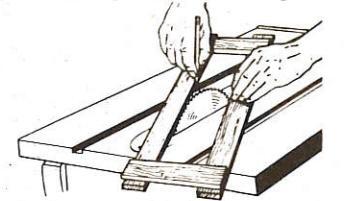
Best practice when pushing end of work past blade with right hand is to lock one or two fingers over fence to anchor hand, and tuck thumb behind end of board to push it. (See illustration at top of page.) Skilled operators generally walk around saw and pull end of work through, whenever workpiece is long enough. Never backtrack by pulling work from
behind blade toward the front. To lift partially completed work from table, stop the saw. Finished work that has cleared the blade can be lifted off table from in back of blade.


HANDLING NARROW WORK
When there is less than the width of your palm between fence and blade, do not attempt to push work through by hand. Use a push stick like that shown in illustration, or pull work through from behind saw.
HANDLING LONG WORK
Do not leave a long board unsupported so that the spring of the board causes it to shift on table when sawing. Use some sort of support to catch end of board behind blade; and, if board is very long, use another support in front of saw (in which case board can be pulled through after you have advanced up to the front support). Suitable table extension can usually be purchased. A good homemade support is illustrated. Ordinary wooden horses of proper height will also do; and the drill press table makes an excellent adjustable height support.

standard saw operations (cont'd)

RESAWING
Resawing is the cutting of thick boards into thinner ones. It is a ripping operation. Small boards can be resawed in one pass; but larger ones require two passes, one pass along each edge of the board. Boards up to 43% inches wide can be completely resawed on an 8-inch saw; the 10-inch saw will handle boards up to 61% inches wide.
When two cuts from opposite edges are required, these should be made to overlap about 1/2 inch at the approximate center of the board. If the first cut is too deep, the kerf will close and bind the saw on the second cut, with danger of kickback. Also, when the kerf closes, the two sides of the cut are no longer parallel to the saw blade, and the saw will cut into them to spoil their appearance.
Position the fence and make the first cut. Then turn the board end for end (so that the same face is still against the fence), to make the second cut. Hold board securely against kickback, and finish each cut by using a push stick, or by pulling work through from back side of saw.
If the board is too wide, make two maximum cuts from the opposite edges, then finish resawing the board on a bandsaw (the blade of which will track nicely in the cuts already made).

- 10 -

CROSSCUTTING
Crosscutting is the sawing of wood across the grain. As planks are cut with the grain the long way, the long edge of the work is placed across the table top when crosscutting. Therefore, the miter gage is used to guide the work to the saw, and the work is held in position by keeping it firmly in contact with the gage. Most operators prefer to use the left-hand table groove. In this case, the left hand is used to hold the work in contact with the gage and to push the work and gage into the saw blade. The right hand is free to assist in the feeding operation, as required. If the right hand groove is used, the hand positions are reversed.
Ordinarily, the gage is placed in the table groove with the slide in front. When the work is so wide that it completely covers table in front of saw, reverse the gage. However, make certain that your gage will not strike the blade — on some saws the right-hand table groove is too close to permit reversing the gage.
Square crosscutting is done with the miter gage set at zero (at a right angle to the slide and groove). The splitter need not be removed, but is not needed for this operation. (It is best never to remove splitter unless necessary.) Start the cut slowly and hold work firmly to table to prevent kickback or chatter. (Loosely held workpiece will sometimes vibrate against table when crosscutting. This tends to bind the blade and dull the teeth.)


USE OF MITER GAGE AUXILIARY AND TABLE EXTENSION
An auxiliary extension, screwed or bolted to the miter gage, greatly improves the use of the gage as a support. Such an extension is very much needed to keep long work from twisting on the saw blade. If fitted with pin points (phonograph needles are excellent) or sand-
paper to hold the work, the extension will also be a big help in preventing side creep of the work. When much long work is to be

handled, a table extension will be very useful. Crosscutting long boards always creates a problem of support, and a wider table is obviously better. If board overhangs table enough to sag at either end, it will be necessary to support the sagging end by sliding it along a wooden horse or auxiliary table placed at the side of the saw.
USE OF STOPS AND CLEARANCE BLOCKS Crosscut-Trimming of Duplicate Parts
To produce a number of identical pieces by crosscutting various lengths of scrap from various length workpieces, a
stop fastened to the miter gage is used. When the pieces are short enough, the handiest stop to use is the stop rod with which many miter gages are equipped. This


rod can be set to position each workpiece exactly the same.
If the workpieces are too long, or if there is no stop rod on the gage, it is better to use a miter gage extension. A wood block can be screwed or clamped to the extension to serve as a stop. Each workpiece is bolted against the stop to position it for cutting.
Crosscutting Duplicate Pieces from Original Piece
When it is desired to establish the length of the piece being cut-off (instead of the piece remaining), the fence and clearance block can be used for a stop. Never use a stop on the miter gage or miter gage extension to hold the piece being cut-off, as this would bind the piece to the blade and result in a kickback.
The clearance block is a metal or wood yoke that can be fitted over the fence like a collar. The block is positioned on the fence so that it can be used to locate the work against the miter gage, before the sawing operation begins. This block must not make contact with the work when work is pushed forward into the saw. If the setting of the fence gage is noted, the block and fence set up can be duplicated at any later date.
A stop that will serve the same purpose as the clearance block can be formed by clamping a piece of wood to the front corner of the table on the side opposite the miter gage. The miter gage clamp illustrated is excellent for holding work accurately in the position established by the stop. (Refer to page 12.)

making angle cuts

BEVEL CUTS
Bevels from 1 degree to 45 degrees are cut by tilting the saw blade or the table, depending upon type of saw. Operations on the tilting blade saw are much the same as standard ripping and crosscutting operations, as the table remains level. With a tilting table saw, however, some extra precaution must be taken to prevent work from sliding down the table slope as it is fed to the saw. When the fence is used (for bevel ripping), it will serve this purpose. In crosscut beveling, when the miter gage is used, a miter gage extension (refer to page 11), with anchor points or sandpaper on the contact face, should be used to hold work firmly. A miter gage clamp also serves very well to hold work in position.
The fence and miter gage should always be placed on the low side of the blade, when using a tilting table saw. It is much safer and easier to work on the low side.
MITER CUTS
Miters are crosscuts at an angle to the edge of the workpiece. The miter gage is set at the required angle to make the cut.
Unless the work is very tightly held, it will creep while making a miter cut. This creep is into the saw blade, and is equal to the set of the teeth, or the taper of a hollow-ground blade. To eliminate creep, use a miter gage extension (refer to page 11) with anchor points. If great accuracy is desired, use a miter gage clamp.
4" HOLE SERVE AS CLAMPS 3" BOLTS 4" TAPPED HOLES ALUMINUM BAR 4" THICK A HOMEMADE MITER-GAGE CLAMP
TAPER RIPPING

Ripped tapers are cut with an adjustable jig like the one illustrated. First, however, the amount of taper per foot must be determined. This is easily figured, as shown in the illustration. If the taper is to be all on one side, instead of on two opposite sides, multiply by 12 instead of 6 when using the formula.
After determining correct taper per foot, open the jig until the distance between the two jig arms at the 12-inch mark is the same as the taper desired. Lock the jig. It is now ready to cut the first taper; or, if a square leg is being worked, it is properly set to cut any two (only) adjacent sides. Position the fence so that inner edge of saw blade just touches corner of work, then slide the jig and work together past the blade to make the cut. If a square piece is being tapered, cut one adjacent side in the same manner. Before cutting the remaining side or sides, open the jig to twice the previous setting to allow for the tapers already cut.

- 12 -

an odd-shaped board that cannot be guided by the fence or miter gage. A cut-off board is very useful for jobs of this kind. The board is easily made, as shown in the illustration above. The guide strip on bottom of board should be a good sliding fit in the table grooves; and matching V-grooves in the faces of the boards are useful for
holding dowels and similar round stock. If the top board is also countersunk to receive the bolt heads. the fixture can be turned upside down (by reversing. bolts) for freehand use.


CUTTING TRUE STRAIGHT EDGES
When reversed, as noted above, the cut-off board can be used for freehand operations.
One such use is for trimming veneer for jointing. Lock both pieces of veneer together in the cut-off board with approximately 1/2 inch of the ragged edge of each exposed at one side. Clamp an auxiliary guide, one inch or more thick to the fence. Position this guide high enough above table to ride over the top of the saw blade when blade is projected just high enough to cut through the work in the cut-off board. Position fence so as to trim approximately 1/4 inch off of the workpieces, then slide the cut-off board along the auxiliary guide to make the cut.
A board with two ragged edges can be similarly trimmed and trued to have two parallel straight edges. If more than 3/4 inch must be trimmed from edge of board, use a thicker
auxiliary guide like the one shown
CUT-OFF BOARD
Odd-shaped, straight-sided pieces can be cut but should be thick enough to make firm con-

tact with the guide. A guide like the one illustrated is best because it is wide enough to proguide must have a small rabbet at bottom of lower edge to provide clearance for the saw blade, and must be positioned flush with outer
If a wooden pattern is used, nail it lightly to the workpiece. The cut-off board can also be used to hold workpiece and
pattern together, and is very useful when pattern is of a material that cannot be nailed to the workpiece. Make the set up as shown in the illustration, leaving room under the guide for the edge of the work. Slide

pattern along guide to make each cut required.
MATCHING EDGES OF OFFSET WORK
If it is desired to have a second piece of work (bottom piece) larger than the pattern (top piece), use the pattern sawing set up already described: but set the guide out over the blade by the amount of offset desired between each edge of second piece and pattern.
-13-
special saw operations

MAKING CENTER CUTS
If a long slot through the center of a board is to be cut, it is necessary to drop the board down on top of the saw blade to start the cut.
Always clamp some type of a stop to the table in front of the blade to hold the front end of board against kickback. Stand at one side or in back of the saw. Place front of board on table against the stop, then lower back of board slowly down over the blade until blade cuts through and board is flat on table. Push or pull board until blade is at end of desired cut, then stop the saw before lifting board from table.
Make a second cut, parallel to the first, in like manner. The stop and fence can be positioned to locate the two cuts. Center section of board can be cut free with a scroll saw or chied
MAKING EDGE CUTS
(Design for a Hold-in)
Edge cutting, like resawing, requires careful support of the workbiece. This is especially true of high, thin boards. Always secure an auxiliary guide to the fence to give it sufficient height to support at least the bottom two-thirds of the work. Also, preferably, always use a hold-in. This can be a spring metal guide (many types can be purchased), or a homemade wood spring.
The wood spring is simply a length of wood, miter cut (at approximately a 45-degree angle)

and slotted at one end. It is clamped to the table so that the mittered end bears against the work to keep it against the fence. Position the hold-in to contact the work just behind the front edge of the blade. If work is not high enough for a good grip, always finish cut with a push stick or by pulling it through.
MAKING END CUTS
End cuts are more difficult than edge cuts because the small portion of board at bottom does not give a firm sliding contact with the table. Special end cuts, like tenons, are generally made with a jig (page 17); but such cuts can be made as illustrated. Note that the auxiliary guide fastened to the fence is high enough for operator to hook fingers over the top to support right hand. Also note that push stick is used and left hand is kept very much in the clear, away from the blade.

CUTTING A RABBET
A rabbet is cut by making two saw cuts at right angles to each other, to remove a corner from the workpiece edge.
First mark the size of the rabbet on one end of the work as a guide for setting the required saw blade projections. Set the blade so that the top of the teeth just touch the center of the
- 14 -

mark for the cut; then make the cut into the flat side of the board first. Use either the fence or the miter gage for guide, as required. Then reset the saw in similar manner, and make the second cut. This second cut will be either an edge cut or an end cut, and the workpiece should be guided accordingly.

CUTTING CURVES

Though intended for straight line work only. the bench saw can be used to cut slow curves. The maximum curvature should not exceed 1/2 inch per foot. One pattern for a concave (inside) curve, and another for a convex (out-

side) curve is needed. These patterns are made to the degree of curvature desired. The con-
pattern must be at least as long as the workpiece. A convex pattern can be any length that will give good con-tact — and it can only be used when workpiece already has one edge cut to a concave curve that will match the pattern (a straight edge could not be guided by the pattern as there would be only one point of con-
Set the blade to barely project, through the work. Clamp the concave pattern to the fence with the center of the curve exactly in line with the blade axis (center of blade). Rig a metal or wood spring hold-in to keep work in contact with the pattern. Feed work slowly,
If the convex pattern is to be used for shaping the other edge of the work, the set up and procedure are the same
CUTTING COVES
Coves are rounded grooves made by feeding the work at an angle to the saw blade, taking light cuts of about 1/8 inch at a time until full depth is reached. Cove cuts have many uses in shaping edges, the most popular being the making of rounded table corners.

To cut a cove first draw a pencil outline of the desired cove on one end of your workpiece. Now draw a horizontal line touching the top (highest part) of the cove outline — and draw a vertical line through the center of the cove outline. These lines will help guide the cut.

special saw operations (cont'd)
Using two straightedge boards, make a frame Using two straightedge boards, make a frame (by nailing these together with cross pieces) which will: 1) Be exactly the same width inside as the width of the desired cove; and 2) Have perfectly straight, parallel inner edges.
Measure the height of the vertical line which marks the center of your cove outline (above) — and raise the saw blade to this exact height. Place the frame over the saw blade to this exact height. until the sides of the blade just touch the inner sides of the two parallel straightedge boards. Rotate the blade by hand to make certain it will just touch the frame, without cutting into it. Now draw a pencil line on the table top, using the inner edge of the left-hand straightedge board as a guide. This line indicates the angle at which the workpiece must be fed to the saw at which the workpiece must be fed to the saw blade to cut the desired cove. Draw a second line using the inner edge of the other straightedge as a guide. Remove the frame and draw a third line exactly halfway between the first two lines. This third line is the centerline of the saw blade.

Measure the distance between the vertical line (on edge of workpiece) which marks the center your cove outline and the outer workpiece edge which will be at your left when cutting the cove. Clamp a straightedge board (to serve as a guide) to the table top, with the straight edge parallel to the three pencil lines drawn on the table top — and have it exactly the same distance (A in illustration) from the centerline of the saw blade as the measurement you just made
Lower the saw blade until it projects up no more than 1/8 inch. Start the saw and feed your workpiece very slowly, sliding it over the blade while keeping the left edge firmly against the straightedge guide. After each full pass, raise the blade another 1/8 inch (no more), and re-peat —until the full desired depth is reached. The finished cove will not be perfectly round because the work is always fed at an angle to
the blade. If it is fed at a 45° angle (the widest
angle you can use without strain on the
blade) the cove will be most nearly round will become less and less round as the angle becomes narrower (as shown in accompanying

To make rounded table corners first make a split turning on your lathe, turning down the outer sides of the two halves to the desired exterior dimensions for the corners. Separate the two halves and work a cove in each piece — to make the inner sides of the corners. Now slice each piece in half — and you have four useable corners which can be mounted to the table top and sides with dowel pins, or by cutting rabbets (p. 19) to make glue joints.
CUTTING BOWLS

Bowl-like cuts can be made in much the same manner that coves are cut. However, the depth of any bowl cut will be in fixed proportion to the width, for any one size of saw blade. The smaller blades will make cuts more nearly semi-circular.

If a round workpiece is used, two boards clamped to the table to form a "V" will serve as a guide. Arrange these in back of the blade so that, when work is positioned against them, the top center of the blade will be at the center of the desired cut. If a square workpiece is used, rig up an arm to hold a pivot at center of workpiece. Take 1/8-inch cuts at a time, revolving work one complete turn for each cut until finished.


 Loading...