

| INDEA |
|---|
| GENERAL INFORMATION 2-3 Descriptive Data — Selection of Saw and Motor Attachments and Accession |
| SET UP AND ADJUSTMENTS |
| PROPER OPERATING PROCEDURES |
|
STANDARD SAWING OPERATIONS8-11
Selection of Blades — Tooth Patterns — Rip- ping — Narrow Work — Long Work — Resaw- ing — Crosscutting — Miter Gage Auxiliary and Table Extension — Stops and Clearance Blocks. |
| MAKING ANGLE CUTS |
|
USES OF CUT-OFF BOARD AND
PATTERNS 13 |
| Edges — Matching, Edges of Offset Work. |
| SPECIAL SAWING OPERATIONS |
|
DADO AND GROOVER SAWS 18-20
The Tools — Adjustments — Work Handling — Regularly Spaced Grooves — Wide Grooves — Gains and Stopped Grooves — Tenons — Rabbets — Round- ing and Tapering Square Stock. |
|
THE MOULDING HEAD AND CUTTERS 21-22
Set-Up — Patterns — Straight Edges — Strip Mouldings — Circular and Curved Work — Tenons and Raised Panels — Dowels — Ornamental Work — Spiral Turnings — Coves. |
|
ABRASIVE WHEELS 23
Cut-Off Wheels — Mounting and Feeding — Trueing — Grinding Wheels — Sand- ing Plates. |
|
30 DIFFERENT WC 37 JOINTS 24-27
Completely illustrat, instructions for mak- ing thirty different wood joints. |
| RADIAL SAWS |
| SWING SAWS |
| SHARPENING SAWS |
|
- Dodo Blades - Cutters.
TABLES |
Circular Saw

for the . HOME CRAFTSMAN SHOP OWNER
SET-UP - ADJUSTMENTS - PROPER HANDLING ALL STANDARD AND SPECIAL SAWING OPERATIONS. WOBBLE SAW - DADO HEAD -ABRASIVE WHEELS - 30 WOOD JOINTS - MOULDING OPERATIONS SHARPENING SAWS - TABLES
215 ILLUSTRATIONS
A CRAFTSMAN POWER TOOL HANDBOOK
Catalog No. 9-2926
Copyrighted 1952 SEARS, ROEBUCK and CO. REVISED 1952
GUARD AND SPLITTER
MITER GAGE -
THE Circular Saw ADVANTAGES OF MODERN BENCH SAW We would like to show you how, with your
bench saw, you can produce the quality and variety of work which most people believe to be only possible for highly experienced cabinet makers and craftsmen. Take full advantage of your bench saw. It is a precision tool. Learn the many adjustments. Make good use of the different blades and accessories. There is practically no limit to the quality and variety of work you can then do.
Originally, the bench saw was simply a boxlike base inside of which there was a shaft (arbor or spindle) to hold the circular saw blade. The blade was mounted at one end of the arbor, and a power drive was connected to the other end. The top of the base was the worktable; and the saw blade projected up through a slot near the center of this worktable.
Modern saws are like this, but nearly all have weral important added features. The saw indes can be raised or lowered through the table slot by a hand lever, and can be locked in any position. The table is fitted with an adjustable position rip fence and has one or two grooves for a sliding miter gage, both the fence and gage being used to guide work accurately to the saw blade. Either the table (tilting table type) or the saw blade (tilting arbor type) can be tilted and locked at any angle up to 45 degrees. Also, nearly all modern bench saws use a V-belt drive; some having the motor in the base, most with the motor outside. Most have a saw guard and a splitter. Antikickback pawls give added safety.

SELECTION OF A SAW AND MOTOR
The named size of any circular saw is based on the diameter of the saw blade which it will swing. Sizes generally run from 6-inch up to 10-inch. With the blade as high as possible, a 7-inch saw will make a 2-inch cut; an 8inch will make a 2-1/2-inch cut; and a 10-inch will make a 3-1/4-inch • cut, on an average. Motors should be at least 1/3, 1/2 and 3/4 h.p. minimum for the 7-, 8- and 10-inch saws, respectively, for home workshop use. Motor rpms are given in the table on page 32.
It is a mistake to underpower a saw or to run it slower or faster than the manufacturer recommends, because saw blades are designed to operate at certain speeds.
Other than size, a choice must be made on the basis of refinements built into the better saws. The more precision adjustments there are for changing the height and angle of the blade in the table, and for positioning the fence and miter gage, the better the quality of work that can be done. Tilting arbor saws offer the greatest amount of safety and ease of operation when making bevel cuts; but tilting table saws are equally good for the straight cuts which represent 90 percent of all general sawing operations. Whether the saw base is a bench type, or a 'full height cabinet type, makes no difference in its efficiency; and table size is not too important as most better quality saws can be fitted with table extensions to increase table sizes.
HEIGHT & TILT CONTROL KNO
EIGHT LOCK HEIGHT CONTROL
FENCE
INCH TILT TABLE SAWS
GUAR
-INCH TILT ARBOR SAW
POWR-PANL A safe, convenient way to hook up your saw, tool light and the accessaries. Two plug-in

Solid, all-steel benches for mounting saw and motor. Sizes 30x161/4 and 18x161/4 inches — just the right height the

MOTOR RAILS These attachments provide for correct suspension mounting of motors wherever necessary.
TABLE EXTENSIONS
Available for many types of bench saws — to increase the work area for handling large workpieces.
TOOL LIGHT
IT THE Y
Adjustable position light always provides ample illumination for close, precise cutting. Fits on tool bench or table edge.
MOUNTING THE SAW
If not already built onto a cabinet, the bench saw can be mounted on a bench or any solid stand which will place the table top a few inches above your belt line. As freedom of movement around the saw is desirable, a moveable type stand that can be placed in the center of the workshop (for use) is preferable. Bolt the saw firmly to the stand; and provide an opening through the stand under the blade, so that sawdust can fall out.
A serviceable wooden stand like the one illustrated can easily be made. Typewriter or laundry tub stands can also be used with some
rypes of saws, and the follers are handy for moving the saw about. It is advisable to make some arrangement for catching the sawdust. One way is to enclose the top part of the stand and place a container under the chure thus formed.


IMPORTANCE OF ACCURATE ADJUSTMENTS
Accurate work cannot be done on a saw that is not trued-up in every respect. On the other hand, even inexpensive saws can be made to produce excellent work, if properly adjusted. Moreover, the setting of the blade, table and fence in proper alignment is necessary for safety, to prevent possible binding of wood and kickbacks. (Wood can be thrown like an arrow by the whirling blade if it binds the blade.)
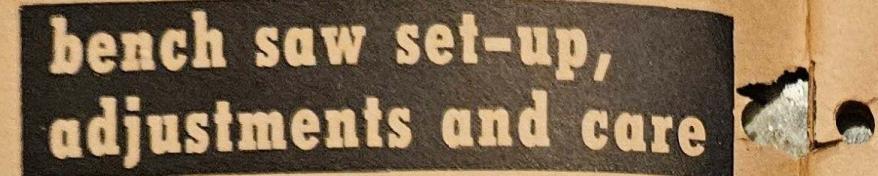
ADJUSTING SAW BLADE PARALLEL TO TABLE GROOVES
Set saw blade for deepest cut. Make a pencil mark on the tooth that is just above the table top at the front of the blade. Measure distance from tooth point to the right-hand table groove. Rotate saw by hand to place this same tooth just above table top at the rear, then again measure distance from tooth to same groove. If the two measurements are not exactly equal, shift the table or trunnions on the base until they are. This can usually be done by loosening

the boilts that secure tablo or trunnions to the base here being enough play a the bolt holes to permit ad ustment when table edge i apped lightly with a wood an mallet.
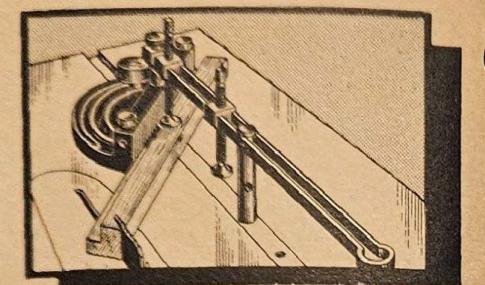
ADJUSTING FENCE PARALLEL TO SAW BLADE
On saws which have a fence guide bar and screw feed, align the fence parallel to the right hand table groove. To do this, loosen the bolts that secure the fence to the guide bar slide.

On saws without a precision fence guide bar and/or a non-adjustable table top, it is necessary to align fence with saw blade, each time the fence is used. To do this quickly, keep on hand a suitable length of board with
perfectly parallel edges. Lay board on table pressed firmly against side of saw blade, and

set fence parallel to outer edge of board by measuring with a ruler at each end.
DJUSTING TILT SCALE

Using an accurate square, set the saw blade at right angles to the table top. Then adjust the pointer on the tilt scale to zero. Also, if saw has a stop screw which automatically stops it at zero, adjust this screw to the proper position.
ADJUSTING MITER GAGE SCALE
Using an accurate square, lock the miter gage at the square position. Make a trial cut on a fairly wide board, then check this cut with the

square. If cut is accurate, set the pointer on the miter gage to the 90-degree mark on the scale. When table edge is suitable, gage can be quickly set by turning it upside down and aligning it with table edge.
ADJUSTING FENCE SCALE

Run the fence over until in lightly touches the blade then set the pointer to zero on the graduated guide ban
ADJUSTING THE SPLITTER

The splitter serves to keep the saw cut (kerf) open to prevent binding of blade in the wood. Obviously, the splitter must be perfectly aligned with the cut made by the blade. Thin cardboard washers can be used for aligning the splitter.
SAW MAINTENANCE
Keep your bench saw as clean and free from sawdust accumulations as possible. Wipe off the table top, blade and other exposed metal parts with an oily rag; dust other parts with a dry rag. Keep bearings lubricated as instructed by the manufacturer.

proper operating procedure

DRESS PROPERLY
Floppy sleeves and loose ties are an invitation to danger, and are easily caught by whirling saw blade to pull operator into contact with the blade. Sleeves should be down with cuffs fastemed; or wear short sleeves. Do not wear a tie or other loose article. A work apron is excellent. Also, if a quantity of work is to be done, some type of goggles or face shield to keep studies out of the eyes (especially if working in close quarters) will be helpful.
NEVER STOP BEING CAREFUL
One moment of inattention can cost you a painful injury. Most sawing operations are so simple, and so quickly and easily done, that some operators become careless and inattentive. Do more fall into this unsafe habit. Always be abert!
A LOW BLADE IS THE SAFEST
Equally good cuts can be made with the blade elevated to full height, or with it raised just enough to clear the top of the workpiece by approximately 1/4 inch. When the blade is in the second position, a little more power is required so drive the saw, because of the long

cutting angle of the blade. Also, a little more feed pressure may be needed. But this second position is the safer one, and any saw that is properly powered will operate, with little noticeable difference, in any blade position.

The lower position is safer because the blade enters the wood at an angle more nearly parallel with the direction of feed, and there is better opportunity to hold the work against kickback.
AVOID KICKBACKS
Anything that will cause the blade to bind in the work will cause a kickback. Under certain circumstances, the work can be thrown from the saw with extreme force endangering the operator. Most common causes of
kickbacks are: 1. Twistingthe workpiece out of line when freehand feeding. 2. Misalignment of fence and blade so that work is twisted or wedged between fence and blade during feeding. 3. Failure to use splitter (or to otherwise hold the kerf open) so that a long kerf closes around saw blade. It is best to use the splitter, and if the splitter is fitted with antikickback pawls, so much the better. If for any reason splitter is not used, and you are making a long cut, stop and put a wedge into the cut as soon as possible to hold the kerf open.
Too rapid a feed, knots or sap in the workpiece, a dull or rusty blade can also be causes of kickback. Hold work extra firmly to table when starting a cut, passing
a knot or during special operations. Avoid using damp or warped lumber without special precautions (page 8).
Warped and crooked workpieces can also cause kickback, especially if placed on the table or

against fence in a manner that permits rocking or twisting during the feeding process. Always make certain that work will slide on table and along fence without tendency to bind the saw

KEEP HANDS CLEAR OF THE BLADE
Always be certain that there is ample room between the blade and the fence, before getting your hand into this position. To be on the safe side, make it a rule not to use your hand to push work through, unless the space available is equal to the maximum width of your
palm. For added safety, when using your hand for the push through, hook the two outer fingers over the fence to keep hand steady, and tuck the thumb in behind the palm and anchor it against the end of the workpiece.
If work is too narrow for hand to be sately used, use a push stick (page 9), or walk around the saw and pull the work through from behind to finish the cut. Hold work as you walk around the saw.
AVOID AWKWARD HAND POSITIONS
When crosscutting, use the miter gage, even for straight cuts. Freehand crosscutting involves more risk because kickbacks are especially likely to occur in this type of operation. If using the left-hand groove, stand at the left

side of blade. Place left hand on workpiece with thumb hooked behind gage at center of gage. Use this hand to hold work against gage, and to push gage and work to the saw. If right hand is used, keep it as close to center of gage as possible.
Never advance an unwieldy workpiece to the saw without first providing a good support to keep it from being upset. It takes but a few minutes to arrange some safe support that will allow work to slide on table without danger of being upset or kicked back..

NEVER BIND FREE END OF WORK BETWEEN BLADE AND A STOP

Any form of stop should be placed against the supported end of the work, leaving the unsupported end free to fall away from the blade when the cut is complete.
TWO OBVIOUS "DON'TS"
Don't reach up to saw blade to grab a piece of free wood—until blade has stopped. Don't let floor become littered so that your feet might slip. Sawdust is a definite fire hazard, especially after being damp, and should not be allowed to accumulate.
standard saw operations

A LAND AND AN A REAL OF AN A REAL OF AN

CUTOFE BLADE


SELECTION OF SAW BLADES
ground planer blade. All will rip, crosscut and reeth of the fancy-tooth blade are set alternately
Two special purpose blades are the rip and the special purpose blade is the one designed for nail cutting. It is very useful when sawing up specialized blades for different lumbers, other
STANDARD TOOTH PATTERNS
The tooth patterns, names and distinctive feaas nearly as possible to the pattern of the blade if a blade is to cut smooth and fast. For this reason it is good practice to make a paper ening becomes necessary, you can refer back to the original pattern for proper reshaping of the teeth. Note on the pattern the degree of tooth set, filing angles, and other useful in-
RIPPING
Ripping is the sawing of wood with the grain. as a guide to position and maintain the work at the correct width for the cut. Because the work is pushed along the fence, it must have a reasonably straight edge to make sliding contact with the fence. Also, work must make solid contact with the table, so that it will not wobble during the operation. Provide a straight edge to go against the fence, even if this means temporary nailing of an auxiliary straight edge board to the work to serve as a guide. If a moulding fence (with cut-out near center) is used, clamp an auxiliary guide board to the fence. If workpiece is warped, turn the hollow
Use of the saw guard is recommended; but the

erations. Wood cut with the grain tends to stop and insert a wedge in the kerf just as soon as cut is long enough to do so.
Set fence to desired width of cut, either by using the scale on the fence guide bar, or by measuring distance between blade and fence. Fence is almost always used on right-hand side of blade. Stand a little to the right of center be clear of work in case of a kickback. Start saw and advance work to the blade, using left hand to hold it down against tendency to kickback, and right hand to push it into blade. As cut nears completion, move left hand to
push work through with right hand alone. Weight generally hold it down on table: but if work is so light that blade will tend to kick it up, clamp a hold-down in place before starting the
has cleared the blade can
be lifted off table from in

HANDLING NARROW WORK
When there is less than the width of your palm like that shown in illustration, or pull work through from behind saw.
HANDLING LONG WORK
Do not leave a long board unsupported so that table makes an excellent adjustable height sup-


RESAWING
Resaming is the cutting of thick boards into
When two cuts from opposite edges are rethe two sides of the cut are no longer parallel them to spoil their appearance
Position the fence and make the first cut. Then face is still against the fence), to make the
If the board is too wide, make two maximum


CROSSCUTTING
long way, the long edge of the work is placed fore, the miter gage is used to guide the work to the saw, and the work is held in position by keeping it firmly in contact with the gage Most operators prefer to use the left-hand table hold the work in contact with the gage and The right hand is free to assist in the feeding operation, as required. If the right hand groove
Ordinarily, the gage is placed in the table groove with the slide in front. When the work is so wide that it completely covers the table
groove). The splitter need not be removed, Start the cut slowly and hold work firmly to table when crosscutting. This tends to bind

USE OF MITER GAGE AUXILIARY AND TABLE EXTENSION
An auxiliary extension, screwed or bolted to the miter gage, greatly improves the use of the on the saw blade. If fitted with pin points (phonograph needles are excellent) or sand-
a big help in preof the work. When much long work is to be

handled, a table extension will be very useful. Crosscutting long boards always creates a probbetter. If board overhangs table enough to sag at either end, it will be necessary to support the sagging end by sliding it along a wooden horse or auxiliary table placed at the
USE OF STOPS AND CLEARANCE BLOCKS Crosscut-Trimming of Duplicate Parts
To produce a number of identical pieces by crosscutting various lengths of scrap from various length workpieces, a gage is used. When the pieces are short enough, the handirod with which many miter gages are equipped. This


rod can be set to position each workpiece ex-
If the workpieces are too long, or if there is miter gage extension. A wood block can be screwed or clamped to the extension to serve the stop to position it for cutting.
Crosscutting Duplicate Pieces from Original Piece
When it is desired to establish the length of the piece being cut-off (instead of the piece to the blade and result in a kickback.
The clearance block is a metal or wood voke that can be fitted over the fence like a collar gage, before the sawing operation begins. This block must not make contact with the work when work is pushed forward into the saw. If the setting of the fence gage is noted, the block
A stop that will serve the same purpose as the on the side opposite the miter gage. The miter gage clamp illustrated is excellent for holding the stop. (Refer to page 12.)


making angle cuts
BEVEL CUTS
Bevels from 1 degree to 45 degrees are out by thing the saw blade or the table, depending upon type of saw. Operations on the tilting blade saw are much the same as standard ripping and crosscutting operations, as the table remains level. With a tilting table saw, however, some extra precaution must be taken to present work from sliding down the table slope as it is fed to the saw. When the fence is used (for hewel ripping), it will serve this purpose. In crosscut beveling, when the miter gage is used, a miter gage extension (refer to page 11), with anchor points or sandpaper on the contact
r gage clamp also serves very well to hold in position.
reference and miter gage should always be placed on the low side of the blade, when using a ultring table saw. It is much safer and easier to work on the low side.
MITER CUTS
Miners are crosscuts at an angle to the edge of the workpiece. The miter gage is set at the required angle to make the cut.
Lialess the work is very tightly held, it will creep while making a miter cut. This creep is into the saw blade, and is equal to the set of the teeth, or the taper of a hollow-ground blade. To eliminate creep, use a miter gage extension (refer to page 11) with anchor points. If great accuracy is desired, use a miter gage clamp.

TAPER RIPPING

Ripped tapers are cut with an adjustable jig like the one illustrated. First, however, the amount of taper per foot must be determined. This is easily figured, as shown in the illustration. If the taper is to be all on one side, instead of on two opposite sides, multiply by 12 instead of 6 when using the formula.
After determining correct taper per foot, open the jig until the distance between the two jig arms at the 12-inch mark is the same as the taper desired. Lock the jig. It is now ready to cut the first taper; or, if a square leg is being worked, it is properly set to cut any two (only) adjacent sides. Position the fence so that inner edge of saw blade just touches corner of work, then slide the jig and work together past the blade to make the cut. If a square piece is being tapered, cut one adjacent side in the same manner. Before cutting the remaining side or sides, open the jig to twice the previous setting to allow for the tapers already cut.

cut-off board and patterns
HANDLING ODD-SHAPED WORK
It is often necessary to make a straight cut on an odd-shaped board that cannot be guided by the fence or miter gage. A cut-off board is very useful for jobs of this kind. The board is easily made, as shown in the illustration above. The guide strip on bottom of board should be a good sliding fit in the table grooves; and matching V-grooves in the faces
of the boards are useful for holding dowels and similar round stock. If the top board is also countersunk to receive the bolt heads, the fixture can be turned upside down (by reversing bolts) for freehand use.

CUTTING TRUE STRAIGHT EDGES
When reversed, as noted above, the cut-off board can be used for freehand operations.
One such use is for trimming veneer for jointing. Lock both pieces of veneer together in the cut-off board with approximately 1/2 inch of the ragged edge of each exposed at one side. Clamp an auxiliary guide, one inch or more thick, to the fence. Position this guide high enough above table to ride over the top of the saw blade when blade is projected just high enough to cut through the work in the cut-off board. Position fence so as to trim approximately 1/4 inch off of the workpieces, then slide the cut-off board along the auxiliary guide to make the cut.
A board with two ragged edges can be similarly trimmed and trued to have two parallel straight edges. If more than 3/4 inch must be trimmed from edge of board, use a thicker

auxiliary guide like the one shown.
Odd-shaped, straight-sided pieces can be cut with the aid of a pattern and an auxiliary fence guide. The pattern can be any desired shape, but should be thick enough to make firm con-

tact with the guide. A guide like the one illustrated is best because it is wide enough to provide ample clearance out from the fence. The guide must have a small rabbet at bottom of lower edge to provide clearance for the saw blade, and must be positioned flush with outer face of blade.
If a wooden pattern is used, nail it lightly to the workpiece. The cut-off board can also be used to hold workpiece and
pattern together, and is very useful when pattern is of a material that cannot be nailed to the workpiece. Make the set up as shown in the illustration, leaving room under the guide for

pattern along guide to make each cut required.
MATCHING EDGES OF OFFSET WORK
If it is desired to have a second piece of work (bottom piece) larger than the pattern (top piece), use the pattern sawing set up already described; but set the guide out over the blade by the amount of offset desired between each edge of second piece and pattern.
special saw operations

MAKING CENTER CUTS
If a long slot through the center of a board is to be cut, it is necessary to drop the board down on top of the saw blade to start the cut. Always clamp some type of a stop to the table in front of the blade to hold the front end of board against kickback. Stand at one side or in back of the saw. Place front of board on rable against the stop, then lower back of board slowing down over the blade until blade cuts through and board is flat on table. Push or pull board until blade is at end of desired cut, then stop the saw before lifting board from rable.
Make a second cut, parallel to the first, in like manner. The stop and fence can be positioned to locate the two cuts. Center section of board can be cut free with a scroll saw or chisel.
MAKING EDGE CUTS
(Design for a Hold-in)
Edge cutting, like resawing, requires careful support of the workbiece. This is especially true of high, thin boards. Always secure an auxiliary guide to the fence to give it sufficient height to support at least the bottom two-thirds of the work. Also, preferably, always use a hold-in. This can be a spring metal guide (many types can be purchased), or a homemade wood spring.
The wood spring is simply a length of wood, miter cut (at approximately a 45-degree angle)

and slotted at one end. It is clamped to the table so that the mitered end bears against the work to keep it against the fence. Position the hold-in to contact the work just behind the front edge of the blade. If work is not high enough for a good grip, always finish cut with a push stick or by pulling it through.
MAKING END CUTS
End cuts are more difficult than edge cuts because the small portion of board at bottom does not give a firm sliding contact with the table. Special end cuts, like tenons, are generally made with a jig (page 17); but such cuts can be made as illustrated. Note that the auxiliary guide fastened to the fence is high enough for operator to hook fingers over the top to support right hand. Also note that push stick is used and left hand is kept very much in the clear, away from the blade.

CUTTING A RABBET
A rabbet is cut by making two saw cuts at right angles to each other, to remove a corner from the workpiece edge.
First mark the size of the rabbet on one end of the work as a guide for setting the required saw blade projections. Set the blade so that the top of the teeth just touch the center of the

mark for the cut; then make the cut into the flat side of the board first. Use either the fence or the miter gage for guide, as required. Then reset the saw in similar manner, and make the second cut. This second cut will be either an edge cut or an end cut, and the workpiece should be enided accordingly.

FIRST CUT SECOND C
CUTTING CURVES

Though intended for straight line work only, the bench saw can be used to cut slow curves. The maximum curvature should not exceed 1/2 inch per foot. One pattern for a concave (inside) curve, and another for a convex (out-

side) curve is needed. These patterns are made to the degree of curvature desired. The concave pattern must be the same length as the workpiece. The convex pattern can be any length that will give good contact when acting as a guide; and can only be used when the workpiece already has one edge cut to a concave curve that will match the pattern (a straight edge could not be guided by the pattern as there would be only one point of contact.)
Set the blade to barely project through the work. Clamp the concave pattern to the fence with the center of the curve exactly in line with the blade axis (center of blade). Riga metal or wood spring hold-in to keep work in contact with the pattern. Feed work slowly. If the convex pattern is to be used for shaping the other edge of the work, the set up and procedure are the same.

CUTTING COVES
Coves are rounded grooves made by feeding the work at an angle to the saw blade, taking light cuts of about 1/8 inch at a time until full

-14 ---
special saw operations (contrd)
depth is reached. Cove cuts have many uses in shaping edges, the most popular being the making of rounded table corners.
The rounded corner is made by first working the outer curve as a split turning on the lathe. Somere the original pieces and center them on

lathe accurately, as the remaining square ends are later used as guides in routing grooves for tenons. After turning the outside curve, separate the two pieces and cut a cove in one or
can then be halved to form two identical quarter rounds for opposite ends of the table.
Determine the depth and width of the desired cove cut. Then take two straight edge strips of wood and se-
cure these together by two crosspieces, to make an oblong frame having the two inner edges of the long strips parallel and exactly the same distance apart as the desired width of the cove. (A parallel rule can be used, instead.) Elevate the saw blade to project above the table to the exact depth of the desired cove. Place frame over blade and turn it until it just touches the
tips of the front and rear teeth of the blade. Whirl blade by hand to check setting. Draw a pencil line on the table along the inner edge of the left-hand frame strip. This line gives the angle at which the guide must be set.
Use a straight-edge board as a guide. Clamp this to table at left of blade so that the inner edge is parallel to the pencil line and far enough from the blade so that center line of work is on a line
as ble the gh en-
with the exact center of the blade when work is placed against guide. Set blade to project above table no more than 1/8 inch, and make first cut by feeding work slowly to blade along the guide. Raise blade 1/8 inch at a time and continue making cuts until cove is finished.
The finished cove will not be perfectly round. Actual shapes for various guide angles are shown in the illustration. If desired, work cove round with sandpaper
wrapped on round stock. Before cutting off the square ends, rout out the tenon grooves along the edges of each finished quarter round. Time can be saved in making coves by roughing out the center part with a dado head, or by taking out a "V" with two here! saw outs

CUTTING BOWLS
Bowl-like cuts can be made in much the same manner that coves are cut. However, the depth of any bowl cut will be in fixed proportion to the width, for any one size of saw blade. The smaller blades will make cuts more nearly semi-circular.
If a round workpiece is used, two boards clamped to the table to form a "V" will serve as a guide. Arrange these in back of the blade so that, when work is positioned against them, the top center of the blade will be at the center of the desired cut. If a square workpiece is used, rig up an arm to hold a pivot at center of workpiece. Take 1/8-inch cuts at a time, revolving work one complete turn for each cut until finished.
USING A MITER BOARD
The ordinary (square) miter for joining two boards is cut with the miter gage set at 45 degrees. To cut the opposite end of the same board, turn the board upside down. If board cannot be turned upside down, move the miter gage to the opposite side of the saw and reset it to 45 degrees in the opposite direction. If work is allowed to creep (page 12) the resulting joints will be out of square (as in the illustration). For this reason, cabinet joints are best made with the use of a miter board.
A simple miter board can be quickly made as illustrated. The two mitered stops should be cut at the same time, with the miter gage set at 45 degrees. Guide strips are ar-
ranged to slide in the miter gage grooves. Workpieces should be square cut to the desired overall length plus 1/4 inch to allow for saw kerfs, and are then miter cut in the jig.
THE TENONING JIG
Cutting tenons, like making other end cuts (page 14), requires special holding of the work. Two homemade tenoning jigs that will make it easy to hold and position the work are illustrated. Each is fitted with a stop shoulder that is cut away to allow passage of the saw blade when the jig is close enough to the blade to make the inside cheek cut of a tenon. Jigs designed to travel in the miter gage groove, and having adjustments for accurate positioning of the work, can be purchased.
CUTTING TENONS
When cutting tenons, make the shoulder cuts first, using a stop block to position these cuts accurately. Then make the two cheek cuts and the edge cut.
There are three methods of making the cheek cuts. The simplest method is to clamp the work to the tenoning jig and position the jig and fence so as to cut out the cheek on the side away from the jig. Then turn the work around and cut the other cheek, without moving the fence. This method centers the tenon accurately. but the widths of the tenons will vary if there are variations in the thickness of the wood.
Accurate width tenons can be cut by using a backing block (as illustrated). This block should be the width of the desired tenon plus the width of the saw kerf. If there are variations in the thickness of the wood, tenons cut in this manner will not all be accurately centered.
Accurately centered, exact width tenons can be cut by using two saw blades of the same diameter, with a collar between. Paper discs can be used with the metal collar to space the blades as required. The work is clamped to the jig, and the fence can be positioned, as needed, to accurately center each tenop that is cut.
xact t by the billar rempence ded, each


- 17 -

dado and groover saws

HOW THE DADO SAW WORKS
A Typical Dado Set
The dado saw or head, as it is also called, is a special set of blades for cutting grooves and dados on the circular saw. This head consists of two solid, full-circle outside blades and a number of two-toothed chipper blades for use between the outside blades.

A typical head set contains the outside blades. A typical head set contains two 1/8-inch thick outside blades, four 1/8-inch thick chippers, and one 1/16-inch thick chipper. With this assortment you can cut grooves as follows: 1/8 inch (1 outside blades); 1/4 inch (2 outside blades); 5/16 inch (2 outside blades and the small chipper)... and in additional widths increased 1/16 inch each up to 13/16 inch maximum (with the complete set).
same manner as a combination blade; the chipper blades act as planers to smooth out the area between the two outside blades. These chippers cannot be used alone as they will tear the work.
The Dado Head Set-Up
A dado insert must be used to replace the standard table insert. This can, if necessary be a piece of plywood cut to fit the table insert opening and provided with a wide slot for the dado head.
Dado blades are generally smaller in diameter than standard saw blades so that the depth-ofcut gage probably cannot be used. Each setting of the dado head must be made by aligning the top of the blades with a mark on the work, Settings should be checked on scrap lumber. As the splitter and guard cannot be used, these should be removed for dado operations.
Whenever two or more chippers are used, space the swaged ends of the chippers as evenly as possible around the circumference of the assembled head. Avoid having the teeth of two or more chippers in a straight line across the head. Each swaged chipper end must fall in a gullet of the adjacent outer blade.
Fractional Thickness Adjustments
Fractional adjustments in the thickness of a dado head can be made by using paper washers to seperate the outside blades from the chippers. In this manner thickness variations up to 1/16 inch can be obtained. Such adjustments are often useful in securing a tight fit for a grooved joint.
HOW THE GROOVER SAW WORKS
A groover saw is a wide, 8-tooth blade with chisel-type teeth designed for cutting grooves. It will do the same work as a dado head but is not variable in thickness as each saw will cut only one size groove. Standard widths generally are: 1/8, 3/16, 1/4, 5/16, 3/8, 1/2, 5/8 and 3/4-inch; but other sizes can be obtained.
HANDLING WORKPIECE
Operations with the dado head are much the same as with a standard blade. It must be remembered, however, that the dado head takes a bigger bite in the workpiece: and that the likelihood of kickback is therefore in-
creased. As the splitter, and msequently the anti-kickback pawls, cannot be ted, the workpiece should be held down firmly hand, or by use of a hold-down jig like the illustrated.
REGULARLY SPACED GROOVES
Regular spacing of grooves can be done by using the stop rod on the miter gage to engage the last groove cut, and so set the position for
the next groove. Another method is to use a notched stop block (below) to fix the starting positions of the various grooves. This block should be clamped to the table well ahead of should be clamped to the table well ahead of the blades so that work is free from it before the blades so that work is free from it before outing operation begins. The block can be cutting operation begins. The block can be cutting to any notched in regular steps, or according to any desired pattern. A third method is to clamp a yardstick to the miter gage (or miter gage extension), and position the work for any desired spacing of grooves by referring to the sired marks on the stick.
WIDE GROOVES
When a groove wider than the dado head is needed, it must be cut in two or more passes. Best method is to use a notched stop block, as illustrated.
When moving the workpiece over to make additional cuts, move it just a little less than the thickness of the head so that the cuts will overlap. Also remember that right side of head will establish right edge of cut, and the left side of the head will establish left edge of out
CUTTING GAINS AND STOPPED
A gain is a groove that is closed at one end; stopped grooves are closed at both ends. Both are used in making joints.
A gain is started like an ordinary groove or dado; but a stop block is used to fix the end of the cut. To


locate this block, place work alongside dado and position it so that back edge of dado lines up with the desired end of the groove. Butt the block up against back end of work, and clamp it to the table or fence. Always stop saw before removing finished work.
To cut a stopped groove, both the end stop block and a starting block must be used. The starting block is located just like the end block, and is clamped to table or fence. But front of work against starting block, and lower work onto the blades.
DADO TENONS
Tenons are usually cut with the widest dado combination. If tenon is still wider than the dado head make the inside
cut first and widen the tenon by making later cuts, advancing toward the end. The notched stop block already described can be used.

DADO RABBETS
Rabbets are quickly cut with the dado head, using the fence as a guide. Use a combination a little wider than the rabbet to insure a clean edge. Preferably make the cut on the edge

dado and groover saws (cont'd)
away from the fence; otherwise an auxiliary fence, cut out like a moulding fence, must be used.

ROUNDING AND TAPERING SQUARE
Perfect round and capered-round cuts (such as cound and capered-round tenons) can be quickly cet on the bench saw. A fixture like the one illustrated, and a dado head, are all that are needed. The fixture is designed to be clamped to the saw table, and to hold round or square stock as in a lathe. One end of the fixture is adjustable horizontally, so that the fixture will hold different length workpiece, and is also adjustable vertically so that one end of the workpiece can be raised up for making taper cuts. The other end is swivel mounted on a horizontal axis so that it can turn whenever the adjustable end is raised up. The bed piece is cut out to fit over the dado head.
To use the fixture, first mount the workpiece in it as in a lathe, with the end (or middle area) that is to be rounded at the nonadjustable end of the fixture. Locate the fixture over the dado head with the center line of the workpiece exactly above and parallel with the axis of the dado head, and the area in which the first out is to be made directly over the dado
head. Clamp fixture to table in this position. Now start the saw and raise
(especially if a square workpiece is being rounded), until it cuts into the wood about 1/8 to 1/4 inch maximum. Rotate the workpiece by hand to cut it all around. Then raise up the
dado head another 1/8 to 1/4 inch, and repeat the cutting process. Continue this until full desired depth of cut is reached.
is required, move the fix-
above process. The fence above process. The fence can be used to locate the fixture and help keep it square with the blades. When so used, it will also help to fix the amount of fixture movement needed to position
To cut tapered round tenons or sections, raise the adjustable end of the fixture to position the workpiece at the desired angle of taper with respect to the saw table. If tapered end is to be pointed, cut wood nearly through (as when using a lathe), then finish the cut with a brife.

THE SET-UP
A dado insert with a 1-1/8-inch wide slot will accomodate the moulding cutter head. You can also make an insert from plywood — and, if close work with narrow knives is to be done, a specially made insert that will give support to the work right up to the knives will be helpful. The cutter head is installed in place of your regular blade — and need not be removed to install various cutters (instructions are furnished with each head).

If you do not have a shaper fence (like the one illustrated), you can easily adapt your regular fence to shaping operations. Make two 1-inch thick facings to fit your fence Straight-grained hardwood i best. Clamp one facing to the fence on top of a 1-inch
thick scrap board — then use a set of planer knives in the head to cut a semi-circular notch in the bottom edge of the facing for knife clearnace. Prepare the other facing in like manner, and mount the two facings on opposite sides of your fence with countersunk bolts and nuts.

the moulding head
SELECTING YOUR PATTERNS

cord of your knife shapes. Use 4-inch squares of vellum or tracing paper — and make ink outlines of your various knives. Two or more papers can then be stacked together and moved around so that, when you look through them, you can see the results of different knife arrangements. Whenever you select a design for use, trace the composite design on a clean piece of paper, outlining each knife cut, and indicate by numbers the knives to be used. You can then easily duplicate the design at any time.
MOULDING STRAIGHT EDGES
Work is fed to the moulding head in same manner that it is fed to a saw blade, except that the moulding fence is always used as a guide, even when moulding end grain with the aid of the miter gage. Sometimes, especially when work must be placed on edge, it is desirable to move the fence back so that cutting operation is on side of work away from fence. This is last desirable than
This is less desirable than cutting along edge next to fence, however, as variations in the thickness of the work will cause imperfect results.

Avoid cross grain moulding as much as possible because it is difficult to keep from splintering the end of the cut. If work is moulded all around, make the two cross grain cuts first, then splinters will be cut off when making the with-grain .cuts.
STRIP MOULDINGS
Strip mouldings are often made by edge moulding a sizeable board, then sawing off the moulded edge in as thin a strip as desired. If thin (strip) stock is used, however, it must be fed to the knives through a strip-


ping guide. The guide is grooved to the exact size needed to contain the strip, and the groove is covered as shown. A cut-out is made in the cover for the swing of the knives. This guide is then clamped to the fence, and the strip stock is fiel through it to the knives.
CIRCULAR AND CURVED WORK
by two triangular blocks clamped to the fence to form a V-groove; or by use of a privat pin held by an auxilliary arm fastened to the fence. Curved work must be fed freehand; but a mark on the fence or guide to show center of cutter will help to guide the work. To obtain best results, go around the work two or three times. Overcutting is impossible since the knives can only cut as wide as the fence is set.
TENONS AND RAISED PANELS
Scraight knives, used in the same manner as a dado head, will cut excellent tenons. When the arbor (or table) is tilted, these same knives will cut the sides of raised panels. Make the cross grain cuts first, as when making a moulded edge all around a workpiece.
CUTTING DOWELS
To cut dowels, select stock that is about 1/32-inch thicker than diameter of dowel to be made. After both sides are cut, dowel can then be broken from stock and sanded smooth. Semi-circular knives are required.

ORNAMENTAL MOULDINGS AND PANELS
Mouldings and panels can be made by using an auxiliary extension clamped to the miter gage. This tence holds a guide pin so positioned that it will locate in the previous cut to stop the work at the proper place for the next cut. (Operation is same as in making box joints, page 24.) If miter cuts are to be made, pin must slant also. By cutting and crosscutting with different knives, a great many patterns can be made.
SPIRAL TURNINGS
Quick spiral turnings on round stock can be made as follows: Make set up as shown, using an auxiliary extension on the miter gage and a standard saw blade. Angle at which gage is set will determine length (pitch)

to sheld lightly and fed along fence, the blade will revolve it and advance it to cut a spiral groove that will be surprisingly near to accurate. A pin put into the fence can now be used to ride in the groove and guide the workpiece for further cutting with moulding knives. Select a knife that will rout out the width spiral you have prepared, and adjust the fence to obtain the pattern of cut needed. Feed work along fence (guided by pin) to rout out the spirals. Round off rough edges with sandpaper, or rasp file, by hand or by using a lathe. COVE-CUTING, JOINTING AND
PLANING
A series of overlapping semi-circular cuts will form a smooth straight cove when fence is used to position the cuts. Jointing is done with boards on edge; planing is a series of parallel, light cuts with straight-edge knives.

CUT-OFF WHEELS
Abrasive cut-off wheels are thin, but strong discs of bonded abrasive. Several different types are available, each intended for use with certain classes of materials. When properly used, these wheels make the circular saw a very useful tool for cutting sheet metal, rods, angle irons, bricks, stones, plastics, glass and many other items.

MOUNTING WHEEL AND FEEDING WORK
The wheel should be mounted to the arbor with blotting paper washers at either side, if washers are not already glued to it. It is used in much the same manner as a saw blade, except that work should be fed into the wheel with steady, firm pressure. Too slow a feed permits the wheel to glaze. Glazing is the chief cause of wheel breakage. Too fast a feed will tear abrasive grains away from the wheel before

abrasive wheels
these have accomplished full duty, and will shorten the life of the wheel.
Although wheels are not likely to break or chip in use, it is good practice to use the saw guard and wear goggles or a face shield. It is also advisable, as a rule.
to clamp the workpiece to the guide being used, to clamp the workpiece to the guide being used, to keep the feed accurate and avoid putting stress on the wheel. Many of the materials that can be cut become hot some distance from the cutting point, making it necessary to clamp the work and hold onto the guide. The cut-off board (page 13) makes an excellent guide for round stock; so does the V-block and clamp illustrated.
The wheel is run dry at the regular saw speed. Shapes up to one-inch thick can be cut in one pass; larger shapes are generally cut by "walking" around the cut, if this is possible. Do not expose more of the wheel than necessary. If metals discolor from the heat, remove the discoloration with sandpaper or steel wool.
TRUEING WHEELS
Wheels should be balanced and have clean edges to do accurate cutting. If a wheel becomes out-of-round or chipped, hold an abrasive stick or grinding wheel dresser against the edge (as shown), while saw is running, to true it.

GRINDING WHEELS
Grinding wheels of 1/4-inch to 3/4-inch thickness, depending upon size and style of saw, can be used on bench saws. Because of the many fine adjustments possible
with the better bench saws, these wheels are excellent for a number of precision grinding operations. They are especially adaptable to tool sharpening.

A SANDING PLATE
A 1/4-inch thick sanding plate can be mounted
discs or sandpaper of any desired grit can be glued to either side of the plate with a quick setting cement. Such a setup is very useful for precision sanding work of all kinds.


1. Single Milter, Flot
2. Single Miller, On Edge
Single (source) miter joints are cut with the board (page 17). Cuts must be exact for a neat fit. The "on edge" miter can be cut
3. Polypon Miters
Minered angles of less or more than 45 degrees
To find angles of polygons: of sides they subtract this gage setting in degrees
| COMMON | POLTGON ANGLES | ||||
|---|---|---|---|---|---|
| THREE | SIDES | = | 30. | DEGREES | |
| FIVE | SIDES | = | 54. | DEGREES | |
| SIX | SIDES | = | 60. | DEGREES | |
| SEVEN | SIDES | = | 64.3 | DEGREES | |
| (APPROX.) | |||||
| EIGHT | SIDES | = | 67.5 | DECREES | |
| NINE | SIDES | = | 70. | DEGREES | |
| TEN | SIDES | = | 72 | DEGREES | |
4. Compound Miter
This is a combination miter and bevel cur The bevel angles for some commonly used he two to obtain amounts for six inches or

5. Slip Feather Miter
so that it will take a slip feather, clamp the two workpieces together onto a tenon-
6. Splined Joint
On-edge miters are often joined with a spline to give added strength. The spline can be metal or wood, and should run the full length of the joint. To cut the tilted at the same angle used
but move work around from the right to the left side of the blade. The groove should the blade. The bloore another the point of the bevel edge. he point of the bever edge, ad should not be too deep.
Box Joint
good strong joint for small boxes. Use a dado small poxes. Use a dado head approximately the same pare a guide fence by edge pare a guide tence by edge illustrated. The two cuts are made with the dado head and are exactly the same distance apart as the width of each cut. Line "A" is at the center of the first miter gage in the position in which the fence was
To start the box joint, place both boards against the guide fence, having the edge of one in line with line "A" and the edge of the other in line with line "B". Make the first cut (through both boards). Now move both boards to the guide pin, and make the second cut. Continue to move boards one notch at a time and make cuts until joint is finished
If the guide fence is fastened to the miter gage so that it is adjustable, and the first cut is made large enough, the same set up can be used for various size box joints. When setting the
fence, adjust it so that the distance between the guide pin and side of dado is the same as the width of the dado. Guide pin should he small and hoards are pushed to the right against it each time when lining up the new
- End Lan Joint
- Tee Ian Joint
- 0. Middle Lap Joint
he cut with a dado head, or the end lap pieces can be cut in the same manner as a trunnion. If a dado head is used, the first piece is
fitted to the second by using a spacing block the width of the cut to be made. Depth should
11. Middle Lap on Edge with Groove
To make each cut in the grooved board, set the dado head to the thickness of the other board. Cut the two grooves first, each approximately 1/5 to 1/4 the thickness of the board. Depth of both edge cuts is exactly 1/2 width of other board; and thickness of cut in between the two grooves of the first board This is a steady joint for a shelf held by two sides which are not strongly braced.
12. Simple Mortise and Tenon
The tenon can be cut with a dado head (page 19) or in several ways with a standard blade (page 17). The mortise is generally cut with a mortising chisel on the drill press.

30 different wood joints (cont'd)

13 Born Frond Tanan
This type of tenor has just one cheek. It is
14. Hounched Tenon
This sense is often used for joining a piece
15. Concepted Hounched Tenon
The concealed baunch provides extra strength without showing a break at the end (as in the case of the haunched tenon). To make the ensore for the haunch clamp the wood at an angle so the drill press table, and cut the
16. Long and Short Shoulders Tenon
This is a single senon with a rabbet out out of the shoulder at one side to mate with an edging on the other board. The rabber curs
17. Open Mortise Tenon
This is used in rough box work when the additional strength of a simple tenon is not remired. The mortise for this joint can be
18. Wedged Tenons
Both the through wedged tenon (illustrated) and the blind wedged tenon (for which the mortise is not cut through) are simple tenons with wedge slots added. As shown, wedges should be slightly bowed at one side instead of straight tapered; and the mortise must be flared out at each end. The flare at each end wedge minus the thickness of one slot
19. Moulded and Rabbeted Tenon
This is a simple mortise and tenon joint formed in two boards having edge mouldings. Fach moulding is miter cut at a 45-degree angle. To start these miter cuts, measure back from the ing above the board, and make a mark. The saw should enter the wood adjacent to this mark on the side nearest the end of the board.
20. Mitered Tenons
The ends of these tenons are cut with a 45degree bevel so that they form a miter joint inside of the mortised piece. Tenons should Mitered ends are useful when the tenons are
21 Dade Box Corner
This is a simple joint quickly made with the This is a simple joint quickly made with the dado head. Often used to fit the back of a drawer to the antis, it should be made with the dado groove narrower than the rabbet cut.
22 Milled Dado Box Corner
This is used when it is desired to expose the This is used when it is desired to expose the cross grain edge at the side instead of at the cross grain edge at the side instead of at the end. If the two grooves and the end lap are
vided. A weaker, but never appearing joint is obtained
23. Lock Miter Joint
This combines the appeardado corner. The grooves
24. Rabbet Miter Joint
To make this standard saw blade joint: First into the second board to a depth equal to half the thickness of the first board. Then cut a rabbet in the first board that is as wide (measboard by the partial miter cut made at the start.
25 Housed Dado Joint
This is a firm, easily made joint for seating
26. Cogged Joint
BOX CORNER
Beinforcing strips are often fitted to main frame
LOCK JOINT
27. Dovetail Dado
Because of the straight bottom, shelves mount-
just as well. The mortise is cut with a dado head set to the narrowest desired width then routed out on the formed. A beveled rabbet forms the tenon.

28. Simple Glue Block Joint
The simplest way to joint two boards at right angles is to cut a rabbet in one board, as illustrated. Such

GROOVE JOINT

29 Lock Joint
This makes a very firm joint in all directions. dado head. The order in which cuts should be
30 Tanque and Groove Joint
This is the commonest type of joint for floordado head, or like two ordinary rabbets. of the tongue are slightly rounded off.


USES AND ADJUSTMENTS
The radial saw affords an exceptionally fast, convenient, and accurate method of making bevel, miter and compound miter crosscuts in lumber. It is extensively used in building construction and production woodworking; but also is a very useful tool for small shops doing varied work. All cutting is done through the top of the work. This has the obvious advantage of making it easier to follow a marked line (as in pattern cutting). Though its principal use is for crosscutting, it can quickly be adapted for rip cuting, shaping, routing and sanding operations.
As with the bench saw, exact adjustment o the saw must be made to obtain accurate work
First, level the table — by means of the adjustable tabletop supports. It is level when the blade will just touch any point on the table, when lowered sufficiently.
The arm (miter) settings are next adjusted. Block the blade to an exact 90° angl to the table front fence an adjust the 90° stop — and the pointer of the miter scale. Block the blade at an exact 45° angle to the fence to set the two (right and left) 45° stops

OPERATION OF THE SAW
Crosscutting
Straight crosscutting is done with the yoke at 0°. Depth of cut is set by raising or lowering the blade — then all the clamps except the arm clamp are made tight. The saw handle is used to pull the blade through the work. Miter cross-cutting differs only in that the arm is set to the desired miter angle instead of at 90°. Bevel crosscutting is done with the saw at the straight crosscut position and the yoke (only) tilted to the desired bevel angle. By setting the arm at a miter angle and the yoke at a bevel angle any compound angle desired can be cut.
When crosscutting, the saw should always be started while in back of the front fence — and should be returned there before the work is removed. Never feed work to the (stationary) blade for crosscuting as the blade will "hog" the work unless it is against the fence.
Ripping
Straight rip cutting is done with the arm at 90°, the trunnion at the rip-cut stop position, and the yoke at 0°. Depth of cut is set as in crosscutting — and the distance of the cut out from the fence is set by pulling the saw
out, then locking the arm. Tighten all clamps and feed work to the blade along the fence – from your left to right (never from right to left). Use the anti-kick-back plate to hold work down. Bevel rip cuts are made by varying the yoke position – and taper rip cuts are made with a taper ripping jig (page 12).
OTHER OPERATIONS
swing saws
circular hand saw
Dado and groover saws, sanding discs, and a moulding cutter head can all be used the same as with a bench saw. In addition, the radial saw head can be positioned with the arbor vertical (like a drill press) by tilting the yoke to 90°. This makes the saw useful for routing, drum sanding, surfacing (with a surface planer), and for accurate tongue and groove cutting. Special adapters to hold these various tools are available — and also left-hand cut router bits (standard right-hand cut bits won't work). Tenoning (tongue cutting) is done by using special spacers to separate parts of a dado set so that both sides of the tongue can be cut simultaneously.
n all vertical arbor operations the saw can be builled through (as for crosscutting) — or can be locked so that work can be fed along the ence or a jig guide. It is important to remember, however, that in this position the arbor rotation is reversed — work fed along the ence must be fed from your right to left.
Swing saws are very much like radial saws in regard to special uses and adjustments. Instead of being hung on a horizontal arm (like the radial saw) the swing saw is hung on a swivel arm which also provides a back and forth swing motion.
Straight crosscutting is done with the arm at crosscut position — by swinging the saw forward through the work. Miter angles are obtained by positioning the arm — and rip cutting is done by swiveling the saw at the end of the arm, then swinging it in this position. There is no bevel cut provision. Dado and groover saws can be used.
Circular hand saws of various sizes and motor horsepower are generally used for on-the-job carpentry work. Not adapted to the many precision operations of the bench saw, these saws, nevertheless, are extremely useful for rough cutting and trimming operations of the kind required in construction work. The better types are fitted with adjustable guide shoes for bevel cutting.
sharpening saws
SEQUENCE OF OPERATIONS -STANDARD RIADED
Reconclusioning of most standard saw blades and filing jointing is the regrinding of the of the tips of the teeth alternately right and left so that the blade will cut a kerf slightly by run freely without binding or burning Filing restores the proper edges, bevels and ciercances of the various types of teeth.
TYPES OF TEETU
There are three general types of standard saw Filed spinste across and act-
ing exactly like a chicel in fast and free cutting with is done by the knife-edge cut-off tooch. This tooth is smaller than the rip tooth and is filed to a needle like rip teeth, but have much
Rip and cut-off teeth, except alternately right and left Hollow-ground blade teeth
are not set because the blade is tapered in from the edge to the center to provide clarance at the sides. Raker teeth are never set
The front sides of cut-off teeth are in line with the redii of the blade (hooked to center), and slope on the outer side. Rip teeth have deeper ($ 26 inch) sullets and the front faces are booked back so that a line extended down from each will be tangent to a circle on the side of the blade that has a radius 1/4 the radius of the blade (1/4 book). This book and the deeper guilet are necessary to clear the chips out by the chisel action of the tooth. If the angle of hook is too small, blade may crack at front of faulty tooth. For the same reason, more tooth generally have an even deeper gul let and sometimes more of a hook. The front address of rip and raket teeth are not beveled
The backs of all rip and raker teeth are high to make the teeth large and strong for chiseling operations. Back of rip teeth generally slope so that a line extended from each one back wards will touch the top of the seventh tooth back, and are beveled 5 degrees to compensate for tooth set and keep backs level. Raker teeth are sloped to various patterns, and are not beveled. Cut-off teeth have steep back slopes (angle between front of one and back of next is generally 50 degrees), and the backs are beveled like rip teeth, but at 10 degrees
JOINTING
lointing is done with the the saw arbor. Reverse the blade on the arbor. Lower stone, resting on two wood blocks, lengthwise above it Start the saw and slowly each time until every rip or move any more metal than
The rakers of combination blades are jointed 1/64 to 1/32 inch lower than the cutting teeth (depending upon design of blade). These can
MARKING GUILLETS
Before removing blade from arbor, mark new depth of gullets with a pencil held to the spin-
ning blade as illustrated, Position of pencil point can be measured before starting (page 8) made of the origihal saw blade to determine the depth of raker teeth
SETTING
Setting is generally required only about every enough set will otherwise be left in the teeth for satisfactory operation. Check carefully however. Only the tips of
the teeth are bent, and the set should never include more than 1/3 of the tooth Setting can be done with a hand set, which works like / a pair of pliers. The better method, however, is to use of a punch and anvil arranged

FILING
Filing can be done with the a piece of rubber hose for a wedge, as illustrated. It is saw filing vise of a design like the one illustrated, set
done first on every other tooth, around the blade; then from the opposite side. This equalizes the stresses caused
Most rip or raker teeth are
teeth and flat side for the backs. File each tooth to correct shape, then (in the case of rip teeth) make a out gullets with a rattail file, using a rotary motion.
file on cut-off teeth. Shape 10 degrees: front bevels, 15 to 20 degrees.
Clean out gullets with a rattail file, using a rotary mo-
DADO HEAD BLADES
Outside cutters are generally treated like hollow ground combination blades, except that all other side. Cutters are sharpened by filing only the tops of the teeth, to turn over light burrs at the front, these burrs being removed with very light file strokes. File strokes should be counted to take same amount off of every tooth and keep the cutter in balance.
MOUIDING HEAD CUTTERS
Made of high-speed steel, these cutters do not

tables
TILT AND MITER-GAGE SETTINGS FOR COMPOUND ANGLES 4 Sides 6 Sides Sides 8 Sides Miter Butt Alitar Joint Miter Tilt Miter Miter Mitor Work Angle Table Gage 85 44 3/ 85 293/ 87 1/2 88 1/2 10° 14 44 1/ 8014 29 1/2 84 1/2 86 80 1/4 3 3/4 75 1/2 43 1/4 75 1/2 29 8134 20° 28 1/4 79 61/4 25° 10 67 40 67 27 1/4 761/2 20 1/ 80 30° 141/ 373/ 74 191/ 781/ 63 1/2 63 1/2 26 35° 191/2 60 1/4 351/4 60 1/ 24 1/2 713/ 181/ 7634 40° 24 1/2 57 1/4 32 3/4 57 1/4 223/4 693/ 17 45° 30 54 3/4 54 3/4 21 67 3/ 1534 7334 50° 36 52 1/2 52 1/2 19 66 1/4 141/4 55° 42 50 3/ 50 3/4 163/ 64 3/ 123/ 711 60° - 48 49 49 14 1/2 63 1/2 70 1/4
FIGURES ARE IN DEGREES AND ARE FOR DIRECT SETTING TO TILT SCALE AND MITER GAGE SCALE PROVIDING TILT STARTS AT 0° AND MITER GAGE AT 90° IN NORMAL POSITION.
|
Ripping
(Tilt Table) |
BEVELS AND MITERS | ||||||
|---|---|---|---|---|---|---|---|
| Figure | Sides |
Crosscutting
(Set Miter Gage) |
Figure | Sides |
Ripping
(Tilt Table) |
Crosscutting
(Set Miter Gage) |
|
| Triangle | 3 | and the second second | 30° | Octagon | 8 | 22.5° | 67.5° |
| Square | 4 | 45° | 45° | Nonagon | 9 | 20° | 70° |
| Pentagon | 5 | 36° | 54° | Decagon | 10 | 18° | 72° |
| Hexagon | 6 | 30° | 60° | Undecagon | 11 | 16.62° | 73.38° |
| Heptagon | 7 | 25.83° | 64.17° | Dodecagon | 12 | 15° | 75° |
| TENON DIMENSIONS | |||||
|---|---|---|---|---|---|
| SPEEDS |
Thickness
of Work |
Thickness
of Tenon |
Corresponding
Mortise |
||
| OF SAW | SPEED | 3/8 inch | Vs inch | Vs inch router bit | |
| She She bar She | 1/2 inch | 1/s inch | 1/2 inch router bit | ||
| 6 | 6300 RPM | 3/4 inch | 1/4 inch | ¼ in. hollow chisel | |
| 0000 1111 | 7∕∎ inch | 1/4 or To inch | 1/4 or to in. chisel | ||
| 7 | 5400 RPM | 1 inch | To inch | To in. hollow chisel | |
| Participal . | 1 1/8 inch | 3% inch | 3% in. hollow chisel | ||
| 8 | 4700 RPM | 1¼ inch | % or To inch | % or To in. chisel | |
| A State Landston | 1 1/2 inch | 1/2 inch | 1/2 in. hollow chisel | ||
| 10 | 3800 RPM | 1¾ inch | To inch | 3/2 in. chisor (two rows) | |
| 12 | 3200 RPM |
These are ma
smaller is off sizes. |
ten satisfactory, |
cknesses. The next siz
especially in the large |
|


 Loading...