


PRINTED IN U.S.A
FORM No. TH BOO

CRAFTSMAN AUTO-SCROLLER SAW-MODEL NUMBER 315.26750 The Model Number will be found on a plate attached to the top of the end cover. Always mention the Model Number in all correspondence regarding vour AUTO-SCROLLER SAW or when ordering repair parts. COVEL.
SEE BACK PAGE FOR PARTS ORDERING INSTRUCTIONS
Duan. 2-22-*Set Screw (#8-32x1/4 Hex Socket Headless) (Includes Key No. 57) Screw (#8-32× 1-Vs Fil. Hd.) Speed Control Knob . Tilting Bracket Assembly Control Knob Adapter Pivot Screw (1/4-20x 3/4 Hex Socket Hd.) Hex Socket Wrench (3/16" Hex) Circuit Board Accom Base with Bracket *Screw (#8-32x½ FI. Hd.) Blade Guide Lock Washer *Screw (#8-32x¾ Flat Hd.) Lock Washer (1/4" nstruction Sheet Hex Nut (8-32) Brush Tube Brush Holder Screw (Special) Drive Screw Support Bar Vameplate End Cover Retaining nsulator rommet Spacer 2-623877-01 2-615756-01 1-613813-01 2-615989-01 2-615758-01 1-930186-08 2-613840-01 1-703428-11 1-703473-32 1-703428-26 -703473-21 -706404-07 I-613322-02 EN-522 2-623878-01 2-613811-03 -613984-03 I-820193-07 I-621644-04 613832-02 -615557-01 615555-02 621048-01 615235-01 Key 282 5000 66226648 8 2 88 2 Ξ 22 45.95 Leads Key Nos. 31 and 32) Caged Roller Bearing-Closed End (Breman Bearings (Includes . (Hoover Gear Thrust Washer Caged Roller Bearina-Open End (Breman #BRO50807) Complete (Hoover #97038) Armature Complete Fil, Hd, T. F.) Gear Housing with 5/16 Fil. Hd.) Light Housing . Light Bulb (G.E. No. 1893) . Light Socket with L E C #16 and/or #18 Wire) Screw (#8-18x5/8 F (#8-18×¾ Hd. T. F.) crew (#8-18x1-7/6 Rd. Hd. T. C.) Brush with Spring #7038 LAC2) #BN050807) bcrew (#5-40 × Vire Connector Housing searing Plug Sall Bearing (1 Ē Ball Bearing Cap Core Air Baffle LISI Hd. T. Motor 1 rush ( Crew eld ( PARTS 3-615719-01 4-613215-04 1-614008-01 2-615322-01 1-931937-00 1-886101-01 1-615346-01 -615723-01 -623173-02 2-613966-01 1-703578-804 1-886086-01 1-616189-01 4-615478-01 1-615347-01 1-940049-07 1-940049-14 4-613335-07 1-621221-01 2-615718-01 623019-01 740943-01 Key Jumber 05 33 g 45 32 33 39 $ 42 444 45 8885 41 Quan. 5 Shaft Screw (#8-18x3/4 T.C. Saw Blade (See Page Grounding Adapter Dia.) Connelian Tools) Cover Complete Screw (#8-18x1-1/8 Plug Button Chip Shield Cross Slide Roller Sear with Pin and Screw (#6-32x5/1 (Not supplied wivel Knob-Uppe Screw (#8-18x7/ Fil. Hd. T. F.) Screw (#8-18×7/ Fil. Hd. T. F.) teel Ball (1/8" F Retaining Ring Description Gear Housing Lower Half landle Plate Slide Hd. ⊣. Cord . . Bend Relief ead (Black) ead (Brown ead (White) ead (White) Swivel Knobocking Pin Pan Hd. Spring Guide Bar landle humb witch Ē 1-621413-05 1-621413-05 3-615474-02 2-615474-02 1-703774-03 1-615141-405 1-6153355-05 -622897-01 -621414-18 -621414-18 -615631-02 1-885989-801 2-614996-01 1-615129-01 1-615795-01 1-706875-00 615475-423 1-940049-11 1-940049-15 1-930993-01 4-613334-03 2-623247-02 1-940049-17 Part Manhar Key 04 u v 8 8 1112 112 112 22 3828 S
Fer Illustration — See Page 2 Proce 3
Standard Hardware Item --- May Be Purchased Locally.
INSTALLING BLADES—IMPORTANT—Be sure cord is disconnected from power supply—(See Fig. 1) Remove blade screw (A), Key No. 33, (See Parts List, Page 3) with screw driver. Insert blade screw thru lower hole in saw blade shank and position notch around roll pin in blade clamp with cutting edge of blade toward saw bar. Tighten blade screw firmly.
NOTE: CRAFTSMAN SABRE SAW BLADES HAVE A UNIVERSAL SHANK THAT IS DESIGNED TO FIT ALL SABRE SAWS

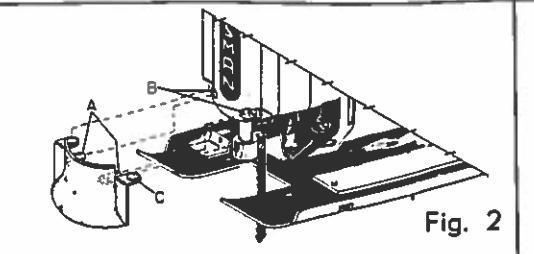
CHIP SHIELD—IMPORTANT—Be sure power cord is disconnected from power supply. (See Fig. 2) The chip shield, Key No. 27, (See parts list, Page 3) attaches on the saw gear housing cover, Key No. 24. First remove plug buttons, Key No. 26 from saw. To mount chip shield, place pins (A) into screw holes (B). Push forward on chip shield to snap projections (C) into open end of bearings on saw gear housing cover. To remove, grasp the edges of the chip shield near the top and pull forward.
AUTO-SCROLL CUTTING—(See Figs. 3 & 4) YOUR AUTO-SCROL-LER SAW IS DESIGNED TO PERMIT 360° SWIVEL OF THE SAW BLADE EITHER BY ROTATING THE CONTOURED TOP SWIVEL KNOB FOR SCROLL CUTTING OR GUIDING THE DIRECTION OF THE CUT WITH APPLIED PRESSURE AT THE HANDLE FOR AUTO-SCROLL CUTTING. THE GUIDING AT THE HANDLE APPROACH LEAVES ONE HAND FREE TO CHANGE SPEEDS, HOLD MATERIAL BEING CUT SECURE, ETC. THE SCROLLING AND AUTO-SCROLLING FEATURE MAKES YOUR SAW IDEALLY SUITED FOR MAKING FANCY CUTS AND SCAL-LOPS WITH RADII AS SMALL AS 3/16 INCH. IT IS DESIGNED TO CUT IN CORNERS AND CLOSE PLACES WITHOUT THE NECESSITY OF ROTATING AND TURNING THE COMPLETE SAW (See Fig. 4), IT IS IDEAL FOR CUTTING ELECTRICAL OUTLET AND SWITCH BOX HOLES, SINK AND LAVATORY CUT-OUTS AND MANY OTHER USES.
The swivel knob is equipped with a sliding thumb operated lock for locking the knob in four (4) positions (90° apart). The white indicator mark on front of swivel knob indicates direction of blade cutting edge. For scroll cutting and auto-scroll cutting the slide lock must be in the rear (unlocked) position for free rotation of saw bar. Use sufficient forward pressure to permit blade to cut freely and follow the scribed line with gentle rotation of swivel knob or directional guidance at handle.

METAL CUTTING_Many kinds of metals can be cut with your saw. Be careful not to twist or bend the blader DO NOT FORCE. If the blade chatters or vibrates excessively, use a finer-tooth blade or higher speed. If blade heats excessively use lower speed. If blade teeth become filled or clogged when cutting soft metals, such as aluminum, use a coarser-tooth blade or lower speed. We recommend use of kerosene when cutting most soft metals and oil when cutting steel to keep blades cool, increase cutting action, and prolong blade life. Hold the work firmly and saw close to the holding point to eliminate any vibration of the work being cut. When cutting conduit, pipe or angle iron clamp work in a vise if possible and saw close to the vise. To cut thin sheet material "sandwich" the material between hard board or plywood and clamp the layers to eliminate vibration and material tearing. In doing this,
the material will be cut smoothly. Lay out your pattern or line of cut on top of the "sandwich."
IMPORTANT—When cutting metal keep exposed portion of saw bar clean and free of metal chips by wiping frequently with an oily cloth. Use extreme caution in disposing of oily cloth after completion of job to prevent potential fire hazard.
LUBRICATION—All of the bearings in this tool are lubricated with a sufficient amount of high grade lubricant for the life of the unit under normal operating conditions, therefore, no further lubrication is required.
GENERAL CUTTING—The angle of cut on your saw may be set at any point from 0° to 45° right or left. (See Fig. 5). Setting for required angle may be accomplished by loosening base pivot screw, Key No. 71, with hex socket wrench, Key No. 70, (See Parts List, Page 3), and adjusting base until index mark is in line with required angle on quadrant. Retighten base pivot screw.
NOTE: ANGLE CUTS MAY BE MADE ONLY WHEN WHITE INDICA-TOR MARK ON SWIVEL KNOB IS SET DIRECTLY IN FRONT OR BACK POSITION AND SCROLLER MECHANISM IS LOCKED.
For straight and miter cutting the slide lock must be in the locked position and the white indicator mark on swivel knob toward direction of cut. Rest the front of the base on the work and align cutting edge of blade with line on work. Move saw forward with a firm downward pressure on the base and with sufficient forward pressure to permit blade to cut freely. DO NOT FORCE. Be sure to keep base flat on work.
To make a straight cut, clamp a piece of wood or straight-edge on the work, and guide the edge of the saw against the straight-edge or use edge-guide provided. When cutting against a straight edge or board, cut in one direction only across the material, don't cut half way and continue cut from the opposite end. For best results, clamp work to bench.
NOTE: BECAUSE THE TAPERED BACK BLADE, CATALOG #2876, HAS NO SET IN THE TEETH, IT SHOULD NOT BE USED WHEN USING A BOARD TO GUIDE THE SAW.

Fig. 5 PLUNGE CUTTING—(See Fig. 6) To cut an inside hole in work, mark the line of cut clearly, rotate swivel knob into normal forward cutting position and slide lock into locked position. Choose a convenient starting point and place the tip of the blade over that point and inside the line on the waste. Rest curved end of base on work and hold firmly in position. Depress trigger switch, and with saw blade in motion, slowly tilt saw downward until tip of blade starts cutting work. After blade penetrates work, tilt saw until the blade is perpendicular to the work.
Use only 7-teeth per inch blade for plunge cutting.
SPLINTER-FREE ATTACHMENT (See Fig. 7) A splinter free attachment consisting of a Blade Guide, Key No. 74 (See Parts List, Page 3) two screws, Key No. 73, two washers, Key No. 75, and two nuts, Key No. 76, is supplied with your Craftsman Auto-Scroller Saw. This attachment allows making of smooth, splinter-free cuts in plywood with little or no sanding of the cut surface required.

IMPORTANT—Be sure power cord is disconnected from power supply. To assemble the splinter-free attachment rotate the swivel knob into normal forward cutting position and side lock into locked position. Attach the blade guide to the saw base making sure the saw blade is centered in the blade guide slot and not rubbing against blade guide.
IMPORTANT-USE ONLY THE TAPERED BACK 10-TEETH PER INCH SAW BLADE WITH THE SPLINTER-FREE ATTACHMENT.
YOUR SPLINTER-FREE ATTACHMENT IS DESIGNED PRIMARILY FOR STRAIGHT LINE CUTTING THEREFORE DO NOT ATTEMPT A CIRCULAR CUT WITH A RADIUS OF LESS THAN APPROXIMATELY 4 INCHES.

BRUSH REPLACEMENT—Periodically check the brushes for wear and replace both brushes when either is worn to about 1/4 inch in length. To check length of brushes they must be removed from tool (see, instructions below). Riplacement of these relatively inexpensive parts, when necessary, will keep your tool operating more efficiently and prolong the life of the motor.
IMPORTANT Be sure power cord is disconnected from power supply. To replace carbon brushes (See Fig. 8) unscrew brush cap, Key No. 50. (See parts list, page 3) and remove old brush, Key No. 51. Reassemble new brush and spring making sure that curvature of brush matches curvature of the surface of the motor to which it is mated and that the brushes move freely in holder. Be sure that brush caps are tight.
CRAFTSMAN AUTO-SCROLLER SAW-MODEL NUMBER 315.26750
CUSTOMER DO'S AND DON'TS
- DO read thoroughly ASSEMBLY, OPERATING IN-STRUCTIONS AND PARTS LIST before beginning operation of your AUTO-SCROLLER SAW.
- 2. DO be sure the voltage of the power supply agrees with the nameplate marking on the unit.
- 3. DO use only specified replacement parts.
- 4. DO use goggles when cutting any metal.
- DO be sure switch is in "OFF" position before connecting tool to power supply.
- DO replace both brushes when either is worn to about ¼ inch in length.
- 1. DON'T begin operation of your AUTO-SCROLLER SAW before reading thoroughly ASSEMBLY, OPER-ATING INSTRUCTIONS AND PARTS LIST.
- DON'T destroy grounding system It is for your protection.
- 3. DON'T lift tool from work with motor running. This can cause the surface of the work to be marred and may break blades.
- 4. DON'T leave the line cord plug connected to the power supply while making tool adjustments or changing motor brushes.

CRAFTSMAN AUTO-SCROLLER SAW-MODEL NUMBER 315.26750
BLADE AND SPEED SELECTION —To obtain the best performance from your saw it is important to select a specific blade and speed for the particular application and type of material you wish to cut. By doing this you will get a smoother faster cut and prolong blade life. Replacement blades for this saw are available from your nearest Sears retail store or catalog order house. Order by model number of saw and number of teeth per inch of blades required.

READ CHART DOWN AND BLADES CLOCK-WISE
| IDEALLY SUITED FOR: |
Teeth
Per Inch |
Blade
Length |
Speed |
|---|---|---|---|
| * Steel Rods, Pipe, Sheet Steel, etc. | 32 | 3 | 1 thru 4 |
| Rubber, Leather, Tile, Cardboard, Wallboard | Knife | 3 | 9 thru 12 |
| All Purpose—Wood, Steel, Non-Ferrous Metals (1/8" or thicker) | 14 | 31/2 | 5 thru 8 |
| Tree Branches, Logs, Wall Partitions, etc. | - 7.4 | 6 | 5 thru 8 |
| * Soft Wood (1x4's, 2x4's Plaster Board). Ripping | 7 | 31/2 | 9 thru 12 |
| Flush Cutting | 7 | 31/2 | 5 thru 8 |
| * Kromedge® Scroller Blade Specially for Intricate Scroll Cuts | 10 | 3 | 9 thru 12 |
| * Deep Angle Cuts for 1 Inch Stroke Sabre Saws | 3 | 6 | 5 thru 8 |
| * Hardwood, Wallboard, General Crosscutting (NOT PLYWOOD) | 10 | 31/2 | 9 thru 12 |
| * Finish Cuts In Plywood, Veneer To 11/2" Thick. Tapered Back | 10 | 3 | 9 thru 12 |
| * All Non-Ferrous Metals (Brass, Copper, Aluminum, etc.) | 24 | 3 | 9 thru 12 |
| * Included With Tool |
ACCESSORIES ADD VERSATILITY-

BLADE HOLDER CARRYING CASE SAW TABLE


AVAILABLE AT YOUR NEAREST SEARS RETAIL STORE OR CATALOG OFFICE

Reg. Trade Mark
AUTO-SCROLLER SAW 1 INCH STROKE – MULTI-SPEED
MODEL NUMBER 315 26750
MULTI-SPEED This saw has the unique feature of continuously variable speed controlled by its electronic circuit assembly. The circuit assembly which has a reserve power feature automatically maintains constant speed and power to maximum as the load increases.
The speed control knob is located in the rear end cover where it remains readily available for immediate speed selection. Speeds may be changed while the saw is running.
The speed selector is conveniently numbered 1 through 12 and is easily visible through the opening in speed control knob. Number 1 corresponds to the lowest speed. Rotation of the knob from 1 to 12 will progressively increase the speed and power. Any intermediate knob setting may be used when so desired.
AVOID RUNNING AT SLOWER SPEEDS FOR EXTENDED PERIOD OF TIME WHEN POSSIBLE. AT SLOWER SPEEDS UNDER CONSTANT PROLONGED, USAGE, THE UNIT MAY BECOME OVERHEATED. SHOULD THIS OCCUR, RUN TOOL WITH NO LOAD AT MAXIMUM SPEED TO COOL THE UNIT. THIS WILL ACCELERATE COOLING PROCESS.
During use, transit or storage of the saw provide a reasonable amount of protection around the speed control knob to prevent any possible damage.
The triager switch controls 'On - Off' operation of this saw, is double pole for added safety and has lock button with safety release for added utility. The lock button may be engaged when trigger is fully depressed. The trigger lock is convenient when saving soft woods or soft metals. DO NOT LOCK THE TRIG-GER ON HEAVY JOBS WHERE THE SAW MAY NEED TO BE STOPPED QUICKLY. The locking mechanism may be disenaaged by applying additional inward pressure to the trigger.
-11 Conteman partable flectric tools to be free from defects in material and control of the maintained, we we replace or spair as our option, and permittof the (1) year from the stale, any part which proves, upon our under pormal. sc CHADLE t to you t defective
cover burn withdue to I w or improper voltage or from the tool being forced or ; blades, cords of or, other parts subjected to abuse; or tools used in rental ser-SEARS, ROE JCK AND CO.
DERVICE AND PARTS- Alletine tools, on operation, may require service or the replacement of parts due to the life of your sof wicen repairs are needed, call on your nearest Sears Catalog risk nossible electrical hazards, additional cost or damage to the tool through inexalong the li
1.18 Number Will be found as a plate attached to the the end cover. Alweis mention the Model Number in all spondence regarding bur AUTO-SCROLLER SAW or when a repair parts
dered through SEARS

COAST TO COAST NATION-WIDE SERVICE FROM SEARS
FOR YOUR CRAFTSMAN AUTO-SCROLLER SAW
INS SEARS LIMITED rom the cataloa of ritory in which you liver. Field an request or parts will vailing prices and you will be billed
VALUE OF THE PARTS
WHEN ORDERING REPAIR PARTS, ALWAYS GIVE HE FOLLOWING INFORMAT HISTLIST
The PART NUMBE The PART NAME
The MODEL NUMBER 315, 5750 The NAME of item UTO-SCROLLER SAW
OTECT ars Čare A TENA
SEARS ROEBUCK AND CO. and SIMPSONS-SEARS LIMITED in Canada back up your investment with quick, expert mechanical service and genuine CRAFTS-MAN replacement parts.
If and when you need repairs or service, call on us to protect your investment in this fine piece of equipmeat.
ROEBUCK AND CO.-Chicago, Illinois 60607 U.S.A. and SIMPSONS SEARS LIMITED Toronto


 Loading...