

Sears | Craftsman 315.17251 Craftsman Auto-Scroller Saber Saw, VS, 3/4""-Stroke Power Tool - Hand Held

OWNERS MANUAL
MODEL NO. 315,17251
CAUTION: Read Rules for Safe Operation and Instructions Carefully

CRAFTSMAN
AUTO-SCROLLER® SAW DOUBLE INSULATED 3/4 INCH STROKE-VARIABLE SPEED
Introduction Operation Maintenance Repair Parts

Designed exclusively for and sold only by SEARS, ROEBUCK AND CO., Chicago, IL 60684 U.S.A. and SIMPSONS-SEARS LIMITED, Toronto, Canada
FULL ONE YEAR WARRANTY ON CRAESTMAN AUTO-SCROLLER SAW
If this Craftsman Auto-Scroller Saw fails to give complete satisfaction within one year from the date of purchase, return it to the nearest Sears store throughout the United States and Sears will replace it free of charge
If this auto-scroller saw is used for commercial or rental purposes this warranty applies for only 90 days from the date of purchase.
This warranty gives you specific legal rights, and you may also have other rights which vary from state to state
SEARS, ROEBUCK AND CO. BSC 41 - 3 SEARS TOWER CHICAGO, IL 60684
INTRODUCTION
DOUBLE INSULATION is a concept in safety, in electric power tools, which eliminates the need for the usual three wire grounded power cord and grounded supply system. Wherever there is electric current in the tool there are two complete sets of insulation to protect the user. All exposed metal parts are isolated from the internal metal motor components with protecting insulation
IMPORTANT-Servicing of a tool with double insulation requires extreme care and knowledge of the system and should be performed only by a qualified service technician. For service we suggest you return the tool to your nearest Sears Store for repair. Always use original factory replacement parts when servicing
SWITCH
The switch of your auto-scroller saw is equipped with a "lock-on" feature for added utility. To lock on, depress the trigger and engage the lock button located on the side of the handle. To release the lock, depress the trigger and release it. Be sure the triager is not in the "lock-on" position before connecting to power supply.
RULES FOR SAFE OPERATION
- 1. KNOW YOUR POWER TOOL Read owner's manual carefully. Learn its applications and limitations as well as the specific potential hazards peculiar to this too
- 2. GROUND ALL TOOLS UNLESS DOUBLE-INSULATED. If tool is equipped with three-prong plug, it should be plugged into a three-hole electrical receptacle. If adapter is used to accommodate two-prong receptacle, the adapter wire must be attached to a known ground. (Usually the screw securing receptacle cover plate). Never remove third prono.
- KEEP GUARDS IN PLACE and in working order. KEEP WORK AREA CLEAN. Cluttered areas and benches invite accidents.
- 5. AVOID DANGEROUS ENVIRONMENT. Don't use power tool in damp or wet locations or expose to rain. Keep work area well lit.
- 6. KEEP CHILDREN AWAY. All visitors should be kept safe distance from work area.
- 7. STORE IDLE TOOLS. When not in use, tools should be stored in dry, high or locked-up place-out of
- 8. DON'T FORCE TOOL. It will do the job better and safer at the rate for which it was designed. 9. USE RIGHT TOOL.
- Don't force small tool or attachment to do the job of a heavy duty tool.
- 10. WEAR PROPER APPAREL. No loose clothing or jewelry to get caught in moving parts. Rubber gloves and footwear are recommended when working outdoors.
- 11. USE SAFETY GLASSES with most tools. Also face or dust mask if cutting operation is dusty.
- 12. DON'T ABUSE CORD. Never carry tool by cord or yank it to disconnect from receptacle. Keep cord from heat, oil and sharp edges.
- 13. SECURE WORK. Use clamps or a vise to hold work. It's safer than using your hand and it frees both ands to operate too
- 14. DON'T OVERREACH. Keep proper footing and balance at all times. 15. MAINTAIN TOOLS WITH CARE. Keep tools sharp at all times, and clean for best and safest performance. Follow instructions for lubricating and changing accessories.
- 16. DISCONNECT TOOLS when not in use, before servicing; when changing attachments blades, bits,
- 17. REMOVE ADJUSTING KEYS AND WRENCHES. Form habit of checking to see that keys and adwrenches are removed from tool before turning it on.
- 18. AVOID ACCIDENTAL STARTING. Don't carry plugged-in tools with finger on switch. Be sure switch is off when plugging in.
- 19. OUTDOOR USE EXTENSION CORDS. When tool is used outdoors, use only extension cords suitable for use outdoors and so marked
- 20. KEEP HANDS AWAY FROM CUTTING AREA
VARIABLE SPEED
This saw has a variable speed control switch which delivers higher speed and higher torque with increased trigger pressure. The speed of your saw is controlled by the amount of switch trigger depression.
The following guidelines may be used in determining correct speed for various applications: LOW speed is ideal for starting cuts, sawing ceramics, as well as other applications where minimum speed and power is required. MEDIUM speed is suitable for sawing ferrous metals, plastics and laminates. HIGH speed produces best results in sawing wood and non-ferrous metals such as aluminum which require high speeds and a maximum power.
When the tool is operated at slow speeds for extended periods of time, it may become overheated. Should this occur, run the tool without load at maximum speed for a few minutes to cool the unit.
OPERATION

INSTALLING BLADES
Disconnect saw from power supply.
- 1. See Figure 1. Loosen blade screw (A) and insert saw blade as far as possible into slot (B) in blade clamp.
- 2. Tighten blade screw securely.
NOTE: Craftsman sabre saw blades have a universal shank which is designed to fit all Sears sabre saws and Sears scroller sabre saws and most other brands of sabre saws.
NOTE: All blades except the flush cutting blade, Cat. No. 2877, should be installed with the cutting edge toward the saw bar. Follow the directions below for installing the flush cutting blade.
- 1. Slide the lock button toward the rear of the tool to allow the saw bar to be rotated.
- 2. Turn the auto-scroller knob so that the arrow points to the rear of the saw as shown in Figure 2 and lock in place.
- 3. Install flush cutting blade.
Forcing the saw may overheat the motor and break saw blades. Broken blades can be re-used by loosening the blade screw until portion left in clamp drops out, then putting the remainder of the blade back into the clamp and re-tightening the blade screw. It may be necessary to flatten tooth set in area to be inserted into clamp when using broken blade.

Page 3
AUTO-SCROLL CUTTING
The auto-scroller saw is designed to permit 360 degrees rotation of the saw blade so that intricate designs may be cut with minimum effort. The auto-scroller may be operated either by rotating the auto-scroller knob manually with the free hand, or by guiding the direction of the cut with applied pressure on the handle as shown in Figure 3. The latter method frees one hand for holding material heing cut. etc.
Unlock the scrolling mechanism by sliding the lock button (Key No. 37 on parts list) toward the rear of the saw.
The saw bar of your auto-scroller saw may be locked in four positions 90 degrees apart. Locking it as shown in Figure 4 permits cuts to be made close to walls and corners.
GENERAL
Rest the front of the saw base on the workpiece and align cutting edge of the blade with line on workpiece. Start the saw and move it forward. Apply downward pressure to keep the saw steady and only enough forward pressure to keep the blade cutting. Do not force the saw.
A straight cut can be made by clamping a piece of wood or straightedge to the workpiece and guiding the edge of the saw against it. Make the cut from one direction only; don't cut halfway and complete the cut from the opposite end. When making straight or miter cuts the saw bar of your auto-scroller must be locked in position toward the direction of cut.
The cutting angle may be adjusted from zero to 45 degrees right or left. Loosen the two base pivot screws (Key No. 18 on parts list) until base can be moved. Adjust base until index point (See Figure 5) is in line with required angle on scale, then tighten base pivot screws. The auto-scroller mechanism must be locked in place with the cutting edge of blade facing the front or rear of tool when making angle cuts.


PLUNGE CUTTING
To cut an inside hole, mark the line of cut clearly on the workpiece. Lock the saw bar in the forward cutting position. Tip the saw forward so that it rests on the front edge of the base as shown in Figure 6 with the blade inside the area to be cut out. Start the saw and slowly tilt the tool backward until the blade cuts through the wood. Continue tilting the saw backward until the base rests flat on work surface, then move the saw forward to complete the hole. Use only the 7-teeth per inch blade for this type of cut.

METAL CUTTING
Many kinds of metals can be cut with your saw. Be careful not to twist or bend the blades. DO NOT FORCE. If the blade chatters or vibrates excessively, use a finer-tooth blade or higher speed. If blade heats excessively use lower speed. If blade teeth become filled or clogged when cutting soft metals, such as aluminum, use a coarser-tooth blade or lower speed. We recommend use of kerosene when cutting most soft metals and oil when cutting steel to keep blades cool, increase cutting action, and prolong blade life. Hold the work firmly and saw close to the holding point to eliminate any vibration of the work being cut.
When cutting conduit, pipe or angle iron clamp work in a vise if possible and saw close to the vise. To cut thin sheet material "sandwich" the material between hardboard or plywood and clamp the layers to eliminate vibration and material tearing. In doing this, the material will be cut smoothly. Lay out your pattern or line of cut on top of the "sandwich."
IMPORTANT —When cutting metal keep exposed portion of saw bar clean and free of metal chips by wiping frequently with an oily cloth. Use extreme caution in disposing of oily cloth after completion of job to prevent potential fire hazard.
MAINTENANCE
BRUSH REPLACEMENT Disconnect the saw from power supply.
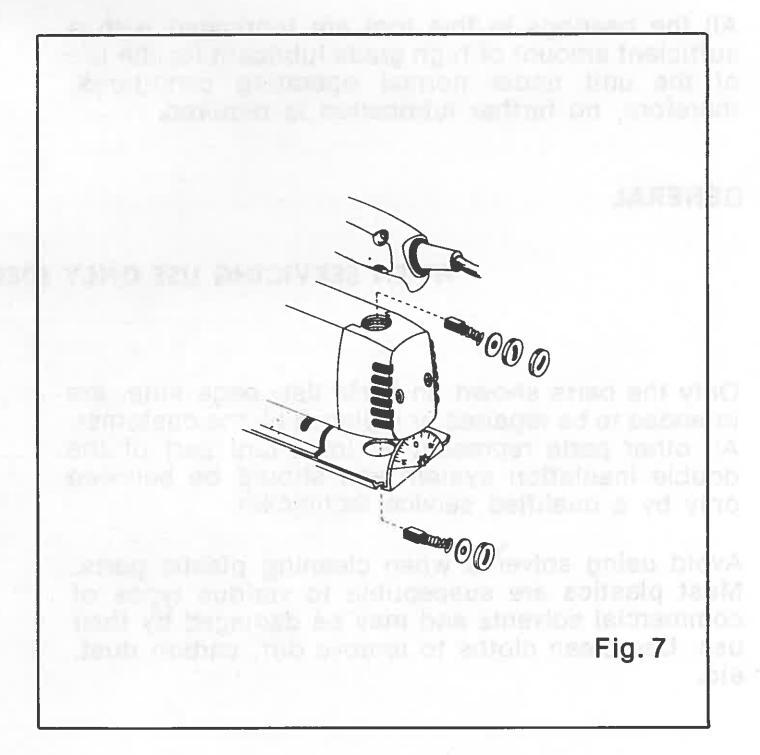
- 1. Remove brush caps with screwdriver. See Figure
- 2. Remove fiber washers. The washers are designed to fit tightly in the brush holders to prevent twisting of brush springs when replacing brush caps.
- 3. Remove brushes.
- Reassemble brush with spring into tcol making sure that the curvature of the brush matches curvature of the motor and that the brush moves freely in the brush holder.
- 5. Replace fiber washers and brush caps.
SWITCH REPLACEMENT
- 1. Remove the five screws that secure the handle cover and carefully lift it from the tool. Note the locations of all wiring in the handle and how each connection is made to the switch. Connections and wiring position must be identical when installing the new switch. See Figure 8.
- 2. Remove the screw securing the switch and lift it away from the handle.
- Release the leads to the switch by inserting a 1/32" diameter pin or nail into each switch lead receptacle. See Figure 9.
- 4. Make the lead connections to the new switch by pushing each lead as far as possible into the switch lead receptacles.
- Arrange the wiring in the handle so that it will not be pinched when the handle cover is replaced, and secure switch in place.
- Place the cord and bend relief in their correct locations.
- 7. Replace handle cover and tighten all screws securely.
CORD REPLACEMENT
- 1. Remove handle cover as described above.
- 2. Remove switch from handle and disconnect the supply cord leads from the switch.
- 3. Remove the bend relief from old supply cord and place it on the new one.
- 4. Push each lead of the new supply cord as far as possible into the proper switch lead receptacles.
- 5. Arrange the wiring in the handle so that it will not be pinched when handle cover is replaced and secure the switch in place.
- 6. Place the bend relief and cord in their intended locations and replace handle cover.
LUBRICATION
All the bearings in this tool are lubricated with a sufficient amount of high grade lubricant for the life of the unit under normal operating conditions, therefore, no further lubrication is required.
GENERAL
WHEN SERVICING USE ONLY IDENTICAL REPLACEMENT PARTS.
Only the parts shown on parts list, page nine, are intended to be repaired or replaced by the customer. All other parts represent an important part of the double insulation system and should be serviced only by a qualified service technician.
Avoid using solvents when cleaning plastic parts. Most plastics are susceptible to various types of commercial solvents and may be damaged by their use. Use clean cloths to remove dirt, carbon dust, etc.
When electric tools are used on fiberglass boats, sports cars, etc., it has been found that they are subject to accelerated wear and possible premature failure, as the fiberglass chips and grindings are highly abrasive to bearings, brushes, commutator, etc. Consequently it is not recommended that this tool be used for continuous production work on any fiberglass material. During any use on fiberglass it is extremely important that the tool is cleaned frequently by blowing with an air jet.

CRAFTSMAN AUTO-SCROLLER SAW-MODEL NUMBER 315.17251
BLADE AND SPEED SELECTION —To obtain the best performance from your saw it is important to select a specific blade and speed for the particular application and type of material you wish to cut. By doing this you will get a smoother faster cut and prolong blade life. Replacement blades for this saw are available from your nearest Sears Catalog Order or Retail Store.

| Cat. No. | IDEALLY SUITED FOR: |
Teeth
Per Inch |
Blade
Length |
Speed | |
|---|---|---|---|---|---|
| 1 | 9 28701 | Steel Rods, Pipe, Sheet Steel, etc. | 32 | 3 | LOW |
| 2 | 9 2873 | Rubber, Leather, Tile, Cardboard, Wallboard | Knife | 3 | HIGH |
| 3 | 9 2874 | All Purpose — Wood, Steel, Non-Ferrous Metals (1/8" or thicker) | 14 | 31⁄2 | MEDIUM |
| 4 | 9 2875 | Tree Branches, Logs, Wall Partitions, etc. | 7 | 6 | MEDIUM |
| 5 | 9 28711 | Soft Wood (1x4's, 2x4's Plaster Board), Ripping | 7 | 31⁄2 | HIGH |
| 6 | 9 2877 | Flush Cutting | 7 | 31/2 | MEDIUM |
| 7 | 9 28781 | Kromedge Scroller Blade Specially for Intricate Scroll Cuts | 10 | 3 | HIGH |
| 8 | 9 2879 | Deep Angle Cuts for 1 Inch Stroke Sabre Saws | 3 | 6 | MEDIUM |
| 9 | 9 28712 | Hardwood, Wallboard, General Crosscutting (NOT PLYWOOD) | 10 | 31/2 | HIGH |
| 10 | 9 2876 | Finish Cuts In Plywood, Veneer to 11/2" Thick, Tapered Back | 10 | 3 | HIGH |
| 11 | 9 28702 | All Non-Ferrous Metals (Brass, Copper, Aluminum, etc.) | 24 | 3 | HIGH |
| 12 | 9 28761 | Super Fine Finishing Blade for All Woods | 20 | 3 | HIGH |
Attach-Lite (9 25176) Carrying Case (9 1452)
Blade Holder (9 2871) Cord Lock (9 2595)
The above recommended accessories are current and were available at the time this manual was printed.
CAUTION: The use of attachments or accessories not listed above might be hazardous.
EXTENSION CORDS
The use of any extension cord will cause some loss of power. To keep the loss to a minimum and to prevent tool overheating, use minimum 16 A.W.G. wire size for extension cord lengths from 25 to 100 feet. When
tool is used outdoors, use only extension cords suitable for outdoor use and so marked. Extension cords are available at Sears Catalog Order or Retail Stores.
SAFETY CLASSES
The operation of any power tool can result in foreign objects being thrown into the eyes, which can result in severe eye damage. Always wear safery glasses or eye shields before commencing power tool operation. We recommend Wide Vision Safety Mask for use over spectacles, or standard safety glasses... available at Sears retail or catalog stores.

|
The Model Number will be
Always mention the Model AUTO-SCROLLER SAW or w |
found on
Number ir hen orderir |
a plate
n all co ng repai |
e attached to th
orrespondence re ir parts. |
ie end cover.
igarding your |
||
|---|---|---|---|---|---|---|
| SEE BACK PAGE F | OR PARTS | ORDE | RING INSTRUCT | IONS | ||
| d . | ARTS | LIS | T | |||
|
Key
No. Part No. |
Description | Quan. |
Key
No. |
Part No. | Description | |
| 2-606107-0 | 03 | Knob | - | 23 | 3-617536-02 | Base Complete . 🥢 |
| 2 1-930687-0 | 02 |
*Set Screw (#8-32 × 3/16 Hex Socket)
***STD 500802 . |
с у. | 25 | 1-614008-01 | Brush Cap |
| 3-606283-0 | 01 | Saw Bar Bushing | 26 | 1-610784-02 | Brush with Spring | |
| 1-622347-1 | 13 | Spring Washer | 27 | 2-606160-01 | ||
| 5 1-622167-5 | 20 | Retaining Ring | 200 | 1-622/39-01 | "Screw (#0-32 x 3/ 10 Pan Ha.) | |
| 7 2-617530-0 | 10 | Saw Bar Complete | 000 | 1-614658-10 | *Screw (#8-32 x 3/8 Pan Hd.) ***STD 5108( | |
| 3 2-617583-0 | 10 |
Housing Cover with Bearing and Roll Pins
(Includes Key Nos. 16 and 17) |
31 | 4-606200-01 | Handle Cover | |
| 1-940038-8 | 819 | Screw (#8-32 × 1% Fil. Hd.) | 2 | 22 | 1-705247-06 | Drive Screw |
| 1-940038-8 | 802 | Screw (#8-32 × 1 Fil. Hd.) | . 2 | 946 | 2-607791-01 | |
| 1 2-606127-0 | 03 |
Blade Clamp (Includes One Key No. 2 and
Key No. 15) |
35 | 1-616968-02 | *Screw (#6-20 × 1/4 Pan Hd. T.C.) | |
| 3 1-621645-0 | 03 |
Screw (#8-32 x 3⁄8 Truss Hd.)
***STD510803 |
37.0 | 2-606229-02 | Lock Button | |
| ** | * | *Saw Blade | 8 | 1-709863-804 | *Square Nut (#8-32) ***STD 541008 | |
| 1-613931-0 | 04 | *Screw (#8-32 × 5/16 Rd. Hd.) . | - | 65 | 1-706404-07 | "Hex Nut (#8-32) """>110 041008 . |
| 5 1-621115-0 | 00 | Sleeve Bearing | 40 | 2-614703-01 | ||
| 1-941401-8 | 812 | Roll Pin | 2 0 | - 64 | 00-0201410-2 | Switch |
| 3 1-940038-3 | 32 | Screw (#8-32 x %8 Fil. Hd.) | 43 | 1-616445-05 | Screw (#8-18 × 3/8 Fil. Hd. T.C.) . | |
| 1-50010-2 | 5 5 | Cross since busiling | 10 | 44 | 1-614658-06 | *Screw (#8-32 × 5⁄8 Pan Hd.) |
| 1-703768-8 | 801 | *Screw (#6-32 × ½ Rd. Hd.) ***STD51060 | 5 - 1 | 45 | 1-616081-16 | Screw (#8-18 × 15/16 Pan Hd. T.C.) . |
| 2-606206-0 | 10 | Ouandrant Clamp Bar | 1 | 46 | 3-617526-01 | Data Plate |
| 201 | PA | 125 | 2-620263-622 | Instruction Sheet | ||
| 1809 | N |
TE: "A"—The assembly shown represents an
of alteration or damage to the System, serv Specialty Repair Center. Contact your nea |
important pa
rice should b rest Catalog |
art of the
e perfor Order o |
Double Insulated :
med by your near- or Retail Store. |
System. To avoid the possibility
sst Sears Electric Motor Shop/ |
oage 9
Sears
OWNERS MANUAL
CRAFTSMAN °
AUTO-SCROLLER® SAW DOUBLE INSULATED 3/4 INCH STROKE – VARIABLE SPEED
SERVICE
MODEL NO. 315.17251
HOW TO ORDER REPAIR PARTS
Now that you have purchased your Auto-Scroller Saw, should a need ever exist for repair parts or service, simply contact any Sears Service Center and most Sears, Roebuck and Co. or Simpsons-Sears Limited stores. Be sure to provide all pertinent facts when you call or visit.
The model number of your Auto-Scroller Saw will be found on the plate attached to the end cover.
WHEN ORDERING REPAIR PARTS, ALWAYS GIVE THE FOLLOWING INFORMATION:
- PART NUMBER
- PART DESCRIPTION
- MODEL NUMBER 315.17251
- NAME OF ITEM
Auto-Scroller Saw
All parts listed may be ordered from any Sears Service Center and most Sears stores.
If the parts you need are not stocked locally, your order will be electronically transmitted to a Sears Repair Parts Distribution Center for handling.
SEARS, ROEBUCK AND CO., Chicago, IL 60684 U.S.A. and SIMPSONS-SEARS LIMITED, Toronto, Canada


 Loading...