

Sears TY Pennington Style Mayfield 4 PC Owner's Manual

Table of ContentsTable of Contents
WarrantyWarranty
Table of Contents....................... 2
Safety Information...................... 2
Set Up our Furniture Properly..... 2
Examine your furniture............... 2
Observe weight Limits............... 2
Warranty..................................... 3
What is Covered....................... 3
What is Not Covered................. 3
Pre-Assembly.............................. 4
Planning Assembly..................... 4
Hardware Included..................... 4
Package Contents...................... 5
Assembly (CHAIR)....................... 6
Assembly (LOVESEAT).............. 10
Assembly (COFFEE TABLE)....... 15
Care and Cleaning..................... 20
Safety InformationSafety Information
SET UP YOUR FURNITURE PROPERLYSET UP YOUR FURNITURE PROPERLY
Ensure that all parts are assembled properly and fully tightened as per
the instructions.
When placing in the desired location, ensure that all legs are resting on
the same surface. You may adjust the legs levelers as required to
ensure that the item stands in a rigid position.
1 YEAR WARRANTY FOR FRAME, RESIN WEAVE AND CUSHIONS1 YEAR WARRANTY FOR FRAME, RESIN WEAVE AND CUSHIONS
WHAT IS COVEREDWHAT IS COVERED
We warrant to the original purchaser for one year, from the date of purchase,
that the frame, resin weave and cushions will be free from manufacturing
defects. This warrant also covers peeling, crackling, blistering, discoloration,
or fading for this one year period.
WHAT IS NOT COVEREDWHAT IS NOT COVERED
It remains the customer's responsibility for freight and packaging charges to
and from our service center.This warranty does not cover commercial use,
acts of nature, fire, freezing, and abusive use. Discoloration or fading of the
finish or fabrics as a result of chemicals or spills is not covered.Glass
tabletop breakage and corrosion or rusting of hardware are not covered. In
addition, purchased parts are not covered under this warranty. Proof of
purchase (dated register receipt) is required for warranty claims. We reserve
the right to make substitutions with similar merchandise , if the model is no
longer in production. Warranty is to the original purchaser and is not
transferable. As some states do not allow exclusions or limitations on an
implied warranty, the above exclusions and limitations may not apply. This
warranty gives you specific rights, and you may also have other rights, which
vary from state to state
EXAMINE YOUR FURNITUREEXAMINE YOUR FURNITURE
Examine occasionally to ensure that there are no loose parts. If loose
parts are found, they must be retightened fully before additional use.
OBSERVE WEIGHT LIMITSOBSERVE WEIGHT LIMITS
The weight limits for the following products are listed below:
Chair: 300 lbs
Swivel Chair: 300 lbs
Loveseat: 500 lbs
Ottoman: 150 lbs
Table: 50 lbs
CAUTION:
CAUTION:If you overload your
furniture, injuries can occur.
2 3
Pre-AssemblyPre-Assembly
Pre-Assembly(continued)Pre-Assembly(continued)
PLANNING ASSEMBLYPLANNING ASSEMBLY
To prevent damage, place all parts on a soft surface during assembly.
Remove all protective caps before beginning assembly.
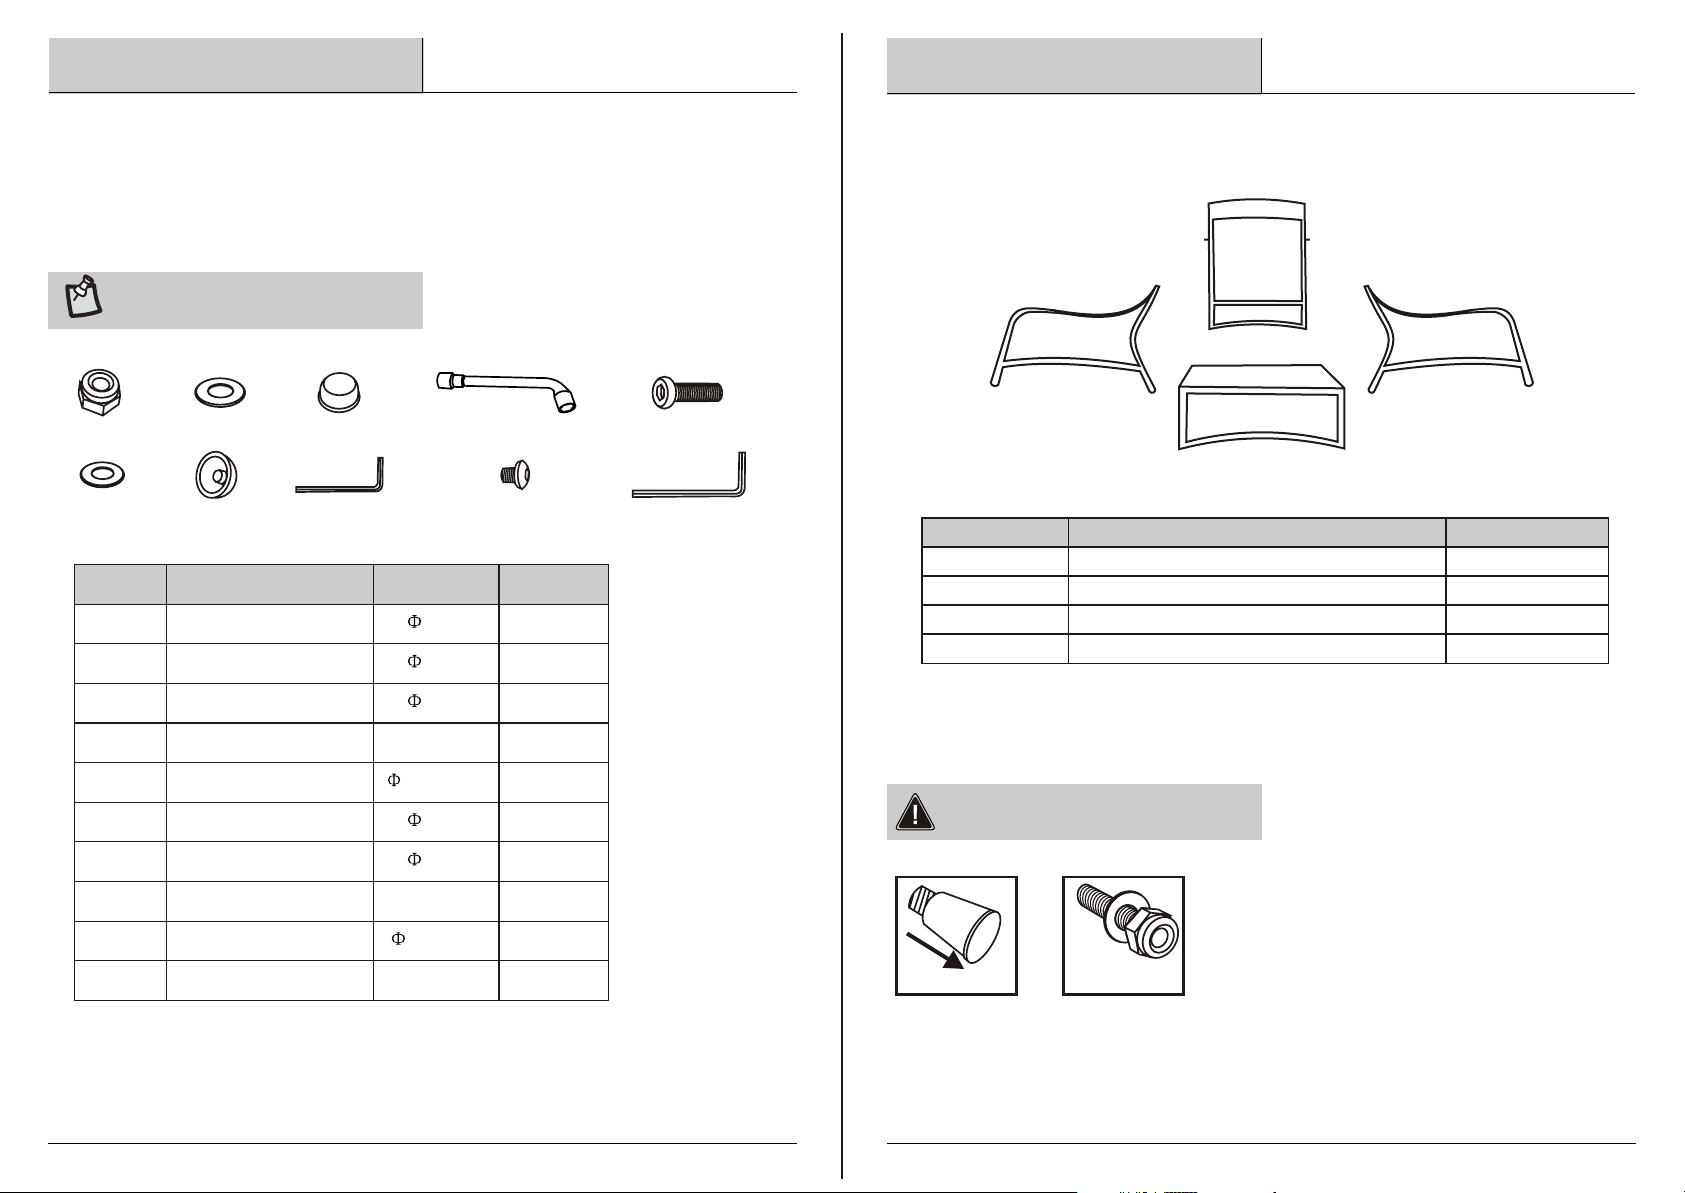
HARDWARE INCLUDEDHARDWARE INCLUDED
NOTED:Hardware not shown
NOTED:Hardware not shown
to actual size.
to actual size.
_AA _BB _CC _DD _EE
_FF _GG _HH _II _JJ
Part
AA
BB
CC
Description
LOCKING NUTS
WASHERS
CAPS FOR NUTS
Size
( 8mm)
( 8mm)
( 8mm)
QTY.
29
29
29
Package ContentsPackage Contents
D
PAR TPAR T
A
B
C
D
B
A
DESCRIPTIONDESCRIPTION
THE SEAT OF CHAIR
THE BACK OF CHAIR
LEFT ARM
RIGHT ARM
C
QUANTITYQUANTITY
1
1
1
1
DD
EE
FF
GG
HH
II
JJ
WRENCH
BOLTS
SMALL WASHERS
CAPS FOR BOLTS
ALLEN WRENCH
BOLTS
ALLEN WRENCH
(13#)
( 1/4x25mm)
( 6mm)
( 6mm)
(4mm)
( 8x12mm)
(5mm)
4
1
7
7
7
1
4
1
Safety InformationSafety Information
1
1. REMOVE PLASTIC PROTECTIVE CAPS.
1. REMOVE PLASTIC PROTECTIVE CAPS.
2. EVERY NUT OR BOLT NEEDS TO BE WITH A WASHER.
2. EVERY NUT OR BOLT NEEDS TO BE WITH A WASHER.
2
5
Assembly (chair)Assembly (chair)
Assembly (chair)Assembly (chair)
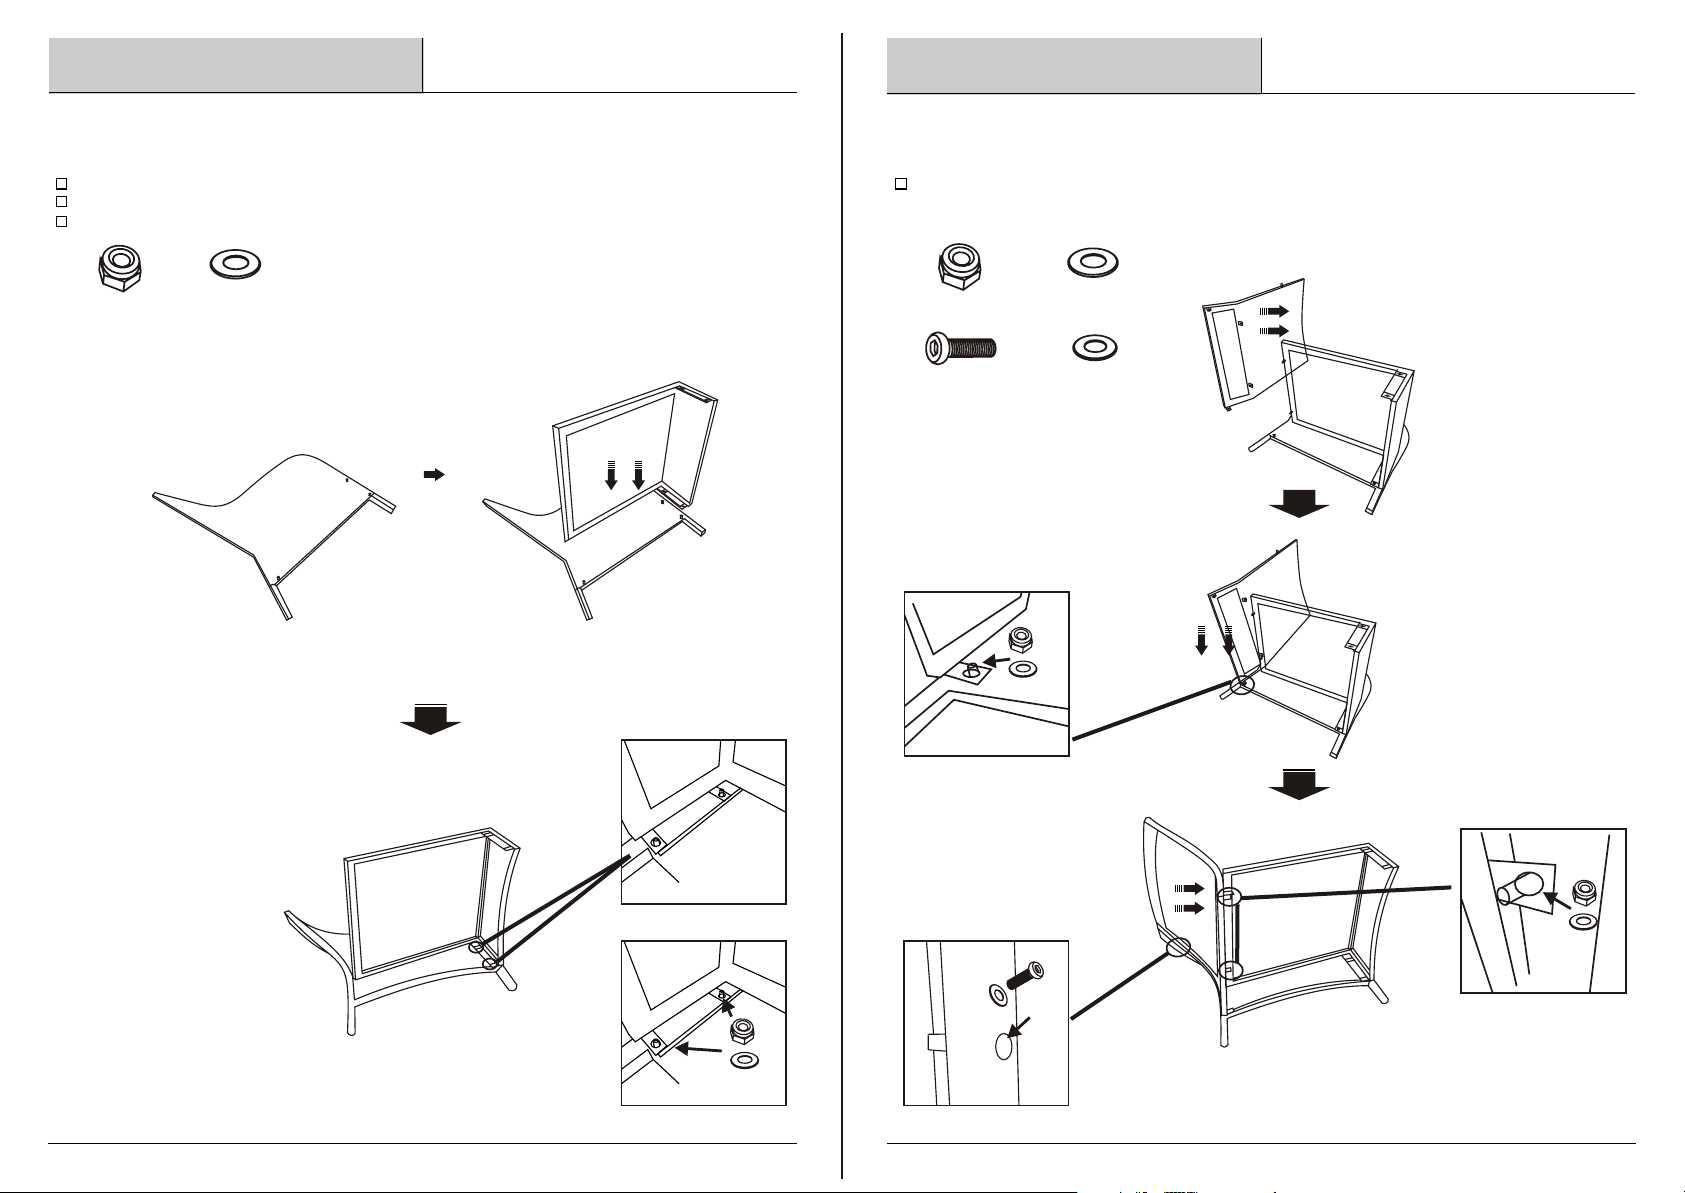
Attaching the left arm to the seatAttaching the left arm to the seat
1
PLACE ARM “C” ON THE FLOOR AS SHOWN.
PLACE THE SEAT “A” OVER THE 2 BOLTS ON THE ARM “C”.
FASTEN IT USING LOCKING NUTS “AA” AND HAND TIGHTEN.
_AA
X2
C
_BB
X2
Attaching the backAttaching the back
2
PUT BACK OF CHAIR “B” ONTO THE 2 BOLTS ON SEAT “A” AND 1 BOLT ON ARM “C”.
FASTEN USING LOCKING NUTS. MAKE SURE TO INSERT THE PIN ON THE BACK OF
THE CHAIR “B” INTO THE HOLE ON ARM “C” FASTEN WITH BOLT “EE”.
X3
X1
_BB
_FF
B
A
C
B
A
C
_AA
X3
A
C
_EE
X1
_AA_AA
_BB_BB
A
C
_AA_AA
_BB_BB
_EE_EE
_FF_FF
6
B
A
_AA_AA
_BB_BB
C
7
 Loading...