

Sears LXI 626.54618390 SERIES,LXI 626.54618390 Series Owner's Manual

OWNERS
MANUAL
MODEL NO.
626.54618390
SERIES
KNOW YOUR UNIT
Read this booklet so you will be
able to enjoy all the features in
your Projection Television.
Record in the space provided
below the Model No. and the
Serial No. as found on the label
located on the back of your
Projection Tetevision.
Model No.
Serial No.
Purchase Date
Retain this information for future
reference, along with your sales receipt.
_LXi_
MTS STEREO SOUND
REMOTE CONTROL
PROJECTION
TELEVISION
5ears, Hoebuck and Co., Hoflmall Fstates, IL 6019b
To c,,_u_c that plctmc ,_clccn pcrlormancc is of the highest quality, avoid rubbing any object t)l material on tile sclccn that could scJatcl_
or damage its surface.
When cleaning the TV screen take care not to scratch or damage the screen surface (avoid wearing jewelry or using anything abrasive).
Please see the directions in the Cleaning and Care section of this manual for further details.
CAUTION: A video source (such as a video game, Compact Disc Interactive - CDI, or TV information channel) which shows a constant
non-moving pattern on the TV screen, can cause picture tube damage. When your TV is continuously used with such a source the pattern
of the non-moving portion of the game (CDI, etc.) could leave an image permanently on the picture tube. When not in use, turn the video
source OFF. Regularly alternate the use of such video sources with normal TV viewing.
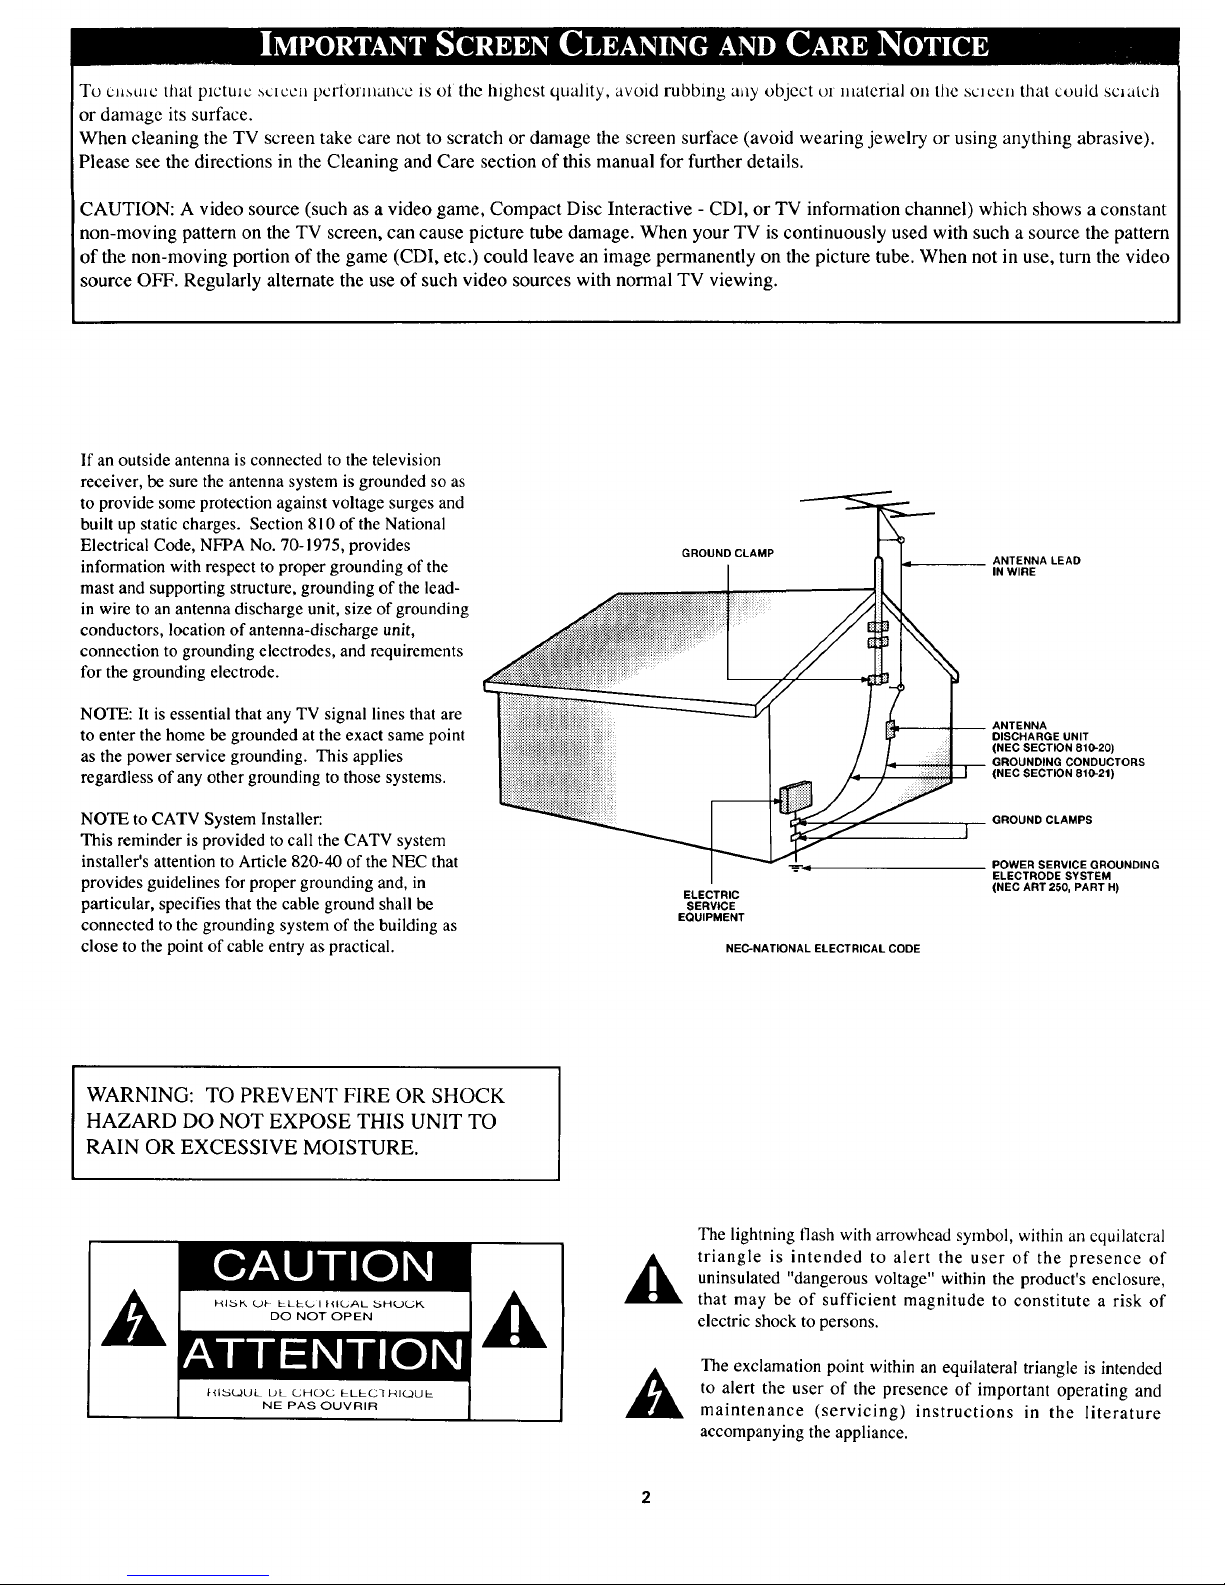
If an outside antenna is connected to the television
receiver, be sure the antenna system is grounded so as
to provide some protection against voltage surges and
built up static charges. Section 810 of the National
Electrical Code, NFPA No. 70-1975, provides
information with respect to proper grounding of the
mast and supporting structure, grounding of the lead-
in wire to an antenna discharge unit, size of grounding
conductors, location of antenna-discharge unit,
connection to grounding electrodes, and requirements
for the grounding electrode.
NOTE: It is essential that any TV signal lines that are
to enter the home be grounded at the exact same point
as the power service grounding. This applies
regardless of any other grounding to those systems.
NOTE to CATV System Installer:
This reminder is provided to call the CATV system
installer's attention to Article 820-40 of the NEC that
provides guidelines for proper grounding and, in
particular, specifies that the cable ground shall be
connected to the grounding system of the building as
close to the point of cable entry as practical.
GROUNDCLAMP
ELECTRIC
SERVICE
EQUIPMENT
ANTENNA LEAD
IN WIRE
ANTENNA
DISCHARGE UNIT
(NEC SECTION 810-20)
GROUNDING CONDUCTORS
(NEC SECTION 810-21)
GROUND CLAMPS
]
_4 POWER SERVICE GROUNDING
ELECTRODE SYSTEM
(NEC ART 250, PART H)
NEC-NATIONAL ELECTRICAL CODE
WARNING: TO PREVENT FIRE OR SHOCK
HAZARD DO NOT EXPOSE THIS UNIT TO
RAIN OR EXCESSIVE MOISTURE.
The lightning flash with arrowhead symbol, within an equilatcral
triangle is intended to alert the user of the presence of
uninsulated "dangerous voltage" within the product's enclosure,
that may be of sufficient magnitude to constitute a risk of
electric shock to persons.
The exclamation point within an equilateral triangle is intended
to alert the user of the presence of important operating and
maintenance (servicing) instructions in the literature
accompanying the appliance.

•, Getting Started
_; Warning/Precautions ................................ 2-3
Antenna and Cable TV Connections ........ 4-5
VCR to TV Antenna Connections ............................. 5
First Time Set-Up and Use of the TV ................. 6-7
Basic TV and Remote Control Operation .............. 8-9
[---_ On-Screen Featlires
How to Use the On-Screen Feature Controls ..... 10-11
How to Select Picture and Sound Controls ...... 12
+ Selecting a Picture Source ................................ 12
+Adjusting Brightness, Picture, Color,
Tint, and Sharpness Controls ............................ 13
+Using the Clearview Control ............................. 14
+Using the Flesh Correction Control .................. 14
+Adjusting Bass, Treble, and Balance Sound
Controls ............................................................. 15
+Using the Expander Sound Control .................. 16
+Setting the TV for Stereo Programs ................. 17
How to Select Advanced Controls ..................... 18
+Setting the TV Clock ......................................... 18
+Setting the Sleep Timer ..................................... 19
+Setting the TV for Closed Captioning ............... 20
+Using the Time/Channel Reminder Controls....21
+Adjusting the Size of Channel/Time Display ...22
+Setting the TV for Cable or Antenna Signals....23
+Adding Channels in Memory (Automatically) 24
+Adding Channels in Memory (Manually) ......... 25
+Adjusting the TV's Convergence Control ......... 26
+Using the TV Speaker On/Off Switch with
the Audio Output Jacks .................................... 27
+Using the TV's Audio/Video Input Jacks ......... 28
+Surround Sound Speaker Connections ............. 29
Remote Control
Operation
Using the Remote (TV/VCR buttons)...30-31
Setting the Remote to Work Your VCR ............. 32-33
Setting the Remote to Work Your
Cable Converter .................................................. 34-35
Setting the Remote to Work a VCR or Cable
Converter- "Search Method". ............................ 36-37
_.._ Picture-ln-Picture (PIP)
How to Use PIP (Connections) .............. _8-39
How to Use PIP with the TV Remote ................ 40-41
Adjusting Picture-In-Picture Color and Tint ........... 42
More PIP Connections (Cable Converter) ............... 43
General Inf0rmctti0n
Tips if Something Isn't Working ............... 44
Accessory Shelf Installation .................................... 45
Glossary of TV Terms ............................................. 46
Index ........................................................................ 47
Warranty .................................................................. 48
First Time bet Up which automatically .scls ti_c TV
for local channels and correct antenna mode (see page
6).
Infrared Remote Control which operates your TV
and a variety of wireless remote control VCRs and
Cable Converters.
Picture-In-Picture (PIP) which can show a TV
program and the direct video output from an
accessory (VCR, camera, etc.) onto the TV screen at
the same time.
Standard TV broadcast (VHFAIHF) or Cable TV
(CATV) channel capability.
Closed Captioning which allows the viewer to read
TV program dialogue or voice conversations as on-
screen text.
Automatic Programming of channels for quick and
easy selection of favorite stations available in your
area.
Stereo-Ready TV with built-in audio amplifier and
twin speaker system. Receives TV programs in both
broadcast stereo sound or (SAP) bilingual broadcast.
On-Screen Features which display helpful
information for setting of TV controls (such as color
adjustment, timer settings and channel programming).
Audio/Video jacks for direct connections with VCRs
(and other accessories) for quality TV picture and
sound playback.
Sleep-Timer which automatically turns the TV OFF
at preset time intervals.

HSI 1('1 'S _Oltn_'('l )'oil/ A/tlcIHItl
or Cable TV signal to your TV.
Tiffs will be easy since there is
onl)/ one antenna plug (75_) oll
the back of your TV- and that's
where the antenna goes.
[BEGIN]
<_If your antenna (or CABLE
TV signal) has a round cable
(75 ohm) with a metal prong (F-
connector) on the end, then you're
ready to connect it to the TV.
if your antenna has flat twin-
lead wire (300ohm), you first
need to attach the antenna wires to
the screws on an optional (300 to
75 ohm) adapter.
<_ Push the round end of the
cable (or adapter) onto the
ANTENNA plug on the back of
the TV. If the round end of the
cable connector is threaded, screw
it down tight.
ll_ _Try out. to
it Press POWER
turn the TV ON. Press the
CHANNEL UP button. You
should see local channels flash by.
Remember. Use the
IRST TIME SETUP section
(page 6) to have the TV
automatically set itself for local
channels and type of antenna
signal.
To order any optional accessory
('onltlcl your n_'(trexl Sears Repair
De pa rl nl en t:
U H F/V H F Combi ne r. ................. 705109 -I
75-300 Ohm Adapter .................. 704427-6
i1
Back ol 'IV
ooooooooooooooooooooooouoouooooooooooooooooooo
oooooooooooooooooooooooooooooooooooooooooooooo
oooooooooooooooooooooooooooooooooooooooooooooo
oooooooooooooooooooooooooooooooooooooooooooooo
oooooooooooooooooooooooooooooooooooooooooooooo
oooooooooooooooooooooooooooooooooooooooooooouu
oooooooooooooooooooooooouooooooooooooooooooooo
oooooooooooooooooooooooooooooooooooooooooooooo
Ouldoul VIII'/LJlII" Anlcnl}a
Twin I.ead (
Wire
3(X)to 75_)
Adapter
(not supplied)
\
\
ooooooooooooooooooooooo
oooooooooooooooooooooo
ooooooooooooooooooooooo
oooooooooooooooooooooo
ooooooouoooooooooooo
ooooooooooooooooooo
oooooooooooooooooooo
oooooooooooooooooooo
ooooooooooooooooooooo
oooooooooooooooooooo
\
\
\
\
\
\
\
\
\
\
\
\
\
\
\
\
\
\
\
\
\
\
\
k
\
\
""
Round Cable
75_1
Outdoor VHFIUHF Antenna
('able TV Signal

_0111( O/ .\'OH IH_I.\ ]I_IVC ltt'o
SE'p,C,IF(IIE' EIIIlE'IIlI_IS. For
instance, one anlem_a isfor Vt/k
chwmels (2-13). and the other
amemm is.fi, r UHF chan.e/s (/4-
For homes with two separate
anlennas, you will need an optional
"combiner" before you can conned
to the TV. See ordering details on
the previous page.
_1,_ Attach the separate antennas
to the correct screws on the
combiner.
_Push lhe round end of the
combiner onto the ANTENNA
plug on the rear of the TV.
Twin Lead
Wire
I$11_ k ol J\
oo oooo(,oooooooooooo oooo oooooooo(_ooooo,,_,oooooo
ooooooooooo oo oo oooooo0oooooooooo oooooooooooooo
ooooooooooooouoooooooooooooooooooooooooooooooo
ooouooooooooooovooooooouoooooooooooooooooooooo
oooooooooooooooooooooooooooooooooooooooooooooo
oooooooooooooooooooooooooooooooooooooooooooooo
ooooooooooooooooooooooooooo_o0oooooooooo0ooooo
ooooooooooooooooooooo0oooo_oooooouoooooooooooo
oooooooooooooouoooooouoooooooooooooooooooooooo
ooooooooooooooooooooooooooooooooooooooooooooo
ooooooooooooooooooooooo
oo0ooooooooooooooooooo
ooooooooooooooooooooooo
ooooooooooooouoooooooo
oooooooooooooooooooo
ooooooooooooooooooo
oooooooooooooooooooo
oooo0ooooooooooooooo
ooooooooooooooooooooo [
oooooooooooooooooooo
Twin Lead
Wire
Adapler Round (?able
Connect your Antenna or
Cable TV signal to the IN FROM
ANT plug on the back of the VCR.
,_ Connect the OUT TO TV
plug on the VCR to the Antenna
plug on the TV. (Connecting cable
supplied with the VCR).
\
\
Round Cable
75(2 Supplied with VCR
Ouldoor VHI:/UIJF
A ntcnn:.l
3(X)to75_2
Adapter
"_. attic I'V Signal

irst Time Set Up makes the
initial use of your TV easy and
automatic. Just follow the steps
below and let your TV set itself for
local channels and the type of
antenna signal you have. The TV's
on-screen clock may also be set
when using First Time Set Up.
_ Press button on the
the
MENU
TV or the remote control.
A TELEVISION ADJUSTMENTS
screen appears on the TV. (For
more details on "How to Use On-
Screen Features" see page 10).
<_ Press the MENU • button to
I move the on-screen arrow to
FIRST TIME SETUP.
_s Press the MENU button to
elect FIRST TIME SETUP.
<_ Press MENU button again to
continue with FIRST TIME
SETUP.
<_ Check your (or
that Antenna
I Cable TV) signal is connected to
the rear of the TV. (See page 4 if
you need any help).
<_ Press MENU button to
continue.
The TV will begin to automatically
set itself:
• First for the type of signal you
connected - either Antenna or
Cable.
• Then for the TV channels
available in your area.
continue to the next page ....
Remember. You may press
e STATUS button (on the TV
or remote) to stop the FIRST TIME
SETUP at any time.
TELEVISION ADJUSTMEN1S
USE,,_)lTOSELECTITEM.
-- PICTURE/SOUNDCONTROLS
m ADVANCEDCONTROLS............._:_::_i!i::!iiiiiiii!!i
.....:.::::_:iiiiii_iiiiiii_!i!i!i
I_, FIRSTTIMESETUP..................._:_::iiiiiii_i_i
-- EXIT
iiiiiiiii!iiiiii
:iiiiiiiii!iiii[iiL
:::::::::::::::::::::
THEFIRST-TIMESETUP
PROVIDESASIMPLEMETHOD
OFADJUSTINGTHEMOST
IMPORTANTCONTROLSFOR
THISTELEVISIONRECEIVER.
PRESS_) TO CONTINUE
MANY OFTHECURRENTTV
CONTROLSETTINGSWILL BE
MODIFIEDBYCONTINUING
WITH FIRST-TIME SETUP.
PRESS_TO QUIT
OR
PRESSI_ TOCONTINUE
!
PLEASECHECKTHATYOUR
ANTENNAORCABLEIS
CONNECTEDTOTHEPLUG
MARKEDANT/CABLEON
THETVREARINPUTPANEL.
PRESS_TO QUIT
OR
PRESS0 TOCONTINUE
!
* PLEASEWAIT*
SYSTEMISTESTINGFOR
CORRECTTUNINGMODE.
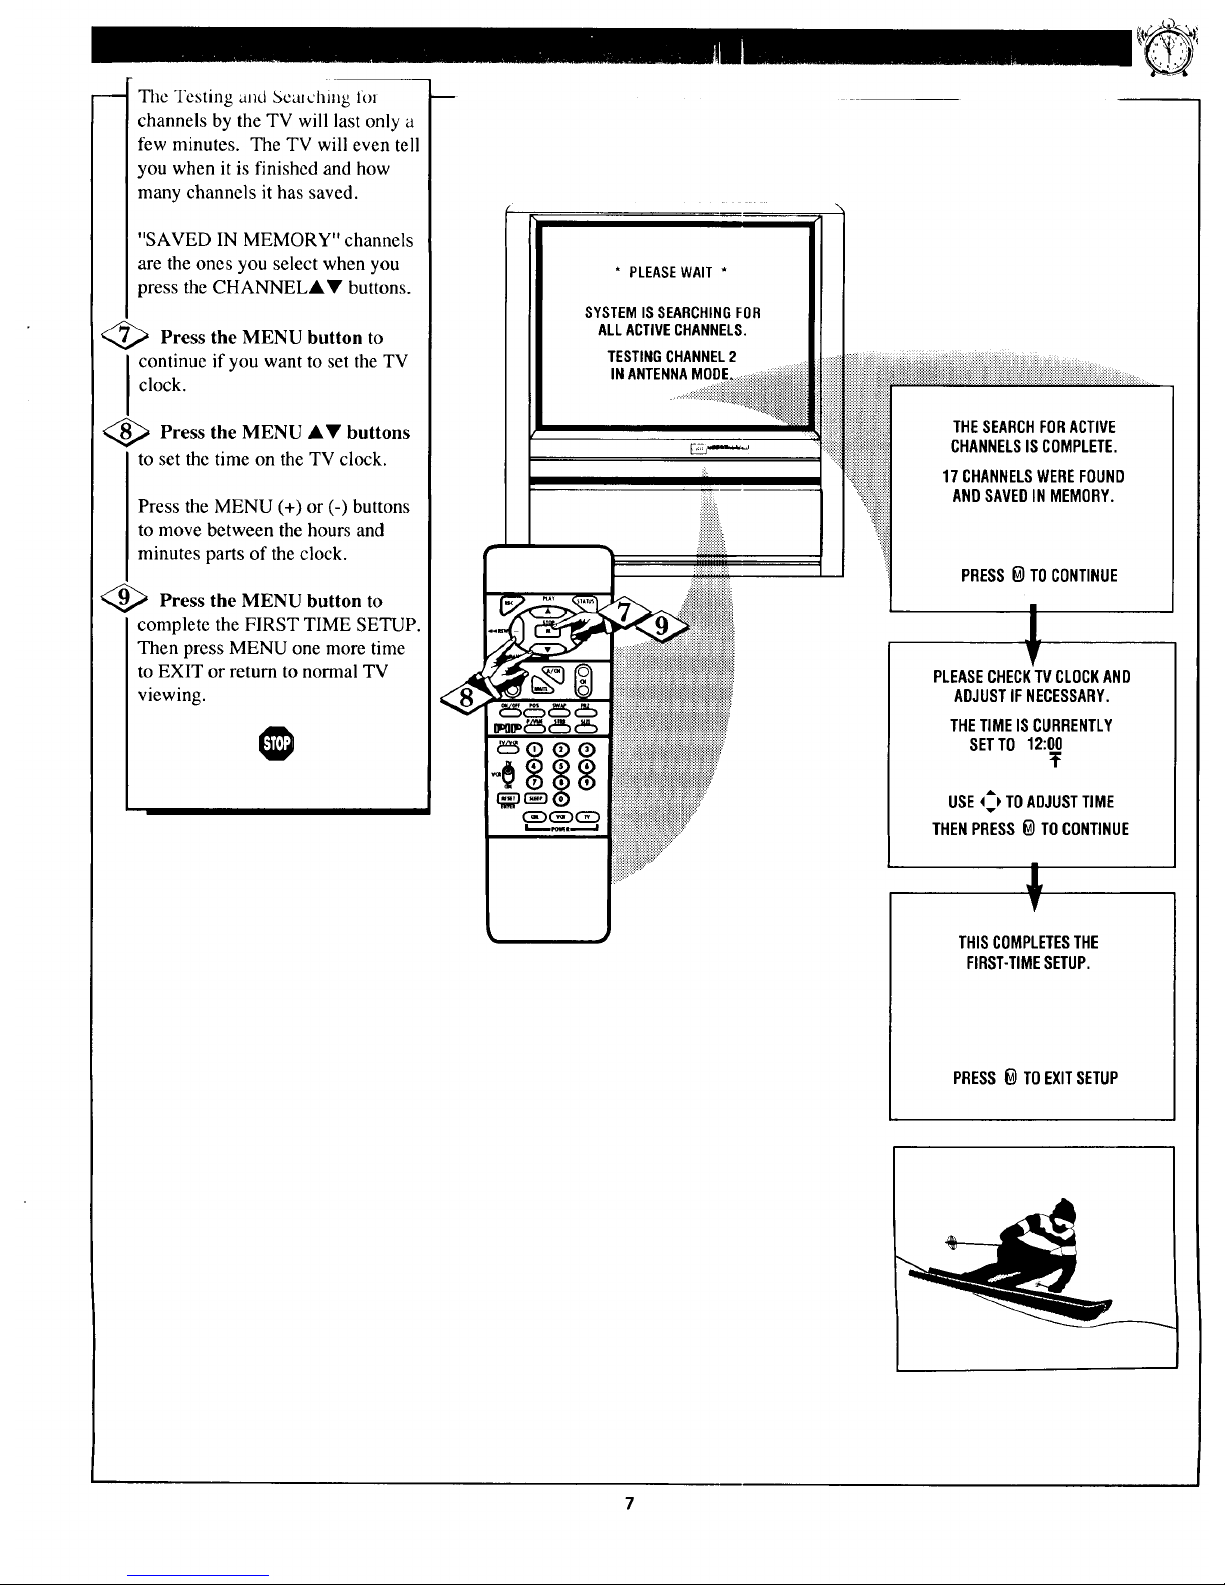
Tile Testing ,rod _;cat_.'hing 101
channels by the TV will last only a
few minutes. The TV will even tell
you when it is finished and how
many channels it has saved.
"SAVED IN MEMORY" channels
are the ones you select when you
press the CHANNEL&Y buttons.
<_a Press the MENU button to
I continue if you want to set the TV
clock.
<_ Press the MENU &V buttons
to set the time on the TV clock.
Press the MENU (+) or (-) buttons
to move between the hours and
minutes parts of the clock.
_ Press the MENU button to
complete the FIRST TIME SETUP.
Then press MENU one more time
to EXIT or return to normal TV
viewing.
iiiiiiiiiiiiiiiiiiiiiiiiiiiiiiiiiiiiiiiiiiiiiiiiiiiiiiiiiiiiiiiiiiiiiiiiiiiiiiiiiiiiiiiiiiiiiiiiiiiiiiiiiiiiiiiiiiiiiiiiiiiiiiiiiiiiiiiiiiiii i .......
THESEARCHFORACTIVE
CHANNELSISCOMPLETE.
17 CHANNELSWEREFOUND
ANDSAVEDINMEMORY.
PRESSO TO CONTINUE
I
V
PLEASECHECKTVCLOCKAND
ADJUSTIFNECESSARY.
THETIME IS CURRENTLY
SETTO12:00
T
USE_ TOADJUSTTIME
THENPRESSO TOCONTINUE
THISCOMPLETESTHE
FIRST-TIMESETUP.
PRESS_ TOEXITSETUP
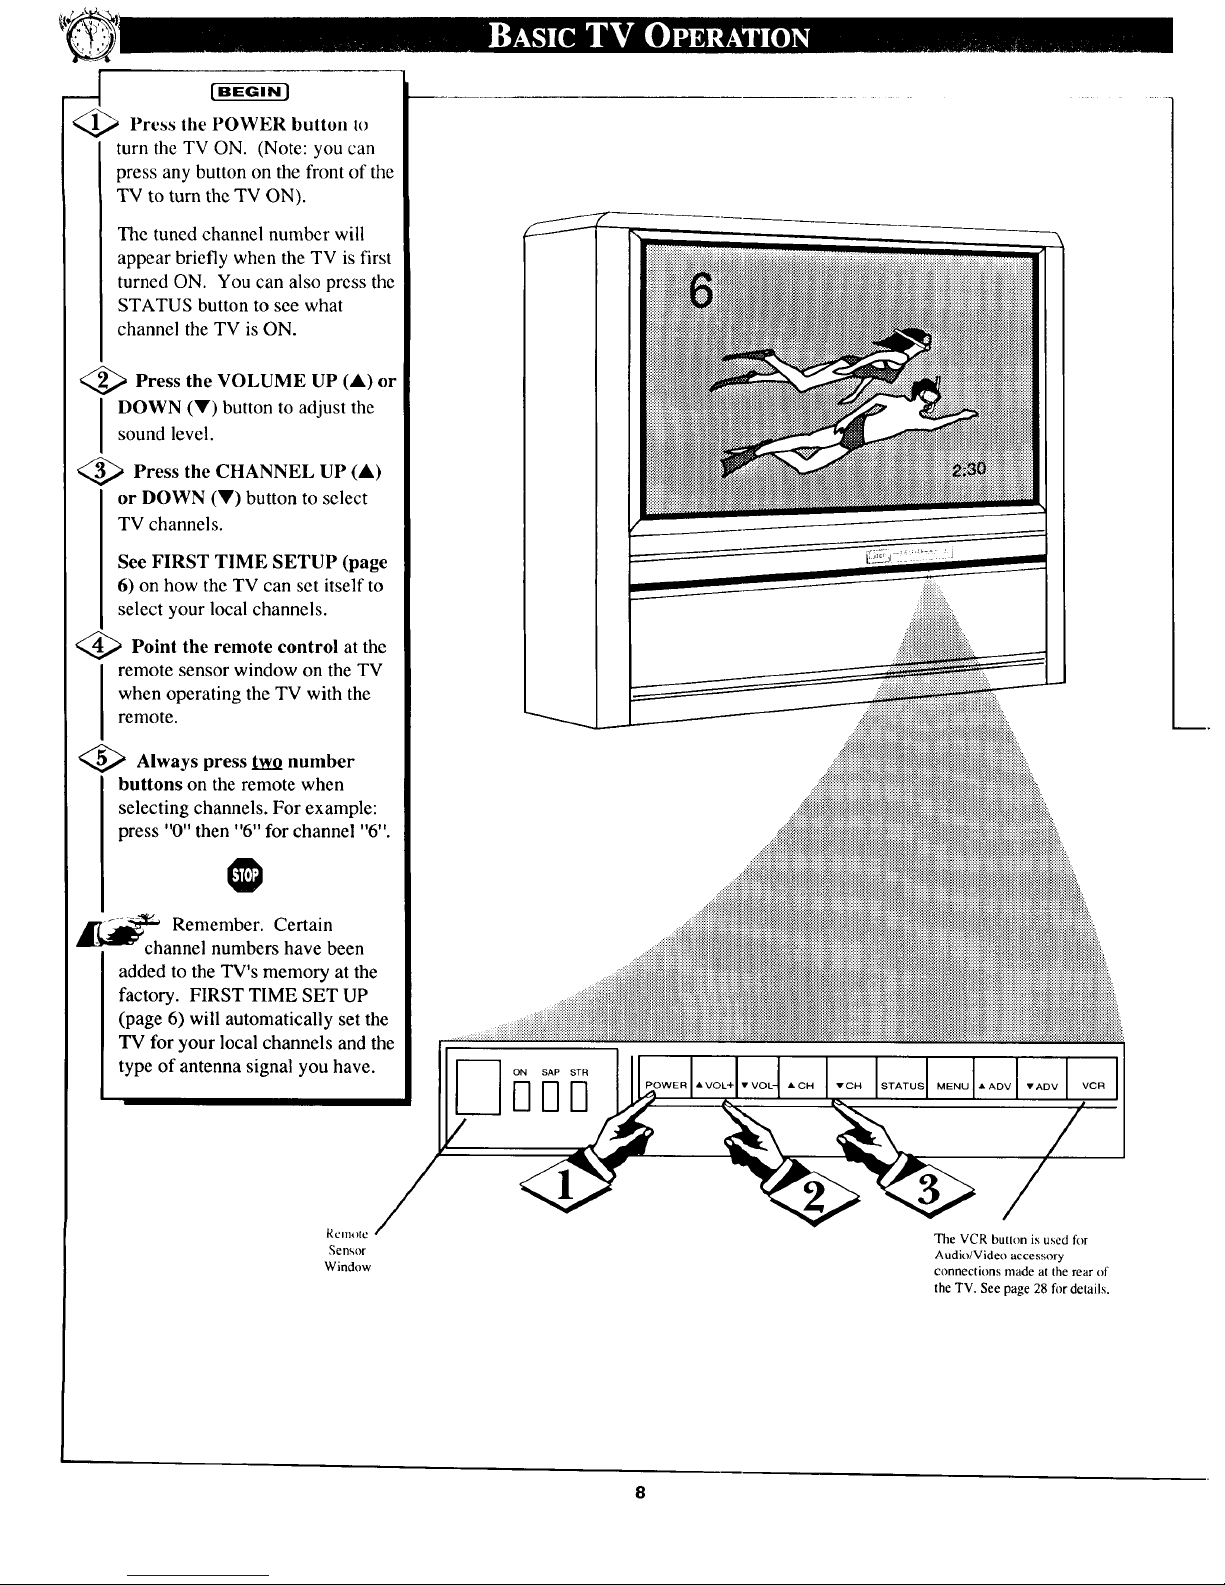
_ Press the POWER button lo
turn tile TV ON. (Note: you can
press any button on the front of the
TV to turn the TV ON).
The tuned channel number will
appear briefly when the TV is first
turned ON. You can also press the
STATUS button to see what
channel the TV is ON.
<_ Press the UP (A) or
VOLUME
I OWN (Y) button to adjust the
sound level.
<_ Press UP (&)
the CHANNEL
or DOWN (V) button to select
TV channels.
See FIRST TIME SETUP (page
6) on how the TV can set itself to
select your local channels.
<_ Point the remote control at the
remote sensor window on the TV
when operating the TV with the
remote.
<_ Always press two number
buttons on the remote when
selecting channels. For example:
press "0" then "6" for channel "6".
Remember. Certain
channel numbers have been
added to the TV's memory at the
factory. FIRST TIME SET UP ......_::iii::_
(page 6) will automatically set the
TV for your local channels and the J
type of antenna signal you have. __ oN sapSTR]_ __
Remote _" The VCR button is used for
Sensor Audio/Video accessory
Window connections made at the rear of
the TV. See page 28 for details.
8
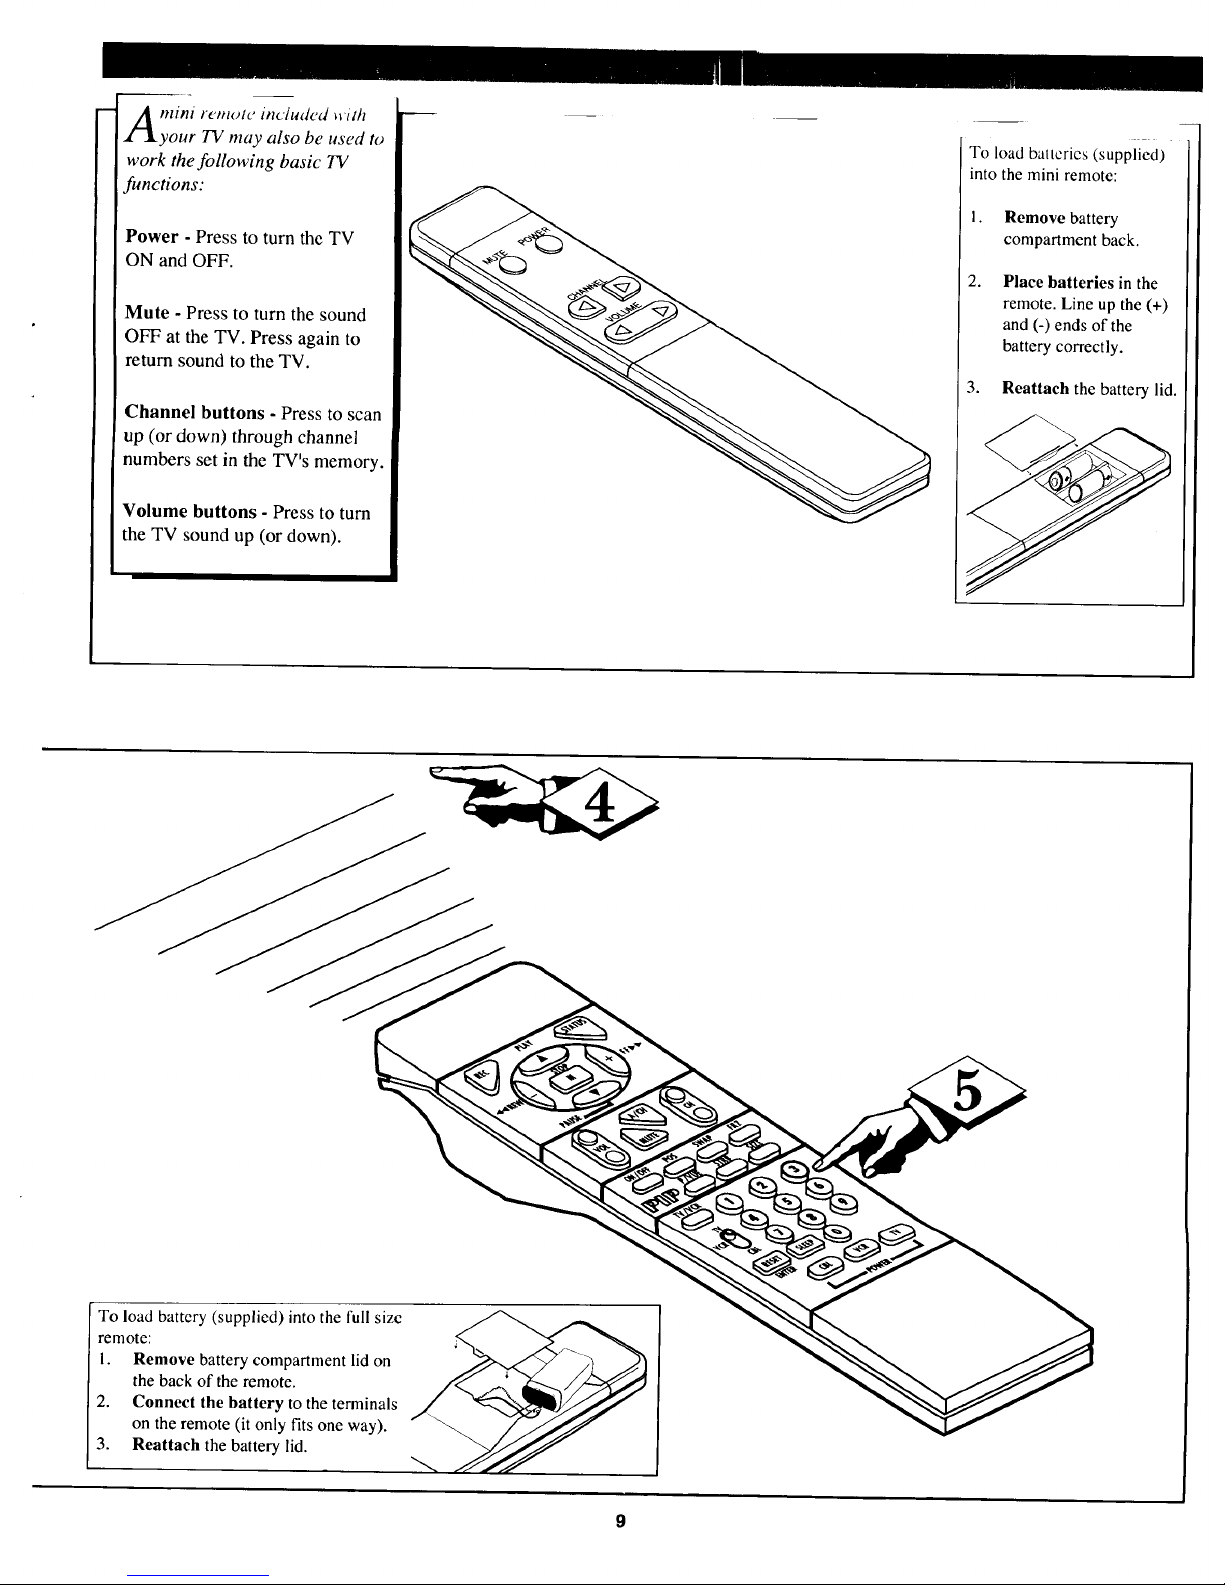
mini rcmvte mc'ludcd wdh
your TV may also be used to
work the following basic TV
functions:
Power - Press to turn the TV
ON and OFF.
Mute - Press to turn the sound
OFF at the TV. Press again to
return sound to the TV.
Channel buttons - Press to scan
up (or down) through channel
numbers set in the TV's memory.
Volume buttons - Press to turn
the TV sound up (or down).
To load batteries (supplied)
into the mini remote:
1. Remove battery
compartment back.
2. Place batteries in the
remote. Line up the (+)
and (-) ends of the
battery correctly.
3. Reattach the battery lid.
To load battery (supplied) into the full size
remote:
1. Remove battery compartment lid on
the back of the remote.
2. Connect the battery to the terminals
on the remote (it only fits one wa,
3. Reattaeh the battery lid.
9

eature'.riOt your TV can be
adjusted from a MENU screen
shown on the TV. A MENU is
nothing more than an on-screen
list offeatures. Each MENU item
can be adjusted by viewing the
screen and pressing a button.
_ Press the MENU button on the
I emote or TV. A list of TV
ADJUSTMENT controls appears
on the TV screen.
<_ Press the MENU AV buttons
(on the remote) to move the RED
ARROW to the desired TV
Adjustments section.
(See next page for list of controls).
The ADVANCE (ADV) &V
buttons on the TV can also be used
to move the RED ARROW to the
desired control.
<_ Press the MENU button to
select the Adjustment control
section highlighted with the RED
ARROW.
A list of individual Adjustment
controls appears on the TV screen.
,;_ Press the MENU &V
(orADV)
buttons to move the RED ARROW
up or down the list of controls.
Then press MENU to select the
desired control.
<_ Press (+) or (-) buttons to adjust
the selected on-screen control.
<_ Press the STATUS button to
clear the screen after an adjustment
Use the EXIT control within the
MENU to return to normal TV
viewing.
A
_ Remember. If an on-screen
ntrol disappears from the TV
screen and you are not finished
working with it, just repress the
MENU button until the last
selected control reappears on the
screen.
TELEVISIONADJUSTMENTS
USEi_)i TO SELECTITEM.
I_ PICTURE/SOUNDCONTROLS
ADVANCEDCONTROLS
FIRST TIME SETUP
EXIT
ON THE '_ JONTHE
TELEVISION 'V REMOTE
10
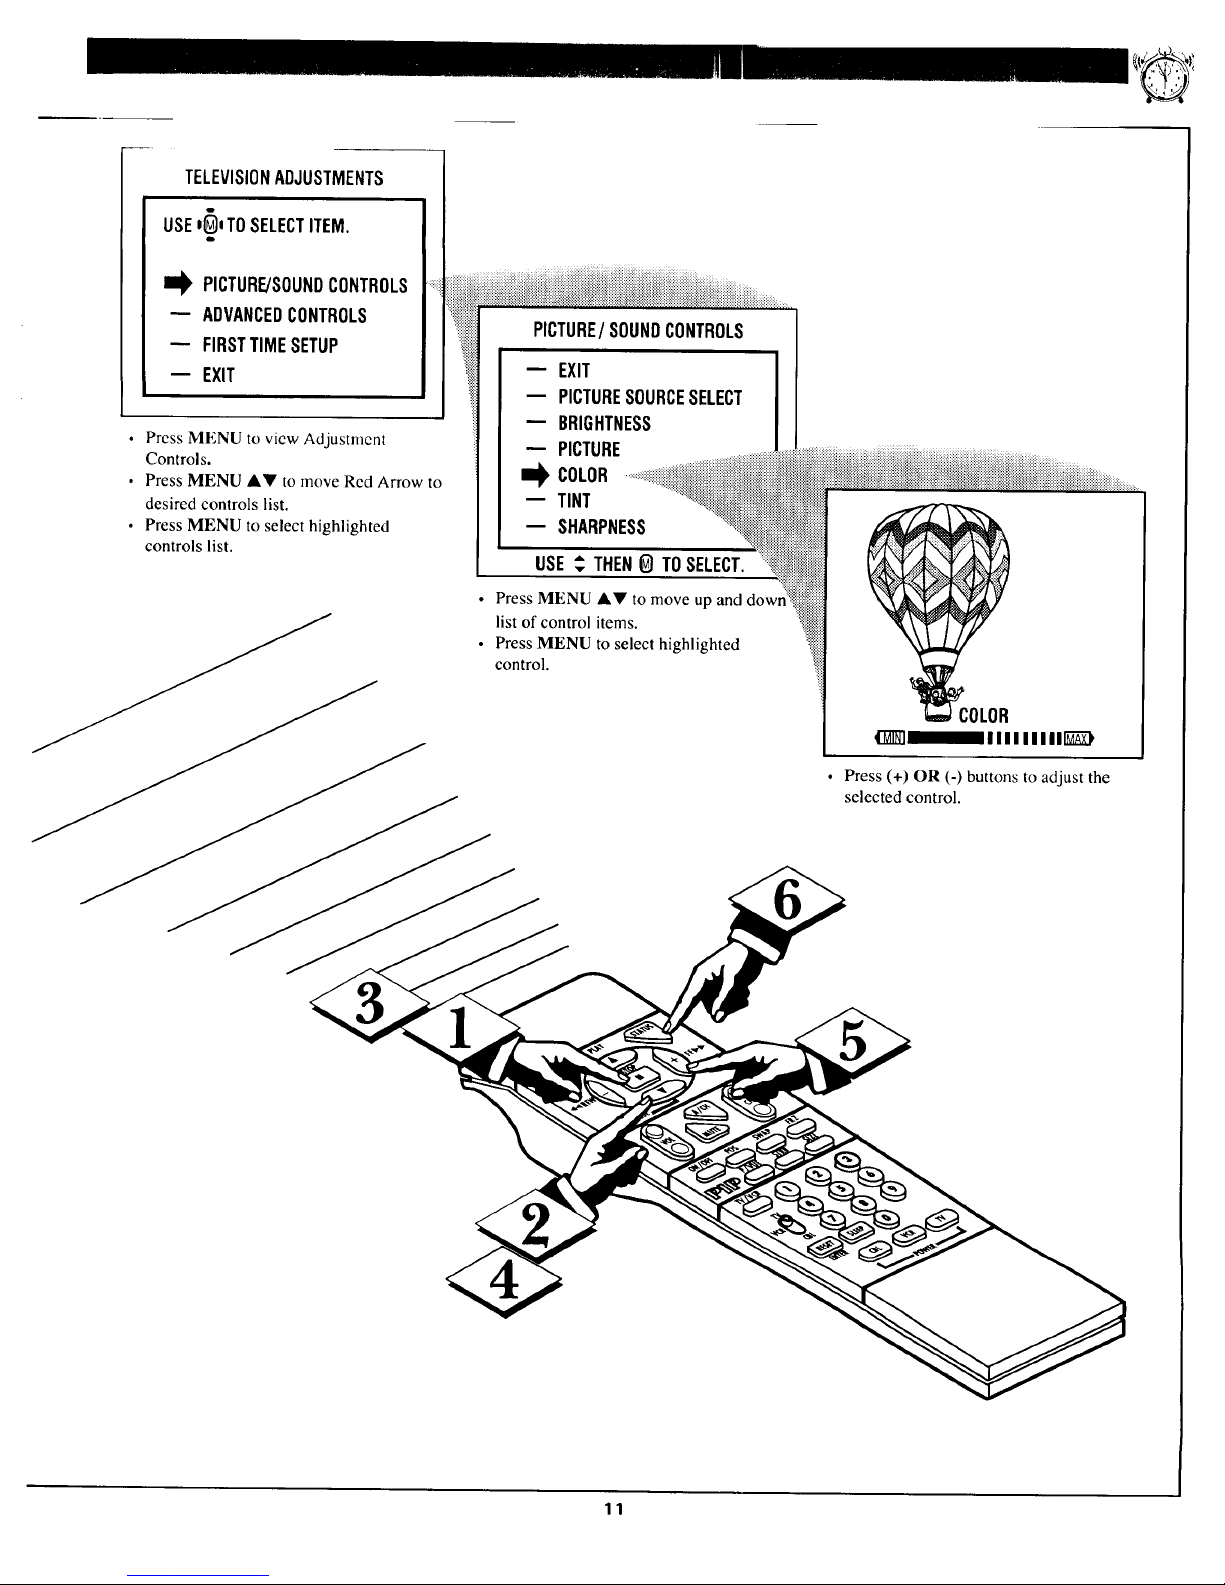
TELEVISIONADJUSTMENTS
USEe_e TOSELECTITEM.
I_ PICTURE/SOUNDCONTROLS
-- ADVANCEDCONTROLS
-- FIRSTTIMESETUP
-- EXIT
• Press MENU to view Adjustment
Controls.
• Press MENU AY to move Rcd Arrow to
desired controls list.
• Press MENU to select highlighted
controls list.
PICTURE/SOUNDCONTROLS
EXIT
-- PICTURESOURCESELECT
-- BRIGHTNESS
-- PICTURE
Bl_ COLOR
TINT
-- SHARPNESS
USE_ THENO TOSELECT.
• Press MENU A.y to move up and
__ list of control items.
• Press MENU to select highlighted
control.
!ii
COLOR
#I__IIIIIIIII[]Z_)
• Press (+) OR (-) buttons to adjust the
selected control.
11
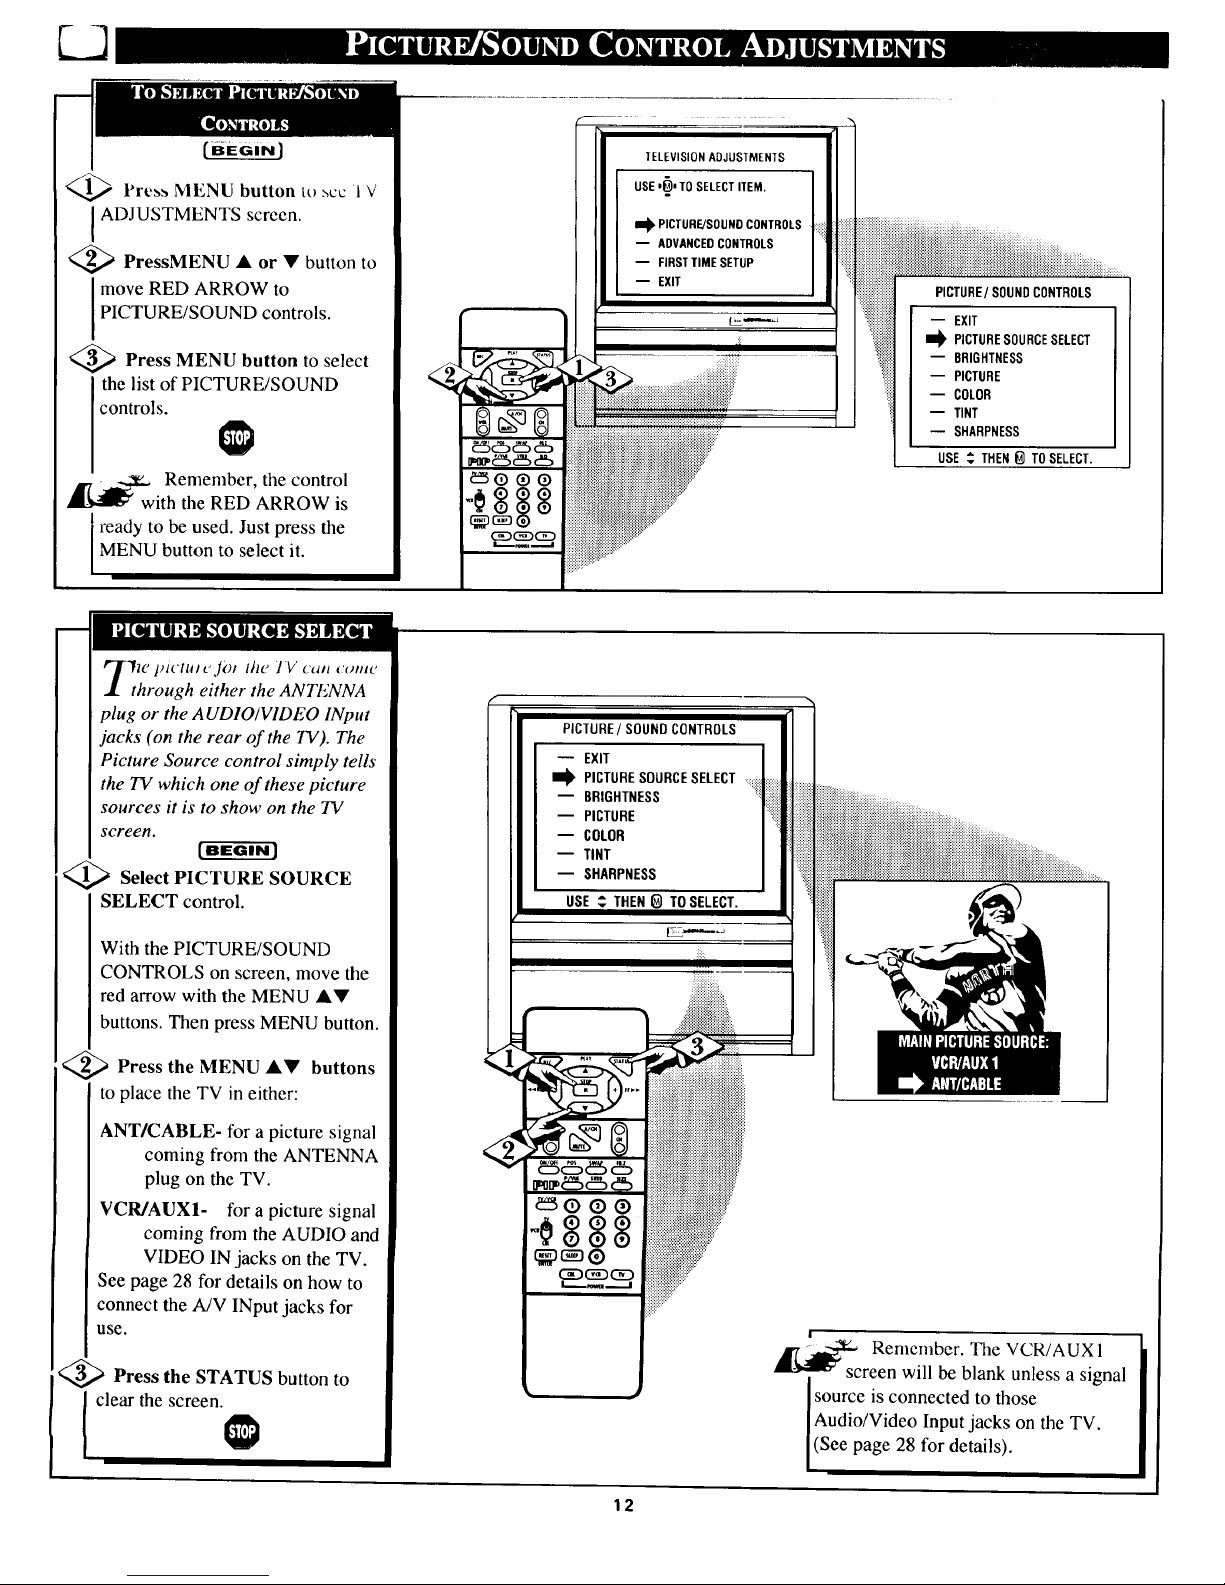
_ l'res,,, MENU button tt_ _cc 1 V
ADJUSTMENTS screen.
<_ PressMENU • or • button to
move RED ARROW to
PICTURE/SOUND controls.
<_ Press MENU button to select
the list of PICTURE/SOUND
controls.
&7 _ _:1_ Remember, the control
with the RED ARROW is
i ready to be used. Just press the
MENU button to select it.
TELEVISION ADJUS'[MENTS
USE ,_oTO SELECT ITEM.
I_ PICTURE/SOUND CONTROLS
-- ADVANCED CONTROLS
-- FIRST TIME SETUP
-- EXIT
PICTURE/SOUNDCONTROLS
-- EXIT
I_ PICTURESOURCESELECT
-- BRIGHTNESS
-- PICTURE
-- COLOR
-- TINT
-- SHARPNESS
USE _ THEN_] TOSELECT.
e p_t'tu; c JO/ the ] V can (onto
hrough either the ANTENNA
plug or the AUDIO/VIDEO INput
jacks (on the rear of the TV). The
Picture Source control simply tells
the TV which one of these picture
sources it is to show on the TV
screen.
<_ Select PICTURE SOURCE
SELECT control.
With the PICTURE/SOUND
CONTROLS on screen, move the
red arrow with the MENU ••
buttons. Then press MENU button.
_ Press the MENU A• buttons
to place the TV in either:
ANT/CABLE- for a picture signal
coming from the ANTENNA
plug on the TV.
VCR/AUX1- for a picture signal
coming from the AUDIO and
VIDEO IN jacks on the TV.
See page 28 for details on how to
connect the A/V INput jacks for
use.
<_ Press the STATUS button to
clear the screen.
PICTURE / SOUND CONTROLS
i_ EXIT
PICTURE SOURCESELECT ::ii:iii:iii::|il:iiiiii_i
-- BRIGHTNESS ii!iil
PICTURE
COLOR
TINT
-- SHARPNESS
USE _ THEN O TO SELECT. :_iii
_ Remember. The VCR/AUXI
screen will be blank unless a signal
Isource is connected to those
Audio/Video Input jacks on the TV.
(See page 28 for details).
12

) adjusl 3()t_t 1 _ (()lor (_ltd
icture controls, select a 7V
channel and follow the steps shown
below:
[BEGIN]
Select BRIGHTNESS,
PICTURE, COLOR, TINT, or
SHARPNESS picture control.
With the PICTURE/SOUND
CONTROLS on screen, move the
red arrow with the MENU AV
buttons. Then press MENU button.
<_ Press the (+) or (-) buttons to
adjust the selected control.
<_ Press the STATUS button to
clear the screen.
!
_ _ Remember. When the bar
_ scale is centered, control
settings are at normal mid-range
levels.
Press (-) or (+) until
whitest parts of the picture are as bright
as you prefer.
PICTURE Press (-) or (+) until dark
parts of the picture show good detail.
COLOR Press (-) or (+) to add or
eliminate color.
TINT Press (-) or (+) to obtain natural
skin tones. (Also see Flesh Correction
on page 14 for more information).
Press (-) or (+) to
improve detail in the picture.
PICTURE/SOUNDCONTROLS
m EXIT
m PICTURESOURCESELECT
-- PICTURE t _i iili iiiiiiii:;:i:iiiiiiiiii
-- COLOR iiiiiiii::iii
-- TINT ...._iii!iiiiiiii!i iiiiiiiiiii
iiiiiii[ii]_ii
m SHARPNESS _::i::i::i::i::i:::.:_::eiiiiiiiii
iliii::::iiiiii
BRIGHTNESS
4_]BIIIIIIIIl[_
13

L2
[eu! vtcw Lv _ ?;Jlalj)/l(,_,_ ,]eu/141 _'
which smoothes out
background snow (or picture noise)
without losing picture image detail
or crispness.
[ BEGIN ]
Select CLEARVIEW control.
With the PICTURE/SOUND
CONTROLS on screen, move the
red arrow with the MENU AY
buttons. Then press MENU button.
<_ Press the MENU AV buttons
to place the TV in ENHANCED
mode.
<_ Press the STATUS button to
clear the screen.
I
PICTURE/SOUND CONTROLS
-- SHARPNESS
II@ CLEARVIEW ............................................
-- FLESH
-- PIP COLOR
-- PIPTINT
-- BASS
-- TREBLE
USE ,_ THEN_ TO SELECT.
_:::::
se the t'lesh Cot _c('tton
control to keep skin tone hues
(or facial tint)from varying from
TV channel to TV channel.
[BEGIN]
Select FLESH
CORRECTION control.
With the PICTURE/SOUND
CONTROLS on screen, move the
red arrow with the MENU &V
buttons. Then press MENU button.
,_ Press the MENU &V
buttons
to turn the FLESH CORRECTION
control ON.
<_ Press the STATUS button to
clear the screen.
PICTURE/ SOUNDCONTROLS
-- SHARPNESS
-- CLEARVIEW
P,pFLESHco'oRCORHECT'OH i+iii+ii
-- PIP TINIT ....
-- BASS
-- TREBLE
USE _ THEN_ TOSELECT.
!if:.
I11
iiiiiiii::
, .....,.....
...........
++.............
...................
..............
..+.................
14
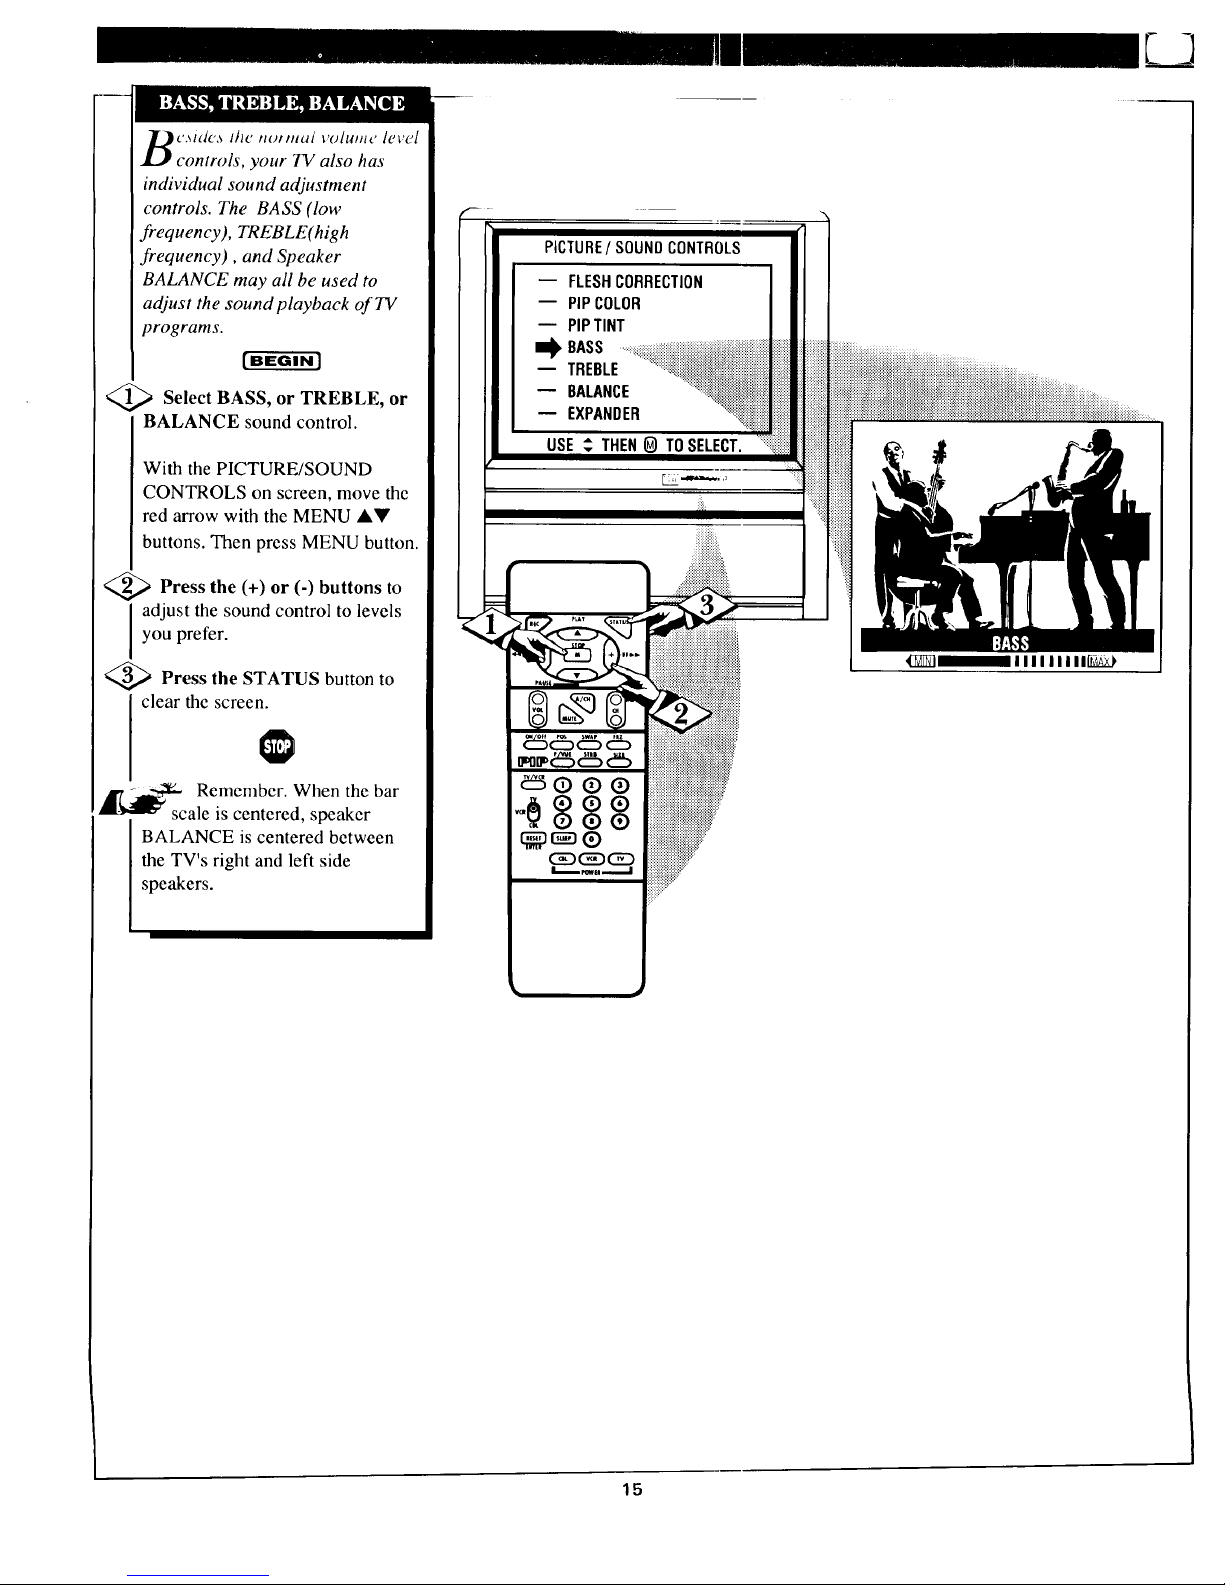
_'Md_',s lJl¢¢ ttot//t_i VOlUHI_' level
controls, your TV also has
individual sound adjustment
controls. The BASS (low
frequency), TREBLE(high
frequency), and Speaker
BALANCE may all be used to
adjust the sound playback of TV
programs.
<_ Select BASS, or TREBLE, or
BALANCE sound control.
With the PICTURE/SOUND
CONTROLS on screen, move the
red arrow with the MENU AV
buttons. Then press MENU button.
<_ Press the (+) or (-) buttons to
adjust the sound control to levels
you prefer.
_:_ Press the STATUS button to
clear the screen.
_c Remember. When the bar
ale is centered, speaker
BALANCE is centered between
the TV's right and left side
speakers.
PICTURE/SOUNDCONTROLS
m FLESHCORRECTION
-- PIPCOLOR
m PIPTINT
I_.BASS
-- TREBLE
BALANCE
EXPANDER
USE _ THENO TOSELECT.
_QQQ
15
_]]_]IIIIIIIII1[I_,9
 Loading...