

Sears LXI 626.54462950,LXI 626.54462950 Series Owner's Manual
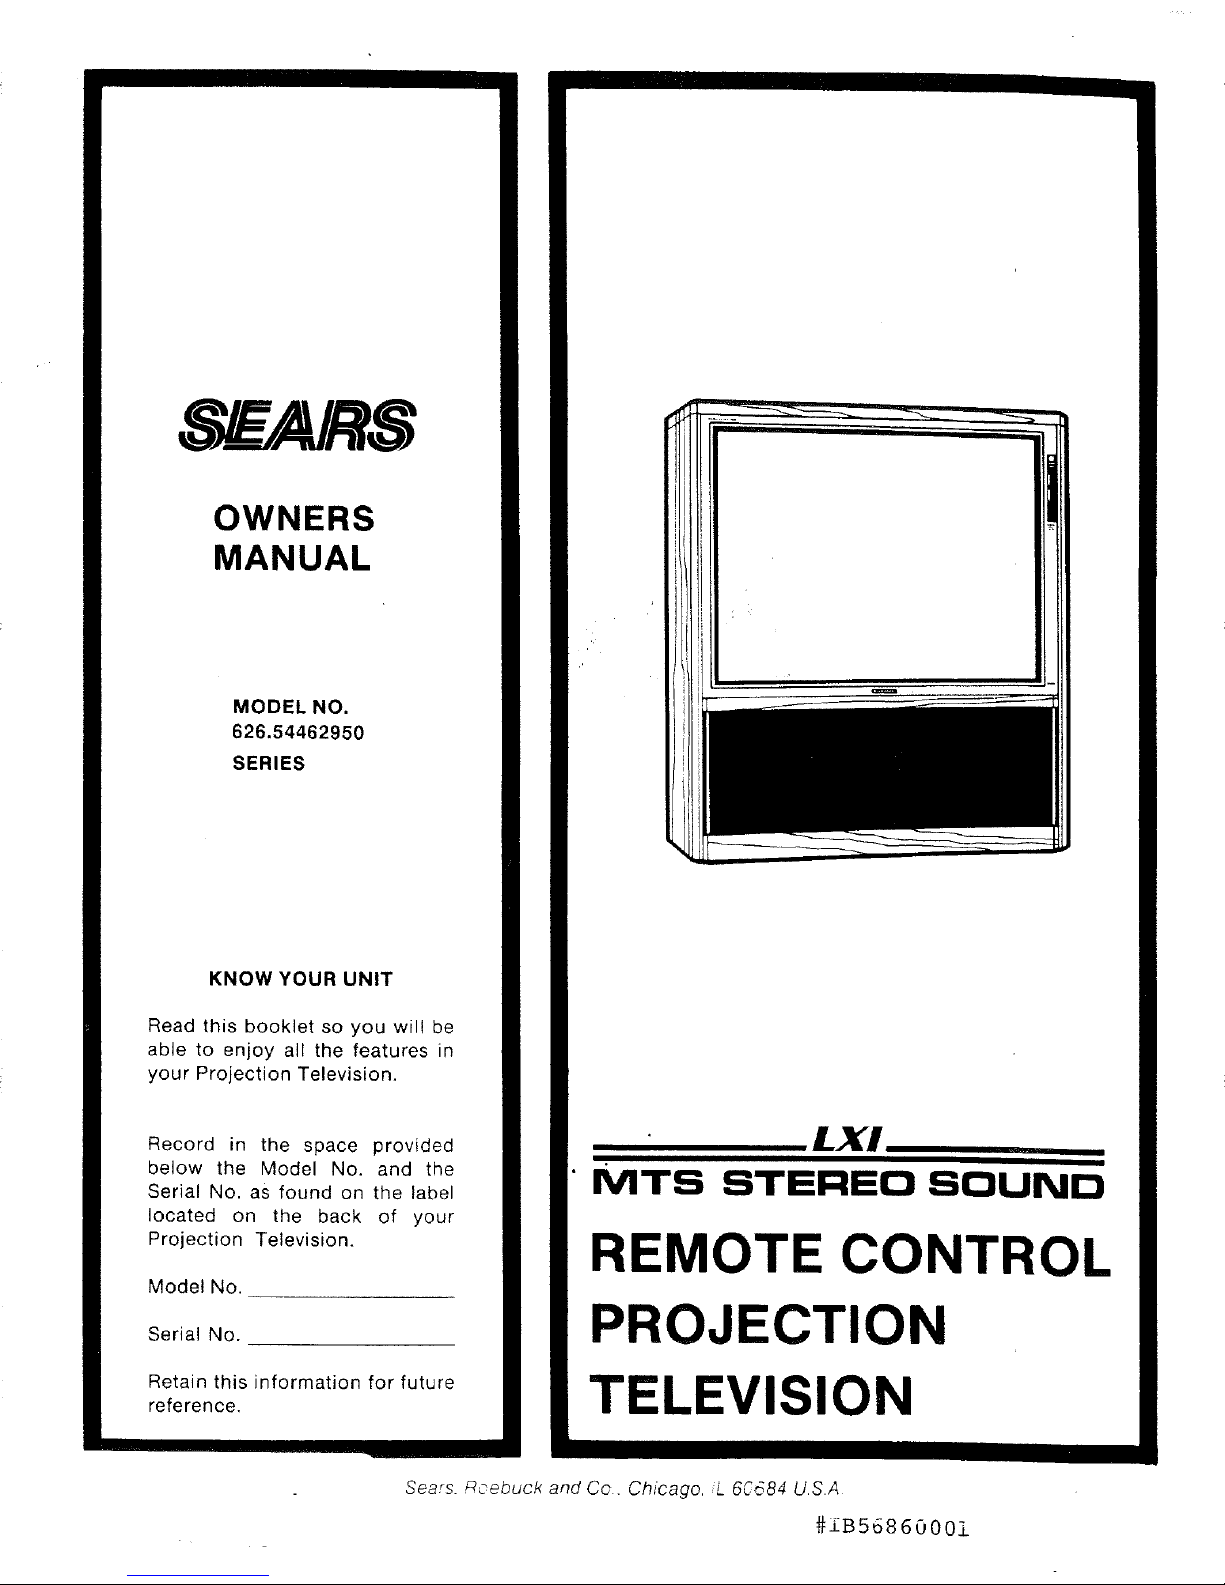
OWNERS
MANUAL
MODEL NO.
626.54462950
SERIES
KNOW YOUR UNIT
Read this booklet so you wil! be
able to enjoy all the features in
your Projection Television.
Record in the space provided
below the Model No. and the
Serial No. as found on the label
located on the back of your
Projection Television.
Model No,
Serial No.
Retain this information for future
reference.
Sears. Roebuck and Co. Chicago, L 60684 USA
LX!
MTS STEREO SOUND
REMOTE CONTROL
PROJECTION
TELEVISION
#1B56860001
I
t.&et:_U
Warning/Precautions ........................... 2
TV Operations - Quick Use Guide ................ 3
Antenna/Cable Connections .................. 4-5
On-Screen Features
How to Select and Adjust On-Screen Features ..... 6
AUDIO - Audio Adjustments .................. 7-8
VIDEO - Color and Picture Adjustments .......... 9
INPUT - Tuning Adjustments ................ 10-12
FEATURES - Clock and Channel Adjustments .. 13-16
Remote Control Operation
Using the Remote Control with the TV ........ 17-18
How to Identify a VCR ..................... 19-20
Using the Remote With a VCR .................. 21
How to Identify a Cable Converter ........... 22-23
General Information
Before Calling for Service ..................... 24
36 Pushbutton Infrared Remote Control which operates
your TV set and a variety of wireless remote control
VCR's and Cable Converters.
VHF/UHFICable TV (CATV) tuning for receiving
standard broadcast or cable TV channels.
Automatic Programming of channels for quick and
easy selection of favorite stations available in your area.
Stereo-Ready TV with built-in audio amplifier and twin
speaker system for receiving TV programs broadcasted
in stereo sound or (SAP) bilingual broadcasts.
Parental Control for "censoring" or blanking out
channels and audio!video INPUT jack connections to
prevent children from watching undesirable
programming.
On-screen graphics which display helpful information in
the operation and adjustment of feature control settings
such as channel, time, programming, etc.
Audio/Video jackpanel for direct connections with
accessorie s, such as VCRs or Videodisc Players, for
playback and recordings.
Sleep-Timer which automatically turns the TV OFF at the
end of preset time intervals.
WARNING: TO PREVENT FIRE OR SHOCK
HAZARD DO NOT EXPOSE THIS UNIT TO RAIN OR
EXCESSIVE MOISTURE.
,1_ II DO NOT OPEN
IF_- IIi II1 1 !11Ill[m] II
I R'SQU%EpO. %% TR'OUE
CAUTION: TO REDUCE THE RISK OF ELEOTRIO SHOOK, DO NOT
REMOVE COVER (OR BACK)NO USER SERV OEABLE PARTS
INSIDE, REFER SERVICING TO QUALIFIED SERVICE PERSONNEL
The Model and Serial Numbers are found on the back
of this TV set. Please record these numbers and pur-
chase date in the spaces below, Refer to them when-
ever you ask your dealer about this TV set.
Model No.
Serial No.
Purchase Date
Please attach your sales receipt to this book and
keep it for future reference.
The lightning flash with arrowhead symbol, within an equilateral triangle
Is intended to alert the user of the presence of uninsulated "dangerous
voltage" within the product's enclosure, that may be sufficient magni-
tude to constitute a risk of electric shock to persons.
The exclamation point within an equilateral triangle is Intended to alert
the user of the presence of important operating and maintenance (serV-
icing) Instructions in the literature accompanying the appliance.
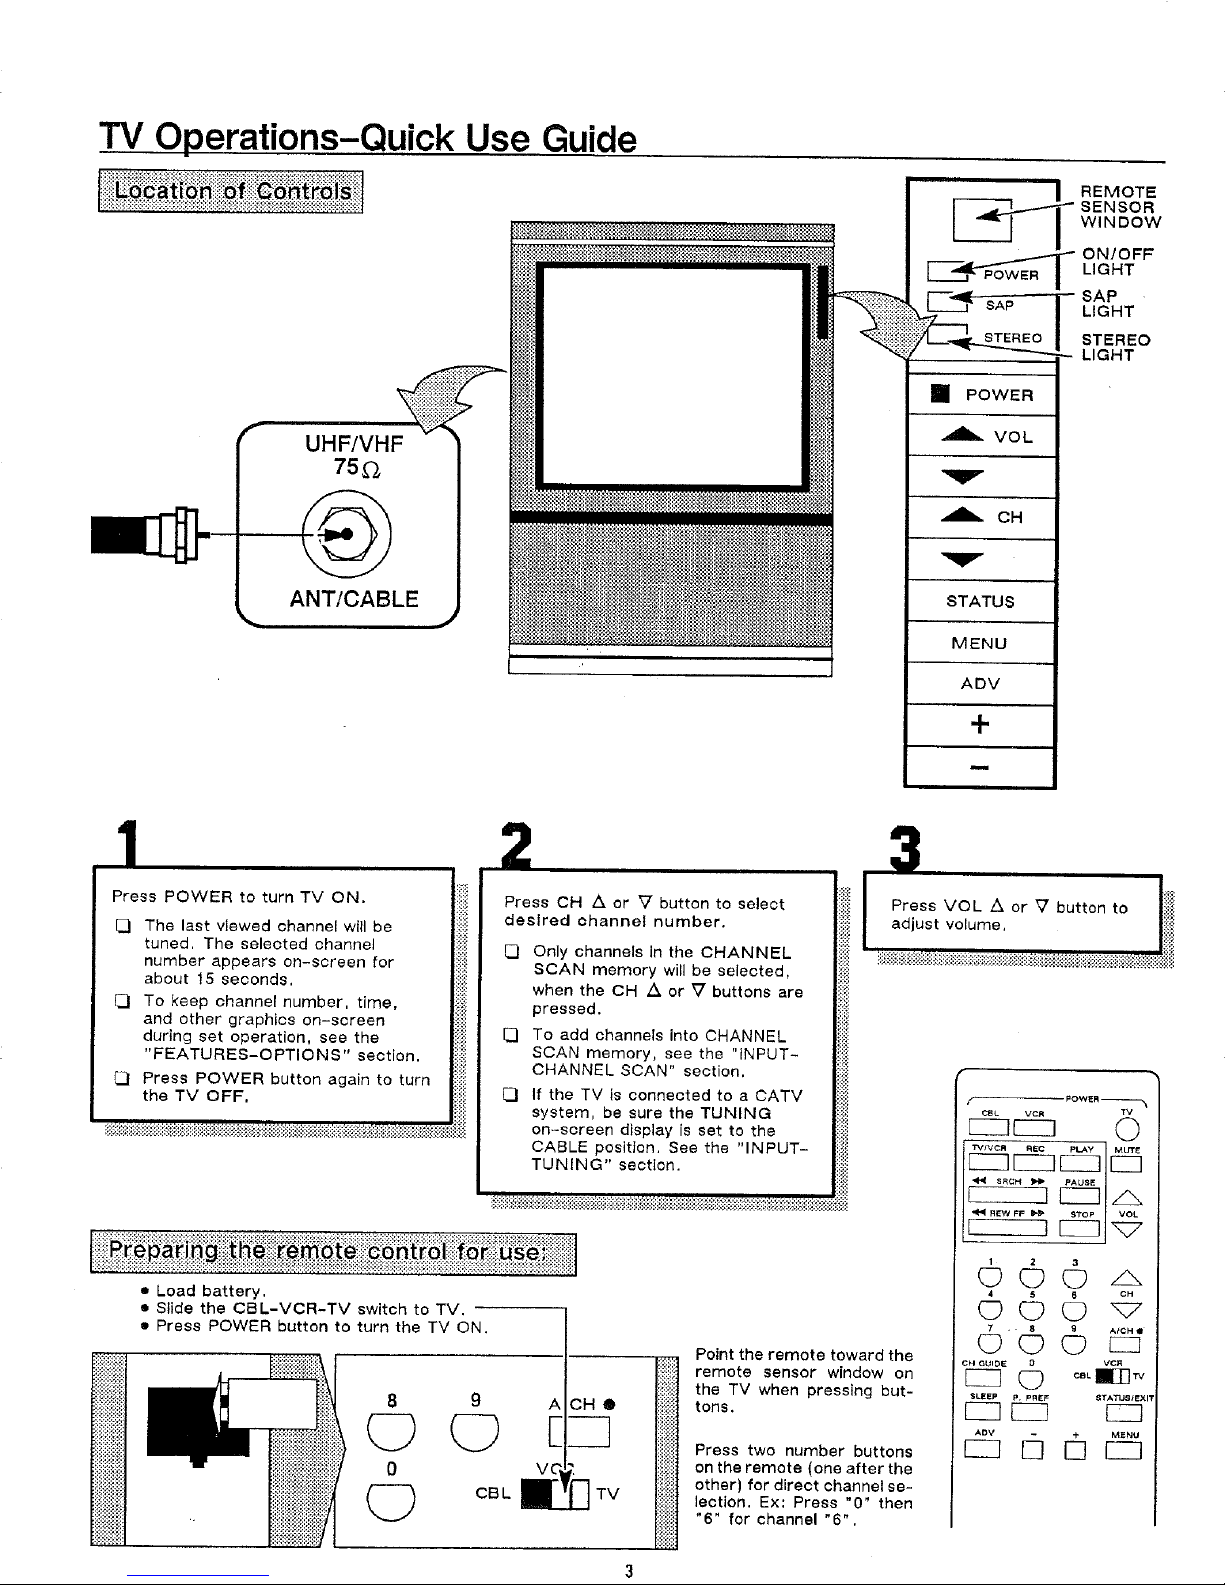
TV Operations-Quick Use Guide
UHF/VHF
75_
ANT/CABLE
__ REMOTE
[-'_'d_POWER I LIGHT
SAP LIGHT
STEREO
[] POWER
VOL
SENSOR
WINDOW
ON/OFF
SAP
STEREO
LIGHT
_. OH
STATUS
MENU
ADV
+
L
Press POWER to turn TV ON,
C] The last viewed channel will be
tuned, The selected channel
number appears on-screen for
about 15 seconds.
[-J To keep channel number, time,
and other graphics on-screen
during set operation, see the
"FEATURES-OPTION S" section.
Press POWER button again to turn
the TV OFF.
:::::::::::::::::::::::::::::::::::::::::::::::::::::::::::::::::::::::::::::::::::::::::
, ,:_.,_.,__............ 7:,:..:,:. ,:,_ ,,. ,7,, ,_..•-_,,..7....,. ,:-:-:.:,_.-:-:,: _:.::, ,,,..:-:.:-::-:-:.:,:-..:-:,.._
• Load battery.
• Slide the CE]L-VCR-TV switch to TV.
Press POWER button to turn the TV ON.
8
C_
0
C_
2 3
Presso._or_button,oso,octliiilI' Pressvo"_or__u,ton,o 'li_i_i
_esI.odoha_ooloumbor, liiI adjustvolume li_
Only channels In the CHANNEL liii_i
SCAN memory will be selected, I;i!i::
when the CH ,& or _ buttons are liiiii
pressed, li;ii
E] To add channels into CHANNEL li!::ii::
SCAN memory, see the "{NPUT- |_ii
CHANNEL SCAN" section, liill
[_1 If the TV is connected to a CATV I::i::i r _ow_._
system, be sure the TUNING lilii! _]1_
CABLE position. See the "INPUT- |i{#
on-screen display is set to the |!ili _{ k.jj[_
9 ACHO
(Z) E
VC"
Point the remote toward the
ii_iiiii
remote sensor window on
the TV when pressing but-
tons.
:::::_
5:::;:
Press two number buttons
on the remote (one after the
other) for direct channel se-
lection. Ex: Press "0" then
"6" for channel "6".
!iliiii
4 $ 6 CH
7 , 8 9 At_H •
CH GUIDE O VCR
SLEEp STATUSIEXlT
ADV . + MENU
C221 5 _ C_3
F_

Antenna/Cable Connections
For best reception of broadcast VHF/UHF channels, a
good outdoor antenna is recommended. With different
antenna lead-in wires, use of one of the adapters listed
below may be necessary,
Twin Lead (300 ohm)
1. Attach twin lead wires to screws on the adapter.
2. Push end of adapter onto UHF/VHF input on the
set.
300-75 OHM
ADAPTER
FROM ANTENNA
A-I-rAC H TO
TWIN LEAD-IN
ADAPTER
Connectonly one antenna twin lead-tn to this adapter
Coaxial Cable (75 ohm)
1. Attach connector end of cable directly to UHF/VHF
input on the set.
REAR OF TV
COAXIAL LEAD-IN
FROM EITHER A VHFt
UHF/VHF 75_
ANT/CABLE
UHF COMBINATION
ANTENNA OR CABLE
TV SERVICE
For cATV Cable, follow the 75 ohm Coaxial cable
connections and see CABLE/NORMAL TUNING in _il
[3 Premium or Pay Cable channels use scrambled
signals and will require a converter box (provided
by the cable company) in addition to the normal
cable connections.
With Converter/Descrambler Box
1. Attach cable from the converter to the UHF/VHF input
on the set.
2. Set TV to channel output of the converter (check
back of the converter).
3, Make channel selections with the converter,
REAR OF TV
ANT/CABLE
CABLE TV
CONVERTER
¢H3 BOX
OH 4
1. Attach twin lead wires from both antennas to
correct screws on combiner (Not Supplied).
2. Push end of combiner onto UHF/VHF input on
the set.
TWIN LEAD-IN FROM
UHF ANTENNA
/" J.._
UHF
0 G
TWIN LEAD-IN FROM
VHF ANTENNA
(BACK} (SIDE)
°°!
75-300 OHM
ADAPTER
=OptionaI Combiner accessory (Part # 705109-1) available from your nearest Sears
Repair Dept.
_ ._ If your separate antennas have two different
* COMBINER
REAR OF TV
[UH_._._575_ 1
I lead-ins (coaxial and twin-lead), the use of
,a 75 to 300 ohm adapter may be necessary.
(75-300 ohm adapter Part # 704427-6 avail-
able from your nearest Sears Repair Dept.}.
Optional RF Switcher
An optional AK9132 RF Switcher is available that will allow
an Antenna/Cable TV input and two video accessories
(VCR, Video Disc Player, etc.) to be connected to the
TV at the same time.
The accessory AK9132 RF Switcher can be purchased or
ordered from your nearest Sears Repair Dept.
REAR OF TV
Y
RF SWITCH
POWER
ACCESSORY J
w
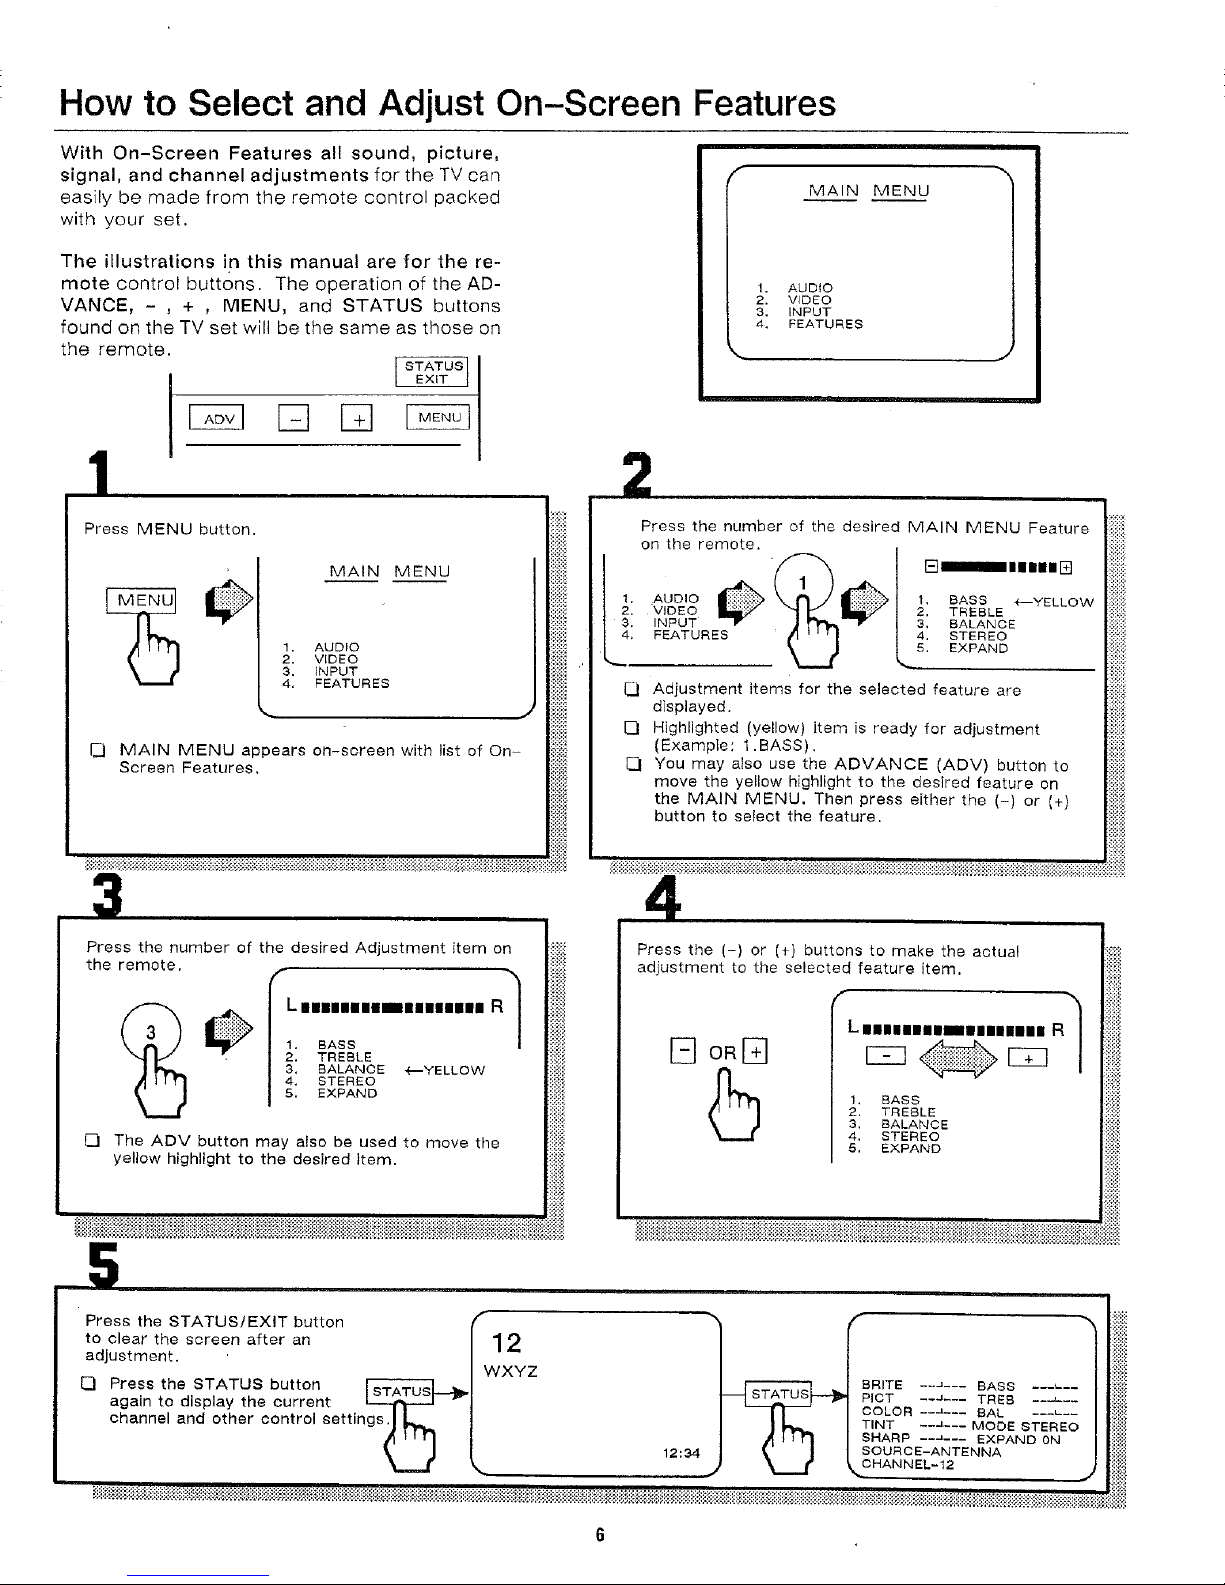
How to Select and Adjust On-Screen Features
With On-Screen Features all sound, picture,
signal, and channel adjustments for the TV carl
easily be made from the remote control packed
with your set.
The illustrations in this manual are for the re-
mote control buttons. The operation of the AD-
VANCE, - , + , MENU, and STATUS buttons
found on the TV set will be the same as those on
the remote.
1. AUDIO
2. VIDEO
3, INPUT
4. FEATURES
MAIN MENU
_1
Press MENU button.
MAIN MENU
1. AUDIO
2, VIDEO
3. INPUT
4, FEATURES
F..j MAIN MENU appears on-screen with list of On-
Screen Features.
Press the number of the desired Adjustment item on
the remote,
L munmiuuinununnunn R 1
• /2, TREBLE
1. BASS /
|3, BALANCE "('--YELLOW
/4. STEREO
5, EXPAND
2
Press the number of the desired MAIN MENU Feature
on the remote.
2. VIDEO
1, AUDIO
3. INPUT
4. FEATURES
Q
Adjustment items for the selected feature are
displayed,
[]
Highlighted (yellow) item is ready for adjustment
(Example: 1•BASS).
Q
You may also use the ADVANCE (ADV) button to
move the yellow highlight to the desired feature en
the MAIN MENU. Then press either the (-) or (+)
button to select the feature,
1, BASS +--YELLOW
2, TREBLE
s, BALANCE
F:l_mmmmmB_
4. STEREO
B. EXPAND
4
Press the (-) or (+) buttons to make the actual t_!!i
adjustment to the selected feature item. Iiii!i!
_ L .mnnmmmmmmmnunummnmnR_ Ii_iiil
[] o.IZ] / r-q / lii')il
[] The ADV button may also be used to move the
yellow highlight to the desired item.
5
Press the STATUS!EXIT button
to clear the screen after an
adjustment.
[] Press the STATUS button
again to display the current _ r
channel and other control settings.I L
©
_ii_!i,_iiii_i_i_HE!i!Eii_iii_;iE_:_i!:!;!_H:_i:!_i! i!;!i ; : :::;:::=:_:=::::::::_::_::_8_:::=::::_?-::::?-=::::: : _: : :::::::::::::::::::::::::::::::::::::::::::::::::::::::::::::::::::::::: ......................................... , .......................
z,-
WXYZ
12
12:34
U s . EXPAND I iii[i_il
PICT --a--- TREB __i___
COLOR---1--- BAL ---_---
TINT ---_--- MODE STEREO
SHARP ---_--- EXPAND ON
BRITE --J--- BASS ---_---
SOURCE-ANTENNA
CHANNEL-12
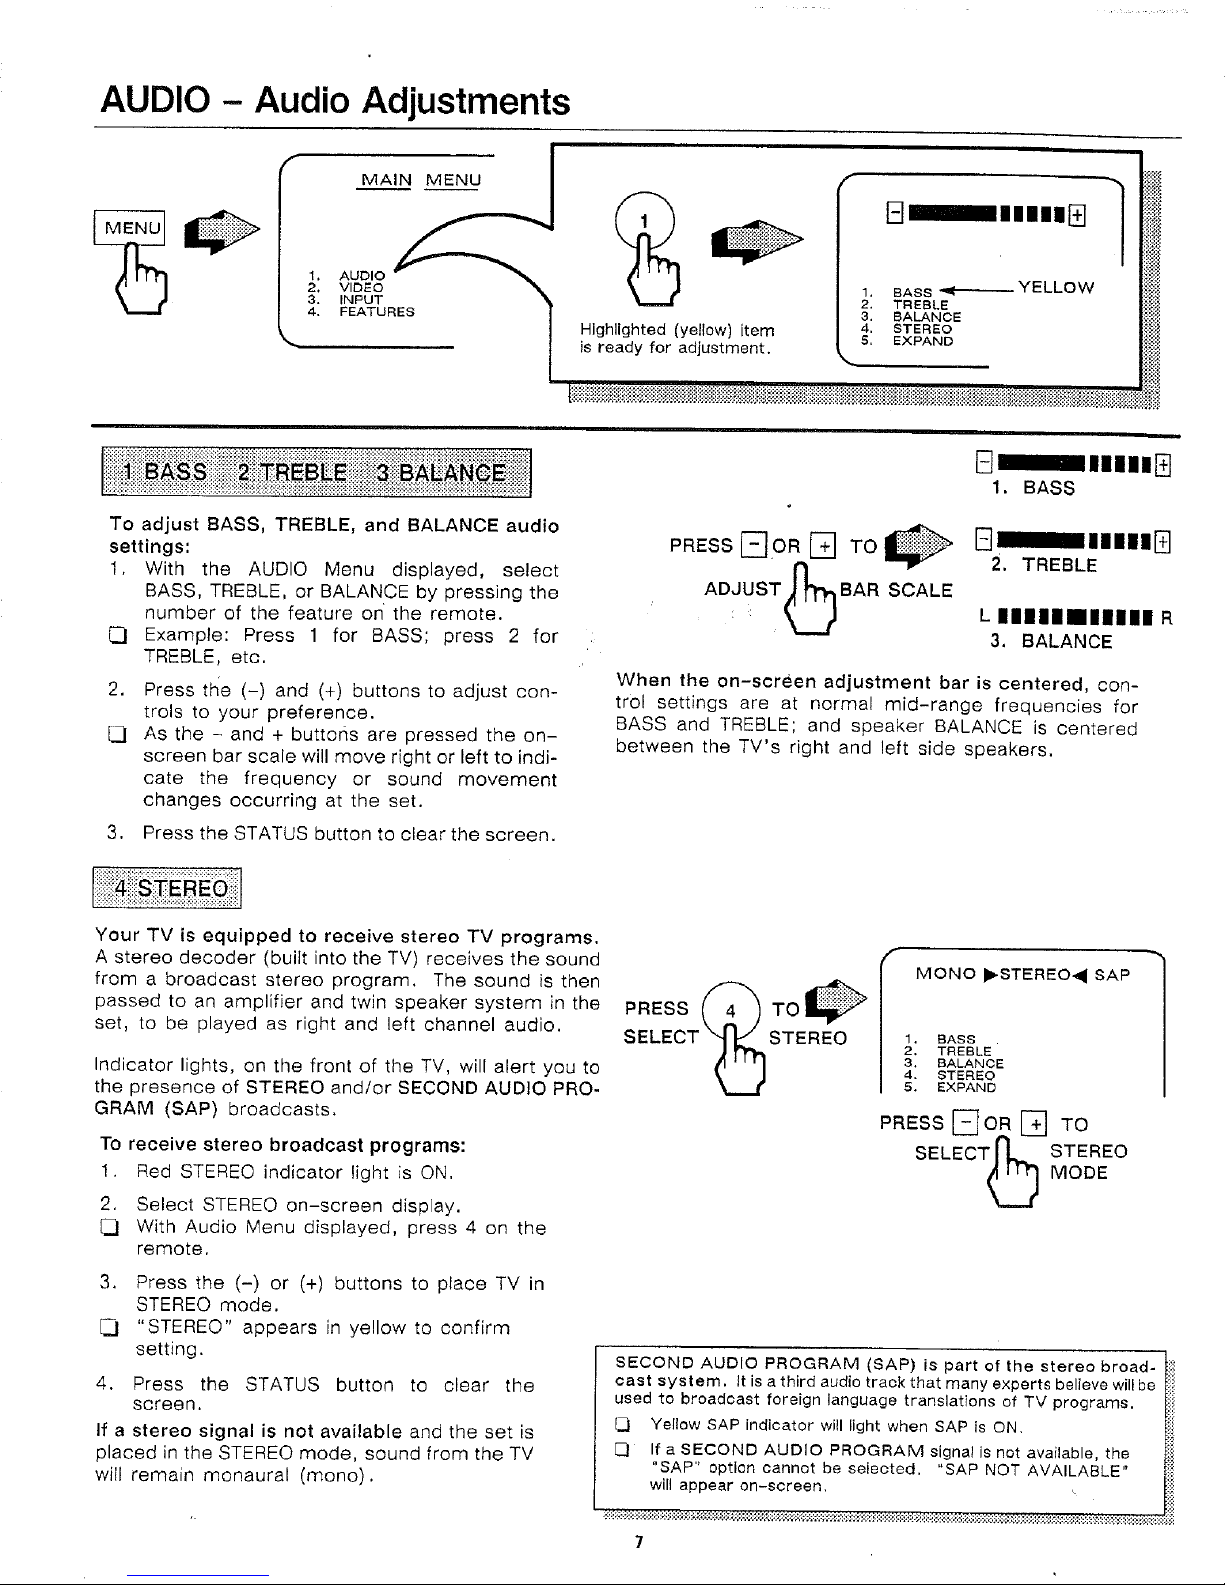
AUDIO - Audio Adjustments
f
MAIN MENU
1, AUDIO
2, VIDEO
3, INPUT
4. FEATURES
1, BASS _- YELLOW
2. TREBLE
3. BALANCE
Highlighted (yellow) item 4. STEREO
is ready for adjustment, s. EXPAND
_manlna_
1. BASS
TO adjust BASS, TREBLE, and BALANCE audio
settings:
1. With the AUDIO Menu displayed, select
BASS, TREBLE, or BALANCE by pressing the
number of the feature on the remote.
Example: Press 1 for BASS; press 2 for
TREBLE, etc.
2. Press the (-) and (+) buttons to adjust con-
trols to your preference.
I/ As the - and + buttons are pressed the on-
screen bar scale will move right or left to indi-
cate the frequency or sound movement
changes occurring at the set.
3. Press the STATUS button to clear the screen.
Your TV is equipped to receive stereo TV programs.
A stereo decoder (built into the TV) receives the sound
from a broadcast stereo program. The sound is then
passed to an amplifier and twin speaker system in the
set, to be played as right and left channel audio.
Indicator lights, on the front of the TV, will alert you to
the presence of STEREO and/or SECOND AUDIO PRO-
GRAM (SAP) broadcasts.
To receive stereo broadcast programs:
1. Red STEREO indicator light is ON.
2. Select STEREO on-screen display.
_d With Audio Menu displayed, press 4 on the
remote.
.
Press the (-) or (+) buttons to place TV in
STEREO mode.
"STEREO" appears in yellow to confirm
setting.
4. Press the STATUS button to clear the
screen.
If a stereo signal is not available and the set is
placed in the STEREO mode, sound from the TV
will remain monaural (mono).
B nmnmnB
2. TREBLE
L UlIliIIIU R
3. BALANCE
When the on-screen adjustment bar is centered, con-
trol settings are at normal mid-range frequencies for
BASS and TREBLE; and speaker BALANCE is centered
between the TV's right and left side speakers.
PRESS
STEREO 1. BASS
SECOND AUDIO PROGRAM (SAP) is part of the stereo broad-
cast system. It is a third audio track that many experts believe will be
used to broadcast foreign language translations of TV programs.
[_1 Yellow SAP indicator will light when SAP is ON.
[_ If a SECOND AUDIO PROGRAM signal is not available, the
"SAP" option cannot be selected. "SAP NOT AVAILABLE"
will appear on-screen.
2, TREBLE
I MONO ,STERE04SAP
3, BALANCE
4, BTEREO
5. EXPAND
PRESS []OR [] TO
SELECTFL _ STEREO
_ MODE
7
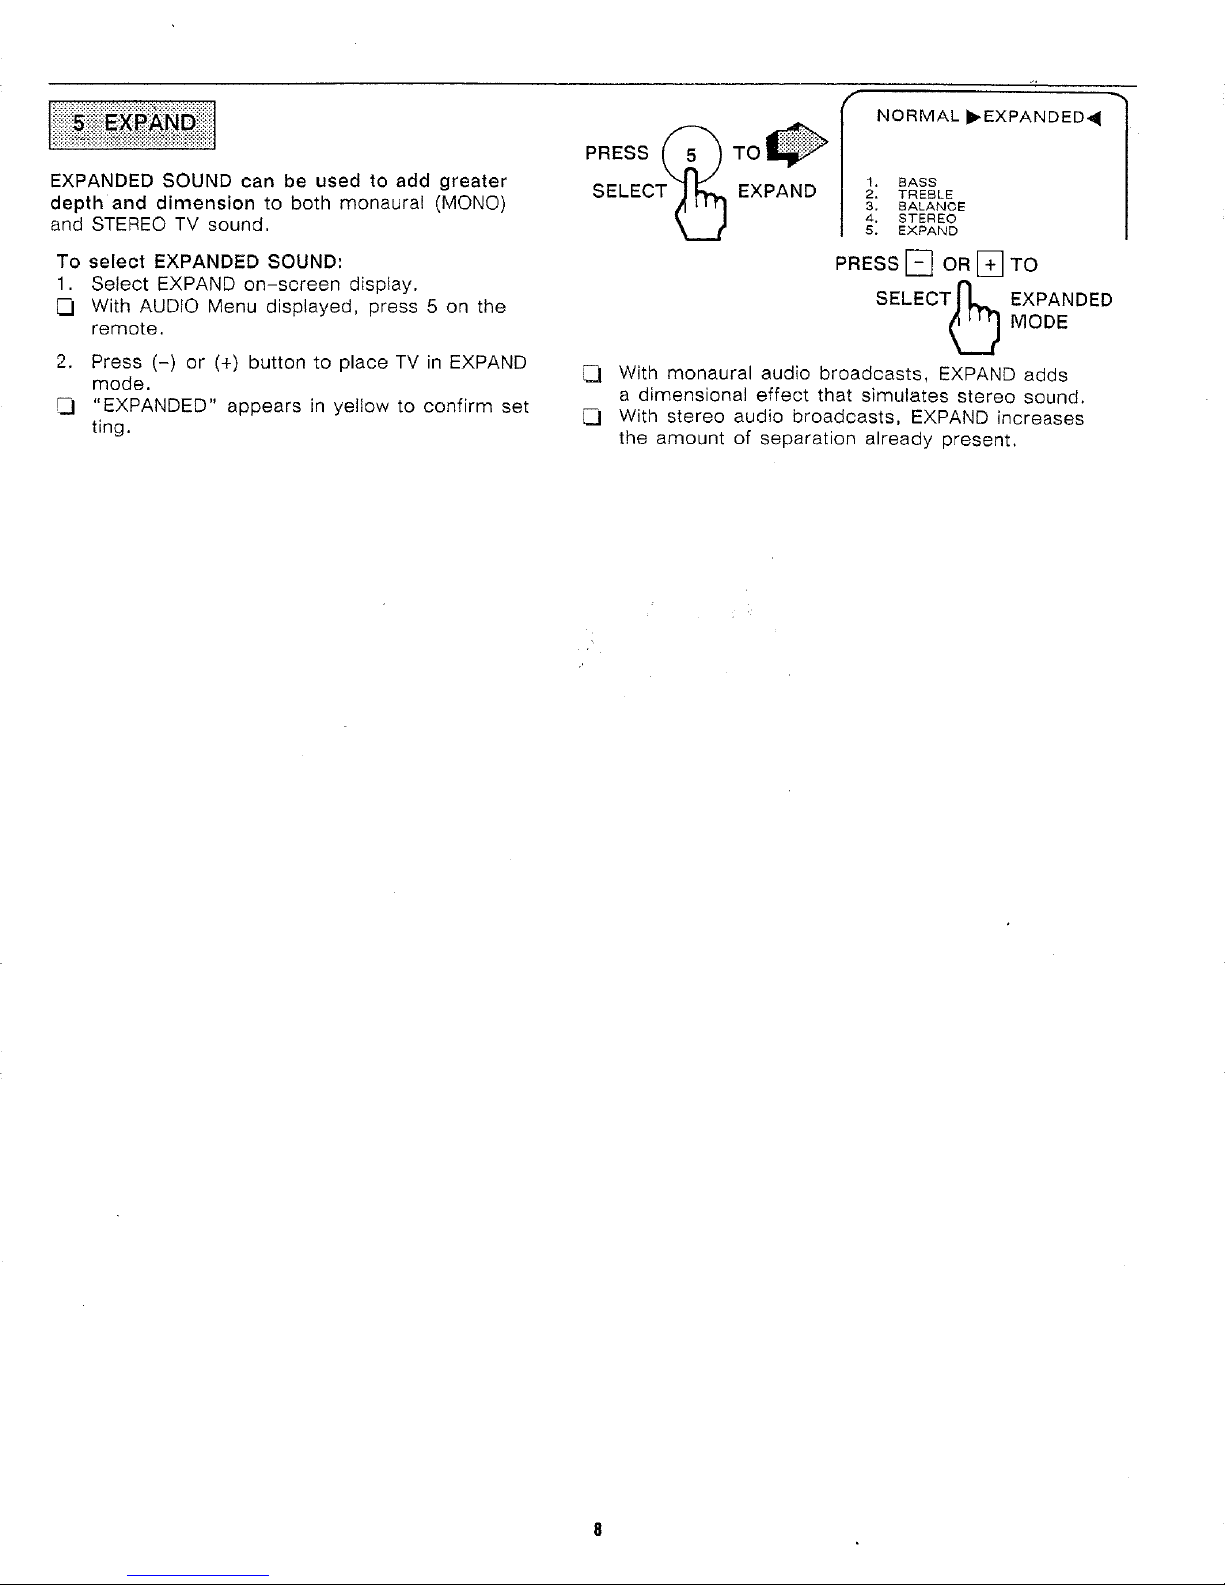
EXPANDED SOUND can be used to add greater
depth and dimension to both monaural (MONO)
and STEREO TV sound.
To select EXPANDED SOUND;
1. Select EXPAND on-screen display.
_1 With AUDIO Menu displayed, press 5 on the
remote.
2. Press (-) or (+) button to place TV in EXPAND
mode.
_d "EXPANDED" appears in yellow to confirm set
ting.
PRESS _)
EXPAND 2, TREBLE
TO _ I 1,NORMALBASS I_EXPANDED_
SELECT O
3, BALANCE
4, STEREO
S. EXPAND
PRESS[] oR[] TO
SELECT_ MoDEEXPANDED
,_ With monaural audio broadcasts, EXPAND adds
a dimensional effect that simulates stereo sound.
J_l With stereo audio broadcasts, EXPAND increases
the amount of separation already present.
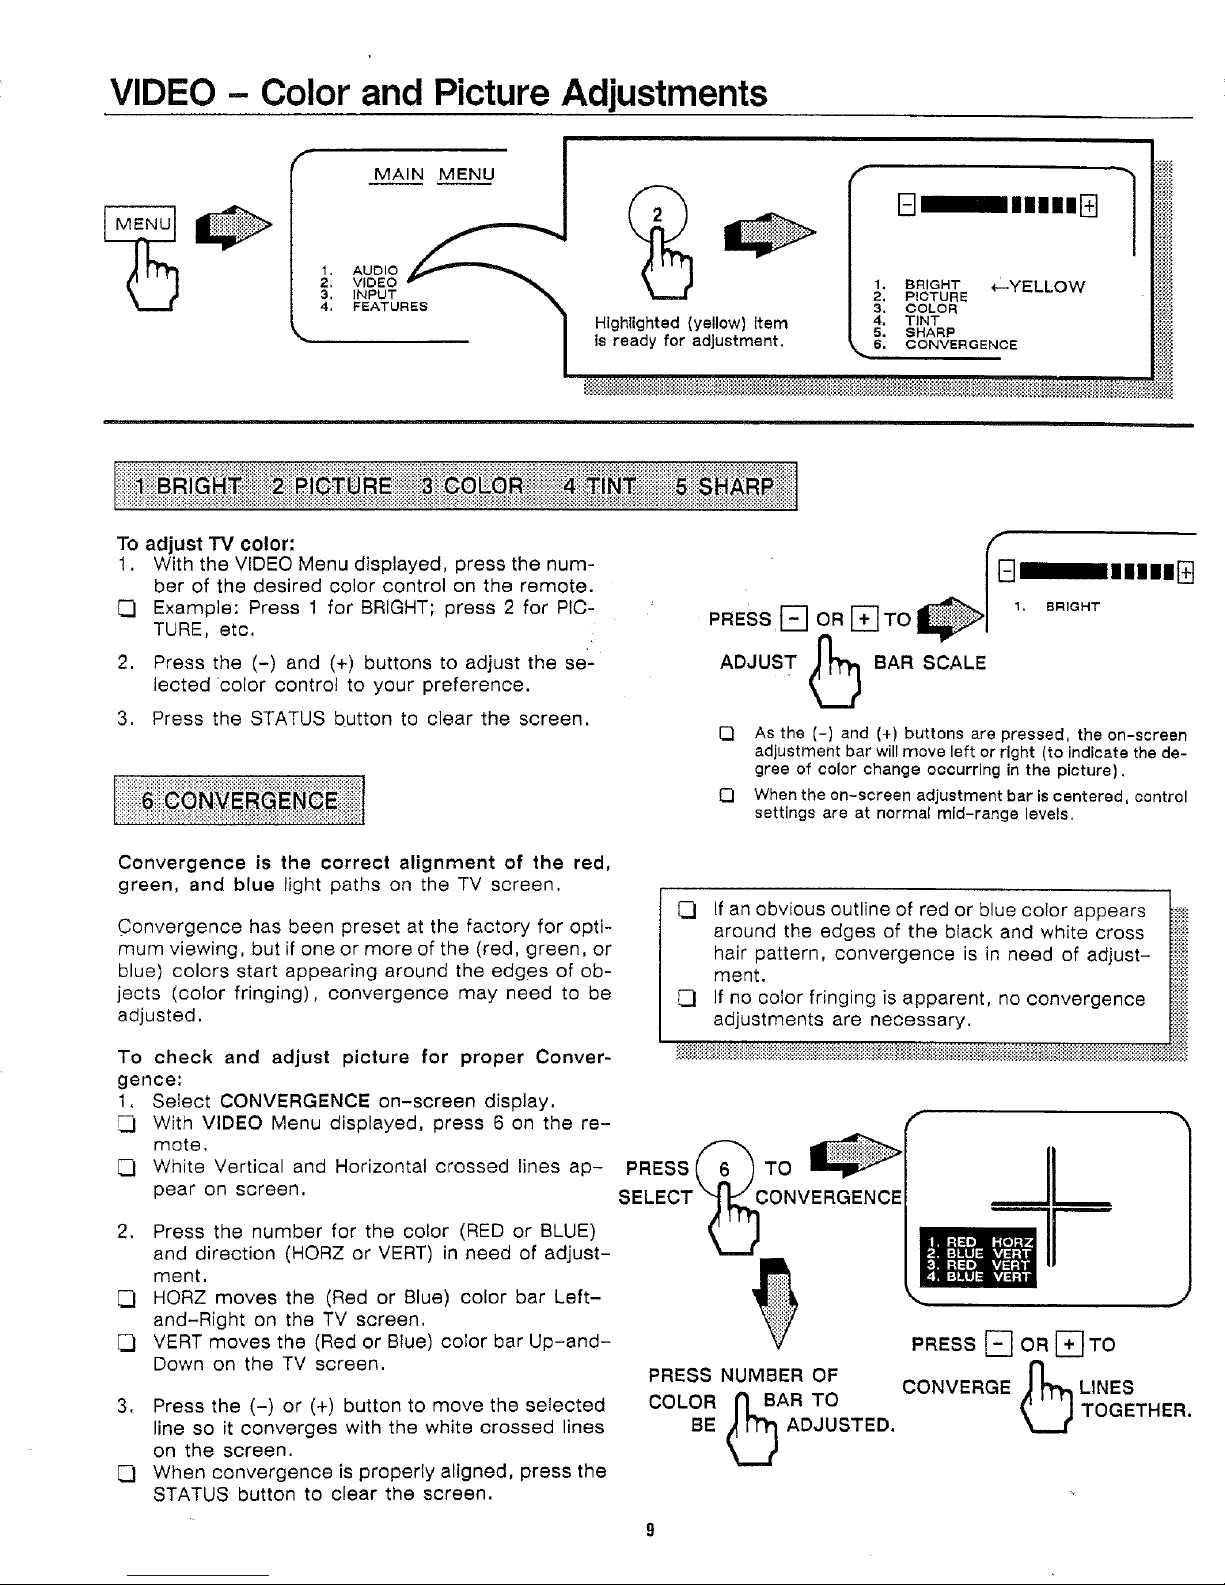
VIDEO - Color and Picture Adjustments
1,
AUDIO
2.
VIDEO r "_
3.
4.
P%RES
To adjust TV color:
1. With the VIDEO Menu displayed, press the num-
ber of the desired color control on the remote.
Example: Press 1 for BRIGHT; press 2 for PIC-
TURE, etc.
2. Press the (-) and (+) buttons to adjust the se-
lected color control to your preference.
3. Press the STATUS button to clear the screen,
Highlighted (yellow)Item
is ready for adjustment.
PRESSr-qORI-qTOn
ADJUST J_,_ BAR SCALE
E] As the (-) and (+) buttons are pressed, the on-screen
[3 When the on-screen adjustment bar is centered, control
r
B =mnuimm
1
1, BRIGHT *--YELLOW
2, P!CTURE
3, COLOR
4. TINT
5. SHARP
6. CONVERGENCE
m mnmmm
adjustment bar will move left or right (to indicate the de-
gree of color change occurring in the picture),
settings are at normal mid-range levels,
Convergence is the correct alignment of the red,
green, and blue light paths on the TV screen.
Convergence has been preset at the factory for opti-
mum viewing, but if one or more of the (red, green, or
blue) colors start appearing around the edges of ob-
jects (color fringing), convergence may need to be
adjusted.
To check and adjust picture for proper Conver-
gence:
1. Select CONVERGENCE on-screen display.
With VIDEO Menu displayed, press 6 on the re-
mote.
_d White Vertical and Horizontal crossed lines ap-
pear on screen.
2. Press the number for the color (RED or BLUE)
and direction (HORZ or VERT) in need of adjust-
ment,
[_1 HORZ moves the (Red or Blue) color bar Left-
and-Right on the TV screen,
VERT moves the (Red or Blue) color bar Up-and-
Down on the TV screen.
3. Press the (-) or (+) button to move the selected
line so it converges with the white crossed lines
on the screen.
When convergence is properly aligned, press the
STATUS button to clear the screen.
If an obvious outline of red or blue color appears
around the edges of the black and white cross
hair pattern, convergence is in need of adjust-
ment.
If no color fringing is apparent, no convergence
adjustments are necessary.
PRESSi TO
SELECT
PRESS [] OR ['_TO
PRESS NUMBER OF n
COLOR _ BAR TO
BE Q ADJUSTED.
CONVERGE
©
LINES
TOGETHER.
 Loading...