

Sears LS elite 1200,831.297550 Owner's Manual

LS t 12-0 0
Model No. 631.297550
Serial No.
The serial number can be found in
the location shown below. Write the
serial number in the space above.
'Sedal Number Decal
_-'X t=" RC I S z==" .
EQUIPMENT
H IELPLIN E!
1-800-736-6879
_CAUTION!
Read all precautions and ,
instructions in this manual
before using this equipmanL
Keep this manual.in a safe place
for _reference.
OWNER'S MANUAL
SEARS, ROEBUCK AND CO., HOFFMAN ESTATES, IL 60179

LS eHt:e1200
TABLE OF CONTENTS
IMPORTANT SAFETY PRECAUTIONS ....................................
BEFORE YOU BEGIN .................................................
ASSEMBLY ............ : .............................................
HOW TO USE THE PULSE SENSOR ......................................
OPERATION AND ADJUSTMENT ........................................
MANUAL MODE OPERATION
°.°*......... ,...*..° ....*°..*°. 0, °
*,°.°°.°° .°o°°°°B°*3
°°_o°_.°° °°°°°° • ° °°4
• • °°_°°° • °_ • °°°_o°.5
• • °. • °°._ • °_° • .°. • °7
°°_ °°° . • ..8
°°° .°°
................ 10
• °
HOW TO CONTROL THE SPEED ...................................................... 10
HOW TO CONTROLTHE INCLINE ............................................ . .. .. . 2.I0
HOW TO USE THE FAT CALORIE MONITOR ....................... . ... .. ... .. .. "....... 11
PROGRAM MODE OPERATION ........................................ ... ... .. ... .. . . .. 11
How TO USE A PRESET WORKOUT PROGRAM . . . . . 11
• .=*.. * • ..= • .. *• ... •* .* • _.. i.•. • o* •
HOW TO USE THE PULSE MODE ............................ 12
• • • • • ° .. • .. • ...*°..o*.o*
HOW TO USE THE FAT BURN AND FAT BURN PLUS PROGRAMS ................. ... ... .. 14
HOW TO USE THE FITNESS TEST PROGRAM ................................. .. . .... . . . 14
HOW TO CREATE CUSTOM WORKOUT PROGRAMS . 15
_=o°°o.o.°o° °.°°....**°...°..°.°.°1•
HOW TO USE A CUSTOM WORKOUT PROGRAM . . . ..... . ... . ... .. .. . ................. .. 16
TROUBLE-sHooTING AND STORAGE ......................... 18
. °. ° =...* ... • oo oo= .= . o=l=_.._•
CONDITIONING GUIDELINES ....... 20
• .. i=• • • • _t .. p• • .°* • ..*...°... *. _° •_..° • °.o • • o* •.°°,.•*
PART LIST ............................................. ...... . . . ........... .. .... ...•. . ..22
EXPLODED DRAWING ........... •................. 23
• ''" . °°. o=.._..=°.°o*°. .=* =._ ... ..=t..o
ORDERING REPLACEMENT PARTS ................................... . .. .. .. ... ... .. BackCover
2
IMPORTANT SAFETY PRECAUTIONS
WARNING:To _duc_ the dsk of bums, fire, electric shock or Injury to parsons, read thin fol-
lowing important safety preceutions and Information before operating the treadnlIll. .....
1. Position the treadmill on a level surface, with at
least 8 feet of clearance behind the treadmill.
Do not place the treadmill near water, outdoors
or on a surface that blocks any air openings.
Do not operate where aerosol products are
used or where oxygen is being administered.
2. When connecting the power cord (see HOW TO
PLUG IN THE POWER CORD on page 9), plug
the power cord directly into a grounded circuit
capable of carrying 12 or more amps. No other
appliance should be on the same circuit. Keep
the power cord away from heated surfaces. If
an extension cord is needed, use only a 14-
gauge general-purpose cord of five feet or less
in length with a three-wire conductor.
3. Never move the walking belt while the power Is
turned off. Do not operate the treadmill if the
power cord or plug is damaged, or if the tread-
mill is not working properly. (See BEFORE YOU
BEGIN on page 4 if the treadmill is not working
propedy.)
4. Wear appropriate exercise clothing when using
the treadmill; do not wear loose clothlng that
could become caught in the treadmill. Always
wear athletic shoes; never use the treadmill
with bare feet, wearing only stockings or In
sandals. Athletic support clothes are recom-
mended for both men end women.
5. The pulse sensor is not a medical device.
Various factors, Including the user's movement
while exercising, may affect the accuracy of
heart rate readings. The sensor is intended
only as an exercise aid in determining heart
rate trends in general.
6. Never start the treadmill while you are afanding
on the walking bell Always hold the handrail
when exercising on the treadmill.
7. Never allow more than one parson on the tread-
mill at a time. The treadmill should not he used
by persona weighing more than 250 pounds.
8. Keep small children away from the treadmill at
all times.
9. Never leave the treadmill unattended while it is
running. Always turn the power off when the
treadmill is not in use.
10. Never drop or insert any object into any open-
ing.
11. To reduce the possibility of overheating, do not
operate the treadmill continuously for longer
than I hour.
12. The treadmill Is capable of high speeds. Adjust
the speed in small Increments to avoid sudden
jumps In speed.
13. Use the treadmill only as described in this man-
ual.
14. Always unplug the power cord before perform-
Ing the maintenance and adjustment proce-
dures described In this manual. Never remove
the safety cover unless instructed to do so by
an authorized servlce representative. Servicing
other than the procedures in this manual
should be performed by an authorized service
representative only.
AWARNING: Before beginnlng this or any exercise program, consult your physician. This is
especially Important for persons over the age of 35 or parsons with pre-existing health problems. Read
all Instructions before using. SEARS assumes no responsibility for personal Injury or property damage
sustained by or through the use of this product.
SAVE THESE INSTRUCTIONS
3

BEFORE YOU BEGIN
Thank you for selecting the SEARS LSELITE 1200
treadmilLThe sophisticated LS ELITE 1200 treadmill
blends sta_e-of-the-art technology with Innovative
design to let you enjoy an excellent form of cardiovas-
cularexercise in the convenience and privacy ofyour
home.
For your benefit, read this manual carefully before
using the treadmill. Ifyou have additionalquestions,
please call our Customer Service Department toll-free
at 1-800-736-6879, Monday through Saturday, 7 a.m.
until 7 p.m. Central ]1me (excluo'incjholidays)'.TOhelp
us assist you, please note the productmodel number
and serial number before calling. The model number
ofthe treadmill is 831.297550. The serial number can
be found on a decal attached to the treedm_l (see the
frontcover of this manual forthe location of the
decal).
Before reading further, please review the drawing
below and familiarize yourself with the parts that are
labeled.
Console
Handrail
Uprights
Foot Rails
FRONT
CircuitBreaker
On/Off Switch
BACK
Rear Roller
Adjustment Bolt
RIGHT SIDE
4
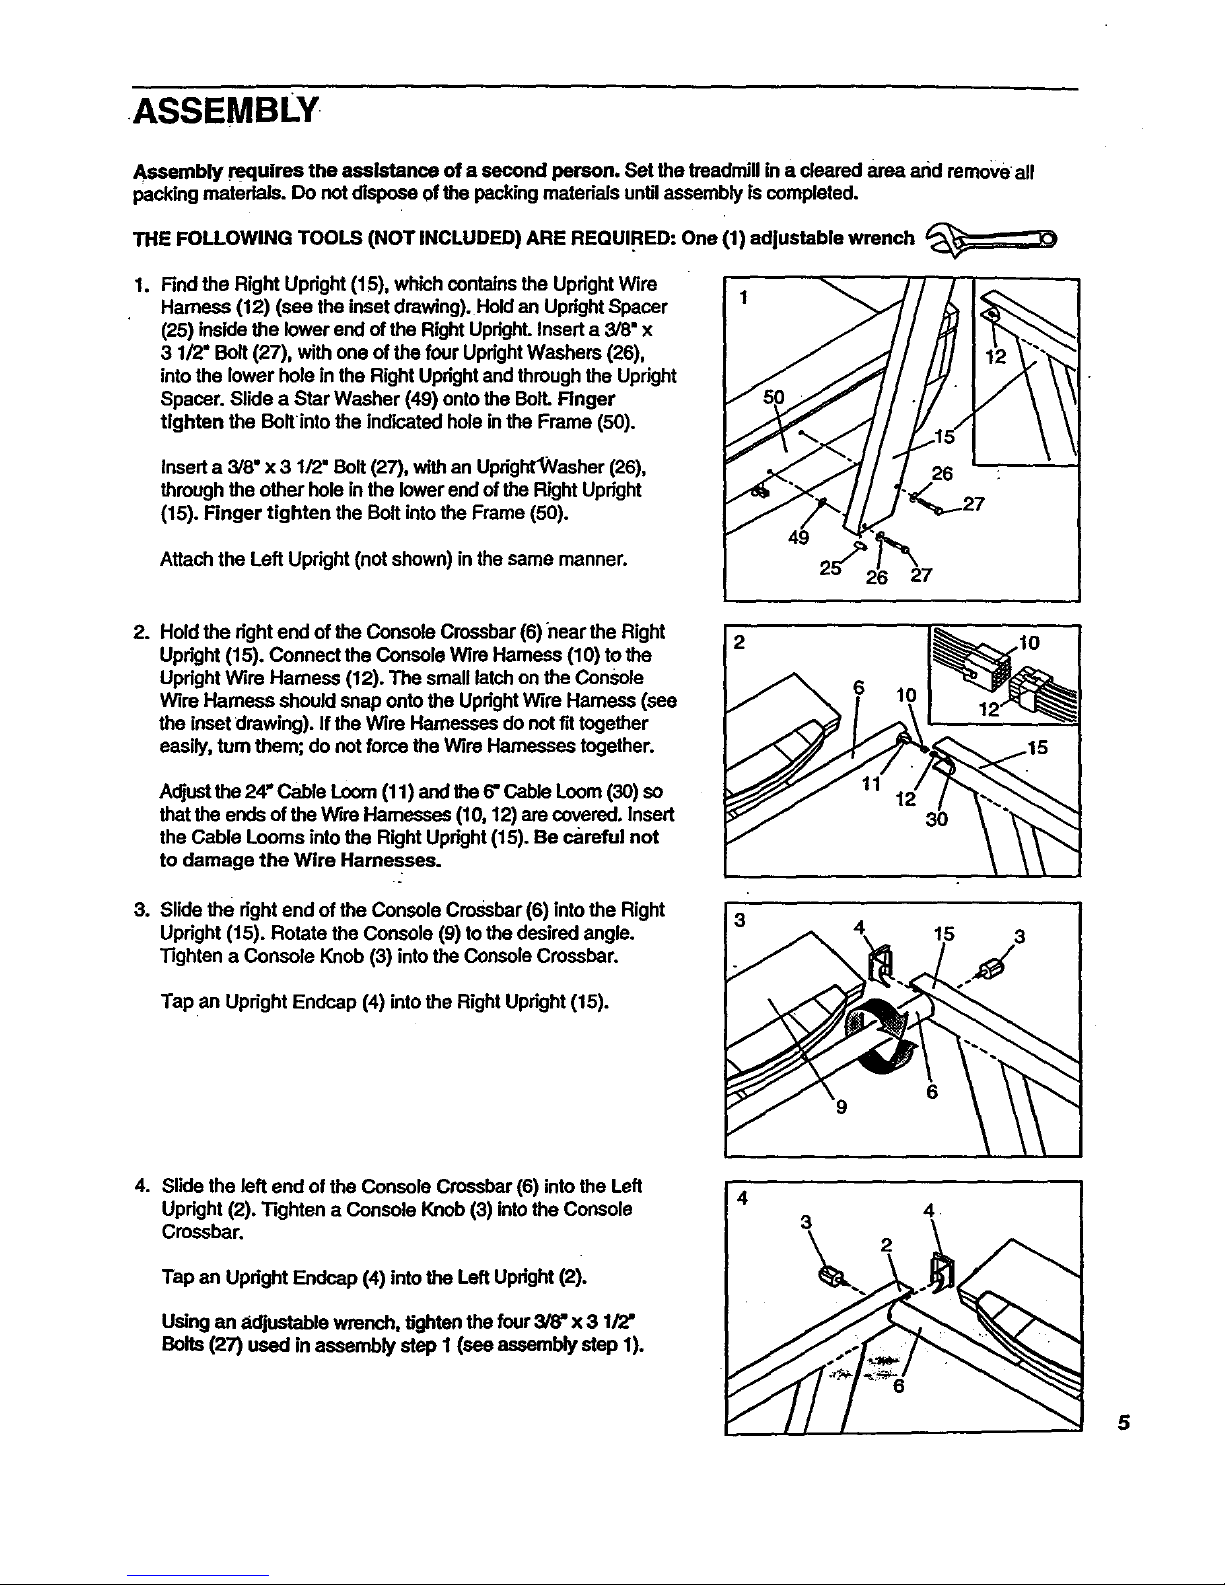
.ASSEMBLY.
Assembly requires the assistance of a second person. Set the treadmill in a cleared area and remove all
packing materials. Do not dispose of the packing reatedais until assembly is completed.
THE FOLLOWING TOOLS (NOT INCLUDED) ARE REQUIRED: One (1) adjustable wrench
1. Find the Right Upright (15), which contains the Upright Wire
Harness (12) (see the inset drawing). Hold an Upright Spacer
(25) inside the lower end of the Right UprighLInsert a 3/8" x
3 1/2° Bolt (27), with one of the four Upright Washers (26),
into the lower hole in the Right Uprightand through the Upright
Spacer. Slide a Star Washer (49) onto the BolL Finger
tighten the Bolt into the indicated hole in the Frame (50).
Insert a 3/8" x 3 1/2" Bolt (27), with an Uprigh_Washer (26),
through the other hole in the lower end of the Right Upright
(15). Finger tighten the Bolt into the Frame (50).
Attach the Left Upright (not shown) in the same manner.
12
2
26 27
2. Hold the right end of the Console Crossbar (6) near the Right
Upright (15). Connect the Console Wire Harness (10) to the
Upright Wire Harness (12). The small latch on the Console
Wire Harness should snap onto the Upright Wire Hamess (see
the inset drawing). If the Wire Harnesses do not fit together
easily, turn them; do not force the Wire Harnesses together.
Adjust the 24" Cable Loom (11) and the 6"Cable Loom (30) so
thatthe ends of the Wire Harnesses (10, 12) are covered. Insert
the Cable Looms into the Right Upright (15). Be careful not
to damage the Wire Harnesses.
3. Slide the right end of the Console Crossbar (6) intothe Right
Upright (15). Rotate the Console (9) to the desired angle.
Tighten a Console Knob (3) into the Console Crossbar.
Tap an Upright Endcap (4) into the Right Upright (15).
2
3
6
4
9
3O
15
3
4. Slide the left end of the Console Crossbar (6) into the Left
Upright (2). Tighten a Console Knob (3) intothe Console
Crossbar.
Tap an Upright Endeap (4) into the Left Upright (2).
Using an adjustablewrench,tighten the four3/8"x 3 1/2"
Bolts (27) usedin assemblystep I (seeassemblystep 1).
4
3
6
5
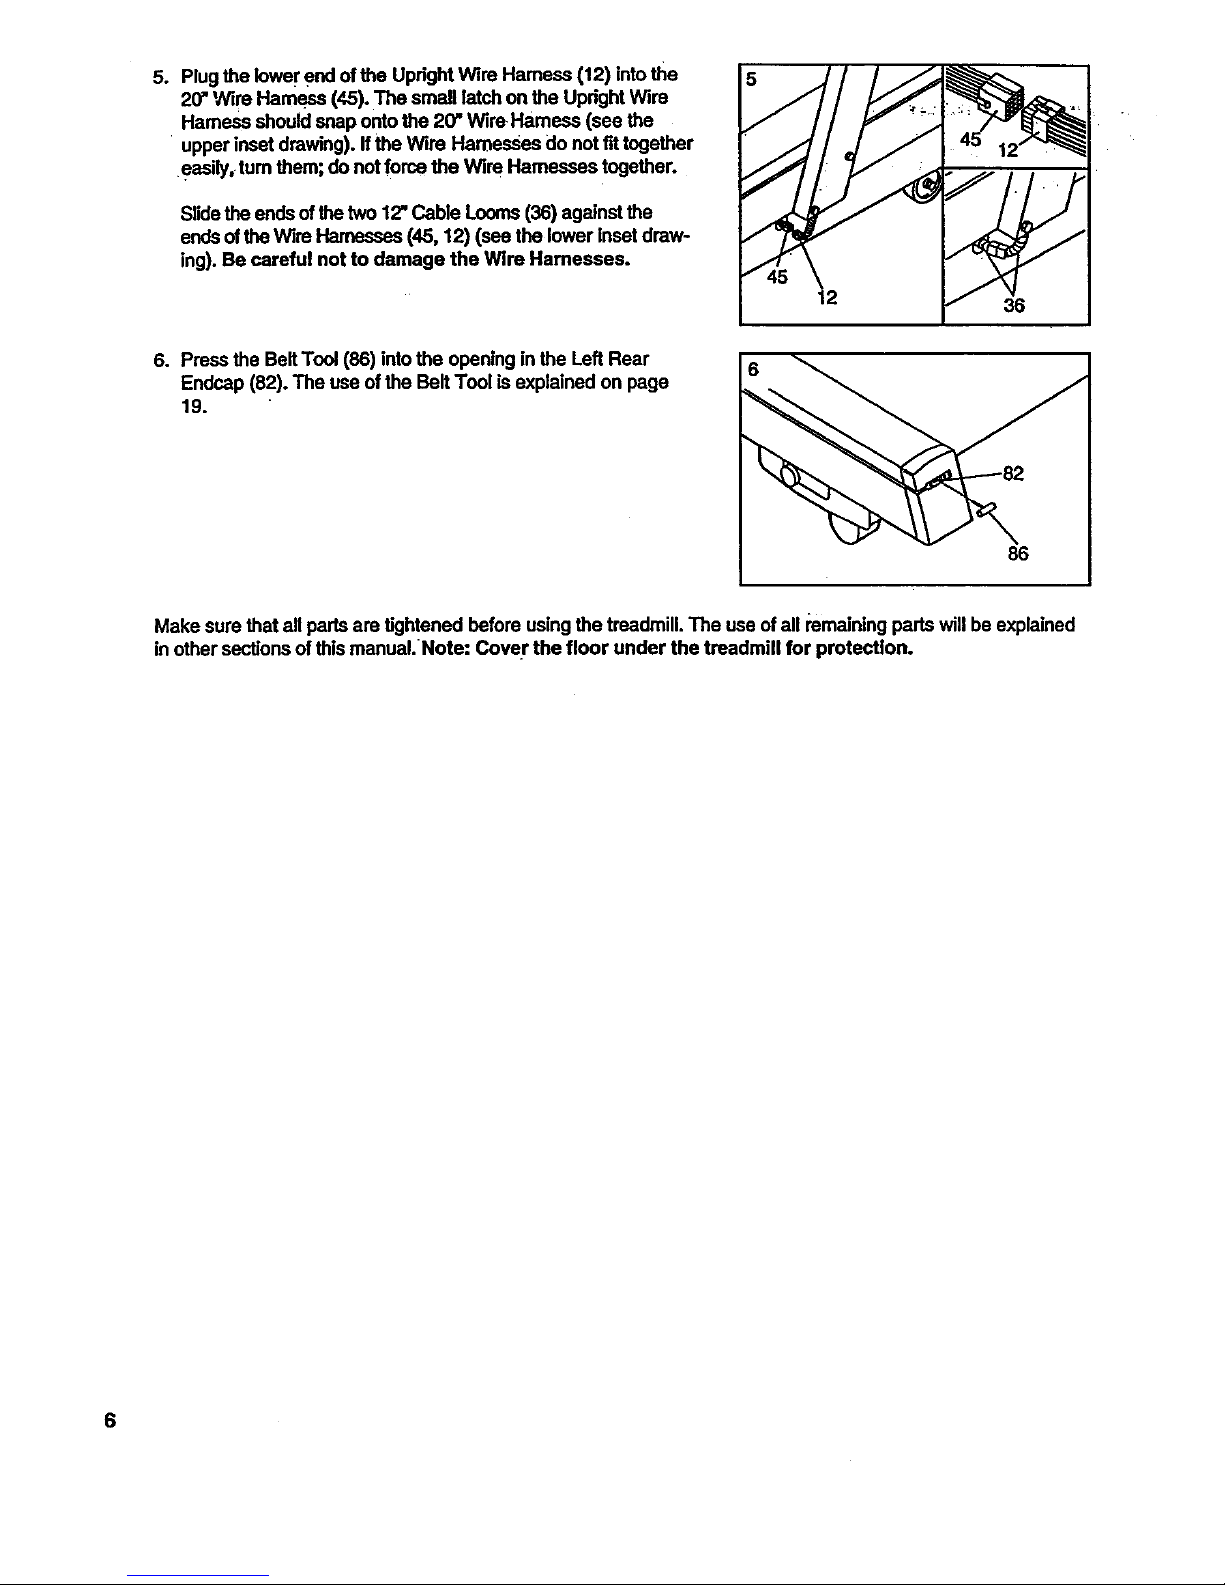
o Plug the lowel"end ofthe Upright Wire Harness (12) into the
20" Wire Hamess (45). The small latch on the Upright Wire
Hamess should snap ontothe 20" Wire Hamess (see the
upper inset drawing), ffthe Wire Hamesees do not tit together
eas ly, turn them; do not force the Wire Harnesses together.
Slidethe ends ofthe two 12"Cable Looms (36) against the
ends ofthe Wire Harnesses (45, 12) (see the lower inset draw-
ing). Be careful not to damage the Wire Hamesees.
12
36
6. Press the Belt Tool (86) intothe opening in the Left Rear
Endcap (82). The use ofthe Belt Tool is explained on page
19.
86
Make sure that all pads are tightened before using the treadmill. The use of all remainingpads will be explained
in other sections of this manual.Note: Cover the floor under the treadmill for protection.
6
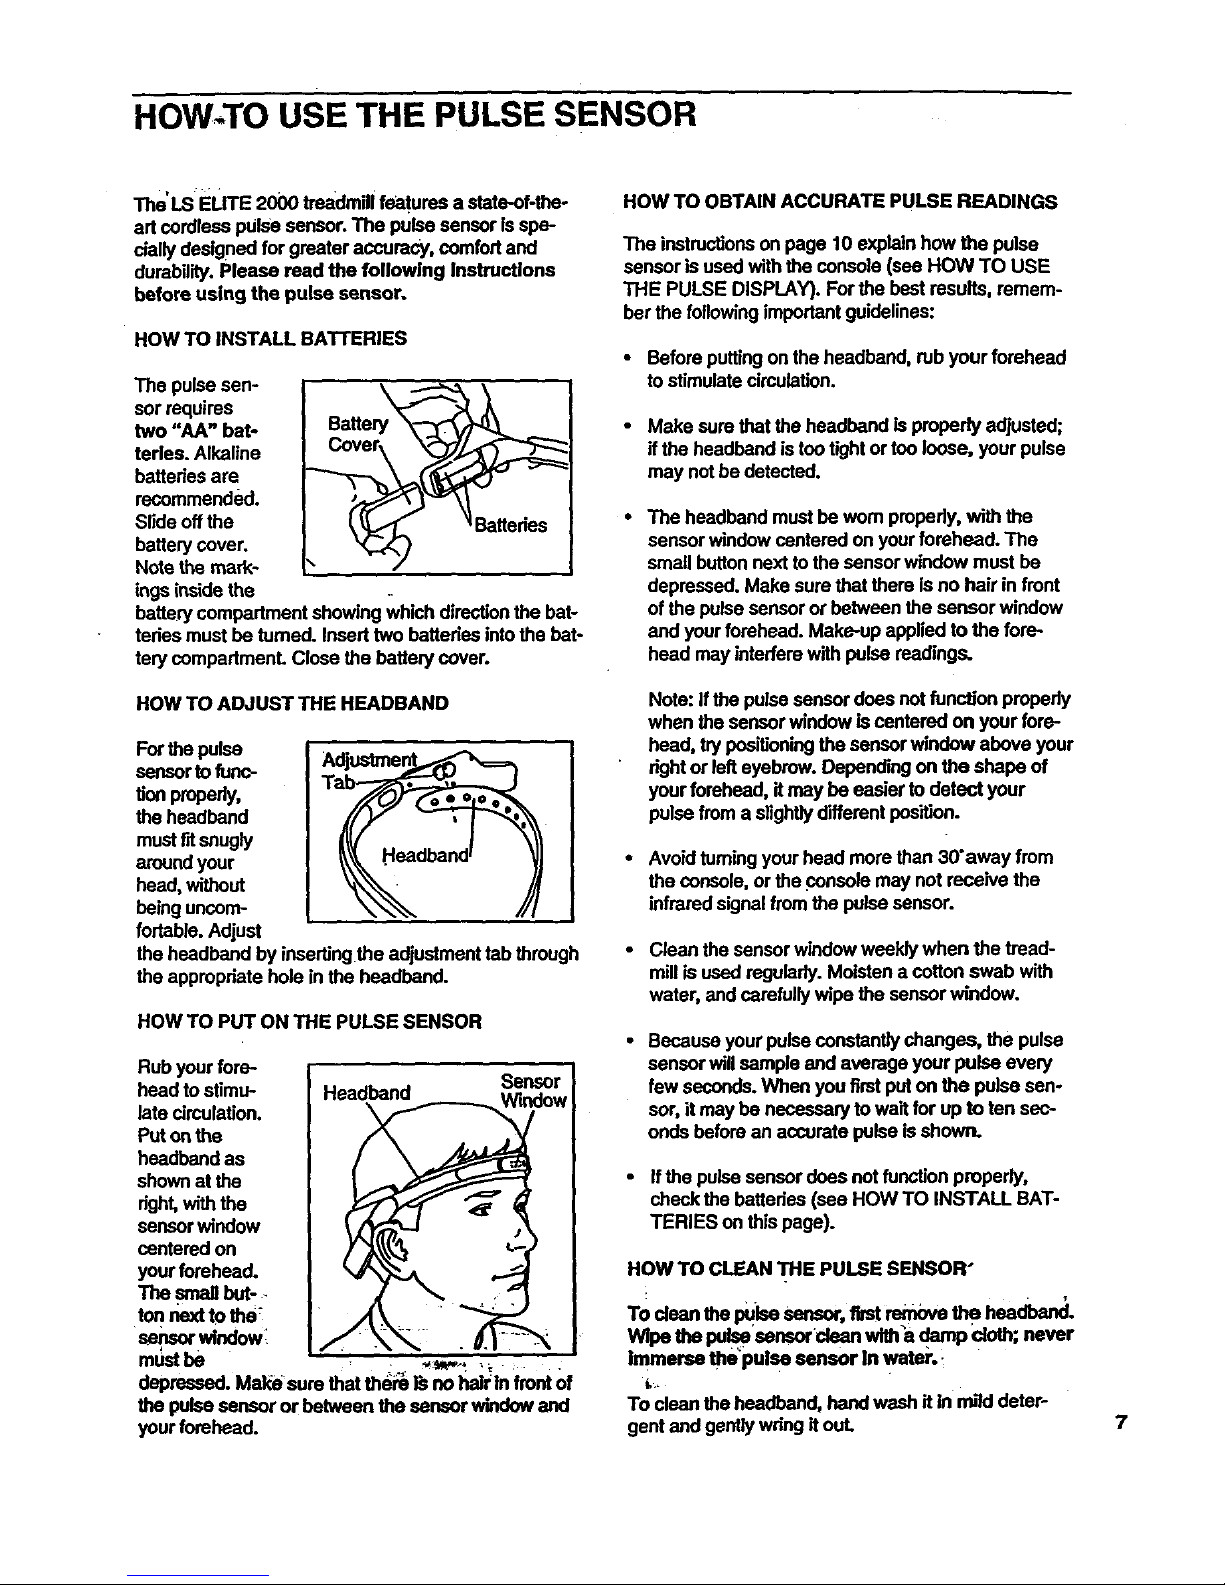
HOW-TO USE THE PULSE SENSOR
The'LS ELITE 2000 treadmill features a state-of-the-
art cordless pulse sensor. The pulse sensor Is spe-
dally designed for greater accuracy, comfort and
durability. Please read the following Instructions
before using the pulse sensor.
HOW TO INSTALL BATI'ERIES
The pulse sen-
sor requires
two "AA" bat-
terles. Alkaline
batteries are
recornmend_=d.
Slide off the
battery cover.
Note the mark-
Battery_
,. _ _ Batteries
ings inside the
battery compartment showing which direction the bat-
teries must be tumed. Insert two battedes into the bat-
tery compadmenL Close the battery cover.
HOW TO ADJUST THE HEADBAND
For the pulse
sensor to func-
tion properly,
the headband
must fit snugly
around your
bead, without
being uncom-
fortable. Adjust
the headband by inserting the adjustment tab through
the appropriate hole in the headband.
HOW TO PUT ON THE PULSE SENSOR
Rub your fore- Sensor
head to stimu- Headband W_edow
late circulation.
Put on the
headband as
shown at the
dght, with the
sensor window
centered on
your forehead.
Tba but-
tonnext to the_
sensor window_
must be . :. _,,i,,._ __
depressed. Mal_eSure that the_ i_ no halr In front of
the pulse sensor or between the ean_or window and
your forehead.
HOW TO OBTAIN ACCURATE PULSE READINGS
The instructionson page 10 explain how the pulse
sensor is used with the console (see HOW TO USE
THE PULSE DISPLAY). For the best results, remem-
ber the following important guidelines:
• Before putting on the headband, rub your forehead
to stimulate circulation.
• Make sure that the headband is properly adjusted;
if the headband is too tightor too loose, your pulse
may not be detected.
The headband must be wore properly, with the
sensor window centered on your forehead. The
small button next to the sensor window must be
depressed. Make sure that there is no hair in front
of the pulse sensor or between the sensor window
and your forehead. Make-up applied to the fore-
head may interfere with pulse readings.
Note: Ifthe pulse sensor does not function propedy
when the sensor window is centered on your fore-
head, try positioningthe sensor window above your
right or left eyebrow. Depending on the shape of
your forehead, itmay be easier to detect your
pulse from a slightly different position.
• Avoid tuming your head more than 30"away from
the console, or the console may not receive the
infrared signal from the poise sensor.
• Clean the sensor window weekly when the tread-
mill is used regularly. Moisten a cotton swab with
water, and carefully wipe the sensor window.
Because your pulse constantly changes, the pulse
sensor will sample and average your pulse every
few seconds. When you first put on the pulse sen-
sor, it may be necessary to wad for up to ten see-
onds before an accurate pulse is shown.
• If the pulse sensor does not function properly,
check the batteries (see HOW TO INSTALL BAT-
TERIES on this page).
HOW TO CLEAN THE PULSE SENSOR"
To dean the pulse sensor, flret rembve the headband.
Wipe the pu_e'sensorclean with_a .damp cloth; never
Immerse the pulse sensor in water.
To clean the headband, hand wash it In nu'lddeter-
gent and gently wring it out.
7
OPERATION AND ADJUSTMENT
8
THE MAINTENANCE-FREE WALKING BELT
The treadm,l features a maintenance-frea walking
belt. Never apply silicone spray or other sub-
stances to the walking belt or the walking plat-
form; such substances will deteriorate the walking
belt and cause excessive wear.
HOW TO PLUG INTHE POWER CORD
This product must be grounded. If it shouldmalfunc-
tion or break down, grounding providesa path of least
resistancefor electric currentto reduce the riskof elec-
tric shock. This product is equipped with a cord having
an equipment-grounding conductorand a grounding
plug.Plug the power cord Into an appropdste outlet
that is properly installed and grounded in accor-
dance with all local codes and ordinances.
kDANGER: Improper connectionofthe
equipment-grounding conductor can result in a
risk of electric shock. Check with a qualified elec-
trician or sendceman if you are in doubt as to
whether the product Is propedy grounded. Do not
modify the plug provided with the product--If it
will not fit the outlet, have a proper outlet
Installed by a qualified electrician.
This product isfor use on a nominal 120-volt circuit,
and has a grounding plug that lookslike the plug
illustrated in drawing I below.
2
_Gm_._. indedOutletJGmundedOutlet Box
_ap iGmGmUndedOutlet Box
ter
und'mgPlug
A temporaly adapter that looks like the adapter illus-
trated in drawing2 may be used to connect this plug
to a 2-pole receptacle as shown in drawing 2 if a
properly grounded outlet is not available. The tempo-
rary adapter should be used only untga properly
grounded outlet (drawing 1) can be installed by a
qualified electrician. The green-colored dgid ear, lug,
or the like extending from the adapter must be con-
nected to a permanent ground suchas a propedy
grounded outlet box cover. Whenever the adapter is
used it must be held in place by a metal screw. Some
2-pole receptacle outlet box covers are not
grounded. Contact a qualified electrician to deter-
mine if the outlet box cover is grounded before
using an adapter.
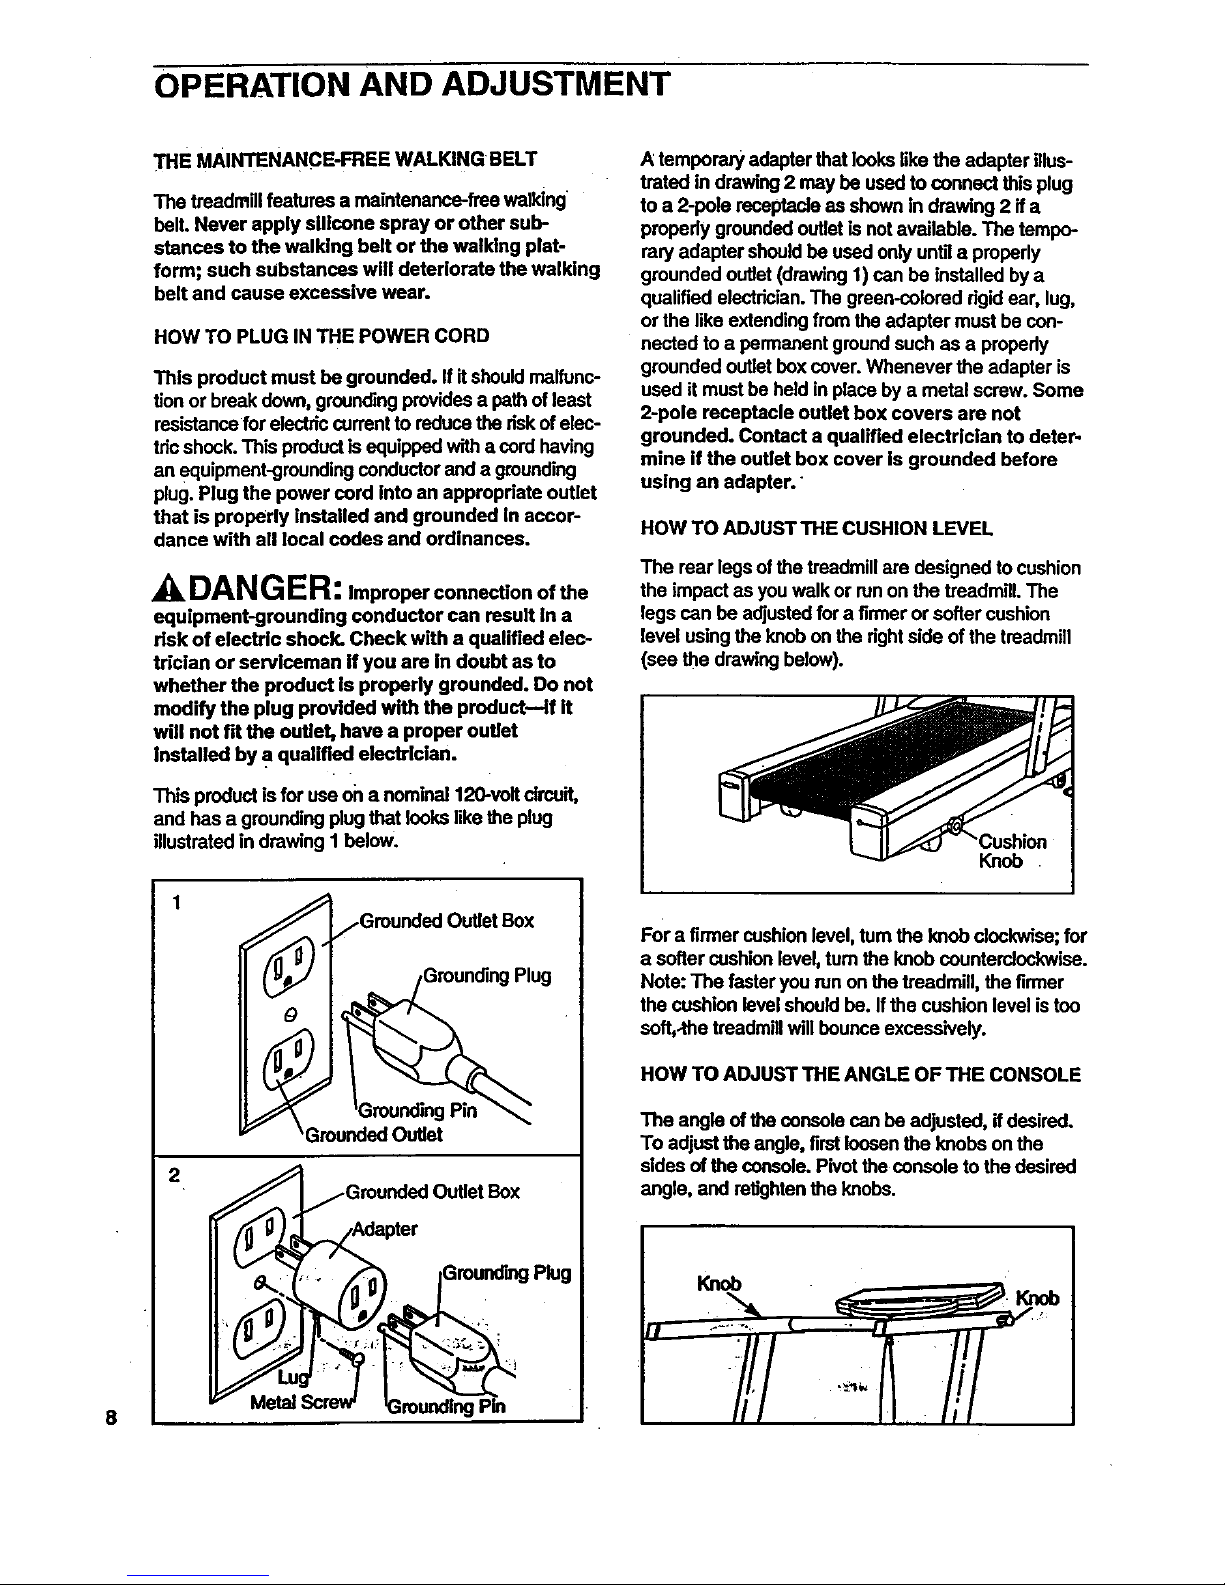
HOW TO ADJUST THE CUSHION LEVEL
The rear legs of the treadmill are designed to cushion
the impact as you walk or runon the treadmill. The
legs can be adjusted for a firmer or softer cushion
level using the knob on the rightside of the treadmill
(see the drewieg below).
Knob
For a firmer cushion level, tum the knob cluckwise; for
a softer cushion level, turn the knob counterclockwise.
Note: The fasteryou mn on the treadmill, the firmer
the cushion level should be. If the cushion level is too
soft,-the treadmill will bounce excessively.
HOW TO ADJUST THE ANGLE OF THE CONSOLE
The angle of the console can be adjusted, if desired.
To adjust the angle, firstloosenthe knobs on the
sides of the console. Pivot the console tothe desired
angle, and reifghten the knobs.
Knob
Knob
 Loading...