

Sears Kenmore Vacuum Cleaner Owner's Manual
Owner's Manual
Vacuum Cleaner
CAUTION:
Read and follow all
safety and operating
instructionsbefore first
use of this product.
Sears, Roebuck and Co., Hoffman Estates, IL 60179 U.S.A.
www.sears.com
PART NO. CO1ZBCB00UOO-8175128 Printed in U.S,A.
Before Using Your New Vacuum ....... 2
Kenmore Vacuum Cleaner Warranty .._ 2
important Safety Instructions ......... 3
Parts and Features .................. 4
Assembly Instructions ............. 5-6
Operating Instructions .................. 7
Pile Height Selection and Setting ........ 7
Releasing the Handle ................. 8
ON/OFF Switch ..................... 8
Motor Protector ........................ 8
Attachments ..................... 9-10
Attachment Use Chart ............... 10
Vacuuming Tips .................... 11
Vacuum Cleaner Care ............... 11
Vacuum Storage .................... 11
Cleaning Exterior and Attachments ..... 12
Dust Bag Changing ............... 12-13
Motor Safety Filter Changing .......... 13
Exhaust Filter Changing ............. 14
Belt Changing and Agitator Cleaning o. 15-17
ClOgRemoval ..................... !7
LightBulb Changing ................. 18
Troubleshooting ...................... 19
Requesting Assistance Or Service , ,. 20
Please read this guide. It wilthelp you assemble and operate your new Kenmore vacuum in
the safest and most effectiveway.
For more informationabout the care andoperation, callyournearest Sears store. You will
need the complete model and serial numberswhen requestinginformation_Yourvacuum's
model and serial numbers are located on the Model and Serial Number Plate,
Use the space below to record the model number and serial number of your new Kenmore
vacuum.
Model No.
Serial No.
Date of Purchase
Keep this book and your sales check (receipt) in a safe place for future reference.
FULL ONE.YEAR WARRANTY
When used for private household purposes, if within one year from the date of purchase, this
vacuum cleaner fails due to a defect in material or workmanship, RETURN IT TO THE
NEAREST SEARS SERVICE CENTER/DEPARTMENT IN THE UNITED STATES, and Sears
willrepair itfree of charge.
This warranty givesyou specificlegal rights,and you may also have other rightswhichvary
fromstate to state,
SEARS, ROEBUCK AND CO., Dt817 WA, Hoffman Estates, IL 60179
WARNING
Your safety is important to us. To reduce the risk of fire, electrical shock, injury
to persons or damage when using your vacuum cleaner, follow basic safety pre-
cautions including the following:
Read this manual before assembling or
using your vacuum cleaner.
Use your cleaner only as described in
this manual. Use only with Sears recom-
mended attachments.
To reduce the risk of electricalshock-
Do not use outdoors or on wet surfaces,
Disconnect electrical supply before any
servicing or cleaning., Failure to do so
could result in electrical shock or person-
al injury.
Always turn cleaner off before unplug-
ging.
Do not unplug by pulling on cord.. To
unplug, grasp the plug, not the cord.
Do not use with damaged cord or plug. If
cleaner is not working as it should, has
been dropped, damaged, left outdoors, or
dropped into water, return it to a Sears
Service CentedDepartment.
Do not pull or carry by cord, use cord as
a handle, close door on cord, or pull cord
around sharp edges or corners. Do not
run cleaner over cord. Keep cord away
from heated surfaces.
Do not leave cleaner when plugged in.
Unplug from outlet when not in use and
before servicing.
Do not allow to be used as a toy. Close
attention is necessary when used by or
near children.
Do not handle plug or cleaner with wet
hands,
Do not put any objects into openings.
Do not use with any opening blocked;
keep free of dust, lint, hair and anything
that may reduce air flow.
Keep hair, loose clothing, fingers, and all
parts of body away from openings and
moving parts.
Do not use cleaner without dust bag
and/or filters in place.
Always change the dust bag after vacu-
uming carpet cleaners or freshener, pow-
ders and fine dust. These products clog
the bag, reduce airflow and can cause
the bag to burst° Failure to change bag
could cause permanent damage to the
cleaner.
Do not use the cleaner to pick up sharp
hard objects, small toys, pins, paper
clips, etc. They may damage the cleaner
or dust bag.
Do not pick up anything that is burning
or smoking, such as cigarettes, matches,
or hot ashes.
Do not use cleaner to pick up flammable
or combustible liquids (gasoline, cleaning
fluids, perfumes, etc.), or use in areas
where they may be present. The fumes
from these substances can create a fire
hazard or explosion.
Use extra care when cleaning on stairs,.
Do not put on chairs, tables, etc. Keep
on floor.
You are responsible for making sure that
your vacuum cleaner is not used by any-
one unable to operate it properly°
THESE INSTRUCTIONS
Proper assembly and safe use of your vacuum cleaner are your responsibilities° Your
cleaner is intended only for household use. Read this Owner's Manual carefully for
important use and safety information. This guide contains safety statements under
warning and caution symbols. Please pay special attention to these boxes and follow
any instructions given. WARNING statements alert you to such dangers as fire, electri-
cal shock, burns and personal injury. CAUTION statements alert you to such dangers
as personal injury and/or property damage,.
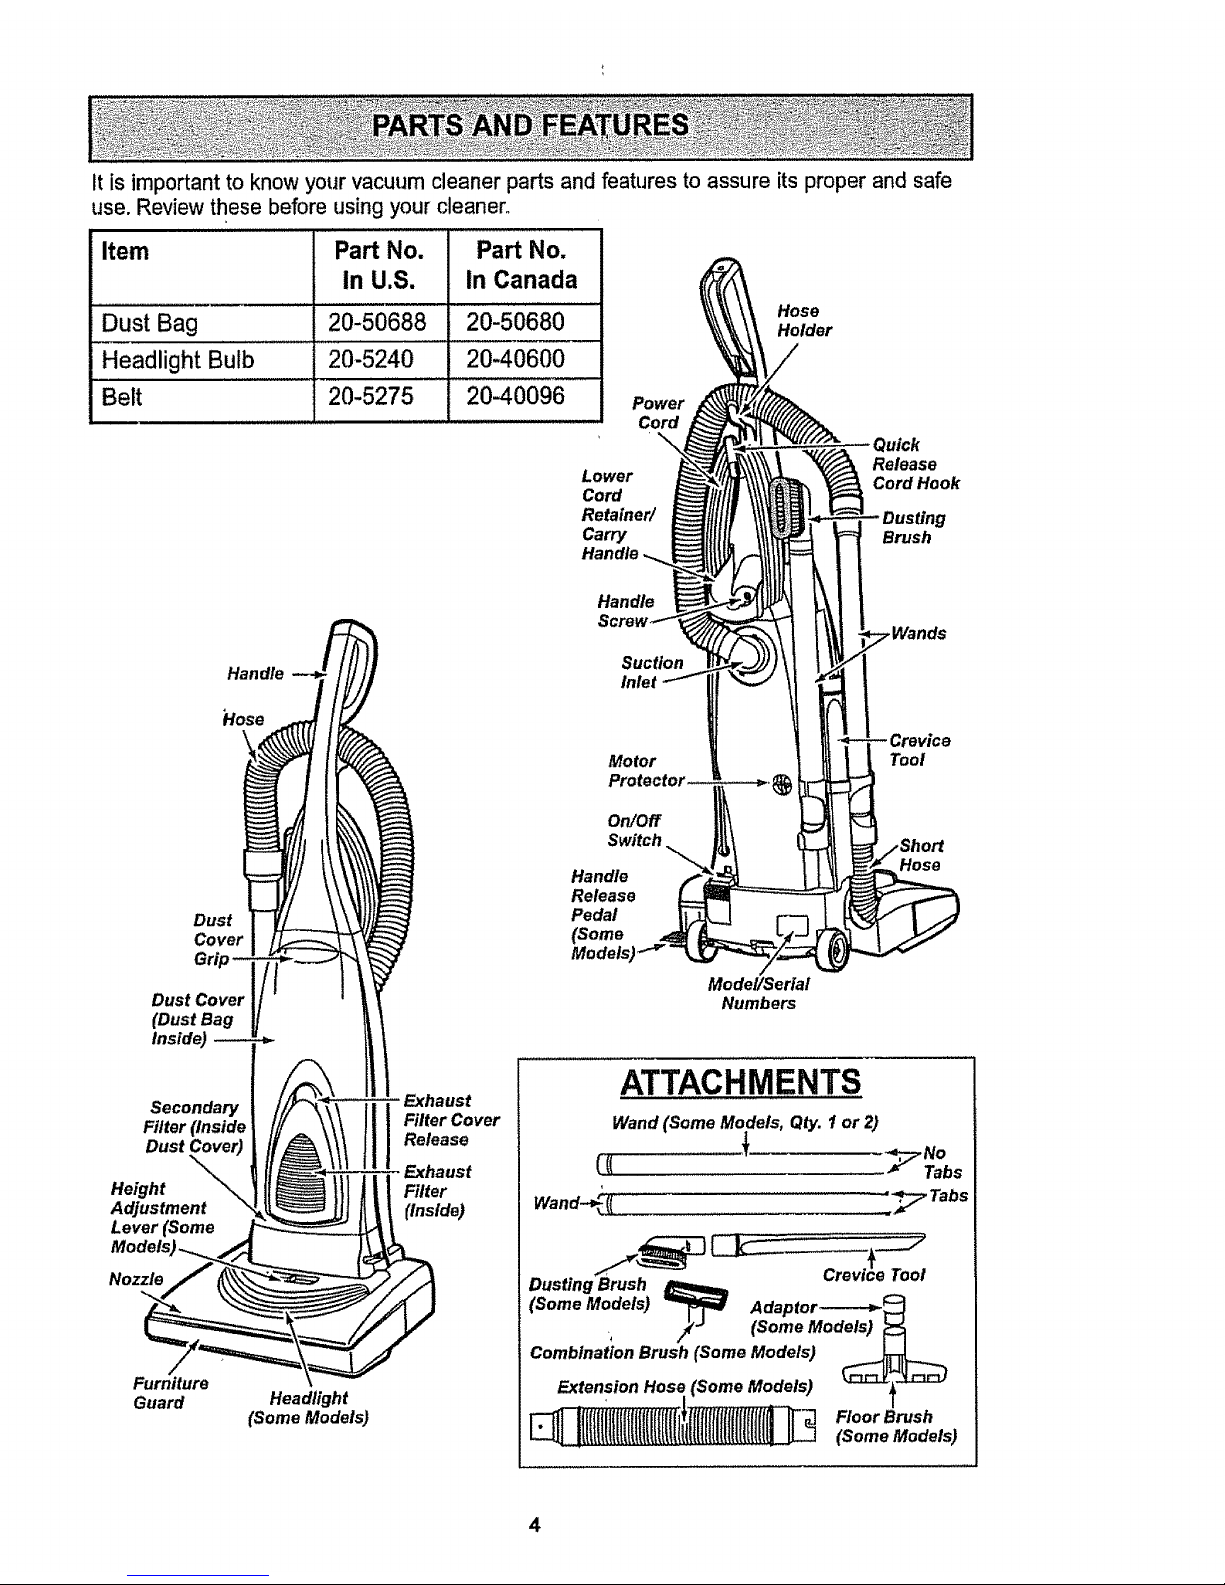
ttisimportantto knowyourvacuumcleanerpartsandfeaturesto assureitsproperandsafe
use.Reviewthesebeforeusingyourcleaner.
Item Part No. Part No.
In U.S. In Canada
Dust Bag 20-50688 20-50680
Headlight Bulb..............................20-5240 20-40600
Belt 20-5275 20-40096
Power
Cord
Lower
Cord
Retainer/
Carry
Handle
Hose
Holder
Release
Cord Hook
Brush
Hose
Handle
SucUon
In_t
Motor
.Wands
Tool
Dust
Cover
Dust Cover
(Dust Bag
inside)
Secondary
Filter (inside
Dust
Height
Adjustment
Lever (Some
Models
Nozzle
Furniture
Guard
Headlight
(Some Models)
Filter Cover
Release
Filter
(Inside)
On/Off
Switch
Handle
Release
Pedal
(Some
Model/Serial
Numbers
Hose
ATTACHMENTS
Wand (Some Models, Qty. I or 2)
Wand "7 Tabs
Crevice Tool
Dusting Brush _
(Some Models) Adaptor-----P_
(Some Mode_
Combination Brush (Some Models)
Extension HoseI(Some Models)
1_ iilI!lliltUlt[l{lIlll[(lii'il[I{Iflll({lIflt{{I(I_ _,oorB,,_h
• I . (Some Models)
4
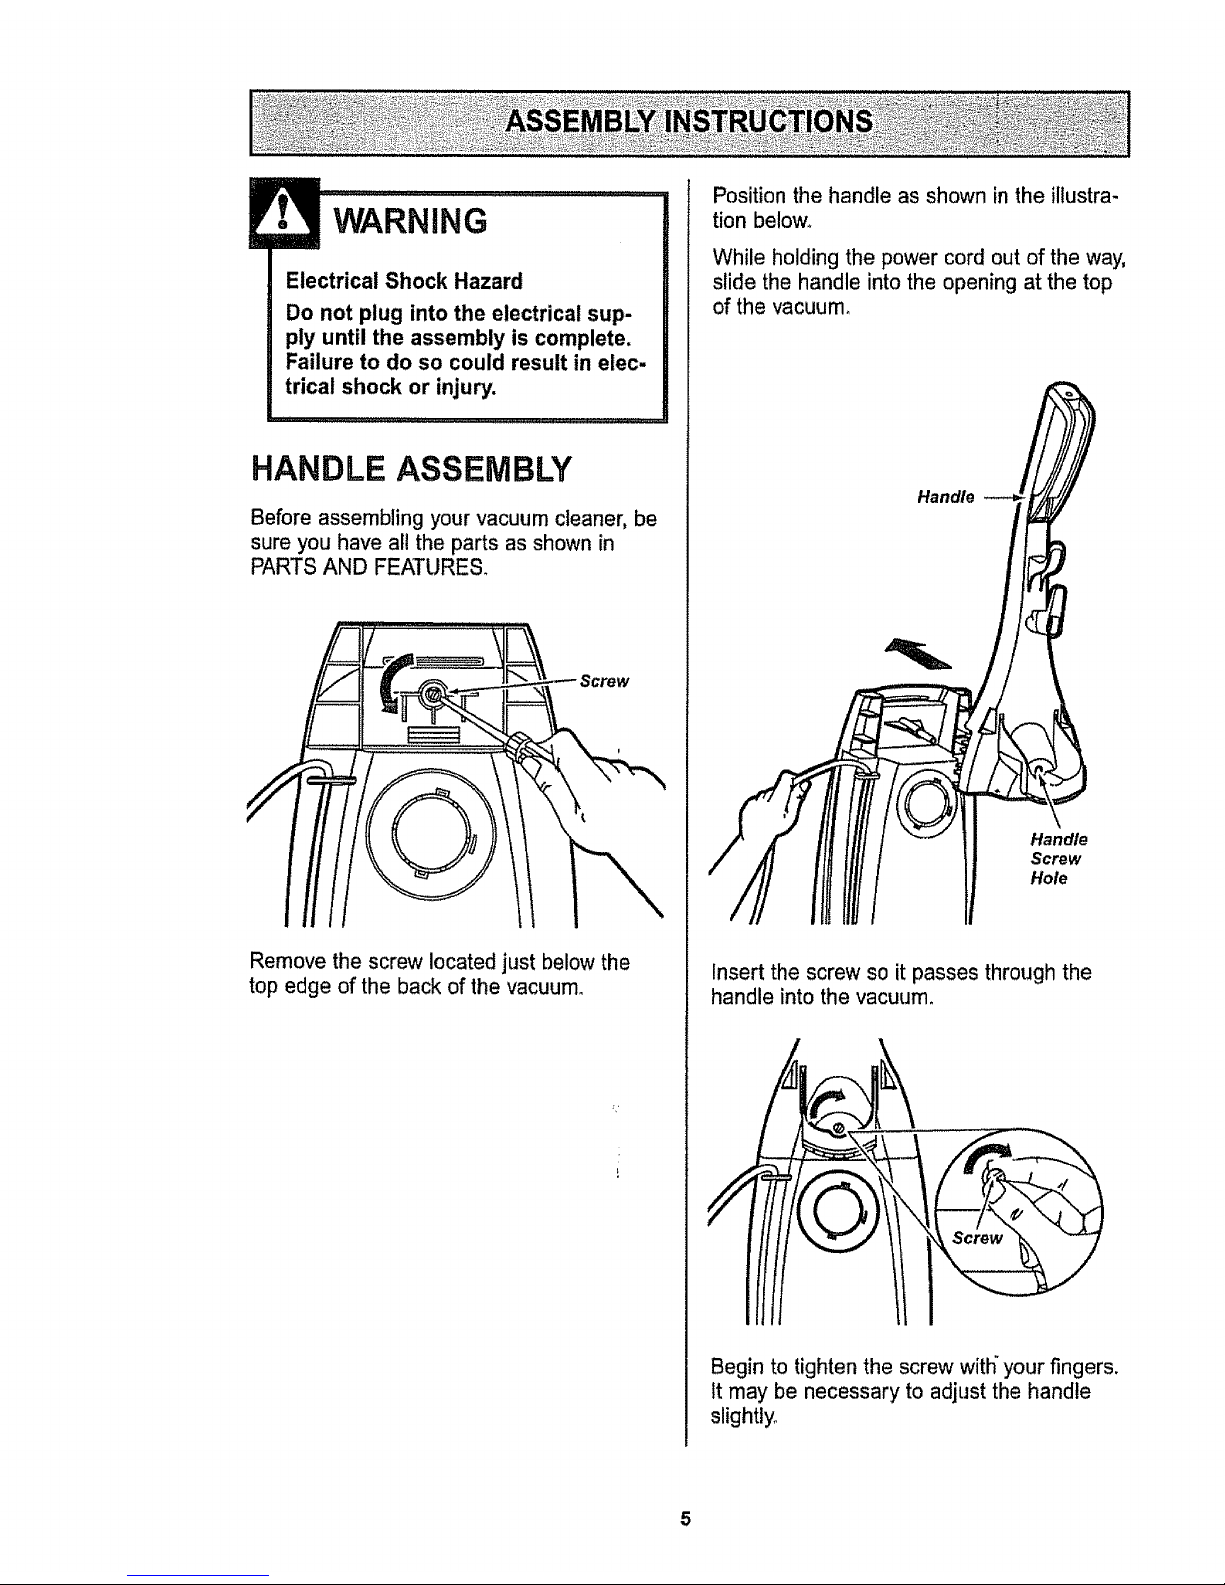
WARNING
Electrical Shock Hazard
Do not plug into the electrical sup-
ply until the assembly is complete.
Failure to do so could result in elec-
tricat shock or injury,
HANDLE ASSEMBLY
Before assemblingyour vacuum cleaner, be
sure you have all the parts asshown in
PARTS AND FEATURES.
Remove the screw located just below the
top edge of the back of the vacuum.
Position the handle as shown in the illustra-
tion below,
While holding the power cord out of the way,
slide the handle into the opening at the top
of the vacuum,
Handle
Handle
Screw
Hole
Insert the screw so it passes through the
handle into the vacuum.
Begin to tightenthe screw with"your fingers.
It may be necessary to adjust the handle
slightly_
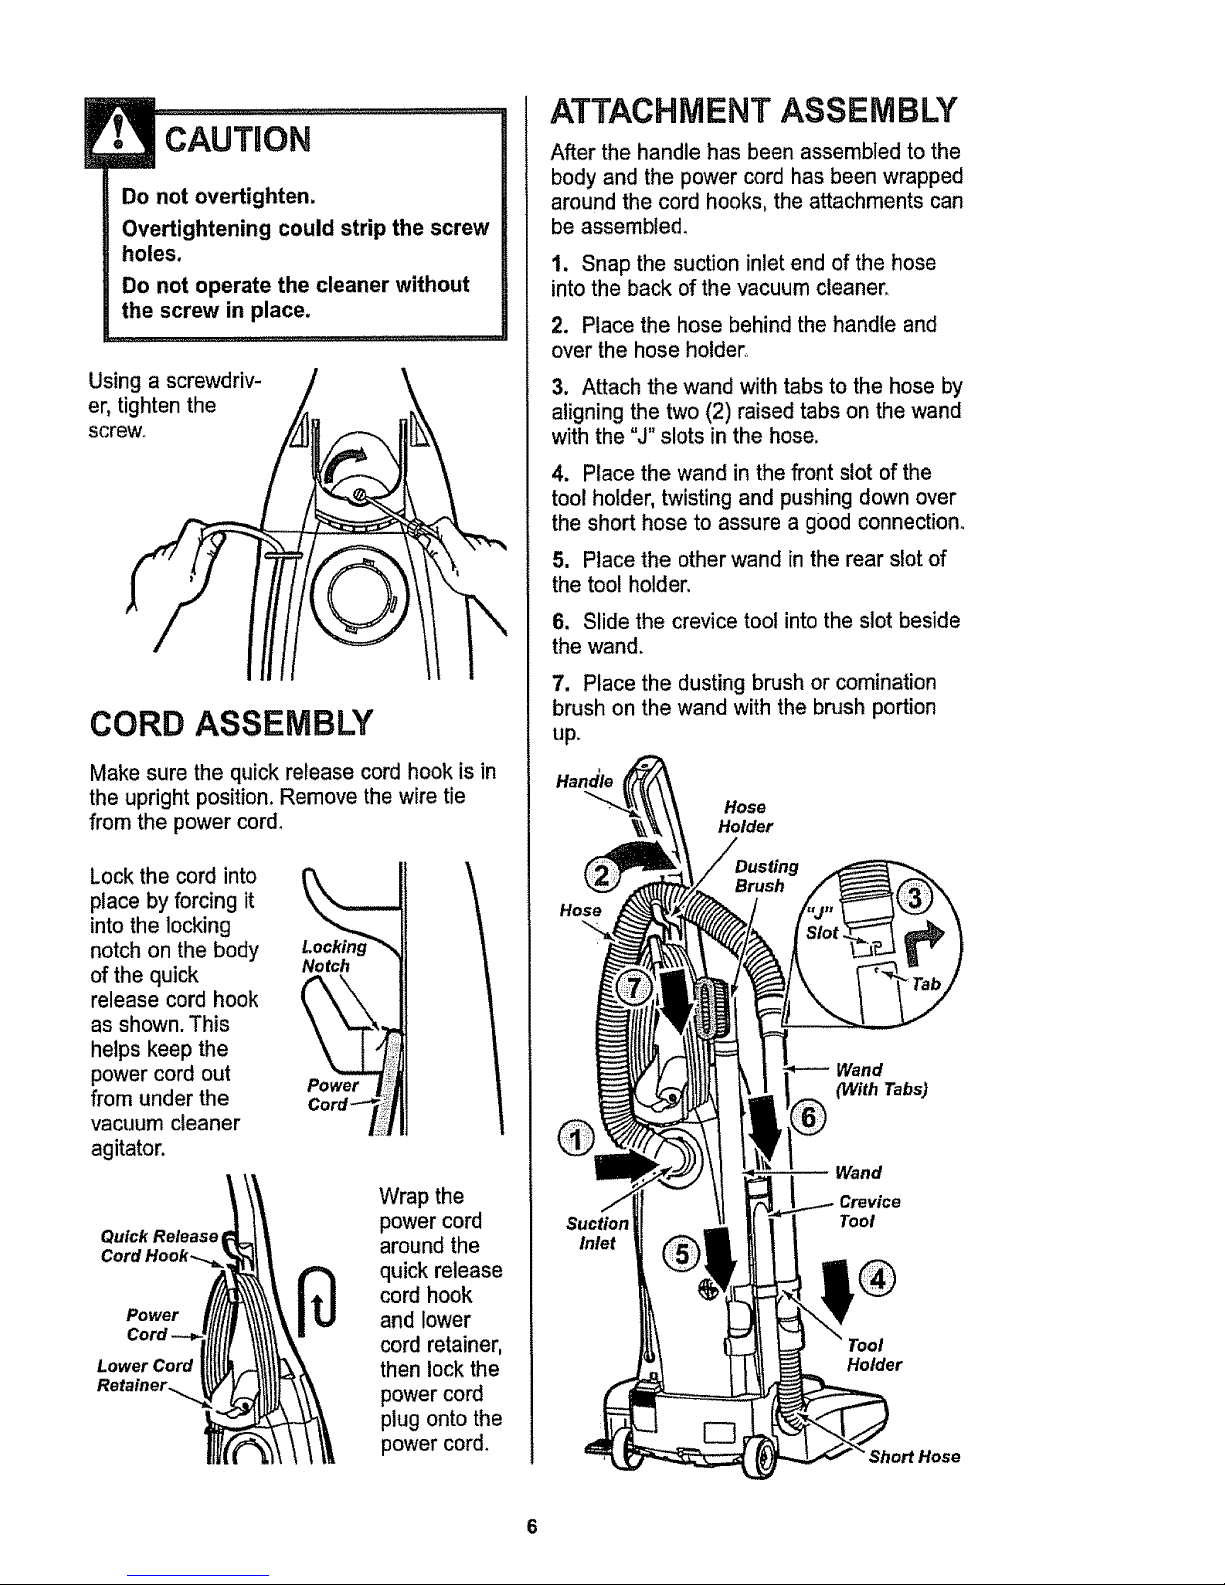
CAUTUON
Do not overtighten,
Overtightening could strip the screw
holes.
Do not operate the cleaner without
the screw in place.
,, ,_,,,,,,v,,,,_,_,,,,,,_.................
Using a screwdriv-
er, tighten the
screw_
CORD ASSEMBLY
Make sure the quick release cord hook is in
the upright position. Remove the wire tie
from the power cord,
Lock the cord into
place by forcing it
into the locking
notch on the body
of the quick
release cord hook
as shown. This
helps keep the
power cord out
from under the
vacuum cleaner
agitator.
Notch
Quick Release
Cord Hook....=
Power
Lower Cord
Wrap the
power cord
around the
quick release
cord hook
and lower
cord retainer,
then lock the
power cord
plug onto the
power cord.
ATTACHMENT ASSEMBLY
After the handle has been assembled to the
body and the power cord has been wrapped
around the cord hooks, the attachments can
be assembled,
t. Snap the suction inlet end of the hose
into the back of the vacuum cleaner.
2. Place the hose behind the handle and
over the hose holder,
3, Attach the wand with tabs to the hose by
aligning the two (2) raised tabs on the wand
with the °J" slots in the hose,
4. Place the wand in the front slot of the
tool holder, twisting and pushing down over
the short hose to assure a good connection.
5. Place the other wand inthe rear slot of
the too! holder.
6. Slide the crevice tool into the slot beside
the wand.
7. Place the dusting brush or comination
brush on the wand with the brush portion
up.
Handle
Hose
Wand
(WithTabs)
Suction
Inlet
®!
Wand
Crevice
Tool
Tool
Holder
Sho_ Hose
6
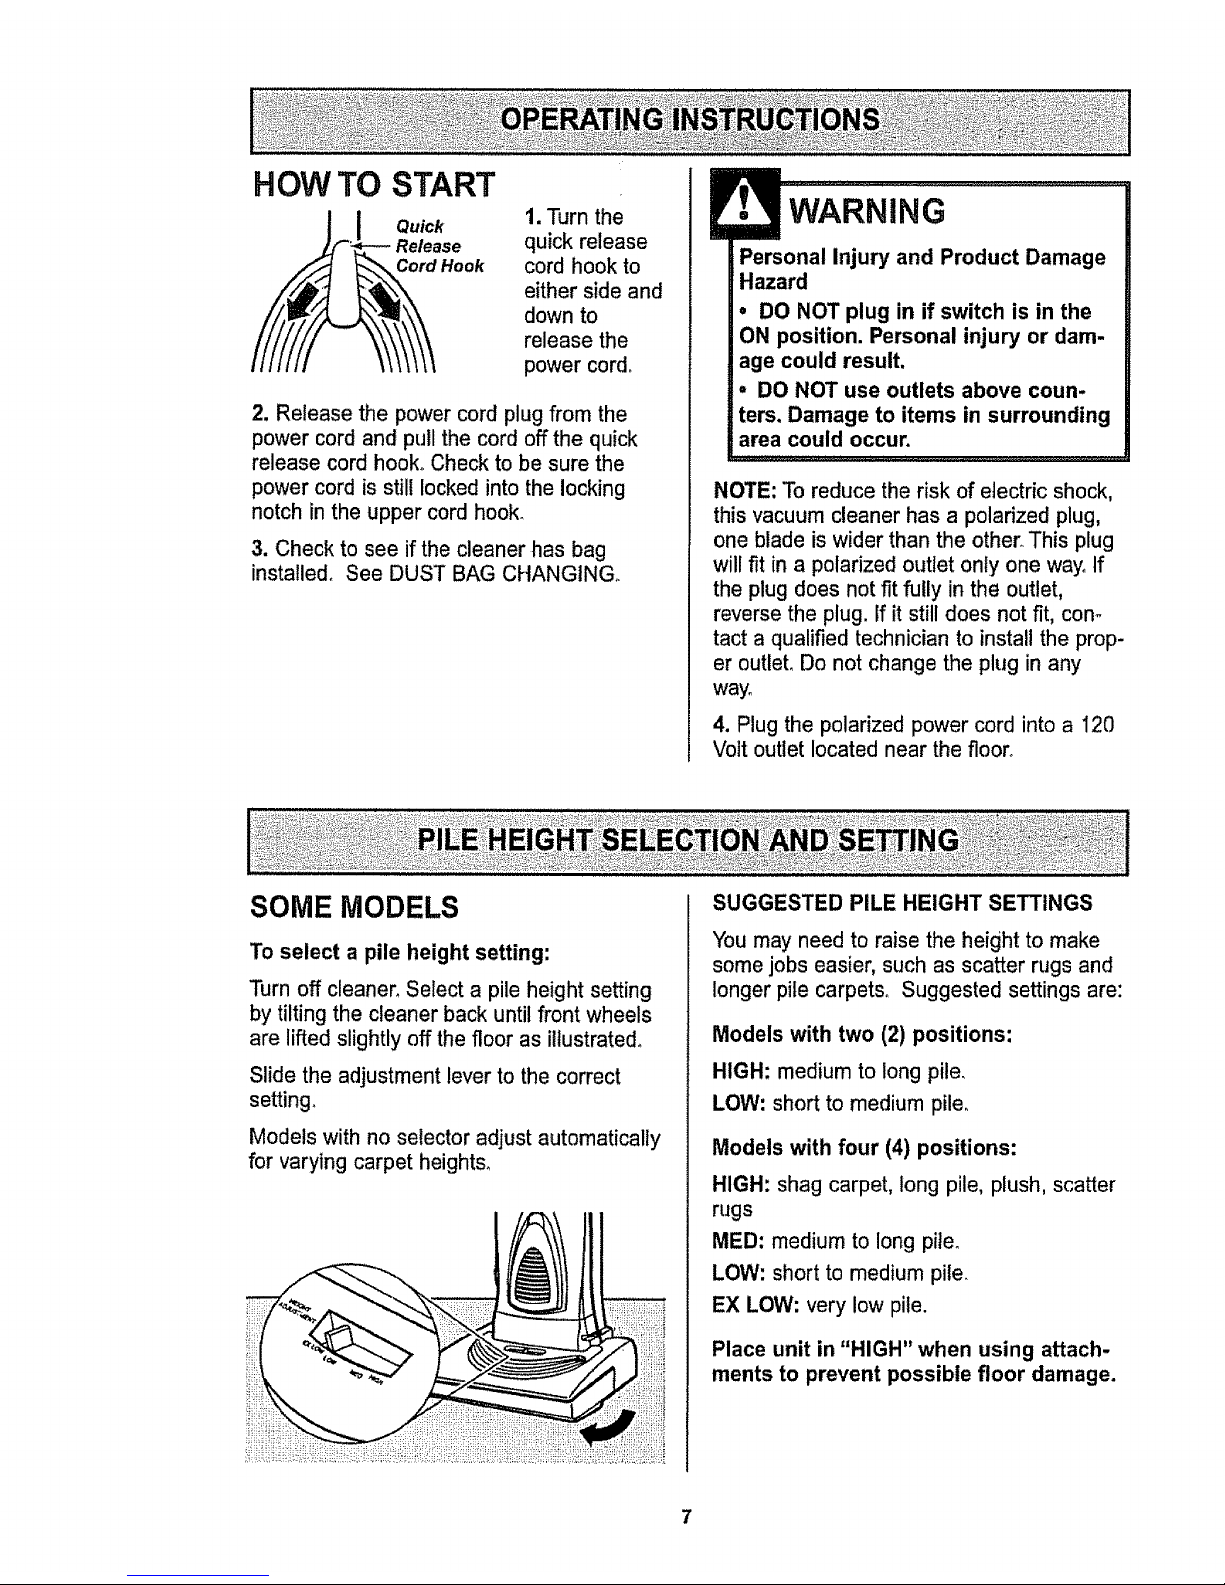
HOW TO START
Quick
Cord Hook
1. Turn the
quick release
cord hook to
either side and
down to
release the
power cord_
2. Release the power cord plug from the
power cord and pull the cord off the quick
release cord hook° Check to be sure the
power cord is still locked into the locking
notch in the upper cord hook.
3. Check to see if the cleaner has bag
installed° See DUST BAG CHANGING.
WARNING
_;Personal Injury and Product Damage
!Hazard
• DO NOT plug in if switch is in the
ON position. Personal injury or dam-
age could result.
• DO NOT use outlets above coun.
ters. Damage to items in surrounding
area could occur.
NOTE: To reduce the risk of etectric shock,
this vacuum cleaner has a polarized plug,
one blade is wider than the other,. This plug
will fit in a polarized outlet only one way° If
the plug does not fit fully in the outlet,
reverse the plug. If it still does not fit, corn
tact a qualified technician to install the prop-
er outteL Do not change the plug in any
way°
4. Plug the polarized power cord into a 120
Volt outlet located near the floor_,
SOME MODELS
To select a pile height setting:
Turn off cleaner. Select a pile height setting
by tilting the cleaner back until front wheels
are lifted slightly off the floor as illustrated.
Slide the adjustment lever to the correct
setting.
Models with no selector adjust automatically
for varying carpet heights.
SUGGESTED PILE HEIGHT SETTINGS
You may need to raise the height to make
some jobs easier, such as scatter rugs and
longer pile carpets,_ Suggested settings are:
Models with two (2) positions:
HIGH: medium to long pile.
LOW: short to medium pile_
Models with four (4) positions:
HIGH: shag carpet, long pile, plush, scatter
rugs
MED: mediumto long pile,
LOVV:short to medium pile_
EX LOW: very low pile.
Place unit in "HIGH" when using attach-
ments to prevent possible floor damage.

Release the handle by pressing down on
the handle release pedal with your foot and
pulling back and down on the handle with
your hand.
Handle
Release
Pedal
To start the vacuum cleaner, step on the
ON/OFF switch located on the back of the
vacuum. To stop the vacuum cleaner, step
on the switch a second time.
On/Off
Switch
Motor
Protector
This vacuum has a motor protector by-pass
valve which automatically opens to provide
cooling air to the motor when a clog
prevents the normal flow of air. If the by-
pass'valve opens to prevent motor
overheating and possible damage to the
vacuum, a change of sound will be noticed
as air' rushes through the valve opening,. If
this occurs, turn the vacuum off and unplug
the power cord from the outlet. Then check
for clogs as described under the CLOG
REMOVAL section,
The motor protector by-pass valve may open
when using attachments or when cleaning
new carpet, due to reduced air flow by the
attachments themselves or by new carpet
fuzz filling the bag quickly,
8
WARNING
Personal Injury Hazard and Property
Hazard
DO NOT place hands or feet under-
neath the unit at any time. When
using attachments, the agitator con-
tinues rotating. Do not allow the
cleaner to remain in just one place
for a period of time as the agitator
may damage the floor surface.
Avoid placing the cleaner on furni-
ture, the fringed area of rugs, deep
pile carpeting, or carpeted stairs.
The ideal position for the cleaner
when using attachments is for the
unit to be on a level area with the
handle in the _ position.
TO USE ATTACHMENTS:
Place the cleaner on a flat surface, and
move the height adjustment to HIGH.
The attachments will fit on the hose or the
wand. In addition, the dusting brush or
combination brush will also fit on the crevice
tool,
The hose and wand can be pulled off the
short hose by grasping the cuff and twisting
while pulling up.
!
DO NOT pull the vacuum cleaner
around the room by the hose.
Property damage could result.
The attachments can be added to the hose
if the item to be cleaned is not far from the
cleaner° The hose on some models will
expand°
NOTE: When cleaner is turned on, the hose
on some models will have a tendency to
collapse due to suction of the cleaner.
If more reach is needed, the wand can be
attached to the hose and the attachments
can be added to the wand.
CAUTION
When using attachments, be careful
not to overextend the hose length
when reaching, Trying to reach
beyond the hose reach could cause
the cleaner to tip over.
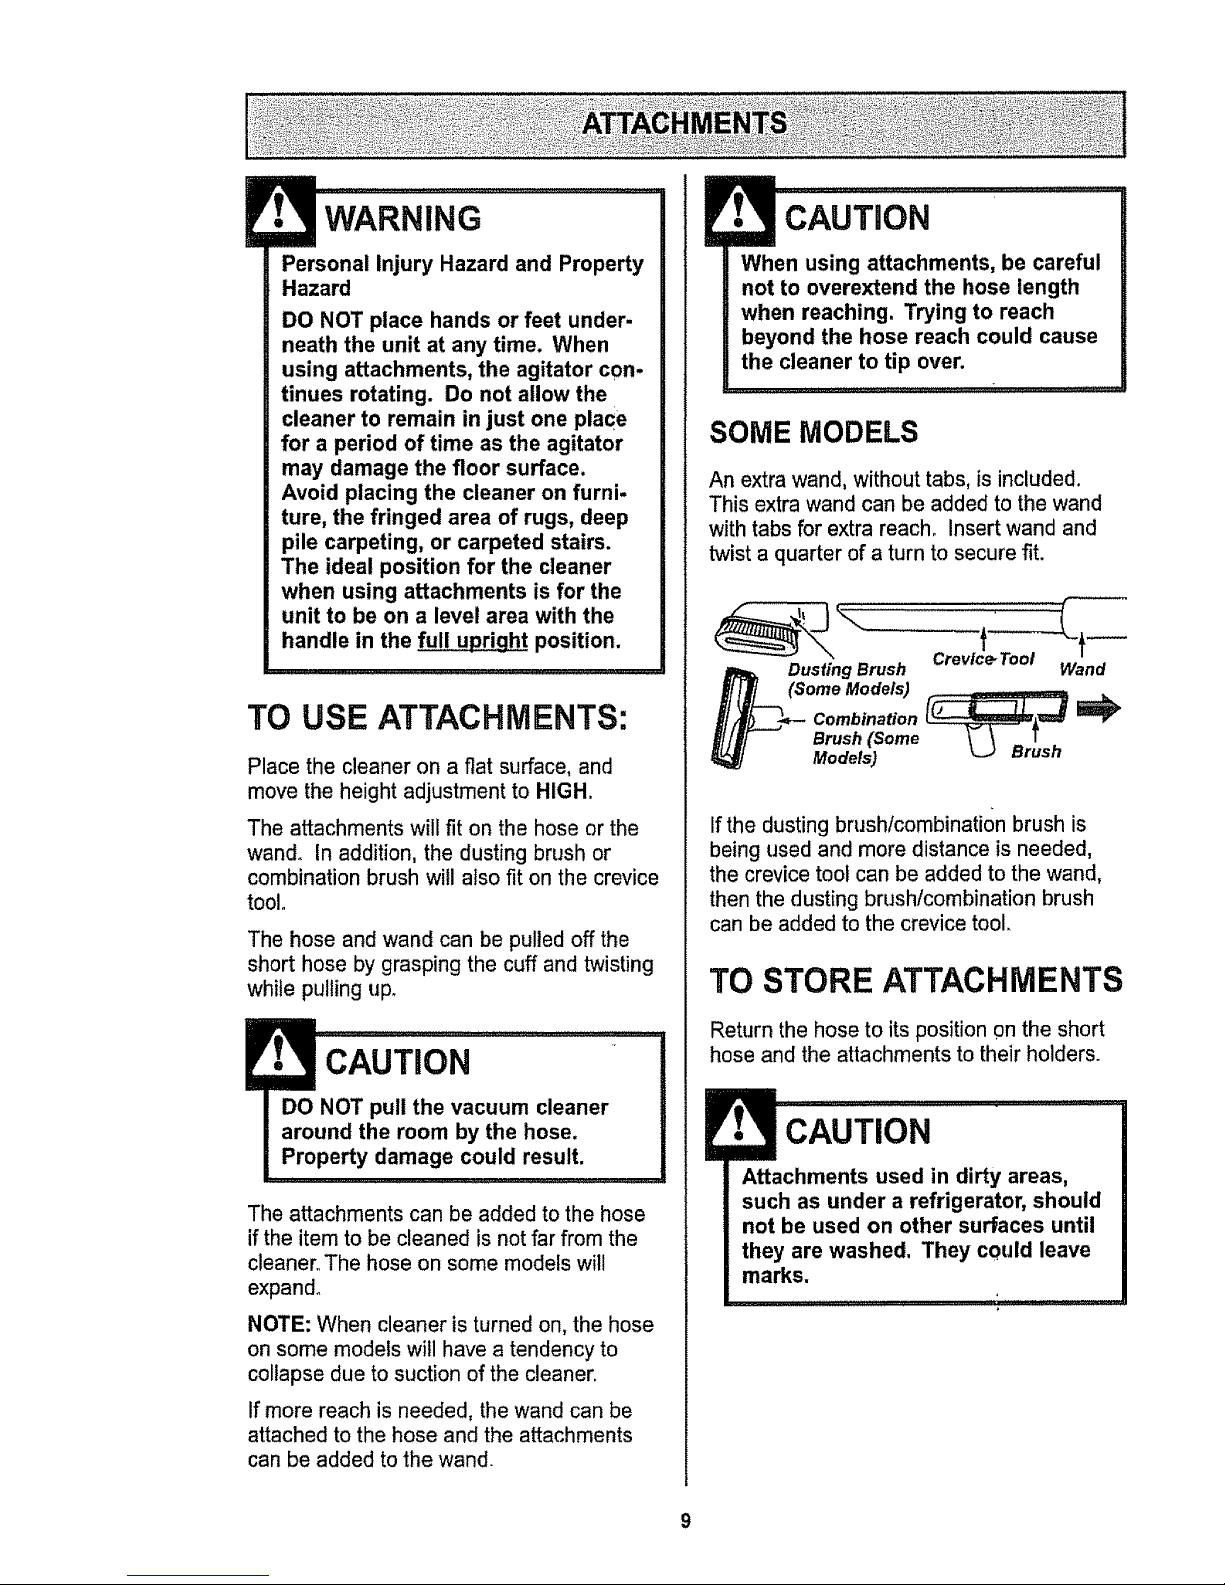
SOME MODELS
An extra wand, without tabs, is included.
This extra wand can be added to the wand
with tabs for extra reach. Insert wand and
twist a quarter of a turn to secure fit.
Crevice-Tool
Dusting Brush Wand
(Some Models) _
Combination
Brush (Some _" \_
Brush
Models)
If the dusting brush/combinati0n brush is
being used and more distance is needed,
the crevice tool can be added to the wand,
then the dusting brush/combination brush
can be added to the crevice tool.
TO STORE ATTACHMENTS
Return the hose to its position on the short
hose and the attachments to their holders.
CAUTION
Attachments used in dirty areas,
such as under a refrigerator, should
not be used on other surfaces until
they are washed, They could leave
marks.

CAUTION
When using the regular hose or with
the extension hose attached, the
cleaner should be on a solid surface
on the same level or below the level
of the user's feet. DO NOT use the
hoses when the cleaner is above the
level of the user's feet.
EXTENSION HOSE:
SOME MODELS
Some models include an extra hose which
connects to the stretch hose on the vacuum
for a longer cleaning reach.
Unit Hose tim Extension Hose
insert the two tabs on the end of the
extension hose into the two "J" shaped slots
on the unit hose and twist to connect.
All attachments and the wand can be
attached to the open end of the hose.
FLOOR BRUSH AND WAND:
SOME MODELS
Some models have an extra brush and wand
for cleaning bare floors. Twist one end of the
adaptor into the floor brush and the other
end into the straight wand. Connect the
straight wand to the telescopic wand and
then to the vacuum hose or extension hose_
CLEANING AREA
, , , ,,,,,,,,_.....
ATTACHMENT
Furniture*
OUSTINGBRUSH..................X ...........
CREVlCETOOL X
COMBINATION BRUSH _ X
HANDI-MATE TM JR.
X
(Some Models)** %_yr
Between
Cushions*
X
Drapes*
X
X
Stairs
X
X
X
X
Walls
X
The motor protector may open when using attachments or when cleaning new carpet due to
reduced air flow by the attachments themselves or by new carpet fuzz filling the bag quickly.
using
*Always clean attachments before on fabrics_
** HANDI,.MATETMJRoattachment instructionsare included with the product.
10

WARNING
Personal Injury Hazard
Use care if vacuum cleaner is
placed on stairs. If it fails, personal
injury or property damage could
result.
Carpet edges.
Guide either side or the front of the nozzle
along a baseboard. The full length brushes
help remove dirt at carpet edges.
Stairs.
Put handle in full upright position. Use the
crevice tool or dusting brush° Set the On/Off
switch to ON.
Always follow all safety precautions when
cleaning and servicing the vacuum
cleaner.
Gather the cord and wrap it loosely around
WARNING
Electrical Shock And Personal Injury
Hazard
Disconnect electrical supply before
servicing or cleaning the unit.
Failure to do so could result in elec-
trical shock or personal injury from
cleaner suddenly starting.
.............. , ,,,,,,,,,,
the quick release cord hook and lower cord
retainer.
Quick
Release Store the cleaner in a
CordHook dry, indoor area, on
the floor with the
handle locked in
Power the upright
Cord position,
Lower Cord
Retainer
WARNING
Electrical Shock And Personal Injury
Hazard
Wrapping the cord too tightly puts
stress on the cord and can cause
cord damage. A damaged cord is an
electrical shock hazard and could
cause personal injury or damage.
11
_,::-ii i icLEANiNG:Ex.TERIOR !ANDATTAC I :ENTS i
Unplug cord from wall outlet, DO NOT drip
water on cleaner.
Clean exterior using a clean, soft cloth that
has been dipped in a solution of mild liquid
detergent and water, then wrung dry. Wipe
dry after cleaning.
To reduce static electricity and dust build-
up, wipe outer surface of cleaner and
attachments.
Wash attachments in warm soapy water,
rinse and air dry. Do not clean in dish-
washer.
DO NOT USE ATTACHMENTS IF THEY ARE
WET
i
!
L !!1_, ............ ', '
'f. i CAUT!ON
Attachments used in dirty areas,
such as under a refrigerator,
should not be used on other
surfaces until they are washed.
They could leave marks.
,., ,....... ' ' i, ,,,,
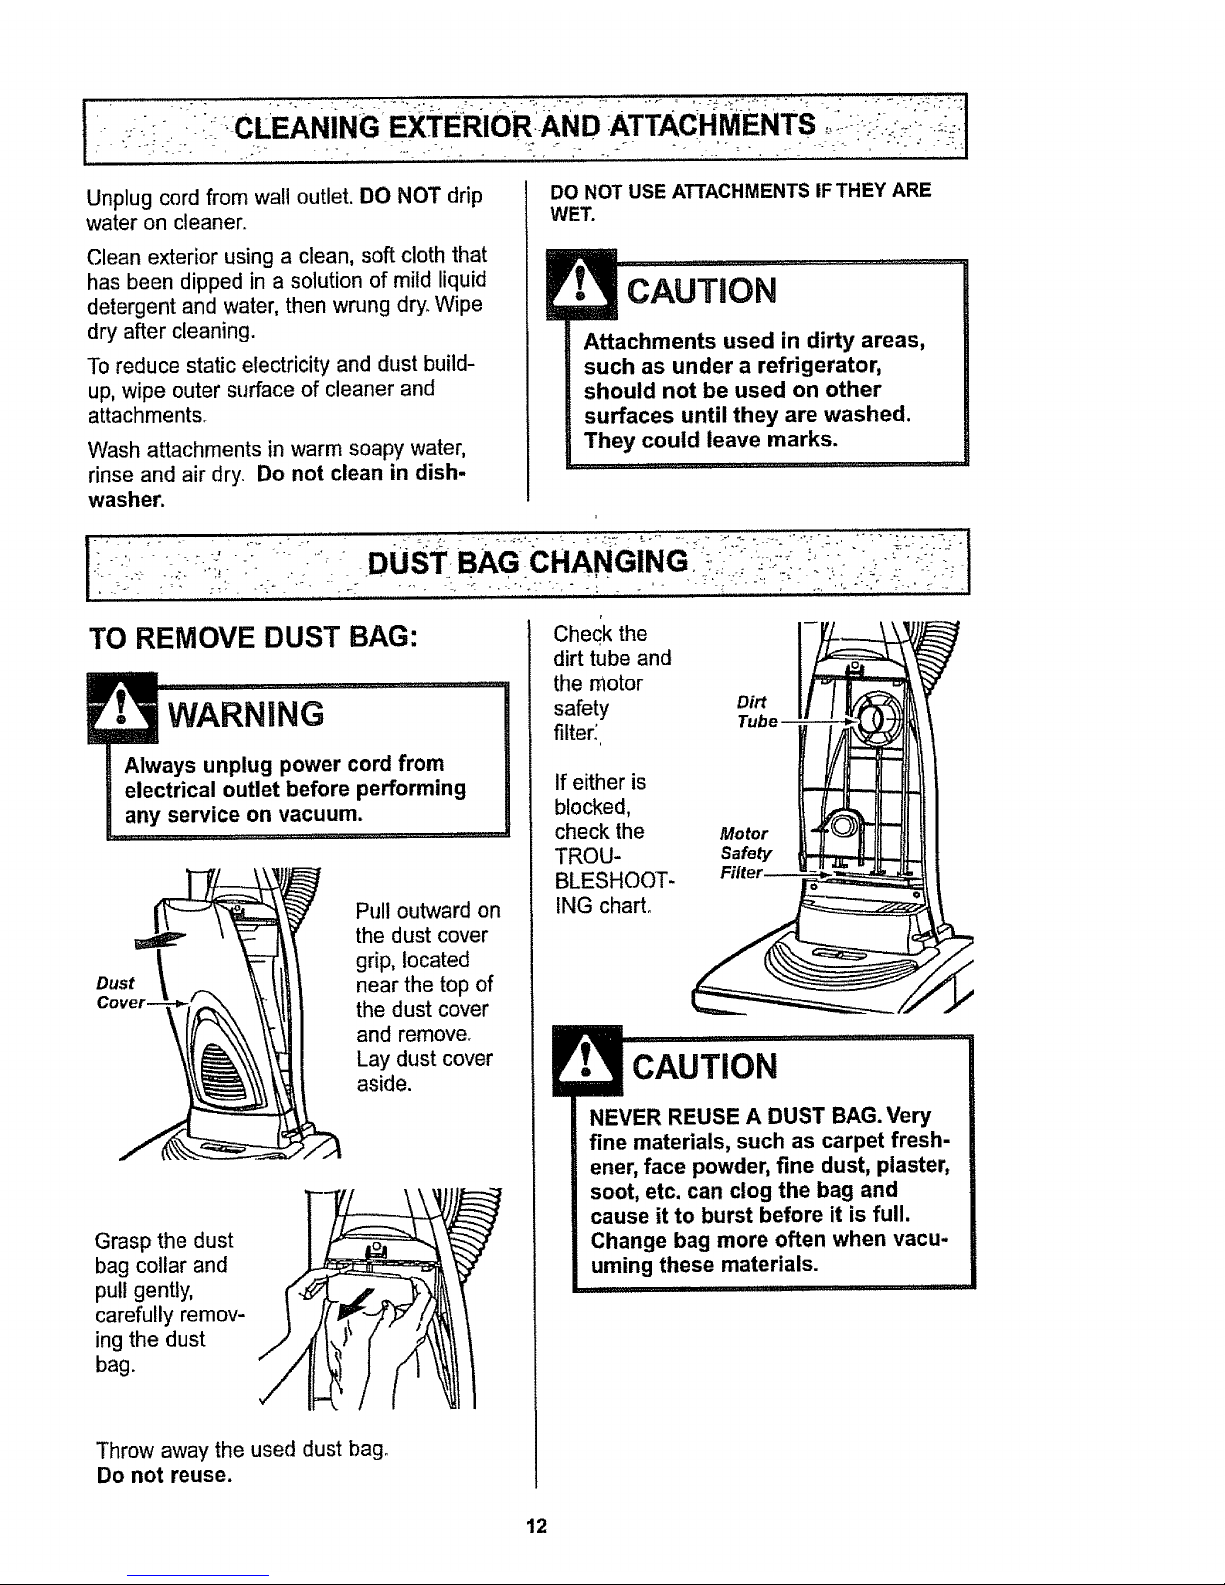
TO REMOVE DUST BAG:
1
m
__ i !1 .....
WARNING
Always unplug power cord from
electrical outlet before performing
any service on vacuum.
Pull outward on
the dust cover
grip, located
near the top of
the dust cover
and remove.
Lay dust cover
aside.
Grasp the dust
bag collar and
pull gently,
carefully remov-
ing the dust
bag.
O
Throw away the used dust bag.
Do not reuse.
Check the
dirt tube and
the motor
safety
filteK
If either is
blocked,
check the
TROU-
BLESHOOT-
tNG chart.
Di_
Tube--
Motor
Safely
Filter_
NEVER REUSE A DUST BAG. Very
fine materials, such as carpet fresh-
ener, face powder, fine dust, plaster,
soot, etc. can clog the bag and
cause it to burst before it is full.
Change bag more often when vacu-
uming these materials.
I I I1,1
12
 Loading...