

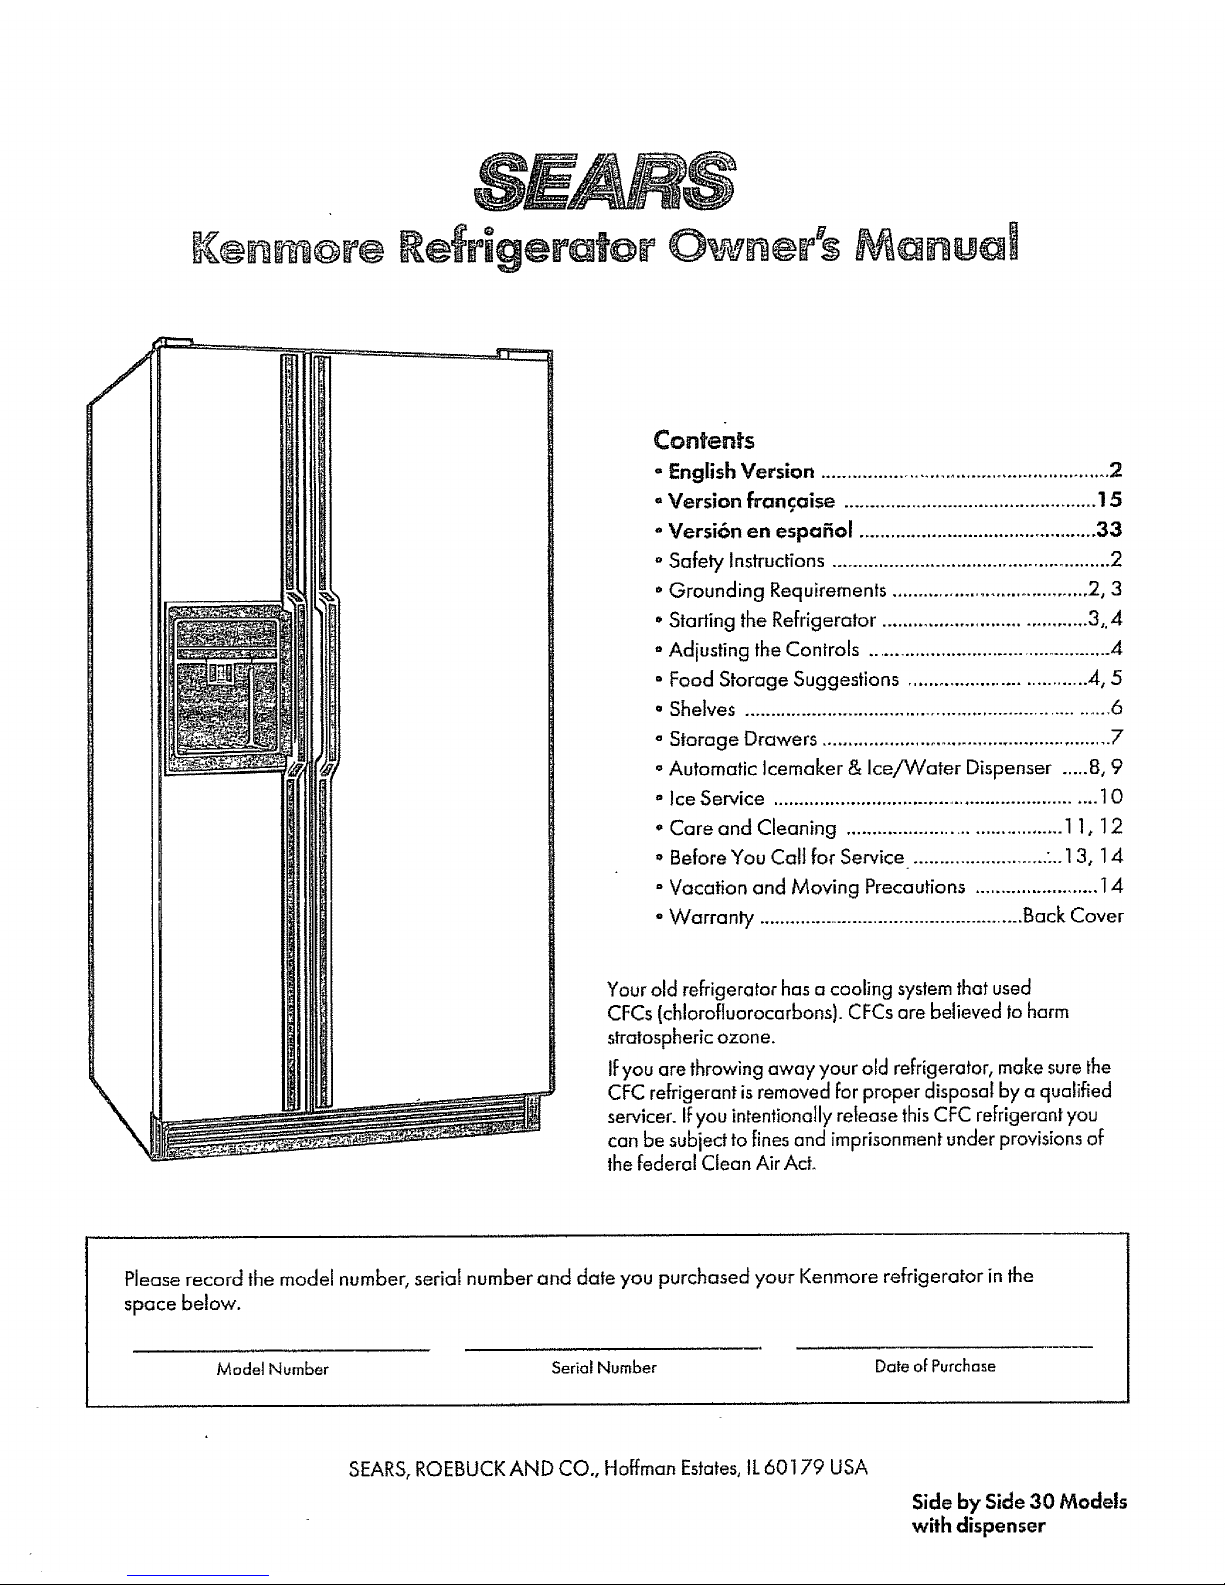
Sears Kenmore Refrigerator Owner's Manual
Contents
° English Version ........................................................ 2
"Version froncaise ................................................. 15
- Versi6n en espafiol .............................................. 33
o Safety Instructions...................................................... 2
• Grounding Requirements ...................................... 2, 3
° Starting the Refrigerator ....................................... 3,,4
oAdjusting the Controls ............................................... 4
° Food Storage Suggestions .................................. 4, 5
° Shelves ...................................................................... 6
oStorage Drawers ........................................................ 7
oAutomatic Icemaker & Ice/Water Dispenser .....8, 9
" Ice Service ............................................................... 10
Care and Cleaning ......................................... 1 1, 12
o Before You Call for Service .......................... :..13, 14
° Vacation and Moving Precautions .........................14
° Warranty .................................................... Back Cover
Your old refrigerator has acooling systemthat used
CFCs (chlorofluorocarbons). CFCsare believed to harm
stratospheric ozone.
IFyou are throwing away your old refrigerator, make sure the
CFC refrigerant is removed for proper disposal by a qualified
servicer. Ifyou intentionally release this CFC refrigerant you
can be subject to fines and imprisonment under provisions of
the federal Clean Air Act.
Please record the model number, serial number and date you purchased your Kenmore refrigerator in the
space below.
Model Number Serial Number Date of Purchase
SEARS,ROEBUCK AND CO., Hoffman Estates,1L60179 USA
Side by Side 30 Models
with dispenser
IMPORTANT SAFETYINSTRUCTIONS
Read aH instructions before using
this appliance.
WARNING-When using this appliance, always
exercise basic safety precautions, including the
following:
• Use this appliance only for its intended
purpose as described in this Owner's Manual.
• This refrigerator must be properly installed
in accordance with the Attention Installer
Instructions before it is used. See grounding
requirements below and oh page 3.
" Never unplug your refrigerator by pulling on
the power cord. Always grip plug firmly and pull
straight out from the outleL
• Repair or replace immediately all electric
service cords that have become frayed or otherwise
damaged. Do not use a cord that shows cracks or
abrasion damage along its length or at either the plug or
connector end.
" When moving your refrigerator away from the
wall, be careful not to roll over or damage the
power cord.
- After your refrigerator is in operation, do not
touch the cold surfaces in the freezer compartment,
particularly when hands are damp or wet. Skin
may adhere to the extremely cold surfaces.
* Do not place fingers or hands on the automatic
icemaking mechanism while the refrigerator is
plugged in. This will help protect you from possible
injury. It wilLalso prevent interference with the moving
parts of the ejector mechanism, or with the heating
element that releases the cubes.
• Do not store or use gasoline or other flammable
vapors and liquids in the vicinity of this or any
other appliance.
• Don't refreeze frozen foods which have thawed
completely. The United States Department of Agriculture
in Home and Garden Bulletin No 69 says:
"...You may safely refreeze frozen foods that have
thawed if they still contain ice crystals or if they are still
cold-below 40 ° F, (4°C.).
"..,Thawed ground meats, poultry or fish that have any
off-odor or off-color should not be refrozen and should
not be eaten. Thawed ice cream should be discarded If
the odor or color of any food is poor or questionable, get
rid of it. The food may be dangerous to eat
"Even partial thawing and refreezing reduce the eating
quality of foods, particularly fruits, vegetables and
prepared foods. The eating quality of red meats is
affected lessthan that of many other foods. Use refrozen
foods as soon as possible to save as much of their eating
quality as you can"
• if your old refrigerator is still around the house but
not in use, be sure to remove the doors. This will
reduce the possibility of danger to children,
• Do not allow children to climb, stand or hang on
the shelves in the refrigerator° They could damage
the refrigerator and seriously injure themselves.
- Unplug your refrigerator before making any
repairs. NOTE: We strongly recommend that any
servicing be performed by a qualified individual.
- Before replacing a burned-out light bulb, unplug the
refrigerator or turn off power at the circuit breaker or Fuse
box in order to avoid contact with a live wire filament (A
burned-out light bulb may break when being replaced )
NOTE: Moving control to OFF position does not remove
power to the lightcircuit
SAVETHESEINSTRUCTIONS
Grounding Requirements lmportant--Pleaseread carefully.
To Connect Electricity
For personal safety,
this appliance must be
properly grounded.
The power cord of this
appliance isequipped
with a three-prong
(grounding) plug which
mateswith a standard
PREFERRED
I
r_tt ' _ BEFORE USE
three-prong(grounding) wall outlet (Fig 1) to minimize the
possibility of electric shock hazard Fromthisappliance
Have wall outlet and circuit checked by a qualified
electrician to make sure outlet is properly grounded
Where a standard two-prong wall outlet is encountered,
it is your personal responsibility and obligation to have it
replaced with a properly grounded three-prong wall
outlet
DO NOT, UNDER ANY CIRCUMSTANCES, CUT OR
REMOVE THE THIRD (GROUND) PRONG FROM
THE POWER CORD_
Use of Adapter Plug
Because of potential safety hazards under certain
conditions, we strongly recommend against use of an
adapter plug However, if you still elect to use an
adapter, where local codes permit, a TEMPORARY
CONNECTION may be made to a properly grounded
2-prong wall outlet by use of a UL listed adapter
(Fig. 2) available at most local hardware stores.
The larger slot in the adapter
mustbe aligned with the
larger slot in the wall outlet
to provide proper polarity
in the connection of the
power cord
CAUTION: Attaching an
adapter ground terminal to
the wall outlet cover screw
TEMPORARYM_HOD
CAoA_E._,UOSNoT I_
PERM;n_OINCANADA)II_ I
AUGNURGE,._ _ II_ I
_,PRONGiSLOTSN_ I:
RE PROPER GROUND
/"/JJl/ AND FIRM CONNECTION
.7,///_z BEFORE USE
does not ground the appliance unlessthe cover screw is
metal, and not insulated, and the wall outlet is grounded
through the house wiring. You should have circuit
checked by a qualified electrician to make sure the outlet
isproperly grounded
When disconnecting the power cord from the
adapter, always hold the adapter with one hand
If this is not done, the adapter ground terminal is
very likely to break with repeated use
Should the adapter ground terminal break,
DO NOT USE the appliance until a proper
ground has again been established.
Use of Extension Cords
Because of potential safety hazards under certain
conditions, we strongly recommend against the use
of an extension cord However, if you still elect to use
an extension cord, it is absolutely necessary that it
be a ULlisted 3-wire grounding type appliance
extension cord having a grounding type plug and
outlet and that the electrical rating of the cord be
15 amperes (minimum) and 120 volts
Starting the Refrigerator
Location
o install the refrigerator on a floor strong enough to
support it when it is fully loaded
o Do not install it where the temperature will be
below 60°F (16°C_) because it will not run often
enough to maintain proper temperatures
o Do not install it next to your range, a heating vent
or where the sun will shine directly on it
Clearances
Allow the following clearances for ease of installation,
proper air circulation, and plumbing and electrical
connections:
Sides ......... 1/8" (3 ram)
Top ............... 1/8" (3 mm)
Back .................. 5/8" (16 ram}
(If built-in, allow 7/8" [22 mini at top for hinge covers.)
If the refrigerator is against a wall on either side, allow
3/4" (19 ram) for door clearances
Rollers
Some models have
adjustable rollers that
allow you to move the
refrigerator away from
the wall for cleaning.
Rollers should be setso
the refrigerator is firmly
positioned on the floor and
the front is raised just enough
screws
(about 3/4" [19 mm] from the floor) that the doors close
easily when opened partway
Turn the _,o front roller adjusting screws clockwise to
raise the refrigerator, counterclockwise to lower it.
(continued next page)
Electrical Requirements
The refrigerator should always be plugged into its
own individual electrical outlet which has a voltage
rating that matches the rating plate This provides the
best performance and also prevents overloading house
wiring circuits, which could cause a fire hazard from
overheating wires
Starting the Refrigerator (continued)
._.,=-_=a--== = = = CoCoCOLO [NrF_L COtOE_T OFF COO_ " :N_n_ = E_
SETRNG SETTING
Temperature Controls (appearance may vary)
Two controls let you regulate the temperature inthe
fresh Food and freezer compartments
At first, set the Fresh Food and Freezer controls at the
center of the "INITIAL SETTING" range
Allow 24 hours for the temperature to stabilize, whether
you are setting the controls for the first time or adjusting
them later Then, if you want colder or warmer
temperatures in either compartment, adjust the controls
one letter or number at a time.
NOTE: Turning the Fresh Food control to OFF turns off
cooling in both compartments-fresh food and freezer-
but does not shut off power to the refrigerator
How to Test Temperatures
Use milk test for fresh food comportment. Place
a container of milk on the top shelf in the fresh food
compartment Check it a day later, tf the milk is too
warm or too cold, adjust the temperature controls.
Use ice cream test for freezer compartment.
Place a container of ice cream in the center of the
freezer compartment Check it after a day If it's too
hard or too soft, adjust the temperature controls.
Turning your Household Thermostat
Below 60°F. (16°C.) at Night?
You may want to move the Freezer control one step
colder Cooler temperatures in the house may cause
the compressor to operate less frequently, thus allowing
the freezer compartment to warm somewhat
To protect your frozen food supply, leave your Freezer
control at this new, colder setting for the entire winter
or for as long as you keep your thermostat turned down
Moving the Freezer control to a colder setting should
have no effect on your fresh food compartment
However, if freezing occurs, turn the numbered
control one step warmer
When you stop turning the household thermostat
down at night, turn the refrigerator temperature
controls back to their regular settingsr
Food Storage Suggestions
Fresh Food Storage Tips
To store unfrozen meats, fish and poultry:
• Always remove store wrappings
- Rewrap in foil, plastic wrap or wax paper and
refrigerate immediately.
To store cheese, wrap well with wax paper or
aluminum foil, or put in a plastic bag
• Carefully wrap to expel air and help prevent mold
• Store pre-packaged cheese in its own wrapping if
you wish
To store vegetables, use the vegetable drawers-
they've been designed to preserve the natural
moisture and freshness of produce.
" Covering vegetables with a moist towel helps
maintain crispness
• As a further aid to freshness, pre-packaged
vegetables can be stored in their original wrapping
Tips on Freezing Foods
1. Freeze only top-quality foods. Freezing retains
quality and flavor; it cannot improve quality_
2. Freeze fruits and vegetables quickly after
picking° The sooner you do, the better the frozen
product will be, with less culling and sorting to do,
3. Use food wraps designed especially for
freezing.
To freeze meat, fish and poultry, wrap well in
freezer-weight foil (or other heavy-duty wrapping
material) forming it carefully to the shape of the
contents, This expels air. Fold and crimp ends of
the package to provide o good, lasting seal
Don't refreeze meat that has completely thawed;
meal whether raw or cooked, can be frozen
successfully only once
To store ice cream-Fine-quality ice cream, with
high cream content, will normally require slightly
Iower temperatures than more "airy" already-
packaged brands with low cream content
• It will be necessary to experiment to determine the
freezer compartment location and temperature
control setting to keep your ice cream at the right
serving temperature
• The rear of the freezer compartment isslightly
colder than the front
4
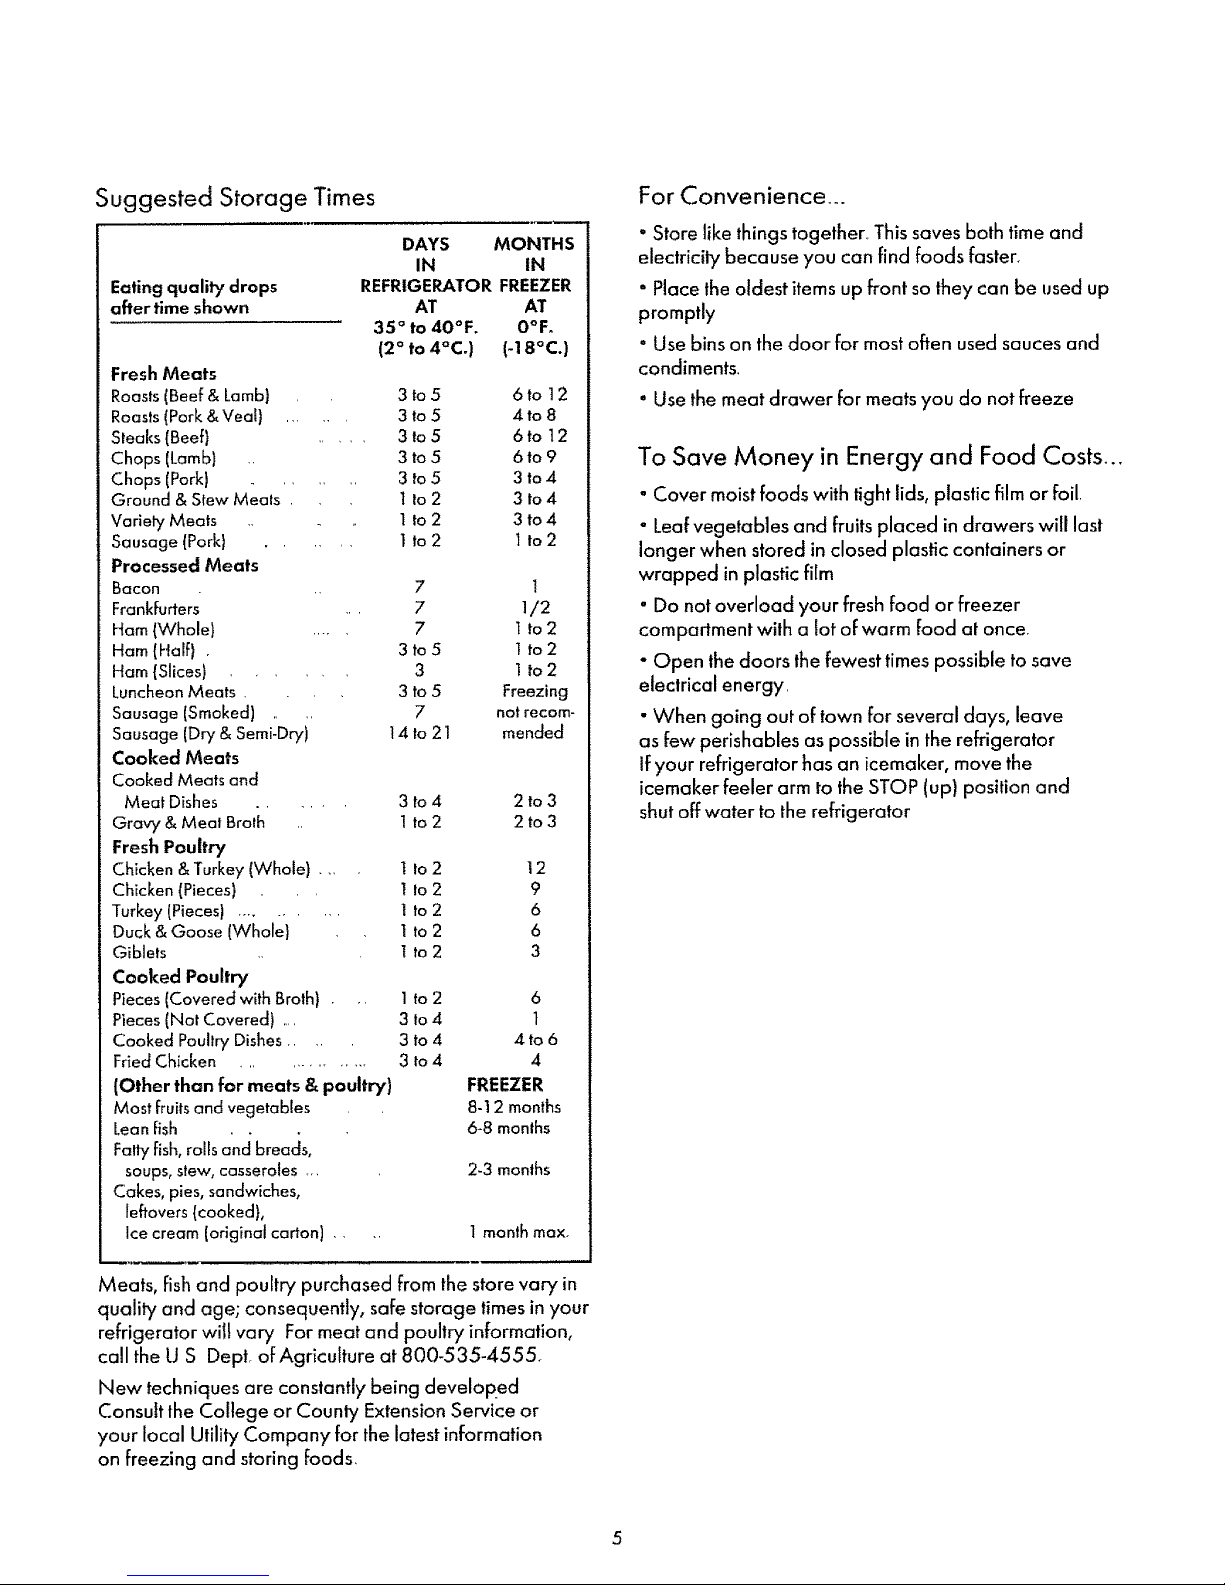
Suggested Storage Times
Eating quality drops
after time shown
DAYS MONTHS
IN IN
REFRIGERATOR FREEZER
AT AT
35 ° to 40°F. O°F°
(2 ° to 4°C.) (-18°C.)
Fresh Meats
Roasts (Beef & Lamb)
Roasts(Pork&Veal) ...
Steaks (Beef) .....
Chops (Lamb) ..
Chops (Pork} ..
Ground & Stew Meats
Variety Meats
Sausage {Pork)
Processed Meats
Bacon
Frankfurters
Ham {Whole) ....
Ham {Half) .
Ham {Slices) ....
Luncheon Meats .
Sausage (Smoked)
Sausage (Dry & Semi-Dry)
Cooked Meats
Cooked Meats and
Meat Dishes ......
Gravy & Meat Broth
Fresh Poultry
Chicken & Turkey (Whole) . ..
Chicken (Pieces)
Turkey (Pieces) ..........
Duck & Goose (Whole)
Giblets
Cooked Poultry
Pieces (Covered with Broth) . ..
Pieces (Nat Covered) ....
Cooked Poultry Dishes ....
Fried Chicken ..............
(Other than for meats & poultry)
Most fruits and vegetables
Lean fish
Fatty fish, rolls and breads,
soups, stew, casseroles ..,
Cakes, pies, sandwiches,
leftovers (cooked),
Ice cream (originalcarton) ....
31o5 61o 12
31o5 41o8
31o5 6to 12
3to5 61o9
31o5 31o4
I 1o2 3to4
1to2 31o4
I to2 11o2
7 1
7 1/2
7 t to2
3to5 ] to2
3 I to2
3 to 5 Freezing
7 not recom-
14 to 21 mended
3 to 4 2 to 3
1 to2 21o3
t to2 12
I to2 9
! to2 6
I to2 6
] to2 3
1to2 6
31o4 t
31o4 4to6
3 to4 4
FREEZER
8-12 months
6-8 months
2-3 months
1month max.
Meats, Fishand poultry purchased from the store vary in
quality and age; consequently, safe storage times in your
refrigerator will vary For meat and poultry information,
call the U S Dept. of Agriculture at 800-535-4555.
New techniques are constantly being developed
Consult the College or County Extension Service or
your local Utility Company for the latest information
on freezing and storing foods.
For Convenience°_
° Store like things together. This saves both time and
electricity because you can find foods faster.
" Place the oldest items up front so they can be used up
promptly
" Use bins on the door for most often used sauces and
condiments.
* Use the meat drawer for meats you do not freeze
To Save Money in Energy and Food Costs_..
- Cover moist foods with tight lids, plastic film or foil.
" Leaf vegetables and fruits placed in drawers will last
longer when stored in closed plastic containers or
wrapped in plastic film
° Do not overload your fresh food or freezer
compartment with a lot of warm food at once.
" Open the doors the fewest times possible to save
electrical energy.
• When going out of town for several days, leave
as few perishables as possible in the refrigerator
If your refrigerator has an icemaker, move the
icemaker feeler arm to the STOP (up) position and
shut off water to the refrigerator
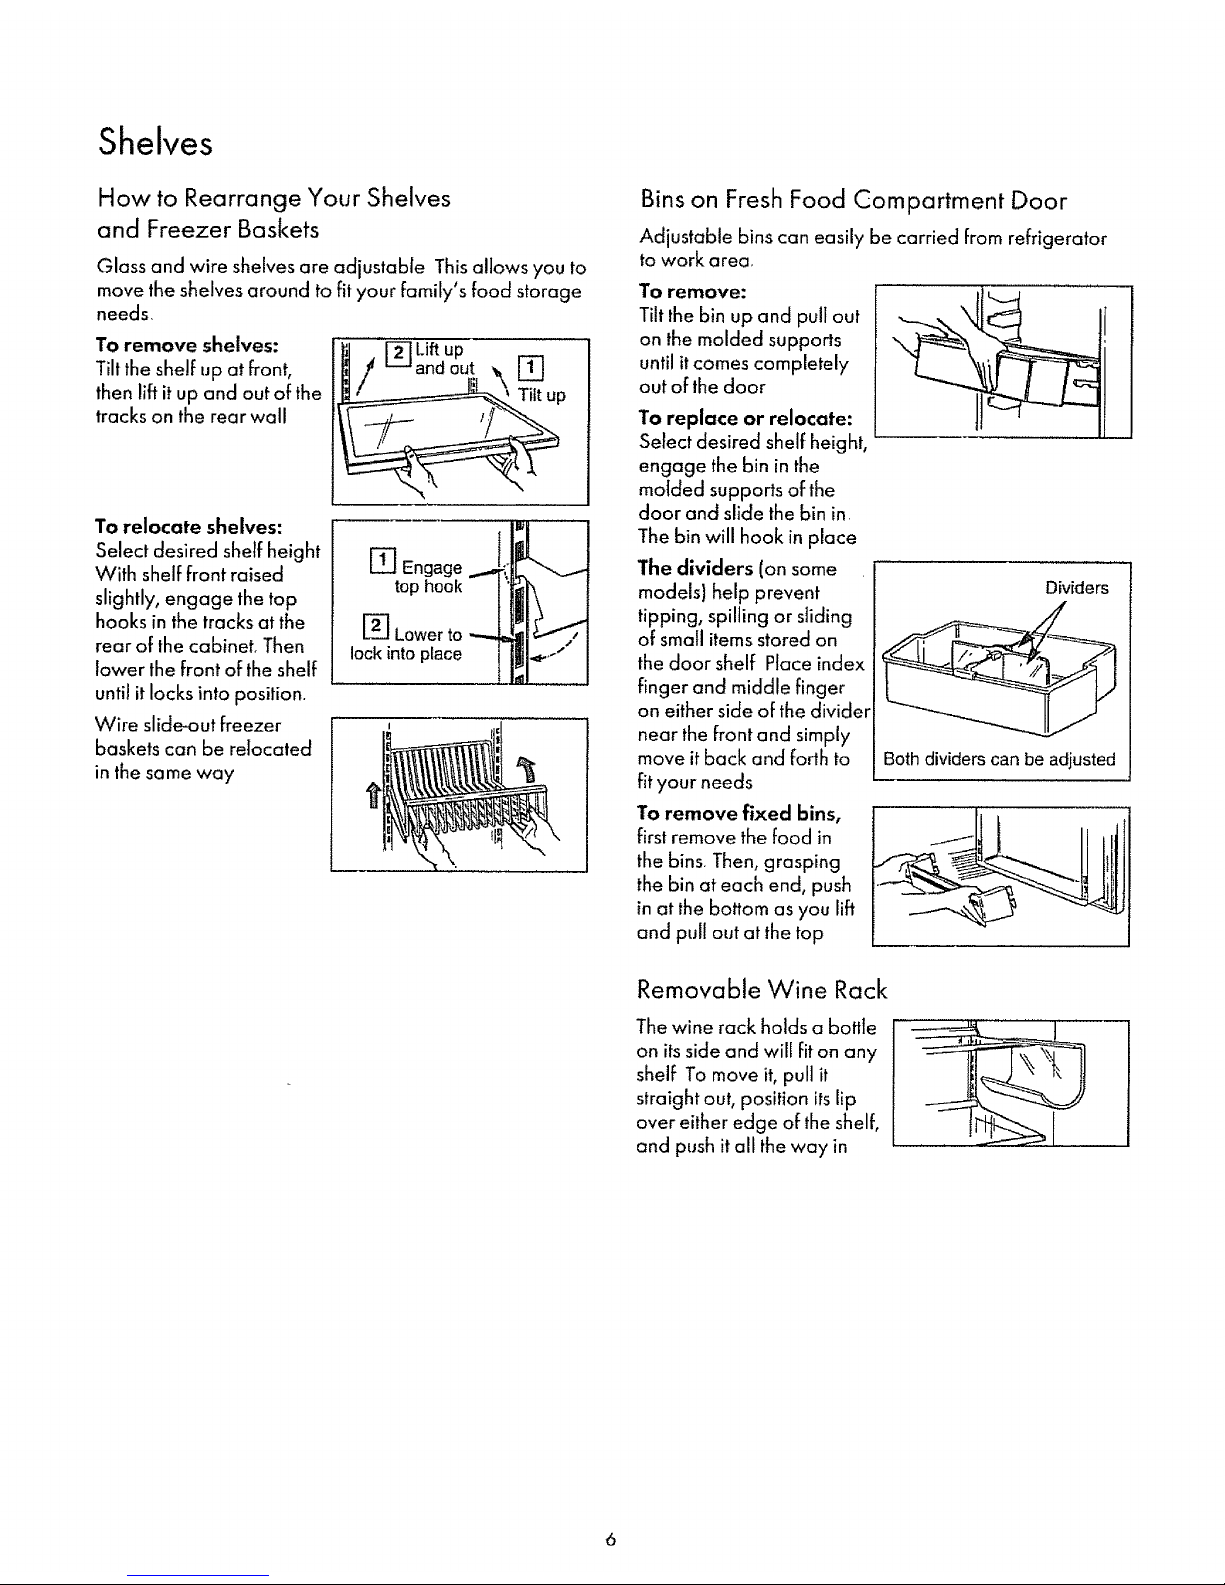
Shelves
How to Rearrange Your Shelves
and Freezer Baskets
Glass and wire shelves are adjustable This allows you to
move the shelves around to fit your family's food storage
needs,
To remove shelves:
Tilt the shelf up at Front,
then lift it up and out of the
tracks on the rear wall
To relocate shelves:
Select desired shelf height
With shelffront raised
slightly, engage the top
hooks in the tracks at the
rear of the cabinetf Then
lower the front of the shelf
until it locks into position.
Wire slide-out Freezer
baskets can be relocated
in the same way
_I _ Lift up
_upl-_ and out
r_ Engage
top hook
[_] Lower to
lock into place
Bins on Fresh Food Compartment Door
Adjustable bins can easily be carried Fromrefrigerator
to work area.
To remove:
Tilt the bin up and pull out
on the molded supports
until it comes completely
out of the door
To replace or relocate:
Select desired shelf height,
engage the bin in the
molded supports of the
door and slide the bin in.
The bin will hook in place
The dividers (on some
models) help prevent
tipping, spilling or sliding
of small items stored on
the door shelf Place index
finger and middle finger
on either side of the divider
near the front and simply
move it back and forth to
fit your needs
To remove fixed bins,
first remove the food in
the bins. Then, grasping
the bin at each end, push
in at the bottom as you lift
and pull out at the top
Dividers
Both dividers can be adjusted
Removable Wine Rack
The wine rack holds a botlle
on its side and will Fiton any
shelf To move it, pull it
straight out, position itslip
over either edge of the shelf,
and push it all the way in
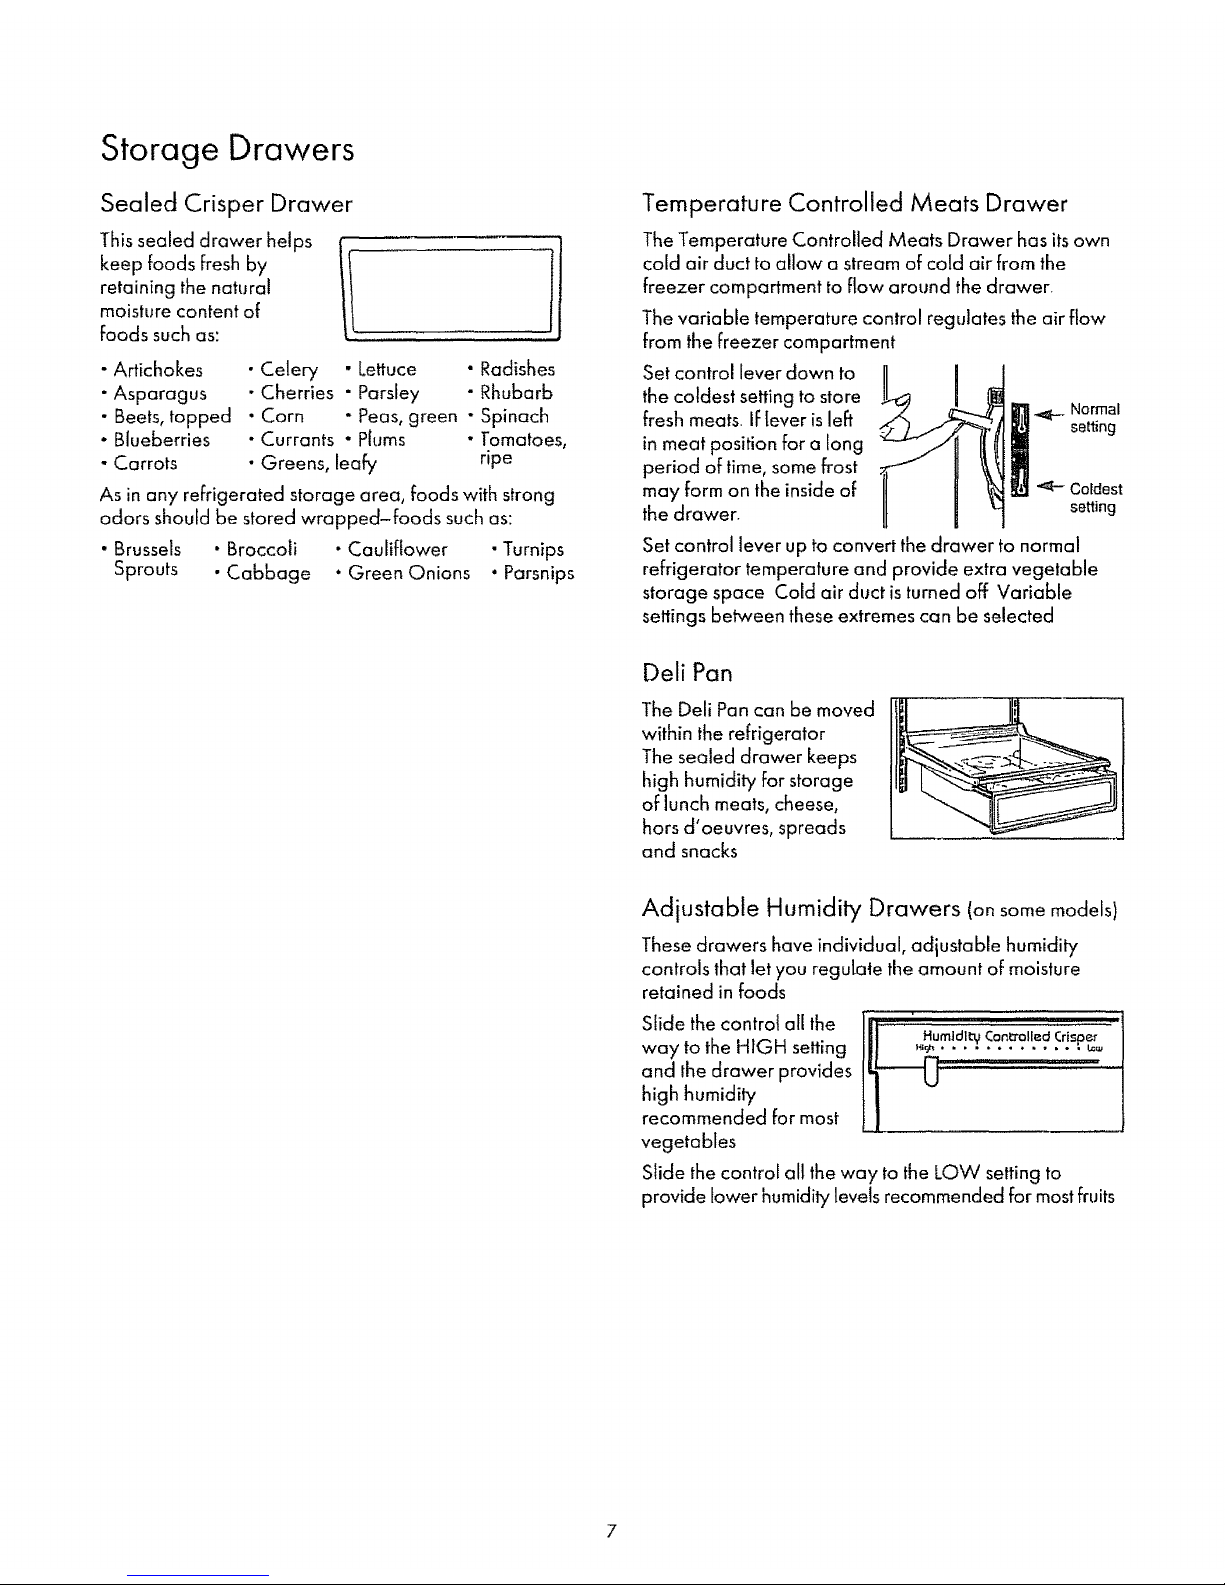
Storage Drawers
Sealed Crisper Drawer
Thissealed drawer helps f.
keep foods fresh by
retaining the natural
moisture content of
foods such as:
• Artichokes • Celery • Lettuce ° Radishes
• Asparagus • Cherries • Parsley • Rhubarb
• Beets, topped • Corn " Peas, green " Spinach
• Blueberries - Currants ° Plums " Tomatoes,
- Carrots o Greens, leafy ripe
As in any refrigerated storage area, foods with strong
odors should be stored wrapped-foods such as:
• Brussels ° Broccoli • Cauliflower • Turnips
Sprouts • Cabbage • Green Onions ° Parsnips
Temperature Controlled Meats Drawer
The Temperature Controlled Meats Drawer has its own
cold air duct to allow a stream of cold air from the
freezer compartment to flow around the drawer+
The variable temperature control regulates the air flow
from the freezer compartment
Set control lever down to
the coldest setting to store
fresh meats. Iflever is left
in meat position for a long
period of time, some frost
may form on the inside of
the drawer+
_ _ _F- Normal
i setting
Coldest
setting
Set control lever up to convert the drawer to normal
refrigerator temperature and provide extra vegetable
storage space Cold air duct is turned off Variable
settings between these extremes can be selected
Dell Pan
The Dell Pan can be moved
within the refrigerator
The sealed drawer keeps
high humidity for storage
of lunch meats, cheese,
hors d'oeuvres, spreads
and snacks
Adjustable Humidity Drawers (onsome models)
These drawers have individual, adjustable humidity
controls that let you regulate the amount of moisture
retained in foods
Slide the controt atl the
way to the HIGH setting
and the drawer provides
high humidity
recommended for most
vegetables
,.. . ...............
_I - Humidl_ Con_'o'_l_dCrisp€,
Slide the control all the way to the LOW setting to
provide lower humidity levels recommended for most fruits
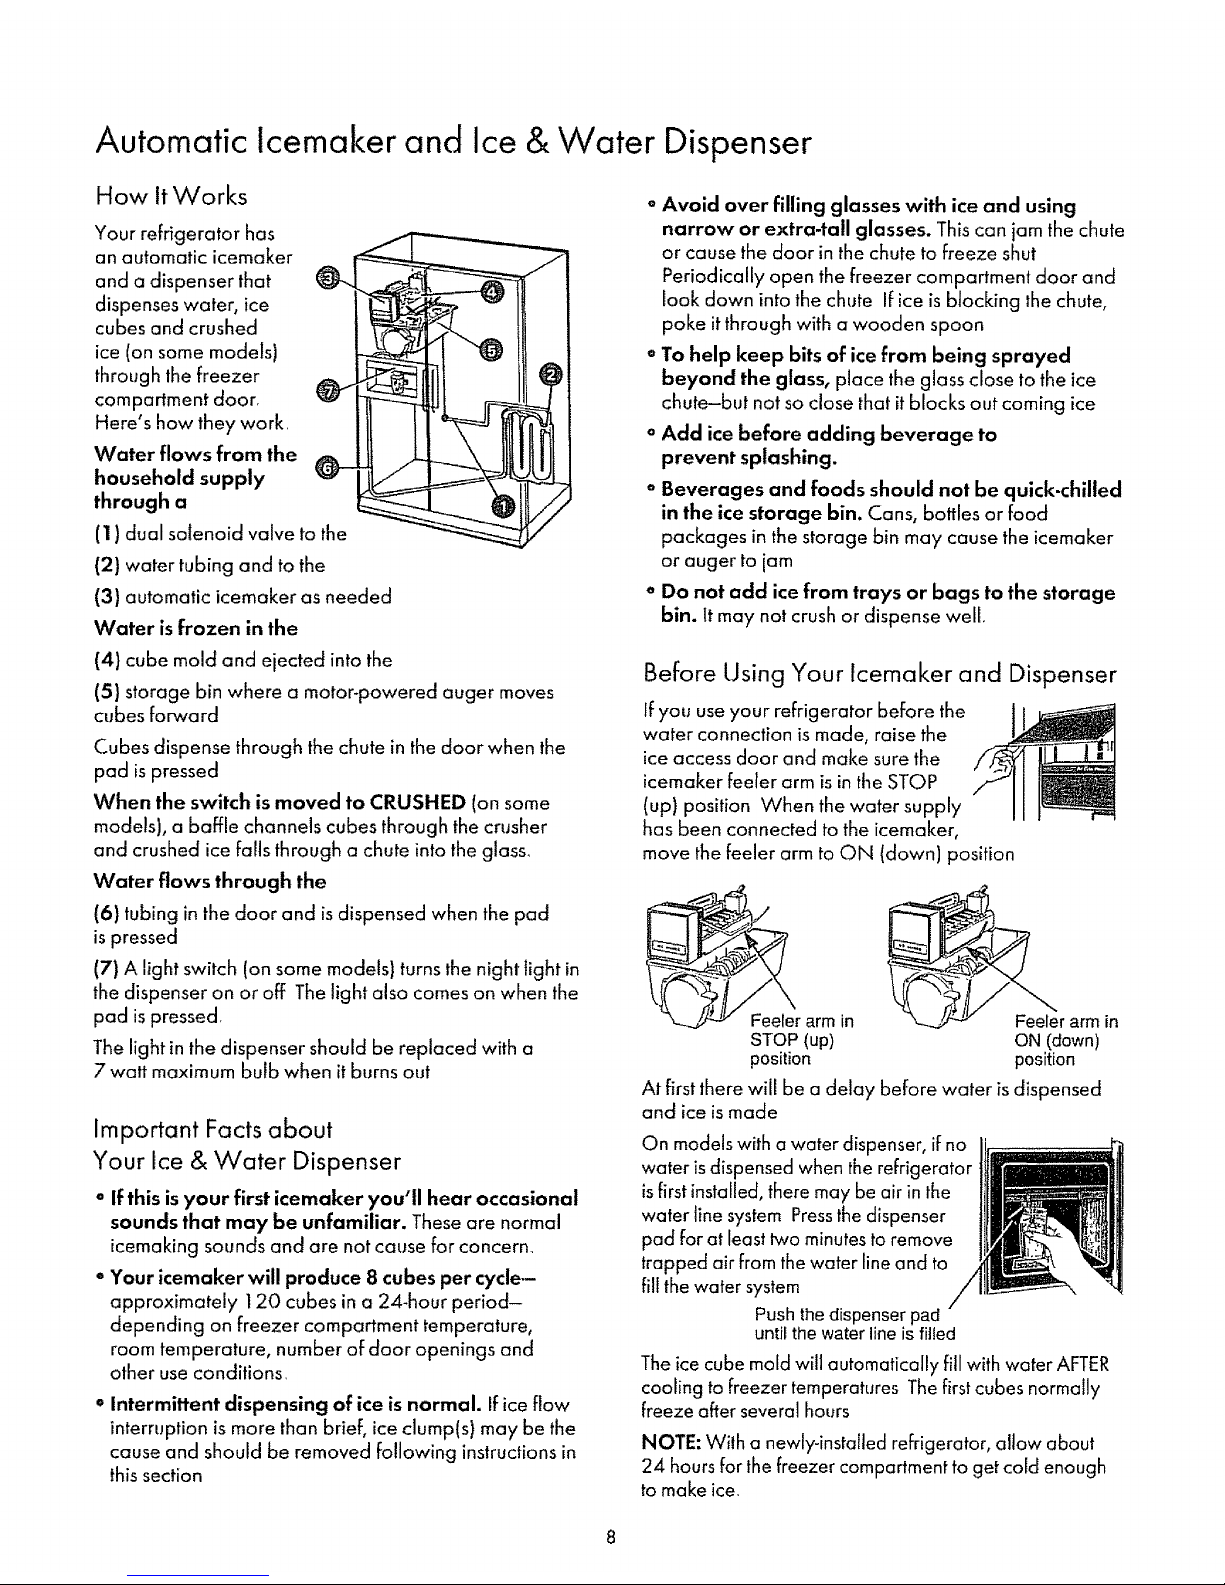
Automatic Icemaker and Ice & Water Dispenser
How ItWorks
Your refrigerator has
an automatic icemaker
and a dispenser that
dispenses water, ice
cubes and crushed
ice (on some models)
through the freezer
compartment door
Here's how they work
Water flows from the
household supply
through a
(1) dual solenoid valve to the
(2) water tubing and to the
(3) automatic icemaker as needed
Water is frozen in the
(4) cube mold and ejected into the
(5) storage bin where a motor-powered auger moves
cubes forward
Cubes dispense through the chute in the door when the
pad is pressed
When the switch is moved to CRUSHED (on some
models), a baffle channels cubes through the crusher
and crushed ice falls through a chute into the glass.
Water flows through the
(6) tubing in the door and isdispensed when the pad
ispressed
(7) A light switch (on some models) turns the night _ight in
the dispenser on or off The light also comes on when the
pad is pressed
The light in the dispenser should be replaced with a
7 watt maximum bulb when it burns out
Important Facts about
Your )ce & Water Dispenser
° If this is your first icemaker you'll hear occasional
sounds that may be unfamiliar. These are normal
icemaking sounds and are not cause for concern_
° Your icemaker will produce 8 cubes per cycle--
approximately 120 cubes in a 24-hour period-
depending on freezer compartment temperature,
room temperature, number of door openings and
other use conditions
• Intermittent dispensing of ice is normal. Ifice flow
interruptionis more than brief, ice clump(s) may be the
cause and should be removed following instructions in
this section
oAvoid over filling glasses with ice and using
narrow or extra-tall glasses. This can jam the chute
or cause the door in the chute to freeze shut
Periodically open the freezer compartment door and
look down into the chute If ice is blocking lhe chute,
poke it through with a wooden spoon
° To help keep bits of ice from being sprayed
beyond the glass, place the glass close to the ice
chute-but not so close that itblocks out coming ice
oAdd ice before adding beverage to
prevent splashing.
° Beverages and foods should not be quick-chilled
in the ice storage bin. Cans, bottles or food
packages in the storage bin may cause the icemaker
or auger to iam
o Do not add ice from trays or bags to the storage
bin. It may not crush or dispense well
Before Using Your Icemaker and Dispenser
If you use your refrigerator before the
water connection is made, raise the
ice access door and make sure the
icemaker feeler arm is in the STOP
(up) position When the water supply
has been connected to the icemaker,
move the feeler arm to ON (down) position
r arm in
STOP (up)
position
_r arm in
ON (down)
position
At first there will be a delay before water is dispensed
and ice is made
On models with a water dispenser, if no
water is dispensed when the refrigerator
isfirst installed, there may be air in the
water line system Pressthe dispenser
pad for at least two minutesto remove
trapped air from the water line and to
fill the water system
Pushthe dispenser pad
untiFthe water line is filled
The ice cube mold will automatically fill with water AFTER
cooling to freezer temperatures The first cubes normally
freeze after several hours
NOTE: Wilh a newly-installed refrigerator, allow about
24 hours for 1hefreezer compartment to get cold enough
to make ice
Once Your Icemaker & Dispenser
are in Operation
Throw away the firstfew batches of ice cubes ( 16 or 24
cubes) Thiswill flush away any impurities in the water fine
Do the same thing after vacations or extended periods when
ice isn't used
To clean out the line, pour the first six glassfuls of water in the
kitchen sink The firstwater through the systempicks up a
slight "plastic" tastefrom the water tubing
To make sure the bin fills with ice, level the cubes
occasionally. When cubes fall into the bin they may pile
up close to the icemaker and push the feeler arm to the
STOP (up) position before the bin gets full Keeping the
cubes level allows the icemaker to fill the bin
To Dispense Ice and Water
o Set the selector switch to CUBES, CRUSHED ICE
(on some models) or WATER
o Grip the glass or other container near the rim and press
the rim against the center of the pad
When Dispensing Ice:
o Some crushed ice may be
dispensed even though you
selected CUBES Thishappens
occasionally when a few cubes
get channeled to the crusher
oSometimes a mound of snow will
form on the door inthe ice chute
Thiscondition is normal, and usually occurs when you
have dispensed crushed ice repeatedfy The snowwilt
eventually evaporate
o Sometimes crushed ice will spray beyond the glass To
avoid this, hold the glass up close to the chute
When Dispensing Water:
• Thefirst giass of water dispensed
may be warmer than the following
ones This is normal
o Dispensed water iscool, noticed. For
colder water, simplyadd crushed ice
or cubes before dispensing water
CAUTION: Never put fingers or other
objects into the dispenser opening
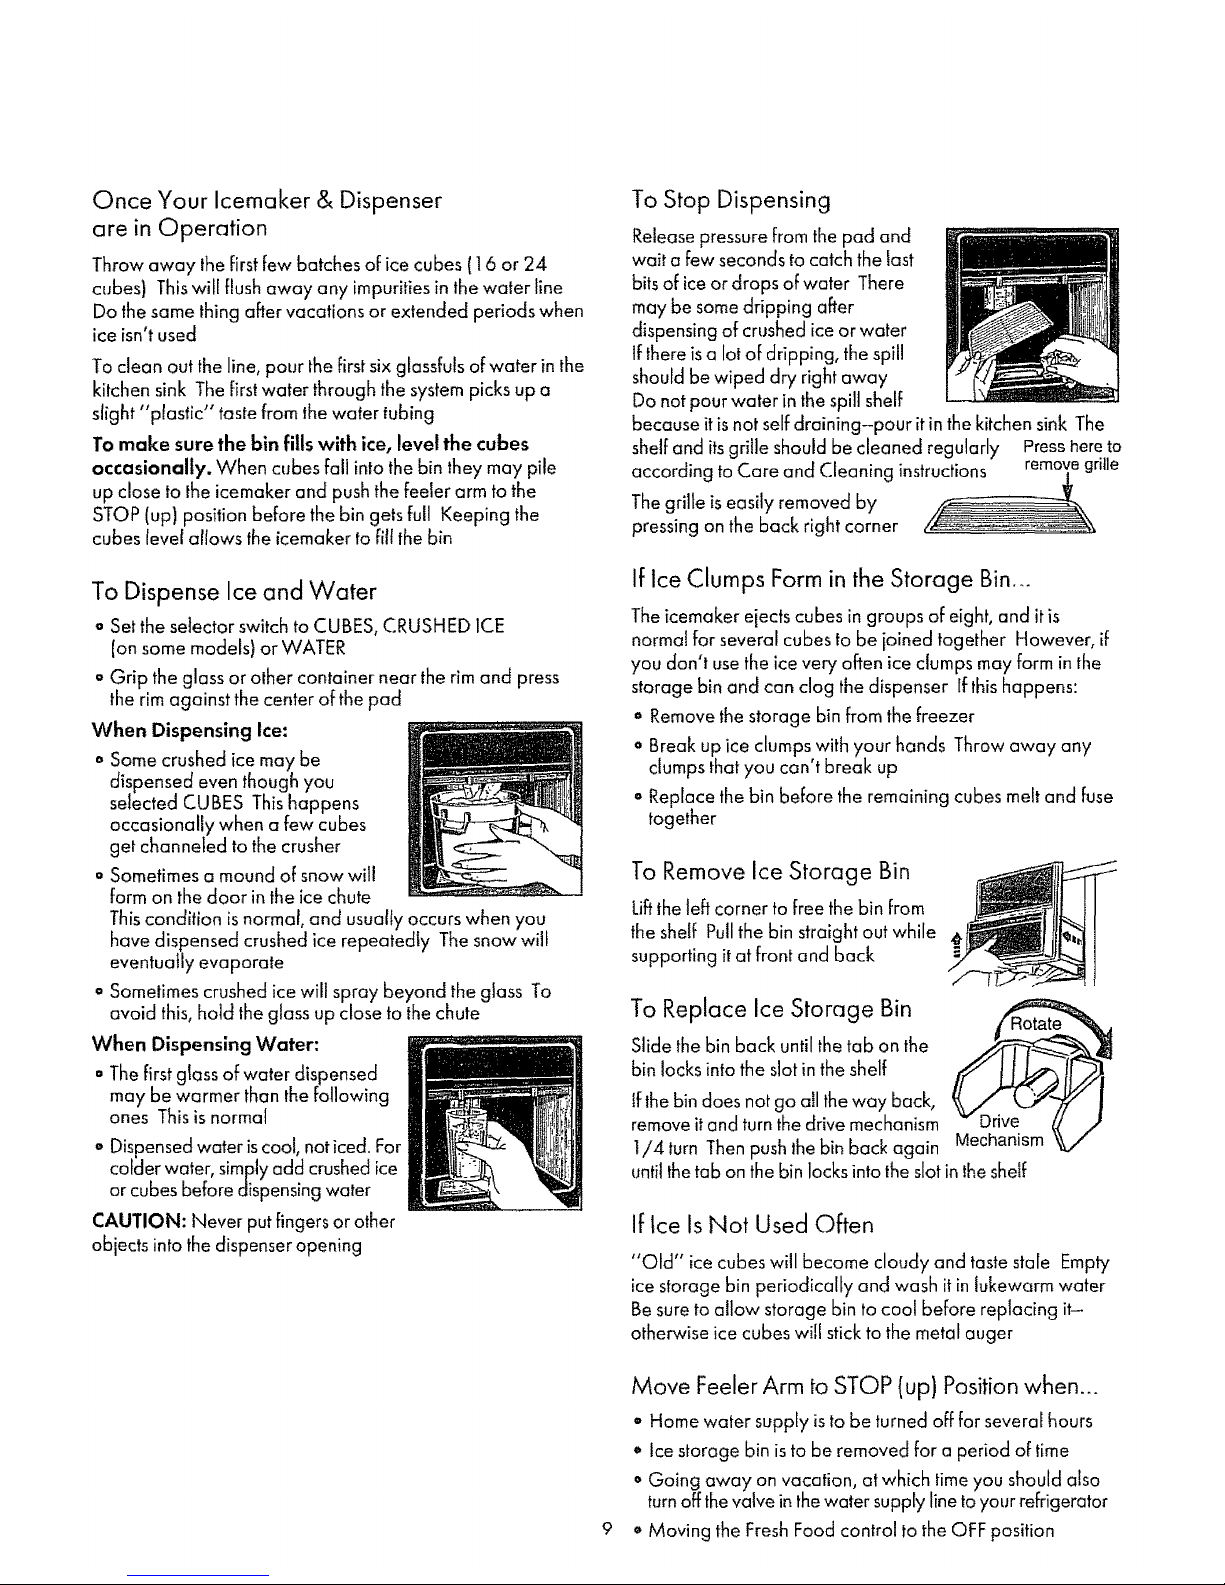
To Stop Dispensing
Releasepressure from the pad and
wait a few seconds to catch the last
bitsof ice or drops of water There
may be somedripping after
dispensing of crushed ice or water
If there isa lot of dripping, the spill
should be wiped dry right away
Do not pour water in the spill shelf
because it is not self draining-pour it in the kitchen sink The
shelfand itsgrille should be cleaned regularly Presshereto
according to Care and Cleaning instructions removegrille
The grille iseasily removed by
pressing on the back right corner
If Ice Clumps Form in the Storage Bin
Theicemaker ejects cubes in groups of eight, and it is
normal for several cubes to be joined together However, if
you don't usethe ice very often ice clumps may form in the
storage bin and can clog the dispenser [f thishappens:
• Remove the storage bin from the freezer
o Break up ice clumps with your hands Throw away any
dumps that you can't break up
oReplace the bin before the remaining cubes melt and fuse
together
To Remove Ice Storage Bin
Lift|he left corner to free the bin from
the shelf Pullthe bin straight out while
supporting it at front and back
To Replace Ice Storage Bin
Slide the bin back until the tab on the
bin locks into the slot in the shelf
Ifthe bin does not go all theway back,
remove itand turn the drive mechanism
!/4 turn Then pushlhe bin back again
until the tab on the bin locks into the slot in theshelf
If Ice Is Not Used Often
"Old" ice cubes will become cloudy and taste stale Empty
ice storage bin periodically and wash it in lukewarm water
Be sureto allow storage bin to cool before replacing it-
other,vise ice cubes will stick to the metal auger
9
Move Feeler Arm to STOP (up) Positionwhen...
o Home water supply isto be turned off far several hours
o Ice storage bin isto be removed for a period of time
• Going away on vacation, atwhich time you should also
turnoff thevalve in thewater supply line to your refrigerator
• Moving the Fresh Food control to the OFF position
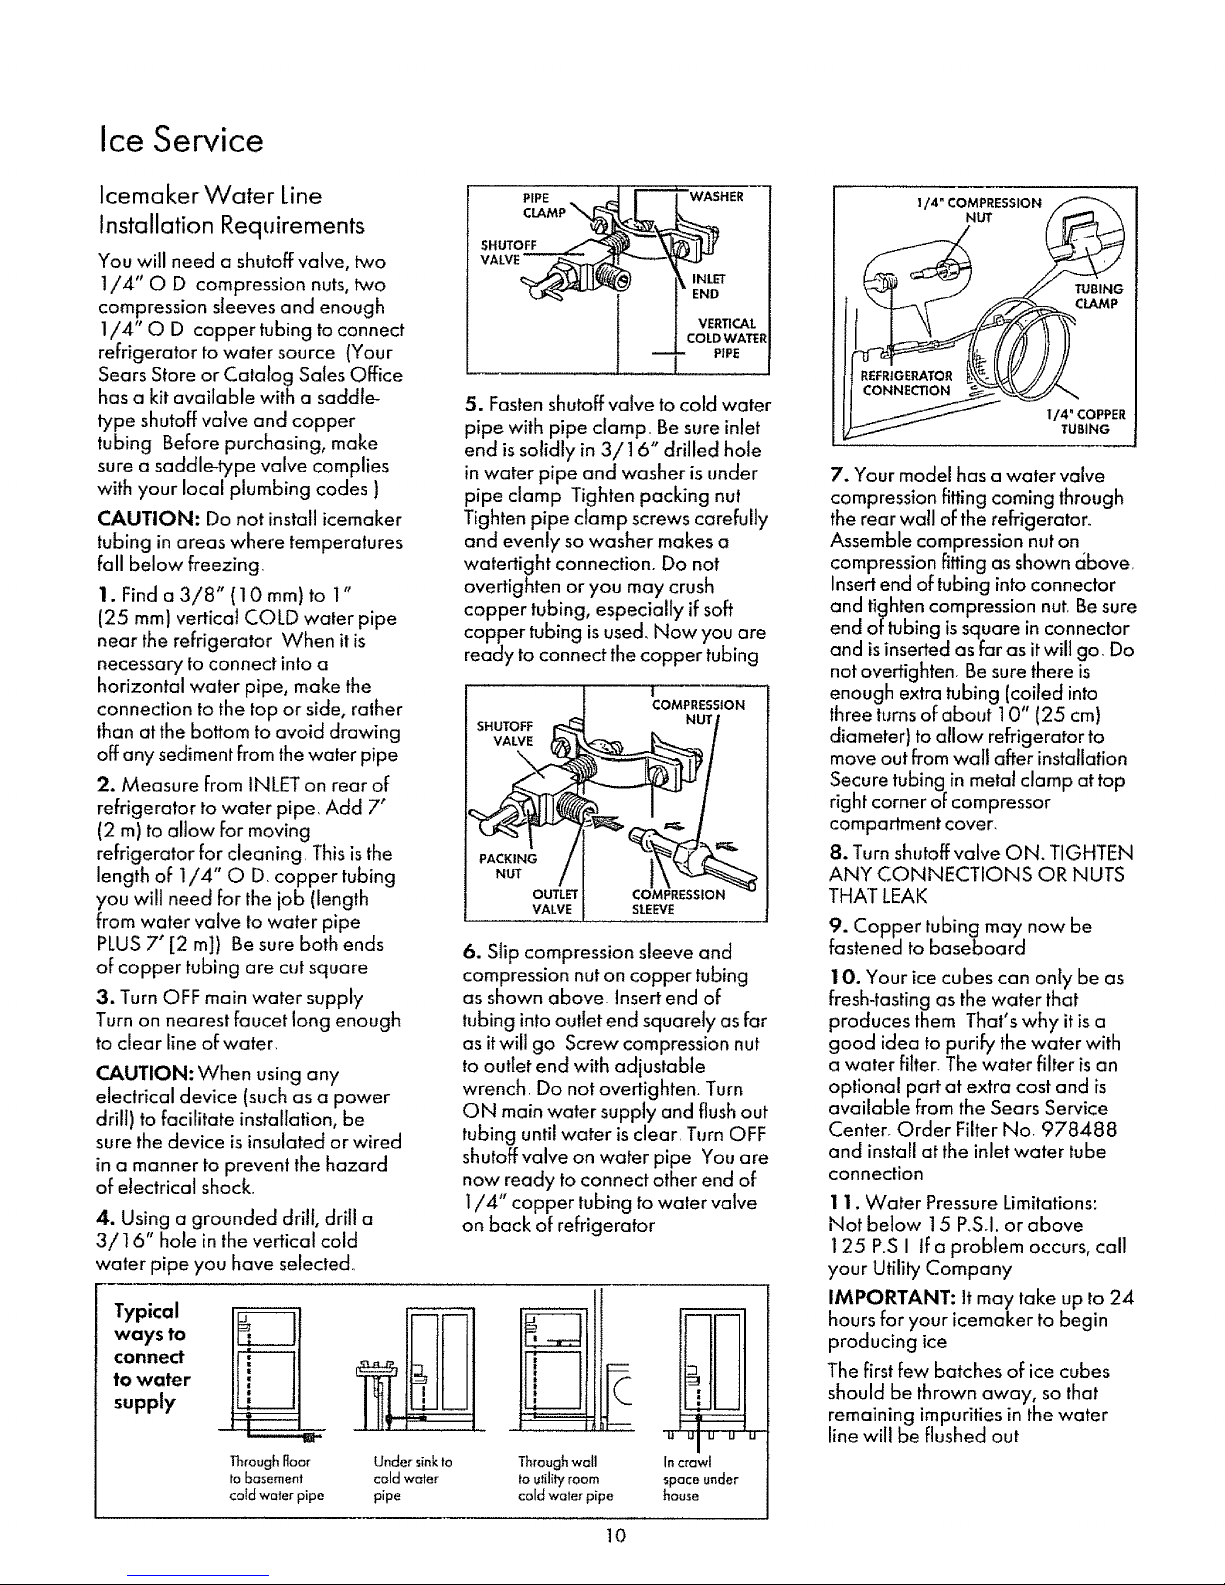
Ice Service
Icemaker Water Line
Installation Requirements
You will need a shutoff valve, two
!/4" O D compression nuts, two
compression sleeves and enough
1/4" O D copper tubing to connect
refrigerator to water source (Your
Sears Store or Catalog Sales Office
has a kit available with a saddle-
type shutoff valve and copper
tubing Before purchasing, make
sure a saddle-type valve complies
with your local plumbing codes )
CAUTION: Do not install icemaker
tubing in areas where temperatures
fall below freezing,
1. Find a 3/8" {10 mm) to I"
(25 ram) vertical COLD water pipe
near the refrigerator When it is
necessary to connect into a
horizontal water pipe, make the
connection to the top or side, rather
than at the bottom to avoid drawing
off any sediment from the water pipe
2. Measure FromINLET on rear of
refrigerator to water pipe, Add 7'
(2 m) to allow Formoving
refrigerator for cleaning This isthe
length of 1/4" O D, copper tubing
you will need for the job (length
from water valve to water pipe
PLUS7" [2 m]) Be sure both ends
of copper tubing are cut square
3. Turn OFF main water supply
Turn on nearest faucet long enough
to clear line of water,
CAUTION: When using any
electrical device (such as a power
drill) to facilitate installation, be
sure the device is insulated or wired
in a manner to prevent the hazard
of electrical shock.
4. Using a grounded drill, drill a
3/16" hole in the vertical cold
water pipe you have selected,
PIPE
CLAMP\
SHUTOFF
VALVE
INLET
END
VERTICAL
COLD WATER
j PIPE
5. Fastenshutoff valve to cold water
pipe with pipe clamp Be sure inlet
end is solidly in 3/16" drilled hole
in water pipe and washer is under
pipe clamp Tighten packing nut
Tighten pipe clamp screws carefully
and evenly so washer makes a
watertight connection, Do not
overtighten or you may crush
copper tubing, especially if soft
copper tubing is used, Now you are
ready to connect the copper tubing
SHUTOFF I_
VALVE _
PACKINGNUT /
OUTLET
VALVE
I
COMPRESSION
COMPRESSION
SLEEVE
6. Slip compression sleeve and
compression nut on copper tubing
as shown above Insert end of
tubing into outlet end squarely as far
as itwill go Screw compression nut
to outlet end with adjustable
wrench Do not overtighten. Turn
ON main water supply and flush out
tubing until water is clear Turn OFF
shutoff valve on water pipe You are
now ready to connect other end of
1/4" copper tubing to water valve
on back of refrigerator
Typical
ways to
connect
to water
supply
Through floor
to basement
cold water pipe
Under sink to
cold water
pipe
Through well
to utility room
cold water pipe
Incrawl
spaceunder
house
1/4" COMPRESSION
R_RJGE_TOR_.',._' // //
CONNEOION _-__
7, Your model has a water valve
compression fitting coming through
the rear wall of the refrigerator,
Assemble compression nut on
compression rifling as shown cibove
Insert end of tubing into connector
and tighten compression nut. Be sure
end of tubing is square in connector
and is inserted as far as itwill go, Do
not overtighten Be sure there is
enough extra tubing (coiled into
three turns of about 10 (25 cm)
diameter} to allow refrigerator to
move out from wall after installation
Secure tubing in metal clamp at top
right corner of compressor
compartment cover,
8. Turn shutoff valve ON. TIGHTEN
ANY CONNECTIONS OR NUTS
THAT LEAK
9. Copper tubing may now Be
fastened to baseboard
I0. Your ice cubes can only be as
fresh-tasting as the water that
produces them That's why it is a
good idea to purify the water with
a water filter, The water filter is an
optional part at extra cost and is
available from the Sears Service
Center, Order Filter No, 978488
and install at the inlet water tube
connection
1 I. Water Pressure Limitations:
Not below 15 P,S.I. or above
125 P.S I If a problem occurs, call
your Utility Company
IMPORTANT: It may take up to 24
hours for your icemaker to begin
producing ice
The first few Batches of ice cubes
should be thrown away, so that
remaining impurities in the water
line will be flushed out
10
Care and Cleaning
Outside
The water and ice dispenser spill shelf should be
wiped dry immediately to prevent spotting Water left on
the shelf may leave deposits that you can remove by
soaking in undiluted vinegar. You can also usea paste of
non-precipitating water softener (such as Calgon brand)
and water, or one teaspoon (5 ml) of citric acid powder
per pint (500 ml) of hot tap water Soak until the deposit
disappears or becomes loose enough to rinse away
Usually 30 minutes soaking time is adequate Avoid
using wax on the spill shelf and trim
The soft door handles are easy to clean if they are
waxed every few months Use a household wax such as
Pledge or Jubilee brand to coat the handles. Soil wilt then
easily wash off with dish detergent and water or a non_
abrasive all-purpose cleaner
Keep the finish clean. Wipe with a clean cloth lightly
dampened with kitchen appliance wax or mild liquid
dishwashing detergent Dry and polish with a clean, soft
cloth Do not wipe the refrigerator with a soiled
dishwashing cloth or wet towel. These may leave a
residue that can harm the paint Do not use scouring
pads, powdered cleaners, bleach or cleaners containing
bleach because these products can scratch and weaken
the paint finish
Protect the paint finish. The finish on the outside of the
refrigerator is a high quality, baked-on paint finish With
proper care, itwill stay new-looking and rust-free for
years Apply a coat of kitchen/appliance wax when the
refrigerator isnew and then at least twice a year.
The dispenser pad can be cleaned by using a warm
water and baking soda solution-about a tablespoon ( 15
ml) of baking soda to a quart (1 L) of water Rinse
thoroughly with water and wipe dry
Inside
The fresh food and freezer compartment interiors should
be cleaned at least once a year Unplug the refrigerator
before cleaning If this is not practical, wring excess
moisture out of sponge or cloth when cleaning around
switches, lights or controls
Use warm water and baking soda solution-about a
tablespoon (15 ml) of baking soda to a quart (1 L)of
water. This both cleans and neutralizes odors. Rinse
thoroughly with water and wipe dry
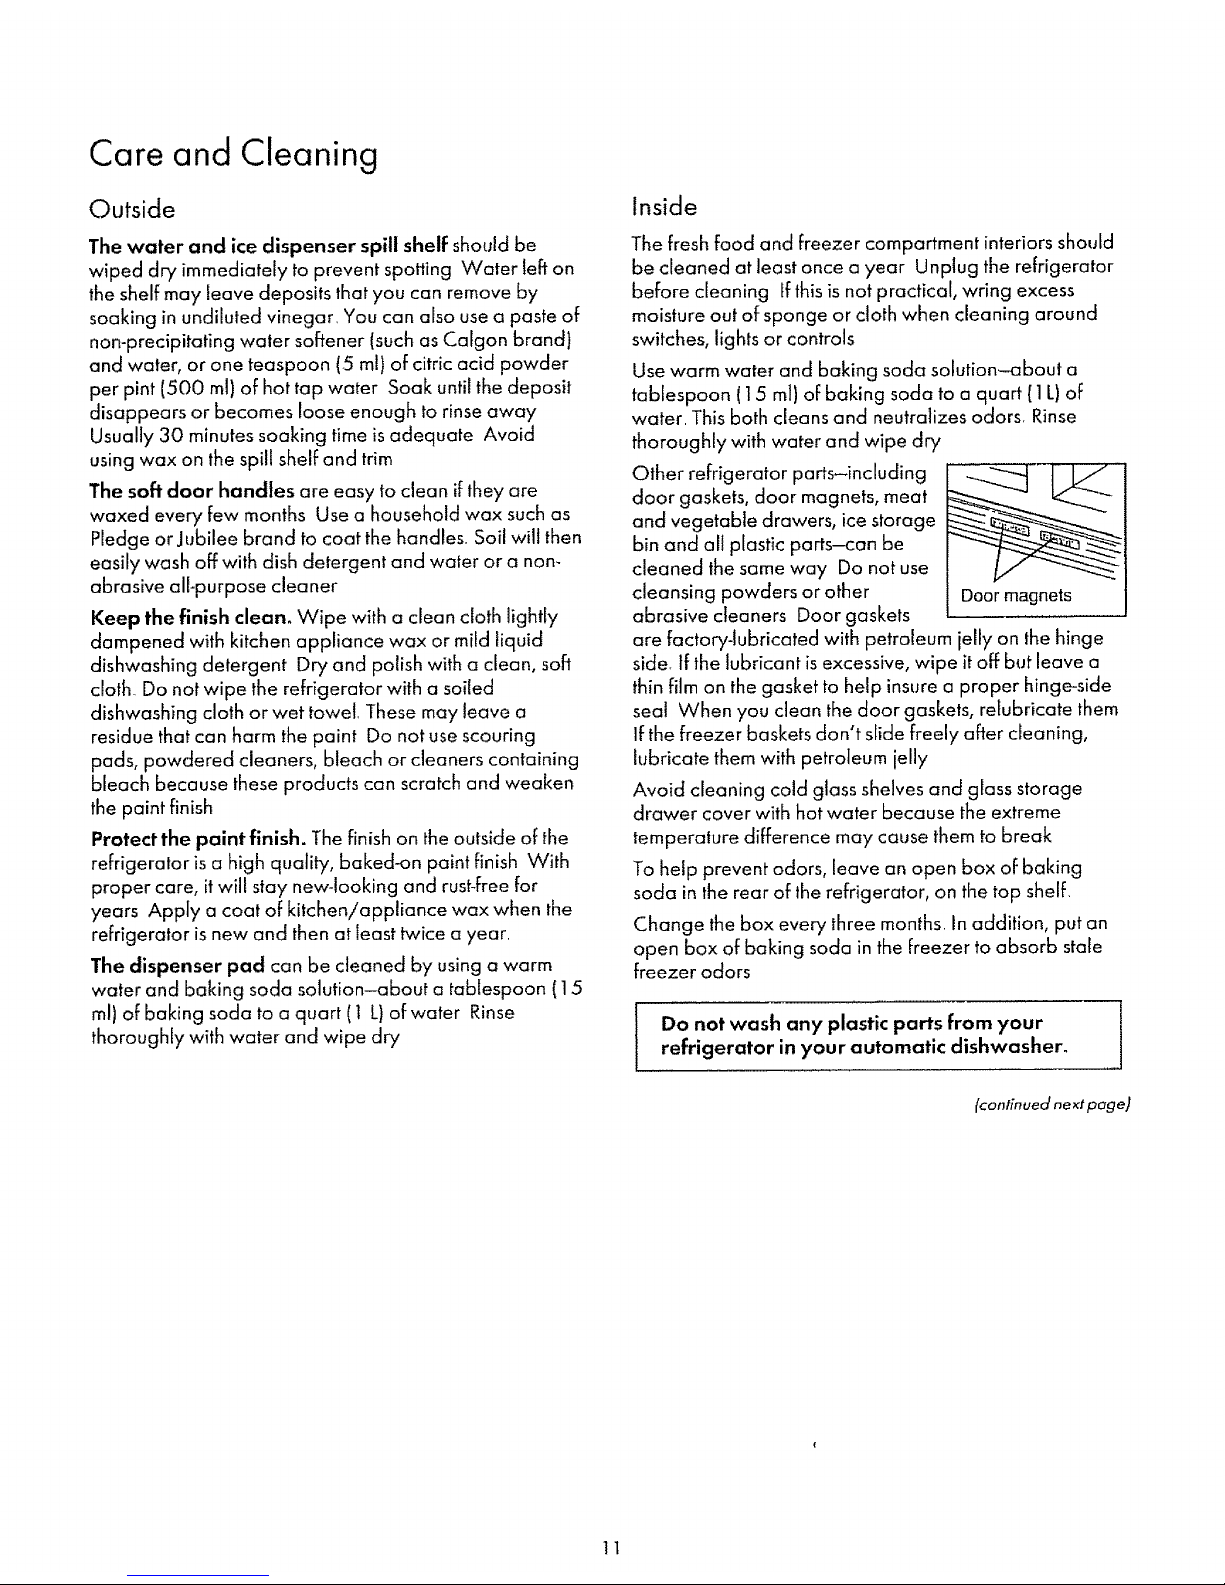
Other refrigerator parts-including
door gaskets, door magnets, meat
and vegetable drawers, ice storage
bin and all plastic parts-can be
cleaned the same way Do not use
cleansing powders or other
abrasive cleaners Door gaskets
Door magnets
are factory-lubricated with petroleum jelly on the hinge
side. tf the lubricant is excessive, wipe it off but leave a
thin film on the gasket to help insurea proper hinge-side
seal When you clean the door gaskets, retubricate them
If the freezer baskets don't slide freely after cleaning,
lubricate them with petroleum jelly
Avoid cleaning cold glass shelves and glass storage
drawer cover with hot water because the extreme
temperature difference may cause them to break
To help prevent odors, leave an open box of baking
soda in the rear of the refrigerator, on the top shelf.
Change the box every three months. In addition, put an
open box of baking soda in the keezer to absorb stale
freezer odors
Do not wash any plastic parts from your
refrigerator in your automatic dishwasher°
(continued next page]
11

Care and Cleaning (continued)
Drawer Removal
Drawers will stop before
coming all the way out of the
refrigerator to help prevent
contents from spilling onto
the floor Drawers can easily
be removed by tilting up
slightly and pulling past
"stop" location
On some models you may
need to remove the door
bins from the fresh food door
before removing the drawers
'_'_ ,_. Drawer
Jthe drawers _--_
l make sure you \_
Jslide them fl
I through the "
{ drawer guides
Ion the right side
If the door prevents you from taking out the drawers, the
refrigerator will need to be rolled forward until the door
opens enough to slide the drawers out. In some cases
when you roll the refrigerator out you will need to move
the refrigerator to the left as you roll it out
Under Refrigerator
For most efficient operation,
you need to keep the area
under the refrigerator clean
Remove the base grille and
either sweep away or
vacuum up dust that is
readily accessible on the
condenser coils
To remove the base grille,
open both doors, grasp the
Cleanthe condenser ceils
at least once a year
bottom of the grille and pull it out
To replace the base grille,
line up the clips on the back
of the grille with the openings
in the baseplate and push the
grille forward until it snaps
into place
Behind Refrigerator
Take care moving your refrigerator away from the wall All
types of floor coverings can be damaged, particularly
cushioned coverings and those with embossed surfaces Pull
the refrigerator straight out and return it to position by
pushing itstraight in Moving refrigerator in a side direction
may damage floor covering or refrigerator
When pushing the refrigerator back, make sure you don't
roll over the power cord or icemaker supply line
]2
Light Bulb Replacement
Unplug refrigerator before changing a light bulb.
Fresh Food Compartment-Upper Light
1. Pull off temperature control knobs
2. Pull the bottom of the light shield down and forward,
then rotate the top up and off
After replacing with same size bulb, reinstall light shield.
Fresh Food Compartment--Lower Ught (onsomemodels}
This light is located behind the top drawer or right above
the top drawer (depending on your model}
1. Unplug the refrigerator
2. If the light is behind the top drawer you will need to
remove the drawer and the shelf above it To remove the
drawer see the Drawer Removal section in Care and
Cleaning
- To remove the shelf first
remove any food on the shelf
Then tilt the shelf up at the
front and lift it up and out
of the tracks
3. Grasp the bottom of
the light shield and pull it
forward and up
4. After replacing with thesame size bulb, replace theshield.
If you cannot locate the correct bulb, see your dealer
5. If the light was behind the top drawer, you will need to
replace the drawer and the shelf above it
" To replace the shelf, raise the shelf front slightly and
place the top hooks in the lowest large track slots Then
lower the front of the shelf until it is level
6. Plug the refrigerator back in
Freezer Compartment
1. Remove shelf lust below
light panel (Shelf will be
easier to remove if it is
emptied first )
2. Pull plastic light panel toward you (It will bend to free
tabs from grooves )
3. After replacing with same size bulb, reinstall panel
and shelf

Before You Call for Service
Save time and money Check this list of causes of minor
operating problems you can correct yourself
Refrigerator does not operate
o May be in defrost cycle when motor does not operate
for about 30 minutes
o Temperature control in OFF position
o If interior light is not on, refrigerator may not be
plugged in at wall outlet
o If plug is secure and refrigerator fairs to operate,
plug lamp into same outlet to determine if there is tripped
circuit breaker or burned out fuse
Motor operates for long periods
o Modern refrigerators with more storage space and
a larger freezer require more operating time
o Normal when refrigerator isfirstdelivered to your
home-usually requires 24 hours to completely cool down
o Large amounts of food placed in refrigerator to be
cooled or frozen
o Hot weather-frequent door openings
o Door left open
o Temperature controls settoo cold
o Condenser needs cleaning
Operating sounds
o The high speed compressor motor required to
maintain near zero temperatures in the large freezer
compartment may produce higher sound levels than
your old refrigerator
o Normal fan air flow-one fan blows cold air through
the refrigerator and freezer compartments-another fan
cools the compressor motor.
• These NORMAL sounds will also be heard from
time to time:
o Defrost timer switch clicks at defrost.
o Defrost water dripping
o Temperature control clicks ON or OFF
• Refrigerant boiling or gurgling
o Cracking or popping of cooling coils caused by
expansion and contraction during defrost and
refrigeration following defrost
o Ice cubes dropping into the bin and water running in
pipes as icernaker refills
Motor starts & stops frequently
o Temperature control starts and stops motor to maintain
even temperatures Thisis normal
Door not closing properly
o Door gasket on hinge side sticking or folding over.
To correct, put a small amount of petroleum jelly on face
of gasket
Vibration or rattling
• If refrigerator vibrates, more than likely it is not
resting solidly on the floor The front roller screws need
adjusting, or floor isweak or uneven Referto Starting
Your Refrigerator section
o If dishes vibrate on shelves, try moving them
Slight vibralion is normal
o Icemaker supply line may be rattling, move the
refrigerator 1/2" out from the wall
Foods dry out
o Foods not covered, wrapped or sealed properly
Fresh food or freezer compartment temperature
too warm
o Temperature control not set cold enough_
o Warm weather-frequent door openings
• Door left open for long time
o Package may be holding door open
Frost or ice crystals on frozen food
o Door may have been left ajar or package holding
door open
o Too frequent or too long door openings
o Frost within package isnormal
Slow ice cube freezing
o Door may have been left ajar
o Set temperature of freezer compartment colder
Ice cubes have odor/taste
- Old cubes need to be discarded Empty ice bin every
30 days
° Ice storage bin needs to be washed
o Unsealed packages in refrigerator and/or freezer
compartments may be transmitting odor/taste to ice
cubes
o Interior of refrigerator needs cleaning
Cube dispenser does not work
o No ice cubes Remove storage container. If cubes are
frozen to wire arm, remove cubes
• No ice cubes Icemaker or water supply turned off
o Irregular ice clumps in storage container Break up as
many as you can with fingertip pressure and discard the
remaining clumps
(continued next page)
t3
Before You Call for Service (continued)
Automatic icemaker does not work
o Icemaker feeler arm in STOP (up) position
o Water supply turned off or not connected
o Freezer compartment too warm
o Cubes too small-water shutoff valve connecting
refrigerator to home water line may be clogged
o Sometimes cubes fuse to the side of the ice mold and
hold the feeler arm in the STOP (up) position, Remove
this ice to restart the icemaker
o Piled up cubes in storage bin may cause icemaker to
shut off prematurely With icemaker feeler arm in STOP
(up) position, level cubes in bin by hand,
o When leveling cubes by hand, you may have pushed
the feeler arm into the STOP (up) position by mistake
Water has poor taste/odor
o If water dispenser has not been used for an extended
period, dispense several glassfuls of water to eliminate
taste temporarily imparted by the water line
• Poor4asting incoming water Enstalla water filter,
Water dispenser does not work
• Water supply line turned off or not connected
o Supply line may be clogged with sediment
o If no water is dispensed when the refrigerator is first
installed, there may be air in the water system Pressthe
dispenser pad for at least two minutes to remove trapped
air from the water line and to fill the water system
Moisture forms on outside of refrigerator
o Not unusual during periods of high humidity
Moisture collects inside
o Too frequent or too long door openings
o In humid weather, air carries moisture into refrigerator
when doors are opened
Water on floor
o The drain in the bottom of the freezer may be clogged,
Remove any ice on the freezer bottom and clean the
drain Refer to Care and Cleaning section
t4ot air from bottom of refrigerator
o Normal air flow cooling motor In the refrigeration
process, it is normal that heat be expelled in the area
under the refrigerator Some floor coverings will discolor
at these normal and safe operating temperatures, Your
floor covering supplier should be consulted if you obiect
to this discoloration
Interior light does not work
o No power at outlet
• Light bulb needs replacing See Care and Cleaning
section
Refrigerator has odor
o Food with strong odors should be tightly covered
o Check for spoiled food
o _nterior needs cleaning Refer to Care and Cleaning
section,
o Defrost water system needs cleaning
• Keep open box of baking soda in refrigerator; replace
every three months
Water Filter Accessory
(optional at extra cost)
Your ice cubes can only be as fresh-tasting as the water
that produces them, That's why it's a good idea to purify
the water with a water filter
The water filter is an optional part at extra cost and is
available from your Sears Service Center Order Filter
No 978488 and it may be installed in minutes when
attached to the inlet water tube connection
Water Supply Accessory Kit
(optional at extra cost)
A water supply kit containing copper tubing, shut-off
valve, fittings and instructions needed to connect the
icemaker to your cold water line is also available from
your Sears store or Sears Service Center
Moving Precautions
Disconnect thepower cord from the wall outlet,
remove all foodand clean and dry the interior Secure
all loose items by taping them securely in place Keep
the refrigerator in an upright position during actual
moving and in the van Secure the refrigerator in the
van to prevent movement, and protect the outside with
a blanket
Vacation Precautions
For shorter vacations, remove perishable foods and
leave controls at their regular settings However, if room
temperature is expected to drop below 60°F (I 6°C,},
follow the same instructions as for extended vacations
For extended vacations or absences, shut off power
to the refrigerator, move the numbered control to the OFF
position, and clean the interior with a baking soda
solution of one tablespoon of baking soda to one quart
ofwater Wipe dry To prevent odors, Ieave an open box
of baking soda in the refrigerator Leave the doors open
Set icemaker to the STOP (up) position and shut off water
supply to refrigerator
14
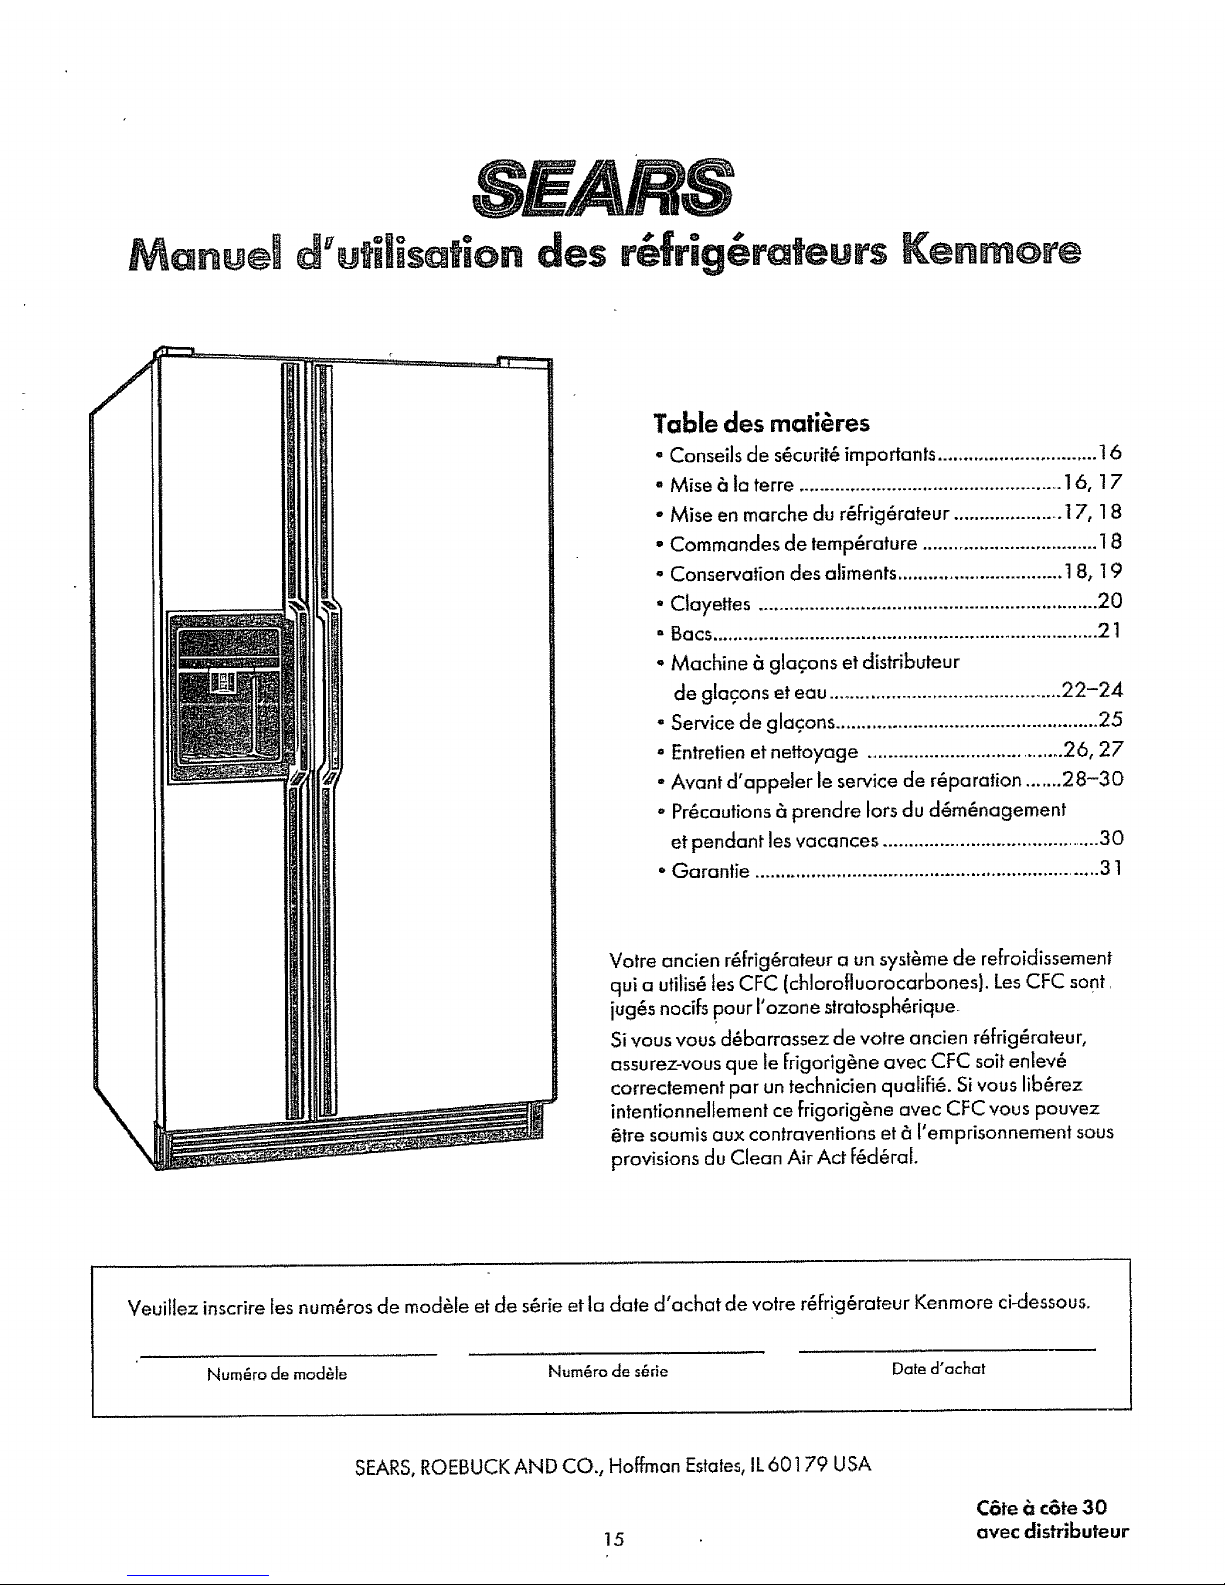
M n@e
Een @{e
Table des mati_res
* ConseiJs de s_curit_ importants ............................... 16
o Mise & la terre .................................................... 16, 17
- Mise en marche du r_Frig_rateur ..................... 17, 18
- Commandes de temperature .................................. 18
- Conservation des aliments ................................ t 8, 19
- Clayettes .................................................................. 20
- Bacs........................................................................... 21
° Machine _ glacons et distributeur
de glacons et eau ............................................. 22-24
- Service de glacons ................................................... 25
° Entretien et nettoyage .......................................26, 27
- Avant d'appeler le service de r_paration .......28-30
° Precautions _ prendre tars du d_m_nagement
et pendant les vacances ........................................... 30
oGarantie ................................................................... 31
Votre ancien r_frig_rateur a un syst_me de refroidissement
qui a utilis_ tesCFC (chlorofiuoracarbones). Les CFC sont
jug,s nocifs pour I'ozone stratosph_rique
Si vous vous d_barrassez de votre ancien r_frig_rateur,
assurez-vous que le ffigorig_ne avec CFC saltenIev_
correctement par un technicien qualifi_. Si vous lib_rez
intentionneHement ce frigorig&ne avec CFC vous pouvez
_tre soumis aux contraventions et (_l'emprisonnement sous
provisionsdu Clean Air Act f_d_ra[.
Veuiliez inscrire [esnum_ros de module et de s_rie et la date d'achat de votre r_frig_rateur Kenmore ci-dessovs.
Num_ro de module Num_ro de s_rle Date d'achat
SEARS,ROEBUCK AND CO., Hoffman Estates,IL 60179 USA
15
CSte _ c_te 30
avec distributeur
MESURESDESECURITEIMPORTANTES
Veuiflez life toutes les directives avant
d'utiliser l'appareil.
MISE EN GARDE--Lorsque vous utilisez cet
61ectrom_nager, observez toujours lesmesures de
s_curit_ de base, notamment lessuivantes :
• N'ufilisez cet appareil que pour l'usage auquel il
est destin_, comme expliqu& dans le present Manuel
d'utitisation.
• Avant d'utiliser votre r&frig_rateur, assurez-vous
qu'ii a _t_ ad6quatement installS, conform_ment
aux directives d'installation. Voir Jesdirectives de raise
ta terre au_essous et _ la page 17.
• Ne d_branchez jamais le r_frig_rateur en tirant sur
le cordon d'alimentation. Saisissez fermement la fiche _
du cordon et tirez-la bien droit de la prise de courant.
- R_parez ou remplacez imm&diatement tout
cordon d'alimentation effiloch_ ou endommag6.
N'utifisez pas un cordon dont I'isolant est fendilI_ ou
montre des signes d'usure.
• Lorsque vous d6placez votre r&frig_rateur, faites
attention de ne pas le faire rouler sur le cordon
d'alimentation afin de ne pas i'endommager.
• Lorsque le r&frig6rateur est en marche, ne touchez
pas aux surfaces froides, surtout slvous avez les
mains humides. La peau risque d'adh6rer _ ces surfaces.
• Si votre r_frig_rateur est dot_ d'une machine 6
glacons automatlque, ne mettez pas les doigts
dans le m_canisme de la machine pendant que
le r_frig_rateur est branch& Vous risquez de vous
blesser et de bloquer les pi_ces mobiles du m_canisme
d'6jection ou de toucher _ 1'_16mentchauffant qui
d_moule les gtacons.
- Ne rangez pas ou n'utilisez pas d'essence ou
autres vapeurs ou liquides inflammables
proximit& de votre r&frig_rateur ou de tout autre
_lectrom6nager.
• Ne faites pas recongeler des aliments surgel_s qui
ant compl6tement d_gel& Leminist_re de I:Agriculture
des Etats-Unis affirme dans le n° 69 du p_riodique Home
and Garden Bulletin :
_{Vouspouvez recongeler des aliments partiellement
d_gel_s s'ifs renFerment encore des cristaux de glace ou
s'ils sont encore tr_s froids-moins de 40 °F. (14 °C.)._>
_{Laviande hach_e, la volaille ou le paissan d_geI_s dont
I'odeur ou la couleur sont suspe'ctes ne doivent pas 6tre
recongel_s ni consomm&s. La cr_me glac6e d_congei_e
dolt 6tre jet, e. Si I'odeur ou la couleur d'un aliment vous
semblent anormales, jetez-le. It .pourrait _tre dangereux
de le consommer._>
_M_me une d_cong61ation partielfe, suivie d'une
recong6tation, peut alt6rer la qualit_ des aliments,
surtout celle des fruits, des I_gumes et des plats cuisin6s.
Lesviandes rouges sont mains sensibles 6 cet effet que
la plupart des autres aliments. Veillez _ consommer les
aliments recongel6s leplus rapidement possib_e._>
- Si vous oyez gard_ votre ancien r&frig&rateur et
que vous ne vous en servez pas, ayez soin d'enlever
les portes, afin de r_duire les risques pour les enFants.
• Ne laissez pas les enfants grimper, s'asseoir ou
monter sur les clayettes du r_frig_rateur, ou s'y
agripper. I& pourraient endommager le r_frig_rateurret
se blesser s_rieusemento
• D6branchez votre r_frig6rateur avant de le
nettoyer ou de le r_parer. REMAROUE : Nous vous
recommandons fortement de confier route r_paration c]
un technicien qualifi6.
•Avant de remplacer une ampoule grill_e,
d6branchez le r_frig6rateur ou coupez I'alimentation
_lectrique en enlevant le fusible ou en d_clenchant le
disjoncteur, afin d'_viter tout contact avec [efilament sous
tension de I'ampouleo (Une ampoule grill_e peut se casser
Iorsque vous la rempiacez.) REMARQUE : Lorsque vous
r_glez Ia commande de temperature _ _<OFF_(_teint),vous
ne coupez pas le courant qui alimente le circuit de Ia fampe
CONSERVEZ CES DIRECTIVES
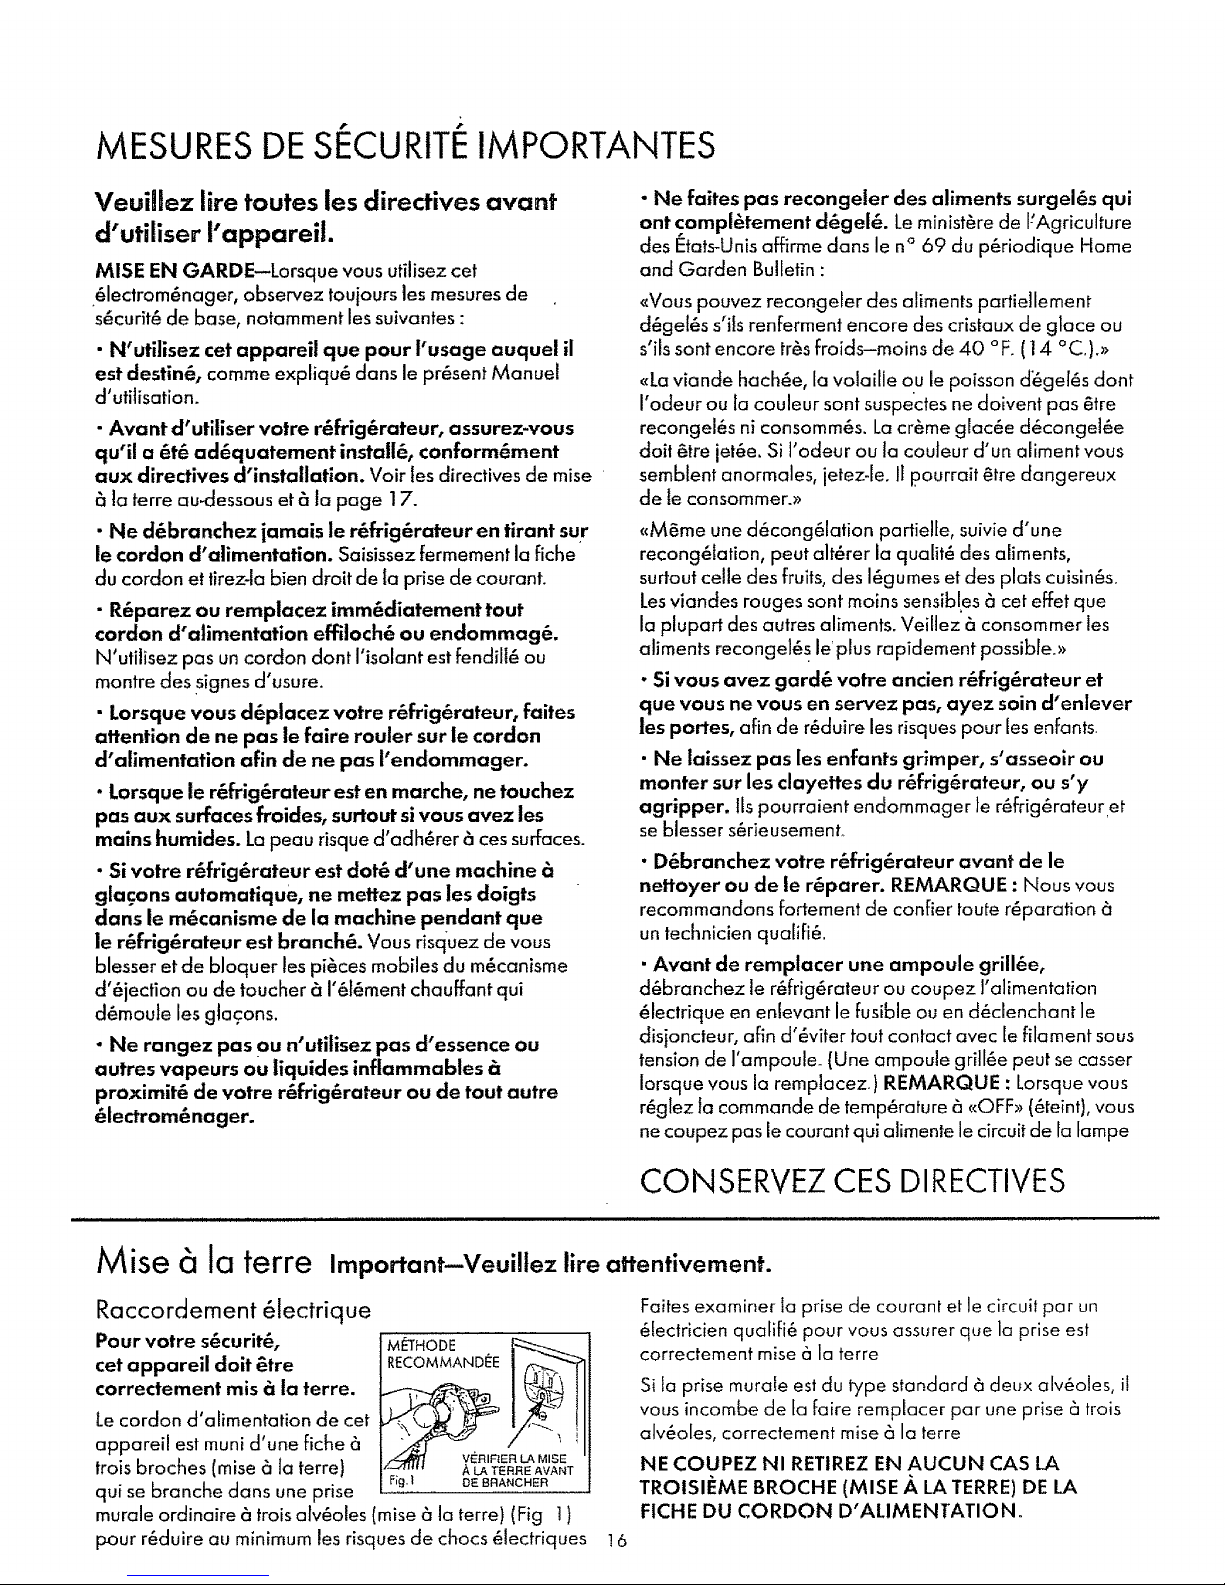
M ise c1ia terre Important--Veuiflez lire attentivernent.
Raccordement 61ectrique
Pour votre s_curit_,
cet appareil dolt _tre
correctement mis _ ia terre.
Le cordon d'alimentation de cet
appareil est muni d'une fiche
troisbroches (raise 6 la terre)
qui se branche dans une prise
MEq'HODF .
__RECOMMANDEE..
VEa_F_E _ SE
z-_-a_ A tJ_ T_RRE AVANT
F;g:l DE BRANCHER
murale ordinaire 6 trois alv6oles (raise 6 la terre) (Fig 1)
pour r6duire au minimum les risques de chocs 6Iectriques
16
Faites examiner la prise de courant et le circuit par un
6fectricien qualifi6 pour vous assurer que la prise est
correctement raise 6 la terre
Sila prise murale est du type standard 6 deux alv6oles, il
vous incombe de la fake remplacer par une prise 6 trois
alv6oles, correctement raise 6 la terre
NE COUPEZ NI RETIREZ EN AUCUN CAS LA
TROISII_ME BROCHE (MISE .&LA TERRE) DE LA
FICHE DU CORDON D'ALIMENTATION.
 Loading...