

Sears Kenmore Classic 98591,Kenmore Classic 98598 Owner's Manual
K_nmore
CLASSIC ®
ELECTRIC RANGE
OWNER'S MANUAL
models 98591/98598
CONTENTS
INSTALLATION
INTEGRAL VENTING
HOOD EXTENSION
CARE AND USE
Important Safety Instructions
Features of Your Cooking Center
Surface Cooking:
Canning Tips
Sudace Cooking Guide
Ovens:
Clock/Timer
Control Settings
Baking, Baking Guide
Roasting, Roasting Guide
Broiling, Broiling Guide
Favorite American Recipes
Care & Cleaning
Thermostat Adjustment
Self-Cleaning Instructions
Exhaust System
PROBLEM SOLVER
The Problem Solver lists causes of
minor operating problems that you can
correct yourself.
WARRANTY
3
INSTALLATIONINSTRUCTIONS
Before you begin--Read these instructions com-
pletely and carefully,
IMPORTANT--Save these instructions for local
inspector's use.
IMPORTANT--OBSERVE ALL GOVERNING CODES
AND ORDINANCES.
Note to Installer--Be sure to leave these instruc.
tions with the Consumer.
Note to Consumer--Keep this Owner's Manual for
future reference.
Note--This appliance must be properly grounded.
Tools You Will Need
Electric drill
3/32" drill bit
Phillips head screwdriver
Blade type screwdriver
Hammer
Knife
Electrician pliers
Electrical Requirements
CAUTION, FOR PERSONAL SAFETY: DO NOT USE
AN EXTENSION CORD WiTH THIS APPLIANCE.
IMPROPER CONNECTION OF ALUMINUM HOUSE
WIRING TO COPPER LEADS CAN RESULT IN A
SERIOUS PROBLEM. USE ONLY CONNECTORS
DESIGNED FOR JOINING COPPER TO ALUMINUM
AND FOLLOW THE MANUFACTURER'S RECOM-
MENDED PROCEDURE CLOSELY.
REMOVE HOUSE FUSE OR OPEN CIRCUIT
BREAKER BEFORE BEGINNING INSTALLATION.
• This appliance must be supplied with the proper
voltageand frequency, andconnectedtoan individual,
properly grounded branch circuit, protected by a cir-
cuit breaker or time delay fuse, as noted onthe rating
plate. (Rating plateis located on the loweroven door
frame.)
• Wiring must conform to National Electric Codes.
• If the electric supply provided does not meet the
above specifications,call a licensed electrician.
• Because range terminals are not accessible after
range is in position,flexible service conduit or cord
must be used.
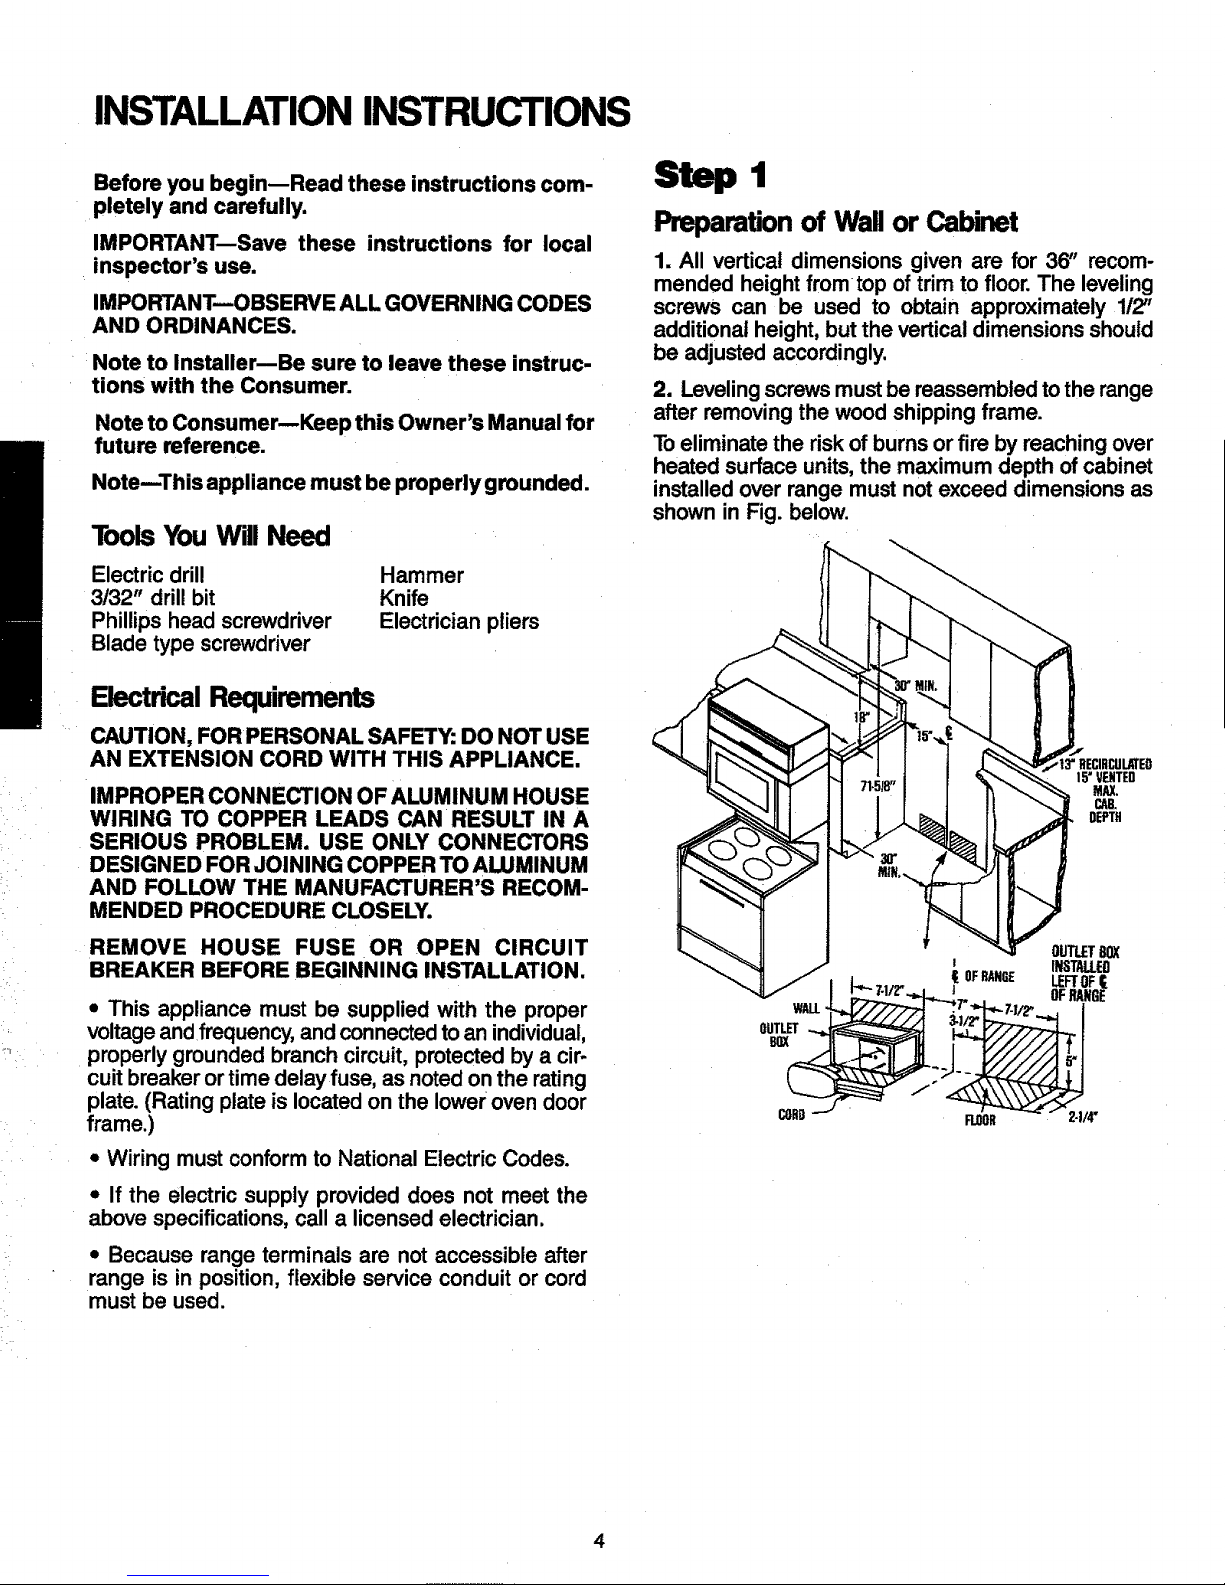
Step I
Preparation of Wag or Cabinet
1. All vertical dimensions given are for 36" recom-
mended height fromtop of trim to floor. The leveling
screws can be used to obtain approximately 112'
additional height,but the vertical dimensions should
be adjusted accordingly.
2. Leveling screwsmust be reassembled tothe range
after removing the wood shipping frame.
Toeliminate the risk of burns or fire by reaching over
heated surface units,the maximum depth of cabinet
installed over range must notexceed dimensions as
shown in Fig. below.
15"VENTED
MAX,
CAB.
DEPTH
WALL-
OUTLET
8OX
OUTLET80X
INSTALLED
f OFRANGE LEFTOF
OFRANGE
CORD FLOOR 2-1/4"
4
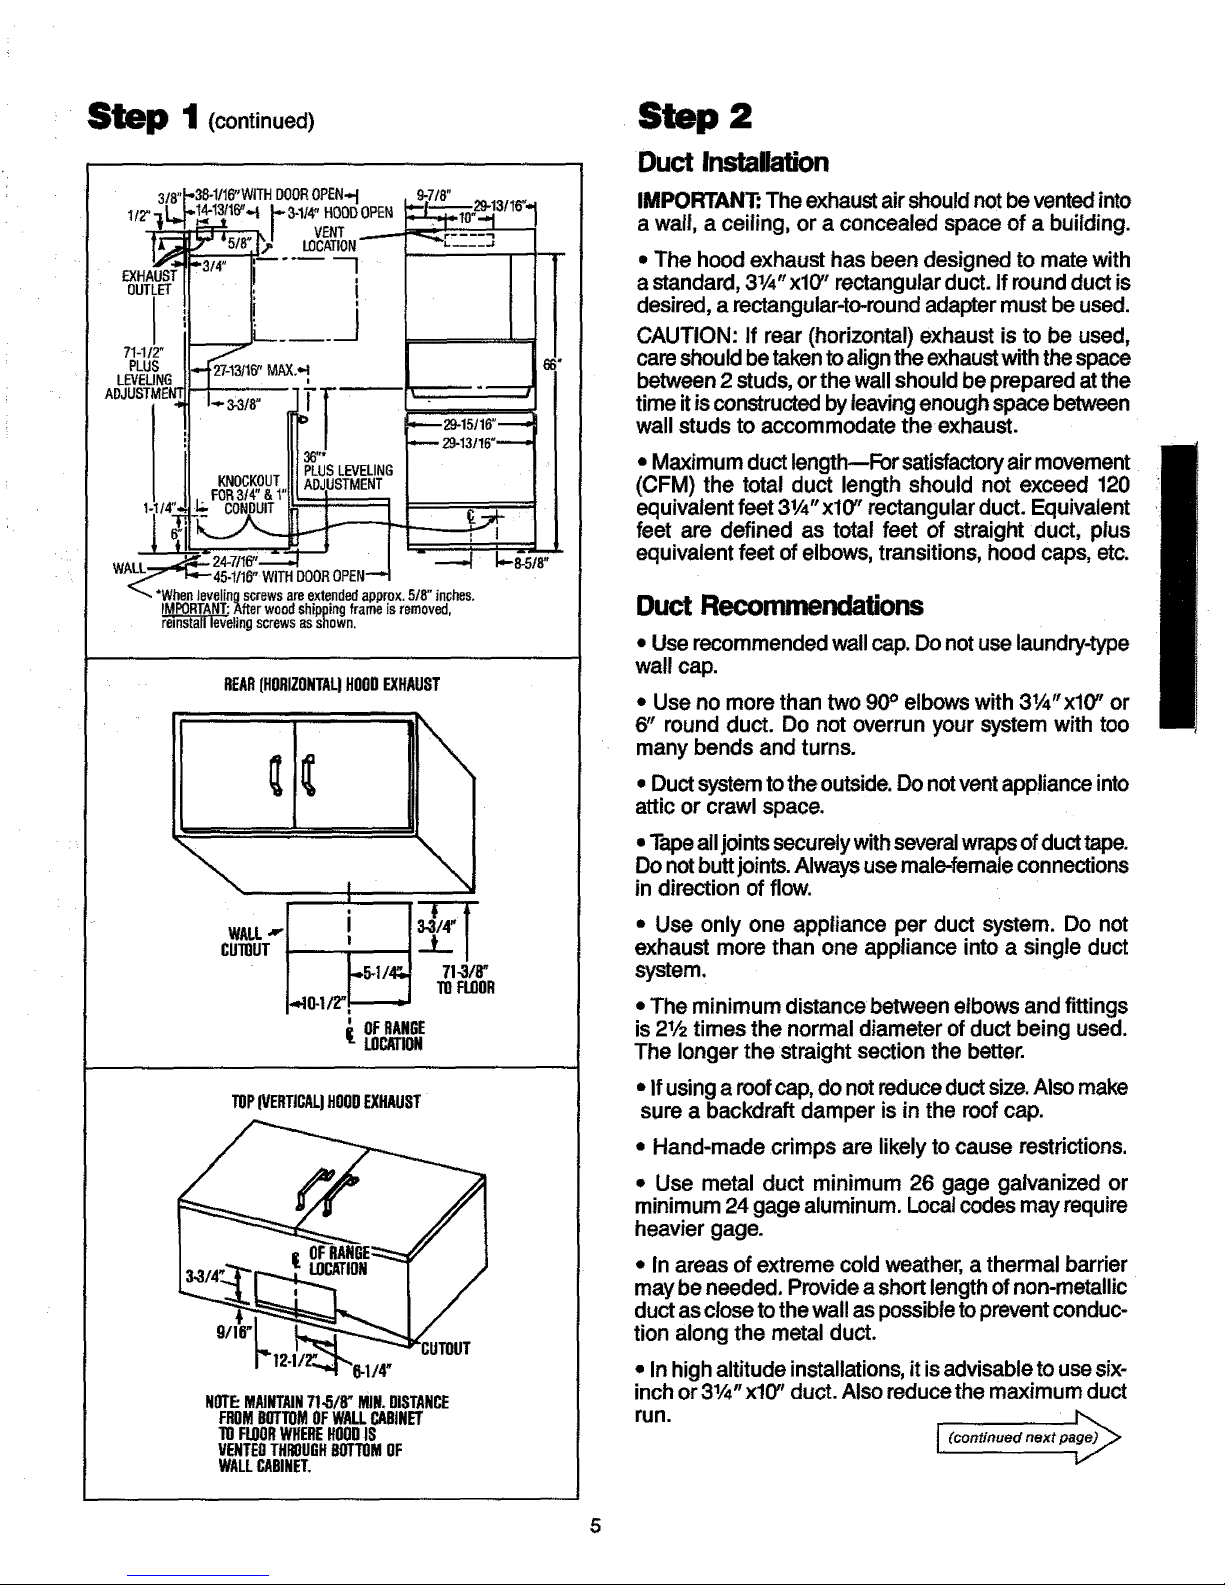
Step 1 (continued)
,
I
Step 2
Duct Installation
IMPORTANT:The exhaustairshouldnotbeventedinto
a wall, a ceiling, or a concealed space of a building.
• The hood exhaust has been designed to mate with
a standard, 31/4"xl0" rectangularduct. If roundduct is
desired, a rectangular-to-roundadapter must beused.
CAUTION: If rear (horizontal) exhaust is to be used,
careshouldbetakentoaligntheexhaustwiththe space
between 2 studs,or thewallshouldbe prepared atthe
timeit isconstructedbyleavingenoughspace between
wall studs to accommodate the exhaust.
,,Maximum ductlength--For satisfactoryairmovement
(CFM) the total duct length should not exceed 120
equivalentfeet 3V4"xl0" rectangular duct. Equivalent
feet are defined as total feet of straight duct, plus
equivalent feet of elbows, transitions,hood caps, etc.
Duct Recommendations
• Use recommended wallcap. Do notuse laundry-type
wall cap.
• Use no more than two 90° elbows with 3V4"x10" or
6" round duct. Do not overrun your system with too
many bends and turns.
• Ductsystemtothe outside.Donotventappliance into
attic or crawl space.
• Tapealljoints securelywithseveralwrapsof duct tape.
Donotbuttjoints.Alwaysuse male-femaleconnections
in direction of flow.
,, Use only one appliance per duct system. Do not
exhaust more than one appliance into a single duct
system.
•The minimum distancebetween elbows and fittings
is21/2times the normal diameter ofduct being used.
The longer the straight section the better.
• Ifusinga roofcap,donotreduce ductsize.Alsomake
sure a backdraft damper is in the roofcap.
• Hand-made crimps are likely to cause restrictions.
,, Use metal duct minimum 26 gage galvanized or
minimum24 gage aluminum. Localcodesmay require
heavier gage.
• In areas ofextreme cold weather, a thermal barrier
may be needed. Providea shortlengthofnon-metallic
ductasclosetothe wall as possibletopreventconduc-
tion along the metal duct.
,, In highaltitude installations,itisadvisabletousesix-
inchor 31/4"xl0" duct. Alsoreducethe maximumduct
run.
[, (continued next pa_ge)'_
5

Duct Rttings
_Stock
#59781
6" Adjustable
Elbow(Galv.)
Equivalent Length--10 ft.
Stock
#59581
Round Duct
Transition(Galv.)
Equivalent Length--9 ft,
RectangularElbow
formutingrightorleft
For31/4"xl0" Duct
_Stock
#59581
(Galv.) Ducts with 31,_"side down
Equivalent Length--10 It,
#59391
3t/4"xl0"Walt Cap(Painted)
IncludesDamperandScreen
EquivalentLength--32 ft.
Stock
#59281
6"RoundDuct(Galv.)
Two24" Sections
Equivalent Length--2 ft.
6" dia. Round Duct
Transition (Galv.)
Equivalent Length--7 ft.
#59691
6" WallCap(Aluminum)
IncludesDamperandScreen
EquivalentLength--40 ft.
#59296
RectangularElbow
formutingbackorfront
For31/4"xl0" Duct
(Galv.)Ductswith 10"sidedown
EquivalentLength--16 ft.
#59091
3V4"xl0" or6"RoofCap (Painted)
IncludesBackdraftDamper
andScreen
EquivalentLength--24 ft.
Stock
Rectangular Duct #56351
31/4"xt0"(Galv.)
Two 24" Sections
Equivalent Length--2 ft.
L
Equivalent Length--1 ft.
Straight Duct--t ft,
SAFETY
INSTALLATION MUST BE IN ACCORDANCE
WITH ALL LOCAL AND NATIONAL CODES, USE
ONI2f MJ_TERIALSWHICH CONFORM TO UNDER-
WRITERS' LABORATORIES, NATIONAL ELEC-
TRIC CODE AND THE LOCAL CODE IN EFFECT.
BE SURE THE POWER IS DISCONNECTED
BEFORE DOING ANY ELECTRICAL WORK.
Further instructions on wiring can be found in Sears
book"Simplified ElectricalWiring"available fromSears
storesand catalog. (Stock No. 5428.)
Step 3
Preparefor ElectricalConnection
Use only a 3-conductor, or if required, a 4-conductor
rangecordsetasnoted below.These cordsetsare pro-
videdwith ring type terminals.
The electrical ratingof the cord mustbe 125/250 volts
minimum, 40 amperes.
NOTE: Onlya 4-conductorcordistobe usedwhen the
appliance isinstalled ina mobilehome or where local
codes do not permit grounding throughthe neutral.
Step 4
1. Locateconnector block at the bottom rear ofrange
and remove rear wiring cover.
2. Directly belowthe connector block is a holewith a
knockout ring for accommodating conduit fittings.
Bracketsprovidedare usedtosupportthe flexible cord
strain relief,which must be securely attached to the
cord set.
6
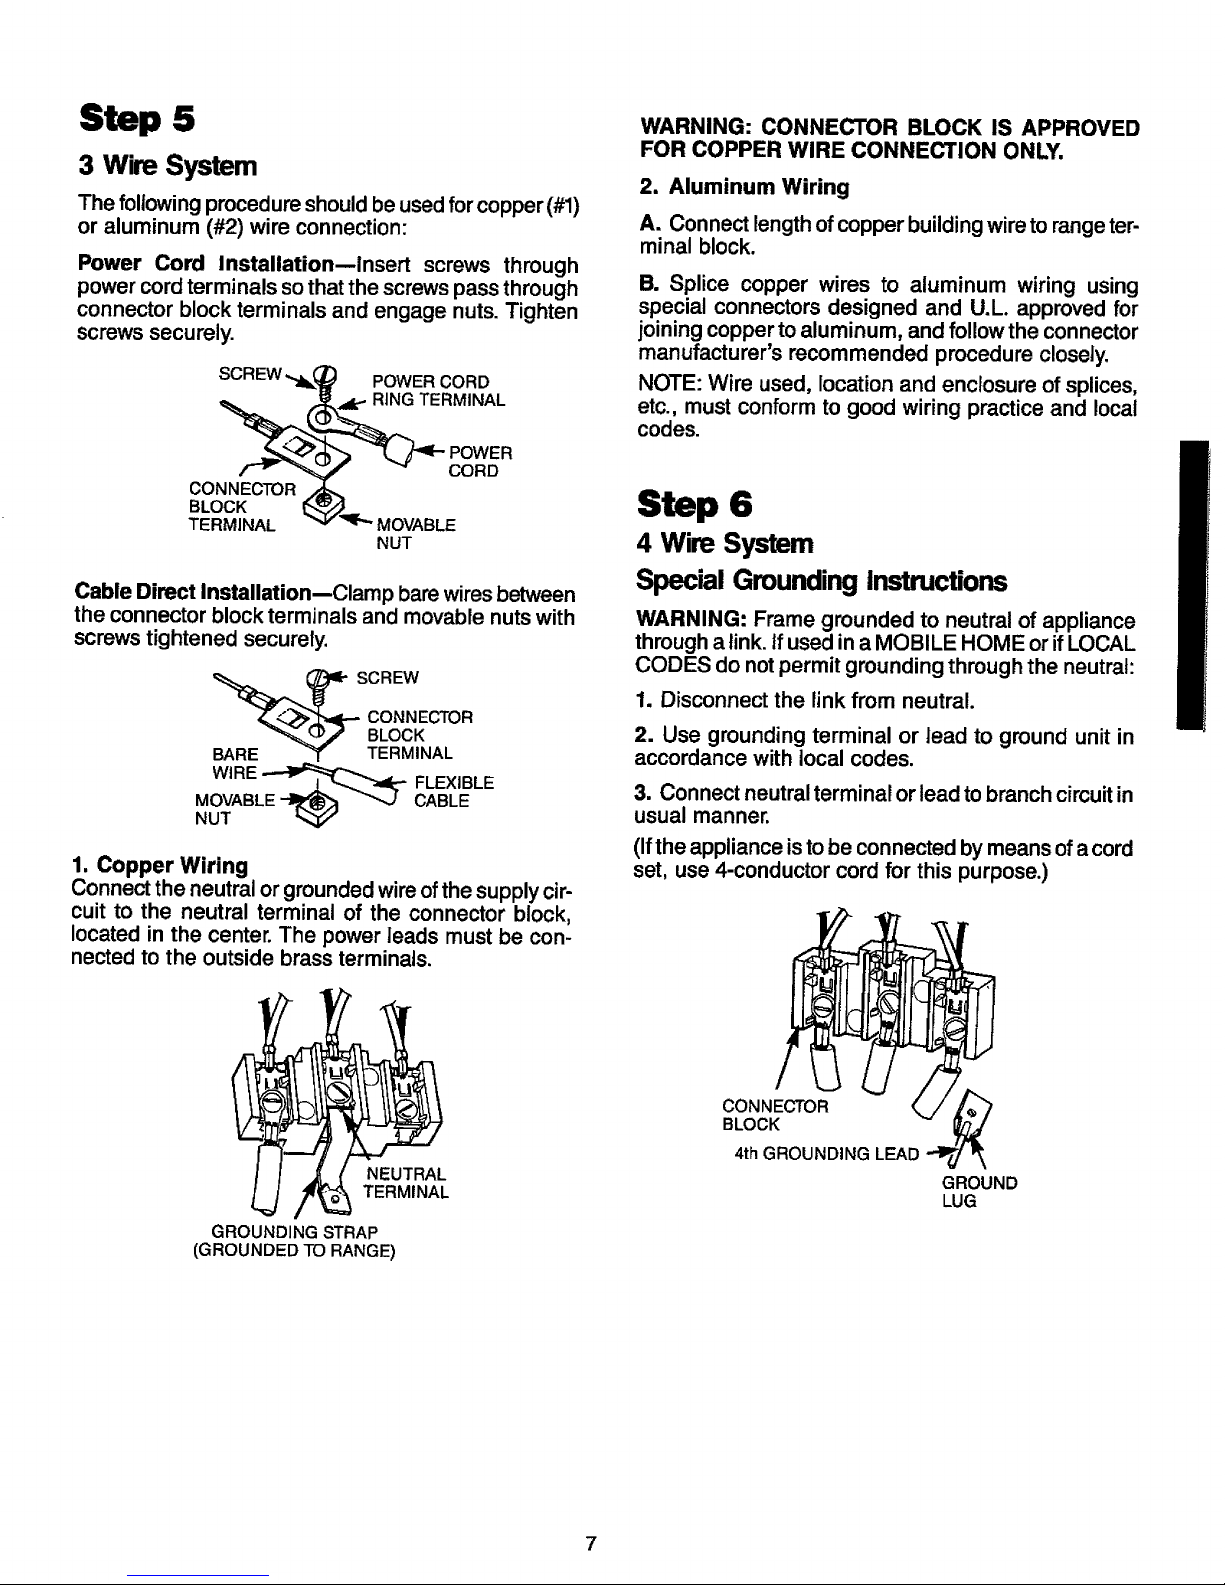
Step 5
3 Wire System
The followingprocedureshouldbeusedforcopper (#1)
or aluminum (#2) wire connection:
Power Cord Installation--insert screws through
power cordterminals sothat the screwspass through
connector blockterminals and engage nuts. Tighten
screws securely.
POWER CORD
RING TERMINAL
CONNECTOR
BLOCK
TERMINAL
POWER
CORD
MOVABLE
NUT
Cable Direct Installation--Clamp bare wires between
the connector block terminals and movable nuts with
screws tightened securely.
SCREW
CONNECTOR
BLOCK
TERMINAL
WIRE_ . FLEXIBLE
1. Copper Wiring
Connect the neutral or grounded wireofthe supplycir-
cuit to the neutral terminal of the connector block,
located in the center. The power leads must be con-
nected to the outside brass terminals.
NEUTRAL
TERMINAL
GROUNDING STRAP
(GROUNDED TO RANGE)
WARNING: CONNECTOR BLOCK IS APPROVED
FOR COPPER WIRE CONNECTION ONLY,
2. Aluminum Wiring
A. Connect length of copper building wire to range ter-
minal block.
B. Splice copper wires to aluminum wiring using
special connectors designed and U.L. approved for
joining copperto aluminum, and follow the connector
manufacturer's recommended procedure closely.
NOTE: Wire used, locationand enclosure ofsplices,
etc., must conform to good wiring practice and local
codes.
Step 6
4 Wire System
SpecialGroundingInstructions
WARNING: Frame grounded to neutral of appliance
througha link.If used ina MOBILE HOME orifLOCAL
CODES do notpermit groundingthrough the neutral:
1. Disconnect the link from neutral.
2. Use grounding terminal or lead to ground unit in
accordance with local codes.
3. Connect neutral terminal or lead to branch circuit in
usual manner.
(If the appliance is to be connected by means of acord
set, use 4-conductor cord for this purpose.)
CONNECTOR
BLOCK
4th GROUNDING LEAD
GROUND
LUG
7
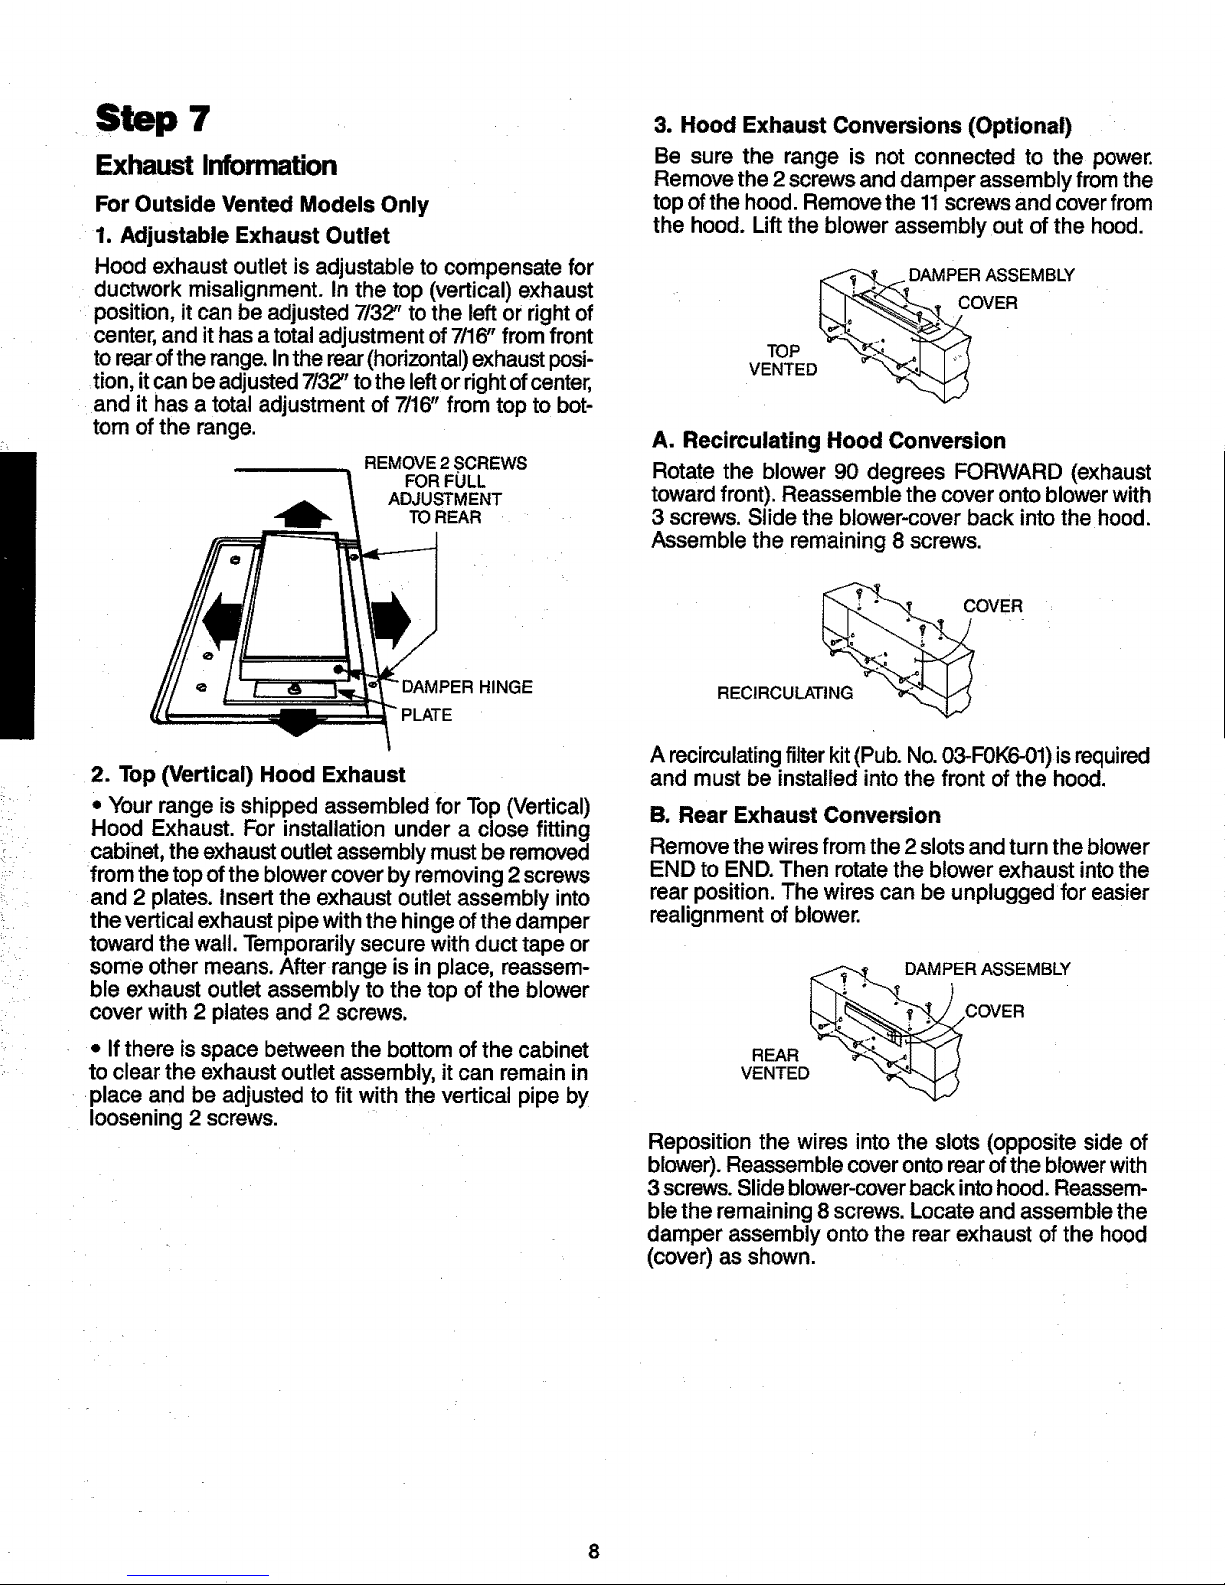
Step 7
Exhaust Information
For Outside Vented Models Only
1. Adjustable Exhaust Outlet
Hood exhaust outlet is adjustable to compensate for
duct-work misalignment. In the top (vertical) exhaust
position, it can be adjusted 7/3"Z' to the left or right of
center, and it has a total adjustment of 7/16" from front
to rear of the range, inthe rear(horizontal) exhaust posi-
tion, itcan be adjusted 7/3,_' to the leftor right of center,
and it has a total adjustment of 7/16" from top to bot-
tom of the range.
REMOVE 2 SCREWS
FOR FULL
ADJUSTMENT
TO REAR
HINGE
2. Top (Vertical) Hood Exhaust
• Your range is shipped assembled for Top (Vertical)
Hood Exhaust. For installation under a close fitting
cabinet, the exhaust outlet assembly must be removed
from the top of the blower cover by removing 2 screws
and 2 plates. Insert the exhaust outlet assembly into
the vertical exhaust pipe with the hinge of the damper
toward the wall. Temporarily secure with duct tape or
some other means. After range is in place, reassem-
ble exhaust outlet assembly to the top of the blower
cover with 2 plates and 2 screws.
* Ifthere isspace between the bottom ofthe cabinet
to clear the exhaust outlet assembly, it can remain in
place and be adjusted to fit with the vertical pipeby
loosening 2 screws.
3, Hood Exhaust Conversions (Optional)
Be sure the range is not connected to the power.
Remove the 2 screws and damper assembly from the
top of the hood. Remove the 11 screws and cover from
the hood. Lift the blower assembly out of the hood.
_ DAMPER ASSEMBLY
VENTED
A. Recirculating Hood Conversion
Rotate the blower 90 degrees FORWARD (exhaust
toward front). Reassemble the cover onto blower with
3 screws. Slide the blower-cover back into the hood.
Assemble the remaining 8 screws.
RECIRCU_'_LATING_OVER
A recirculating filter kit (Pub. No.03-FOK6-01)isrequired
and must be installed intothe front of the hood.
B. Rear Exhaust Conversion
Remove the wires from the 2 slotsand turnthe blower
END to END. Then rotatethe blower exhaust intothe
rear position.The wires can be unplugged for easier
realignment of blower.
j_: ._,,__AMPER ASSEMBLY
COVER
Reposition the wires into the slots (opposite side of
blower).Reassemble coverontorear ofthe blowerwith
3 screws.Slide blower-coverback intohood.Reassem-
blethe remaining8 screws. Locateand assemble the
damper assembly onto the rear exhaust of the hood
(cover) as shown.
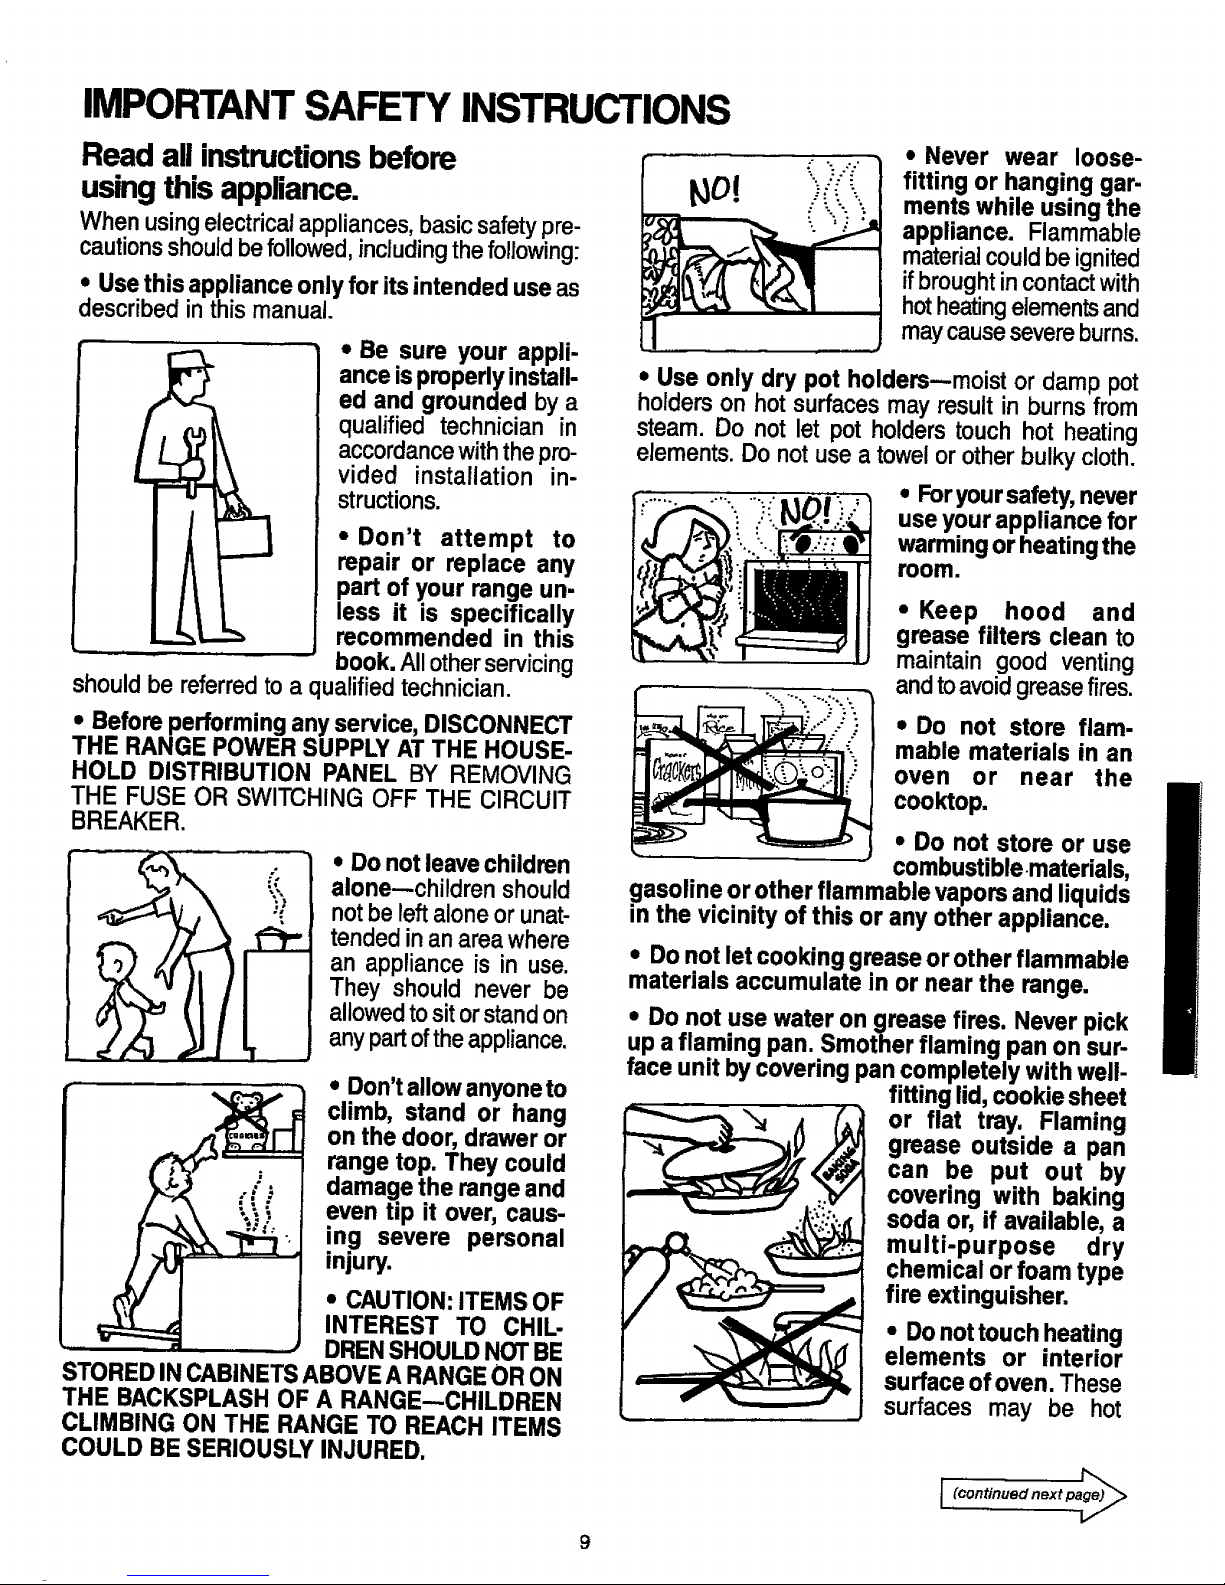
IMPORTANT SAFETY INSTRUCTIONS
Read all instructions before
using this appliance.
When usingelectricalappliances,basicsafetypre-
cautionsshouldbefollowed,including thefollowing:
• Use this appliance only for its intended useas
describedinthismanual.
• Be sure your appli-
ance isproperlyinstall-
ed and grounded by a
qualified technician in
accordance withthepro-
vided installation in-
structions.
• Don't attempt to
repair or replace any
part of your range un-
less it is specifically
recommended in this
book. All otherservicing
shouldbe referredtoa qualifiedtechnician.
• Before performing any service, DISCONNECT
THE RANGE POWER SUPPLY AT THE HOUSE-
HOLD DISTRIBUTION PANEL BY REMOVING
THE FUSE OR SWITCHING OFF THE CIRCUIT
BREAKER.
;l
• Do not leavechildren
alone--children should
notbeleft aloneor unat-
tendedinanareawhere
an appliance is in use.
They should never be
allowedtositorstandon
anypartoftheappliance.
• Don't allowanyoneto
climb, stand or hang
on the door, drawer or
range top. They could
damage the range and
even tip it over, caus-
ing severe personal
injury.
• CAUTION: ITEMS OF
INTEREST TO CHIL-
DRENSHOULDNOT BE
STORED IN CABINETSABOVEA RANGE OR ON
THE BACKSPLASH OF A RANGE--CHILDREN
CLIMBING ON THE RANGE TO REACH ITEMS
COULD BE SERIOUSLY INJURED.
:.-".'..-. :...
• Never wear loose-
fitting or hanging gar-
ments while using the
appliance. Flammable
materialcouldbeignited
ifbroughtincontactwith
hotheatingelementsand
maycausesevereburns.
• Use only dry pot holders--moist or damp pot
holders on hot surfaces may result in burns from
steam. Do not let pot holders touch hot heating
elements.Do notuse atowelor otherbulkycloth.
• For your safety, never
use your appliance for
warming or heating the
room.
• Keep hood and
grease filters clean to
maintain good venting
andtoavoidgreasefires.
• Do not store flam-
mable materials in an
oven or near the
cool(top.
• Do not store or use
combustible materials,
gasoline or other flammable vapors and liquids
in the vicinity of this or any other appliance.
• Donotletcookinggreaseorotherflammable
materialsaccumulatein or nearthe range.
• Do not use water on grease fires. Never pick
up a flaming pan. Smother flaming pan on sur-
face unit bycovering pan completely with well-
fitting lid, cookie sheet
or flat tray, Flaming
grease outside a pan
can be put out by
covering with baking
soda or, if available, a
multi-purpose dry
chemical orfoam type
fire extinguisher.
• Donottouch heating
elements or interior
surface of oven. These
surfaces may be hot
(continued next page_
IMPORTANTSAFETY INSTRUCTIONS(continued)
enough to burn eventhoughthey are dark incolor.
During and afteruse,donottouch, or let clothing or
other flammable materials contact surface units,
areas nearby surface units or any interior areaofthe
oven; allow sufficient time for cooling, first.
Potentiallyhot surfaces
includethe cooktopand
areasfacing the cooktop,
oven vent opening and
surfacesnear the open-
ing,andcrevicesaround
the ovendoor.Remem-
ber: The inside surface
of the oven may be hot
whenthedoorisopened.
• When cooking pork, follow the directionsexactly
andalwayscookthemeattoan internaltemperature
of at least 170°F.This assuresthat, in the remote
possibilitythattrichinamaybe presentinthe meat,
it will be killed and the meat will be safe to eat.
Oven
• Whenusingcookingorroastingbagsinoven,
followthemanufacturer'sdirections.
• Do not use your oven to dry newspapers. If
overheated,they can catchfire.
Self-CleaningOven
• Do not clean door gasket. The doorgasketis
essential for a goodseal. Care shouldbetakennot
to rub,damage or movethe gasket.
• Do not use oven
cleaners. No commer-
cialovencleaneroroven
linerprotectivecoatingof
anykindshouldbe used
in oraroundany part of
the oven.
• Clean only parts listed in this Owner's Manual.
• Before self-cleaning the oven, remove broiler
pan and other cookware,
• Stand away from range when opening oven
door. Hotair or steam which escapes can cause
burns to hands, face and/or eyes.
• Don't heat unopened
food containers in the
oven. Pressure could
build up and the con-
tainer could burst,
causing an injury.
, Keep oven vent duct
unobstructed.
• Keep oven free from grease buildup.
• Place oven shelf in
desired position while
oven is cool. If shelves
must be handled when
hot,do notletpotholder
contactheatingunitsin
the oven.
• Pulling out shelf to
the shelf stop is a con-
venience in lifting heavy foods. It is also a
precaution against burnsfromtouching hotsur-
faces of the door or oven walls.
Surface Cooking Units
../_, • Use proper pan size
: _ ....._..... --Thisapplianceis equip
:.. "%. ..
"_ :." ped with one or more
surfaceunitsofdifferent
size. Select cookware
havingflatbottomslarge
enough to cover the
surfaceunitheatingele-
ment.Theuseofunder-
sized cookware will
exposeaportionoftheheatingelementtodirectcon-
tact and may result in ignitionof clothing. Proper
relationshipofcookwaretoburnerwillalsoimprove
efficiency(see pages 16-17).
• Never leave surface
units unattended at
highheatsettings.Boil:
over causes smoking
and greasy spillovers
that maycatchon fire.
10
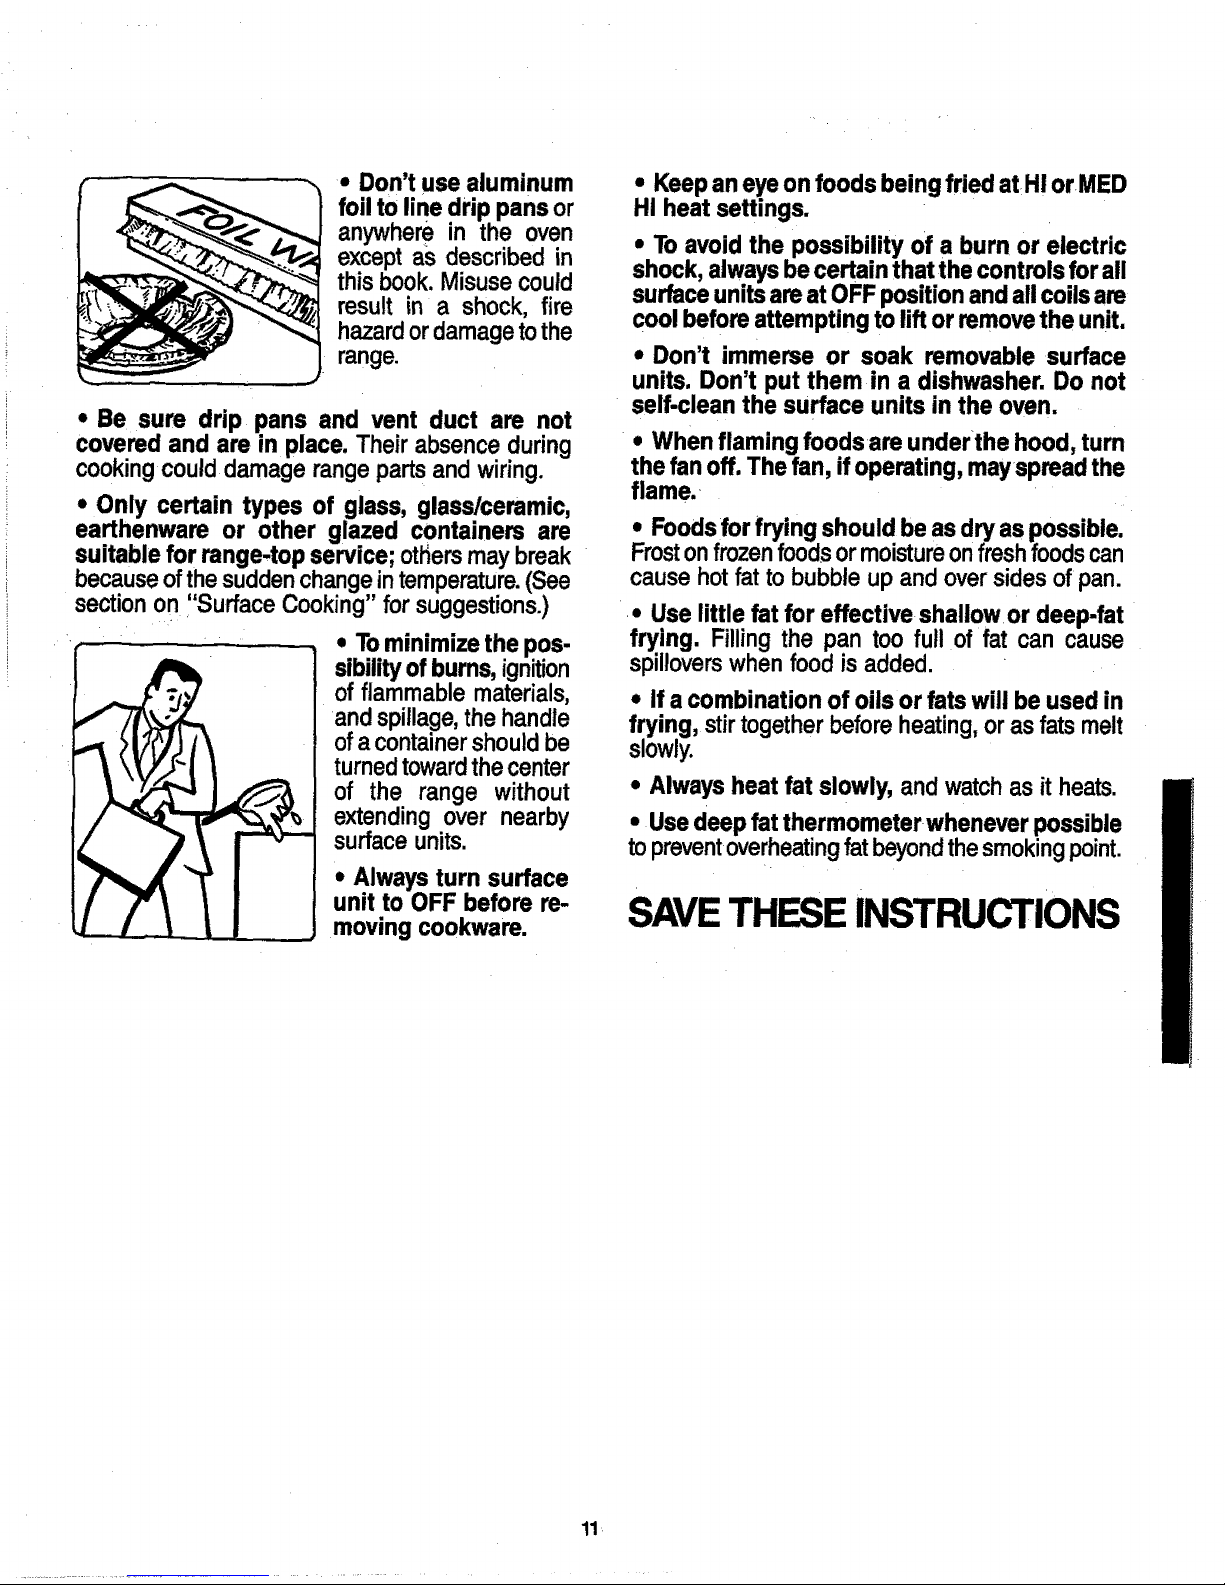
• Don't use aluminum
foil to line drip pans or
anywhere in the oven
except as described in
this book.Misuse could
result in a shock, fire
hazardor damagetothe
range.
• Be sure drip pans and vent duct are not
covered and are in place. Their absence during
cookingcould damage rangepartsand wiring.
• Only certain types of glass, glass/ceramic,
earthenware or other glazed containers are
suitable for range.top service; othersmay break
becauseofthesuddenchangeintemperature.(See
sectionon ,Surface Cooking"for suggestions.)
• Tominimize the pos-
sibilityof burns,ignition
of flammable materials,
and spillage,the handle
ofa containershouldbe
turnedtowardthecenter
of the range without
extending over nearby
surface units.
• Always turn surface
unit to OFF before re-
moving cookware.
• Keep an eye on foods being fried atH! orMED
Hi heat settings.
• To avoid the possibility of a burn or electric
shock, alwaysbecertain that the controls forall
surface unitsareat OFF position andall coils are
cool before attempting to lift orremove the unit.
• Don't immerse or soak removable surface
units. Don't put them in a dishwasher. Do not
self-clean the surface units in the oven.
= When flaming foods are underthe hood, turn
the fanoff. The fan, if operating, mayspread the
flame.
• • m
Foodsfor frying should be asdry as possible.
Frostonfrozenfoodsormoisture onfreshfoodscan
cause hotfat to bubbleup and oversidesof pan.
• Use little fat for effective shallow or deepfat
frying. Filling the pan too full off at can cause
spilloverswhen food is added.
,, Ifa combination of oils or fats will be used in
frying, stirtogetherbeforeheating,or as fatsmelt
slowly.
• Always heat fat slowly, and watchas itheats.
• Usedeep fat thermometer whenever possible
topreventLoverheatingfatbeyondthesmokingpoint.
SAVETHESE INSTRUCTIONS
Energy-Saving Tips
SurfaceCooking
• For best use of energy, use cooking utensils of
mediumweightaluminum,tight-fittingcovers,and flat
bottomswhich completelycover the heated portionof
the surface unit.
• Cook freshvegetables with a minimum amount of
water ina covered pan.
• Watch foodswhen bringingthem quicklytocooking
temperaturesat HIGH heat. When food reachescook-
ingtemperature,reduce heat immediatelytolowestset-
ting that will keep itcooking.
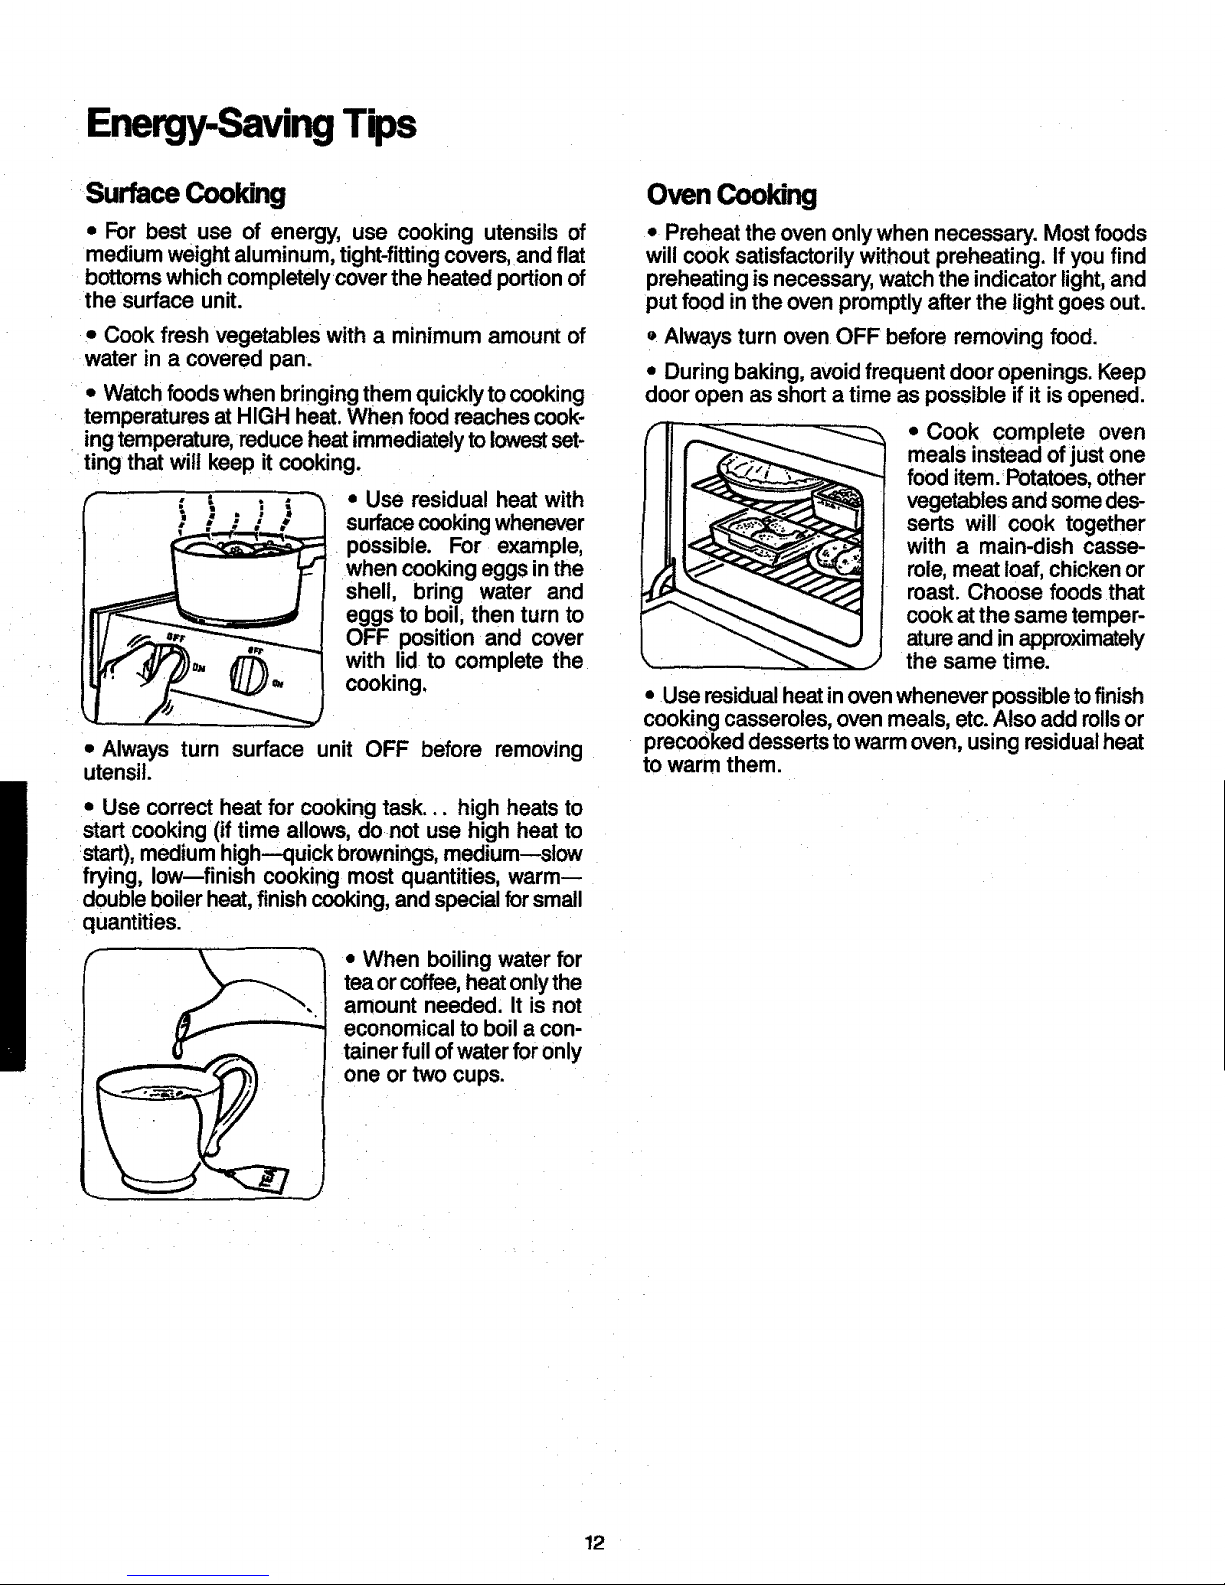
• Use residual heat with
surfacecookingwhenever
possible. For example,
when cooking eggs inthe
shell, bring water and
eggs to boil, then turn to
OFF position and cover
with lid to complete the
cooking,
• Always turn surface unit OFF before removing
utensil.
• Use correct heat for cooking task.., high heats to
start cooking (if time allows,donot use high heat to
:start), medium high--quick brownings,medium--slow
frying, low--finish cooking most quantities, warm
doubleboilerheat,finish cooking,and specialfor small
quantities.
• When boiling water for
teaor coffee,heatonlythe
amount needed. It is not
economicalto boil a con-
tainerfull ofwater for only
one or two cups.
Oven Cooking
• Preheat the oven only when necessary. Most foods
will cook satisfactorilywithout preheating. Ifyou find
preheatingisnecessary,watchthe indicator light,and
put food inthe oven promptlyafter the light goesout.
• Always turn oven OFF before removing food.
• During baking, avoidfrequent door openings. Keep
door open as short a time as possible if it is opened.
• Cook complete oven
meals instead of just one
food item. Potatoes,other
vegetablesand somedes-
serts will cook together
with a main-dish casse-
role,meat loaf,chickenor
roast. Choose foodsthat
cookatthesame temper-
atureand in approximately
the same time.
• Use residualheatinovenwhenever possibletofinish
cooking casseroles, ovenmeals, etc.Also add rollsor
precookeddesserts towarm oven, using residualheat
to warm them.
12
 Loading...