

Sears Kenmore C970-418823,Kenmore C970_41882 Use And Care Manual
P/N 318131000 (9805) Rev. C Printed in Canada Recycled Paper
Product Registration
Thank you for choosing this appliance. The information contained within this
Owner's Guide will instruct you on how to properly operate and care for your wall
oven. Please read through the information contained in your literature pack to learn
more about your new appliance.
Record Your Model and Serial Numbers
Record in the space provided below the model and serial numbers found on the serial
plate located along the side of the oven door in the open position.
Model Number: _____________________________________________________
Serial Number: _____________________________________________________
Date of Purchase: ___________________________________________________
Contents
This Owner's Guide contains general
operating instructions for your oven and
feature information for several models.
Your oven may not have all the
described features.
Note: The instructions appearing in this
Owner's Guide are not meant to cover
every possible condition and situation
that may occur. Common sense and
caution must be practiced when
installing, operating and maintaining any
appliance.
2 Product Registration
3-4 Important Safety Instructions
5-6 Control Pad Functions
7 Oven Controls
7 Temperature Conversion (Fahrenheit to Celsius)
8 Setting the Clock and Minute Timer
9 Before Setting Oven Controls
9 Oven Door Bracket Adjustment
10-13 Setting Oven Controls
14-15 Oven Cleaning
16-17 General Cleaning
18 Changing Oven Light
18 Adjusting Oven Temperature
19-20 Avoid Service Checklist
21 Service Information
22 Warranty
© 1997 White Consolidated Industries
All rights reserved
2
IMPORTANT SAFETY INSTRUCTIONS
Read all instructions before using this appliance.
Save these instructions for future reference.
This guide contains important safety symbols and instructions. Please pay special attention to these symbols and follow all
instructions given. Here is a brief explanation of the use of these symbols.
This symbol will help alert you to situations that
may cause serious bodily harm, death or property damage.
• Remove all tape and packaging wrap before using the
wall oven. Destroy the carton and plastic bags after
unpacking the wall oven. Never allow children to play with
packaging material. Do not remove the wiring label and other
literature attached to the back of the wall oven. Do not remove
model/serial number plate.
• Proper Installation—Be sure your appliance is properly
installed and grounded by a qualified electrician or
installer in accordance with the Canadian Standard CSA
C22.1, PART 1—latest editions and local code
requirements. Install only per installation instructions
provided in the literature package for this wall oven.
Ask your
dealer to recommend a qualified installer, technician or an
authorized repair service. Know how to disconnect the
electrical power to the wall oven at the circuit breaker or fuse
box in case of an emergency.
Cold temperatures can damage the electronic
control. When using the appliance for the first time, or when the
appliance has not been used for an extended period of time, be
certain the unit has been in temperatures above 32°F/0°C for at
least 3 hours before turning on the power to the appliance.
• User Servicing—Do not repair or replace any part of the
appliance unless specifically recommended in the
manuals. All other servicing should be done only by a qualified
technician. This may reduce the risk of personal injury and
damage to the wall oven.
• Never modify or alter the construction of the wall oven
by removing panels, wire covers, or any other part of the
product.
• Remove the oven door from any unused wall oven if it is
to be stored or discarded. Refer to the Installation
Instructions for instructions on removing the oven door.
Stepping, leaning or pulling down on the
door of this wall oven can result in serious injuries and may
also cause damage to the wall oven. Do not allow children to
climb or play around the wall oven.
This symbol will help alert you to situations that
may cause bodily injury or property damage.
Do not store items of interest to children in
the cabinets above a wall oven. Children climbing on the wall
oven to reach items could be seriously injured.
• Do not leave children alone—Children should not be left
alone or unattended in the area where an appliance is in
use. They should never be allowed to sit or stand on any part
of the appliance.
• DO NOT TOUCH INTERIOR OVEN ELEMENTS OR INTERIOR
SURFACES OF THE WALL OVEN UNTIL THEY HAVE
COOLED. The oven heating elements may be hot even though
the elements are dark in color. Areas near the elements may
become hot enough to cause burns. During and after use, do
not touch, or let clothing or other flammable materials touch
these areas until they have had sufficient time to cool. Among
these areas are the oven vent openings, the surfaces near these
openings, oven door and window.
• Wear Proper Apparel—Loose-fitting or hanging
garments should never be worn while using the
appliance. Do not let clothing or other flammable materials
contact hot surfaces.
Never use your appliance for warming or
heating the room.
• Do Not Use Water or Flour on Grease Fires—Smother the
fire with a pan lid, or use baking soda, a dry chemical or
foam-type extinguisher.
• When heating fat or grease, watch it closely. Fat or grease
may catch fire if allowed to become too hot.
• Use Only Dry Potholders—Moist or damp potholders on
hot surfaces may result in burns from steam. Do not let the
potholders touch the hot heating elements. Do not use a towel
or other bulky cloth instead of a potholder.
• Do Not Heat Unopened Food Containers—Build-up of
pressure may cause the container to burst and result in
injury.
• Storage in or on Appliance—Flammable materials should
not be stored in an oven. This includes paper, plastic and
cloth items, such as cookbooks, plasticware and towels, as well
as flammable liquids. Do not store explosives, such as aerosol
cans, in or near the wall oven.
Do not use the wall oven for storage.
3

IMPORTANT SAFETY INSTRUCTIONS (continued)
IMPORTANT INSTRUCTIONS FOR
USING YOUR OVEN
• Use Care When Opening an Oven Door—Stand to the side
of the wall oven when opening the door of a hot oven. Let hot
air or steam escape before you remove or replace food in the
oven.
• Keep Oven Vent Ducts Unobstructed. The wall oven is
vented at the upper control panel. Touching the surfaces in this
area when the wall oven is operating may cause severe burns.
Also, do not place plastic or heat-sensitive items near the oven
vent. These items could melt or ignite.
• Placement of Oven Racks. Always place oven racks in desired
location while oven is cool. If the rack must be moved while the
oven is hot, use extreme caution. Use potholders and grasp the
rack with both hands to reposition. Do not let potholders
contact the hot oven element or interior of the oven. Remove
all utensils from the rack before removing the rack.
• Do not use the broiler pan without its insert. The broiler
pan and grid allow dripping fat to drain and be kept away from
the high heat of the broiler.
• Do not cover the broiler grid or oven bottom with
aluminum foil. Exposed fat and grease could ignite.
• Do not touch a hot oven light bulb with a damp cloth.
Doing so could cause the bulb to break. Disconnect the oven
or shut off the power to the oven before removing and
replacing the bulb.
IMPORTANT INSTRUCTIONS FOR
CLEANING YOUR OVEN
• Clean the wall oven regularly to keep all parts free of
grease that could catch fire. Do not allow grease to
accumulate.
• Kitchen cleaners/aerosols—Always follow the
manufacturer's recommended directions for use. Be aware
that excess residue from cleaners and aerosols may ignite
causing damage and/or injury.
SELF-CLEANING OVENS:
• Clean in the self-cleaning cycle only the parts of the wall
oven listed in this Owner's Guide. Before using the self-
cleaning cycle of the wall oven, remove the broiler pan and any
utensils stored in the wall oven.
• Do not clean the oven door gasket. The door gasket is
essential for a good seal. Care should be taken not to rub,
damage or move the gasket.
• Do not use oven cleaners. No oven cleaner or oven liner
protective coating of any kind should be used in or around any
part of the wall oven.
SAVE THESE INSTRUCTIONS
4
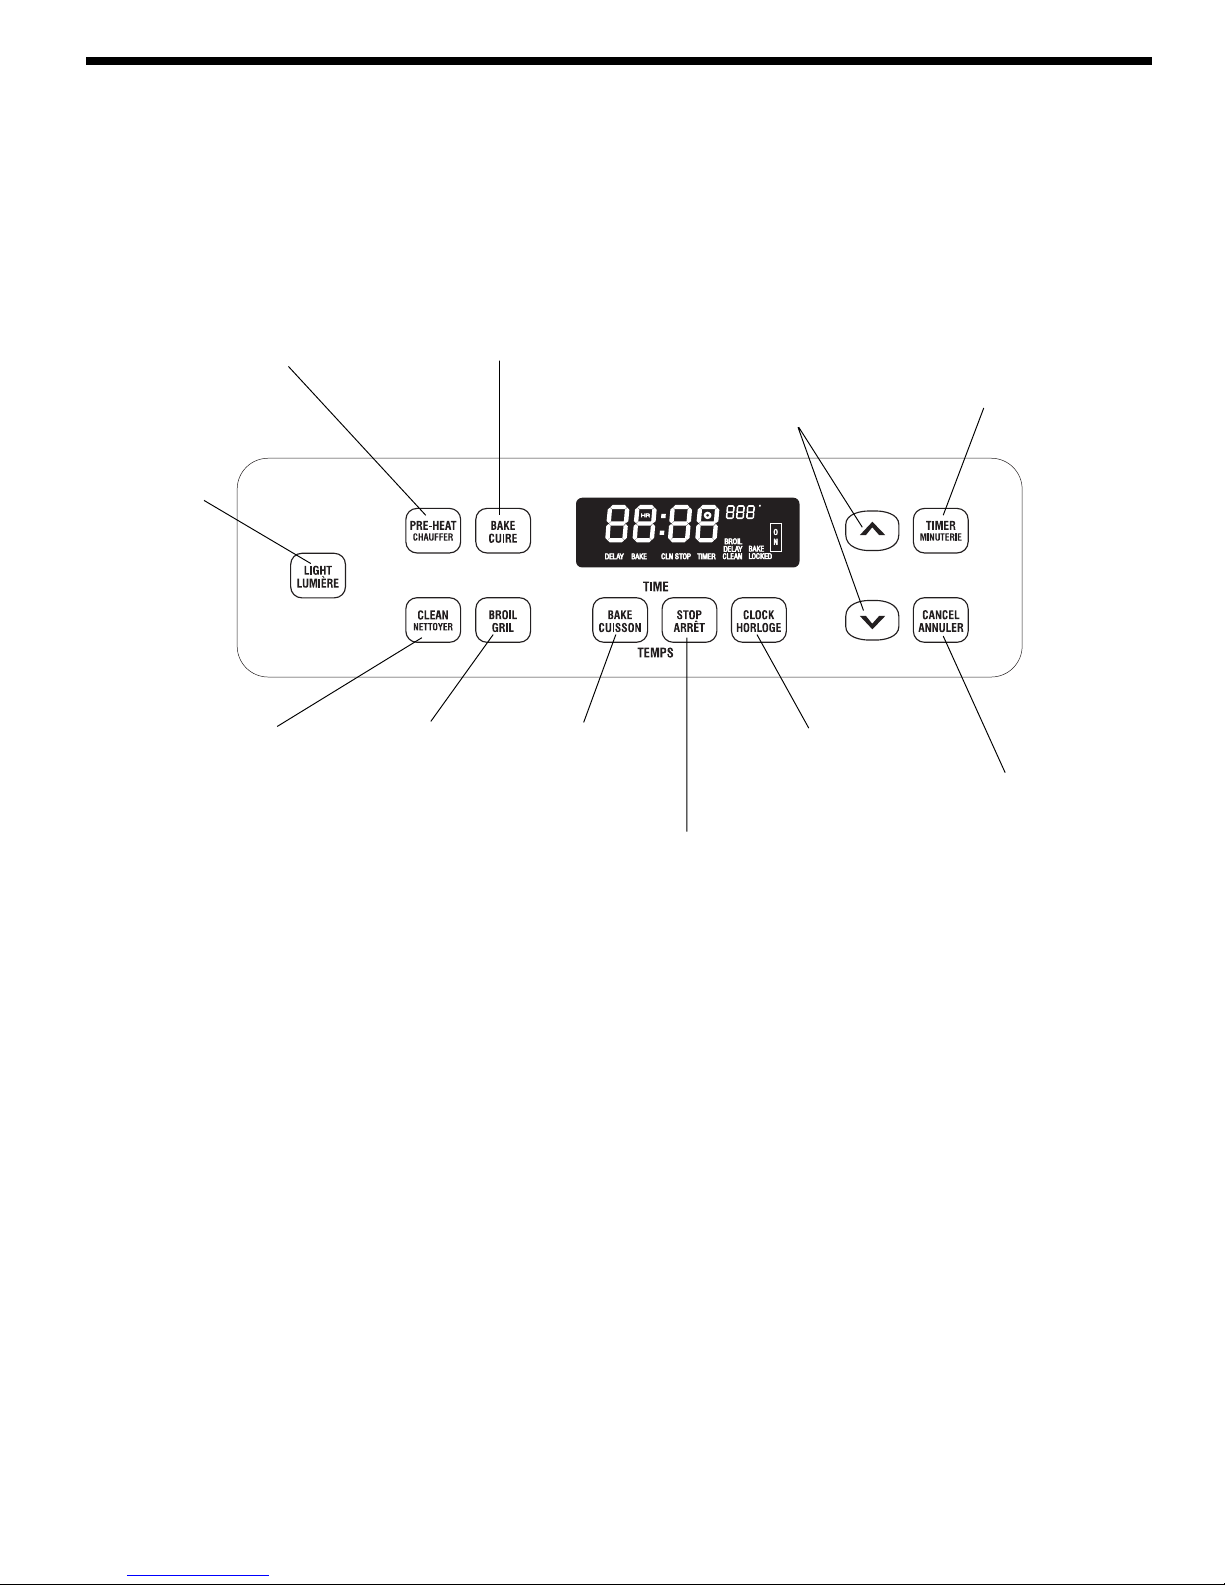
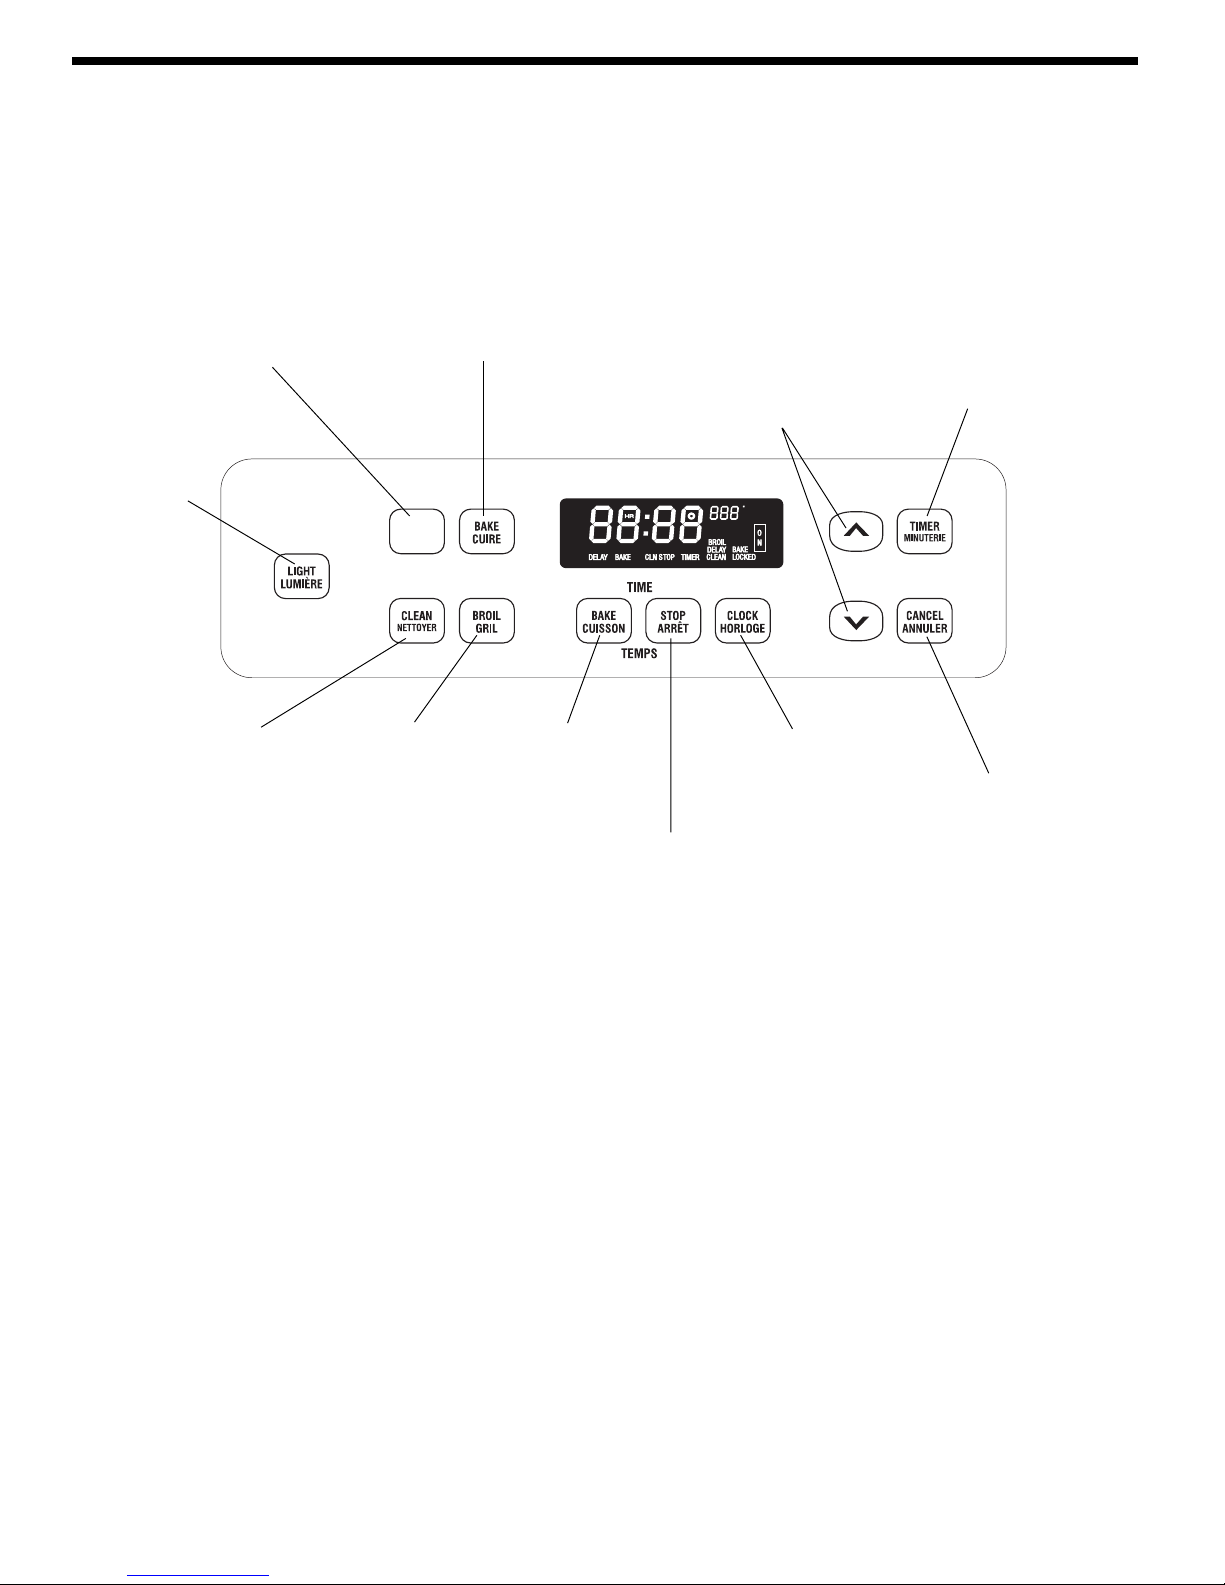
Control Pad Functions (for preheat models)
READ THE INSTRUCTIONS CAREFULLY BEFORE USING THE OVEN. For satisfactory use of your oven, become familiar with
the various functions of the oven as described below.
PREHEAT PAD— Used to
select the preheat mode.
After oven has reached
preheat temperature, a
beep will signal that the
oven is ready for use.
LIGHT PAD—
Used to turn the
oven light on and
off when the
door is closed
CLEAN PAD—
Used to select the
self-cleaning
cycle.
BROIL PAD—
Used to select
the broil
function.
BAKE PAD—
Used to enter the
normal baking
mode
temperature.
BAKE TIME
PAD— Used to
enter the length of
the baking time.
STOP TIME PAD— Used
with the BAKE TIME and
CLEAN pads to program a
delayed automatic baking or
cleaning cycle stop time.
UP and DOWN ARROW
PADS— Used along with
the function pads to
select oven temperature,
cooking time, stop time
(when programming an
automatic stop time),
time of day, clean time
and minute timer.
CLOCK PAD—
Used to set the time
of day.
TIMER PAD— Used
to set or cancel the
minute timer. The
minute timer does not
start or stop cooking.
CANCEL PAD— Used
to cancel any function
previously entered
except the time of day
and minute timer.
Push the CANCEL pad
to stop cooking.
The oven can be programmed to:
• Bake normally
• Preheat
• Time bake with automatic on and off times
• Broil
• Self-clean
IMPORTANT: The control cannot be used until the clock is set to the time of day.
Safety Lockout
Safety Lockout is a feature that allows the oven controls to be locked when the oven will not be used for an extended period
of time. This feature makes the oven child-resistant and allows cleaning of the control panel without accidentally activating the
oven.
Safety Lockout can be set or cancelled by pressing the BAKE TIME and STOP TIME pads at the same time. During this mode,
depressing any button results in the word "OFF" being displayed for 2 seconds. While in Lockout, the display will show the current
time of day.
For a silent control panel:
When choosing a function, a beep will be heard each time a pad is pushed. If desired, the controls can be programmed for silent
operation. Push and hold the STOP TIME pad. After 5 seconds, the control will beep twice. This will block the controls from
sounding when a pad is pushed. To return the sound, push and hold the STOP TIME pad again for 5 seconds until 1 beep is heard.
5
Control Pad Functions (for convection models)
READ THE INSTRUCTIONS CAREFULLY BEFORE USING THE OVEN. For satisfactory use of your oven, become familiar with
the various functions of the oven as described below.
UP and DOWN ARROW
CONVEC PAD— Used to
select the convection
mode.
LIGHT PAD—
Used to turn the
oven light on and
off when the
door is closed
BAKE PAD—
Used to enter the
normal baking
mode
temperature.
CONVEC
PADS— Used along with
the function pads to
select oven temperature,
cooking time, stop time
(when programming an
automatic stop time),
time of day, clean time
and minute timer.
TIMER PAD— Used
to set or cancel the
minute timer. The
minute timer does not
start or stop cooking.
CLEAN PAD—
Used to select the
self-cleaning
cycle.
BROIL PAD—
Used to select
the broil
function.
BAKE TIME
PAD— Used to
enter the length of
the baking time.
STOP TIME PAD— Used
with the BAKE TIME and
CLEAN pads to program a
delayed automatic baking or
cleaning cycle stop time.
CLOCK PAD—
Used to set the time
of day.
CANCEL PAD— Used
to cancel any function
previously entered
except the time of day
and minute timer.
Push the CANCEL pad
to stop cooking.
The oven can be programmed to:
• Bake normally
• Convection. Convection Time.
• Time bake with automatic on and off times
• Broil
• Self-clean
IMPORTANT: The control cannot be used until the clock is set to the time of day.
Safety Lockout
Safety Lockout is a feature that allows the oven controls to be locked when the oven will not be used for an extended period
of time. This feature makes the oven child-resistant and allows cleaning of the control panel without accidentally activating the
oven.
Safety Lockout can be set or cancelled by pressing the BAKE TIME and STOP TIME pads at the same time. During this mode,
depressing any button results in the word "OFF" being displayed for 2 seconds. While in Lockout, the display will show the current
time of day.
For a silent control panel:
When choosing a function, a beep will be heard each time a pad is pushed. If desired, the controls can be programmed for silent
operation. Push and hold the STOP TIME pad. After 5 seconds, the control will beep twice. This will block the controls from
sounding when a pad is pushed. To return the sound, push and hold the STOP TIME pad again for 5 seconds until 1 beep is heard.
6

Oven Controls
(feature Information)
Lockout
(Child-Resistant Lock)
Temperature
Conversion
(Fahrenheit to Celsius)
Lockout is an added feature that allows the oven controls to be locked when the
wall oven will not be used for an extended period of time. This feature makes the
oven child-resistant and allows cleaning of the control panel without accidentally
activating the oven.
Lockout can be set or cancelled by pressing the TIME BAKE and TIME STOP pads
at the same time. During this mode, depressing any button results in the word
"OFF" being displayed for 2 seconds.
While in Lockout, the display will show the current time of day.
The electronic oven control is set to operate in °F (Fahrenheit) when shipped from
the factory. To change the temperature to °C (Celsius) or from °C to °F:
1. Push the CONV BAKE/ROAST pad and set the oven temperature to 500°F/
260°C or more using the UP or DOWN ARROW pad.
2. Push the CONV BAKE/ROAST pad within the next 6 seconds for 3-4 seconds.
A beep sounds and a number appears in red to the right of the display. For the
conversion, "1" must be displayed. If another number is displayed, push the
CONV BAKE/ROAST pad and select "1".
3. Push the UP or DOWN ARROW pad to change °F to °C or °C to °F in the
display.
4. Push the CANCEL pad to confirm your choice.
12 Hour Shut-Off
For energy conservation, the electronic oven control has been set at the factory to
shut off automatically after a continuous 12 hour operation of the oven (except
during timed bake). To cancel this setting:
1. Push the CONV BAKE/ROAST pad and set the oven temperature to 500°F/
260°C or more using the UP or DOWN ARROW pad.
2. Push the CONV BAKE/ROAST pad within the next 6 seconds for 3-4 seconds.
A beep sounds and a number appears in red to the right of the display. For the
conversion, "3" must be displayed. If another number is displayed, push the
CONV BAKE/ROAST pad and select "3".
3. Push the UP or DOWN ARROW pad to change from 12 hour to 9999 in the
display, for no 12 hour shut-off.
4. Push the CANCEL pad to confirm your choice.
7

Setting the Clock
and Minute Timer
CONVEC
OR
PRE-HEAT
To Set the Clock
You must set the clock when the oven is first plugged in or each time the power
supply to the oven has been disconnected or interrupted. The clock must always be
set to the correct time of day, as the automatic start and stop time operations (used
to set the timed bake and self-clean modes) work directly with the clock.
1. The display window will flash "12:00." For Convection models, the oven
control may lock and then unlock the oven door. The word "Lock" will glow in
the display. The locking and unlocking of the door takes about one minute. This
is a normal part of the initial start-up and does not mean that the oven will begin
a self-clean cycle.
2. Push the CLOCK pad. The display window will stop flashing and the word
"Time" will glow in the display for a few seconds.
3. Push and hold the UP or DOWN ARROW pad until the correct time of day
appears in the display. The word "TIME" will disappear after 6 seconds and the
clock will start.
To Set the Minute Timer
The minute timer does not start or stop cooking. It serves as an extra timer in the
kitchen that will beep when the set time has run out. The minute timer can be used
independently during any of the oven functions and can be set for any amount of
time from 1 second to 9 hours and 50 minutes. The minute timer is not active during
the self-clean function.
1. Push the TIMER pad. ":00" and the word "Timer" will glow in the display.
2. Push the Increase or Decrease pad until the desired time appears in the
display. As soon as the set pads are released, the time will begin to count down
in the display and the word "Timer" will continue to glow.
3. When the set time has run out, the timer will beep 3 times. The timer will then
continue to beep once every 10 seconds for 5 minutes or until the TIMER pad
is pushed.
When setting the minute timer
for:
5 seconds to 2 minutes
2 minutes to 10 minutes
10 minutes to 1 hour
1 hour to 9 hours and 50 minutes
The time will appear in the
display and increase in:
5 second increments
10 second increments
1 minute increments
5 minute increments
To change the minute timer while it is in use, push the Increase or Decrease pad
to increase or decrease the time.
To stop the minute timer, push the TIMER pad. The word "Timer" will disappear
from the display a few seconds later. Or, push the Decrease pad until "00" appears
in the display.
8
Before Setting Oven
Controls
Oven Vent Location
The oven is vented at the upper control panel or grille. When the oven is on, warm
air is released through the vent. This venting is necessary for proper air circulation
in the oven and good baking results. DO NOT block the vent. Doing so may cause
cooking failures, fire or damage to the wall oven.
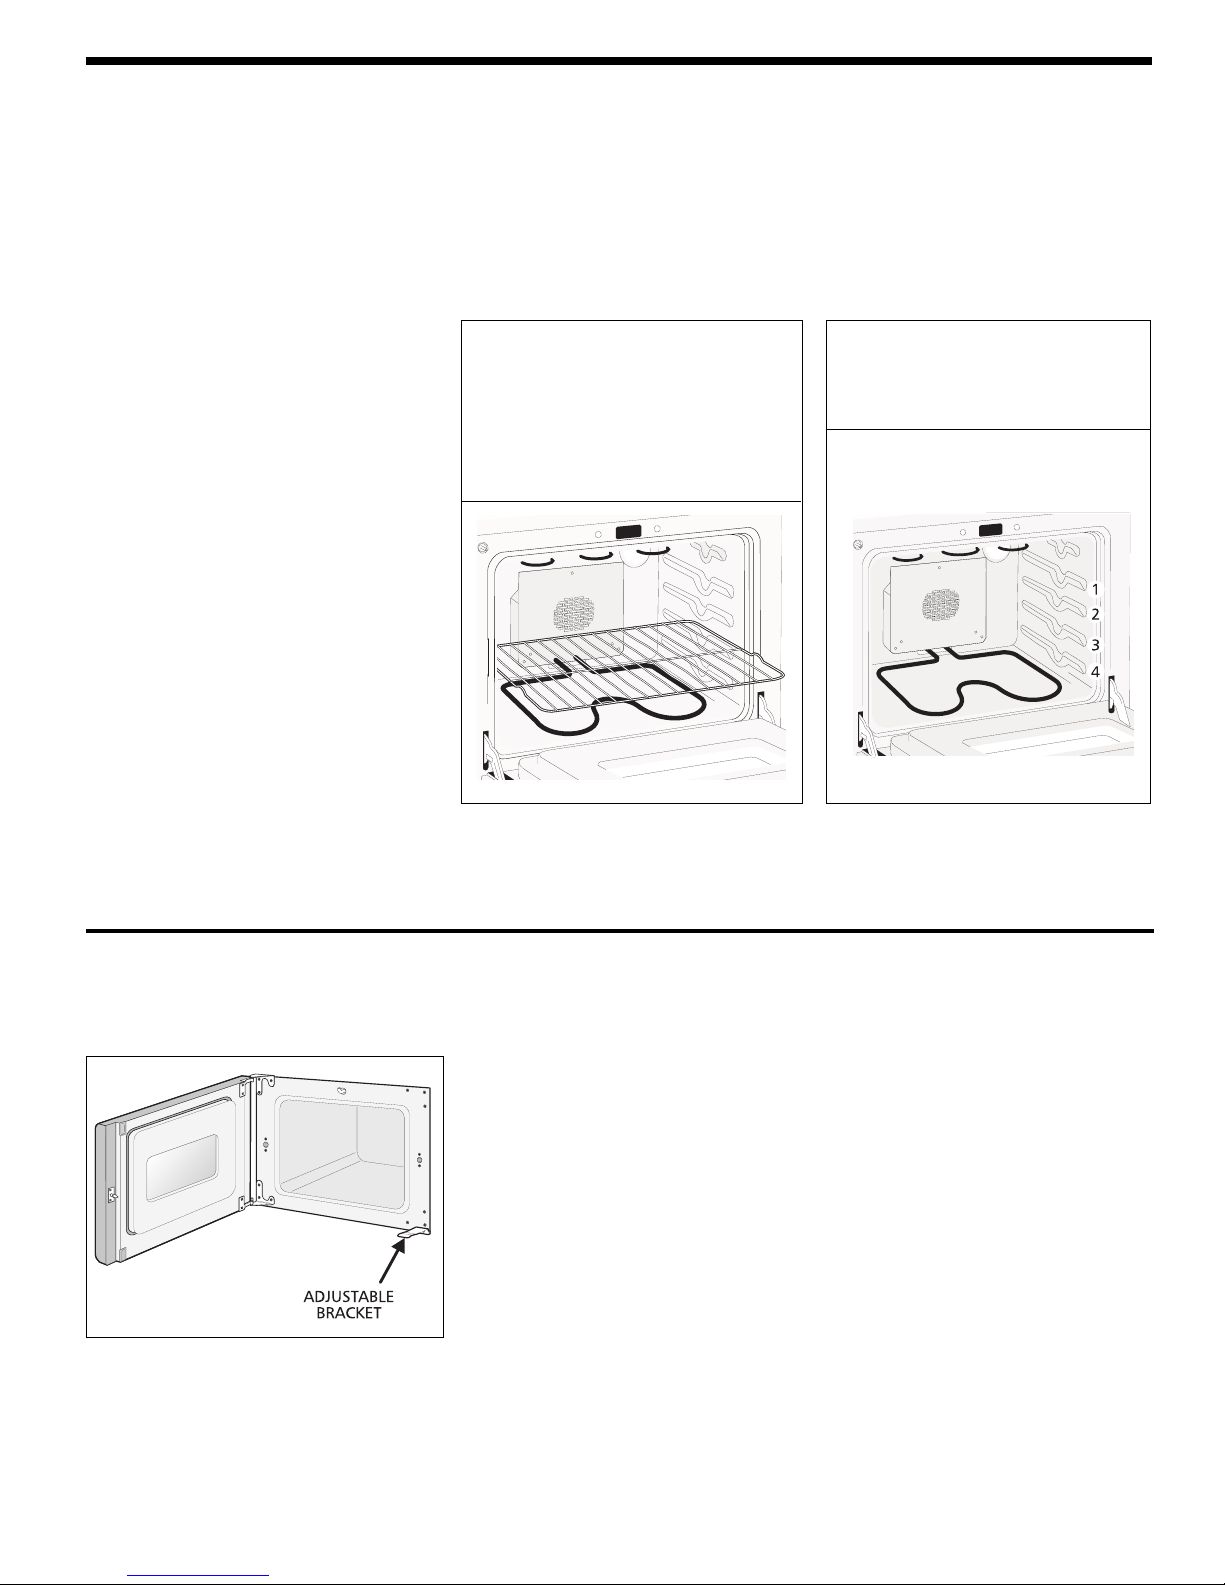
Arranging Oven Racks
ALWAYS ARRANGE OVEN RACKS WHEN THE OVEN IS COOL (PRIOR TO OPERATING
THE OVEN). Always use oven mitts when using the oven.
To remove an oven rack, pull the
rack forward until it stops. Lift up front
of rack and slide out. To replace an
oven rack, fit the rack onto the guides
on the oven walls. Tilt the front of the
rack upward and slide the rack back
into place.
The interior of a convection oven is shown in the above illustrations. As many as 3
racks may be supplied with convection models and 2 racks for other models.
To bake on one rack, place the
rack at position 3 or 4. To bake on
two racks, place the racks at
positions 2 and 4.
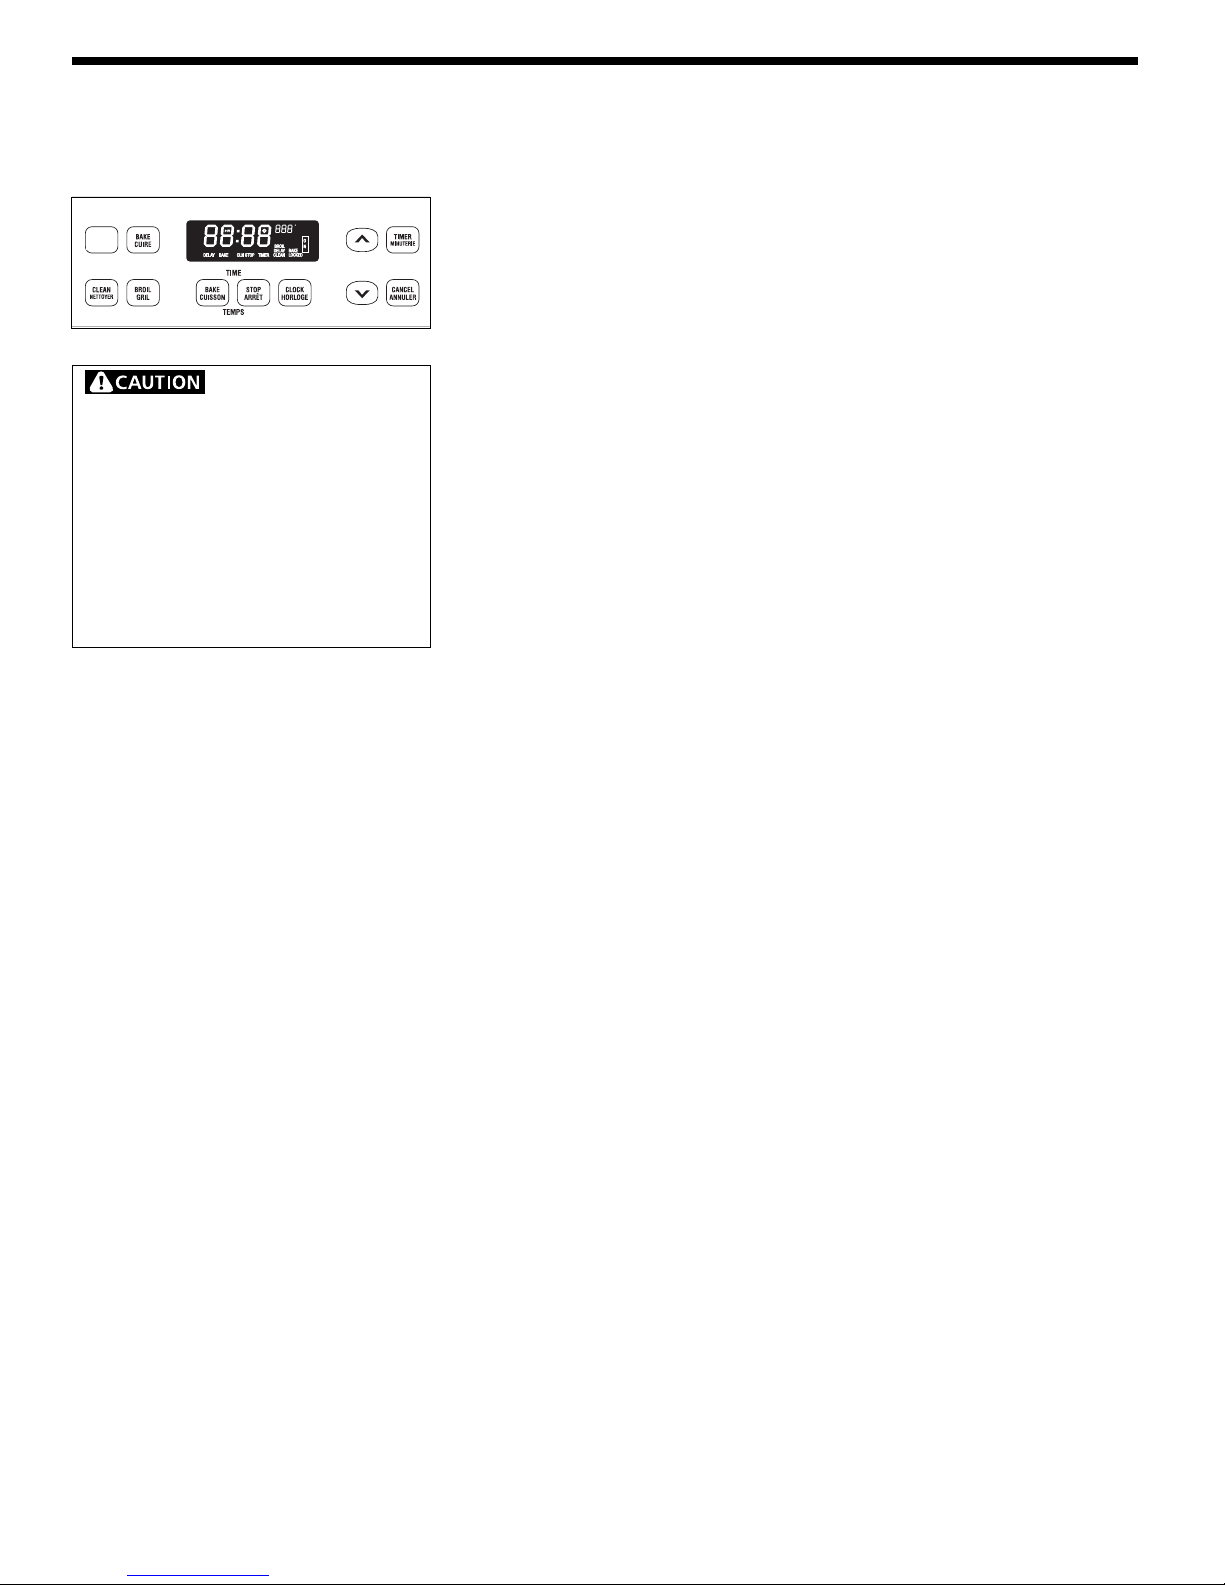
Oven Door Bracket
Adjustment (some models)
If the oven door is too loose or too tight to open, it is possible to adjust it. There is
an adjustable bracket located on the front frame under the door on the handle side.
(See figure below)
To have an oven door opening loosens, push down the adjustable bracket and to
have it tighten, lift up the bracket.
9
Setting Oven Controls
CONVEC
OR
PRE-HEAT
Use caution when using
the automatic timer. Use the automatic
timer when cooking cured or frozen
meats and most fruits and vegetables.
Foods that can easily spoil such as milk,
eggs, fish, meat or poultry, should be
chilled in the refrigerator first. Even
when chilled, they should not stand in
the oven for more than one hour before
cooking begins, and should be removed
promptly when cooking is completed.
To Set or Change the Temperature for Normal Baking
The oven can be programmed to bake at any temperature from 170°F/77°C to
550°F/288°C. To set the controls, follow these steps:
1. Push CANCEL if the oven temperature was set incorrectly or if you wish to
change the temperature set during preheat.
2. Push BAKE. "— — —°" and the word "BAKE" will glow in the display.
3. Push the UP or DOWN ARROW pad. The display will show "350°F/177°C"
By holding the UP or DOWN ARROW pad, the temperature can then be
adjusted in 5°F/3°C increments.
4. As soon as the UP or DOWN ARROW pad is released, the oven will begin
heating to the selected temperature. The display will show the actual oven
temperature as it increases to the desired setting. The words "BAKE" and
"ON" will appear in the display. When the displayed temperature reaches the
desired baking temperature, the oven is ready for baking. Wait 10 minutes for
the oven to cycle to the correct temperature.
5. To cancel the baking function, push CANCEL.
To Set the Automatic Timer (Timed Bake Feature)
The BAKE TIME and STOP TIME pads control the Time Bake operation. The
automatic timer will turn the oven on and off at the times you select in advance. The
oven can be programmed to start immediately and shut off automatically or to begin
baking at a later time with an automatic shutoff.
To Program the Oven to Begin Baking Immediately and To Shut Off
Automatically:
1. Be sure that the clock shows the correct time of day.
2. Place the food in the oven.
3. Push BAKE TIME. "— —:— —" and the words "BAKE TIME" will glow in the
display window.
4. Push and hold the UP or DOWN ARROW pad until the desired baking time
appears in the display. The baking time can be set for any amount of time from
five minutes to 11 hours and 59 minutes. When setting the baking time, the
time will appear in the display and increase in five minute increments.
5. Push BAKE. "— — —°" and the word "BAKE" will glow in the display.
6. Push and hold the UP or DOWN ARROW pad until the desired baking
temperature appears in the display.
Once the Controls are Set:
a. The oven will come on and begin heating to the selected baking temperature.
b. The words "BAKE" and "ON" will appear in the display.
c. The main display will show the oven baking time and will count down by
minutes until it reaches ":00."
When the Set BAKE TIME Runs Out:
a. ":00" will appear in the display window and the oven will shut off automatically.
b. The control will beep three times.
c. The control will then continue to beep once every ten seconds for five minutes
or until the CANCEL pad is pushed.
To Program Oven for a Delayed Start Time and an Automatic Shutoff
Follow steps 1-4 above, THEN:
5. After the bake time has been set, "— — —°" will appear in the display and the
word "BAKE" will flash. The display will flash and beep once until the oven
temperature has been set.
6. Push the STOP TIME pad. The time when baking will stop, will appear in the
display window. The words "BAKE STOP TIME" will glow in the display.
7. Push and hold the UP or DOWN ARROW pad until the time that you want
cooking to be completed appears in the display.
8. Push BAKE. "— — —°" will appear, and the word "BAKE" will glow in the
display.
9. Push and hold the UP or DOWN ARROW pad until the desired baking
temperature appears in the display.
10. If the baking temperature is not set, the control will beep. "— — —°" will flash
and the word "BAKE" will appear in the display.
10
Setting Oven Controls
(continued)
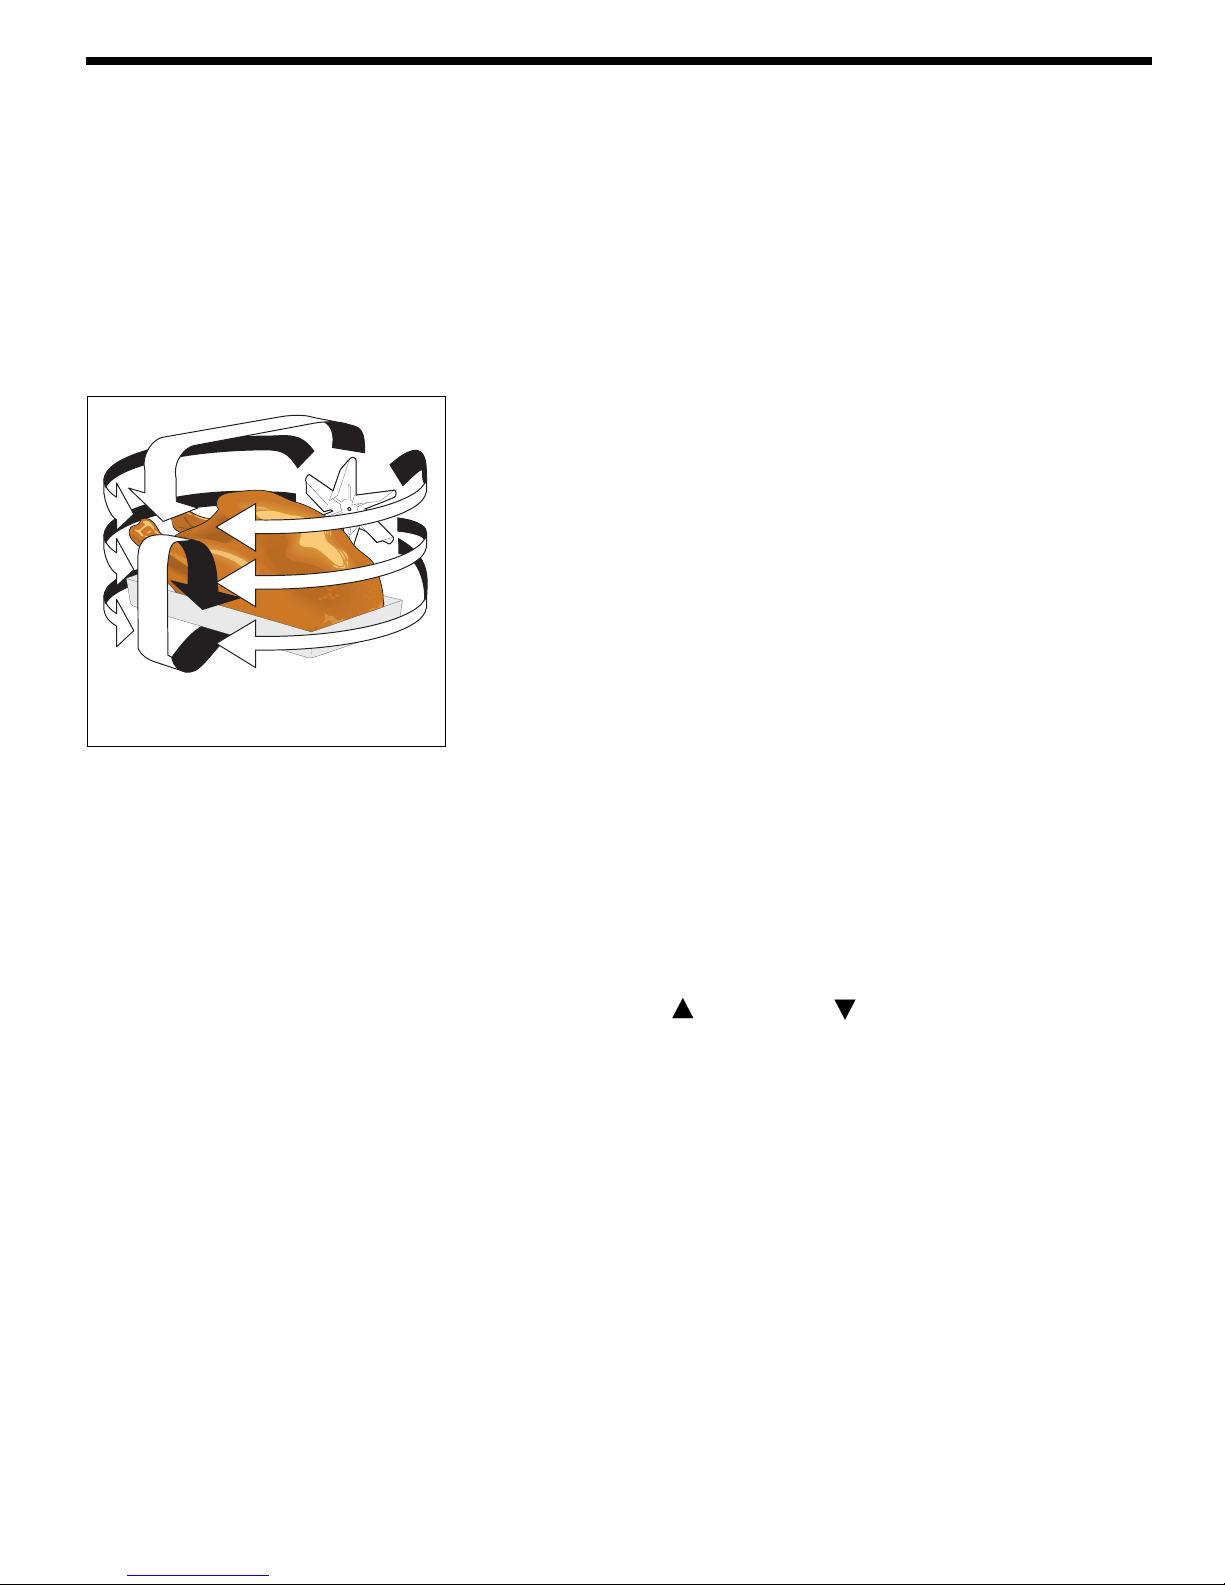
Air circulation during convection
cooking.
To Preheat
Before using the oven, arrange the oven racks according to the food being cooked.
See "Arranging Oven Racks." Preheating the oven is recommended when baking.
It is not necessary when roasting or cooking casseroles. The oven can be
programmed to preheat at any temperature from 135°F/57°C to 550°F/288°C.
To Set or Change the Preheat Temperature
1. Push PREHEAT. "— — —°" and the word "BAKE" will glow in the display.
2. Push and hold the UP or DOWN ARROW pad until the desired baking
temperature appears in the display.
3. When setting the baking temperature, the temperature will start in at 350°F/
177°C and increase or decrease in increments of 5°F/3°C.
4. As soon as the UP or DOWN ARROW pad is released, the oven will begin
preheating to the selected temperature. The display will show "PrE," and the
words "BAKE" and "ON" will appear in the display.
5. When the oven has finished preheating, the control will beep three times and
the display will change from "PrE" to the programmed set temperature.
6. When the control beeps and the control displays the set temperature, the oven
enters the bake mode.
To Convection Bake
Due to better heat distribution inside the oven, lower temperatures can be used
when using the convection mode. This temperature adjustment is automatically
made by the electronic oven control. When using the convection mode, the actual
oven temperature can be 25°F/12°C lower than required for oven cooking without
convection. This allows you to use your existing recipes without having to manually
adjust the temperature down.
Remember to use tested recipes with times adjusted for convection baking when
using the convection mode. Times may be reduced by as much as 30% when using
the convection feature. Additional information on convection baking and convection
recipes can be found in the Convection Oven Cook book and the Convection
Recipe book.
The oven can be programmed to bake in the convection mode at any temperature
from 170°F/77°C to 550°F/288°C. Preheating the oven for 10-12 minutes is
recommended when using convection, but is not necessary when roasting or
cooking casseroles. Follow the recommendations in the recipe.
1. Arrange oven racks while the oven is still cool.
2. Push the CONV BAKE/ROAST pad. "— — —°" and the word "Bake" will glow
in the display.
3. Push the Increase ( ) or Decrease ( ) pad until the desired convection
temperature appears in the display. When setting the convection temperature,
the temperature will start in at 325°F/163°C and increase or decrease in
increments of 5°F/2.5°C.
As soon as the convection temperature is set, the oven will begin heating to the
selected temperature. The display will show the temperature and the words "Bake"
and "On" will appear in the display. When the displayed temperature reaches the
desired convection temperature, the oven is ready for baking; only "Bake" is
displayed. The word "On" will appear in the display when the bake element is on.
4. When cooking is finished, push the CANCEL pad.
To change the convection temperature after baking has begun, repeat steps 2 & 3
above.
To cancel the convection function, push the CANCEL pad.
To Set the Automatic Timer (convection bake feature)
The BAKE TIME and STOP TIME pads control the timed convection operation. The
automatic timer will turn the oven on and off at the times you select in advance.
The oven can be programmed to start immediately and turn off automatically; or to
start at a delayed time and turn off automatically.
11
Setting Oven Controls
(continued)
To Start the Oven to Begin Convection Baking Now and Turn Off Automatically
1. Be sure clock is set to the correct time of day, as this controls the automatic timing.
2. Arrange oven racks while the oven is still cool. Preheat the oven if necessary and
place the food in the oven.
3. Push the BAKE TIME pad. "— —:— —" and the words "Bake Time" will glow in
the display.
4. Push the Increase (
in the display. The convection baking time can be set for any amount of time from
10 minutes to 11 hours and 50 minutes. When setting the convection baking time,
the time will appear in the display and increase in 5 minute increments.
5. Push the CONV BAKE/ROAST pad. "— — —°" will flash and the word "Bake"
will glow in the display.
6. Push the Increase (
temperature appears in the display. When setting the convection baking temperature,
the temperature will start in at 325°F/163°C and increase or decrease in increments
of 5°F/2.5°C. If the convection baking temperature is not set, the control will beep
once. "— — —°", and the word "Bake" will flash in the display. Complete step
5 again before the display returns to time of day.
As soon as the controls are set, the oven will come on and begin heating to the selected
convection temperature. The words "Bake Time", "Bake" and "On" will appear in the
display. The main display will show the oven convection baking time and will count
down by minutes until it reaches "00." When the set convection baking time runs out,
the control will beep 3 times. "00" will appear in the display window. The control will
then continue to beep once every 10 seconds for 5 minutes or until the CANCEL pad
is pushed.
7. Convection baking can be stopped at any time by pushing the CANCEL pad. When
convection baking is completed, push the CANCEL pad.
) or Decrease ( ) pad until the desired baking time appears
) or Decrease ( ) pad until the desired convection baking
To Set the Automatic Timer (convection bake feature)
The BAKE TIME and STOP TIME pads control the timed convection operation. The
automatic timer will turn the oven on and off at the times you select in advance.
The oven can be programmed to start immediately and turn off automatically; or to start
at a delayed time and turn off automatically.
To Start the Oven to Begin Convection Baking Now and Turn Off Automatically
1. Be sure clock is set to the correct time of day, as this controls the automatic timing.
2. Arrange oven racks while the oven is still cool. Preheat the oven if necessary and
place the food in the oven.
3. Push the BAKE TIME pad. "— —:— —" and the words "Bake Time" will glow in
the display.
4. Push the Increase (
in the display. The convection baking time can be set for any amount of time from
10 minutes to 11 hours and 50 minutes. When setting the convection baking time,
the time will appear in the display and increase in 5 minute increments.
5. Push the CONV BAKE/ROAST pad. "— — —°" will flash and the word "Bake"
will glow in the display.
6. Push the Increase (
temperature appears in the display. When setting the convection baking temperature,
the temperature will start in at 325°F/163°C and increase or decrease in increments
of 5°F/2.5°C. If the convection baking temperature is not set, the control will beep
once. "— — —°", and the word "Bake" will flash in the display. Complete step
5 again before the display returns to time of day.
As soon as the controls are set, the oven will come on and begin heating to the selected
convection temperature. The words "Bake Time", "Bake" and "On" will appear in the
display. The main display will show the oven convection baking time and will count
down by minutes until it reaches "00." When the set convection baking time runs out,
the control will beep 3 times. "00" will appear in the display window. The control will
then continue to beep once every 10 seconds for 5 minutes or until the CANCEL pad
is pushed.
) or Decrease ( ) pad until the desired baking time appears
) or Decrease ( ) pad until the desired convection baking
7. Convection baking can be stopped at any time by pushing the CANCEL pad. When
convection baking is completed, push the CANCEL pad.
12

Setting Oven Controls
(continued)
To Broil
1. Arrange oven rack while oven is still cool. Position the rack as suggested in the
chart below.
Rack Position From Top Food
1 Rare steaks
2 Ham slices, fish, medium steaks,
hamburgers and chops
3 Well-done foods such as chicken
and lobster
2. Push the BROIL pad. "— — —" and the word "BROIL" will appear in the
display.
3. Push and hold the UP or DOWN ARROW pad until the desired broil setting
level appears in the display.
Down Swing Door Broil Stop Position
Side Swing Door Broil Position
Note: Always pull the rack out to the stop
position before turning or removing food.
The broiler pan and its grid allow
dripping grease to drain and be kept
away from the high heat of the broiler.
DO NOT use the pan without its grid.
DO NOT cover the grid with foil. The
exposed grease could ignite.
Setting Doneness
LO (LOW) Well done
2 (Medium Low) Medium well
3
(Medium) Medium
4
5 (Medium HI) Medium rare
HI (High) Rare
4. Place the grid on the broiler pan, then place the food on the grid. DO NOT use
the broiler pan without the grid or cover the grid with aluminum foil. The
exposed fat could ignite.
5. Place the pan on the oven rack. Leave the oven door open at the broil stop
position (approximately 3" for side swing door) when broiling.
6. Broil on one side until food is browned; turn and cook on the second side. Season
and serve. Note: Always pull the rack out to the stop position before turning or
removing food.
7. When broiling is finished, push the CANCEL pad.
Should an oven fire occur, close the oven door and turn off the oven.
If the fire continues, throw baking soda on the fire or use a fire extinguisher. DO
NOT put water or flour on the fire. Flour may be explosive.
13

Oven Cleaning
CONVEC
OR
PRE-HEAT
During the self-cleaning
cycle, the outside of the wall oven can
become very hot to the touch. DO NOT
leave small children unattended near the
appliance.
DO NOT line the oven
walls, racks, bottom or any other part of
the wall oven with aluminum foil. Doing
so will destroy heat distribution, produce
poor baking results and cause
permanent damage to the oven interior
(aluminum foil will melt to the interior
surface of the oven).
(Typical Down Swing Door Shown)
Self-Cleaning Oven
A self-cleaning oven cleans itself with high temperatures (well above cooking
temperatures) which eliminate soil completely or reduce it to a fine powdered ash
you can whisk away with a damp cloth.
1. Adhere to the following cleaning precautions:
• Allow the oven to cool before precleaning.
• Wear rubber gloves when precleaning and while wiping up the residue after
the self-clean cycle.
• DO NOT use oven cleaners or oven protective coatings in or around any part
of the self-cleaning oven.
• DO NOT clean the oven door gasket. The material of the oven door
gasket is essential for a good seal. Care should be taken not to rub, damage
or remove the gasket.
• DO NOT use any cleaning materials on the oven door gasket. Doing so could
cause damage.
2. Remove the broiler pan and insert, all utensils and any aluminum foil.
These items cannot withstand high cleaning temperatures.
3. Oven racks may be left in the oven or may be removed. If they go through the
clean cycle their color will turn slightly blue and the finish will be dull. After the
cycle is complete and the oven has cooled, rub the sides of the racks with wax
paper or a cloth containing a small amount of baby oil or salad oil (this will make
the racks glide easier into the rack position).
4. Remove any excess spillovers in the oven cavity before starting the self-cleaning
cycle. To clean, use hot, soapy water and a cloth. Large spillovers can cause
heavy smoke or fire when subjected to high temperatures. DO NOT allow food
spills with a high sugar or acid content (such as milk, tomatoes, sauerkraut, fruit
juices or pie filling) to remain on the surface as they may cause a dull spot even
after cleaning.
5. Clean any soil from the oven frame, the door liner outside the oven door gasket,
and the the small area at the front center of the oven bottom. These areas heat
sufficiently to burn soil on. Clean with soap and water.
Stopping or Interrupting a Self-Cleaning Cycle
If it becomes necessary to stop or interrupt a self-cleaning cycle due to excessive
smoke or fire:
1. Push the CANCEL pad.
2. Once the oven has cooled down for 1 HOUR and the word "LOCKED" shown
in the display has gone out, then the oven door can be opened.
DO NOT force the oven door open. This can damage the automatic
door locking system. Use caution when opening the door after the self-cleaning
cycle is completed. The oven may still be VERY HOT.
14
 Loading...