

Sears Kenmore 23-11-2223N-003 Owner's Manual
ENGLISH
h:qportant Safety Instructions .................................... 1
Installation .............................................................. 3
Operation ................................................................ 6
Maintenance ............................................................ 7
Warranty .................................................................. 9
ESPANOL
Instrucciones importantes de seguridad .................. 11
Instalaci6n .............................................................. 13
Funcionamiento .................................................... 14
Mantenimiento ...................................................... 16
Garantfa ................................................................ 18
FRAN(_AIS
Directives de s6curit6 importantes .......................... 21
Installation ............................................................ 23
Utilisation .............................................................. 24
D6pannage ............................................................ 26
Garantie ................................................................ 28
Air Cleaner
Read and Save These Instructions
This Owner's Guide provides specific operating instructions for your model. Use the air
conditioner only as instructed in this guide. These instructions are not meant to cover every
possible condition and situation that may occur. Common sense and caution must be practiced
when installing, operating, and maintaining any appliance.
Record Your Model and Serial Numbers
Record in the space provided below the model and serial numbers.
Model Number:
Serial Number:
Purchase Date:
Sears, Roebuck and Co., Hoffman Estates, IL 60179 U.S.A.
important
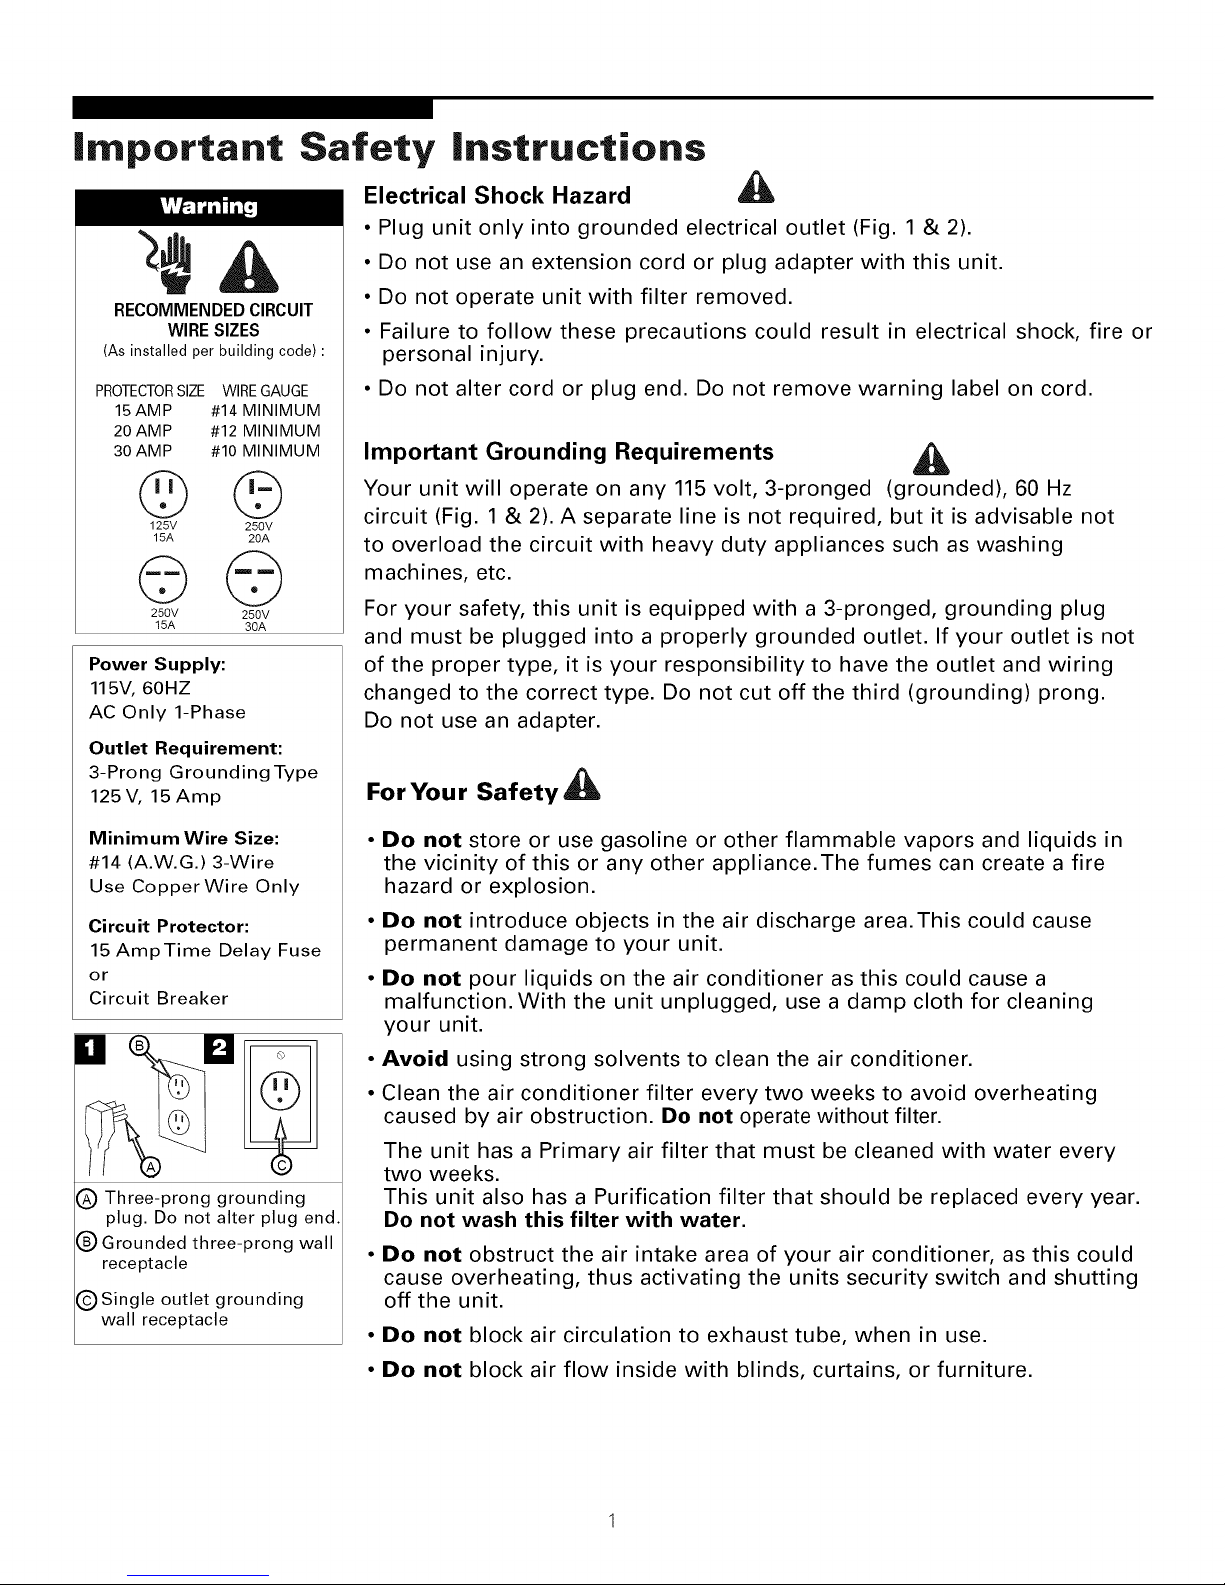
RECOMMENDED CIRCUIT
WIRE SIZES
(As installed per building code):
PROTECTORSIZE WIREGAUGE
15 AMP #14 MINIMUM
20 AMP #12 MINIMUM
30 AMP #10 MINIMUM
©©
125V 250V
15A 20A
©©
250V 250V
15A 30A
Power Supply:
115V, 60HZ
AC Only 1-Phase
Outlet Requirement:
3-Prong Grounding Type
125V, 15Amp
Safety instructions
Electrical Shock Hazard
• Plug unit only into grounded electrical outlet (Fig. 1 & 2).
• Do not use an extension cord or plug adapter with this unit.
• Do not operate unit with filter removed.
• Failure to follow these precautions could result in electrical shock, fire or
personal injury.
• Do not alter cord or plug end. Do not remove warning label on cord.
Important Grounding Requirements
Your unit will operate on any 115 volt, 3-pronged (grounded), 60 Hz
circuit (Fig. 1 & 2). A separate line is not required, but it is advisable not
to overload the circuit with heavy duty appliances such as washing
machines, etc.
For your safety, this unit is equipped with a 3-pronged, grounding plug
and must be plugged into a properly grounded outlet. If your outlet is not
of the proper type, it is your responsibility to have the outlet and wiring
changed to the correct type. Do not cut off the third (grounding) prong.
Do not use an adapter.
For Your Safety
Minimum Wire Size:
#14 (A.W.G.) 3-Wire
Use CopperWire Only
Circuit Protector:
15 AmpTime Delay Fuse
or
Circuit Breaker
C) Three-prong grounding
plug. Do not alter plug end,
I_) Grounded three-prong wall
receptacle
@Single outlet grounding
wall receptacle
Do not store or use gasoline or other flammable vapors and liquids in
the vicinity of this or any other appliance.The fumes can create a fire
hazard or explosion.
Do not introduce objects in the air discharge area.This could cause
permanent damage to your unit.
Do not pour liquids on the air conditioner as this could cause a
malfunction. With the unit unplugged, use a damp cloth for cleaning
your unit.
Avoid using strong solvents to clean the air conditioner.
Clean the air conditioner filter every two weeks to avoid overheating
caused by air obstruction. Be net operate without filter.
The unit has a Primary air filter that must be cleaned with water every
two weeks.
This unit also has a Purification filter that should be replaced every year.
Do not wash this filter with water.
Do not obstruct the air intake area of your air conditioner, as this could
cause overheating, thus activating the units security switch and shutting
off the unit.
Do not block air circulation to exhaust tube, when in use.
Do not block air flow inside with blinds, curtains, or furniture.
Before Getting Started
BEF@RE STARTZNG Y@UR UNiT
• Read the instruction manual before operating the unit for the first time. It contains important information on
operation, safety, maintenance, service and warranty.
• Keep this instruction manual for future reference.
• Do not start a damaged unit.
•The assembly and connection of the unit must be carried out according to the instructions. If they are not followed
you run the risk of voiding the warranty.
Important information
1. The power cord is located in the rear of the unit.
2. Do not allow contact between the unit and water.
3. Do not cover the air discharge and air intake louvers of the unit.
4. Proper venting of the air to the exterior is required at all times.
The unit hascasters to ease movement. If it is necessaryto tilt the unit, it must first be emptied of water in the internal tank
using the drain valve at the bottom of the unit. (See the section When transporting the unit or Storing the unit for the season.)
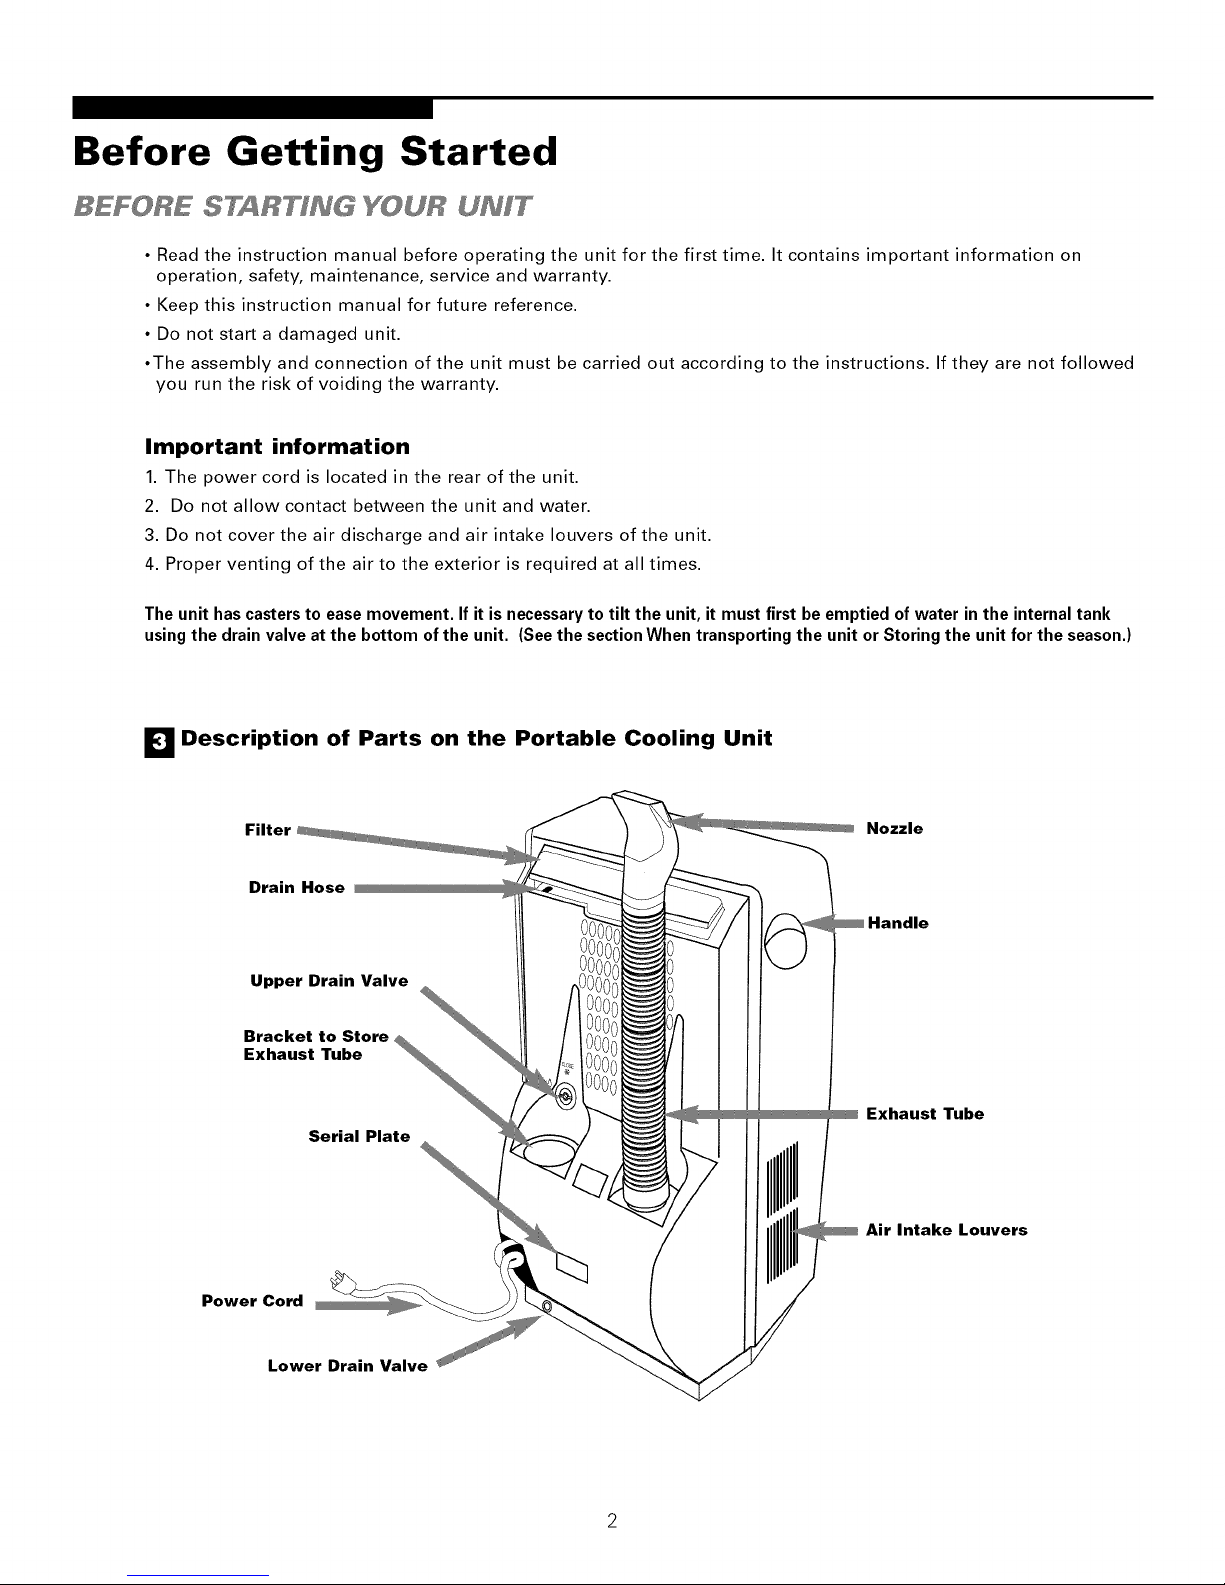
_] Description of Parts on the Portable Cooling Unit
Filter Nozzle
Drain Hose
Upper Drain Valve
Bracket to Store
Exhaust Tube
Serial Plate
Power Cord
Exhaust Tube
Air Intake Louvers
Lower Drain Valve
Installation
MOBELE gNSTALLAT ON
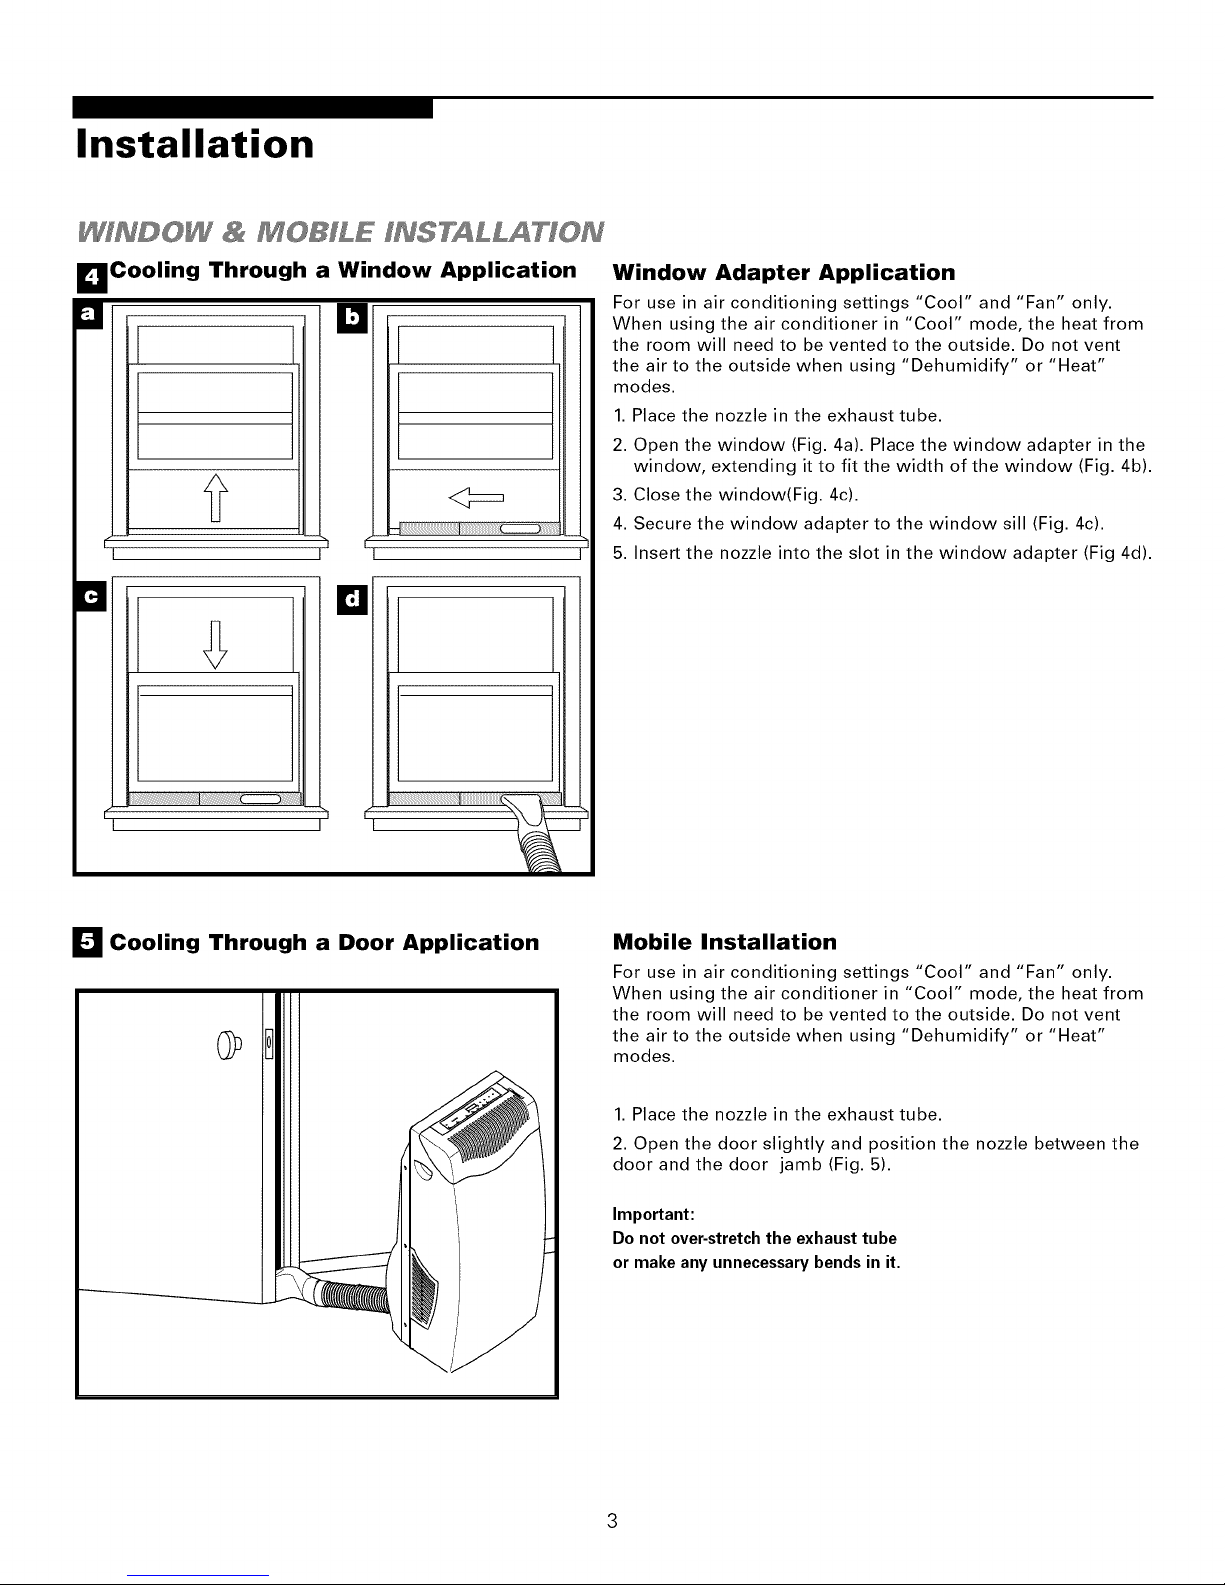
I_Cooling Through a Window Application
u k]
If_ -- I
I I
F
B
I I
13
h
Window Adapter Application
For use in air conditioning settings "Cool" and "Fan" only.
When using the air conditioner in "Cool" mode, the heat from
the room will need to be vented to the outside. Do not vent
the air to the outside when using "Dehumidify" or "Heat"
modes.
1. Place the nozzle in the exhaust tube.
2. Open the window (Fig. 4a). Place the window adapter in the
window, extending it to fit the width of the window (Fig. 4b).
3. Close the window(Fig. 4c).
4. Secure the window adapter to the window sill (Fig. 4c).
5. Insert the nozzle into the slot in the window adapter (Fig 4d).
I_1 Cooling Through a Door Application
Mobile Installation
For use in air conditioning settings "Cool" and "Fan" only.
When using the air conditioner in "Cool" mode, the heat from
the room will need to be vented to the outside. Do not vent
the air to the outside when using "Dehumidify" or "Heat"
modes.
1. Place the nozzle in the exhaust tube.
2. Open the door slightly and position the nozzle between the
door and the door jamb (Fig. 5).
Important:
Do not over-stretch the exhaust tube
or make any unnecessary bends in it.
Operation
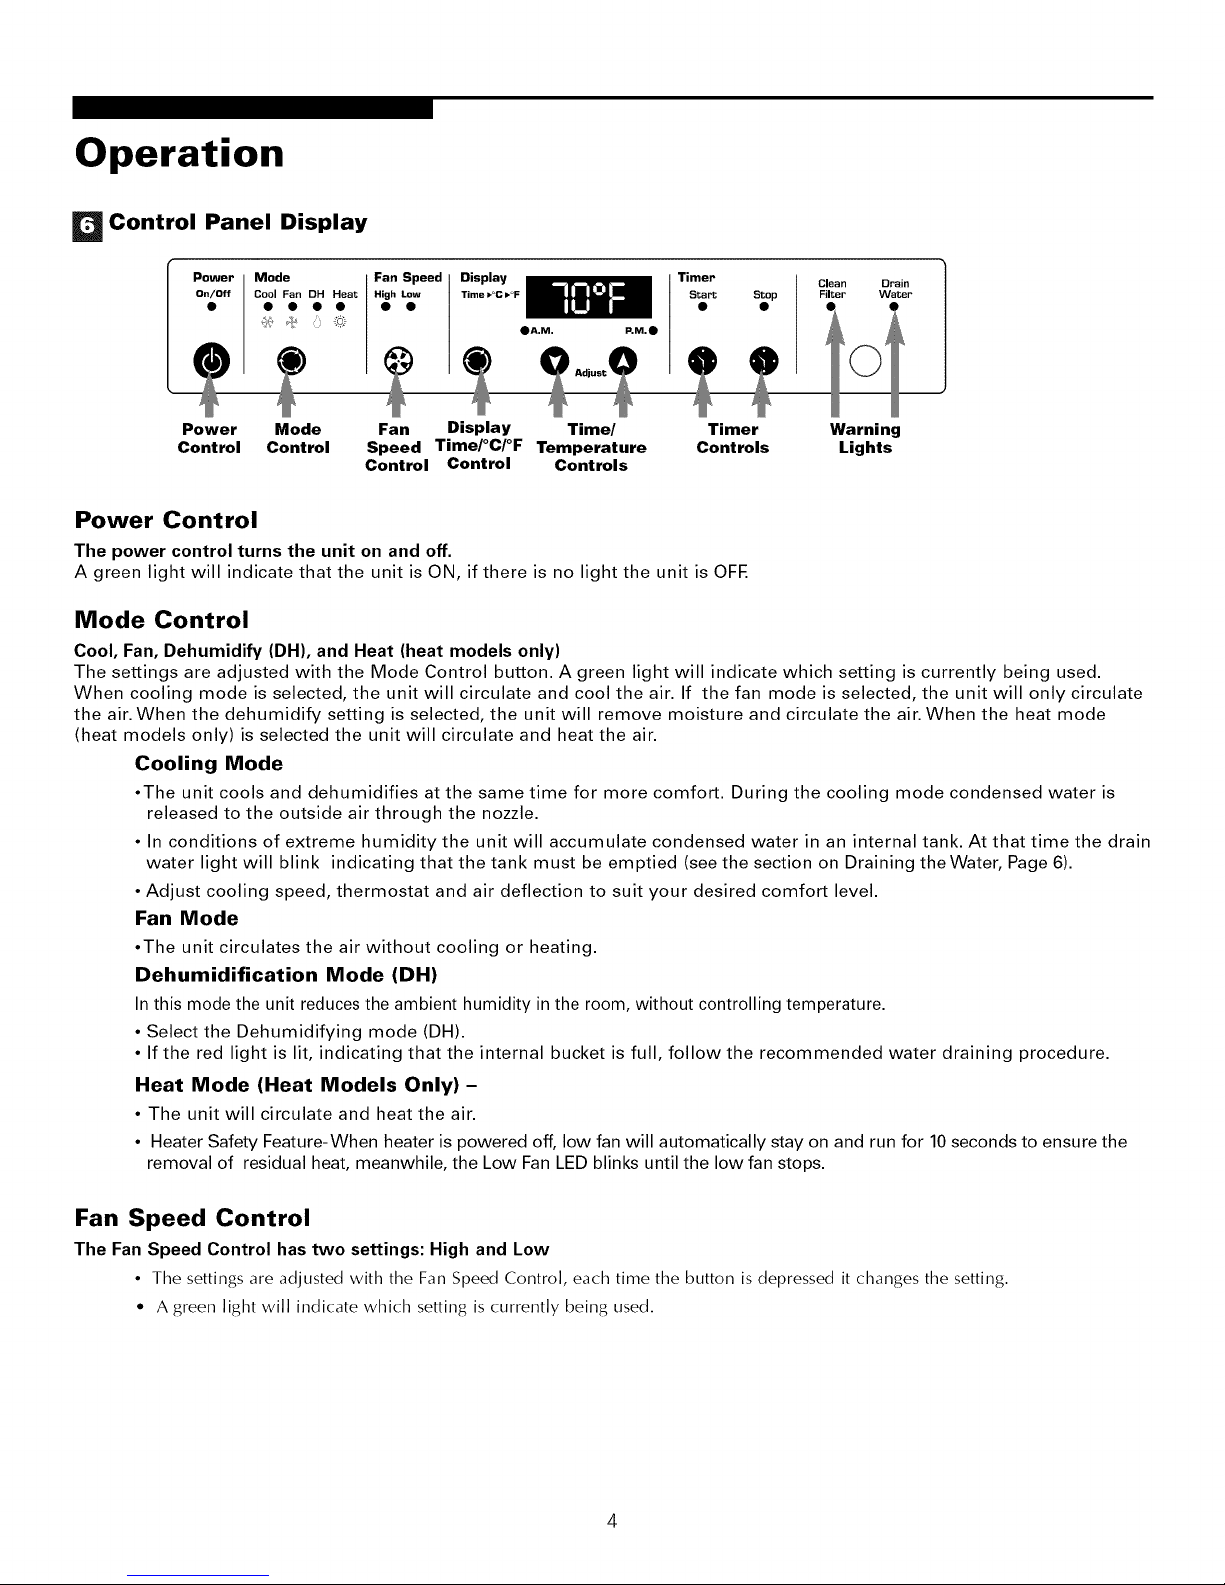
Control Panel Display
Mode
Cool Fan DH Heat
• • • •
• A.M. P,M._)
Timer
Start Stop
Clean
Filter
i
Power Mode Fan Display Time/ Timer
Control Control Speed Time/°C/°F Temperature Controls
Control Control Controls
Power Control
The power control turns the unit on and off
A green light will indicate that the unit is ON, if there is no light the unit is OFE
Mode Control
Cool, Fan, Dehumidify (DH), and Heat (heat models only)
The settings are adjusted with the Mode Control button. A green light will indicate which setting is currently being used.
When cooling mode is selected, the unit will circulate and cool the air. If the fan mode is selected, the unit will only circulate
the air. When the dehumidify setting is selected, the unit will remove moisture and circulate the air. When the heat mode
(heat models only) is selected the unit will circulate and heat the air.
Cooling Mode
•The unit cools and dehumidifies at the same time for more comfort. During the cooling mode condensed water is
released to the outside air through the nozzle.
• In conditions of extreme humidity the unit will accumulate condensed water in an internal tank. At that time the drain
water light will blink indicating that the tank must be emptied (see the section on Draining theWater, Page 6).
• Adjust cooling speed, thermostat and air deflection to suit your desired comfort level.
Fan Mode
•The unit circulates the air without cooling or heating.
Dehumidification Mode (DH)
In this mode the unit reduces the ambient humidity in the room, without controlling temperature.
• Select the Dehumidifying mode (DH).
• If the red light is lit, indicating that the internal bucket is full, follow the recommended water draining procedure.
Heat Mode (Heat Models Only) -
• The unit will circulate and heat the air.
• Heater Safety Feature-When heater is powered off, low fan will automatically stay on and run for 10 seconds to ensure the
removal of residual heat, meanwhile, the Low Fan LED blinks until the low fan stops.
Warning
Lights
Fan Speed Control
The Fan Speed Control has two settings: High and Low
• The settings are adjusted with the Fan Speed Control, each time the button is depressed it changes the setting.
• A green light will indicate which setting is currently being used.
Operation
Display Controls
Time/°C/°F Mode Control: The display control is used to change the current display setting.
• There are three settings on the display: Temperature in Fahrenheit, Temperature in Celsius, Clock
• The display will return from the time setting to the Fahrenheit setting after the control has not been depressed for five seconds.
• THE TEMPERATURE SETTING ONLY SHOWS THE SET TEMPERATURE, NOT THE ROOM TEMPERATURE.
Time/Temperature Controls: These buttons are used to change the set temperature, the clock, start time, and stop time.
Changing the SetTemperature
Select either Fahrenheit or Celsius on the display by using the Display Control, then change the set temperature in
increments of 1° using theTime!Temperature.
Setting the Clock
Select the time display with the Display Control and change the clock with theTime!Temperature controls.The time will
increase or decrease in one minute increments with each depression. If either the up or down buttons is held down, the
time will change continuously until the button is released.The AM and PM lights will change appropriately with the clock.
Timer Controls
TheTimer Controls can be used to set a time for the air conditioner to start as well as a time for the air conditioner to stop.
Setting a StartTime
Press the start or stop button.The display will now show the number of hours until the unit will automatically start.
Use theTime/Temperature controls to adjust the number of hours before start.The timer will be set after no buttons have
been depressed for five seconds. A light above the start button will indicate the timer is activated.
Setting a StopTime
While the unit is running, press the stop button.The display will now show the number of hours until the unit will
automatically stop. Use theTime/Temperature controls to adjust the number of hours before stop.The timer will be set
after no buttons have been depressed for five seconds. A light above the start button will indicate the timer is activated.
Shutting theTimer Function OFF
If the Start function is set:
Press the Start button for three seconds. The light will go off and the start function is now deactivated.
If the Stop function is set:
Press the Stop button for three seconds. The light will go off and the stop function is now deactivated.
Warning Lights: These lights will come on when the air conditioner needs attention.
Clean Filter Light
This light indicates that the primary filter needs to be cleaned.The air conditioner will continue to run even when the light
is on. However, the filter should be cleaned as soon as possible after the light comes on. After cleaning the filter, press both
Time/Temperature controls simultaneously to reset the filter monitor.
Drain Water Light
This light indicates that the internal water bucket needs to be drained.The unit will not operate until the water has been
drained. See the next page of the owners' manual for instructions on how to drain the water.The air conditioner must be
set to dehumidify when the water is drained.
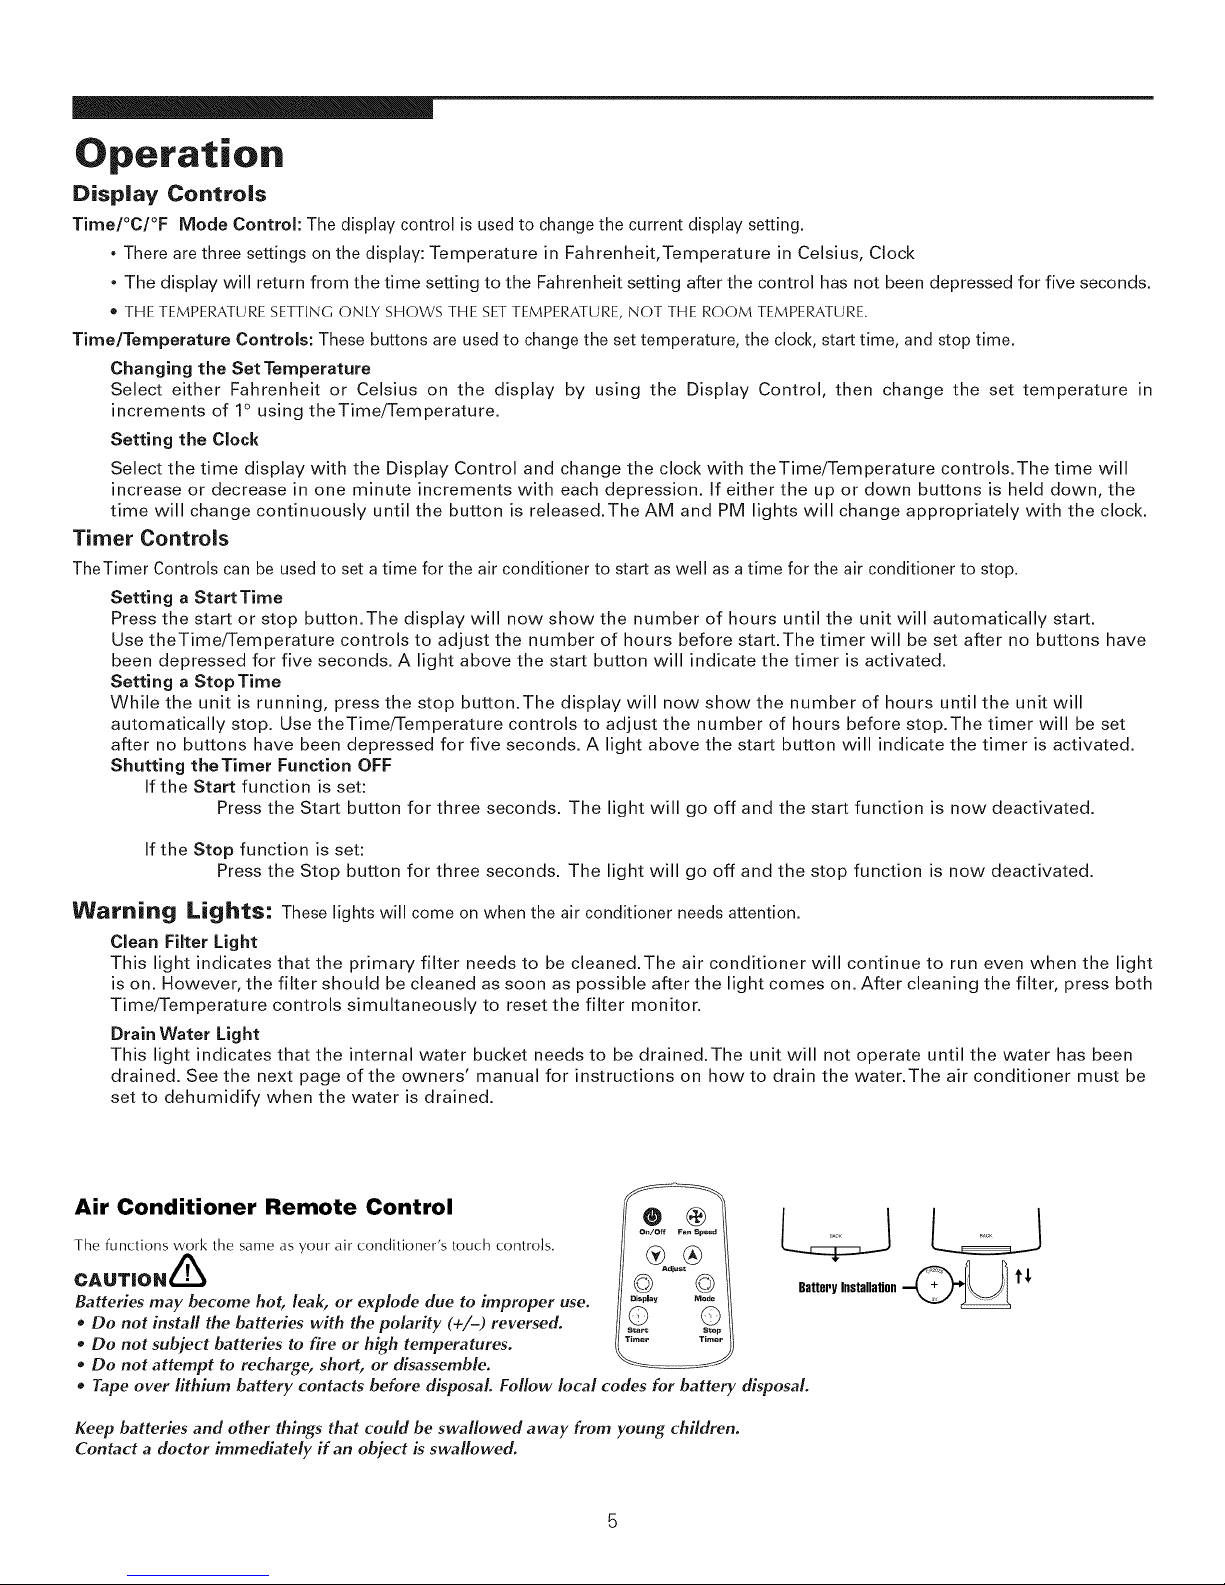
Air Conditioner Remote Control
The functions work the same as your air conditioner's touch controls,
CAUT|ON_
Batteries may become hot, leak, or explode due to improper use.
o Do not install the batteries with the polarity (+/-) reversed.
o Do not subject batteries to fire or high temperatures.
o Do not attempt to recharge, short, or disassemble.
o Tape over lithium battery contacts before disposal. Follow local codes for battery disposal.
Keep batteries and other things that could be swallowed away from young children.
Contact a doctor immediately if an object is swallowed.
® @
on!off Fan Spoof
© ©
oisplav Node
© ©
S_art S_op
Timer Timer
BatteryInstallation_ 1'
Maintenance
Upper Drain Valve
CLOSE
@
OPEN
Primary Filter
IN WATER EVERY 2 WEEKS)
Purification Filter
DO NOT WASH)
CLOSE
@
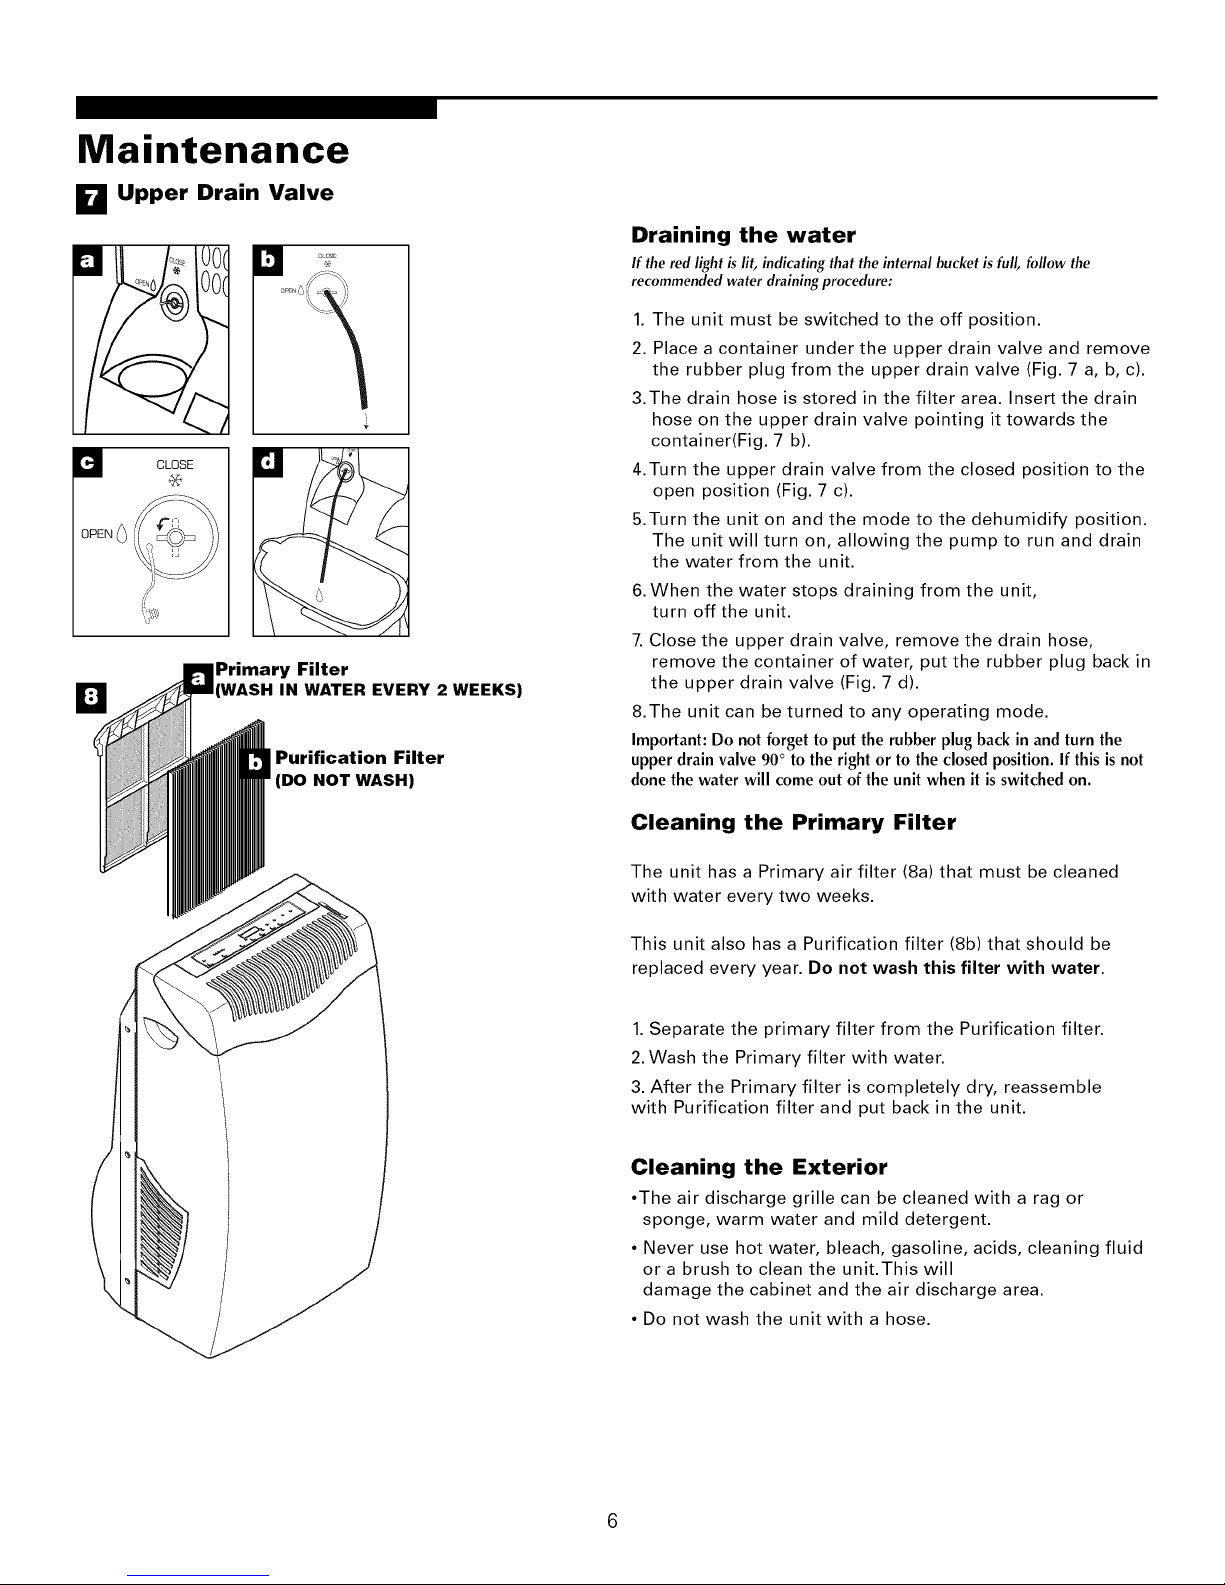
Draining the water
If the red light is lit, indicating that the internal bucket is full, follow the
recommended water draining procedure:
1. The unit must be switched to the off position.
2. Place a container under the upper drain valve and remove
the rubber plug from the upper drain valve (Fig. 7 a, b, c).
3.The drain hose is stored in the filter area. Insert the drain
hose on the upper drain valve pointing it towards the
container(Fig. 7 b).
4.Turn the upper drain valve from the closed position to the
open position (Fig. 7 c).
5.Turn the unit on and the mode to the dehumidify position.
The unit will turn on, allowing the pump to run and drain
the water from the unit.
6.When the water stops draining from the unit,
turn off the unit.
7. Close the upper drain valve, remove the drain hose,
remove the container of water, put the rubber plug back in
the upper drain valve (Fig. 7 d).
8.The unit can be turned to any operating mode.
Important:Do notforgetto put the rubber plugbackin andturn the
upperdrainvalve90° to the right or to the closedposition.If this isnot
donethewater will comeout of the unit when it isswitchedon.
Cleaning the Primary Filter
The unit has a Primary air filter (8a) that must be cleaned
with water every two weeks.
This unit also has a Purification filter (8b) that should be
replaced every year. Be net wash this filter with water.
1.Separate the primary filter from the Purification filter.
2. Wash the Primary filter with water.
3. After the Primary filter is completely dry, reassemble
with Purification filter and put back in the unit.
Cleaning the Exterior
•The air discharge grille can be cleaned with a rag or
sponge, warm water and mild detergent.
• Never use hot water, bleach, gasoline, acids, cleaning fluid
or a brush to clean the unit.This will
damage the cabinet and the air discharge area.
• Do not wash the unit with a hose.
Maintenance
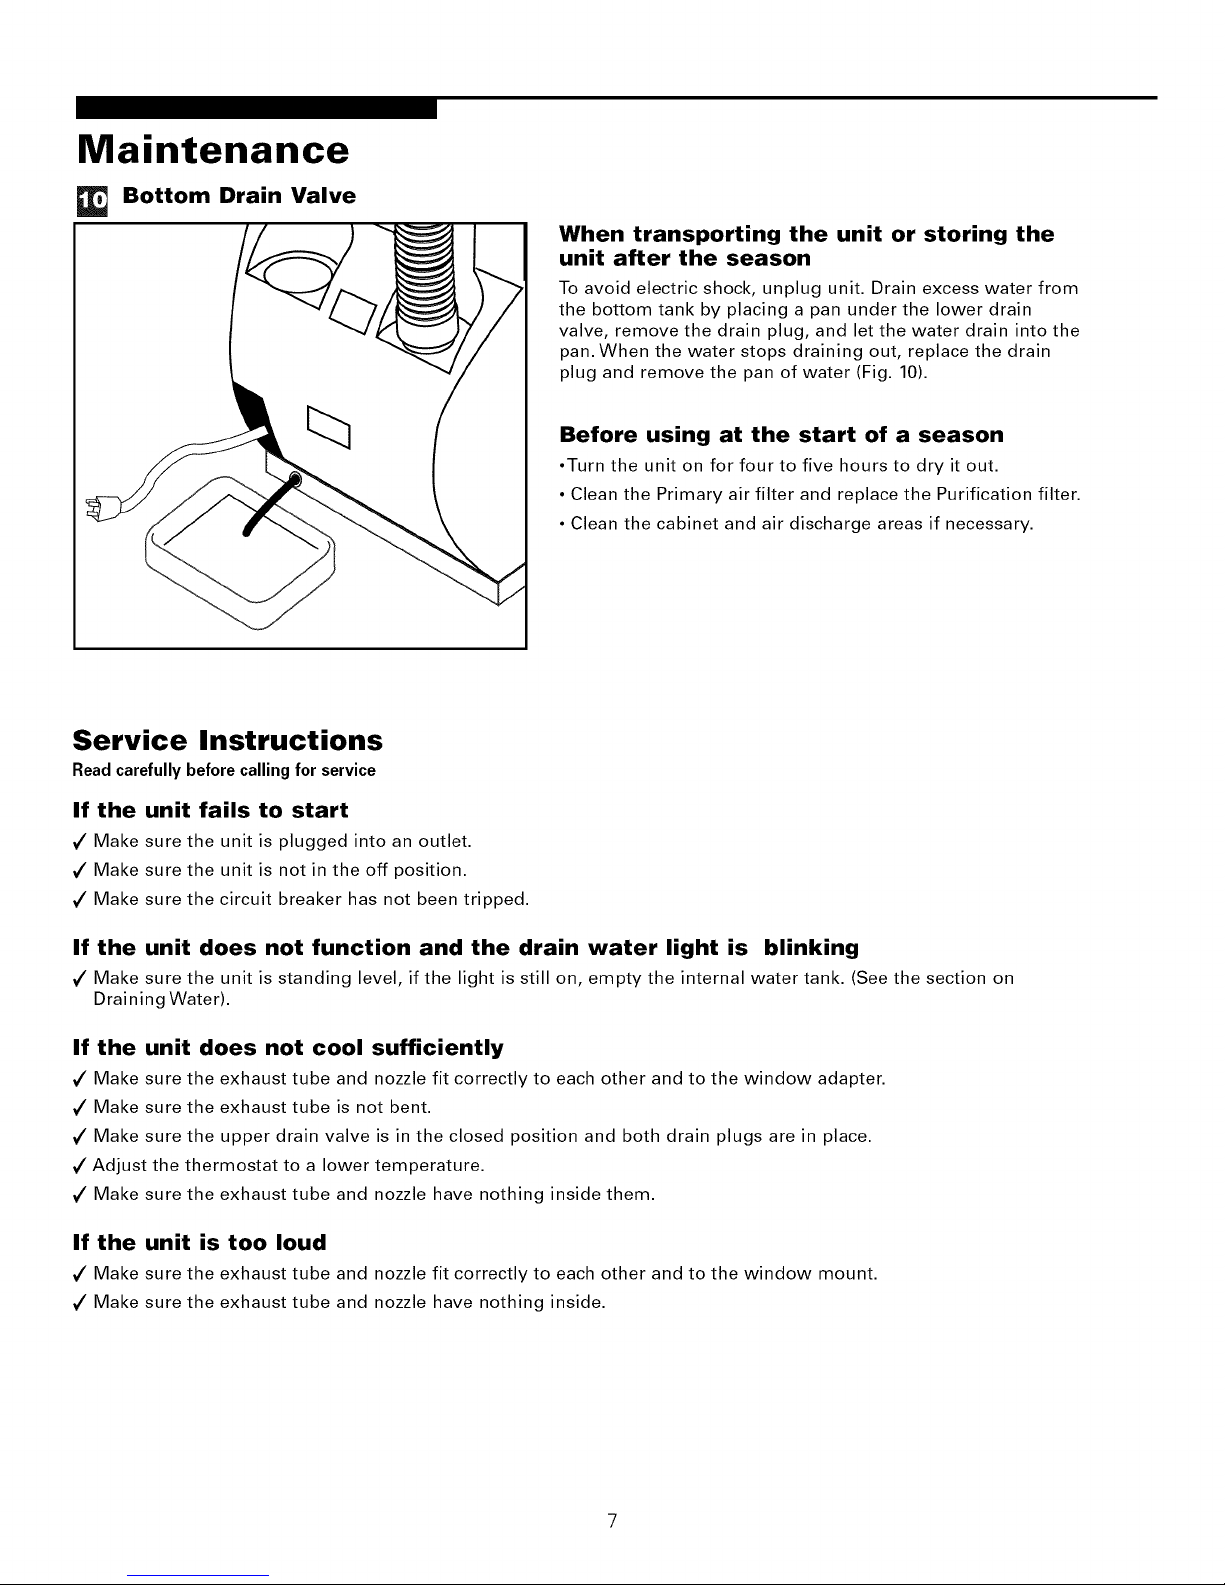
Bottom Drain Valve
When transporting the unit or storing the
unit after the season
To avoid electric shock, unplug unit. Drain excess water from
the bottom tank by placing a pan under the lower drain
valve, remove the drain plug, and let the water drain into the
pan. When the water stops draining out, replace the drain
plug and remove the pan of water (Fig. 10).
Before using at the start of a season
•Turn the unit on for four to five hours to dry it out.
• Clean the Primary air filter and replace the Purification filter.
• Clean the cabinet and air discharge areas if necessary.
Service Instructions
Read carefully before calling for service
If the unit fails to start
V" Make sure the unit is plugged into an outlet.
V" Make sure the unit is not in the off position.
V" Make sure the circuit breaker has not been tripped.
If the unit does not function and the drain water light is blinking
V" Make sure the unit is standing level, if the light is still on, empty the internal water tank. (See the section on
Draining Water).
If the unit does not cool sufficiently
V" Make sure the exhaust tube and nozzle fit correctly to each other and to the window adapter.
V" Make sure the exhaust tube is not bent.
V" Make sure the upper drain valve is in the closed position and both drain plugs are in place.
V" Adjust the thermostat to a lower temperature.
V" Make sure the exhaust tube and nozzle have nothing inside them.
If the unit is too loud
V" Make sure the exhaust tube and nozzle fit correctly to each other and to the window mount.
V" Make sure the exhaust tube and nozzle have nothing inside.
Warranty
Full One-YearWarranty on Air Conditioner
for one year from date of purchase, when this air conditioner is operated and
maintained for normal room cooling according to instructions in this owner's
manual, Sears will repair item, free of charge, if defective in material or
workmanship.
Full Five-Year Warranty on Sealed Refrigeration System
For five years from the date of purchase, when this air conditioner is operated and
maintained for normal room cooling according to instructions in this owner's
manual, Sears will repair the sealed refrigeration system (consisting of refrigerant,
connecting tubing, and compressor), free of charge, if defective in material or
workmanship.
Warranty Service
Warranty gives you specific legal rights, and you may have other rights which vary
from state to state.
SEARS, ROEBUCK and CO. Dept. 817WA, Hoffman Estates, IL 60719
Sears Service
Maintenance Agreement
"We Service What We Sell" is our assurance you can depend on Sears for service.
Your air conditioner has added value when you consider that Sears has service
units nationwide, staffed with professional technicians trained on all appliances
Sears sells.They have the knowledge and sills, tools pars and equipment to insure
our pledge to you that "We Service WhatWe Sell"
Sears Maintenance Agreement
Maintain the value of your air conditioner with a Sears Maintenance Agreement.
Sears air conditioners are designed, manufactured, and tested for years of
dependable operation. Yet, andy modern appliance may require service from time
to time.The Sears Maintenance Agreement offers you an outstanding service
program for your air conditioner.
The Sears Maintenance Agreement
* Is your way to buy tomorrow's service at today's price.
* Eliminates repair bills resulting from normal use.
* Allows for as many service calls as required.
* Provides and annual Preventive Maintenance Check at your request to
keep your Air Conditioner in proper running condition.
For more information, call 1-800-827-6655
Just Call
1-800-4-MY-HOME
(1-800-469-4663)
24 hours a day, 7 days a week
For the repair of major brand name appliances in your own home...
no matter who made it, no matter who sold itt
For your nearest Sears Parts & Service location,
to bring in products like vacuums, lawn equipment and electronics.
For Sears Parts & Service, to order the replacement parts,
accessories and owner's manuals that you need to do -it-yourself.
www. sea rs. ca
To purchase orinquire abouta Sears Maintenance Agreement, call:
1-800-361-6665
9a.m. -- 8 p.m. Mon. -- Fri. EST, 9 a.m. -- 4 p.m. Sat.
Pour service en francais:
1-800-LE FOYER mc
(1-800-533-6937)
www. sea rs. ca
 Loading...