

Sears Kenmore 1163491291,Kenmore 1163691290 Owner's Manual
IIIlrl I I I III
IIIIIlI
IIIII IIII IIIIIIIM
III1! II IIIIIIII
I IIII I I IIII I
II I IIIII IIII
1111111111111111III
I IIII IIIII
IIIIr III r l IIIIIIII IIIIII
IIII I
I IIIII IIII IIIIIIII IIII
II
II ..........................
• III
II I IIIIIIII IIIIII
IIIIIII I
III II II IIIIIIIIIIL IIIII
iiiiiiiiiiiii
lUlIII I
III
_ I II II I I I I I II11111 ] I II
_1111111 I]
! • I I
' I!11 IIIIIII I III III '
] I I IIIIII II I I II
.................... I 1_ I!l I_
'PIPIIIIIrP I !!lrr il :]I:EII!!II ! i
WL.. ' I ! I IF III I '! ........
II II IIII IIII
II IIII IIIII IIIIIIII
IIIIll!It! I IIIIII II IIII I IIIIII III I II IIIIII1[
Ilrllllll IIIIIIIIIIIIII I I1'11 IIIIIIII III IIIIII IIIIII
'1!11111 IIIIIIIIIII '111111 III II
III I
IIIIIIIII IIII I
IIII III I
l!1111111 IIIIIIII I II
• [!l[ll ii I IjII / Hi
I I'111 IIIIlll III
I I I
IIIII IIIIIII
I
II
SEARS
Kenmore Vacuum Cleaner
0WNER'SMANUAL
READTHISMANUAL for important safety,
assembly and operating instructions.
C_) IZACR 1OUOO-4369556A
ONTENTS
WARRANTY
SERVICE
IMPORTANT SAFETYINSTRUCTIONS....... I
PARTSAND FEATURES.................... 2
ASSEMBLY ............................... 3
USE ...................................... 3
How to Start ............................. 3
Self-Propel Control ....................... 3
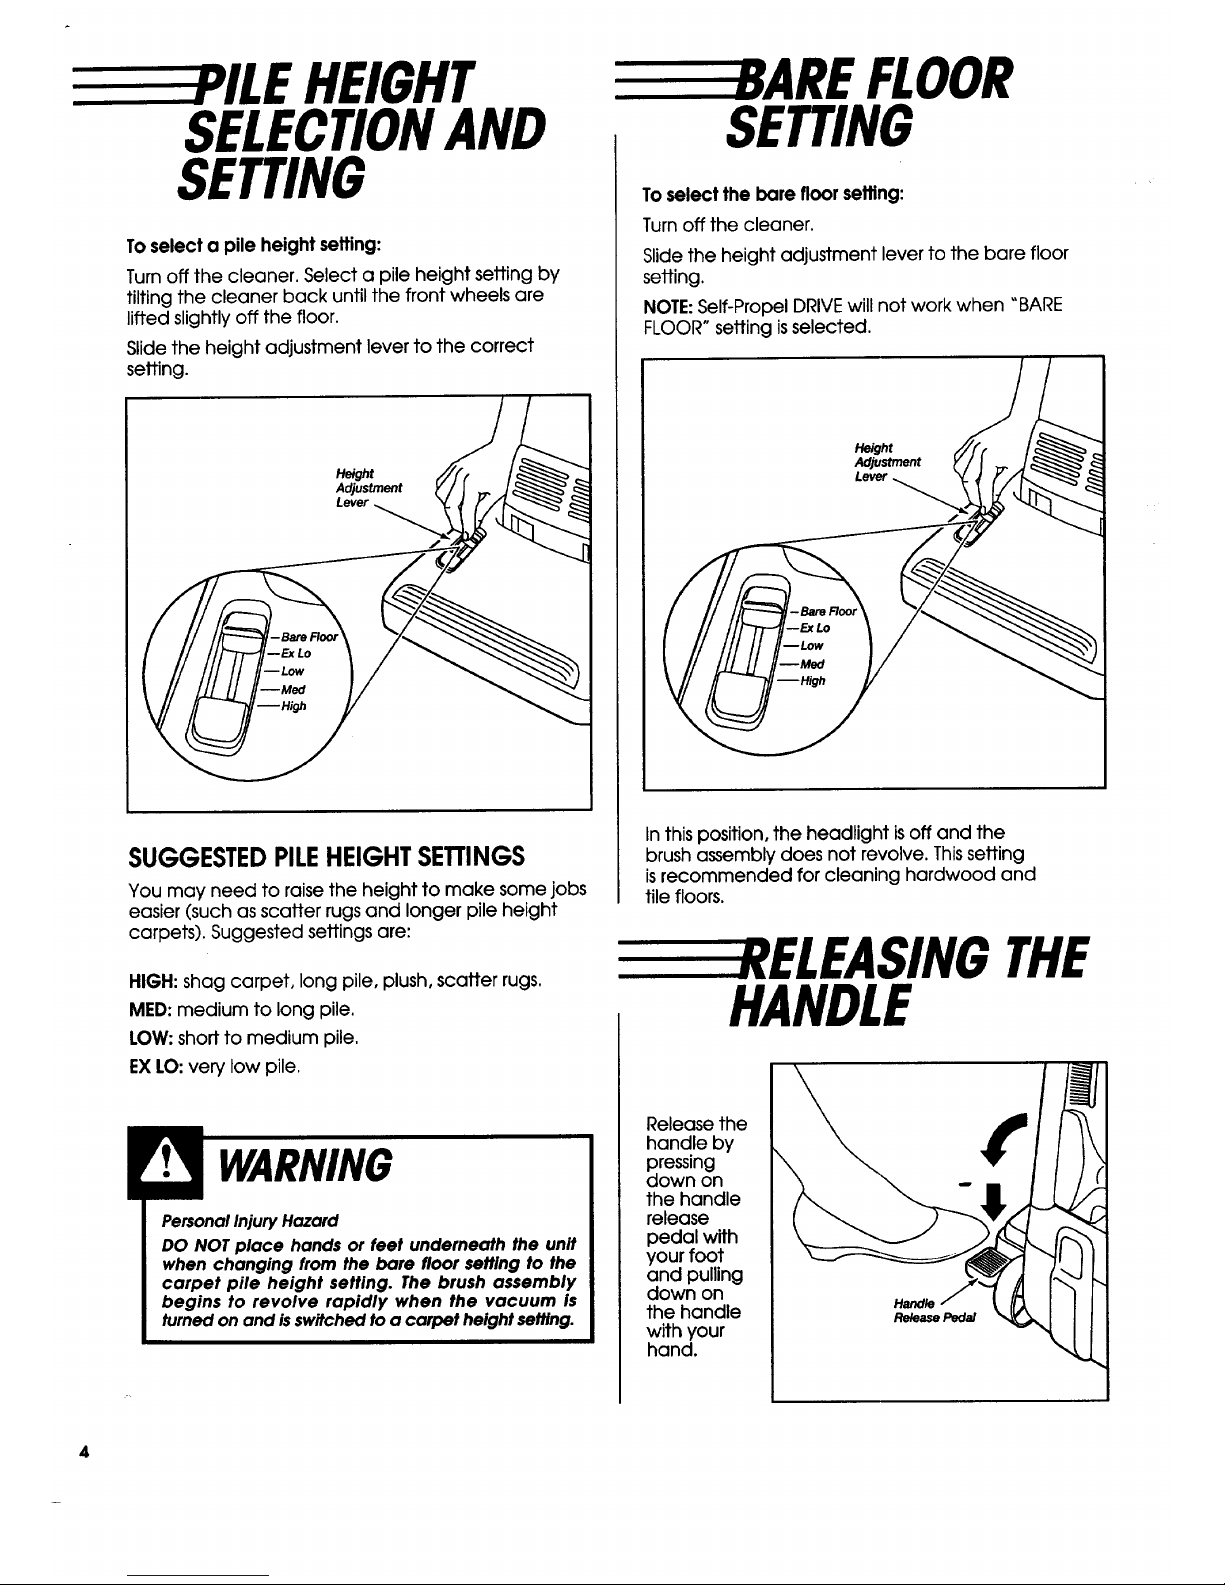
Pile Height Selection and Setting ............ 4
Bare Floor Setting ......................... 4
Releasing the Handle ...................... 4
On/Off Selection .......................... 5
Using Attachments ...................... 5-7
Vacuuming Tips ........................... 8
Performance Features .................... 8-9
VACUUM CARE ........................... 9
Vacuum Storage .......................... 9
Cleaning Exterior and Attachments .......... 9
Bag Changing ........................ 10-11
Motor Safety Filter Cleaning ................ 12
Exhaust Filter Cleaning .................... 13
Belt Changing and Brush Cleaning ....... 14-16
Clog Removal ........................... 17
Light Bulb Changing ...................... 18
Brush Servicing ........................... 19
Brush Assembly .......................... 19
TROUBLESHOOTING..................... 20
Proper assembly and safe use of your vacuum cleaner are your responsibilities. Your cleaner is
intended only for household use. The cleaner should be stored in a dry, indoor area. Read this Owner's
Manual carefully for important use and safety information.
YARRANTY
KENMOREVACUUM CLEANER
FULLONE-YEARWARRANTY
When used for private household purposes, if within
one year from the date of purchase, this vacuum
cleaner fails due to a defect in material or
workmanship, RETURN IT TO THE NEAREST SEARS
SERVICECENTER/DEPARTMENTIN THE UNITEDSTATES,
and Sears will repair it free of charge.
If this vacuum cleaner is used for commercial or
rental purposes, the above warranty coverage
applies for only 90 days from the date of purchase.
This warranty gives you specific legal rights, and
you may also have other rights which vary from
state to state.
SEARS,ROEBUCKAND CO., D/817 WA,
Hoffman Estates, IL. 60179
If you need service or parts, visit your nearest Sears
Service Center or the Service Department located at
most Sears Retail Stores. They will be able to solve
your problem and supply any needed replacement
parts. Any service needed other than described in
this Owner's Manual should be done by a Sears
authorized service representative.
How to Order Repair Parts
When requesting service or ordering parts, have the
following information available:
1.Model number.
2. Serial number.
3. Description of problem.
4. Part number.
5. Name of part.
EnglishSpeaking:
To Call Toll Free For Service:
To Call Toll Free For Parts:
Spanish Speaking:
To Call TollFree ForService:
To Call Toll Free For Parts:
(1-800-4-J_EPAIR)
(1-800-473-7247)
(1-80DFON-PART)
(1-800-366-7278)
(1-800-626-5811)
(1-800-659-7084)
SAFETYINSTRUCTIONS
To reduce the risk of fire, electrical shock, injury to persons or damage when using
your vacuum cleaner, follow basic safety precautions including the following:
Read this manual before assembling or using
your vacuum cleaner.
Use your cleaner only as described in this
manual. Use only with Sears recommended
attachments.
To reduce the risk of electrical shock - Do not
use outdoors or on wet surfaces.
Disconnect electrical supply before servicing
or cleaning out brush area. Failure to do so
could result in electrical shock or brush
suddenly starting.
Always turn cleaner off before unplugging.
Do not unplug by pullingon cord.To unplug,
graspthe plug,notthe cord.
Do not use with damaged cord or plug. If
cleaner isnot working as itshould,has been
dropped, damaged, leftoutdoors,ordropped
into water, return itto a Sears Service
Center/Department.
Do not pull or carry by cord, use cord as a
handle, close door on cord, or pull cord
around sharp edges or corners. Do not run
cleaner over cord. Keep cord away from
heated surfaces.
Do not leave cleaner when plugged in.
Unplug from outletwhen not inuse and before
servicing.
Do not allow to be used as a toy. Close
attention is necessary when used by or near
children.
Do not handle plug orcleaner withwet hands.
Do not put any objects intoopenings.
Do not use with any opening blocked;keep
freeof dust,lint,hairand anythingthat may
reduce airflow.
Keep hair, loose clothing, fingers, and all parts
of body away from openings and moving
parts.
Do not use cleaner without dust bag in place.
Always change the dust bag after vacuuming
carpet cleaners or fresheners, powders and
fine dust. These products clog the bag,
reduce airflow and can cause the bag to
burst. Failure to change bag could cause
permanent damage to the cleaner.
Do not use the cleaner to pick up sharp hard
objects,small toys,pins,paper, etc.They may
damage the cleaner or dustbag.
Do not pick up anything that isburning or
smoking, such as cigarettes,matches, or
hot ashes.
Do not use cleaner to pick up flammable or
combustible liquids (gasoline, cleaning fluids,
perfumes, etc.), or use in areas where they
may be present. The fumes from these
substances can create a fire hazard or
explosion.
Use extra care when cleaning on stairs.Do not
put on chairs,tables,etc.Keep on floor.
You are responsible for making sure that your
vacuum cleaner is not used by anyone unable
to operate it properly.
SAVETHESEINSTRUCTIONS
Proper assembly and safe use of your vacuum cleaner are your responsibilities.
Your cleaner is intended only for household use.
Read this Owner's Manual carefully for impoffant use and safety information.

AND FEATURES
It isimportant to know your vacuum cleaner parts
and features to assure its proper and safe use.
Review these before using your cleaner.
COPY YOUR MODELAND SERIAL
NUMBERSHERE.
Copy this information from the
bottom of the vacuum cleaner into
these spaces. Keep these numbers
for future reference. If you need
service or call with a question, have
this information ready:
116.
Model Number
O.
Serial Number
SELF-PROPELLED
UPRIGHTVACUUM CLEANER
Seff-Prepei
Control
OnlOff Switch
Handle Mounted ---'--1
(Some Models) _
Bag Cover
Handle
Pedal
Quick Release
Upper Cord Hook
Power Cord
Cord Hook
Carry Handle
Telescoping
Wand
Upholstery
Bag Cover
I Bag # ln U.S. #20-506881Bag # In Canada #20-50680
BareFtoor
Setting
(Some
Models)
Height Adjustment
Lever
Belt Protection
System Reset
Furniture
Guard
Clean-Out
Port Cover
Ready-to-Use
3_0° Swivel Hose
Stretch Hose
Headlight
Bulb # In U.S. #20-5240
Bulb # In Canada #20-40600
Belt
Belt # In U.S. #20-5286 I
Belt # In Canada #20-40094
I
Indicator
(SomeModels)
Base
Cover
t
Base
Modell,.ea_riei
Numbers
Brush
Assemuy
Y
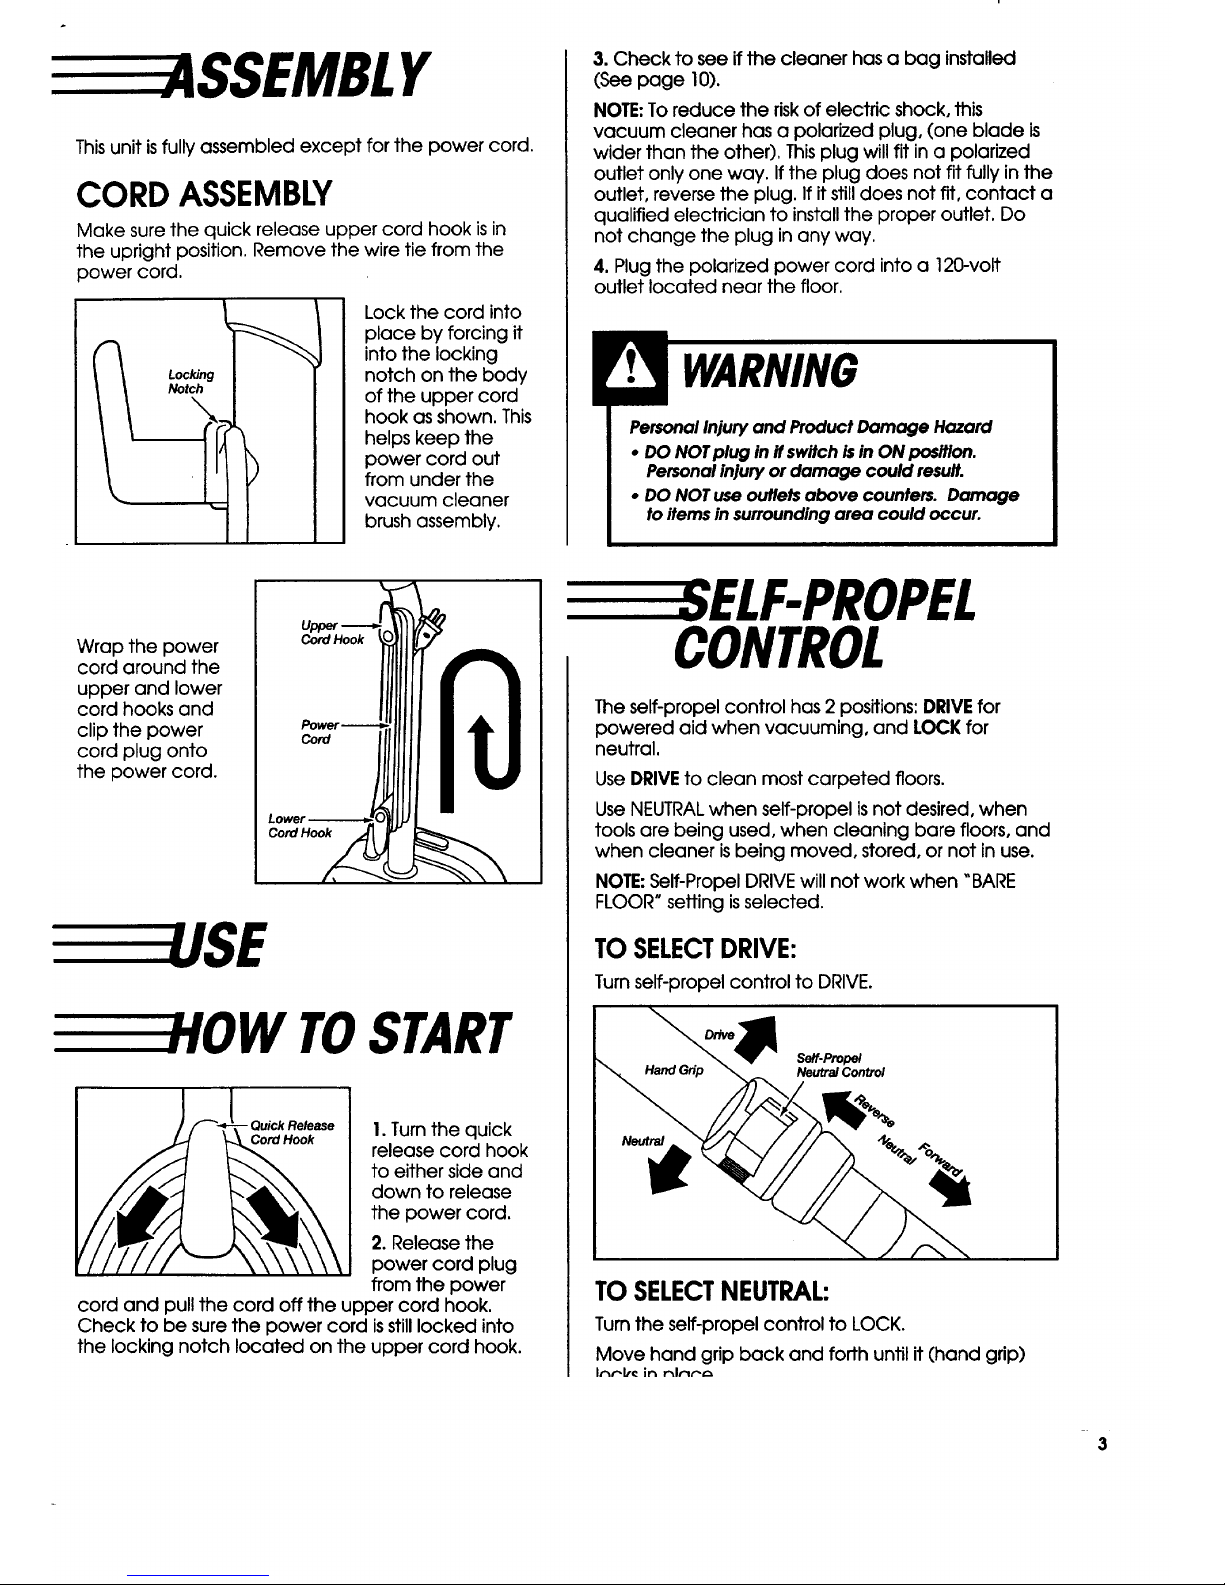
Thisunit isfully assembled except for the power cord.
CORD ASSEMBLY
Make sure the quick release upper cord hook is in
the upright position. Remove the wire tie from the
power cord.
Locking
Notch
Lock the cord into
place by forcing it
into the locking
notch on the body
of the upper cord
hook as shown. This
helps keep the
power cord out
from under the
vacuum cleaner
brush assembly.
3.Check to see ifthe cleanerhas a bag installed
(Seepage 10).
NOTE:To reduce the riskofelectricshock,this
vacuum cleanerhas a polarizedplug,(one blade is
widerthan theother).Thisplugwillfitina polarized
outletonlyone way. Iftheplugdoes notfitfullyinthe
outlet,reversethe plug.Ifitstilldoes notfit,contact a
qualifiedelectricianto installtheproper outlet.Do
not change the plug inany way.
4.Plugthepolarizedpower cord intoa 12C-volt
outletlocated nearthefloor.
Personal Injuryand Product Damage Hazard
• DO NOTplug inif switchis in ON position.
Personalinjuryor damage could result.
• DO NOTuse outletsabove counters. Damage
toitemsin surroundingarea could occur.
Wrap the power
cord around the
upper and lower
cord hooks and
clipthe power
cord plug onto
the power cord.
Cord Hook
Cord
Cord Hook
W TOSTART
- Quick Release I.Turnthe quick
Cord Hook
release cord hook
to either side and
down to release
the power cord.
2. Release the
power cord plug
from the power
cord and pull the cord off the upper cord hook.
Check to be sure the power cord is still locked into
the locking notch located on the upper cord hook.
ELF-PROPEL
CONTROL
The self-propelcontrolhas 2 positions:DRIVE for
powered aidwhen vacuuming, and LOCK for
neutral.
Use DRIVE toclean most carpeted floors.
Use NEUTRALwhen self-propel is not desired, when
tools are being used, when cleaning bare floors, and
when cleaner is being moved, stored, or not in use.
NOTE:Self-PropelDRIVE willnot work when "BARE
FLOOR" settingisselected.
TO SELECTDRIVE:
Turnself-propel control to DRIVE.
s_f-Prop_
Neutra/Contro/
TO SELECTNEUTRAL:
Turnthe self-propel control to LOCK.
Move hand grip back and forth until it (hand grip)
Ir_r-lt_in r_l_..'-,",
3
HEIGHT
SELECTIONAND
SETTING
To select a pile height setting:
Turnoffthe cleaner.Selecta pileheightsettingby
tiltingthe cleanerback untilthefrontwheels are
liftedslightlyoffthe floor.
Slidethe heightadjustmentlevertothe correct
setting.
Height
Adjustment
Lever
SUGGESTEDPILEHEIGHTSETTINGS
You may need to raisethe heightto make some jobs
easier(suchas scatterrugsand longerpileheight
carpets).Suggested settingsare:
HIGH: shag carpet,longpile,plush,scatterrugs.
MED: medium to longpile.
LOW: shortto medium pile.
EX LO:very low pile.
PersonalInjuryHazard
DO NOT place hands or feet underneath the unit
when changing from the bare floor settlng to the
carpet pile height setting. The brush assembly
begins to revolve rapidly when the vacuum is
turnedon and is switched toa carpet height setting.
FLOOR
SETTING
To selectthe barefloorseffing:
Turnoffthe cleaner.
Slidethe heightadjustmentlevertothe bare floor
setting.
NOTE: Self-PropelDRIVE willnot work when "BARE
FLOOR" settingisselected.
Height
Adjustment
Inthisposition,the headlightisoffand the
brushassembly does not revolve.Thissetting
isrecommended forcleaninghardwood and
tilefloors.
E EREL EASINGTHE
HANDLE
Release the
handle by
pressing
down on
the handle
release
pedal with
your foot
and pulling
down on
the handle
with your
hand.
Hand/e
Re/ease Peda/
4

LEVELSELECTION
ON/OFF SWITCHBODY MOUNTED
(SOMEMODELS)
To start the
vacuum cleaner,
put the switch on
the top of the
body in the ON
position. To stop
the vacuum
cleaner, put the
switch in the OFF
position.
r
Handle
HANDLEMOUNTED
(SOMEMODELS)
To staff the
vacuum cleaner,
slide the On/Off
Switch to the ON
position. Usethe
OFF position when
leaving or storing
the cleaner.
To stop the
vacuum, slide the
On/Off Switch to
the OFF position.
SING ATTACHMENTS
Identify each of the attachments shown below.
Crevice
Tool
Wand
Dusting
Brush
Upholstery
Tool --
Hose
Collar _,_
TO USEATTACHMENTS:
Remove the lower end of the stretch hose from the
cleaner by grasping the hose collar, twisting and
pulling straight up.
NOTE:Brush
assembly stops
revolving and the
headlight goes off
when hose is
removed.
Hos(
Collar
PersonalInjuryHazard
Always unplug vacuum before placing hands
near brush assembly as brush may suddenly
restart.Failureto do socould resultin injury.
5
 Loading...