

Page 1
Galaxy
Electric Range
Use & Care Guide
Cuisinière électrique
Guide d’utilisation et d’entretien
Models, Modèles
970-6011*
*
= color number, numéro de couleur*
ENGLISH
FRANÇAIS
Sears Canada Inc., Toronto,
Ontario, Canada, M5B 2B8
Visit us on the internet at: www.sears.ca
p/n 316417295 (0803)
Page 2
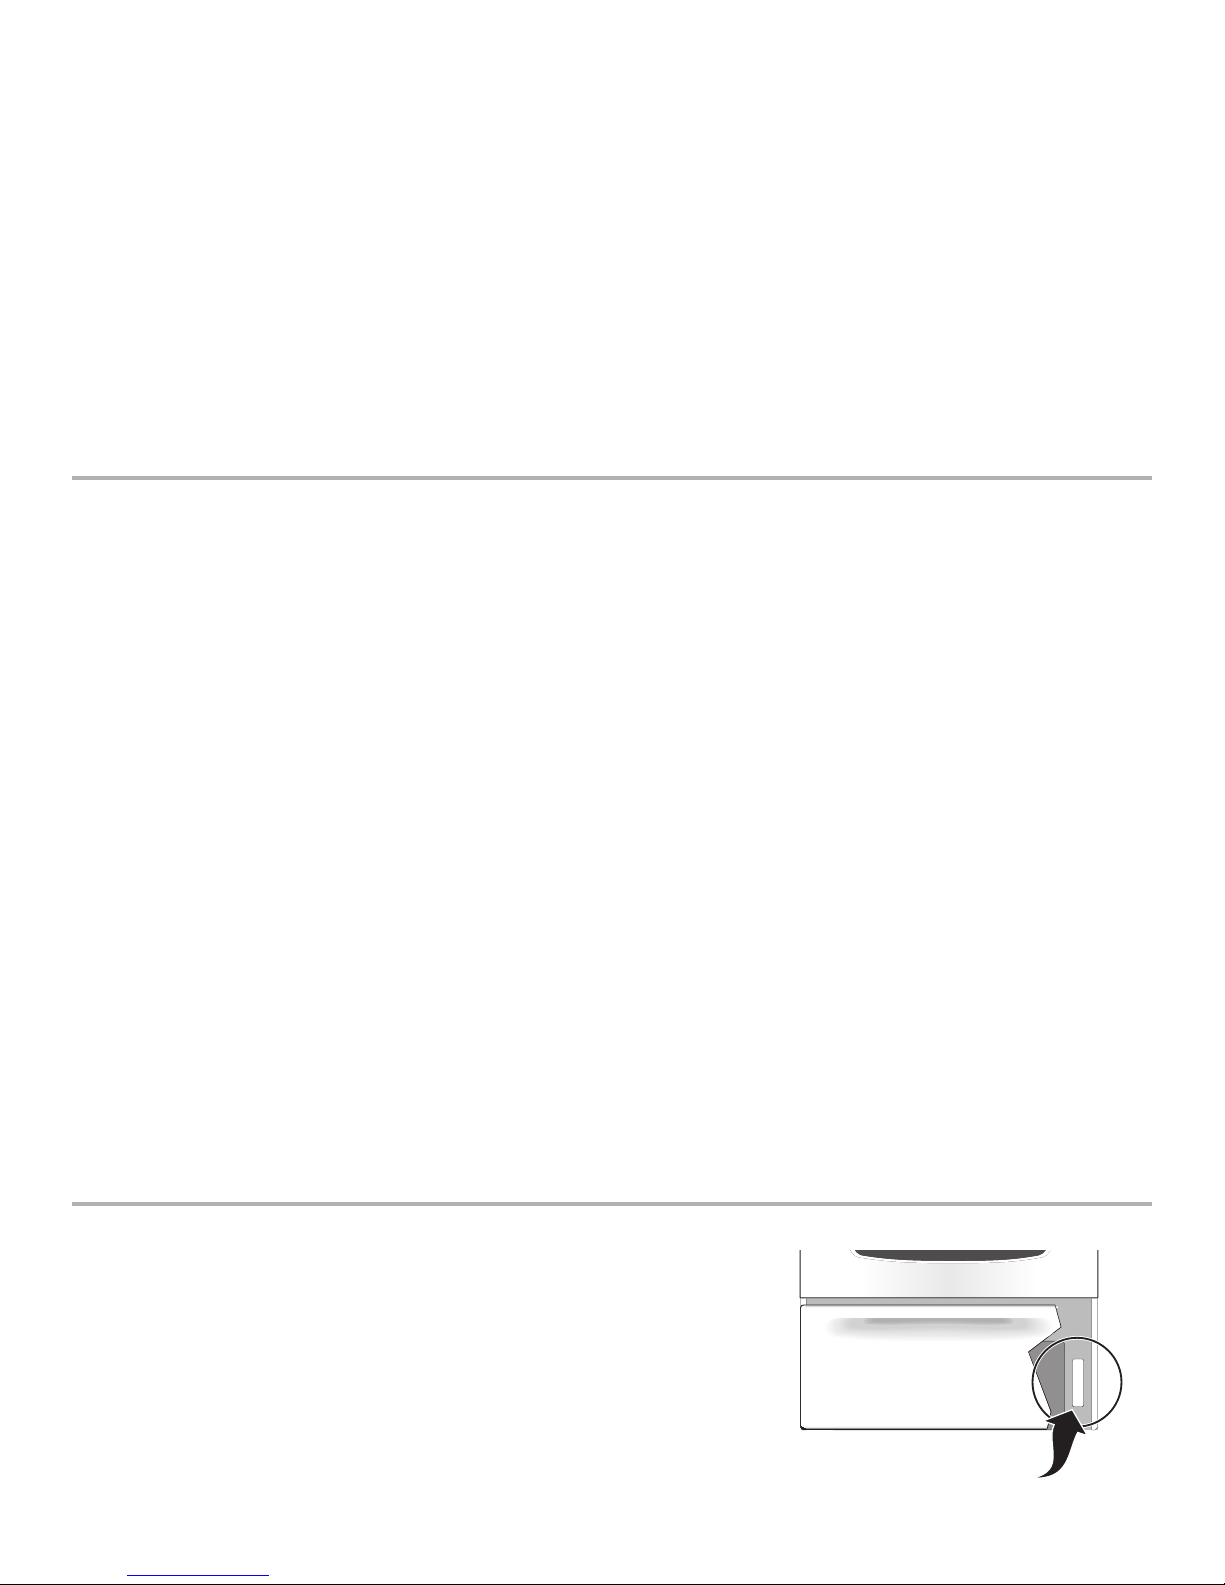
Table of Contents
Product Record
In this space below, record the date of purchase, model and
Free-Standing Range Warranty ........................................... 2
Product Record ...................................................................2
IMPORTANT SAFETY INSTRUCTIONS .......................... 3-4
Master Protection Agreements ...........................................5
Before Setting Oven Controls ...........................................6-7
serial number of your product. You will find the model and
serial number printed on an identification plate. This serial
plate is located on the right side of the oven front frame in
the storage or warmer drawer compartment. See bottom of
this page for the serial plate location.
Setting Surface Controls ..................................................... 7
Surface Cooking ................................................................. 7
Model No. _____________________________________
970-
Oven Control Functions .......................................................8
Setting Oven Controls .................................................... 8-10
Serial No. _____________________________________
Adjusting Your Oven Temperature (some models) ............. 11
General Care & Cleaning.............................................. 12-15
Date of Purchase ________________________________
Before You Make a Service Call ................................... 16-17
Sears Service .................................................... Back Cover
Save these instructions and your sales receipt for future
reference.
One Year Limited Warranty
When installed, operated and maintained according to all instructions supplied with the product, if this appliance fails due to
a defect in material and workmanship within one year from the date of purchase, call 1-800-4-MY-HOME® to arrange for free
repair. If this appliance is ever used for other than private family purposes, this warranty applies for only 90 days from the date of
purchase.
This warranty covers only defects in material and workmanship. Sears will NOT pay for:
1. Cracks in a ceramic glass cooktop that are not a result of thermal shock.
2. Stains and scratches on a ceramic glass cooktop resulting from failure to maintain it properly according to all instructions
supplied with the product.
3. Expendable items that can wear out from normal use, including but not limited to filters, belts, light bulbs, and bags.
4. A service technician to instruct the user in correct product installation, operation or maintenance.
5. A service technician to clean or maintain this product.
6. Damage to or failure of this product if it is not installed, operated or maintained according to all instructions supplied with the
product.
7. Damage to or failure of this product resulting from accident, abuse, misuse or use for other than its intended purpose.
8. Damage to or failure of this product caused by the use of detergents, cleaners, chemicals or utensils other than those recom-
mended in all instructions supplied with the product.
9. Damage to or failure of parts or systems resulting from unauthorized modifications made to this product.
Disclaimer of implied warranties; limitation of remedies
Customer’s sole and exclusive remedy under this limited warranty shall be product repair as provided herein. Implied warranties,
including warranties of merchantability or fitness for a particular purpose, are limited to one year or the shortest period allowed by
law. Sears shall not be liable for incidental or consequential damages. Some states and provinces do not allow the exclusion or
limitation of incidental or consequential damages, or limitation on the duration of implied warranties of merchantability or fitness, so
these exclusions or limitations may not apply to you.
This warranty applies only while this appliance is used in the United States or Canada.
This warranty gives you specific legal rights, and you may also have other rights which vary from state to state.
Sears, Roebuck and Co., Hoffman Estates, IL 60179
Sears Canada Inc., Toronto, Ontario, Canada M5B 2B8
Serial Plate Location
You will find the model and serial number printed on a serial plate. This
serial plate is located on the right side of the oven front frame behind the
lower panel or storage drawer compartment.
Please see the illustration at right for the exact location.
Remember to record the serial number for future reference (See top of this
page) under Product Record.
Serial plate location; remove
lower panel (on some models) or
storage drawer.
2
Page 3
Important Safety Instructions
Read all instructions before using this appliance.
Save these instructions for future reference.
This manual contains important safety symbols and instructions. Please pay attention to these symbols and follow all instructions given.
This symbol will help alert you to situations that may cause serious bodily harm, death or property damage.
This symbol will help alert you to situations that may cause bodily injury or property damage.
• Remove all tape and packaging before using the range.
Destroy the carton and plastic bags after unpacking the range.
Never allow children to play with packaging material.
• Proper Installation—Be sure your appliance is properly
installed and grounded by a qualified technician in
accordance with the National Electrical Code ANSI/NFPA No.
70 latest edition and local electrical code requirements.
Install only per installation instructions provided in the
literature package for this range.
Ask your dealer to recommend a qualified technician and an
authorized repair service. Know how to disconnect the power
to the range at the circuit breaker or fuse box in case of an
emergency.
• User servicing—Do not repair or replace any part of the
appliance unless specifically recommended in the manuals.
All other servicing should be done only by a qualified
technician. This may reduce the risk of personal injury and
damage to the range.
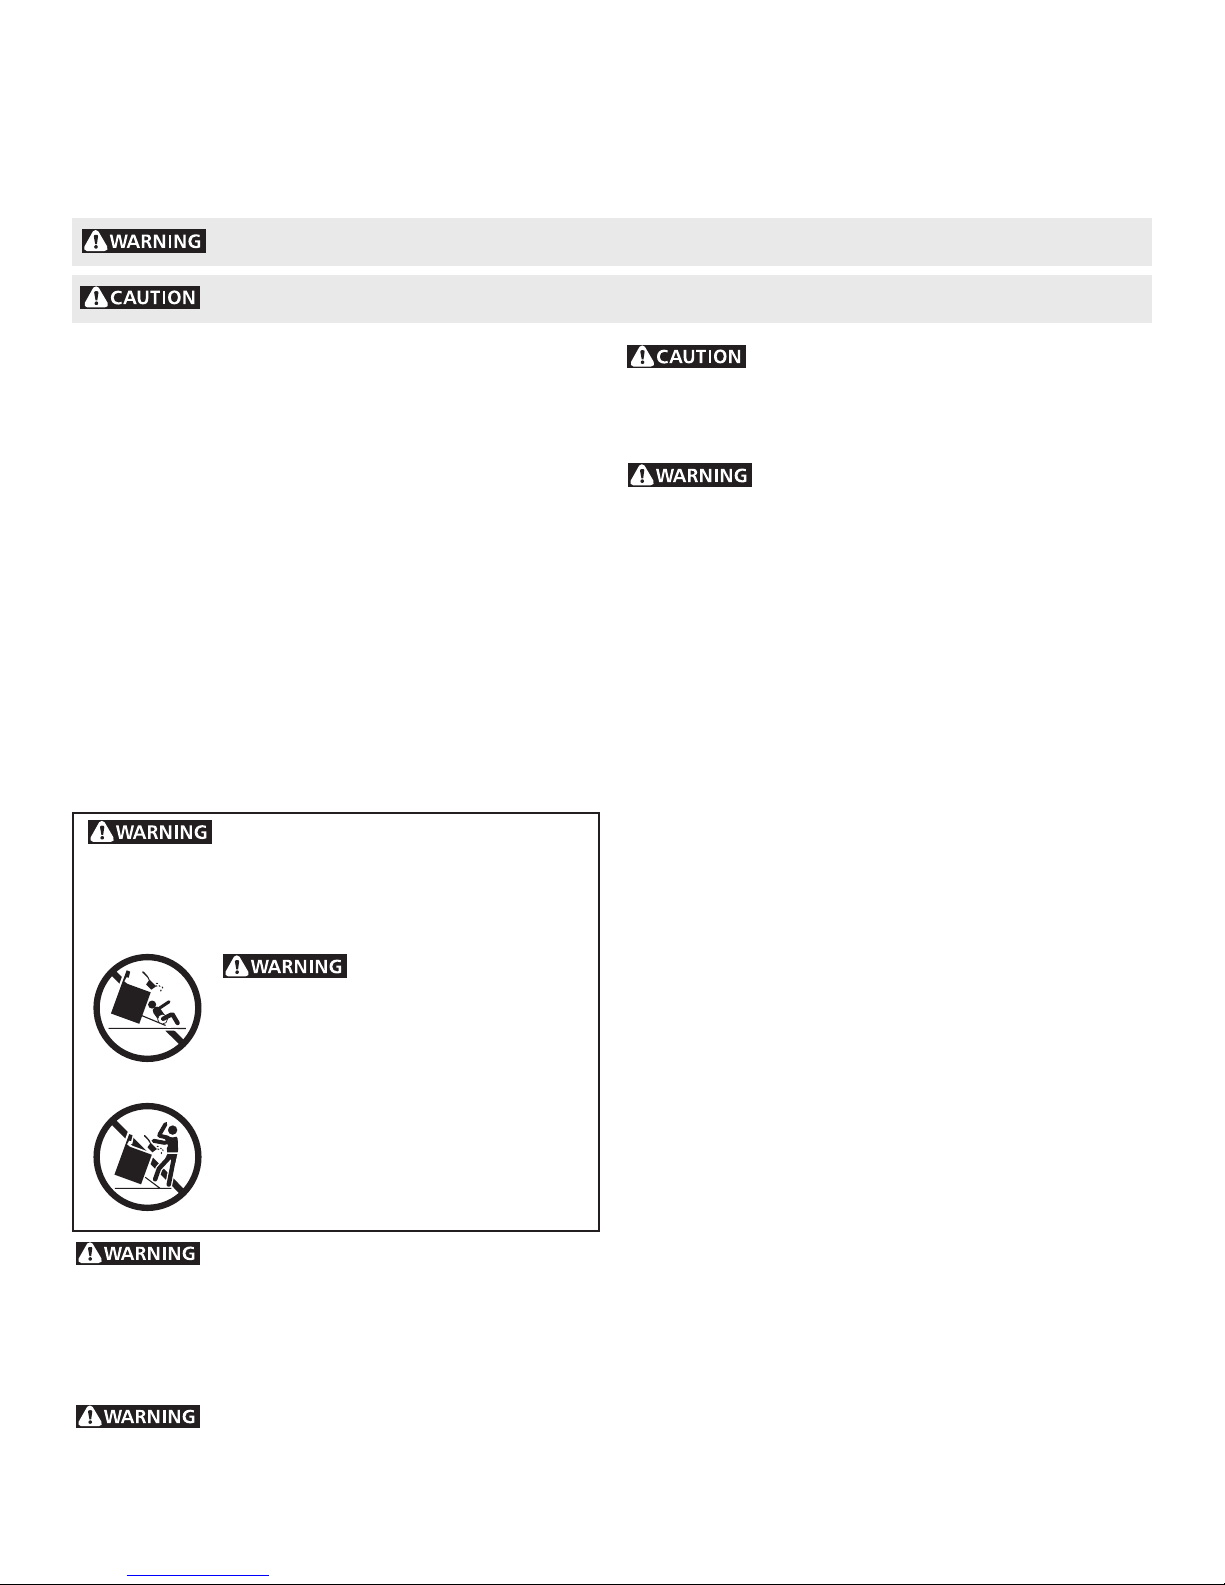
• Never modify or alter the construction of a range by
removing leveling legs, panels, wire covers, anti-tip
brackets/screws, or any other part of the product.
• All ranges can tip.
• Injury to persons could result.
• Install anti-tip device packed with range.
• See Installation Instructions.
To reduce the risk of
tipping, the range must be secured by
properly installed anti-tip bracket provided
with the range. To check if the bracket is
installed properly, visually check that rear
leveling leg is inserted into and fully secured
by the anti-tip bracket by removing lower
panel or storage drawer. For models with a
warmer drawer, grasp the top rear edge of
the range and carefully attempt to tilt it
forward. Refer to the Installation Instructions
for proper anti-tip bracket installation.
Stepping, leaning or sitting on the doors or
drawers of this range can result in serious injuries and also
cause damage to the range. Do not allow children to climb or
play around the range. The weight of a child on an open door
may cause the range to tip, resulting in serious burns or other
injury.
Do not use the oven or warmer drawer (if
equipped) for storage.
Do not store items of interest to children in
the cabinets above a range or on the backguard of a range.
Children climbing on the range to reach items could be
seriously injured.
Never Use Your Appliance for Warming or
Heating the Room.
• Storage in or on Appliance—Flammable materials should
not be stored in an oven, warmer drawer, near surface
units or in the storage drawer. This includes paper, plastic
and cloth items, such as cookbooks, plasticware and towels,
as well as flammable liquids. Do not store explosives, such
as aerosol cans, on or near the range.
• Do Not Leave Children Alone—Children should not be left
alone or unattended in the area where appliance is in use.
They should never be allowed to sit or stand on any part of the
appliance.
• DO NOT TOUCH SURFACE UNITS, AREAS NEAR THESE UNITS,
HEATING ELEMENTS OR INTERIOR SURFACES OF THE OVEN.
Both surface units and oven heating elements may be hot
even though they are dark in color. Areas near surface units
may become hot enough to cause burns. During and after
use, do not touch, or let clothing or other flammable materials
touch these areas until they have had sufficient time to cool.
Among these areas are the cook top, surfaces facing the cook
top, the oven vent openings and surfaces near these
openings, oven door and window.
• Wear Proper Apparel—Loose-fitting or hanging garments
should never be worn while using the appliance. Do not let
clothing or other flammable materials contact hot surfaces.
• Do Not Use Water or Flour on Grease Fires—Smother the
fire with a pan lid, or use baking soda, a dry chemical or
foam-type extinguisher.
• When heating fat or grease, watch it closely. Fat or grease
may catch fire if allowed to become too hot.
• Use Only Dry Potholders—Moist or damp potholders on hot
surfaces may result in burns from steam. Do not let
potholders touch hot heating elements. Do not use a towel or
other bulky cloth instead of a potholder.
• Do Not Heat Unopened Food Containers—Buildup of
pressure may cause container to burst and result in injury.
• Remove the oven door from any unused range if it is to be
stored or discarded.
IMPORTANT—Do not attempt to operate the range during a
power failure. If the power fails, always turn off the range. If the
range is not turned off and the power resumes, the range will
begin to operate again. Once the power resumes, reset the
clock and oven function.
ENGLISH
3
Page 4

Important Safety Instructions
IMPORTANT INSTRUCTIONS FOR USING
YOUR COOKTOP
• Know which knob controls each surface heating unit. Place
a pan of food on the unit before turning it on, and turn the unit
off before removing the pan.
• Use Proper Pan Size—This appliance is equipped with one
or more surface units of different sizes. Select utensils having
flat bottoms large enough to cover the surface unit heating
element. The use of undersized utensils will expose a portion
of the heating element to direct contact and may result in
ignition of clothing. Proper relationship of utensil to element
will also improve efficiency.
• Utensil Handles Should Be Turned Inward and Not Extend
Over Adjacent Surface Elements—To reduce the risk of
burns, ignition of flammable materials, and spillage due to
unintentional contact with the utensil, the handle of the utensil
should be positioned so that it is turned inward, and does not
extend over adjacent surface units.
• Never Leave Surface Elements Unattended at High Heat
Settings—Boilovers cause smoking and greasy spillovers
that may ignite, or a pan that has boiled dry may melt.
• Do Not Immerse or Soak Removable Heating Elements—
Heating elements should never be immersed in water.
Heating elements clean themselves during normal operation.
• Glazed Cooking Utensils—Only certain types of glass, glass/
ceramic, ceramic, earthenware, or other glazed utensils are
suitable for cook top service without breaking due to the
sudden change in temperature. Check the manufacturer’s
recommendations for cook top use.
• When flaming foods under a ventilating hood, turn the fan
on.
IMPORTANT INSTRUCTIONS FOR CLEANING
YOUR RANGE
• Clean the range regularly to keep all parts free of grease that
could catch fire. Pay particular attention to the area underneath
each surface element. Do not allow grease to accumulate.
• Kitchen cleaners and aerosols—Always follow the
manufacturer’s recommended directions for use. Be aware
that excess residue from cleaners and aerosols may ignite
causing damage and injury.
• Clean Ventilating Hoods Frequently—Grease should not be
allowed to accumulate on the hood or filter. Follow
manufacturer’s instructions for cleaning.
FOR CERAMIC-GLASS COOK TOP MODELS
• Do Not Cook on Broken Cook Top—If cook top should break,
cleaning solutions and spillovers may penetrate the broken
cook top and create a risk of electric shock. Contact a
qualified technician immediately.
• Clean Cook Top with Caution—If a wet sponge or cloth is
used to wipe spills on a hot cooking area, be careful to avoid
a steam burn. Some cleaners can produce noxious fumes if
applied to a hot surface.
IMPORTANT SAFETY NOTICE
The California Safe Drinking Water and Toxic Enforcement Act
requires the Governor of California to publish a list of substances
known to the state to cause cancer, birth defects or other reproductive
harm, and requires businesses to warn customers of potential
exposure to such substances.
IMPORTANT INSTRUCTIONS FOR USING
YOUR OVEN
• Use Care When Opening Oven Door or Warmer Drawer (if
equipped)—Stand to the side of the range when opening the
door of a hot oven. Let hot air or steam escape before you
remove or replace food in the oven.
• Keep Oven Vent Ducts Unobstructed. The oven vent is
located under the left rear surface element if your model is
equipped with coil elements. The oven vent is located below
the backguard for models equipped with ceramic-glass cook
tops. Touching the surfaces in this area when the oven is
operating may cause severe burns. Also, do not place plastic
or heat-sensitive items on or near the oven vent. These items
could melt or ignite.
• Placement of Oven Racks. Always place oven racks in
desired location while oven is cool. If rack must be moved
while oven is hot use extreme caution. Use potholders and
grasp the rack with both hands to reposition. Do not let
potholders contact the hot heating elements in the oven.
Remove all utensils from the rack before moving.
• Do not use the broiler pan without its insert. The broiler pan
and its insert allow dripping fat to drain and be kept away from
the high heat of the broiler.
• Do not cover the broiler insert with aluminum foil. Exposed
fat and grease could ignite.
• Protective Liners—Do not use aluminum foil to line the oven
bottom. Only use aluminum foil as recommended in this
manual. Improper installation of these liners may result in risk
of electric shock, or fire.
4
Page 5
Master Protection Agreements
Congratulations on making a smart purchase. Your new Kenmore
product is designed and manufactured for years of dependable operation.
But like all products, it may require preventive maintenance or repair from
time to time. That’s when having a Master Protection Agreement can
save you money and aggravation.
The Master Protection Agreement also helps extend the life of your new
product. Here’s what the Agreement* includes:
Parts and labor needed to help keep products operating properly
under normal use, not just defects. Our coverage goes well
beyond the product warranty. No deductibles, no functional failure
excluded from coverage – real protection.
Expert service by a force of more than 10,000 authorized Sears
service technicians, which means someone you can trust will be
working on your product.
Unlimited service calls and nationwide service, as often as you
want us, whenever you want us.
“No-lemon” guarantee – replacement of your covered product if
four or more product failures occur within twelve months.
Product replacement if your covered product can’t be fixed.
Annual Preventive Maintenance Check at your request – no extra
charge.
Fast help by phone – we call it Rapid Resolution – phone support
from a Sears representative on all products. Think of us as a “talking
owner’s manual”.
Power surge protection against electrical damage due to power
fluctuations.
$250 Food Loss Protection annually for any food spoilage that is
the result of mechanical failure of any covered refrigerator or
freezer.
Rental reimbursement if repair of your covered product takes
longer than promised.
10% discount off the regular price of any non-covered repair
service and related installed parts.
Once you purchase the Agreement, a simple phone call is all that it takes
for you to schedule service. You can call anytime day or night, or
schedule a service appointment online.
The Master Protection Agreement is a risk free purchase. If you cancel
for any reason during the product warranty period, we will provide a full
refund. Or, a prorated refund anytime after the product warranty period
expires. Purchase your Master Protection Agreement today!
Some limitations and exclusions apply. For prices and additional
information in the U.S.A. call 1-800-827-6655.
* Coverage in Canada varies on some items. For full details call
Sears Canada at 1-800-361-6665.
®
Sears Installation Service
For Sears professional installation of home appliances, garage door
openers, water heaters, and other major home items, in the U.S.A. or
Canada call 1-800-4-MY-HOME
®
.
Contrats de protection principaux
Félicitations! Vous avez fait un bon achat. Votre nouvel appareil
Kenmore
années d'utilisation sans tracas. Cependant, comme tout appareil, il peut
nécessiter un entretien préventif ou des réparations occasionnelles. C'est
pourquoi un contrat de protection principal peut vous permettre
d'épargner de l’argent et vous éviter des problèmes.
Le contrat de protection principal contribue également à prolonger la
durée de vie de votre nouvel appareil. Voici ce que couvre le contrat* :
Une fois le contrat acheté, un simple appel téléphonique suffit pour
obtenir un service de réparation. Vous pouvez téléphoner à toute heure
du jour ou de la nuit, ou prendre rendez-vous en ligne pour une
réparation.
Le contrat de protection principal est un achat sans risque. Si, pour
quelque raison que ce soit, vous annulez le contrat durant la période de
garantie du produit, vous serez remboursé en totalité. En cas
d'annulation après la période de garantie du produit, vous recevrez un
remboursement calculé au prorata. Procurez-vous votre contrat de
protection principal dès aujourd’hui!
Certaines restrictions et exclusions s'appliquent. Si vous êtes aux
États-Unis et que vous désirez connaître les prix et obtenir de plus
amples renseignements, téléphonez au 1 800 827-6655.
* Au Canada, la couverture de certains articles peut varier. Pour
connaître tous les détails, communiquez avec Sears Canada au
1 800 361-6665.
®
est conçu et fabriqué dans le but de vous offrir plusieurs
Les pièces et la main-d'oeuvre requises pour le fonctionnement
adéquat de l'appareil dans des conditions d'utilisation normales,
pas seulement pour les défauts. Notre couverture vous offre
beaucoup plus que la simple garantie du produit. Aucune
franchise, aucune exclusion de défaillance fonctionnelle, une
véritable protection.
Un service professionnel offert par une équipe de plus de 10 000
techniciens de service Sears autorisés, ce qui signifie que votre
appareil sera confié à une personne de confiance.
Des appels de service illimités et un service à la grandeur du
pays, à tout moment, aussi souvent que vous le désirez.
La garantie « anti-citron », vous assurant le remplacement de
l'appareil couvert si quatre défaillances ou plus surviennent à
l'intérieur de douze mois.
Le remplacement de l'appareil couvert s'il ne peut être réparé.
Une vérification d'entretien préventive annuelle sur demande et
sans frais.
Un service d'aide téléphonique rapide, appelé « Résolution
rapide », qui vous permet de bénéficier du soutien téléphonique
d'un représentant Sears pour tous les produits. Nous sommes
votre « guide d'utilisation parlant ».
Une protection contre les surtensions pour les dommages
électriques causés par des fluctuations électriques.
Une couverture annuelle de 250 $ pour la perte d'aliments à la
suite de toute détérioration d'aliments résultant d'une défaillance
mécanique d'un réfrigérateur ou d'un congélateur couvert.
Le remboursement de la location, si la réparation de l'appareil
couvert prend plus de temps que prévu.
Un rabais de 10 % sur le prix régulier de tout service de réparation
non couvert et les pièces installées qui en découlent.
Service d’installation Sears
Pour bénéficier du service d'installation professionnel de Sears pour
électroménagers, ouvre-portes de garage, chauffe-eau et autres
appareils domestiques importants, aux États-Unis et au Canada,
téléphonez au 1 800 4-MY-HOME.
ENGLISH
5
Page 6
Before Setting Oven Controls
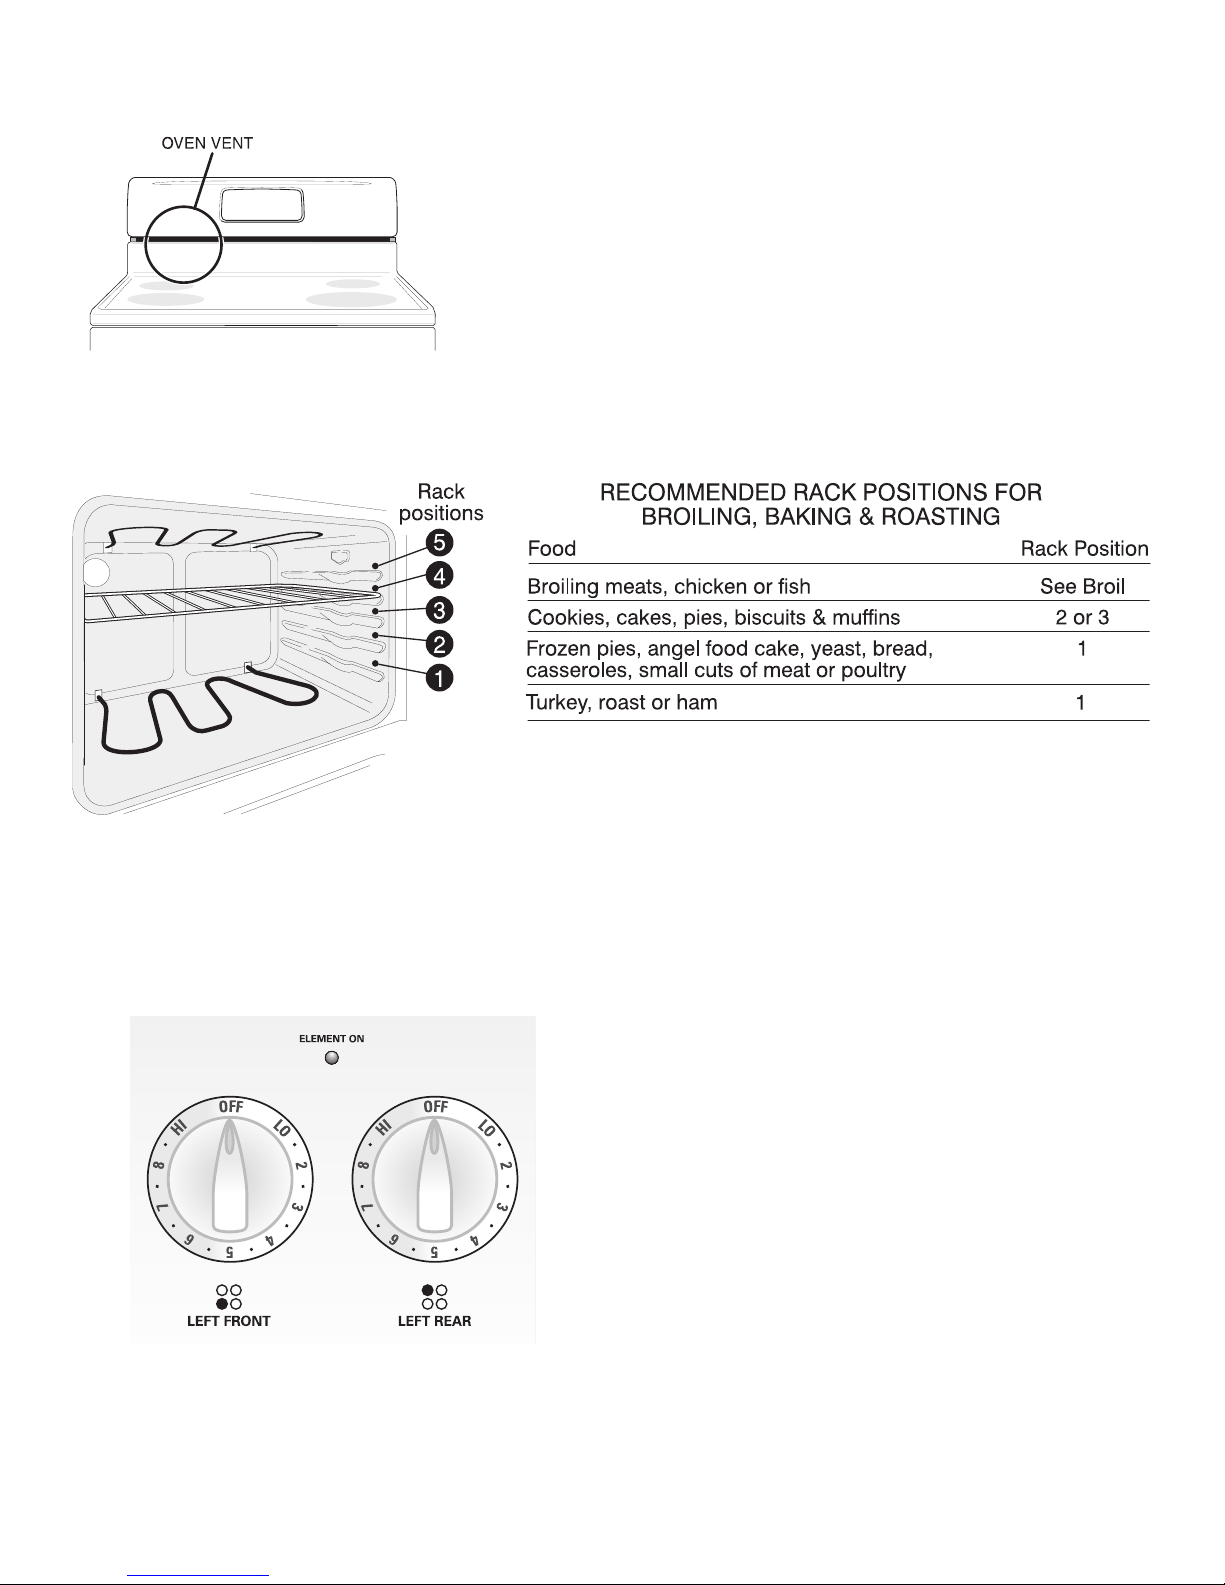
Oven Vent Location
For models equipped with ceramic cooktops, the oven vent is located under
the left rear side of the control panel. When the oven is on, warm air is
released through the vent. This venting is necessary for proper air circulation
in the oven and good baking results. DO NOT BLOCK OVEN VENT.
Arranging Oven Racks
ALWAYS ARRANGE OVEN RACKS WHEN THE OVEN IS COOL (PRIOR
TO OPERATING THE OVEN). Always use oven mitts when using the oven.
Removing & Replacing Oven Racks
To remove, pull the rack forward until it stops. Lift up front of rack and slide out. To replace, fit the rack onto the guides
on the oven walls. Tilt the front of the rack upward and slide the rack back into place.
About the Ceramic Glass Cooktop
The ceramic cooktop has radiant surface elements located below the surface of the glass. The design of the ceramic
cooktop outlines the area of the surface element underneath. Make sure the diameter of the pan matches the diameter of
the element outline on the cooktop. Heat is transferred up through the surface of the cooktop to the cookware. Only flatbottomed cookware should be used. The type and size of cookware, the number of surface elements in use and their
settings, are all factors that will affect the amount of heat that will spread to areas beyond the surface elements. The areas
surrounding the elements may become hot enough to cause burns.
About the Radiant Surface Elements
The element temperature rises gradually and evenly. As the
temperature rises, the element will glow red. To maintain the
selected setting, the element will cycle on and off. The heating
element retains enough heat to provide a uniform and consistent
heat during the off cycle. The ceramic fixture thermally insulates the
heating element, concentrating heat in the heating zone. For
efficient cooking, turn off the element several minutes before cooking
is complete. This will allow residual heat to complete the cooking
process.
NOTE: Please read detailed instructions for ceramic glass cooktop
cleaning in the General Care & Cleaning and Before You Call
checklist sections of this Use & Care Guide.
NOTE: Radiant elements have a limiter that allows the element to cycle on and off, even at the HI setting. This helps to
prevent damage to the ceramic smooth top. Cycling at the HI setting is normal and can occur if the cookware is too small
for the radiant element or if the cookware bottom is not flat.
6
Page 7
Before Setting Oven Controls
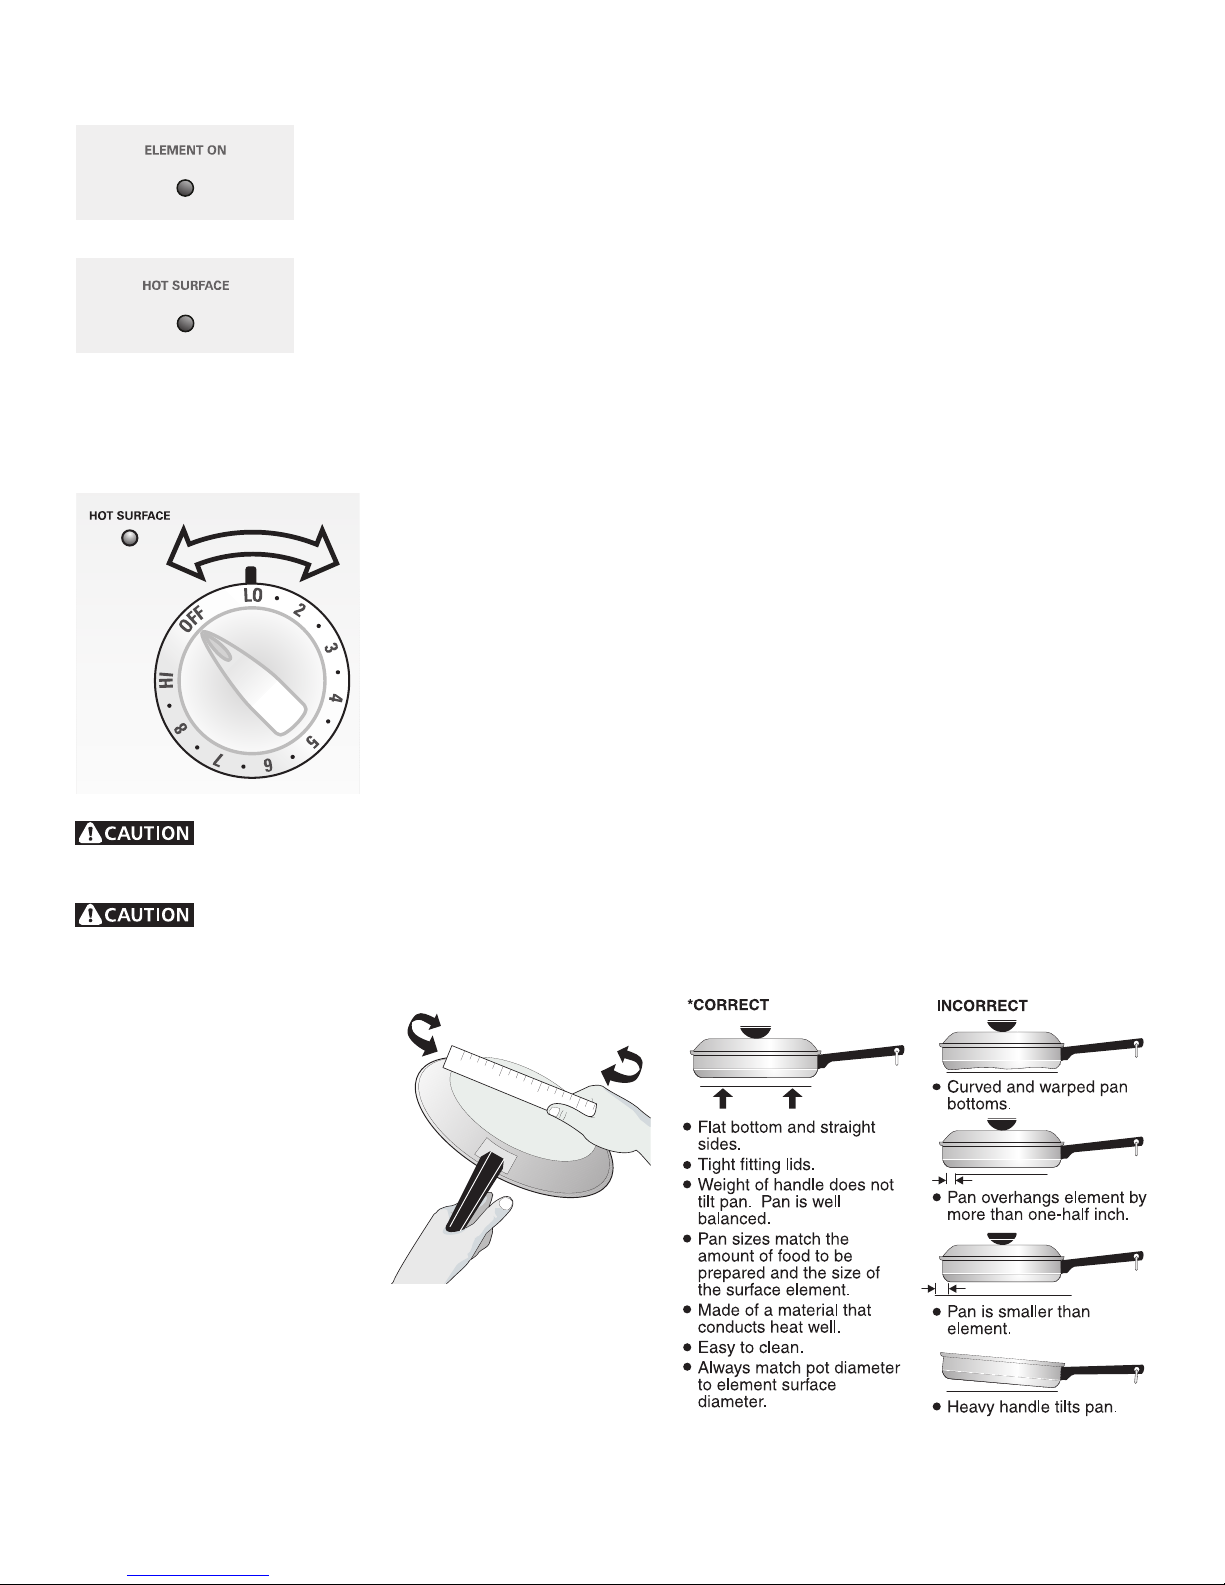
Element ON and Hot Surface Indicator Lights
Your range is equipped with two different surface control lights that will glow on your
range— the Element On indicator light and a Hot Surface indicator light.
The Element On located on the control panel, will glow when any surface element is
turned on. A quick glance at this light after cooking is an easy check to be sure all
surface controls are turned off.
The Hot Surface indicator light, located on the control panel, will glow as the surface
cooking area heats up and will REMAIN ON until the glass cooktop has cooled to a
MODERATE level.
Setting Surface Controls
To Operate Single Radiant
1. Place correctly sized cookware on the radiant surface element.
Surface Elements
2. Push in and turn the surface control knob in either direction to the desired setting.
Start most cooking operations on a higher setting and then turn to a lower setting
to finish cooking. The surface control knobs do not have to be set exactly on a
particular mark. Use the marks as a guide and adjust the control knob as needed.
Each surface element provides a constant amount of heat at each setting. A
glowing red surface heating area extending beyond the bottom edge of the
cookware indicates the cookware is too small for the surface heating area.
3. When cooking is completed, turn the surface element off before removing the
cookware. Note: the Element On indicator light will glow when one or more
elements are turned on. A quick glance at the indicator light(s) when cooking is
finished is an easy check to be sure all control knobs are turned off. The Hot
Surface indicator light will continue to glow AFTER the control knob is turned to
the “Off” position and will glow until the heating surface area has cooled sufficiently.
Radiant surface elements may appear to have cooled after they have been turned off. The glass surface
may still be hot and burns may occur if the glass surface is touched before it has cooled sufficiently.
Do not place plastic items such as salt and pepper shakers, spoon holders or plastic wrappings on
top of the range when it is in use. These items could melt or ignite. Potholders, towels or wooden spoons could catch
fire if placed too close to the surface elements.
ENGLISH
Surface Cooking
Using proper cookware
Cookware should have flat
bottoms that make good contact
with the entire surface heating
element. Check for flatness by
rotating a ruler across the bottom
of the cookware (See Fig.1).
Be sure to follow the
recommendations for using
cookware as shown in Fig. 2.
Note: The size and type of cookware used will influence the setting
needed for best cooking results.
Deep fat frying - Use a thermometer and adjust the surface
control knob accordingly. If the fat is too cool, the food will absorb
the fat and be greasy. If the fat is too hot, the food will brown so
quickly that the center will be undercooked. Do not attempt to deep
fat fry too much food at once as the food will neither brown or cook
properly.
Fig. 1
Fig. 2
7
Page 8
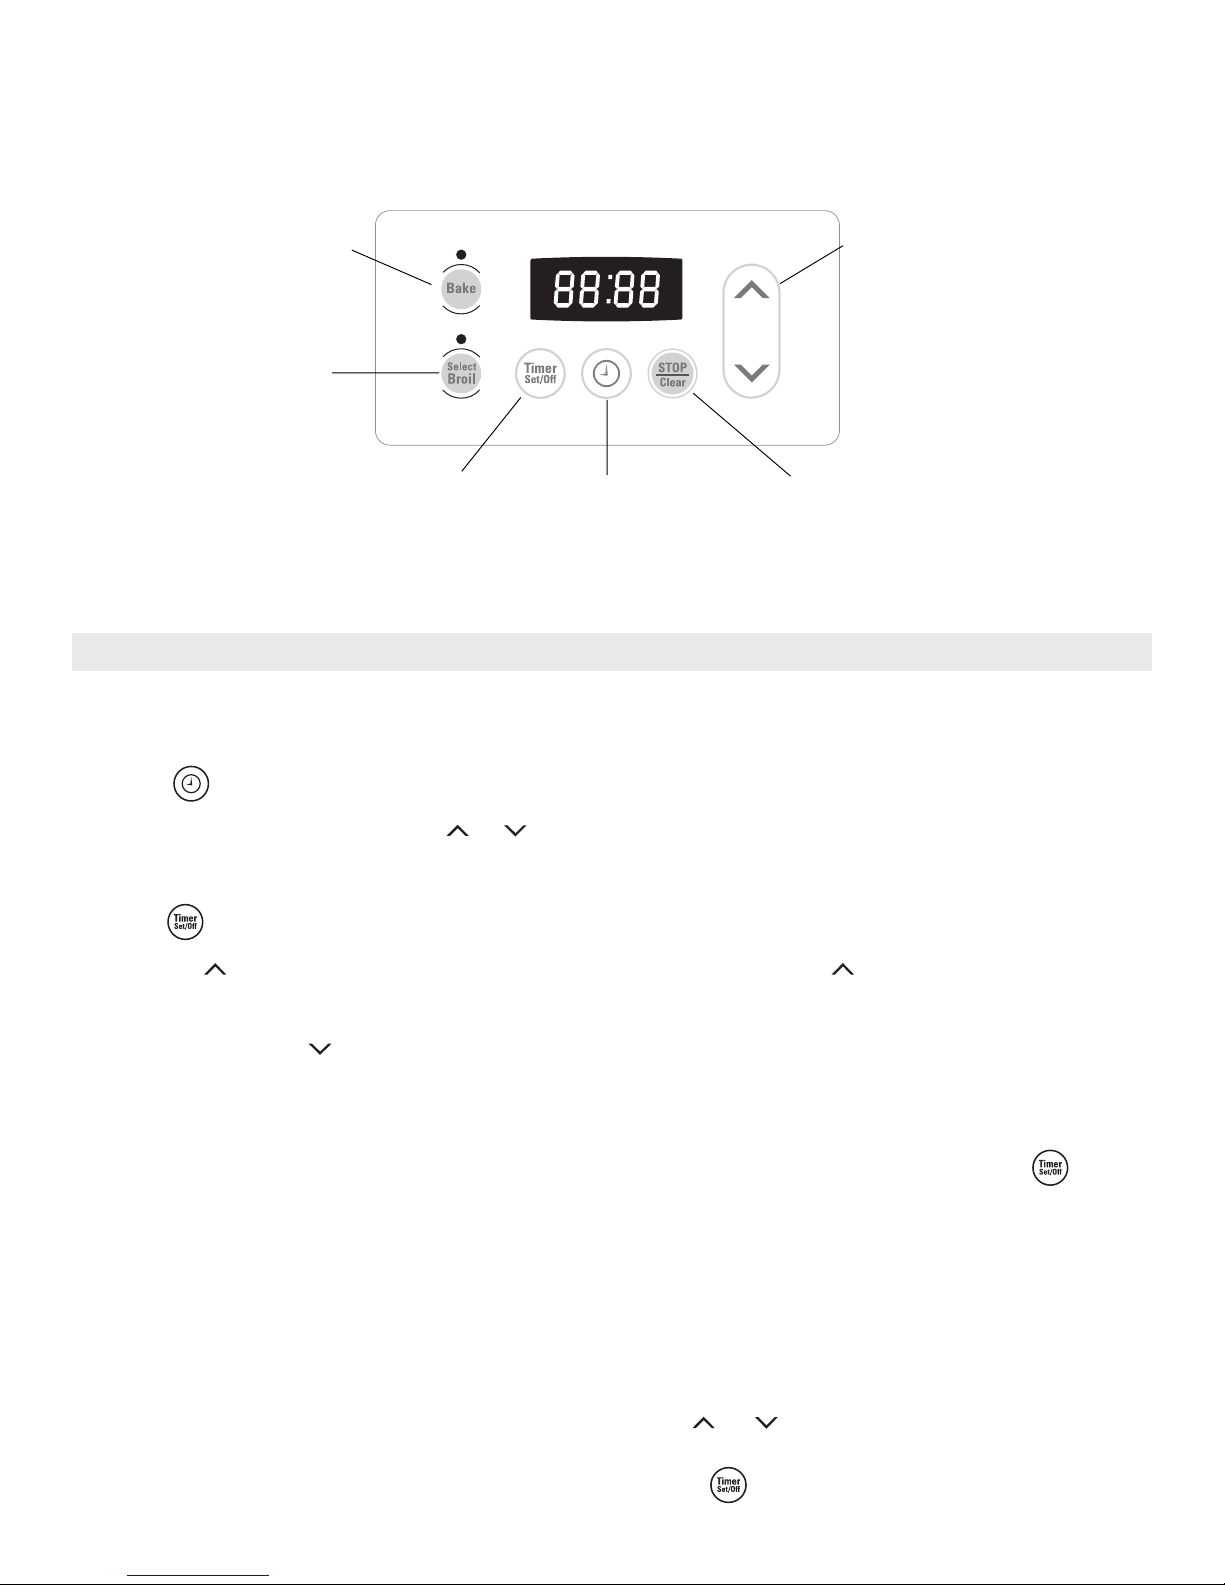
Oven Control Functions
READ THE INSTRUCTIONS CAREFULLY BEFORE USING THE OVEN. For satisfactory use of your oven, become familiar with
the various functions of the oven as described below.
UP & DOWN ARROW PADS—
BAKE PAD—Used to
select the bake
function.
SELECT BROIL PAD—
Used to select the
variable broil feature.
Used along with the function
pads to select oven
temperature, time of day,
clean time and minute timer.
TIMER ON/OFF PAD— Used to set or
cancel the minute timer. The minute
timer does not start or stop cooking.
CLOCK SET PAD—
Used to set the
time of day.
STOP/CLEAR — Used to clear
any function previously entered
except the time of day and
minute timer. Press STOP/
CLEAR to stop cooking.
Setting Oven Controls
Note: The time of day must first be set in order to operate the oven.
To Set the Clock
When the range is first plugged in, or when the power supply to the range has been interrupted, the display will flash
"12:00".
1. Press .
2. Within 5 seconds, press and hold the or until the correct time of day appears in the display.
To Set the Minute Timer:
1. Press .
2. Press the to increase the time in one minute increments. Press and hold the to increase the time in 10
minute increments. The timer can be set for any amount of time from 1 minute to 11 hours and 59 minutes.
Note: If you press the first, the timer will advance to 11 hours and 59 minutes.
3. The display shows the timer count down in minutes until one minute remains. Then the display will count down in
seconds.
4. When the set time has run out, the timer will sound a 3 second beep. 0:00 will appear in the display until is
pressed.
Note: While the minute timer is counting down, the “:” will flash. The minute timer does not start or stop cooking. It serves
as an extra timer in the kitchen that will beep when the set time has run out. The minute timer can be used alone or during
any of the other oven functions. When the minute timer is in use with any other function, the minute timer will be shown in
the display. To view other functions, press the pad for that function.
To Change the Minute Timer while it is in use:
While the timer is active and shows in the display, press and hold the or to increase or decrease the time.
To Cancel the Minute Timer before the set time has run out: Press .
8
Page 9

Setting Oven Controls
Changing the Temperature Display Mode (some models)
The electronic oven control temperature display mode was factory preset to display (Fahrenheit) °F oven tempertaures.
Note: Oven cooking temperatures may be set from 170°F to 500°F (77°C to 260°C).
To change the Temperature Display Mode to °C (Celsius) or from °C to °F (do not use Bake or Broil while changing
the Temperature Display Mode):
FF
1. Press & hold the
show the current Temperature Display Mode whether set for
2. Press the
(Celsius) °C mode.
3. After 5 seconds, the display will flash. To accept the change, wait 5 more seconds until the oven control beeps once.
To complete the change skip step 4 below, OR;
4. If at any time during the process of changing the Temperature Display Mode (
key pad once to choose the (Fahrenheit) °F mode; or press the key pad once to choose the
key pad for 6-8 seconds until
CC
F or
C appears in the display. Note: At this time the display will
FF
CC
FF
C C
F or
C .
FF
C C
FF
CC
F or
) you decide the change is not
C
FF
CC
desired, press the
5. The control will beep once. The display will then return to the time of day with any temperature display mode change
you may have requested.
key pad before the oven control beeps once to cancel the process.
To Set or Change the Temperature for Baking
The oven can be programmed to bake at any temperature from 170°F to 500°F.
To Set the Controls for Baking:
1. Press . "— — —°" appears in the display.
2. Within 5 seconds, press the or . The display will show "350°F." By pressing and holding the or , the
temperature can then be adjusted in 5°F increments.
3. When the or is released, the oven will begin heating to the selected temperature. When the displayed
temperature reaches the desired baking temperature, the control will beep one (1) time.
4. To cancel the baking function, press .
To Change the Oven Temperature after Baking has Started:
1. Press and make sure the bake temperature is displayed.
ENGLISH
2. Press the or to increase or decrease the set temperature.
9
Page 10
Setting Oven Controls
Should an oven fire occur,
close the oven door and turn off the oven.
If the fire continues, use a fire
extinguisher. DO NOT put water or flour
on the fire. Flour may be explosive.
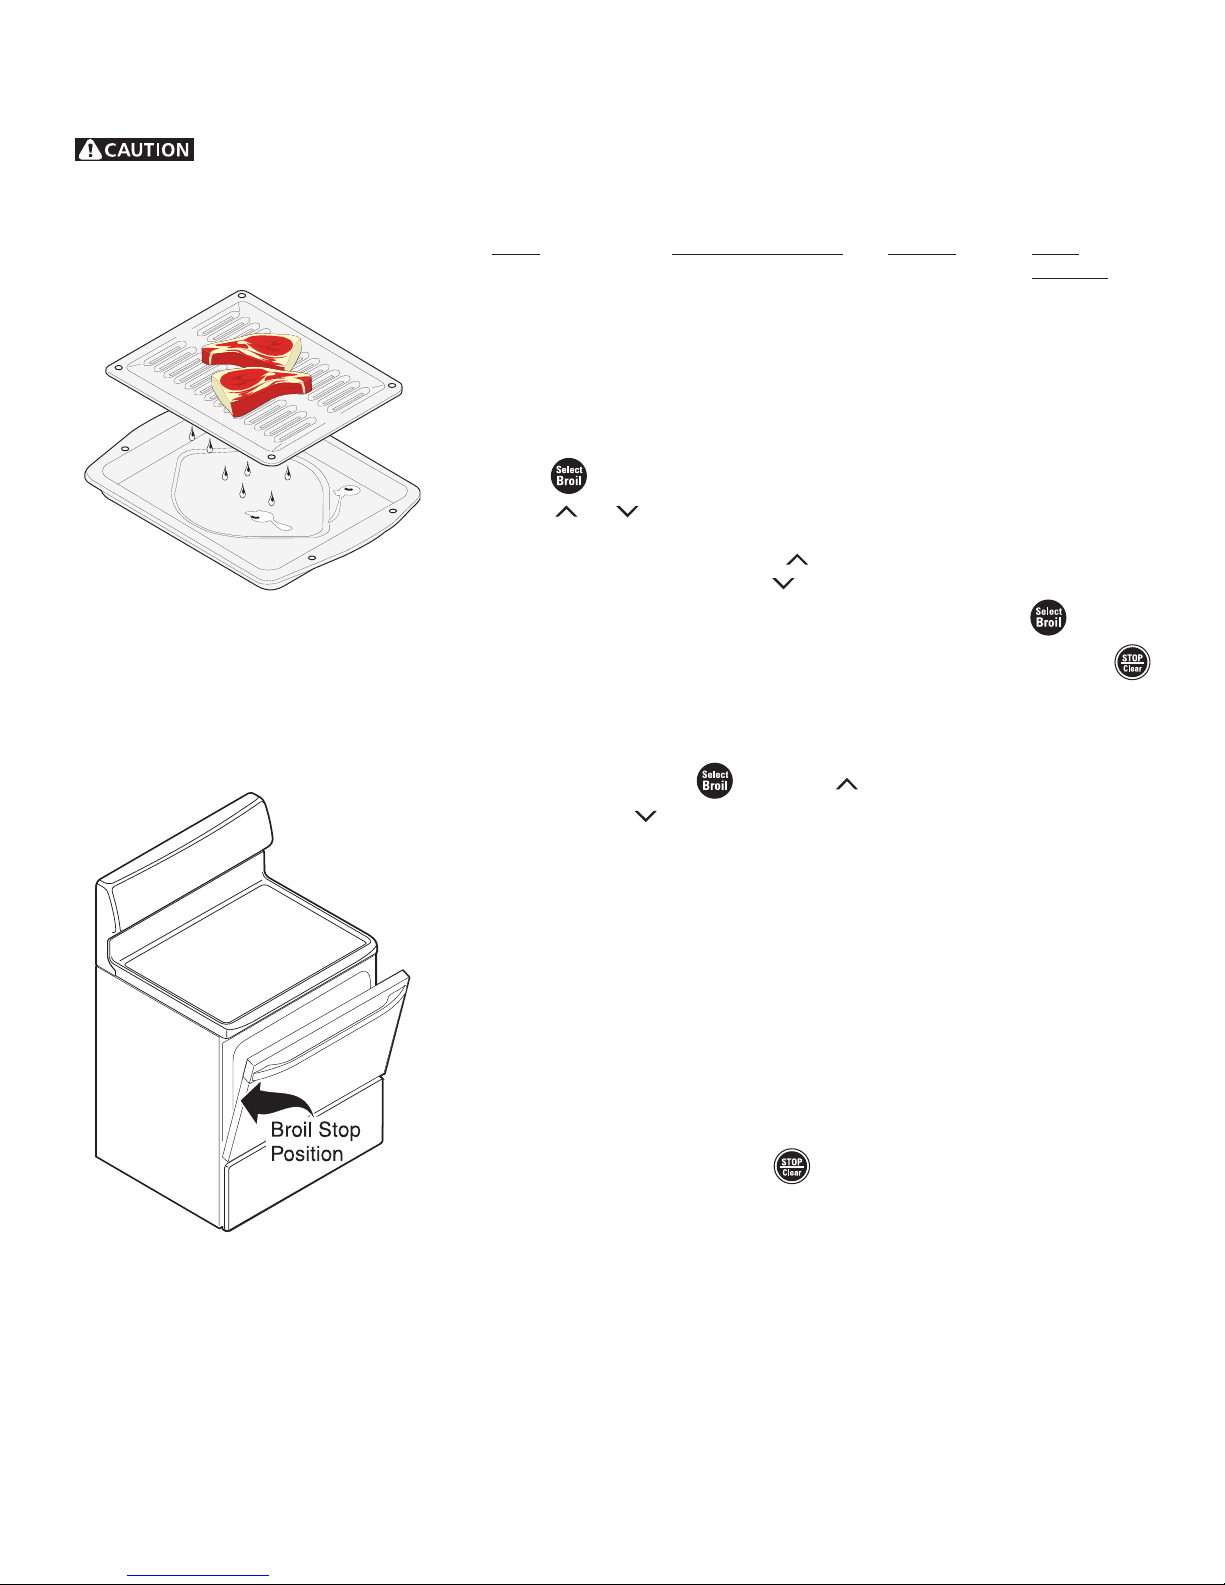
The broiler pan and the insert (some
models) allows grease to drain and be
kept away from the high heat of the
broiler. DO NOT use the pan without the
insert. DO NOT cover the insert with foil;
the exposed grease could ignite.
To Broil:
1. Arrange the oven rack while oven is still cool. Position the rack and adjust the
Broil settings as suggested in the chart provided below:
Food Desired Doneness Setting Rack
Position
Steak Medium Hi 5th
Medium-Well Normal 5th
Hamburger patties Well Hi 4th
Pork chops Well Normal 4th
Chicken Well Lo 4th
Fish Well Lo 4th
2. Press . “ - - ” will appear in the display.
3. Press or once to Broil with a normal setting (nor will appear in the
display).
4. To Broil with a high setting press twice (hi will appear in the display). To
Broil with a low setting press the arrow twice (lo will appear in the display).
5. The oven is properly set for Broil when the indicator light over the pad stops
flashing and glows steady. Broil may be canceled at anytime by pressing
at anytime.
Note: The Broil level setting may be changed anytime while broiling. To
change the level press and press one time for each increment of
higher levels or for each desired lower level increment. Select the lo
broil setting to avoid excess browning or drying of foods that should be
broiled to the well-done stage.
6. Place the insert on the broil pan, then place the food on the insert (some
models). DO NOT use the broiler pan without the insert or cover the insert
with aluminum foil. The exposed grease could ignite.
7. Place the pan on the oven rack. Open the oven door to the broil stop
position when broiling (see illustration).
8. Broil on one side until food is browned; turn and cook on the 2nd side.
Note: Always pull the oven rack out to the stop position before turning or
removing food.
9. When broiling is finished, press .
10. When removing broiler pan from the oven always use pot holders.
10
Page 11

Adjusting Your Oven Temperature (some models)
Your new oven has been factory calibrated and tested to ensure an accurate baking temperature. For the first few uses, follow
your recipe times and temperature recommendations carefully. If you feel your oven is too hot or too cool from your baking
experience, the oven temperature may be adjusted to your liking.
Note: DO NOT adjust your oven temperature based on oven thermometers, such as those found in grocery stores, they may
not be accurate.
To Adjust the Oven Temperature (do not use Bake or Broil while adjusting the oven temperature):
1. Press & hold the
Note: If the oven temperature has been previously adjusted from the factory setting, the current temperature adjusted value
will flash in the display instead.
2. You may increase the oven temperature in 5°F increments with each press of the key pad to a maximum oven adjustment
of +35°F. You may also adjust the oven temperature downward in 5°F increments with each press of the key pad ( total
range of for (Celsius) °C, see Changing the Temperature Display Mode in the Oven Control Functions section of this Use & Care
Manual.
3. If no other key pad is pressed after 5 seconds the display will begin to flash.
4. If you do not want to keep the display adjustment, press the key pad before the oven control beeps. This will cancel
the temperature adjustment procedure. To start this procedure over again begin with step 1 above OR;
5. If you want to keep the adjustment, wait until the display quits flashing and the oven control beeps once.
6. The oven temperature adjustment has be accepted by the oven control and the display will return to the time of day.
Notes: The oven temperature adjustment may be made if your oven control has been set to operate in the (Celsius) °C
Temperature Display Mode. In this case each press of the or key will adjust in 1°C increments upward (maximum
+18°C) or downward (maximum -18°C), depending on which arrow key pad is pressed.
3535
35 to +
3535
key pad and release after the display begins flashing the factory temperature change of
35 35
35 ). Note: Your oven control was factory set in the (Fahrenheit) °F Temperature Display Mode. To change
35 35
0000
00.
0000
ENGLISH
11
Page 12

General Care & Cleaning
Cleaning Table
Surfaces
Glass, Painted
Plastic Body Parts &
Control Knobs
Painted Control
Panels & Display
areas
Cooktop Surface,
Broiler Pan & Insert
(some models),
Broiler Drawer (some
models), Door Liner &
Oven Bottom
Oven Racks
Oven Door
How to Clean
For general cleaning, use a soft cloth, clean with mild dish detergent & water or a 50/50 solution
of vinegar & water. Follow by rinsing the area with clean water; dry & polish with a soft cloth.
Glass cleaners may be used if sprayed on a soft cloth. DO NOT spray liquids directly on the
control pad and display areas. DO NOT use large amounts of water on the control panel - excess
water on the control area may cause damage to the appliance. DO NOT use other liquid
cleaners, abrasive cleaners, scouring pads, or some paper towels - they will damage the finish.
Before cleaning the control panel, turn all controls to OFF & remove the control knobs. To
remove, pull each knob straight off the shaft. Use the general cleaning instructions provided in the
paragraph above.
Gentle scouring with a soapy scouring pad will remove most spots. Rinse with a 1:1 solution of
clean water & ammonia. If necessary, cover difficult spots with an ammonia-soaked paper towel
for 30 to 40 minutes. Rinse with clean water and a damp cloth, then scrub with a soap-filled
scouring pad. Rinse & wipe dry with a clean cloth. Remove all cleaners or the porcelain may
become damaged during future heating. DO NOT use spray oven cleaners on the range top.
Remove oven racks. See "Removing & Replacing Oven Racks" under Before Setting Oven
Controls. Use a mild, abrasive cleaner, following the cleaner’s recommendations. Rinse with
clean water & let dry. After cleaning the racks, rub the sides of the racks with wax paper or a
cloth containing a small amount of salad oil (this will make the racks glide easier into the oven
rack positions).
Use soap & water to thoroughly clean the top, sides & front of the oven door. Rinse well. You
may use a glass cleaner on the outside glass of the oven door. DO NOT immerse the door in
water. DO NOT spray or allow water or the glass cleaner to enter the door vents. DO NOT
use oven cleaners, cleaning powders or any harsh abrasive cleaning materials on the outside of
the oven door. DO NOT clean the oven door gasket. The oven door gasket is made of a woven
material, on Self-Cleaning models, which is essential for a good seal. Care should be taken not
to rub, damage or remove this gasket.
Stainless
Steel (some models)
Ceramic Cooktop
Clean stainless steel with hot soapy water & a dishcloth. Rinse with clean water and a cloth.
DO NOT use cleaners with high conecentrations of chlorides or chlorines. DO NOT use harsh
scrubbing cleaners. Only use kitchen cleaners that are especially made for cleaning stainless
steel. Always be sure to rinse the cleaners form the surface as bluish stains may occur during
heating that cannot be removed.
See Cooktop Cleaning & Maintenance in the General Care & Cleaning section.
12
Page 13

General Care & Cleaning
Cooktop Cleaning & Maintenance
Consistent and proper cleaning is essential to maintaining your ceramic glass cooktop.
Prior to using your cooktop for the first time, apply the recommended CookTop® Cleaning Creme to the ceramic surface
(on the web visit www.sears.com for replacement cooktop cleaner, item number 40079). Buff with a non-abrasive cloth
or no-scratch cleaning pad. This will make cleaning easier when soiled from cooking. The special cooktop cleaning cream
leaves a protective finish on the glass to help prevent scratches and abrasions.
Sliding aluminum or copper clad bottom pans on the cooktop can cause
metal markings on the cooktop surface. These marks should be removed
immediately after the cooktop has cooled using the cooktop cleaning
cream. Metal marks can become permanent if not removed prior to future
use.
Cookware (cast iron, metal, ceramic or glass) with rough bottoms can
mark or scratch the cooktop surface. Do not slide anything metal or
glass across the cooktop. Do not use your cooktop as a cutting board or
work surface in the kitchen. Do not cook foods directly on the cooktop
surface without a pan. Do not drop heavy or hard objects on the glass
cooktop, they may cause it to crack.
ENGLISH
Cleaning Recommendations for the Ceramic Glass Cooktop
Before cleaning the cooktop, be sure the controls are turned to OFF and the cooktop is COOL.
DO NOT use a cooktop cleaner on a hot cooktop. The fumes can be hazardous to your health, and can
chemically damage the ceramic-glass surface.
For light to moderate soil:
Apply a few drops of CookTop® Cleaning Creme directly to the cooktop. Use a paper towel or use a non-abrasive plastic
type no-scratch cleaning pad to clean the entire cooktop surface. Make sure the cooktop is cleaned thoroughly, leaving no
residue.
For heavy, burned on soil:
Apply a few drops of CookTop® Cleaning Creme directly to the soiled area. Rub the soiled area using a non-abrasive
plastic type no-scratch cleaning pad, applying pressure as needed. Do not use the pad you use to clean the cooktop for
any other purpose.
If soils remain, carefully scrape soils with a metal razor blade scraper, holding
scraper at a 30 degree angle to the surface. Remove loosened soils with
cooktop cleaning cream and buff surface clean.
IMPORTANT NOTE: Damage to the ceramic glass cooktop may occur if you
use an abrasive type cleaning pad. Only use cleaning products that have been
specifically designed for ceramic glass cooktops.
Plastic or foods with a high sugar content:
These types of soils need be removed immediately if spilled or melted onto the
ceramic cooktop surface. Permanent damage (such as pitting of the cooktop
surface) may occur if not removed immediately. After turning the surface
elements OFF, use a razor blade scraper or a metal spatula with a mitt and
scrape the soil from the hot surface (as illustrated). Allow the cooktop to cool,
and use the same method for heavy or burned on soils.
13
Page 14

General Care & Cleaning
Cooktop Cleaning & Maintenance (cont’d)
Do not use the following on the ceramic glass cooktop:
• Do not use abrasive cleaners and scouring pads, such as metal and some
nylon pads. They may scratch the cooktop, making it more difficult to clean.
• Do not use harsh cleaners, such as chlorine bleach, ammonia or oven
cleaners, as they may etch or discolor the cooktop.
• Do not use dirty sponges, cloths or paper towels, as they can leave soil or
lint on the cooktop which can burn and cause discoloration.
Care & Cleaning of Stainless Steel (some models)
Some models are equipped with stainless steel exterior parts. Special care and cleaning are required for maintaining the
appearance of stainless parts. Please refer to the table provided at the beginning of the Care & Cleaning section in this
Use & Care Manual.
To Remove and Replace Oven Door
Fig. 1
Fig. 2
Fig. 3
Removing and Replacing the Oven Door
The door is heavy. For safe, temporary storage, lay the door flat with
the inside of the door facing down.
To Remove Oven Door:
1. Open oven door completely (horizontal with floor - See Fig. 1).
2. Remove 2 screws located on the inside of the oven door liner (See A Fig. 2)
3. Insert the 2 screws into the door hinge holes located on the side of the hinge arm,
one into each hinge (See B Fig. 2).
4. Close oven door until the door stops, (Do not force the door to close any further).
The placement of these screws should keep door open in about a 45 degree
position.
5. Grasp oven door firmly on both sides and slide door up and off hinges at the same
angle. (See Fig. 3)
6. To clean oven door, follow the instructions in the General Care & Cleaning table.
To Replace Oven Door:
1. Be sure the hinge arms remain at the 45 degree angle position. Be sure the screws
are still locking the hinge arms from moving. If the screws fall out of the hinge
holes, the hinge(s) may snap back against the oven frame and could pinch fingers
or chip the porcelain finish on the oven front frame.
2. Hold door at the sides near the top while resting the lower front of door on your
knee. Insert the door channels at the bottom of door over the door hinges, (See
Fig. 3).
3. Allow the door to slide down into the door hinges evenly at the same 45 degree
angle. The hinge arms should be inserted into the bottom corners as far as they
can go.
4. Open door completely (horizontal with floor) and remove both screws from holes
in door hinges.
5. Reinstall the 2 screws into the door liner (See C Fig. 2).
6. If the door is not in alignment with the oven frame, remove door and repeat the
above steps.
14
Page 15

General Care & Cleaning
Cleaning Oven Bottom
The bake element is designed to be gently tilted up using your hand from the
front of the bake element. This will allow easier access to the oven bottom for
cleaning. Be careful not to raise the element more than 4 or 5 inches from the
resting position.
Changing the Oven Light (some models)
On some models, the oven light automatically turns on when the door is opened.
Some models have a switch located on the control panel to turn on the light. The
oven light is located at the rear of the oven.
To replace the oven light:
1. Turn electrical power off at the main source or unplug the range.
2. Replace bulb with a new 40 watt appliance bulb.
3. Turn power back on again at the main source (or plug the range back in).
4. The clock will then need to be reset. To reset, see Setting Oven Controls in
ENGLISH
this Use & Care Manual.
Be sure the range is unplugged and all parts are COOL before
replacing oven light. Wear a leather-faced glove for protection against possible
broken glass.
15
Page 16

Before You Call
Solutions to Common Problems
Before you call for service, review this list. It may save you time and expense. The list includes common occurrences
that are not the result of defective workmanship or materials in this appliance.
OCCURRENCE
Range is not level.
Cannot move appliance easily. Appliance
must be accessible for service.
Surface element too hot or not hot enough.
Surface element does not heat.
POSSIBLE CAUSE/SOLUTION
Poor installation. Place oven rack in center of oven. Place a level on the oven rack. Adjust
leveling legs at base of range until the oven rack is level.
Be sure floor is level and is strong and stable enough to adequately support range.
If floor is sagging or sloping, contact a carpenter to correct the situation.
Kitchen cabinet alignment may make range appear unlevel. Be sure cabinets are
square and have sufficient room for range clearance.
Cabinets not square or are built in too tightly. Contact builder or installer to make
appliance accessible.
Carpet interferes with range. Provide sufficient space so range can be lifted over carpet.
Incorrect control setting. Make sure the correct control is on for the surface unit to be
used.
Lightweight or warped pans used. Use only flat, evenly balanced, medium or heavyweight
cookware. Flat pans heat better than warped pans. Cookware materials and weight of
the material affect heating. Heavy- and medium-weight pans heat evenly. Because
lightweight pans heat unevenly, foods may burn easily.
No power to the appliance. Check steps under "Entire Appliance Does Not Operate" in
this Before You Call checklist.
Entire appliance does not operate.
Oven light does not work.
Incorrect control setting. Make sure the correct control is on for the surface unit to be
used.
Make sure cord/plug is plugged tightly into outlet.
Service wiring is not complete. Be sure to call Sears at 1-800-4-MY-HOME® (See back
cover).
Power outage. Check house lights to be sure. Call your local electric company for
service.
Replace or tighten bulb. See "Changing Oven Light" in the General Care & Cleaning
section of this Use & Care Guide for instructions.
16
Page 17

Before You Call
Solutions to Common Problems (cont’d)
OCCURRENCE POSSIBLE CAUSE/SOLUTION
Oven smokes excessively during broiling. Control not set properly. Follow instructions under Setting Oven Controls.
Make sure oven door is opened to broil stop position.
Meat too close to the element. Reposition the rack to provide proper clearance between
the meat and the element. Preheat broil element for searing.
Meat not properly prepared. Remove excess fat from meat. Cut remaining fatty edges
to prevent curling, but do not cut into lean.
Insert on broiler pan wrong side up and grease not draining. Always place grid on the
broiler pan with ribs up and slots down to allow grease to drip into pan.
Grease has built up on oven surfaces. Regular cleaning is necessary when broiling
frequently. Old grease or food spatters cause excessive smoking.
Flames inside oven or smoking from vent.
Scratches or abrasions on cooktop surface
(Ceramic-Glass cooktop models).
Metal marks
(Ceramic-Glass cooktop models).
Brown streaks or specks
(Ceramic-Glass cooktop models).
Areas of discoloration with metallic sheen
(Ceramic-Glass cooktop models).
Poor baking results.
Excessive spillovers in oven. This is normal, especially for high oven temperatures, pie
spillovers or large amounts of grease on bottom of oven. Wipe up excessive spillovers.
For oven fire, see "Setting Surface & Oven Controls" in this Use & Care Guide.
Coarse particles such as salt or sand between cooktop and utensils can cause
scratches. Be sure cooktop surface and bottoms of utensils are clean before usage.
Small scratches do not affect cooking and will become less visible with time.
Cleaning materials not recommended for ceramic-glass cooktop have been used. See
"Cooktop Cleaning and Maintenance" in the General Care & Cleaning section.
Cookware with rough bottom has been used. Use smooth, flat-bottomed cookware.
Sliding or scraping of metal utensils on cooktop surface. Do not slide metal utensils
on cooktop surface. Use a ceramic-glass cooktop cleaning creme to remove the marks.
See "Cooktop Cleaning and Maintenance" in the General Care & Cleaning section.
Boilovers are cooked onto surface. See "Cooktop Cleaning & Maintenance" in the
General Care & Cleaning section in this Use & Care Guide for more detailed information.
Mineral deposits from water and food. Remove using a ceramic-glass cooktop cleaning
creme. Use cookware with clean, dry bottoms.
Many factors affect baking results. Make sure the proper oven rack position is
used. Center food in the oven & space pans to allow air to circulate. Allow the
oven to preheat to the set temperature before placing food in the oven. Try
adjusting the recipe's recommended temperature or baking time. If you feel the
oven is too hot or cool, see Adjusting Your Oven Temperature in this Use &
Care Guide.
ENGLISH
17
Page 18

Page 19

Galaxy
Electric Range
Use & Care Guide
Cuisinière électrique
Guide d’utilisation et d’entretien
Models, Modèles
970-6011*
* = color number, numéro de couleur*
FRANÇAISENGLISH
Sears Canada Inc., Toronto,
Ontario, Canada, M5B 2B8
Visitez notre site à l’adresse suivante : www.sears.ca
p/n 316417295 (0803)
Page 20

Table des matières
Enregistrement du produit
Garantie pour la cuisinière autonome ........................................2
Enregistrement du produit........................................................... 2
MESURES DE SÉCURITÉ IMPORTANTES ................................ 3-4
Contrats de protection principaux ............................................... 5
Avant l’utilisation du four .......................................................... 6-7
Commandes des éléments de surface .....................................7
Utilisation de la table de cuisson ...............................................7
Fonctions des commandes du four ............................................ 8
Commandes du four ............................................................. 8-10
Ajustement de la température du four (certains modèles) ...... 11
Entretien et nettoyage .......................................................... 12-15
Avant de faire appel au service après-vente ....................... 16-17
Service Sears ........................................... Dernière de couverture
Garantie limitée d’un an
Si le produit est installé, utilisé et entretenu selon toutes les instructions fournies et qu’il présente un problème relié à un défaut de
fabrication ou à un vice de matériau au cours de l’année suivant la date d’achat, téléphonez au 1-800-4-MY-HOMEMD pour obtenir
une réparation gratuite de l’appareil. Si cet appareil est utilisé à d’autres fins que l’usage familial privé, cette garantie est valide
seulement pendant les 90 jours suivant la date d’achat.
Cette garantie couvre seulement les défauts de fabrication et les vices de matériau. Sears NE COUVRE PAS les frais liés:
1. Aux fissures de la table de cuisson en vitrocéramique qui ne résultent pas d’un choc thermique.
2. Aux taches et aux égratignures sur la table de cuisson en vitrocéramique qui sont apparues à la suite du non-respect des
instructions fournies avec ce produit.
3. Aux articles consomptibles qui sont sujets à l’usure normale, incluant, sans en exclure d’autres, filtres, courroies, ampoules et
sacs.
4. À la visite d’un réparateur venu expliquer comment installer, utiliser ou entretenir l’appareil.
5. À la visite d’un réparateur venu nettoyer ou entretenir l’appareil.
6. Aux dommages ou pannes causés par une installation, une utilisation ou un entretien non conformes aux instructions fournies
avec ce produit.
7. Aux dommages ou aux pannes causés par un accident, un abus, une mauvaise utilisation ou toute utilisation autre que celle pour
laquelle l’appareil a été conçu.
8. Aux dommages ou aux pannes causés par l’utilisation de détergents, de nettoyants, de produits chimiques ou d’accessoires
autres que ceux recommandés dans les instructions fournies avec cet appareil.
9. Aux dommages affectant les pièces ou les systèmes ou aux pannes causées par des modifications non autorisées de l’appareil.
Exonération de garanties implicites; limitations des recours
L’unique recours du client en vertu de cette garantie limitée est la réparation du produit comme décrit précédemment. Les garanties
implicites, y compris les garanties de qualité marchande et d’adaptation à un usage particulier, sont limitées à un an ou à la
période la plus courte permise par la loi. Sears ne peut être tenue responsable des dommages accessoires ou indirects. Certains
États et certaines provinces ne permettent pas de restriction ou d’exemption sur les dommages accessoires ou indirects, ni de
restriction sur les garanties implicites de qualité marchande ou d’adaptation à un usage particulier. Dans ce cas, ces restrictions ou
exemptions pourraient ne pas être applicables.
Cette garantie est valide seulement si ce produit est utilisé aux États-Unis ou au Canada.
Cette garantie vous confère des droits juridiques spécifiques. Vous pouvez aussi bénéficier d’autres droits qui varient d’un État à un
autre ou d’une province à une autre.
Notez ci-dessous la date d’achat et les numéros de modèle et
de série de votre appareil. Le numéro de modèle et le numéro
de série sont imprimés sur la plaque signalétique. Celle-ci se
trouve sur le côté droit du cadre avant du four, dans le
compartiment du tiroir de rangement ou du tiroir chauffant.
Reportez-vous au bas de cette page pour trouver
l’emplacement de la plaque signalétique.
N° de modèle _______________________________________
N° de série _________________________________________
Date d’achat ________________________________________
Conservez ces instructions et votre reçu pour vous y reporter
ultérieurement.
970-
Sears, Roebuck and Co., Hoffman Estates, IL 60179, États-Unis
Sears Canada Inc., Toronto, Ontario, Canada M5B 2B8
Emplacement de la plaque signalétique
Vous trouverez les numéros de modèle et de série imprimés sur la
plaque signalétique. Celle-ci se trouve sur le côté droit du cadre avant du
four, derrière le tiroir de rangement ou derrière le panneau inférieur.
Reportez-vous à l’illustration de droite pour connaître l’emplacement exact
de la plaque signalétique.
N’oubliez pas d’enregistrer le numéro de série de votre appareil pour
pouvoir vous y reporter ultérieurement (consultez le paragraphe
« Enregistrement du produit » en haut de cette page).
Emplacement de la plaque
signalétique; retirez le panneau
inférieur (certains modèles) ou
le tiroir de rangement.
2
Page 21

Mesures de sécurité importantes
Lisez toutes les instructions avant d’utiliser cet appareil.
Conservez ces instructions pour vous y reporter ultérieurement.
Le présent manuel contient des symboles et des renseignements importants concernant la sécurité. Veuillez porter une attention particulière à
ces symboles et respecter toutes les directives.
Ce symbole attire l’attention sur des situations pouvant causer des dommages matériels, des blessures graves ou
même la mort.
Ce symbole attire l’attention sur des situations pouvant causer des dommages matériels ou des blessures.
• Enlevez tout ruban adhésif et matériau d’emballage avant
d’utiliser la cuisinière. Détruisez le cartonnage et les sacs en
plastique après avoir déballé l’appareil. Ne laissez jamais d’enfants
jouer avec les matériaux d’emballage.
• Installation adéquate : Assurez-vous que l’appareil est
installé et mis à la terre correctement par un technicien
qualifié, conformément à la dernière édition du Code national
de l’électricité ANSI/NFPA n° 70, ainsi qu’aux codes locaux.
N’installez la cuisinière que selon les instructions d’installation
données dans la documentation fournie avec l’appareil.
Demandez à votre marchand de vous recommander un technicien
qualifié ainsi qu’un centre de réparation autorisé. En cas d’urgence,
sachez comment couper l’alimentation électrique de la cuisinière à la
boîte de fusibles ou au disjoncteur.
• Entretien par l’usager : Vous ne devez ni réparer ni
remplacer des pièces de l’appareil à moins d’une
recommandation précise donnée dans les manuels. Toute
autre réparation devrait être effectuée par un technicien qualifié
seulement. Vous réduirez ainsi les risques de blessures et éviterez
d’endommager la cuisinière.
• Ne modifiez jamais la cuisinière, que ce soit en enlevant des
panneaux, des pieds de mise à niveau, des protège-fils, des
supports ou des vis anti-renversement ou toute autre pièce.
• Toutes les cuisinières peuvent se renverser.
• Le renversement de la cuisinière peut causer des blessures.
• Installez le dispositif anti-renversement inclus avec cette
cuisinière.
• Reportez-vous aux instructions d’installation.
Afin de réduire les
risques de renversement, la cuisinière doit être
fixée par le support anti-renversement fourni
avec la cuisinière. Ce dernier doit être installé
correctement. Pour vous assurer que le support
est installé correctement, vérifiez que le pied de
mise à niveau arrière est inséré et fixé solidement
dans le support anti-renversement en enlevant le
panneau inférieur ou le tiroir de rangement. Dans
le cas des modèles comportant un tiroir chauffant,
agrippez le bord supérieur arrière de la cuisinière
et, avec prudence, tentez de la pencher vers
l’avant. Reportez-vous aux instructions
d’installation pour installer correctement le support
anti-renversement.
Grimper, s’appuyer ou s’asseoir sur
les portes ou les tiroirs de la cuisinière peut causer des
blessures graves et endommager la cuisinière. Ne laissez pas
les enfants grimper sur la cuisinière ou jouer autour de celle-ci. Le
poids d’un enfant sur une porte ouverte peut suffire à faire basculer la
cuisinière et ainsi entraîner de graves brûlures ou d’autres blessures.
N’utilisez pas le four ni le tiroir
chauffant (si l’appareil en est muni) comme espace de
rangement.
Ne rangez pas d’objets pouvant intéresser les
enfants dans les armoires au-dessus de la cuisinière ou sur
son dosseret. En voulant atteindre ces objets, les enfants risquent
de se blesser gravement.
N’utilisez jamais votre appareil pour
réchauffer ou chauffer une pièce.
• Rangement à l’intérieur de l’appareil ou sur l’appareil : Les
articles inflammables ne doivent pas être rangés dans le
four, dans le tiroir chauffant, près des éléments de surface
ou dans le tiroir de rangement. Cela inclut les articles en papier,
en plastique et en tissu (par ex. les livres de cuisine, les objets en
plastique et les chiffons), ainsi que tout liquide inflammable. Ne rangez
pas de produits explosifs comme des bombes aérosol sur la
cuisinière ou près de celle-ci.
• Ne laissez pas les enfants seuls : Les enfants ne devraient
jamais être laissés seuls ou sans surveillance lorsque
l’appareil fonctionne. Ne les laissez jamais s’asseoir ou se tenir
debout sur une pièce quelconque de l’appareil.
• NE TOUCHEZ PAS AUX ÉLÉMENTS DE SURFACE, AUX ZONES
ENTOURANT CES ÉLÉMENTS, AUX ÉLÉMENTS CHAUFFANTS, NI À
L’INTÉRIEUR DU FOUR. Les éléments chauffants du four et les
éléments de surface peuvent être chauds même si leur couleur laisse
croire qu’ils ne chauffent pas. Les zones situées près des éléments
de surface peuvent devenir suffisamment chaudes pour causer des
brûlures. Pendant et après l’utilisation de l’appareil, ne touchez pas
ces zones et ne laissez pas vos vêtements ou d’autres produits
inflammables entrer en contact avec celles-ci, à moins qu’elles n’aient
eu le temps de refroidir. Ces zones comprennent la surface de
cuisson, les surfaces orientées vers elle, les ouvertures de l’évent du
four et les zones situées à proximité de ces ouvertures, la porte du
four et le hublot.
• Portez des vêtements appropriés : Ne portez jamais de
vêtements amples ou flottants lors de l’utilisation de cet
appareil. Ne laissez pas de matériaux inflammables ni de vêtements
entrer en contact avec les surfaces chaudes.
• N’éteignez pas les feux de friture avec de l’eau ou de la
farine : Étouffez les feux avec un couvercle ou du bicarbonate
de soude, ou encore avec un extincteur à poudre sèche ou à
mousse.
• Lorsque vous faites chauffer de l’huile ou de la graisse,
restez près de la cuisinière. La graisse ou l’huile peuvent prendre
feu si elles deviennent trop chaudes.
• N’utilisez que des maniques sèches : Des maniques
mouillées ou humides en contact avec des surfaces chaudes
peuvent causer des brûlures par la vapeur. Ne laissez pas les
maniques entrer en contact avec les éléments chauffants. Ne vous
servez pas d’un chiffon ni d’un linge épais à la place d’une manique.
• Ne chauffez pas de contenants non ouverts : L’augmentation
de la pression peut faire exploser le contenant et causer des
blessures.
• Enlevez la porte du four si vous entreposez la cuisinière ou
si vous la mettez au rebut.
IMPORTANT : N’essayez pas de faire fonctionner la cuisinière
lors d’une panne de courant. En cas de panne, éteignez toujours la
cuisinière. Si la cuisinière n’est pas éteinte et que le courant se rétablit,
le four se mettra à fonctionner de nouveau. Une fois le courant rétabli,
reprogrammez l’horloge et les fonctions du four.
3
FRANÇAIS
Page 22

Mesures de sécurité importantes
INSTRUCTIONS IMPORTANTES POUR
L’UTILISATION DE LA TABLE DE CUISSON
• Sachez quel bouton correspond à quel élément de surface.
Placez un ustensile contenant de la nourriture sur l’élément avant de
le mettre en marche et arrêtez l’élément avant d’enlever l’ustensile.
• Utilisez des ustensiles de dimension appropriée : Cet appareil
est équipé d’un ou de plusieurs éléments de tailles différentes.
Choisissez des ustensiles dont le dessous est plat et assez large
pour recouvrir l’élément chauffant de surface. Si vous utilisez des
ustensiles trop petits, une partie de l’élément sera à découvert et les
vêtements entrant directement en contact avec l’élément seront
susceptibles de prendre feu. L’utilisation d’ustensiles d’une taille
proportionnelle à l’élément améliore aussi le rendement.
• Tournez toujours les ustensiles pour que les poignées se
trouvent vers l’intérieur et non au-dessus d’autres
éléments : Pour réduire le risque de brûlures, d’inflammation de
matériaux et de renversement par suite du contact accidentel avec
l’ustensile, la poignée d’un ustensile doit être placée vers l’intérieur et
non au-dessus des autres éléments de surface.
• Ne laissez jamais des éléments de surface sans surveillance
à des réglages élevés : Les débordements peuvent causer de la
fumée, la graisse peut s’enflammer ou une casserole laissée sans
contenu peut fondre.
• N’immergez pas et ne trempez pas les éléments chauffants
amovibles : Les éléments chauffants ne doivent en aucun cas être
immergés dans l’eau. Ils se nettoient d’eux-mêmes lors du
fonctionnement normal.
• Ustensiles émaillés : En raison des brusques changements de
température, seuls certains types d’ustensiles en verre, en
vitrocéramique, en céramique, en terre cuite ou autres ustensiles
émaillés peuvent être utilisés avec la surface de cuisson sans risquer
qu’ils ne se fendent. Vérifiez les recommandations du fabricant quant
à leur utilisation sur une surface de cuisson.
• Lorsque vous flambez des aliments en dessous de la hotte,
mettez le ventilateur en marche.
INSTRUCTIONS IMPORTANTES RELATIVES À
L’UTILISATION DE VOTRE FOUR
• Soyez prudent en ouvrant la porte du four ou le tiroir
chauffant (si l’appareil en est muni) : Tenez-vous sur le côté de
la cuisinière lorsque vous ouvrez la porte d’un four chaud. Laissez
l’air chaud ou la vapeur s’échapper du four avant d’en retirer ou d’y
placer des aliments.
• Ne bloquez pas les conduits de l’évent du four. L’évent est
situé sous l’élément de surface arrière gauche si le modèle comporte
des éléments tubulaires. Il est situé sous le dosseret pour les modèles
munis d’une table de cuisson en vitrocéramique. Si vous touchez les
surfaces de cette zone lorsque le four fonctionne, vous risquez de
vous brûler gravement. Ne placez pas d’articles en plastique ni
d’articles sensibles à la chaleur sur l’évent du four ou près de celui-ci.
Ces articles pourraient fondre ou s’enflammer.
• Installation des grilles du four. Disposez toujours les grilles à
l’emplacement désiré lorsque le four est froid. Faites preuve
d’extrême prudence si vous devez déplacer une grille lorsque le four
est chaud. Utilisez des maniques et tenez la grille fermement avec les
deux mains pour la remettre en place. Ne laissez pas les maniques
entrer en contact avec les éléments chauffants du four lorsque ceuxci sont chauds. Retirez tous les ustensiles qui se trouvent sur la grille
avant d’enlever cette dernière.
• Ne vous servez pas de la lèchefrite sans sa grille. La lèchefrite
et sa grille permettent à la graisse de s’écouler et de rester à l’écart
de la forte chaleur dégagée par le gril.
• Ne recouvrez pas la grille de la lèchefrite de papier
d’aluminium. La graisse ainsi exposée pourrait prendre feu.
• Revêtements protecteurs : N’utilisez pas de papier d’aluminium
pour recouvrir la sole du four. N’utilisez le papier d’aluminium que
selon les recommandations données dans ce guide. Une mauvaise
installation de ces revêtements peut entraîner un risque de choc
électrique ou d’incendie.
INSTRUCTIONS DE NETTOYAGE
IMPORTANTES
• Nettoyez la cuisinière régulièrement pour vous assurer que
toutes les pièces sont exemptes de graisse qui pourrait
s’enflammer. Portez une attention particulière à la zone située sous
chacun des éléments de surface. Ne laissez pas de graisse s’y
accumuler.
• Produits de nettoyage et aérosols : Suivez toujours les
recommandations du fabricant. N’oubliez pas que les résidus de
produits de nettoyage et d’aérosols risquent de s’enflammer et
d’entraîner des dommages et/ou des blessures.
• Nettoyez fréquemment les hottes de ventilation : Ne laissez
pas de graisse s’accumuler sur la hotte ou sur le filtre.
Suivez les instructions de nettoyage du fabricant.
POUR LES MODÈLES À TABLE DE CUISSON EN
VITROCÉRAMIQUE
• Ne cuisinez pas sur une table de cuisson cassée : Si la table
est cassée, les solutions nettoyantes et les éclaboussures peuvent y
pénétrer et créer un risque de choc électrique. Communiquez
immédiatement avec un technicien qualifié.
• Nettoyez soigneusement la table de cuisson : Si vous essuyez
des renversements sur une surface chaude avec une éponge ou un
chiffon humide, faites attention de ne pas vous brûler avec la vapeur.
Certains nettoyants peuvent produire des fumées nocives s’ils sont
appliqués sur une surface chaude.
AVIS IMPORTANT
La loi de la Californie « Safe Drinking Water and Toxic Enforcement
Act » exige que le Gouverneur de la Californie publie une liste des
substances connues pouvant entraîner le cancer, des anomalies
congénitales ou autres dangers à l’égard des fonctions de reproduction
et exige que les entreprises avisent les clients des dangers associés à
l’exposition possible à de telles substances.
4
Page 23

Master Protection Agreements
Congratulations on making a smart purchase. Your new Kenmore
product is designed and manufactured for years of dependable operation.
But like all products, it may require preventive maintenance or repair from
time to time. That’s when having a Master Protection Agreement can
save you money and aggravation.
The Master Protection Agreement also helps extend the life of your new
product. Here’s what the Agreement* includes:
Parts and labor needed to help keep products operating properly
under normal use, not just defects. Our coverage goes well
beyond the product warranty. No deductibles, no functional failure
excluded from coverage – real protection.
Expert service by a force of more than 10,000 authorized Sears
service technicians, which means someone you can trust will be
working on your product.
Unlimited service calls and nationwide service, as often as you
want us, whenever you want us.
“No-lemon” guarantee – replacement of your covered product if
four or more product failures occur within twelve months.
Product replacement if your covered product can’t be fixed.
Annual Preventive Maintenance Check at your request – no extra
charge.
Fast help by phone – we call it Rapid Resolution – phone support
from a Sears representative on all products. Think of us as a “talking
owner’s manual”.
Power surge protection against electrical damage due to power
fluctuations.
$250 Food Loss Protection annually for any food spoilage that is
the result of mechanical failure of any covered refrigerator or
freezer.
Rental reimbursement if repair of your covered product takes
longer than promised.
10% discount off the regular price of any non-covered repair
service and related installed parts.
Once you purchase the Agreement, a simple phone call is all that it takes
for you to schedule service. You can call anytime day or night, or
schedule a service appointment online.
The Master Protection Agreement is a risk free purchase. If you cancel
for any reason during the product warranty period, we will provide a full
refund. Or, a prorated refund anytime after the product warranty period
expires. Purchase your Master Protection Agreement today!
Some limitations and exclusions apply. For prices and additional
information in the U.S.A. call 1-800-827-6655.
* Coverage in Canada varies on some items. For full details call
Sears Canada at 1-800-361-6665.
®
Sears Installation Service
For Sears professional installation of home appliances, garage door
openers, water heaters, and other major home items, in the U.S.A. or
Canada call 1-800-4-MY-HOME
®
.
Contrats de protection principaux
Félicitations! Vous avez fait un bon achat. Votre nouvel appareil
Kenmore
années d'utilisation sans tracas. Cependant, comme tout appareil, il peut
nécessiter un entretien préventif ou des réparations occasionnelles. C'est
pourquoi un contrat de protection principal peut vous permettre
d'épargner de l’argent et vous éviter des problèmes.
Le contrat de protection principal contribue également à prolonger la
durée de vie de votre nouvel appareil. Voici ce que couvre le contrat* :
Une fois le contrat acheté, un simple appel téléphonique suffit pour
obtenir un service de réparation. Vous pouvez téléphoner à toute heure
du jour ou de la nuit, ou prendre rendez-vous en ligne pour une
réparation.
Le contrat de protection principal est un achat sans risque. Si, pour
quelque raison que ce soit, vous annulez le contrat durant la période de
garantie du produit, vous serez remboursé en totalité. En cas
d'annulation après la période de garantie du produit, vous recevrez un
remboursement calculé au prorata. Procurez-vous votre contrat de
protection principal dès aujourd’hui!
Certaines restrictions et exclusions s'appliquent. Si vous êtes aux
États-Unis et que vous désirez connaître les prix et obtenir de plus
amples renseignements, téléphonez au 1 800 827-6655.
* Au Canada, la couverture de certains articles peut varier. Pour
connaître tous les détails, communiquez avec Sears Canada au
1 800 361-6665.
®
est conçu et fabriqué dans le but de vous offrir plusieurs
Les pièces et la main-d'oeuvre requises pour le fonctionnement
adéquat de l'appareil dans des conditions d'utilisation normales,
pas seulement pour les défauts. Notre couverture vous offre
beaucoup plus que la simple garantie du produit. Aucune
franchise, aucune exclusion de défaillance fonctionnelle, une
véritable protection.
Un service professionnel offert par une équipe de plus de 10 000
techniciens de service Sears autorisés, ce qui signifie que votre
appareil sera confié à une personne de confiance.
Des appels de service illimités et un service à la grandeur du
pays, à tout moment, aussi souvent que vous le désirez.
La garantie « anti-citron », vous assurant le remplacement de
l'appareil couvert si quatre défaillances ou plus surviennent à
l'intérieur de douze mois.
Le remplacement de l'appareil couvert s'il ne peut être réparé.
Une vérification d'entretien préventive annuelle sur demande et
sans frais.
Un service d'aide téléphonique rapide, appelé « Résolution
rapide », qui vous permet de bénéficier du soutien téléphonique
d'un représentant Sears pour tous les produits. Nous sommes
votre « guide d'utilisation parlant ».
Une protection contre les surtensions pour les dommages
électriques causés par des fluctuations électriques.
Une couverture annuelle de 250 $ pour la perte d'aliments à la
suite de toute détérioration d'aliments résultant d'une défaillance
mécanique d'un réfrigérateur ou d'un congélateur couvert.
Le remboursement de la location, si la réparation de l'appareil
couvert prend plus de temps que prévu.
Un rabais de 10 % sur le prix régulier de tout service de réparation
non couvert et les pièces installées qui en découlent.
Service d’installation Sears
Pour bénéficier du service d'installation professionnel de Sears pour
électroménagers, ouvre-portes de garage, chauffe-eau et autres
appareils domestiques importants, aux États-Unis et au Canada,
téléphonez au 1 800 4-MY-HOME.
FRANÇAIS
5
Page 24

Avant l’utilisation du four
ÉVENT DU FOUR
Emplacement de l’évent du four
Sur les modèles munis d’une table de cuisson en vitrocéramique, l’évent est
situé sous le tableau de commande, en arrière à gauche. Lorsque le four est
chaud, l’air chaud s’échappe de l’évent. Cette ventilation est nécessaire pour
assurer une bonne circulation d’air et de bons résultats de cuisson.
N’OBSTRUEZ JAMAIS L’ÉVENT DU FOUR.
Disposition des grilles du four
DISPOSEZ TOUJOURS LES GRILLES LORSQUE LE FOUR EST FROID (AVANT
DE L’ALLUMER). Portez toujours des gants de cuisine lorsque vous utilisez le
four.
Retrait et remise en place des grilles du four
Pour enlever une grille, tirez-la vers l’avant jusqu’à ce qu’elle s’arrête. Soulevez l’avant et sortez la grille. Pour remettre la grille
en place, appuyez-la sur les guides des parois du four. Soulevez l’avant et poussez la grille en place.
Positions
des grilles
Aliments Position de la grille
Viande, poulet ou poisson au gril Consultez la section « Gril »
Biscuits, gâteaux, tartes, petits pains et muffins 2 ou 3
Tartes surgelées, gâteau des anges, levure, pain,
plats mijotés, petites coupes de viande ou de volaille 1
Dinde, rôti ou jambon 1
POSITIONS DES GRILLES RECOMMANDÉES POUR LE GRIL,
LA CUISSON AU FOUR ET LE RÔTISSAGE
À propos de la table de cuisson en vitrocéramique
La table de cuisson en vitrocéramique comporte des éléments de surface radiants situés sous la surface. Le design de la table
de cuisson en vitrocéramique marque le contour des éléments de surface qui se trouvent en dessous. Assurez-vous que le
diamètre de l’ustensile correspond au diamètre de l’élément tracé sur la table de cuisson. La chaleur est transmise de la surface
de la table de cuisson à l’ustensile. Vous devriez utiliser des ustensiles à fond plat seulement. Le type d’ustensile utilisé et sa
dimension ainsi que le nombre d’éléments de surface en marche et le réglage choisis sont des facteurs qui modifient la quantité
de chaleur diffusée aux différentes zones entourant les éléments. Les surfaces entourant les éléments peuvent devenir assez
chaudes pour causer des brûlures.
À propos des éléments de surface radiants
La température de l’élément de surface augmente graduellement et
uniformément. Au fur et à mesure que la température augmente,
l’élément rougit. Pour maintenir le réglage choisi, l’élément fonctionne
par intermittence. Il conserve suffisamment de chaleur pour assurer
une cuisson uniforme et constante même lorsqu’il cesse de chauffer.
La surface en vitrocéramique isole thermiquement l’élément chauffant
et concentre la chaleur dans la zone de chauffe. Pour une cuisson
efficace, éteignez l’élément plusieurs minutes avant que la cuisson soit
complétée. Ceci permet à la chaleur résiduelle de terminer la cuisson.
REMARQUE : Veuillez lire les instructions détaillées concernant le
nettoyage de la table de cuisson en vitrocéramique dans les sections
Entretien et nettoyage et Avant de faire appel au service après-vente
du présent guide.
REMARQUE : Les éléments radiants sont munis d’un limiteur qui leur permet de fonctionner de façon intermittente, même à
réglage élevé. Ceci permet d’éviter d’endommager la table de cuisson en vitrocéramique. Il est normal qu’un élément fonctionne
de façon intermittente lorsqu’il est à réglage élevé. Le fonctionnement intermittent peut aussi être causé par l’utilisation d’un
ustensile plus petit que l’élément radiant ou dont le fond n’est pas plat.
6
Page 25

Avant l’utilisation du four
*CORRECT INCORRECT
•
Fond plat et côtés droits.
Couvercles bien ajustés.
Le poids de la poignée ne
fait pas basculer l’ustensile.
Le poids de l’ustensile est
bien réparti.
La taille des ustensiles
correspond à la quantité de
nourriture à préparer et à la
taille de l’élément de surface.
Fait d’un matériau qui
conduit bien la chaleur.
Facile à nettoyer.
Faites toujours correspondre
le diamètre de l’ustensile
à celui de l’élément.
•
•
•
•
•
•
Fond d’ustensile courbé
ou gauchi.
L’ustensile dépasse l’élément
de plus de 1,3 cm (1/2 po).
L’ustensile est plus petit que
l’élément.
Le poids de la poignée fait
basculer l’ustensile.
•
•
•
•
Voyants de fonctionnement de l’élément et de surface chaude
Votre cuisinière est munie de deux voyants de commande de surface différents qui
s’allumeront sur le tableau de commande : le voyant Element On et le voyant Hot Surface.
Le voyant Element On situé sur le tableau de commande s’allume lorsqu’un élément de
surface est en marche. Après la cuisson, vous pouvez vous assurer rapidement que toutes
les commandes de surface sont éteintes en vérifiant ce voyant.
Le voyant Hot Surface situé sur le tableau de commande s’allume lorsqu’une surface de
cuisson devient chaude et RESTE ALLUMÉ jusqu’à ce que la surface de cuisson en
vitrocéramique ait refroidi de façon MODÉRÉE.
Commandes des éléments de surface
Emploi des éléments
radiants simples
1. Placez un ustensile de taille appropriée sur l’élément de surface radiant.
2. Appuyez sur le bouton de commande de l’élément et tournez-le dans une direction ou
l’autre, jusqu’à la température voulue. Commencez la plupart de vos cuissons par un
réglage plus élevé, puis baissez le réglage pour terminer la cuisson. Les boutons n’ont
pas à être réglés à un repère particulier. Utilisez les réglages comme repère et ajustez
le bouton de commande selon le besoin. Chaque élément de surface fournit une
quantité de chaleur constante à chacun des réglages. Si la couleur rouge de la zone de
chauffage dépasse du bord inférieur de l’ustensile, ce dernier est trop petit pour cette
zone.
3. Lorsque la cuisson est terminée, éteignez l’élément de surface avant de retirer
l’ustensile. Remarque : Le voyant Element On s’allume lorsqu’un ou plusieurs
éléments sont allumés. Après la cuisson, vous pouvez vous assurer rapidement que
toutes les commandes de surface sont éteintes en vérifiant le voyant. Le voyant Hot
Surface reste allumé même APRÈS avoir ÉTEINT le bouton de commande et il restera
allumé jusqu’à ce que la surface ait suffisamment refroidi.
Les éléments de surface radiants peuvent sembler froids une fois éteints. Cependant, la surface en
vitrocéramique peut être encore très chaude et entraîner des brûlures si elle est touchée avant d’avoir suffisamment refroidi.
Ne placez pas d’articles en plastique comme une salière ou une poivrière, un porte-cuillère ou des sacs
d’emballage sur le haut de la cuisinière en cours d’utilisation. Ceux-ci pourraient fondre ou s’enflammer. Les maniques,
serviettes ou cuillères en bois peuvent prendre feu si elles sont placées trop près d’un élément de surface.
Utilisation de la
FRANÇAIS
table de cuisson
Utilisation d’ustensiles
appropriés
Les ustensiles doivent avoir un fond
plat qui fait bon contact avec toute la
surface de l’élément chauffant.
Vérifiez que le fond des ustensiles
est bien plat en y faisant tourner une
règle (fig. 1).
Assurez-vous de suivre les
recommandations d’utilisation des
ustensiles, tel qu’indiqué à la fig. 2.
Remarque : La dimension et le type d’ustensile utilisé influencent le
réglage nécessaire à l’obtention de résultats optimaux.
Grande friture : Servez-vous d’un thermomètre et réglez le bouton de
commande en conséquence. Si l’huile est trop froide, les aliments
l’absorberont et seront gras. Si l’huile est trop chaude, la nourriture
rissolera si rapidement que le centre ne cuira pas. N’essayez pas de
frire à grande friture une trop grande quantité d’aliments à la fois. Ils
risquent de ne pas rissoler ou de ne pas cuire correctement.
Fig. 1
Fig. 2
7
Page 26

Fonctions des commandes du four
LISEZ ATTENTIVEMENT LES INSTRUCTIONS AVANT D’UTILISER LE FOUR. Pour bien utiliser votre four, familiarisez-vous avec les
différentes fonctions du four décrites ci-dessous.
FLÈCHES ORIENTÉES VERS LE
BAKE (cuisson) :
Sert à sélectionner
le mode de cuisson.
SELECT BROIL
(sélection du gril) :
Sert à sélectionner
le mode de gril.
HAUT ou VERS LE BAS : S’utilisent
avec les touches de fonction pour
programmer la température du
four, l’heure du jour, la durée de
nettoyage et la minuterie.
TIMER ON/OFF (minuterie marche/arrêt) :
Sert à mettre en marche ou à désactiver la
minuterie. La minuterie ne fait pas
démarrer ni arrêter la cuisson.
RÉGLAGE DE
L’HORLOGE : Sert à
régler l’heure exacte.
STOP/CLEAR (arrêt/annulation) : Sert à
annuler toute fonction entrée précédemment,
sauf l’heure du jour et la minuterie. Appuyez
sur STOP/CLEAR (arrêt/annulation) pour
arrêter la cuisson.
Commandes du four
Remarque : L’horloge doit d’abord être mise à l’heure afin de faire fonctionner le four.
Réglage de l’horloge
Lorsque la cuisinière est branchée pour la première fois ou s’il y a eu interruption de l’alimentation, « 12:00 » clignote à
l’afficheur.
1. Appuyez sur
2. Dans les 5 secondes qui suivent, appuyez et maintenez la pression sur
l’afficheur.
Réglage de la minuterie :
1. Appuyez sur .
2. Appuyez sur
pour faire avancer l’heure par intervalles de 10 minutes. La minuterie peut être réglée pour toute durée située entre 1 minute
et 11 heures 59 minutes.
Remarque : Si vous appuyez d’abord sur , la minuterie indiquera 11 heures et 59 minutes.
.
ou jusqu’à ce que l’heure juste paraisse à
pour faire avancer l’heure par intervalles d’une minute. Appuyez sur et maintenez la touche enfoncée
3. L’afficheur indique le compte à rebours en minutes jusqu’à ce qu’il ne reste qu’une minute. Ensuite, le compte à rebours
s’affiche en secondes.
4. Lorsque la durée programmée s’est écoulée, la minuterie sonne pendant trois secondes. 0:00 apparaît à l’affichage jusqu’à
ce que vous appuyiez sur
Remarque : Durant le compte à rebours de la minuterie, le « : » clignotera. La minuterie ne fait pas démarrer ni arrêter la cuisson.
Elle sert de minuterie additionnelle dans la cuisine et émet un signal sonore lorsque la durée programmée s’est écoulée. La
minuterie peut être utilisée de façon indépendante ou avec toute autre fonction du four. Lorsque la minuterie est utilisée en même
temps qu’une autre fonction, le décompte de la minuterie s’affiche. Pour afficher les autres fonctions, appuyez sur la touche de
fonction correspondante.
Pour changer la durée de la minuterie pendant qu’elle fonctionne :
Lorsque la minuterie est active et que la durée est affichée, maintenez enfoncées les touches
diminuer la durée activée.
Pour annuler la minuterie avant que le temps programmé ne soit écoulé : Appuyez sur
.
ou pour augmenter ou
.
8
Page 27

Commandes du four
Changement du mode d’affichage de la température (certains modèles)
La commande électronique du mode d’affichage de la température du four a été réglée en usine pour afficher la température en
°F (Fahrenheit). Remarque : La température de cuisson peut être réglée de 170 °F à 500 °F (77 °C à 260 °C).
Pour convertir le mode de cuisson en °C (Celsius) ou de °C à °F (n’utilisez pas les fonctions Bake [cuisson au four] ou Grill
[cuisson au gril] lorsque vous modifiez le mode d’affichage de la température) :
1. Appuyez sur la touche
l’afficheur indiquera le mode d’affichage actuel, qu’il soit réglé à F ou à C.
2. Appuyez une fois sur la touche
le mode °C (Celsius).
3. Après 5 secondes, l’affichage clignotera. Pour confirmer le changement, attendez encore 5 secondes jusqu’à ce que la
commande du four émette un signal sonore. Pour compléter le changement, passez à l’étape 4 ci-dessous, OU;
4. Si vous changez d’avis au cours du processus de conversion du mode d’affichage de la température (F ou C), appuyez sur la
touche
5. La commande émettra un signal sonore. L’afficheur indiquera à nouveau l’heure du jour et affichera la température en
fonction du changement de mode d’affichage de la température demandé.
avant que le signal sonore de la commande du four ne se fasse entendre pour annuler l’opération.
pendant 6 à 8 secondes jusqu’à ce que les lettres F ou C s’affichent. Remarque : À ce moment,
pour choisir le mode °F (Fahrenheit); ou appuyez une fois sur la touche pour choisir
Programmer ou changer la température de cuisson
Le four peut être programmé pour cuire à toute température située entre 170 °F (75 °C) et 500 °F (260 °C).
Pour programmer la cuisson au four :
1. Appuyez sur
2. Dans les cinq secondes qui suivent, appuyez sur
ou enfoncées, la température peut alors être ajustée par intervalles de 5 °F (3 °C).
3. Dès que vous relâchez les touches ou , le four se met à chauffer jusqu’à la température sélectionnée. Lorsque le
four atteint la température affichée, la commande émet un signal sonore.
4. Pour annuler la fonction de cuisson, appuyez sur
. « — — —° » s’affiche.
ou . L’afficheur indique 350 °F (177 °C). En maintenant les touches
.
Pour changer la température du four une fois la cuisson commencée :
1. Appuyez sur
2. Appuyez sur
et assurez-vous que la température de cuisson sélectionnée s’affiche.
ou pour augmenter ou réduire la température antérieurement sélectionnée.
FRANÇAIS
9
Page 28

Commandes du four
Si un feu se produit dans
le four, fermez la porte du four et éteignez
ce dernier. Si le feu continue, servez-vous
d’un extincteur. NE JETEZ PAS d’eau ni de
farine sur le feu. La farine peut être
explosive.
La lèchefrite et sa grille (certains modèles)
permettent à la graisse de s’écouler et de
rester à l’écart de la forte chaleur. NE
VOUS SERVEZ PAS de la lèchefrite sans
sa grille. NE COUVREZ PAS la grille de
papier d’aluminium. La graisse ainsi
exposée pourrait prendre feu.
Gril :
1. Disposez les grilles du four lorsque sa température est encore basse. Placez
la grille et programmez le gril selon les recommandations du tableau cidessous :
Aliments Cuisson désirée Réglage Position
de la grille
Steak À point Hi (élevé) 5
À point-bien cuit Normal 5
Galettes de hamburgers Bien cuit Hi (élevé) 4
Côtelettes de porc Bien cuit Normal 4
Poulet Bien cuit Lo (bas) 4
Poisson Bien cuit Lo (bas) 4
2. Appuyez sur
3. Appuyez sur
(nor s’affichera).
4. Pour programmer le réglage élevé du gril, appuyez sur deux fois (hi
s’affichera). Pour programmer le réglage bas du gril, appuyez sur deux fois
(lo s’affichera).
5. Le gril du four est réglé correctement lorsque le voyant situé au-dessus de la
touche
annulé à tout moment en appuyant sur
Remarque : Le réglage du gril peut être changé à tout moment durant la
cuisson. Pour changer la température, appuyez sur
pour augmenter d’un degré ou sur
réglage lo (bas) du gril afin d’éviter de trop brunir ou d’assécher les aliments
qui doivent être bien cuits.
. « - - » s’affichera.
ou une fois pour programmer le réglage normal du gril
cesse de clignoter et reste allumé. Le réglage du gril peut être
.
et sur une fois
pour baisser d’un degré. Choisissez le
Position
d'arrêt
pour gril
6. Placez la grille dans la lèchefrite, puis placez la nourriture sur la grille (certains
modèles). N’UTILISEZ PAS la lèchefrite sans sa grille et NE RECOUVREZ PAS
la grille de papier d’aluminium. La graisse ainsi exposée pourrait s’enflammer.
7. Placez la lèchefrite sur la grille du four. Ouvrez la porte du four jusqu’à la
position d’arrêt durant la cuisson au gril (reportez-vous à l’illustration).
8. Passez la viande au gril sur un côté jusqu’à ce qu’elle brunisse. Retournez-la
et faites-la cuire de l’autre côté. Remarque : Tirez toujours la grille du four
jusqu’à la position d’arrêt avant de tourner la nourriture ou de la retirer du four.
9. Lorsque la cuisson au gril est terminée, appuyez sur
10. Pour retirer la lèchefrite du four, servez-vous toujours de maniques.
.
10
Page 29

Ajustement de la température du four (certains modèles)
Votre four a été réglé et testé en usine de façon à fournir une température de cuisson précise. Lors des premières utilisations,
suivez attentivement les durées et les températures recommandées dans vos recettes. Si, après quelques essais, vous croyez
que votre four est trop chaud ou ne l’est pas assez, vous pouvez ajuster la température du four selon vos préférences.
Remarque : N’AJUSTEZ PAS la température de votre four en vous fiant à des thermomètres pour four comme ceux que vous
retrouvez dans les épiceries. Ceux-ci ne sont pas toujours précis.
Pour ajuster la température du four (n’utilisez pas les fonctions Bake (cuisson) ni Broil (gril) pendant l’ajustement de la
température du four) :
1. Appuyez sur la touche
réglée à l’usine de
Remarque : Si la température du four a déjà été ajustée par rapport à celle réglée à l’usine, ce sera plutôt la valeur de cet
ajustement de température qui clignotera sur l’afficheur.
2. Vous pouvez augmenter la température du four par intervalles de 5 °F à chaque pression de la touche
ajustement maximal de +35 °F. Vous pouvez aussi ajuster la température à la baisse par intervalles de 5 °F à chaque
pression de la touche
réglées à l’usine pour afficher la température en degrés Fahrenheit (°F). Pour afficher les commandes en degrés Celsius
(°C), reportez-vous au paragraphe Changement du mode d’affichage de la température de la section « Fonctions des
commandes du four » du présent guide d’utilisation et d’entretien.
3. Si aucune autre touche n’est enfoncée après un délai de cinq secondes, l’afficheur commencera à clignoter.
4. Si vous ne voulez pas conserver le réglage affiché, appuyez sur la touche
un signal sonore. Vous annulerez ainsi le processus de réglage de la température. Si vous désirez recommencer cette
procédure, retournez à l’étape 1 ci-dessus OU;
5. Si vous désirez conserver le réglage, attendez que l’afficheur arrête de clignoter et que les commandes du four émettent un
signal sonore.
6. Le réglage de la température a été accepté par les commandes du four et l’afficheur revient au mode d’affichage de l’heure.
Remarques : Vous pouvez également procéder à un tel réglage lorsque la température de votre four est réglée pour
fonctionner en degrés Celsius (°C). Dans ce cas, vous pouvez augmenter ou diminuer la température par intervalles de 1 °C
en appuyant sur les flèches pointant vers le haut
00.
et tenez-la enfoncée jusqu’à ce que l’afficheur clignote et affiche le changement de la température
, jusqu’à un
(gamme de réglage totale allant de -35 à +35). Remarque : Les commandes du four ont été
avant que les commandes du four n’émettent
(maximum +18 °C) ou vers le bas (maximum -18 °C).
FRANÇAIS
11
Page 30

Entretien et nettoyage
Tableau de nettoyage
Surfaces
Verre, boutons de
commande et parties
de la caisse en
plastique peint
Tableaux de
commande et zones
d’affichage peints
Surface de cuisson,
lèchefrite et grille
(certains modèles),
tiroir-gril (certains
modèles),
revêtement de porte
et sole du four
Grilles du four
Comment nettoyer
Pour le nettoyage général, utilisez un chiffon doux et une solution composée de détergent à
vaisselle et d’eau ou d’une part d’eau pour une part de vinaigre. Rincez la zone nettoyée à l’eau
claire. Séchez et polissez à l’aide d’un chiffon doux. Les nettoyants pour verre peuvent être
utilisés si vous les vaporisez d’abord sur un chiffon doux. NE VAPORISEZ PAS de liquides
directement sur le tableau de commande et les zones d’affichage. N’UTILISEZ PAS de grandes
quantités d’eau sur le tableau de commande : une trop grande quantité d’eau sur la zone de
commande pourrait endommager l’appareil. N’UTILISEZ PAS d’autres nettoyants liquides,
nettoyants abrasifs, tampons à récurer ou papiers essuie-tout : ils endommageront le fini.
Avant de nettoyer le tableau de commande, mettez toutes les commandes à la position Arrêt
(OFF) et enlevez les boutons en les tirant de leur axe. Suivez les instructions de nettoyage
général fournies dans le paragraphe ci-dessus.
Frotter doucement avec un tampon à récurer savonneux permettra d’enlever la plupart des
taches. Rincez avec un mélange à parts égales d’eau et d’ammoniaque. Au besoin, recouvrez
les taches rebelles d’un papier essuie-tout trempé dans l’ammoniaque pendant 30 à 40 minutes.
Rincez à l’eau propre et avec un linge humide, puis frottez avec un tampon à récurer savonneux.
Rincez et séchez avec un linge propre. Enlevez bien tous les produits de nettoyage, sinon l’émail
risque de s’abîmer lors des prochaines utilisations de l’appareil. NE PULVÉRISEZ PAS de
produit de nettoyage pour four sur le dessus de la cuisinière.
Enlevez les grilles du four. Reportez-vous au paragraphe « Retrait et remise en place des grilles
du four » de la section « Avant l’utilisation du four ». Utilisez un produit de nettoyage abrasif
doux et suivez les instructions du fabricant. Rincez à l’eau propre et laissez sécher. Après le
nettoyage, frottez les côtés des grilles avec du papier ciré ou un linge contenant une petite
quantité d’huile à salade (pour mieux les faire glisser).
Porte du four
Acier
inoxydable (certains
modèles)
Table de cuisson en
vitrocéramique
Utilisez du savon et de l’eau pour bien nettoyer le dessus, les côtés et l’avant de la porte du four.
Rincez bien. Vous pouvez utiliser un nettoyant pour vitres sur la fenêtre externe de la porte du
four. NE TREMPEZ PAS la porte dans l’eau. NE LAISSEZ PAS d’eau ni de nettoyant pour
vitres entrer dans les évents de la porte. N’UTILISEZ PAS de produits de nettoyage de four,
de poudres à récurer ou d’autres produits de nettoyage puissants et abrasifs sur l’extérieur de la
porte du four. NE NETTOYEZ PAS le joint de la porte du four. Sur les modèles autonettoyants, le
joint est tissé, ce qui est essentiel à une bonne étanchéité. Ne frottez pas le joint, ne
l’endommagez pas et ne l’enlevez pas.
Nettoyez l’acier inoxydable avec un linge et de l’eau savonneuse chaude. Rincez à l’eau claire
et essuyez avec un linge. N’UTILISEZ PAS de produit de nettoyage comportant une
concentration élevée en chlore ou en chlorure. N’UTILISEZ PAS de produits de récurage alcalins.
N’utilisez que des produits nettoyants pour la cuisine destinés au nettoyage de l’acier
inoxydable. Assurez-vous de rincer les produits utilisés sur la surface, sinon des taches
bleuâtres indélébiles pourraient apparaître lors du fonctionnement de l’appareil.
Reportez-vous au paragraphe Entretien et nettoyage de la table de cuisson de la section
Entretien et nettoyage.
12
Page 31

Entretien et nettoyage
Entretien et nettoyage de la table de cuisson
Un nettoyage régulier et adéquat est essentiel au bon entretien de votre table de cuisson
en vitrocéramique.
Avant d’utiliser votre table de cuisson pour la première fois, il est recommandé d’appliquer la crème de nettoyage CookTop® sur
la surface en vitrocéramique (visitez le site www.sears.com pour commander le produit de nettoyage, numéro d’article 40079).
Frottez avec un linge ou un tampon anti-rayures non abrasifs. Ceci facilitera le nettoyage des résidus de cuisson. La crème de
nettoyage spéciale pour table de cuisson laisse un fini protecteur qui permet d’éviter les égratignures et les éraflures.
Le frottement d’ustensiles à fond recouvert de cuivre ou d’aluminium peut
laisser des marques de métal sur la surface de la table de cuisson. Ces
marques doivent être enlevées immédiatement une fois que la table de cuisson
a refroidi, à l’aide de la crème de nettoyage. Les marques de métal peuvent
devenir permanentes si elles ne sont pas enlevées avant la prochaine
utilisation de la table de cuisson.
Les ustensiles de cuisine (fonte, métal, céramique ou verre) dont les fonds sont
inégaux peuvent marquer ou égratigner la surface de la table de cuisson. Ne
faites pas glisser d’objets en verre ou en métal sur la table de cuisson.
N’utilisez pas votre table de cuisson comme planche à découper ou comme
surface de travail. Ne cuisez pas directement les aliments sur la surface de la
table de cuisson, sans ustensile. Ne laissez pas tomber d’objets lourds ou
durs sur la surface; vous risqueriez de la casser.
Recommandations de nettoyage pour la table de cuisson en vitrocéramique
Avant de nettoyer la table de cuisson, assurez-vous que les commandes sont à la position OFF (arrêt) et que la
table de cuisson a REFROIDI.
N’UTILISEZ PAS de produit de nettoyage pour table de cuisson sur une surface encore chaude. Les
fumées se dégageant de l’appareil peuvent être nocives et endommager chimiquement la surface en vitrocéramique.
Saleté légère à modérée :
Appliquez quelques gouttes de crème de nettoyage CookTop® directement sur la table de cuisson. Utilisez un essuie-tout ou un
tampon anti-rayures en plastique non abrasif pour nettoyer la totalité de la surface de cuisson. Assurez-vous que celle-ci est bien
propre, sans résidu.
Saleté épaisse, brûlée :
Appliquez quelques gouttes de crème de nettoyage CookTop® directement sur la partie salie. Frottez la zone tachée avec un
tampon anti-rayures en plastique non abrasif en appuyant, au besoin. N’utilisez pas l’éponge avec laquelle vous avez nettoyé la
table de cuisson pour d’autres usages.
S’il reste encore de la saleté, grattez soigneusement celle-ci à l’aide d’un grattoir à
lame de rasoir, en le tenant à un angle de 30 degrés par rapport à la surface. Retirez
les saletés détachées avec une crème de nettoyage pour table de cuisson et frottez la
surface jusqu’à ce qu’elle soit propre.
REMARQUE IMPORTANTE : La table de cuisson en vitrocéramique peut être
endommagée par l’utilisation d’un tampon à récurer abrasif. N’utilisez que des
produits de nettoyage spécialement conçus pour les tables de cuisson en
vitrocéramique.
Plastique ou aliments à teneur élevée en sucre :
Ces saletés doivent être enlevées immédiatement si elles sont renversées ou si elles
ont fondu sur la surface en vitrocéramique. Des dommages permanents (comme la
piqûre de la surface) peuvent se produire si ces saletés ne sont pas enlevées
immédiatement. Après avoir éteint les éléments de surface, servez-vous d’un grattoir
à lame de rasoir ou d’une spatule en métal et d’un gant de cuisine pour gratter la
saleté de la surface (comme illustré). Laissez la table de cuisson refroidir et servezvous de la même méthode pour les saletés épaisses ou carbonisées.
FRANÇAIS
13
Page 32

Entretien et nettoyage
Entretien et nettoyage de la table de cuisson (suite)
N’utilisez pas les produits suivants sur la table de cuisson en vitrocéramique :
• Produits de nettoyage abrasifs, tampons à récurer comme les tampons
TAM PO NS
JAVELLISANT
ABRASIFS
NETTOYANTS
À RÉCURER
AMMONIAQUE
POUR FOUR
NETTOYANT
Entretien et nettoyage de l’acier inoxydable (certains modèles)
Certains modèles sont dotés de pièces extérieures en acier inoxydable. Un soin tout particulier doit y être apporté pour maintenir
l’apparence de l’acier inoxydable. Veuillez vous reporter au tableau fourni au début de la section Entretien et nettoyage de ce
manuel.
Retrait et remise en place de la porte du four :
métalliques et certains en nylon. Ils peuvent rayer la surface, ce qui la rendrait
plus difficile à nettoyer.
• Produits de nettoyage puissants comme le javellisant, l’ammoniaque ou les
produits de nettoyage pour four; ils risquent de marquer ou de décolorer la
surface.
• N’utilisez pas de papier essuie-tout, de chiffons ou d’éponges encrassés; ils
risquent de laisser de la saleté ou de la charpie sur la table de cuisson, laquelle
pourrait brûler et causer une décoloration.
ou
utilisez
un clou
CADRE DE LA
CUISINIÈRE
Fig. 1
BRAS DE
CHARNI
ÈRE
Fig. 2
environ
45 degrés
Charnière
de la porte
du four
REVÊTEMENT
DE LA PORTE
DU FOUR
Porte
du four
Retrait et remise en place de la porte du four :
La porte est lourde. Pour la ranger de façon sécuritaire pendant le
nettoyage, posez-la à plat, l’intérieur de la porte vers le sol.
Retrait de la porte du four :
1. Ouvrez complètement la porte du four (parallèle au sol; fig. 1).
2. Enlevez les 2 vis situées à l’intérieur de la contre-porte (fig 2, A.)
3. Introduisez les deux vis dans les trous de charnière de la porte situés sur le côté
du bras de charnière, une dans chaque charnière (fig. 2, B).
4. Fermez la porte du four jusqu’à la butée (ne forcez pas la porte pour la fermer plus
loin). La mise en place de ces vis devrait vous permettre de garder la porte
ouverte à un angle d’environ 45°.
5. Tenez fermement la porte du four de chaque côté et faites-la glisser vers le haut
pour la sortir de ses charnières en conservant le même angle (fig. 3).
6. Pour nettoyer la porte du four, référez-vous aux instructions du tableau « Entretien
et nettoyage ».
Pour remettre la porte du four en place :
1. Assurez-vous que les bras des charnières sont restés dans la même position, à
un angle de 45°. Assurez-vous que les vis empêchent toujours les bras des
charnières de bouger. Si les vis sont tombées des trous des charnières, ces
dernières peuvent se replier contre le cadre du four et peuvent vous pincer les
doigts ou écailler la finition vitrifiée du cadre avant du four.
2. Tenez la porte de chaque côté près du haut de la porte, tout en la faisant reposer
sur votre genou. Insérez les profilés situés dans le bas de la porte sur les bras
des charnières de porte (fig. 3).
3. Laissez la porte glisser vers le bas sur les charnières, en la tenant à un angle de
45°. Les bras des charnières doivent s’insérer aussi loin que possible dans les
coins inférieurs.
4. Ouvrez la porte complètement (parallèlement au sol) et enlevez les deux vis des
trous des charnières de porte.
5. Réinstallez les 2 vis dans la contre-porte (fig. 2, C).
6. Si la porte n’est pas alignée avec le cadre du four, enlevez-la et répétez les étapes
ci-dessus.
Fig. 3
14
Page 33

Entretien et nettoyage
L'élément de cuisson peut
être soulevé de 10 à 13 cm
(4 ou 5 po) pour faciliter le
nettoyage de la sole du four.
Lampe
du four
Nettoyage de la sole du four
L’élément de cuisson est conçu pour être soulevé délicatement à la main, à partir
de l’avant. Vous pouvez ainsi nettoyer plus facilement la sole du four. Ne soulevez
pas l’élément à plus de 10 à 13 cm (4 ou 5 po) de sa position normale.
Remplacement de l’ampoule du four (certains modèles)
Sur certains modèles, la lampe du four s’allume automatiquement à l’ouverture de
la porte. Certains modèles ont un interrupteur situé sur le tableau de commande
pour allumer la lampe du four. La lampe du four est située à l’arrière du four.
Remplacement de l’ampoule du four :
1. Coupez l’alimentation électrique ou débranchez la cuisinière.
2. Remplacez l’ampoule par une nouvelle ampoule de 40 watts pour
électroménagers.
3. Rétablissez le courant (ou rebranchez la cuisinière).
4. L’horloge doit alors être remise à l’heure. Pour la réactiver, reportez-vous à la
section Commande des brûleurs de surface du présent Guide d’utilisation et
d’entretien.
Assurez-vous que la cuisinière est débranchée et que toutes les
pièces sont FROIDES avant de remplacer l’ampoule du four. Portez un gant en cuir
pour vous protéger contre le bris éventuel du verre.
FRANÇAIS
15
Page 34

Avant de faire appel au service après-vente
Solutions aux problèmes courants
Avant de faire appel au service après-vente, consultez cette liste. Cela pourrait vous faire économiser temps et argent. Cette
liste décrit des situations courantes qui ne sont causées ni par un défaut de fabrication ni par un matériau défectueux.
CAUSE POSSIBLE/SOLUTIONPROBLÈME
La cuisinière n’est pas de niveau.
La cuisinière est difficile à déplacer. La
cuisinière doit être accessible en cas de
réparation.
L’élément de surface est trop chaud ou
pas assez chaud.
L’élément de surface ne chauffe pas.
La cuisinière ne fonctionne pas dans sa
totalité.
L’éclairage du four ne fonctionne pas.
Mauvaise installation. Placez la grille du four au centre du four. Placez un niveau sur la
grille. Réglez les pieds de mise à niveau jusqu’à l’obtention du bon niveau.
Assurez-vous que le sol est de niveau et qu’il peut supporter le poids de l’appareil.
Adressez-vous à un charpentier pour corriger l’affaissement ou la pente du plancher.
Des armoires mal alignées peuvent laisser croire que la cuisinière n’est pas de niveau.
Assurez-vous que les armoires sont d’équerre et qu’il y a assez d’espace libre pour la
cuisinière.
Les armoires ne sont pas d’équerre ou sont trop serrées contre l’appareil. Adressezvous à un ébéniste ou à un installateur pour qu’il apporte les modifications nécessaires.
La moquette gêne la cuisinière. Laissez assez d’espace pour pouvoir soulever la
cuisinière par-dessus la moquette.
Mauvais réglage. Assurez-vous que la commande appropriée est activée pour l’élément
de surface utilisé.
Vous utilisez des ustensiles légers ou crochis. N’utilisez que des ustensiles lourds ou
moyennement lourds à fond plat. Les casseroles à fond plat permettent une meilleure
cuisson que celles dont le fond est gondolé. Le matériau et le poids des ustensiles
affectent le chauffage. Les ustensiles de poids moyen ou plus important chauffent de
façon égale. Parce que les ustensiles légers ne chauffent pas la nourriture de façon
uniforme, celle-ci peut facilement brûler.
La cuisinière n’est pas alimentée en électricité. Reportez-vous à la partie « La cuisinière
ne fonctionne pas dans sa totalité » de la section Avant de faire appel au service après-
vente, sur cette page.
Mauvais réglage. Assurez-vous que la commande appropriée est activée pour l’élément
de surface utilisé.
Assurez-vous que la fiche du cordon d’alimentation est bien branchée.
Le câblage n’est pas complet. Communiquez avec Sears au 1 800 4-MY-HOME®
(reportez-vous à la dernière de couverture).
Panne de courant. Vérifiez l’éclairage de la maison pour vous en assurer. Appelez la
compagnie d’électricité de votre région.
Remplacez ou resserrez l’ampoule. Reportez-vous au paragraphe « Remplacement
de l’ampoule du four » de la section Entretien et nettoyage du présent Guide
d’utilisation et d’entretien pour connaître la marche à suivre.
16
Page 35

Avant de faire appel au service après-vente
Solutions aux problèmes courants (suite)
CAUSE POSSIBLE/SOLUTIONPROBLÈME
Le four dégage beaucoup de fumée lors
de la cuisson au gril.
Flamme à l’intérieur du four ou fumée
sortant de l’évent.
Il y a des égratignures ou des éraflures
sur la table de cuisson
(pour les tables de cuisson en
vitrocéramique seulement).
Il y a des marques de métal
(pour les tables de cuisson en
vitrocéramique seulement).
Il y a des stries ou des taches brunes
(pour les tables de cuisson en
vitrocéramique seulement).
Des zones sont décolorées et brillantes
(pour les tables de cuisson en
vitrocéramique seulement).
Mauvais résultats de cuisson.
Les commandes ne sont pas correctement réglées. Suivez les instructions données
dans la section Commandes du four.
Assurez-vous que la porte est ouverte à la position d’arrêt pour gril.
La viande est placée trop proche de l’élément du gril. Changez la position des grilles
en laissant plus de place entre la viande et l’élément du gril. Pour saisir, préchauffez
l’élément du grill.
La viande n’est pas correctement préparée. Enlevez l’excédent de gras. Tailladez les
bords de gras restants pour qu’ils ne se soulèvent pas, sans couper dans le maigre.
La lèchefrite est à l’envers et la graisse ne s’écoule pas. Placez toujours la grille sur
la lèchefrite en plaçant les nervures vers le haut et les fentes vers le bas pour permettre
à la graisse de s’écouler dans la lèchefrite.
La graisse s’est accumulée sur les surfaces du four. Un nettoyage régulier est
nécessaire si vous utilisez fréquemment la cuisson au gril. La graisse accumulée et
les débordements produisent une fumée excessive.
Il y a eu des renversements excessifs dans le four. Cela est normal, surtout lorsque
vous cuisez à haute température, que des tartes débordent ou qu’une grande quantité
de graisse s’est accumulée sur la plaque de sole. Essuyez ces débordements.
Pour connaître la marche à suivre si un feu se produit dans le four, reportez-vous à la
section « Commandes du four » du présent Guide d’utilisation et d’entretien.
Les substances à grains grossiers comme le sel et le sable qui se trouvent entre
l’ustensile et la table de cuisson peuvent causer des égratignures. Assurez-vous que
la surface de cuisson et le fond de l’ustensile sont propres avant de les utiliser. Les
petites égratignures n’affectent pas la cuisson et deviendront de moins en moins
visibles avec le temps.
Des produits de nettoyage non recommandés pour les tables de cuisson en
vitrocéramique ont été utilisés. Reportez-vous au paragraphe « Entretien et nettoyage
de la table de cuisson » de la section Entretien et nettoyage.
Un ustensile à fond rugueux a été utilisé. Utilisez des ustensiles à fond plat et lisse.
Des ustensiles en métal ont glissé sur la surface de cuisson et l’ont éraflée. Ne faites
pas glisser d’ustensiles en métal sur la surface de cuisson. Utilisez une crème de
nettoyage pour les tables de cuisson en vitrocéramique afin d’enlever les marques.
Reportez-vous au paragraphe « Entretien et nettoyage de la table de cuisson » de la
section Entretien et nettoyage.
Des renversements ont cuit sur la surface. Reportez-vous au paragraphe « Entretien
et nettoyage de la table de cuisson » de la section Entretien et nettoyage du présent
Guide d’utilisation et d’entretien pour en savoir plus.
Des minéraux provenant de l’eau ou de la nourriture se sont déposés sur la surface.
Enlevez-les en utilisant une crème de nettoyage pour tables de cuisson en vitrocéramique.
Servez-vous d’ustensiles dont le fond est propre et sec.
De nombreux facteurs affectent les résultats de cuisson. Assurez-vous de la bonne
position des grilles du four. Centrez les aliments dans le four et disposez les plats pour
permettre une bonne circulation de l’air. Laissez le four préchauffer à la température
choisie avant d’y placer les aliments. Essayez d’ajuster la durée de cuisson ou la
température recommandée dans la recette. Si vous pensez que le four est trop chaud
ou pas assez, reportez-vous à la section Ajustement de la température du four de
ce guide.
FRANÇAIS
17
Page 36

 Loading...