

Sears free spirit C 249 30236 0 Owner's Manual
C 249 30236 0
OWNER’S MANUAL
ASSEMBLY‧OPERATION‧MAINTENANCE
WARRANTY‧PART ORDERING
CAUTION:
Exercise of a strenuous nature, as is customarily done on this equipment, should not be
undertaken without first consulting a physician. No specific health claims are made or implied as they
relate to the equipment.
IMPORTANT: Read all instructions carefully before using this product. Retain this owner’s
manual for future reference.
SEARS CANADA INC.
‧
TORONTO , ONTARIO M5B 2B8

1 ©2007
TABLE OF CONTENTS
Warranty……………………………… 2
Safety Precautions……………………. 3
Assembly Check List…………………. 4
Assembly……………………………… 5-6
Folding………………………………… 7
Treadmill & Monitor Operation…….. 8-14
Parts list……………………………….. 15-18
Overview Drawing……………………. 19-20
Trouble Shooting……………………… 21
Adjustment……………………………. 22
Maintenance…………………………... 23-25
Training guidelines…………………… 26-28
Stretching……..………………………. 29-30
Ordering Replacement parts ……….. 31
Service and Parts ……………………. 32

2 ©2007
WHAT DOES THIS WARRANTY COVER? This warranty covers your Free Spirit Treadmill against
defects in material and workmanship when used for the purpose intended, under normal conditions and
provided it receives proper care.
HOW LONG DOES THE COVERAGE LAST? This warranty lasts for one year on all parts and
labour, 3 years on motor only and 10 years on the frame from date of purchase. This warranty is not
transferable and is extended only to the original owner.
WHAT WILL SEARS DO? Sears will provide a replacement part at no charge for any part found
defective in workmanship or materials during the warranty period.
WHAT DOES THIS WARRANTY NOT COVER? This warranty does not cover fitness products
which are (1) used for commercial or other income producing purposes, or (2) subject to misuse, neglect,
accident or unauthorized repairs and alterations. Some provinces do not allow the exclusion or limitation
of incidental or consequential damages, so the above limitation or exclusion may not apply to you.
HOW DO YOU GET SERVICE? In order to obtain service as provided by this warranty, contact your
nearest Sears Canada Inc. service center.
WHAT DOES THIS WARRANTY COVER? This warranty covers your treadmill motor against
defects in material and workmanship when used for the purpose intended, under normal conditions and
provided it receives proper care.
HOW LONG DOES THE COVERAGE LAST? This warranty lasts for three years from date of
purchase. This warranty is not transferable and is extended only to the original owner.
WHAT YOU NEED TO DO? You need to record the date of purchase in the area provided below.
You must keep your receipt which shows the date of purchase of your treadmill. We suggest you staple
it to this page.
WHAT WILL SEARS DO? Sears provide a replacement part at no charge for any part found defective
in workmanship or materials during the warranty period.
WHAT DOES THIS WARRANTY NOT COVER? This warranty does not cover fitness products which
are (1) used for commercial or other income producing purposes, or (2) subject to misuse, neglect,
accident or unauthorized repairs and alterations. Some provinces do not allow the exclusion or limitation
of incidental or consequential damages, so the above limitation or exclusion may not apply to you.
HOW DO YOU GET SERVICE? In order to obtain replacement parts as provided by this
warranty, contact your nearest Sears Canada Inc. store or service center.
WARRANTY
MANUFACTURER LIMITED WARRANTY, REPAIR AND SERVICE
SEARS THREE-YEAR MOTOR WARRANTY
3 ©2007
IMPORTANT SAFETY INFORMATION
THIS UNIT IS INTENDED FOR HOUSEHOLD USE ONLY
READ ALL INSTRUCTIONS BEFORE USING THIS TREADMILL
CAUTION: Before starting any exercise program, it is recommended that you consult your physician.
WARNING: Connect this unit to a properly grounded outlet only.
DANGER: To reduce the risk of electric shock, always unplug the treadmill from the electrical outlet immediately after
using and before cleaning.
WARNING
To reduce the risk of burns, fire, electric shock, or injury to persons:
1. Use 120 volt a.c. household current on a dedicated circuit.
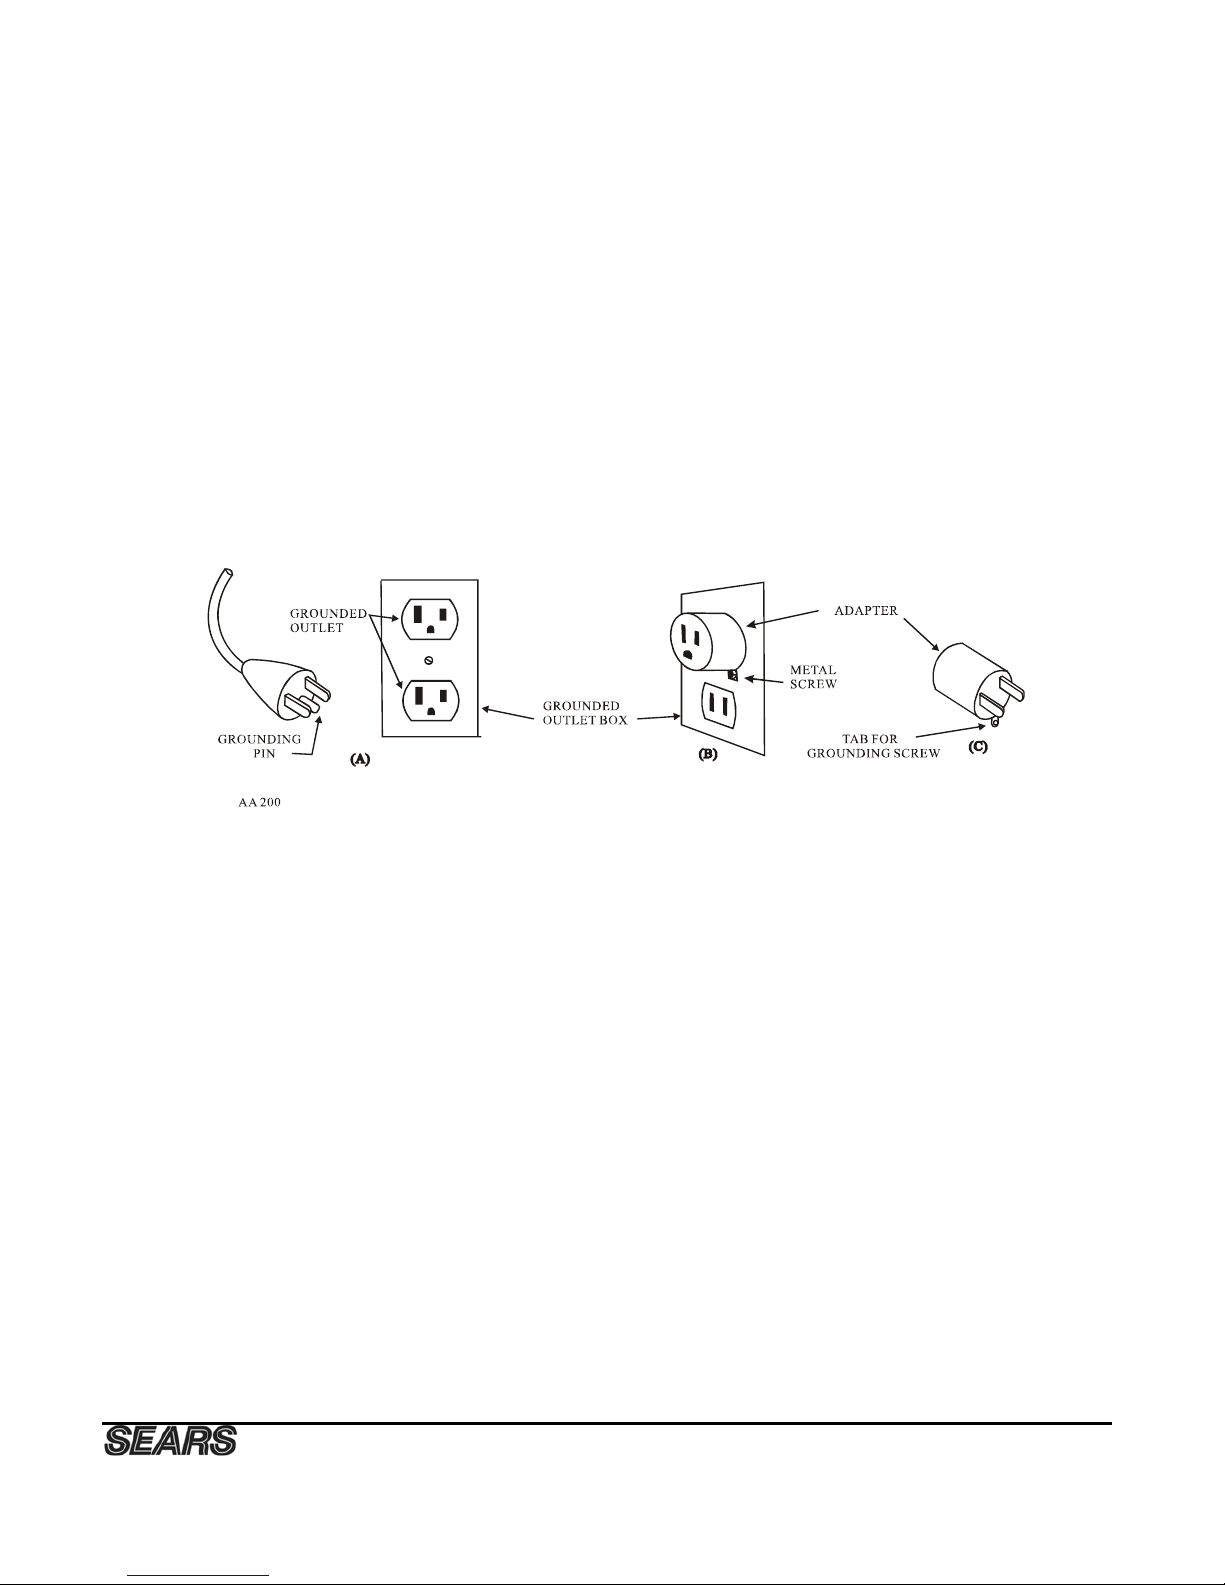
Grounding Instructions
This product must be grounded. If it should malfunction or breakdown, grounding provides a path of least resistance for electric current to reduce
the risk of electric shock. This product is equipped with a cord having an equipment-grounding conductor and a grounding plug. The plug must be
plugged into an appropriate outlet that is properly installed and grounded in accordance with all local codes and ordinances. See diagram below for
grounding methods.
2.The use of an extension cord with this product is not recommended. If an extension cord is needed, use a short (less than 10 feet) heavy gauge
(14 gauge or better) extension cord with a three prong (grounded) plug and receptacle.
3. Never leave the treadmill unattended when plugged in. Unplug from the outlet when not in use and before removing or replacing parts.
4. Never operate the treadmill if it has a damaged cord or plug, if it is not working properly, if it has been dropped, damaged, or exposed to water.
5. Do not pull the treadmill by the power supply cord or use cord as a handle. Keep cord away from heated surfaces and open flames.
6. Fitness equipment must always be installed and used on a flat surface. Do not use outdoors or near water.
7. Do not insert any objects into any openings.
8. Keep children and pets away from this equipment at all times while exercising.
9. Handicapped individuals should have medical approval and close supervision when using this treadmill.
10.Do not place hands or feet under the treadmill. Always keep hands and legs off of the treadmill when others are using it.
11.Never turn on treadmill while standing on treadbelt. Always return the treadmill to slow speed to provide for safe dismount and low speed
restart.
12.To disconnect, turn all controls to the off position, then remove plug from outlet.
13.Use the treadmill only for it’s intended use as described in this manual. Do not use any attachments that are not recommended by the
manufacturer.
14.Warm up 5 to 10 minutes before each workout and cool down 5 to 10 minutes afterward. This allows your heart rate to gradually increase and
decrease and will help prevent straining muscles.
15. Never hold your breath while exercising. Breathing should remain at a normal rate in conjunction with the level of exercise being performed.
16. Start your program slowly and very gradually increase your speed and distance.
17. Always wear suitable clothing and footwear while exercising. Do not wear loose fitting clothing that could become entangled with the moving
parts of your treadmill.
18. Do not walk or jog barefoot, in stocking feet or loose fitting shoes or slippers.
19. Care must be taken when lifting or moving the equipment, so as not to injure your back. Always use proper lifting techniques.
WARNING: Before beginning any exercise program consult your physician. This is especially important for
individuals over the age of 35 or persons with pre-existing health problems. Read all instructions before using any
fitness equipment. We assume no responsibility for personal injury or property damage sustained by or through the use
of this product.
4 ©2007
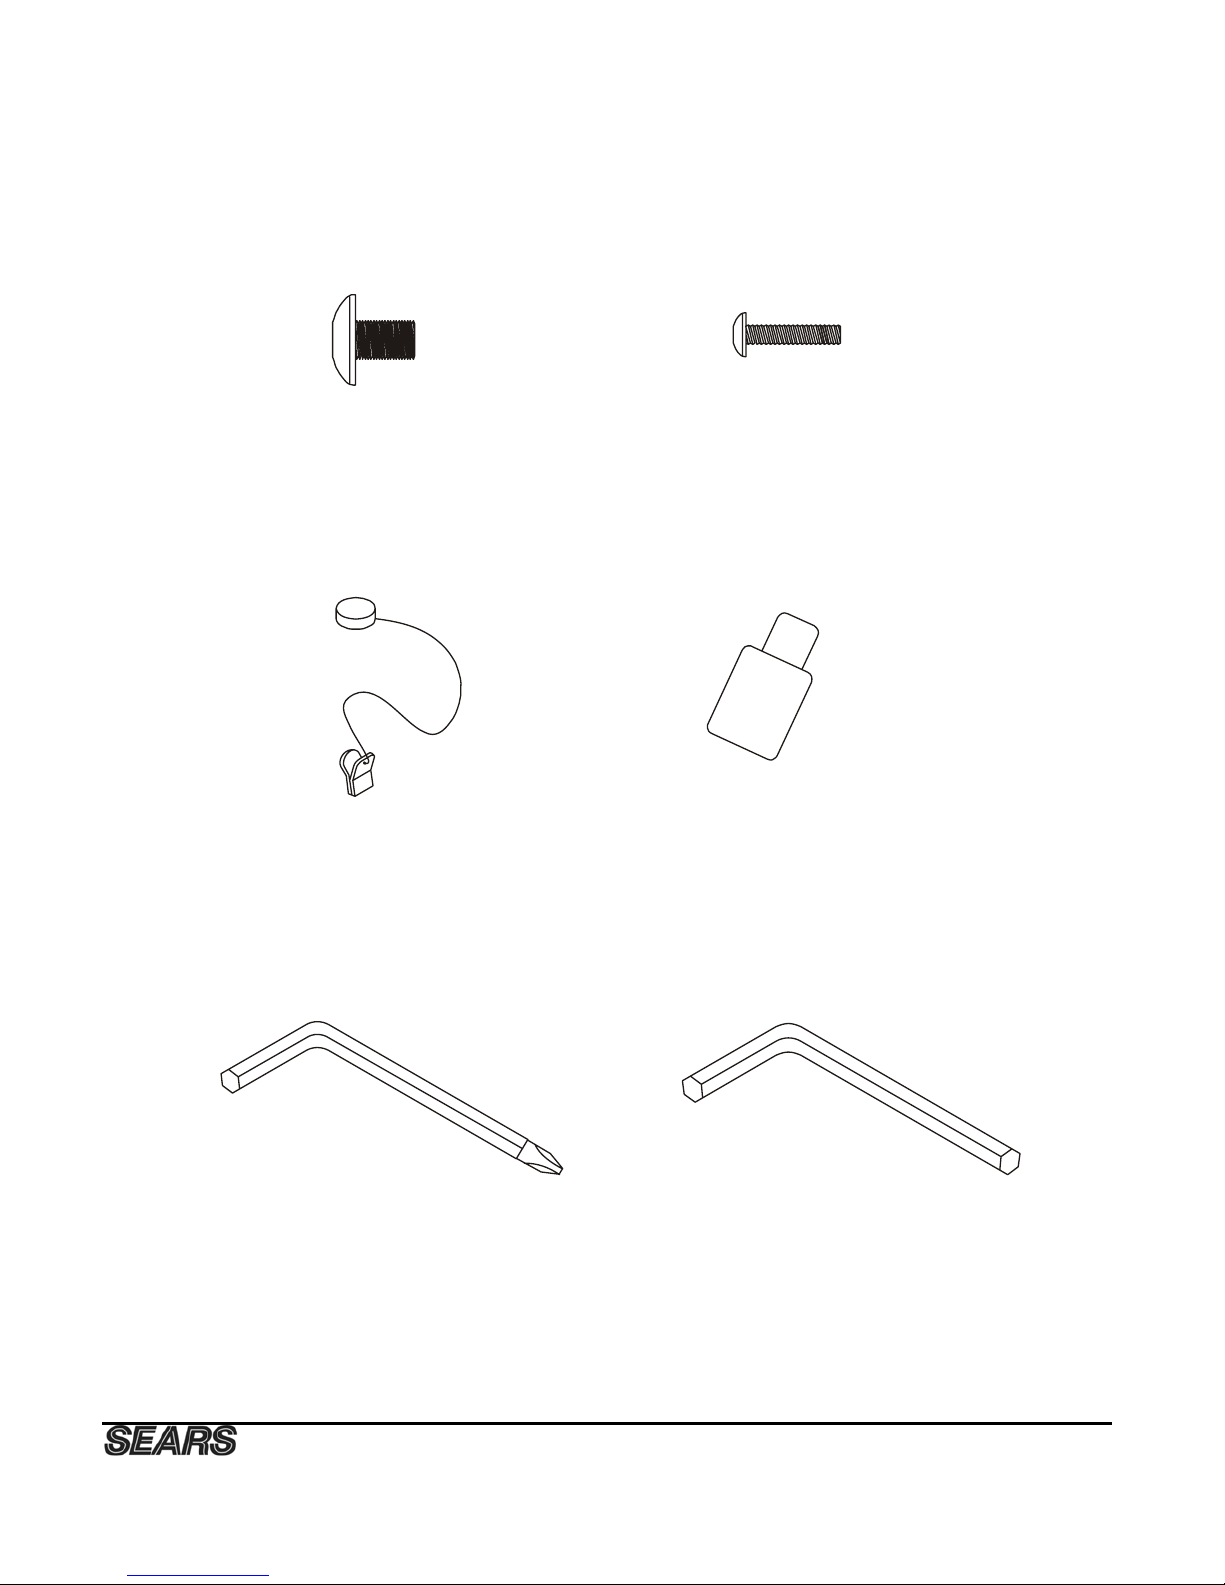
ASSEMBLY CHECK LIST
#135. M3 x 18mm
Button Head Bolt (3pc)
#30. Lubricant (1pc)
#75. Safety Key (1pc)
#132. M6 Allen Wrench (1pc)
#131. Combo M5 Allen Wrench
and Screwdriver (1pc)
#130. 5/16” x ½”
Button Head Bolt (12 pcs)
5 ©2007
ASSEMBLY

6 ©2007
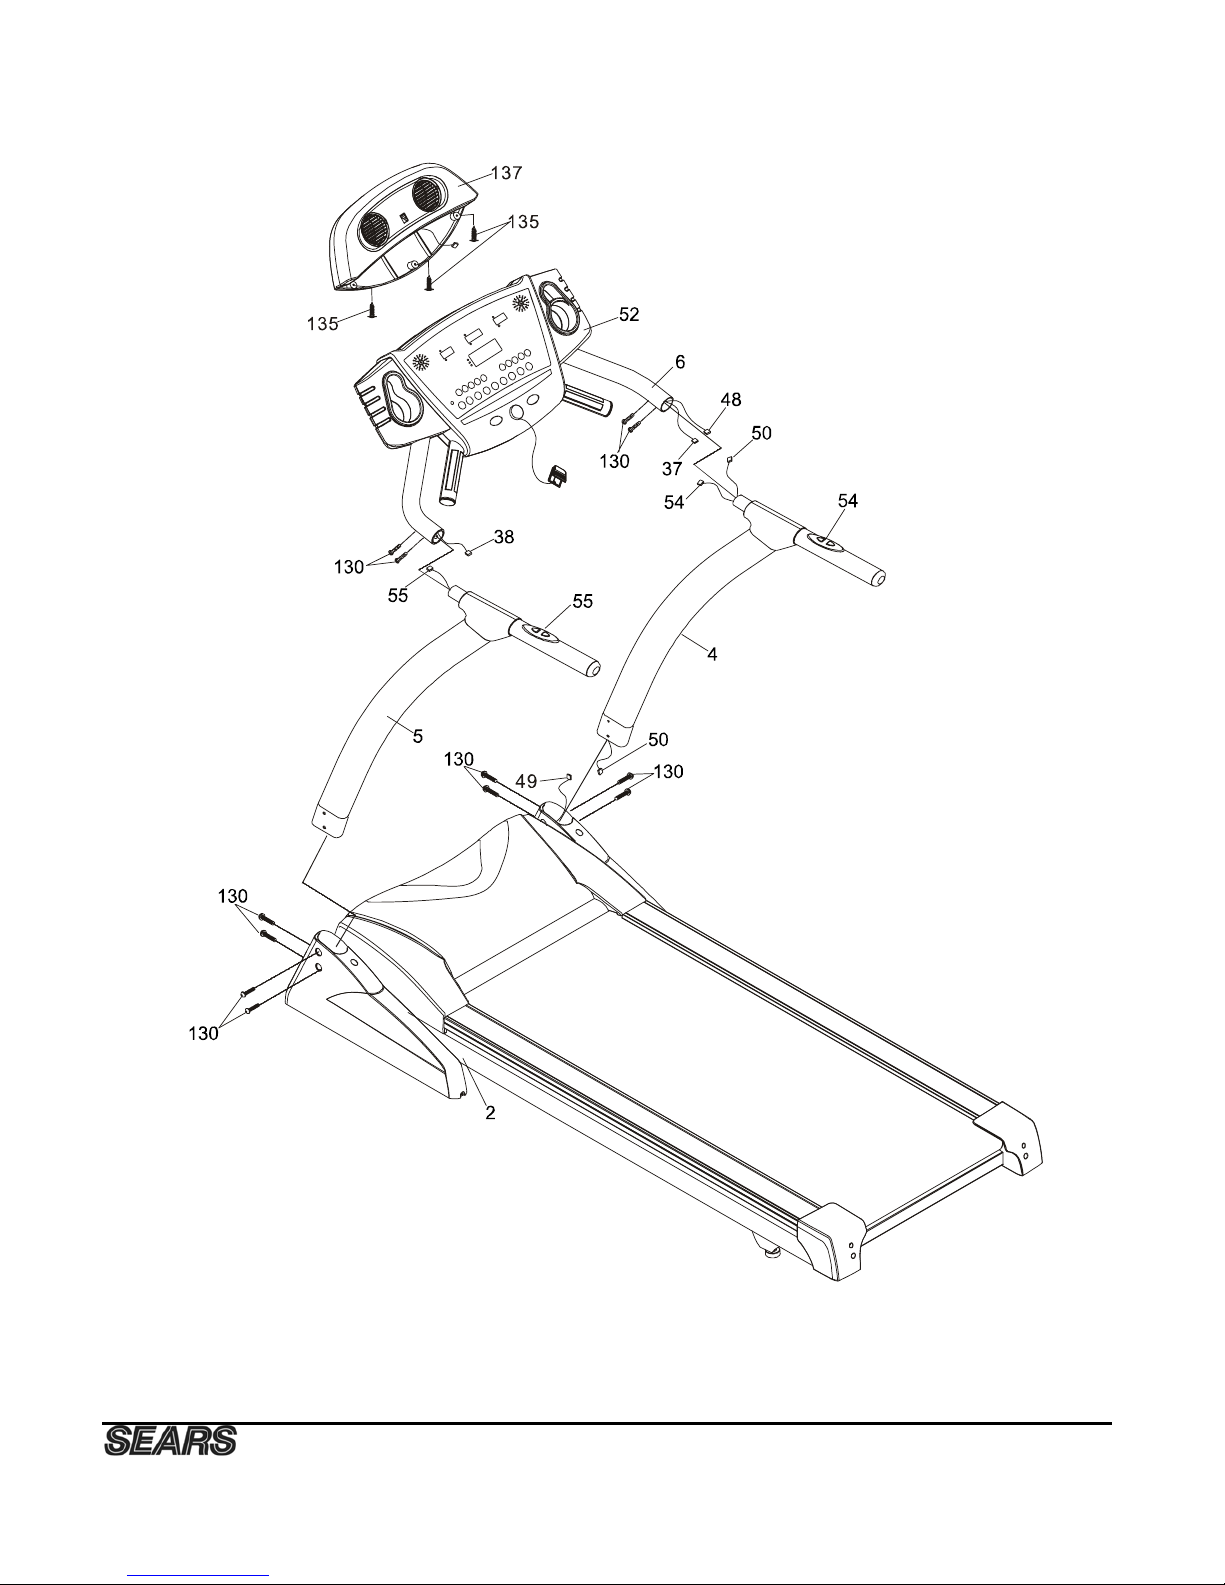
ASSEMBLY INSTRUCTIONS
STEP 1
It will take two people to assemble your unit. Remove all the components from the carton.
STEP 2
Connect the computer extension cable (50) to the lower computer cable (49).
NOTE: Ensure that the wire is safely inserted i n the upright to avoid pinching the computer wire.
STEP 3
Fasten the right upright (4) into the frame base (2) securing with four button head bolts 5/16” x 1/2”
(130) using the combination wrench / screwdriver (131).
Repeat for left upright (5).
HAND TIGHTEN ONLY FOR NOW
STEP4
Connect the computer extension cable (50) to the upper computer extension cable (48) from the
console support (6).
Connect the speed switch w/cable (54) to the upper speed cable (37) from the console support (6).
Connect the incline switch w/cable (55) to the upper incline cable (38) from the console support (6).
STEP 5
Install the console support assembly (6) into the right and left uprights (4,5) securing with four button
head bolts 5/16” x ½” (130) using the combination wrench / screwdriver (131).
HAND TIGHTEN ONLY FOR NOW
NOTE: Carefully insert the cables inside the console assembly, so that you do not pinch and cut the
cables when fastening the console assembly.
STEP 6
Connect the cable from the cooling fan assembly (137) to the back of the console (52).
Attach the cooling fan assembly (137) to the top of the console assembly (52) securing with three
button head bolts M3 x 18mm (135) using the combination wrench / screwdriver (131).
ENSURE THAT ALL NUTS AND BOLTS ARE NOW FIRMLY TIGHTEN
7 ©2007
MOVING YOUR TREADMILL
Before moving the treadmill turn the power switch off located on front of the motor co ver and unplug the power
cord.
Caution: You must be able to safely lift 20 kg (45lbs) in order to raise\lower and move the treadmill.
To protect the floor or carpet from damage, place a mat under the treadmill. Keep the treadmill out of direct
sunlight. Do not leave the treadmill in the storage position in temperatures above 85 degrees Fahrenheit.
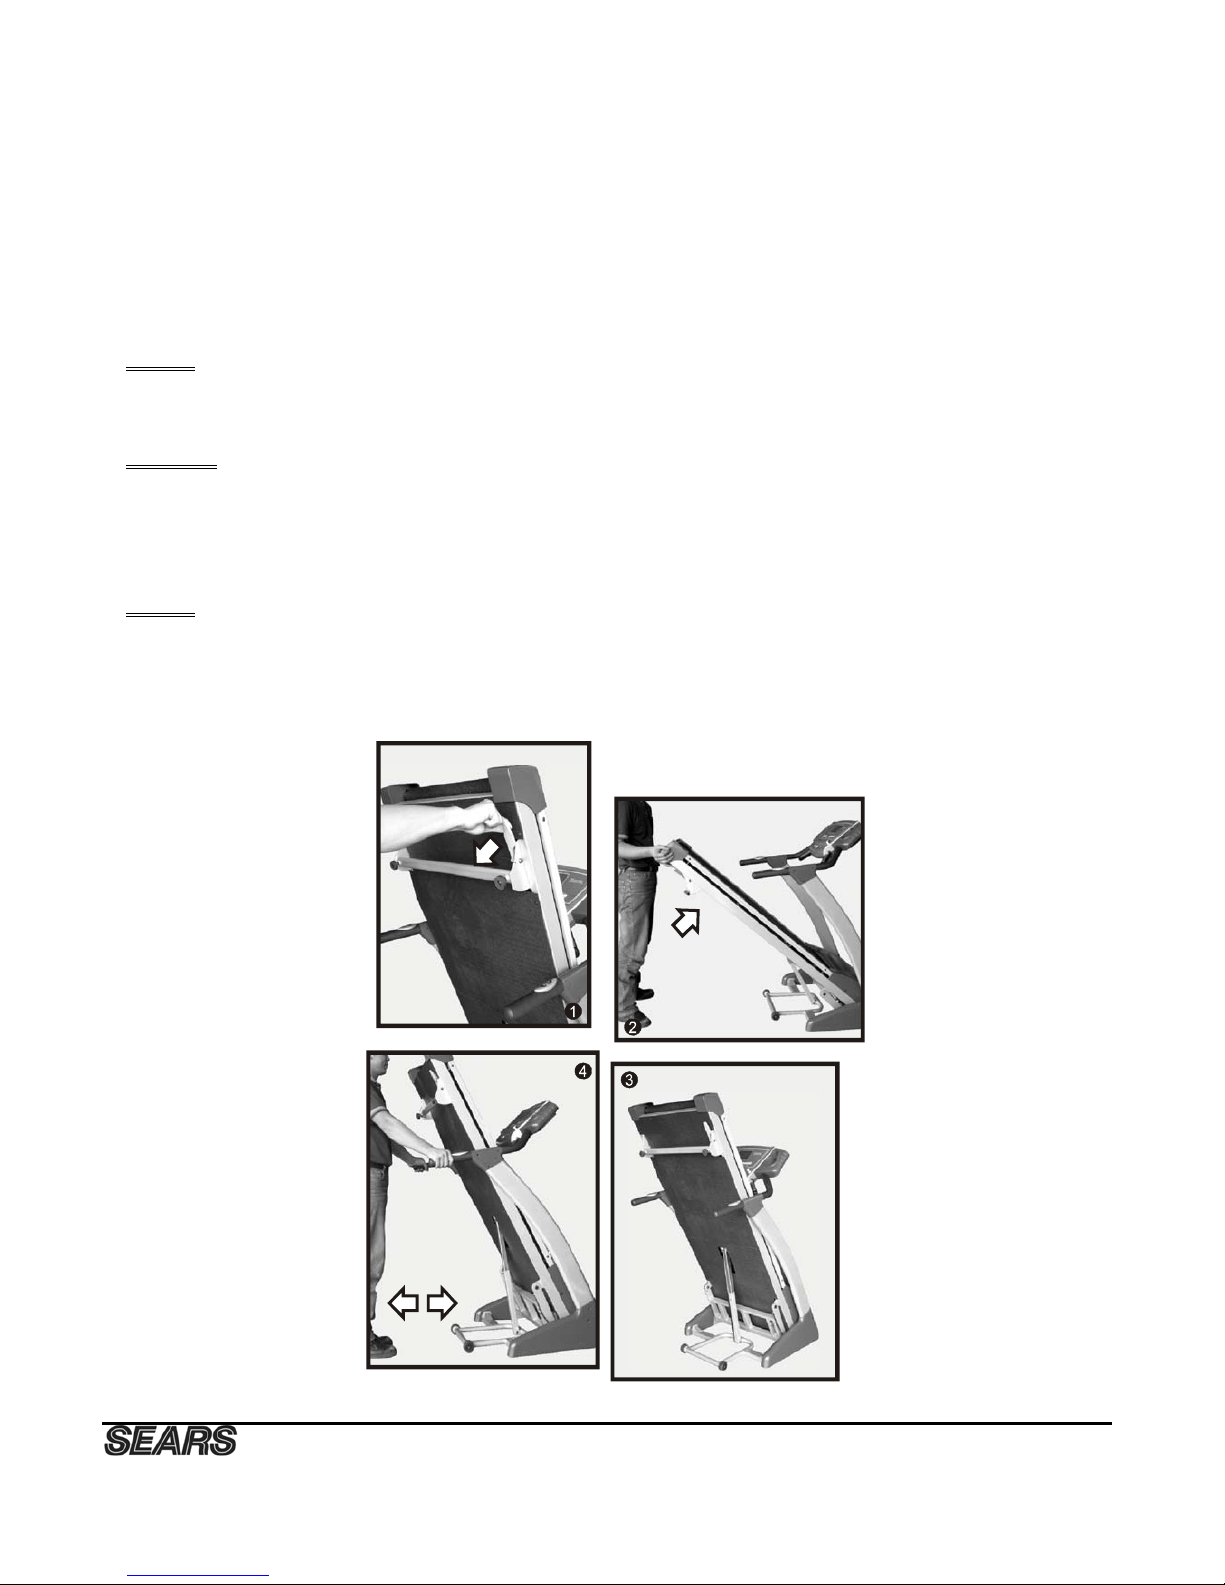
Folding
Ensure the incline angle of the treadmill is at it lowest position.
Lift the treadmill running deck until it is locked by the locking pedal as shown in FIGURE 2-3.
Unfolding
Apply slight forward pressure at the rear roller area to relieve pressure on the locking system. Hold the treadmill
running deck with your left hand. Pull the clenching pedal with your right hand and slowly lower the treadmill
running deck as shown in FIGURE 1. The treadmill running deck will lower unassisted when it reaches about waist
high.
Moving
Before moving the treadmill, fold the treadmill to the stored position as described above. Hold the handgrip tubes
and carefully move the treadmill to your desired location as shown in FIGURE 4.
To reduce the risk of injury, use extreme caution while moving the treadmill, do not attempt to move the treadmill
over an uneven surface.
Do not attempt to move the treadmill over uneven surface.
8 ©2007
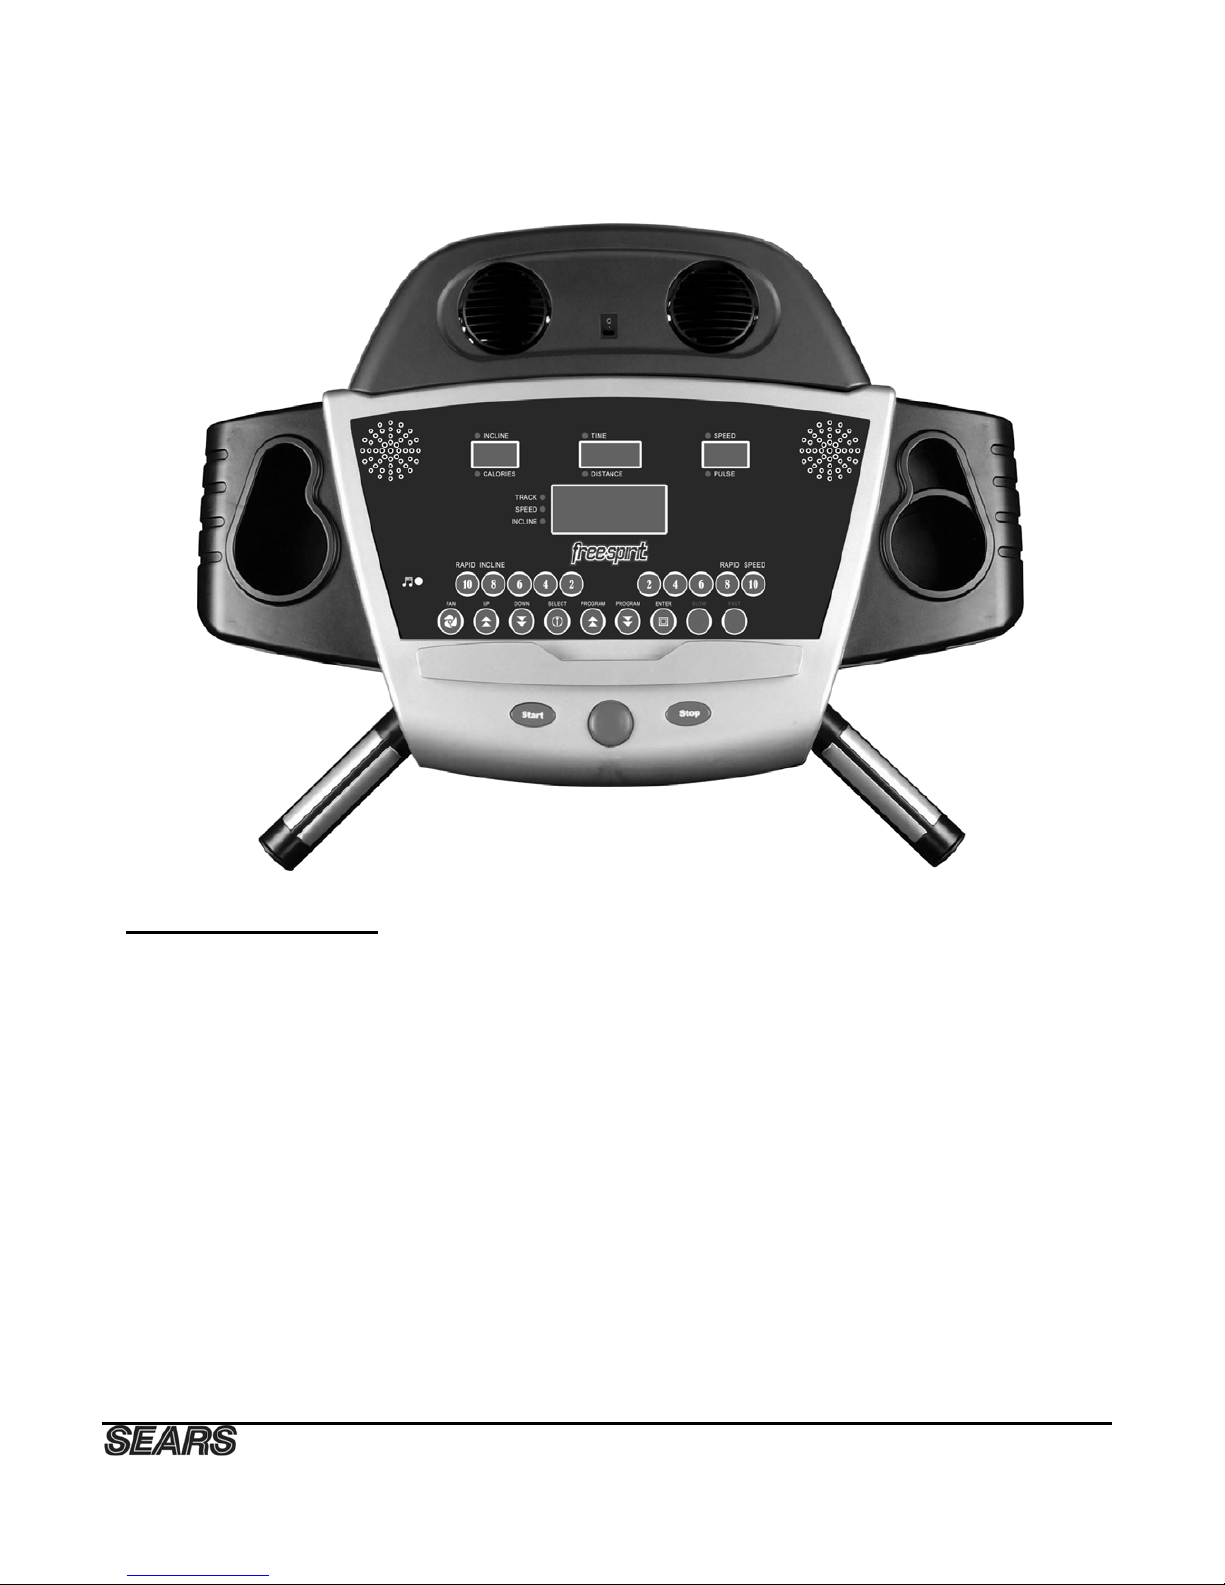
Operation of Your Treadmill
Getting familiar with the control panel
INITIAL DISPLAY
HRS: Displays the total working time accumulated in the TIME window from 0 to 99:99.
If time exceeds 99:99 minutes the time accumulated will be displayed in hours up to 9999 in the
TIME window.
ODO: Displays the total distance accumulated in the DISTANCE window up to 999 miles.
VER: Displays current software version in the SPEED window.
To Operate treadmill
Note: Before operating your treadmill, become familiar with all operating parts and contr ols - their location
and function see figure 4 on page 14.
Before operating the console make sure that the power cord (44) is properly plugged in and the on / off button
(43) is on.
CAUTION: To avoid injury, hold onto Handrail while mounting and dismounting treadmill. Hold onto
handrail and place feet on side rails before starting. Step onto treadbelt only at slowest speed.

9 ©2007
Monitor Operation
Dot Matrix Center Display (Manual Operation):
Twenty rows of Red “dots” (8 high) indicate each segment of a workout. The dots are only to show an
approximate level (speed/incline) of effort. They do not necessarily indicate a specific value - only an
approximate percent to compare levels of intensity. In Manual Operation the Speed / Incline dot matrix
window will build a profile “picture” as values are changed during a workout.
Next to the Dot Matrix window are three LEDs labeled: Track, Speed and Incline, along with a Display button.
When the Track LED is lit the Dot matrix displays the Track profile, when the Speed LED is lit the Dot matrix
displays the Speed profile and when the Incline LED is lit the Dot Matrix displays the Incline profile. You may
change the Dot Matrix profile view by pressing the Select button. After scrolling through the three profiles, by
pressing the Select button, the Dot matrix will automatically scroll through the three displays showing each
one for four seconds. The LED associated with each profile wil l blink while that view is displayed. One more
press of the Display button will return you to the Track profile.
Functions
Time: Displays your elapsed workout time in minutes up to 99:59
Counts down from your preset target time to 00:00 during your workout
Speed: Display the current speed in miles per hour
Distance: Displays the distance traveled in miles per hour
Calories: Displays the cumulative calories burned at any given time during your workout.
Note: This is a rough guide used for comparison of different exercise sessions, which
cannot be used for medical purposes. No exercise machine can give you an exact
calorie count because there are too many factors which determine exact calorie burn
for a particular person. Even if someone is the exact same bodyweight, age and
height, their calorie burn may be very different than yours. The Calorie display is to
be used as a reference only to monitor improvement from workout to workout.
Pulse: Displays the user’s current heart rate in beats per minutes during the workout.
To display your heart rate, you must hold both handrails.
Note: This is a rough guide used for comparison of different exercise sessions, which
cannot be used for medical purposes.
Incline: Displays the incline position from 0 to 15
Program: Displays your current program.
¼ Track: The ¼ mile track will be displayed around the dot matrix window. The flashing dot indicates
your progress. Once the ¼ mile is complete this feature will begin again.
Speaker: The console is equipped with built-in speakers. Plug in the audio cable to an audio source (CD
 Loading...