

Page 1
C 249 30199 0
ASSEMBLY‧OPERATION‧MAINTENANCE
WARRANTY‧PART ORDERING
CAUTION:
Exercise of a strenuous nature, as is customarily done on this equipment, should not be
undertaken without first consulting a physician. No specif ic health claims are made or implied as they
relate to the equipment.
IMPORTANT: Read all instructions carefully before using this product. Retain this owner’s
manual for future reference.
SEARS CANADA INC.
‧
TORONTO , ONTARIO M5B 2B8
OWNER’S MANUAL
Page 2

1
TABLE OF CONTENTS
Warranty……………………………… 2
Safety Precautions……………………. 3-4
Before you begin ..……………………. 5
Assembly Check List…………………. 6
Assembly……………………………… 7-8
Treadmill & Monitor Operation…….. 9-16
Folding………………………………… 17
Parts list……………………………….. 18-20
Overview Drawing……………………. 21-22
Trouble Shooting……………………… 23
Maintenance…………………………... 24-27
Training guidelines…………………… 28-30
Stretching……..………………………. 31-33
Ordering Replacement parts ……….. 33
Service and Parts ……………………. 34
Page 3

2
WHAT DOES THIS WARRANTY COVER? This warranty covers your Free Spirit Treadmill
against defects in material and workmanship when used for the purpose intended, under normal
conditions and provided it receives proper care.
HOW LONG DOES THE COVERAGE LAST? This warranty lasts for one year on all parts and
labor, 3 years on motor only and 10 years on the frame from date of purchase. This warranty is not
transferable and is extended only to the original owner.
WHAT WILL SEARS DO? Sears will provide a replacement part at no charge for any part found
defective in workmanship or materials during the warranty period.
WHAT DOES THIS WARRANTY NOT COVER? This warranty does not cover fitness products
which are (1) used for commercial or other income producing purposes, or (2) subject to misuse,
neglect, accident or unauthorized repairs and alterations. Some provinces do not allow the exclusion or
limitation of incidental or consequential damages, so the above limitation or exclusion may not apply to
you.
HOW DO YOU GET SERVICE? In order to obtain service as provided by this warranty, contact
your nearest Sears Canada Inc. service center.
WHAT DOES THIS WARRANTY COVER? This warranty covers your treadmill motor against
defects in material and workmanship when used for the purpose intended, under normal conditions and
provided it receives proper care.
HOW LONG DOES THE COVERAGE LAST? This warranty lasts for three years from date of
purchase. This warranty is not transferable and is extended only to the original owner.
WHAT YOU NEED TO DO? You need to record the date of purchase in the area provided below.
You must keep your receipt which shows the date of purchase of your treadmill. We suggest you staple
it to this page.
WHAT WILL SEARS DO? Sears provide a replacement part at no charge for any part found
defective in workmanship or materials during the warranty period.
WHAT DOES THIS WARRANTY NOT COVER? This warranty does not cover
fitness products which are (1) used for commercial or other income producing purposes, or (2) subject
to misuse, neglect, accident or unauthorized repairs and alterations. Some provinces do not allow the
exclusion or limitation of incidental or consequential damages, so the above limitation or exclusion
may not apply to you.
HOW DO YOU GET SERVICE? In order to obtain replacement parts as provided by this
warranty, contact your nearest Sears Canada Inc. store or service center.
WARRANTY
MANUFACTURER LIMITED WARRANTY, REPAIR AND SERVICE
SEARS THREE-YEAR MOTOR WARRANTY
Page 4
3
IMPORTANT SAFETY INFORMATION
THIS UNIT IS INTENDED FOR HOUSEHOLD USE ONLY
READ ALL INSTRUCTIONS BEFORE USING THIS TREADMILL
CAUTION: Before starting any exercise program, it is recommended that you consult your physician.
WARNING: Connect this unit to a properly grounded outlet only.
DANGER: To reduce the risk of electric shock, always unplug the treadmill from the electrical outlet
immediately after using and before cleaning.
WARNING
To reduce the risk of burns, fire, electric shock, or injury to persons:
1. Use 120 volt a.c. household current on a dedicated circuit.
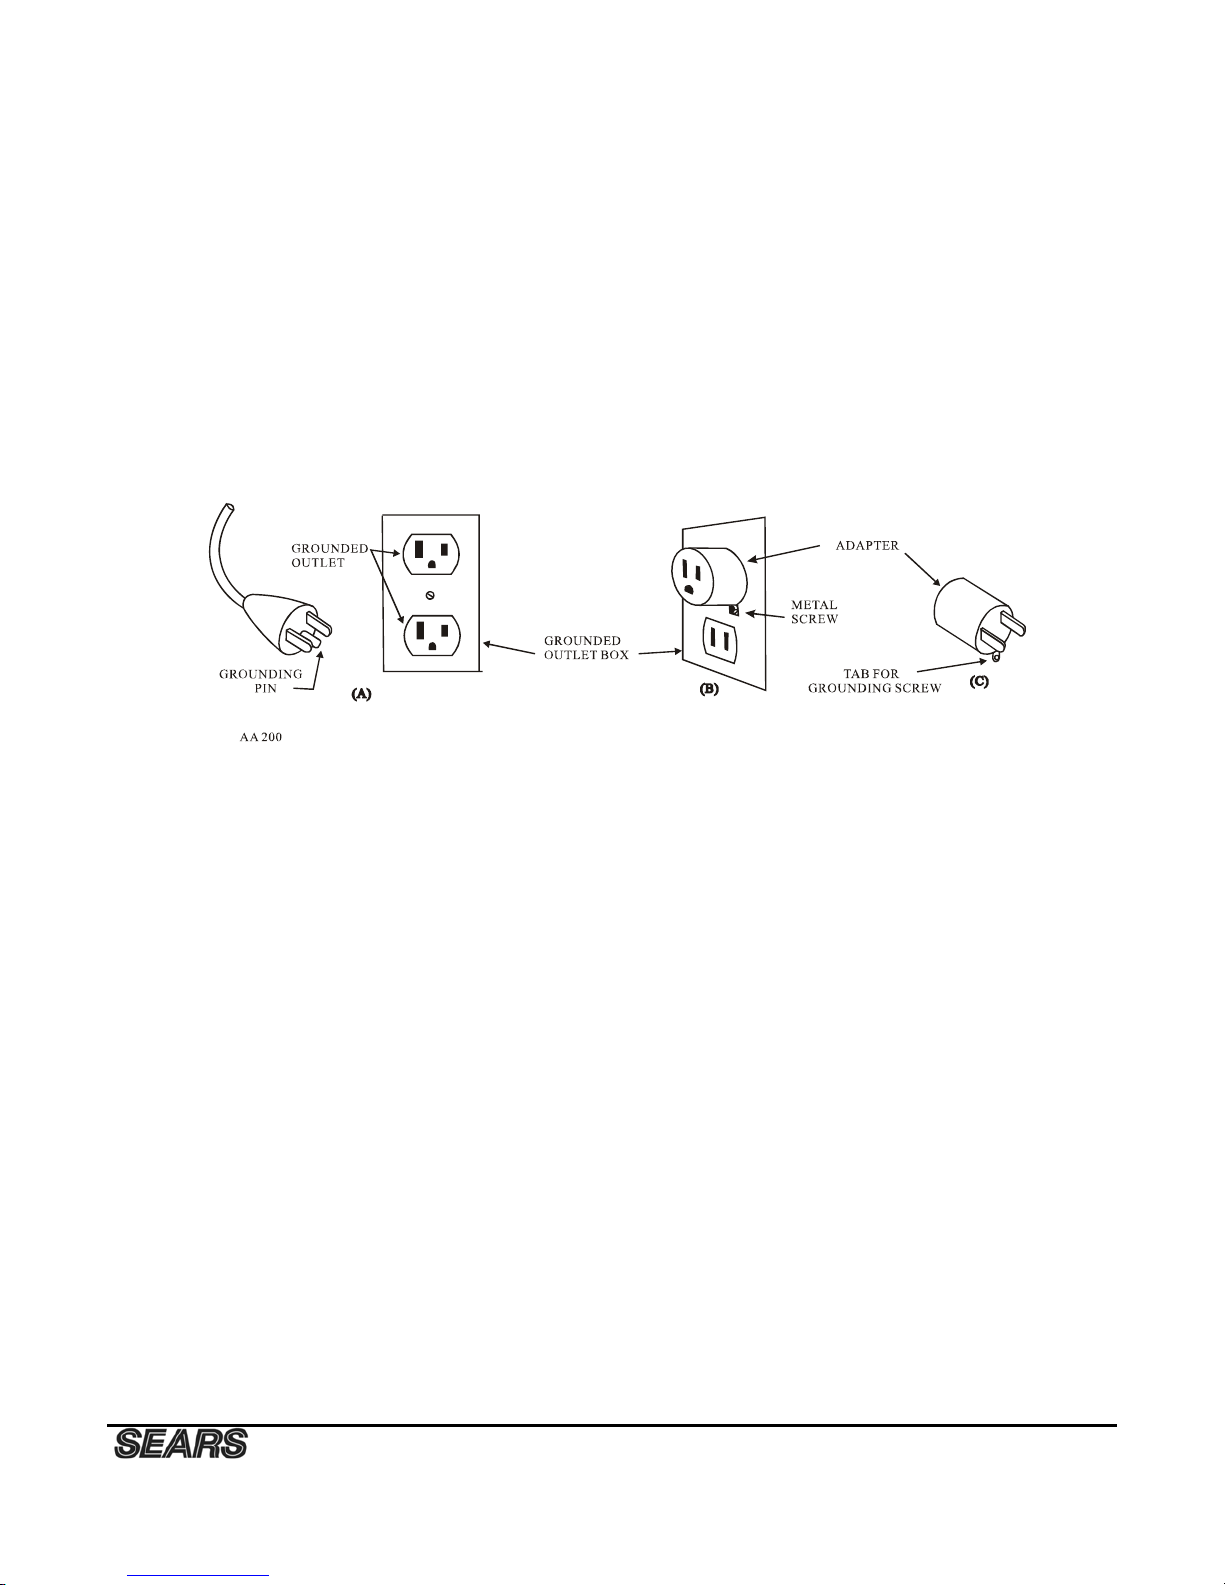
Grounding Instructions
This product must be grounded. If it should malfunction or breakdown, grounding provides a path of least resistance for electric current to reduce the
risk of electric shock. This product is equipped with a cord having an equipment-grounding conductor and a grounding plug. The plug must be
plugged into an appropriate outlet that is properly installed and grounded in accordance with all local codes and ordinances. See diagram below for
grounding methods.
2. It is the responsibility of the owner to ensure that all users of this treadmill are adequately informed of all warnings and
precautions.
3. The use of an extension cord with this product is not recommended. If an extension cord is needed, use a short (less than 10 feet)
heavy gauge (14 gauge or better) extension cord with a three prong (grounded) plug and receptacle.
4. Never leave the treadmill unattended when plugged in. Remove the safety key and unplug the unit from the outlet when not in
use and before removing or replacing parts.
5. Never operate the treadmill if it has a damaged cord or plug, if it is not working properly, if it has been dropped, damaged, or
exposed to water. Never move the treadmill belt while the power is turned off.
6. Do not pull the treadmill by the power supply cord or use cord as a handle. Keep cord away from heated surfaces and open
flames.
7. Fitness equipment must always be installed and used on a flat surface. Do not use outdoors or near water. Do not place the unit
on a loose rug or uneven surface. It is recommended to use an equipment mat to prevent the unit from moving while it is being
used, which could possibly scratch or damage the surface of your floor. It is recommended to have a minimum of 3 metres safe
clearance on all sides of the treadmill while in use.
8. Keep the treadmill indoors, away from moisture and dust. Do not put the treadmill in a garage, covered patio or near water.
9. Do not operate the treadmill where aerosol products are used or where oxygen is being administered.
10. Read, understand and test the emergency stop procedure before using the treadmill (see operation and adjustment on page10)
11. Do not insert any objects into any openings.
12. Inspect and properly tighten all parts of the treadmill regularly.
13. Keep children and pets away from this equipment at all times while exercising.
14. Handicapped individuals should have medical approval and close supervision when using this treadmill.
15. Do not place hands or feet under the treadmill. Always keep hands and legs off of the treadmill when others are using it.
16. Never turn on treadmill while standing on treadbelt. Always hold the handrails while using the treadmill. Always return the
treadmill to the slowest speed to provide for safe dismount and low speed restart.
17. To disconnect, turn all controls to the off position, then remove plug from outlet.
18. Do not attempt to raise, lower or move the treadmill until it is properly assembled. See assembly on page 7 and to fold and move
the treadmill on page 17. Care must be taken when lifting or moving the equipment, so as not to injure your back. Always use
proper lifting techniques. You must use any attachments that are not recommended by the manufacturer.
Page 5

4
19. Use the treadmill only for its intended use as described in this manual. Do not use any attachments that are not recommended by
the manufacturer.
20. User weight should not exceed 350 lbs (160 kg).
21. Never allow more than one person on the treadmill at once.
22. Warm up 5 to 10 minutes before each workout and cool down 5 to 10 minutes afterward. This allows your heart rate to gradually
increase and decrease and will help prevent straining muscles.
23. Never hold your breath while exercising. Breathing should remain at a normal rate in conjunction with the level of exercise
being performed.
24. Start your program slowly and very gradually increase your speed and distance.
25. Always wear suitable clothing and footwear while exercising. Do not wear loose fitting clothing that could become entangled
with the moving parts of your treadmill. Do not walk or jog barefoot, in stocking feet or loose fitting shoes or slippers.
26. This treadmill is intended for in-home use only. Do not use the treadmill in any commercial, rental or institutional setting.
▲WARNING: Before beginning any exercise program consult your physician. This is especially important for individuals over the
age of 35 or persons with pre-existing health problems. Read all instructions before using any fitness equipment. We assume no
responsibility from personal injury or property damage sustained by or through the use of this product.
SAVE THESE INSTRUCTIONS
Page 6
5
Before you begin
Thank you for purchasing our product. Even though we go to great efforts to ensure the quality of each product
we produce, occasional errors and /or omissions do occur. In any event should you find this product to have
either a defective or a missing part please contact us for a replacement.
This product has been designed for home use only. Product liability and guarantee conditions will not be
applicable to products being subjected to professional use or products being used in a gym center.
This exercise equipment was designed and built for optimum safety. However, certain precautions apply
whenever you operate a piece of exercise equipment. Be sure to read the entire manual before assembly and
operation of this machine.
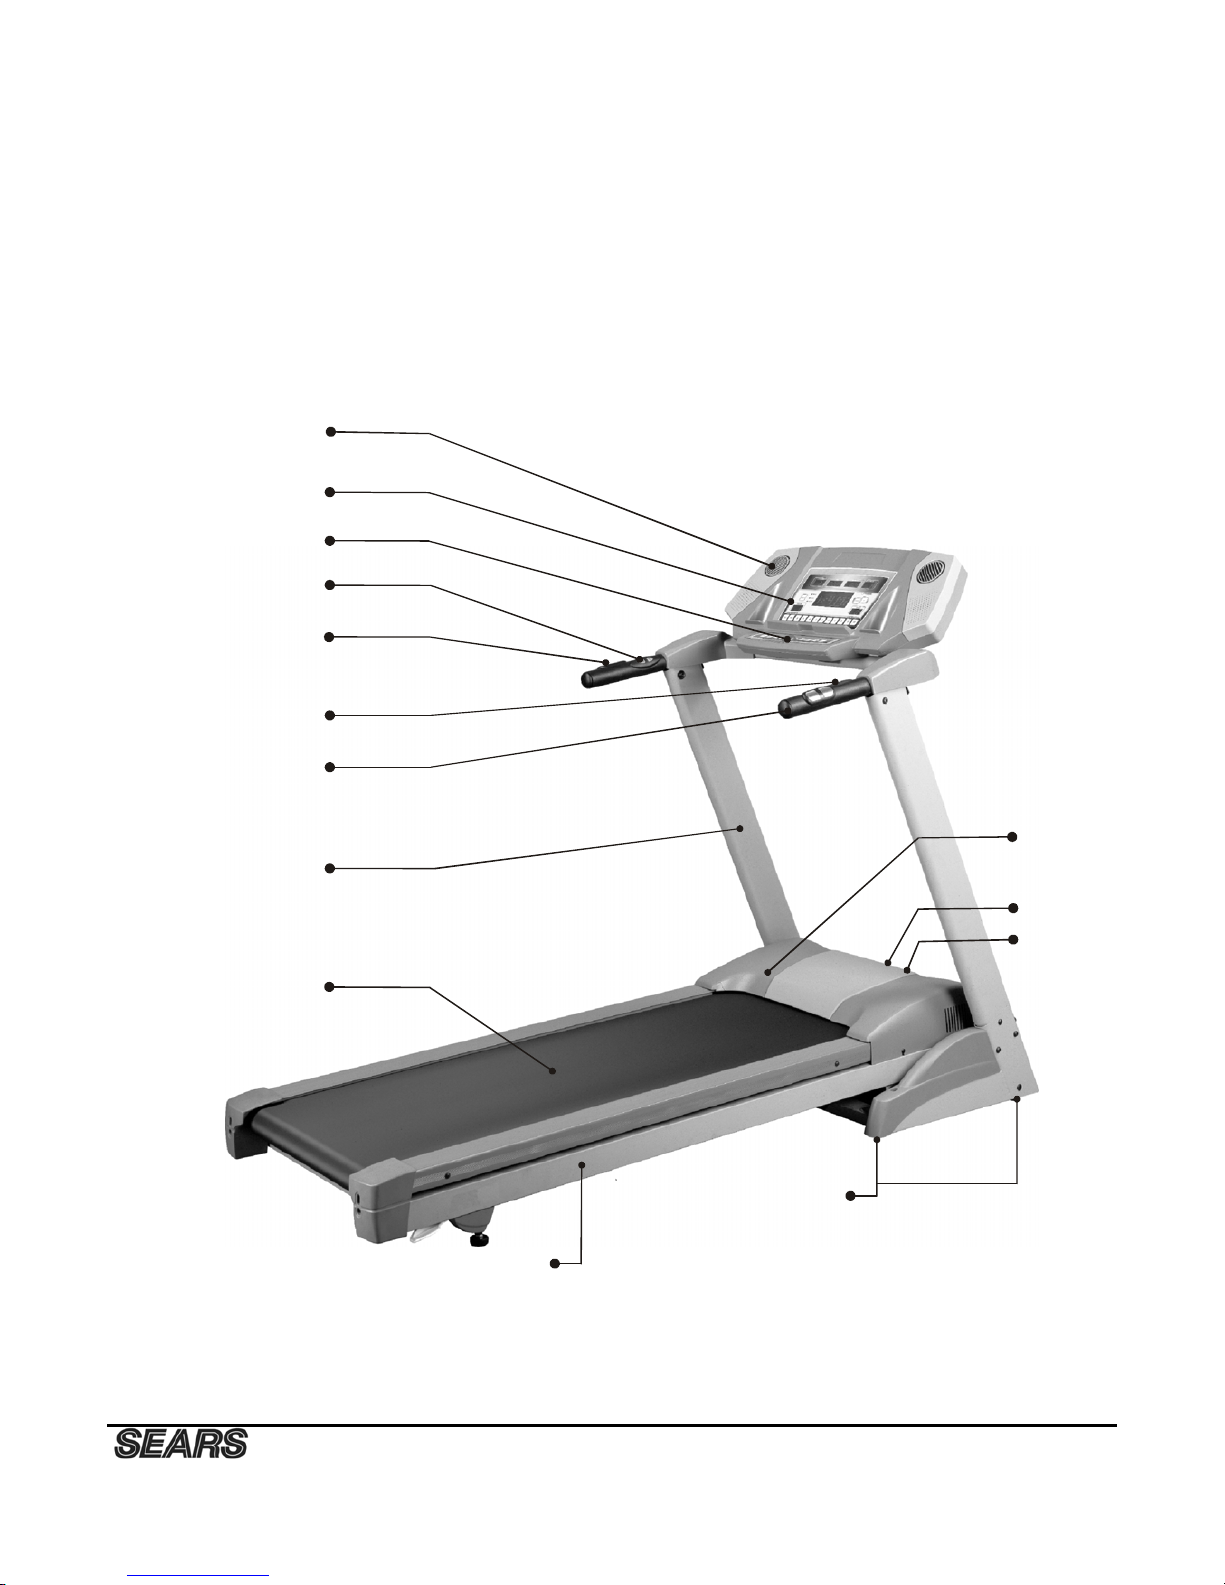
Before reading further, please familiarize yourself with the parts that are labeled in the drawing below.
MAX. USER WEIGHT 160 KGS
Speed Adjustment Switch
Handpulse
Incline Adjustment Switch
Upright
Handrail
Console
Fan
Running belt
Main frame
Wheel
Safety key
Motor cover
Circuit Breaker
On / off switch
Page 7
6
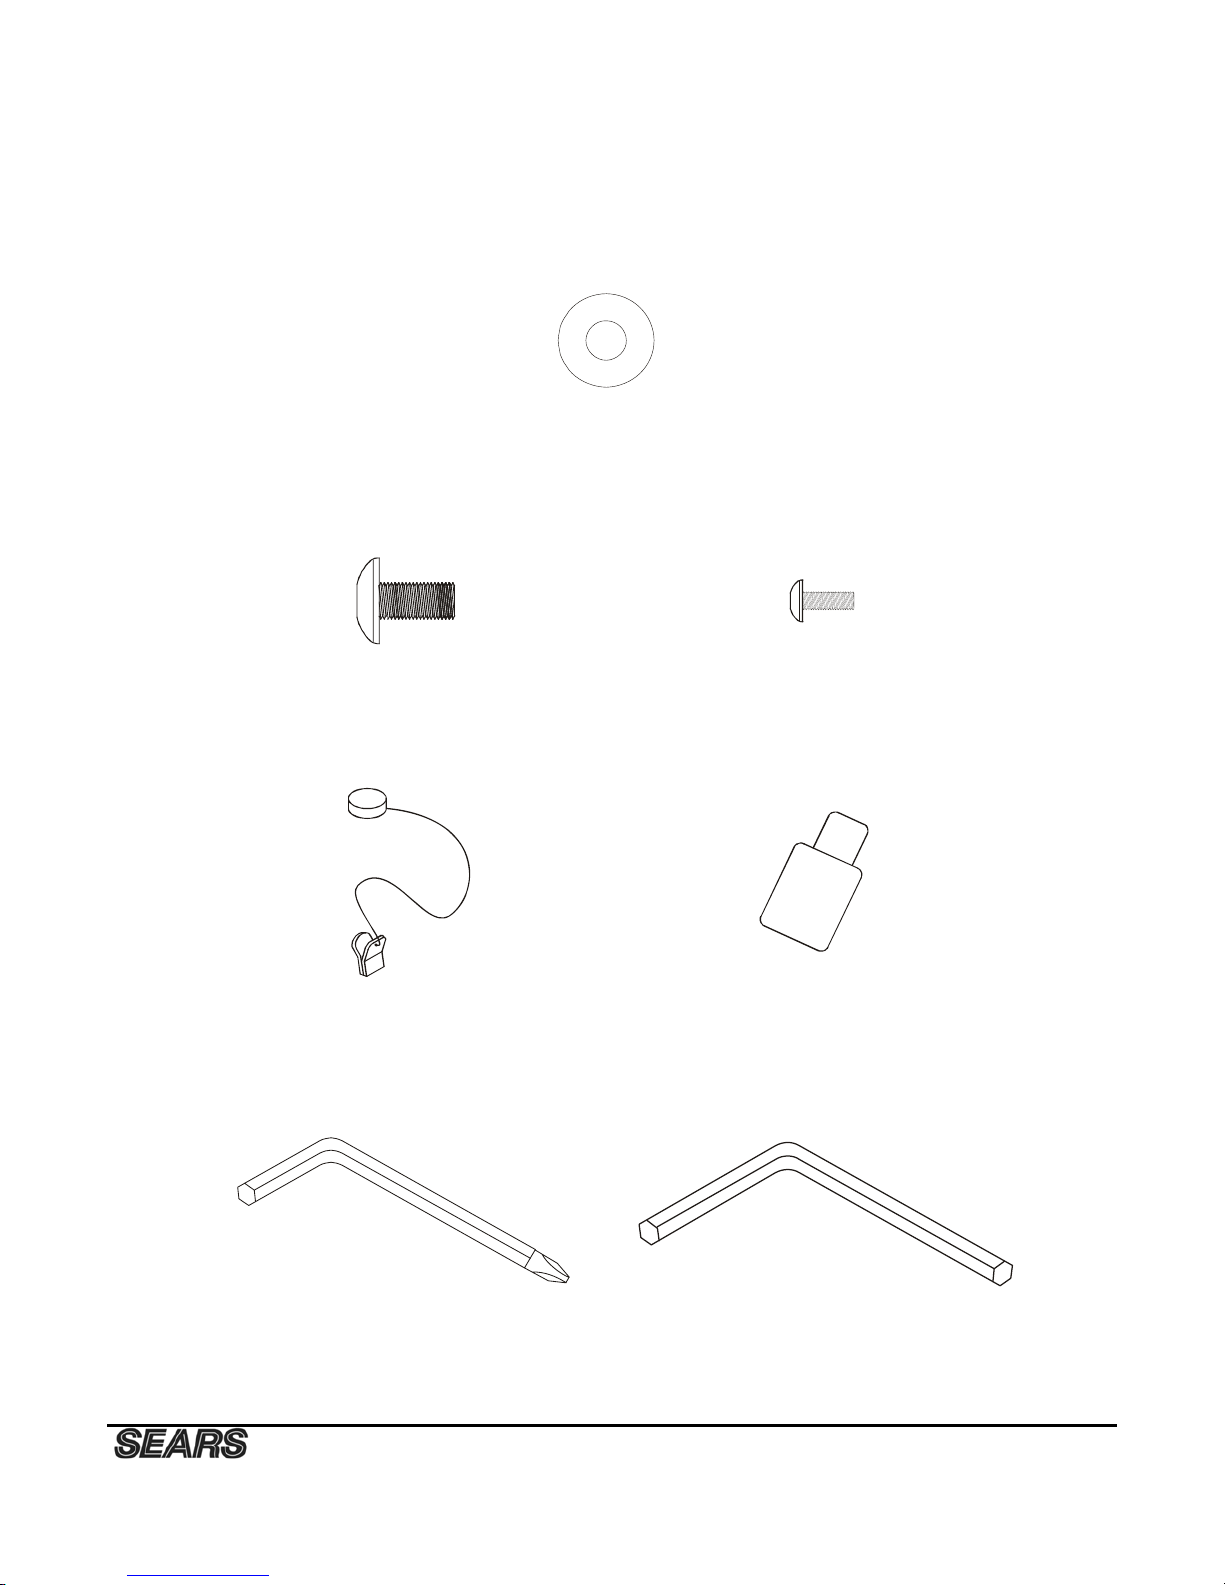
DO NOT ATTEMPT TO RAISE
#96. M5 x 15 m/m
Philli
p
s Head Screw (6 pcs)
#98. M6 Allen Wrench (1pc) #97. Combination M5 Allen Wench
& Phillips Head Screwdriver (1 pc)
#30.Safety Key (1pc)
#59.Lubricant (1pc)
#95. 5/16” x 19 x 1.5T
Curved Washer (4 pcs)
#94. 5/16” x15m/m
Button Head Socket Bolt (14 pcs)
Page 8

7
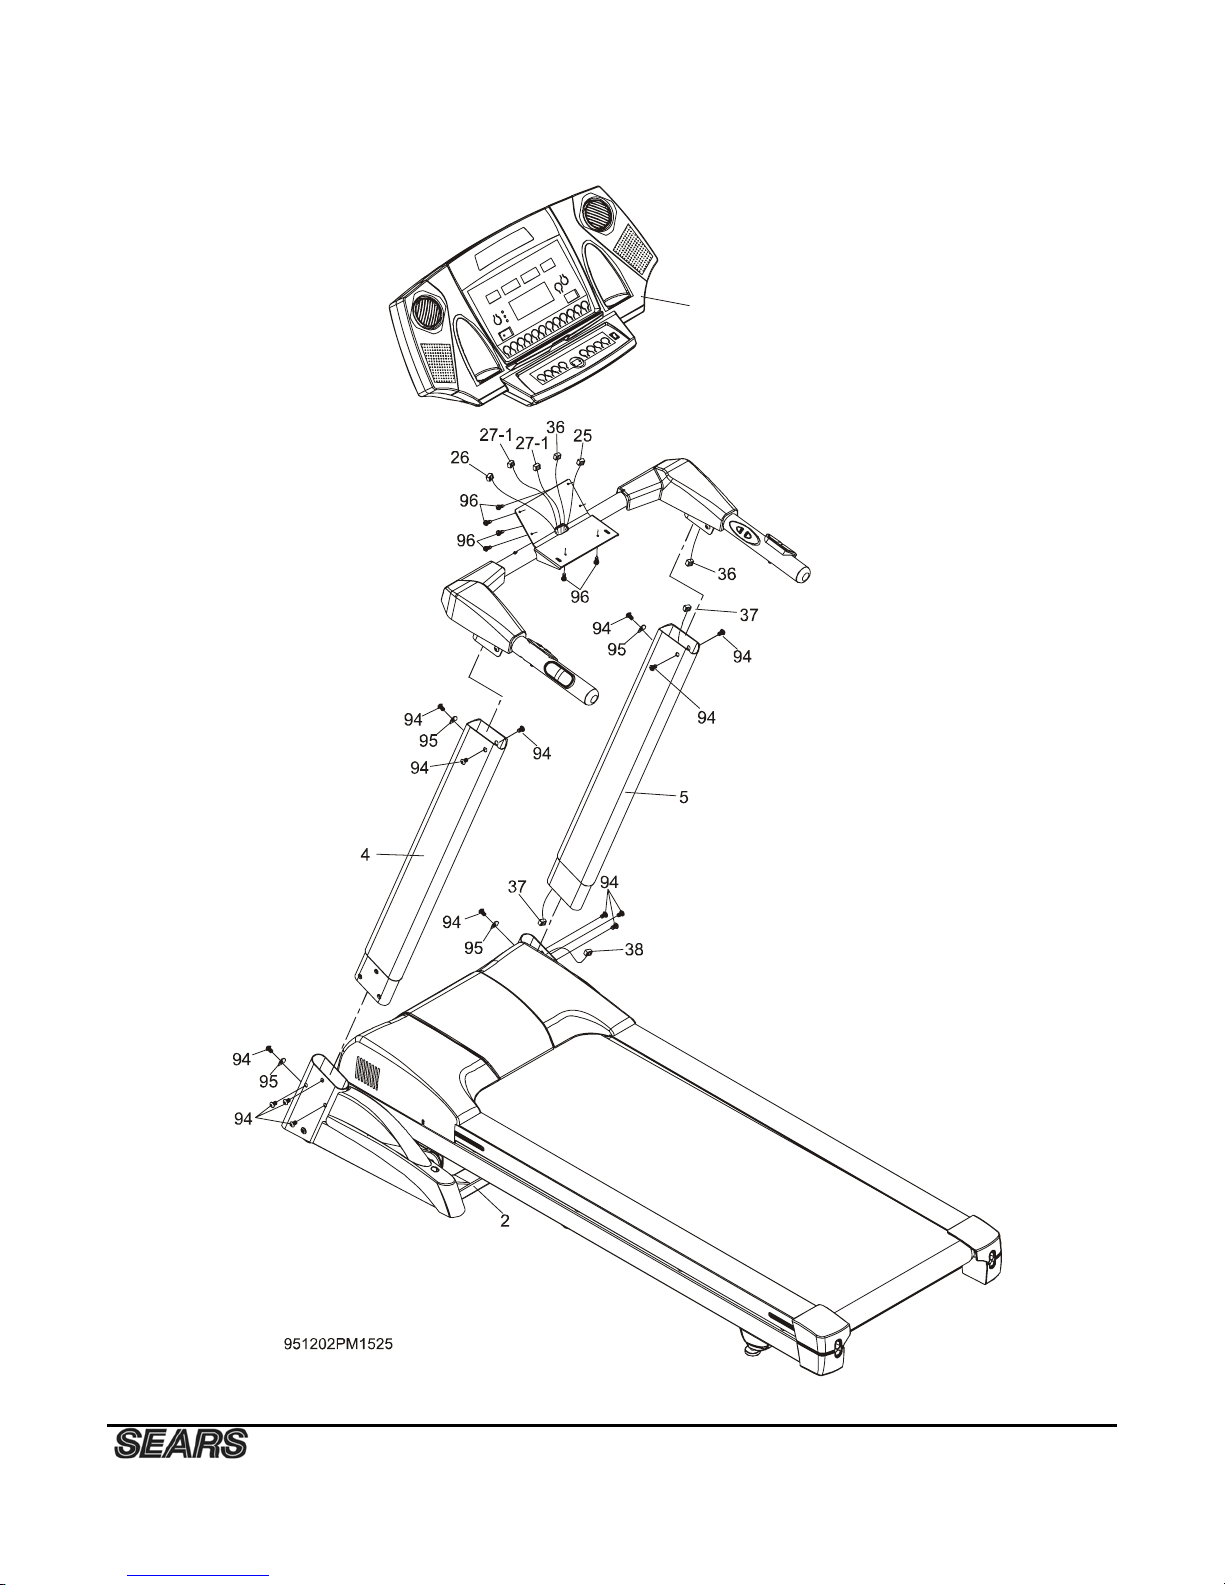
ASSEMBLY INSTRUCTIONS
It will take two people to assemble your unit.
Set the treadmill in a cleared area and remove all packing material. Do not dispose of the material until your
assembly is completed. Note: The underside of your treadmill’s walking belt is coated with a lubricant.
During shipping, a small amount of lubricant may be transferred to the top of the walking belt or the shipping
carton. This does not affect the treadmill’s performance. If you notice any lubricant on the top of the walking
belt, simply wipe off the lubricant with a soft cloth and a mild, non abrasive cleaner.
For the sake of familiarizing yourself with the parts identified in the instructions, first study the overview
drawing.
Assembly only requires the included wrenches.
STEP 1
Remove all the components from the carton.
STEP 2
Connect the computer extension cable (37) to the lower computer cable (38).
NOTE: Ensure that the wire is safely inserted in the upright to avoid pinching the computer wire.
STEP 3
Fasten the right upright (5) into the frame base (2). Secure using three 5/16” x 15mm button head bolts (94).
Secure the back of the right upright (5) with one 5/16” curved washer (95) and one 5/16” x 15mm button head
bolt (94) using the combination wrench / screwdriver (97).
Repeat for left upright (4).
HAND TIGHTEN ONLY FOR NOW
STEP4
Connect the computer extension cable (37) to the upper computer extension cable (36) from the console support
(6).
NOTE: Carefully insert the cables inside the console assembly, so that you do not pinch and cut the cables
when fastening the console assembly.
Install the console support assembly (6) into the right and left uprights (4,5). Secure the right upright (5) with
three 5/16” x 15mm button head bolts (94). Secure the back of the right upright (5) with one 5/16” curved
washer and one 5/16” x 15mm button head bolt (94) using the combination wrench / screwdriver (97).
Repeat for the left upright (4).
HAND TIGHTEN ONLY FOR NOW
STEP 5
Connect the upper computer extension cable (36) to the back of the console (39).
Connect the speed switch w/cable (25) to the back of the console (39).
Connect the incline switch w/cable (26) to the back of the console (39).
Connect the handpulse wire (27-1) to the back of the console (39).
Slide the console (39) on to the console support assembly (6) through the back opening of the console
(39). Secure the back of the console (39) with four M5 x15mm phillips head screws (96) and the bottom back
of the console (39) with two M5 x15mm phillips head screws (96), using the combination wrench /
screwdriver (97).
ENSURE THAT ALL NUTS AND BOLTS ARE NOW FIRMLY TIGHTEN
Page 9
8
READ, UNDERSTAND AND TEST
39
Page 10
9
TREADMILL OPERATION
Your treadmill features a walking belt coated with a lubricant. IMPORTANT: Never apply silicone spray or
other substances to the walking belt or walking board. Such substances will deteriorate the walking belt and
cause excessive wear.
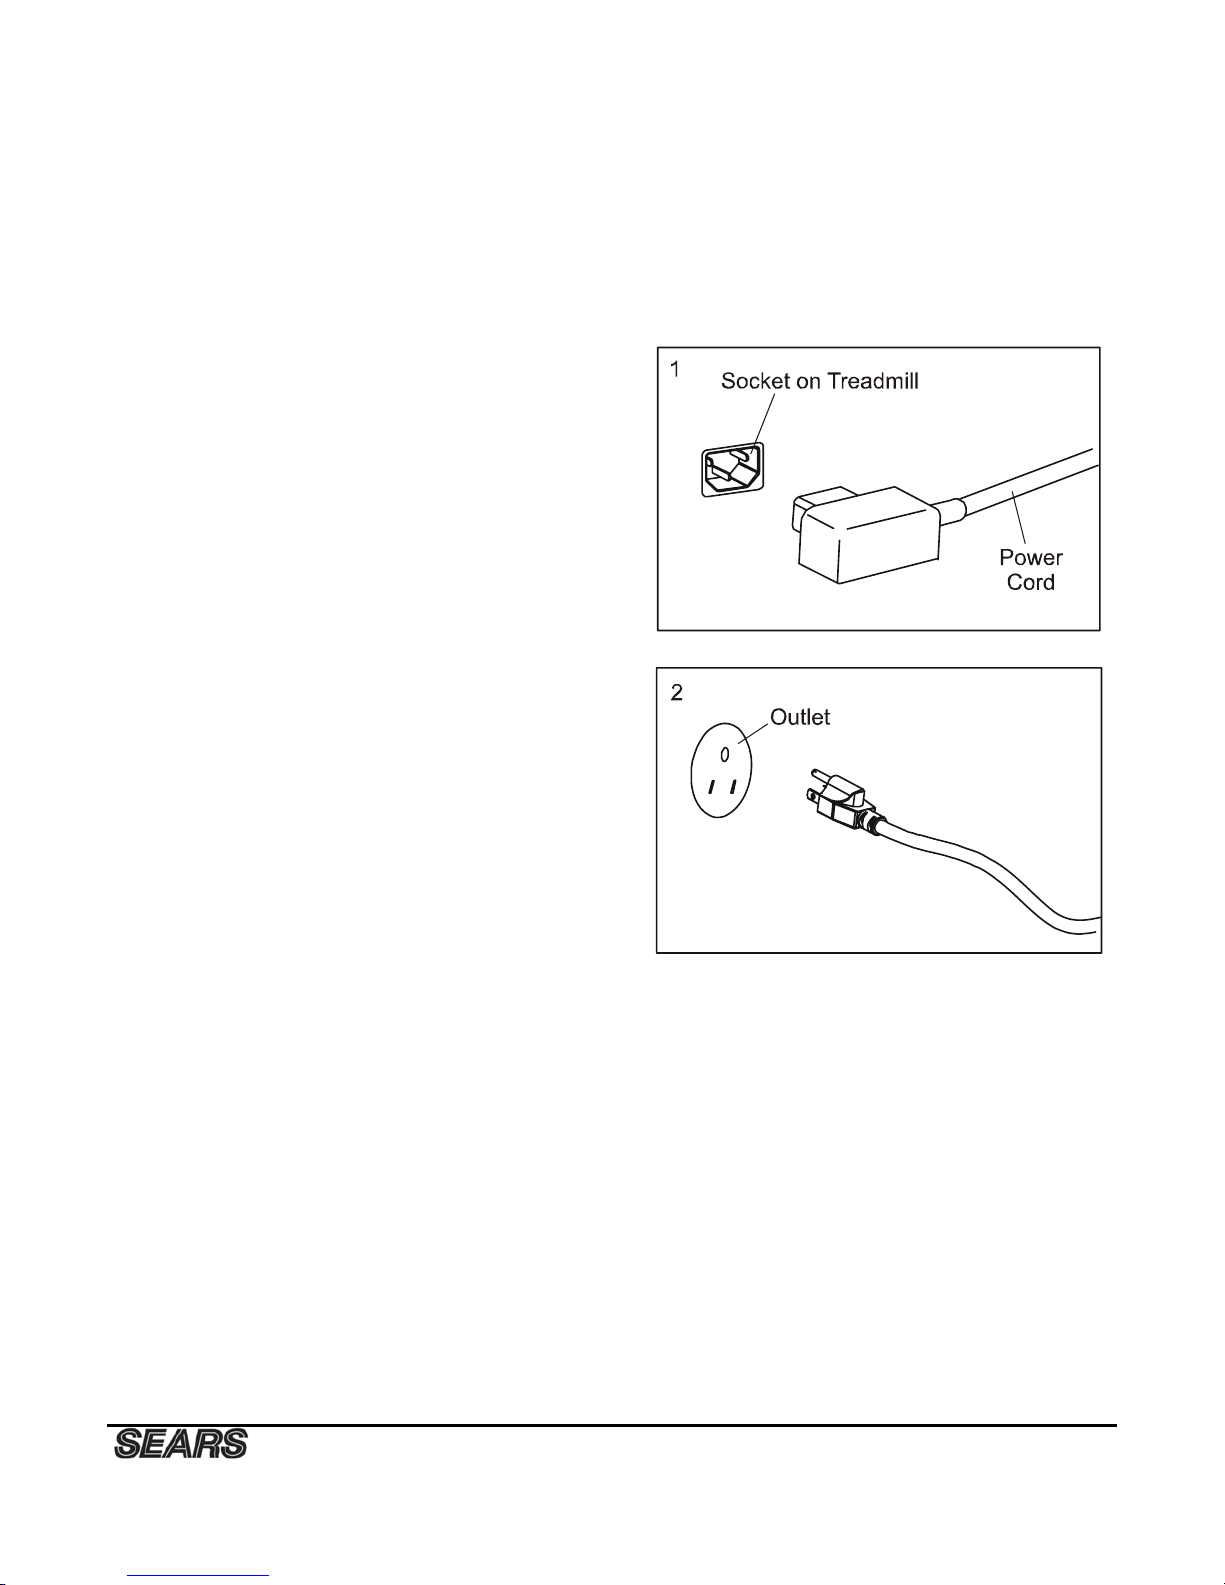
How to plug in the power cord.
GROUNDING INSTRUCTIONS.
This product must be grounded. No plug adapter should
be used with this product.
▲WARNING: Improper connection of the equipment
grounding conductor can result in a risk of an electric
shock. Check with a qualified electrician if you are in
doubt as to whether the product is properly grounded. Do
not modify the plug provided with the product, if it will
not fit the outlet; have a proper outlet installed by a
qualified electrician. The use of an extension cord with
this product is not recommended. If an extension cord is
needed, use a short (less than 10 feet) heavy gauge (14
gauge or better) extension cord with a three prong
(grounded) plug and receptacle. IMPORTANT: If the
power cord is damaged, it must be replaced with a
manufacturer recommended power cord.
1. Plug the indicated end of the power cord into
the socket of the treadmill. See drawing
below
2. Plug the power cord into an appropriate outlet
that is properly installed and grounded. See
drawing below. Important: The treadmill is
not compatible with GFCI-equipped outlets.
Note: Your power cord and outlet may appear different
Page 11
10
TREADMILL OPERATION
▲CAUTION: Before operating the console, read the following precautions:
• Do not stand on the walking belt when turning on the treadmill
• Always wear the safety key
• Adjust the speed in small increments to avoid sudden jumps in speed
• To reduce the possibility of electric shock, keep the console dry. Avoid spilling liquids on the console
and place only sealed water bottles in the water bottle holders.
TO OPERATE TREADMILL
▲CAUTION: To avoid injury, hold onto the handrails while mounting and dismounting the treadmill. Hold
onto the handrails and place feet on siderails before starting. Step onto the walking belt only a slowest speed.
Before operating the console make sure that the power cord (32) is properly plugged in and the on / off button
(29) is on. Attach the magnet end of the safety key (30) onto the monitor and attach the clip end of the safety
key (30) to your clothing (ie: waistband). If you should slip or fall while exercising the safety key will pull out
of the console, shutting off the treadmill.
Getting started:
Power the treadmill on by plugging it into an appropriate wall outlet, then turn on the power switch located
at the front of the treadmill below the motor hood.
When the power is turned on, all the lights on the display will light for a short time. Then the Time and
Distance windows will display Odometer readings for a short time. The Time window will show how
many hours the treadmill has been in use and the Distance window will show how many miles (or
Kilometers if the treadmill is set to metric readings) the treadmill has gone. Then a message will scroll
across the dot matrix showing the current software version. The treadmill will then enter idle mode, which
is the starting point for operation.
Page 12

11
Quick-Start Operation:
STEP 1: Press and release the Start key to wake display up (if not already on).
Note: Installing the tether key will also wake up the console.
STEP 2: Press and release the Start key to begin belt movement, at .5 mph (1.0kmph), then
adjust to the desired speed using the Fast / Slow keys (console or hand rail). You may also use the rapid
speed keys 2 through 12 to adjust the speed.
STEP 3: To slow tread-belt press and hold the Slow key (console or hand rail) to the desired speed. You
may also press the rapid speed adjust keys, 2 through 12.
STEP 4: To stop the tread-belt press and release the Stop key.
Pause/Stop/Reset Feature:
STEP 1: When the treadmill is running the pause feature may be utilized by pressing the Stop key once.
This will slowly decelerate the tread-belt to stop. The incline will go to zero percent. The Time, Distance and
Calorie readings will hold while the unit is in the pause mode. After 5 minutes the display will reset and
return to the start up screen.
STEP 2: To resume your exercise, when in Pause mode, press the Start key. The speed and incline will
return to their previous settings.
z Pause is executed when the Stop button is pressed once. If the Stop key is pressed a second time, the
program will end and a workout summary will be displayed. If the Stop button is pressed a third time,
the console will return to the idle mode (start up) screen. If the Stop button is held down for more than
3 seconds the console will reset.
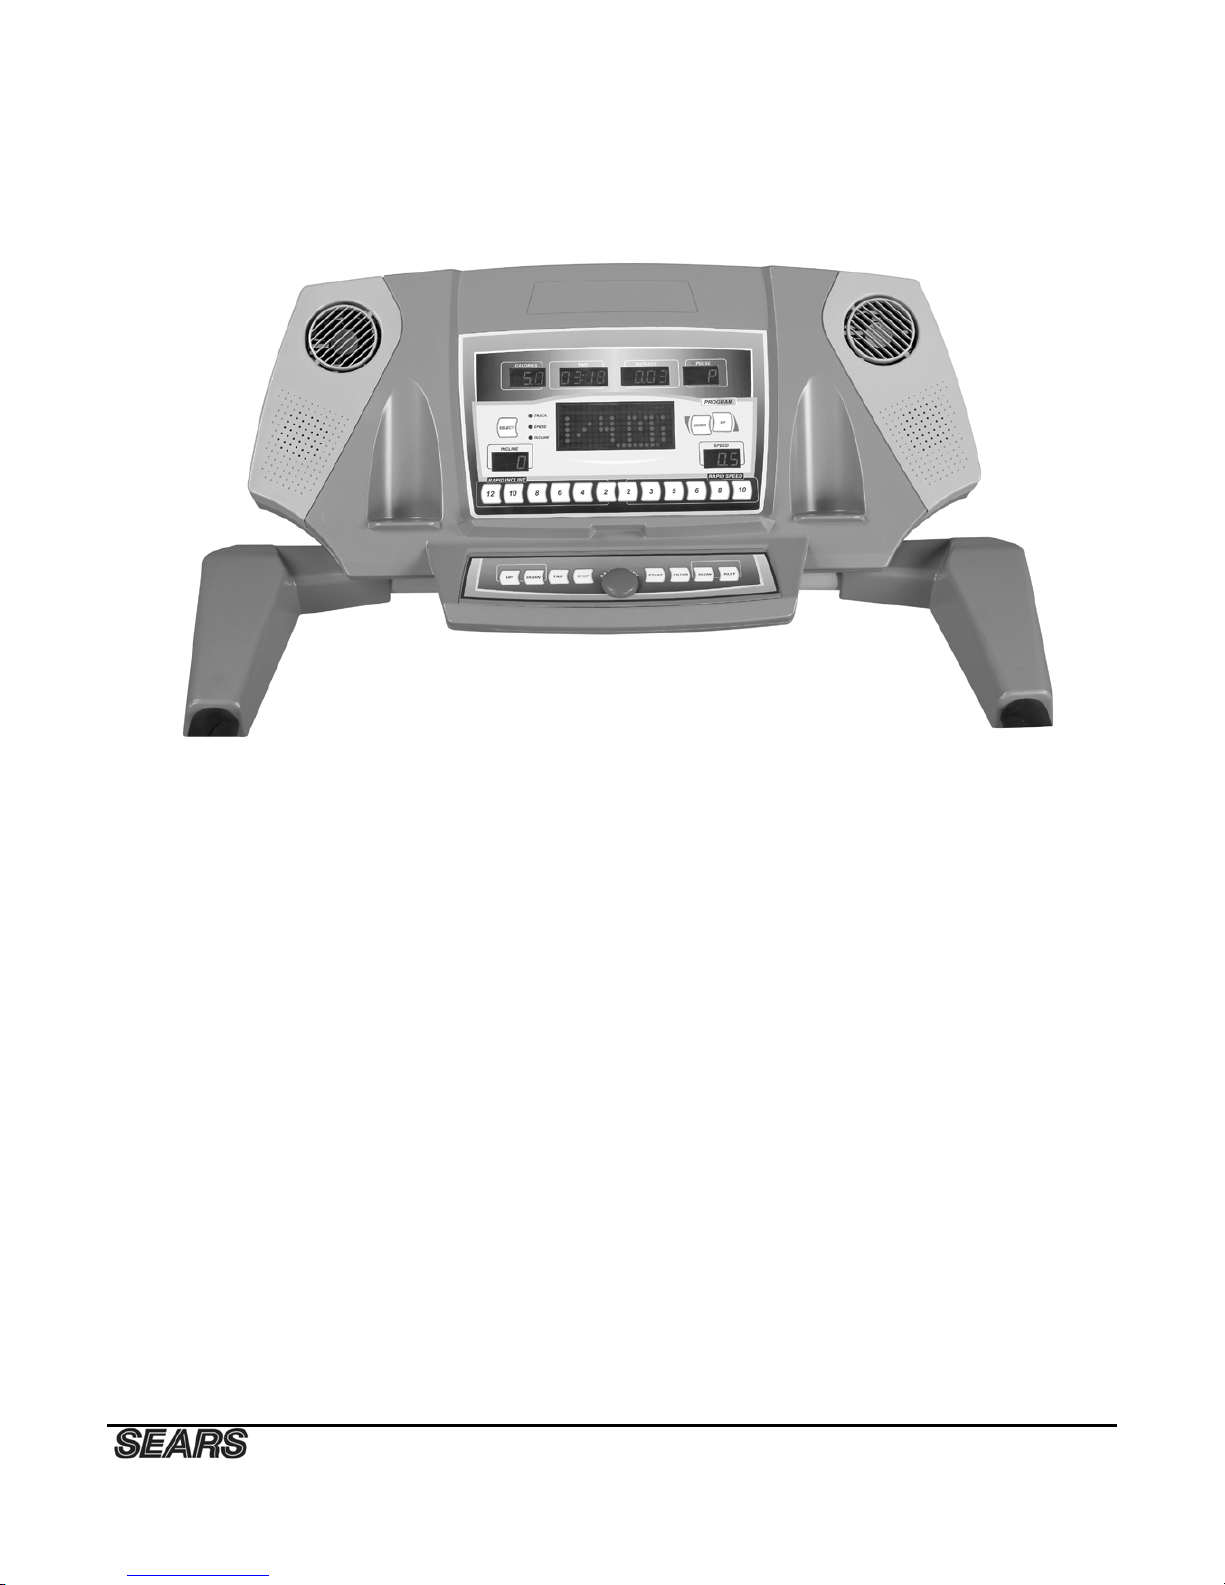
Dot Matrix Center Display (Manual Operation):
Twenty rows of Red “dots”(8 high) indicate each segment of a workout. The dots are only to show an
approximate level (speed/incline) of effort. They do not necessarily indicate a specific value - only an
approximate percent to compare levels of intensity. In Manual Operation the Speed / Incline dot matrix window
will build a profile “picture” as values are changed during a workout.
Next to the Dot Matrix window are three LEDs labeled: Track, Speed and Incline, along with a Display button.
When the Track LED is lit the Dot matrix displays the Track profile, when the Speed LED is lit the Dot matrix
displays the Speed profile and when the Incline LED is lit the Dot Matrix displays the Incline profile. You may
change the Dot Matrix profile view by pressing the Select button. After scrolling through the three profiles, by
pressing the Select button, the Dot matrix will automatically scroll through the three displays showing each one
for four seconds. The LED associated with each profile will blink while that view is displayed. One more press
of the Display button will return you to the Track profile.
0.4 KM (1/4 Mile)Track*:
The 0.4 KM track will be displayed around the dot matrix window. The flashing dot indicates your progress.
Once the 0.4 KM is complete this feature will begin again.
Page 13

12
Pulse Grip Feature:
The Pulse (Heart Rate) console window will display your current heart rate in beats per minute during the
workout. Pulse value displays anytime the upper display is receiving a Grip Pulse signal.
Calorie Display:
Displays the cumulative calories burned at any given time during your workout.
Note: This is only a rough guide used for comparison of different exercise sessions, which
cannot be used for medical purposes.
Speakers:
The console has a built-in Speakers. You may Plug an Audio Source (CD player, MP3, Computer ,etc.) into
the Jack on the Left side of console.
There is no volume control on console, volume must be controlled by Audio Source.
Fan Feature:
z Press the Fan key once to turn on the fan and press the Fan key a second time to turn off the fan.
Incline Feature:
z Incline may be adjusted anytime after belt movement.
z Press and hold the Up / Down keys (console or hand rail) to achieve desired level of effort. You may
also choose a more rapid increase / decrease by selecting desired key, 2 through 12, on left hand side of
console (incline).
z The display will indicate incline percent as adjustments are made.
z Incline will remain in it’s position when display is turned off.
To Turn Treadmill Off (Blank out Display):
Two methods accomplish this: Use either one.
(1) Display will automatically turn off (blank out) after 30 minutes (no key operations) in
Pause / Stop mode.
(2) Remove tether cord.
Programmable Features
The treadmill has the preset programs, and 2 user programs. Each preset program has a maximum speed
level that is displayed when a desired workout is chosen. The maximum speed that the particular program
will achieve will be displayed in the Speed window. Also included are two user programs (User 1 and User
2) for custom workouts.
Page 14

13
To Select a Program:
STEP 1: Press the desired Program Up / Down key. Press enter to set the program. The display will prompt you
through the programming or you can just press Start to begin the program with default values.
STEP 2: If Enter was pressed, the Time window will blink with the default value of 20 minutes. You may use
any of the up/down keys to adjust the time. After adjusting, or to accept the default, press enter. (Note: You
may press start at any time during the programming to start the program.)
STEP 3: The Distance window will now be blinking a value, which is your Bodyweight. Entering the correct
bodyweight will affect the calorie count. Use the Up/Down keys to adjust, then press enter.
A note about the Calorie display: No exercise machine can give you an exact calorie count because there are
too many factors which determine exact calorie burn for a particular person. Even if someone is the exact same
bodyweight, age and height, their calorie burn may be very different than yours. The Calorie display is to be
used as a reference only to monitor improvement from workout to workout.
STEP 4: The Calorie window will now be blinking a value, which is your Age. Entering your correct age
affects the Heart Rate Control programs. Use the Up/Down keys to adjust, then press enter.
Your age determines the maximum heart rate you may achieve. Since the Heart Rate control features are based
on a percentage of your maximum heart rate, it is important to enter the correct age for these features to work
properly.
STEP 5: The Speed window will now be blinking the preset top speed of the selected program. Use the Fast /
Slow keys to adjust, then press enter. Each program has various speed changes through out, this allows you to
limit the highest speed the program can reach.
User Programs:
STEP 1: Select User 1 or User 2 via the Program key then press Enter key to set.
STEP 2: Note the clock (Time) window is flashing. Use the Up / Down keys to adjust up from 10 minutes (if
desired). Press Enter key. This is a must to continue even if time is not adjusted.
STEP 3: The Distance window will now be blinking a bodyweight value. Enter your bodyweight and press
Enter.
STEP 4: The Calorie window will now be blinking an Age value. Adjust the age and press enter.
STEP 5: Note that the dot matrix display portion will have a single row of dots at the bottom (Unless there is a
previously stored program). The first column (segment) will now be blinking. Using the Fast / Slow keys,
adjust the speed level to your desired effort for the first segment then press Enter. The second column will now
be blinking. Repeat the above process until all segments have been programmed. The first column will be
blinking again. This is for the incline programming. Repeat the above process to program all segments for
incline.
STEP 6: Press the Start button to begin the workout and also save the program to memory.
Page 15

14
FUNCTIONS
P1 SPEED PROFILE
P2 SPEED PROFILE
P3 SPEED PROFILE
P4 SPEED PROFILE
P5 SPEED PROFILE
*
S
PEED PROFILE
P1 INCLINE PROFILE
P2 INCLINE PROFILE
P3 INCLINE PROFILE
P4 INCLINE PROFILE
P5 INCLINE PROFILE
*INCLIN
E PROFILE
Page 16

15
Target Heart Rate
The old motto, “no pain, no gain”, is a myth that has been overpowered by the benefits of exercising comfortably.
A great deal of this success has been promoted by the use of heart rate monitors. With the proper use of a heart rate
monitor, many people find that their choice of exercise intensity is either too high or too low and exercise is much
more enjoyable by maintaining their heart rate in the desired benefit range.
To determine the benefit range in which you wish to train, you must first determine your Maximum Heart Rate.
This can be accomplished by using the following formula: 220 - User’s Age = Maximum Heart Rate. If you enter
your age during programming of the console the console will perform this calculation automatically. This is used for
the HR control programs and also for the Heart rate bar graph After calculating your Maximum Heart Rate, you can
decide upon which goal you would like to pursue. The
two most popular reasons for, or goals of exercise, are
cardiovascular fitness (training for the heart and
lungs) and weight control. The black columns on the
chart above represent the Maximum Heart Rate for a
person whose age is listed at the bottom of each
column. The training heart rate, for either
cardiovascular fitness or weight loss, is represented
by two different lines that cut diagonally through the
chart. A definition of the lines’ goal is in the bottom
left-hand corner of the chart. If your goal is
cardiovascular fitness or if it is weight loss, it can be
achieved by training at 90% or 70%, respectively, of
your Maximum Heart Rate on a schedule approved by
your physician. Consult your physician before
participating in any exercise program.
With all Spirit Heart Rate Control treadmills, you may
use the heart rate monitor feature without using the Heart Rate Control program. This function can be used during
manual mode or during any of the nine different programs. The Heart Rate Control program automatically controls
incline.
CAUTION!
The target value used in H-1 and H-2 programs is a suggestion only for normal, healthy individuals. Do not
exceed your limits! You may not be able to obtain your chosen target. If in question, enter a higher age value
that will set a lower target goal.
Page 17

16
Erratic Operation:
Caution! Do not use this treadmill for Heart Rate Control unless a steady, solid Actual Heart Rate value
is being displayed. High, wild, random numbers being displayed indicate a problem.
Areas to look for on interference:
(1) Treadmill not properly grounded - A must!
(2) Microwave ovens, T.V.’s, small appliances, etc.
(3) Fluorescent lights.
(4) Some household security systems.
(5) Perimeter fence for a pet.
(6) Loose treadmill console / upright.
WARNING!
DO NOT USE THE HEART RATE CONTROL PROGRAM IF YOUR HEART RATE IS NOT
REGISTERING PROPERLY ON THE TREADMILL’S DISPLAY!
Special Operations of Heart Rate Functions:
Treadmills that are factory equipped with a Heart Rate Control system have many distinct features both in the
Heart Rate Control program and during heart rate monitoring. This section will give you a more detailed
background to use your treadmill in the most effective manner.
How the Heart Rate Control Program Works:
Heart Rate Control uses your treadmill’s incline system to adjust your heart rate.
Increases and decreases in elevation affect heart rate much more efficiently than changes in speed.
Additionally, changes in incline keep you in control of the machine’s speed instead of the machine controlling
you.
Selecting a Heart Rate Control Program:
You have the option, during the setup mode, to choose either the Weight Control (H-1) program or the
Cardiovascular (H-2) program. Weight Control attempts to maintain your heart rate at 70% of your Maximum
Heart Rate. Cardiovascular attempts to maintain your heart rate at 90% of your Maximum Heart Rate. Your
Maximum Heart Rate is based upon a formula that subtracts your age from 220. Your age input is performed
during the setup mode.
CAUTION!
The target value used in H-1 and H-2 programs is a suggestion only for normal, healthy individuals. Do
not exceed your limits! You may not be able to obtain your chosen target. If in question, enter a higher
age value that will set a lower target goal.
Heart Rate Control Operation
STEP 1: Press HR1 or HR2 button.
STEP 2: The Distance window will be blinking, showing bodyweight. You may adjust it and press enter if you
want or just press enter to accept the default value.
STEP 3: The Calorie will now be blinking showing age. Adjust and press enter or press enter to accept default.
STEP 4: The Pulse window will now be blinking showing the default HR for this program. Adjust and press
enter or press enter to accept default.
STEP 5: The Time window will now be blinking. Adjust the time and press enter.
STEP 6: Press Start to begin program.
Page 18

17
FOLDING AND MOVING YOUR TREADMILL
Before folding the treadmill, ensure that the treadmill is at it’s lowest incline position. Turn the power switch
off, located on the front of the motor cover and unplug the power cord.
CAUTION: You must be able to safely lift 20 kg (45lbs) in order to raise and lower the treadmill.
To decrease the possibility of injury, bend your legs and keep your back straight while you are raising or
lowering your treadmill.
To protect the floor or carpet from damage, place a mat under the treadmill. Keep the treadmill out of direct
sunlight. Do not leave the treadmill in the storage position in temperatures above 85 degrees Fahrenheit.
Unfolding
Apply slight forward pressure* on the treadmill running deck with one hand. Pull down on the unlocking lever and
slowly lower the running deck to the floor. The deck will lower unassisted when it reaches about waist high.
*At the rear roller area to relieve pressure on the locking system
Folding
Ensure the incline angle of the treadmill is at it lowest position.
Lift the treadmill running deck until it is locked by the locking pedal.
Moving
Before moving the treadmill, fold the treadmill to the stored position as described above. Hold the upper ends
of the handrails and slowly move the treadmill to your desired location.
To reduce the risk of injury, use extreme caution whi le moving the treadmill, do not attempt to move the treadmill
over an uneven surface.
Page 19

18
PARTS LIST
KEY NO. PART NO. DESCRIPTION Q'TY
1
297001 MAIN FRAME 1
2
297002 FRAME BASE 1
3
297003 INCLINE BRACKET 1
4
297004 LEFT UPRIGHT 1
5
297005 RIGHT UPRIGHT 1
6
297006 CONSOLE SUPPORT 1
7
297007 OUTER SLIDE 1
8
297008 INNER SLIDE 1
10
297010 BOTTOM MOTOR COVER 1
11
297011 BELT GUIDE 2
12
297012 RUNNING DECK 1
13
297013 RUNNING BELT 1
14
297014 DRIVE BELT 1
15
297015 FRONT ROLLER W/ PULLEY 1
16
297016 REAR ROLLER 1
17
297017
10 x 14 x 35.5L_ FRONT WHEEL SLEEVE
2
18
297018 MAGNET 1
19
297019 CYLINDER 1
20L
297020L HANDGRIP FOAM (L) 1
20R
297020R HANDGRIP FOAM (R) 1
21
297021 WIRE TIE MOUNT 6
22
297022 MAGNET 1
23
297023 INCLINE MOTOR 1
24
297024 CONTROLLER 1
25
297025 SPEED ADJUSTMENT SWITCH W/CABLE 1
26
297026 INCLINE ADJUSTMENT SWITCH W/CABLE 1
27
297027
HANDPULSE ASSEMBLY
2
27~1
297027-1 HANDPULSE WIRE 2
28
297028 SENSOR W/CABLE 1
29
297029 ELECTRONIC MODULE 1
30
297030 SAFETY KEY 1
32
297032 POWER CORD 1
33
297033 150m/m x 764 x 764 _CONNECTING CABLE (WHITE) 1
34
297034 150m/m x 764 x 764 _CONNECTING CABLE (BLACK) 1
36
297036 800m/m_UPPER COMPUTER EXTENSION CABLE 1
37
297037 1100m/m_COMPUTER EXTENSION CABLE 1
38
297038
1050M/M_COMPUTER CABLE (LOWER)
1
39~1
297039-1 TOP CONSOLE COVER 1
39~2
297039-2 BOTTOM CONSOLE COVER 1
39~4
297039-4 CONSOLE ANCHOR 2
39~5
297039-5 INNER CONSOLE COVER 1
39~7
297039-7
FAN ASSEMBLY
2
39~8
297039-8 DEFLECTOR FAN GRILL 2
39~9
297039-9
GRILL ANCHOR
4
Page 20

19
KEY NO. PART NO. DESCRIPTION Q'TY
39~14
297039-14
250M/M_SPEAKER W/CABLE 1
39~15
297039-15
700M/M_SPEAKER W/CABLE 1
39~16
297039-16
AMPLIFIER 1
39~17
297039-17
PLASTIC WASHER 6
39~19
297039-19
600M/M_POWER CORD OF AMPLIFIER 1
39~21
297039-21
400M/M_CONSOLE GROUND WIRE 1
42
297042 38m/m_BUTTON HEAD END CAP 2
43R
297043R FRAME BASE CAP (R) 1
43L
297043L FRAME BASE CAP (L) 1
44
297044 FRONT WHEEL 2
45
297045 REAR WHEEL 2
46
297046
□30x60 _SQUARE END CAP
2
47
297047 MOTOR COVER ANCHOR 3
48
297048 LEFT MOTOR COVER 1
49
297049 MIDDLE MOTOR COVER 1
50
297050 RIGHT MOTOR COVER 1
51
297051 FOOT RAIL 2
52
297052 CUSHION 6
53L
297053L REAR AD JUSTMENT BASE (L) 1
53R
297053R REAR ADJUSTMENT BASE (R) 1
54 L
297054L
ADJUSTMENT FOOT PAD CAP (L)
2
54 R
297054R
ADJUSTMENT FOOT PAD CAP (R)
57
297057 Ø30x3/8"_FOOT PAD 2
58
297058 SENSOR RACK 1
59
297059 LUBRICANT 1
60
297060 Ø 10 x 24 x 3T _NYLON WASHER (A) 2
61
297061 Ø 50 x 13 x 3T _NYLON WASHER (B) 4
62
297062 1/2" x 1-1/4"_CARRIAGE BOLT 2
63
297063 1/2" x 1"_HEX HEAD BOLT 2
64
297064 3/8" x 4"_SOCKET HEAD CAP SCREW 1
65
297065 3/8" x 92mm_HEX HEAD BOLT 1
66
297066 3/8" x 1" _HEX HEAD BOLT 4
67
297067 5/16 " x 2-3/4" _HEX HEAD BOLT 2
70
297070 3/8" x 2"_FLAT HEAD BOLT 2
71
297071 5/16 " x 1" _BUTTON HEAD BOLT 2
72
297072 M8 x 60m/m _HEX HEAD BOLT 1
73
297073 M8 x 80 m/m _SOCKET HEAD CAP SCREW 2
74
297074 M8 x 25 m/m _FLAT HEAD COUNTERSINK SCREW 8
75
297075 1/2" x 8T_ NYLON NUT 4
76
297076
3/8" x 7T_ NYLON NUT 4
77
297077
5/16" x 6T_ NYLON NUT 3
78
297078
M8 x 8T_ NYLON NUT 1
79
297079
3/8" x 7T_ NUT 3
80
297080
Ø 35 x 5/16" x 1.5T _ FLAT WASHER 2
Page 21

20
KEY NO. PART NO. DESCRIPTION Q'TY
81
297081
Ø 25 x 10 x 1.5T _ FLAT WASHER 4
82
297082
Ø 19 x 10 x 1.5T _ FLAT WASHER 4
83
297083 Ø 10 _SPRING WASHER 4
84
297084 Ø 6.5 x 25 x 1T _CONCAVE WASHER 8
85
297085 M5_RAISED WASHER 3
86
297086 4x12m/m_SELF TAPPING SCREW 16
87
297087 5x16m/m_ TAPPING SCREW 33
88
297088 5x19m/m_ TAPPING SCREW 2
89
297089 5x16m/m_ TAPPING SCREW 5
90
297090 3.5x12m/m_SELF TAPPING SCREW 25
91
297091 4x38m/m_SELF TAPPING SCREW 4
92
297092 3.5x16m/m_TAPPING SCREW 6
93
297093 Ø32 x 1.8T _NUT 2
94
297094 5/16" x 15m/m _BUTTON HEAD BOLT 14
95
297095 Ø 5/16 " x 19 x 1.5T _CURVED WASHER 4
96
297096 M5 x 15m/m_PHILLIPS HEAD SCREW 10
97
297097
COMBINATION M5 ALLEN WRENCH & PHILLIPS HEAD SCREW
1
98
297098
M6_ALLEN WRENCH
1
99
297099 3/8"×2"_HEX HEAD BOLT 1
100
2970100
HANDGRIP SIDE CAP (L)
1
101
2970101
HANDGRIP SIDE CAP (R)
1
102
2970102
3.5x32m/m_SELF TAPPING SCREW
8
104
2970104
NON-SLIP RUBBER (L)
1
105
2970105
NON-SLIP RUBBER (R)
1
106
2970106 5×8×25L_ CLEVIS PIN 1
107
2970107 5×8×9L_ FASTENING BUSHING 2
108
2970108 8×30L_LINK SHAFT
2
109
2970109 8×12.7×12L_ SHAFT BUSHING 1
110
2970110 2T_ FASTENING BRACKET 1
111
2970111 2T_LINK 1
112
2970112 1.0_ DUAL ROTA-SPRING 1
113
2970113 CHENCHING ROTA-SPRING 1
114
2970114 STEEL ROPE ROTA-SPRING
115
2970115
STEEL ROPE
116
2970116 CLENCHING HANDLE 1
119
2970119 M3×10m/m_PHILLIPS HEAD SCREW 1
120
2970120 M5×20m/m_PHILLIPS HEAD SCREW 1
121
2970121 5/16"×2"_PHILLIPS HEAD SCREW 1
122
2970122 M5_ NYLOC NUT 5
123
2970123 M3_NUT 1
124
2970124 5×10×1.0T_ FLAT WASHER 2
126
2970126 5×12×1.0T_ FLAT WASHER 1
127
2970127 M3_SPRING WASHER 1
128
2970128 CONSOLE GUSSET 1
Page 22

21
KEY NO. PART NO. DESCRIPTION Q'TY
135
2970135 3 × 8M/M_SHEET METAL SCREW 8
136
2970136
CONTROLLER BACK PLATE
1
138
2970138 5/16" × 19 × 1.5T_FLAT WASHER 6
140
2970140
FACE CLOTH
1
Page 23

22
EXPLODED DIAGRAM
15
18
83
83
81
81
66
66
22
14
72
78
24
30
88
27-1
91
4
94
95
94
94
89
6
27-1
26
94
26
37
42
27
5
94
95
91
94
20L
25
91
36
37
89
36
25
42
20R
91
27
3
75
75
87
85
100
101
39-8
39-7
39-8
39-9
102
102
102
39-9
39-9
102
39-7
90
90
90
90
90
39-5
39-2
87
87
87
87
87
10
87
87
87
87
39-4
128
122
122
96
39-21
39-19
39-16
39-1
90
90
96
96
90
90
Page 24

23
5998
980723PM1515
13
84
86
12
84
86
84
86
84
86
84
86
84
84
86
86
86
84
51
48
49
50
90
99
52
74
52
74
52
74
52
74
1
47
87
89
87
58
28
87
87
16
73
73
53L
53R
79
54R
57
79
87
54L
87
47
89
87
89
87
47
92
21
97
65
23
82
76
82
76
64
33
34
46
32
46
60
79
60
2
38
38
75
75
86
86
86
86
87
87
29
85
87
85
87
92
21
51
92
21
120
126
122
77
116
113
121
105
104
138
52
74
138
52
74
138
138
138
138
57
92
29
Page 25

24
TROUBLE SHOOTING
Problem Cause Correction
Treadmill will not start Treadmill not plugged in Plug into three prong (grounded) outlet
On / off switch not on Push the on/off button to on
House circuit breaker tripped Reset or replace
Treadmill reset switch tripped
Reset treadmill reset switch see reset
switch resetting
Treadmill motor controller fuse or
incline controller fuse blown
Replace fuse - see fuse replacement
Unit plugged into insufficient
extension cord
Plug directly into wall outlet
Treadmill stop or shuts off
by itself
House circuit breaker tripped Reset or replace
Treadmill reset switch tripped Reset treadmill reset switch
Treadmill motor controller fuse
blown
Replace fuse
Treadbelt does not run in
center
Treadbelt tension not even across
treadbelt
See treadbelt adjustment
Treadbelt slips Treadbelt tension too loose See treadbelt adjustment
Treadbelt hesitates while
being stepped on
Insufficient lubricant on treadbelt See treadbelt lubrication
Black particles collecting
under treadmill
Drive belt is breaking in Vacuum under treadmill periodically
No display on monitor On / off switch not on Push on / off button to on
Monitor does not display
speed or distance
Reed switch not aligned properly See reed switch adjustment
Magnet damaged or missing from
front roller pulley
Replace magnet
Monitor not working properly Replace monitor
No pulse displayed on
monitor
Hands not on hand pulse Place two hands on hand pulse
Hands on hand pulse Replace hand pulse
NOTE: It is not necessary to return treadmill for a monitor repair. The monitor or console is removable from
the treadmill for repair or replacement - see parts section
Page 26

25
MAINTENANCE INSTRUCTIONS
TREADBELT ADJUSTMENT
The treadbelt has been factory pre-adjusted, however
if during the operation:
Treadbelt slips during use if the treadbelt is too loose:
a) Tighten both rear roller adjusting bolts 1/4 turn
clockwise using allen wrench.
Treadbelt shifts too far to the right
a) Set the treadmill speed to 3.5 M.P.H.
b) Tighten the right adjusting bolt a 1/4 turn clockwise
using allen wrench.
c) Wait 15 seconds: if no change; turn the left adjusting
bolt a 1/4 turn counter-clockwise using allen
wrench.
e) Repeat steps b and c until belt is centered
Treadbelt shifts too far to the left
a) Set the treadmill speed to 3.5 M.P.H.
b) Tighten the left adjusting bolt a 1/4 turn clockwis e
using allen wrench.
c) Wait 15 seconds: if no change; turn the right adjusting
bolt a 1/4 turn counter-clockwise using allen
wrench.
e) Repeat steps b and c until belt is centered
IMPORTANT
DO NOT OVERTIGHTEN TREADBELT
If treadbelt is over-tightened, edges of treadbelt will
begin to curl
CAUTION!! DO NOT ALLOW ANYONE TO WALK
ON TREADBELT WHILE YOU ARE ADJUSTING.
1/4 TURN
1/4 TURN
1/4 TURN
If TREADMILL
slips during use.
too fa r to RIGH T.
If TR EA DM IL L is
If TR EA DM IL L is
too fa r to L F F T .
If Treadbelt slips
during use.
If Treadbelt shifts too far
to the right
If Treadbelt shifts too far
to the left
Page 27

26
MAINTENANCE INSTRUCTIONS
CLEANING
Care has been taken to assure that your treadmill has been properly adjusted and lubricated at the factory. It is not
recommended that the user attempt service on the inte rnal components instead seek service from an authorized
service center. However, from time-to-time the outer surfaces may appear dull or dirty, following the instructions
listed below will restore and preserve the original finish.
Note: Always unplug your treadmill prior to cleaning in order to avoid electrical hazard or shock.
1. Cleaning metal surfaces may be accomplished by using a soft cotton or terry cloth rag with a light application
of car wax. Do not use aerosol sprays or pump bottles as they may deposit wax upon the walking or computer
surface.
2. Under no circumstances are you to use ammonia, oils, silicones or any other compounds on the rubberized
walking surface. The use of such materials may cause serious injury to the body and/or deteriorate the
performance of the walking surface. Only clean the rubberized walking surface with a damp cloth (water
only).
3. From time-to-time the computer surface may collect dust or finger prints. The use of harsh chemicals will
destroy the protective coating and cause a static build up that will damage the components. This surface may
be cleaned with specially prepared chemicals found in most computer supply stores especially made for antistatic surfaces. It is strongly recommended that you purchase such a cleaning compound.
Page 28

27
MAINTENANCE INSTRUCTIONS
TREADMILL LUBRICATION
Your treadmill should require little maintenance other then periodically applying lubricant. Lubricating
under the treadbelt will ensure superior performance and extend its life expectancy.
HOW TO CHECK TREADBELT FOR PROPER LUBRICATION
Lift one side of the treadbelt and feel the top surface of the treadboard
If the surface is slick to the touch, then no further lubrication is required
If the surface is dry to the touch, apply one packet of lubricant or half of the bottle of lubricant.
HOW TO APPLY LUBRICANT
1. Lift one side of treadbelt.
2. Pour one half of the lubricant bottle under the center of the treadbelt on the top surface of the treadboard
3. Walk on the treadmill at a slow speed for 3 to 5 minutes to evenly distribute lubricant.
NOTE: DO NOT over lubricate treadboard. Any excess lubricant that comes out should be wiped off.
IMPORTANT: ONLY USE HALF THE BOTTLE OF LUBRICANT PER APPLICATION
LUBRICATION SCHEDULE
1. After the first 25 hours of use (2-3 months) apply one half bottle of lubricant
2. Every 50 hours of use (5-8 months) apply one half bottle of lubricant
We recommend that you use:
LUBE-N-Walk
™ Treadmill Lubrication Kit, available from Sears parts and service.
Page 29

28
RESET SWITCH RESETTING
If your treadmill looses power or will not start, check the reset switch located on the front of the motor cover.
If the white tab of the reset switch is not showing then the reset switch has not been tripped.
If the white tab of the reset switch is showing, the reset switch has tripped.
To reset the reset switch:
Remove the safety clip on console.
Press white tab of the reset switch in until it snaps back into place.
If the reset switch continues to trip - see treadbelt adjustment and treadbelt lubrication
SPEED SENSOR ADJUSTMENT
If the monitor does not display speed or distance the speed sensor and magnet may be misaligned. Follow these
step to check and realign.
Remove the motor cover
Check the spacing and alignment between the magnet on the right side of the front roller and the speed sensor on
the frame. The spacing must be 1/8”.
Loosened screw and slide speed sensor in or out of clamp.
Retighten screw
Replace the motor cover
Page 30

29
TRAINING GUIDELINES
Exercise is one of the most important factors in the overall health of an individual. Listed among its benefits
are:
x Increased capacity for physical work (strength endurance)
x Increased cardiovascular (heart and art eries/veins) and respiratory efficiency
x Decreased risk of coronary heart disease
x Changes in body metabolism, e.g. losing weight
x Delaying the physiological effects of age
x Physiological effects, e.g. reduction in stress, increase in self-confidence, etc.
Basic Components of Physical Fitness
There are four all encompassing components of physical fitness and we need to briefly define each and clarify
its role
.
Strength is the capacity of a muscle to exert a force against resistance. Strength contributes to power and sp eed
and is of great importance to a majority of sports people.
Muscular Endurance is the capacity to exert a force repeatedly over a period of time, e.g. it is the capacity of
your legs to carry you 10 Km without stopping.
Flexibility is the range of motion about a joint. Improving fl exibility involves the stretching of muscles and
tendons to maintain or increase suppleness, and provides increased resistance to muscle injury or soreness.
Cardio-Respiratory Endurance is the most essential component of physical fitness. It is the efficient
functioning of the heart and lungs.
Aerobic Fitness
The largest amount of oxygen that you can use per minute during exercise is called your maximum oxygen
uptake (MVo2). This is often referred to as your aerobic capacity.
The effort that you can exert over a prolonged period of time is limited by your ability to deliver oxygen to the
working muscles. Regular vigorous exercise produces a training effect that can increase your aerobic capacity
by as much as 20 to 30%. An increased MVO2 indicates an increased ability of the heart to pump blood, of the
lungs to ventilate oxygen and of the muscles to take up oxygen.
Anaerobic Training
This means “without oxygen” and is the output of energy when the oxygen supply is insuffi cient to meet the
body’s long term energy demands. (For example, 100 meter sprint).
The Training Threshold
This is the minimum leve l of exercise which is required to produce significant improvements in any physical
fitness parameter.
Progression
As your become fitter, a higher intensity of exercise is required to create an overload and therefore provide
continued improvement
Overload
This is where you exercise at a level above that which can be carried out comfortably. The intensity, duration
and frequency of exercise should be above the training threshold and should be gradually increased as the body
adapts to the increasing demands. As your fitness level improves, the training threshold should be raised.
Working through your program and gradually increasing the overload factor is important.
Page 31

30
Specificity
Different forms of exercise produce different results. The type of exercise that is carried out is specific both t o
the muscle groups being used and to the energy source involved.
There is little transfer of the effects of exercise, i.e. from strength training to cardiovascular fitness. That is why
it is important to have an exercise program tailored to your specific needs.
Reversibility
If you stop exercising or do not do your program often enough, you will lo se the benefits you have gained.
Regular workouts are the key to success.
Warm Up
Every exercise program should start with a warm up where the body is prepared for the effort to come. It
should be gentle and preferably use the muscles to be involved later.
Stretching should be included in both your warm up and cool down, and should be performed after 3-5
minutes of low intensity aerobic activity or callisthenic type exercise.
Warm Down or Cool Down
This involves a gradual decrease in the intensity of the exercise session. Following exercise, a large supply of
blood remains in the working muscles. If it is not returned promptly to the central circulation, pooling of bl ood
may occur in the muscles.
Heart Rate
As you exercise, the rate at which your heart beat increases. This is often used as a measure of the required
intensity of exercise. You need to exercise hard enough to condition yo ur circu latory system, and increase yo ur
pulse rate, but not enough to strain your heart.
Your initial level of fitness is important in developing an exercise progr am for you. If you are starting off, you
can get a good training effect with a heart rate of 110-120 beats per minute(BPM). If you are fit ter, you will
need a higher threshold of stimulation.
To begin with, you should exercise at a level that elevates your heart rate to about 65 to 70% of your
maximum. If you find this is too easy, you may want to increase it, but it is better to lean on the conservative
side.
As a rule of thumb, the maximum heart rate is 220 minus your age. As you increase in age, your heart, like
other muscles, loses some of its efficiency. Some of its natural loss is won back as fitness improves.
The following table is a guide to those who are “starting fitness”.
Age 25 30 35 40 45 50 55 60 65
Target heart Rate
10Second Count 23 22 22 21 20 19 19 18 18
Beats per Minute 138 132 132 126 120 114 114 108 108
Pulse Count
The pulse count (on your wrist or carotid artery in the neck, taken with two index fingers)is done for ten
seconds, taken a few seconds after you stop exercising. This is for two reasons: (a) 10 seconds is long enough
for accuracy, (b) the pulse count is to approximate your BPM rate at the time you are exercising. Since heart
rate slows as you recover, a longer count isn’t as accurate.
The target is not a magic number, but a general guide. If you’re above average fitness, you may work quite
comfortably a little above that suggested for your age group.
The following table is a guide to those who are keeping fit. Here we are working at about 80% of maximum.
Page 32

31
Age 25 30 35 40 45 50 55 60 65
Target heart Rate
10 Second Count 26 26 25 24 23 22 22 21 20
Beats per Minute 156 156 150 144 138 132 132 126 120
Don’t push yourself too hard to reach the figures on t his table. It can be very uncomfortable if you overdo it.
Let it happen naturally as you work through your progr am. Remember, the target is a guide, not a rule, a little
above or below is just fine.
Two final comments:(1) don’t be concerned with day to day variations in your pulse rate, being under pressure
or not enough sleep can affect it;(2) your pulse rate is a guide, don’t become a slave to it.
Muscle Soreness
For the first week or so, this may be the only indication you have that you are on an exerci se program. This, of
course, does depend on your overall fitness level. A confirmation that you are on the correct program is a very
slight soreness in most major muscle groups. This is quite normal and will disappear in a matter of days.
If you experience major discomfort, you may be on a program that is too advanced or you have increased your
program too rapidly.
If you experience PAIN during or after exercise, your body is telling your something.
Stop exercising and consult your doctor.
What to Wear
Wear clothing that will not restrict your movement in any way while exercising. Clothes should be light
enough to allow the body to cool. Excessive clothing that causes you to perspire more than you normally would
while exercising, gives you no advantage. The extr a weigh t you lo se is body fluid and will be replaced with the
next glass of water you drink. It is advisable to wear a pair of gym or running shoes or “sneakers”.
Breathing during Exercise
Do not hold your breath while exercising. Breathe normally as much as possible. Remember, breathing
involves the intake and distribution of oxygen, which feeds the working muscles.
Rest periods
Once you start your exercise program, you should continue through to the end. Do not break off halfway
through and then restart at the same place later on without going through the warm-up stage again.
The rest period required between strength training exercises may vary from person to person. This will depend
mostly on your level of fitness and the program you have chosen. Rest between exercises by all means, but do
not allow this to exceed two minutes. Most people manage with half minute to one minute rest periods
Page 33

32
STRETCHING
Stretching should be included in both your warm up and cool down, and should be performed after 3-5 minutes
of low intensity aerobic activity or callisthenic type exercise. Movements should be performed slowly and
smoothly, with no bouncing or jerking. Move into the stretch until slight tension, not pain, is felt in the muscle
and hold for 20-30 seconds. Breathing should be slow, rhythmical and under control, making sure never to
hold your breath.
Page 34

33
Page 35

34
OWNER`S
MANUAL
Model No.
C249 30199 0
FREE SPIRIT
TREADMILL
SERVICE
Is at
YOUR
SERVICE
Model and serial
number may be found
on the serial number
label on the front of
the treadmill.
You should record
both model number
and serial number and
keep in a safe place for
future reference.
HOW TO ORDER REPLACEMENT PARTS
The MODEL NUMBER for the TREADMILL will be found on
the frame.
Always mention this MODEL NUMBER when requesting
service or replacement parts for your TREADMILL.
All parts listed herein may be ordered through SEARS
CANADA INC.RETAIL OR CATALOG STORES AND
SERVICE CENTERS. If the parts you need are not stocked
locally your order will be electronically transmitted to a SEARS
Parts Distribution Center for expedited handling.
When ordering parts by mail, selling prices will be furnished on
request or parts will be shipped at prevailing prices and you will
be billed accordingly.
WHEN ORDERING REPLACEMENT PARTS, ALWAYS
GIVE THE FOLLOWING INFORMATION.
1. PA RT NU MBER
2. PA RT DESCRIPTION
3. MODEL NUMBER
4. NAME OF ITEM
Your sears merchandise takes on added value when you discover
that Sears has Service Units throughout the Country. Each is
staffed by Sears, Trained Technicians Sears approved methods.
For assembly helps or missing parts call the factory at 1-888707-1880
Page 36

35
Get it fixed, at your home or ours!
Just Call:
1-800-4-MY-HOME
®
(1-800-469-4663)
24 hours a day, 7 days a week
For the repair of major brand appliances in your own home …
no matter who made it, no matter who sold it!
For your nearest Sears Parts & Service location,
to bring in products like vacuums, lawn equipment and electronics.
For Sears Parts & Service, to order the replacement parts,
accessories and owner’s manuals that you need to do-it-yourself.
www.sears.ca
_______________________________________________________________________________________________
To purchase or inquire about a Sears Maintenance Agreement, call:
1-800-361-6665
9 a.m. – 11 p.m. Mon. – Fri. EST, 9 a.m. – 4 p.m. Sat.
_______________________________________________________________________________________________
Pour service en francais:
1-800-LE-FOYER
MC
(1-800-533-6937)
www.sears.ca
®/TM
Trademarks of Sears, Roebuck and Co. used under license by Sears Canada
®
Marque deposée/
MC
Marque de commerce de Sears, Roebuck and Co. utilisée en vertu d’une licence de Sears Canada
 Loading...