

Sears Craftsman C950-52943-0 Owner's Manual
Owner's
Manual
AL STAGE
IVlodel
C950-52943-0
13.5 T.P. 27 inch
S
OW T ROW
CAUTION:
You must read and
understand this owner's
manual before operating
unit.
Serial No.
Sears Canada inc., Toronto, Ontario M5B 2C3
Visit our Craftsman website: www.sears.ca/craftsman
1738165
RevisionA
Rev.Date07/2009

Thankyou for purchasingthis quality-built Craftsmansnowthrower. We're pleasedthat you've placedyour confidenceinthe Craftsman
brand. Whenoperatedandmaintained according to the instructionsinthis manual,your Craftsmanproduct will provide many years of
dependableservice.
Thismanual contains safety information to makeyou awareof the hazardsand risksassociatedwith snow throwers and how to avoid
them. Thissnow thrower is designed and intendedonly for snow throwing and is not intendedfor any other purpose, it is important that
you readand understandthese instructions throroughiy beforeattempting to start or operatethis equipment. Thissnow thrower
requires final assembly before use. Referto the Assembly section for instructions on final assembly procedures.Follow the instruc-
tions completely.Savethese instructionsfor future reference.
Snow Thrower:
Model Number
Revision
Serial Number
Engine:
Model Number
Revision
SerialNumber
Date Purchased:
Store Where Purchased:
City:
Province:
Telephone:
NOTICE:Recordthis informationabout your snowthrowersothatyouwiii beable to provideit in case of lossor theft.
TABLEOFCONTENTS
OPERATORSAFETY.................................................................................... 4
ASSEMBLY.............................................................................................. 10
TOOLSREQUIREDFORASSEMBLY..........................................................................................................10
CONTENTSOFSHiPPiNGCARTON..........................................................................................................10
PARTSBAGCONTENTS............................................................................................................................10
UNPACKING..............................................................................................................................................11
UPPERHANDLEANDCRANKASSEMBLY................................................................................................12
CHECKTHECABLES................................................................................................................................12
SETTHELENGTHOFTHECABLES..........................................................................................................12
SPEEDSELECTLEVERASSEMBLY..........................................................................................................13
SNOWCHUTEASSEMBLY........................................................................................................................14
HEADLIGHTASSEMBLY...........................................................................................................................14
FEATURESANDCONTROLS.......................................................................... 15
OPERATION............................................................................................. 17
BEFOREOPERATINGSNOWTHROWER................................................................................. 17
OPERATETHESNOWTHROWER..............................................................................................................17
STOPTHESNOWTHROWER....................................................................................................................18
TRACTIONLOCKPINS.............................................................................................................................18
CHECKTHEOIL(BEFORESTARTINGENGINE)........................................................................................18
FILLTHEFUELTANK................................................................................................................................19
STARTTHEENGINE..................................................................................................................................19
STOPTHEENGINE....................................................................................................................................20
CLEARA CLOGGEDDISCHARGECHUTE.................................................................................................21
OPERATINGTIPS......................................................................................................................................21
MAINTENANCE......................................................................................... 22
SERVICERECOMMENDATIONS...............................................................................................................22
LUBRICATEAUGERGEARBOX.................................................................................................................23
LUBRICATEAUGERSHAFTFITTINGS......................................................................................................23
LUBRICATECHUTEROTATIONGEAR.......................................................................................................23
ENGINEMAINTENANCE...........................................................................................................................24
CHANGETHESPARKPLUG......................................................................................................................25
ADJUSTSKIDHEIGHT..............................................................................................................................26
BELTADJUSTMENT..................................................................................................................................27
BELTGUIDEADJUSTMENT......................................................................................................................28
CHECKANDADJUSTTHECABLES..........................................................................................................28
AUGERSHEARPINREPLACEMENT.........................................................................................................30
CHECKTHETIRES.................................................................................................................. 30
STORAGE................................................................................................ 31
OFFSEASONSTORAGE............................................................................................................................31
LUBRICATEHEXSHAFTANDCHAINS.....................................................................................................31
REMOVEFROMSTORAGE........................................................................................................................31
TROUBLESHOOTING................................................................................... 32
WARRANTIES........................................................................................... 34
SPECIFICATIONS....................................................................................... 37
OPERATORSAFETY
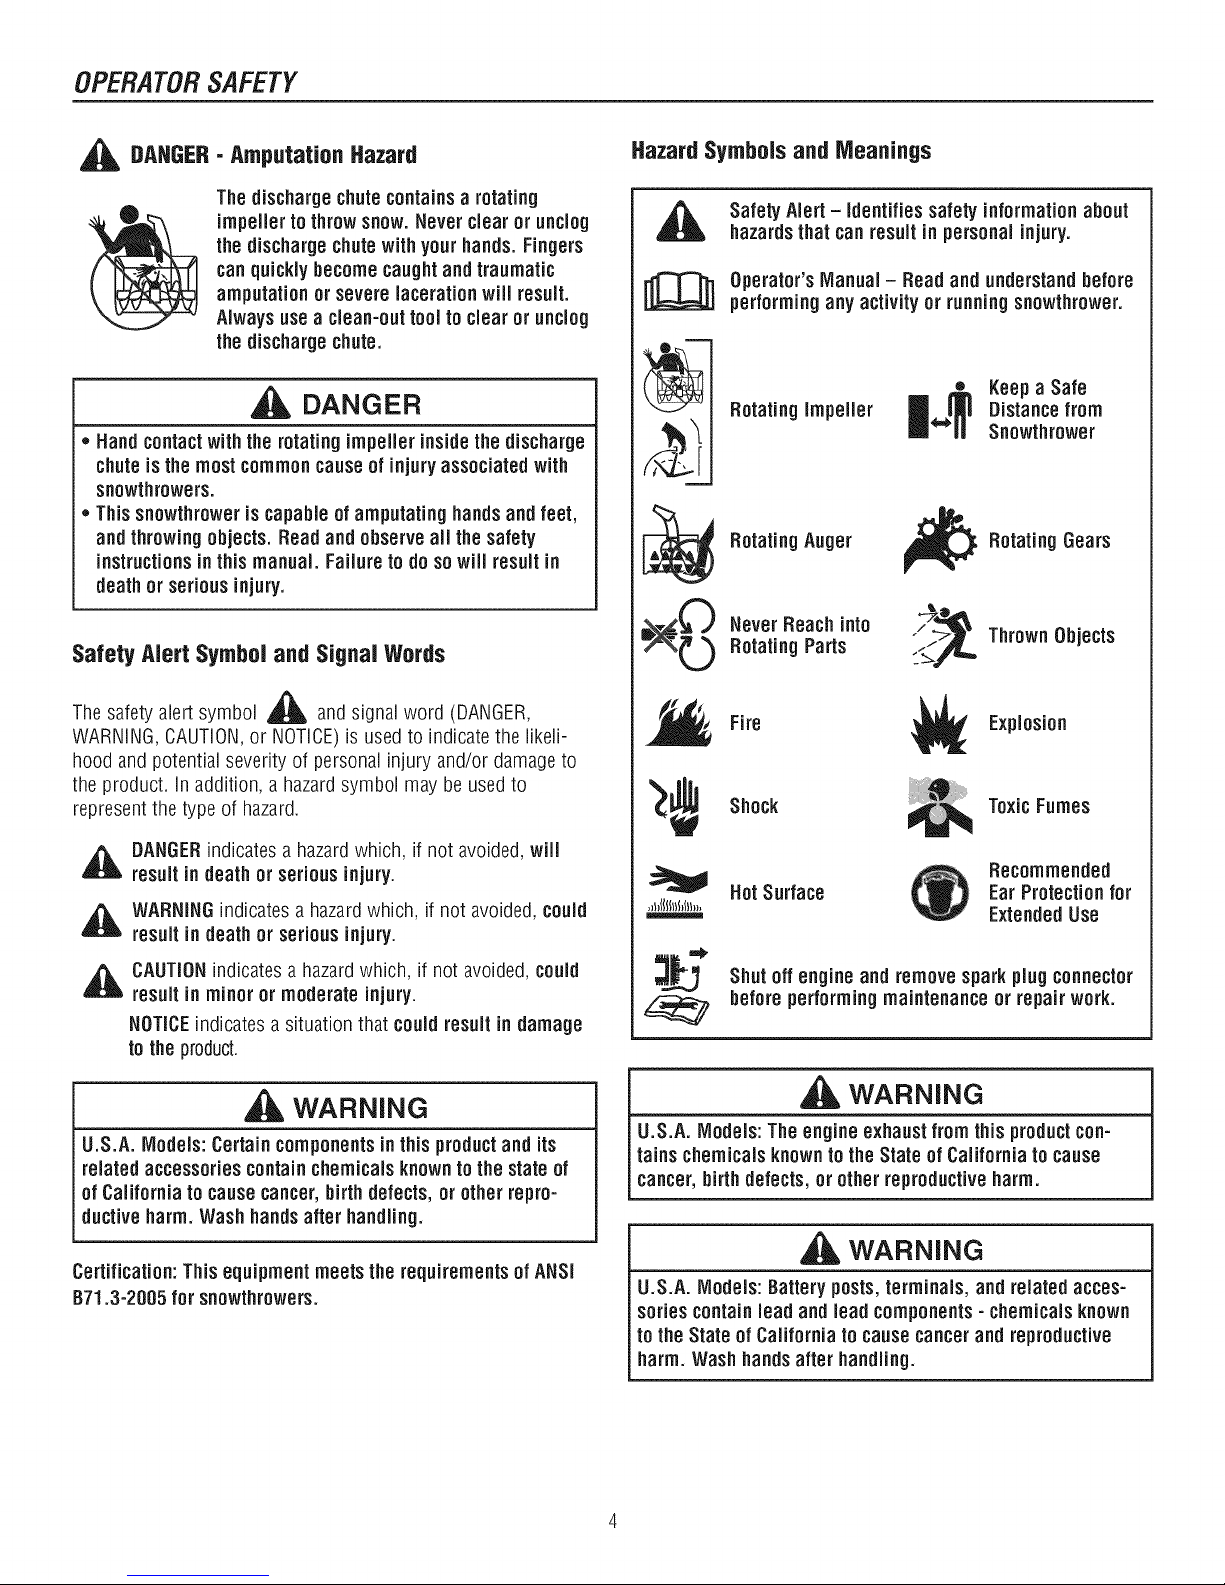
DAHGER- Amputation Hazard
The dischargechutecontainsarotating
impeller to throwsnow. Never clear or unclog
the dischargechutewith your hands.Fingers
canquickly becomecaughtand traumatic
amputation or severe lacerationwill result.
Alwaysusea clean-outtool to dear or unclog
the dischargechute.
DANGER
• Hand contactwith the rotating impeller inside the discharge
chuteisthe most commoncauseof injuryassociated with
snowthrowers.
• Thissnowthroweris capableof amputating handsand feet,
and throwingobjects. Readand observeall the safety
instructionsin this manual. Failure to do so will result in
deathor serious injury.
SafetyAlert Symboland SignalWords
A
Thesafety alert symbol _ and signal word (DANGER,
WARNING,CAUTION,or NOTICE)is usedto indicatethe likeli-
hood and potential severity of personalinjuryand/or damage to
the product. In addition, a hazardsymbol may be usedto
represent the type of hazard.
Hazard Symbols and Meanings
Safety Alert - identifiessafety informationabout
hazardsthat canresult in personalinjury.
Operator's Manual- Readand understand before
performingany activity or running snowthrower.
t_
Rotating Impeller
f _ %1[,,.,._i
_ Rotating Auger
_(_ Never Reach into
Rotating Parts
L)
Fire
Shock ToxicFumes
_ Rotating Gears
/_-_ Thrown Objects
• Keepa Safe
Distance from
Snowthrower
Explosion
_ ANGERindicates a hazardwhich, if not avoided,will
result in death or serious injury.
,_lll WARNINGindicatesa hazardwhich, if not avoided, could
resultin death or serious injury.
_ AUTIONindicates a hazardwhich, if not avoided,could
resultin minor or moderate injury.
NOTICEindicates a situation that couldresult in damage
to the product.
WARNING
U.S.A. Models:Certain componentsinthis productand its
related accessories containchemicalsknown to the state of
of California to causecancer,birth defects, or other repro-
ductive harm. Wash hands after handling.
Certification: This equipmentmeets the requirementsof ANSI
B71.3-2005 for snowthrowers.
Recommended
HotSurface
Shut off engine and remove sparkplug connector
beforeperformingmaintenance or repairwork.
EarProtection for
ExtendedUse
WARNING
U.S.A. Models: The engine exhaust from this productcon-
rainschemicalsknown to the State of California to cause
cancer,birthdefects, or other reproductiveharm.
WARNING
U.S.A. Models: Batteryposts,terminals, and related acces-
sories containlead and lead components- chemicalsknown
tothe State of California to causecancerand reproductive
harm. Wash hands after handling.

OPERATORSAFETY
Control Symbols on Equipment
._ Fuel
On Off
J+J Choke 0ff
R1--
NI °"°"°°°
Stop
Slow
Fast
Forward
Neutral
Reverse
ElectricStart -
Engage(Down) &
Disengage (Up)
Engine- Run
Engine - Stop
Readthe Manual
DANGER
Read,understand,andfollowalltheinstructionsonthe
snowthrowerandintheoperator'smanualbeforeoperating
thisunit.
[
,, Bethoroughlyfamiliarwith thecontrolsandtheproperuseofthesnow
thrower.
,, Makesureyouareproperlytrainedbeforeoperatingthesnowthrower.
,, Knowhowtostoptheunitanddisengagethecontrolsquickly.
,, Neverallowanyonetooperatethesnowthrowerwithoutproperinstruction.
,, Alwaysfollowtheinstructionsin theoperator'smanual,if thesnowthrower
will bestoredforanextendedperiod.
,, Maintainorreplacesafetyandinstructionlabelsasnecessary.
,, Neverattemptto makemajorrepairsonthesnowthrowerunlessyouhave
beenproperlytrained.Improperservicingofthesnowthrowercanresult
in hazardousoperation,equipmentdamage,andvoidingoftheproduct
warranty.
Discharge Chute
Failuretoobservethesafetyinstructionsinthismanualwill
resultindeathorseriousinjury.
w
TractionControl -
Engage(Down)
O
AugerClutch
(Left and Right)
[_ ischargeChute
='_'-m
Auger Control -
Engage(Down)
-dr
¢_ Chute Deflector
(Up and Down)
(High and Low)
Heated HandGrips
DANGER
Dischargechutecontainsrotatingimpellerto throwsnow.
Neverclearorunclogthedischargechutewithyourhands.
Fingerscanquicklybecomecaughtintheimpeller.Always
useaclean-outtool.
Failureto observethesesafetyinstructionswill resultin
traumaticamputationorseverelaceration.
TOSAFELYCLEARACLOGGEDDISCHARGECHUTE
,_ DANGER:Handcontactwiththerotatingimpellerinsidethedischarge
chuteis themostcommoncauseofinjuryassociatedwithsnow
throwers.Neveruseyourhandstocleanoutthedischargechute.
FOLLOWTHESEIHSTRUCTIOHS:
1 ShutOFFtheengine
2 Wait10secondstobesuretheimpellerbladeshavestoppedrotating
3.Alwaysuseaclean-outtool,notyourhands.
NOTE:Notall controlsymbols shownon this pagewill appear
on your snowthrower.See FEATURESANDCONTROLSsection
for the applicable symbols.
Easy-TurnTM TractionControl
Free-HandControl
TM
OPERATORSAFETY
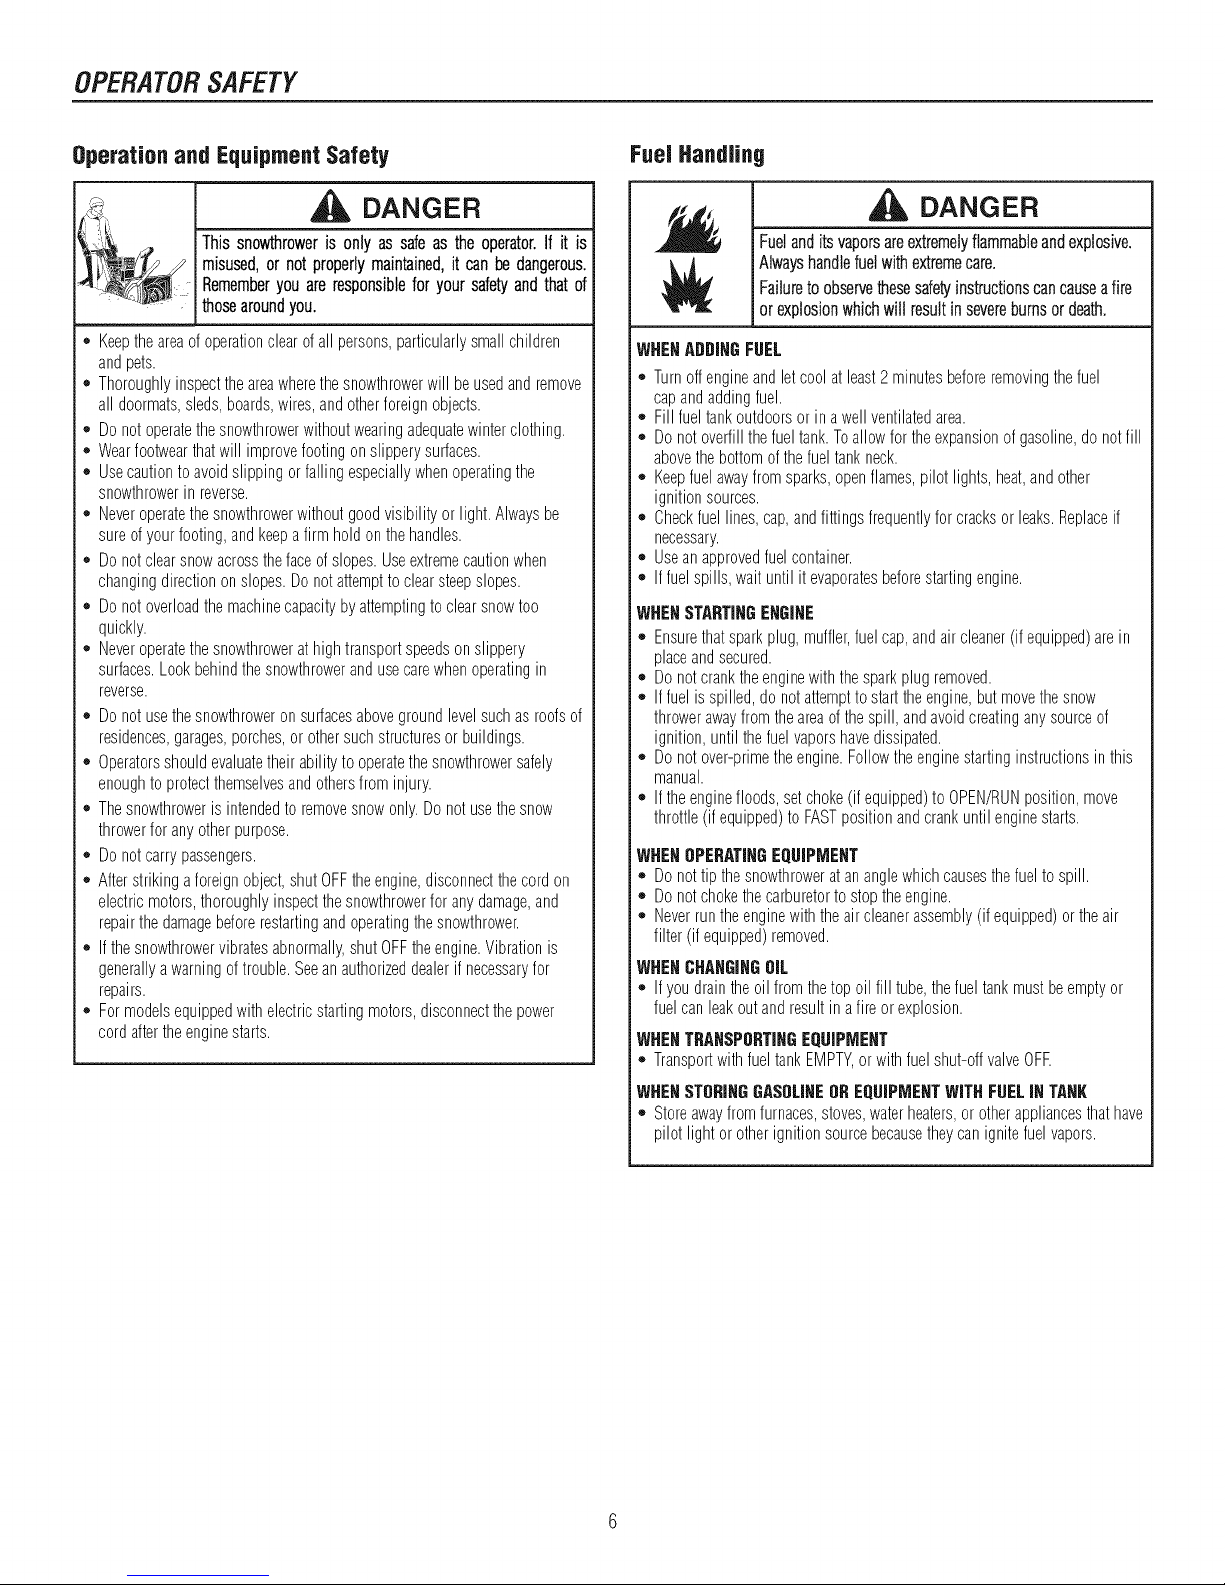
Operationand EquipmentSafety
DANGER
G
* Keeptheareaofoperationclearof all persons,particularlysmallchildren
andpets.
. Thoroughlyinspecttheareawherethesnowthrowerwill beusedand remove
all doormats,sleds,boards,wires,andotherforeignobjects.
. Do notoperatethesnowthrowerwithoutwearingadequatewinterclothing.
. Wearfootwearthatwill improvefootingonslipperysurfaces.
. Usecautionto avoidslippingorfallingespeciallywhenoperatingthe
snowthrowerinreverse.
*, Neveroperatethesnowthrowerwithoutgoodvisibility orlight.Alwaysbe
sureof yourfooting,andkeepafirm holdonthehandles.
. Do notclearsnowacrossthefaceof slopes.Useextremecautionwhen
changingdirectiononslopes.Donotattemptto clearsteepslopes.
. Do notoverloadthemachinecapacitybyattemptingto clearsnowtoo
quickly.
. Neveroperatethesnowthrowerat hightransportspeedsonslippery
surfaces.Lookbehindthesnowthrowerandusecarewhenoperatingin
reverse.
* Do notusethesnowthroweronsurfacesabovegroundlevelsuchas roofsof
residences,garages,porches,or othersuchstructuresor buildings.
. Operatorsshouldevaluatetheirabilityto operatethesnowthrowersafely
enoughtoprotectthemselvesandothersfrominjury.
. Thesnowthroweris intendedto removesnowonly.Do notusethesnow
throwerforanyotherpurpose.
. Do notcarrypassengers.
*, Afterstrikinga foreignobject,shutOFFtheengine,disconnectthecordon
electricmotors,thoroughlyinspectthesnowthrowerforanydamage,and
repairthedamagebeforerestartingandoperatingthesnowthrower.
*, If thesnowthrowervibratesabnormally,shutOFFtheengine.Vibrationis
generallyawarningof trouble.Seeanauthorizeddealerif necessaryfor
repairs.
. Formodelsequippedwithelectricstartingmotors,disconnectthepower
cordaftertheenginestarts.
Thissnowthroweris only assafeastheoperator.If it is
misused,or notproperlymaintained,it canbedangerous.
i Rememberyouareresponsibleforyoursafetyandthatof
thosearoundyou.
FuelHandling
DANGER
Fuelanditsvaporsareextremelyflammableandexplosive,
Alwayshandlefuel withextremecare.
Failuretoobservethesesafetyinstructionscancauseafire
Ior explosionwhichwill resultin severeburnsor death.
WHENADDINGFUEL
* Turnoffengineandletcoolatleast2 minutesbeforeremovingthefuel
capandaddingfuel.
o Fill fueltankoutdoorsor ina wellventilatedarea.
o Donotoverfillthefuel tank.Toallowfor theexpansionofgasoline,do notfill
abovethebottomofthefueltankneck.
o Keepfuelawayfromsparks,openflames,pilotlights,heat,andother
ignitionsources.
o Checkfuellines,cap,andfittingsfrequentlyfor cracksor leaks.Replaceif
necessary.
o Useanapprovedfuelcontainer.
o If fuelspills,wait until it evaporatesbeforestartingengine.
WHENSTARTINGENGINE
*, Ensurethatsparkplug,muffler,fuelcap,andair cleaner(if equipped)arein
placeandsecured.
. Donotcranktheenginewiththesparkplugremoved.
. Iffuel isspilled,do notattemptto starttheengine,butmovethesnow
throwerawayfromtheareaofthespill, andavoidcreatinganysourceof
ignition,until thefuelvaporshavedissipated.
*, Donotover-primetheengine.Followtheenginestartinginstructionsin this
manual.
. Iftheenginefloods,setchoke(if equipped)to OPEN/RUNposition,move
throttle(if equipped)to FASTpositionandcrankuntilenginestarts.
WHENOPERATINGEQUIPMENT
* Donottip thesnowthrowerat ananglewhichcausesthefueltospill.
. Donotchokethecarburetorto stoptheengine.
. Neverruntheenginewiththeaircleanerassembly(ifequipped)or theair
filter (if equipped)removed.
WHENCHANGINGOIL
* If youdraintheoilfromthetopoil fill tube,thefueltankmustbeemptyor
fuelcanleakoutandresultin afire orexplosion.
IWHENTRANSPORTINGEQUIPMENT
* TransportwithfueltankEMPTY,orwithfuelshut-offvalveOFE
WHENSTORINGGASOLINEOREQUIPMENTWITHFUELIN TANK
*, Storeawayfromfurnaces,stoves,waterheaters,or otherappliancesthathave
pilotlight or otherignitionsourcebecausetheycanignitefuelvapors.
OPERATORSAFETY
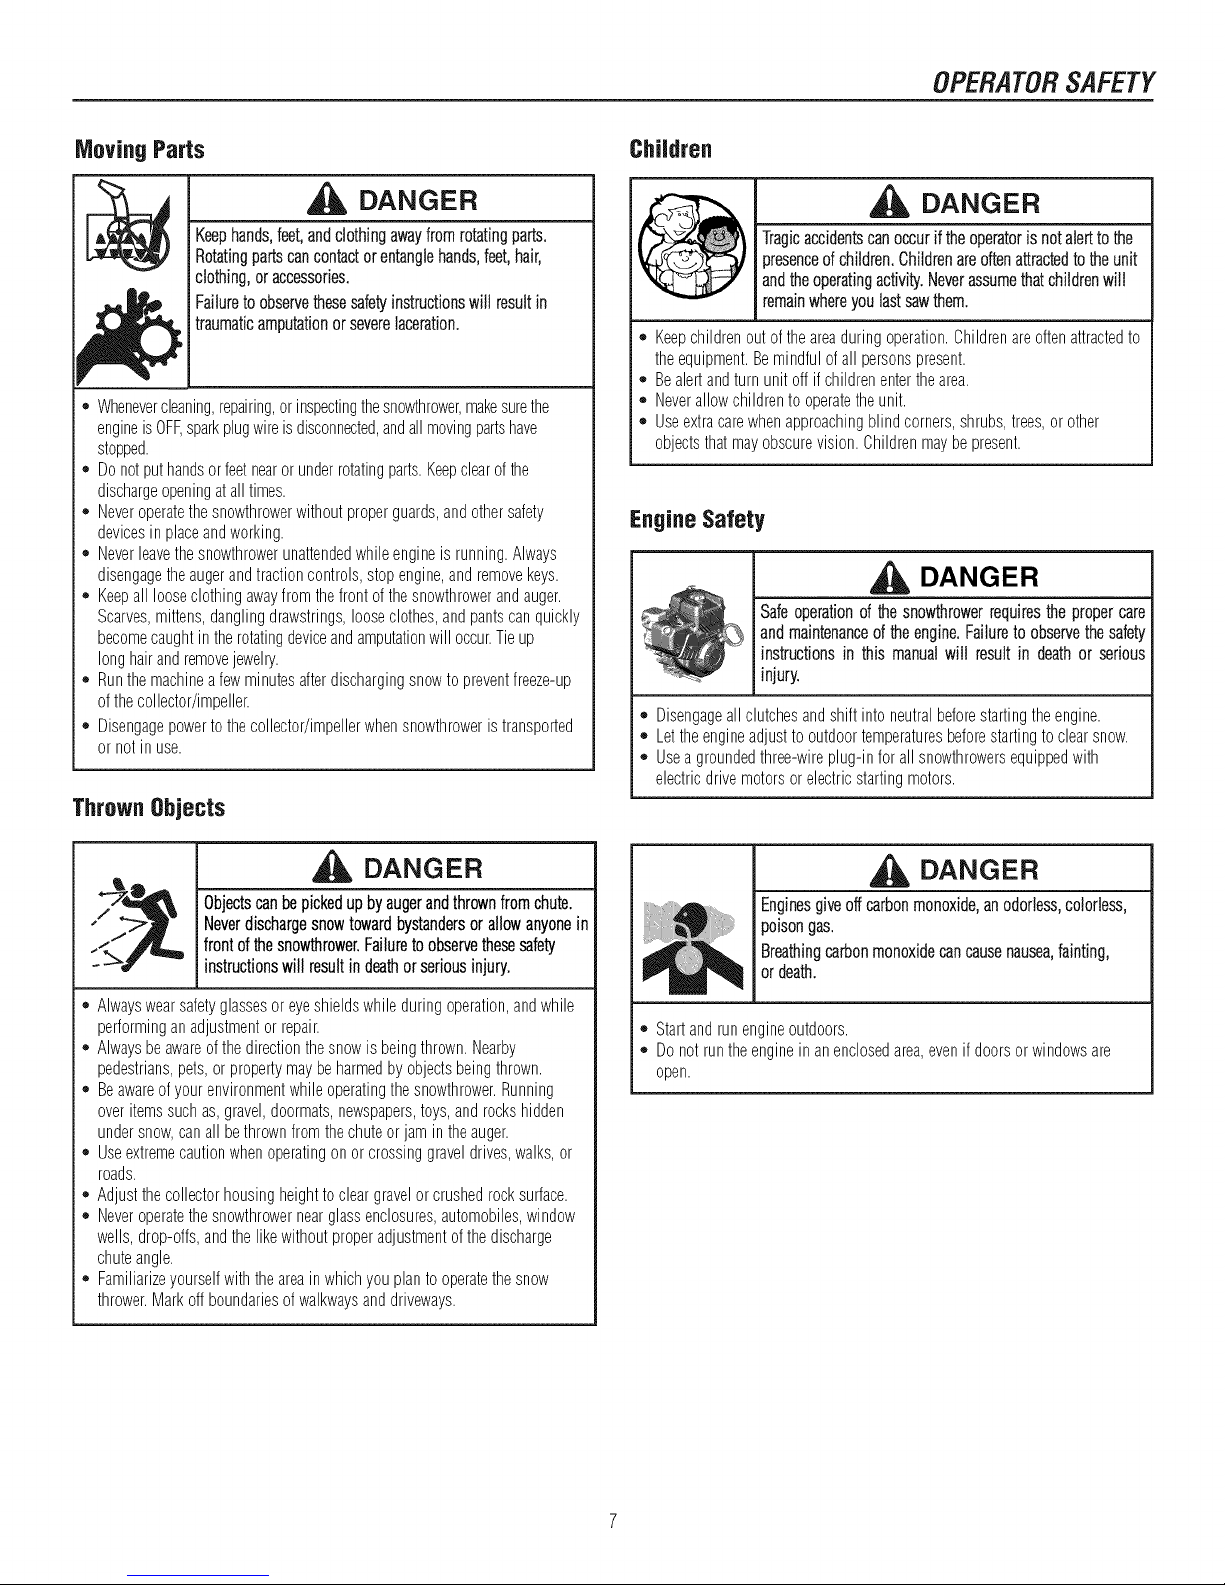
Moving Parts
DANGER
Keephands,feet,andclothingawayfromrotatingparts.
Rotatingpartscancontactorentanglehands,feet,hair,
clothing,oraccessories.
Failuretoobservethesesafetyinstructionswillresultin
traumaticamputationorseverelaceration.
* Whenevercleaning,repairing,orinspectingthesnowthrower,makesurethe
engineis OFF,sparkplugwireis disconnected,andallmovingpartshave
stopped.
. Donotputhandsorfeetnearor underrotatingparts.Keepclearofthe
dischargeopeningat alltimes.
. Neveroperatethesnowthrowerwithoutproperguards,andothersafety
devicesin placeandworking.
. Neverleavethesnowthrowerunattendedwhileengineis running.Always
disengagetheaugerandtractioncontrols,stopengine,andremovekeys.
. Keepall looseclothingawayfromthefrontofthesnowthrowerandauger.
Scarves,mittens,danglingdrawstrings,looseclothes,andpantscanquickly
becomecaughtintherotatingdeviceandamputationwill occur.Tieup
longhairandremovejewelry.
. Runthemachineafewminutesafterdischargingsnowto preventfreeze-up
ofthecollector/impeller.
. Disengagepowertothecollector/impellerwhensnowthroweris transported
or notin use.
Thrown Objects
Children
DANGER
Tragicaccidentscanoccuriftheoperatorisnotalerttothe
presenceofchildren,Childrenareoftenattractedtotheunit
andtheoperatingactivity.Neverassumethatchildrenwill
remainwhereyoulastsawthem.
o Keepchildrenout oftheareaduringoperation.Childrenareoftenattractedto
theequipment.Bemindfulofall personspresent.
,, Bealertandturnunit offif childrenenterthearea.
,, Neverallowchildrento operatetheunit.
,, Useextracarewhenapproachingblindcorners,shrubs,trees,or other
objectsthatmayobscurevision.Childrenmaybepresent.
Engine Safety
DANGER
__ _ Safeoperationof thesnowthrowerrequiresthepropercare
,, Disengageallclutchesandshiftintoneutralbeforestartingtheengine.
,, Lettheengineadjustto outdoortemperaturesbeforestartingtoclearsnow.
,, Usea groundedthree-wireplug-inforall snowthrowersequippedwith
electricdrivemotorsor electricstartingmotors.
I andmaintenanceoftheengine.Failureto observethesafetyinstructionsin this manualwill result in deathor serious
injury.
DANGER
Objectscanbepickedupbyaugerandthrownfromchute.
Neverdischargesnowtowardbystandersorallowanyonein
frontofthesnowthrower.Failuretoobservethesesafety
instructionswillresultindeathorseriousinjury.
* Alwayswearsafetyglassesoreyeshieldswhileduringoperation,andwhile
performinganadjustmentor repair.
,, Alwaysbeawareofthedirectionthesnowis beingthrown.Nearby
pedestrians,pets,orpropertymaybeharmedby objectsbeingthrown.
,, Beawareof yourenvironmentwhileoperatingthesnowthrower.Running
overitemssuchas,gravel,doormats,newspapers,toys,androckshidden
undersnow,canall bethrownfromthechuteor jamintheauger.
,, Useextremecautionwhenoperatingonor crossinggraveldrives,walks,or
roads.
,, Adjustthecollectorhousingheighttocleargravelorcrushedrocksurface.
,, Neveroperatethesnowthrowernearglassenclosures,automobiles,window
wells,drop-otis,andthelikewithoutproperadjustmentofthedischarge
chuteangle.
,, Familiarizeyourselfwiththeareainwhichyouplanto operatethesnow
thrower.Markoffboundariesofwalkwaysanddriveways.
DANGER
Enginesgiveoff carbonmonoxide,anodorless,colorless,
poisongas.
Breathingcarbonmonoxidecancausenausea,fainting,
or death.
o Startandrun engineoutdoors.
o Donotruntheenginein anenclosedarea,evenifdoorsorwindowsare
open.
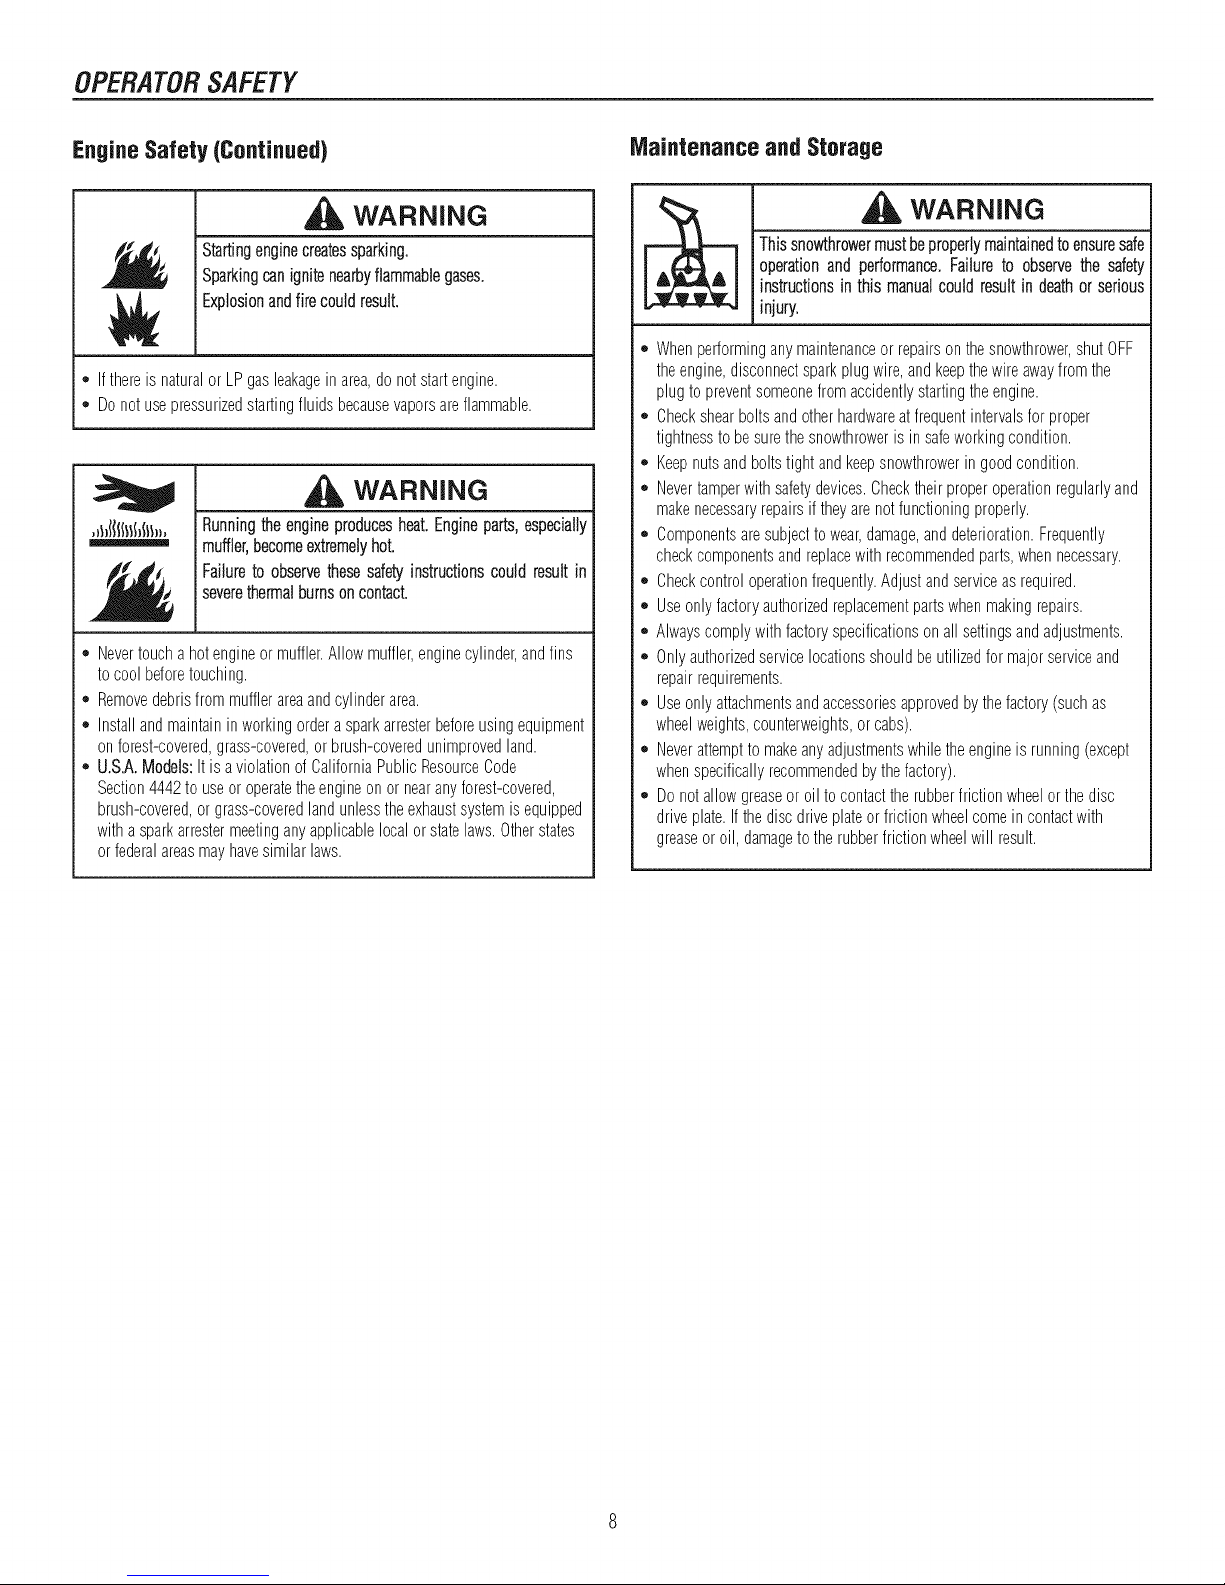
OPERATORSAFETY
Engine Safety (Continued)
WARNING
j Startingenginecreatessparking.
i ,
j Sparkingcanignitenearbyflammablegases.
Explosionandfire couldresult.
* Ifthereisnaturalor LPgasleakagein area,donotstartengine.
* Donotusepressurizedstartingfluidsbecausevaporsareflammable.
,_I_IISIIII_$11,, Runningtheengineproducesheat.Engineparts,especially
"="='===_ i muffler,becomeextremelyhot,
Failureto observethesesafetyinstructionscould result in
i severethermalburnsoncontact.
* Nevertouchahotengineormuffler.Allow muffler,enginecylinder,andfins
to coolbeforetouching.
* Removedebrisfrommufflerareaandcylinderarea.
* Installandmaintaininworkingorderasparkarresterbeforeusingequipment
onforest-covered,grass-covered,orbrush-coveredunimprovedland.
* U.S.A.Models:It isa violationof CaliforniaPublicResourceCode
Section4442to useor operatetheengineonor nearanyforest-covered,
brush-covered,or grass-coveredlandunlesstheexhaustsystemis equipped
with asparkarrestermeetinganyapplicablelocalor statelaws.Otherstates
orfederalareasmayhavesimilarlaws.
Maintenanceand Storage
Thissnowthrowermustbeproperlymaintainedto ensuresafe
operationand performance.Failure to observethe safety
instructionsin this manualcould resultin deathor serious
injury.
o Whenperforminganymaintenanceor repairsonthesnowthrower,shutOFF
theengine,disconnectsparkplugwire,andkeepthewireawayfromthe
plugtopreventsomeonefromaccidentlystartingtheengine.
* Checkshearboltsandotherhardwareatfrequentintervalsforproper
tightnessto besurethesnowthroweris in safeworkingcondition.
* Keepnutsandboltstight andkeepsnowthrowerin goodcondition.
* Nevertamperwith safetydevices.Checktheir properoperationregularlyand
makenecessaryrepairsif theyarenotfunctioningproperly.
* Componentsaresubjecttowear,damage,anddeterioration.Frequently
checkcomponentsandreplacewith recommendedparts,whennecessary.
* Checkcontroloperationfrequently.Adjustandserviceas required.
* Useonlyfactoryauthorizedreplacementpartswhenmakingrepairs.
* Alwayscomplywithfactoryspecificationsonall settingsandadjustments.
* Onlyauthorizedservicelocationsshouldbeutilizedformajorserviceand
repairrequirements.
* Useonlyattachmentsandaccessoriesapprovedby thefactory(suchas
wheelweights,counterweights,orcabs).
* Neverattemptto makeanyadjustmentswhiletheengineis running(except
whenspecificallyrecommendedbythefactory).
,, Donotallowgreaseor oilto contacttherubberfrictionwheelor thedisc
driveplate.Ifthediscdriveplateorfrictionwheelcomeincontactwith
greaseoroil, damageto therubberfrictionwheelwill result.
WARNING
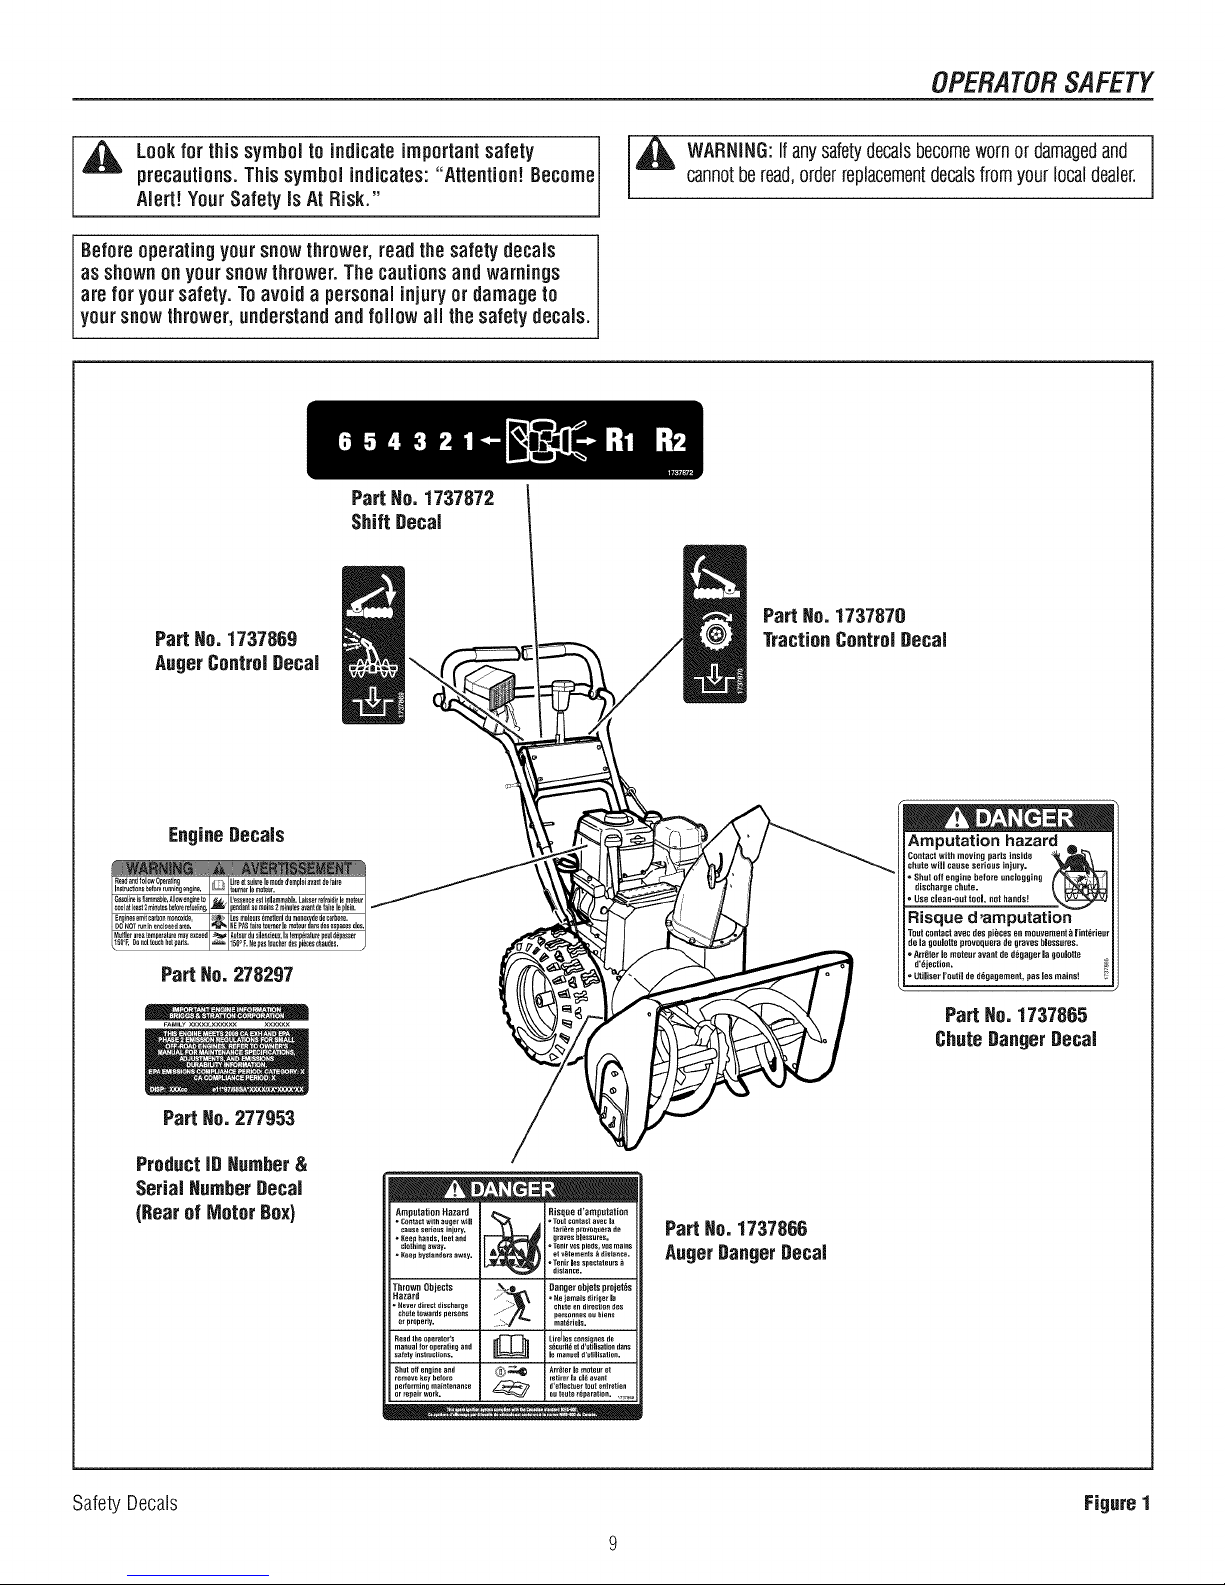
Lookfor this symbol to indicateimportantsafety
precautions.This symbolindicates:"Attention! Become
Alert!YourSafety is At Risk."
Before operatingyoursnow thrower, readthe safetydecals
as shown on yoursnowthrower. The cautionsand warnings
are for yoursafety. Toavoid a personalinjuryor damageto
yoursnow thrower, understandand fo ow al the safety decals.
OPERATORSAFETY
cannotberead,orderreplacementdecalsfromyourlocaldealer.
_ ARNING:Ifanysafetydecalsbecomewornor damagedand J
I
Part No. 1737872 I
Shift Decal
Part He. 1737868
AugerControlDecal \
EngineDecals
Part Ho. 278297
,.-._._..::....
FAUlLYXXXXX.XXXXXX XXXXXX
I
Part He. 1737870
TractionControlDecal
Amputation hazard
Contactwith moving parts inside
chute will Causeserious injury,
=Shut off engine before unclogging
dischargechute.
. Use clean-out tool, not hands!
Risque d ,amputation
de la goulotte provoqueradegraveshlessures.
ArrOterlemote,r avant ded_gager la go,lotto
d'_jection.
=Utiliser I'outil ded_gagement, pas los mains!
Part Ho. 1737865
ChuteDanger Decal
Part Ho. 277953
ProductID Humber&
SerialHumber Decal
(Rearof MotorBox)
Amputation Hazard
- Contact with a_er will
cause seri{}us injury.
• _eep hands, leet and
_lothing away.
• Keep hys_aneers away.
Thrown Objects
Hazard
=Heverdirectffischarge
_h_tetowardspers_ns
_rproperly.
Readlhe_perator's
man_ailor_perating and
_at_lyiflstroct_ns.
Shutoff engine aed
remove key before
pertorming maintenance
or rep_irwork.
SafetyDecals
Risqued'amputation
°To_tco_lactavecla
tafl_re provoqeera de
graveshlessures.
et vgtemenls _ _is_ance.
• Tenir vos pieds, vos mai_s
° Ten[_ les spect_teurs
dislance.
_i .He i_rnals dlri_erla
;_ Oangerobjetsp_ojet_s
chute en dire_tio_ des
pe_sonnes ou biefl_
"_ matdtiels.
s_,_ril_ et d'_tilisation duns
Lireiles¢o_si_esde
le manuel _rutiJi_tio0.
_-_ _,_ Arrgter le moteur eI
retirerla cld avant
d'elfect_tt_ol_Iretien
outo_tet_p_ration. ,,,_
Part Ho. 1737866
AugerDangerDecal
FigureI
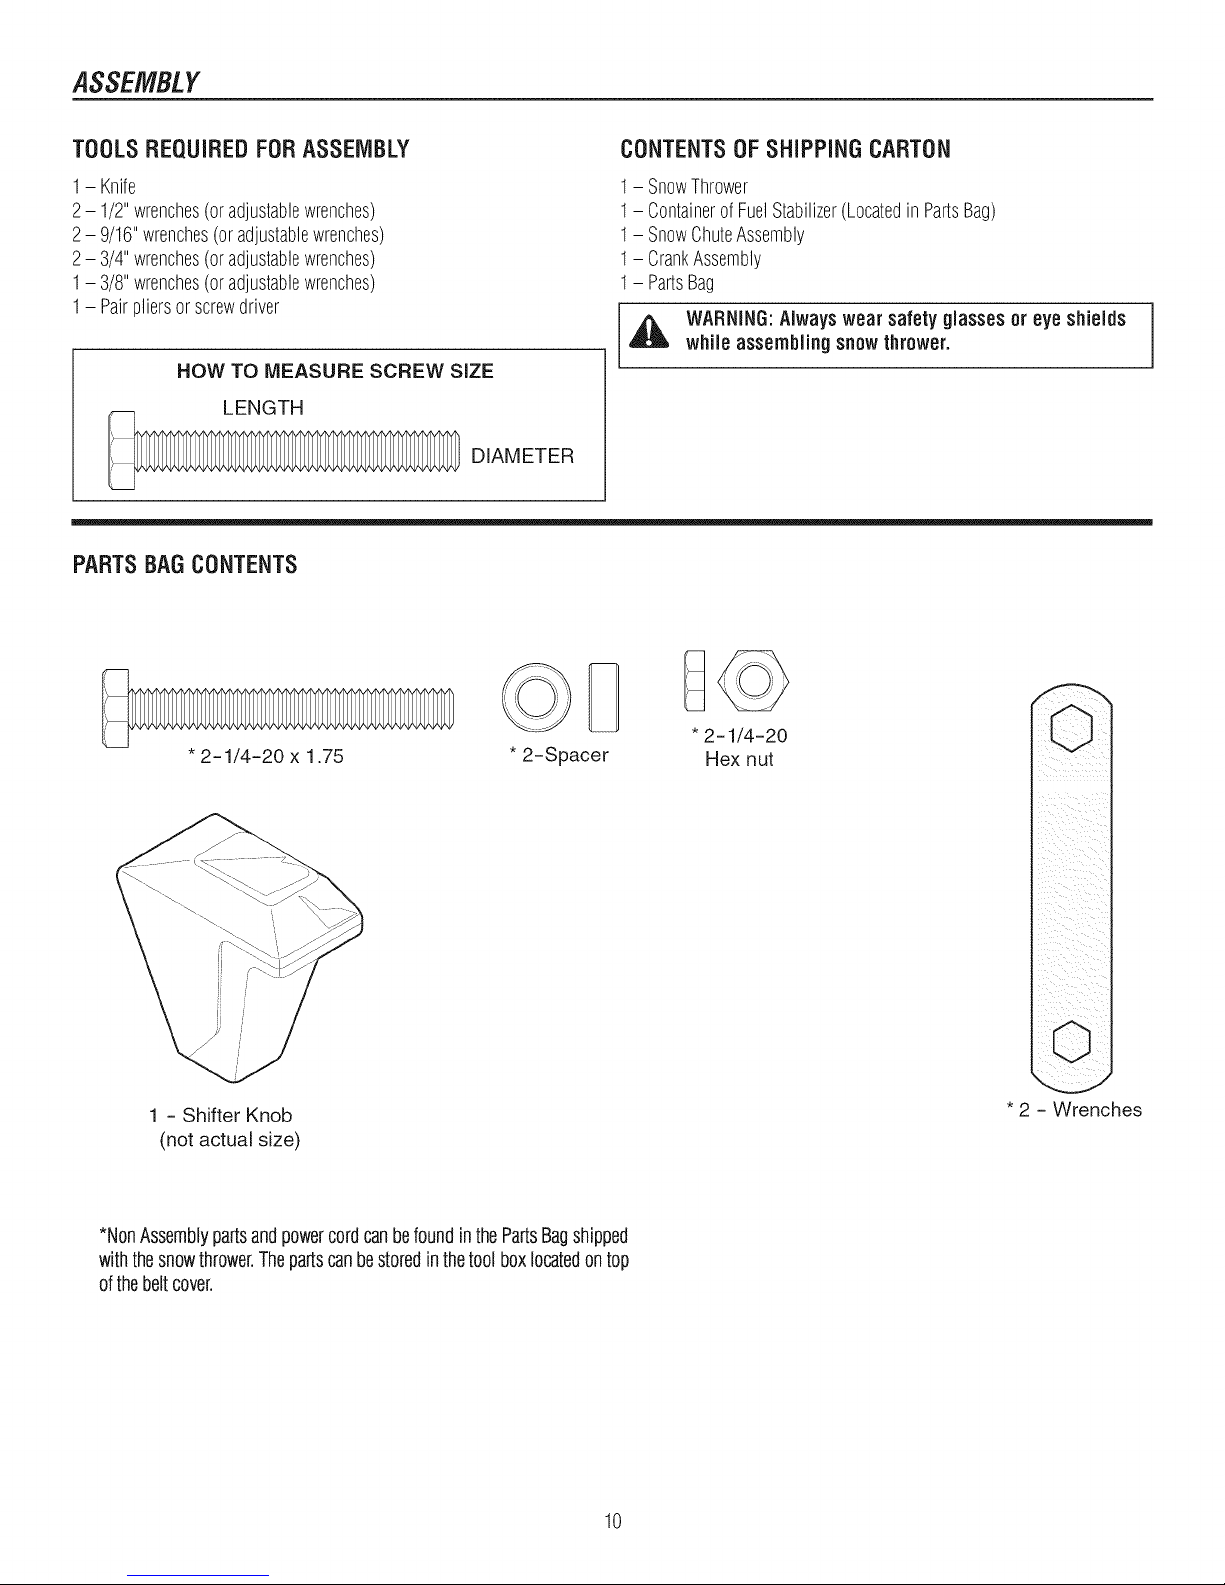
ASSEMBLY
TOOLSREQUIREDFORASSEMBLY
1- Knife
2- 1/2"wrenches(oradjustablewrenches)
2- 9/16"wrenches(oradjustablewrenches)
2- 3/4"wrenches(oradjustablewrenches)
1- 3/8"wrenches(oradjustablewrenches)
1- Pairpliersorscrewdriver
HOW TO MEASURE SCREW SIZE
LENGTH
PARTSBAGCONTENTS
DIAMETER
CONTENTSOFSHiPPiNGCARTON
1- SnowThrower
1- ContainerofFuelStabilizer(Locatedin PartsBag)
1- SnowChuteAssembly
1- CrankAssembly
1- PartsBag
WARNING:Alwayswear safety glasses or eye shields
whiJe assembling snow thrower.
I
* 2=1/4=20 x 1.75
1 = Shifter Knob
(not actual size)
*NonAssemblypartsandpowercordcanbefoundinthePartsBagshipped
withthesnowthrower.Thepartscanbestoredinthetoolboxlocatedontop
ofthebeltcover.
* 2=Spacer
* 2=1/4=20
Hex nut
*2 =Wrenches
10
NOTE:Referencetorightandlefthandsideofthesnowthroweris fromthe
operator'spositionatthehandle.
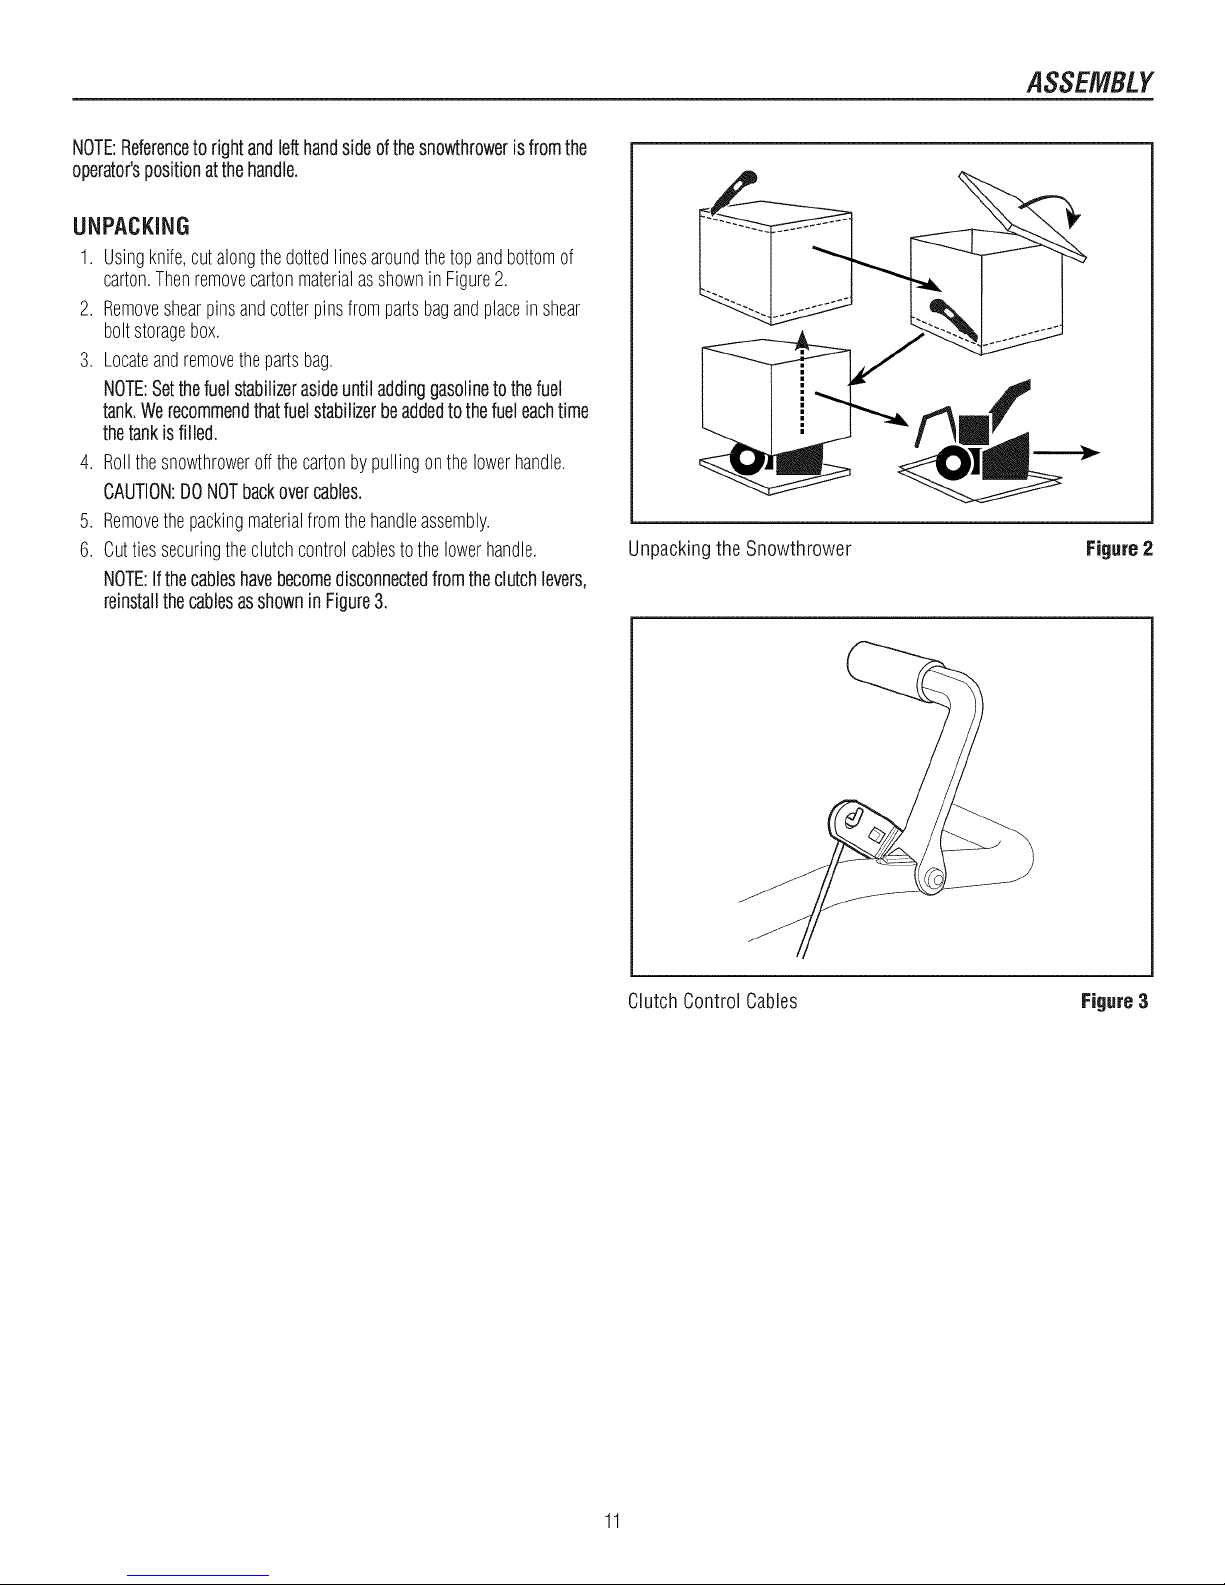
UNPACKING
1. Usingknife,cutalongthedottedlinesaroundthetop andbottomof
carton.ThenremovecartonmaterialasshowninFigure2.
2. Removeshearpinsandcotterpinsfrompartsbagandplacein shear
boltstoragebox.
3. Locateandremovethepartsbag.
NOTE:Setthefuelstabilizerasideuntiladdinggasolinetothefuel
tank.Werecommendthatfuelstabilizerbeaddedto thefueleachtime
thetankis filled.
4. Rollthesnowthroweroffthecartonbypullingonthelowerhandle.
CAUTION:DONOTbackovercables.
5. Removethepackingmaterialfromthehandleassembly.
6. Cuttiessecuringtheclutchcontrolcablestothelowerhandle.
NOTE:Ifthecableshavebecomedisconnectedfromtheclutchlevers,
reinstallthecablesasshowninFigure3.
Unpackingthe Snowthrower
ASSEMBLY
Figure2
ClutchControl Cables
11
Figure3
ASSEMBLY
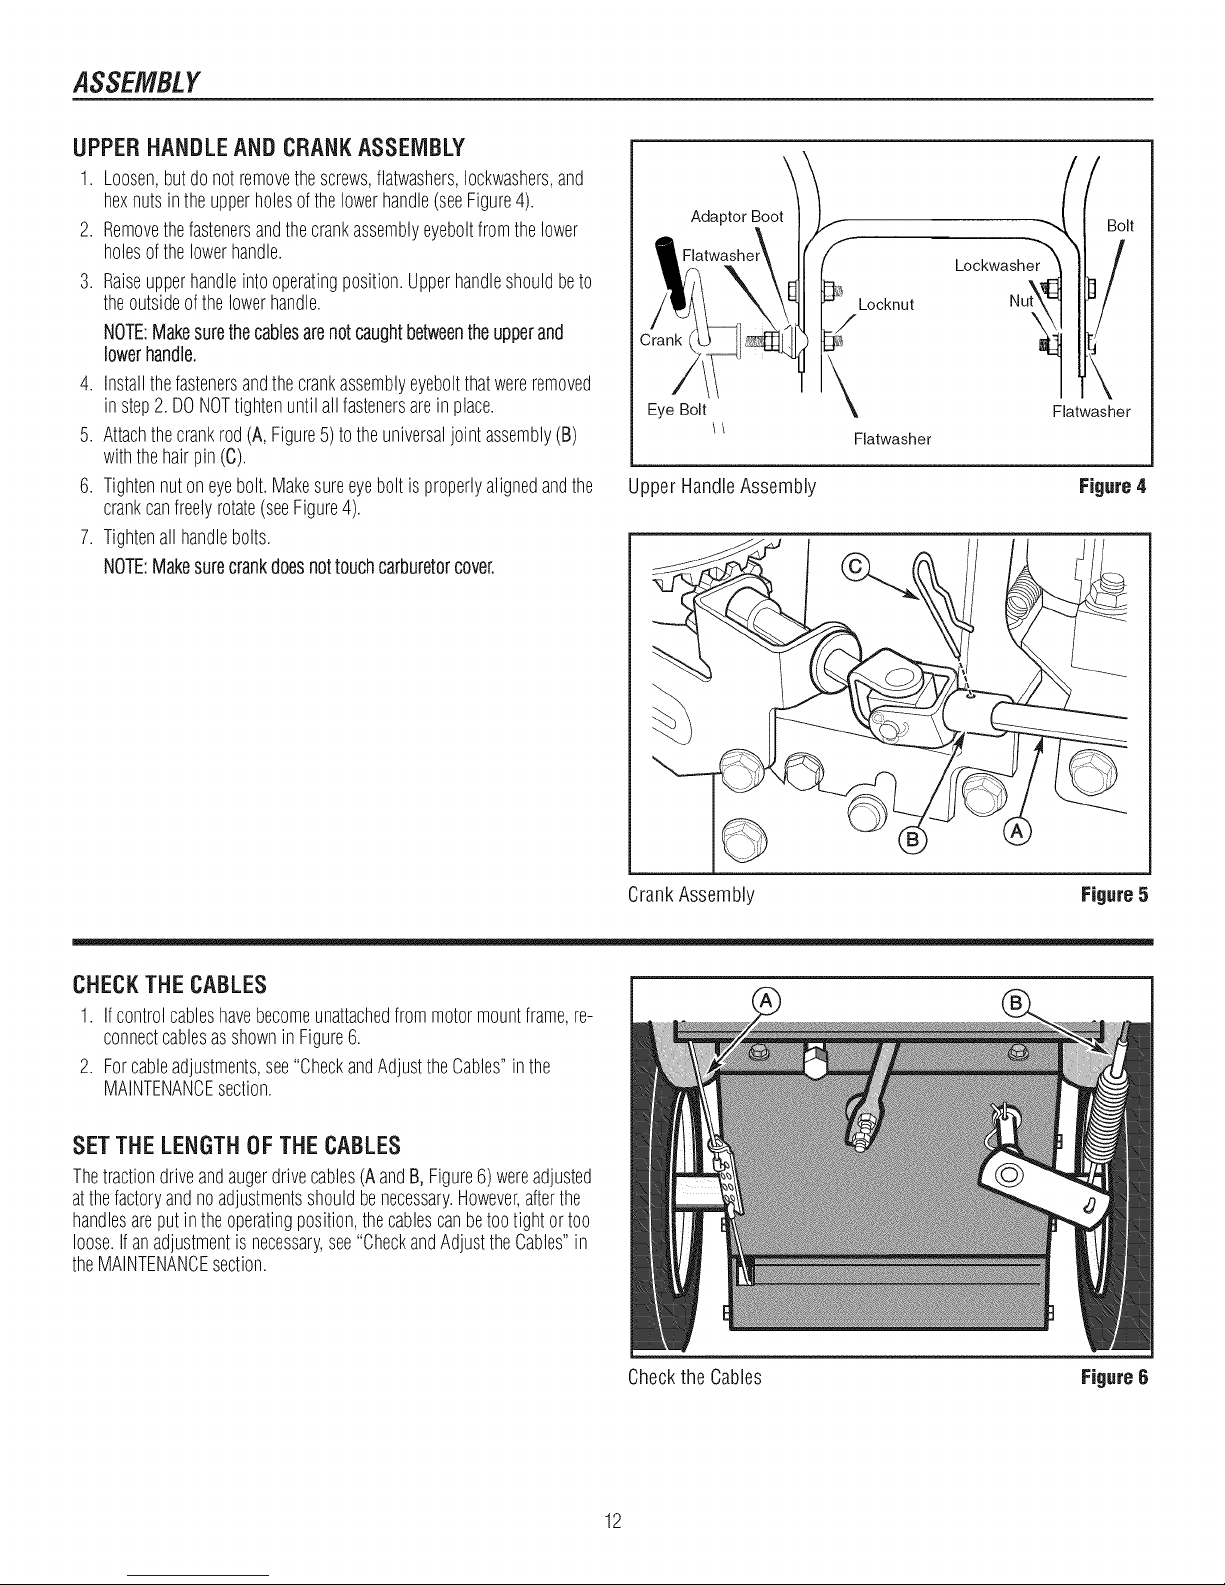
UPPERHANDLEANDCRANKASSEMBLY
1. Loosen,butdonotremovethescrews,flatwashers,Iockwashers,and
hexnutsintheupperholesofthelowerhandle(seeFigure4).
2. Removethefastenersandthecrankassemblyeyeboltfromthelower
holesofthelowerhandle.
3. Raiseupperhandleintooperatingposition.Upperhandleshouldbeto
theoutsideofthelowerhandle.
NOTE:Makesurethecablesarenotcaughtbetweentheupperand
lowerhandle.
4. Installthefastenersandthecrankassemblyeyeboltthatwereremoved
instep2.DONOTtightenuntil allfastenersarein place.
5. Attachthecrankrod(A,Figure5)totheuniversaljointassembly(B)
withthehairpin(C).
6. Tightennutoneyebolt.Makesureeyeboltisproperlyalignedandthe
crankcanfreelyrotate(seeFigure4).
7. Tightenall handlebolts.
NOTE:Makesurecrankdoesnottouchcarburetorcover.
Adaptor Boot
_olt
!
Eye Bolt Flatwasher
Flatwasher
UpperHandleAssembly Figure4
CHECK THE CABLES
1. Ifcontrolcableshavebecomeunattachedfrommotormountframe,re-
connectcablesasshownin Figure6.
2. Forcableadjustments,see"CheckandAdjusttheCables"inthe
MAINTENANCEsection.
SETTHE LENGTH OF THE CABLES
Thetractiondriveandaugerdrivecables(AandB, Figure6) wereadjusted
atthefactoryandnoadjustmentsshouldbenecessary.However,afterthe
handlesareputintheoperatingposition,thecablescanbetootightortoo
loose,ifanadjustmentis necessary,see"CheckandAdjusttheCables"in
theMAINTENANCEsection.
CrankAssembly Figure5
Checkthe Cables
Figure6
12
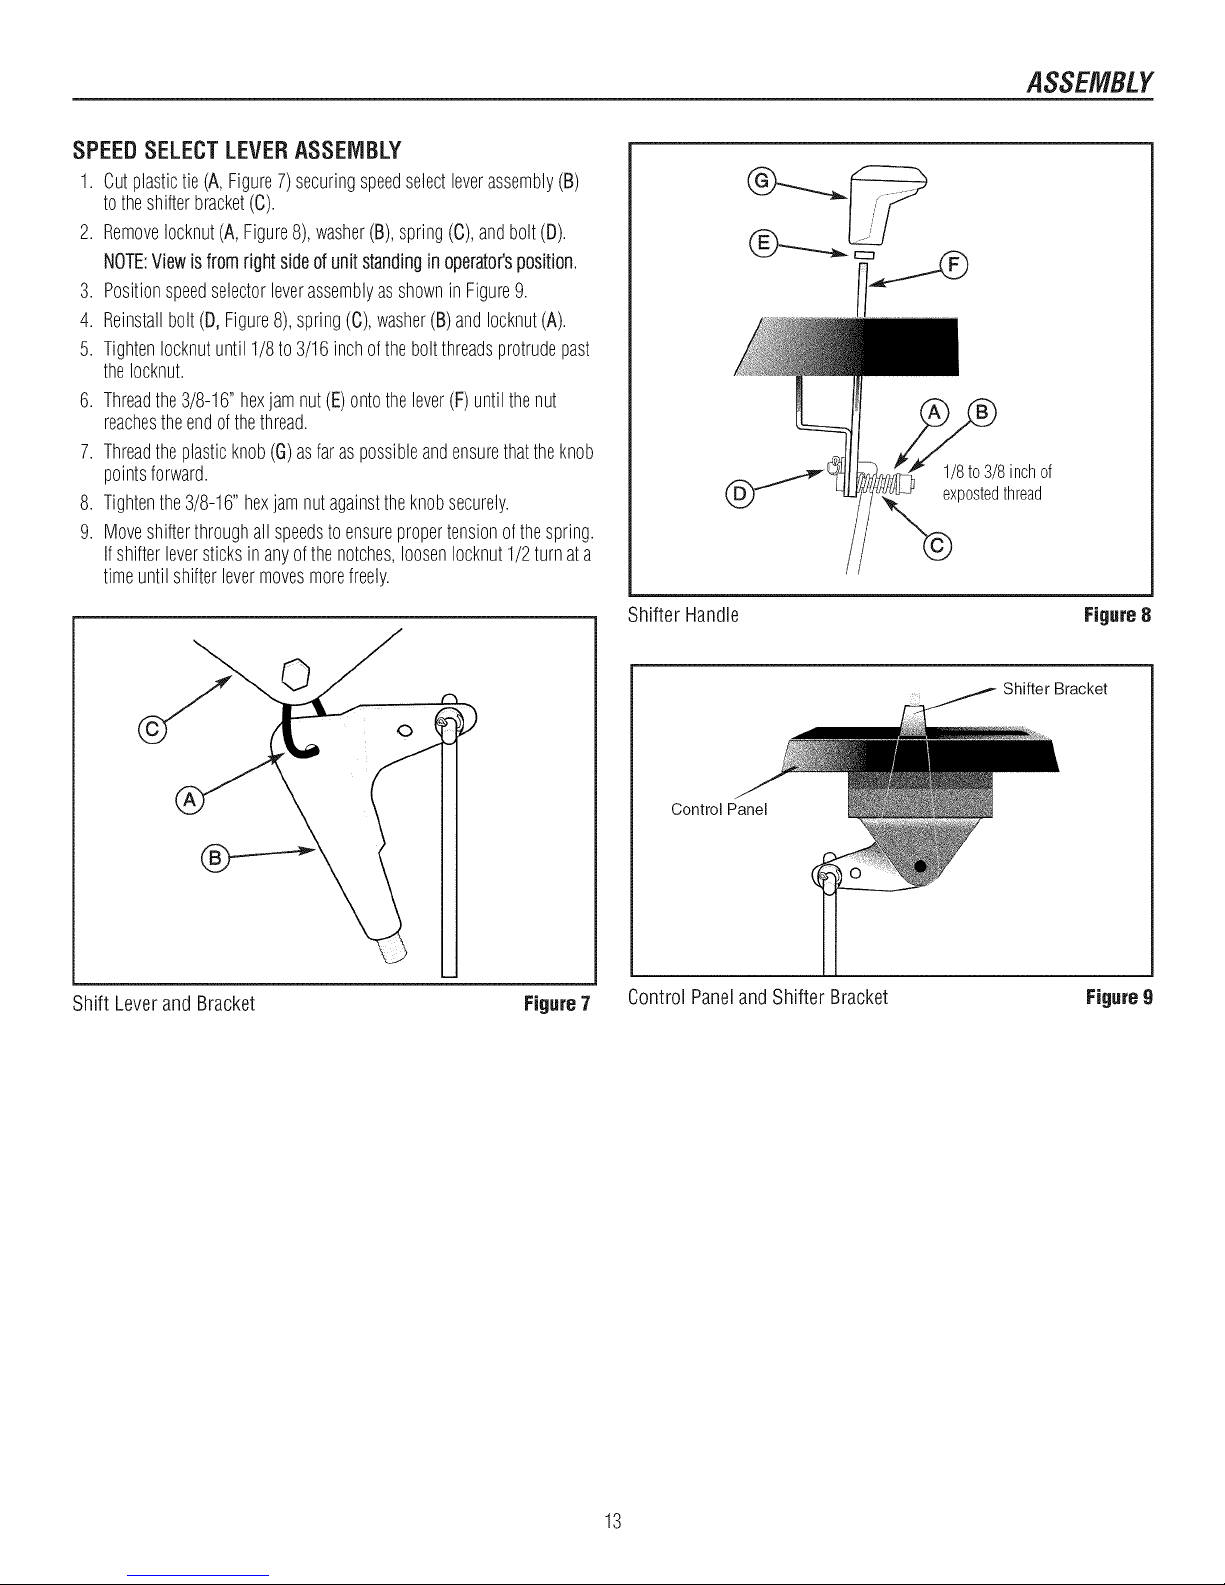
SPEED SELECT LEVER ASSEMBLY
1. Cutplastictie(A,Figure7) securingspeedselectleverassembly(B)
totheshifterbracket(C).
2. RemoveIocknut(A,Figure8),washer(B),spring(C),andbolt(D).
NOTE:Viewis fromright sideofunitstandingin operator'sposition.
3. PositionspeedselectorleverassemblyasshowninFigure9.
4. Reinstallbolt(D,Figure8),spring(C),washer(B)andIocknut(A).
5. TightenIocknutuntil1/8 to 3/16 inchoftheboltthreadsprotrudepast
theIocknut.
6. Threadthe3/8-16"hexjamnut(E)ontothelever(F)untilthenut
reachestheendofthethread.
7. Threadtheplasticknob(G)asfaraspossibleandensurethattheknob
pointsforward.
8. Tightenthe3/8-16"hexjamnutagainsttheknobsecurely.
9. Moveshifterthroughall speedsto ensurepropertensionofthespring.
Ifshifterleversticksin anyofthenotches,loosenIocknut1/2turnata
timeuntilshifterlevermovesmorefreely.
ASSEMBLY
1/8to3/8inchof
expostedthread
Shifter Handle
Control Panel
Shift Leverand Bracket Figure7 ControlPaneland Shifter Bracket
Figure8
Shifter Bracket
Figure9
13
ASSEMBLY
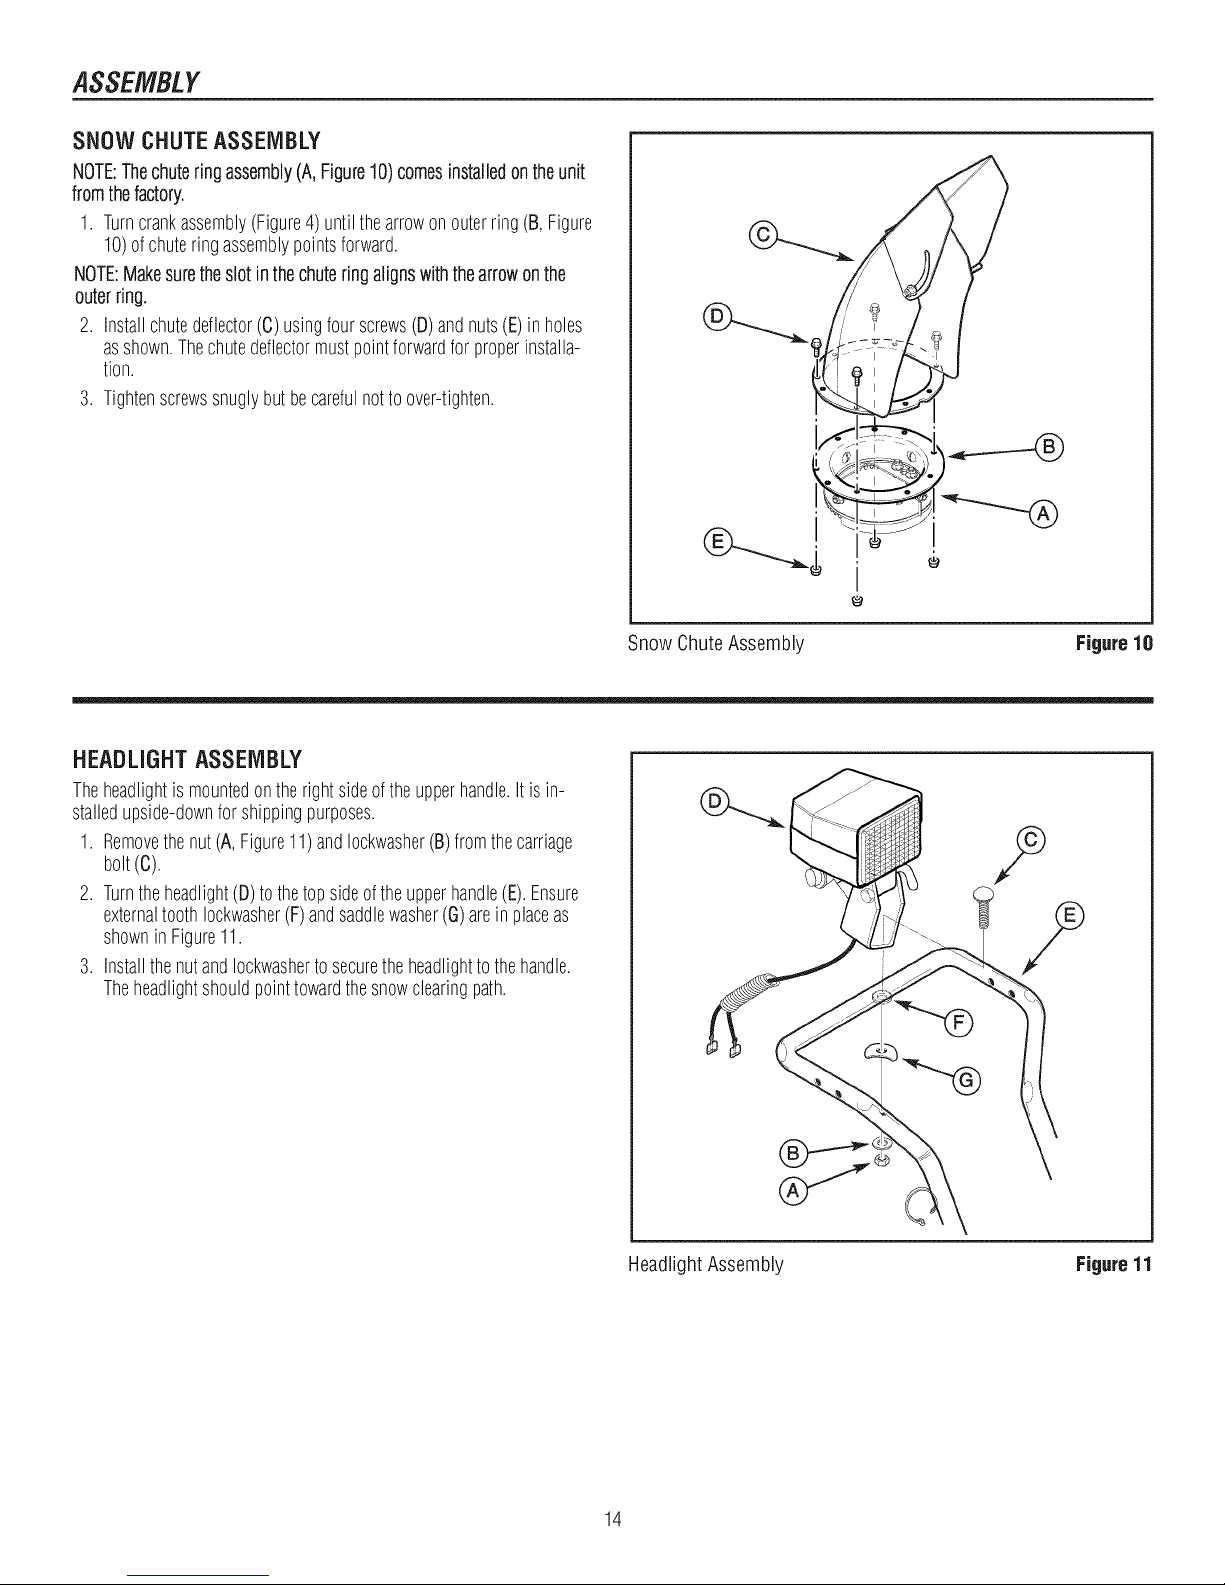
SNOW CHUTEASSEMBLY
NOTE:Thechuteringassembly(A,Figure10)comesinstalledontheunit
fromthefactory.
1. Turncrankassembly(Figure4) untilthearrowonouterring(B, Figure
10)ofchuteringassemblypointsforward.
NOTE:Makesuretheslot inthechuteringalignswiththearrowonthe
outerring.
2. Installchutedeflector(C)usingfourscrews(D)andnuts(E)in holes
asshown.Thechutedeflectormustpointforwardforproperinstalla-
tion.
3. Tightenscrewssnuglybutbecarefulnottoover-tighten.
Snow ChuteAssembly Figure18
HEADLIGHT ASSEMBLY
Theheadlightismountedontherightsideofthe upperhandle,itisin-
stalledupside-downforshippingpurposes,
1. Removethe nut(A,Figure11)andIockwasher(B)fromthecarriage
bolt(C).
2. Turntheheadlight(D)tothetopsideoftheupperhandle(E).Ensure
externaltoothIockwasher(F)andsaddlewasher(G)arein placeas
shownin Figure11.
3. InstallthenutandIockwashertosecuretheheadlighttothehandle.
Theheadlightshouldpointtowardthesnowclearingpath.
HeadlightAssembly Figure11
14
©
FEATURESANDCONTROLS
®
®
,_-,llllt
o___
-tS-
a _
i
Y \
®
1 _-- I;__-->- R1
®
I
®
"iJ
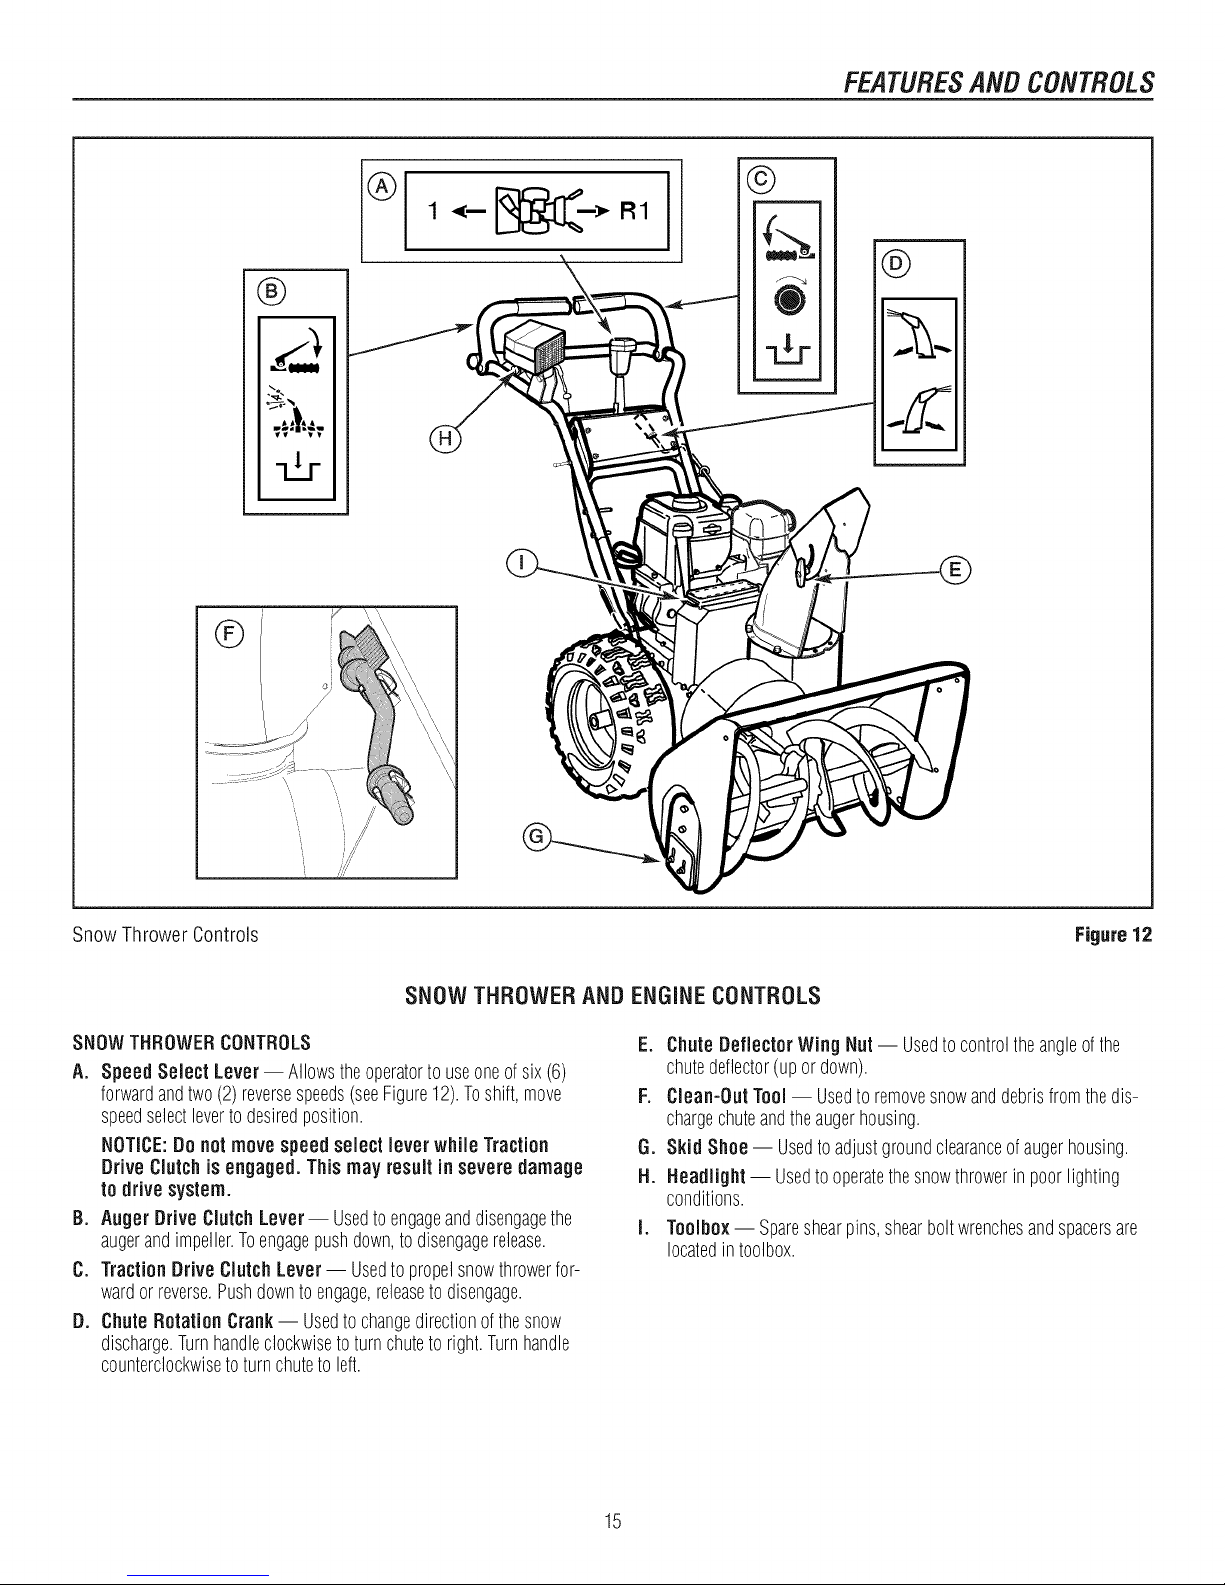
SnowThrower Controls
SNOWTHROWERANDENGINECONTROLS
SNOWTHROWERCONTROLS
A. SpeedSelect Lever- Allowstheoperatortouseoneof six(6)
forwardandtwo(2)reversespeeds(seeFigure12).Toshift,move
speedselectlevertodesiredposition.
NOTICE:Do notmove speed select lever while Traction
DriveClutch is engaged. This may result in severe damage
to drive system.
B. AugerDriveClutch Lever-- Usedto engageanddisengagethe
augerandimpeller.Toengagepushdown,todisengagerelease.
C. Traction DriveClutch Lever-- Usedtopropelsnowthrowerfor-
wardorreverse.Pushdownto engage,releasetodisengage.
D. Chute Rotation Crank-- Usedtochangedirectionofthesnow
discharge.Turnhandleclockwisetoturnchuteto right.Turnhandle
counterclockwisetoturn chuteto left.
figure 12
E. ChuteDeflectorWing Nut -- Usedto controltheangleofthe
chutedeflector(upor down).
f. Clean-Out Tool-- Usedto removesnowanddebrisfromthedis-
chargechuteandtheaugerhousing.
G. SkidShoe-- Usedto adjustgroundclearanceofaugerhousing.
H. Headlight-- Usedtooperatethesnowthrowerin poorlighting
conditions.
I. Toolbox-- Spareshearpins,shearboltwrenchesandspacersare
locatedin toolbox.
15
FEATURESANDCONTROLS
®
®
I÷1I×l
®
/
®
®
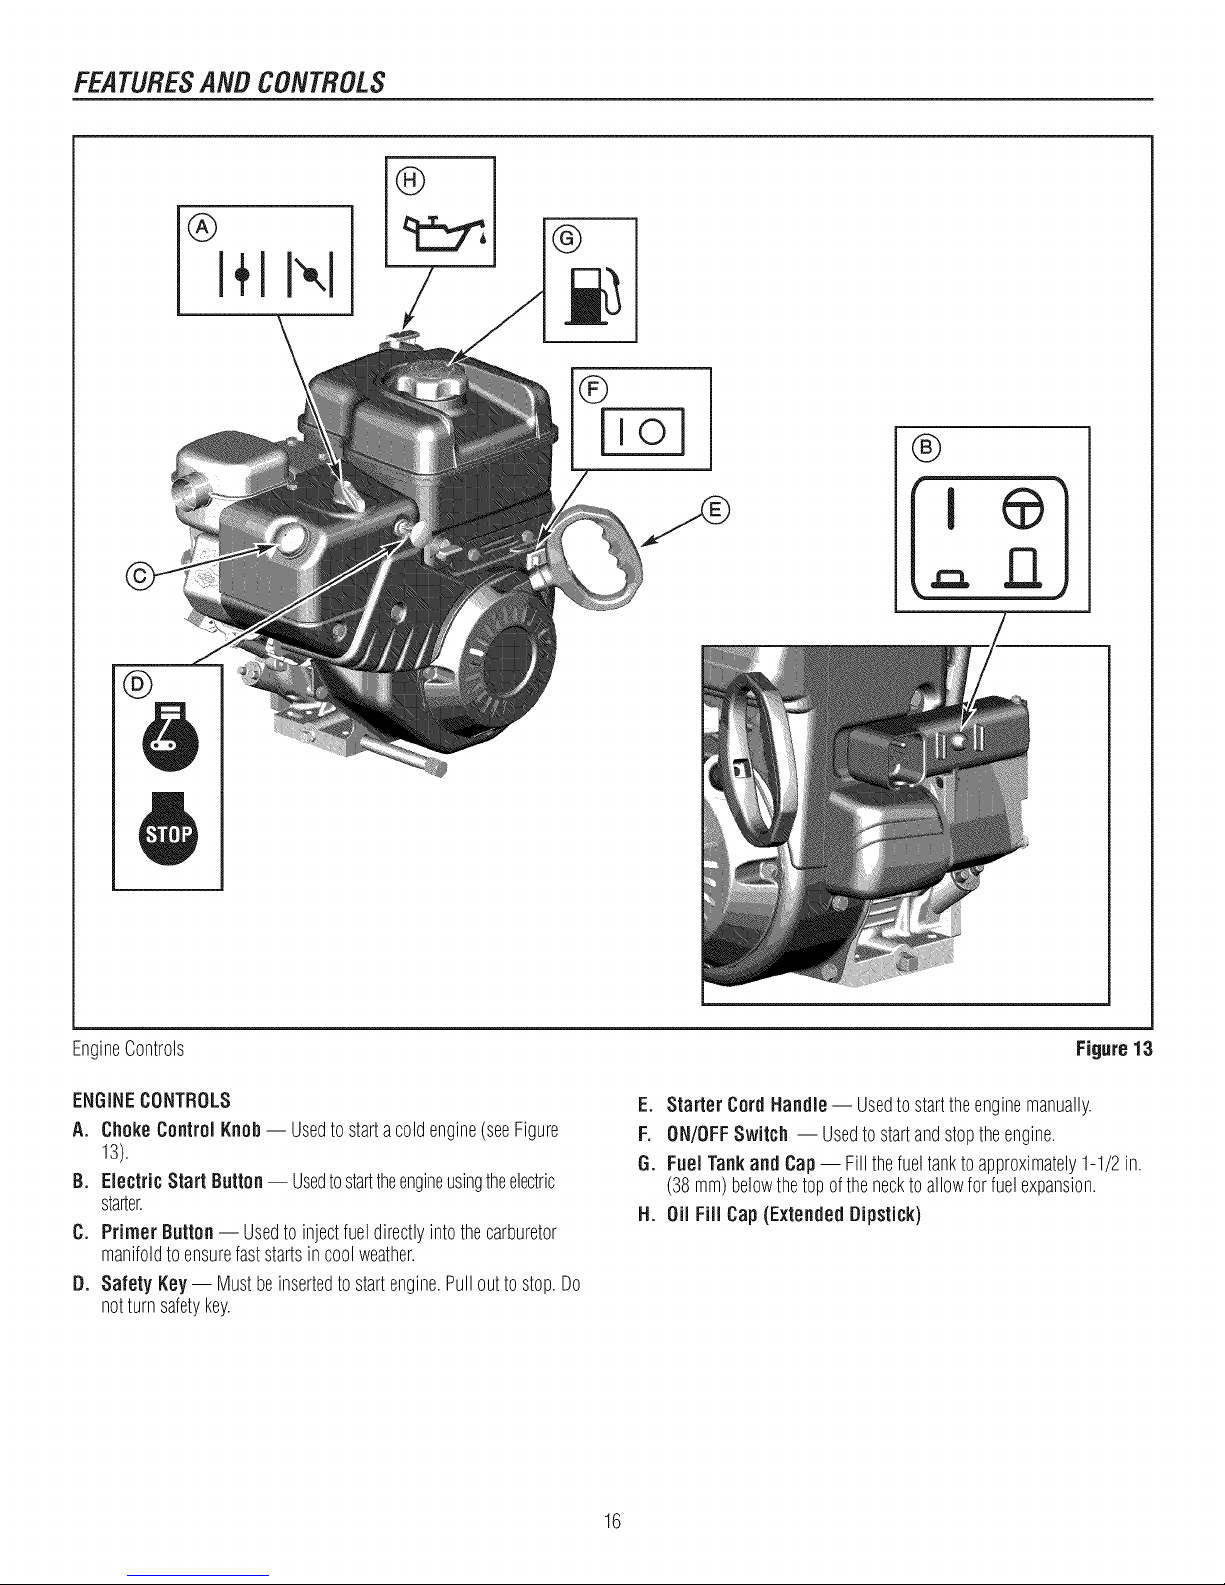
EngineControls
ENGINECONTROLS
A. ChokeControl Knob-- Usedtostartacold engine(seeFigure
13).
B. Electric Start Button-- Usedtostarttheengineusingtheelectric
starter.
C. Primer Button -- Usedto injectfueldirectlyintothecarburetor
manifoldtoensurefaststartsincoolweather.
D. Safety Key-- Mustbeinsertedtostartengine.Pullout to stop.Do
notturnsafetykey.
Figure13
E. Starter Cord Handle-- Usedtostarttheenginemanually.
Fo ON/OFFSwitch -- Usedtostartandstoptheengine.
G. FuelTankand Cap-- Fillthefueltanktoapproximately1-1/2in.
(38mm)belowthetopof thenecktoallowforfuelexpansion.
H. 0il Fill Cap (Extended Dipstick)
16
OPERATION
BEFOREOPERATING SNOW THROWER
Checkthefasteners.Makesureall fastenersaretight.
ReadthisOPERATOR'SMANUALand OPERATORSAFETYbefore
operatingyoursnowthrower.Comparethe illustrationswithyour
SNOWTHROWERtofamiliarize yourselfwiththe locationofvar-
iouscontrolsandadjustments. Savethismanualforfuture refer-
once.
WARNING:The operation of any snow throwercanresultin foreign objects beingthrownintotheeyes, which can result in
severe eye damage.Alwayswear safety glasses or eye shields beforebeginningsnowthroweroperation. We recommend
standard safety glasses or Wide Vision Safety Maskover spectacles.
OPERATETHESNOWTHROWER
Themosteffectiveuseofthesnowthrowerwill beestablishedbyexperi-
ence,takingintoconsiderationtheterrain,windconditions,andbuilding
locationwhichwill determinethedirectionofthedischargechute.
NOTICE:Donot throwsnowtoward a buildingas hiddenobjects
couldbe thrownwith sufficient force to causedamage.
1. Starttheengine.See"ToStartEngine"inthis section.
2. Rotatethecrank(A,Figure12)tosetthedirection(leftor right)ofthe
dischargechute.
3. Adjustthesnowchutedeflector.Loosenthewingnut(A,Figure14)on
thesideofthesnowchuteandraisethechutedeflectorformore
distance,or loweritfor lessdistance.Thentightenthewing nut.
NOTE: This snow thrower was shipped WiTH OiL in the
engine. See "Before Starting Engine" instructions in the
OPERATIONsection of this manual before startingengine.
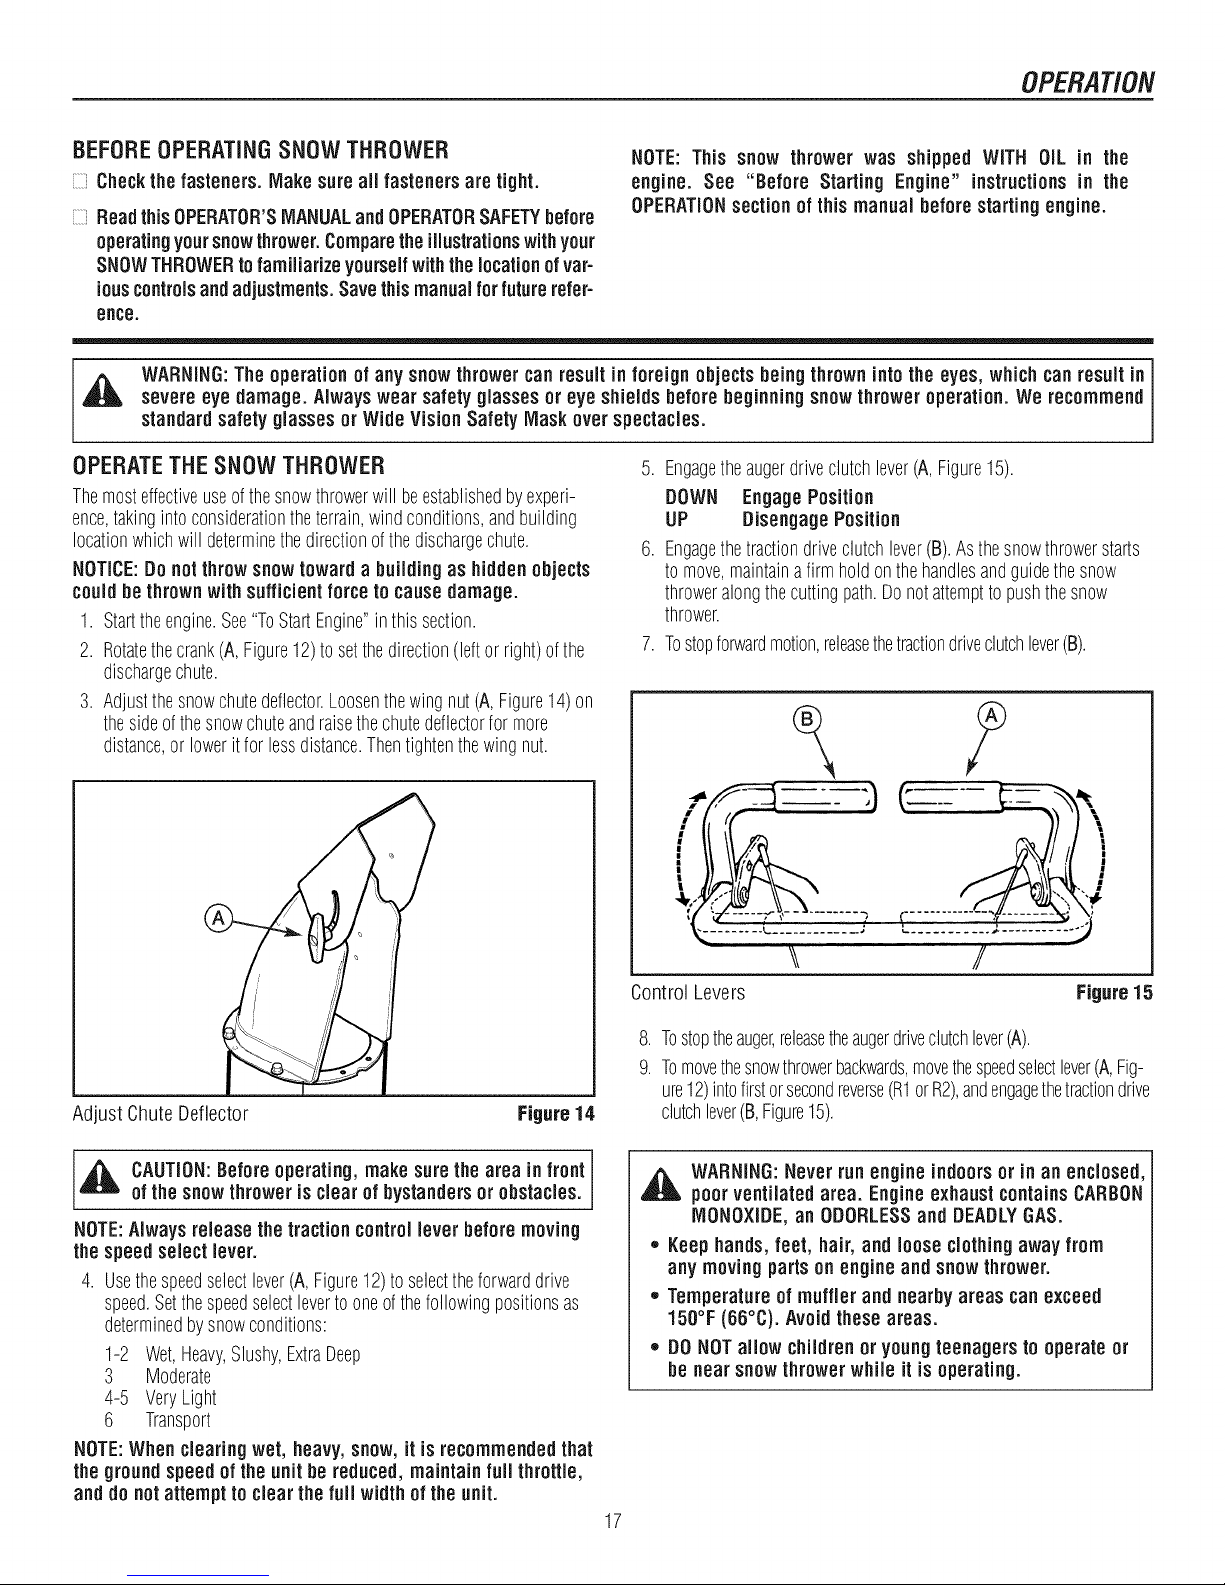
5. Engagetheaugerdriveclutchlever(A,Figure15).
DOWN EngagePosition
UP DisengagePosition
6. Engagethetractiondriveclutchlever(B).Asthesnowthrowerstarts
tomove,maintainafirm holdonthehandlesandguidethesnow
throweralongthecuttingpath.Donotattemptto pushthesnow
thrower.
7. Tostopforwardmotion,releasethetractiondriveclutchlever(B).
Adjust ChuteDeflector Figure14
_ AUTION:Before operating, make sure thearea in front
ofthe snow throweris clear of bystandersor obstacles.
NOTE:Always releasethe tractioncontrol lever beforemoving
the speed select lever.
4. Usethespeedselectlever(A,Figure12)to selecttheforwarddrive
speed.Setthespeedselectlevertooneofthefollowingpositionsas
determinedby snowconditions:
1-2 Wet,Heavy,Slushy,ExtraDeep
3 Moderate
4-5 VeryLight
6 Transport
NOTE:When clearing wet, heavy,snow, it is recommended that
the ground speedof the unit be reduced, maintain full throttle,
and do notattempt to clear thefull widthof the unit.
,)',
",,j
CiL2
\\ //
Control Levers Figure15
8. Tostoptheauger,releasetheaugerdriveclutchlever(A).
9. Tomovethesnowthrowerbackwards,movethespeedselectlever(A,Fig-
ure12)intofirstorsecondreverse(R1orR2),andengagethetractiondrive
clutchlever(B,Figure15).
_ WARNING:Never runengine indoorsor in an enclosed,
poorventilated area. Engineexhaust containsCARBON
MONOXIDE,an ODORLESSand DEADLYGAS.
,, Keephands,feet, hair, and looseclothingaway from
any movingparts on engine and snowthrower.
,, Temperatureof muffler and nearby areas can exceed
150°F (66°C). Avoid theseareas.
,, DONOTallow childrenor youngteenagersto operate or
be near snowthrowerwhile it is operating.
17
OPERATION
,_ WARNING:Read Operator's Manual before operating
machine. This machine can be dangerousif used
carelessly.
,, Never operatethe snowthrower without all guards,covers,
shields in place.
,, Never directdischargetowards windows or allow
bystandersnear machine while engine is running.
,, Stop the engine whenever leaving the operating
position.
,, Disconnectspark plug beforeuncloggingthe impeller
housingor the dischargechute and beforemaking
repairs or adjustments.
,, Whenleavingthe machine, removethe safety key.To
reducethe riskof fire, keepthe machine cleanand free
from spilled gas, oil, anddebris.
STOPTHESNOWTHROWER
1. Releasethetractiondriveclutchlever(B,Figure15).
2. PushtheON/OFFswitch(A,Figure22)totheOFFpositionandpulloutthe
safetykey(B).
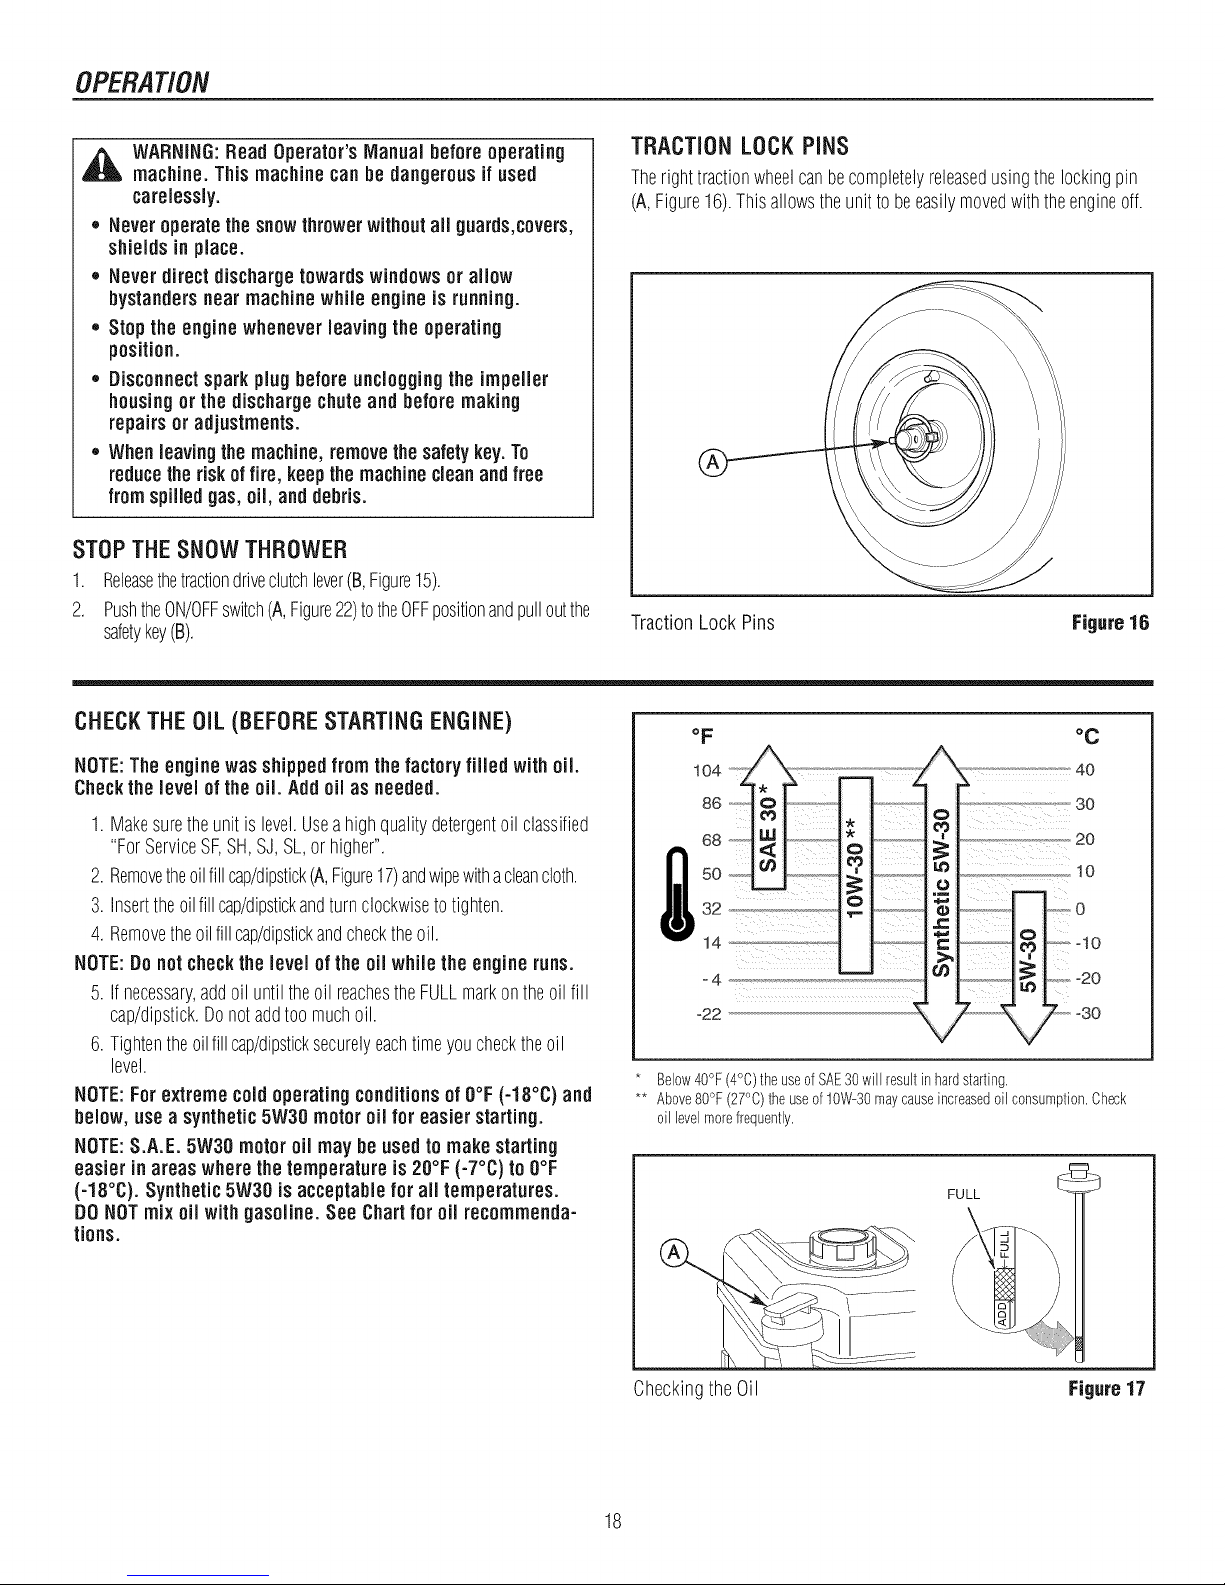
TRACTIONLOCKPiNS
Therighttractionwheelcanbecompletelyreleasedusingthelockingpin
(A,Figure16).Thisallowstheunitto beeasilymovedwiththeengineoff.
TractionLock Pins Figure16
CHECKTHE OiL (BEFORESTARTING ENGINE)
NOTE:The engine was shippedfrom the factory filled with oil.
Checkthe level of the oil. Add oil as needed.
1.Makesuretheunit is level.Useahighqualitydetergentoil classified
"ForServiceSF,SH,SJ,SL,orhigher".
2. Removetheoilfillcap/dipstick(A,Figure17)andwipewithacleancloth.
3. Inserttheoilfillcap/dipstickandturnclockwisetotighten.
4. Removetheoilfillcap/dipstickandchecktheoil.
NOTE:Do notcheckthe level of the oil while the engineruns.
5. If necessary,addoil until theoil reachestheFULLmarkontheoil fill
cap/dipstick.Donotaddtoo muchoil.
6. Tightentheoilfillcap/dipsticksecurelyeachtimeyouchecktheoil
level.
NOTE:For extreme coldoperating conditionsof O°F(-18°C) and
below, use a synthetic5W30motor oil for easierstarting.
NOTE:S.A.E. 5W30 motoroil may be used to makestarting
easier in areas where the temperature is 20°F (-7°C) to O°F
(-18°C). Synthetic 5W30 isacceptable for all temperatures.
DONOTmix oil with gasoline. See Chartfor oil recommenda-
tions.
oF
0_._ _''__" _'_40
' '_"...............30
°C
50 _
32
14
-4
-22
Below40°F(4°C)theuseofSAE30will resultinhardstarting.
** Above80°F (27°C)theuseof10W-30maycauseincreasedoilconsumption=Check
oil levelmorefrequently.
_ €
FULL
Checkingthe Oil Figure17
18
OPERATION
FiLL THE FUEL TANK
Thisengineis certifiedto operateongasoline.ExhaustEmissionControl
System:EM(EngineModifications).
Fillthefueltankwithfresh,clean,unleadedregular,unleadedpremium,orre-
formulatedautomotivegasolinewitha minimumof85octanealongwitha
fuelstabilizer(followinstructionsonfuelstabilizerpackage).DONOTuse
leadedgasoline.Werecommendthatfuelstabilizerbeaddedto thefuel
eachtimethatgasolineisaddedtothefueltank.
NOTE:Winter grade gasoline has higher volatility to improve
starting.Be certain containerisclean and free from rustor
other foreign particles. Never use gasoline that may be stale
from longperiodsof storagein the container.
,_b CAUTION:DONOTuse gasoline containingany
amount of alcohol as it cancauseserious damageto
the engineor significantly reducethe performance.
START THE ENGINE
BesurethatengineoilisatFULLmarkontheoilfill cap/dipstick.Thesnow
throwerengineisequippedwithanA.C.electricstarterandrecoilstarter.Before
startingtheengine,becertainthatyouhavereadthefollowinginformation.
Ifenginefloods,setthechoketotheOPEN/RUNpositionandcrankuntiltheen-
ginestarts.
_ ARNING:Gasolineisflammable. Always usecaution
whenhandlingor storinggasoline. Turnengineoff and
let enginecoolat least two minutes beforeremovingthegas
cap. Donot add gasoline tothefueltankwhile snowthrower
is running,hot,or when snow throweris inan enclosed area.
Keep awayfromopen flame, electricalsparksandDONOT
SMOKEwhilefilling the fuel tank. Neverfiil the fuel tank
completely;butfill thefuel tanktowithin1-1/2 inches(3.8
ram) fromthetopto providespacefortheexpansionofthe
fuel. Alwaysfill fueltankoutdoors and usea funnel or spout
topreventspilling. Makesure to wipe up any spilled fuel
before starting the engine.
Store gasoline ina clean,approvedcontainer,andkeepthe
capin placeon the container.Keepgasoline in a coolwell
ventilatedplace;neverin the house.Never buymorethana
30 day supply of gasolineto assurevolatility.Gasolineis
intendedto be usedas a fuelfor internalcombustionengines;
therefore,do notuse gasolinefor anyother purpose. Since
many childrenlikethe smell of gasoline, keep it out of their
reachbecausethe fumesare dangerousto inhale,aswell as
beingexplosive.
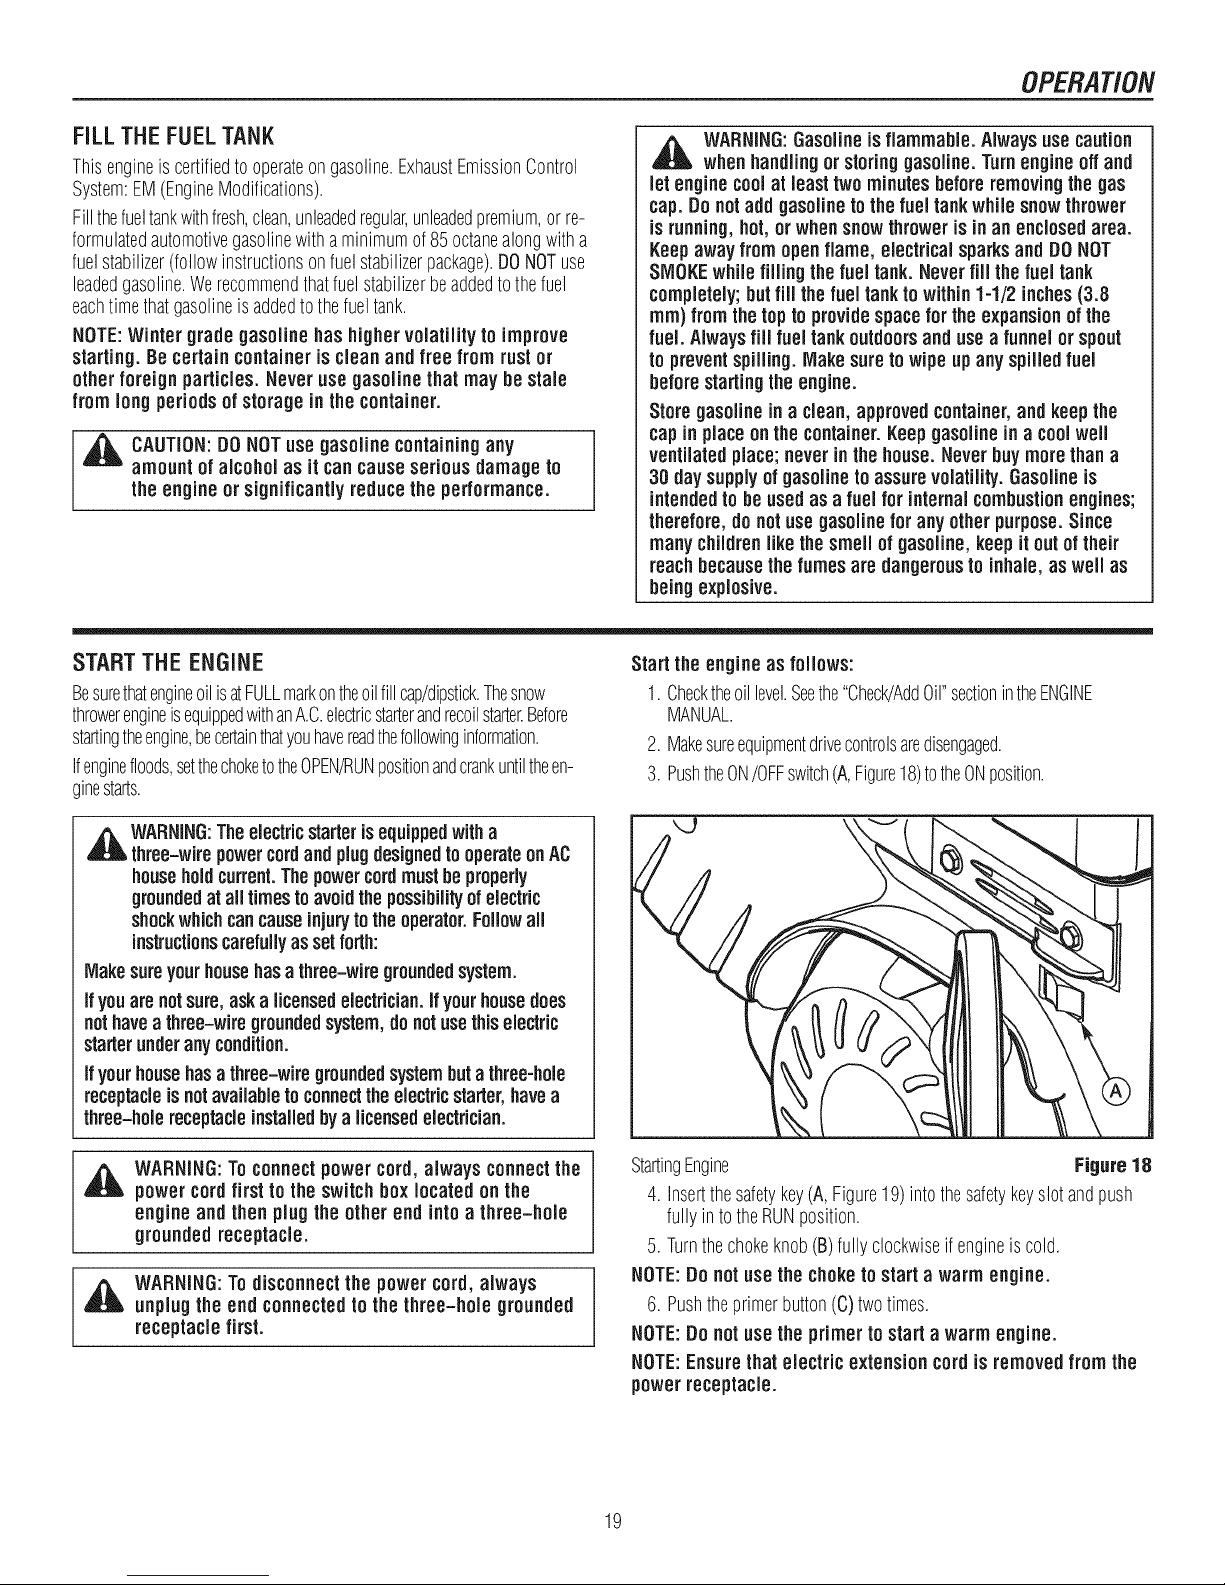
Start theengine as follows:
1.Checktheoillevel.Seethe"Check/AddOil"sectionintheENGINE
MANUAL.
2. Makesureequipmentdrivecontrolsaredisengaged.
3. PushtheON/OFFswitch(A,Figure18)totheONposition.
,_ WARNING:Theelectricstarteris equippedwith a
three-wirepowercordand plugdesignedto operateonAC
householdcurrent.Thepowercordmustbeproperly
groundedat all times toavoidthepossibilityofelectric
shockwhichcancauseinjuryto theoperator.Followall
instructionscarefullyas setforth:
Makesureyourhousehasa three-wiregroundedsystem.
Ifyouarenotsure,aska licensedelectrician.If yourhousedoes
nothaveathree-wire groundedsystem,donotusethiselectric
starterunderanycondition.
Ifyourhousehasathree-wiregroundedsystembuta three-hole
receptacleisnotavailabletoconnecttheelectricstarter,havea
three-holereceptacleinstalledbya licensedelectrician.
,_h WARNING:Toconnectpowercord, always connectthe
powercordfirst to the switch box located on the
engine and then plugthe other end intoa three-hole
grounded receptacle.
WARNING:Todisconnectthe power cord, always
unplug theend connectedto thethree-hole grounded
receptaclefirst.
StartingEngine Figure18
4. Insertthesafetykey(A,Figure19)intothesafetykeyslotandpush
fullyin totheRUNposition.
5. Turnthechokeknob(B)fully clockwiseifengineiscold.
NOTE:Do not usethe choketo start a warm engine.
6. Pushtheprimerbutton(C)twotimes.
NOTE:Donot usethe primertostart a warm engine.
NOTE:Ensurethat electric extension cordis removedfromthe
powerreceptacle.
19
OPERATION
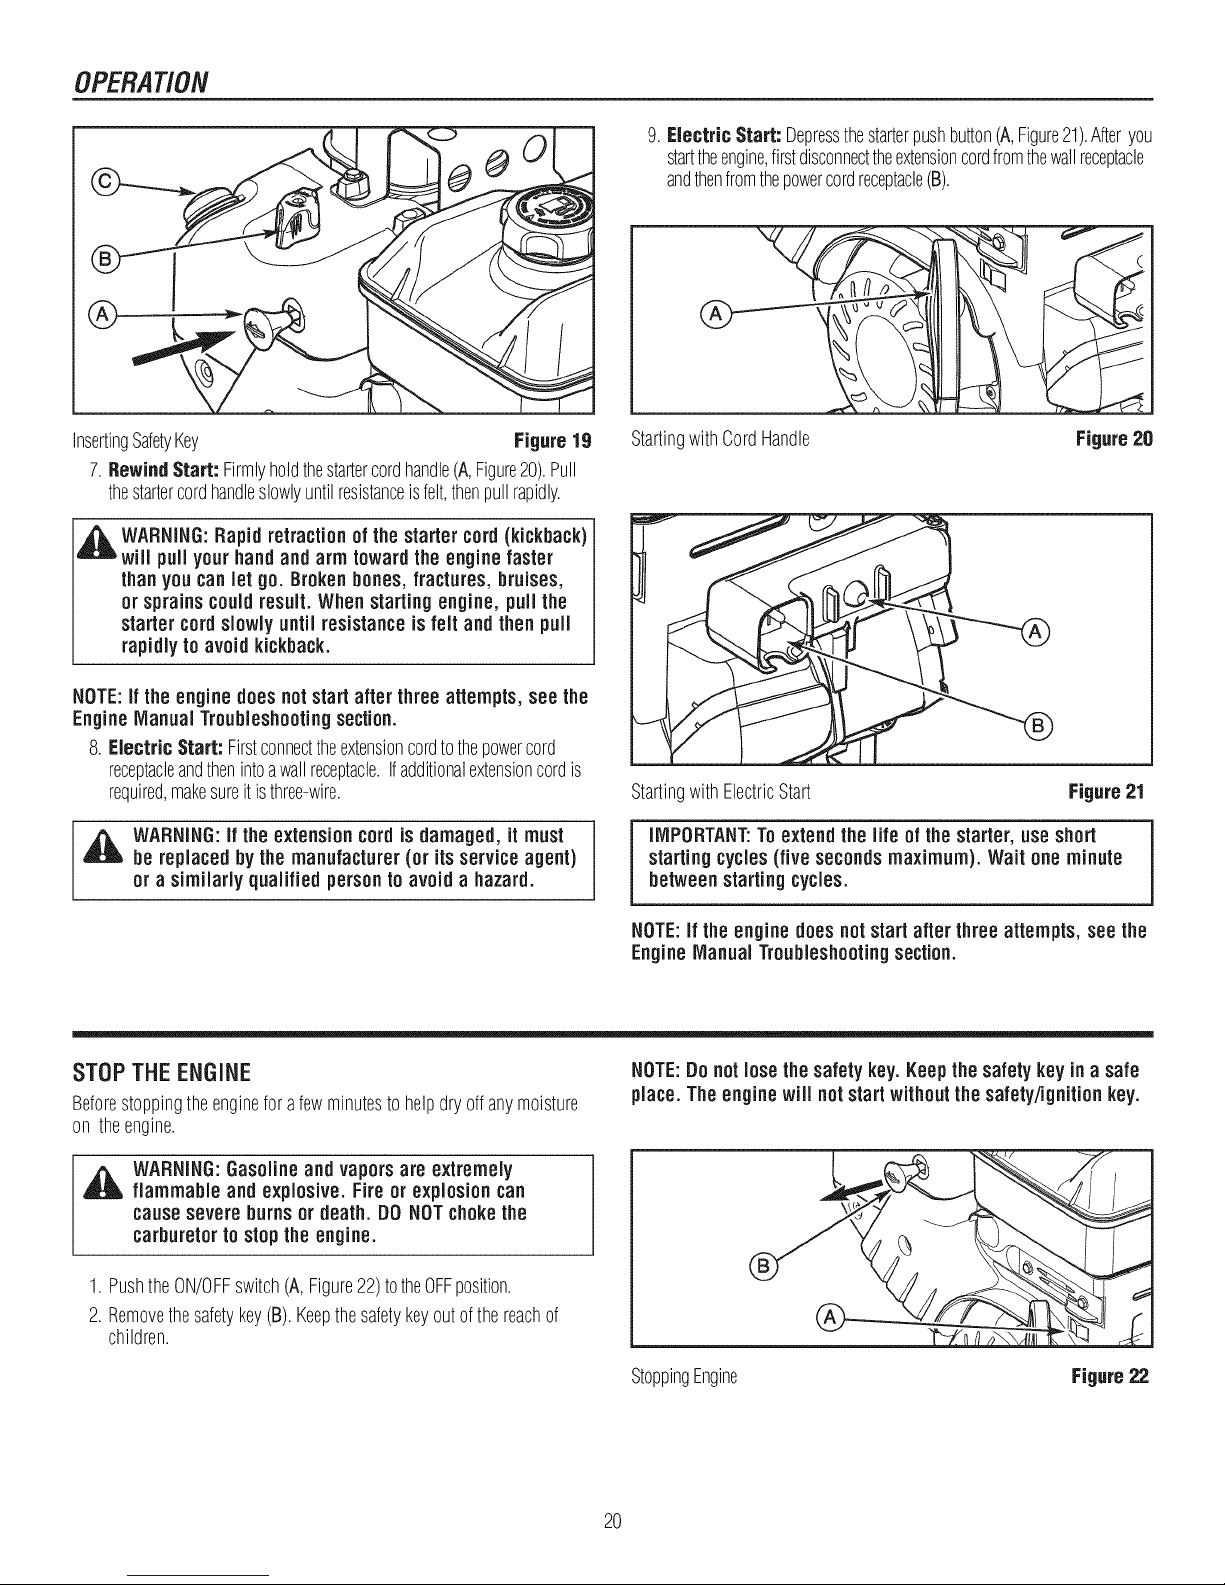
9. Electric Start: Depressthestarterpushbutton(A,Figure21).Afteryou
starttheengine,firstdisconnecttheextensioncordfromthewallreceptacle
andthenfromthepowercordreceptacle(B).
InsertingSafetyKey Figure19
7.Rewind Start: Firmlyholdthestartercordhandle(A,Figure20).Pull
thestartercordhandleslowlyuntilresistanceisfelt,thenpullrapidly.
,_ WARNING:Rapid retractionofthe startercord (kickback)
will pull your hand and arm toward the engine faster
thanyou canlet go. Brokenbones, fractures, bruises,
or sprains couldresult. When startingengine,pull the
starter cordslowlyuntil resistanceis felt and then pull
rapidlyto avoid kickback.
NOTE:if the enginedoes notstart after three attempts, see the
Engine Manual Troubleshootingsection.
8. Electric Start: Firstconnecttheextensioncordtothepowercord
receptacleandthenintoawallreceptacle.Ifadditionalextensioncordis
required,makesureitisthree-wire.
4_ WARNING:if the extension cord is damaged, it must
be replaced bythe manufacturer(or itsservice agent)
or a similarly qualified personto avoid a hazard.
StartingwithCordHandle
StartingwithElectricStart Figure21
IMPORTANT:Toextend the life of the starter, useshort
startingcycles(five secondsmaximum). Wait one minute
betweenstartingcycles.
NOTE:if theengine does notstart after three attempts, see the
Engine Manual Troubleshootingsection.
Figure20
STOP THE ENGINE
Beforestoppingtheengineforafewminutestohelpdryoffanymoisture
on theengine.
,_ WARNING:Gasolineand vaporsare extremely
flammable and explosive.Fire or explosion can
causesevere burns or death. DO NOTchokethe
carburetorto stopthe engine.
1.PushtheON/OFFswitch(A,Figure22)totheOFFposition.
2. Removethesafetykey(B).Keepthesafetykeyoutof the reachof
children.
NOTE:Donot losethe safety key. Keepthe safety key in a safe
place. Theenginewill notstartwithoutthesafety/ignitionkey.
StoppingEngine Figure22
20
OPERATION
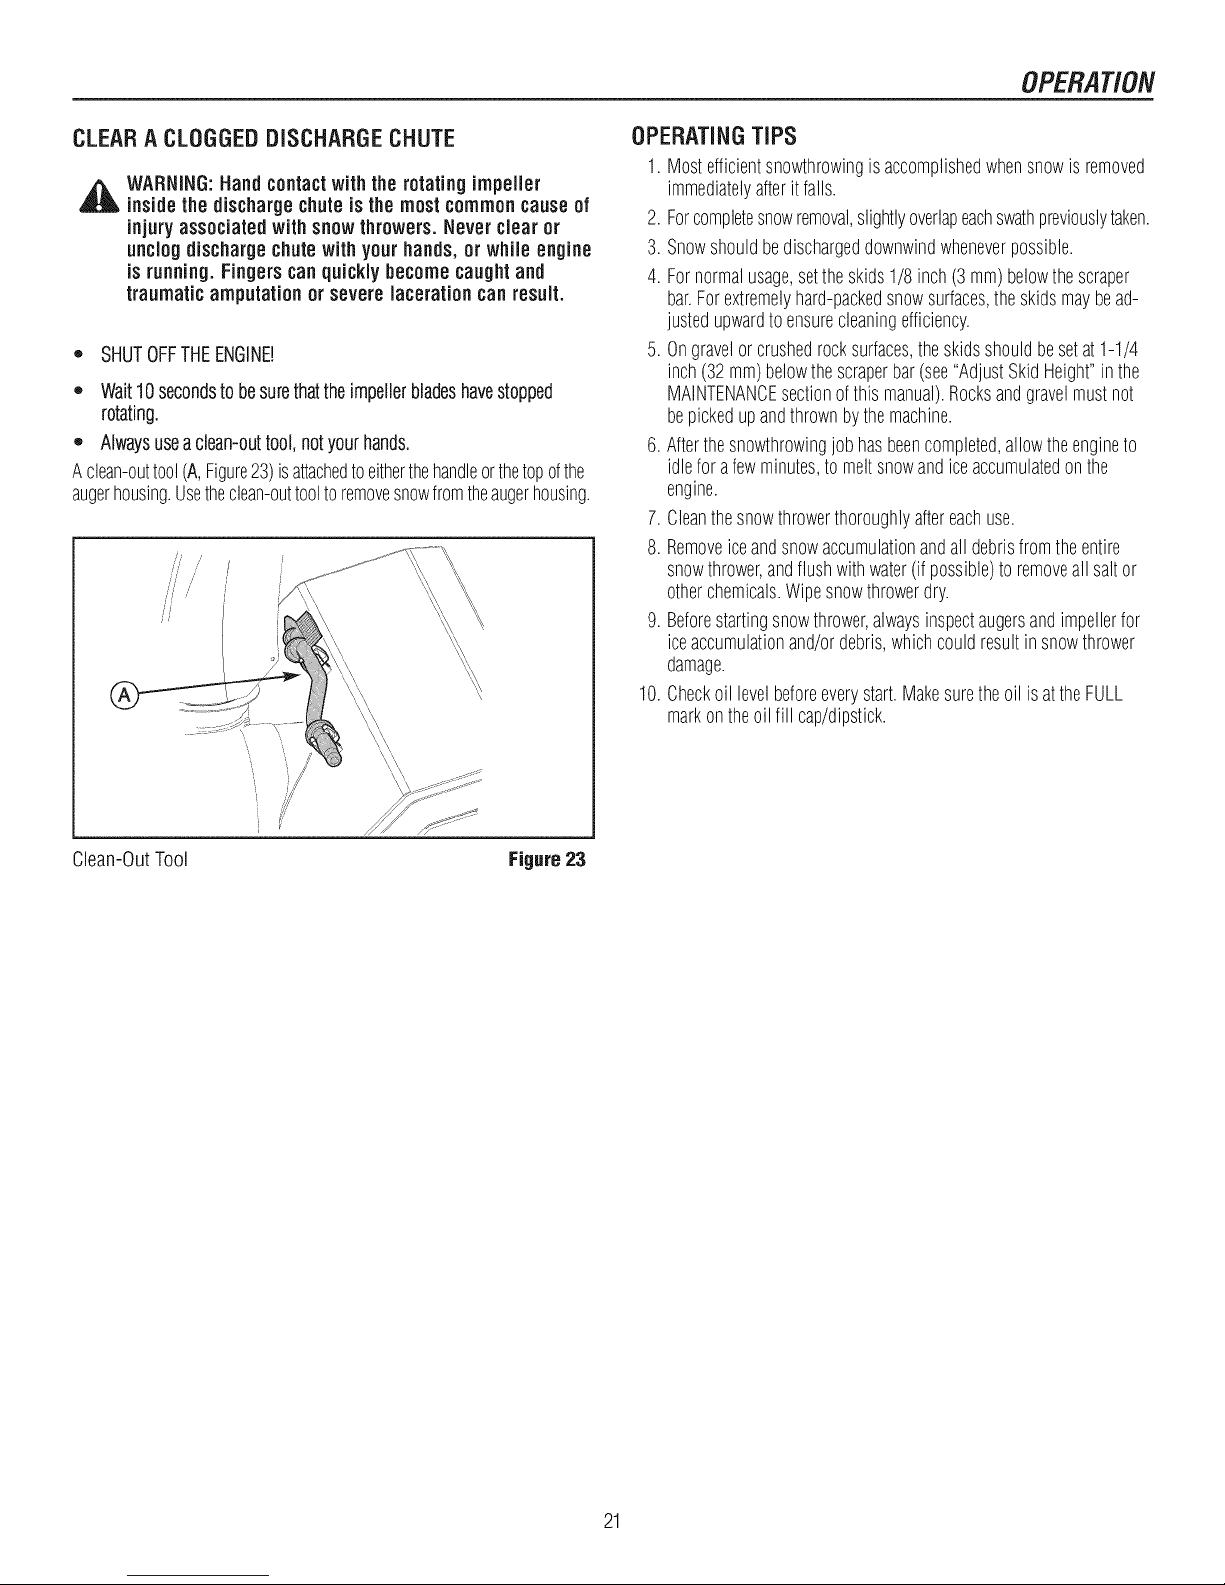
CLEARA CLOGGEDDISCHARGECHUTE
,_ WARNING:Handcontactwith the rotatingimpeller
insidethe dischargechuteis the most common cause of
injuryassociated with snow throwers. Never clear or
unclog dischargechutewith your hands, or while engine
is running.Fingers can quickly becomecaughtand
traumatic amputation or severe lacerationcan result.
o SHUTOFFTHEENGINE!
,, Wait10secondstobesurethattheimpellerbladeshavestopped
rotating.
,' Alwaysuseaclean-outtool,notyourhands.
Aclean-outtool(A,Figure23)isattachedtoeitherthehandleorthetopofthe
augerhousing.Usetheclean-outtooltoremovesnowfromtheaugerhousing.
//' /
OPERATINGTIPS
1.Mostefficientsnowthrowingis accomplishedwhensnowisremoved
immediatelyafterit falls.
2. Forcompletesnowremoval,slightlyoverlapeachswathpreviouslytaken.
3. Snowshouldbedischargeddownwindwheneverpossible.
4. Fornormalusage,settheskids1/8inch(3 mm)belowthe scraper
bar.Forextremelyhard-packedsnowsurfaces,the skidsmaybead-
justedupwardtoensurecleaningefficiency.
5. Ongravelorcrushedrocksurfaces,theskidsshouldbesetat1-1/4
inch(32mm)belowthescraperbar(see"AdjustSkidHeight"inthe
MAINTENANCEsectionofthis manual).Rocksandgravelmustnot
bepickedupandthrownbythemachine.
6. Afterthesnowthrowingjobhasbeencompleted,allowtheengineto
idleforafewminutes,to meltsnowandiceaccumulatedonthe
engine.
7.Cleanthesnowthrowerthoroughlyaftereachuse.
8. Removeiceandsnowaccumulationandall debrisfromtheentire
snowthrower,andflushwithwater(ifpossible)toremoveall saltor
otherchemicals.Wipesnowthrowerdry.
9. Beforestartingsnowthrower,alwaysinspectaugersandimpellerfor
iceaccumulationand/ordebris,whichcouldresultin snowthrower
damage.
10.Checkoil levelbeforeeverystart.Makesuretheoil is attheFULL
markontheoil fill cap/dipstick.
Clean-OutTool
'i
\\'\
Figure23
21

MAINTENANCE
SERVICERECOMMENDATIONS
PROCEDURE 5 EACH EACH 5 10 25 EACH
Checkto MakeSure
AugerBladeStopsWithin
5 SecondsAfterRight v"
SAFETY ControlLeverisReleased
LubricateControlLevers ,/ ,/ ,/
andLinkages
CheckSnowthrowerfor
LooseHardware v" ,,,"
LubricateHexShaftand
Chains v" v"
LubricateAugerShaft
Fittings v" v"
SNOWTHROWER LubricateChuteRotation
GearandDeflector v"
Mechanism
RemoveAll Snowand
SlushoffSnowthrowerto
PreventFreezingofAuger
or Controls
FIRST BEFORE AFTER EVERY EVERY EVERY BEGINNING
HOURS USE USE HOURS HOURS HOURS SEASON
v"
BEFORE
STORAGE
L_______ i i ,,,,, i
ENGINE
NOTE:The warrantyon this snowthrower does not coveritems
thathavebeensubjectedto operator abuse or negligence.To
receivefull value from the warranty, operator mustmaintain
snowthroweras instructedinthis manual.
TheaboveService Recommendations aresuppliedtoassisttheopera-
tortoproperlymaintainthesnowthrower.
CheckTirePressure ,/
Oil,Check
Oil,Change ,/ v"
CheckandReplace
SparkPlug v" v"
,/ v" ,/ v"
CAUTION:Do notallow grease or oil to contactthe
A
rubberfriction wheel or the disc drive plate, ifthe
disc drive plate or friction wheel come in contactwith
grease or oil, damage to rubberfriction wheel will
result.
NOTICE:if grease or oil comesintocontactwith the disc drive
plate or friction wheel, makesureto clean plate and wheel
thoroughlywith an alcohol basesolvent.
22
MAINTENANCE
LUBRICATEAUGERGEARBOX
Theaugergearboxis lubricatedatthefactoryandshouldnotrequire
additionallubrication.Ifforsomereasonthelubricantshouldleakout,
or if theaugergearboxhasbeenserviced,addLubriplateGR132Greaseor
equivalent.Maximum3-1/4ounces,(92grams)shouldbeused.
Removefillerplug(A,Figure24),onceayear.Ifgreaseisvisible,donot
add.Ifgreaseisnotvisible,usea pieceoffinewire,likeadipstickto check
ifthereisgreaseinthegearbox.MobiluxEP1andShellAIvaniaEP1are
suitableequivalents.
LubricatingAugerGearBox Figure24
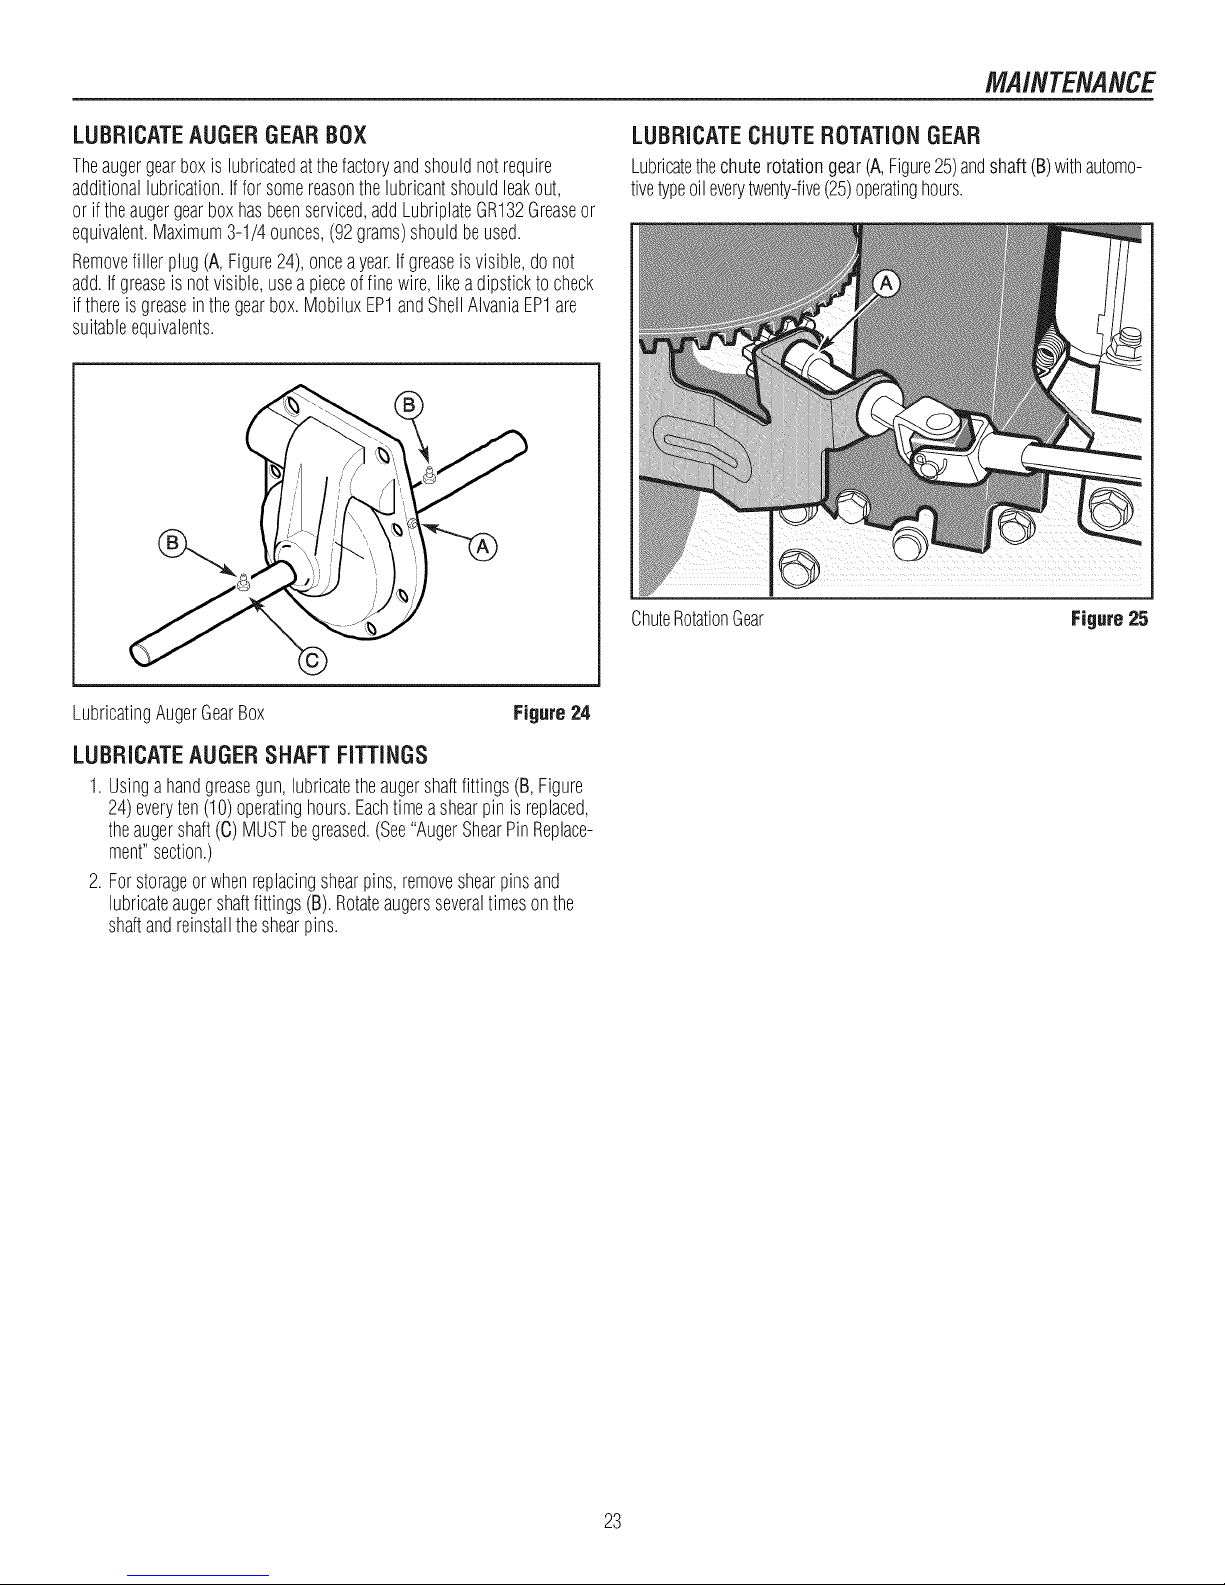
LUBRICATECHUTEROTATIONGEAR
Lubricatethechuterotationgear(A,Figure25)andshaft(B)withautomo-
tivetypeoileverytwenty-five(25)operatinghours.
ChuteRotationGear Figure25
LUBRICATEAUGERSHAFTFITTINGS
1.Usingahandgreasegun,lubricatetheaugershaftfittings(B,Figure
24)everyten(10)operatinghours.Eachtimeashearpinis replaced,
theaugershaft(C)MUSTbegreased.(See"AugerShearPinReplace-
ment"section.)
2. Forstorageorwhenreplacingshearpins,removeshearpinsand
lubricateaugershaftfittings(B).Rotateaugersseveraltimesonthe
shaftandreinstalltheshearpins.
23
MAINTENANCE
ENGINEMAINTENANCE
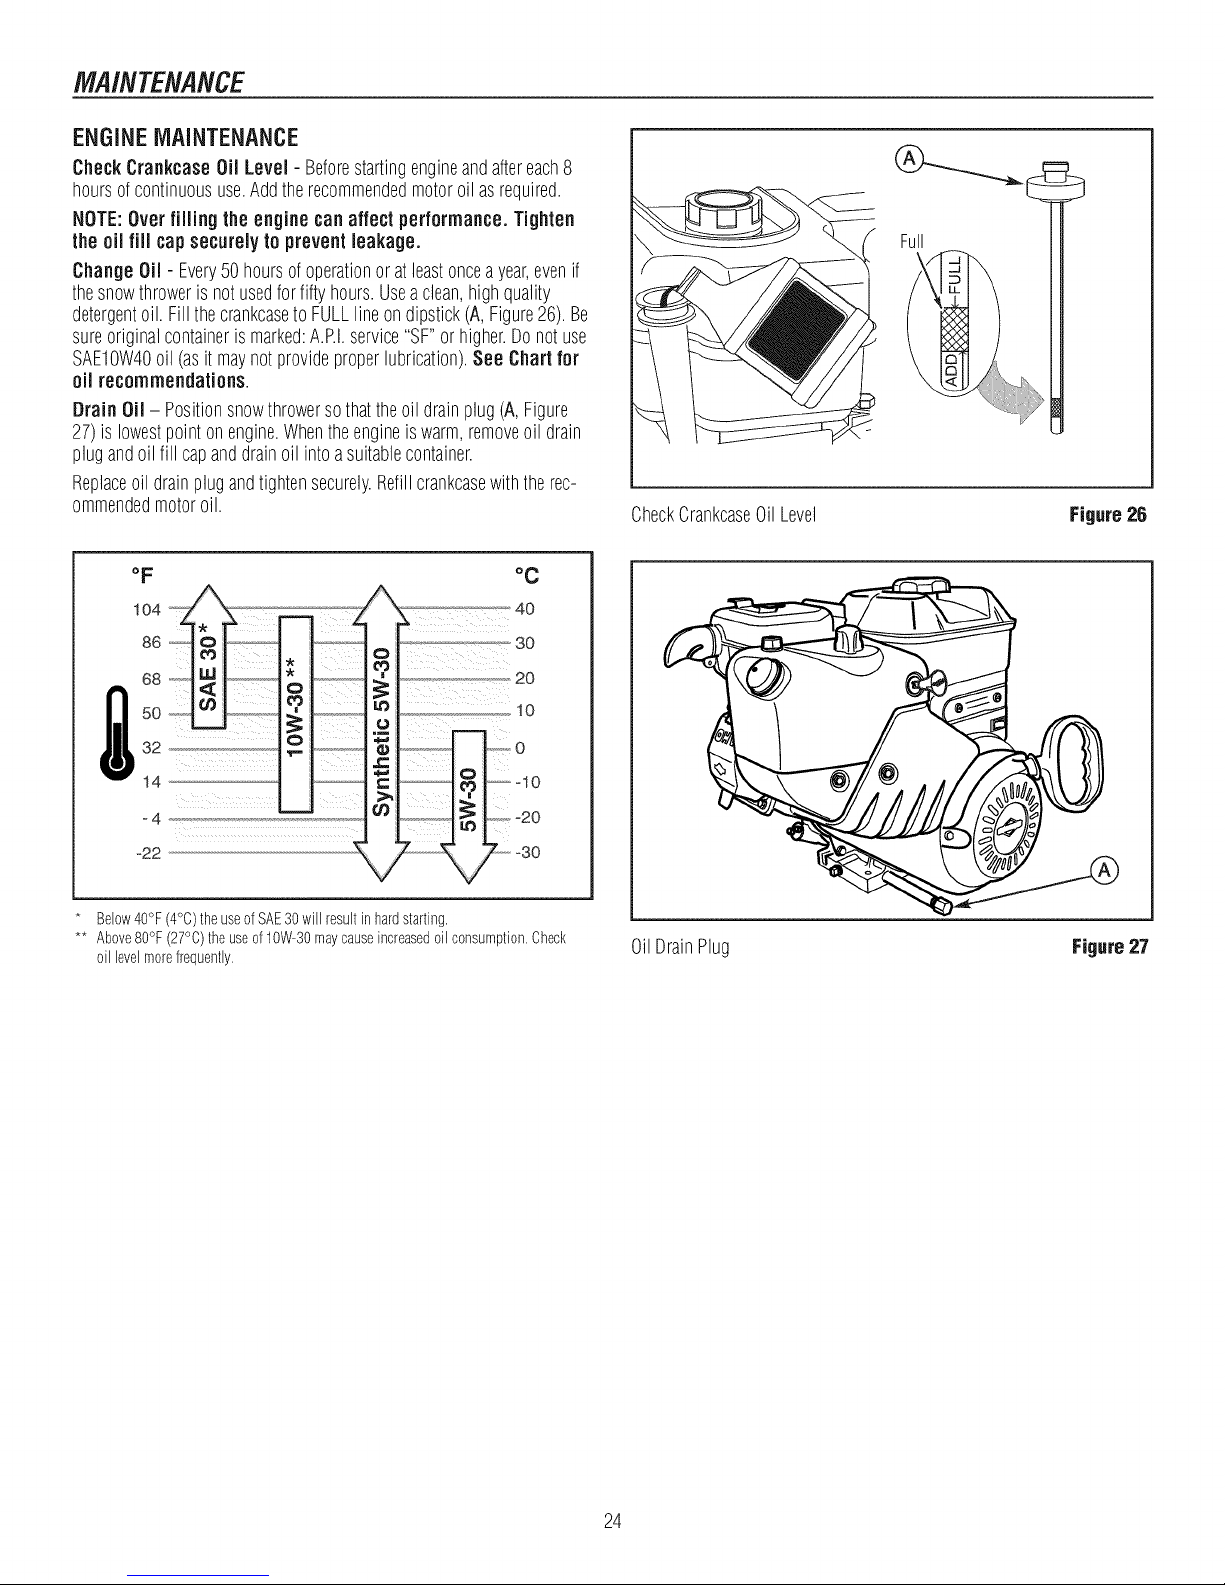
CheckCrankcase Oil Level - Beforestartingengineandaftereach8
hoursofcontinuoususe.Addtherecommendedmotoroil asrequired.
NOTE:Over filling the engine can affect performance.Tighten
the oil fill cap securely to prevent leakage.
ChangeOil - Every50 hoursofoperationor atleastonceayear,evenif
thesnowthrowerisnot usedfor fiftyhours.Usea clean,highquality
detergentoil. Fillthecrankcaseto FULLlineondipstick(A,Figure26).Be
sureoriginalcontainerismarked:A.P.I.service"SF"orhigher.Donotuse
SAEIOW40oil (asitmaynotprovideproperlubrication).See Chart for
oil recommendations.
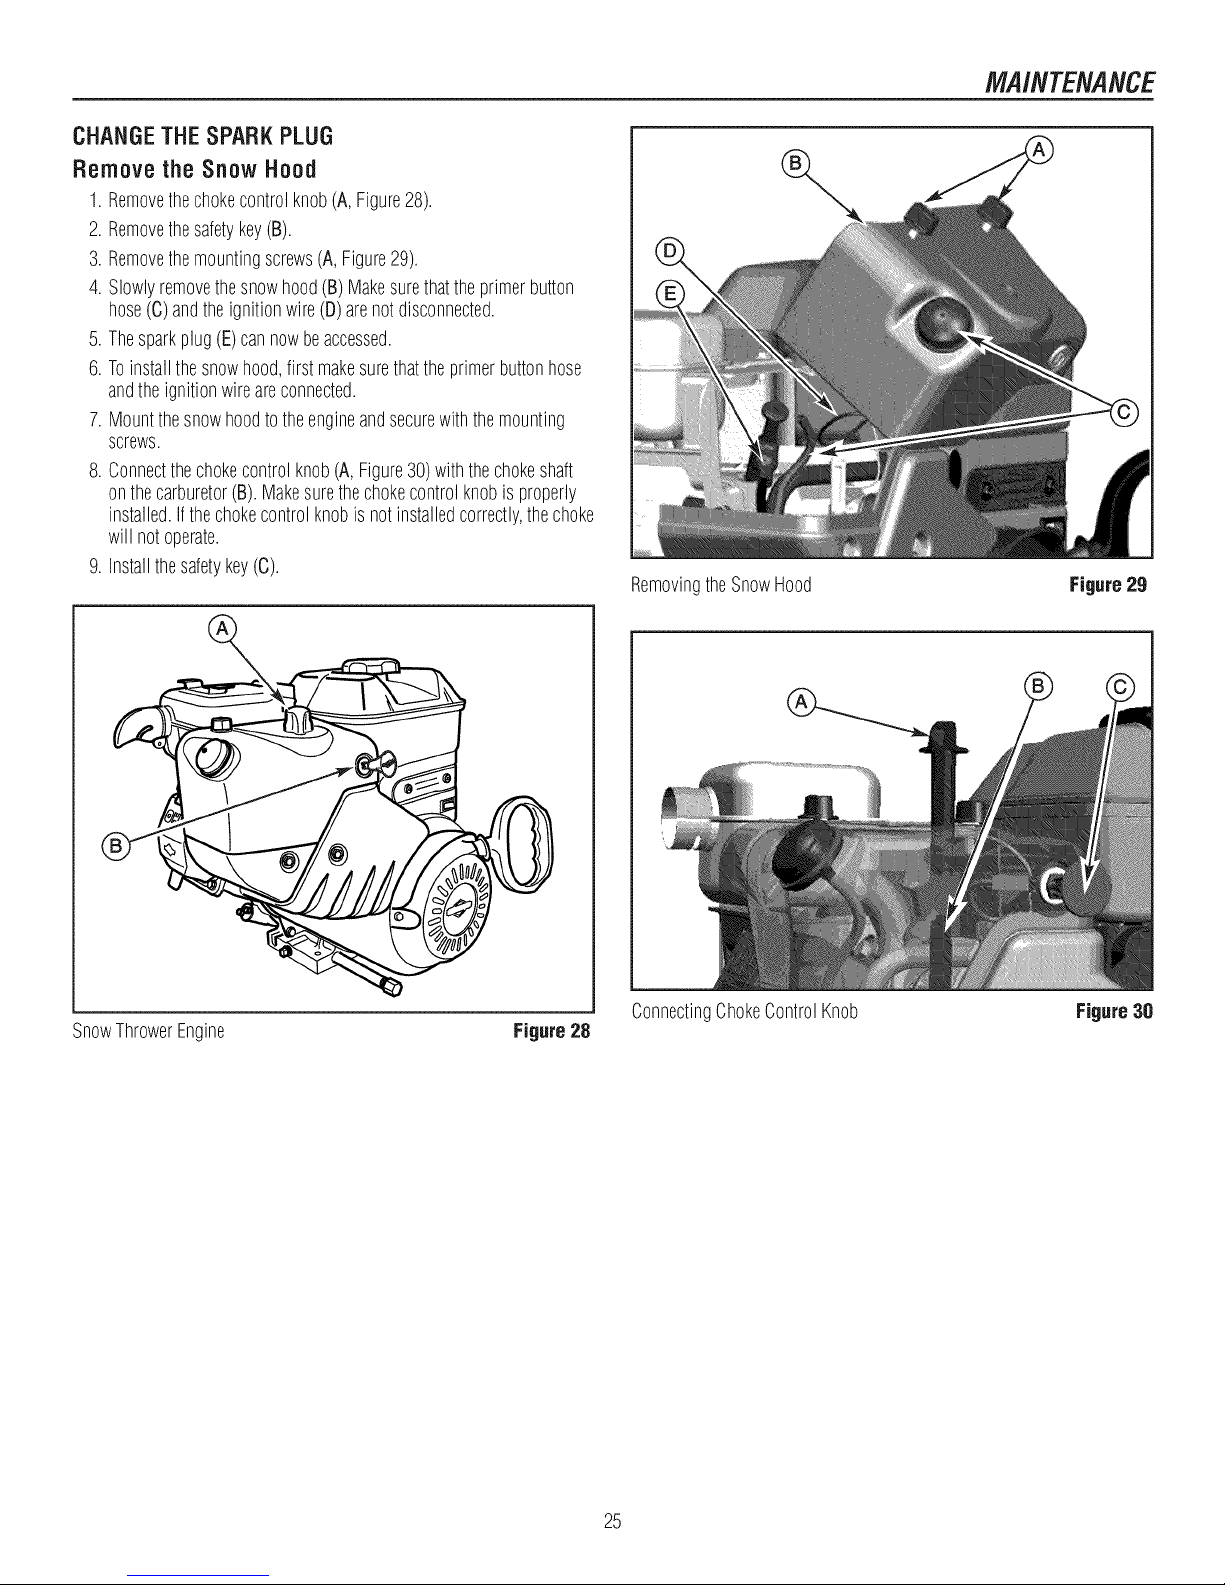
Drain Oil - Positionsnowthrowersothattheoil drainplug(A, Figure
27)is lowestpointonengine.Whentheengineiswarm,removeoil drain
plugandoil fill capanddrainoil intoasuitablecontainer.
Replaceoil drainplugandtightensecurely.Refillcrankcasewiththerec-
ommendedmotoroil.
CheckCrankcaseOil Level
Full
Figure26
oF
10486_
.
68 o
32
Below40°F(4°C)theuseofSAE30willresultinhardstarting.
** Above80°F(27°C)theuseof10W-30maycauseincreasedoilconsumption.Check
oillevelmorefrequently.
z,i
°C
40
30
20
10
0
o10
-20
-30
OilDrainPlug Figure27
24
CHANGETHESPARKPLUG
Remove the Snow Hood
1.Removethechokecontrolknob(A,Figure28).
2. Removethesafetykey(B).
3. Removethemountingscrews(A,Figure29).
4. Slowlyremovethesnowhood(B)Makesurethattheprimerbutton
hose(C)andtheignitionwire(D)arenotdisconnected.
5. Thesparkplug(E)cannowbeaccessed.
6. Toinstallthe snowhood,first makesurethattheprimerbuttonhose
andtheignitionwireareconnected.
7.Mountthesnowhoodtotheengineandsecurewiththemounting
screws.
8. Connectthechokecontrolknob(A,Figure30)withthechokeshaft
onthecarburetor(B).Makesurethechokecontrolknobis properly
installed.Ifthechokecontrolknobis notinstalledcorrectly,thechoke
will notoperate.
9. Installthesafetykey(C).
RemovingtheSnowHood
MAINTENANCE
Figure29
i
SnowThrowerEngine
Figure28
ConnectingChokeControlKnob
Figure30
25
MAINTENANCE
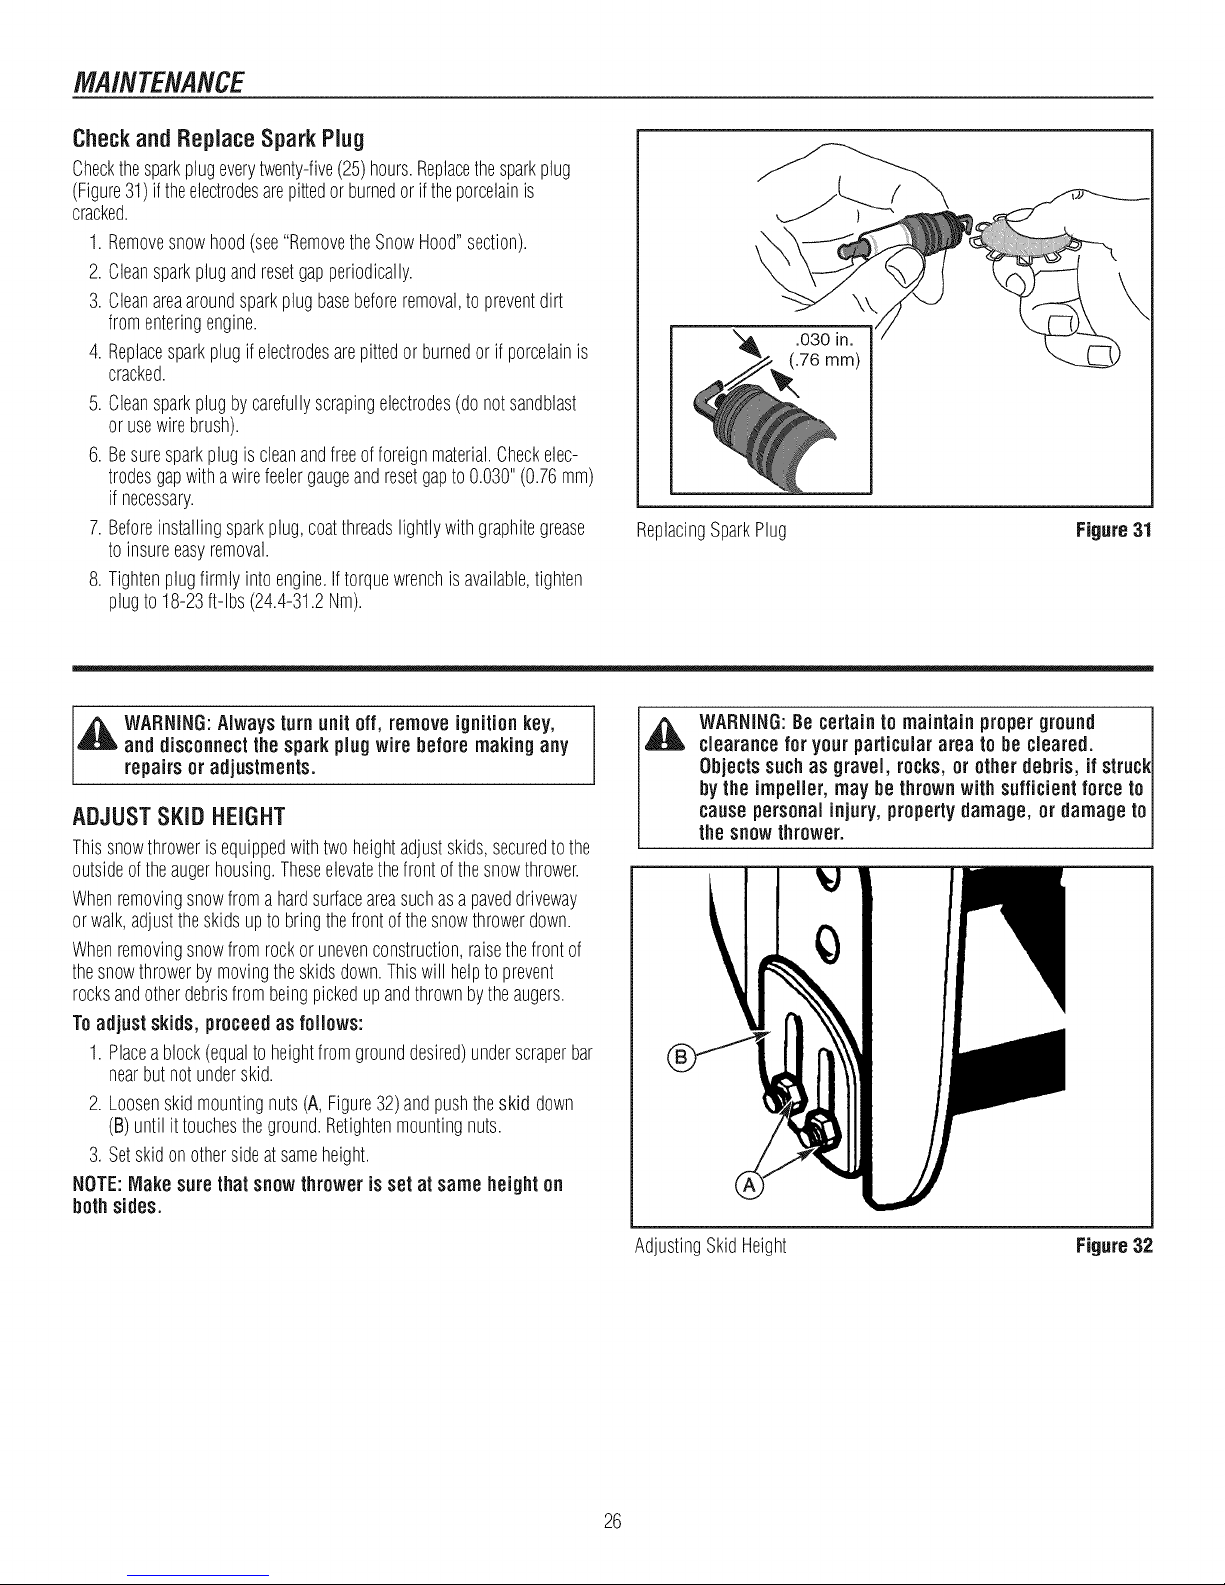
CheckandReplaceSpark Plug
Checkthesparkplugeverytwenty-five(25)hours.Replacethesparkplug
(Figure31)if theelectrodesarepittedorburnedorif theporcelainis
cracked.
1.Removesnowhood(see"RemovetheSnowHood"section).
2. Cleansparkplugandresetgapperiodically.
3. Cleanareaaroundsparkplugbasebeforeremoval,topreventdirt
fromenteringengine.
4. Replacesparkplugifelectrodesarepittedor burnedor if porcelainis
cracked.
5. Cleansparkplugbycarefullyscrapingelectrodes(donotsandblast
orusewirebrush).
6. Besuresparkplugis cleanandfreeofforeignmaterial.Checkelec-
trodesgapwithawirefeelergaugeandresetgapto0.030"(0.76ram)
if necessary.
7.Beforeinstallingsparkplug,coatthreadslightlywithgraphitegrease
toinsureeasyremoval.
8. Tightenplugfirmlyintoengine.Iftorquewrenchisavailable,tighten
plugto18-23ft-lbs(24.4-31.2Nm).
\
ReplacingSparkPlug Figure31
_ ARNING:Always turn unit off, remove ignitionkey,
and disconnectthe sparkplugwire before making any
repairs or adjustments.
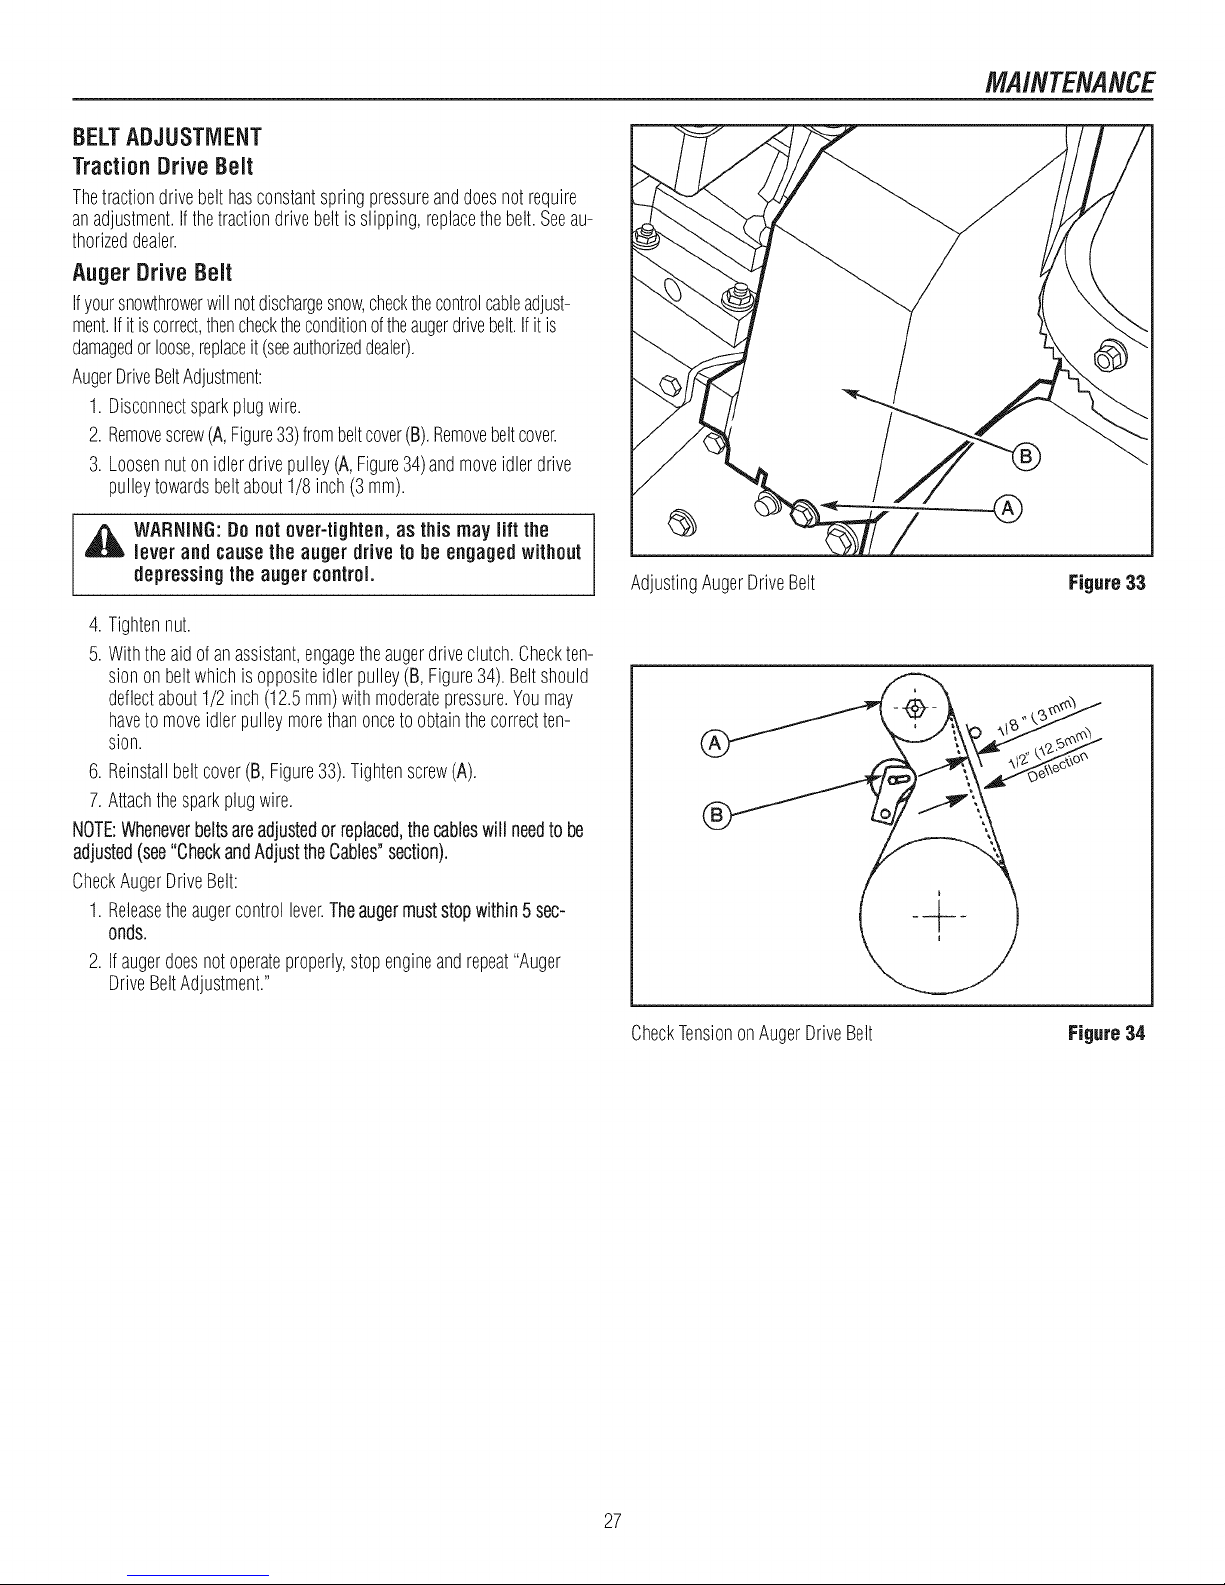
ADJUSTSKiD HEIGHT
Thissnowthrowerisequippedwithtwoheightadjustskids,securedtothe
outsideoftheaugerhousing.Theseelevatethefrontofthesnowthrower.
Whenremovingsnowfromahardsurfaceareasuchasa paveddriveway
orwalk,adjusttheskidsupto bringthefrontofthesnowthrowerdown.
Whenremovingsnowfromrockor unevenconstruction,raisethefrontof
thesnowthrowerbymovingtheskidsdown.Thiswill helpto prevent
rocksandotherdebrisfrombeingpickedupandthrownbytheaugers.
Toadjustskids, proceedas follows:
1.Placeablock(equalto heightfromgrounddesired)underscraperbar
nearbutnotunderskid.
2. Loosenskidmountingnuts(A, Figure32)andpushtheskid down
(B)untilittouchestheground.Retightenmountingnuts.
3. Setskidonothersideatsameheight.
NOTE:Make surethat snowthrowerisset at same heighton
both sides.
WARNING:Be certainto maintainproper ground
clearance for your particulararea to be cleared.
Objects suchas gravel, rocks, or other debris, if struck
by the impeller, may bethrownwith sufficientforce to
causepersonalinjury, propertydamage, or damageto
thesnowthrower.
AdjustingSkidHeight Figure32
26
BELTADJUSTMENT
TractionDriveBelt
Thetractiondrivebelthasconstantspringpressureanddoesnotrequire
anadjustment.Ifthetractiondrivebelt is slipping,replacethebelt.Seeau-
thorizeddealer.
Auger Drive Belt
Ifyoursnowthrowerwill notdischargesnow,checkthecontrolcableadjust-
ment.Ifitiscorrect,thenchecktheconditionoftheaugerdrivebelt.Ifitis
damagedorloose,replaceit (seeauthorizeddealer).
AugerDriveBeltAdjustment:
1.Disconnectsparkplugwire.
2. Removescrew(A,Figure33)frombeltcover(B).Removebeltcover.
3. Loosennutonidlerdrivepulley(A,Figure34)andmoveidlerdrive
pulleytowardsbeltabout1/8inch(3 mm).
WARNING: Donot over-tighten, as this may lift the
lever and causethe auger drive to be engagedwithout
depressingthe auger control.
4. Tightennut.
5. Withtheaidofanassistant,engagetheaugerdriveclutch.Checkten-
sionon beltwhichisoppositeidlerpulley(B,Figure34).Beltshould
deflectabout1/2inch(12.5mm)withmoderatepressure.Youmay
havetomoveidlerpulleymorethanoncetoobtainthecorrectten-
sion.
6. Reinstallbeltcover(B,Figure33).Tightenscrew(A).
7.Attachthesparkplugwire.
NOTE:Wheneverbeltsareadjustedorreplaced,thecableswill needto be
adjusted(see"CheckandAdjusttheCables"section).
CheckAugerDriveBelt:
1.Releasetheaugercontrollever.Theaugermuststopwithin5 sec-
onds.
2. Ifaugerdoesnotoperateproperly,stopengineandrepeat"Auger
DriveBeltAdjustment."
AdjustingAugerDriveBelt
MAINTENANCE
Figure33
CheckTensiononAugerDriveBelt
27
Figure34
MAINTENANCE
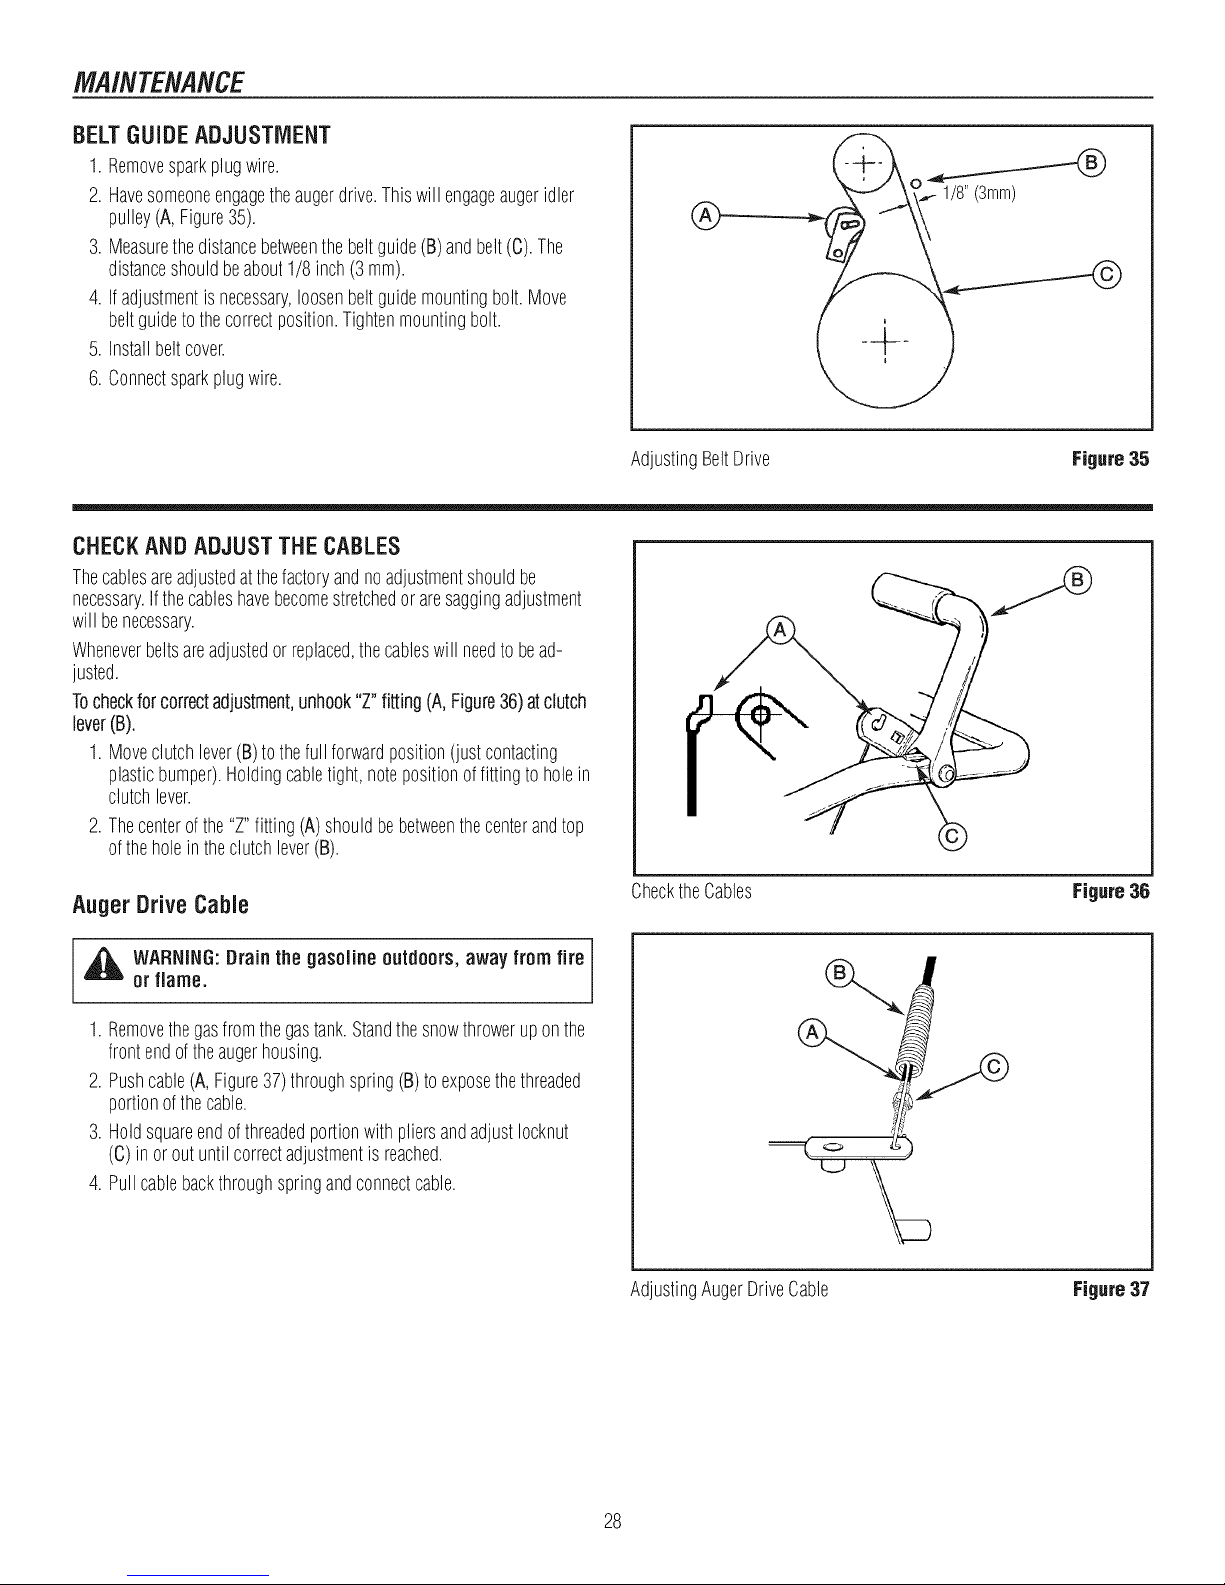
BELT GUIDE ADJUSTMENT
1.Removesparkplugwire.
2. Havesomeoneengagetheaugerdrive.Thiswillengageaugeridler
pulley(A,Figure35).
3. Measurethedistancebetweenthebeltguide(B)andbelt(C).The
distanceshouldbeabout1/8inch(3 ram).
4. Ifadjustmentis necessary,loosenbeltguidemountingbolt.Move
beltguidetothecorrectposition.Tightenmountingbolt.
5. Installbeltcover.
6. Connectsparkplugwire.
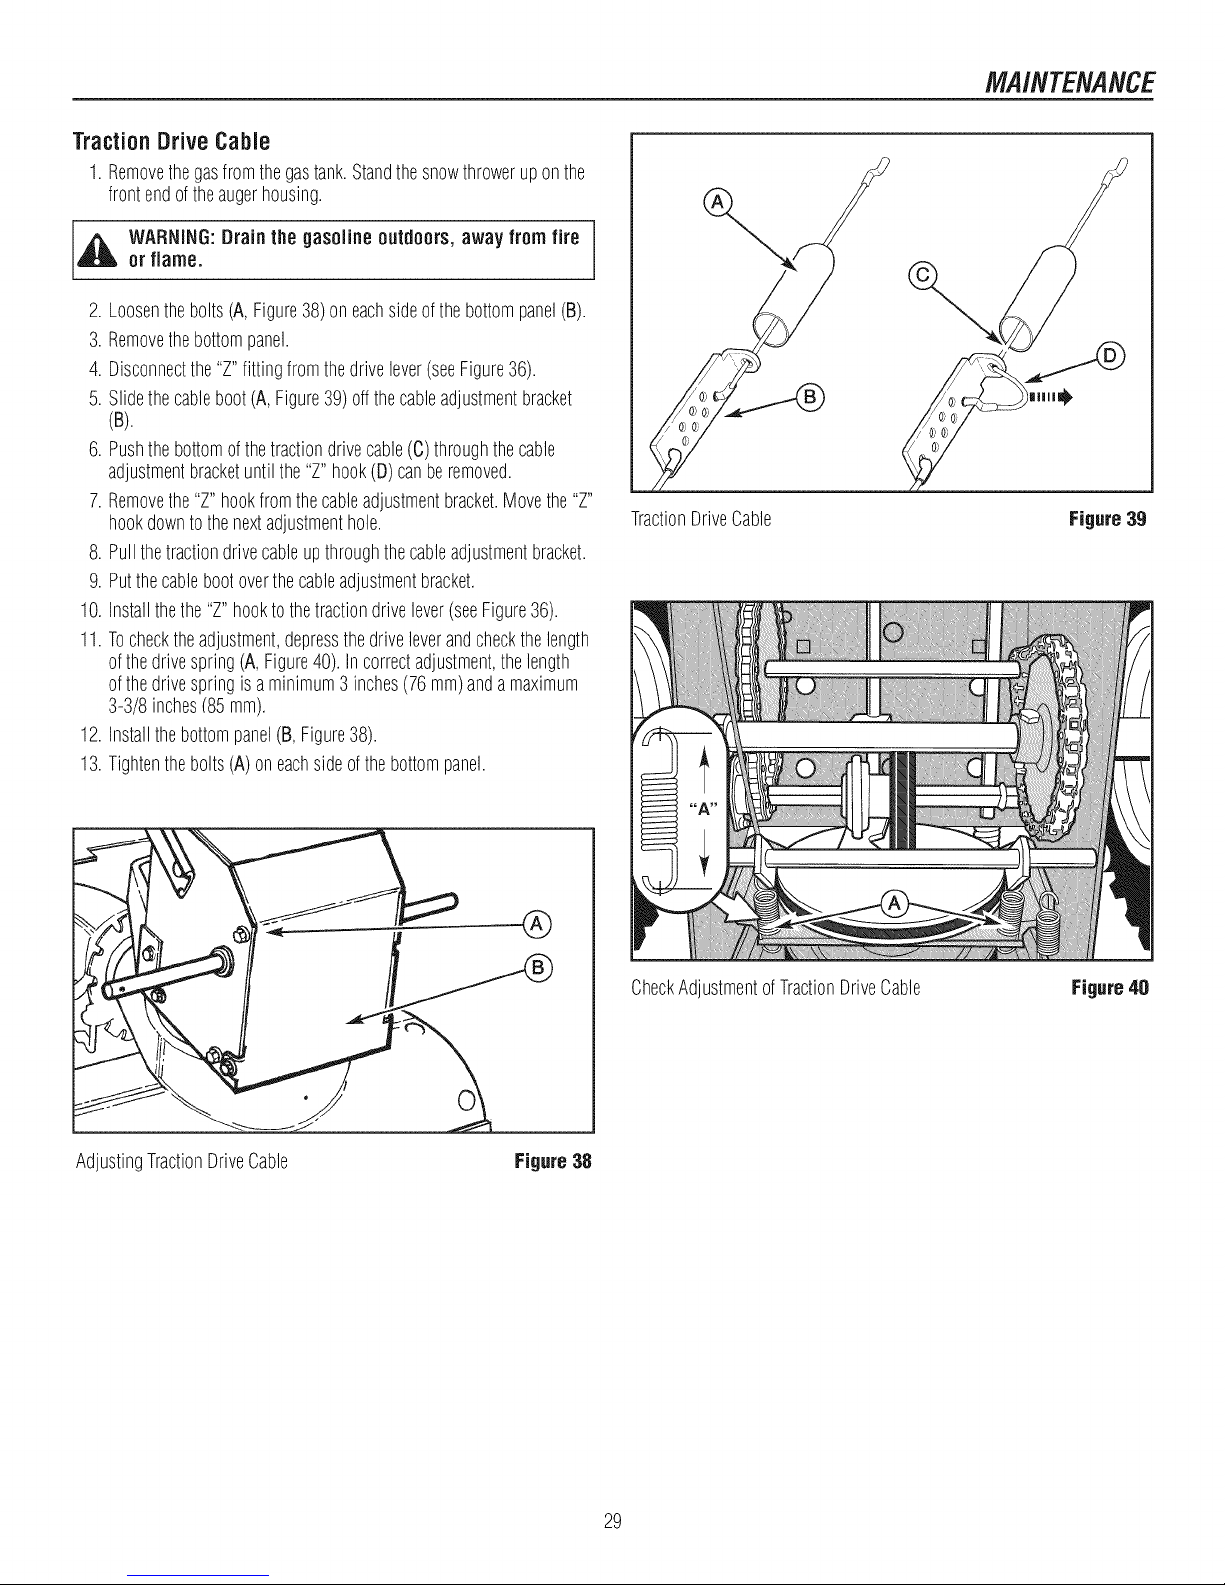
CHECKANDADJUSTTHECABLES
Thecablesareadjustedatthefactoryandnoadjustmentshouldbe
necessary.Ifthecableshavebecomestretchedoraresaggingadjustment
will benecessary.
Wheneverbeltsareadjustedorreplaced,thecableswill needto bead-
justed.
Tocheckforcorrectadjustment,unhook"Z"fitting (A,Figure36)atclutch
lever(B).
1.Moveclutchlever(B)to thefullforwardposition(justcontacting
plasticbumper).Holdingcabletight, notepositionof fittingtoholein
clutchlever.
2. Thecenterofthe"Z"fitting (A)shouldbebetweenthecenterandtop
oftheholein theclutchlever(B).
®
AdjustingBeltDrive Figure35
©
Auger Drive Cable
or flame.
[,_ ARNING: Drain the gasoline outdoors, away from fire
1.Removethegasfromthegastank.Standthesnowthroweruponthe
frontendoftheaugerhousing.
2. Pushcable(A,Figure37)throughspring(B)to exposethethreaded
portionofthecable.
3. Holdsquareendofthreadedportionwith pliersandadjustIocknut
(C)inor outuntil correctadjustmentisreached.
4. Pullcablebackthroughspringandconnectcable.
ChecktheCables Figure36
i
AdjustingAugerDriveCable Figure37
28
TractionDriveCable
1.Removethegasfromthegastank.Standthesnowthroweruponthe
frontendoftheaugerhousing.
_ ARNING:Drainthe gasoline outdoors, away from fire
or flame.
2. Loosenthebolts(A,Figure38)on eachsideofthebottompanel(B).
3. Removethebottompanel.
4. Disconnectthe"Z"fittingfromthedrivelever(seeFigure36).
5. Slidethecableboot(A,Figure39)offthecableadjustmentbracket
(B) I
6. Pushthebottomofthetractiondrivecable(C)throughthecable
adjustmentbracketuntilthe "Z"hook(D)canberemoved.
7.Removethe"Z"hookfromthecableadjustmentbracket.Movethe"Z"
hookdownto thenextadjustmenthole.
8. Pullthetractiondrivecableupthroughthecableadjustmentbracket.
91Putthecablebootoverthecableadjustmentbracket.
10.Installthethe"Z"hooktothetractiondrivelever(seeFigure36)1
11.Tochecktheadjustment,depressthedriveleverandcheckthelength
ofthedrivespring(A,Figure40).Incorrectadjustment,thelength
ofthedrivespringis aminimum3 inches(76mm)anda maximum
3-3/8inches185mm).
12.Installthebottompanel(B,Figure38)1
13.Tightenthebolts(A)oneachsideofthebottompanel.
TractionDriveCable
MAINTENANCE
)|1111|!_
Figure39
AdjustingTractionDriveCable
CheckAdjustmentofTractionDriveCable Figure40
Figure38
29
MAINTENANCE
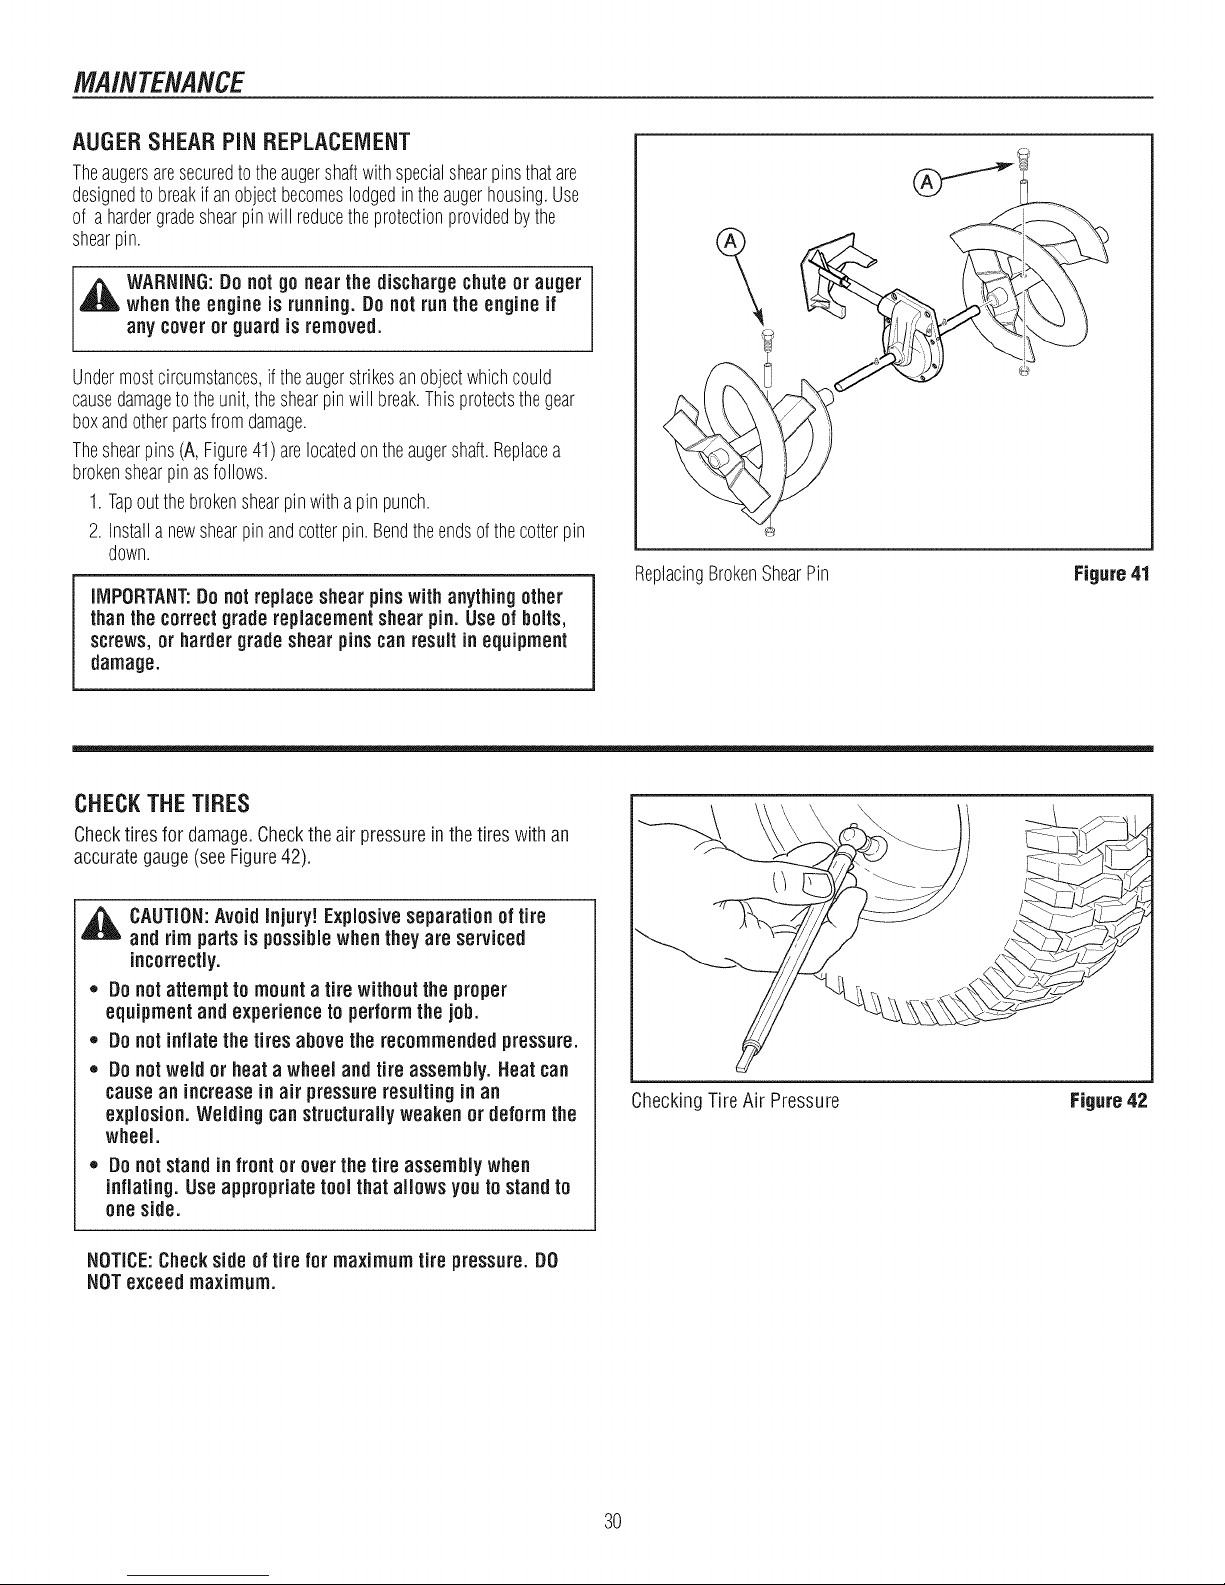
AUGERSHEARPiNREPLACEMENT
Theaugersaresecuredtotheaugershaftwithspecialshearpinsthatare
designedtobreakifanobjectbecomeslodgedintheaugerhousing.Use
of a hardergradeshearpinwill reducetheprotectionprovidedbythe
shearpin.
,_ WARNING:Donot go nearthe dischargechuteor auger
whenthe engineis running.Do notrun the engine if
any coveror guard is removed.
Undermostcircumstances,if theaugerstrikesanobjectwhichcould
causedamagetotheunit,theshearpinwill break.Thisprotectsthegear
boxandotherpartsfromdamage.
Theshearpins(A,Figure41)arelocatedontheaugershaft.Replacea
brokenshearpinasfollows.
1.Tapoutthebrokenshearpinwitha pinpunch.
2. Installanewshearpinandcotterpin.Bendtheendsofthecotterpin
down.
iMPORTANT:Do not replaceshearpins with anything other
thanthe correctgrade replacementshearpin. Useof bolts,
screws,or harder gradeshearpins can result in equipment
damage.
ReplacingBrokenShearPin Figure41
CHECKTHETIRES
Checktiresfor damage.Checktheair pressurein thetires with an
accurategauge(seeFigure42).
,_ CAUTION:Avoid Injury! Explosiveseparation of tire
and rim parts is possible when theyare serviced
incorrectly.
,, Do notattempt to mounta tire without the proper
equipment and experience to perform the job.
,, Do notinflatethe tires abovethe recommended pressure.
,, Do notweld or heat a wheel and tire assembly. Heat can
causean increasein air pressureresulting in an
explosion. Welding canstructurally weaken or deformthe
wheel.
,, Do not stand in front or over the tire assembly when
inflating. Useappropriate tool that allows you to standto
one side.
NOTICE:Checkside of tire for maximum tire pressure.DO
NOTexceed maximum.
CheckingTire Air Pressure Figure42
30
 Loading...