

Sears Craftsman 35900 Owner's Manual

_AR8
CRRFTSHRNo
owners manual
MODEL NO.
35900
SEARS CRAFTSMAN
18" HAND LAWN MOWER
assembly
operating
repair parts
CAUTION:
Read RULES for Safe
OPERATION and
INSTRUCTIONS Carefully
manual del propietario
MODELO NO.
35900
SEARS CRAFTSMAN
PODADORA MANUAL
DE 18" (pulgadas)
ensamblaje
operaci6n
repuestos
PRECAUCION:
Lea cuidadosamente las
REGLAS de OPERACI(_N
segura y las instrucciones
owner manuel
MODELE NO.
35900
SEARS CRAFTSMAN
18"TONDEUSE
MANUELLE
assemblee
operation
pieces pour reparation
ATTENTION:
Lisez attentivement toutes
les Instructions dans ce
manuel concernant rem-
ploi roperation et I'utilisa-
tion de votre tondeuse.
SEARS, CANADA INC, TORONTO ONTARIO M5B 2B8
i
Part No. 31186
RULES" FOR SAFE OPERATION
1. Read and familiarize yoLIrselfwith the methodsofuse.
2. Inspectyour lawn amd removeforeignobjects, etc.
3. Don't operate mower when barefoot or weadng sandals.
4. Use caution - A mower is a precisionpiece oflawncare equip-
ment and should be treated as such.
5. Don't operate a damaged mower.Have repairs made before
returningto work.
6. Never place your hands or feet near a movingpart.
7. Do not mow the tawnwhen it iswet enoughto be slippery.
8. Always be sure of your footing. Walk, don'trun.
9. Keep all screws and nuts tight. Be sureequipmentis in asafe
operating condition.Keep mower clean of dry grassand dirt.
ITEMS IN CARTON
One complete Hand Mower Chassis.
Two lower handle sections.
Two upper handle sections.
One handle grip section.
One plasticbag includinghardware forassembly of
handle.
Six ¼" x 1 ¼" handle bolts-
Eight ¼-20 handle nuts-keps.
Two ¼"x 1" handle bolts.
One foam grip.
Two retaining rings.
Do not use Key Numbers when ordering Repair
Parts, always use Part Numbers.
Your mower is right hand (R.H.) or left hand (LH.)
as you push.
REGLAS DE OPERACI6N SEGURA
1. Lea y familiarfcesecon lasformas de uso.
2. Inspeccione su c6sped y retirecualquierobjeto extrai'lo,etc.
3. No opera la podadoradescalzo o usando sandalias.
4. Tenga cuidado. Una podadoraes un aparatode precisi6npare el
cuidado del c_sped y deber sertratada comotal.
5. No opere la podadorase estd dai_ada.Rep_rela o mdndela a
reparar antes de voIver a usada,
6. Mantsnga las manos y los pies alejados de las partes m6viles.
7. No corte el cdsped si estd mojado o resbaladizo.
8. Tenga lospies firmes en todo momento,iNo core,camine[
9. Mantenga apretados todos lostornillosy tuercas. Aseg0rese de
que su podadora est6 en condicionesadecuadas para un uso
seguro. Mant_ngala limpia de hierba seca y suciedad.
CONTENIDO DE LA CAJA
El chasis completo de la podadora manual.
Dos secciones de manija infedores.
Dos secciones de manija superiores.
Una secci6n de mango de ta manija.
Una bolsa de pldstico con las plazas pare el
ensamblaja de la manija.
Seis pernos de 1/4" x 1 1/4".
Ocho tuercas de 1/4-20.
Dos pernos de 1/4"x 1".
Un mango de espuma.
Dos ares de retsnci6n.
No utilicelos n0meros de clave para ordenar los
repuestos, utilice siempre los n_msros de repuesto.
El lado derecho e izquierdo de la podadore son
desde la perspectiva de qulen la est_ empujando.
RI=GLES POUR L'UTILISATION DE LATONDEUSE
1. Lisez attantivament et familiarisez vousavec Is mode d'entretien.
2. tnspectezta surface de la petouset_tondre et en retirer tous las
corps dtrangsrs (outils,jouets, d6bris, etc.)
3. Ne pas uUliserla tondeuse Iomquevous_tes pied nus ou
Iorsquevous portezdes sandales.
4. Soyez prudent. Une tondeusa& gazonest unepiece
d'equipement spdcifiquepour rentretien de la pelousset dolt an
tout temps _.tre considdr_e de la sorts.
5. N'utifisez pas une tondeuse endommag6e. Assurezvous que les
rdparetionsndcessaires ontdt6 effectuedsavant de reprendre
son utilisation.
6. Ne jamais approcher les mains ou les pieds pros des pi_ces
mobiles de la tondeuse.
7. Ne pas tondra la pelouss Iorsqu'elleestmouill6e au point d'6tre
gflssanta.
8. Poussez toujoure& la mi_me cadence, marchez NE COURREZ
PAS.
9. Guardez tousles vis et _crous bien s6rrds.Assurez vous bvant
chaque amplol qua rdqulpement est en boons conditionde
marche. Guardaz votre tondeuse proprs. Ddbarrasez la du gason
sac et de la saletd.
CONTENU DU CARTON
Le chassis complet d'une tondeuse.
Deux sections superieuras de la poignea.
Deux sections interieure de la poignee.
Un section de poignee centrals
Un sac en plastique contenant le necessaire
pour assembler la poignae
Six boulons 1/4" x 1 1/4" pour la poignee
Huit ecrous 1/4" - 20" pour la poignee
Deux boulons 114"x 1"pour la poignee
Un manchon en caoutchouc
Deux anneaux de retenue
Lorsque vous faites une commands indiquez le
numero de la piece.
Votre tondeuse est main droite ou main gauche
suivant comme vous la poussez.
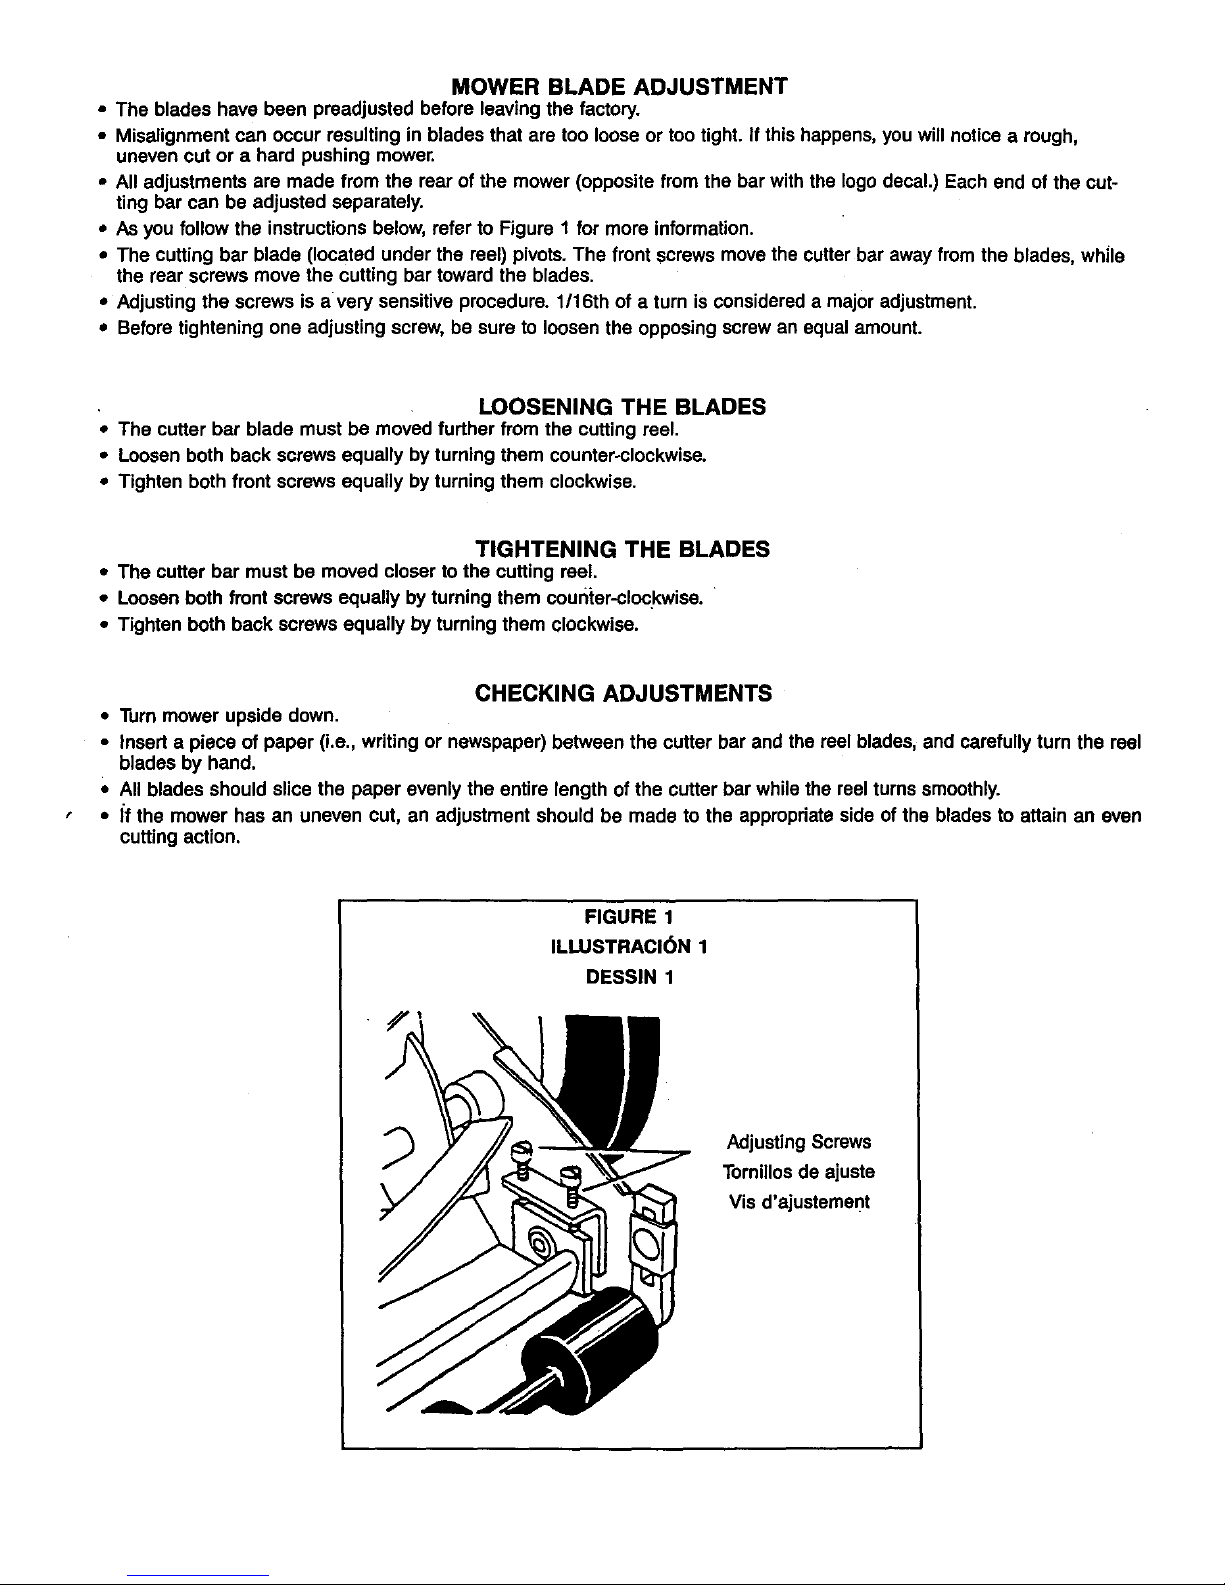
MOWER BLADE ADJUSTMENT
• The blades have been preadjusted before leaving the factory.
• Misalignment can occur resulting in blades that are too loose or too tight. If this happens, you will notice a rough,
uneven cut or a hard pushing mower.
• All adjustments are made from the rear of the mower (opposite from the bar with the logo decal.) Each end of the cut-
ting bar can be adjusted separately.
• As you follow the instructions below, refer to Figure 1 for more information.
• The cutting bar blade (located under the reel) pivots. The front screws move the cutter bar away from the blades, while
the rear screws move the cutting bar toward the blades.
• Adjusting the screws is a very sensitive procedure. 1/16th of a turn is considered a major adjustment.
• Before tightening one adjusting screw, be sure to loosen the opposing screw an equal amount.
LOOSENING THE BLADES
• The cutter bar blade must be moved further from the cutting reel.
• Loosen both back screws equally by turning them counter-clockwise.
• Tighten both front screws equally by turning them clockwise.
TIGHTENING THE BLADES
• The cutter bar must be moved closer to the cutting reel.
• Loosen both front screws equally by turning them counter-clockwise.
• Tighten both back screws equally by turning them clockwise.
CHECKING ADJUSTMENTS
• Turn mower upside down.
• Insert a piece of paper (i.e., writing or newspaper) between the cutter bar and the reel blades, and carefully turn the reel
blades by hand.
* All blades should slice the paper evenly the entire length of the cutter bar while the reel turns smoothly.
• if the mower has an uneven cut, an adjustment should be made to the appropriate side of the blades to attain an even
cutting action.
FIGURE 1
ILLUSTRACI6N 1
DESSIN 1
Adjusting Screws
Tornillos de ajuste
Vis d'ajustement
 Loading...