

Sears Craftsman 358.356091,Craftsman 358.356101 Important Manual

IMPORTANT MANUAL
__.ARS
operator's
manual
• Assembly
• Operation
• Maintenance
• Repair Parts
MODEL NO.
358.356091-3.7120"
358.356101-3.7118"PS
AWARNING
Thischainsawiscapableof severe
kickbackthatcouldtesultinserious
lr_uryto theuser.Donotoperatethis J
sawunlessyouhaveextraordinary
cuttingneeds,andha_especialized
trainingand experiencefor dealing
with kickback.Chainsawswithslg-
nificantlyreducedkickbackpotential
areavailable.
Do Not Throw Away
_A/RSICRRFTSMRN I
3.7/20" 3.7,/t8"PS
GASOLINE CHAIN SAWS
i1: i,,,ii ii
Record in the space provided below the Model N% and Serial No. of
your saw. These numbers are located on the starting instructions
decal.
M6del No. Serial No.
Retain these numbers for future reference.
,i
530-066648-5-21188
Sears, Roebuck and Cx)., Chicago, Ill. 60684 U.S.A.
.
©Sears, Roebuck and Co., 1988.
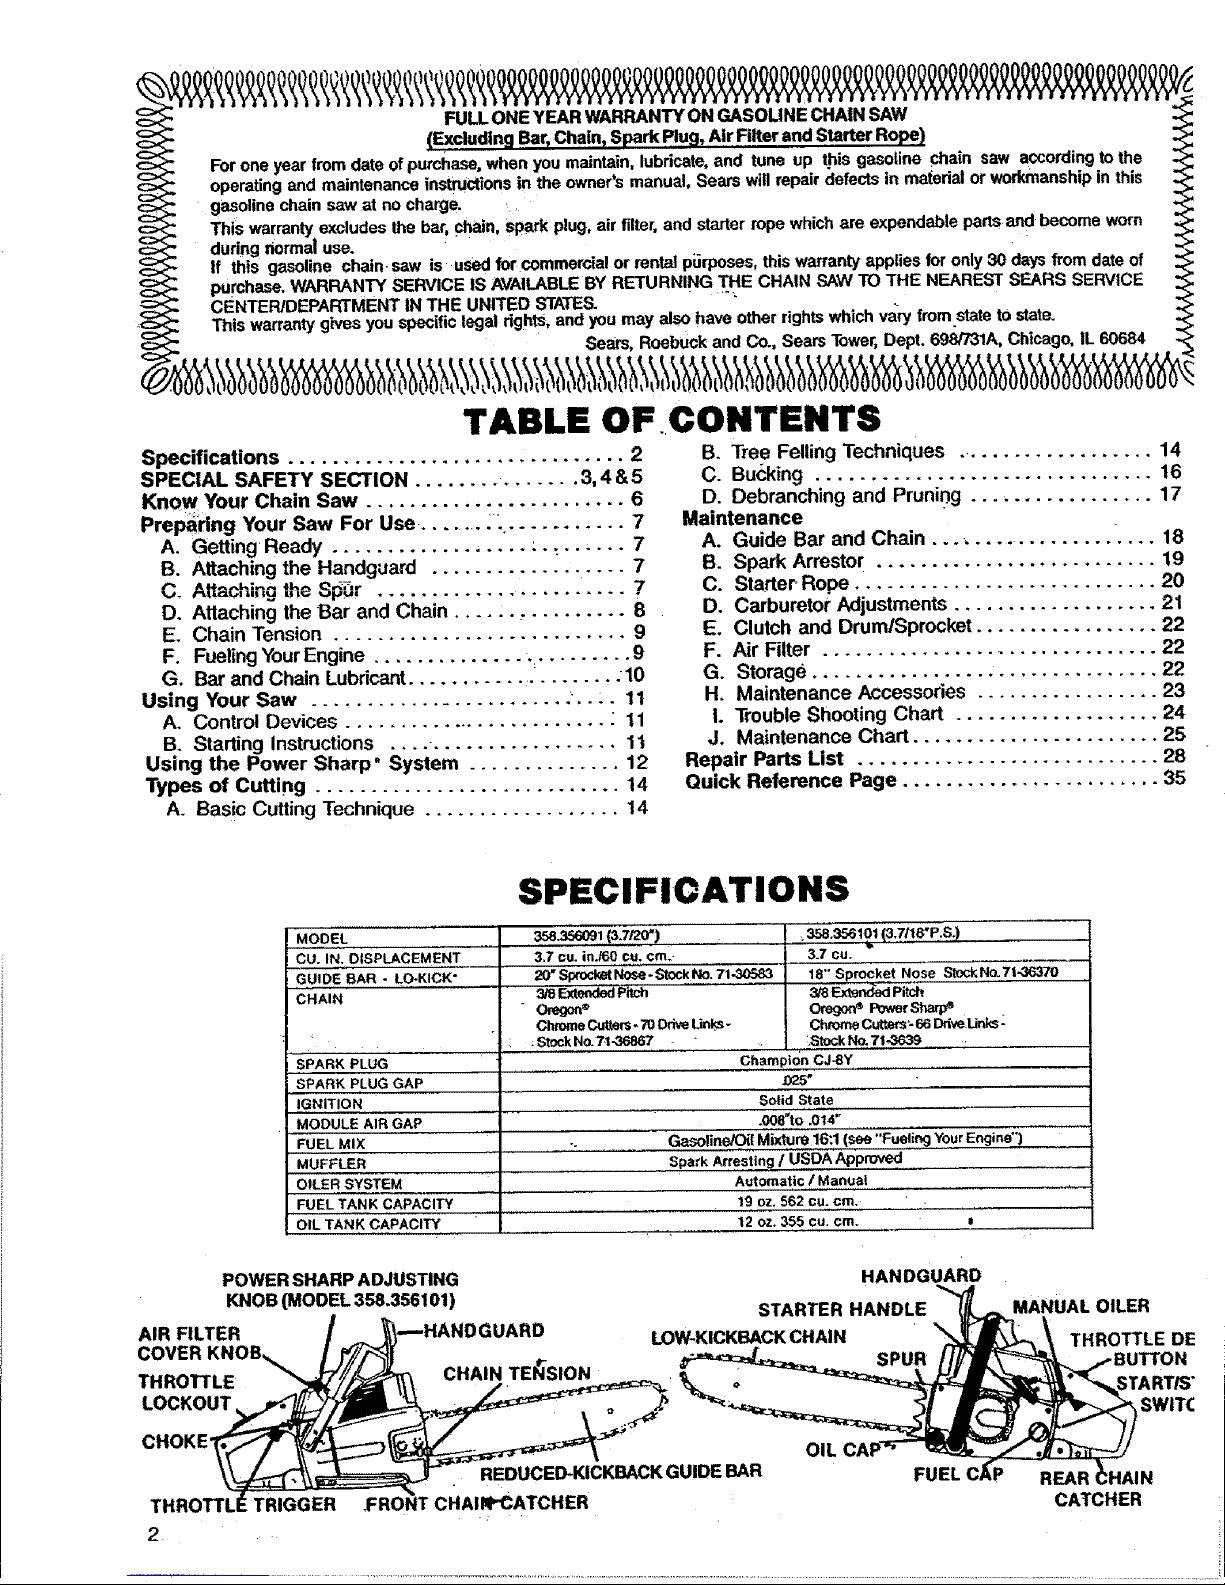
FULLONEYEARWARRANTYON GASOLINECHAINSAW
(ExcludingBar_Chain_SparkPlu9, A!rFilterandStarterRope)
Foroneyear fromdateof purchase,whenyou maintain, lubricate, and tune up thisgasoline chain saw according tothe
operating andmaintenanceinstructionsin theowner's manual, Searswillrepair aetectsin mazedal or workmanship inthis
i gasoline chainsawatno charge.
This warranty excludesthe bar, chain, spark plug, air filter, andstarterropewhichare expendable parts andbecomeworn ._
during normaluse. .....
If this gasolinechain,saw is usedforcommercial or rental p_Jrposes, this warranty applies for only 30 days fromdateof ._
purchase.WARRANTYSERVICEISAVAILABLEBYRETURNINGTHE CHAINSAWTOTHE NEARESTSEARSSERVICE
_ CENTER/DEPARTMENTIN THE UNITEDSTATES. '" -.
Thiswarrantygivesyouspecificlegal dghts,andyoumay alsohaveotherrightswhichvaryfromstatetostate. .<
TABLE OFCONTENTS
Specifications ............................... 2
SPECIAL SAFETY SECTION ............... 3, 4 &5
Know Your Chain Saw ........................ 6
Preparing Your Saw For Use-., " 7
A; Getting Ready .................. :.. ...... 7
B. Attaching the Handguard .............. .... 7
C. Attaching the o,_r,.... 7
D. Attaching the Bar and Chain ....... . ........ 8
E. Chain Tension ........................... 9
F. Fueling Your Engine ............... ........ 9
G. Bar and Chain Lubricant. ... 10
Using Your Saw ........................ ".... 11
A. Control Devices " 11
B. Starting Instructions .... -................. 11
Using the Power Sharp" System .............. 12
Types of Cutting ............................ 14
A. Basic Cutting Technique .................. 14
B. Tree Felling Techniques ................... 14
C. Bucking ............................... 16
D. Debranching and Prunin.g ................. 17
Maintenance
A. Guide Bar and Chain ..................... 18
B. Spark Arrestor .......................... 19
C. Starter Rope ............................ 20
D. Carburetor Adjustments ................... 21
E. Clutch and Drum/Sprocket ................. 22
F. Air Filter ............................... 22
G. Storage ................................ 22
H. Maintenance Accessodes ................. 23
L Trouble Shooting Chart ................... 24
J. Maintenance Chart ....................... 25
Repair Parts List ............................ 28
Quick Reference Page ........................ 35
SPECIFICATIONS
MODEL
cu:iN.DISPU_CE.E.Ti
GUIDE BAR - L,O*KICK"
CHAIN
SPARK PLUG' ,,
SPARK PLUG GAP
IGNITION
MODULE AIR GAP
FUEL MIX
MUFFLER
OILER SYSTEM ..........
FUEL TANK CAPACITY
OIL TANK CAPACITY
_r_K6091{3.7/20 _) ,,, ,, , ,358.356101(3.7/t6"1_.S.)
3.7 cu. inJ60 cu. cm. 3.7 cu.
20"SprocketNose-StockNo.7t_ 18" Sprocket Nose StockNo.7t-36370
318Extended 'Pitch 318_' Pitch
" O_,gon® OtegorPPowerSham_
ChromeCutters*70DriveLinks- ChromeCutters'-66 DriveLinks
:Stock No.T1-36867 " _'tock No. 71-3639
Champion cJ-aY , ,
_025"
Solid State'
.008 to .014
.. ' ...... Gasoline/Oi! Mitre 16:1 (_ "FuelingYourEngine';)
Spark Arresting / USDA Approved,,
Automatic / Manual .......
.... 19 oz. 562 cu. cm. ......
12 oz. 355 cu. cm. ,,
POWER SHARP ADJUSTING
KNOB (MODEL 358.356101 )
AIR FILTER
COVER
THROTTLE
LOCKOUT
CHAIN TEI_SION
CHOKE'
HANDGUARD
STARTER HANDLE
LOW-KICKBACK CHAIN
TRIGGER
REDUCED-KICKBACKGUIDE BAR
CHAII_ATCHER
FU
.ER
THROTTLE DE
I SWITC
REAR !HAIN
CATCHER

UL I i I IHIIIIIIIIIIIJlIJl II I II I / . I I roll=l, ,,,,,,H,II
SPECIAL SAFETY SECTION
GUARD AGAINST KICKBACK
Kickback is a dangerous reaction that can lead to
serious injury. Do not rely only on the safety
devices provided with your saw. As a chain saw
user, you must take special safely precautions to help
keep your cutting jobs free from accident or injury.
A KICKBACK WARNING
Kickback can occur when the moving chain contacts
an object atthe upperportionof the tip ofthegulde bar
or when the wood doses inand pinches the saw chain
inthe cut. Contact at the upper portion of the tip of the
guidebarcan causethechaintodig into theobject and
atop the chain for an Instant. The result is a lightning
fast, reverse reaction which kicks the guide bar up and
back toward the operator, ff the saw chain is pinched
along the top of the guide bar, the guide bar can be
driven rapidly back toward the operator. Either of
these re=icti0ns Can Cause io_,sof saw control which
can result in serious injury.
KICKBACK PATH
Figure 1
AVOID
OBSTRUCTIONS
CLEAR
WORKING AREA
Figure2
NEVER I t STAND
REVERSE TO THE
HAND LEFT OF
POSITIONS THE SAW
ELBOW
I_.OCKED
LEFT HANo
Figure 3
f
ON
UNDER SIDE
-" OF HANDLEBAF_
REDUCE THECHANCE OF
KICKBACK
1. ReCognize that kickback can happen. With a
basic understanding of kickback, you can reduce
the element of surprise which contributes to
_ccidents.
2. Never letthe moving chain contact anyobject at the
tip of the guide bar. Figure 1.
3. Keep the working area free from obstructions
such as other trees, branches, rocks, fences,
stumps, etc. Figure 2. Eliminate or avoid any
- obstruction that your saw chain could hit while you
are cutting through a particular log or branch.
4. Keep your saw chain sharp and properly ten-
sioned. Followmanufacturer's chainsharpeningand
maintenance instructions.Check tension at regular
intervalswiththeenginestopped,neverwiththeengine
running.Make sure the bar clamp nuts are securely
tighter,ed after tensioning the chain. A _ or dull
chain can increase the chance of kickback to occur.
5. Begin and continue cutting aitfull throttle. If the
chain is moving at a slower speed, there is greater
chance for kickback to occur.
6. Cut only one log at a time.
7. Use extreme caution when re-entering a previous
cut.
8. Do not attempt plunge cuts.
9. Watch for shifting logs or other forces that could
close a cut and pinch or fall into the chain.
10. Use only the Reduced-Kickback Guide Bar and
Low-Kickback Chain specifiedforyoursaw.
MAINTAIN CONTROL
1. Keep agood firl_ grip on the saw with both hands
when the engine is running and don't let go.
Figure 3. A firm.grip can neutralize kickback and
help you maintain control of the saw. Keep the
• fingers of your left hand encircling and your left
thumb under the front handlebar. Keep your right
hand completely around the rear handle whether
you are right handed or lefthanded. Keep your left
arm straight with the elbow locked.
2. Position your left hand on the front handlebar soit
isIn a straight line with your right hand on the rear
handle when making bucking cuts. Figure 3. Never
reverse right and left hand positions during any lype
ofcutting.
3. Stand with your weight evenly balanced on
both feet.
4. Stand slightly to the left side of the saw, to keep
your body from being in a direct line with the
cutting chain. Figure 3.
5. Do not overreach. You could be drawn or thrown
off balance and lose control of the saw.
6. Do not cut above shoulder height. It isdifficultto
maintain control of the saw above shoulder height.
SPECIAL SAFETY SECTION (continued)
_ i i i iml. ,,,
.............. j i
,i_ WARNING
Because a chain saw isa high-speed wood-cutting tool, special safety precautions must
be observed to re(zuce the risk of accidents, Careless or improper use can cause
.serious injury.
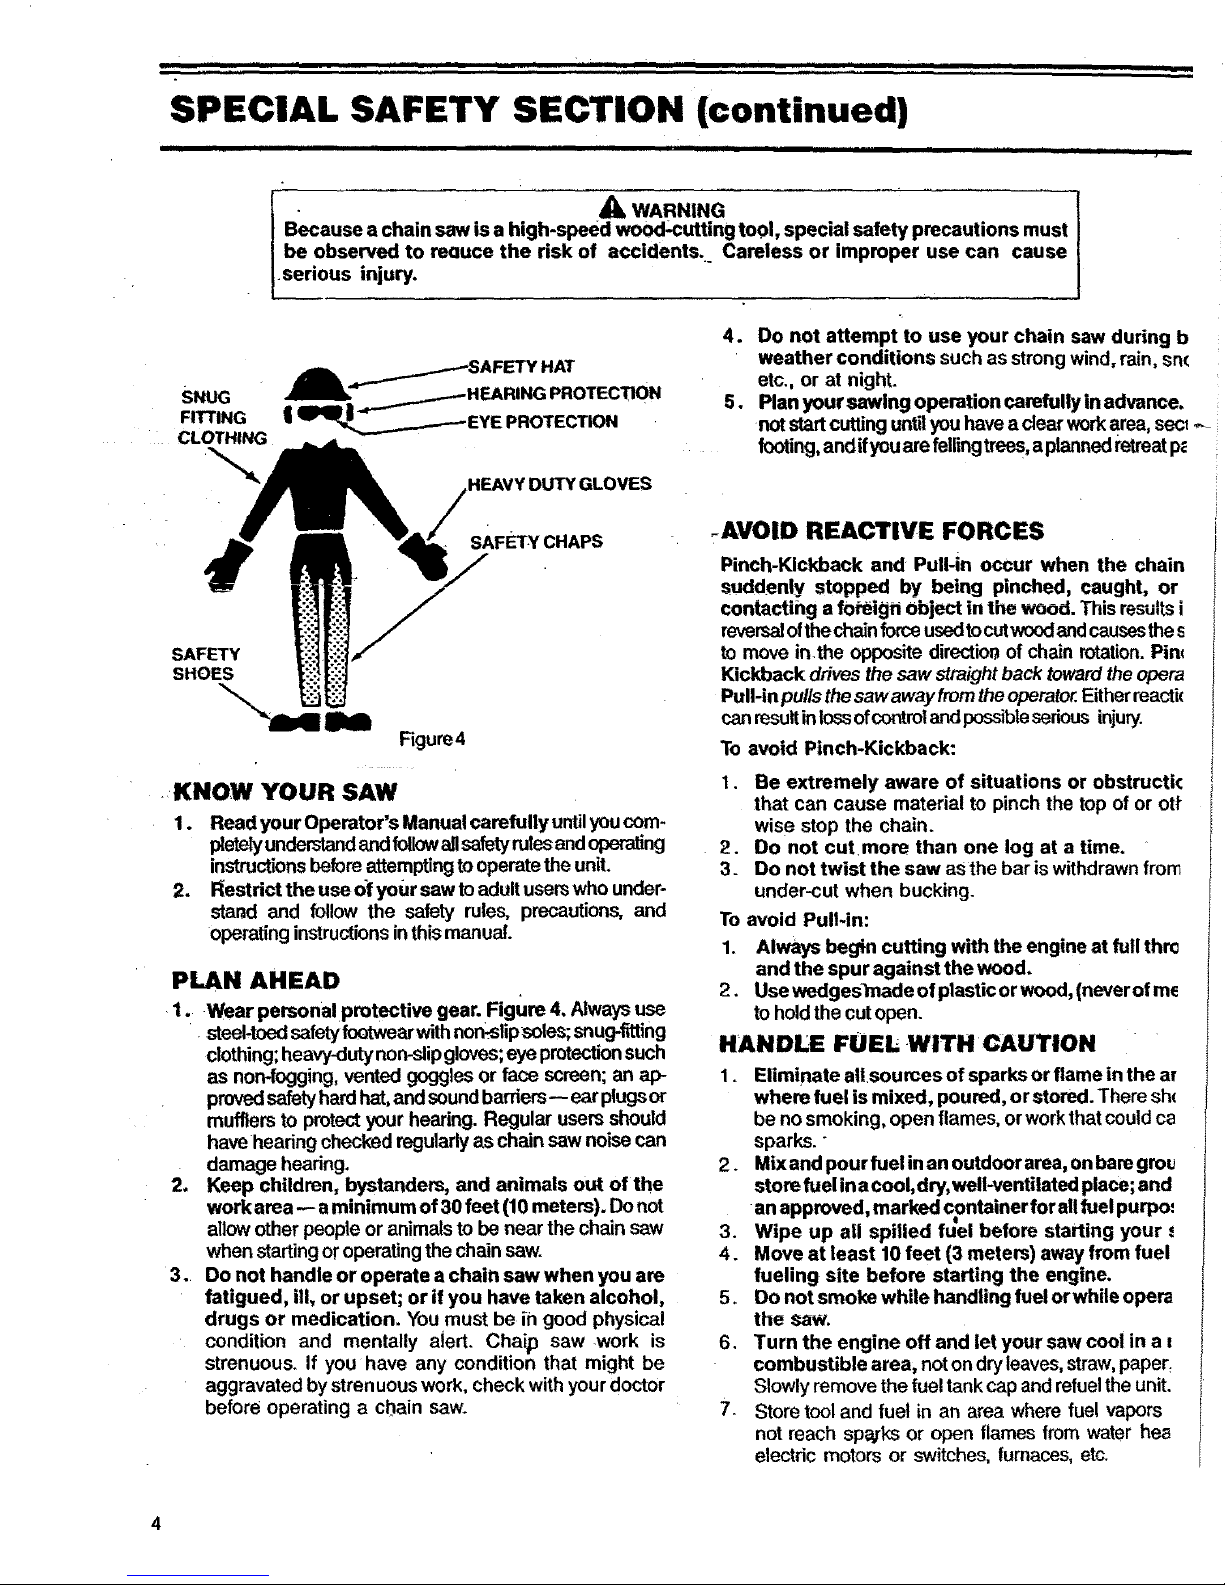
SNUG
FITTING
4. Do not attempt to use your chain saw during b
weather conditions such as strong wind, ralnzsn(
etc., or at night.
5. Plan your sawing operation carefully inadvance.
not startcutting untilyou havea clear workarea, sect ,--
footing,andifyouare fellingtrees,aptanned retreatp_
SAFETY CHAPS
SAFETY
SHOES
Figure4
,KNOW YOUR SAW
1. Read your Operator's Manual carefully untilyou com-
pletelyunderstandandfollowagsafetyrotes andoperating
instructionsbeforeattemptingtooperatethe unit.
2. I_estdct the use o'fyour saw to adult userswho under-
stagd and follow the safety rules, precautions, and
operating instructionsinthismanual.
PLAN AHEAD
1. Wear personal protective gear. Figure 4, Alwaysuse
steel-toedsafetyfoQtwearwithnon,slipsoles;snug-fitting
clothing;heavy-dutynon-slipgloves;eye protectionsuch
as norvfogging, vented goggtes or face screen; an ap-
provedsafetyhardhat,and soundbarriers-- ear plugsor
mufflersto protect your hearing. Regular users should
have headng checked regularlyas chain saw noisecan
damage hearing.
2. Keep children, bystanders, and animals out of the
work area-- aminimum of 30 feet (10 meters). Donot
allowother people or animals to be near the chain saw
when startingor operatingthe chain saw.
3. Do not handle or operate a chain saw when you are
fatigued, ill, or upset; or if you have taken alcohol,
drugs or medication. You must be in good physical
condition and mentally alert. Chaip saw .work is
strenuous. If you have any condition that might be
aggravated by strenuous work, check with your doctor
before operating a chain saw.
_AVOID REACTIVE FORCES
Pinch-Kickback and Pull-in occur when the chain
suddenly stopped by being pinched, caught, or
contacting a foi_ign object in the wood. Thisresultsi
reversalofthechainforceusedtocutwoodand causesthes
to move inthe opposite directior_of chain rotation.Pine
Kickback drives the saw straightback toward the opera
Pull-inpuffs the saw awayfromtheoperator.Eitherreactk
canresult inloss ofcontrol and possible serious inju_.
To avoid Pinch-Kickback:
1, Be extremely aware of situations or obstructk
that can cause material to pinch the top of or otf
wise stop the chain.
2. Do not cutmore than one log at a time.
3. Do not twist the saw asthe bar is withdrawn from
under-cut when bucking.
To avoid Pull-in:
1. Always begin cutting with the engine at full thin
and the spur against the wood.
2. Use wedges_nade ofplastic orwood, (never ofme
toholdthe cut open.
HANDLE FUEL WITH CAUTION
1. Eliminate allsources of sparks or flame in the ar
where fuel is mixed, poured, or stored. There sh(
be no smoking, open flames, orworkthat couldca
sparks."
2. Mix and pour fuelin an outdoor area, on bare grou
store fuel ina cool, dry,well-ventilated place; and
an approved, marked container forall fuel purpo.,
3. Wipe up all spilled f_el before starting your.,
4. Move at least 10 feet (3 meters) away from fuel
fueling site before starting the engine.
5. Oo not smoke while handling fuelor while opera
the saw.
6. Turn the engine off and let your saw cool in a I
combustible area, noton dryleaves,straw,paper:
Slowlyremove thefuel tank cap and refuelthe unit.
7. Store tool and fuel in an area where fuel vapors
not reach sparks or open flames from water hea
electric motors or switches, furnaces, etc.

OPERATE YOUR SAW SAFELY
1. Do not operate a chain saw that is damaged, im-
properly adjusted, or not completely and securely
assembled.
2. Operate the chain saw only in outdoor areas.
3. Do not operate the saw from a ladder or in a tree.
4. Position all parts of your body to the left of cut and
away from the saw chain when the engine is
running.
5. Cut wood only. Do notcutmetal;plastics,masonry,'non-
woodbu,ding materials, etc.Donotuse yoursaw to pryor
shove away limbs,rootsor other objects.
6. Make sure the chain will not makecontact with anyob-
Jectwhile startingthe engine. NeverWto stadthe saw
when the gu'rdebar is in a cutor kerf.
7. Use extreme caution when cutting small size brush
and saplings. Slender material can catchlthe saw
chain and be whipped toward you or pull you off
balance.
8. Be alert for springback when cutting a limb that is
under tension so you will not be struck by the limb or
saw when the tension in the wood fibers is released.
9. Do not put pressure on the saw st the end of a cut.
This can cause you to lose control when the cut is
completed.
10. Stop the engine before setting the saw down.
MAINTAIN YOUR SAW IN GOOD
WORKING ORDER
1. Have all chain saw service performed by your Sears
Service Center withthee00cept_oftheitems listedinthe
maintenance section of this manual. For example, if
improper tools are used to removeor hold the flywheel
when servicing the clutch, structural damage to the
flywheel c_ occur and cause the flywheelto burst.
2. Keep fuel and oil caps, screws and fasteners
securely tightened.
3. Keep the handles dry, clean, and free of oil or fuel
mixture.
4. Make certain the saw chain stops moving when the
throttle trigger is released. Forcorrection,refertopage
24 for carburetor idleadjustmentinstructions.
5. Stop the saw ifthe chain strikes a foreign object. In-
sPect the unitand repair or replace parts as necessary.
6. Disconnect the spark plug before performing any
maintenance except for carburetor adjustments.
7. Never modify your saw in any way. Use only attach-
ments supplied or specifically recommended by the
n_nufacturer.
8. Always replace the handguard immediately if it
becomes damaged, or broken or is otherwise
removed.
9. Keep vibrstion isolators in good condition. Peri,odically
inspectisolatorsfortears,ripsorseparationofthe'rubber
portionfromthe metal mountings. Have your Sears Ser-
vice Center replace the isolatorsif worn or damaged, if
Vibrationincreasesorifmountsdevelopanoutofroundor
swollenshape from exposure to gasolineand/or oil.it is
recommendedthat_ isolatorsbe replaced when a failure
toone occurs.
CARRY AND STORE YOUR SAW SAFELY
1. Handcarry the unit with the engine stopped, the
Muffler away from your body, and the Guide Barand
"Chain to the rear covered preferably with a scabbard.
2. Before transporUng in any vehicle or storing in any
enclosure, allow your saw to cool completely, cover
the bar and chain and properly secure to avoid
turnover, fuel spillage or damage.
3. Empty the fuel tank before storing the tool. Use
up fuel left in the carburetor by starting the eng-
ine and letting the engine run until it stops.
4. Store in a dry area out of the reach of children and
away from where fuel vapors can reach sparks or an
open flame from hotwater heaters,furnaces,etc.
SAVE THESE INSTRUCTIONS
NOTE: Exposure to vibrations through prolonged useof
chain saws may produce Whiteflnger disease
(Raynaud's phenomenon). This phenomenon
reduces the hand's ability to feet and regulate
temperature, produces numbness and burning
sensations and can cause nerve and circulation
damage and tissue necrosis.
An anti-vibration system designed to reduce
engine vibration is recommended for those using
chain saws on a-regular or sustained basis and is
provided on this saw. However, an antivibration
system does not guarantee the avoidance of
•Whitefingerdisease. Continual and regular users
must monitor closely their use of chain saws and
physical condition.
Notice: Refer to the Code of Federal Regulations, Section
1910.266(5); 2.5.1 of American National Standard
Safety Requirements for Pulpwood Logging, ANSI
03.1-1978; and relevant state safety codes when
using a chain saw for logging purposes.
ii ilill ii i ii i i iii
KNOW YOUR CHAIN SAW
i iiiii i i iii
A. INTRODUCTION
• Your saw has been designed with safetyinmind and
includesthefollowing feature_ _sstandardequipment:
- Reduced-Kickback Guide Bar
- Low-Kickback Chain
- Spark Arrestor
-Temperature Limiting Muffler
- Handguards
- Counter-Vibe ® Anti-Vibration System
WARNING
The following features areincluded on your saw to help
reduce the hazard of kickback, however, such features
will not totally eliminate this dangerous reaction. As a
chain saw user, do not rely only on safety devices. You
must follow all safety precautions, instructions and
maintenance in this manual to help avoid kickback and
other forces which can result in serious injury.
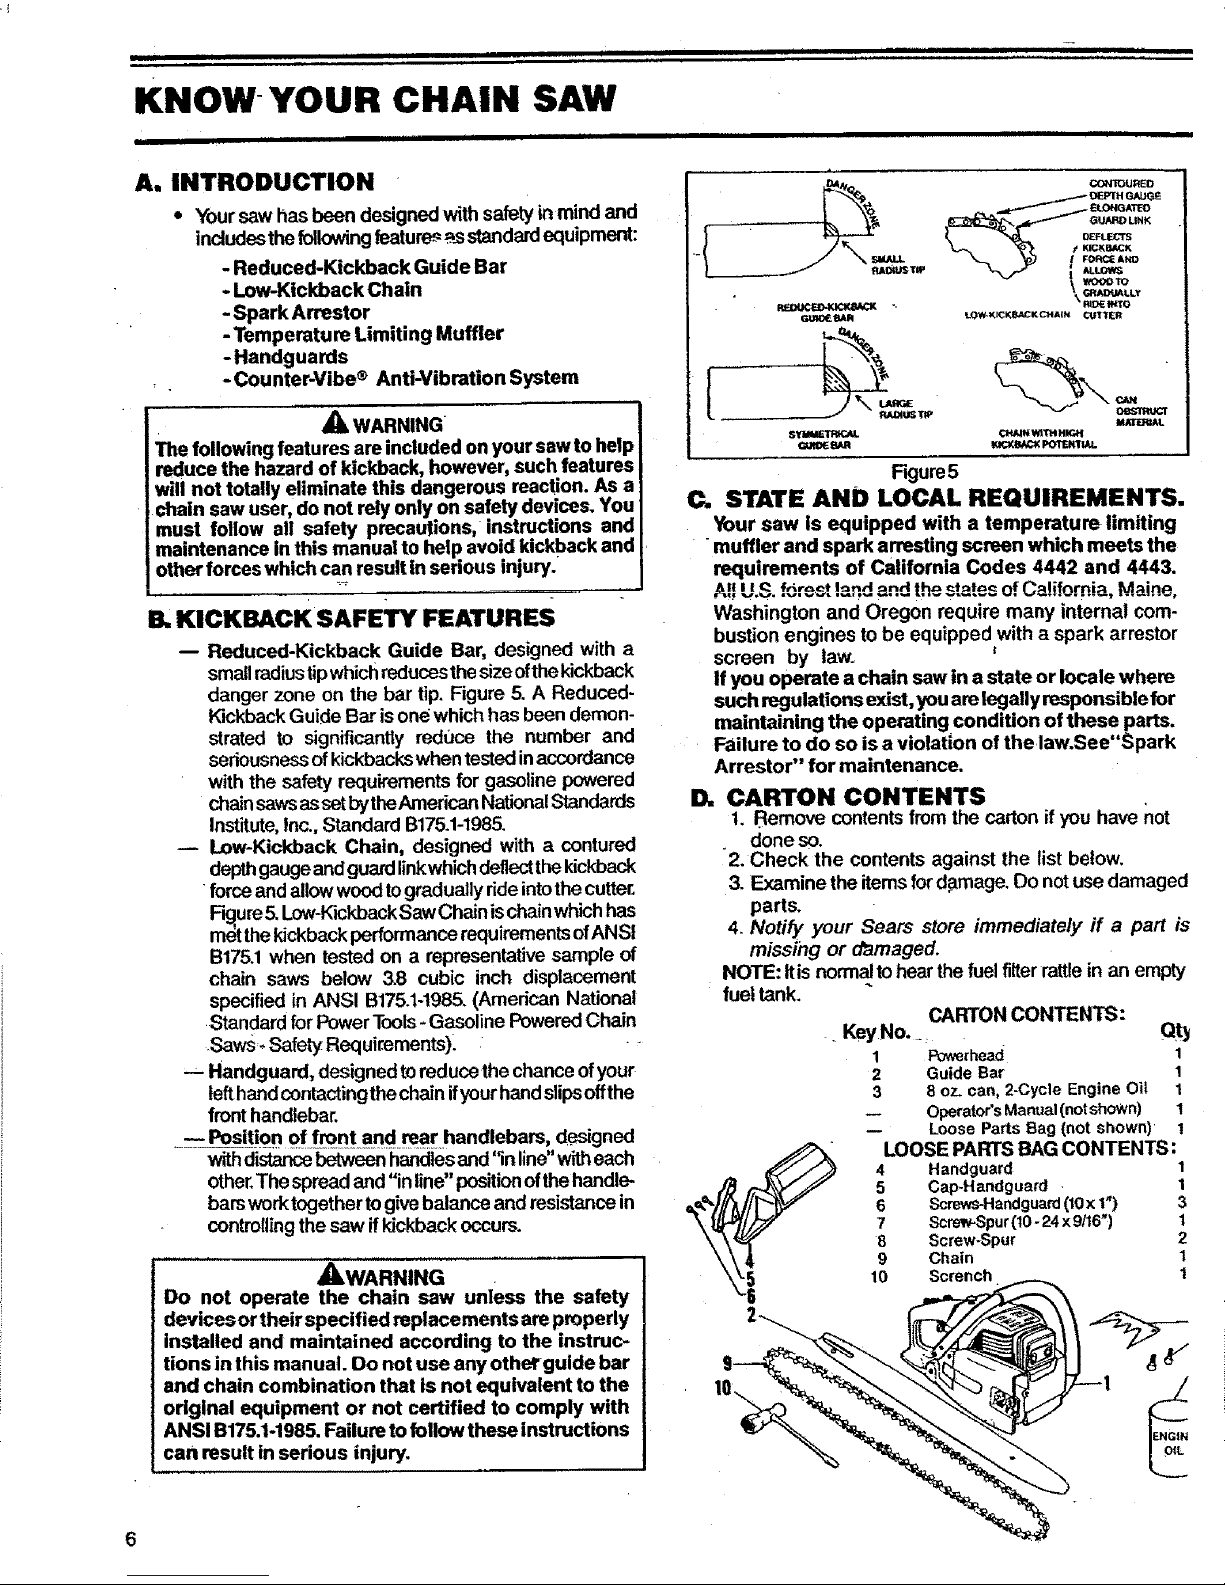
B, KICKBACK SAFETY FEATURES
-- Reduced-Kickback Guide Bar, designed with a
smallradiustipwhichreduces the sizeofthekickback
danger zone on the bar tip. Figure 5. A Reduced-
KickbackGuide Bar isone which has been demon-
strated to significantly redt'Jce the number and
seriousnessofkickbackswhen testedinaccordance
with the safety requirements for gasoline powered
chainsawsassetbythe AmericanNational Standards
Institute,Inc., Standard B175.1-1985.
Low-Kickback Chain, designed with a contured
depthgaugeandguardlinkwhichdeflectthekickback
force and allowwoodto graduallyrideintothecutter.
Figure5.Low-KickbackSaw Chainischainwhichhas
met thekickbackperformancerequirementsofANSI
B175.1when tested on a representative sample of
chain saws below 3.8 cubic inch displacement
specified in ANSI B175.1-1985.(American National
Standard for PowerTools-Gasoline Powered Chain
Saws- Safety Requirements)_
-- Handguard, designed toreduce the chanceof your
tefthandcontactingthechaJnifyourhand slipsoffthe
fronthandlebar.
_-_ PosiUon of f_mntand mar handlebars, designed
withdistancebetweenhandlesand "in line"witheach
other.The spread and "in line" positionofthehandle-
barsworktogethertogivebalanceand resistancein
contmflingthesaw ifkickback occurs.
_,WARNING
Do not operate the chain saw unless the safety
devices or their specified replacements are properly
installed and maintained according to the instruc-
tions in this manual. Do not use any othefguide bar
and chain combination that is not equivalent to the
original equipment or not certified to comply with
ANSI B175.1-1985. Failure tofollow these instructions
can result in serious injury.
OEFTHGAUG_
_ ELONGATED
i [IEFUEC'rs
- I FOR_ _KO
GU_0_ _ R _OW'KICK_ Ken'lAIN _T_rl_*
S_ CHAI_WlTH HIGH
Rgure5
STATE AND LOCAL REQUIREMENTS.
Your saw Is equipped with a temperature limiting
muffler and spark arresting screen which meets the
requirements of California Codes 4442 and 4443.
Aft U.S.forest !and and the s_tes of California, Maine,
Washington and Oregon require many internal com-
bustionengines tobe equipped with a spark arrestor
screen by taw. J
Ifyou operate achain sawin a state or locale where
such regulations exist, you are legally responsible for
maintaining the operatingcondition of these parts.
Failure to do so is a violation of the law.See"_park
Arrestor" for maintenance.
D. CARTON CONTENTS
1. Remove contents fromthe carton ifyou have not
done so.
"2.Check the contents against the list below.
3. Examine the items ford_mage. Do notuse damaged
parts.
4. Notify your Sears store immediately if a part is
missing or damaged.
NOTE: Irisnormalto hearthe fuel filter rattlein an empty
fuel tank.
CARTON CONTENTS:
• Key No. __ Qt_
1 Powerhead 1
2 GuideBar 1
3 8 oz.can,2-Cycle Engine Oil 1
Operator's Manual (not shown) 1
-- LoosePartsBag(notshown) 1
LOOSE PARTSBAG CONTENTS:
4 Handguard 1
5 CapHandguard 1
6 Scmws-Handguard (10x 1") 3
7 Screw-Spur (10- 24x 9/16") 1
8 Screw-Spur 2
9 Chain 1
10 Scrench 1
Ae
S.
GETTING READY
1. READ YOUR OPERATOR'S MANUAL
CAREFULLY.
Your Operator's Manual has been developed to
help you prepare your saw for use and to under-
stand its safe operation, It is important that you
read your manual completely to become familiar
with the unit before you begin assembly.
2. HAVE THE FOLLOWING AVAILABLE:
a. Protective gloves
b. Approved, marked fuel container
c. Onegallon regular unleaded gasoline.
d. 8 oz. (1/2pt.), 2-cycle,engine oil provided with
your unit.
e. Bar and Chain Lubdcant
f. Scrench -- providedwithyouruniLThe longend
ofthetoolcan beused as a slottedscrewdriver.
The small pipe end can be used as a socket
wrench. The larger pipe end can be used to
removethe spark plug.
g. Phillips Screwdriver
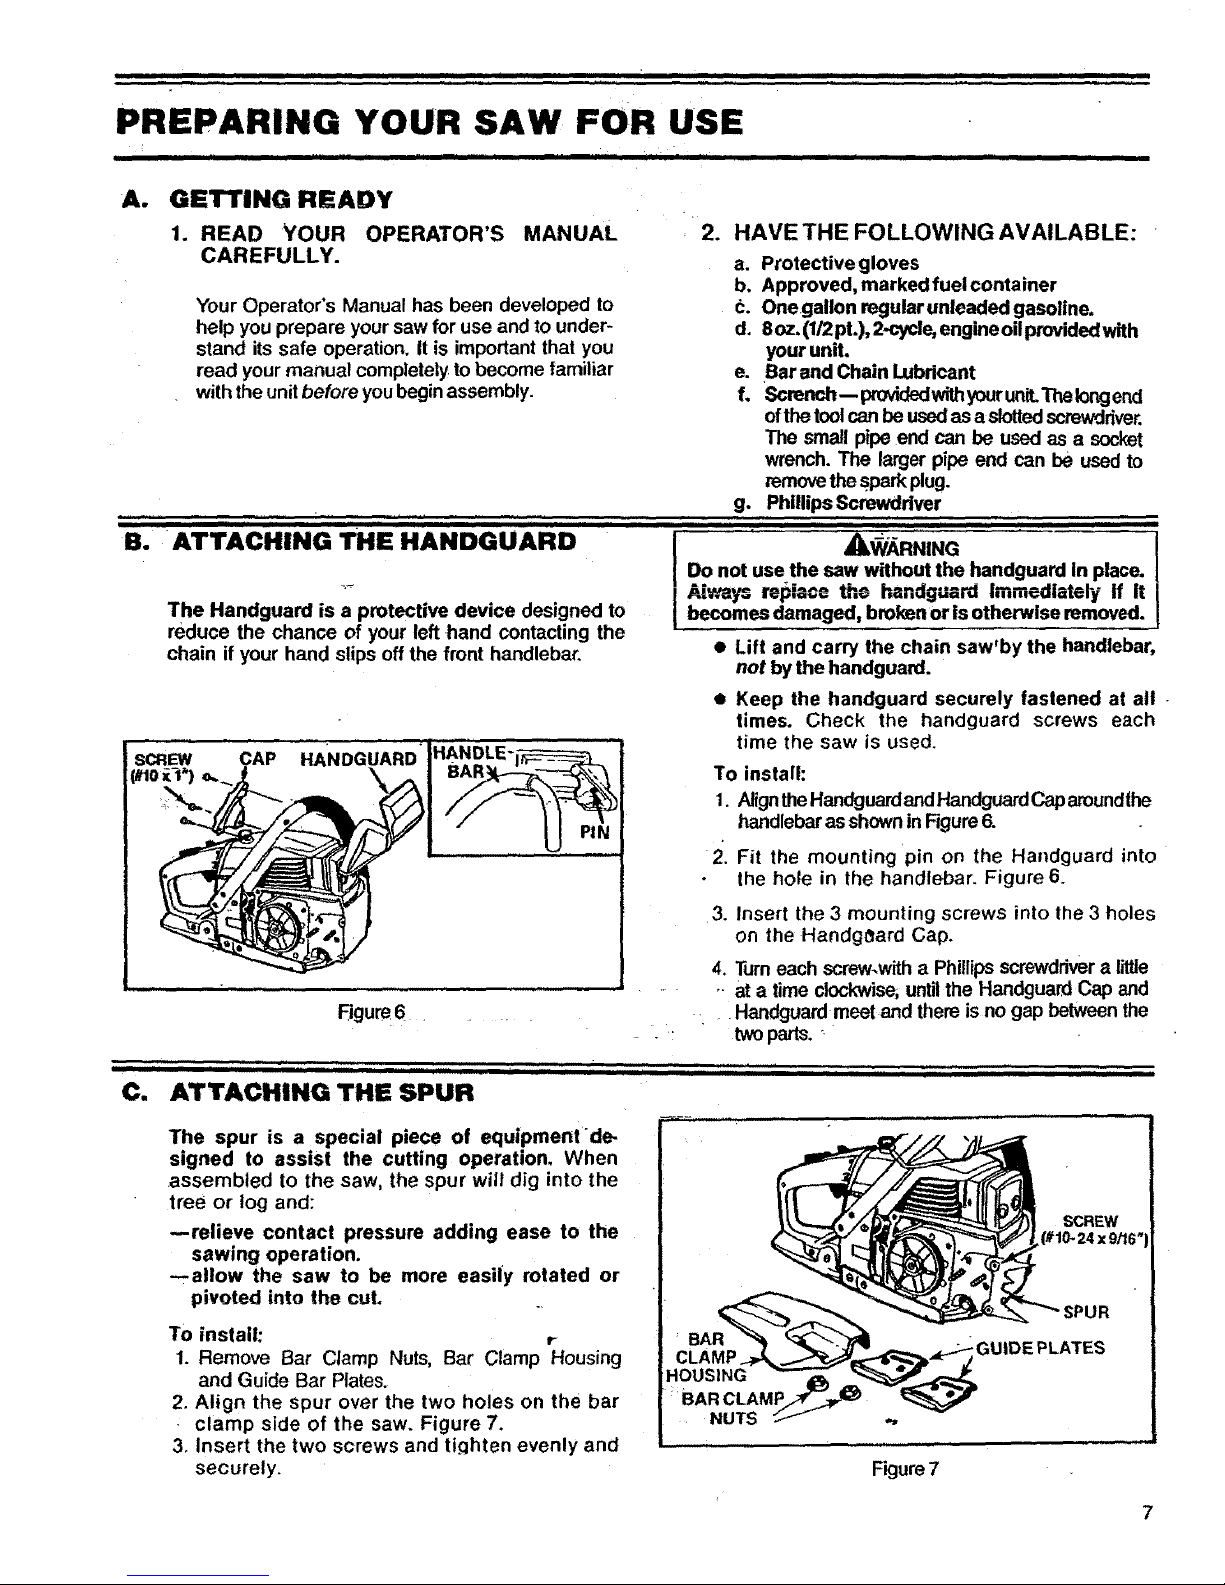
ATTACHING TH'E HANDGUARD ......... [......................Do notuse" the sawA_ti/_RNINGwithoutthe handguard In place. I
Aiways rel_lace the handguard Immediately if itThe Handguard is a protective device designed to becomes damaged, broken or is otherwise removed.
reduce the chance of your left hand contacting the
chain if your hand slips off the front handlebar. • Lift and carry the chain saw'by the handlebar,
not by the handguard.
• Keep the handguard securely fastened at all
limes. Check the handguard screws each
time the saw is used.
SCREW
(//10il *)
To install:
1. Align lhe HandguardandHandguardCap aroundthe
handlebaras shownin Figure 6.
2",Fit the mounting pin on the Handguard into
the hole in the handlebar. Figure 6.
Rgure6 ....
3. Insert the 3 mounting screws into the 3 holes
on the Handg_ard Cap.
4. Turn each screw.with a Phillips screwdrivera little
"- at a time cloclcwise; untilthe HandguaEI Cap and
., Handguard meet and there is no gap between the
two parts.,
C. ATTACHING THE SPUR
,, ,, ,
,, iiiiiii
The spur is a special piece of equipmentde-
signed to assist the cutting operation. When
.assembled to the saw, the spur will dig into the
tree or log and:
--relieve contact pressure adding ease to the
sawing operation.
--allow the saw to be more easi|y rotated or
pivoted into the cut.
To install: r
1. Remove Bar Clamp Nuts, Bar Clamp Housing
and Guide Bar Plates.
2. Align the spur over the two holes on the bar
clamp side of the saw. Figure 7.
3. Insert the two screws and tighten evenly and
securely.
BAR
CLAMP
HOUSING
BAR CLAMP
NUTS
Figure 7
,,,,,,,,,,,,,,,,,, =ll =. ill i ii
D, ATTACHING THE BAR AND CHAIN
JCAUT!ON:JWear protective gloves when ban.
dling or operating your saw. The chain is sharp
and can cut you even when it is not moving!
• Your saw is equipped with a Reduced-Kickback
Guide Bar and aLow-Kickback Chain.
• Use only the Reduced-Kickback Guide Bar and
Low-Kickback Chain specified for your chain
saw model, when replacing these parts. See
•'Specifications:'
AWARNING
i Do not sta..rt engine without guide bar an.d chain
completely assembled: Otherwise, zne czutcn can
com_ on ano serious injury can result.
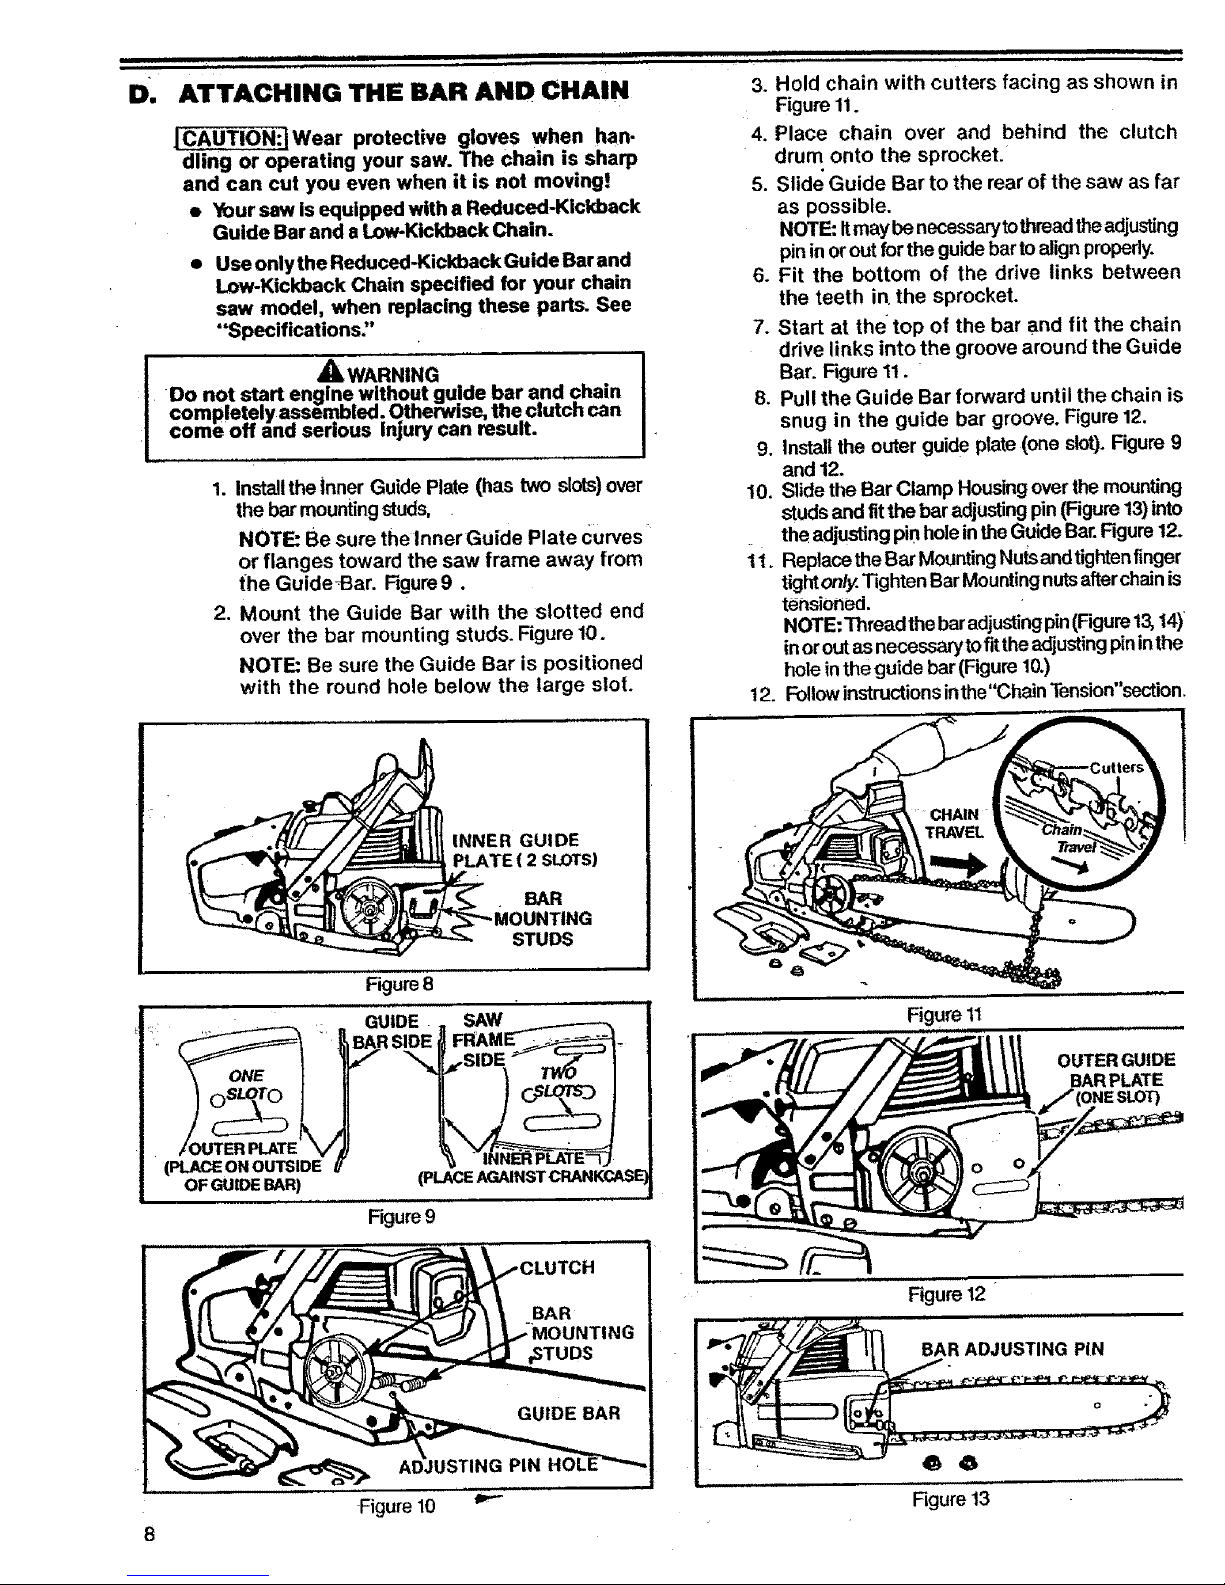
1. Installthe inner Guide Plate (has two slots)over
the bar mountingstuds, .
NOTE: Be sure the InnerGuide Plate curves
or flanges toward the saw frame away from
the Guide_Bar. Figure9.
2. Mount the Guide Bar with the slotted end
over the bar mounting studs. Figure 10.
NOTE: Be sure the Guide Bar is positioned
with the round hole below the large slot.
Figure8
j.... _ GUIDE
/ OUTER PLATE
PLACE ON OUTSIDE
OF GUIDE BAR)
INNER GUIDE
PLATE ( 2 SLOTS)
BAR
STUDS
SAW .... !
(PLACE AGAINST CRANKCAS_
Figure9
3. Hold chain with cutters facing as shown in
Figure 11.
4. Place chain over and behind the clutch
drum onto the sprocket.
5. Slide Guide Bar to the rear of the saw as far
as possible,
NOTE; Itmay be necessarytothreadthe adjusting
pinin orout for the guidebarto align properly.
6. Fit the bottom of the drive links between
the teeth in the sprocket.
7. Start at the top of the bar and fit the chain
drive links into the groove around the Guide
Bar. Figure 11.
8. Pull the Guide Bar forward until the chain is
snug in the guide bar groove. Figure 12.
9. Install the outer guide pla_e(one slot). Figure 9
and 12.
10. Slide the Bar Clamp Housing over the mounting
studs and fit the bar adjusting pin (Figure 13)into
the adjusting pin hole in the Guide Bar. Figure12.
11. Replace the Bar Mounting Nuts and tighten finger
tightonly. Tighten Bar Mounting nutsafterchain is
tensioned.
NOTE: Thread the bar adjusting pin(Figure 13,14)
in or out asnecessaryto fit the adjusting pinin the
hole in the guide bar (Figure 10.)
12. Follow instructions inthe"ChainTension"section,
Figure 11
OUTER GUIDE
BAR PLATE
Figure12 "
BAR ADJUSTING PIN
4_ 6
Figure13
, i
E, - CHAIN TENSION
• Correct chain tension is very important:.
--a loose chain will wear the bar and itself.
--a loose chain can jump off the bar while
you are cutting.
--a tight chain can damage the saw and/or
break.
• The chain stretches during use, especially
when new. Check tension:
each time the saw isused
more frequently when the chainisnew
as the chain warms up to normal operatingtem-
perature
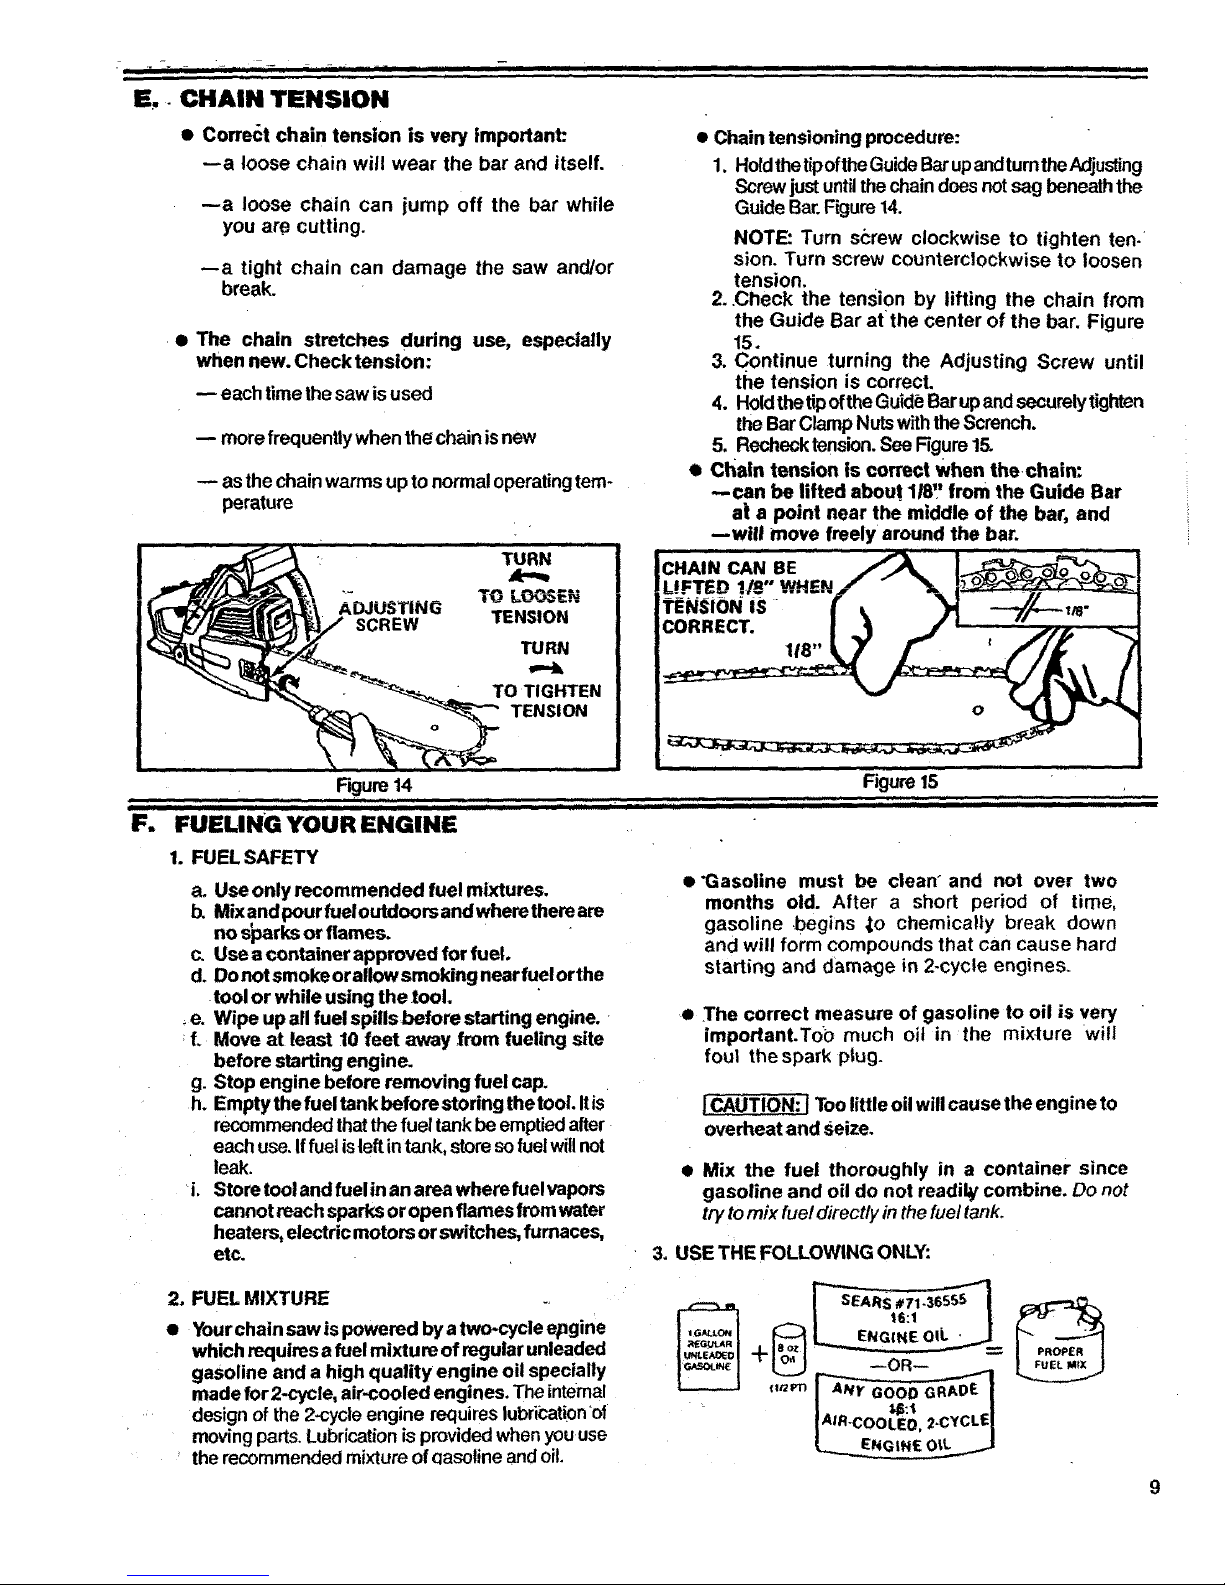
• Chain tensioning procedure:
1. Holdthe t{poftheGuideBarupandturntheAdjusting
Screwjustuntilthe chain does notsag beneath the
Guide Bar.Figure 14.
NOTE: Turn s_:rew clockwise to tighten ten-
sion. Turn screw counterclockwise to loosen
tension.
2..Check the tension by lifting the chain from
the Guide Bar atthe center of the bar. Figure
15.
3. Continue turning the Adjusting Screw until
the tension is correct.
4. Holdthe tipof the Guide Barupand securely tighten
the Bar Clamp Nutswiththe Scrench.
5. Recheck tension.See Figure 15.
• Chain tension is correct When the,chain:
--can be lifted about. 1/8" from the Guide Bar
at a point near the middle of the bar, and
--will move freely around the bar.
Figure14
iiiiiii ii iiii ii i iiiii i
F. FUELING YOUR ENGINE
1. FUEL SAFETY
Figure 15
! _
lift IIIII1[ II I IIIII i IIII IIIIIII IIIIII i iiiii n I iiiiiiiii IIIII I IIIIIIII
a. Use only recommended fuel mixtures.
b. Mix and pour fuel outdoors and where there are
no s_arks or flames.
c. Use a container approved for fuel.
d. Do not smoke or allow smoking near fuel orthe
tool or while using the tool.
e. Wipe upall fuelspillsbeforestarting engine. -
f. Move at least 10 feet away ,from fueling site
before starting engine.
g. Stop engine before removing fuel cap.
h. Emptythefueltankbeforestoringthetool. Iris
recommended thatthe fuel tank beemptiedafter
each use. If fuelisleft intank, storesofuelwill not
leak.
_i. Store tool and fuelin an area where fuelvapors
cannot reach sparks or open flames from water
heaters, electric motors or switches, furnaces,
etc.
• "Gasoline must be clean _and not over two
months old. After a short period of time,
gasoline .begins _to chemically break down
and will form compounds that can cause hard
starting and damage in 2-cycle engines.
• The correct measure of gasoline to oil is very
important.Too much oit in the mixture •will
foul thespark plug.
I_UTION.:_J Too little oil will cause the engine to
overheat and seize.
• Mix the fuel thoroughly in a container since
gasoline and oil do not readily combine. Do not
trytomix fuel directly in the fuel tank°
3, USE THE FOLLOWING ONLY:
2, FUEL MIXTURE
• Yourchainsawispowered byatwo.cycleepgine
which requires afuel mixture of regular unleaded
gasoline and a high quality engine oil specially
made for2-cycle, air-cooled engines. The internal
design of the 2-cycleengine requires lubrication'of
moving parts.Lubrication is provided when youuse
the recommended mixtureof qasoline and oiL

10
4. DO NOT USE:
• BIA C)il (Boating Institute of America)
Doesnothave properadditivesfor_r-cooled,
2-cycleengines and cancausedamage.
• AUTOMOTIVE OIL-
•_ Does not have proper additivesfor 2-cycle
enginesand can cause damage.
c; Covercontainer tighUyand shake forone minute.
d. Slowly remove fuel container cover.
e. Add remainder of gasoline.
f. Cover container tightly and shake again.
g. Slowly remove fuel container cover.
h. Slowly remove fuel cap. See Figure 16for location:
i. Fill the tank using a spout or funnel.
j. Reinstall the fuel cap securely.
5. HOWTO MIX FUELAND RLL TANK
a, Pour 1/2gallonof regular unleaded gasoline
intoanapproved, marked container.Do nottry
tomixoitand gasoline directly in the fuel tank.
b. Add entire measurez)f engine oil.
G, PAR AHD'cHA!" LUBB!¢ANi;
• The guide bar and cutting chain require con-
tinuous lubrication in order to remain in
operating condition. Lubrication is provided
by the automatic oiler system when the oil
tank is kept filled.
-- Lackof lubricant will quickly ruin the bar and
chain.
--Too little lubricant will cause overheating
shown by smoke coming from the chainand/or
discolorationoftheguide bar rails,
Use Sears Bar and Chain Lubricant #71-36554 -
I qt. or #71-36556 - 1 gal. or clean SAE 30W oil.
In f_eezing weather, oil will thicken, making it
necessary to thin bar and chain oil with a small
amount of Diesel Fuel #1 or Kerosene. Barand
chainlubricantmustbefreeflowingfortheoilsystem
topump enough oil for adequatelubrication,
USE:THE FO'LLowING:
30°F or above -- Lubricant.-- undiluted.
30°F - 0°F -- 95% lubricant to 5% Diesel
Fuel # 1 or Kerosene.
Below 0° F -* 90% lubricant to t0%'Diesel
Fuel #t or Kerosene.
FILL THE OIL
TANK EACH'
IS FILLED.
Figure 17
2.
3.
4;
Figure 16
..............."' '
HOW TO FILL THE OIL
a. Stop the engine.
b. Turn saw on its side withoil cap up. Figure 17.
c. Loosen cap slowly and w_litfor pressure in the
tank to bereleased before removing the cap.
d. Fill the oil tank.
e. Replace the oil cap securely.
ADJUSTING THE AUTOMATIC OILER
The adjustlng screw k)catadat the b(_:)m of the
saw on the crankcase next to the bar clamp can
be adjusted with the screwdriver end of the
scronchprovided withyour saw.
a. Toincrease the - oil flow, turn the adjusting
screw counterclockwise 4b,,_,
b. Todecreasa the oil _flow, turn the adjusting
screw clockwise_'-'jk .
NOTE: Theeutomatic oilercan delivermoreoilthan
is requiredduringcertaintypes of cuttingsuchas
pruningordebranchingwhichrequirethesawtobe
operatedata high RPM for a longtime period. To
avoid runningoutofchainoilbefore_runningoutof
'_el, Check the=oil tank:pedodicaUy. Be sure to
readjustthe oiler beforereturning to types of cutting
that requiregreater lubrication.
IMPORTANT POINTS TO REMEM3ER
a. Prime the oil pump on a new saw or a saw that
has been unused for an extended period of
time. Pump the manualoiler slowlyseveraltimes.
Starttheengineandallo_vthechaintorun. Stopthe
engine and check for an even flow Ofoil onthe
chain. Repeat thisprocedureuntiloil is visible on
the chain.
b. Fill the oil tank each time you refill the fuel
tank to ensure there wiltbe stJfficientoilfor the
chainwheneveryou startand runthe saw.
c. The saw will use about 1/2 tank of chain oil for
each tank of fuel mixture. If less oil is used,
checkfor a pluggedoilholeinthe guidebar.
d- it is normal tor a small amount of oil to appear
under the saw after the engine stops. This is
due to oil drainingfrom the bar and chainwhen
not inuse.
!
USING YOUR SAW
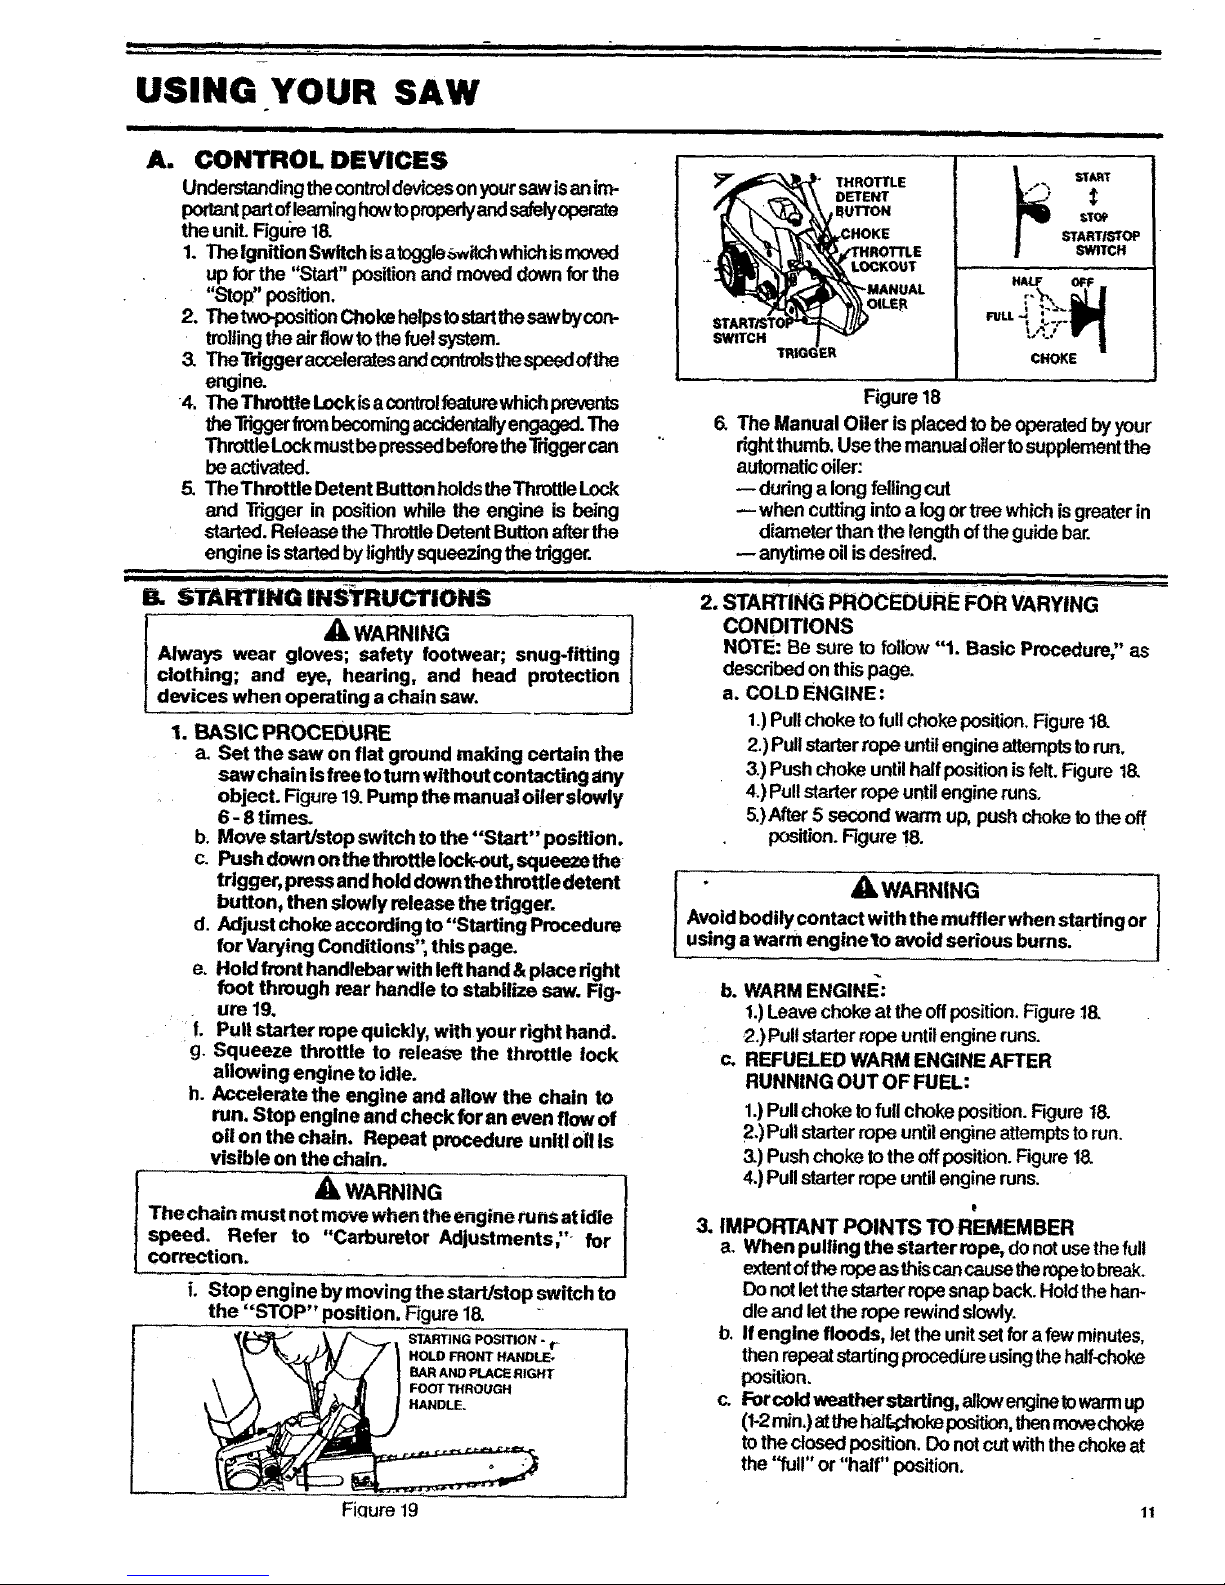
A! CONTROL DEVICES
Understandingthecontroldevicesonyoursawisanirn-
portantpartoflearninghowtoproperlyandsafelyoperate
the unit. Figu're18.
1. The IgnitionSwitch isatoggle_,witchwhiohismoved
up for the "Start" positionand moved down for the
"Stop" position,
2. Thetwocosition Choke helpstostartthesawbycorv
trollingthe airflow tothe fuel system.
3. TheTdggeracceleratesandcontrolsthespeedofthe
engine.
4. The Throttle Lockisa controlfeaturewhichprevents
theTriggerfrom becomingaccidentallyengaged. The
ThrottleLockmustbe pressedbeforethe Triggercan
beactivated.
5, The Throttle Detent Button holdsthe ThrottleLock
and Trigger in position while the engine is being
started.Release the ThrottleDetentButtonafterthe
engine isstartedbylightlysqueezingthe trigger.
B. STARTING INSTRUCTIONS
_,WARNING
Always wear gloves; safety footwear; snug-fitting
clothing; and eye, hearing, and head protection
devices when operating a chain saw.
1. BASIC PROCEDURE
a. Set the saw on fiat ground making certain the
saw chain is free toturn without contacting any
object. F'igure19.Pump the manual oiler slowly
6- 8 times.
b. Move start/stop switch tothe "Start" position.
c. Push down on the throttle lock.out, squeezethe
trigger, press and hold down thethrottle detent
button, then slowly release the trigger.
d. Adjust choke according to "Starting Procedure
for Varying Conditions" this page.
e. Hold front handlebarwith left hand & place dght
foot through rear handle to stabilize saw. Fig-
ure 19.
f. Pull starter rope quickly, with your right hand.
g. Squeeze throttle to release the throttle lock
allowing engine to idle.
h. Accelerate the engine and allow the chain to
run. Stop engine and check for an even flow of
oil on the chain. Repeat procedure unitl 0il is
visible on the chain.
WARNING
The chain must not move when the engine runs atIdle
speed. Refer to "Carburetor Adjustments;'- for
correction.
i. Stop engine by moving the start/stop switch to
the "STOP" position, Figure 18.
_ ,\ F'-_. STAmlNGPosrnoN-,-
_..>_.v_ / | .OLDmO_.AN.UE.
!
xJ_Y'--Z I _RANO_AC_R_T
_'_\ _ ! FOOTTHROUGH
Figure t9
SWITCH
THROTTLE
DETENT
b"Tt,,_T
_'tOl;'
$TARTISffOP
SWITCH
H&LF OFF _
,.- =t I
t_.., Wl
CHOKE
Figure 18
6. The Manual Oiler is placedtobe operatedby your
rightthumb,Use the manualoiler tosupplementthe
automaticoiler:
duringa longfellingcut
when cutting intoa log ortree which isgreaterin
diameterthan the length oftheguide bar.
-- anytimeoilisdesired,
3. IMPORTANT POINTS TO REMEMBER
a. When pulling the Starter rope, do notusethefull
extentoftheropeasthis cancausetheropetobreak.
Do notletthe starterropesnap back. Holdthe han-
dle and letthe rope rewindslowly.
b. If engine floods, let the unitset fora few minutes,
then repeatstartingprocedbreusingthehalf-choke
position.
c. For cold w_.atherstarting, allowenginetowarmup
(1-2min.)atthehaJf.t::hokeposition, then movechoke
to the dosed position. Do not cutwiththe chokeat
the "full" or "half" position.
11
t¸ }
_kWARNING
Avoidbodily contact with the muffler when starting or
using a warm enginelto avoid serious burns.
b. WARM ENGINE:
1.)Leave choke at the offposition.Figure18.
2.) Pull starterrope untilengine runs.
c. REFUELED WARM ENGINE AFTER
RUNNING OUT OF FUEL:
1.)Pullchoke tofull choke position.Figure 18.
2.)Pullstarter ropeuntilengine attemptsto run.
3.)Pushchoke tothe offposition.Figure18.
4.)Pullstarter rope untilengine runs.
2. STARTING PROCEDURE FOR VARYING
CONDITIONS
NOTE: Be sure to follow "1. Basic Procedure" as
describedon thispage.
a. COLD ENGINE:
1.)Pullchoke tofullchoke position. Figure18.
2.)Pull starterrope until engine attemptstorun.
3.)Push choke untilhalfpositionis felt.Figuret8.
4.)Pullstarterropeuntilengine runs.
5.)After 5 second warm up,push choketo the off
position.Figure !8.
 Loading...