

Sears Craftsman 113.23161 Owner's Manual
Sears
owners
manual
MODEL NO.
113.23161
Serial
Number
Model and serial
number may be found
at the front of the base.
You should record both
model and serial number
in a safe place for
future use.
CAUTION:
I
t
Read GENERAL
and ADDITIONAL
SAFETY
INSTRUCTIONS
carefully
Sold by SEARS,
Par1 No 63592
"4-- .........
: ,---, f_t-_
+
CRRFTSMRN_
IO-INCH
RADIAL SAW
• assembly
• operating
• repair parts
ROEBUCK AND CO., Chicago, IL.
60684 U.S.A.
Prlrll*'<l in LJ S _
FULL ONE YEAR WARRANTY ON CRAFTSMAN RADIAL SAWS
If within one year from the date of purchase, this Craftsman Radtal Saw fails due to a defect in material or
workmanship, Sears wtll repair it, free of charge.
Warranty service is available by simply contacting the nearest Sears store or Servtce Center throughout the
United States.
Th=s warranty gives you specific legal rights, and you may also have other rights which vary from state to
state.
SEARS, ROEBUCK AND CO.
BSC 41-3
SEARS TOWER
CHICAGO, IL 60684
general safety instructions for power tools
1. KNOW YOUR POWER TOOL
Rt._(J the owner's manual carefully Learn tts
alxrlmat_or_ and I_m_tat=ons as well as the spec=f=c
pot.;nt_al hazards pecul_a_ to th_s tool
2. GROUND ALL TOOLS
Th,s tool _s equipped with an approved 3-conducto_
cord and a 3-prong g_oundmg type plug to fit the
prt,per grounding type receptacle The green conductor 15.
m the cord _s the grounding w_re Never connect the
gr,en wJre to a I.v__ terminal
3. KEEP GUARDS IN PLACE
_n working order, and m proper adlustment and
al_qnment.
4. REMOVE ADJUSTING KEYS
AND WRENCHES
FC,l m habit of (:heckubg to se,: that keys and adlustmg
wr..nche.s are r,moved from tt)ol b+_for(' tell]inS it on
5. KEEP WORK AREA CLEAN
Oh,ft_rprl areas and bench-_s mwte acodents Floor
mL t not b__slippery due to wax or sawdust
6. AVOID DANGEROUS ENVIRONMENT
Don't use power- tools _n damp or wet Iocat+ons or
ex_)ose them to rain. Keep work area well Irghted.
Provide adequate surrounding work space. 19.
7. KEEP CHILDREN AWAY
All ,_,s,tors should be kept a gale distance from work
dre ;
8. MAKE WORKSHOP KID-PROOF
- ,_th padlock,, master sw_tches, or by remowng
sta, Ter key's 20.
9. DON'T FORCE TOOL
It . _!1 do the job better and safe= at the rate fo_ whmh
,t ',,Js cte_gned
10. USE RIGHT TOOL
Do _'t force tool or attachment to do a lOb _t was not
de-_gr,ed for
11. WEAR PROPER APPAREL
Do f_ot wear loose clothing, gloves, neckbes or lewelrv
(r,_ qs, ',,,.r_st watches} to get caught in mowng parts
Noasl_p footwear is _ecommended. Wear protecbv_ 21.
ha_ co,,.murg to contain long hair Rol! long sleeves
alr, ,_.th- ,:lbow
12. USE SAFETY GOGGLES (Head Protection)
'd,,'t ,r Saf-tv gogqh_s (mLmt Cf)ITI['IJ'y ,.%'lth ANS Z87 1 ) .Jr 22.
rill tlr_les Also, LlSf • facP ot (lust nlask If t.Llttlrlq
O H, Idt_Orq t'_ dLJ_,ty, and L_r protf'ctors (pILros OI C_rLIffs)
dlH _lg e'xt,::ld_d l]ellOdS of operat=on
13. SECURE WORK
Use clamps or a wse to hold work when practical It's
safer than usmgyour hand, frees both hands to operate
tool.
14. DON'T OVERREACH
Keep proper footing and balance at all umes.
MAINTAIN TOOLS WITH CARE
Keep tools sharp and clean for best and safest
performance Follow mstrucbons for lubricating and
changing accessories
16. DISCONNECT TOOLS
before serwcmg, when changing accessor=es such as
blades, b_ts, cutters, etc.
17. AVOID ACCIDENTAL STARTING
Make sure switch _s In "OFF" posluon before plugging
H]
18. USE RECOMMENDED ACCESSORIES
Consult the owner's manual for recommended
accessories Follow tire instructions that accompany
the accessories The use of _mproper accessories may
cause hazards
NEVER STAND ON TOOL
Serious mlu_y could occur _f the tool _st_pped or _f the
cutting tool _saccidentally contacted
Do not store rnater_als above or near the tool such that
rt _snecessary to stand on the tool to reach them
CHECK DAMAGED PARTS
Before further use of the tool, a guard o_ other [)art that
_<damaged should be carefully checked to ensure that _t
,v_ll operate propelly drld p_rform _ts _ntended furlCt_Orq
Check for alignment of mowng parts, binding of mo_'_ng
parts, breakag_ of parts, mounting, and any other
concht_orls that may affect _ts operation A guard or
ogler part tlhat _s damaged should be properly repaired
or replaced
DIRECTION OF FEED
Feed ,azr)rk into a hlad_ or cutter aqau_st the d_re('t_on
ot rotation of the blade or cutter only
NEVER LEAVE TOOL RUNNING
UNATTENDED
TL. trl pOV_,_I utt Don't leaw' tool ur_t_l tl cOr_ltrs to J
COil]pit] [e stop
additional safety instructions for radial saws
WARNING: DO NOT CONNECT POWER CORD UNTIL
THE FOLLOWING STEPS HAVE BEEN
SATISFACTORI LY COMPLETED:
A. Assembly and installation.
B. Examination and operating famdiarity with ON-OFF
switch, elevation control, bevel index and lock, carriage
lock, guard clamp screw, spreader and anti-kickback
device, and miter index and lock.
C. Review and understanding of the Safety Instructions
and Operating Procedures which follow.
CAUTION: Always disconnect the power cord before
removing the guard, changing the cutting tool, changing
the set-up or making adjustments. Shut off motor
before performing layout work on the saw table.
ALWAYS RETURN THE CARRIAGE TO THE FULL
REAR POSITION AFTER EACH CROSSCUT TYPE
OPERATION.
STABILITY
1. The saw should be bolted down if there is any tendency
to tip, walk, or slide during normal operation. The saw
table should be approximately 39" above the floor.
WORK AREA AND MACHINE POSITION
1. Position your entire saw (or saw and bench) to slope
slightly rearward, so the carriage will not roll forward
due to gravity or vibration.
2. The saw should be positioned when ripping so neither
the operator nor a casual observer is forced to stand in
line with the saw blade.
3. The saw work area should have adequate overhead,
non-glare light and adequate surrounding work space.
4. Set carriage lock before moving machine.
KICKBACKS-COMMON WAYS THEY CAN HAPPEN
Kickbacks can cause serious injury: A kickback occurs
when a part of the workpiece binds between the saw blade
and the rip fence or other fixed object, rises from the table,
and is thrown toward the operator. Kickbacks are usually
caused by one or more of the following conditions
1.
Failure to determine that the saw blade is parallel to the
rip fence.
2. Confining the cut-off piece when ripping.
3. Failure to use the spreader when ripping, or failure to
maintain the spreader in alignment with the saw blade.
4. Ripping wood that has a twisted grain, does not have a
straight edge to guide along the fence, or wood that is
twisted or not flat (which may rock on the table and
pinch the blade).
5. Improperly conditioned (dull) saw that permits the
material to pinch on the out-feed edge of the saw and
rise from the table.
6. R_pping by applying the feed force to the section of the
workpiece that will become the cut-off (free) piece
(feed force when ripping should always be applied
between the saw blade and the fence . . use a push
st_ck for narrow or short work).
7. Releasing workpiece before operation is complete ...
not pushing the workpiece all the way past the saw
blade.
8. Failure to adjust the nose of the guard to just clear the
workpiece.
KICKBACKS -- COMMON WAYS THEY CAN BE
AVOIDED OR INJURY FROM THEM PREVENTED OR
MINIMIZED
1. Avoiding any of the causes noted above.
2. Keeping your face and body - and observers - always
out of line of possible kickbacks.
3. Always wear safety goggles.
4. Making sure (by trial) before starting the cut that the
anti-kickback pawls will stop kickback once it has
started.
5. Whenever possible, perform rip, bevel rip, and plough
cuts with the saw in the in-rip position. Refer to "6"
under "Kickbacks - ... Happen" and "6" under
"Operational Instructions."
6. Keeping points of anti-kickback pawls SHARP!
7. Positioning nose of guard to .just clear work and
positioning anti-kickback pawls properly.
8. Plastic and composition (like hardboard) materials may
be cut on your saw. However, since these are usually
quite hard and slippery, the anti-kickback pawls may
not stop a kickback.
Therefore, be especially attentive to following proper
set-up and cutting procedures for ripping these
materials. Do not stand, or permit anyone else to stand,
in line with a potential kickback.
PERSONAL CLOTHING AND EQUIPMENT
1.
Do not wear gloves while operating the saw. Loose
flowing garments, jewehv (rings, wrist watches, etc.)
and neckties must never be worn. Long sleeves must be
rolled to above the elbows.
2.
Always wear safety goggles, (complying with ANS
Z87.1-1968) to protect the eyes. In addition, wear a
face shield if the operation is dusty, and ear protectors
(plugs or muffs) dunng extended periods of operation.
OPERATIONAL INSTRUCTIONS
1. Before starting work, verify that no play exists in the
carriage, and that arm, yoke, and bevel locks/clamps are
tight.
2. Never place your fingers or hands in the path of the saw
blade.
3. Use only accessories that are designed for this machine.
4,
A large proportion of saw accidents is caused by dull,
badly set, improperly filed cutting tools, by gum or
resin adhering to cutting tools, and by saw blade
misahgnment (out-of-parallel) with the fence. Such
conditions cause the material to st_ck, jam, stall the
saw, or kickback at the operator. NEVER ATTEMPT
TO FREE A STALLED SAW BLADE WITHOUT
FIRST TURNING THE SAW "OFF". Avoid potential
injury by proper cutting tool and machine maintenance.
3
CAUTION: DO NOT cycle the motor switch ON and
OFF rapidly, as this might cause the saw blade to
loosen. In the event this should ever occur, allow the
saw blade to come to a complete stop and re-tighten the
arbor nut normally, not excessively.
additional safety instructions for radial saws
6. Prowde proper support for the workptece, based on its
slzf and the type of operation to be performed. Hold
the work brmly against tile fence. When ripping short
wo_kpieces (under 12-_nches long) or narrow pieces
(under 64nches wide}, use a push stick applied to the
section of the workp_ece between the blade and the
fence.
7. Never use a length stop on the free end or edge of the
workpiece whether crosscutting or ripping. Never hang
onto or touch the free end of workpiece, or a free piece
that is cut off, while power _s "'ON'" and/or the saw
blade is rotating. In short, to guard against kickbacks or
other potential accidents, the cut-off piece in any
thru-sawmg operation must never be confined - It must
be allowed to move laterally.
8. Do not leave a long board unsupported so the spring of
tht. board causes it to shift on the table. A support
sh(luld be used to catch the end of the board you are
cutting.
9. Whenever you have a choice, use the "IN-RIP" (instead
of "OUT-RIP") setup. This provides more space on the
fence side of the blade in which to use a push stick.
10. Make sure your fingers do not contact the terminals of
power or motor plugs when installing or removing the
plug to or from a live power source.
11. Never climb on or- near the saw when power is on
Never leave the saw with power on, or before the
cutting tool has come to a complete stop. Lock the
motor switch and put away the key when leaving the
saw.
12. Avoid awkward hand positions, where a sudden shp
could cause a hand to move into a sawblade or other
cutting tool. Never reach in back of or around the
cutting tool with either hand to hold down the
w_)rk piece.
CAUTION: Never reposition the Guard or
anti-kickback/spreader with power ON.
13. Always posihon the GUARD and the anti-Mckhack and
spreader assembly for rtp type operations. Also make
sure the cutting tool, arbor collars and arbor nuts are
installed properly. Keep guard in place.
14. When performing crosscut type operations, be sure the
Guard is clamped solidly in the horizontal position, and
tt'_ anti-kickback assembly is adjusted so the pawls just
cl,ar the workpiece. Tighten securely. ThDs provides
additional guarding.
15. Never operate this saw when equipped with a molding
h,-ad unless the proper molding head guard _s tnstalled
- see listing of recommended accessories. The only
excephon _s when "'top-s_de'" molding when the
sawblade guard must be used. See detailed instructions
that accompany the molding head and molding head
guard.
16. Dr) not use any blade or other cutting tool marked for
arl operating speed lower than 3450 RPM. Never use a
cutting tool larger _n d_ameter than the diameter for
which the saw was designed For greatest safety and
efftc]ency when ripping, use the maximum d_ameter
blade for which the saw _s designed, since under these
c,Jnd_t_ons the spreader is nearest the blade.
17. ]he use of abraswe or cut-off wheels, or w_re wheels
can be dangerous and _s not recommended. (Abraswe or
cJt-off wheels are used to saw marly different materials
m.;lud_ng metals, stone, and glass.)
18 [_., not postt{on the arm so the operation you are
performing permits the cutting tool to extend beyond
the edges of the table.
19. Never- turn your radial arm saw "ON" before clearing
the table or work surface of all objects (tools, scraps of
wood, etc.) except the workplece and related feed or
support devices for the operation planned.
20
21.
22.
23.
24.
25.
Objects can be thrown upward toward the operator by
the back of the blade if proper operating procedures are
not followed during cross-cut type operations. Th_s
usually occurs when a small loose piece of wood or
other objects contacts the rear of the revolwng blade
and ricochets off the fence or the wall behind the saw
toward the operator. It can be avoided by removing all
loose pieces from the table immeidately after they are
made, using a long st_ck, and keeping the guard _n place
at all times.
DO NOT perform layout, assembly, or setup work on
the table while the cutting tool ir rotating.
Never perform any operahon "free hand". Th_s term
means feeding the carriage into the workpiece or
feeding the workpiece into the saw blade or other
cutting tool without using the fence or some other
device which prevents rotation or twisting of the
workpiece during the operation. Never "'rip" (cut with
the grain) narrow or long workpieces m the crosscut
pos_t_on. Never make a miter cut with the arm in the
90 ° crosscut position.
"ALWAYS return the carriage to the full rearward
posit_on at conclusion of each crosscut type cut. Never
remove your hand from the bevel index handle unless
the carriage is m this positron. Otherwise the cutting
tool may climb up on the workpiece and be propelled
toward you."
"Never lower a revolving cutting tool into the table or a
workplece without first locking the Carriage Lock
Knob. Release the knob only after grasping the Bevel
Index Handle. Otherwise the cutting tool may grab the
workplece and be propelled toward you."
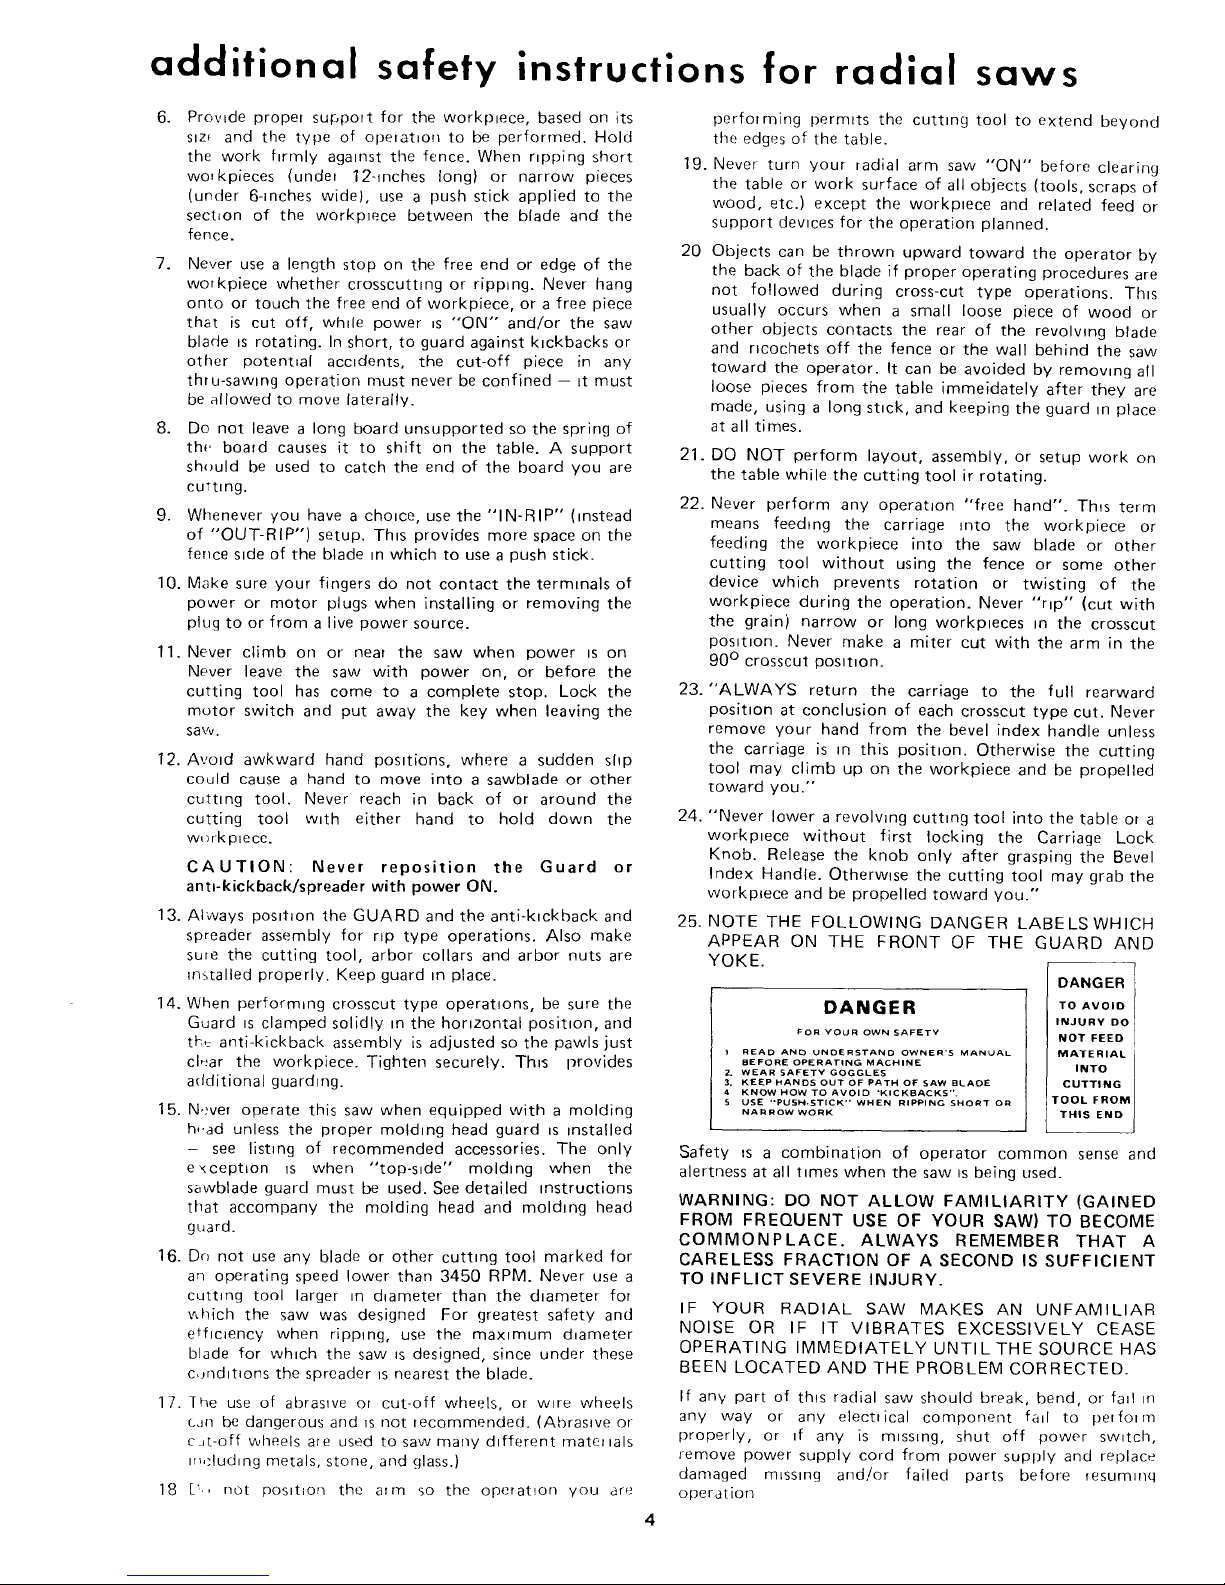
NOTE THE FOLLOWING DANGER LABELSWHICH
APPEAR ON THE FRONT OF THE GUARD AND
YOKE.
DANGER
FOR YOUR OWN SAFETY
I READ AND UNDERSTAND OWNER'S MANUAL
BEFORE OPERATING MACHINE
2. WEAR SAFETY GOGGLES
3. KEEP I_ANDS OUT OF PATH OF SAW BLADE
4 KNOW HOW TO AVOID "KICKBACKS".
S USE "PUSH-STICK" WHEN RIPPING SHORT OR
NARROW WORK
DANGER
TO AVOID
INJURY DO
NOT FEED
MATERIAL
INTO
CUTTING
TOOL FROM
THIS END
I
Safety _s a combination of operator common sense and
alertness at all t_mes when the saw ts being used.
WARNING: DO NOT ALLOW FAMILIARITY (GAINED
FROM FREQUENT USE OF YOUR SAW) TO BECOME
COMMONPLACE. ALWAYS REMEMBER THAT A
CARELESS FRACTION OF A SECOND IS SUFFICIENT
TO INFLICT SEVERE INJURY.
IF YOUR RADIAL SAW MAKES AN UNFAMILIAR
NOISE OR IF IT VIBRATES EXCESSIVELY CEASE
OPERATING IMMEDIATELY UNTILTHE SOURCE HAS
BEEN LOCATED AND THE PROBLEM CORRECTED.
If any part of this radial saw should break, bend, or fa_! m
any way or any electrical component fa_l to perform
properly, or ff any is m_ssmg, shut off power sw_tch,
remove power supply cord from power supply and replace
damaged m_sslng and!or failed parts before _esummq
operation
unpacking and pre-assembly
CONTENTS
Page
Safety Instructions ....................... 2,3,4 & 5
Unpacking and Pre-Assembly ..................... 5
Assembly and Adjustments ...................... 6
Operating Controls ........................... 13
Basic Saw Operations .......................... 15
'age
Electrical Connections ......................... 18
Trouble Shooting ............................. 20
Recommended Accessories ..................... 25
Motor Trouble-Shooting Chart ................... 26
Repair Parts ................................. 27
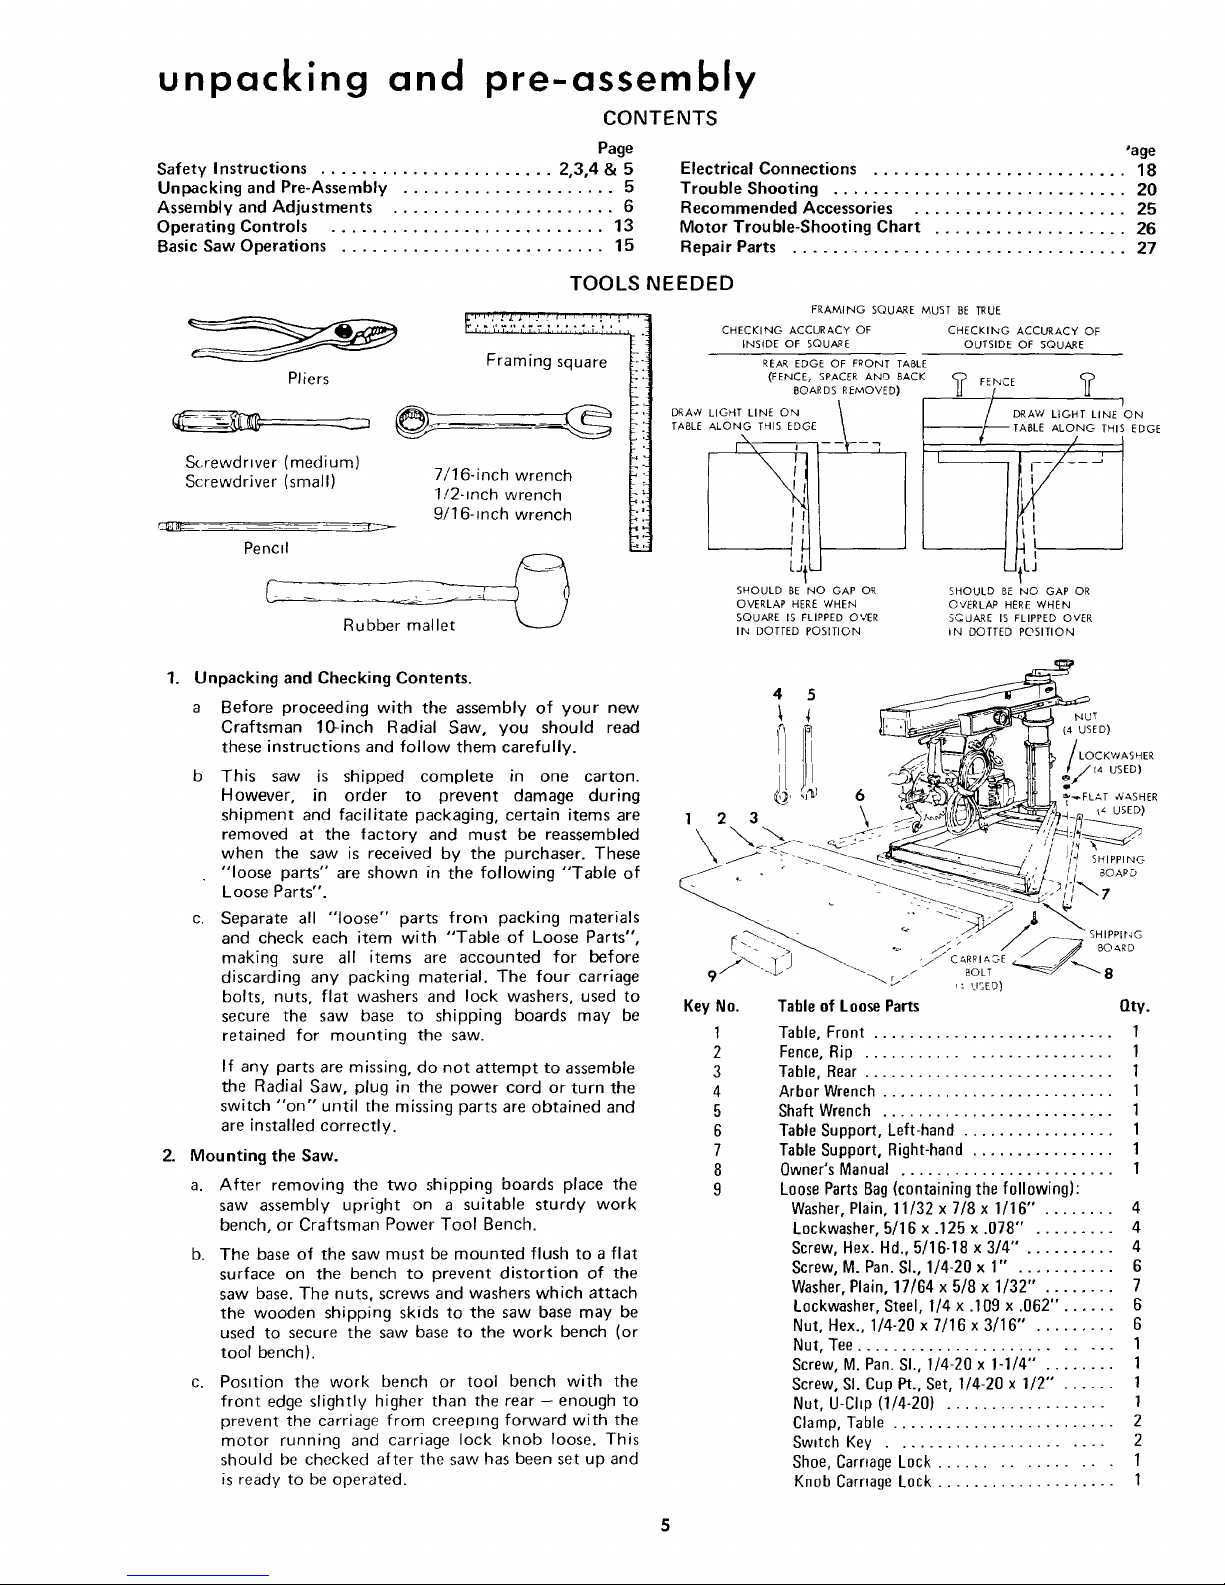
TOOLS
Pliers
_..,...,L_,.,, r.,., ,.: ,r,.
', ,_ '&, ............. t I,,.j,',,_L
Framing square
Screwdrwer (medium)
Screwdriver (small) 7/16-inch wrench
1!2-inch wrench
9/16-inch wrench
Pencil
NEEDED
FRAMING SQUARE MUST BE TRUE
CHECKING ACCURACY OF CHECKING ACCURACY OF
INSIDE OF SQUARE OUTSIDE OF SQUARE
REAR EDGE OF FRONT TABLE
(FENCE, SPACER AND BACK FEINCE ?
BOARDS REMOVED) <_ /
DRA,_LIGHTLINEON \ |/DRAW UO.TUNE'ON
TABLE ALONG THIS EDGE _ I_/L_ fABLE ALONG THIS EDGE
SHOULD BE NO GAP OR SHOULD BE NO GAP OR
OVERLAP HERE WHEN O'VERLAP HERE WHEN
SQUARE IS FLIPPED O%{R SCLJARE IS FLIPPED OVER
11",4 DOTTED POSITION IN DOTTED POSITION
1. Unpacking and Checking Contents.
a Before proceeding with the assembly of your new
Craftsman 10-inch Radial Saw, you should read
these instructions and follow them carefully.
b This saw is shipped complete in one carton.
However, in order to prevent damage during
shipment and facilitate packaging, certain items are
removed at the factory and must be reassembled
when the saw is received by the purchaser. These
"loose parts" are shown in the following "Table of
Loose Parts".
c. Separate all "loose" parts from packing materials
and check each item with "Table of Loose Parts",
making sure all items are accounted for before
discarding any packing material. The four carriage
bolts, nuts, flat washers and lock washers, used to
secure the saw base to shipping boards may be
retained for mounting the saw.
2.
If any parts are missing, do not attempt to assemble
the Radial Saw, plug in the power cord or turn the
switch "on" until the missing parts are obtained and
are installed correctly.
Mounting the Saw.
a. After removing the two shipping boards place the
saw assembly upright on a suitable sturdy work
bench, or Craftsman Power Tool Bench.
b. The base of the saw must be mounted flush to a flat
surface on the bench to prevent distortion of the
saw base. The nuts, screws and washers which attach
the wooden shipping skids to the saw base may be
used to secure the saw base to the work bench (or
tool bench).
C.
Posttion the work bench or tool bench with the
front edge slightly higher than the rear - enough to
prevent the carriage from creeping forward with the
motor running and carriage lock knob loose. This
should be checked after the saw has been set up and
is ready to be operated.
I I/I _LL_---_,;'_L,_L_ till _'/_,_ useea
• " -----_ _-____'.,', _- _.I
_'_'/ ,'- EISED)
Key No. Table of Loose Parts Qty.
1 Table, Front ........................... 1
2 Fence, Rip ........................... 1
3 Table, Rear ............................ 1
4 Arbor Wrench .......................... 1
5 Shaft Wrench .......................... 1
6 Table Support, Left-hand ................. 1
7 Table Support, Right-hand ................ 1
8 Owner's Manual ........................ 1
9 Loose Parts Bag (containing the following):
Washer, Plain, 11/32 x 7/8 x 1/16" . ....... 4
Lockwasher, 5/16 x .125 x .078" . ........ 4
Screw, Hex. Hd., 5/16-18 x 3/4" . ......... 4
Screw, M. Pan. SI., 1/4-20 x 1" . .......... 6
Washer, Plain, 17/64 x 5/8 x 1/32" . ....... 7
Lockwasher, Steel, 1/4 x .109 x .062". ..... 6
Nut, Hex., 1/4-20 x 7/16 x 3/16" . ........ 6
Nut, Tee ........................... 1
Screw, M. Pan. SI., 1/4-20 x 1-1/4'" . ....... 1
Screw, SI. Cup Pt., Set, 1/4-20 x 1/2" . ..... 1
Nut, U-Chp (1/4-20) .................. 1
Clamp, Table ......................... 2
Sw_tch Key ....................... 2
Shoe, Carnage Lock ................ 1
Knob Carnage Lock .................... 1
assembly and adjustments
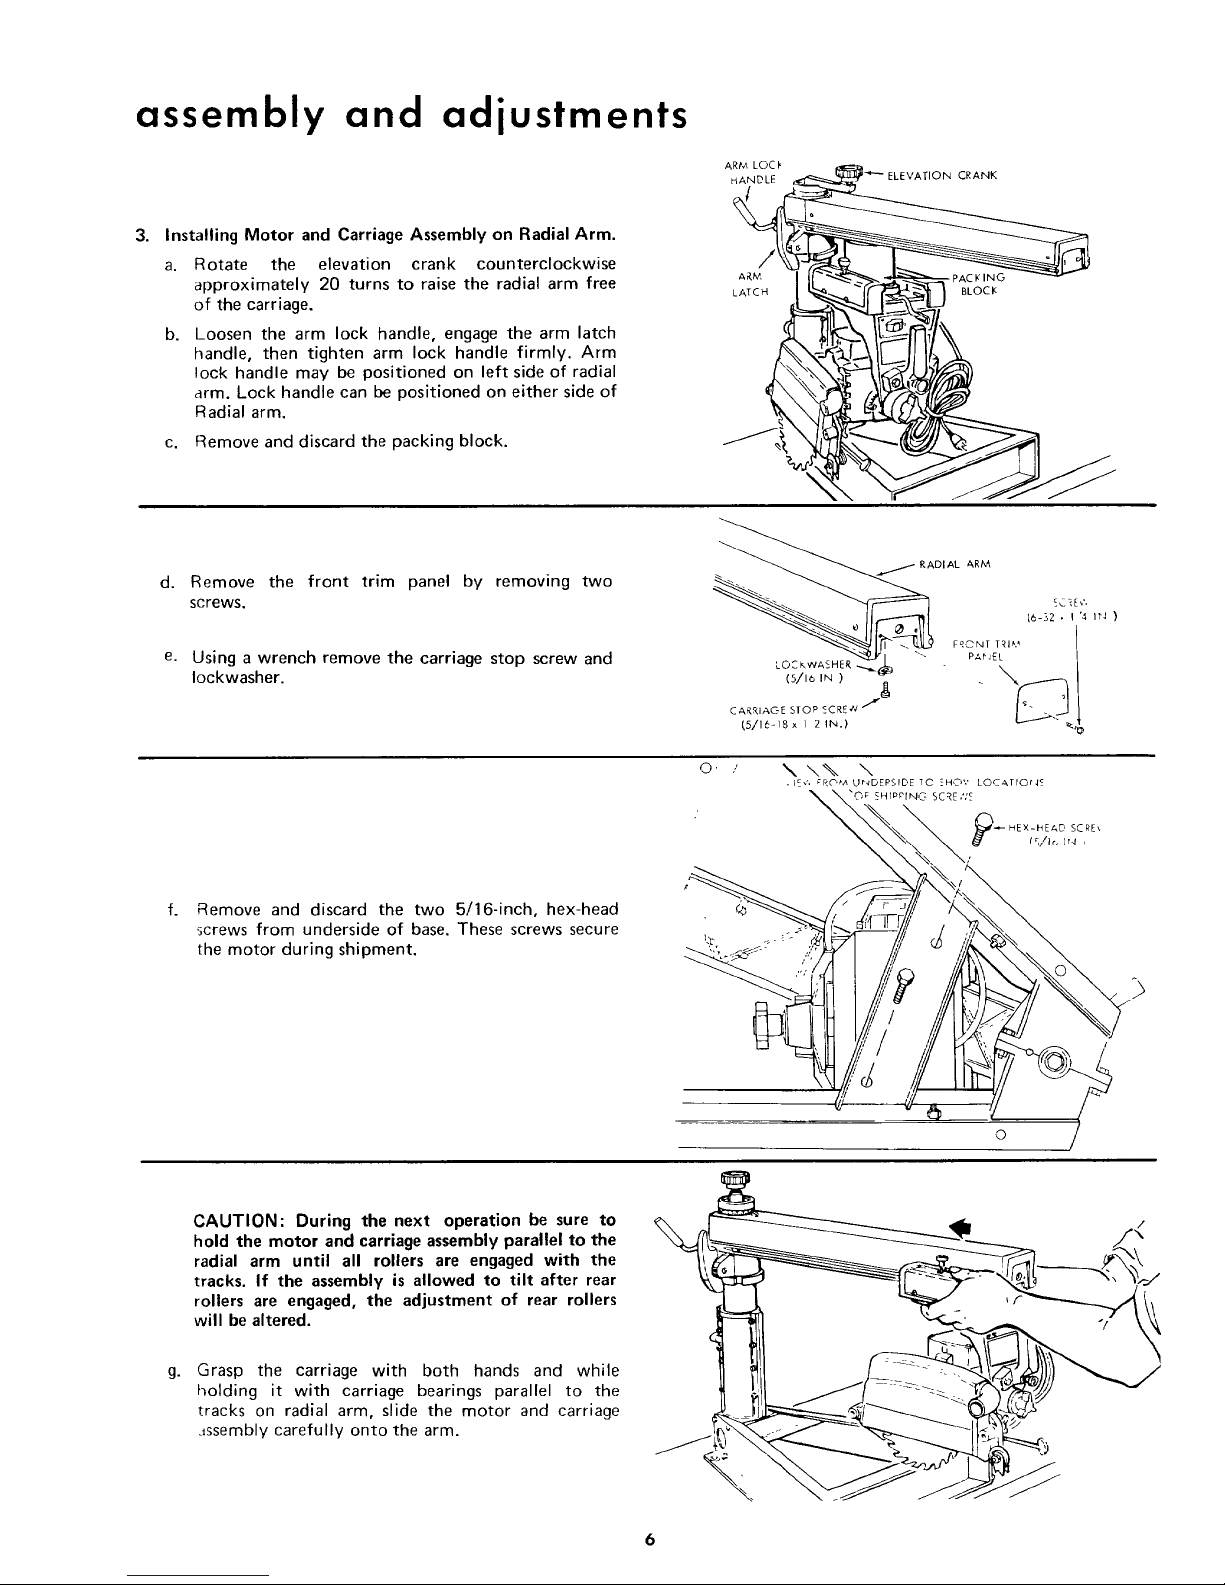
3. Installing Motor and Carriage Assembly on Radial Arm.
a.
b.
ARM LOCI'
Rotate the elevation crank counterclockwise
approximately 20 turns to raise the radial arm free
of the carriage.
Loosen the arm lock handle, engage the arm latch
handle, then tighten arm lock handle firmly. Arm
lock handle may be positioned on left side of radial
arm. Lock handle can be positioned on either side of
Radial arm.
c. Remove and discard the packing block.
d. Remove
screws.
e.
the front trim panel by removing two
Using a wrench remove the carriage stop screw and
Iockwasher.
PAC KING
BLOCI¢
f. Remove and discard the two 5/16-inch, hex-head
screws from underside of base, These screws secure
the motor during shipment.
o, ..' \ \% \
• IE_', CRC',M U_4DEPSIDE TC ZHO',' LOCATIOt4_
_X'_._H r PPINIG SC _E ,',Lc
" __ _-- HEX-HEAD SCRE,
,,_t (fi,/Ir, fr4 ,
}% X
i, ,,ot
g.
CAUTION: During the next operation be sure to
hold the motor and carriage assembly parallel to the
radial arm until all rollers are engaged with the
tracks. If the assembly is allowed to tilt after rear
rollers are engaged, the adjustment of rear rollers
will be altered.
Grasp the carriage with both hands and while
holding it with carriage bearings parallel to the
tracks on radial arm, slide the motor and carriage
._ssembly carefully onto the arm.
\
6
C._,RR[&OE CO..'ER _k H )
CARRIAGE
LOCK SHOE
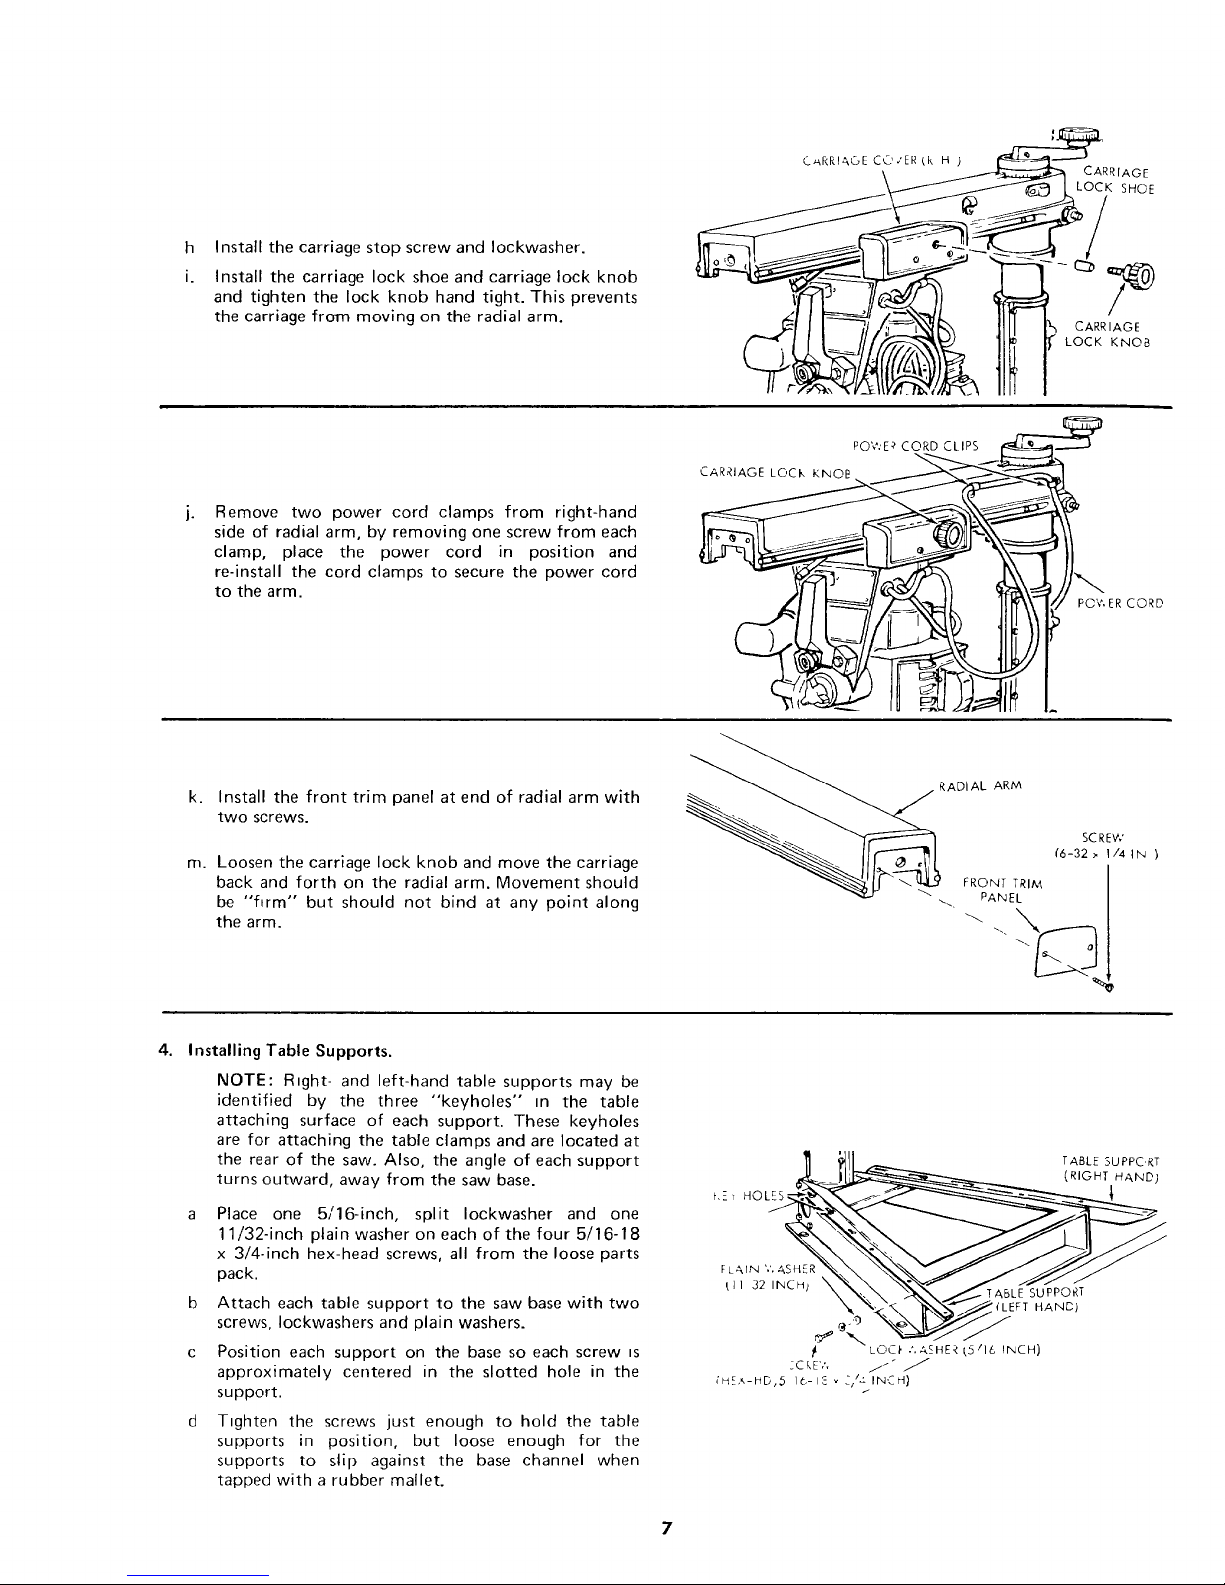
h
i.
Install the carriage stop screw and Iockwasher.
Install the carriage lock shoe and carriage lock knob
and tighten the lock knob hand tight. This prevents
the carriage from moving on the radial arm.
CARRIAGE
LOCK KNOB
Remove two power cord clamps from right-hand
side of radial arm, by removing one screw from each
clamp, place the power cord in position and
re-install the cord clamps to secure the power cord
to the arm.
PO'¢.'E _ CORD CLIPS .__
I__
k. Install the front trim panel at end of radial arm with
two screws.
m. Loosen the carriage lock knob and move the carriage
back and forth on the radial arm. Movement should
be "firm" but should not bind at any point along
the arm.
__ RADIAL ARM
___ SCREW
4. Installing Table Supports.
NOTE: R_ght- and left-hand table supports may be
identified by the three "keyholes" in the table
attaching surface of each support. These keyholes
are for attaching the table clamps and are located at
the rear of the saw. Also, the angle of each support
turns outward, away from the saw base.
a Place one 5/16-inch, split Iockwasher and one
11/32-inch plain washer on each of the four 5/16-18
x 3/4-inch hex-head screws, all from the loose parts
pack.
b Attach each table support to the saw base with two
screws, Iockwashers and plain washers.
c Position each support on the base so each screw _s
approximately centered in the slotted hole in the
support.
d Tighten the screws just enough to hold the table
supports in position, but loose enough for the
supports to slip against the base channel when
tapped with a rubber mallet.
t,-_ HOLrS,_r_
[L,_IN ',', z,,SH_.R "_
t I I 32 lINCH) \
f
_C LE',',
_lJ _ TABLE SUPPC, RT
LC, C_" ,',A_HE< K,5 16 INCH)
it" J
;HE,_-HD,5 16-12 _ _z/_' INCH}
/

assembly and adjustments
ALIGNMENT INSTRUCTIONS
1. Adjusting Table Supports Parallel to Radial Arm.
a. Loosen the guard clamp screw and remove the
guard.
b. Secure the carriage (approximately midway on
radial arm) by tightening the carriage lock knob.
c. Using the shaft wrench on hex portion of motor
shaft (at inner edge of saw blade) and the arbor
wrench on shaft nut, loosen the shaft nut.
NOTE: The motor shaft has left-hand threads.
d,
Remove the shaft nut, outer collar, saw blade and
inner collar.
"- _1 J "
ARBOR\'
- ,,'_'__, . . \ _/" swtveu
• , ," iNDEX
",,, l< 2\ ....<
/ COLLAR \ ,- _.'3 _.'1 EL b NOB
,., . ,,_,_ __k_LLAR CLAMP
(OUTER} (INNER) _NOB
Loosen the bevel lock knob, pull out on the bevel
index knob and swivel the motor to position the saw
end of shaft pointing straight down. Tighten the
bevel lock knob and check the yoke clamp handle to
make sure it is tight.
f. Loosen the arm lock handle, release the arm latch
handle and loosen the carriage lock knob.
NOTE: For safety reasons in accordance with the
UL standard, stops have been provided to prevent
360 ° rotation of the radial arm.
g. Move the radial arm to the left against the stop.
Position the end of motor shaft over the table
support as close as possible to rear support attaching
screw.
h. Hold the arbor wrench between end of motor shaft
and top surface of table support and use the wrench
as a "feeler" gauge to insure an accurate adjustment.
i. Lower the motor with the elevation crank until the
end of motor shaft just touches the arbor wrench.
Then, carefully adjust the motor up or down (with
elevation crank) until the arbor wrench can be
sl_pped back and forth with only slight resistance.
NOTE: Do not change the elevation setting of the
motor untd both right, and left-hand table supports
have been adjusted.
_YOKE CLAMP
INDEX KNOB
EL[ ,ArlOr, CR__
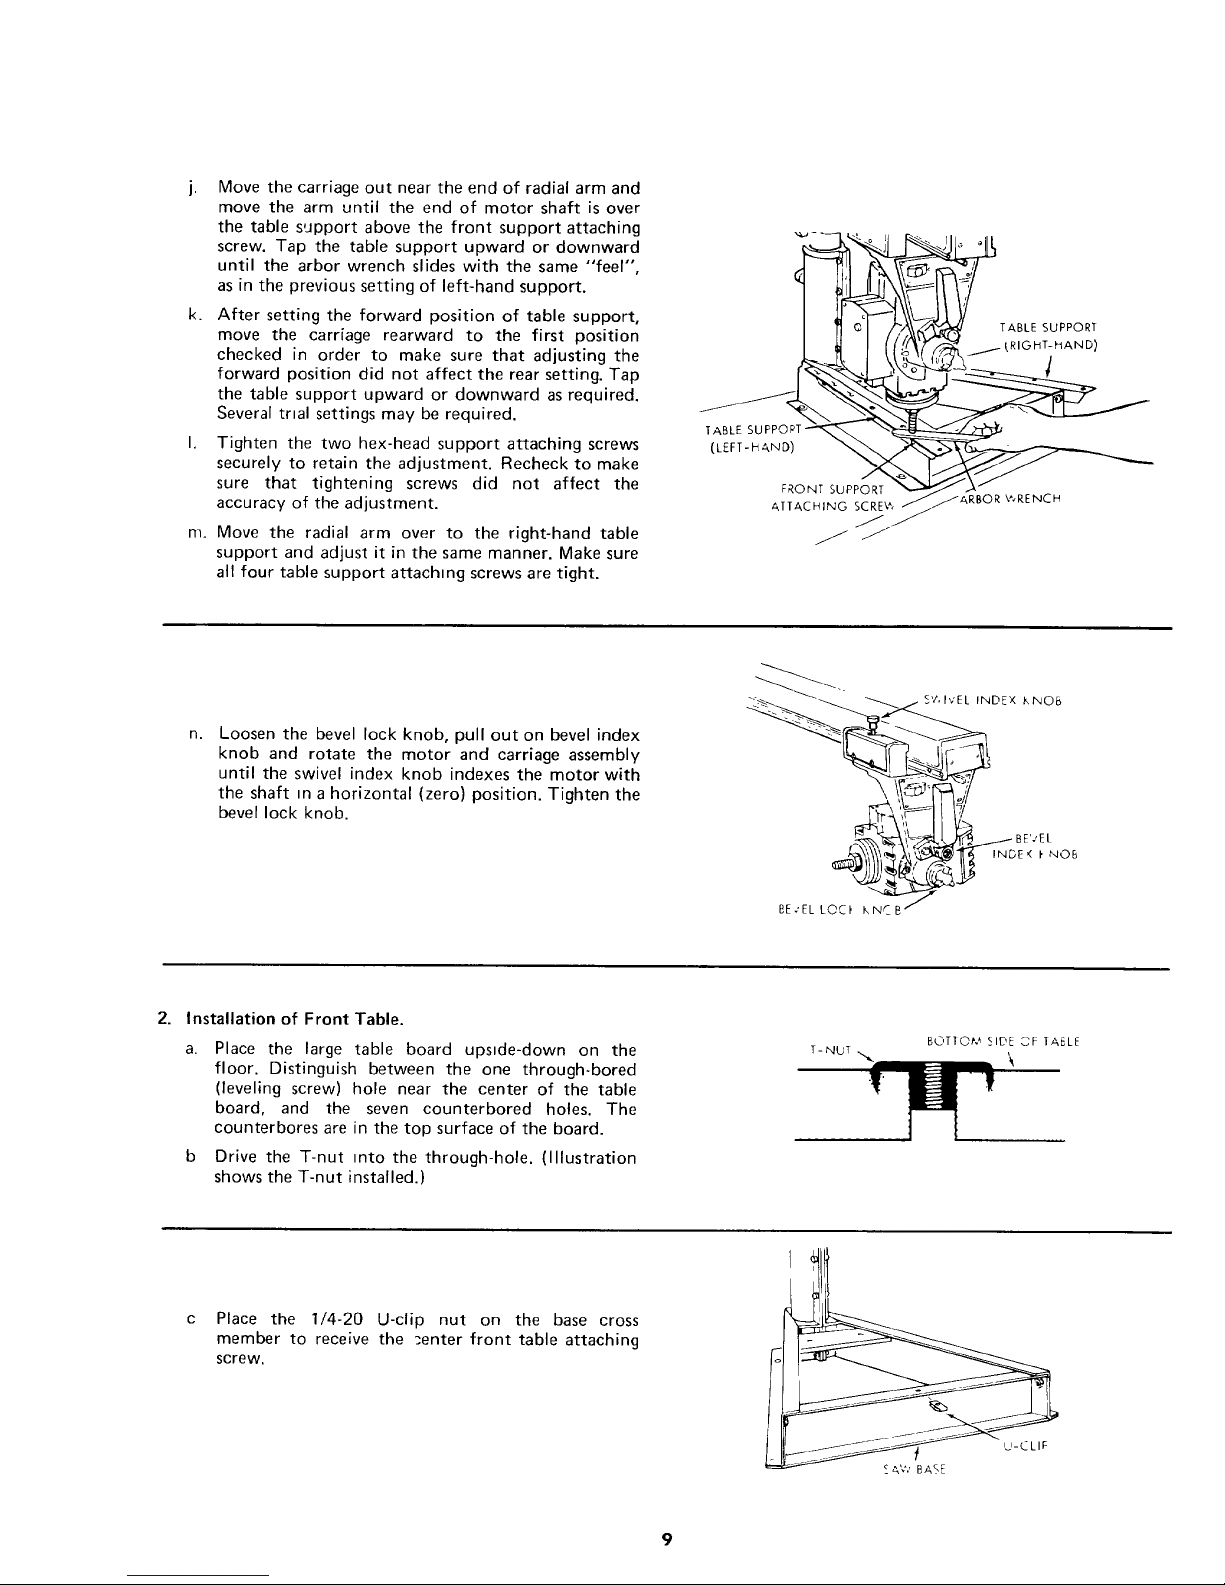
k.
Move the carriage out near the end of radial arm and
move the arm until the end of motor shaft is over
the table support above the front support attaching
screw. Tap the table support upward or downward
until the arbor wrench slides with the same "'feel",
as in the previous setting of left-hand support.
After setting the forward position of table support,
move the carriage rearward to the first position
checked in order to make sure that adjusting the
forward position did not affect the rear setting. Tap
the table support upward or downward as required.
Several trial settings may be required.
Tighten the two hex-head support attaching screws
securely to retain the adjustment. Recheck to make
sure that tightening screws did not affect the
accuracy of the adjustment.
Move the radial arm over to the right-hand table
support and adjust it in the same manner. Make sure
all four table support attaching screws are tight.
TABLE SUPP©PT-
(LEFT-H AND)
FRONT SUPPORT
ATTACHING SCRE\ ^,
J
j J"
TABLE SUPPORT
RIGHT-HAND)
1
RBOR V_RENCH
n.
Loosen the bevel lock knob, pull out on bevel index
knob and rotate the motor and carriage assembly
until the swivel index knob indexes the motor with
the shaft m a horizontal (zero) position. Tighten the
bevel lock knob.
S'7,1vEL INDEX KNOB
,( _' NOB
BE.'EL L©C_ KNC _'_-"_'-'-J
2. Installation of Front Table.
a.
Place the large table board upside-down on the
floor. Distinguish between the one through-bored
(leveling screw) hole near the center of the table
board, and the seven counterbored holes. The
counterbores are in the top surface of the board.
Drive the T-nut into the through-hole. (Illustration
shows the T-nut installed.)
T-NUT
BOTTOM SIDE SF TABLE
Place the 1/4-20 U-clip nut on the base cross
member to receive the _,enter front table attaching
screw.
assembly and adjustments
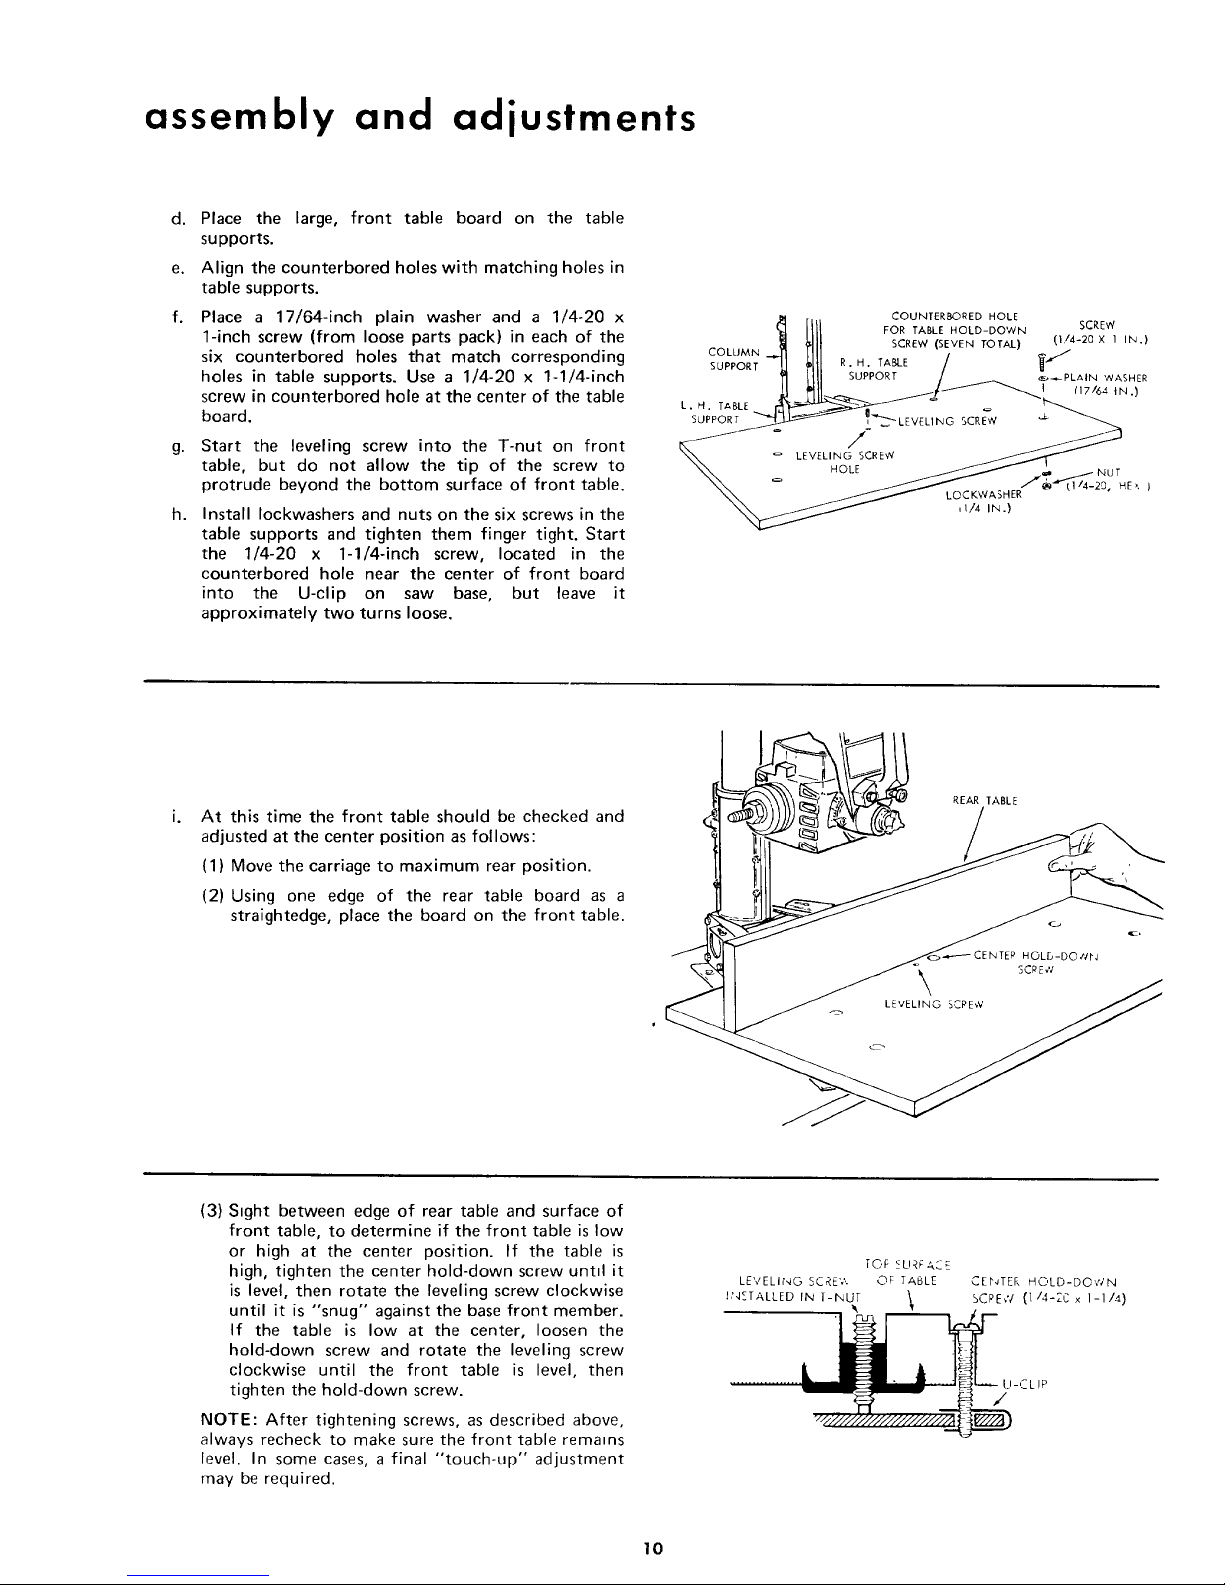
d. Place the large, front table board on the table
supports.
e. Align the counterbored holes with matching holes in
table supports.
f. Place a 17/64-inch plain washer and a 1/4-20 x
1-inch screw (from loose parts pack) in each of the
six counterbored holes that match corresponding
holes in table supports. Use a 1/4-20 x 1-1/4-inch
screw in counterbored hole at the center of the table
board.
g.
h.
Start the leveling screw into the T-nut on front
table, but do not allow the tip of the screw to
protrude beyond the bottom surface of front table.
Install Iockwashers and nuts on the six screws in the
table supports and tighten them finger tight. Start
the 1/4-20 x 1-1/4-inch screw, located in the
counterbored hole near the center of front board
into the U-clip on saw base, but leave it
approximately two turns loose.
_lJ SCREW (SEVEN TOTAL) (I/4-20 X I IN.)
COLUMN .-..J1 HI/ ,' _-"_
SUPPORT-L] _LIl R.H. _A_E / U
_I 1111 SUPPORT I _._ PLAIN WASHER
o
o LEVELING SCRE_
\\ _/ LOCKWASHE" .......
,I/4 IN.}
At this time the front table should be checked and
adjusted at the center position as follows:
(1) Move the carriage to maximum rear position.
(2) Using one edge of the rear table board as a
straightedge, place the board on the front table.
REAR TABLE
_CENTEP HOLD-DO _N
SCPEW
(3) Sight between edge of rear table and surface of
front table, to determine if the front table is low
or high at the center position. If the table is
high, tighten the center hold-down screw untd it
is level, then rotate the leveling screw clockwise
until it is "snug" against the base front member.
If the table is low at the center, loosen the
hold-down screw and rotate the leveling screw
clockwise until the front table is level, then
tighten the hold-down screw.
NOTE: After tightening screws, as described above,
always recheck to make sure the front table remains
level. In some cases, a final "touch-up" adjustment
may be required.
TOF SURFACE
LEVELING SCRE'?,. OF TABLE
hNETALLED IN T-NUT \
CENTER HOLD-DO','_' N
SCRE,V (1/4-2C x 1-1/4)
U-CLIP
10
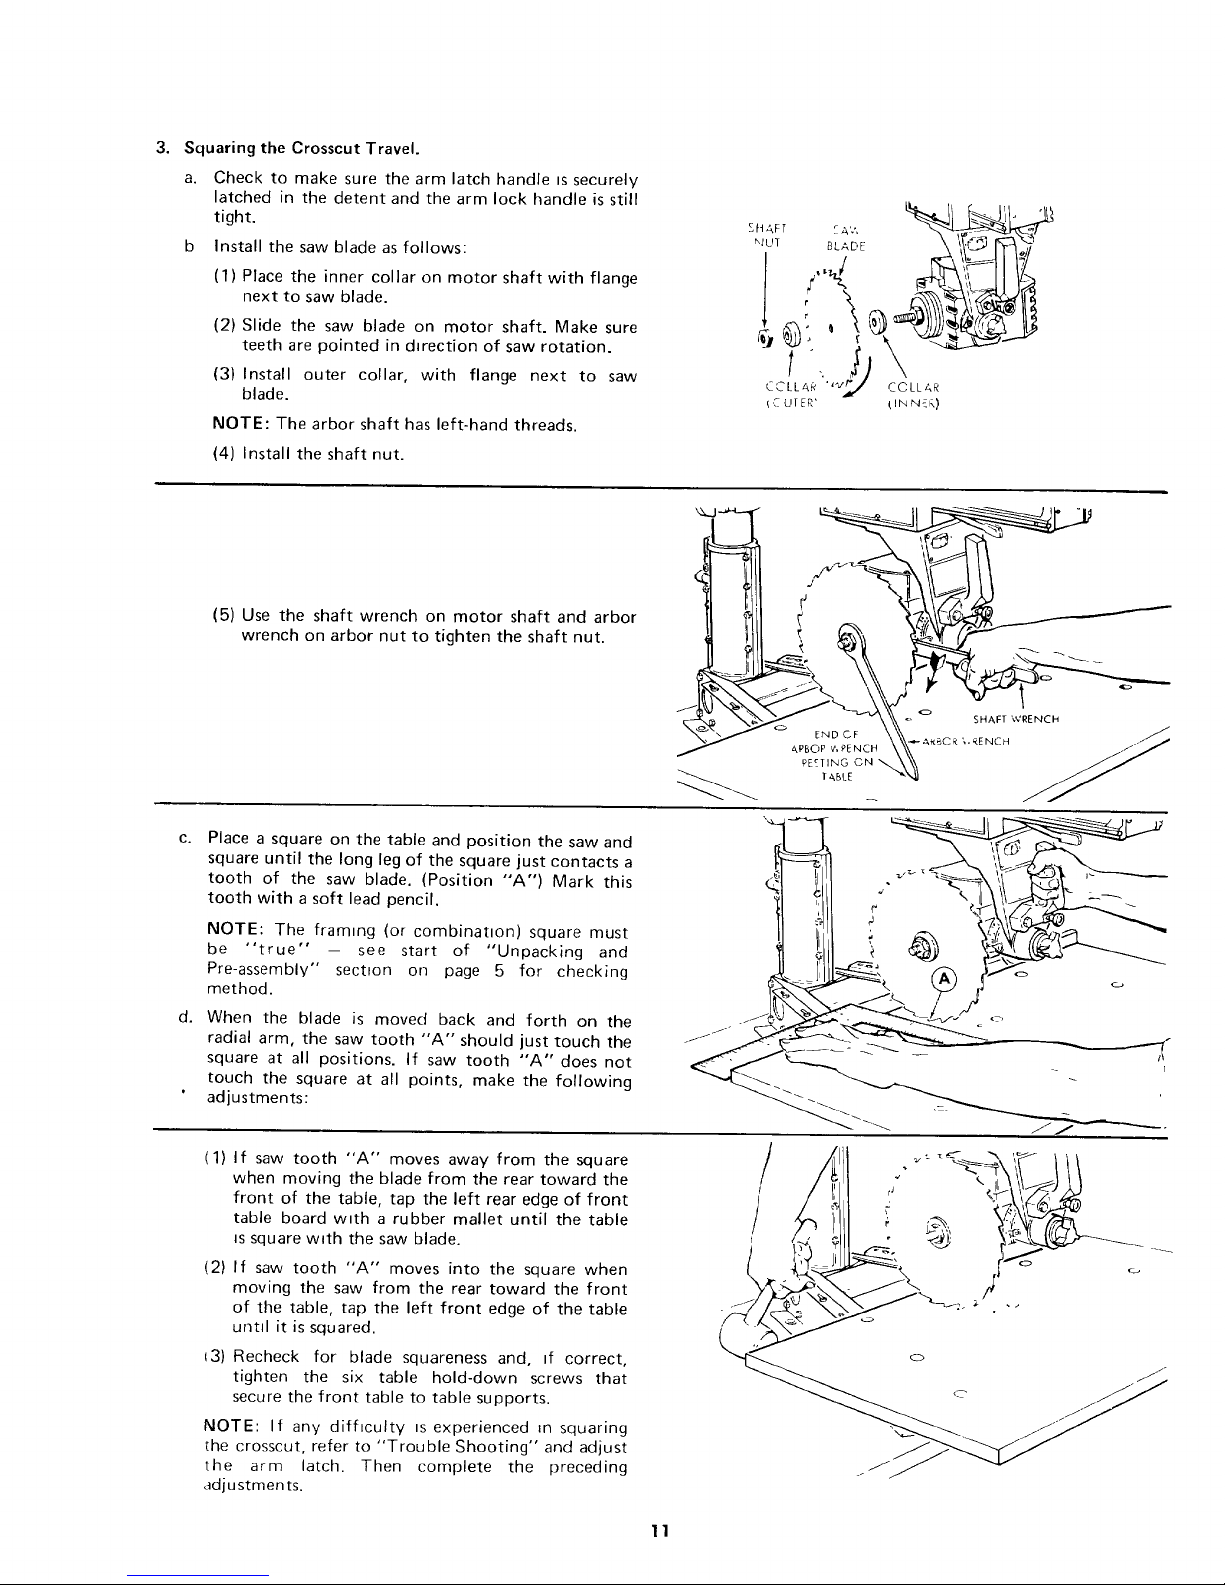
3.
Squaring the Crosscut Travel.
a. Check to make sure the arm latch handle is securely
latched in the detent and the arm lock handle is still
tight.
b Install the saw blade as follows:
(1) Place the inner collar on motor shaft with flange
next to saw blade.
(2) Slide the saw blade on motor shaft. Make sure
teeth are pointed in dwection of saw rotation.
(3) Install outer collar, with flange next to saw
blade.
NOTE: The arbor shaft has left-hand threads.
(4) Install the shaft nut.
SftAFT _ A'.', [_
_Uq BLADE
['._ UIER' (INN{F,)
C.
d.
(5) Use the shaft wrench on motor shaft and arbor
wrench on arbor nut to tighten the shaft nut.
E.DcF \\\ ...........
Place a square on the table and position the saw and
square until the long leg of the square just contacts a
tooth of the saw blade. (Position "A") Mark this
tooth with a soft lead pencil.
NOTE: The framing (or combination) square must
be "true" - see start of "Unpacking and
Pre-assembly" section on page 5 for checking
method.
When the blade is moved back and forth on the
radial arm, the saw tooth "A'" should just touch the
square at all positions. If saw tooth "A" does not
touch the square at all points, make the following
adjustments:
LLI¢
(1)
If saw tooth "A" moves away from the square
when moving the blade from the rear toward the
front of the table, tap the left rear edge of front
table board with a rubber mallet until the table
is square w_th the saw blade.
(2) If saw tooth "A" moves into the square when
moving the saw from the rear toward the front
of the table, tap the left front edge of the table
until it is squared.
13) Recheck for blade squareness and, If correct,
tighten the six table hold-down screws that
secure the front table to table supports.
NOTE: If any difficulty is experienced _n squaring
the crosscut, refer to "Trouble Shooting" and adjust
the arm latch• Then complete the preceding
adjustments•
/
11
 Loading...