

Sears 934.4482639 User Manual

OWNER'S
f
MANUAL
MODEL NO.
934.44826390
TABLE OF CONTENTS
IMPORTANT SAFEGUARDS ............ 2
PRECAUTIONS ...................... 4
SUPPLIED ACCESSORIES ............. 4
FEATURES .......................... 5
OPERATING CONTROLS AND FUNCTIONS 6
REMOTE CONTROL OPERATION ....... 8
ANTENNA CONNECTIONS ............ 10
PREPARATION FOR USE ............. 13
OPERATION ........................ 19
T.V. OPERATION ................. 19
VIEWING AND RECORDING THE SAME
PROGRAM ...................... 20
AUTOMATIC TIMER RECORDING .... 22
QUICK SET PROGRAM ............ 25
CHECKING THE COUNTER, CLOCK AND
CHANNEL NUMBER ............... 27
OTR (ONE TOUCH RECORDING) .... 28
SETTING THE SLEEP TIMER ........ 29
PLAYBACK ...................... 29
RENTAL PLAY ..................... 29
AUTO REPEAT PLAYBACK ......... 30
CLOSED CAPTION SYSTEM ........ 30
TROUBLESHOOTING GUIDE .......... 33
MAINTENANCE ..................... 34
SPECIFICATIONS ................... 35
/II Jl
9"COLOR
TV/VCR
COMBINATION
Record the Model Number and Serial Num-
ber of your TV/VCR combination.
The Model Number and the Serial Number
are on the rear panel.
Model No.
Serial No.
Keep these numbers for future use.
WARNING:
TOREDUCETHERISKOFFIREORELECTRICSHOCK,DONOTEXPOSETHISAPPLIANCETORAINOR
MOISTURE.
CAUTION
CAUTION: TO REDUCE THE RISK OF ELECTRIC
SHOCK, DO NOT REMOVE COVER (OR BACK)
NO USER SERVICEABLE PARTS INSIDE. REFER
SERVICING TO QUALIFIED SERVICE PERSON-
NEL.
The Important note Is located on the rear of the cabinet.
IMPORTANT SAFEGUARDS
1. Read instructions-All the safety and operating instructions
should be read before the appliance is operated.
2. Retain Instructions-The safety and operating instructions
should be retained for future reference.
3. Heed Warnings-All warnings on the appliance and in the
operating instructions should be adhered to.
4. Follow Instructions-All operating and use instructions
should be followed.
5. Cleaning-Unplug TV from the wall outlet before cleaning.
Do not use liquid cleaners or aerosol cleaners. Use a damp
cloth for cleaning.
EXCEPTION : A product that is meant for uninterrupted
service and that for some specific reason, such as the
possibility of the loss of an authorization code for a CATV
converter, is not intended to be unplugged by the user for
cleaning or any other purpose, may exclude the reference
to unplugging the appliance in the cleaning description
otherwise required in item 5.
6. Attachments-Do notuse attachments not recommended by
the TV manufacturer as they may cause hazards.
7. Water and Moisture-Do not use this "IV near water-for
example, near a bath tub, wash bowl, kitchen sink, or
laundry tub, in a wet basement, or near a swimming pool,
and the like.
8. Accessories-Do not place this TV on an unstable cart,
stand, tripod, bracket, or table. The TV may fall, causing
serious injury to someone, and serious damage to the
appliance. Use only with a cart,
stand, tripod, bracket, or table
recommended by the manufac-
turer, or sold with the "IV. Any
mounting of the appliance should
follow the manufacturer's instruc-
tions and should use a mounting
accessory recommended by the
manufacturer. An appliance and
cart combination should be
PORTABLE CART WARNING
9. Ventilation-Slots and openings in the cabinet and the back
10. Power Sources-This TV should be operated only from the
type of power source indicated on the marking label. If you
are not sure of the type of power supply to your home,
consult your appliance dealer or local power company. For
TVs intended to operate from battery power, or other
sources, refer to the operating instructions.
11. Grounding or Polarization-This TV is equipped with a po-
larized alternating-current line plug(a plug having one blade
wider than the other). This plug will fit into the power outlet
only one way. This is a safety feature. If you are unable to
the plug should still fail to fit, contact you electrician to
replace your obsolete outlet. Do not defeat the safety
purpose of the polarized plug.
12. Power-Cord Protection-Power-supply cords should be
routed sothat they are not likely to be walked on or pinched
by items placed upon or against them, paying particular
attention to cords at plugs, convenience receptacles, and
the point where they exit from the appliance.
13. Outdoor Antenna grounding-If an outside antenna or cable
system isconnected to the TV, be sure the antenna or cable
system is grounded so as to provide some protection
against voltage surges and built-up static charges. Section
810 of the National Electrical Code, ANS!/NFPA No. 70-
THIS SYMBOL INDICATES THAT DAN-
GEROUS VOLTAGE CONSTITUTING A
RISK OF ELECTRIC SHOCK IS PRES-
ENT WITHIN THIS UNIT.
THIS SYMBOL INDICATES THAT
THERE ARE IMPORTANT OPERATING
AND MAINTENANCE INSTRUCTIONS
IN THE LITERATURE ACCOMPANYING
THE APPLIANCE.
moved with care. Quick stops, excessive force, and uneven
surfaces may cause the appliance and cart combination to
overturn.
or bottom are provided for ventilation and to ensure reliable
operation of the TV and to protect it from overheating,
these openings must not be blocked or covered. The
openings should never be blocked by placing the TV on a
bed, sofa, rug, or other similar surface. This TV should
never be placed near or over a radiator or heat register.
This "IV should not be placed in a built-in installation such
as a bookcase or rack unless proper ventilation is provided
or the manufacturer's instructions have been adhered to.
insert the plug fully into the outlet, try reversing the plug. If
-2 - EN
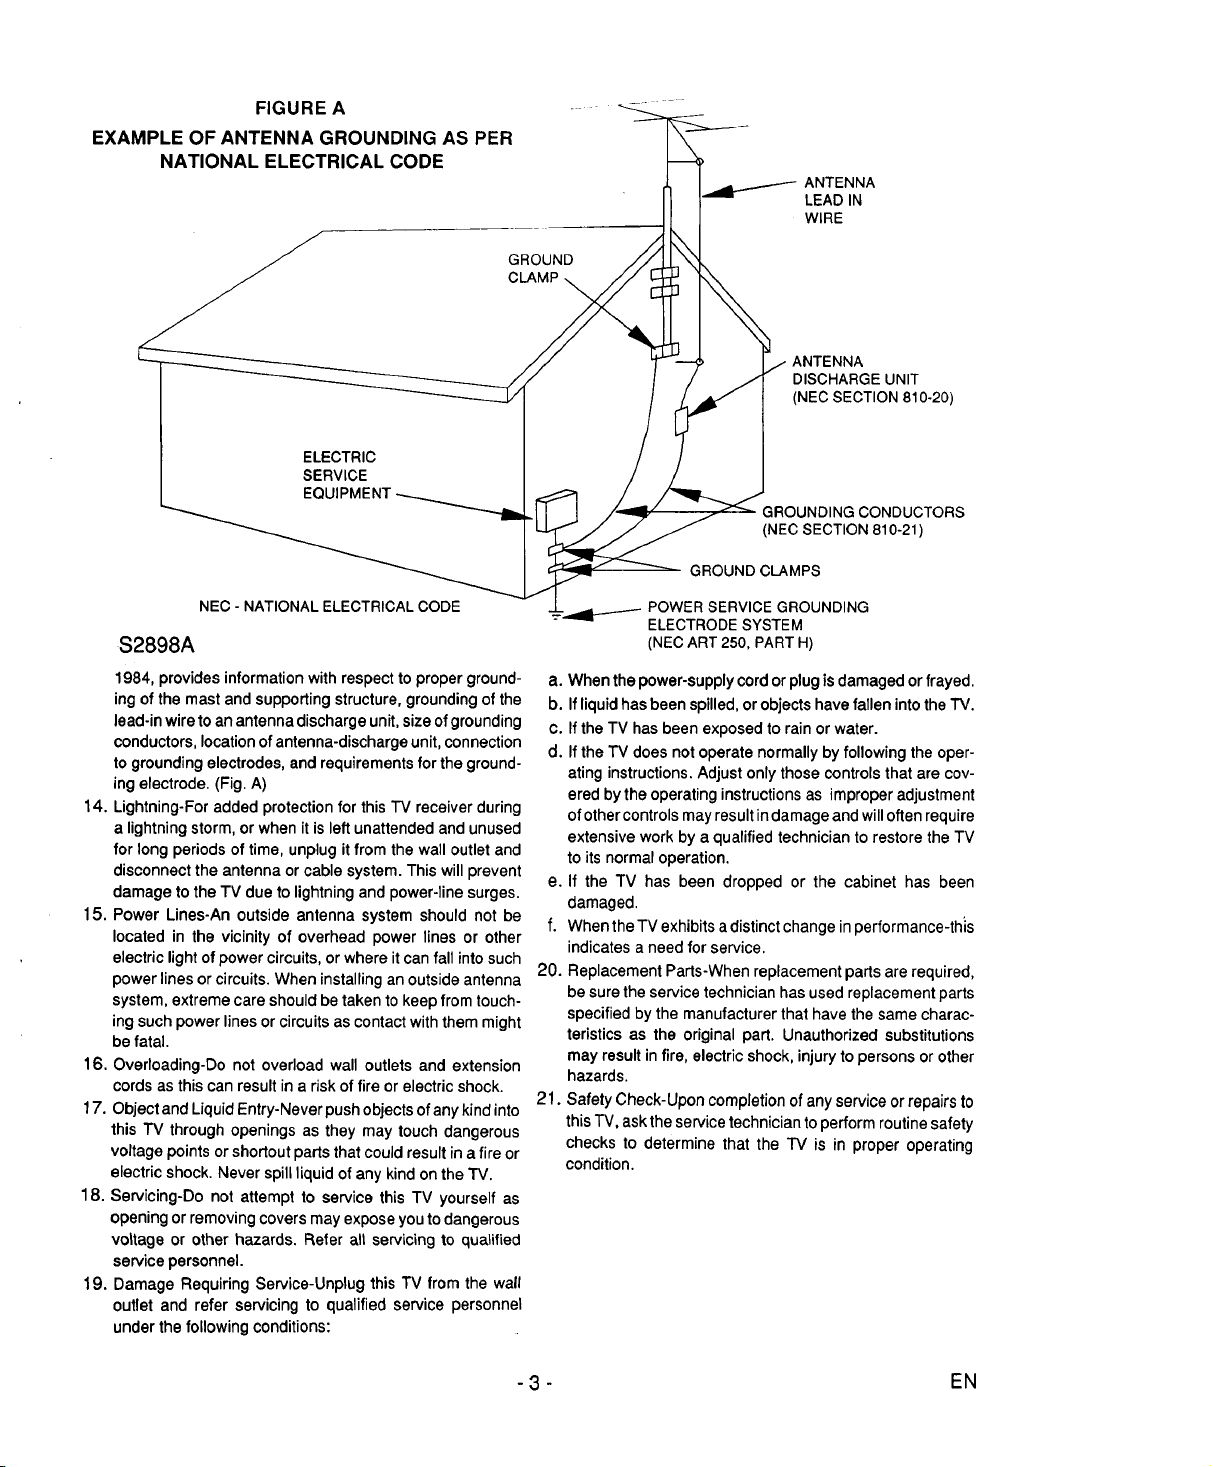
FIGURE A
EXAMPLE OF ANTENNA GROUNDING AS PER
NATIONAL ELECTRICAL CODE
ELECTRIC
SERVICE
EQUIPMENT
ANTENNA
LEAD IN
WIRE
GROUND
ANTENNA
DISCHARGE UNIT
(NEC SECTION810-20)
GROUNDING CONDUCTORS
(NEC SECTION810-21)
GROUND CLAMPS
NEC - NATIONAL ELECTRICAL CODE
$2898A
1984, provides information with respect to proper ground-
ing of the mast and supporting structure, grounding of the
lead-in wire to an antenna discharge unit, size of grounding
conductors, location of antenna-discharge unit, connection
to grounding electrodes, and requirements for the ground-
ing electrode. (Fig. A)
14. Lightning-For added protection for this "IV receiver during
a lightning storm, or when it is left unattended and unused
for long periods of time, unplug it from the wall outlet and
disconnect the antenna or cable system. This will prevent
damage to the TV due to lightning and power-line surges.
15. Power Lines-An outside antenna system should not be
located in the vicinity of overhead power lines or other
electric light of power circuits, or where itcan fall into such
power lines or circuits. When installing an outside antenna
system, extreme care should be taken to keep from touch-
ing such power lines or circuits as contact with them might
be fatal.
16. Overloading-Do not overload wall outlets and extension
cords as this can result in a risk of fire or electric shock.
17. Object and Liquid Entry-Never push objects of any kind into
this TV through openings as they may touch dangerous
voltage points or shortout parts that could result in a fire or
electric shock. Never spill liquid of any kind on the TV.
18. Servicing-Do not attempt to service this TV yourself as
opening or removing covers may expose you to dangerous
voltage or other hazards. Refer all servicing to qualified
service personnel.
19. Damage Requiring Service-Unplug this TV from the wall
outlet and refer servicing to qualified service personnel
under the following conditions:
---,,_1-_-- POWER SERVICE GROUNDING
ELECTRODE SYSTEM
(NEC ART 250, PART H)
a. When the power-supply cord or plug is damaged or frayed,
b. If liquid has been spilled, orobjects have fallen into the TV.
c. If the TV has been exposed to rain or water.
d. If the "IV does not operate normally by following the oper-
ating instructions. Adjust only those controls that are cov-
ered by the operating instructions as improper adjustment
of other controls may result indamage and will often require
extensive work by a qualified technician to restore the TV
to its normal operation.
e. If the TV has been dropped or the cabinet has been
damaged,
f. When the TV exhibits adistinct change inperformance-this
indicates a need for service,
20. Replacement Parts-When replacement parts are required,
be sure the service technician has used replacement parts
specified by the manufacturer that have the same charac-
teristics as the original part. Unauthorized substitutions
may result in fire, electric shock, injury to persons or other
hazards.
21. Safety Check-Upon completion of any service or repairs to
this TV, ask the service technician to perform routine safety
checks to determine that the "IV is in proper operating
condition.
-3 - EN
PRECAUTIONS
XoIo 1Ko
For safe operation and satistactol y perlormance of
your unit, keep the following in mind when select-
ing a place for its installation:
• Shield it from direct sunlight and keep it away
from sources of intense heat.
• Avoid dusty or humid places.
• Avoid places with insufficient ventilation for
proper heat dissipation. Do not block the ven-
tilation holes at the top and bottom of the unit.
Do not place the unit on a carpet because this
will block the ventilation holes.
• Install unit in a horizontal position.
• Avoid locations subject to strong vibration.
• Do not place the unit near strong magnetic
fields.
• Do not move the unit from a cold to a hot place
or vice versa.
Do not handle the power cord with wet hands.
Do not pull out the power cord when discon-
necting it from an AC wall outlet. Grasp it by
the plug.
• If, by accident, water is spilled on your unit,
unplug the power cord immediately and take
the unit to an authorized video service center
for servicing.
• Do not put your fingers or objects into the VCR
cassette holder.
• Do not place anything directly on top of the
unit.
,1:L'll,'J'/:l;111I
This TV/VCR is equipped with a sensor which
prevents DEW condensation. If excessive mois-
ture is present inside the unit, the "DEW" indicator
will appear on the TV/VCR screen. While "DEW"
is displayed, a safety device prevents the unit from
operating until the moisture is gone. Moisture
condensation may occur inside the unit when it is
moved from a cold place to a warm place, after
heating a cold room or under conditions of high
humidity.
Therefore, when the "DEW" indicator appears on
the TV/VCR screen, leave the POWER on and
allow at least 2 hours for the unit to dry out.
IMPORTANT COPYRIGHT INFORMATION
Unauthorized recording or use of broadcast television programming, video tape, film or other
copyrighted material may violate applicable copyright laws. We assume no responsibility for the
unauthorized duplication, use or other acts which infringe upon the rights of copyright owners.
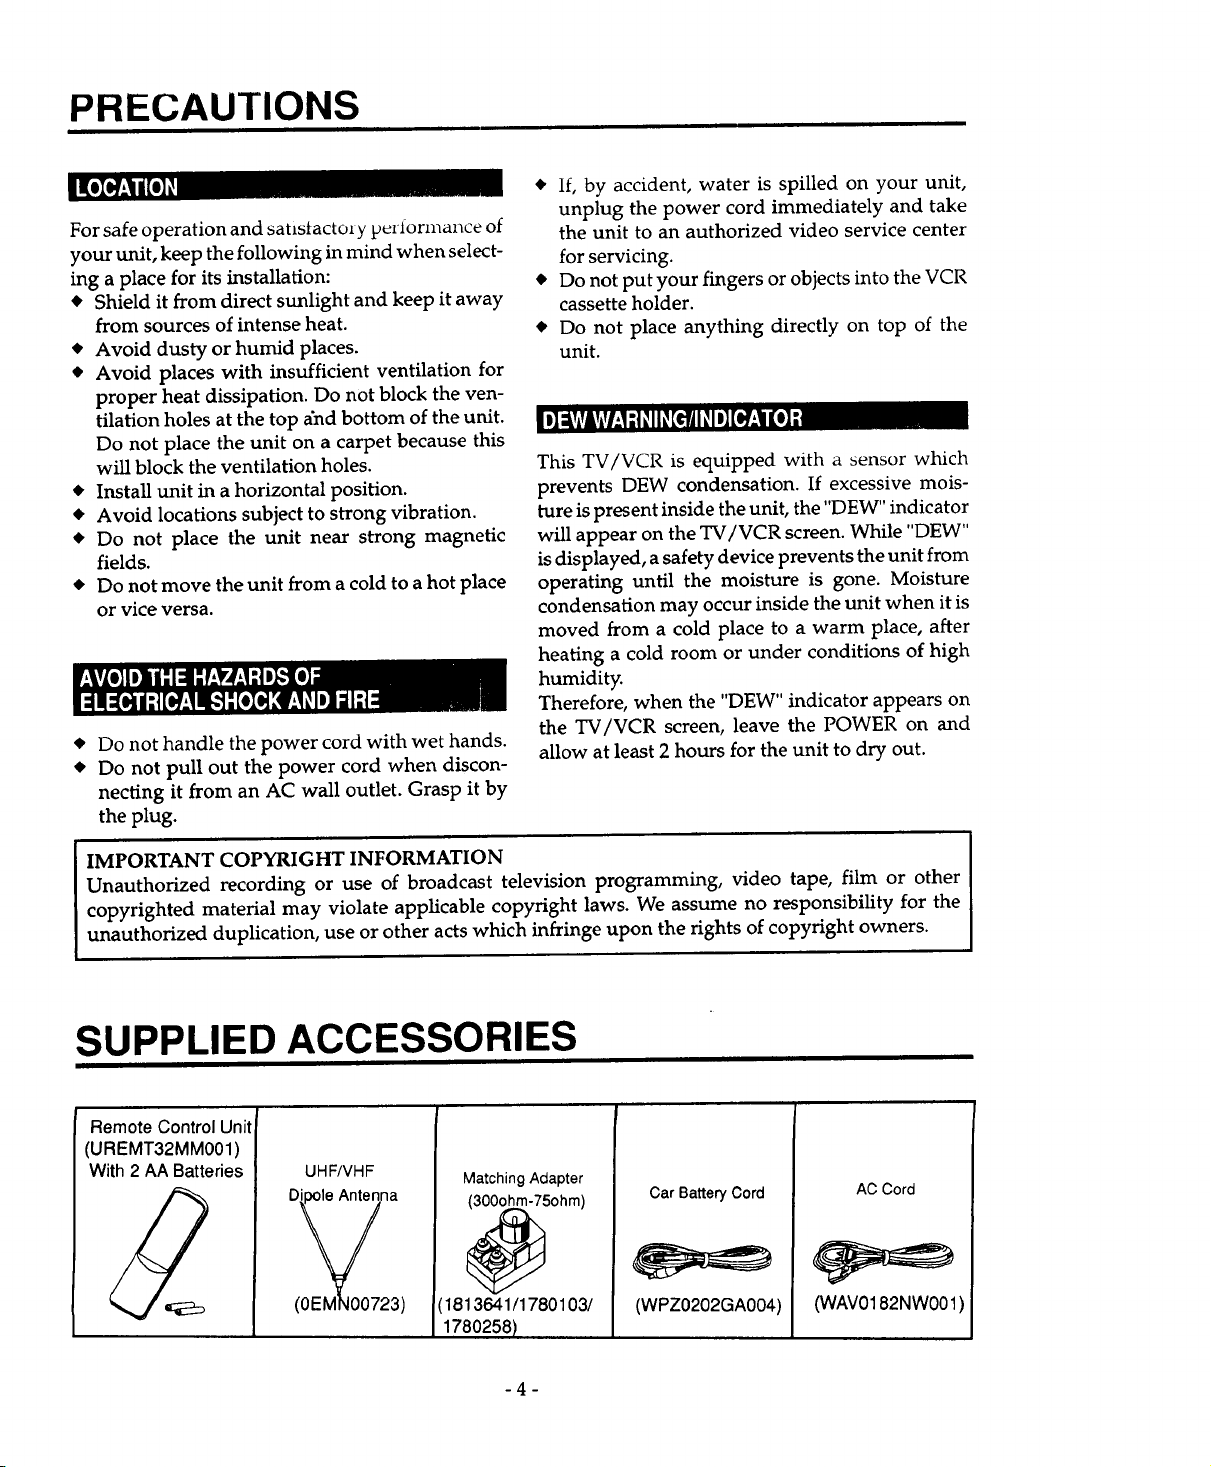
SUPPLIED ACCESSORIES
Remote Control Unit
(UREMT32MM001)
With 2 AA Batteries UHF/VHF
3)
MatchingAdapter
5ohm)
[1813641/1780103/
1780258)
-4-
Car Battery Cord
(WPZ0202GA004)
AC Cord
(WAV0182NW001
FEATURES
Auto Power On and Off system- Automati-
cally turns the TV/VCR on as you insert the
cassette, and turns off after auto-rewind, ejects
when reaches beginning of the tape.
Three Different Record/Playback Speed- Se-
lect the SP mode (Standard play), LP mode
(Long play) and SLP mode (Super long play)
for up to eight hours of recording/playback
with a T-160 tape.
• On-Screen-Display- All major operating and
programming functions appear on your TV
screen for operating convenience.
• On Screen Selectable language for English or
Spanish
• Automatic Playback Speed Selection- Auto-
matically selects the proper playback speed
even if you set speed select to different mode.
• 1 Year, 8 Event Timer (including daily and
weekly)- The built-in timer allows you to re- •
cord up to 7 programs at different times on
different channels up to I year in advance. The
Quick Set Program feature uses program num-
ber 8. Also a daily timer will allow recordings •
to be made of daily broadcasts and the weekly
timer will allow recording to be made once a
week up to the end of the tape.
Quick Set Program- The Quick Set Program
allows you to easily record one program within
24 hours.
Picture Search- You may view the video pro-
gram at a high speed in either a forward or
reverse direction.
STILL- "Freeze" the picture at any time, for
close viewing of a particular scene.
PLL Frequency Synthesizer Tuner with 181
Channel Cable-compatible with Direct sta-
tion Call- (A CATV Box may be necessary to
view pay CATV channels.)
31 Buttons Infrared Remote control- Allows
you to use most of control from a remote loca-
tion.
Rental Play Mode-Improves playback picture
quality of worn tapes, especially rental tapes.
Auto Repeat Play back- Let you set the
TV/VCR to automatically repeat a tape when
it reaches the end.
CCS (Closed Caption System)- You may
watch dramas, movies and news etc. with cap-
tioning the dialogues, if you want. (see page 30)
• AC/DC Operation (see page 12)
-5-
OPERATING CONTROLS AND FUNCTIONS
m FRONT VIEW m
l ui\
_ l,, TT TTT T I _ I
\ I I ] _---_1 /_--+---_ I I _ I I
I I I I I I I I I I I I I
2 3 4 5 6 7 8 9 10 11 12 13 14
m REAR VIEW-
15
16
.J
_20V
I
L__
J
"q_L_..._W
17 18 192021
-6-
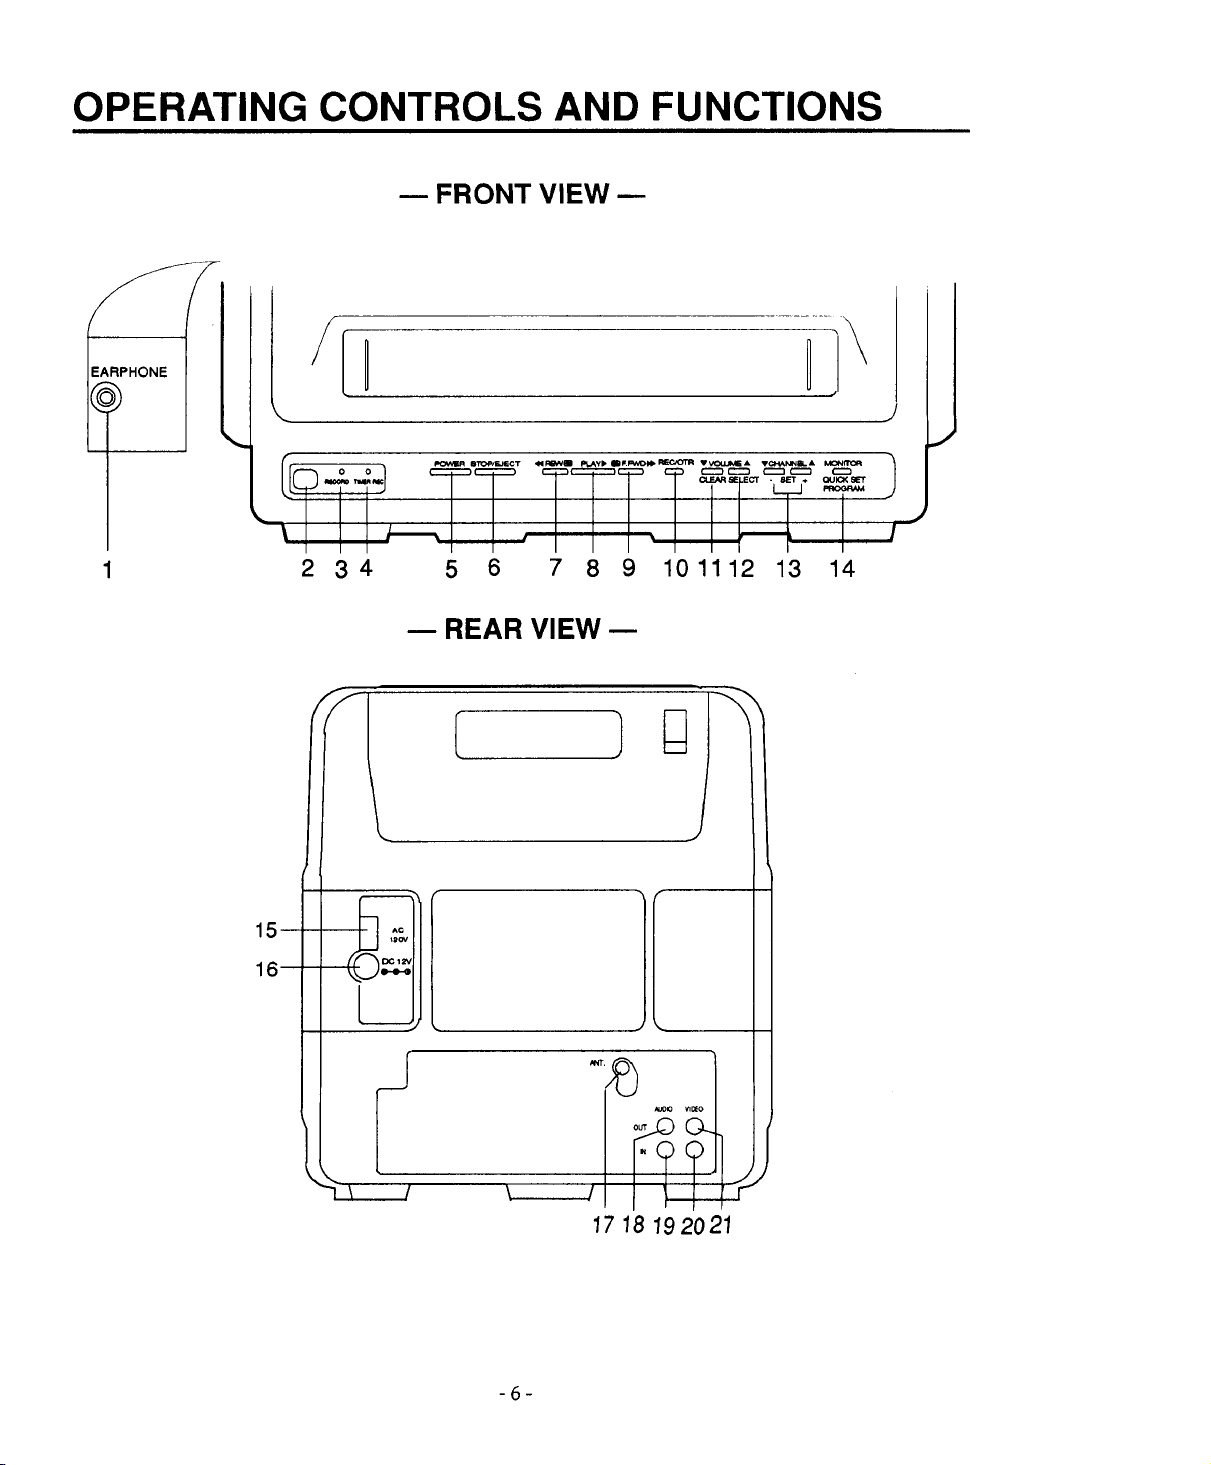
1 EARPHONE jack- To connect earphones (not
supplied) for personal listening.
2 Remote Sensor- Receives the infrared control
signals from the handheld remote control unit.
3 RECORD indicator- Lights when in the Re-
cording mode.
4 TIMER REC indicator- Lights when in the
Timer Recording mode.
5 POWER button- To turn TV/VCR on and off.
Press to activate the automatic recording timer.
6 STOP/EJECT button- Press to stop tape mo-
tion. Press to remove tape from TV/VCR.
7 REW button- Press to rewind tape, or to view
video in reverse during Play mode at a faster
than normal speed. Press PLAY button to re-
turn TV/VCR to normal playback speed.
8 PLAY button- Press to begin playback of a
tape.
9 F.FWD button- Press to advance tape, or to
view video in forward direction during Play
mode at a faster than normal speed. Press
PLAY button to return TV/VCR to normal
playback speed.
10 REC/OTR button- Press to begin manual re-
cording. Press to activate One Touch Recording
mode.
11 VOLUME • button- To descrease the volume
level.
CLEAR button- Press to cancel Quick Set Pro-
gram.
12 VOLUME • button- To increase the volume
level.
SELECT button-Press to select next step when
setting Quick Set Program.
13 CHANNEL buttons- Press to select the chan-
nel for viewing or recording.
TRACKING buttons- Adjust to minimize
video "noise' (lines or dots on screen) during
playback.
SET buttons- Adjust time with "+" or "-" but-
ton.
14 MONITORbutton- Press toturn the TV screen
on and off when in the Recording mode.
QUICK SET PROGRAM button- Press to set
Quick Set Program.
15 AC120V jack- For connection to the AC cord.
16 DC 12V jack- For connection to the Car Battery
Cord.
17 ANT. terminal- For connection to an antenna
or CATV.
18 AUDIO OUT jack- For connection to the audio
in jack of your audio equipment or another
VCR.
19 AUDIO IN jack- For connection to audio out-
put jack of your audio equipment or another
VCR.
20 VIDEO IN jack- For connection to video out-
put jack of your video camera or another VCR.
21 VIDEO OUT jack- For connection to the video
in jack of video processor or another VCR.
-7-
REMOTE CONTROL OPERATION
You can operate most of functions from the Re-
mote Control (included). The buttons on the Re-
mote Control have the same functions as the
corresponding buttons on the unit.
o_ Ullj,']_.'ll_I_O]lll=o__
1 POWER button- To activate the automatic
timer recording and turn TV/VCR on and off.
2 NUMBER buttons- To select desired channels.
To select channels I to 9, first press the 0 button
and then press desired channel button 1 to 9.
+100 button- To select channels which are
equal or greater than number 100.
3 STOP button- To stop tape motion.
4 PLAY button- To playback the tape.
5 REW button- To rewind the tape. To view the
picture rapidly in reverse, in the play mode.
(Rewind Search)
6 F.FWD button- To move the tape forward rap-
idly. To view the picture rapidly in forward in
the play mode. (Forward Search)
7 REC button- Press to begin manual recording.
8 PAUSE/STILL button- To stop the tape tem-
porarily during playback or recording.
9 MENU button- Press to display main menu on
the TV screen. (This function is operative only
when the main menu is displayed on TV screen
in the Stop mode.)
10 SELECT button- Press to select setting modes
(clock, counter, tape speed, program, CH pre-
set) in the main menu. (This function is opera-
tive only when the main menu is displayed on
TV screen in the Stop mode.)
Status function- Press to display the counter or
the current channel number and current time
on the TV screen.
11 ADD/DELETE button- Press to cancel memo-
rized channel or Timer Program, and to add
desired channel. (This function is operative
only when the main menu is displayed on TV
screen in the Stop mode.) (See page 18, 24)
COUNTER RESET button-To reset counter to
0000.
12 COUNTER MEMORY button- To set counter
memory on and off. (See page 21)
13 SPEED button- To set desired recording
speed. (SP/LP/SLP)
14 MONITO_ button- Press to turn the TV screen
on and off when in the Recording mode.
15 MUTE button- To mute sound. Press again to
resume sound.
16 VOLUME buttons--To adjust desired volume
level by pressing either "A" or "V" button.
17 CH. buttons- To select desired channel by
pressing either "A" or "v" button. They cannot
be used during Timer Recording.
They may also be used to adjust the picture
control. (See page 19)
SET button- Adjust time with "A" or "T" but-
ton in the Menu mode.
(This function is operative only when the main
menu is displayed on TV screen in the Stop
mode.)
TRACKING buttons-Adjust to minimize
video 'noise' (lines or dots on screen) during
playback. (See page 32)
18 EJECT button- Press to remove tape from
TV/VCR.
19 SLEEP button- To activate the sleep function.
(See page 29)
-8-

1 2 3 4
5 6 7 8
9 0 V CHJSET A
--2
19
18
_il_-__lll _ !_ d=J,_lI_-']
Slide the battery compartment cover by pressing
the cover on the remote unit in the direction of the
aITo_v.
STOP ,A
F q-
PLAY VOLUME
)ltc
5
REW F,FWD MUTE
--15
Insert 2 "AA" penlight batteries into the battery
compartment in the direction as indicated by the
polarity (+/-) markings.
6
7
MENU _UECT AOD/OELETE
RESET
--14
13
12
11
Replace the coven
-9-
ANTENNA CONNECTIONS
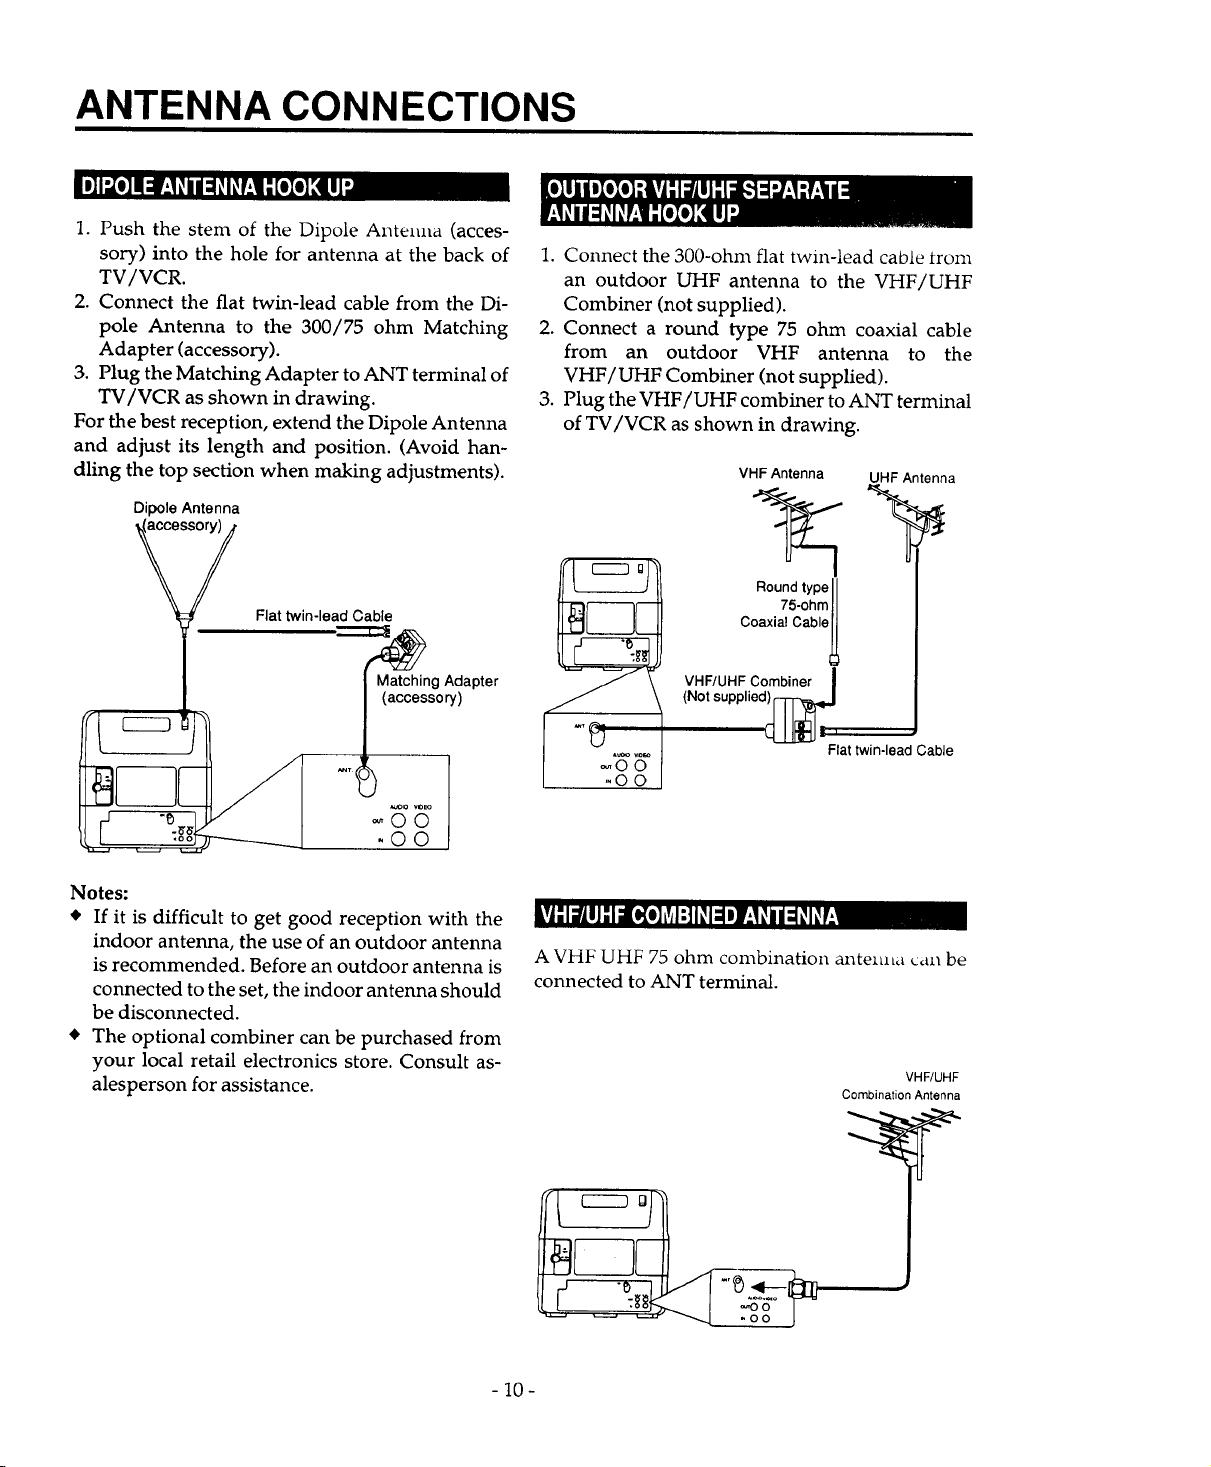
1. Push the stem of the Dipole Antenna (acces-
sory) into the hole for antenna at the back of
TV/VCR.
2. Connect the flat twin-lead cable from the Di-
pole Antenna to the 300/75 ohm Matching
Adapter (accessory).
3. Plug the Matching Adapter to ANT terminal of
TV/VCR as shown in drawing.
For the best reception, extend the Dipole Antenna
and adjust its length and position. (Avoid han-
dling the top section when making adjustments).
Dipole Antenna
accessory)
Flat twin-lead Cable
1. Connect the 300-ohm flat twin-lead cable trom
an outdoor UHF antenna to the VHF/UHF
Combiner (not supplied).
2. Connect a round type 75 ohm coaxial cable
from an outdoor VHF antenna to the
VHF/UHF Combiner (not supplied).
3. Plug the VHF/UHF combiner to ANT terminal
of TV/VCR as shown in drawing.
VHF Antenna UHF Antenna
Round type
75-ohm
J-TC
Coaxial Cable
Matching Adapter
(accessory)
Notes:
• If it is difficult to get good reception with the
indoor antenna, the use of an outdoor antenna
is recommended. Before an outdoor antenna is
connected to the set, the indoor antenna should
be disconnected.
• The optional combiner can be purchased from
your local retail electronics store. Consult as-
alesperson for assistance.
VHF/UHF Combiner
(Not supplieO__ !
Flat twin-lead Cable
_OO
_ [_o]_]lIl:l_ M_i/:_I_P',.,!
A VHF UHF 75 ohm combination antenna can be
connected to ANT terminal.
VHF/UHF
Combination Antenna
-10-
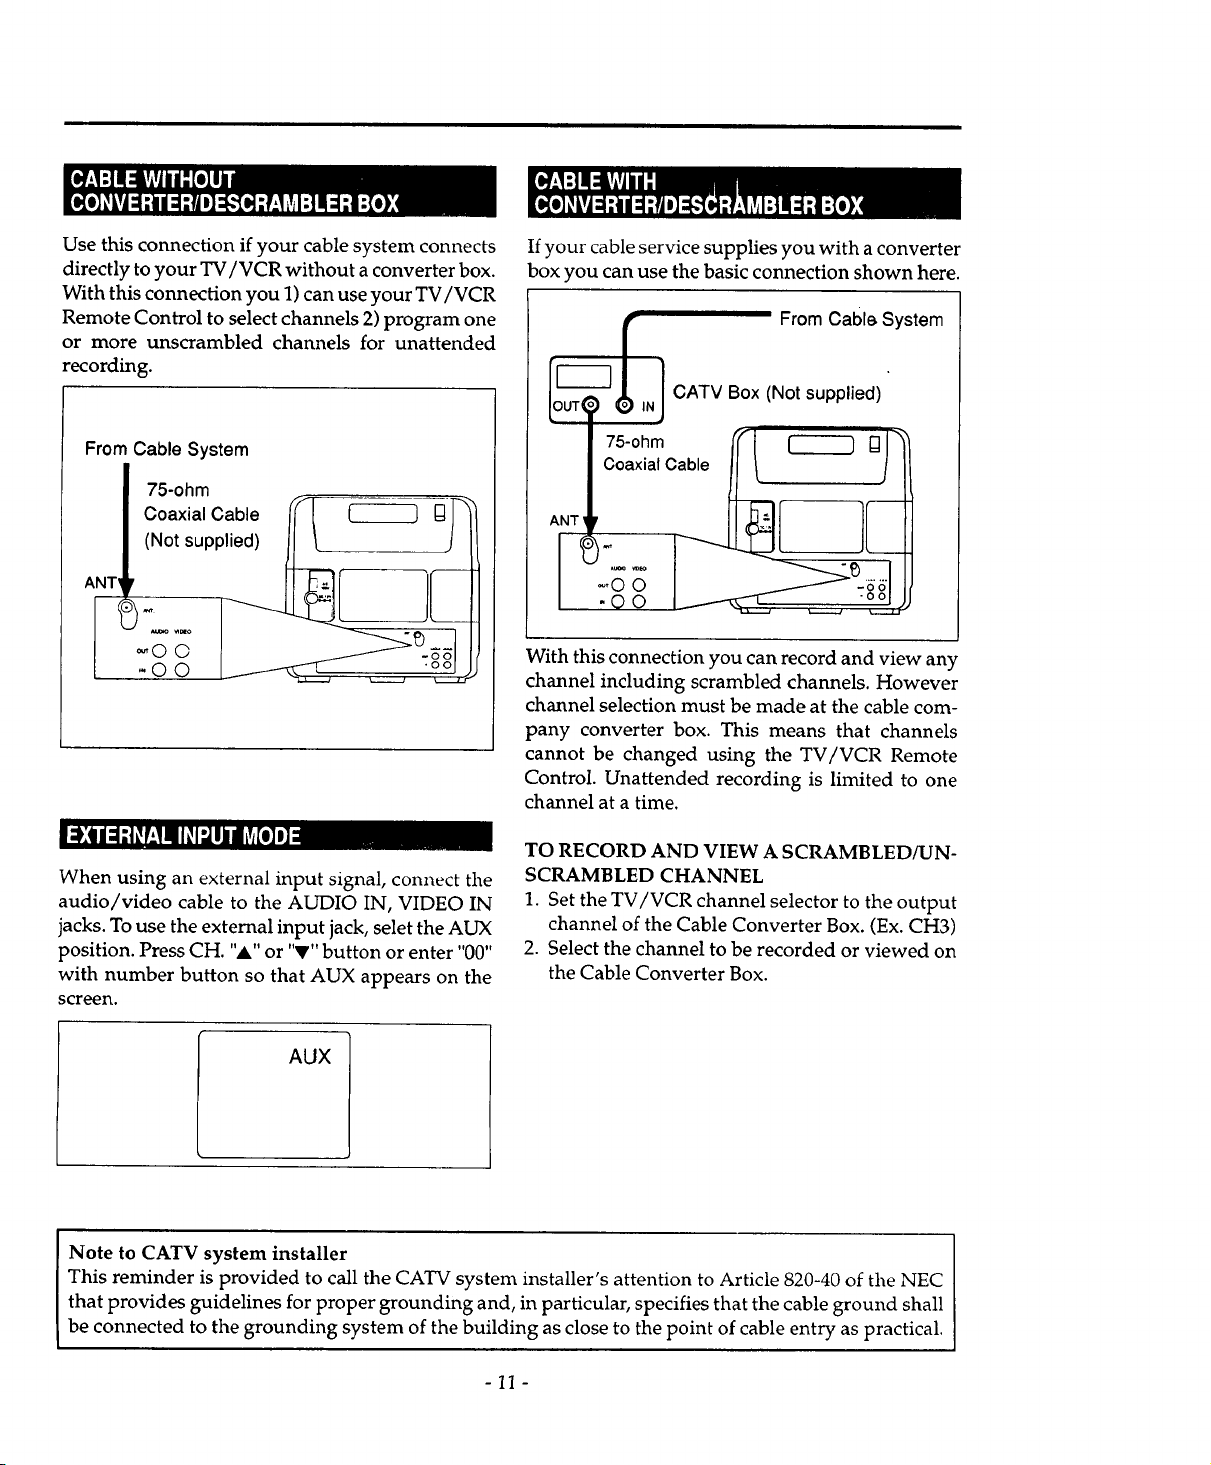
Usethisconnectionif yourcablesystemconnects
directlytoyourTV/VCRwithoutaconverterbox.
Withthisconnectionyou1)canuseyourTV/VCR
RemoteControltoselectchannels2)programone
or moreunscrambledchannelsfor unattended
recording.
From Cable System
75-ohm
Coaxial Cable /"F'] _ I_]_
(Not supplied) L____
If your cable service supplies you with a converter
box you can use the basic connection shown here.
From Cabl6 System
_._l_ CATV Box,,(Notsupplied)
c5aOiha/Cable fl _ _ 13J"
-©©
_ II_i'JI_ [_o_
When using an external input signal, connect the
audio/video cable to the AUDIO IN, VIDEO IN
jacks. To use the external input jack, selet the AUX
position. Press CH. "A" or "V" button or enter "00"
with number button so that AUX appears on the
screen.
AUX
With this connection you can record and view any
channel including scrambled channels. However
channel selection must be made at the cable com-
pany converter box. This means that channels
cannot be changed using the TV/VCR Remote
Control. Unattended recording is limited to one
channel at a time.
TO RECORD AND VIEW A SCRAMBLED/UN-
SCRAMBLED CHANNEL
1. Set the TV/VCR channel selector to the output
channel of the Cable Converter Box. (Ex. CH3)
2. Select the channel to be recorded or viewed on
the Cable Converter Box.
Note to CATV system installer
This reminder is provided to call the CATV system installer's attention to Article 820-40 of the NEC
that provides guidelines for proper grounding and, in particular, specifies that the cable ground shall
be connected to the grounding system of the building as close to the point of cable entry as practical.
-11-
 Loading...