

Sears 917.25170 Owner's Manual
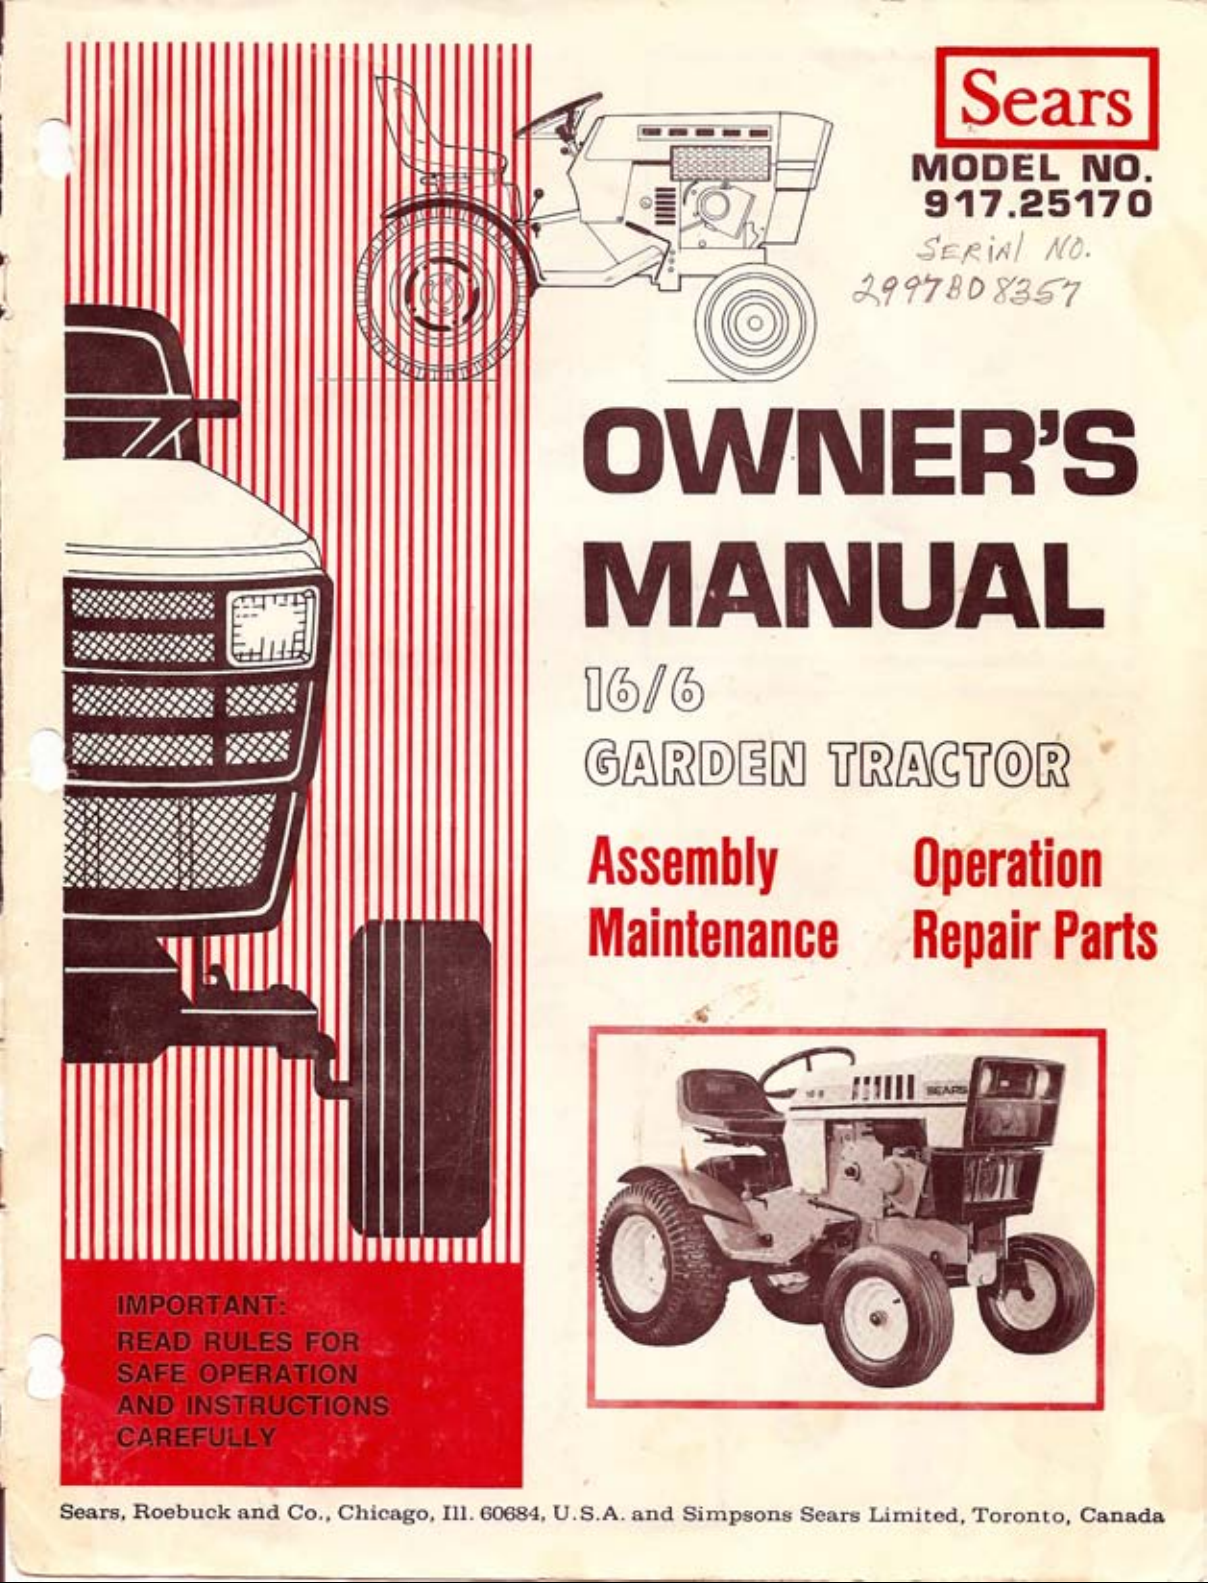
Sears
MODEL NO
s4t .ilstt
Senial t'/e.
A??7BD
vssz
OWNER'S
MAITIUAL
16[6
@AREEN
ti
Assembly
MaintenanGe
llperation
flepair
Pails
--
--*d'i;
.*$q(
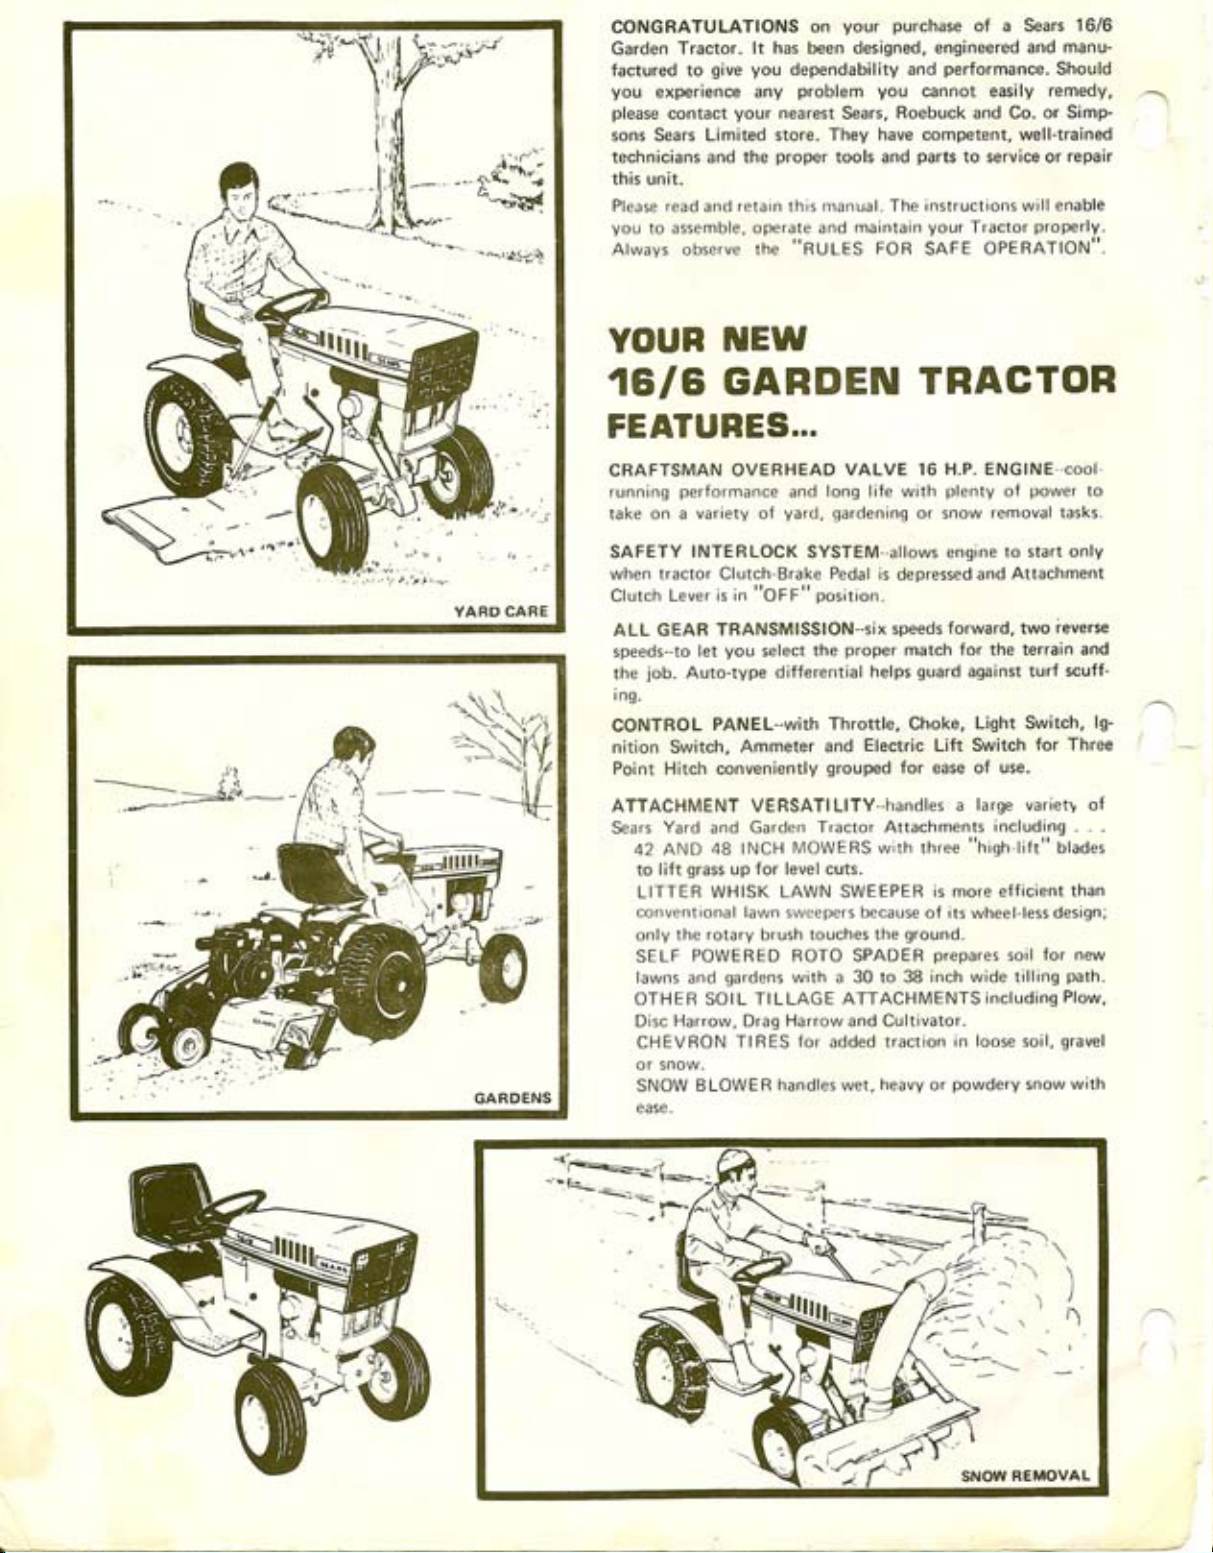
your purchase
CONGBATULATIONS
Garden Tractor.
factured to
you
please
sons Sears Limited store. They
technicians and
this unit.
Please read
you
to assemble,
give
experience any
and
your
the
retain
contact
Always observe
on
lt has been designed, engineered
you
dependability and
problem you
nearest
proper
operate
the
Sears,
tools and
manual. The instructions will
this
maintain
and
"RULES
of a Sears 16/6
and manu-
performance.
cannot easily
Roebuck and Co. or Simp-
have competent, well-trained
parts
to service or repair
your
Tractor
FOR
SAFE OPERnttOtt".
Should
remedy,
enable
properly.
\w
YOUR
1f6IA GARDEN
IUEW
TRAGTOR
FEATURES...
CRAFTSMAN
running
on a variety oI
take
SAFETY
when tractor Clutch-Brake Pedal is
Lever is in
Clutch
GEAR TRANSMISSION-'SiX
ALL
speeds-to
job.
the
ing.
CONTROL
nition Switch,
Point Hitch conveniently
ATTA.CHMENT VE RSATIL|TY-{andles
Yard
Sears
AND 48
42
lift
to
LITTER
conventional lawn sweepers because
only the
SELF
lawns and
OTHER SOIL TILLAGE ATTACH
Disc
CHEVRON
OVEHHEAD
performance
yard,
INTERLOCK
"OFF"
you
let
Auto-type
select
differential
PANEL-with Throttle,
Ammeter and
and Garden
INCH
grass
POWERED ROTO SPADER
Harrow, Drag Harrow and Cultivator.
for level cuts.
up
WHISK LAWN SWEEPER is
rotary
brush
qardens
TIRES
VALVE 16 H.P. ENGINE
long lire with
and
gardening
SYSTEM*allows engine
position.
proper
the
grouped
Tractor Attachments
I\,IOWERS with three
or
depressed and
speeds
match
guard
helps
Choke,
Electric
for ease of use.
of its wheel-less design;
touches the
with
a
for
added
ground.
30 to 38 inch wide tiiling
lVlE NTS including
traclion in
plenty
snow
power
oI
removal tasks-
to start only
Attachment
forward, two
for the terrain and
against
turf scuff-
Light Switch,
Lift Switch
a
"higtr
more efficient than
prepares
for Three
large variet} of
including
lift" btades
lor new
soil
loose soil,
cool
to
ieverse
lg-
path.
Plow,
gravel
GARDENS
SNOW
ease.
BLOWER
handles wet,
heavy
powdery
or
snow with

TABLE
WARRANTY
RULES FOR SAFE OPERATION
ASSEMBLY
OPERATION
INSTRUCTIONS
I NSTRUCTIONS
. .4
OF
GONTENTS.
.1
. 1
MAINTENANCE
TROUBLE
REPAIR
SHOOTING
PARTS .
INSTRUCTIONS
.6
11
12
FULL
For
r
will
lf the tractor
date
For 90
or workmanship
From the 91st day until one
defective in material or workmanship
1/12th of the
Warranty service
United States.
This warranty
ONE
year
one
repair any
purchase.
of
days from the
YEAN WABRANTY
purchase,
the date
from
defect
is used
FULL
will not hold a charge, Sears will replace the battery at no
and
of
in material
for commercial
gO.DAY
date of
purchase,
LIMITED
year
from the date of
price
is
gives you
new battery for each
of the
available
by simply contacting the
specific Iegal
when this
or workmanship
rental
or
WAERANTY ON BATTEPY
if
any battery included with the tractor
WANEAilTY
and will not
rights,
and
Sears, Roebuck and Co.
Sears
BSC
Chicaqo, lL 60684
ON ELEGTBIC START
tractor
in this tractor.
purposes,
is
used
warranty applies for
this
for
personal
except
charge.
ON BATTEBY
purchase,
hold
if any battery
charge, Sears will replace the battery, charging
a
full month from the date of
nearest Sears store or Service Center throughout
you
Tower
41-3
may also
have
other
included wrth
purchase.
rights which vary from
household
battery,
the
proves
TNACTOR
purposes,
no
at
charge.
only 30days
defective in material
the
from the
tractor
state
to state-
Sears
proves
the
NULES FOR SAFE OPENATION
1. Know the controls and how 10 stop
OWNER,S MANUAL.
2. Do not allow
to operate it without
adults
3. Do not carry
tance away.
4.
Clear the
and thrown.
children
passengers.
work
to operate the
proper
Keep children and
of objects which might be
area
quickly.
vehicle. Do not allow
instruction.
5. Disengage all attachment clutches and shift into
fore
attempting to
Disengage
6.
fore
7.
Disengage
making
8. Disengage
tn use.
9. Take all
attended, such as disengaging the
the
brake,
10.
Do not stop or start
hill NIow
15"); never
'11.
Reduce speed
vent
when changing
Stav alert for holes in the terrain and other hidden hazards-
Stay alertStay alert
12.
13.
Use
power
leaving the operator's
power
repairs
any
power
possible
attachments. shifting into neutral,
stopping the engine, and removing the key.
up and down the face ol slopes
across the
on slopes and
or
tipping
tipping
or
for holes in
care when
a. Use only approved drawbar hitch
b. Limit
c, Do not
d.
14. Watch out for traffic
loads
turn
counterweights
Use
thrs owner s manual.
the engine.
start
to attaehments and stop the
to attachments and stop the engine before
or adjustments.
to
precautions
loss of control.
loss of control.
direction on slopes.
pulling
to those
sharply.
position.
attachments when
leaving
when
power-take-off,
suddenly when
face.
the terrain and other
loads
you
Use
or wheel weights when suggested in
going
make
turns
Exercise extreme cautionvent
Exercise extreme caution
using heavy equipment.
or
can safely control.
care when backing.
when c(ossinq or near roadwavs.
READ THE
pets
safe dis-
a
picked
neutral
engine
transporting or
vehicle
the
lowering
setting the
uphill or down-
(not
gradually
hidden hazards.
points-
parking
greater
to
up
bebe-
not
un-
than
pre-
15. When using
materia! toward bystanders nor allow anyone
hicle while in operation.
'16.
Handle
a. Use approved
any attachments,
gasoline
with care
gasoline
b- Never remove the cap of the
running
a
Wipe up spilled
or hot engine, or
gasoline.
never direct discharge of
-
it is highly flammable.
containers-
fuel
tank or add
fill
the
fuel
c. Open doors if the engine is run in the
fumes
17.
Keep the
dition,
18. Keep all nuts,
ment
'19.
Never store the equipment
a building where fumes may reach an open flame or
Allow
20.
To reduce fire hazard, keep
or
excessive
21. The
ed for damage
age
equipment.
22. Do not change
the
23. When using the vehicle
a. Mow
b. Never make
c.
d. Check
24. Check the
ration.
are dangerous. Do not run the engine indoors.
vehicle
and
is in safe working
and attachments in
keep
safety devices in
bolts and screws tight to be sure the equip-
condition.
with
the engine to cool before storing in any enclosure.
vehicle
should be repaired
engine.
grease.
and attachments
after striking a foreign object, and
the engine
only in daylight
is running
Shut the engine
unclogging
frequent
a cutting height
if the operator must
off when removing
chute.
the blade mounting bolts for
intervals.
grass
Replace
catcher
with new
the engine
should be stopped and inspect-
restarting
before
governor
with mower,
in
or
frequently
bags
bags
good
place.
gasoline
good
adiustment while
in the tank inside
free
and operating
settings or overspeed
proceed
artificial light.
dismount to do
the
proper
for wear
for
safety
near the ve-
gasoline
tank indoors.
garage -
grass
exhaust
operating con-
spark.
grass,
of
as follows;
leaves
the dam-
the engine
catcher or
Lightness at
or deterio-
protection.
to
the
so.
LOOK FOR THIS SYMAOL TO POINT OUT IMPORTANT
SAFETY PRECAUTIONS.
BECOME ALERT! YOUR
MEANS,-
IT
SAFETY
ATTENTION!
IS INVOLVED.
,1-
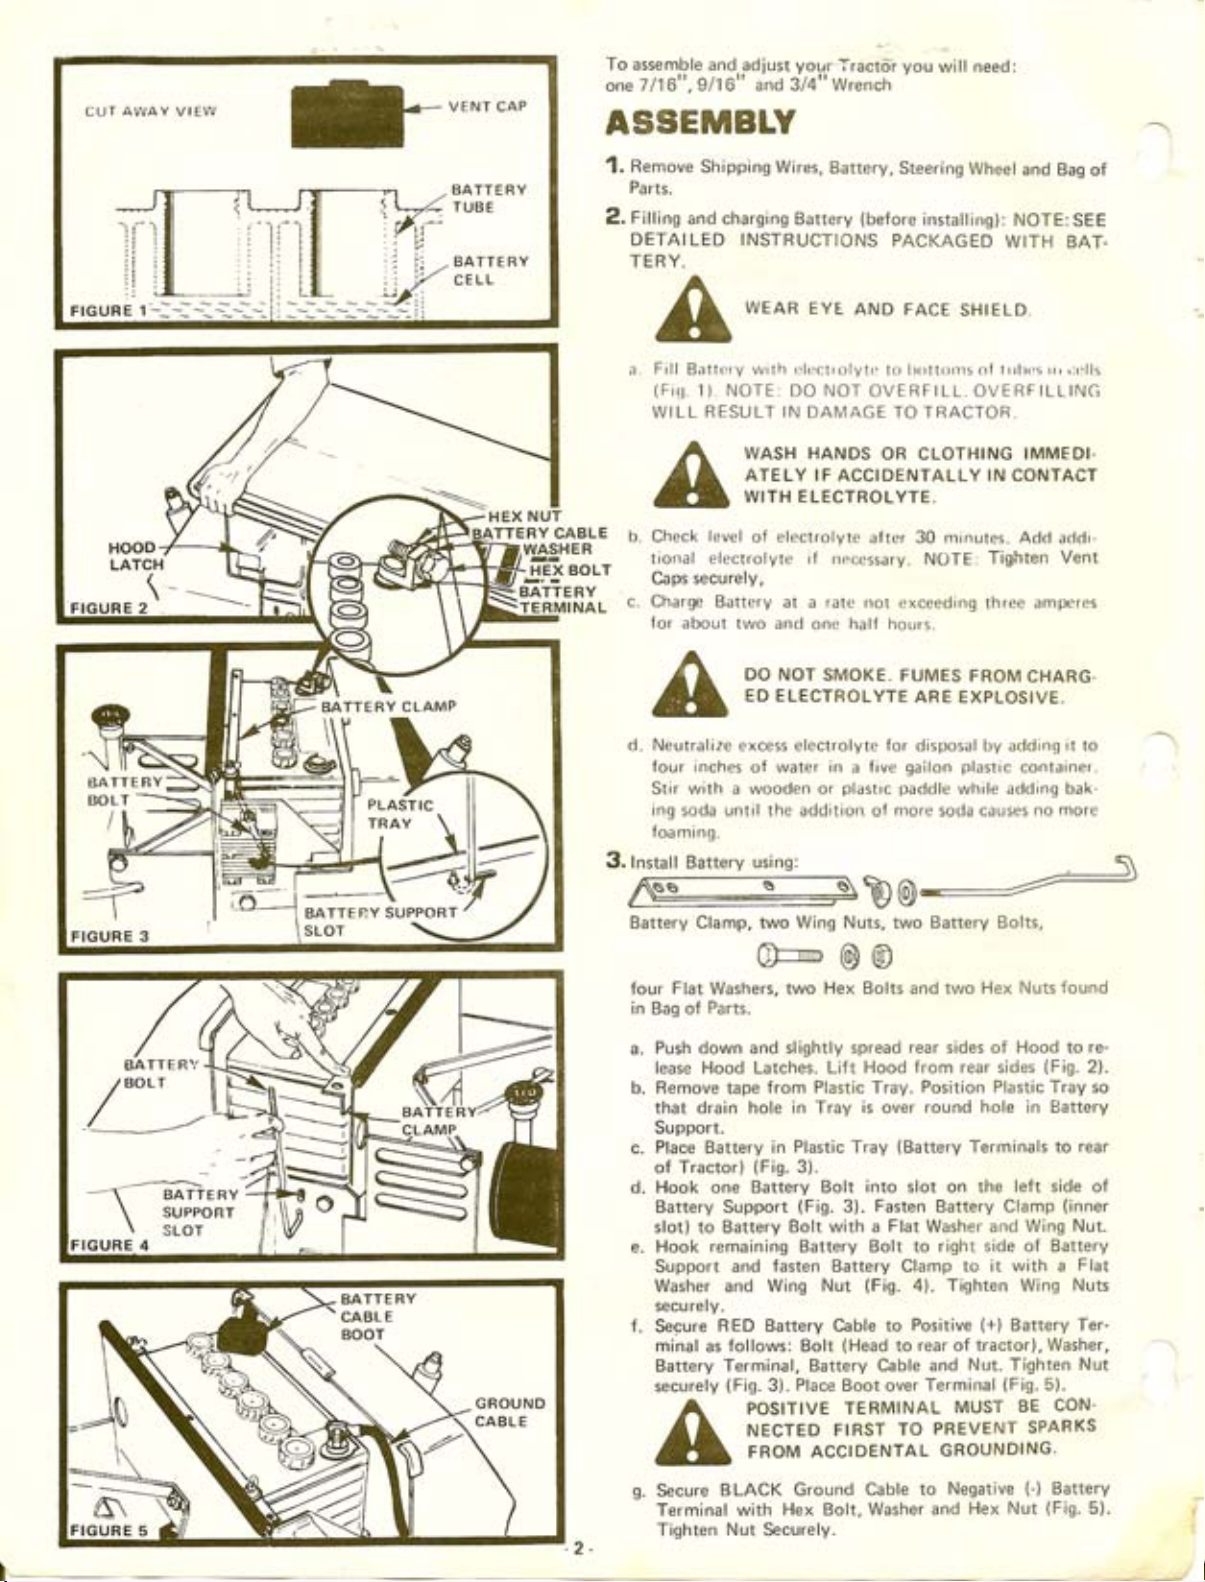
CUT AWAY VIEW
t--u.rr.o,
BATTERY
TUBE
BATTERY
CELL
To assemble
7/16". 9/16" and 3/4" wrench
one
and.adiust
yoLr
ASSEMEIY
Remove
1.
Parts.
Filling
2.
DETAILED INSTRUCTIONS
TERY,
a.
Shipping Wires,
and charging Battery
WEAR
A
Fill
Battcry
(Fiq.
WILL RESULT IN
wilh r)loctrolytc
1) NOTE:
DO
EYE
NOT
DAMAGE TO
Tracto-r
Battery,
you
Steering Wheel
{before
installing):
will need:
PACKAGED
AND
FACE
.HIELD-
to lx)tt()rr)s ol llllxrs
OVERFILL. OVERFILLING
TRACTOR,
and Bag
NOTE:
of
SEE
WITH BAT.
ll,rolls
BATTERY CLAMP
BATTE RY SUPPORT
TTERY CABLE
WASHER
.HEX
BOLT
WASH HANDS OR
ATELY IF ACCIDENTALLY IN
WITH ELECTROLYTE-
b. Check
c. Charge
level
electrolyte
of
tional eiectro,yte if
securely,
Caps
Battery at a rate not
for
about
two and one half hours.
DO NOT
ED E
LECTROLYTE
necessary.
SMOKE. FUMES
d. Neutralize excess electrolyte for
Jour
inches of water in a
Stir with a wooden or
ing
soda until the addition of
foaming.
3.
lnstall Battery
Battery
four
in
Clamp, two Wing Nuts, two Battery Bolts,
Flat
Washers, two
of Parts.
Bag
usinq:
C\*-,
plastic
@
Hex Bolts
CLOTHING
CONTACT
alter 30 minutes.
NOTE:
exceeding three ampcr{rs
ARE EXPLOSIVE.
disposal by
five gailon
paddle
nrore
Tighten
FROM
adding
plastic
while addiog bak-
soda causes
@
two Hex Nuts
and
IMMEDI.
Add addi
Vent
CHARG.
it
container-
no more
found
to
E R\.'
BA TT
-r--'--iiii
\ supponr
\
e n vl
sror
Push down and slightly spread
a.
lease Hood Latches. Lift
b. Remove tape
from Plastic Tray.
rear
Hood from rear sides
that drain hole in Tray is over
Support.
Place
c.
of Tractor)
Battery
in
(Fig.
Plastic
3).
d. Hook one Battery
Battery Support
slot) to Battery Bolt
(Fig.
Bolt into slot on the
with a
Tray
3).
(Battery
Fasten
Flat
e. Hook remaining Battery Bolt to
Support and
Washer and Wing
securely.
f. Secure
minal
as
Battery Terminal, Battery
securelV
Secure
s.
Terminal with
Tighten
fasten Battery Clamp to it with a
(Fig.
Nut
RED Battery Cable to
follows: Bolt
(Fig.
3).
POSITIVE
NECTED
FROM ACCIDENTAL
BLACK Ground Cable
Place
FIRST
(Head
Boot over
TERMINAL
4). Tighten Wing Nuts
Positive
rear of tractor), Washer,
to
Cable and
TO
to
Hex Bolt. Washer and
Nut
Securely,
sides of
Position Plastic
Hood to re-
{Fig.
Tray so
round hole in Battery
Terminals to
rear
left side
Battery
Washer and Wing
Clamp
right side of Battery
(+)
Nut. Tighten Nut
Terminal
(Fig.5).
MUST
PREVENT
GROUNDING.
Negative
Hex Nut
(inner
Nut.
Flat
Battery Ter-
CON.
BE
SPARKS
(')
Battery
{Fig.
2}.
of
5).

4.lnstall
Steering Wheel
using:
oc
Washer, Lockwasher,
Flat
of Steerinq
Woodrulf
Parts.
a- Remove
Steering Shaft
lnsert Woodruff Kev in Kevway
b.
slide
SURE
SHAFT.
Fasten
c.
6t.
Insert
d.
Shaft;
-
Key,
and
Steering
Hex
Bolt, Lockwasher
lFig.
Steering Wheel
WOODRUFF KEY
Flat
with
I rgnren
Steering Wheel Cap in
Washer, Lockwasher
secu.cly
and
Wheel Cap
6).
over Shait
IS
place.
q
Bolr assembled
found
in Bag of
Flat
and
of Steering Shaft and
and Key.
SECURE
Washer
NOTE:
IN STEERING
Hex Bolt
and
on end
,rom
BE
(Fiq.
INITIAL
Reduce Tire
1.
(Tires
2.Seat
loosening
TIGHTEN ING
SEAT
MENT WITH SEAT
A spark arrestor
3.
vo..
INITIAL
NOTE:
THE
FUEL,
l.Check
Wipe dipstick
onds, remove
"FULL"
SD or SE) Oil.
(SC.
(below
DO NOT OVERFILL.
ADJUSTMENTS
pressure
were overlnflated
position
Nut
PLATE HAS NOT
lr,,.ror
C", ck
SERUICE
BE CAREFUL
ENCINE WHEN CHECKING OR
Engine
(Fig.8)
and
mark is
or
SD
SE)
ooF.) use
to
for shipping
SPRING.
mLrftler
qa
l,
NOT
.rcljusted
Plate
may b(i
in Scat
NUT AFTE
Oil Level with Tractor
clean,
read
Oil Level. lf necessary,
reached.
ln winter
or low4o
S.A.E.
pounds
12
(Fig.7).
R ADJUSTMENT,
TWISTED
is available as an accessory
r,,rlrrr,'
TO ALLOW DIRT
in
purposes).
forward
m',11\
tront
or
NOTE
OUT
.n y.r,r
and
backward
WHEN
I\IAKE SURE
OF
o,r
TO
ADDING
level
push
ln summer
(below
32oF.) use S.A.E.
(SC.
SD or SE).
(SC,
5W2O
on
it in tight for
add Oil
use S.A.E. 30
ln extreme cold
or
SD
SE).
a
rear Tires.
by
RE
ALIGN'
part
for
d.
ENTER
OIL OR
ground.
few sec'
until
(SC,
1OW3O
NOTE:
ENGINE OIL
DIPSTiCK
Fill Fuel Tank
2.
leaded
NOT
SWITCH
LINE,
gasoline.
(Fiq.
7)
Capacity
FROM
fresh regular
with
is 3 1/4
LEADED
FILL TO BOTTOM
TO LEAD.FREE
OF
ER NECK. DO NOT OVERFILL. WIPE
OFF ANY SPILLED OIL OR FUEL.
grade
gallons.
GAS TANK FILL.
free
lead
NOTE: DO
GASO.
or
,3-

OPEPATIOil
FIGUBE9
FIGURE'IO
PostrtoN
oFF
ATTACHMENT
CLUTCH
LEVER
GEAR SHIFT
LEV E
REVERSE
PARKING BRAK
LEVER
t.t'
i,f
, )y l::
/ lo"
RANGF SHIFT II
LEVEB
^
--11+^)
l^l ii.
/;"'ll
\
\1 T HIGH
NEUTRAL
tlrt
oll
:1
"ll
STANTING
P
Parkrng
ace
1.
Place
2.
3.Place Gear
4.Move
5.Push
6.
7.
l\,4ove
Prlt
Chok" out
Attachrnent
Range
Clutch-Brake
Throttle
8.Turn lgnition Key
(Fig.
13). Release key
NOTE:
FOR MOR€
engine does not
Control Lever
try again.
NOTE:
an
equipment).
The Electric
attachment when used with a Three Point Hitch
WARMING
Move Throttle
in
as engine warms. NOTE: ALLOW ENGINE
FOR
UP
"r
I
When
to middle
A
restarting
position,
THE
Shift Lever
Shift Lever
Conrrol Lever
DO NOT RUN
THAN
to "FAST"
Control Lever to slow
FEW
MINUTES BEFORE
a warm engine, move
ALWAYS WEAR SUBSTANTIAL FOOT.
WEAR AND AVOID LOOSE FITTING
CLOTHING THAT
IN MOVING PARTS.
LEARN TO START, STOP AND REVERSE
YOUR TRACTOR IN A LARGE. OPEN
SPACE.
ENGINE
Brake Lever ill
Clurch Lever in
in netltral
to
Padal into
'13).
(Fig.
"START" position
to
into
THIRTY
start after several
Lift Switch
THE
UP
Choke may not have
lockecl
"OFF" position
"N"
neutral
brake
middle
to
"ON" position.
STARTER
SECONDS AT A TIME. If
position,
(Fig.
ENGINE
OPERATING.
position
positon
"N"
pos
position (Fig.
position (Fig.
Llntil Engine
CONTINUOUSLY
attempts, move throttle
few
wait a
13)
position.
Throttle Control Lever
COULD GET CAUGHT
(Fiq.
(Fiq.
(Fig.
(Fig.
tion
minutes, and
raises
or lowers
(optional
Push
TO WARM
to be
g).
l0i.
l1).
11).
12).
13).
starts
Choke
used.
\
TRACTOR
OPERATION
1.With engine
middle
Push
2.
3.
Move
" Low".
4.
R"l"us" Parking
5.
Release
movement.
l{
6.
tion
gear.
SPEED THAT
ATTACHI\4ENT
position.
Clutch-Brake Pedal
cear
Clutch-Brake Pedal
ground
travel is too slow move
press
or
NOTE: ALWAYS
running
Shift
Clutch'Brake
Lever to
Brake.
and warm,
down to brake
"2ND"
SELECT
WILL SUIT THE
BEING USED.
BRING TRACTOR TO COMPLETE
BEFORE SHI FTING GEARS.
NEVER PLACE
IN
OR UNDER ANY POWERED ATTACH.
place
Throttle
position.
and Range Shift Lever
SLOWLY
Throttle Lever
pedal
to start forward
and
shift ro a different
A GROUND TRAVEL
TERRAIN AND
YOUR HANDS OR FEET
MENT OR NEAR ANY MOVING
WHILE
ATTACHMENT IS RUNNING-
TRACTOR
ANY POWERED
OR
Lever in
{ast
to
posi
THE
STOP
PART
TNACTON OPERATION OiI HILLS
qears
BEFORE
DRIVE UP OR DOWN HILLS
GREATER THAN 150.AND,
ACROSS ANY SLOPE.
hills.
on
move Throttle C.ntrolto middle
push
Clutch-Brake
prevent
to
rolling.
Pedal
Pedal
\hitrinq
of the lowest
DO NOT
WITH SLOPES
DO NOT DRIVE
\toppinU
or
l.Choose one
down hills.
to
2.Avoid
a. lf slowing is necessary,
position.
b. lf
stopping is necessary,
ly to brake
Engage Parking
c.
d.
Partially
ment
Release
e.
f. Completely
ke
3.[,4a
all turnc
position
Brake and shilt 10
release Clutch-Brake
begins.
Park ing
Brake.
release Clutch-Brake
gradually.
starting
lowest
Lrntil forward move-
Pedal
speed
up
quick.
rang..
or
STOPPING
1.
Reduce Throttle
YOUB
Lever to
2.Push Clutch-Brake Pedal
3. Release Attachment
4.
Move Gear ShiIt Lever
5.Place
6. lutch-Braketi.
Parkrng
Release
Clut
Clutch.
to
Brake in
MAKE
HOLD TRACTOR
"l
SURE
A
7,
Turn
lqnition
"OFF"
Key
to
REMOVE KEY
TOR TO PREVENT
A
TNANSPONTIiIG
pushinq
For
and
Range
or towing
Shifl
DO NOT TOW YOUR
IV] IL ES PER
HOUR.
Lever
yoLrr
in neutral
TRACTOR
TPACTOR
"SLoW" position.
into
Brake
netrtral
OCK"
YOUN
"N".
posrrron.
PARKING
SECURE.
positiorr.
WHEN
UNAUTHORIZED
TRACTON
tractor,
place
position
FASTER
posttion.
BRAKE
LEAVING
Gear ShifI Lever
(Fig.
TRAC.
11). NOTE:
THAN SIX
WILL
USE.
STARTING
WITH A
your
lf
recharged.
fottow
PED
THE
NEGATIV E
l.Connect
2.Connect one end
3.Connect
4.D.,conno' I
.5
Battery is
thls
WITH A 12
OTHER VEHICLE IVIUST
terminals
chassis
(
)rerminal
good
or
Tank or Battery).
Enqine
a.
b. Negative
Posltive
c.
YOUN
LOW
"Jumper
lf
procedurei
GROUNDED
each end of the
of each battery
).
of
the orher
CHASSIS GROUND
.dblP\
Block or chassis
terminal of
terminals
BATTERY
too low to start
Cables"
NoTE:
VOLT NEGATIVE
LEAD,ACID
PLOSIVE
AND SMOKING
BATTERIES.
AROUND
o{ rhe BLACI<
"GOoD"
end of the cabte
r. r(v€.,e
DO NOT USE YOUR
TERY
TO START OTHER VEHICLES.
TNACTOR
the engine,
Lrsed {or
are
YoUR
SYSTEI\,I,
BATTERIES GENEBATE
GASSES.KEEP
MATERIALS
ALWAYS
BATTERIES.
RED cable
(takinq
battery.
on lractor
urdel
"GOOD"
emergency startinq
TRACTOR tS EoUIP
GROUNDED SYSTEM,
ALSO
BE A 12 VOLT
SPARKS, FLAME,
SHIELD EYES
to the
care not
cable to rhe NEGATTVE
to short aqainst
ENGINE
to
(awav
batt"'v
TRACTOR BAT,
it
should be
EX.
AWAYFROM
POSITIVE
BLOCK
from
Gas
(+)
FLAT
IOI ER
1_r
,,)=:\
j
il e['
P
BELT
GU ID€
e
='-
FlGltRF l5
^e
-.'-/
O
^C
--fi14
UT
pEorr
RETAINEB
IDLER BEARING
'IT
SPRING
OIL DBAIN PLUG
GUABD
MAIilTEiIATCE
your
keep
To
service
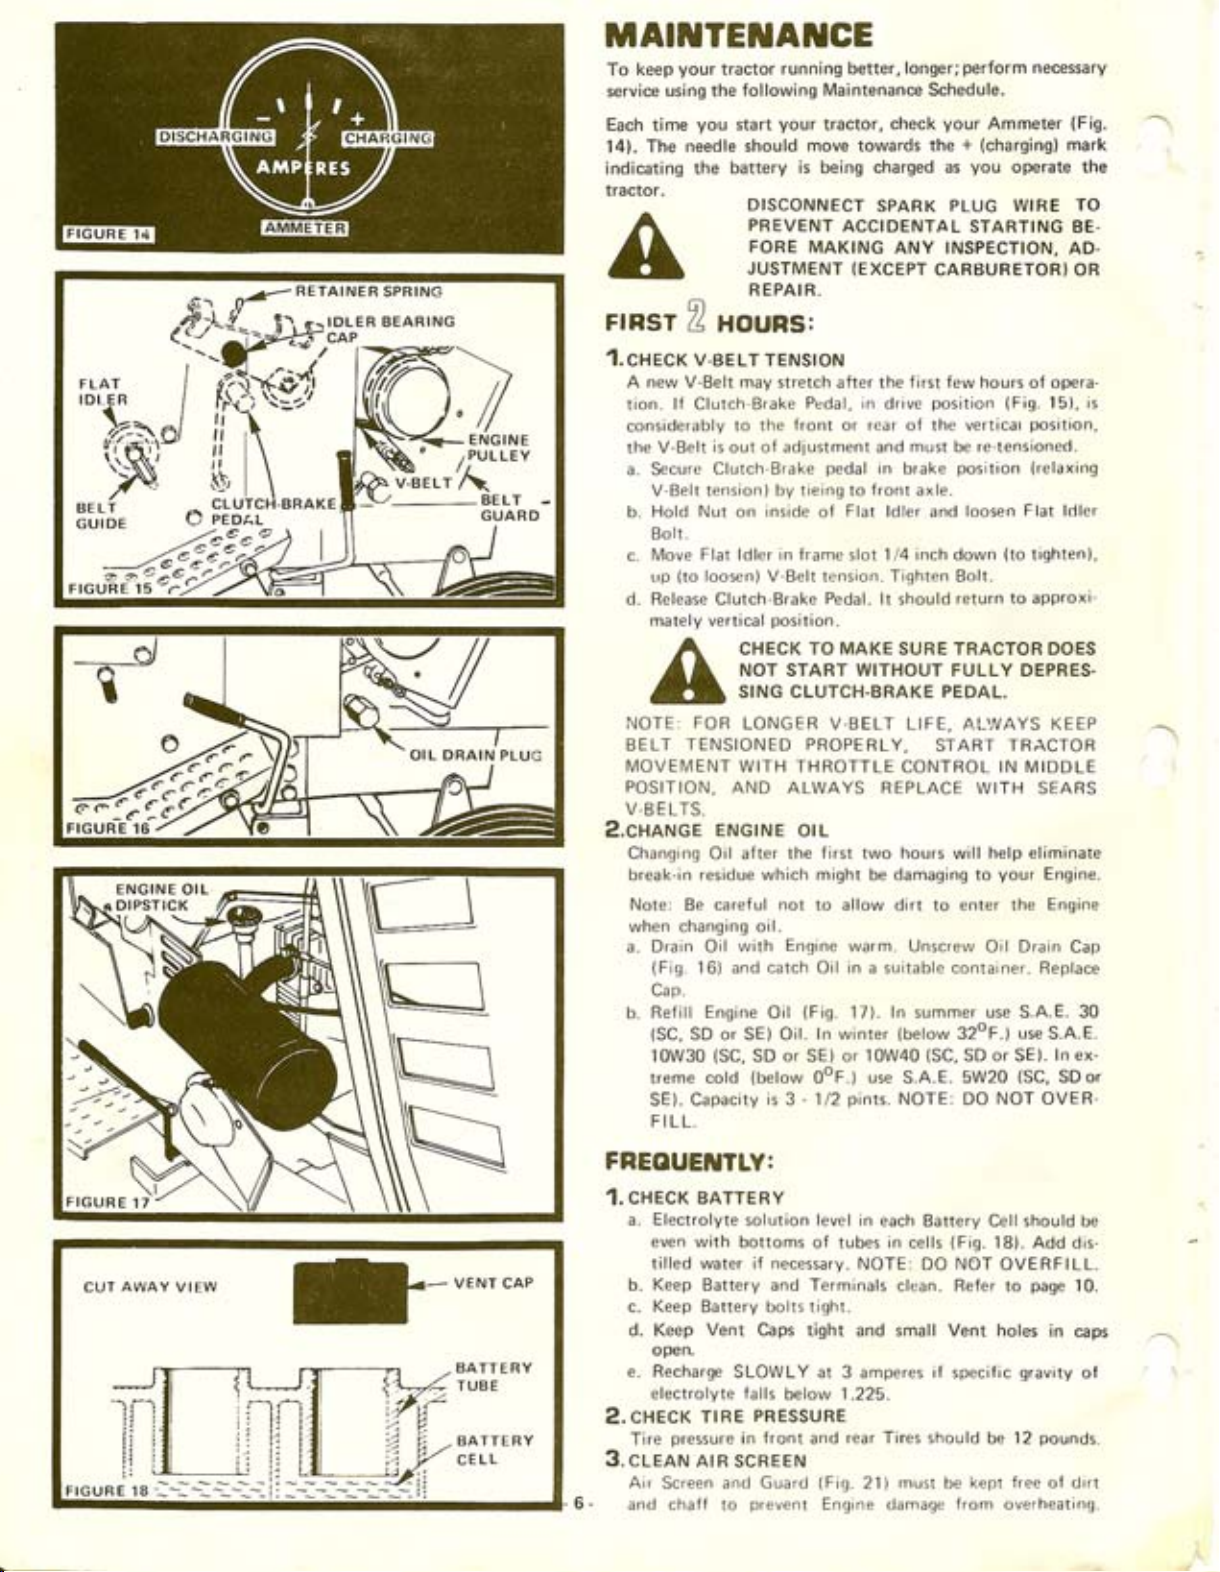
Each time
tractor
using the following
you
l4). The needle should
indicating
tractor.
the battery
A
FIEST
1.
curcr v.BELT TENsroN
A new V-Belt may stretch after
Iion.
considerably
the
a. Secure
b.
c.
d. Releare Clutch Bra[e
NOTE:
BELT
IV]OVEIV]ENT WITH
POSITION,
V.B E LTS.
2.cHaruce
a. Drain Oil
b. Refill
o
4 HOUPS:
lf Clutch Brake
is
V-Belt
Clutch Brake
V-Belt tension) by tieing to
Hold Nut
lt.
Bo
Flat ldler in frame
l\,4ove
loosen) V-Belt tension. Tighten Bolt.
rrp
{to
mately vertical
FOR
TENSIONED PROPERLY,
ENGTNE
Changing Oil alter the
break-in
Note: Be careful not to allow
when chanqinq oil.
residue which miqht be damaqing to
'16)
(Fig.
p.
Ca
Engine
(SC,
SD or SE) Oil. ln winter
'10W30
treme
SE). Capacity
FILL.
(SC,
cold
running better,longer;
Maintenance Schedule.
your
start
tractor,
move towards
is being charged as
DISCONNECT
PREVENT
FORE
JUSTMENT
REPAIR.
to the
out of adjustment and
inside
on
position.
CHECK
NOT START WITHOUT FULLY
SING
LONGER V-BELT
ACCIDENTA
MAKING
(EXCEPT
Pedal, ln
front or rear
pedal
Flat ldler
of
slot
Pedal.
TO MAKE
CLUTCH.BRAKE PEDAL.
THROTTLE CONTROL IN MIDDLE
AND ALWAYS REPLACE
orL
first
with Engine warm. Unscrew
catch
and
Oil
SD or SE) or 10W40
(below
is
3-
in
Oil
(Fig.
17).
ooF.) use S.A.E. 5W20
pints.
1/2
check
the
SPABK
perform
your
+
you
PLUG WIRE
necessary
Ammeter
(charging)
operate the
mark
L STARTING
ANY INSPECTION, AD.
CARBURETOR} OR
first few hours
the
position
drive
must
axle.
and
vertical
re'tensioned.
be
posltion
loosen
down
return to
of the
in
brake
Iront
1/4 inch
lt shorrld
SURE TRACTOR DOES
oI
(Fig.
position,
(relaxing
Flat ldler
(to
tighten),
approxi
DEPRES-
opera'
15), is
LIFE. AI-WAYS KEEP
START
TRACTOR
WITH SEARS
two
hours
dirt to
help eliminate
will
your
enter the
Engine.
Engine
Oil Drain
a suitable container. Replace
ln
summer
{below
NOTE: DO
32oF.)
(SC,
use S.A.E. 30
use
or
SD
SE).
(SC,
NOT
S.A.E.
ln ex'
SDor
OVER
(Fig.
TO
BE-
Cap
CI.IT AWAY VIFW
kvENrcaP
I
t
I
,,o, * J
1a
li
ll
l-ll
tx&
BATTERY
TUAE
AATTE RY
CELL
FNEOUETUTLY:
,I.
cHEcK BATTERY
Electrolyte
a.
even with bottoms
tilled water i, necessary.
b. Keep Battery and Terminals
solution level in
of tubes in cells
NOTEi DO NOT
each Battery Cell should tre
clean. Refer to
c. Keep Battery bolts tight.
d. Keep Vent Caps tight and small Vent
open.
e. Recharge
electrolyte
2. cHEcK
pressure
Tire
3.
clearu AtR scREEN
Air Screen and Guard
and chaff to
SLOWLY at 3
falls
PH EssuRE
TrRE
{ront
in
prevent
below
and
(Fig.
Engine
amperes
1.225.
rear Tires should
must
21)
damage
(Fig.
18).
Add dis-
OVERFILL.
page
holes in
iI
specific
be
gravity
be l2
kept free of dirt
from overheating.
10.
caps
of
pounds.
fJ
EVERY
HOT.IRS:
FJ
l,cnecr ENGTNE
A
fi,',,i?1"fi:'x,'^,l,?it:
otL LEVEL
o'|L
LEVEL
STEE R ING G EAA
\
SECTOR ANO ARM
GREASE FITTING
Several minutes
Level with Tractor
push
clcan,
after stopping Engine,
on level
it
down
tight for
Oil Levet. lf necessary,
reached.
winter
10W40
S.A.E. 5W20
FILL.
Luantcare
2.
There
Using a Gre€se
Extreme Prc,ssure
al)le at
3. otL
Place
move
a.
l). Front
ln
summer
(below
32oF.1
(SC,
SD or
(SC,
sTEERtNG AND FRoNT
are six Grease
your
local
Prvor
against
ldler
,
PotNTs
several drops of
{,ach
Bearing
Remove
Remove Retainer
Plastic
lvlove ldler
posed
Shaft.
RetuIn
Retainer
Axle
ldler
Spring, and
Prvot
rnfa
use S.A.E:30
SE). ln exlreme
SD or
Gun,
Lubricatinq
Sears
other, especially:
(Fig.
and
and Shaft to original
(Fig.'19)
EUENYZF] HOURS:
{EVERY 15 HOURS
IN
VERY
DUSTY
IF OPERATING
CONDITIONS}
qround.
few
a
seconds, remove
add Oii until
u5s S.A.E.
Fittings
give
Servico Centerj.
10W30
NOTE:
SE).
on
each Grease Fittinq
Grease
SAE 30 Oil
15)
Cap.
lrom ldler
Spriog
Shaft outward
reposition
check Engine
Wipe
dipstick
"FULL"
(SC,
SD or SE) Oil. ln
(SC,
SD or SE) or
(below
cold
DO
NOT
wHEELs
your
Tractor
Anttlex No.
points
at
ShaIt.
and
position,
Cap.
Oil
(Fig.
17)
and read
mark is
ooF.) use
OVER.
(Fig.
19).
two shots o,
(Avail-
I
parts
where
lubricate
replace
ex-
STEERING
BELL
CRANK
GBEASE
FITTING
FBONT
GREASE FITTING
(LEFT
& RIGHT}
SPINOLE
FRONT
GREASE
(L€FT
&
FIGUR
WHE EL
FITTITlG
BIGHT)
E 19
l.cLEAN
a. Unscrew
b.
c.
d.
c.
f.
ArR FTLTER
Wing
Paper
Clean
ping
Wash Foam Prc-Cleaner
Rinse,
oughly.
Coat with
knead
Check Paper
Filter
Air
dust Irom Paper
Element
on a flat
s{lueezc
three
to distribute
Air
dirry.
q.
Re
Assemble
NOTE:
REI\4OVED,
2.crrnru
Aii
to
Screen and Guard
{li[t
3.cxaruce ENGTNE
'l-lie
operat;on
in
ArR
Soeen and Guard
prevorlt
chaff and
arrd
l)cst
time to change
thc hot
Air Filter
NEVER
scnEEN
Engrne
wheD
all
Oil. Refcl
& FoAM PRE-CLEANER
(Fiq.
Nut
Element
(rathcr
RUN ENGINE
darn:rge from
and clenn with
stubborn dried
otL
dirt and toreign
20)
and Foam
Air Filter
surface_
in
dctergent
than twjst)
tablespoons
evenly,
Filter
EI€iment.
and reposition
(Fiq.
21) must
Engine
pagc
to
6.
to remove
of
ancl s(lueeze
overheating.
a wire
gL]m
Oil is
Filter
Air
pre-Cleaner.
Element
and water.
and
S_A.E. 30 Engine
allow
gently
by
to dry thor_
out excess.
Replace
if excessively
on Tractol.
WITH
AIR CLEANER
allow free
aod fibers.
at thc end
material
brush
flow
Remove
remove
to
of a days
is
suspended
Cover
tap
Oil,
of air
Air
'f,[,6
AIB SCREEN
AND GUABD
FIG
UR E
21
-7 -
----
$
FIGURE
22
GURE 23
TRANSAXLE
FILLER PLUG
EvERY
1, cLEAN ENGTNE
Remove
lFis.
cHEcK
2.
a. Block up Rear
b. Remove Filler
c. Check Pressure
d. Reposition
evenvfl00
CLEAN SPARK PLUGS
1.
Wire brush carbon deposits Irom
reset
they show signs of
LUBRTCATE
2.
a.
b.
c.
5l[]]xouns,
cooLtNG FtNs
any dust, dirt or
22)
Remove
should
l\4otor
top
pulled
prevent
to
TRANSAXLE
Axle
Left rear
Plug
be
even with Filler
Oil if necessary.
(Fig.
26). lt
out by hand.
wheel. Secure
Engine
otL LEVEL
securely or
wheel by removing E-Ring.
(Fig.
Relief Valve
should spring
xouns:
AND RESET GAp
gap
at .025
l\4ove Rubber Boots to expose Ball
and Steerinq
Coat
Ball Joints
Reposition
inch.
{Fig. 24).
foulinq
BALL
JotNTs
(Fig.27).
Link
with
Rubber Boots.
Silicone Spray Lubricant.
from
oil
23) from
Ptug
Engine
damage from
use a Sears
threads. Add
located on B-H- side near
completely closed
Cooling Fins
Tractor
Transaxle.
with E-Ring.
Plug
Spark
Replace
Electrodes
Spark
or elect(ode erosion.
Joants on
overheating.
Jack.
Oil Level
S.A.E.
when
and
Plugs
Tie Rods
30
iI
FIGUR E 25
.O25" FEELER
evenvZ00xouns:
REPLACE
Reler to
PAPER
paqe
AIR FILTER ELEMENT
7.
evenv4ECIxouns:
CHANGE TRANSAXLE OIL
a. Block
b. Drain Transaxle Oil by removing
c.
d. Check Pressure
e. Reposition
up Rear
Remove
catching Oil in suitable
Left
Rear
Axle securely
Wheel
by
container.
use
or
removing
Drain
a Sears Tractor Jack.
E-Ring.
(Fig.
Plug
Replace
Drain
Befill Transaxle with S.A.E. 30 l\4otor Oil. Capacity is 5
quarts.
top
quickly.
closed when
Pressure
may
Relief Valve located on
held
be
open to allow
Relief Valve. lt should spring c..npletely
pulled
out by hand
wheel.
Secure
with E'Ring.
Transaxle to fill more
and
R.H.
released.
25)
Plug.
side near
and
I,
 Loading...