

Page 1
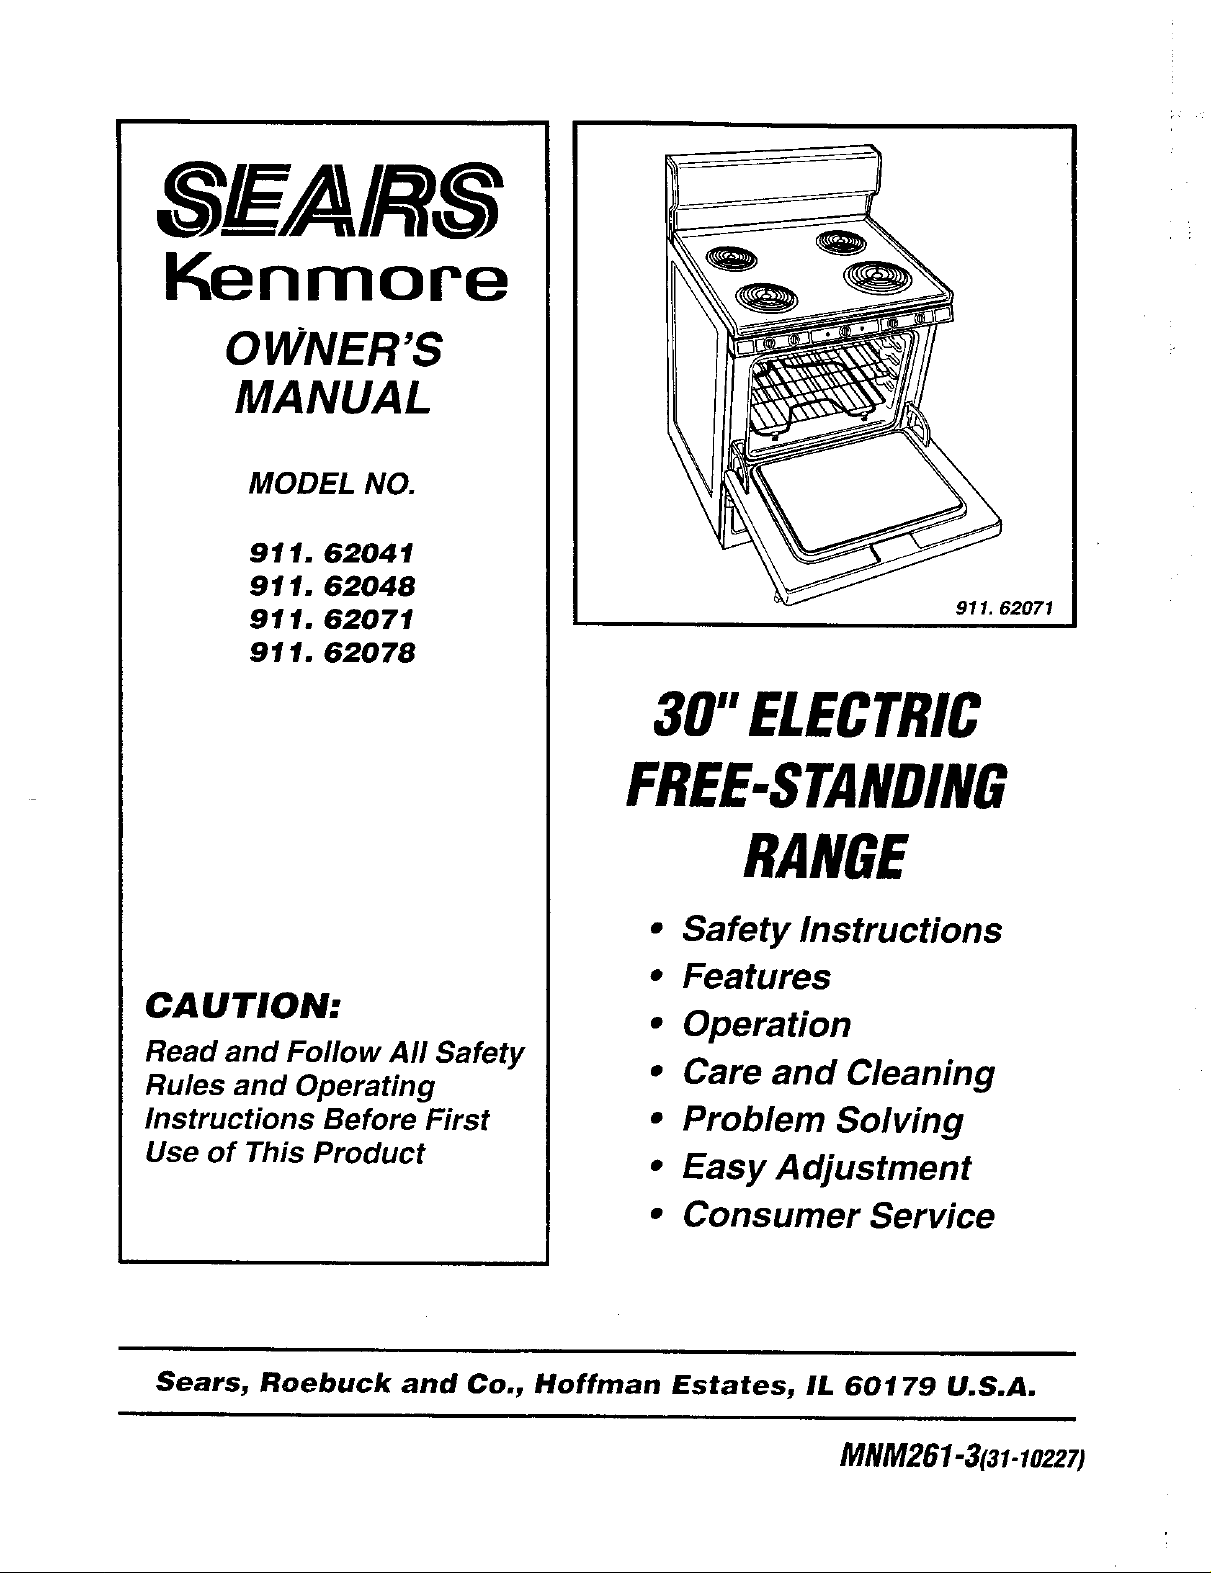
SFARS
Kenmore
OWNER'S
MANUAL
MODEL NO.
911. 62041
911. 62048
911. 62071
911. 62078
911. 62071
30"ELECTRIC
FREE-STANDING
RANGE
• Safety Instructions
• Features
CA U TION:
• Operation
Read and Follow All Safety
Rules and Operating
Instructions Before First
Use of This Product
Sears, Roebuck and Co., Hoffman Estates, IL 60179 U.S.A.
• Care and Cleaning
• Problem Solving
• Easy Adjustment
• Consumer Service
MNM261-3131-1o227)
Page 2
ELECTRICFREE-STANDING
TABLE OF CONTENTS
Range Safety ................................................. 3-5
Stability Device.._.- ............................................ 3
Features of Your Range ...................................... 6
Removal of Packaging Tape .............................. 6
CookingElements ............................................... 7
ControlSettings .................................................. 7
HomeCanning ................................................... 7
Bakeware Placement ......................................... 9
Element Cycling ............................................... 9
Oven Racks ..................................................... 10
Oven Temperature Adjustment ................. 10, 19
How to Set Bake .............................................. 10
ToSet Roast .................................................... 10
Broiling ....................................... 11
General Rules .................................................. 11
Preparing Meats .............................................. 11
Oven Rack Position ......................................... 11
How to Set Broil ............................................... t 1
Control Panel ................................................... 12
Broiler Pan and Grid ........................................ 12
Porcelain Enamel Cooktop .............................. 12
Burner Box Bottom .......................................... 12
Painted Surface ............................................... 12
Oven Interior .................................................... 12
Oven Cooking Tips ................... 8- _n
Strong Smell or Odor ........................................
No Peeking ........................................................ ;
Aluminum Foil .................................................... 8
Preheating ......................................................... 8
Temperature Sensor ......................................... ,_
Oven Vent .......................................................... 8
Moisture ............................................................. 9
Bakeware .......................................................... 9
For your convenience and future r_fe_',_ii_:_, p;_:ase write down your xr_ode_
and serial number in_ the space pr_-_,__,_. _#)_y a. e _r _ _h_ _r_;_
tram_ behind the:,_tor_._ _,_raw_::
Oven Racks ..................................................... 14
Oven Door ....................................................... 14
Surface Control Knobs .................................... 13
Storage Drawer ............................................... 15
Lift Up Cooktop ............................................... 15
Cooktop Units .................................................. 16
Before Calling for Service ........................ 17, 18
Consumer Service Numbers ........................... 20
Warranty
_#;_DEL NUMBER:
_,,, ,,,,,
2
Page 3
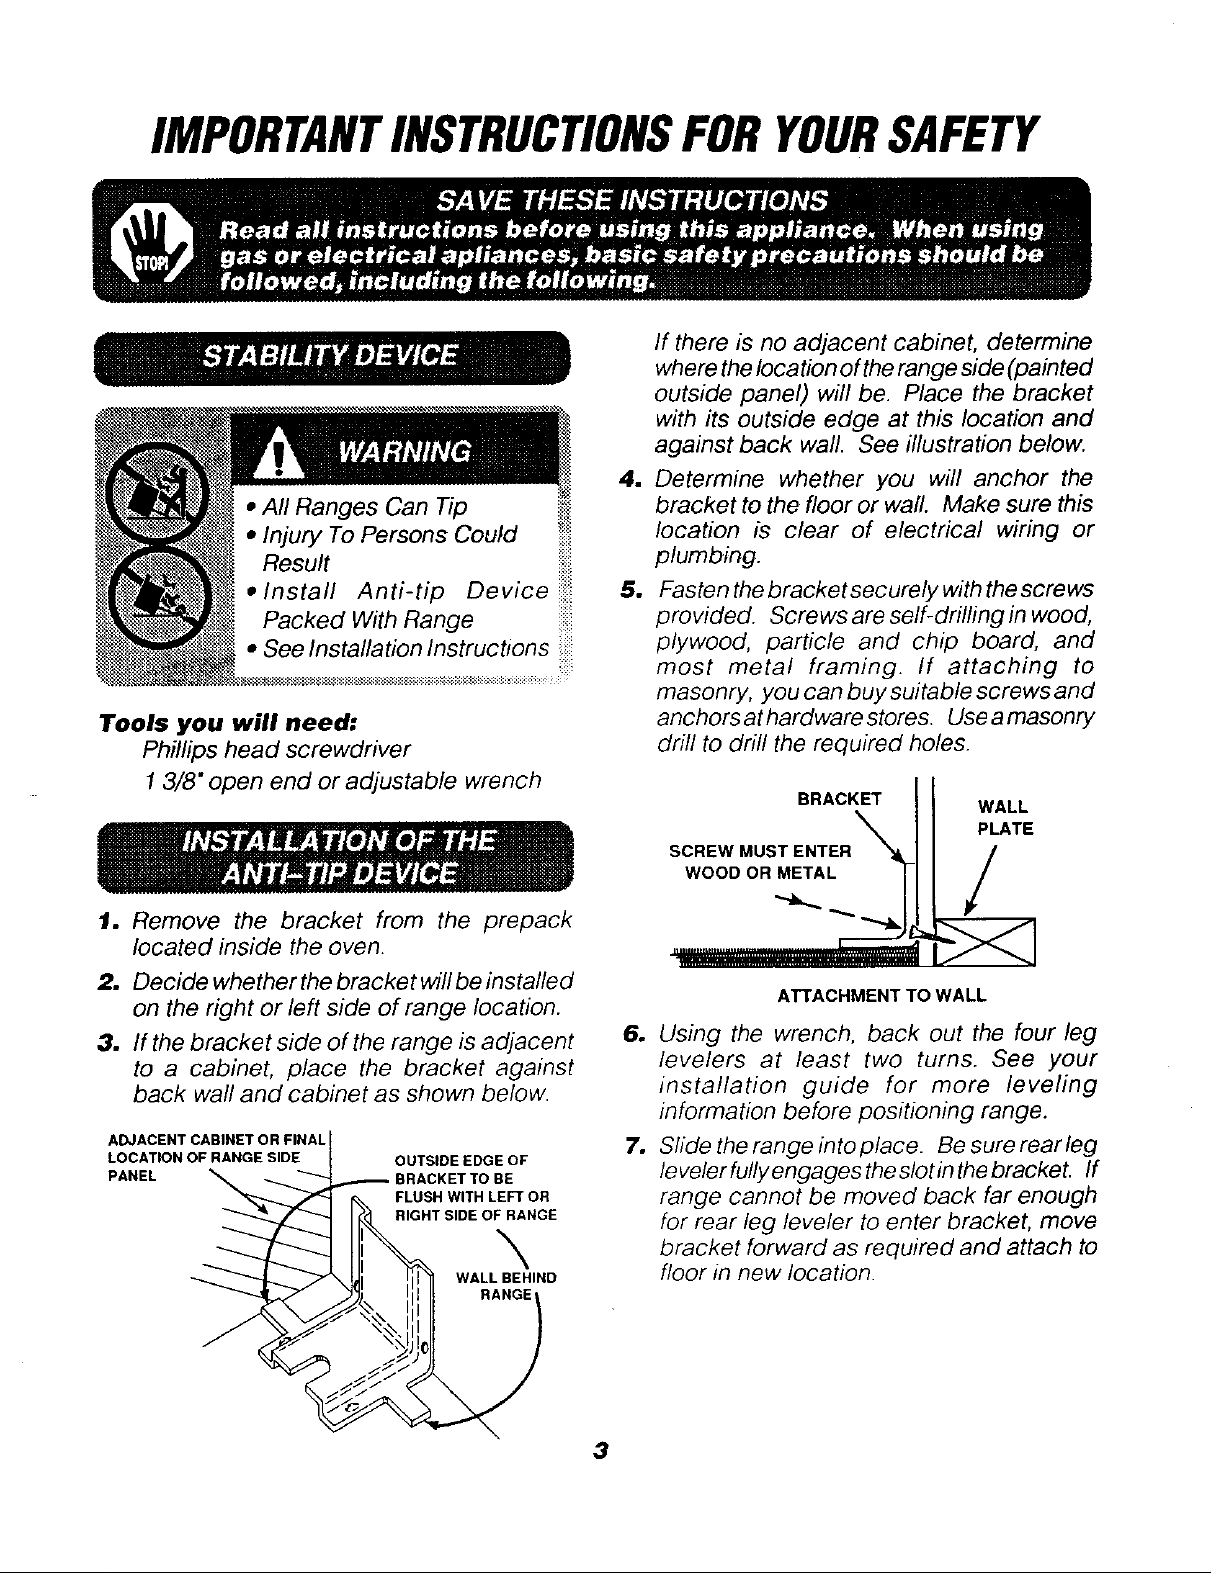
IMPORTANTINSTRUCTIONSFORYOURSAFETY
If there is no adjacent cabinet, determine
where the location of the range side (painted
outside panel) will be. Place the bracket
with its outside edge at this location and
against back wall. See illustration below.
a
Determine whether you will anchor the
bracket to the floor or waft. Make sure this
• Injury To Persons Could i_!i_i
Result _i_iiiii
• Install Anti-tip Device _
Packed+ithRange
• See Installation Instructions
Tools you will need:
Phillips head screwdriver
1 3/8" open end or adjustable wrench
1. Remove the bracket from the prepack
located inside the oven.
location is clear of electrical wiring or
plumbing.
1
Fasten the bracket securely with the screws
provided. Screws are selFdrilling in wood,
plywood, particle and chip board, and
most metal framing. If attaching to
masonry, you can buy suitable screws and
anchors at hardware stores. Use amasonry
drill to drill the required holes.
BRACKET
SCREW MUST ENTER_
WOOD OR METAL |
illlllP*,**L*lbl..,i _tll
WALL
PLATE
/
2. Decide whetherthe bracketwill be installed
on the right or left side of range location.
3. If the bracket side of the range is adjacent
to a cabinet, place the bracket against
back wall and cabinet as shown below.
ADJACENT CABINET OR FINAL
LOCATION OF RANGE SIDE
PANEL
OUTSIDE EDGE OF
ACKET TO BE
FLUSH WITH LEFt OR
RIGHT SIDE OF RANGE
N
WALL BEHIND
RANGE1
ATTACHMENT TO WALL
m
Using the wrench, back out the four leg
levelers at least two turns. See your
installation guide for more leveling
information before positioning range.
w
Slide the range into place. Be sure rear leg
levelerfullyengagestheslotinthebrackeL If
range cannot be moved back far enough
for rear leg leveler to enter bracket, move
bracket forward as required and attach to
floor in new location.
3
Page 4

IMPORTANTINSTRUCTIONSFORYOURSAFETYcentinued
To insure safety for yourself, family and home,
please read your Owner's Manual carefully.
Keep it handy for reference. Pay close
attention to Safety Sections.
BE SURE your applliance is installed and
grounded by a qualified technician.
WARNING e.
To prevent accidental
tipping of the range from
abnormal usage, including
excessive loading of the
oven door, attach it to the
wall or floor by installing the
Anti.Tip device supplied. If the range
is moved for cleaning, servicing or
any reason, be sure the Anti.Tip
device is re.engaged properly when
the range is slid back in the open.
ing. Failure to do so could result
in. the range tipping or personal
injury.
TEACH CHILDREN
• Not to play with controls or
any part of the appliance.
• Not to sit, climb or stand on
the appliance door.
NEVER STORE items of
interest to children in cabinets
above the appliance.
KEEP THIS book forlater use.
NEVER USE your appliance
for warming or heating the
room.
AL WAYS KEEP combustible
wall coverings, curtains and
other linens a safe distance from
appliance.
NEVER HEAT unopened food containers.
Pressure buildup can cause the container to
burst and cause injury.
NEVER LEAVE jars or cans of fat or
drippings in or near your appliance.
ALWAYS KEEP the appliance area free
from things that will bum. Food,
wooden utensils and grease
buildup could catch fire. Plastic
utensils could melt and canned
foods could explode. Your
appliance should never be used
as a storage area.
ALWAYS KEEP your appliance clear of
things that will bum (gasoline and other
flammable vapors or liquids).
SOME CLEANERS produce
noxious fumes and wet cloths
burns.
orsponges could cause steam
the
NEVER TRY to repair or
replace any part of the appliance unless
instructions are given in this manual. All other
work should be done by a quafified technician.
4 important safety instruction continued
Page 5
IMPORTANTINSTRUCTIONSFORYOURSAFETYcontinued
NEVER WEAR loose fitting clothing when
using your appliance.
NEVER USE a towel or other
bulky cloth as a potholder and
make sure the potholder is ,_ _
dry. Moist potholders could
cause steam bums. Keep dish
towels, dishcloths, potholders
and other linens a safe
distance away from your appliance.
ONLY SOME kinds of glass or ceramic
cookware can be used for cooktop cooking.
Make sure the cookware you choose to use is
designed for cooktop cooking.
ALWAYS USE care when touching cooktop
elements. They will retain heat after the range
has been turned off.
NEVER BLOCK the oven air vent under the
right rear element.
COOKWARE USED for cooktop cooking
should be flat on the bottom
and large enough to cover
the heating area being used.
ALWAYS USE care when opening the oven
door. Let hot air and steam escape before
moving foods.
NEVER USE aluminum foiltoline theoven bottom.
Improper use of foil could start afire.
UNDERSTAND THIS
READ AND
INFORMATION NOW!
Should you ever need it, you will not
have time for reading. Be sure everyone
in your home knows what to do in case
of fire. Never use water on a grease fire;
it will only spread the flames.
COOKTOP GREASE FIRE:
Never pick up a flaming pan...
1. Turn off the surface
elements.
2, Smother the flame with a
tightly fitting lid, baking soda
or an extinguisher.
OVEN FIRE:
Do not try to move the pan!
PLACE OVEN RACKS in the desired
position while the oven is cool. If racks must
be moved while oven is hot, do not let
potholder contact the hot oven element.
AFTER BROILING, always take the broiler
pan and grid out of the oven and clean them.
Leftover grease in the broiler pan could catch
fire next time you use your oven.
1. controlsCl°sethe °ven d°°r and turnoff.
2. Iffirecontinues, throwbakingsoda
on the fire, or use a dry chemical,
foam, or halon type extinguisher.
5
Page 6

FEATURESOFYOURNEW
FREE-STANDINGRANGE
To remove the adhesive left from packaging tape, use household dishwashing liquid, mineral oil
or cooking oil. With a soft cloth rub into the area and aflow to soak. Rinse and dry well. Repeat
procedure using an appliance polish to insure no damage is done to the oven. This should be
done before the range is turned on for the first time. The tape cannot be
removed once the oven has heated.
Packaging tape can be found in the following areas:
Cooktop Surface
Door Handle
Oven Area
Control Panel Area
Door Trim
6
Page 7
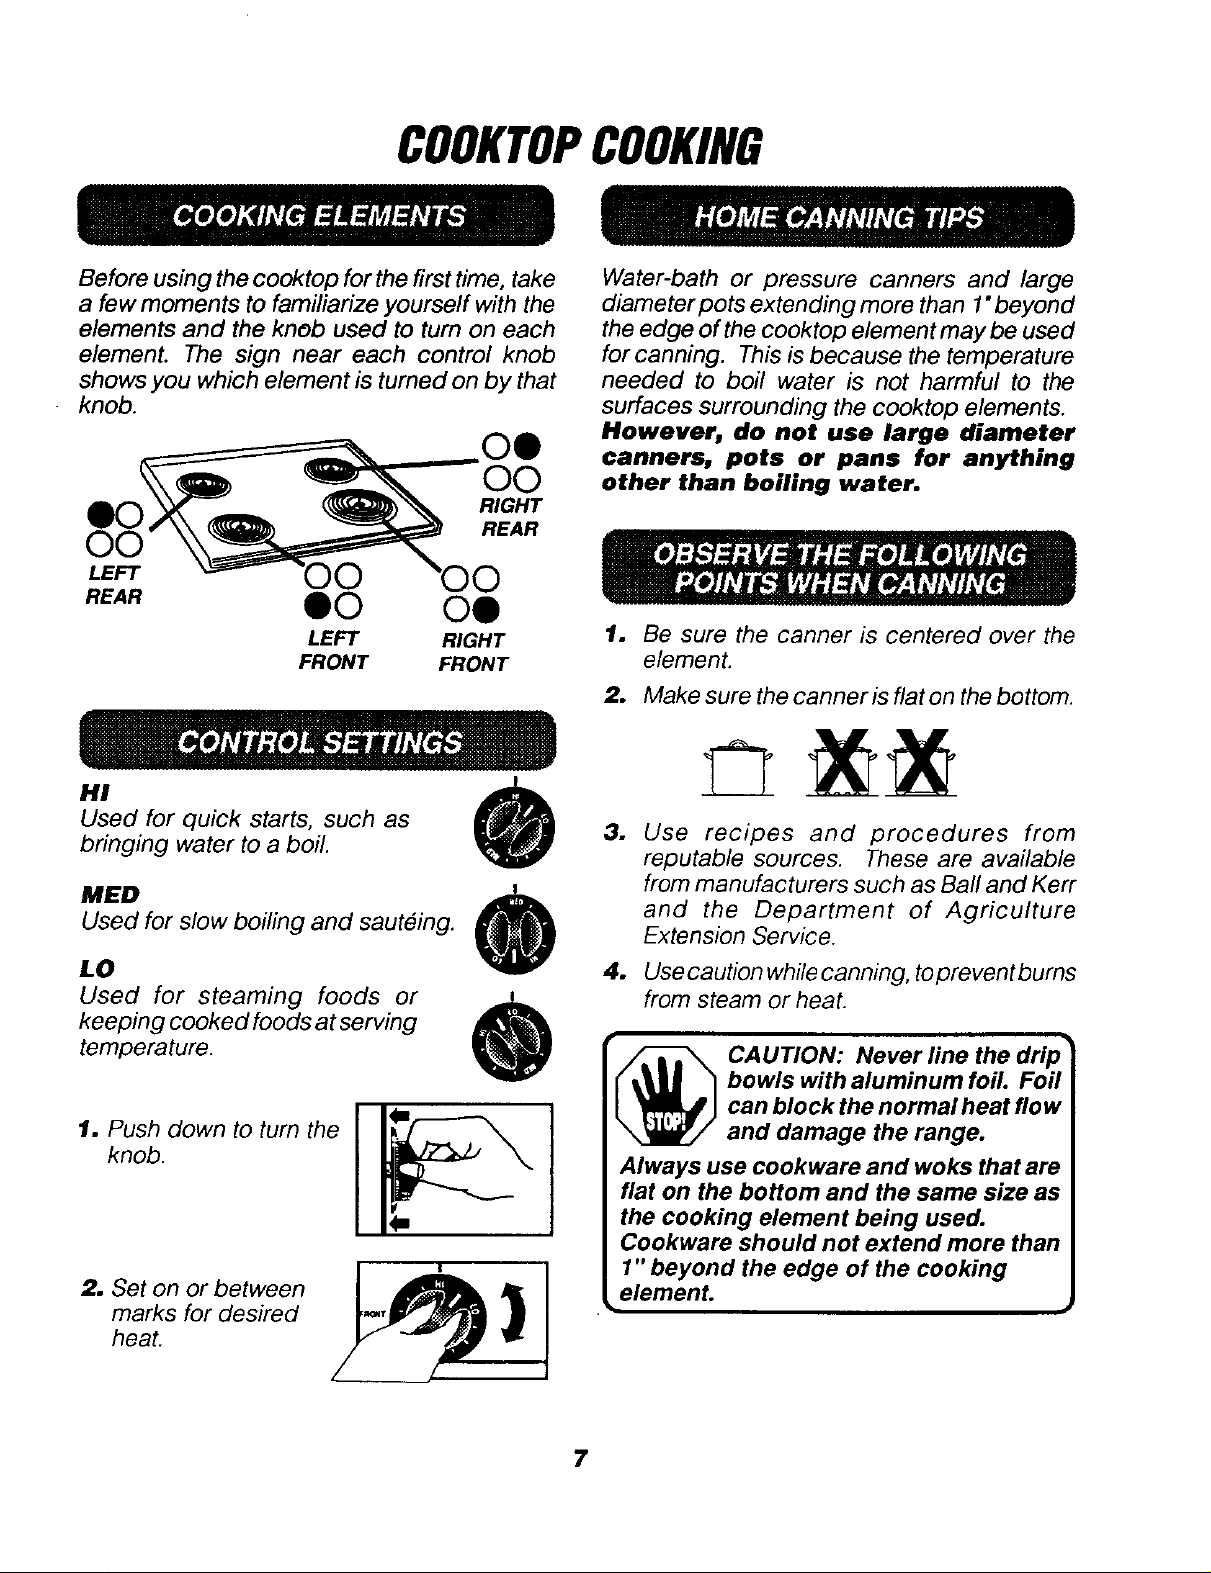
COOKTOPCOOKING
Before using the cooktop for the first time, take
a few moments to familiarize yourself with the
elements and the knob used to turn on each
element. The sign near each control knob
shows you which element is tumed on by that
knob.
O0
RIGHT
,oO °"
REAR
• -00 "00
REAR eO Oe
LEFT RIGHT
FRONT FRONT
HI
Used for quick starts, such as
bringing water to a boil.
M£D
Used for slow boiling and sauteing.
@
e
LO
Used for steaming foods or
keeping cooked foods at serving
temperature.
2. Set on or between I A _ I
marks for desired
heat.
e
Water-bath or pressure canners and large
diameter pots extending more than 1"beyond
the edge of the cooktop element may be used
for canning. This is because the temperature
needed to boil water is not harmful to the
surfaces surrounding the cooktop elements.
However, do not use large diameter
canners, pots or pans for anything
other than boiling water.
1. Be sure the canner is centered over the
element.
2. Make sure the canner is flat on the bottom.
3. Use recipes and procedures from
reputable sources. These are available
from manufacturers such as Ball and Kerr
and the Department of Agriculture
Extension Service.
4. Usecautionwhilecanning, topreventbums
from steam or heat.
r
bowls with aluminum foil. Foil
_ CAUTION: Never line the drip
Always use cookware and woks that are
flat on the bottom and the same size as
the cooking element being used.
Cookware should not extend more than
1" beyond the edge of the cooking
element.
can block the normal heat flo w
and damage the range.
7
Page 8

OVENCOOKINGTIPS
It is normal to have some odor when using
your oven for the first time. This is caused bj/
the heating of new-parts and insulation.
To help eliminate this odor, ventilate the
room by opening a window or using a
vent hood.
IMPORTANT:
Never cover the
oven bottom or oven
rack with aluminum
foil. Improper use
can cause poor heat
flow, poor baking
results, and may
damage the oven
finish.
Let the oven preheat thoroughly when recipes
call for preheating. Preheating is bringing the
temperature up to the temperature you will be
using during baking. When the oven has
reached the preheat temperature, the
indicator light will turn off. Have foods nearby
ready to place in the oven.
In the back of the oven you will notice a small
tube. This is a heat sensor that maintains the
temperature of the oven. Never move or bend
this tube.
OVEN TEMPERATURE
SENSOR
The oven vent is located under the right rear
elemenL This area could become very hot
during oven use. The vent is important for
proper air circulation. Never block this
vent.
OVEN VENT
LOCATION
Opening the door often to check foods will
cause heat loss and poor baking results.
8 oven cooking tips continued
Page 9

OVENCOOKINGTIPScontinued
FLAT COOKIE SHEETS
(without sides)
Flat cookie sheets allow air to circulate all
around the cookies for even browning.
3 &
SHINY PANS
(reflect heat)
Shiny pans are perfect for cakes and quick
breads that have a golden brown crust.
GLASS, DARK NON-STICK, OR
DARKENED BY AGE BAKEWARE
(absorb heat)
As the oven heats, the change in temperature
inside the oven causes water droplets to form
on the oven door glass. To prevent this, open
the door momentarily to allow the moist air out.
If baking with more than one pan, place the
pans so each has at least 1 to 1 1/2" of air
space around it. Place pans so one is not
directly above the other.
;* .J L. _,
Perfect for yeast breads, pie crust or foods that
have a brown crust. The oven temperature
should be reduced by 25°F.
The Oven Temperature Sensor at the back of
the oven continuously senses and controls the
temperature inside the oven. To keep a
constant set temperature, the elements will
cycle or turn on and off during cooking.
9 oven cooking tips continued
Page 10

OVENCOOKINGTIPScontinued
The oven racks are
designed with stop
!ocks, a convenience
as well as a safety
precaution for placing
foods in or removing
foods from the oven.
When the racks are
placed correctly in the
oven, the guides have
a bump to prevent the racks from tilting.
Your oven has four (4) rack positions that may
be used during cooking.
The top position is only a guide. It
cannot be used as a rack position.
1. Set the OVEN
CONTROL KNOB to
the desired temperature.
2. When baking is finished,
turn the OVEN
CONTROL KNOB to
the "OFF" position.
Roasting is cooking tender cuts of meats with
dry heat. It is not necessary to preheat your
oven before roasting.
Always place oven racks in the proper
position while oven is cool.
You may feel that your new oven cooks
differently than the oven it replaced. We
recommend that you use your new oven a few
weeks to become more familiar with it,
following the times given in your recipes as a
guide. See Do It Yourself Adjustment at the
back of this manual to make the adjustment if
you feel your oven is too hot or too cool for your
cooking preference.
GENERAL ROASTING INSTRUCTIONS
1. Place meat (fatty side up) on a roasting
rack or in a shallow pan about the same
size of the meat.
2. Place pan in No. 1or No. 2 rack position.
3. Set the OVEN CONTROL KNOB to the
desired temperature.
Remember:
Most meats continue to cook internally after
being taken out of the oven.
10
Page 11

BROILING
Broiling is cooking by direct
heat from the upper element.
The oven door should remain
opened to the broil stop
position during broiling.
It is not necessary to preheat the oven when
broiling. Use the broiler pan and grid that
came with your range. Both are designed for
proper drainage of fat and liquids.
Foil must be molded tightly
to the grid and slits cut in to
the foil to match those of
the grid. This allows fats
and liquids to drain into the
broiler pan, preventing fire
and excessive smoke.
Always remove the pan
and grid from the oven.
Storing or forgetting a
soiled broiler pan in the
oven is a potential smoke
or fire hazard.
TheU.S. Depar_nent ofAgric ulture notes that meat
cooked rare is popular, but meat cooked to only
140_F (rare) means that some poisoning
organisms may survive.
The closer you place foods to the broil element,
the faster foods brown on the outside yet remain
red to pink in the center.
Moving meats away from theelement willallowthe
meat to cook to the center while browning on the
outside. Using thispositioning, cook side 1atleast
2 minutes longer than side 2. If your oven is
connected to 208 volts, you may want to use a
higher rack position and/or broil foods longer.
The size, weight, thickness, starting
temperature and your pre ferenc eof the doneness
of the meat will affec tbroiling. This chart is based
onmeats at refrigerator temperature.
RACK
POSITION
3
3
• Choose tender cuts of meat at least 3/4"
thick for broiling.
• Trim the outer layer of fat; slit the edges to
keep meats from curling.
• Always use tongs to turn meats. Piercing
meat allows juices to escape.
Salt the first side of meats just before
turning, the second side just before
serving. Brush chicken and fish with butter
several times as they broil.
• Chicken and fish should be placed on the
grid skin side down. Forfish, lightly grease
the grid to prevent sticking.
3
TO SET BROIL:
1. Set the OVEN CONTROL
KNOB to BROIL.
2. When broiling is finished,
turn the 0 VEN CONTROL
KNOB to the "OFF" position.
11
Page 12

CLEANING
CLEANING MATERIALS TO USE:
* Dishwashing detergent
• Warm water
• Soft cloth
Do not use abrasive cleaners,
industrial cleaners, or bleach.
CLEANING MATERIALS TO USE:
* Dishwashingdetergent
• Warm water //_
• Soap-rifted steel wool pad
• Commercial oven cleaner
TO CLEAN:
Allow the pan to soak. Sprinkle the grid with
dishwashing detergent and cover with adamp
cloth or paper towel and let stand. Scour as
needed. Wash, rinse, and dry weft. You may
also place both the pan and grid in the
dishwasher.
CLEANING MATERIALS TO USE:
• Dishwashing detergent
• Warm water
• Paper towels
TO CLEAN
Do not use oven cleaners, cleansing powder,
or harsh abrasives. Ifmarinades, tomatosauce,
basting materials, etc. should spil!, wipe up as
muchaspossible. Whensuffaceshavecooled
thoroughly clean painted areas.
CLEANING MATERIALS TO USE:
• Oven cleaner
TO CLEAN
Clean up after each oven use. Rinse
thoroughly. Do not coat bake or broil element
with oven cleaner. When using oven cleaner
read directions on container carefully.
CLEANING MATERIALS TO USE:
• Dishwashing detergent • Ammonia
• Warm water • Abrasive cleaner
• Paper towel • Scouring pad
TO CLEAN
Clean after each use. If acidic foods (hot fruit
filling, milk, tomatoes, sauerkraut or sauces
with vinegar or lemon juice) spill, use a dry
paper towel to wipe up as much as possible.
When surface has cooled thoroughly clean
cooktop.
12
Page 13

REMOVABLEPARTS
CLEANING MATERIALS TO USE:
• Dishwashing detergent
• Warm water
• Soft cloth
TO REMOVE:
1. Be sure the control knob is in the off
position.
2. Pull straight off the stem.
Using a piece of string can make removing the
knob easier. Slip the string under and around
the knob, pulling straight out.
CLEAR GROOVE
IN STEM
MOLDED
RIB
PRING
CLIP
TO CLEAN:
Wash the knob thoroughly with soapy water.
Dry completely with a soft cloth. DO NOT let
the knob soak.
TO REPLACE:
1. Check the back of the knob. The molded rib
of the knob is designed to fit perfectly onto
the knob stem.
2. Align the molded rib to the clear groove in
the knob stem.
3. Push the knob back as far as it will go.
13 removable parts continued
Page 14

REMOVABLEPARTScontinued
CLEANING MATERIALS
• Dishwashing detergent
• Warm water
• Scouring pad or soap-filled steel wool
pad
RAISED BACK
OF THE RACK
BROIL STOP POSITON / _/<j/_
TO REMOVE:
1. Open the door to the broil stop position.
2. Grasp the door at each side and lift up
and off the hinges. DO NOT LIFT
DOOR BY THE HANDLE.
TO REMOVE:
1. Pull the racks out to the stop lock position.
2. Pull up the front of the rack and slide under
the bump of the rack guide.
TO CLEAN:
Clean with warm water and detergent. For
hard to remove stains, gently scrub with a
scouring pad or a soap-filled steel wool pad.
Rinse well.
TO REPLACE:
1. Place the raised back of the rack onto the
rack guides.
2. Lift the front of the rack until the raised back
slides under the bump of the rack guides.
3. Slide the rack all the way back.
CAUTION: When the door is
_ removed and the hinge arms
are at the broil stop position,
as a precaution, cover the
hinge arms with toweling or an !
empty paper towel roll. Do not bump or
try to move the hinge arms while working
in the oven area. They could snap back
causing injury to the hands or damage
the porcelain finish of the front frame.
TO REPLACE:
1. Make sure the hinge arms are in the broil
stop position.
2. Lift the door by the sides.
3. Line up the slots at the bottom edge of the
door with the hinge arms.
4. Slide the door down onto the hinge arms as
far as it will go.
5. Close the door.
14 removable parts continued
Page 15

REMOVABLEPARTSContinued
3. Lift up on the front of the drawer until the
stop guide of the drawer clears the stop
CLEANING MATERIALS
• Dishwashing detergent
• Damp cloth
• Warm water
TO REMOVE:
stops.
1. Pull the drawer out until it
2. Lift the front of the drawer _J! opened.
until the stop guide of the _--':_x_l
drawer clears the stop \ _._-J'_Z.J I!
guide on the base rail. \ !
3. Lift the drawer up and
over the drawer stop.
TO CLEAN
STOP GUIDE
guide of the base rail. Slide the drawer into
place.
_ ou space for keeping
In this drawer. Do not overload the
storage drawer, ff the drawer is too
heavy, it may slip off the base rail when
_PPORT
CAUTION: The drawer gives"
cookware and bakeware.
Plastics and flammable
materials should not be kept
SUPPORTRODS
Wipe the inside and outside with warm soapy
water and a damp cloth or sponge. Do not use
harsh abrasives or scouring pads on the
drawer.
TO REPLACE
1. Lift the front of the drawer
stop and lower the stop i_-..._1
of the drawer through the
opening of the base rail.
2. Lower the front of the
drawer and push back
the drawer until it stops.
1. Grasp the edge of the cooktop and rift up.
2. Holding the cooktop with one hand, rift the
support rod(s) up and rest the edge of the
cooktop on it.
3. When cleaning is finished, lower the
support rod(s) and the cooktop.
15 removabl e parts continued
Page 16

REMOVABLEPARTScontinued
TO REMOVE:
1. Be sure the controls are in the off position
and the elements are cool before
attempting to remove them.
2, Grasp the element and lift slightly, just
enough to clear the drip bowl and pull it
straight out.
damage the receptacle,
For blue.gold heat stains-- use a metal
polish.
These stains are caused by overheating, and
are usually permanent. To help minimize this
effect, avoid excessive use of high heat
settings and use flat bottom pans that do not
extend more than 1" from the edge of the
cooking element.
TO REPLACE THE UNIT:
1. Place the drip bowl into the opening and
make sure the receptacle is visible.
2. Slide the element firmly back into the
receptacle and lower it onto the drip bowl.
3. Lift out the drip bowl.
TO CLEAN THE DRIP BOWL:
For brown food stains -- use dishwashing
detergent, warm water, plastic scouring pads,
mild abrasive cleaners, soap-filled scouring
pads or ammonia.
Clean drip bowls after each use. Rinse and
dry well. Foods that are not removed can
cause permanent stains that cannot be
removed. For heavily soiled bowls, place an
ammonia-soaked paper towel over the bowl to
loosen the soil, then gently scrub the bowl with
a plastic scouring pad.
16
Page 17

BEFORECALLINGFORSERVICE
To save you time and money, before making a service call, check the list below for any
problem you may feel you have with the performance of your range. If the problem is
something you cannot repair, use the Consumer Service Numbers located at the back of this
manual When making any calls, have the model number, repair parts list, use
and care manual and the date of purchase available.
PROBLEM
Oven will not work;
totally inoperative.
Foods do not
bake properly.
POSSIBLECAUSE
No power to range.
a, Oven is not a,
preheated.
b. Improper rack or pan b.
placement.
c. Oven vent blocked or c.
covered.
d. Improper use of foil. do
e. Improper
temperature setting for
utensil used.
f, Recipe not followed.
g. Improper oven control
calibration.
ho Range and Oven rack
not level
a, Check the household circuit
b, Check to make sure the range is
e.
f. Check recipe and measurement.
POSSIBLE SOLUTION
breaker or fuse box.
plugged in.
Be sure to preheat until the tone
sounds.
Maintain uniform air space around
pans and utensils. See oven
cooking section.
Keep vent clear.
Racks should not be covered
during baking.
Reduce temperature 25 degrees
for glass or dull/darkened pans.
g. Check the temperature adjustment
following this section.
ho Check the installation instructions
for leveling.
Oven temperature
seems inaccurate.
Oven control calibration. See oven cooking section.
17 before calling for service continued
Page 18

BEFORECALLINGFORSERVICEcontinued
PROBLEM
Foods do not
broil properly.
Oven smokes.
POSSIBLE CAUSE POSSIBL E SOL UTION
a. Improper rack
position.
b. Oven preheated.
c. Improper use of foil.
d. Oven door closed
during broiling.
e. Low voltage (208
volts).
f. Improper broiling
time.
a. Dirty oven.
b. Improper use
of aluminum foil.
c. Broiler pan containing
grease left in the oven.
a. Check broil pan placement; see
broiling section.
b, Do not preheat when broiling.
c. Check broiling section,
do Open door to broil stop position.
e. Use higher rack position and/or
longer cooking time.
fo Check broiling chart in broiling
section.
a. Check for heavy spillover,
b. Use of foil not recommended.
c. Clean pan and grid after each
use.
18
Page 19

"DOIT YOURSELF"TEMPERATUREADJUSTMENT
You may feel that your new oven cooks
differently than the oven it replaced. We
recommend that you use your new oven afe w
weeks to become more familiar with it,
following the times given in your recipes as a
guide.
If you think your new oven is too hot (burning
foods) or not hot enough (foods are
undercooked) you can adjust the temperature
yourself. Theappearanceandtextureoffoods
is a better indicator of oven accuracy than an
inexpensive thermometer, such as those found
in grocery stores, to check the temperature
settingofyournewoven. Thesethermometers
can vary by 20-40 degrees. In addition, the
oven door must be opened to read these
thermometers. Opening the door will change
the temperature of the oven.
To decide how much to change the
temperature, set the oven temperature 25
degrees higher (if foods are undercooked) or
25 degrees lower (if foods are burning) than
the temperature in your recipe, then bake. The
results of this "test" should give you an idea of
how much the temperature should be changed.
1
Use a screwdriver to carefully loosen both
screws.
4.
To make your oven temperature HOTTER,
hold the knob by the handle and turn the
knob skirt so the top screw moves toward
the word hotter. As you turn the skirt you will
hear clicks and feel notches or teeth. Each
click or notch will adjust the temperature
15°F hotter.
TOP SCREW MOVES
TOWARD Ho'rrER
5. To make your oven temperature COOLER,
hold the knob by the handle and turn the
knob skirt so that the top screw moves
toward the word cooler. As you turn the
skirt you will hear clicks and feel notches or
teeth. Each click or notch will adjust the
temperature 15°F cooler.
TOP SCREW MOVES
TOWARD COOLER
1o Make sure the oven control knob is in the
OFF position. Remove the knob by pulling
it straight off.
2, Look at the back of the knob. The pointer
in the center indicates the original
temperature setting.
POINTER
KNOB _
KNOB
SKIRT
(
6, When you have made the desired
temperature adjustment, re-tighten both
screws and retum the oven control knob to
your range.
19
Page 20

Fortherepairor replacementpartsyouneed
delivereddirectlytoyourhome
Call7 am - 7 pm, 7 daysa week
1-800-366-PART
(1-800-366-7278)
Forin-homemajorbrandrepairservice
Call24 hours a day,7 days a week
1-800-4-REPAIR
(1-800-473-7247)
Forthelocationofa
SearspartsandRepairCenterin yourarea
Call24 hours a day,7 daysa week
For!nformation onpurchasinga Sears X_A Iz_ll_ L
MaintenanceAgreementorto inquire _-_'___///'_"7
aboutanexisting Agreement '_._ /_'_'7
Call9 am-5 pm, Monday-Saturday '___ ,,/_/
1-800-827-6655 '_',,,_7
SE/ S
America's Repair Specialists
2O
Page 21

KENMORE ELECTRIC RANGE WARRANTY
f
Dear Customer:
Our constant efforts are
directed toward making
sure your new Kenmore
Range will arrive at your
home In perfect condi-
tion and will give you
proper performance. AS
part of these efforts, we
feel It Is our responsibil-
Ity to provide you with
this warranty for your
range.
RecycledP_oer
_FuLL ONE YEAR WARRANTY ON THE FUNCTIONING OF ALL _
PARTS EXCEPT GLASS PARTS
If, within one year from the date of installation, any part, other than a glass
part, fallsto function properly due to a defect in material or workmanship,
Sears will repair or replace It, free of charge.
FULL 30-DAY WARRANTY ON GLASS PARTS AND FINISH OF PORCE-
LAIN ENAMEL, PAINTED OR BRIGHT METAL FINISHED PARTS
If, within 30 days from the date of Installation, any glass part or the finish
on any porcelain enamel, painted or bright metal part Is defective in
material or workmanship, Sears will replace the part, free of charge.
FULL 90-DAY WARRANTY ON MECHANICAL ADJUSTMENTS
For90 days from the date of Installation, Seers will provide, free of charge,
any mechanical adjustments necessary for proper operation of the range,
except for normal maintenance.
If the range is subjected to other than private family use, the above
warranty coverage Is effective for only 90 days.
WARRANTY SERVICE IS AVAILABLE BY CONTACTING THE
NEAREST SEARS SERVICE CENTER/DEPARTMENT IN THE
UNITED STATES
This warranty applies only while this product is In use In the United States.
This warranty gives you specific legal rights, and you may also have other
rights which vary from state to state.
SEARS, ROEBUCK and CO.
Dept. 8t7 WA
Hoffman Estates, IL 60179
J
WE SERVICE WHAT WE SELL
"We Service What We Sell" Is our assurance to youthatyou can dependon Searsfor service because Sears serviceIs
nationwide.
YourKenmore Range has added valuewhen youconsiderthatSearshasa serviceunit nearyoustaffed by Sears trained
technicians.., professionaltechnicians specificallytrainedon Sears appliances,having the parts, tools and equipment
to ensure that we meet our pledge to you -- "We Service WhatWe Sell!"
TO FURTHER ADD TO THE VALUE OF YOUR RANGE, BUY A SEARS MAINTENANCE AGREEMENT.
Kenmore Ranges are designed, manufactured and tested
for years of dependable operation, Yet, any modern
appliance may require service from time to time. The
Sears Warranty plus the Sears Maintenance Agreement
provides protection from unexpected repair bills and
assures you of enjoying maximum range efficiency.
Here's a comparative warranty and Maintenance Agree-
ment chart showing you the benefits of a Sears Range
Maintenance Agreement.
yeitsofOw_4fCYrpCOv*rlge lltVtu 21wlyoar _dyW
Replacement of _ve
1 ,'.._,.*.,..,,'_o.,._ W MA MA
o¢ GIidm
DAYS
2 _h,.o. Ad_._,,_ W MA MA
3 p_©*l.n _ GI.I P_'cs W MA MA
30 OAY_
w* w_ly I_. kl_m M@lm_.eul
CONTACT YOUR SEARS SALESPERSON OR LOCAL SEARS SERVICE
CENTER TODAY AND PURCHASE A SEARS MAINTENANCE AGREEMENT.
t FiFiFior.e ® America's Best Selling Appliance Brand
Sold by SEARS, ROEBUCK AND CO., Hoffman Estates, IL 60179
--Printed in the United States--
 Loading...