

Sears 911.47890C2,911.47891C2 Service Manual
lHi;
tLtlr
.!
Department
7314. Tbronto
TECHNICAL
FLASH
78
r
989
SER-VT
CE IVIA}{[TIA]-
EI-ECTR.-
C
Bt'I
I.T-
II{I
IVIODEI,S
:
9f-1 - 47 890C2
91f_ - 47 89f-C2
OVEI.T
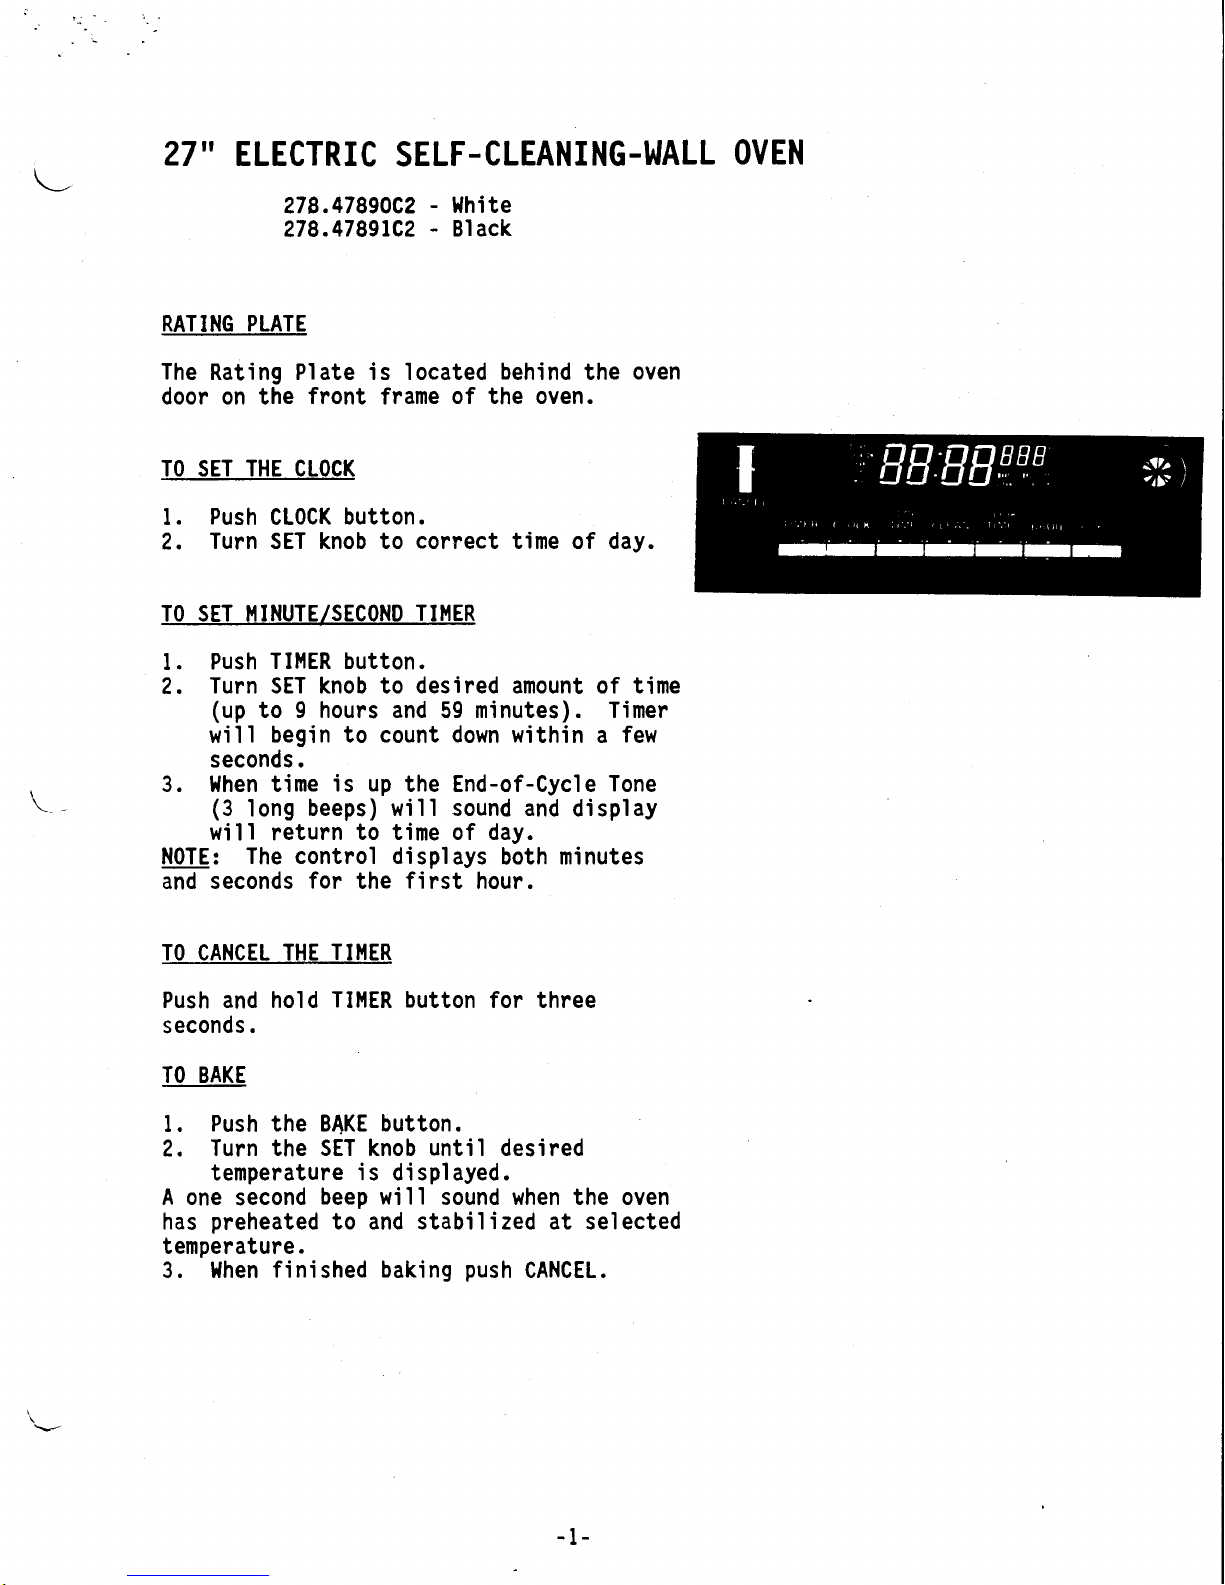
27 " ELECTRI
C SELF-
CLEANI
NG-IJALL
oVEN
?78.47890C2
-
l{hite
278.47891C2 - Black
RATING PLATE
The Rating Plate is located behind the
oven
door on the front
frame
of the oven.
TO SET THE CLOCK
1. Push
CL0CK button.
2. Turn
SET knob to cornect time of day.
TO SET I'IINUTE/SECOND
TII,IER
I . Push T ll'lER
button .
2. Turn
SET knob to desired amount of time
(up
to
t hours and 59 minutes).
Timer
w'il'l begin to count
down within a few
seconds.
3. }lhen time
is
up the End-of-Cycle Tone
(3
'long
beeps) wi 11 sound and di spl ay
will return to t'ime of day.
N0TE: The
control displays
both minutes
and seconds
for
the
first
hour.
TO CANCEL THE
TII'IER
Push and hold TIl,lER button for three
seconds.
TO BAKE
1. Push
the BAKE button.
2. Turn
the SET knob until desired
temperature is
displayed.
A one second beep wi 1 1 sound when the oven
has
preheated
to and stabi I i zed at sel ected
temperature.
3.
l'lhen f i ni shed bak'ing
push
CANCEL.
-I-
1.
2.
TO
BROIL
1.
Push
BR0IL
button.
2.
Turn
SET
knob
until
your
choice
of
HI
BR0IL
or
L0 BROIL
is
visible
in
the
di
spl
ay.
3.
llhen
finished
push
CAI{CEL.
TO
USE
AI'TO}IATIC
OYEII TII,IER
Push
C00K
TI}IE
button.
Turn
SET
knob
to set
length
of
baking
time.
,
3.
Push
EA|G
button.
4.
Turn
SET
knob
to
set
desired
temperature.
llhen
cook
time
is
complete
End-of-Cycle
Tone
will
sound
and
the
oven
will
sirut
off.
TO
DISPLAY
START
OVEII
TII,IER
l.
Push
C00K
TII|E
button.
2.
Set
baklng
time
with
SET
knob.
3.
Push
STOP
TlitE
button.
4.
Turn
SET
knob
to time
of
day
baking
should
be
complete.
5.
Push
BAIG
button.
6.
Turn
SET
knob
to desired
temperature.
llhen
cook
tlme
is
complete
End-oi-Cycle
Tone
will
sound
and
the
oven
will
sirut
off.
HO}I
TO
CHANGE
A
PROGRAI'I
l{hen
a function
has
been
entered,
you
can
recall
what
has
been
programed
by
pushing
the
corresponding
function
button.
'fne
messages
in
the
display
show
you
which
function
is
currently
being
displayed.
l{hile
the
function
is
dispiayed,
you
can
change
it
with
the
SET
knob.
you
can
change
any
prograrmed
function
at any
time.
-2-

TOI{E
End-of-Cvcl'e
Tone
(3
long
beeps
-
one
second on,
one second
off): shows
that a
tined oyen
operation
has reached
ST0p
TIiIE
or that
the
lllnute/Second
Timer
has counted
down.
Attention
Tone
(series
of short
beeps,
l/4
second
on,
l/4 second
off, until
proper
responss
is
given):
will
sound
if
oven has
only been
partlally
progranmed.
For
example,
if
you
have
selected
a
cook time
but no tenperature,
you
will
hear
the
Attention
Tone untll
you
select
a
temperature
or
push
oven CANCEL.
Notificatlon
Tone
(single,
one-second
beep):
indicates
oven
has stabilized
at
selected
temperature.
Kev Tone
(single
1/10
second
beep):
sounds
when any
button
is
pushed.
Function
Error Tone
(series
of
very rapid
beepg
,
l/8
second on,
l/4
second
off):
display will
shc
a failure
code.
Cancel
Functlon
Error Tone
by
pushing
the
oven
CAI{CEL button.
If
the Function
Error
Tone
starts
again
(after
about
15 seconds),
call
for serYice.
Dlsconnect
the
range
electrical
supply to
stop
the
tone.
If the
functlon
error
occurred
while
you
were
progranning
the
Electronic
Control,
push
the
oven CAI{CEL
button and
try again.
To Cancel
the Tone...If
you
don't
want an
audible tone
when
you
push
a button,
you
can el iminate the
Key
Tone
by
pushing
and
holding the
oven CAIICEL
button
until
you
hear a
short beep
(ln
approximately
two
seconds).
To
actlvate
the tones
again,
push
and hold the
oven
CAI{CEL
button
once
more until
you
hear
a
short
beep.
Canceling
or actlvatlng
the tones
should
only be done when
there
is no
oven
operation
prograrmed.
Pushing the oven CAilCEL
button
will
clear
all
functions except
the Clock
and
ili nute/Second Timer.
-5-

SET
THE
OVEil
FOR
CLEANITIG
l.
Push
the CLEAII
button.
2. Turn
SET
knob
in
the
clock wise
di
recti
on.
Display
will
read
3
hour
30 min.
NOTE:
You can
find
out
when
the
clean
cycle
will
be finished
by
pushing
the
STOP
TII|E
button.
The
word
D00R
is
displayed
when
you
try to
set
a clean
cycle
with
the door
open
or
when
the
oven
temperature
is
too
high.
TO SET
A
DELAYED
START
l.
Push
ST0P
TI}IE
button.
2.
Turn
SET
knob
to time
of day
when
you
wish
cleaning
to
be
completed
(must
be
more
than
3
l/2
hours
later
than
current
tine
of
day.)
3.
Push
the
CLEAT{
button.
4.
Turn
SET
knob
in the
clockwise
di recti
on.
The words
DELAY
CLEAII
will
be
on
in
the
display
until
the
clean
cycle
starts.
After
the
clean
cycle
starts,
the
word
CLEAII
will
be
on
in the
display.
NOTE:
During
a
delayed
self-clean
operation
you
can
find
out
when
the
oven
turns
on
by
pushing
and
holding
the
CLEAII
button.
-4-
TO STOP
A CLEAII
CYCLE
1.
Press
the oven
CAIICEL button.
2. l{ait
until
the
oven has cooled
below
locking
tenperature
(about
20-30
minutes)
and
the word
L0CK
is off
in
the
display.
You
will
not
be
able to open
the door
right
away
unless
the
oven
temperature
is at a
safe
level.
If
you
cannot
open
the oven
door
irmedlately
after
the
word
LOCK
goes
off,
wait
one
minute
and
try
again.
II'IPORTAI{T
The
oven
door
must
be closed
and
all
controls
must
be
set correcily
for
the
clean
cycle to
work
properly.
If the
oven
door
is
not closed,
the
D00R
is displayed
and
the oven
beeps
continuously.
Close
the
door,
touch
and
begin
again.
word
CAI{CEL
OYEII
THERIIOSTAT
The
oven
tenperature
is
preset
at
the
factory
but can
be
changed
by
the following
procedure.
To
Adjust
Temoerature:
l. Push
the
BAKE
button.
2. Select
a temperature
between
500.F and
550'F
with
the
SET
knob.
3.
Qulckly
(withln
two
seconds,
before
the
BAKE
function
energizes)
push
and
hold
the
BAIG button
for about
5
seconds.
The
display
will
show
number
of degrees
difference
between
the original
factory
temperature
settlng
and the
current
temperature
setting.
If the
oven
tenperature
has
neyer been
adjusted,
the
display
will
read
00.
-3-
4. Turn
the SET knob
to
adjust
the
tenperature
in
5.F
steps.
you
can
raise
lt
35.F or
lower
it
35.F. A
minus
sign
(-)
before
the
number means
that
the
oven will
be
cooler
by
the
displayed
anount of
degrees.
If the
control
beeps and
flashes,
push
the
CAIICEL
button
and
start
oyer.
5.
lfhen
you
have made
the
desired
adJustnent,
push
the
CL0CK
button to
go
back
to
the
tlme
of day
dlsplay
or to
use
your
oyen
as
you
would
normally.
t{0TE:
The
adJustnent
descrlbed
above
will
not
change
the
self-clean
temperature.
-6-
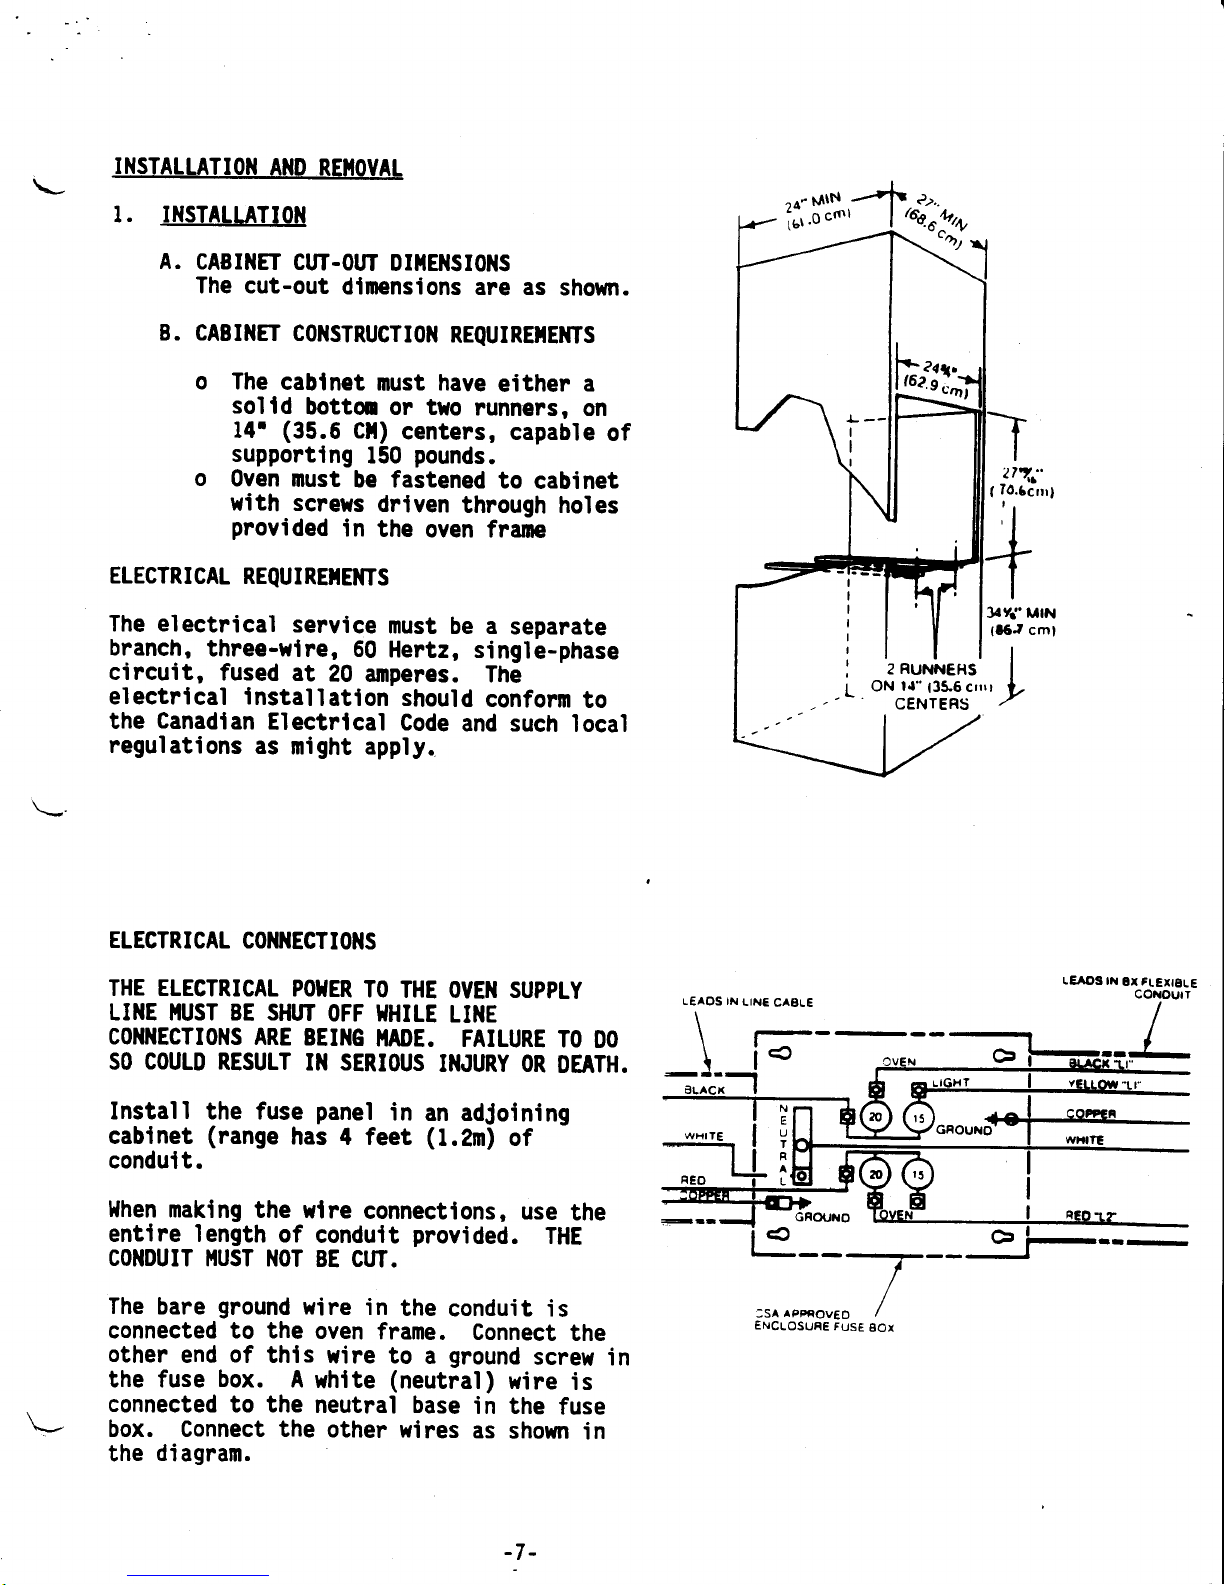
IiISTALLATI0iI
At{D
RE!,|0VAL
1. IIISTALLATIOII
A.
CABIIIET
CUI-OUT
Dll,lEllSIOilS
The
cut-out
dimensions
are as
shown.
B.
CABIilET
CoI|STRUCTI0I{
REQUIRE}tEilrS
o
The
cablnet
must have
either
a
solld
botton
or
tro
runners,
on
14'
(35.6
Cll)
centers,
capable
of
supportlng
150
pounds.
o
0ven
must
be fastened
to
cabinet
with
screws
driven
through
holes
provided
in
the
oven frane
ELECTRICAL
REQUIREIIEI{TS
The electrical
service
must
be
a separate
branch,
three-wire,
60
Hertz,
single-phase
circuit,
fused
at
20 amperes.
The
electrical
installatlon
should
conform
to
the Canadian
Electrical
Code
and such
local
regulations
as
might
apply.
ELECTRICAL
CON]IECTIOTIS
THE ELECTRICAL
POIIER
TO THE
OVEII
SUPPLY
LITIE IIUST
BE SH['T
OFF }IHILE
LIIIE
COIIIIECTIOilS
ARE
BEIIIG
}IADE.
FAILURE
TO
DO
SO COULD
RESULT
IN SERIOUS
II{JURY
()R
DEATH.
Install the fuse
panel
in
an
adJoining
cabinet
(range
has 4 feet
(1.2m)
of
conduit.
l{hen
maklng
the
wlre
connectlons,
use
the
entlre length
of
conduit
provided.
THE
COi{DUIT
iIUST }IOT
BE CUT.
The bare
ground
wire
'in
the
conduit
is
connected
to the
oven
frame.
Connect
the
other end of this
wire to
a
ground
screw
in
the fuse box.
A whlte
(neutral)
wire
is
,
connected to the
neutral
base
'in
the
fuse
\-
box. Connect the
other
wires
as
shown
in
the
diagram.
-7-
'
f,It,,,
:1
I
a
I
]|Yj'MIN
tt6J
cmt
LEAOS
IN
6X
FLEXIBLE
coNoutt
I
IN
LINC
CAELE
',
"rnL.*r'
I
ON
l.l"
1l$"$61111
|
CENTERS
''
f;:;;
 Loading...