

Page 1
Owner's Manual
®
1.3 Cu. ft / 900W(EEC 705 Rating Standard)
MICROWAVE OVEN
Model No. 721.67600
721.67601
721.67602
CAUTION: Read and follow
all Safety Rules and Operating
instructions before First Use
of this Product.
Sears, Roebuck and Co., Hoffrnan Estates, IL. 60179 U.SoA=
Page 2
TABLE OF CONTENTS ...................................... 2
WARRANTY ........................................................ 2
SAFETY .............................................................. 3
Important Safety Instructions ........................... 3
Precautions To Avoid Possible Exposure
To Excessive Microwave Energy ..................... 4
INFORMATION ................................................... 5
Location of Model Number ............................... 5
Oven Specifications ....................................... 5
Electrical Rating .............................................. 5
Electrical Requirements ................................... 5
Grounding instructions ..................................... 5
Microwave Oven Features .............................. 6
Oven Control Panel ......................................... 7
OPERATION ....................................................... 9
LEARN ABOUT YOUR t_t|CROWAVE OVEN 9
Time of Day ................................................ 9
Kitchen Timer ............................................... 9
Light Timer ..................................................... 9
Fan Hi/Low/Off ............................................. 10
Light Hi/Low/Off ........................................... 10
Turntable On/Off ........................................... 10
Child Lock ..................................................... 10
Help .............................................................. 10
Hold Warm .................................................. 10
User Choice .............................................. 11
Quick On ....................................................... 11
Plus One Minute ............................................ 1t
Popcorn ........................................................ 12
Cooking with More than One Cook Cycte 12
Cooking at High Cook Power ....................... 12
Cooking at Lower Power Levefs ................... 12
Cooking Guide for "Lower Power Levels'. ..... 13
Beverage ..................................................... !4
Potato ........................................................... 14
Bacon ............................................................ 14
Auto Cook ................................................... 14
Cooking Guide for "Auto Cook", ................... 15
Auto Reheat ................................................. 16
CooKing Guide for 'Auto Reheat". ................ 16
Auto Defrost ................................................. 17
Defrosting Tips ............................................ 17
Auto Defrost Chart ...................................... 18
Cooking with the Temperature Probe .......... 20
Temperature Guide ....................................... 21
Two position Metal Rack ............................. 21
COOKING .......................................................... 2?-
Getting the Best Cooking Results ................. 22
FiSH & SHELLFISH ....................................... 22
APPET_ZERS/SAUCES/B OUPS ................... 23,
MEAT ............................................................... 23
POULTRY ........................................................ 25
PASTA AND RiCE ......................................... 26
MAINTE_ANCE ................................................ 27
CARE AND CLEANING ................................ 27
Temperature Probe ..................................... 27
Metal Rack .................................................. 27
Cleaning the Grease Filters ....................... 27
Charcoal Filter Replacement ....................... 27
Cooktop/Night Light Replacement .............. 28
Oven Light Replacement ............................. 28
QUESTIONS AND ANSWERS ...................... 28
MICROWAVE UTENSIL GUIDE .................... 2g
BEFORE CALLING FOR SERVICE ............... 30
FULL ONE YEAR WARRANTY ON
MICROWAVE OVEN
For one year from the date of purchase, if this
Kenmore microwave oven fails due to a defect
in material of workmanship, Sears will repair it
free of charge.
FULL FiVE YEAR WARRANTY ON THE
MAGNETRON
For five years from the date of purchase, of the
magnetron in this Kenmore microwave oven
fails due to a defect in material or workmanship,
Sears will repair it free of charge.
WARRANTY SERVICE IS AVAILABLE BY
S_MPLY CONTACTING THE NEAREST
SEARS STORE OR SERVICE CENTER iN
THE UNITED STATES.
This warranty applies only wh_le this product is
in use in the unit_ states.
This warranty gives you specific legal rights,
and you may also have other right which vary
from state to state.
Sears,Roebuck and Co.. Di 817WA,
Hoffman Estates, IL 60t79
-2-
Page 3
iMPORTANT SAFETY INSTRUCTIONS
The safety instructions below will tell you how to use your oven to avoid harm to yourself or damage
to your oven.
WARNiNG-To reduce the risk of burns, etectric
shock fire, injury to persons or exposure to excessive
microwave energy,
- Read all the instructions before using your oven.
* Do not allow children to use this oven without
close supervision,
= Read and follow the specific "PRECAUTIONS TO
AVOID POSSIBLE EXPOSURE TO
EXCESSIVE M_CROWAVE ENERGY" found
on page 4.
* Do not use corrosive chemicals or vapors, such as
sulfide and chloride, in this appliance. This type of
oven is specifically designed to heat, cook ot dry
food it is not designed for industriat or laboratory
use,
- Do not use or store this appliance outdoors. Do not
use this product near water -for example, near a
kitchen sink, in a wet basemenL or near a swimming
poe!, and the tike,
* De not use the cavity for storage purposes, Do not
leave paper products, cooking utensils, or food in
the cavity when not in use
,,Clean the ventilating hood frequently. Do not
allow grease to accumulate on the hood or the
filters,
When flaming foods under the hood, turn the fan off.
The fan, if operatin9_ may spread the flame,
* Suitable for use above both gas and electric cooking
equipment 36 inches wide or less,
- Use care when cleaning the vent hood filters.
Corrosive cleaning agents such as Iye-based oven
c!eaners, may damage the filters.
, When cleaning the door and the surfaces that
touch the door, use only mild, non-abrasive
soaps or detergents and a sponge or soft cloth.
Do net tamper with the built-in safety switches
on the oven door. The oven has several built-in
safety switches to make sure the power is off when
tle doo_"is Open,
f your oven is dropped or damaged, have it
thoroughly checked by a qualified service technician
before using it again.
, To avoid a fire hazard:
- Do not severely over-cook food. Severely
overcooked foods can starts a fire in the oven.
Watch the oven carefully, especially if you have
paper, plastic, or other combustibles in the oven,
- Do not store combustible items
(bread,cookies, ere,) in the oven, because if
lightning strikes the power ]ines it may cause the
oven to turn on,
- Do not use wire twist-ties in the even. Be sure
to inspect purchased items for wire twist-ties and
remove them before placing the item in the oven.
If a fire should start:
- Keep the oven door closed.
* Turn the oven off.
- Disconnect the power cord or shut off the
power at the fuse or circuit breaker panel.
oTo avoid electric shock:
- This appliance must be grounded, Connect it
only to a properly grounded outlet. See the
electtical grounding instructions on page 5
Do not operate this appliance if it has a
damaged cord or plug, if it is not working
properly or if it has been damaged or dropped.
- Do not immerse the electrical cord or plug in
water.
- Keep the cord away from heated surfaces.
, To avoid improperly cooking some foods.
- Do not heat any types of baby bottles or baby
food, Uneven heating may occur and possibly
cause persona] injury.
- Do not heat small-necked containers, such as
syrup bottles.
- Do not dee_fet fry in your microwave oven.
- Do not attempt home canning in your
microwave oven,
- Do not heat the following items in the
microwave oven: whole eggs in the shell; water
with oil or fat; sealed containers or closed glass
jars. These items may explode,
-Do not use thisoven forcommercial purposes. It
is made forhousehold use only.
* Do not cover or block any openings in the oven,
- Use your oven onfy for the operations described in
this manual.
Do not run the oven empty, without food in it.
Do not let cord hang over edge of table or counter.
, Preserve the oven f_oor:
- Do not heat the oven floor excessively.
-3-
Page 4
- Do not allow the gray film on special microwave-
cooking packages to touch the oven floor, Put the
package on a microwavable dish.
o Do not cook anything directly on the oven floor.
Use a microwavable dish.
- Keep a browning dish at least 3/!6 inch above
ftoor. Carefully road and follow the instructions for
the browning dish, If you use a browning dish
incorrectly, you could damage the oven floor.
, Preserve the metal rack:
- Remove the metal rack from the oven when you
are not using it.
- Do net usethe oven empty with the metal rack in
it,
- The metal rack may get hot while cooking, Use pot
holders to remove itafter cooking,
De net usefoil or metal containers on the metal
rack.
Install or located this appliance only in accordance
with the provided installation instructions.
oThis appliance should be serviced only by qualified
service personnel. Contact nearest authorized
service facility for examination, repair or adjustment.
SAVE THESE INSTRUCTIONS
PRECAUTIONS TO AVOID POSSIBLE EXPOSURE
TO EXCESSIVE MICROWAVE ENERGY ,,.
, Do not attempt to operate this oven with the door open, since open-door operation can result in
harmful exposure to microwave energy. It is important not to defeat or tamper with the safe_
interlock.
, Do not operate the oven if it is damaged, It is particularly important that the oven door close
properly and that there is no damage to the:
- door (bent)
- hinges and latches (broken or _oosened)
- door seals and sealing surfaces.
- Do not piece any obiect: between the oven front face and the door, or allow soil or cleaner
residue to accumulate on sealing surfaces.
, The oven should not be adjusted or repaired by anyone except properly qualified service
personnel
FEDERAL COMtViUNICATIONS COIVIM_SSION RADIO FREQUENCY iNTERFERENCE
STATEMENT ( U,S,A, ONLY)
WARNING:
This equipment generates and uses tSM frequency
energy and if not installed and used properly, that is
in strict accordance with the manufactureCs
instructions may cause interference to radio and
television reception, It has been type tested and
found to comply with limits for ISM Equipment
pursuant to part 18 of FCC Rules_which are
designed to provide reasonable protection against
s_ch interference in a residential installation,
However, there is no guarantee that interference will
_ot occur in a particu!ar installation, If this equipment
does cause interference to radio or television
reception, which can be determined by turning the
equipment off and on, the _ser is encouraged to try
to correct the interference by one or more of the
following:
Reorient the receiving antenna of the radio or
television,
Retocate the Microwave Oven with respect to the
receiver,
• Move the microwave oven away from th receiver.
Plug the microwave oven into a different outlet so
that the microwave oven and the receiver are on
different branch circuits,
The manufacturer is not responsible for any radio or
TV interference c_used by unauthorized
modification to this microwave oven. It is the
responsibility of the user to correct such interference,
-4-
Page 5
Please read this owner's m_nual, It wiil tell you
how to use all the fine features of this microwave
oven,
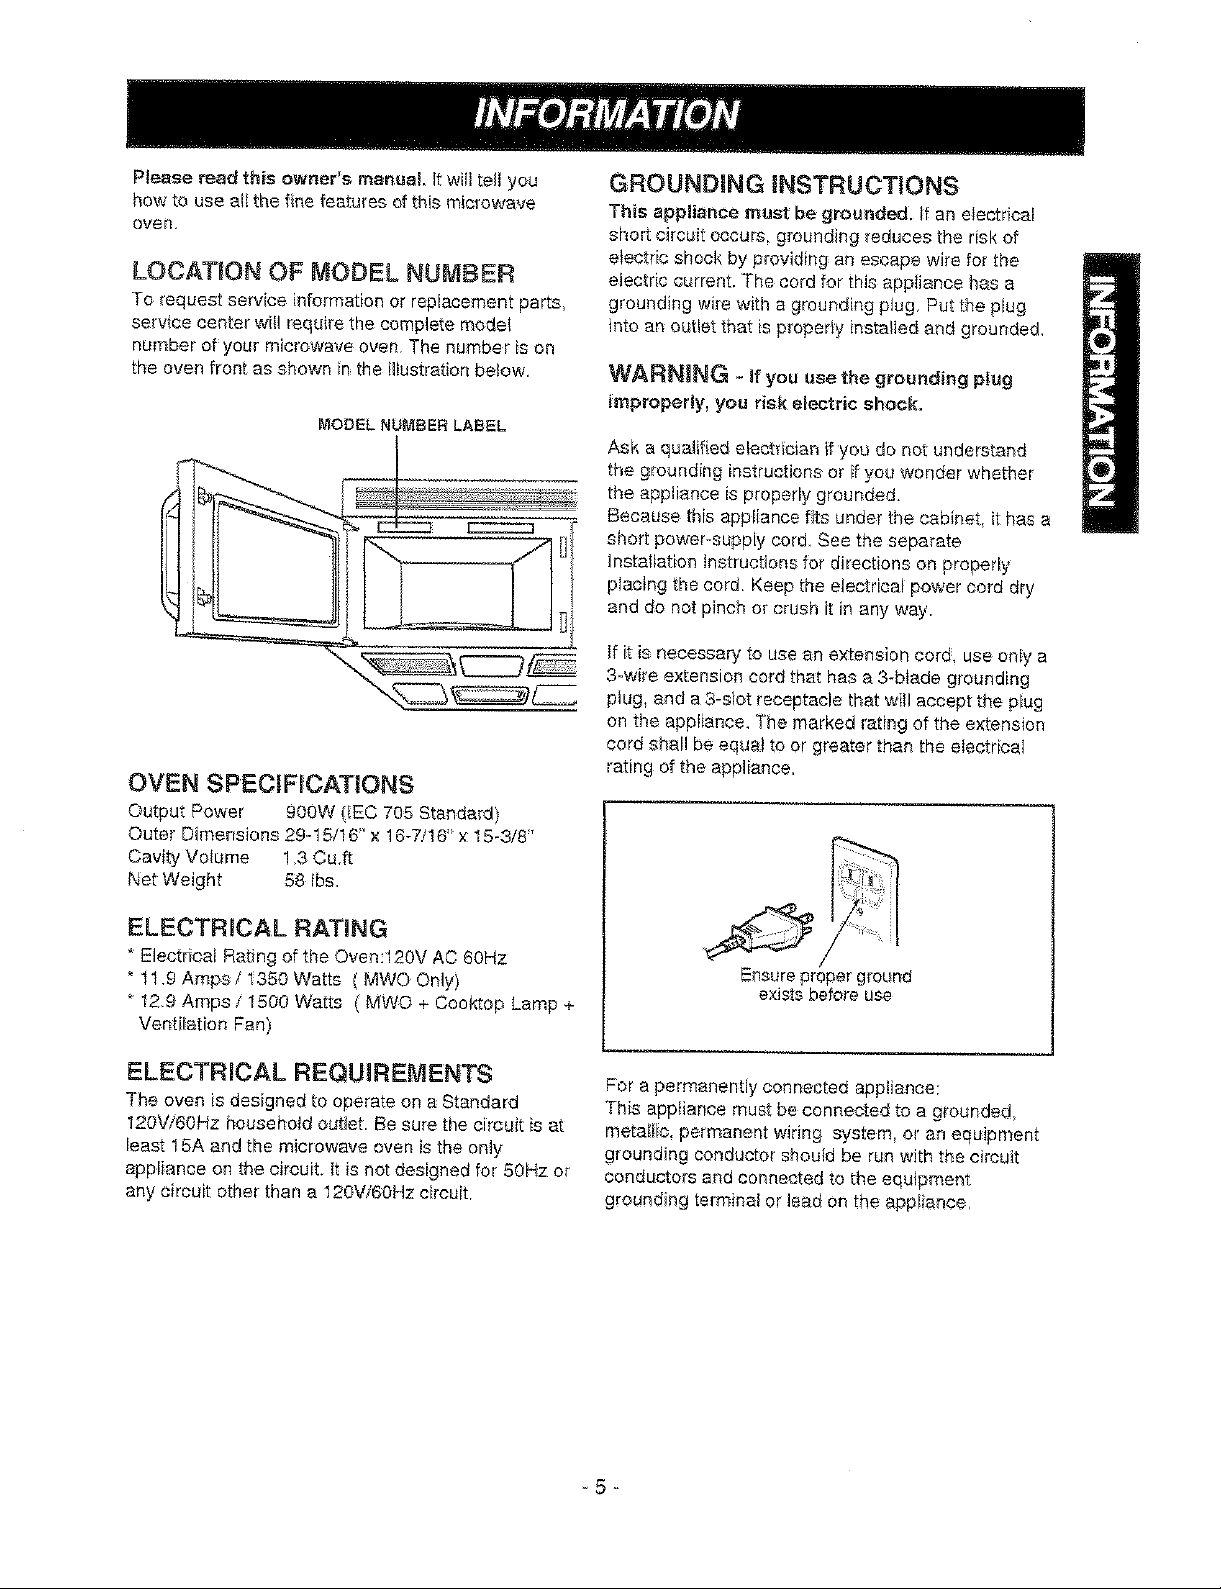
LOCATION OF MODEL NUMBER
To request service information or replacement parts,
service center wil! require the complete model
number of your microwave oven The number is on
the oven front as shown in the illustration below.
NODELNUMBERLABEL
OVEN SPECIFICATIONS
Output Power 900W (IEC 705 Standard)
Outer"Dimensions 29-15/16" x 16-7/16'_x 15-3/8"
Cavity Volume 1,3 Cu.ft
Net Weight 58 tba.
GROUNDING INSTRUCTIONS
This appliance must be grounded. _fan electrical
short circuit occurs, grounding reduces the risk of
electric shock by providing an escape wire for the
electric current. The cord for this appliance has a
grounding wire with a grounding plug, Put the plug
into an outlet that is properly installed and grounded,
WARNING - if you usethe greundingplug
improperly, you risk electric shock.
Ask a qualified etectriaan if you do not understand
the grounding instructions or if you wonder whether
the appliance is properly grounded.
Becaese this appliance fits under the cabinet, it has a
short power-supply cord, See the separate
tnata}lation Instructions for directions on properly
placing the cord Keep the electrical power cord dry
and do not pinch or crush it in any way.
if it is necessary to use an extension cord, use only a
3-wire extension cord that has a 3-blade grounding
plug_ and a 3-slot receptacle that wift accept the plug
on the appliance. The marked rating of the extension
cord shall be equal to or greater than the electrical
rating of the appliance,
ELECTRmCAL RATING
Electrical Rating of the Oven:120V AC 60Hz
* tl.9 Ampsi 1350 Watts ( MWO Only)
* 12.9 Amps / 1500 Watts ( MWO + Cooktop Lamp +
Ventilation Fan)
ELECTRICAL REQUIREMENTS
The oven is designed to operate on a Standard
120V/60Hz household outtet. Be sure the circuit is at
least 15A and the microwave even is the on_y
appliance on the circuit It is not designed for 50Hz ot
any circuit other than a 120W60Hz circuit,
Ensure proper ground
exists before use
For a permanently connected appliance:
This appliance must be connected to a grounded
metaliic, permanent wiring system, or an equipment
grounding conductor should be run with the circuit
conductors and connected to the equipment
grounding terminal or lead on the appliance,
Page 6
MICROWAVE OVEN FEATURES
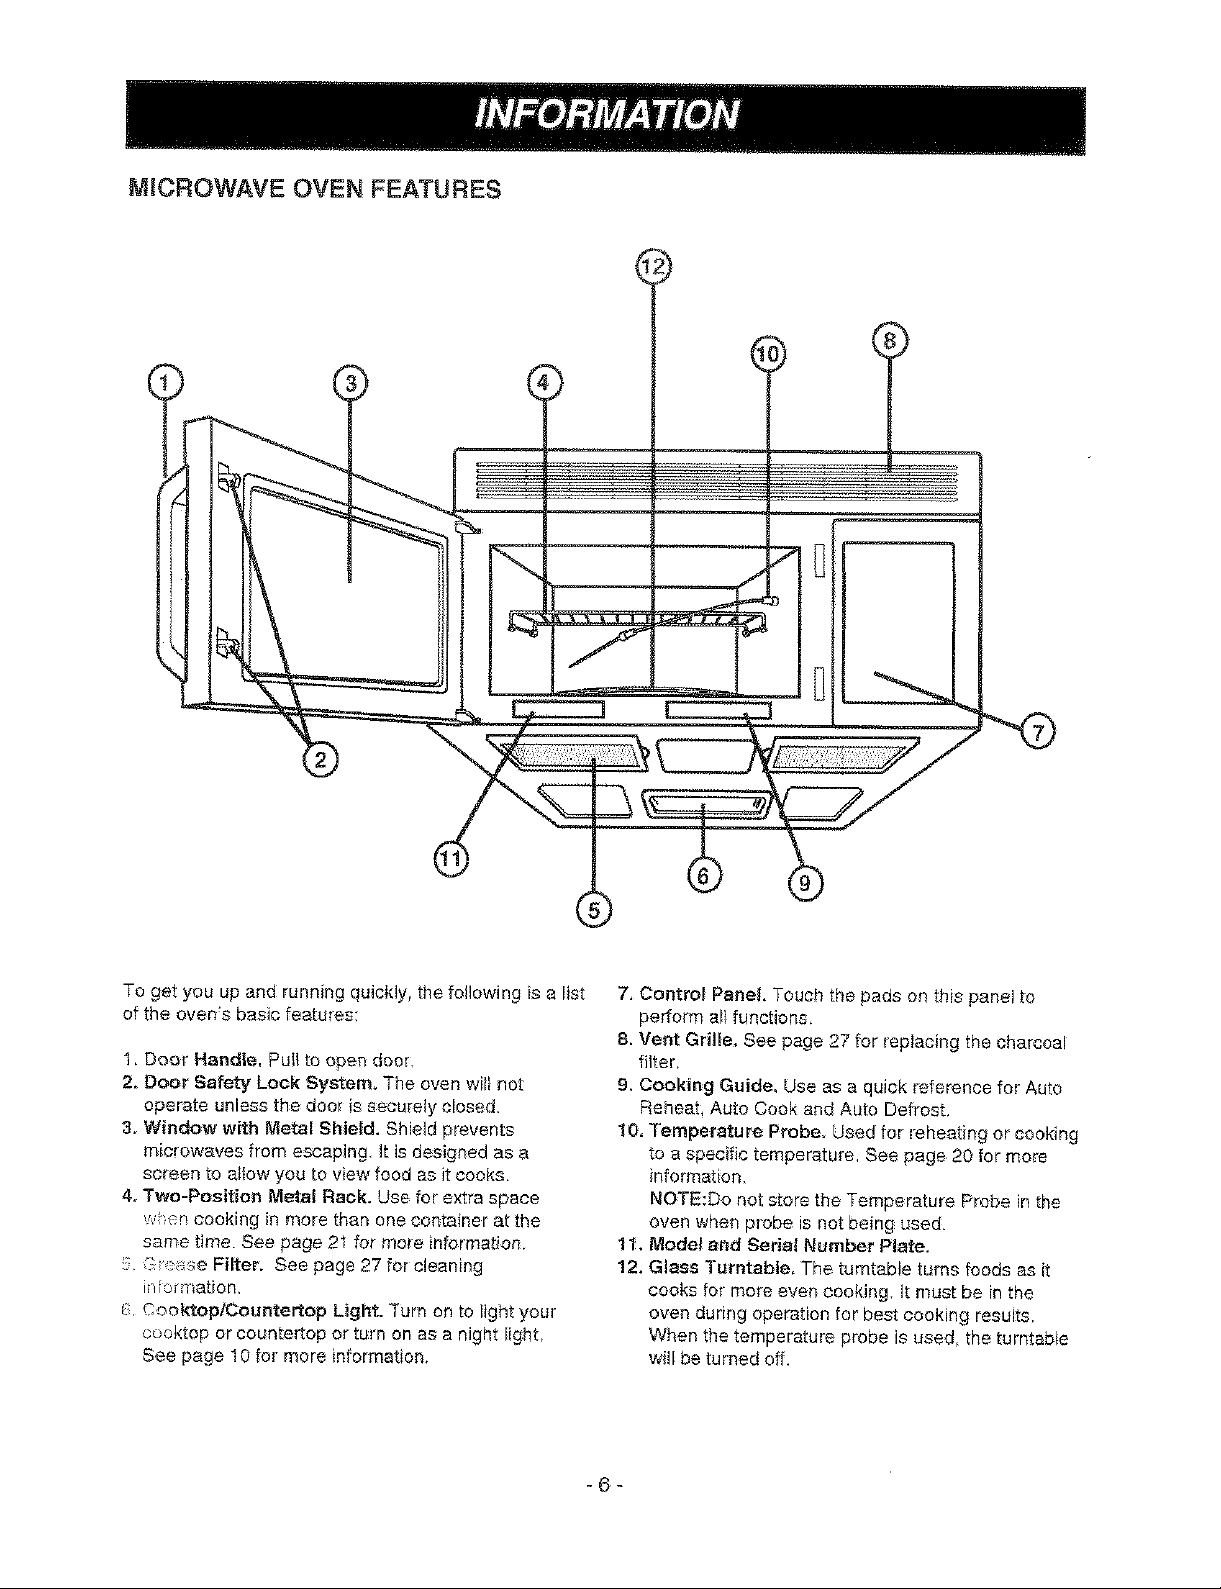
To get you up and running q_ickty, the following is a list
of the ovens basic features:
1, Door Handle, Pu{I to open door.
2. Door Safety Lock System. The oven wili not
operate unless the doer is eecure_y cloeed.
3. Window with Metal ShieFd. Shield prevents
microwaves from escaping. It is designed as a
screen to allow you to view food as it cooks.
4. Two-Position Metal Rack. Use for extra space
whe_ cooking in more than one container at the
same time. See page 21 for more infor_ation.
::: G ":._se Filter. See page 27 for cleaning
information
r_ Coe, ktop/Oountertop Light. ]'urn on to light your
cooktop or ceunter_op or turn on as a night fight,
See page 10 for more information,
7, Control Panel Touch the pads on this panel to
perform all functions,
8, Vent Gril}e. See page 27 for replacing the charcoal
fi_ter,
& Cooking Guide. Use as a quick reference for Auto
Reheat, Auto Cook and Auto Defrost,
I0. Temperature Probe. Used for reheating or cooking
to a specific temperature, See page 20 for more
informat_on.
NOTE:Do not store the Temperature Probe in the
oven when probe is not being used.
11. Model and $edat Number Plate.
12, Glass Turntable, The turntable turns foods as it
cooks for more even cooking, It must be in the
oven during operation for best cooking results.
When the temperature probe is used, the turntable
will be turned off.
-6-
Page 7
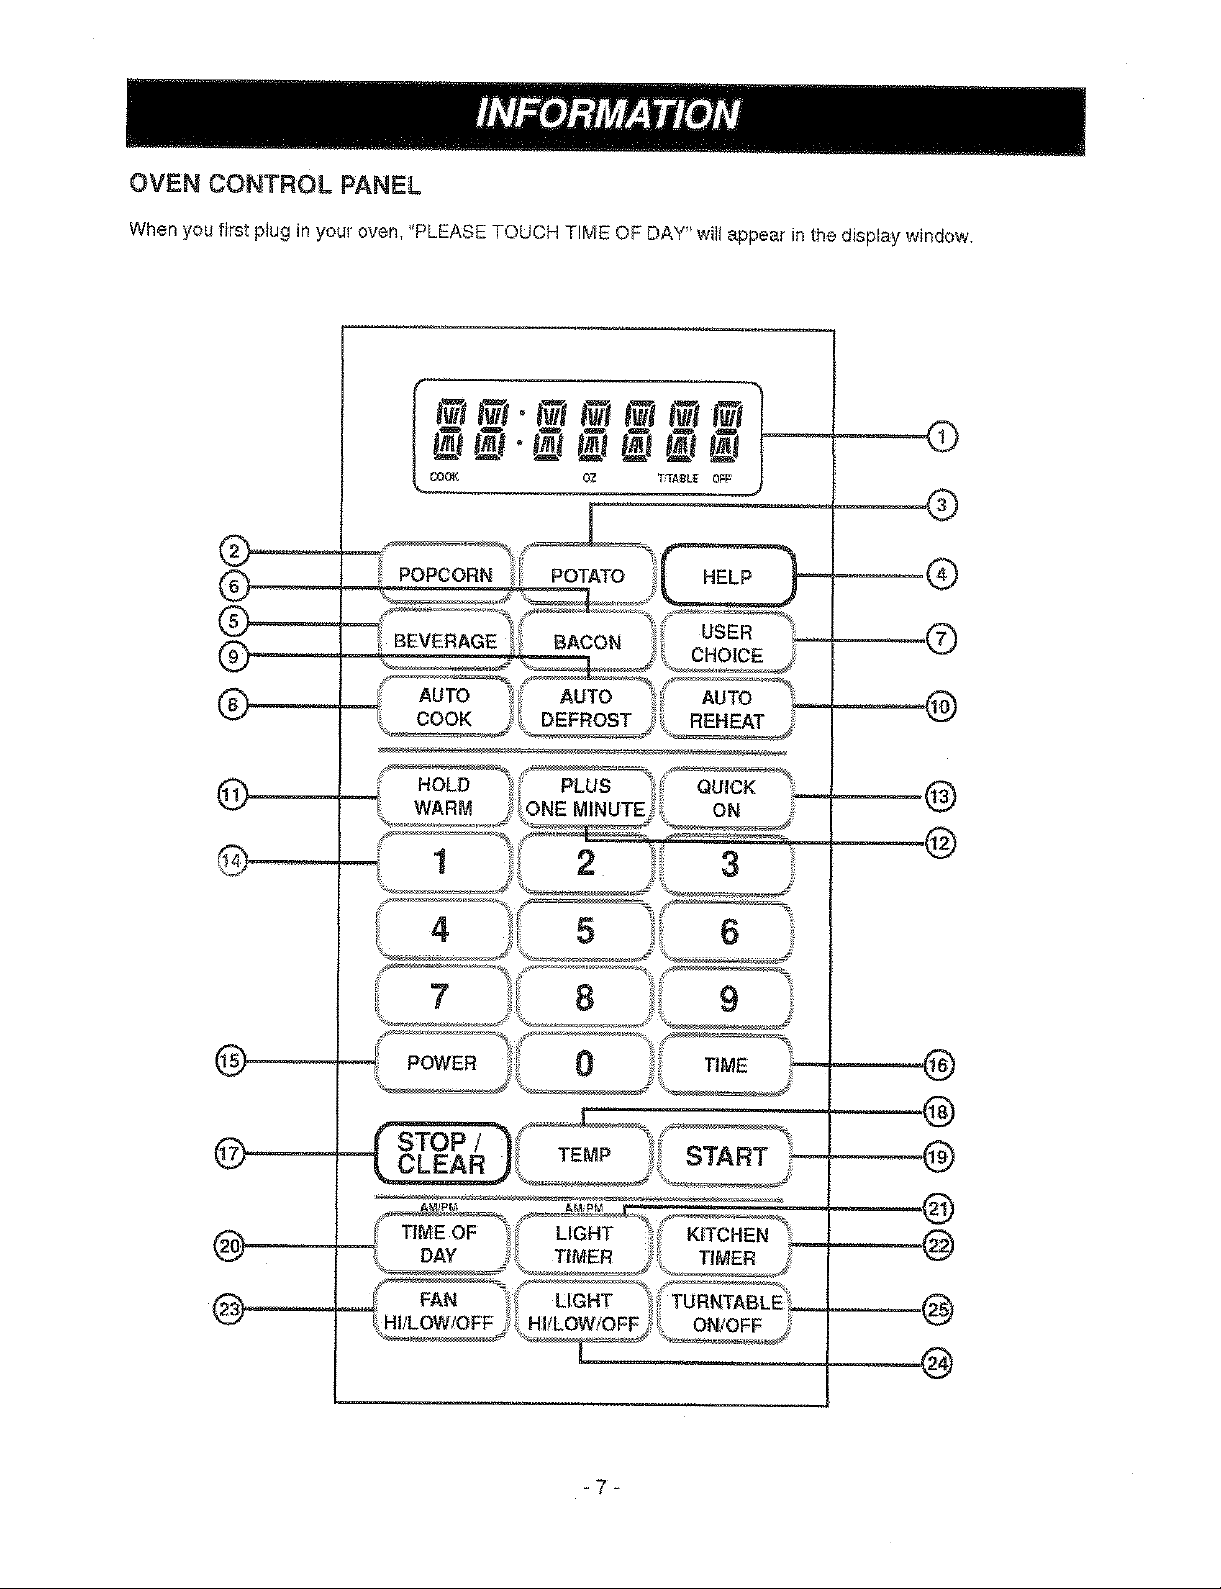
OVEN CONTROL PANEL
When you first plug in your even, "PLEASE TOUCH TIME OF DAY" wilt appear in the display window.
POPCORN
BEVERAGE
AUTO
COOK
POWER
POTATO HELP
BACON USER
CHOICE
AUTO AUTO
DEFROST REHEAT
_®
4_
-7-
._.__@
____@
.____@
Page 8

1. DISPLAY: The Display includes & clock and
indicators to telI you time of day, cooking time
settings and cooking functions selected.
2. POPCORN: Touch this pad when popping popcorn
in your microwave oven. See page 12 for more
information,
15, POWER: Touch this pad to scoot a cooking power
tevet.
16: TIME: Touch this pad to set a cooking time,
17. STOP/CLEAR: Touch this pad to stop the oven or
clear a_lentries,
3, POTATO: Touch this pad to cook from I to 4
potatoes, Seepage 14for more Information.
4. HELP: Touch this pad to }earn how to use each oven
function. See page 10 for more information,
5. BEVERAGE: Touch this pad to reheat one cup or
two cups a beverage, See page 14 for mole
information.
6. BACON: Touch this pad to cook from 2 to 6 slices of
bacon See page 14 for rno_einformation',,
7. USER CHOICE: Touch this pad to change the
ovens default settings for sound, clock, display
speed, defrost weight, and demo mode operations.
See page 11 for more information
8, AUTO COOK; Touch this pad to cook vegetables,
rice, or casseroles, See page 14 for more
information,
9 AUTO DEFROST: Meat, pouitry, fish, Touch on pad
to select food type and defrost food by weight,
See page 17 for more information,
10, AUTO REHEAT: Touch this pad to reheat pizza,
soups, sauces casseroles, roils, and muffins.
See page 16 for more information.
18.TEMP: Touch this pad for temperature probe
cooking. See page 20 for more information.
19. START: Touch this pad to start a function. If you
open the door after oven begins to cook, retouch
START,
20. TiME OF DAY: Touch this pad to enter the time of
day, See page 9 for more information,
24. LIGHT TIMER: Touch this pad to set the fight timer,
See page 9 for more information.
22, KITCHEN TIMER: Touch this pad to ee_the kitchen
timer, See page 9 for more information,
28. FAN HI/LOW OFF::Touch this pad to turn the fan
on or off, See page 10 for more information.
24. LIGHT HI/LOW OFF: Touch this pad to turn on the
cooktop/countertop _ight,See page 10 for more
information.
25. TURNTABLE ONtOFF: Touch this pad to turn off
the tumtabte. "T/TABLE OFF' wilt appear in the
display, See page 10 for more information,
11. HOLD WARM: Touch th{spad to keep hot, cooked
foods safety warm in your microwave oven for upto
99 minutes 99 seconds, See page 10for more
information.
12. PLUS ONE MINUTE: Touch th}s pad to cook for
one minute_ at 100% power level
See page 11 for more information.
13. QUICK ON: Touch th_spad to cook from I to g
minutes automatically at 100% power.
See page 11 for more information,
14. NUMBER: Touch number pads to enter cooking
time, power leve}, quantities or weights
-8-
Page 9
LEARN ABOUT YOUR MICROWAVE OVEN
This section discusses the concepts behind microwave cooking and introduces you to the basics you need to
know to operate your microwave oven. Please read this information before use.
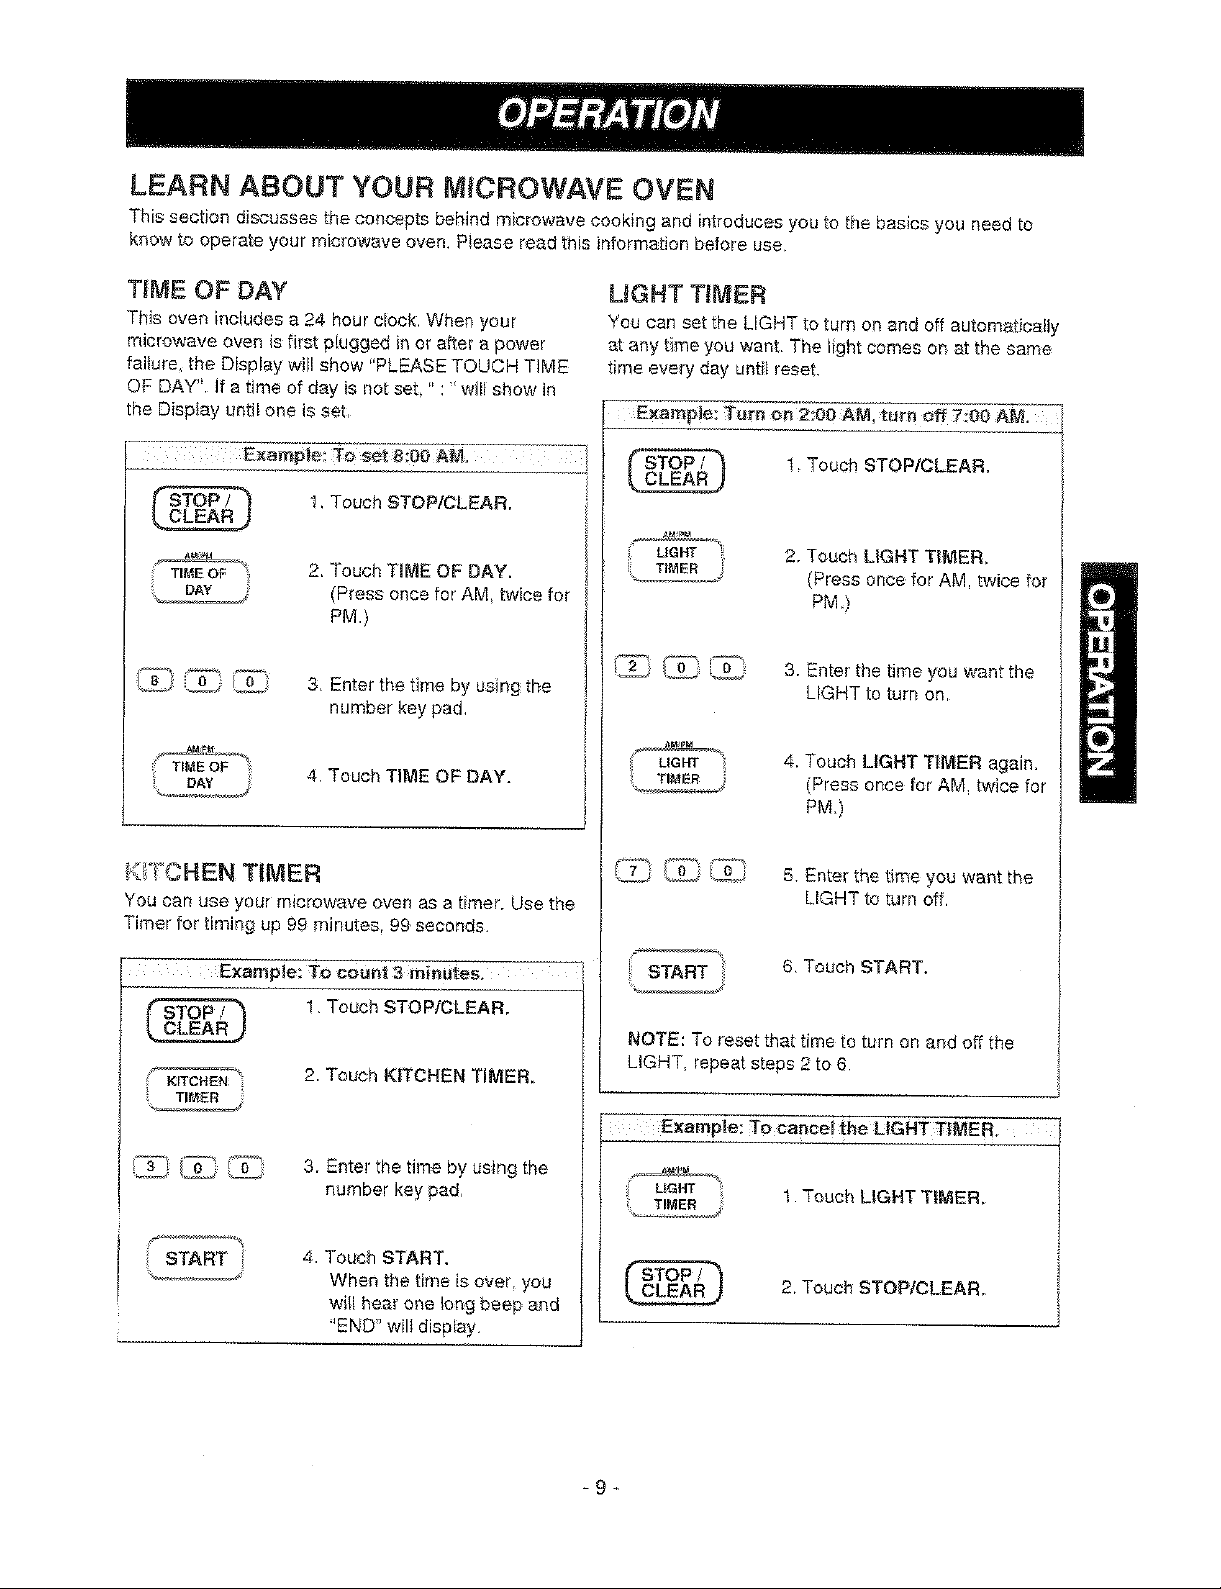
TIME OF DAY
This oven includes a 24 hour efeok, When your
microwave oven is first ptugged in or after a power
faiture, the Display will show "PLEASE TOUCH TIME
OF DAY '_.if a time of day is not set, " : ' wif{ show in
the Display until one is set,
1, Touch STOP!CLEAR.
2, Touch TiME OF DAY.
(Press once for AM twice for
PM.)
3, Enter the time by using the
number key pad,
4. Touch TIME OF DAY.
OHEN T|MER
You can use your microwave oven as a timer. Use the
Timer for timing up 99 minutes, 99 seconds.
Example: TO count 3 minutes. --
UGHT TIMER
You can set the LIGHT to turn on and off automatically
at any time you want,. The tl_ht comes or_at the same
time every day Lmtifreset.
E×atnple: Tut'r_on 2:00 :A_,I,t_rn off 7_00 A_
t, Touch STOP/CLEAR,
2, Touch LIGHT TIllER.
(Press once for AM, twice for
PM)
3. Enter the time you want the
LIGHT to turn on,
4. Touch LIGHT TIMER again.
(Press once for AM, twice for
PM,)
/_ _,_ 5. Enter" the time you want the
LIGHT to turn off.
6, Touch START.
1. Touch STOPICLEAR,
> 2. Touch KITCHEN TIMER.
KITCHEN
3, Enter the time by using the
number key pad,
_%
START
4. Touch START.
When the time is over, you
will hear one tong beep and
"END" will display.
NOTE: To reset that time to turn on and off the '
LIGHT, repeat steps 2 to 6
Example:
To cancel the EIGHT T{MER. 1
1. Touch LIGHT TIMER.
4
i
2, Touch STOP]CLEAR, !
-9-
Page 10
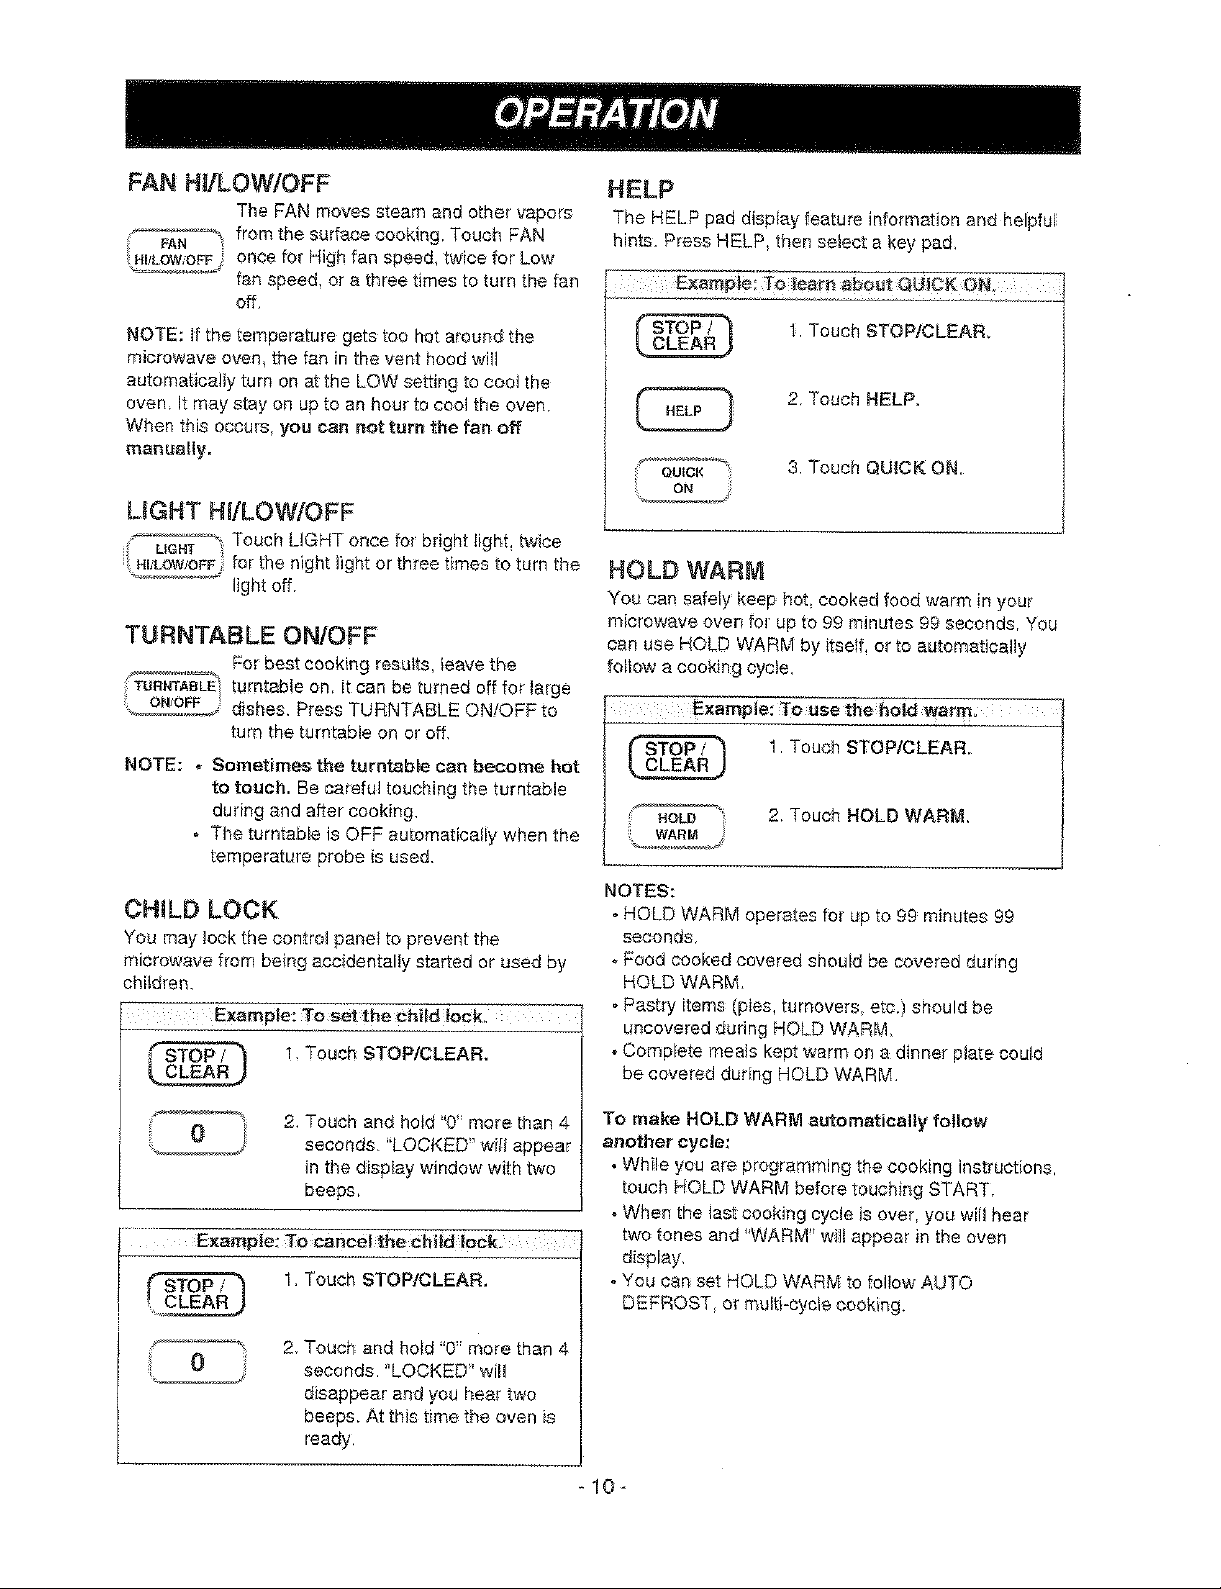
FAN HJiLOWtOFF
The FAN moves steam and other vapors
"- _ from the surface cooking. Touch FAN
FAN
tII]LOW,,OFF once for High fan speed, twice for Low
tan speed, or a three times to turn the fan
off,
NOTE: ff the temperature gets too hat around the
microwave oven, the fan in the vent hood will
automatically turn on at the LOW setting to cool the
oven It may stay on up to an hour to cool the oven.
When this occurs, you can not turn the fan off
manually,
LIGHT HItLOW/OFF
....UGHT _"Touch LtGHT once for bright light, twice
L HL<[OW/OFFfor the night light or three times to turn the
..... light off.
TURNTABLE ON/OFF
For best cooking results, leave the
TUeNTABLE turntable on, it can be turned off for large
ONtOFF_ dishes. Press TURNTABLE ON!OfF to
turn the turntable on or off,
NOTE: , Sometimes the turntable can become hat
to touch. Be careful touching the turntable
during and after cooking.
= The turntable is OFF automatically when the
temperature probe is used.
CHILD LOCK
You may lock the control panel to prevent the
microwave from being accidentally started or used by
children,
Example: To ae_tthe___ck#dtook:. :
! Touch STOP/CLEAR,
HELP
The HELP pad display feature information and helpful
hints. Press HELP, then select a key pal
E×ampl÷; To tea:r-tiabo_t QIJICK ON,
1. Touch STOP/CLEAR_
2. Touch HELP.
3, Touch QUICK ON.
HOLD WARM
You can safely keep hot, cooked food warm in your
microwave oven for up to 99 minutes 99 seconds, You
can use HOLD WARM by itself, or to automatically
follow acooking cycle,
1 Touch STOP/CLEAR.
HOLD_" 2. TOUCh HOLD WARM,
NOTES'.
* HOLD WARM operates for up to g9 minutes 99
seconds.
, Food cooked covered should be covered during
HOLD WARM
oPastry items (pies, turnover& etc.) should be
uncovered during HOLD WARM.
, Complete meals kept warm on a dinner plate could
be covered dudng HOLD WARM.
2. Touch and ho{d "0" more than 4
seconds. "LOCKED' will appear
in the display window with two
beeps,
Example: To cancel the ¢hitd lock.
1, Touch STOP/CLEAR,
2. Touch and hold % more than 4
seconds. "LOCKED" will
disappear and you hear two
beeps. At this time the oven is
ready.
To make HOLD WARM automatically follow
another cycle:
• While you are programming the cooking instructions,
touch HOLD WARM before touching START.
. When the last cooking cycle is over, you wiil hear
two tones and "WARM" wilt appear in the oven
display,
oYou can set HOLD WARM to follow AUTO
DEFROST, or multFcyete cooking.
-10-
Page 11
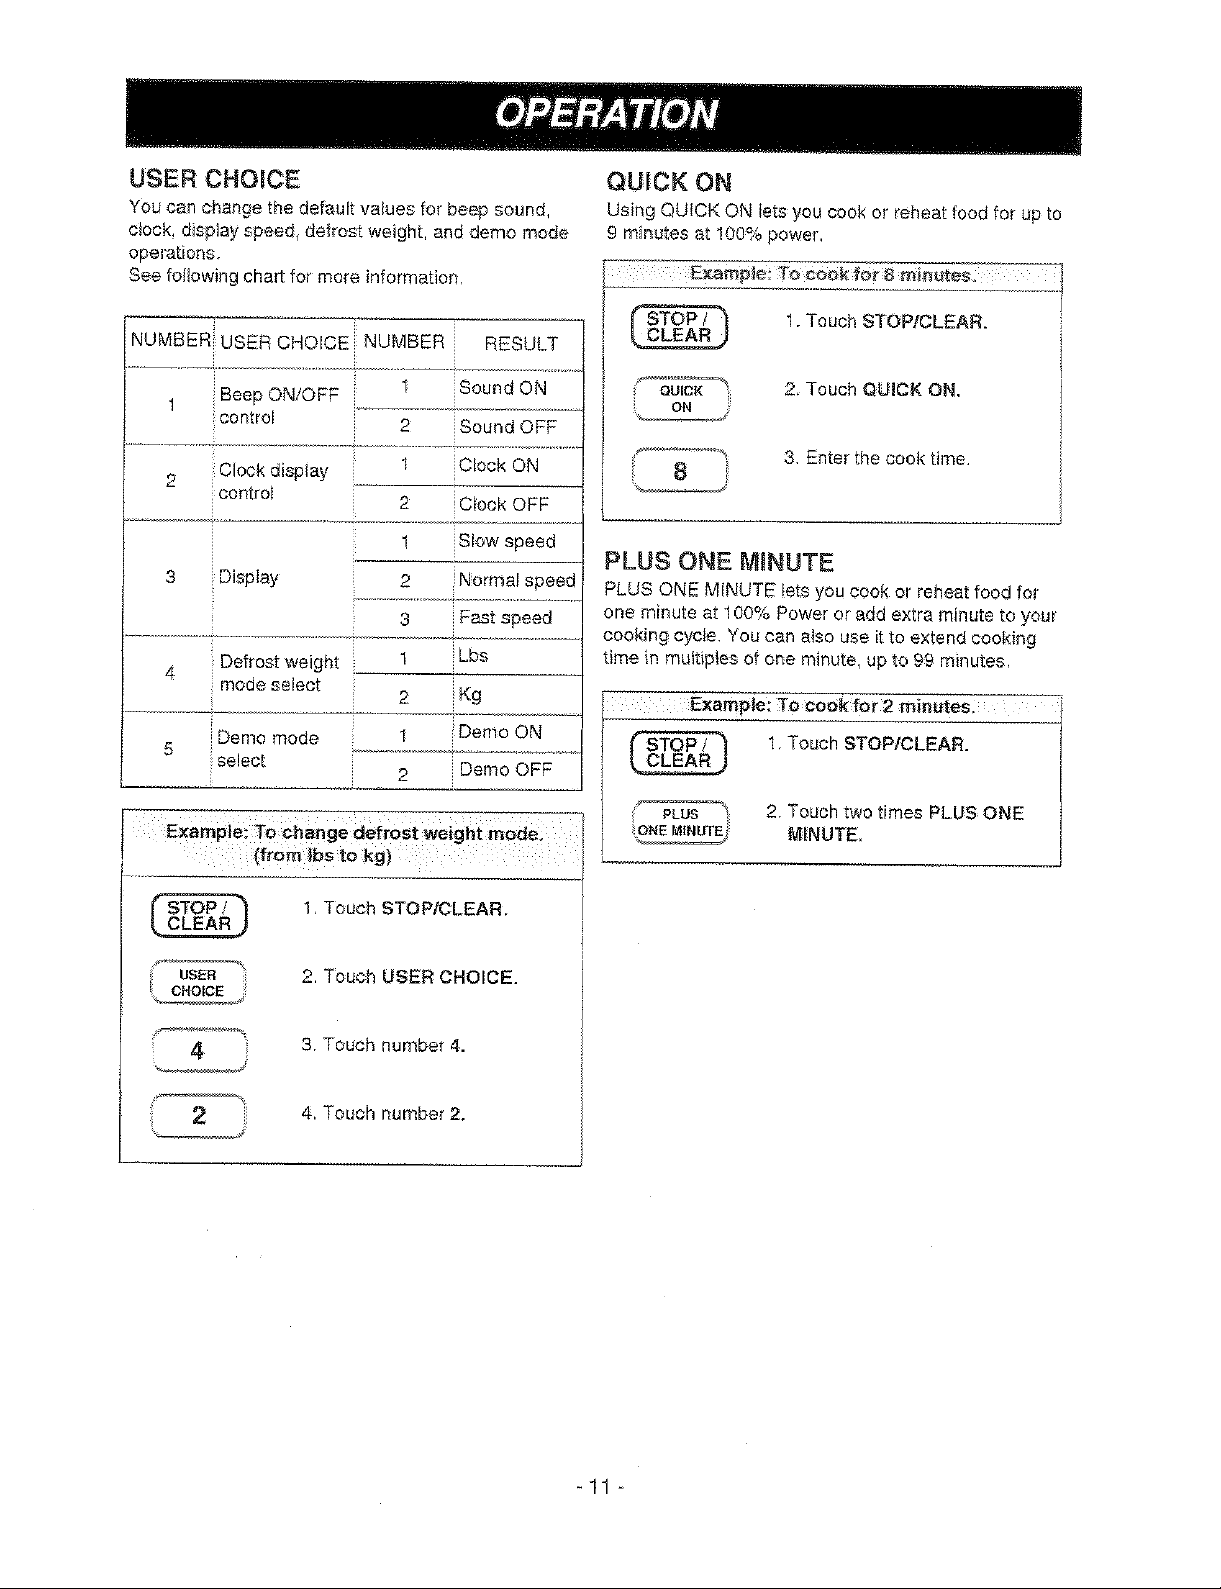
USER CHOICE
You can change the default values for beep sound,
clock, display speed, defrost weight, and demo mode
operations.
See following chart for more information.
QUICK ON
Using QUICK ON tets you cook or reheat food for up to
£ minutes at !00% power,
i ×ampte 'T:_.c?ok.f.o...[._.8-mi_:il"
NUMBER USER CHOICE NUMBER RESULT
Beeu ON/OFF
con[rot 2 Sound OFF
2 Clock display Clock ON
con_rot 2 Clock OFF
3
Display
,_ Defrost weight LOs
moae select
Demo mooe
5 ...........................................
select 2 Demo OFF
1, Touch STOPICLEAR,
Sound ON
Stow speea
2 Norma sDeee
3 Fast soeed
2 Kg
Demo ON
!_' 1. Touch STOP/CLEAR.
2. Touch QUICK ON.
3. Enter the cook time.
8
PLUS ONE MINUTE
PLUS ONE MINUTE !ets you cook or reheat food for
one minute at 100% Power or add extra minute to your
cooking cycle You can else use it to extend cooking
time inmultiples of one minute, up to 99 minutes.
: Example '
t. Touch STOP/CLEAR.
2. Touch two times PLUS ONE
MINUTE,
2. Touch USER CHOICE.
-,'_ 3. Touch number 4.
2 4, Touch number 2.
-11 -
Page 12
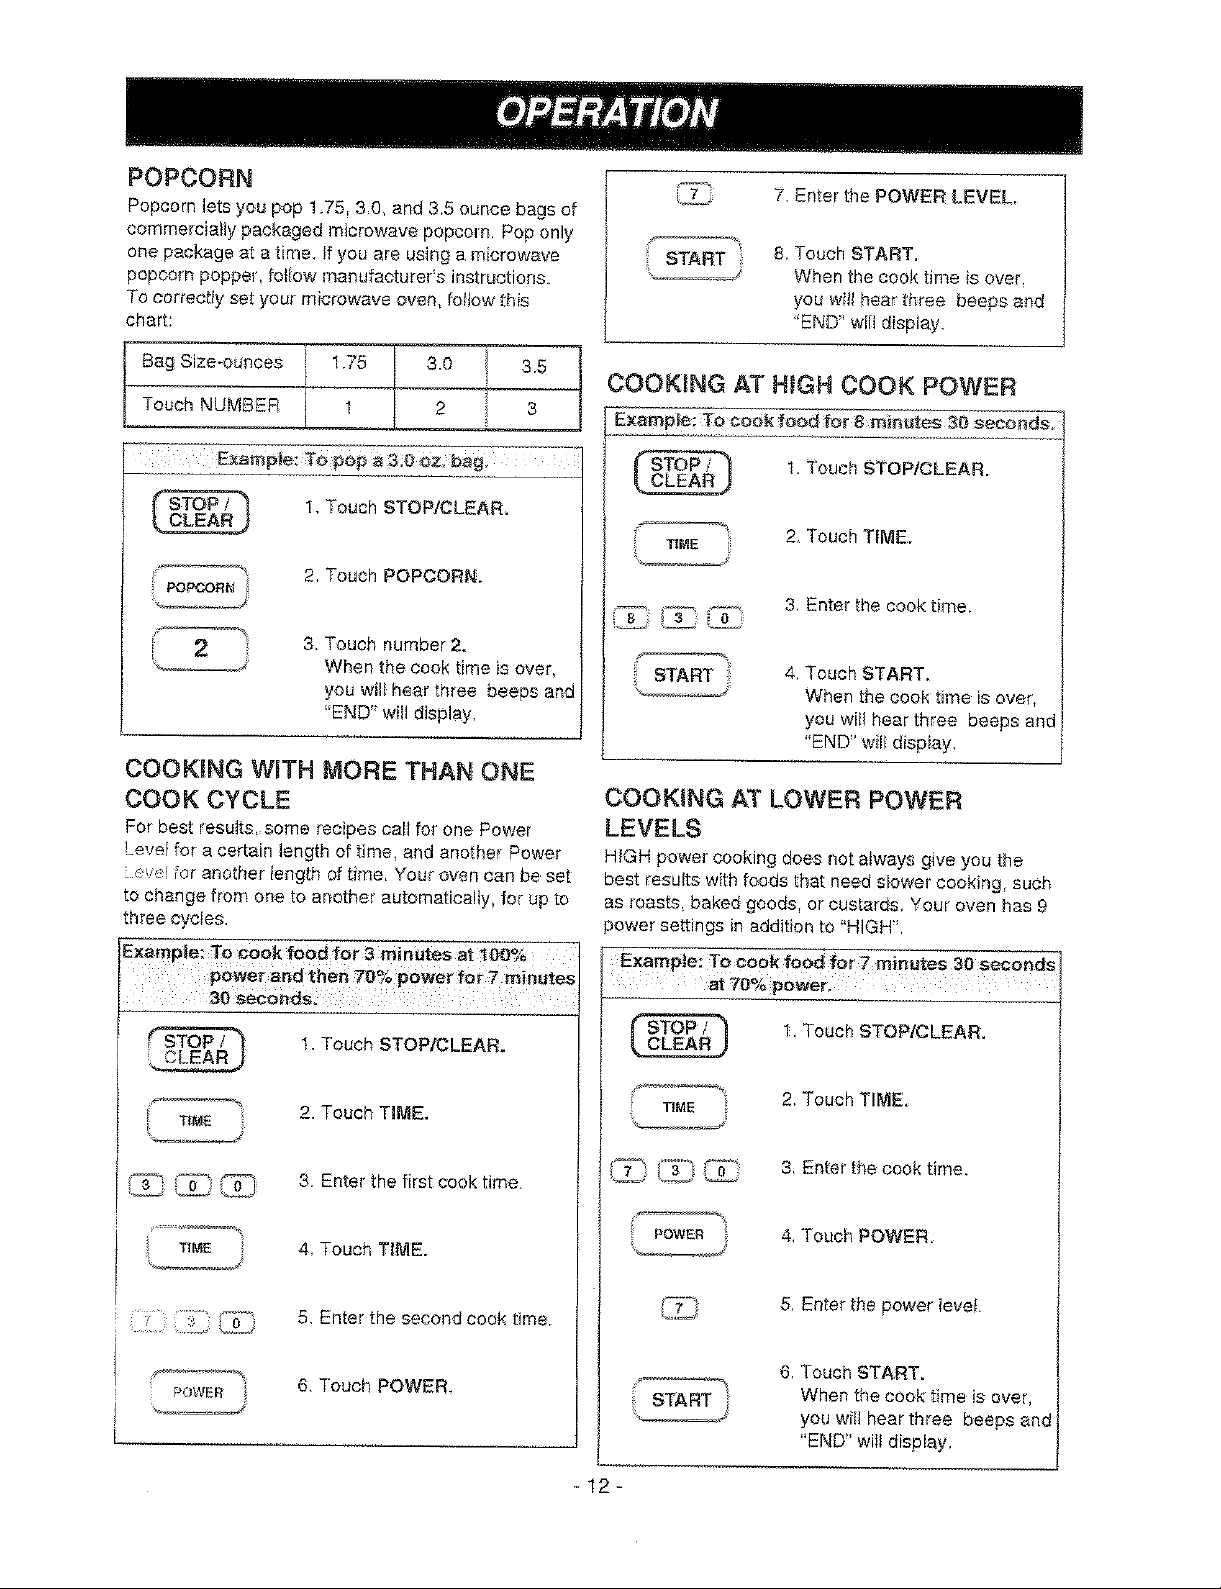
POPCORN
Popcorn lets you pop 1,75, 3,0, and 3,5 ounce bags of
commercially packaged microwave popcorn, Pop only
one package at a time. if you are using a microwave
popcorn popper, fol{ow manufacturers instructions.
To correctly se_your microwave oven, follow this
chart:
START
7, Enter the POWER LEVEL,
8. Touch START,
When the cook time is over.
you witl hear three beeps and
'END' w[II display.
Bag Size-ounces 1.75 3.0 3,5
Touch NUMBER _ 1 2 3
£xample; T0 p0p a 3 9 0z, bag,
2
,1
J
1,Touch STOP/CLEAR,
2, Touch POPCORN.
3. Touch number 2.
When the cook time is over,
you wil_hear three beeps and
"END" wilt display,
COOKING WiTH MORE THAN ONE
COOK CYCLE
For best results, some recipes ca_lfor one Power
Level for a certain length of time, and another Power
Love! for another length of time, Your oven can be set
to change from one to another automatically, for up to
three cyctes.
Ixample: To Cook food for 3minutes at 100%
p woi=odt,o"7o%p0w r 7m!,a!os
COOKING AT HiGH COOK POWER
Example: _o cook food for 8 m_nLrte$30 seconds,
1. Touch STOPiCLEAR.
2, Touch TIME.
3, Enter the cook time.
START
4, Touch START.
When the cook time is over,
you will hear three beeps and
"END" will d{spIay.
COOKING AT LOWER POWER
LEVELS
HiGH power cooking does not always give you the
best results with foods that need slower cooking, such
as roasts, baked goods, or custards, Your oven has 9
3ower settings in addition to 'HIGH"
Examplei TO €0?k food for 7 mi!ute s30 sec0nds_
at 70% power,
i _ I. Touch STOP/CLEAR.
30 secon
2. Touch TIME.
3. Enter the first cook time.
4, Touch TIME.
5. Enter the second cook t_rne.
6. Touch POWER.
1. Touch STOP/CLEAR.
TIME
!_ '_d_ _ 3, Enter the cook time,
-12-
2 Touch TIME.
4,"TouchPOWER.
5, Enter the power tevel.
6, Touch START.
When the cook time is over,
you witl hear three beeps end
"END" wilt_isplay,
Page 13
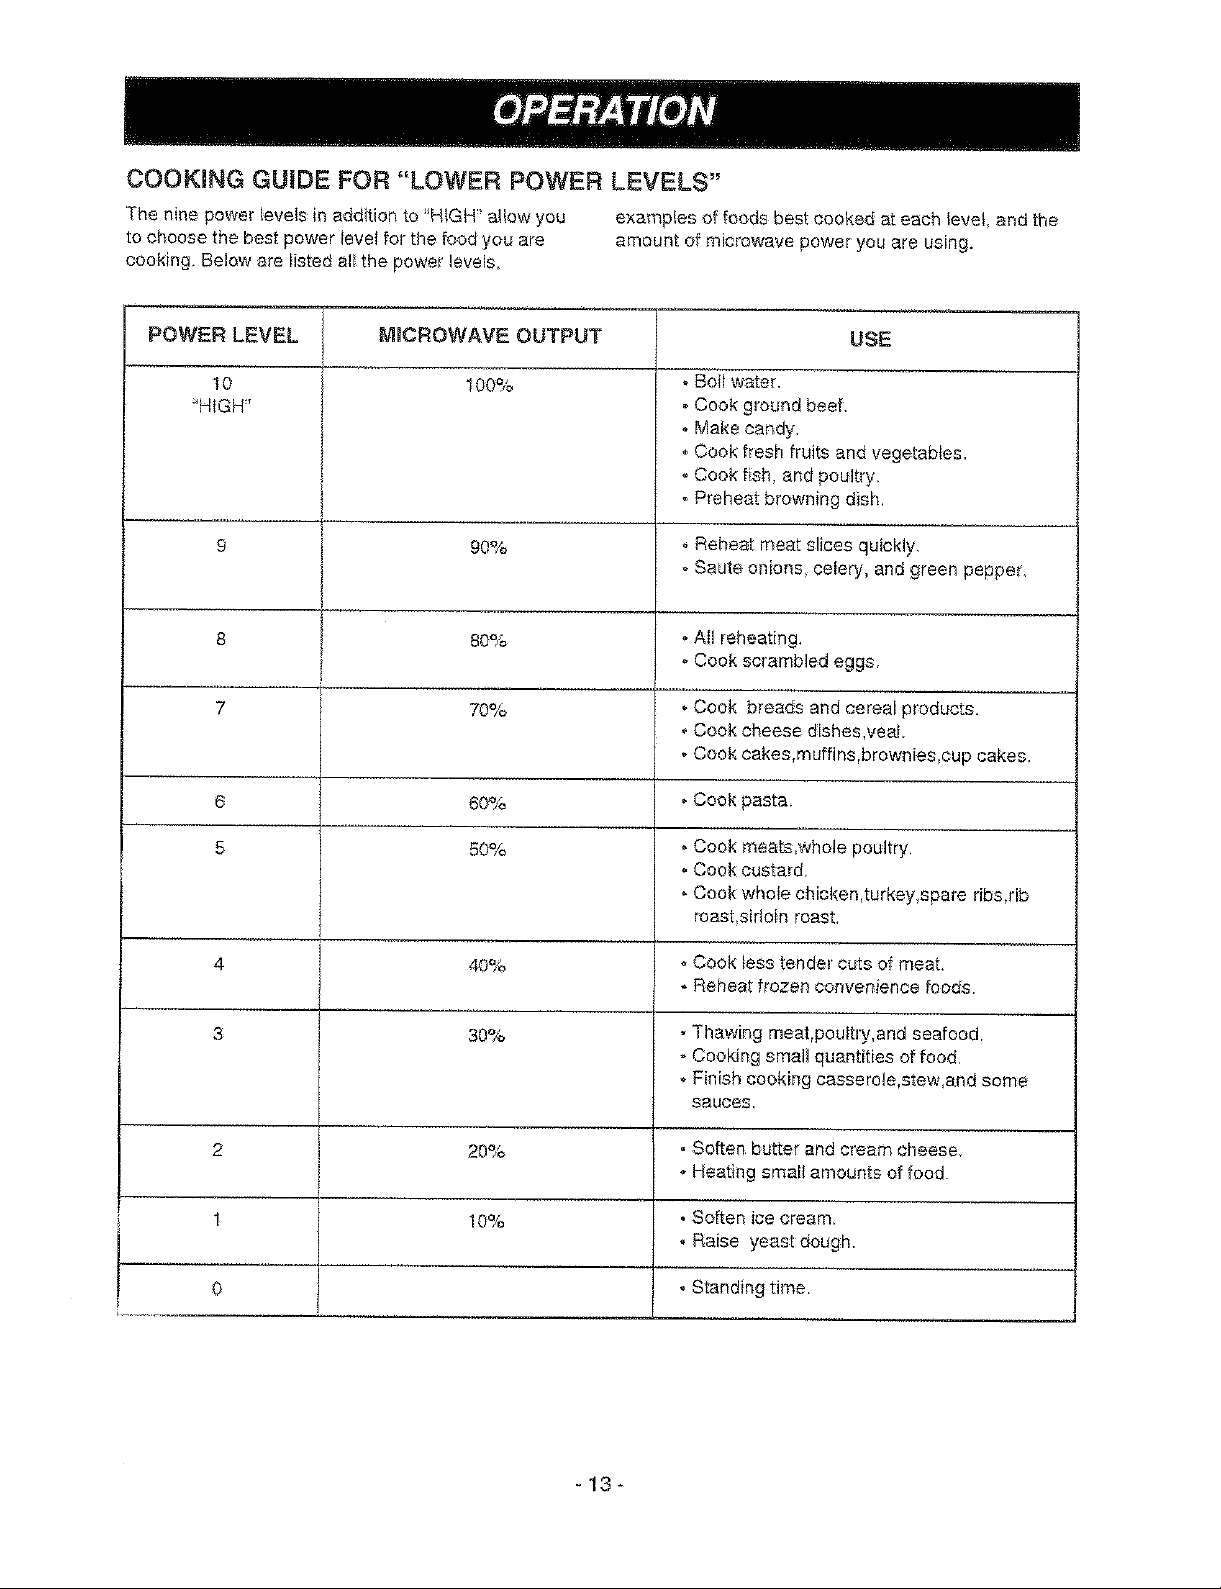
COOKING GUIDE FOR "LOWER POWER LEVELS"
The nine power levels in addition to "HIGH" atlow you
to choose the best power level for the food you are
cooking. Below are listed all the power levels,
exampies of foods best cooked at each tevei, and the
amount of microwave power you are using.
POWER LEVEL MmCROWAVE OUTPUT USE
10 t00%
_HtGH_,
oBoHwater.
• Cook ground beef.
° Make car_dy,
oCook fresh fruits and vegetables,
oCook fish, and poultry,
oPreheat browning dish.
9
I 90%
Reheat meat slices quickly,
oSaute onions celery, and green pepper,
8
80%
* All reheating.
oCook scrambled eggs,
7
70%
• Cook breads and cereal products.
Cook cheese dishes,veal.
I
. Cook cakes,muffins,brownies,cup cakes.
6_
5
60_/a
50%
, Cook pasta,
. Cook meats,whole poultry.
o Cook custard.
- Cook whole chicken,turkey,spare ribs,rib
roast,sftloin roast,
4
40%
oCook tesstender cuts of meat.
- Reheat frozen convenience foods.
3
30%
- Thawing meat,poultry,and seafood.
Cooking small quantities of food,
- Finish cooking casserole,stew,and some
SaUCeS,
2
1
20%
lO%
° Soften butter and cream cheese.
- Heating smalt amounts of food.
• Soften ice cream.
, Raise yeast dough,
0
. Standing time.
-13-
Page 14
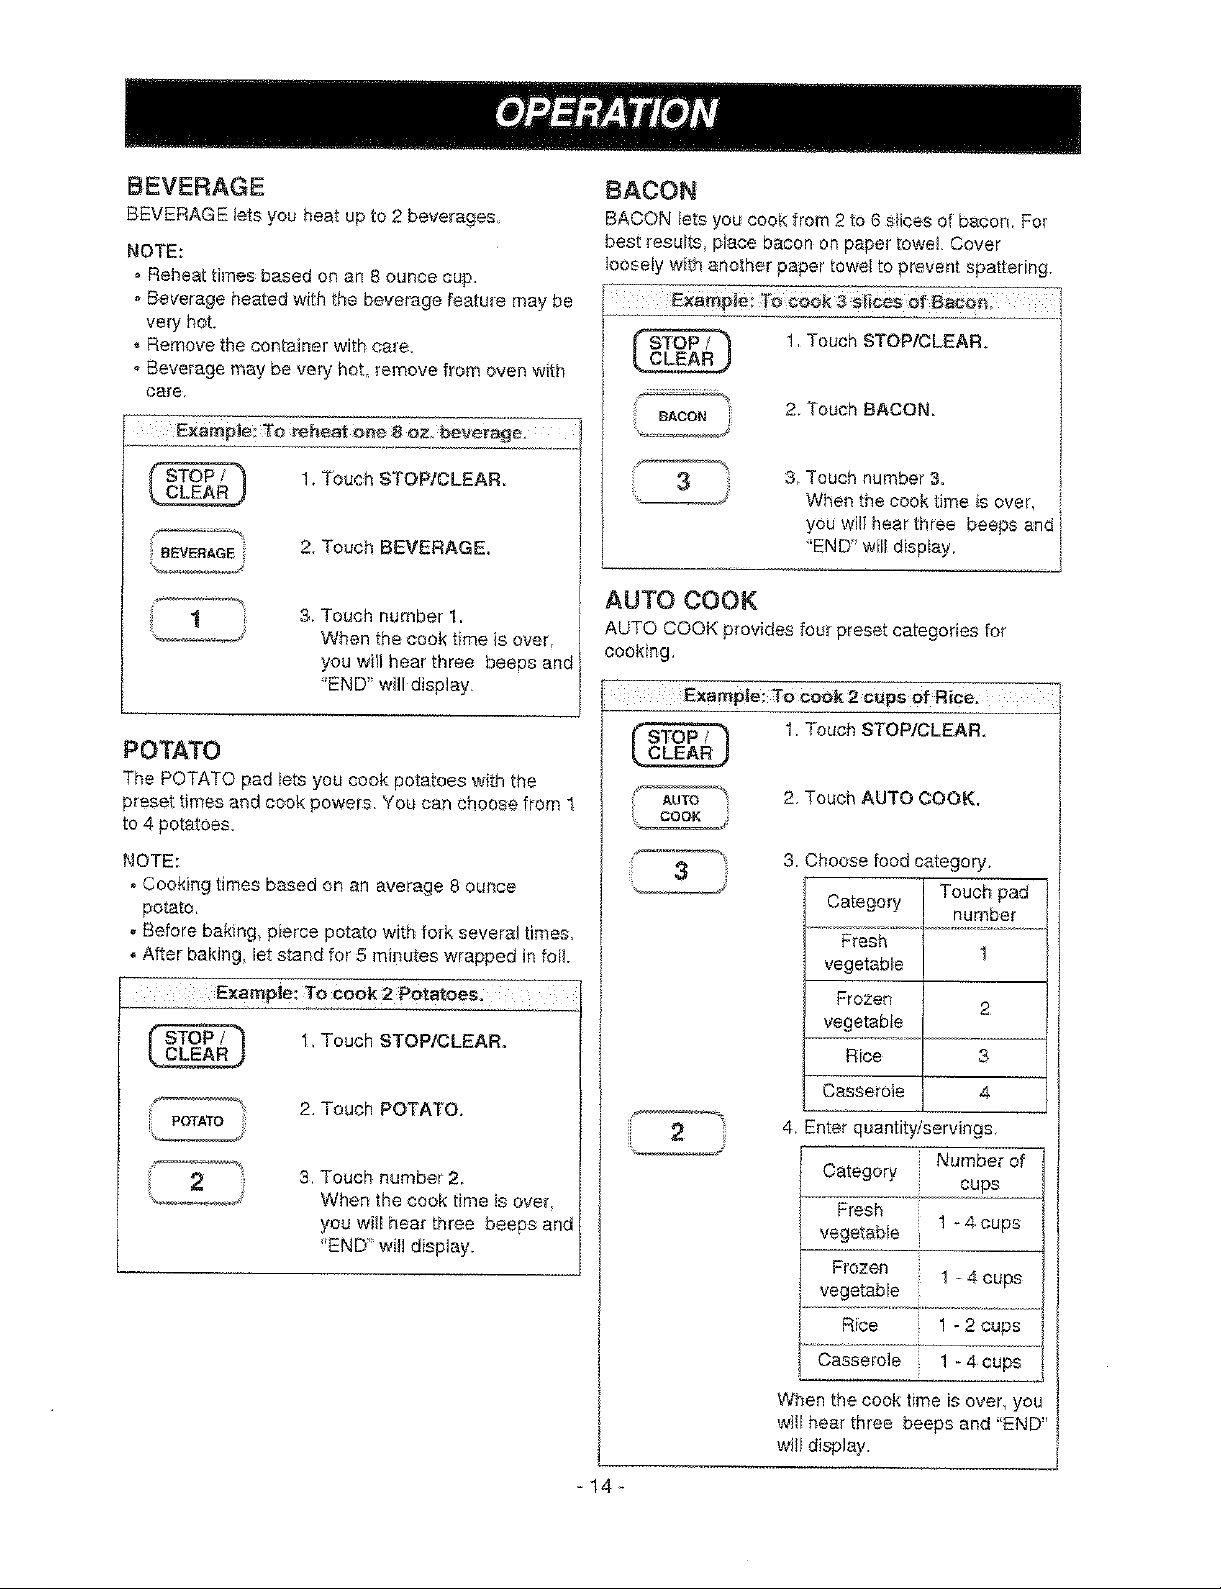
BEVERAGE
BEVERAGE tots you heat up to 2 beverages
NOTE:
o Reheat times based on an 8 ounce cup.
Beverage heated with the beverage feature may be
very hot.
. Remove the container with care.
o Beverage may be very hot remove from oven with
care,
EXampte: To rebea_o#e 8 oz. beve_._e, t
1. Touch STOP/CLEAR. '
i_BEVERAGEi
2. Touch BEVERAGE,
BACON
BACON lets yo_ cook from 2 to 6 s!ices of bacon For
best results, place bacon onpaper rowe Cover
toosely with another paper towel to prevent spattering.
i, Touch STOP/CLEAR.
_coN i
2 Touch BACON.
3_Touch number 3.
When the cook time is over,
you will hear three beeps and
'END" will display,
t
3, Touch number 1.
When the cook time is over,
you will hear three beeps and t
"END" will display.
POTATO
The POTATO pad lets you cook potatoes with the
preset times and cook powers. You can choose from 1
to 4 potatoes.
NOTE;
. Cooking times based on an average 8 ounce
potato,
. Before baking, pierce potato with fork several times,
. After baking, let stand for 5 minutes wrapped in foil
Exampte: To cook 2 Potatoes.
1, Touch STOP/CLEAR.
_ 2, Touch POTATO.
2
3. Touch number 2.
When the cook time is over,
you will hear three beeps and
'END '_wifl display.
AUTO COOK
AUTO COOK provides four preset categories for
cooking,
' Exampfe: T0 Cook 2 cups of Rice.
J
1. Touch STOP/CLEAR.
2. Touch AUTO COOK.
3. Choose food category,
_ Category Touch pad
Fresh
vegetable
Frozen
vegetable
Rice 3
Casserole 4
4, Enter quantity/servings.
Category
Fresh
vegetable
Frozen
vegetable 1 - 4 cups
number r
1
2
Number of
cups
1 -4 cups
_14_
Rice 1 - 2 cups
Casserole 1 - 4 cups
When the cook time is over, you
will hear three beeps and "END"
wit} display.
J
Page 15
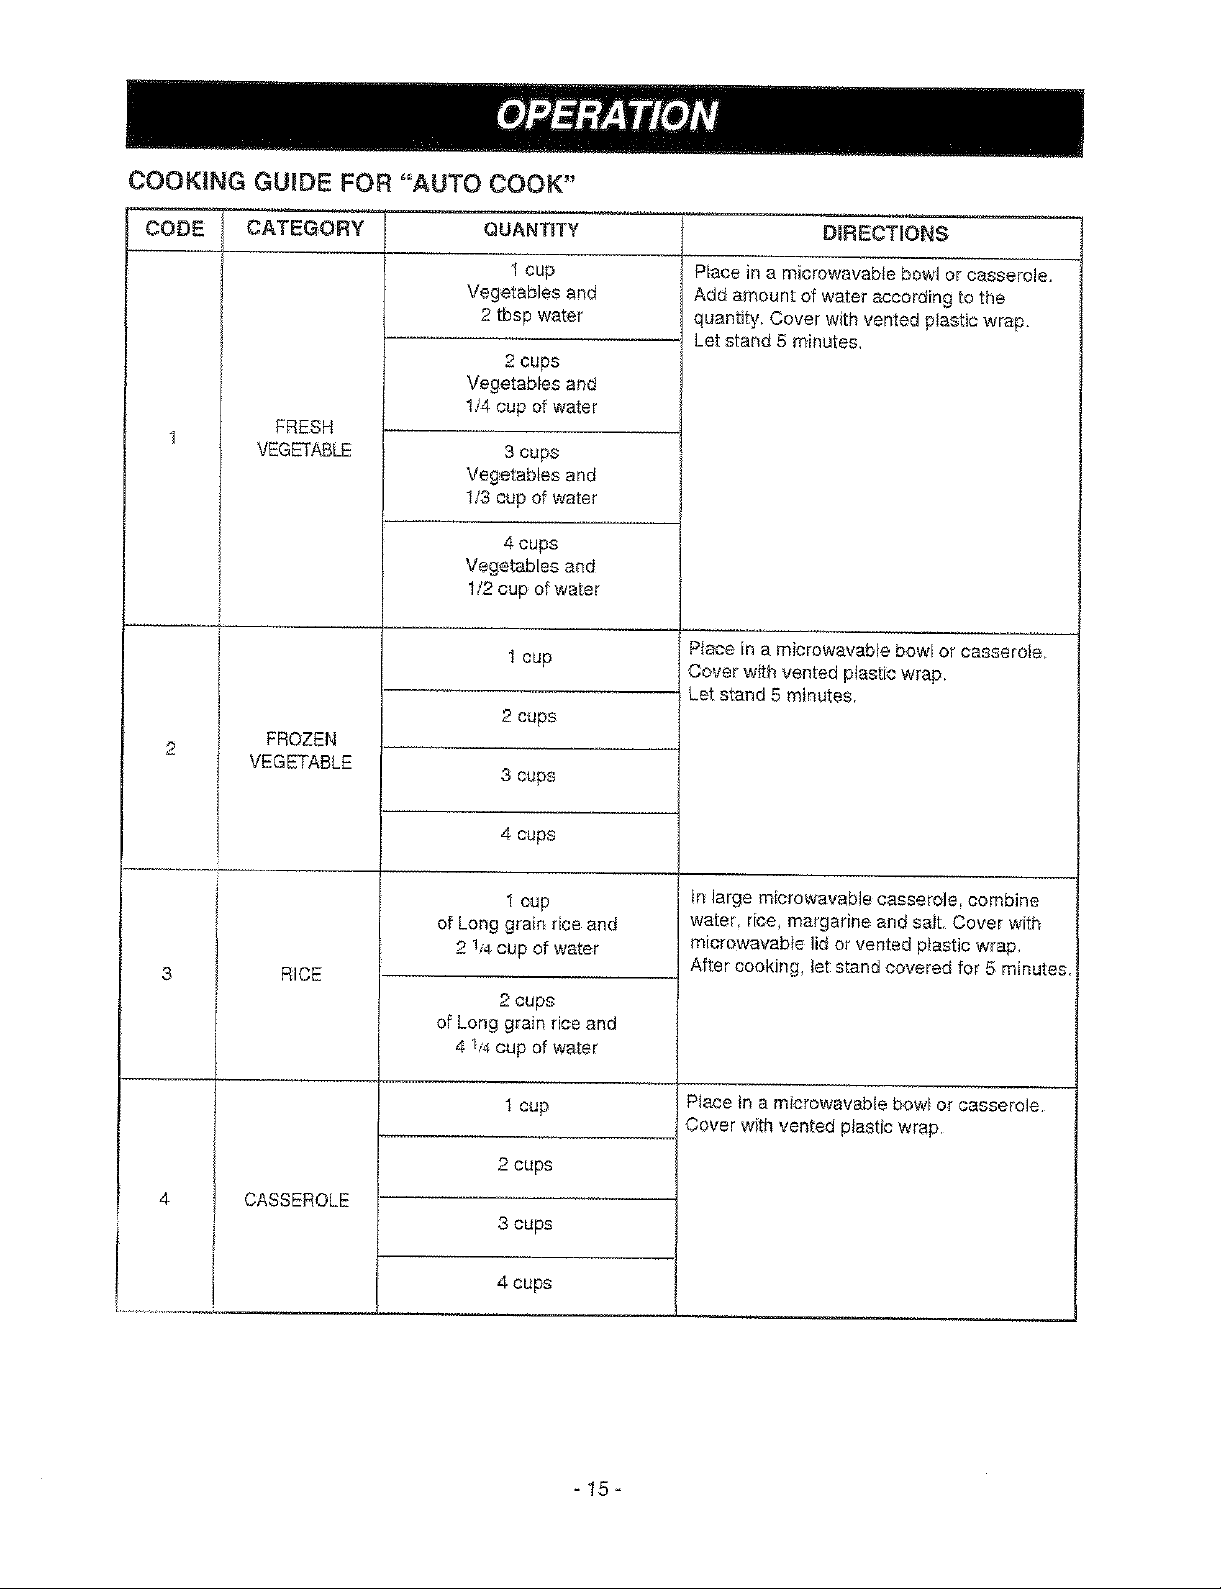
COOKING GUIDE FOR "AUTO COOK"
CODE CATEGORY DIRECTIONS
QUANTITY
1 cup
Vegetables and
2 tbsp water
Piece in a microwavabie bowl or casserole.
Add amount of water according to the
quantity. Cover with vented plastic wrap.
Let stand 5 minutes,
2 cups
Vegetables and
1/4 cup of water
FRESH
VEGETABLE
3 cups
Vegetables and
1/3 cup of water
4 cups
Vegetables and
1/2 cup of water
1 cup
Piece in a miorewavable bowl or casserete_
Cover with vented plastic wrap.
Let.stand 5 minutes,
2 cups
2
FROZEN
VEGETABLE
3 cups
RICE
CASSEROLE
4 cups
"[ cup
of Long grain rice and
2 1/4cup of water
2 cups
of Long grain rice and
4 1/4 cup of water
1 cup
2 cups
3 cups
4cups
tn large microwavable casserole, combine
water, rice, margarine and salt. Cover with
microwavabte lid or vented plastic wrap.
After cooking, let stand covered for 5 minutes.
Place in a microwavable bowl or casserole.
Cover with vented plastic wrap.
-15-
Page 16
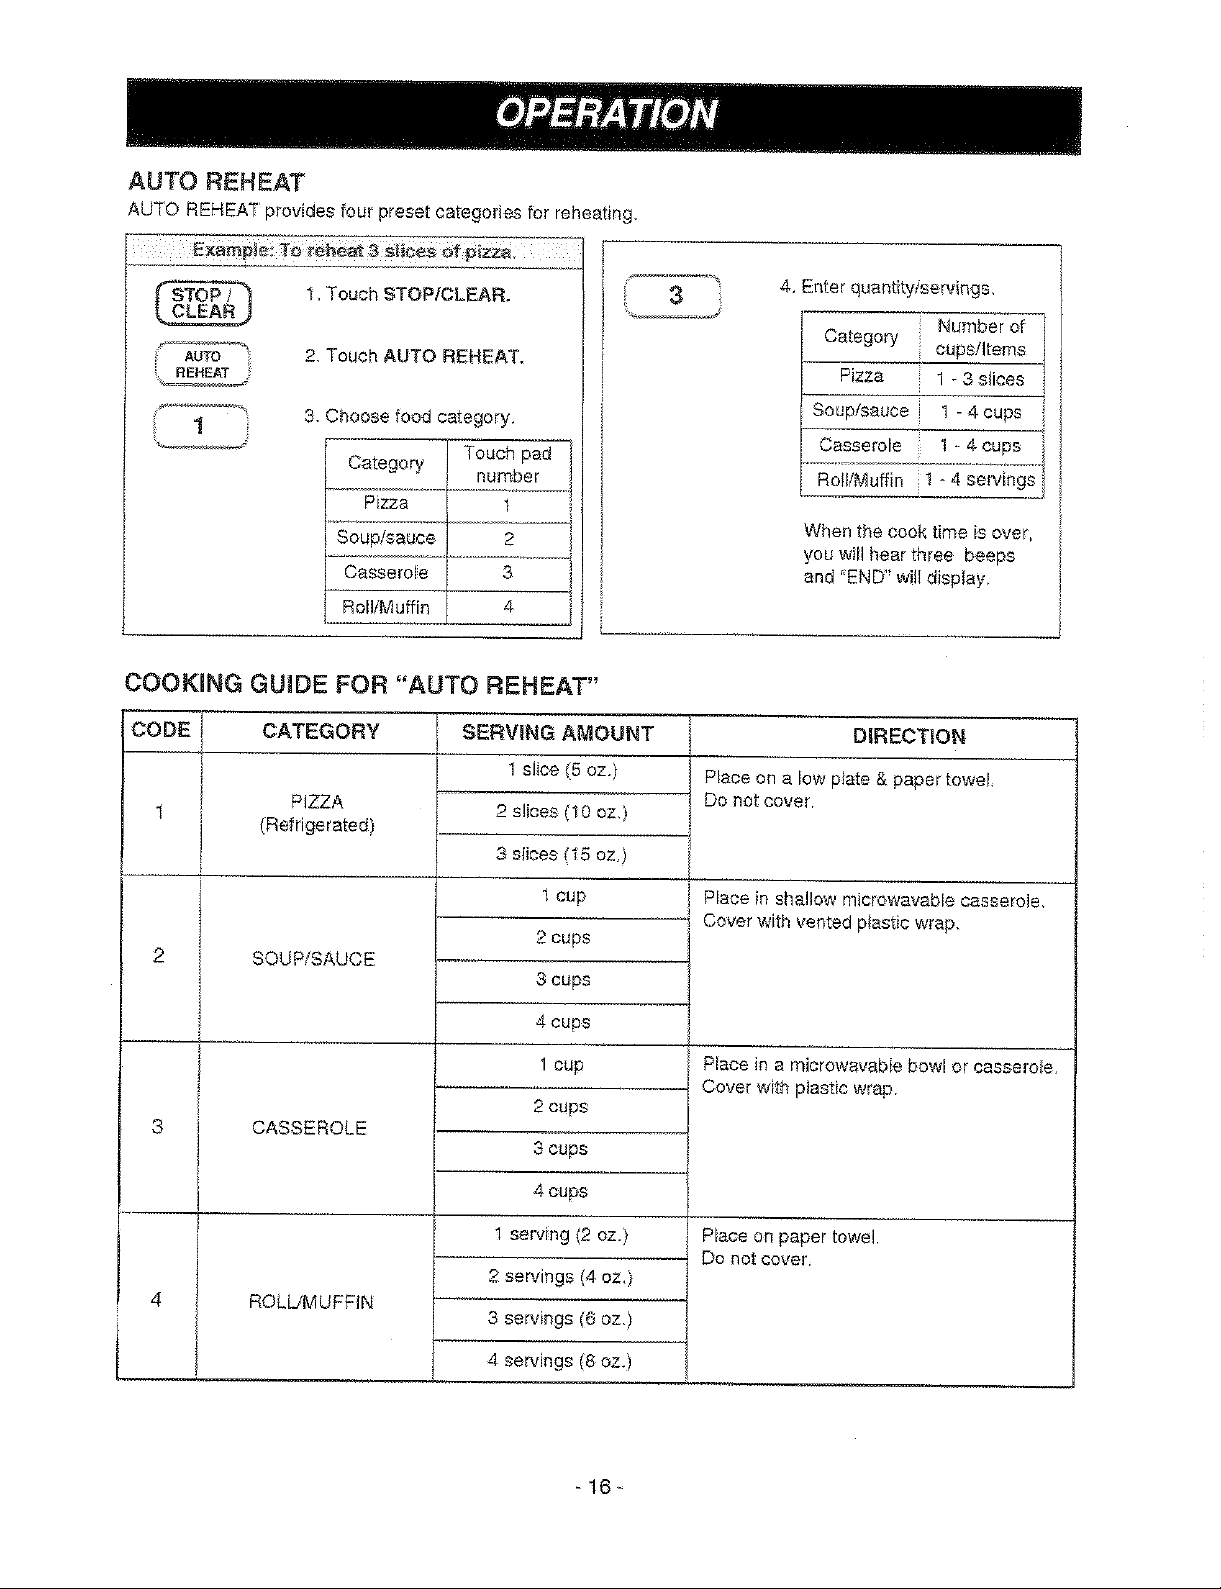
AUTO REHEAT
AUTO REHEAT provides four preset categories for reheating,
1, Touch STOP/CLEAR.
2, Touch AUTO REHEAT.
1
3. Choose food category.
Pizza 1
Soup/sauce 2
Casserole 3
Roll/Muffin 4 j
COOKING GUIDE FOR "AUTO REHEAT"
CODE
J
I
2
CATEGORY
PIZZA
(Refrigerated)
SOUP/SAUCE
SERVING AMOUNT t
1 slice (5 oz.)
2 slices (10 oz,)
3 slices _'15oz )
l cup
2 cups
3 cups
3
I
4, Enter quantity!servings,
Number of
Category cups/Items
Pizza 1 - 3 slices
Soup/sauce t - 4 cups
Casserole 1 - 4 cups
Roll/Muffin 1 _4 servings
When the cook time is over,
you will hear three beeps
and "END" will display.
DIRECTION
Ptace on a low plate & paper towel
Do not cover,
Place in shallow microwavable casserole.
Cover with vented p_astic wrap.
3
4j
l
CASSEROLE
ROLWMUFFIN
4 cups
1 cup
2 cups
3 cups
4 cups
1 serving (2 oz.)
O
servings (4 ozq
3 servings (6 oz.)
4 servings (8 oz.)
-16_
Place in a miorowavabie bowl or casserole
Cover with plastic wrap.
Place on paper towel.
Do not cover,
Page 17

AUTO DEFROST
Your microwave oven is preset with three defrost
sequences. Using Auto Deflost is the best way to
defrost frozen foods. The Auto Defrost Sequence
Table below provides some basic guidelines for using
the three defrost sequences.
Exampie: To defros_ i12 lbs Of ground beef.
However, in order to enter food weight in AUTO
DEFROST, you must specify pounds andtenths of a
pound, if the weight on the food package is in
fractions ol a pound, you can use the following chart
to convert theweight to decimals.
EQUIVALENT NUMBER AFTER
OUNCE WEIGHT DECIMAL
t. Touch STOP/CLEAR.
2, Touch AUTO DEFROST_
3. Choose food category.
Category number
l Touch pad
Meat 1
Poultry 2
Fish 3
4. Enter the weight.
i STARTI
5. Touch START.
6, After 113of the defrost time
is over, The display will
prompt you to turn over food,
Open door, turn over food,
and shield any warm
portions,
START
7, Close the door and restart,
8_After 2;3 of the defrost time
[s over, the display will
prompt you to turn over food.
Repeat steps 6 and 7.
When the defrost time is
over, you wil} hear three
beeps and "END' will
display.
NOTE: if you do not open the
door within 3 seconds,
the display will resume
the countdown,
V#,_ight conversion chart
You are probebty used to food weights as being in
pounds and ounces that are fractions of a pound (for
example 4 ounces equals 1/4 pound).
1.6
3.2
4.0
4,8
6,4
8.0
9.6
11.2
12.0
12,8
t4.4
16.0
.10
.20
.25 One-Quarter Pound
.30
.40
.50 One- Half Pound
.60
.70
.75 Three*Quarters Pound
.80
,90
1.00 One Pound
DEFROST}NG TIPS
, When using AUTO DEFROST, the weight to be
entered is the net weight in pounds and tenths of
pounds (the weight of the food minus the
container).
• Onty use AUTO DEFROSTfor raw food. AUTO
DEFROST gives best results when food to be
thawed is a minimum of 0_F (taken direct!y from a
_'true" freezer), if food has been stored in e
refrigerator-freezer that does not maintain a
temperature of 5°F or below, always program a
lower food weight (for a shorter defrosting time) to
prevent cooking the food.
, If the food is stored outside the freezer for up to 20
minutes, enter a lower food weight.
. The shape of the package alters the dehosting
time, Shallow rectangular packets defrost more
quickly than a deep block,
o Separate pieces as they begin to defrost,
Separated pieces defrost more easily,
, You can use smelt pieces of aluminum foii to
shield foods like chicken wings, _eg tips, and fish
tails, but the foil must not touch the side of the
oven, Foil can damage the oven lining.
o Shield areas of food with small pieces of foil if they
start to become warm.
. For better results, a preset standing time is
included in the defrosting time.
-17-
Page 18

UTO DEFROST CHART
,_eat setting
FOOD SETTING AT BEEP SPECMAL INSTRUCTmONS
Meat of irregular shape and large, fatty cuts of
meat shouid have the narrow or fatty areas
shielded with foil at the beginning of a defrost
sequence,
Ground beef
(bufk)
Ground beef
lpatties)
Round steak
Tenderloin
steak
Stew beef
Pot roast,
chuck roast
Rib roast
reast
LAMB
Cubes for
stew
Chops
(t inch thick)
MEAT
MEAT
MEAT
MEAT
MEAT
MEAT
MEAT
MEAT
MEAT
MEAT
Remove thawed portions with
fork, Turn over, Return
remainder to oven,
Separate and rearrange,
[ Turn over. Cover warm areas
with aluminum foil.
Turn over. Cover warm areas
with aluminum foil.
Remove thawed portions with
fork Separate remainder.
Return remainder to oven.
Turn over, Cover warm areas
with aluminum foil
Turn over, Cover warm areas
with atuminum foil,
Turn over. Cover warm areas
with aluminum foil,
Remove thawed portions with
fork. Return remainder to
oven_
Separate and rearrange,
Do net defrost less than 1/4 Ib,
Freeze in doughnut shape,
Do not defrost less than two oz.patties.
Depress center when freezing,
Place on a microwavable _'oasting rack.
Place on a microwavable roast rack
Place in a microwavabte roast dish.
Place on a microwavable roasting rack,
Place on a microwavable roasting rack.
Place on a microwavabie roasting rack.
Ptace in a microwavabte bakin_ dish,
Place on a microwavable roasting rack.
PORK
Chops
{1 inchthick)
Hot dogs
Spareribs
Country style
_ibs
Sausage,
links
Sausage,
bu!k
Loin roast,
boneless
MEAT
MEAT
MEAT
MEAT
MEAT
MEAT
Separate _nd rearrange.
Separate and rearrange,
Turn over, Cover warm areas
with aluminum foil.
Separate and rearrange,
Remove thawed portiens with
fork. Turn over, Return
remainder to oven.
Turn over, Cever warm areas
with aluminum foil
-18-
Place on a microwavable roasting rack.
P_ace on a microwavabie roasting rack.
Place on a microwavable roasting rack.
Place on a microwavable roasting rack.
Place in 8 miorowavable baking dish,
, Place on a micrewavable
[
roas_ng rack.
Page 19

AUTO DEFROST CHART (continued)
Poultry setting
FOOD _ SETTING AT BEEP SPECIAL iNSTRUCTiONS
POULTRYCHICKEN
Whole
Sut-ap
CORNISH POULTRY
HENS
Whole
I
!
TURKEY
POULTRY
Breast
Fish setting
FOOD
FISH
Fillets
I SETTING I AT BEEP
FISH |Turn over. Separate fillets
Turn over (finish defrosting
breast-side down), Cover
warm areas with aluminum
foil,
Turn over, Cover warm
areas with
aluminum foil. Separate
pieces and rearrange,
Turn over. Cover warm
areas with
aluminum foil
Turn over Cover warm
areas with aluminum foil
|when partially thawed if
Place chicken breast-side-up on a microwavabte
roast rack, Finish defrosting by immersing in cold
water. Remove gibtets when chicken is paltialty
defrosted.
Piace on a microwavabte roasting rack.
Finish defrosting by immersing in cold water.
Place on a microwavable roasting rack.
Finish defrosting by immersing in cold water.
Place on a microwavabie roasting rack.
Finish defrosting by immersing in cold water,
SPECIAL INSTRUCTIONS
Place in a microwavabie baking dish.
Carefully separate fillets under cold water,
Steaks
Whole
SHELLFISH
Crabmeat
Lobster tails
Shrimp
Scallops
possible.
FISH Separate and rearrange.
FISH
FISH
FISH
FISH
FISH
Break apart,
Rearrange.
Separate and rearrange_
Separate and rearrange.
Place in a microwavable baking dish.
Run cold water over to finish defrosting,
Place in a microwavable baking dish,
Cover head and tail with foil; do not let foil touch
sides of microwave Finish defrosting by
immersing in cold water.
Ptace in a mlcrowavabte baking dish,
Place in a microwavable baking dish,
Place in a microwavable baking dish.
Place in a microwavabte baking dish,
-19_
Page 20

COOKING WITH THE TEMPERATURE
PROBE
The Temperature Probe hefps take the guesswork out
of cooking roasts and large casseroles. The probe is
designed to turn the oven off when the temperature
you select (between 90 o199 "F) has been reached_
PLUG
oFor liquids, balance the probe on a wooden spoon
or spatula so the tip of the probe is in the center of
the liquid.
PROBE
.............................................. _e=e _-
E °
aamp}e: Cook beef to 150 F
TEMPE_ATU _
1, Insert probe sensor into food.
(Insert at least 1/3 of the
Temperature Probe into the
food.)
2, Ptace food inoven and plug
probe into socket on oven
wall.
3, Close door,
4. Touch STOP/CLEAR.
TEf_P 5. Touch TEMP,
6. Enter the desired food
temperature.
#
START
7. Touch START.
When the cook time is over,
you will hear three beeps and
"END" willdisplay.
NOTE: The turntable is off
when you use
temperature probe,
Temperature probe cooking tips:
• Stir soups, casseroles, and drinks before serving.
. Cover roast with foil after cooking and let stand a
few minutes, Remove foi_if you decide to cook it
longer,
. For casseroles, the tip of the probe should be in the
center of the food. Stir foods. Replace the probe.
Thaw frozen oasseroies and meets in the microwave
oven before inserting the probe,
, For roasts, the tip of the probe should be in the
center of the largest muscle, but not touching f_t or
bone,
Casseroles cooked using the Temperature Probe
should be made from precooked foods. Do not use
raw meats, raw vegetables, and cream sauces in
casseroles.
, Dry casseroles do not work we_L
• Dry meat loaf mixtures do not work well.
. Roasts may vary in size, shape, andcomposition.
Use the Temperature Probe as a guide
Do not;
• Let probe or probe cable touch any part of the
oven interior,
oLet probe touch foil (if used), You can keep foil
away from probe with wooden toothpicks. Remove
foil if arcing occurs.
. Use paper, plastic wrap, or plastic containers. They
win be in the oven too long and might distort.
- Force probe intofrozen food,
o Use probe for food that needs to simrner.
. Plug the pointed end of the Temperature Probe into
the socket.
Removing and cleaning the Temperature
Probe:
1, After oven hes shut off unplug the Temperature
Probe using an oven mitt or hot pad.
2, Wipe probe with a hot, sudsy cloth and dry
thoroughly. Use a plastic scouring pad to remove
cooked-on foods.
20_
Page 21

TEMPERATURE GUIDE
FOOD
Appegze_ Dips
Beverages
Frozen & Convenience
Frozen Foods
Leftover & Canned
Foods
Main Dishes &
TEMPERATURE
SETTING
130oF
160oF
[
150oF
150'_F Partially cover dish to speed cooking. Stir before serving.
150'_F Partially cover dish to speed cooking. Stir before serving.
Casseroles
Meats
Mediumq 60° F
Beef
_ork
Poultry, whofe
Sauces 150 °F
Well-170_ F
t70°F
t85'_F
TfPS
stir before serving.
Defrost foods completely before inserting probe.
Meat m_st be completely thawed. Place on a microwavabte
roasting rack in a glass backing dish. During standing time,
condue'_{o_of heat to the center will increase temperature 5
to 10"F,
Whote poultry has many variables whfch affect doneness,
Always use another conventional aloneness test such as
cutting near bone to check for pink.
Stir before serving,
Seafood t60" F-170°F
Soups
Vegetables, canned or
t5o,.Fq 60_F
i
i
150_Fq70°F
pre-cooked
Whote MeaIs
As specified for
particular foods
TWO POSITION METAL RACK
The two position Metal Rack gives you extra space
wheP, cookir_g ir_more thar_ or_e co_:ai_,er at the same
time. The metal rack can be turned upsideodown to
he!p fit tatier containers on the bottom of the oven.
NOTE;
. Rack must be on 4 supports when used.
,,]rrr4_rt the rack securely into the four supports on the
side wafts of the oven,
. Turn the rack upside-down when using railer
containers on the bottom of the oven,
Seafood has variables which affect doneness,
Always use another conventional aloneness test such as
checking to see if seafood is firm.
if soup has additional solid ingredients, increase tenqperature
setting,
Partially cover container to speed cooking,
-21-
Page 22

GETTtNG THE BEST COOK{NG
RESULTS
To get the best results from your microwave oven, read
and follow the guidelines below.
* Storage Temperature: Foods taken from the freezer
or refrigerator take longer to cook than the same
foods at room temperature The time for recipes in
this book is based on the normal storage
temperature of the food.
, Size: Small pieces of food cook faster than large
ones, pieces similar in size and shape cook more
evenly. For even cooking, reduce the power when
cooking large pieces of food.
. Natural Moisture: Very moist foods cook mor_
evenly because microwave energy is attracted to
water molecules,
oStir foods such as casseroles and vegetables from
the outside to the center to distribute the heat evenly
and speed cooking. Constant stirring is not
necessary.
Fish & Shellfish
Cooking Fish and Shellfish: General Directions
- Turn over foods tike pork chops, baking pofatoes,
roasts or whole caufiflower haIRt_,aythrough the
cooking time to expose all sides equatty to
microwave energy.
Place delicate areas of foods, such as asparagus
tips toward the center of the dish.
Arrange unevenly shaped foods_ such as chicken
pieces or setmon steaks, with the thicker, meatier
parts toward the outside of the dish,
. Shield, with Smail pieces of aluminum foil parts of
food that may cook quickly such as wing tips and leg
ends of poultry.
oLet it Stand: After you remove the food from the
microwave, cover food with foil or casserole lid and
let it stand to finish cooking in the center and avoid
overceoking the outer edges. The length of standing
time depends on the density and surface area of the
food,
. Wrappir_g in waxed paper or paper towel:
Sandwiches and many other foods containing
prebaked bread should be wrapped prior to
microweving to prevent drying out.
- Prepare the fish for cooking
Completely defrost the fish or shellfish.
- Arrange unevenly shaped pieces with thicker parts
toward the outside of the dish. Arrange sheNfish in
a single layer for even cooking.
- The type of cover you use depends on how you
cook: Poached fish needs a microwavable lid or
vented plastic wrap,
- Baked fish, coated fish or fish in sauce needs to be
lightly covered with waxed paper to keep the
coating crisp and sauce from getting watery.
Fish And Shellfish Cooking Table
Fish fillets
Fish steaks
Whole fish
Scallops
Shrimp, shelled
POWER
LEVEL
H_
HI
7
HI
HI
COOKING
TIME
4-5 minutes
5-6 minutes
5-6 minutes
4-5 minutes
4-5 minutes
- Always set the shortest cooking time, Fish is done
when it turns opaque and the thickest pert begins to
flake, Shellfish is done when the shelt turns from
pink to red and the flesh is opaque and firm.
o The Fish and Shellfish Cooking Table below
provides specific directions with Power Level and
Cooking Time settings for most types of fish and
shellfish.
DiRECTiONS
Arrange fish in a singte layer with thickest portion toward
outside edge of 11_2quart microwavabb baking dish,
Brush with me{ted butter and season_ if desired, Cook
covered with vented plastic wrap. Let stand covered 2
minutes, If you are cooking more than 1lb. of fish, turn the
i fish haIfway through cooking
Arrange in a singte iayer. Prepare as directed above,
except stir instead of turning the shellfish.
22 -
Page 23

Appetizers / Sauces / Soups
Meat
Cooking Appetizers: Tips and Techniques
Recommended
. Crisp crackers, such as melba toast, shredded
wheat and crisp rye crackers are best for microwave
use_ Wait until party time to add the spreads. Place
a paper tower under the crackers while they cook in
the microwave oven to absorb extra moisture.
o Arrange individual appetizers in a circle for even
cooking.
Stir dips to distribute heat and shorten cooking time.
Cooking Sauces: Tips and Techniques
o Use a microwavable casserole or glass measuring
cup that is at least 2 or 3 times the volume of the
Sauce.
o Sauces made with cornstarch thicken more rapidly
than those made with flour,
Cooking Soups: Tips and Techniques
Cook soups in a microwavable dish which holds
doubte the volume ofthe recipe ingredients to
prevent boil-over, especially if you use cream or milk
in the soup.
Generally, cover microwaved soups with VENTED
p_asticwrap or a microwavabie lid.
. Cover foods to retain moisture. Uncover foods to
retain crispness,
o Avoid overcooking by using the minimum suggested
time. Add more time_ifnecessary, only after
checking the food,
Cooking r_leat: General Directions
Prepare the meat for cooking,
- Defrost completely=
- Trim off excess fat to avoid splattering_
- Place the meat, fat side down, on a micl'owavab_e
rack in a microwavabte dish,
- Use oven cooking bag for less tender cuts of
meat,
- Arrange the meat so that thicker portions are
toward the outside of the dish,
- Cover the rneat with waxed paper to prevent
spla[tering.
o Tend the meat as it oooks.
- Drain iuices _s they accumulate to reduce
splattering and keep from overcooking the botIom
of the meat.
Shield thin or bony portions with strips of foil to
prevent overcooking.
NOTE: Keep the foi_ at least 1 inch from the oven
wails, and do not cover more than one-third of the meat
with foil at any one time,
• Let the meat stand covered with foit 10-15 minutes
after you remove it from the even. The internal
temperature of the meat may rise from 5-10 °F
during standing time,
The Meat Cooking Table on the next page provides
detailed directions, Power Level and Cooking Time
settings for most cuts of meat.
Not Recommended
• Appetizers with a crisp coating or puff pastry are
best done in a conventional oven with dry heat.
. Breaded products can be warmed in the mic_"owave
oven but will not come out crisp.
. Cook sauces made with cornstarch or flout"
uncovered so yo_ may stir them 2 or 3 times during
cooking for a smooth consistency.
o To adapt aconventional sauce or gravy recipe,
reduce the amount of liquid s_ightly.
. Stirring occasionally wilt hetp blend flavors, distribute
heat evenly and may even shorten the cooking time.
. When converting a conventiona_ soup recipe to cook
in the microwave, reduce the liquid, salt and strong
seasonings,
23_
Page 24

Meat Cooking Table
MEAT
Beef
Hamburgers,
Fresh or defrosted
(4 oz, each)
1 patty
2 patties
4 patties
Sirtoin tip roast
(3-4 ibs,)
Lamb
Lamb mast, rol_ed
boneless
(3-4 Ibs,)
POWER [
LEVEL
HI
5
COOKING
TIME
1-1t/e minutes
1r .,'2-2minutes
2r_,2_,112minutes
9-11 minutes
per pound
RARE(135 oF)
12-14 minutes
per pound
MED1UM(155 "F)
t2-13 minutes
per pound
RARE(135 "F)
13-14 minutes
per pound
MEDIUM(145 _F)
I5-16 minutes
per pound
WELL(155 '°F)
DIRECTIONS
Form patties with depression in center of each,
Place on microwavable roast rack, Brush with browning
agent, if desired, Cover with waxed paper.
Turn over halfway through cooking. Let stand covered
1 minute_
Place roast fat side down on microwavabte roast rack, Add
desired seasonings and cover with waxed paper. Turn
meat over halfway _hrough cook_ng and shield if necessary.
[f using probe, insert in roast during last half of cooking.
Remove roast from microwave oven when desired
temperature is reached. Let stand covered with foil 15
rninUtes.(Temperature may rise about 10 "F),
Place roast fat side down on microwavable roast rack,
Brash lamb with marinade or desired seasonings such as
rosemary, thyme or marjoram. Cover with waxed paper.
Turn roast over after 15 minutes, and again after 30
minutes, Shield if necessary. If using probe, insert in center
of roast for last part of cooking.
Remove roast from microwave when desired temperature
is reached. Let stand covered with foil 15 minutes
(Temperature may rise about 10 "F).
Pork
Bacon slices
2 slices
,4 elk?.es
6 slices
Chops
{5-7 oz, each)
2 chops
4 chops
Loin Roast,
rolled boneless
(3 !p- 4 ri2 Ibs,)
Sausage Iinks,
Fresh or Frozen,
defrosted
(1-2 oz, each)
2 links
4 Iinks
6 links
i 10 iinks
(8 oz. pkg.)
H_
3
3
HI
t rJe-2 minutes
3-3_z minutes
4-5 minutes
20-21 minutes
per pound
17-18 minutes
per pound
27-29 mina,s
perpound
(! 65 oF)
45-60 seconds
1- I _J_min utes
1r,_-2 minutes
1s/4-2 minutes
Place bacon stices on microwavabb roast rack,
Cover with paper towels,
After cooking, let stand 1 minute,
Place chops in m[crowavable baking dish,
Add desired seasonings and cover with vented plastic
wrap. Cook until no tonger pink or until internal temperature
reaches 170 ° F. Turn chops over halfway through cooking.
Let stand covered 5 minutes,
(Temperature ma'y rise about 10 ° F)_
Place roast in cooking bag in microwavable dish.
Adc_seasonings and browning agent if desired. Close bag
ioosely with mierowavable c_osure or stdng, After cooking
let stand in bag 15 minutes.(Temperature may rise about
10 "F,) internal temperature of pork shoaid reach 170 "F
before eerving_
Pierce finks and place on microwavabte roast rack.
Cover with waxed paper or paper towel.
Turn over halfway through cooking. After cooking, let stand
covered 1 minute.
24
Page 25

Poultry
Cooking Poultry: General Directions
o Prepare the poultry for cooking.
- Defrost completely.
- Arrange poultry pieces with thicker pieces st the
outside edgs of the baking dish, When cooking
legs arrange them like the spokes of a wheel,
- Cover the baking dish with waxed paper to reduce
splattering,
- Use a browning agent or cook with a sauce to give
a browned appearance
o Tend the poultry as itcooks,
- Drain and discard juices as they accumulate.
Shield thin or bony pieces with smat{ strips of
aluminum foil to prevent overcooking, keep foil at
least 1 inch from the oven wails and other pieces
of foil,
Poultry Cooking Table
o The poultry is done when it is no Ionge; pink and the
juices run clear. When done, the temperature in the
thigh meat should be 180-1850F,
o Let the poultry stand after cooking covered with foil
for 10 minutes.
The Poultry Cooking Table below provides detailed
directions, Power Level and Cooking Time settings for
most cuts and types of poultry.
Chicken pieces
(2_/2-3Ibs).
Chicken whole
(3-31/_,Ibs)
',_Omlsh Hens
Whoie
1-1 us Ibs. each)
POWER
LEVEL
Ht
Hi
Ht
COOKING
TIME
5-6 minutes i
per pound /
13-14 minutes
per pound
1
i
t
7-8 minutes
per pound
DIRECTIONS
I
Wash and diy poultry, Place pieces in a single tayer in'a
microwavaMe baking dish with thicker pieces to the
outside, Brush with butter or browning agent and
i
I
seasonings if desired. Cover with waxed paper, Cook
I
until no longer pink and juices run cleat'.
i
J
Let stand covered 5 minutes,
Wash and dry poultry. Place breast side down on a
microwevaMe roast rack. Brush with blotter, or browning
agent and seasoning if desired. Cover with waxed
paper, Cook 1/3 of estimated time. Turn breast side up
brush with butter, or browning agent, Replace waxed
paper, Cook 1/3 of estimated time again, Shield if
necessary. Cook remaining !/3 of estimated time or unti!
no longer pink and juices run clear. Let stand covered
with foil 10 minutes. (The temperature may rise about
10 "F,) The temperature in thigh should be 180 °F-185 °F
when the poultry is done,
Wash and dry poultry. Tie wings to body of hen and the
legs to tail. Place hens breast side down on
microwavable rack, Cover with waxed paper, Turn
breast side up halfway through cooking, Shield bone
ends of drumsticks with foil, Remove and discard
drippings. Brush with butte_ or browning agent and
seasonings if desired, Cook untiI no longer pink and
juices run clear. Remove hens from microwave when
they reach desired temperature, Let stand covered with
foil 5 minutes, (Temperature may rise about 10 _F).
Temperature in breast should be 170 _F before serving,
- 25 -
Page 26

Pasta And Rice
Microwave cooking and conventional cook[eg of pasta
rice and cereal _equire about the same amount of time.
But the microwave is a mo_'econvenient method
because you can cook and serve in the same dish,
There is no stirring needed end _e_tover pasta tastes
just like fresh cooked when reheated in the microwave
oven,
Cooking Pasta and Rice: Tips and Techniques
. [f you are planning to use rice or paste in a o The Pasta and Rice Cooking Tabtes below provide
ee_sel'ote, undercook it so it is stil_ firm. specific directions, with Power Leve_ and cooking
* Af_ow for standing time with rice, but not for pasta, time settings for most common types of pasta end
rice,
Pasta Cooking Table
TYPE OF PASTA POWER COOKING DIRECTIONS
Spaghe_i
4 cups waterAdd
8 oz. spaghe_i
Macaroni
3 cups water Add
2 cups macaroni
Lasagne noodles
4 cups water Add
8 oz. lasagna noodtes
LEVEL TIME
HI 10 to 11 minutes
5 8 to 9 minutes
HI
5
Hi
5
7 to 8 minutes
6 to 7 minutes
8 to 9 minutes
I2 to 13 minutes
Combine hot tap water and salt, if desired. Use
a 2-quert microwavable baking dish and cover
with vented plastic wrap for spaghetti and
lasagne noodles, Use microwavable lid or
vented ptastic wrap for macaroni and egg
noodles,
Cook et Power Level HI as directed in chart or
until water bails, Stir in pasta: cook covered at
Power Level 5 as directed inchart or until
tender Drain in a colander.
Egg noodles HI
6 cups water Add 5
4 cups noodles
9 to I1 minutes
6 to 7 minutes
Rice Cooking Table
TYPE OF R_CE
Long grain
2 I/4 cups water Add
cup rise
Brown
2 1/2 cL_pswater Add
cup rice
Long grain and
wild rice mix
2 r_ cups wa_rAdd
6 oz. pkg.
Quick cooking
cup water Add
' unfit water is absorbed and rice is tender
cup rise I •
POWER COOKING
LEVEL T{ME
Hi 5 to 6 minutes
5 15 minutes
HI 5 to 6 minutes
5 30 minutes
Hi I 41_ to 5i_ minutes
5 25 minutes
HI 2 to 3 minutes
I
DIRECTIONS
i Combine hot tap water and salt if desired, ir_2-
I quart microwevab_e casserole, Cover with
microwa_/ableJidor vented piastic wrap, Cook
as directed in chart at Power Level HI or until
water boils. Stir in rice and any seasonings,
Cook covered as dil"ected in chart at Power
Level 5 or Until water is absorbed a_d rice is
tender. Let stand covered 5 to 10 minutes. F_uff
with fork,
Cook water until it bails, Stir doeinto boiling
water and letstand, covered 5 to t 0 minutes or
Fluff with fork.
26 -
Page 27

CARE AND CLEANING
For best performance and safety, keep the oven ctean
inside and outside. Take spec a[ care to keep the inner
door panel and the oven front frame free of food or
grease build-up.
Never ese rough powder or pads, Wipe the
microwave oven inside and out, including the hoed
bottom cover, with a soft cloth and a warm(not hot)
mild detergent solution. Then rinse and wipe dry. Use a
chrome clearer and polish on chrome, meta_ and
aluminum surfaces. Wipe spatters immediately with a
wet paper towel, especially after cooking chicken or
bacon. Ciean your OVeR weekly or more often, if
needed.
TEMPERATURE PROSE
Remove the temperature probe from the socket after
each use. Ctean the probe with a mild detergent
solution. C_eanthe sensor with a soft, damp ctoth,
Use a pot holder because rife wire_ plug, and
sensor sections may be hot,
METAL RACK
Wash the metal rack with a mild soap and a soft or
nylon scrub brush.Dry completely.
Do not use abrasive scrubbers or cleaners to clean
rack.
3. To reinstall the fitters slide it into the side sfet_ then
push up and toward oven center to look.
i
NOTE: Do not operate the hood without the filters in
ptace_
CHARCOAL F_LTER REPLACEMENT
If your oven is vented inside, the charcoal filter (part
#507269) should be replaced every 6 to I2 months,
and more often if necessary. The charcoal filter cannot
be c_eaned. To order a new charcoal finer, contact the
Parts Department at your nearest Sears Store or
Service Center,
t. Remove the two vent griLtemount{rig sctews
(2 middle screws)
CLEANING THE GREASE RLTERS
7,-_. grease fitters should be removed and c}eaned
ofen, at least once a month.
1. To remove grease filters_ slide each
fitter to the side. Pull filters downward
and push to the other side. The fitter will drop out.
'_
7
2 Se_k grease filters in, hot water and a miid
detergent. Rinse wen and shake to dry. Do not use
ammonia or place in a dishwasher. The
afuminum will darken,
2. Tip the gril}e forward then iift it out
3. Remove old filter.
4. Slide a new charcoai filter intoplace. The filter
should rest at the angle shown.
5. Slide the top of the vent cover into place. Push the
bottom until it snaps into place, Replace the
mounting screws. Turn the power back on at the
main power suppty.
- 27
Page 28

COOKTOPff_IGHT LIGHT REPLACEMENT
1, Unplug oven or turn off power at the main power
supply,
2, Remove the bulb cover mounting screws,
3 Replace bulb(s) with 30 watt appliance bulb(s).
4, Replace bulb cover.
5, Turn the power back on at the main power supply.
OVEN LIGHT REPLACEMENT
I. Unplug oven or turn offpower at the main power
supply.
2. Remove the vent cover mounting screws. (2 middle
screws)
3. Tip the cover forward, then lift out to remove.
r
QUESTIONS AND ANSWERS
Q, Can I use e rack in my microwave oven so that
may _sheat or cook in two ieve_s at 8 time?
A. Only use the rack that is supplied with your
microwave oven Use of any other rack can result in
poor cooking pelformanee and/or arcing and may
damage your oven_
Q. Can I use either metal or aluminum pans in my
microwave oven?
A, Usable metal includes a_uminum foil for shielding
(use small, flat pieces) and shallow foil trays (if tray
is 3/4 inch deep and filled with food to absorb
microwave energy). Never allow metal to touch
walls or door,
Q, Sometimes the door of my microwave even
appears wavy, is this _orma|?
A. This appearance is normal and does not affect the
operation of your oven.
Q, What are the humming noises th_ ] hear when
my microwave oven is operating?
A. You hear the sound of the transformer when the
magnetron tube cycles on and off,
Q. Why does the dish become hot when I
microwave food in it? fthought that this should
not happen,
A. As the food becomes hot it will conduct the heat to
the dish, Use hot pads to remove food after
cooking.
4, Remove bulb holder mounting screw.
5. Lift up the bulb holder,
6. Replace bulb with a 30 watt appliance butb.
7, Replace the bulb holder and mounting screw,
8. S!ide the top of the vent cover into place. Push the
bottom until it snaps into place. Replace the
mounting screws, Turn the power back on at the
main power supply.
Q, What does "standing time" mean?
A, "Standing time' means that food should be taken
out of the oven and covered for additionai time after
cooking, This process allows the cooking to finish,
saves energy and frees the oven for other purpose.
O. Can Ipep popcorn in my microwave oven? How
de I get the best rosette?
A. Yes Pop packaged microwave popcorn following
manufacturers guidelines or use the
preprogrammed Popcorn pad.
Do not use reguiar paper bags. Use the "listening
tesf' by stopping the oven as soon as the popping
slows to a "pop" every one or two seconds. Do not
try to repop unpopped kerne!s. You can also use
special microwave poppers. When using a popper,
be sure to renew manufacturers directions. Do not
pop popcorn in glass utensils.
Q, Why does steam come oat of the air exhaust
vent?
A. Steam is normally produced during cooking. The
microwave oven has been designed to vent this
steam out the top vent,
28 -
Page 29

MICROWAVE UTENSIL GUIDE
USE DO NOT USE
OVENPROOF GLASS (treated for high
intensity heat):
utility dishes, [oafdishes, pie plates,
cake plates, liquid measuring cups,
casseroles and bowls without meta[lic
trim,
CHINA:
bowls cups serving plates and platters
without metallic trim,
PLASTIC:
Plastic wrap (as a cover)-- lay the plastic
wrap Ioosety ever the dish and press it to
the sides.
Vent plastic wrap by turning back one
edge slightty to altow excess steam to
escape, The dish should be deep
enough so that the plastic wrap will not
touch the food. As the food heats it may
melt the plastic wrap wherever the wrap
touches the food.
Jse plastic dishes, cups,
semirigid freezer containers and ptastic
bags only for short cooking time. Use
these with care because the plastic
may soften from the heat ef the food.
PAPER:
Paper towels, waxed paper, paper
napkins and paper plates with no
metaI_ic trim or design. Look for the
manufacturer's labeI for use in the
microwave oven,
METAL UTENSILS:
Matal shietds the food from microwave energy and produces
uneven cooking. Atso avoid metal skewers, thermometers or foil
trays.Metal utensils can cause arcing, which can damage your
microwave oven,
METAL DECORATION:
Metal-trimmed or metal-banded dinnerware, casserole dishes,
etc, The metal trim interferes with normal cooking and may
damage the oven,
ALUMINUM FOIL:
Avoid _argesheets of aluminum foil because they hinder cooking
and may cause harmful arcing. Use smatl pieces of foil to shield
poultry legs and wings. Keep ALL aluminum foil at least 1 inch
from the side walls and door of the oven.
WOOD:
Wooden bowls and boards will dr},out and may split or crack
when you use them in the microwave oven. Baskets react inthe
same way.
TIGHTLY COVERED UTENSILS:
Be sure to leave openings for steam to escape from covered
utensi!s, Pierce plastic pouches of vegetables or other food items
before cooking. Tightly closed pouches could explode
BROWN PAPER:
Avoid using brown paper bags.
They absorb too much heat and could burn.
FLAWED OR CHIPPED UTENSILS:
Any utensil that is cracked, flawed or chipped may break in the
oveR,
METAL TWIST TIES:
Remove metal twist ties from plastic or paper bags,
They become hot and could cause a fire,
- 29 -
Page 30

BEFORE CALLING FOR SERVICE
Check the following list to be sure a service call is
really necessary A quick reference of this manual as
well as reviewing additional information on items to
check, may prevent an unneeded service call.
If nothing on the oven operates:
o check for a blown cil_uit fuse or a tripped main
circuit breaker.
check if oven is properly connected to electric
circuit in house.
check that controls are set properly.
If the oven interior light does not worker
the tight bulb is _oose or defective.
If oven wilt not cook:
, check that control panel was programmed
correctly,
check that door is firmly closed.
o check that Start Pad was touched,
= check that probe was inserted correctly
into receptacle,
o check that timer wasnt started instead of a cook
function.
if o,,mn takes tonger than normal to cook or cooks
too _'apidly:
" be sure the Power Level is programmed properly.
If the time of day c_ock does not a_ways keep
correct time:
- chock that the power cord is fully inserted into the
outlet receptacle.
be sure the oven is the only appliance on the
electrical circuit.
if food cooke unevenly:
be sure food is evenly shaped.
be sure food is completely defrosted before cooking
o check placement of aluminum strips used to prevent
overcooking.
If feed is underoooked:
check recipe to be sure all directions (amount, time_ &
power levels) were correctly foflowed.
be sure microwave oven is on a separate circuit.
be sure food is completely defrosted before cooking.
if feed is overcooked;
check recipe to be sure aNdirections (amount, power
level, time, size of dish) were followed.
if arcing (sparks) occur:
" be sure microwavabte dishes were used.
* be sure wire twist ties weren't used.
- be sure oven wasn't operated when empty.
- make sure metal rack (if used) is proped% installed on
4 supports.
If the Display shows a time counting down but the
oven is not cooking:
check that door is firmly cfosed.
check that Timer wasn't started instead of a cooking
function.
30
Page 31

JND[CE .................................................................... 31
GARANTiA ............................................. :................ 31
SEGURIDAD ........................................................... 32
Importantes }ns_rucciones De Seguridad ................ 32
Precauciones Pare Evita* La Pos}ble Exposici6n
Excesiva a La Energ_'a De Microondas ................... 33
INFORMAOION ....................................................... 34
Ubicaci6n Dot N0mero D6 Mode{o ....................... 34
Especificaciones De[ Homo .................................... 34
R_gimen Eiectrtco .................................................. 34
Requerimientos El6ctdcos ...................................... 34
tnstruccJones Pare La Puesta a Tierra .................... 34
Caracteristicas Del Homo De Microondae ............... 35
Panel De Control Del Homo ................................... 36
OPERACIQN ........................................................... 38
CONOZCA SU HORNO DE M|CROONDAS ......... 38
Hera Def Dia (Time of Day I.................................... 38
Reloi De Cooina (Kitchen Timer) .......................... 38
Reloi De La Luz (Light Timer) ............................... 38
Ventitador a Ve!ocidad AftaiBajaiApagado (Hi/
LowlOff) ............................................................. 39
Luz BdIlente/Tenue/Apagada (LIGHT HIILOW/
Off) ........................................................................ 39
Flataforme Giratona Activada!Desectivada
(I-URNTABLE ON/OFF) ....................................... 39
Btoqueo De Seguridad Para NiSos (Child Lock).. 39
Ayuda {He_p)..................................................... 39
Mantener Caliente (Hold Warm) ......................... 40
Un Minute M_s (Plus One Minute) ....................... 40
Encendido R_pido (Quick On) ............................ 40
Selecol6n Del Usuario (User" Choice) .................. 40
PaIomitas De Maiz (Popcorn) ............................. 41
CocinaY a Alta Potenoia ..................................... 41
Cocinar a Nivetes Mas Bajos De Potenoia .......... 41
Gu_a De Cocci6n Pera "Lower Power Levels", .... 42
Cocinar Con M_,s De Un Ciclo De Cocci6n ......... 43
Tocino (Bacon) ..................................................... 43
Patatas (Potato) .................................................. 43
Bebidas (Beverage) ............................................. 43
Recalentar Autom&ticamente (Auto Reheat) ....... 44
Gula De Cocc[6n Pare "Auto Reheat"
(Recalentar Autom_ticamente) ............................ 44
Coccfon Automatics (Auto Cook) ........................ 45
Gu[a De Cocci6n Para 'Auto Cook' (Coeci6n
Autom_tica) ......................................................... 45
Auto Defrost (Desoongelaci6n Automatica} ......... 46
Sugerencias Pare La Descongelaci6n ................ 46
Cuadro de Descongelaci6n Autom&tica ............. 47
Conoinar Con La Sonda De Temperature ........... 49
Parril/a Metallca De Dos Posioiones ................... 50
Guia De Temperaturas ....................................... 5t
GARANTfA COMPLETA DE UN A_O
PARA EL HORNO DE MICROONDAS
Durante un aFlo a pailir de ]a fecha de oompra,
Sears reparara gratuitamente es_:ehomo de
mieroondas mama Kenmore sieste ttegase a failer
debido a un defecto en materia/es o fabdcaci6n,
GARANTiA COMPLETA DE ClNCO
i!J_OS PARA EL MAGNETRON
Durante since ahos a part_ de fa fecha de compra,
Sears repararA gratuitamente et magnetr6n que
viene en este homo de microondas mama Kenmore
si eae magnetr6n Ilegase a failer debido a un
defecto en materiates o fabricaci6n,
EL SERViClO DE REPARACION DE
GARANTiA EST.& A SU DISPOSI¢ION
CON SOLO PONERSE EN CONTACTO
CON LA TIENDA SEARS O EL CENTRe
DE SERVICIOS SEARS MAS CERCANO
A SU DOMICILIO EN LOS ESTADOS
UNmDOS,
Esta garantia s6fo es v_lida mientras e_pmducto se
est_ usando en los Estados Unities.
Esta gerant[a te otorga derechos tegates espectficos
y usted puede te_'_ertambien otros de_'echos que
varlan de estado en eetado
Sears, Roebuck and Co., Di 817WA, Hoflman
States, IL 60179
Page 32

IMPORTANTES tNSTRUCCIONES DE SEGURaDAD
Las instruccJones de segu_'idad_ue se presentan a continuaci6n te indicaran e6mo user su homo para eviler
daSos para usted mismo u otras personas o daSos a su homo.
ADVERTENCIA: Pare reducir el riesgo de
quemaduras, descargas elCctficas, incendios_
lesiones a personas o la exposieiCn excesiva ala
energia de microondas:
-Lee redes Ins instrucciones antes de user su
homo.
, No permits qt_e los nifios uee_ este he, no sin
set vigilados de Ceres per un edu!_e.
•Lea y sign les "PRECAUC!ONES PARA EVITAR
LA POSIBLE EXPOS|Cl0N EXCESIVA A LA
ENERG}A DE MtCROONDAS" qua haItarA en la
pAgina 33.
- No use agentes qufmicos o vspotes corrosives
come, per ejempb, sutfuros y eloruros, en este
electrodomCstic:o, Este ripe de homo esta
especfficemente disef_ado pare caientar cocinar o
secar stimer_tos. No est_ diseSado pare use
industrial o de taborr_ofio,
. No use ni guards este electredamSstieo al sire
libre. No use eete producto ceres del agua, per
ejemplo, cercs de un fregadero de oocinm en un
sCtano h0medo o cerca de una piseina y _ugares
afines,
- No use la cavidad del homo pare guarder cases,
No deje p[oductes de papel_ utensiltos de cosine o
alimentos en la cavidsd def homo cuando no to
est6 usando.
_Limpie i_'eeuen_emente ]acempane de
ventilaci6n. No permits que iagrasa se acumule
en _acampana o en los filtros.
,,Cuando use flames para eocinar alimentos bajo la
campsna apague e/ventiIador, puesto que_ si est9
funcionando, puede propagar la llama.
Este electrodomCsfleo es adecuade para asarto
sabre equipos de cosine elCctrioos o a gas qua
tengan 36 puigadas o manes de _ncho.
- Teng8 cuidado a_ limpiar los filtros de ventilacidn de
la campana. Agentes corrosives de {impieza come,
per ejemplo, los limpiadores de homo a base de
lejia_ puede da_ar los filtros.
-Cuando limpie lepuerta y lee superficies qua
tocan la puerta_ _se sclo jabones o detergentes
suavas, no abrasives, y una esponja o palSito
suave,
• No menipule indebidamente los interruptores
incorporedos de seguridad en le puerta del
homo. E1home tiene varies intertuptores de
segufidad que garanticeb et apague automAtteo al
ebrirse Is puerta.
,,Si su homo se caeo se da_a, hags qua un
tCcnieo ca!ificado de servicio io revise a for=do
antes de usario otra vez.
Pare evitar peligros de incendio:
,,,,,,, ,_
- No oecine excesivamente los a_imentes, Los
alimentos sabrecocinades pueden causer un
inoendio de_qt*o del homo, Vigile el home
cuidedosamente, en partiauIar si usted tiene
papal, ptastico u otros materieies combustibles en
et horno,
- No _Juerde art_culos combustibles (pan,
gelletas, etc,) en el horno_ porous si un rays cse
sabre los cables de electrieidsd, esa descarga
podrfa haeer que el homo se enciende,
- No use tiritas plasticas o met_licas de cierre
en e_ homo. AsegQrese de reviser bien los
articulos que eompre para detecter estas tiritas
met_ficas que se user para cerrar balsas y
envoItorios y sequoias antes de c01ocar un
articulo en el home,
-Si se produce un incendie:
- Mantengs cerrada la puerta dot homo,
- Apague el homo,
- Descenecte el cordon de suministro elcctrico
o carte }a energia elCctrice en el fusible o el
panel de in_erruptores de circuito,
-Pore eviler descargas etectrices:
-Este electrodomestico debe tenor une
conexibn a tierra. EnchL_felo sotamente a una
tome con puesta adecueda a tierra. En la p_gina
34 hatlara tas instrucciones pare la puesta a tierra
de este eteetrodomCstioo.
- No Dongs este electredernCstioo a f_neioner si
liens un cable o un enchufe daffado, si no est_
funeionando c0_rectamente o si se ha daSado o
se ha caido,
- No sumerja el cordbn de suminietre elcctrico o
e[ enchu_e an ages.
-Mantenga el cordCn de suministro electrico
Is}aS de superficies calientee,
-Pare eviter cocinar incorrectamente alguncs
alimentos.
- No use el homo de microondas pare catentar
biberones e alimentes pare bebcs. Podrta
ocurrir un calentamiento disparejo y eausar
posibtemente lesiones personales.
-No calien_e envaees de cuelle angosto come,
per ejemplo, botellas de almibar,
- Ne hags frituras en grass en su homo de
mieroondas.
-No intents preparer censer,ass en su homo de
mioroondas.
- No ca[lento los eiguientes articuloa en el
home de microondaa; huevos enteros en su
c&scara, ague con aeeite o gi'asa: envases
hermCtJcos o envases cerrados de vidrio. 5sos
articulos pueden explorer.
-32-
Page 33

No use este horns pars fines coraerciales. Ert._ - Mantenga un plato de darer a al menos 3/16 de
hecho Qnicamente pars usadomestics
oNo cubra nibisques _asaber#Jrasdel homo,
Use su homo 0nicamente para tar operacionee
dese_ltas en este manual
No ponga e_homo afuncionar si est6yam's, ee
decir, sin comida easu intel'ior,
• Conserve el piss del horns:
- No salients exoesivamente el piss del homo.
=NOpermits qua le pelicula gris qua viene en
paquetes especiafes para cocinar en microondae
toque ei piss del horns. Ponga el paquete en un
plato especial pars microondas.
- No coo}no nada directameate sobre el piss dei
borne. Use un plato espec{a_pars mic_oondas,
pulgada per robre et piss. Lea y siga
cuidadosamente ]as instrucciones para el plato
de doter. Si use un plato de dorar
inoorrectamente, podrta dafiar el piss del homo.
Preserve |a pardlia metalica:
- Saquela parrilia met_llca del homo cuando no !o
este usando.
- No use el homo yetis con ta parriHa met&lice en
61.
- La parrflta metAlica puede ponerse salients
mient/as cocina, Use guantes o pubes
p_otectores de cessna pars sacafia despu_s de
coo;inst.
= No use papet atuminio o recipientes metAticos
sobre la pardlla melodies,
CONSERVE ESTAS NSTRUOCJONES
PRECAUCIONES PARA EV TAR LA POSIBLE EXPOSICK)N
EXCESIVA A LA ENERGiA DE MICROONDAS ,..
. No intents porter eSte _rne a 1uncienar con Is puerta abiert, a, puesto qua la operar_.J6ncon _apuerta
abierta puede ocasionar la noc{va exposici6n a[a energia de misroondas, Es impertante no e.nL_tarni
maniputar e! dispositivo de enctavamiento e bloqueo de seguridad.
• No ponga el horns a funcionar si e_ta dafiado. Es particularmenta importante qua la puerta del homo se
cJerre adecuadamente y qua no ocurtan da#os on:
- la puerta (qua est'. doblada)
- ]as bisagrae y seguros (qua estOn rotes o f!ojes)
- lasjuntas hermCticas y |as superficies de cierre bern€tics de ta puerta,
, No coloque objetos entre la parle fronts| y la peerta del horns ni pea-mite que ei susie o los residues de toe
agantes fimpiadores se acumuten sobre las superficies de sierra hetm¢tico.
=El he_'no s6!o debeee[ aiustado o ceDarado pot e_personal de servicb apropiadamente oalifieado para
tlevsr a cabs esas tarsus,
%ECLA.AC O.6E NTERFE E"C
DE CO]'_UNICAO|ONES (VAUDA PARA LOS ESTADOS UNIDOS SOLAMENTE)
ADVERTENC|A:
Este equips genera y usa energ[a de frecuencia ISM
y ei no est& instatado y se usa correctamente en
estricta confotmfdad con ias insttucciones del
fabficante pueden ocurfir intefferenciae en la
recepc[On de seiis_ee de radio y tetevisi6n, Este
electi'odomeatico h& side somet_do a ptuebas er_
cuanto a su tips y se he determinado qua cumpte
con _os t[mttes para Equipos ISM seg0n el apartado
S de fas Reglas de ta FCC, qua estan concebidas
para brindar una protecoiOn razonabte contra taler
, }nterferencias enuna instaiaciOn residencial, Sin
embargo, no se puecie garantizar que no ocurran
interferenctas enuna instaf_ctor_ particular. Sieste
equips cause interferencia ala recspci6n de sef_a_es
de re,die y televisi6n, Io cue[ puede determinates
encendiendo y apagando el equips, invitamos al
usuario a intentar corregir _ainterferencJa tomando
una o m&s tie las siguientes medidas:
Reortentsr _aantena receptors del sparato de radio
e television.
o Reubicar el home respects alupstate receptor an
cuestiOn,
,,Alejar el homode mlcroondas de_aparate receptor,
• Enchdar el home de mtcroondas en una toma
diferente de ta_mode qua el horns de mioroondas y
et upstate receptor se tocalicen en diferentes
seccionee del c}rauito el_ctdco.
El fabricante no es respensabte per
inter_erenciaa a la$ se_ales de radio e teievisibn
caesada$ pot _a_odificaoion ne aut_rizada de
eats horns de microendas. Es responsabi(idad dot
usuario corregir tales interferencias,
- 33-
Page 34

DisffuteIanuevaexpedenciadeeocinaquelebrinda
Sears.Lea per favor este manuai del usuario. Be 61
hal]ar9 informaci6n sabre c6mo usar todae Ins
excepeionales earacterfsticas de este homo de
micraondas,
UB_CAC|6N DEL NOMERO DE MODELO
Pars solicitar servic[o de reparaci6n, Informaci6n o
piezas de repuesto, Sears le exigirA el n0mero
complete de modeto de su homo de microendas, Este
n_mero esta en [aparte frontal deLhomo come se
mueatra en la siguiente ilustraci6n,
ET}OU_A CON 5L I'_UMERODE MOOELO
INSTRUCCIONES PARA LA PUESTA A
TIERRA
Este eieotrodomestico debe tenet una conexion a
tierra, Si tlegase a ocurrir un eortoei_euito electric0, la
puesta a tierra reduce el riesgo de descargas
ei_ctricas proporeionando un hilo de escape para la
corriente eIectrica. Et cord6n para este
etectrodomestico tiene un hi[o de puesta a tierra con
un enchufe con eonexidn a tierra, Conecte el enchufe
en una toma qua este correctamente instaiada y
guests, s tierra.
ADVERTENO_A: Si usted usa incorreclamente et
enchufe con oonex_rl a tierra, correrA et rJesgede
sufrir deseargas electricas,
Preg_ntele aun eteetriciata ca}if}cado si no eat}cede
ins instruccJones pars la puesta a tierra o si tiene
dudas acerca de si e! etectrodom_stico tiene una
conexi6n corrects a tierra, Dado que este
electrodomestico ent_ debajo del gabinete, tiene un
oord6n carte de suministro el_ctrico, Vea tas
instrucciones aeparadas de instataci6n deride hatlar_
indieaciones sabre ta colocaei6n corrects de ese
eord6n. Mantenga el cord6n seco y no 1ooprima o lo
aplaste de mode alguno,
ETIQUETA CON EL NOMERO DE IVIODELO
ESPECIFmCACIONES DEL HORNO
Petencia de Salida:
900W (Norm_ de Regimen lEG 705)
Dimensiones Exteriores:
29-15/t6' x 16-7/t6" x t5-3/8'
Ve_umen de ta Cavidad: 1.3pies c0bicos
Peso Neto: 58 libras
REGIMEN ELECTRflCO
Regimen Eiectrico dei Homo: 120 voltios de
corriente atterna, 60 HZ
- 1350 Vatios t 1.9 Amperios (el Home de Microondas
solamente)
• 1500 Varies 12.9 ArapaHos (Homo de Microondas +
Lamparitta Frontal + Ventilador)
REQUERIMIENTOS ELECTRICOS
El homo eats diseSado pars funcionar en una toms
dr_mu_sticaest&ndar de 120 voItios/60 Hz. Aseg0rese
de qua el cireuito tenga una capacidad de al menos
15 stapedes y de que el borne de microondas sea el
0nice aparato en ese circuito, Tampoce esta diseSado
pars 50 Hz o pars cualquier otro cirauite qua no sea
un circuito de 120 voltios/60 Hz,
Si se requiere el use de un cord6n de extensi6n, use
s61o un eerd6n de extensl6n de tres hilos que tangs
un enchufe de tree puntas con puesta a tierra y una
toma con tres ranuras en fa qua ee pueda conec_r ei
enchufe del etectrodomeetico, El calibre mareado de_
cord6n de extensi6n debars, ser igual o mayor qua la
capaeidad el6ctdca nominal del aparato
electrodomestico, Antes de usar el electredom_etico,
aseg_reae de qua exists una pue_ta a tierra corrects
Antes de usar et ele¢_rodom_stico,
_segorese de qt_e exista una puesta a
t}etra cor_'ect_
Pars un electrodomestico conectado
permanentemente:
Este electrodom_atieo debe cenectarse aun sistema,
de cableade met_lieo permanente y con puesta a
tierra o ee debe tender un conductor de puesta a
tien'a pars equipos e_tricos con los conducteree de
cireuito y conectarse a terminal o came de puesta a
tierra en el eleetrodom_stico.
- 34
Page 35

CARACTERiSTiCAS DEL HORNO DE r ICROONDAS
Pare que usted comprenda rapidamente er
funcionamiento de su homo de mioroondas, a
centinuaot6n fe p_'esentamos una lista de redes las
caracterfsticas basicas del horno.
1. Mango de la Puerta. Tire de{ mango para abrir la
puerta.
2, Sistema de Bioqueo de Seguddad de la Puerta.
El homo no funciona_a a menos que la puerta este
firmemente oerrada.
3. Ventaaa con Blindaje Mef_lice. Et bHndaje impide
que las microondas se escapen hacia e_exterior,
Est& disefiado come una pantalia protectora que le
permite ver ta comida mientt'as cocina.
4. Parrille Metaii_-'_ de Des PesJcionea, 0sela pare
e_er espaoio extra mientras cocina en mas de un
recipiente al mismo timpo. En ta pagin8 50 se
presenta mayor informaoi6n,
5. Fi|tro de Grasa.
6. Luz indicadora. Enci_ndala para {luminar el homo
o pare usarla come tuz nocturne, En ta pAgina 39
ee preeenta mayor [nformaci6n.
7. Panel de Control. Toque las tectas en este panet
pare reatizar redes las funciones.
8, Reji!la ¢{e VentilatiOn,
9. Guia de Cocciba, Usela come una r_.pida
referencia pare Recalentar Automaticamente (Auto
Re_eat)Ja Coeci6n Automatica (Auto Cook) y ia
Descongetaoi6n Automa.tiea (Auto Defrost).
10. _nda de Temperatt_ra. Usela papa l'ecatentar o
cocinar a una temperature espec[fica, En ]a
p&gina 49 se presenta mAs informaci6n sobre esta
sonde,
NOTA: No guarde ta Sonde de Temperature en el
homo cuando no ta est_ usando.
Cons_rveta en un lugar practice,
11, Placa con et Nurnero de Modelo y de Serie,
12. Ptataferma Giratoria de Vidrie. La plataforrna
giratoria gira los atimentoe a medida que se van
cocinande para tograr una coccidn m_.s pareja. La
plataforma debe ester en e_homo durante ta
operaci6n pare obter_er mejores reeultadoe de
cocoian. Cuando se usa la sonde de temperatura,
la plataforma giratoria estate desactivada.
- 35
Page 36

PANEL DE CONTROL DEL HORNO
Cuando usted enchuf_ e_ homo por vez primera, et mensaie "PLEASE TOUCH T}ME OF DAY _'(MARQUE POR
FAVOR LA HORA DEL DiA) aparecer4 en ia ventanflla de presentaci6n.
®
BACON
36 -
____@
Page 37

1.PANTALLITA: La Pantaltita inotuye un reloj e
indicadores que seSalar_Iahora deI die, toeajusLes
dettiempo de ooeci6n y las fur_oioneseeteccionadas
de cocciSn,
!3.ENCENDJDO RAPIDO (QUICK ON): Toque esta
tecta pare cocinar de 1 a 9 minutos
autom&_icamente at 100% de potemcia. En la pagioa
40 haltar&mayor informaci6n,
2.PALOM_TAS (POPCORN): Toque esta tecla cuando
desee reventar palomitae de mafz en su homo de
microondas, Enla p&gina 41 ballara mayor
informaci6n,
3.PATATA (POTATO): Toque esta tecta para cocinar
de 1 a 4 patatas. En Iap&gina 43 hallara mayor
informaci6n.
4oAYUDA (HELP): Toque esta tec[a para saber cSmo
usar coda funci6n det homo, En la pag[na 39 ha]tarA
mayor informaci6n.
5,BEBIDA (BEVERAGE): Toque esta tec]a pare
recatentar una o dos razes de una bebida, En }a
pdtgina 43 hallara mayo[ informaciSn.
6.TOClNO (BACON): Toque esta tecla para cocinar de
2 a 6 rebanadas de tocino. Enla p&gine43 hallarA
mayor informaci6n.
7.SELECCI6N DEL USUARIO (USER CHOICE):
Toque esta tec4apare cambiar losajustes po_
defeeto de_homo pare los tonos de a_erta,e! reioj, ta
ve_ocidad de desplazamiento de los mensajes en
pantatla, ia unidad de peso pare la descongelaoi6n y
le operaciSn en modo de demostraciSn, En la pagina
:0 hallara mayor informaci6n.
8.COCCION AUTOMATICA (AUTO COOK): Toque
esta tecla pare cocinar vegetates, arroz o cazuelas.
En la p_.gina 45 haliar#_mayor informaci6e.
9.DESCONGELACION AUTOMATJCA (AUTO
DEFROST): Came aves_pescade. Toque esta tecta
pare seleccionar at tipo de alimente y descongelarlo
pot peso. En la pagina 46 ha[lore mayor informaciSn,
10.RECALENTAR AUTOMATICAIVlENTE (AUTO
REHEAT): Toque esta tecIa pare recalentar pizzas,
sopas satsas_c_ue_as, panecilios y boilos
(muffins), En la p_giaa 44 ha]Iota mayor
informaciBn.
11.MANTENER CALIENTE (HOLD WARM): Toque
_sta tecla pare mantener caHentescon seguddad
ias comidas cocir_adasen su homo de mieroondae
durante hesta 99 mioutos 99segundos. En ta
pAgina 40 ha[_aramayor informaci6n,
12,UN MINUTO MAS (PLUS ONE MINUTE): Toque
esta tecta pare cocinar durante un minuto a_100%
del rfivel de potencia, En ta pa.gina40 haliara mayor
informaci6n,
t4.TECLAS NUMERICAB: Toque los teclas num_ricas
pare marcar et tiempo de cocoi6n, el nivel de
potencia, cantidades o pesos_
15.POTENClA (POWER): Toque esta tecla pare
seleccionar un nivel de poter_cia de cocci6n,
16.TIEMPO (TIME): Toque esta teola pare mercer un
tiempo de coccibn
tT,STOP/CLEAR: Toque esta tecta pare detener e_
homo o eliminar (borrar) todas tas se{ecciones y
ajustes que se marquee.
18,TEMPERATURA (TEMP): Toque esta tecla pare
cocinar con la sonde de temperature, En [apagina
49 ha[iar_t mayor informaci6n,
19.1NICtO(START): Toque esta tecla pare in[c]ar una
funci6n. Si usted abre ta puerto una vez que el
homo ha comenzado a cocinar, vuelva a tocar
START,
2O.HORA DEL DIA (TIME OF DAY): Toque esta tecta
pare mercer ta hera det d(a. En la p&gina 38 hailerS.
mayor informaci6n.
21.RELOJ DE LA LUZ (LIGHT TIMER): Toque esta
tecla pare aiustar el reloi de i_ luz. En la p_gina 38
hatlara mayor informaci6n,
22,RELOJ DE LA COClNA (KITCHEN TIMER): Toque
esta tecta pare ajustar el reloj de la cocina. En ta
pdtgina38 hallarb, mayor irfformaci6n.
23.VENTILADOR A VELOCIDAD
ALTA/BAJA/APAGADO (FAN HI/LOWTOFF):
Toque esta tecta pare encender o apagar el
ventitador. En ta p_gina 39 haltara mayor
ieformaci6n,
24.LUZ BR|LLANTE_ENUE !APAGADA (LIGHT
HI/LOW!OFF): Toque esta tecla pare encender la
luz frontaI/superior del horno. Er_la p_igina39
haltara mayor informaci6n.
25,PLATAFORMA GIRATORIA
ACTIVADA/DESACTIVADA (TURNTABLE
ON/OFF): Toque esta tecla para desacfivar la
ptataforma giratoria, Elmensaje 'T/TABLE OFF*
aparecera en [a pantatlita. En la p_gina 39 hallara
mayor intormaci6n.
- 37 -
Page 38

CONOZCA SU COMBINACION DE CAMPANA DE MICROONDAS
E_qesta secci6n se describen los conceptos de ta cocciSn en micl'oondas y se p_'esentan los aspectos basicos que
ueted necesita saber para operar su homo de microondae. Lea per favor esta informaci6n antes de usar el homo,
HeRA DEL DiA (TIME OF DAY)
Este es un reloj de 24 horns, Cuando su homo de
microondas se enchufa per vez primera o despues de
una interrul%'i6n en el suminietro el_ctrico, en la
pantaliita aparecer& ef mensaje "PLEASE TOUCH
TiME OF DAY' (MARQUE PeR FAVOR LA HeRA
DEL D[A). Si no se nqarca una hera det d(a, " :"
aparecerdt en la pantatlita haeta que usted marque la
HeRA DEL DfA,
.... Ejemp{o Para marca_r _as8.t30 aom;
1 Toque STOP/CLEAR,
2, Touqe T_ME OF DAY.
(Oprima una vez para AM: dos
veees para PM,)
El i_ _ 3. Marque la hera usando las
teclas de nQmero,
4 Toque TiME OF DAY (HERA
DEL DiA).
RELOJ DE COClNA
Usted puede usar su homo microondas come un retoj
o cron6metro. Use el Reloj para cronometrar hasta 99
minutes, 99 segundos.
Ejernpie: Para €onta_" 3 minutes. 1
!. Toque STOP/CLEAR,
RELOJ DE LA LUZ (UGHT TIMER)
Usted puede ajustar la LUZ para que se encienda y se
apague autom&ticamente a ]a hera que usted quiera.
La Iuz se ilumina a ta misma hera cada d{a hasta que
ee te reajuste para que se itumine a otra hera.
1_Toque STeP,CLEAR,
2. Toque LIGHT TIMER.
(Oprima una vez para AM: dos
veces para PM.)
3, Marque la hera a ta que usted
quiere que se encienda la
LUZ.
4. Toque LIGHT TIMER de
nuevo,
(Oprima una vez para AM: dos
veces para PM,)
5, Marque ta hera a Ia que usted
quiere que se apague ta LUZ.
6. Toque START.
NOTA: Para reajustar ia hera a ta que ueted desea
que se encienda y se spague la LUZ, repita
los pasos 2 al 6,
,LJ ,,,2_
2. Toque KITCHEN TIMER.
3 Marque el tiempo usando Ins
tectas de nSmero,
4. Toque START.
AI agorarse ei tiempo, usted
eseuchar& un largo tone de
aterta y ia patabra "END" (F!lk
aparecera en la pan_aHita,
l, Toque LIGHT TIMER.
ToIr_ER
2, Toque STOP/CLEAR.
- 38
Page 39

VENTILADOR A VELOCIDAD
ALTA/BAJA/APAGADA (Hi/LOW/OFF)
El ventitado_ (FAN) mueve el vap0r
_ alej_ndoto de la supe_ficie de cocciSn,
_I,,LOW_OrLF_Toque FAN una vez pare que el
ventflador funcione aatta veiocidad, dos
veces pare que funcione a baia velocidad o tree veees
pare epagar el ventiiador,
NOTA: S_}a temperature se pone demasiado caliente
alrededor del homo de microor_dae, el vent:lieder eh la
campana de ventilaei6n se activate autom_ticemente
a baja vetocidad pera proteger el homo. Puede seguir
funcionando durante un m_.ximo de une hera pare
enfriar et homo. Cuando esto ocurre, usted no puede
ap_gar manualmente el ventitadef:
1,Toque STOPfCLEAR,
2. Toque y mentenga opdmida la
tecta '0" durante m&s de 4
segundos, La p_labra
"LOCKED" (BLOQUEADO)
apareeera en la ventanilia
Indicadora acompa_ada de
dos tones de _lerta,
LUZ B RILLANTEfTENUEiAPAGADA
(UGHT H{/LOW/OFF)
Toque LIGHT una vez pare te_er una
[ LIGHT lUZ bdtlante; dos veces pare ta tuz
_I/LOW, OFF
_ nocturne o tree veces pare apagar la
lUZ,
PLATAFORMA GIRATORIA
ACT|VADA/DESACTIVADA
(TURNTABLE ON/OFF)
Pare obtener los mejores reeultados el
TURNTABLE cocinar_ deje _aplataforma giratorie
_.._ activada,. Usted puede desectiveda pare
plates grandes. Optima TURNTABLE
ON/OFF pare activar o desastivar ta piataforma
NOTA: 11UEn ecasiones le plataferme giraloria se
pondra, demasiedo caliente para tocaria.
Tonga euidado a] tocat la ptataforma
giretoria mient_ae eoeina y despu_s de
cocinar,
IIULa p{ataforma giratoria seapaga
automa.ticamente cuando se use _asonda
de temperature,
1. Toque STOP/CLEAR,
2,Toque y mantenga oprimida ]a
tecla "0' durante mb,s de 4
segundos. La patabra
"LOCKED" (BLOQUEADO)
deseparecera y ueted
eseuchara doe tones de
alerte. En ese memento eI
homo estar& [isto pare
funcionar.
AYUDA (HELP)
La tec!a de AYUDA (HELP) muestra informa¢i6n sobre
lee oaraeteristicas y 5tiles sugerencias. Oprima HELP
y seleccione seguidemente una teela de caraeteristica,
EjempIo: Pare _aber,c_mo,se esa QUICK ON l
1. Toque STOP/CLEAR.
2. Toque HELP,
BLOQUEO DE SEGURIDAD PARA
NIftieS(CHILD LOCK)
t 13_d puede bloquear el panel de control pare impedir
:_u_ un nI[io eneienda accidentalmente e! homo de
microondas.
3. Toque QUICK ON.
39 -
Page 40

MANTENER CALtENTE (HOLD WARM)
Usted puede mantene_" con seguridad [a temperatura
de _aeoomidas ca{ientes ef_su homo de microond&s
durante un maxima de 99 minutes, 99 segundos,
Usted puede usar HOLD WARM (MANTENER
CALtENTE) t3nicamente o hacer que a HOLD WARM
(MANTENER CALIENTE} _esiga autom_.tioamente un
ciclo de cocci6n,
ENCENOtOORAP|DO(QUtCKON)
A_usa_ la caracter{stica de ENCENDIDO RAP1DO
(QUICK ON) usted puede cocinar o _ec_lental
comidas has[a un maxh'no de 9 minutes a/100% de
potenoa.
i, Toque STOP;CLEAR.
1, Toque STOP/CLEAR, 1
2, Toque HOLD WARM. i
NOTAS:
HOLD WARM (MANTENER CALIENTE) fu_ciona
hasta 99 minutes, 99 segundos,
- La comida que se cocina con tapa debe mantenerse
tambien cubierta durante est_ func}6n,
oLos artfeulos de paste_er[a (pastetes tortas, sabras,
etc. ) deben mantenerse descubierto_ (sin tapa)
durante esta funci6n,
Las comidas completas que se mantierten calientes
en una bandeja de servir podriar_ cubrirse durante
HOLD WARM.
Para hacer qae HOLD WARM siga
automaticamente a otto cicle:
_'M[entras eeta marcando instrucoiones de oocoi6n,
toque HOLD WARM antes de tocar START (INICIO)
AI terminar el [ittimo ciclo de cocci6n, usted
escuchara dos tones de aterta, La palabra "HOLD"
aparecera y se mantendr_ en ta ventanilia mientras
et homo sigue tt_bajando,
* Usted puede ajustar HOLD WARM pars que siga a
DESCONGELACION AUTOM_.TICA (AUTO
DEFROST) o a un programa de cocci6n de m_ltiples
ciclos,
UN MINUTe MAS (PLUS ONE I |NUTE)
PLUS ONE MINUTE (UN MiNUTe MAS) le permite
cocinar la comida durante un minute a1100% de
potencia de cocoi6n o a_adir un minute extra a su cicio
de coccl6n. Usted puede usar esta funci_,n para
prolongar el tiempo de cocci6n un minute mas las
races qua desee, basra un m_tximo de 88 minutes.
' Ejerop_e;Para _cina_ darar_te2ra!nu_es
1, Toque STOP!CLEAR,
2. Toque dos votes PLUS ONE
MINUTE,
2. Toque QWCK ON.
3, Marque el tiempo qua usted
quiere cocinar,
SELECCJ6N DEL USUARIO (USER
CHO_CE)
Usted puede cambiar los vateres per defecto para las
poeraciones de_tone de aierta, el _eloj, !a vetcc_dad de
desptazamiento de to que aparece en la pantallita, ta
unidad de peso para _adesoengetaci6n y le mode de
demostraci6n, En ei siguJente cuadro se presenta m&s
infroma¢i6n.
N¢'" _RO SELECCION
u_vl= DEL USUARIO
Cont,'el pata
1 activaridesaetiv-
ar ei tone de
alert&
Controt de la
2 p_esentaO6n
del reloj
Control de
3 velocidad de
desplazamiento
Seleco6n de
unidad de
peso para
descongelar 2
Selecoi6n der l
5
mode de
demostraci6 n 2
NOMERO CONDtC_0N
Sonido
1
Activado
2
i
I Activado
2 Reloj
1 Baja
Sonido
Desactivado
Reto i
Desactivado
velocidad
Velocidad
2 normal
3 A_ta vetoeidad
1 Ubras
Kibgramos
Demo
Activada
Demo
Desaat}vada
40-
Page 41

(Z' 3,
Marque el tiempo deseado
para la cocci6n.
2,TouqeUSERCHOICE.
4 3. Touqe el nOmero4.
4, Toque el nt3mero 2.
PALOMITAS DE MAfZ (POPCORN)
Las palomitas de maiz le permiten reventar bols_s se
palomitas de maiz de 1.75, 3,0 y 3.5 onzas
espeeialmente empacadas para hornos de
mJcroondas. Revien_e s6_o un paquete cada vez. Si
estA usando un "popper' de palomitas de maiz en
micmondas, siga [as instrucciones del fabricante, Para
ajustar correctamente su homo de microondas, siga
este ouadro:
[ Tamaf_o de labotsa t 1
[ ToqueNOMERO I 1 2 t 3
[" Ejempio;Para preparar unabo{sa de 3 onzas
- onzas ! .75 3.0 3.5
START 4.
Toque START.
N finatizar el tiempo de ta
preparaci6n, usted escuchar_t
tres tono_ de alerta y la
palabra "END" (FIN)
apareeer9 en la pantatita.
COCItNAR A N_VELES MAS BAJOS DE
POTENCIA
Cocinar a atta poteneia no siempre te d_ tos mejores
resultados con _osafmentos que necesitan una
eocci6n lenta como, pot ejemplo, carnes para asado,
atimentos homeados o nallas. Su homo tieee 9
niveies de potencia, ademas det nivei "HIGH" de alta
potencia,
1, Toque STOP/CLEAR.
T|ME
2. Toque T_ME (TIEMPO),
1. Toque STOP!CLEAR.
POPCY3RN
2. Toque POPCORN.
3. Toque etn0mero 2.
AI finatizar el tempo de la
preparacion, usted escuchara
tres tonos de alerta y ta
palabra "END'_(FIN)
ap_recer& en ta pantallta,
COCINAR A ALTA POTENCIA
1,Toque STOP/CLEAR,
2. Toque TIME.
i7j I_ i_'_ 3, Marque e! tiempo deseado
Dara la cocci6n.
POWER
START & Toque START.
4, Toque POWER.
5. Marque la potencia a la cual
quiere cocinar.
AI finatzar el tiempo de la
preparaci6n, usted escuchar_
tres tonos de aIerta y la
palabra 'END" (FIN)
apareeerA en la pantalIita.
-41 -
Page 42

GUIA DE COCC!ON PARA "LOWER POWER LEVELS °'
Los nueve niveies de potencia ademAs del nivel
"HIGH" (ALTA POTENCIA) te permiten etegir el meier
nivel de potencia para ]a comida que desee cocinar, A
continuaci6n presentamos una tista de tos niveles de
POWER LEVEL MICROWAVE OUTPUT USE
10 100% 11UHervir agua
"HIGH" 11UCocinar came molida
(ALTA) liu Hacer caramelo
9 90% I1U Recaientar r_pidamente rebanadas de came
8 80% 1]UTodo ripe de recabntamiento
potencia con ejemplos de los a_imentos que se
cocinan meier a cada nivel y la cantidad de potenci_
de microondas que esta usando.
llU Cocinar frutas y vegeta!es frescos
'ilU Cocinar pescado y ayes de corra_
I]U Precatentar la bandeja para dorar
liU Sofreir cebo/_as, apio y pimientos verde&
I_UCocinar huevos revuettos
7 70%
6
5
4
f 40%
60%
50%
30%
20%
10%
I]U Cocinar rapidamente panes y cereates
IUCocinar pintos con queso, came de ternera
llU Cocinar pasteles, panecillos, gaIletas, tortas
I]U Cocinar pastas
llU Cocinar carnes, ayes enteras.
IIU Cocinar natiltas
11UCocinar polio o pave entero, costillas, came de asado,
soiomillo
lIU Cocinar piezas menoe blandas de came
1]U Recatentar atimentos congeiades de preparaci6n
r_pida
1IUDescongelar came, ayes y marisoos
1]UCocinar pequeSas cantidades de comida
IJUTerminar de cocJnarcazuelas, guises y atgunas sabae
IJU Ablandar mantequiIta y queso crema
IIU Calentar pequeSas cantidades de comida
_U Ablandar helados
11uHaeer crecer ia mesa de tevadura
!lU Tiempo de repose
42
Page 43

COClNAR CON MAS DE UN CICLO DE
COCOlON
Para obtener fos mejores resuttados, algunas reoetas
requiere_ un Nivel de Potencia durante un cierto
periodo de tiempo y otro Nivel de Potencia dur_nte
otto periodo. Su homo de microondas puede ajustarse
para que se pase automatioamente de un nive/a otto
pa_'a3 c_cios come maximo.
PATATAS(POTATO)
El control "POTATO" (PATATA) le permite cocir_ar
patatas con los tiempos y lab potencias preajustadas,
Usted puede elegir entre 1 a 4 patata&
NOTA:
,,Los tiempos de cocci6n se basan en una patata
promedio de 8 onzas de peso,
Antes de hornear_as, pinche lab pat_as con un
tenedor varias veces.
Despu_e de ho[neadas, d_je(as _eposa.r du{'_nte 5
minutes envue_tas en pepe_ atuminio,
1.Toque STOPICLEAR,
TI_E !
j_
2. Toque TII_IE.
3. Marque eltiempo deseado de
cocci6n.
TIldE
POWER
4. Toque TIME
5. Marque et tiempo deseado de
cocci6n.
6. Toque POWER.
7. Marque tapotencia a la cua/
quiere cocinar.
START
8. Toque START.
Ai finaiizar et tiempo de la
preparacJ6n, usted escL_chara
tree tones de aterta y la
patabra "END" (FIN)
TOCINO (BACON)
Et controt "BACON" (TOCtNO) le permite eocinar de 2
a 6 rebaRadas de too{no. Para obtener _os mejo[es
resultados coloque et tocino sobre urea toallita de
papel. ClJbratas con soffura con otra toattita de papel
para impedia sa}picaduras.
Ejempi0: Para co,ci_tar 3 rebanadas de t0,cino
E_mp]e: Para cec_na_" 2 pata_as
1. Toque STOP/CLEAR.
r,OI"ATO 2. Toque POTATO(PATATA),
3. Toque et n_mepo 2.
AI finalizar e! liempo de la
preparaci6n, ueted eseuchar_
tres tones de alerta y la
palabra "E_'4D'_(FIN)
aparecera en la pantaNita.
BEBIDAS (BEVERAGE)
Ei control "BEVERAGE" (BEBIDA) te permite calentar
hasta 7 bebidas.
NOTA:
"Los tiempos de ealentamiento se basan en Unataza
de 8 onzas.
La bebld_ calentada con la c_raoterietica
"BEVERAGE" puede estar sumamente caliente.
Saque el envase con ouidado.
, La bebida puede estar muy caliente, s&quela det
homo con cuidado.
1. Toque STOP/CLEAR.
1.Toque STOP/CLEAR,
2. Toque BACON (TOClNO),
3
3, ToqUe nOmero 3.
AI finatizar et tiempo de ia
preparaci6n, usted escuchar_
tres tones de aterta y ta
palabra "END" (FIN)
aparecer_ en fa pantalfita.
BEVERAGE ;
2, Toque BEVERAGE.
3, Toque nLimero 1,
AI finalizar el tiempo de la
preparaci6n usted escucharg,
tres tones de ateR_ y la
palabra "END _'(F_N)
aparecer_t en la pantaflit&
- 43 -
Page 44

RECALENTAR AUTOt'_AT CAMENTE (AUTO REHEAT}
• +
El control AUTO COOK (COCC ON AUTOMAT CA) bnnda cuatro categor[as preajustadas para recalentar,
4. Marca la cantidad/porciones.
1.Toque STOP/CLEAR,
NOmero de
t?l?+ .....
Pizza 1- 3 rebanadas
REHEAT
GUJA DE COCCl6N PARA "AUTO REHEAT" (RECALENTAR AUTOMATICAMENTE
2, Toque AUTO REHEAT,
3, Eiija una eategoria de comida,
+a
I Categoda
i tecla nOmero
Toque
BolifloiMoJlete 4
Sopa / 1o4 tazas
Salsa
Cazuela 1-4 tazas
Bolilio /
Mollete
1- 4 porciones
AI finalizar el tiempo de la
preparaci6n, usted escuchara
tres tones de aJe_tay ta
palabra %ND" (FIN) aparecer_t
en tapantalfita.
C0DIGO CATEGORJA
1
2
PIZZA
(RefHgerada)
SOPA/SALSA
CAZUELA
I ...........
+ 4
BOLILLOi
MOLLETE
CANTIDAD DE PORCION T
I rebanada (5 oz-,)
2 rebanadas (10 oz,)
3 rebanadas (15 oz,)
1 taza
2 tazas
3 tazas
4 tazas
1 taza
2 tazas
3 tazas
4 tazas
1 por_i6n (2 oz.)
2 porciones (4oz.)
3 porciones (6 oz.)
INSTRUCC!ONES
Col6quela en un plato bajo y una
teal]ira de papet
Sin cubierta.
Co+6quelaen una cacerola de pete
rondo especial para microondas,
C_brata con una pal cula d+ plast co,
Cei6queioen un taz6n o caoerola
especial para microondas.
Cubra]a con una pellcula de plastico,
/ #& -
Coi6que/os sobre de papet,
Sin cubierta.
4 porc_or_es(8oz.}
- 44 +
Page 45

COCCION AUTOMATICA (AUTO COOK)
El controt AUTO COOK (COCC_0N AUTOM._,TICA) brinda cuatro categor{as preajustadas pare cocinar,
4, Marque Is csntidadtporctones
1 Toque STOP/CLEAR, I
2. Toque AUTO COOK.
3, Elija una categoria de comida, i
GUiA DE COCCION
CODIGO
CATEGORJA
VEGETALES
FRESCOS
VEGETALES
CONGELADOS
Categoda NOmero de
Vegetates 1 - 4 tazas
frescos
Categoda n_mero
frescos 1
cor_gelados 2
Toque tecla
Vegetales t - 4 razes
congelados
Arroz 1 - 2 razes
Cazuela 1 - 4 razes
AI finatizar el tiempo de la
preparaci6n, ueted escuchar_
Arroz 3
Cazueta 4
tres tones de aierta y la
patabra "END" (FIN) aparecer_
en la pantaltita.
PARA "AUTO COOK" (COCCION AUTOMATICA)
CANT/DAD
1 taza de vegetafes y 2
cucharadas de agua
2 tazas de vegetales y I/4 de
taza de agua
3 tazas de vegetates y 1/3 de
taza de agua
4 tazas d_evege_]es y 1/2raze
de ague
i taza
2tazas
3 tazas
Col6queios en un taz6n o cacerola para
microondas, Aiia#a ta cantidad necesaria
de ague. C4bralos con una peficuta de
pJ4stico.
D,_jetos _eposar durante 5 minutos.
Col6que_os en un taz6n o eace_'olapare
mioroondas. Ct_bralos con una pelicuta de
ptastico.
D_jetos reposar durante 5 minutes.
INSTRUCCIONES
razes
4 tazas
1 taza de arroz de granos largos
3
4
J
L
!
ARROZ
CAZUELA
y 21;4tazas de agua
2 razes de arroz de granos largos
y 41_4razes de ague
t taza
2 tazas
3 razes
En una sacerola grande, combine ague,
arroz, margarine y saL C6bralo. Despu_s
de coeinar, d,_jetereposar cubier_o durante
5 minutoe.
Cobqueta en un taz6n o cacerola especial
para microondas, C0brala con una pellcuia
de plAstico.
4tazas
45 -
Page 46

AUTO DEFROST (DESCONGELACI6N
AUTOMATJCA)
Su homo de rnicroondas viene pt.eajustado con tree
secuencias de descongetaci6m El m_todo de
DescongeJaci6n AutomAtica _Auto Defrost) es ta mejor
manera de decongela alimentos coagelados. En Ia
Tabla de Secuencias de Descongetaci6n Au_omauca
se nd_can _asnorrnas b;_sicas para usra los ires
secuenclas de desconge_aci6n, El recetario ae ooclna
e md_cat.a la secuencla recomendaaa essecifica de
descongetaci6n para eJal4memo sue us[ee aesea
desconge_a{
1. Tooue STOP_CLEAR.
_UTO
DEFROST
START
START
Table pars la coRversJon de pesos
Probablemente usted est_ acostumbrado a manejar
los pesos de Jos alimentos en libras y oozes ;ps que
son ft.acciones de una hbra {por ejempto: 4 onzas es
igual a un caarto de Iibra),
2. Tooue AUTO DEFROST.
3. Ellis una categoria de a!it_qento,
! Categoria TOnqUme;eroCJaI
Came 1
Ave de corral 2
Pescado 3
4. Marque et peso,
5, Marque el peso_
6. Una vez que ha transcurddo la
tercera parts del tiempo de cocci6n.
En la pantalta aparecerA un
mensaje pJdi@ndole que _ed@vuejta
ala comida, Abra ta puerto del
homo, d_,te vueth.qala comida y
cubra con pepsi aluminio los _rtes
catiet_tes,
7. Ciert.e Ia puerta y reinicie ta
cocci6n.
8. Una vez que hayan transcurrido
dos terceras partes del tiempo de
cocci6n: En Japan_aliita aparecer4
un mensaje pidi_ndote que te d_
vue_ta ala eomida Repita los
pesos 6 y 7_
NQTA: Si usted no abre la puerto en
tree segundos, se reanudat.A la cuenta
regresiva que apat.ece er_ la pantaliit_
Sin embargo, para marcar el peso de los alimerltos en
AUTO DEFROST (DESCONGELACION
AUTOM,_,TtCA} usted debe especificat, fibres y
d_cimas de libra, Si el peso indicado en el paquete se
express en fracciones de libra, puede usar el
siguiente cuadro pars convertir el peso en decimeies.
PESOEQULVALEmrENUMERODESPUESDEL
EN ONZAS DE..C_oMA_ ............................PUN TO ............................
SUGERENCIAS PARA EL PROCESS DE
DESCONGELACION
Cuando use AUTO DEFROST (DESCONGELACI©N
AUTOM_,TICA) el peso a marcar es et peso nets (es
deoir, el peso de/aiJmento manes et peso de_
envase) en libras y decims.s de libra,
Use AUTO DEFROST pars aJimentos crudos. AUTO
DEFROST te da los mejores resultados cuando st
at[mento a descongelar est_ aun minimo de 0°F
(sacado directamente de un congefador "verdadero").
Si el aJimento ha sido almacenado en un
refrigerador-congelador que no mantenga una
temperature de 0_F o menos programe siempre un
menor peso {de tal me.nero que el tiempo de
descongelaci6n sea mae cotto) pars impedir la
cocci6n del alimento durante Is descongeiaci6n,
Si e{ alimento he. es_ado faera del congelador
durante haste 20 minutes, marque un peso m&s bajo.
La forms del paquete aRera el tiempo de
descangelaci6n, Los paqaetes rectanguJeres de poco
espesor se descongelan m_ts r_.pidamente que los
bioques gruesos,
Separe los pieza_ cuendo comiencen a
desconge_arse. Los piezas separadas se
descongelan m&e facitmente,
• Usted puede use.r pequeBos trozos de p_pe_ aluminio
pars cubdr alimeotos como elites de polto puntas de
pa['as y colas de pescado, pero recuerde que e!
pepsi eluminio no debe tocat. Joslados del horno_ El
paps{ aiuminio puede daSar et revestimiento del
homo,
®Si comienzan a ponerse catientes, cubra esas areas
de los alimentos con pedazos pequefios de papel
aluminio.
Pars ob_ener los mejores resultados_ se incfuye un
tiempo preajustado de descongelacion eo e{ tiempo
de descongeiack_n.
46 -
16
3,2
4,0
4,8
6.4
8.0
9,6
11,2
12.0
12.8
t4.4
16.0
.10
.20
.25 Un cuarto de libra
,3O
40
.50 Media libra
.90'80'75'70'60Tree cua_tos de t{bra
Uns bra /
d
Page 47

CUADRO DE DESCONGELACKAN AUTOMATICA
AiUSteS para |a came
ALIMENTO AJUSTE
RES
AL SONAR EL TONe INSTRUCCIONES ESPECgALES
La came de forma ir_egulary los trozos grandes y
grasos de sarn¢ deben tener las Areasestrechas
o grasas cubiertas con papel aJuminio at principio
de una secuencia de descongelaci6n.
Came MEAT
molida (CARNE)
(a granel)
Came MEAT
molida (CARNE)
(hamburguesa}
Bistec de MEAT
rueda (CARNE)
Biftec de MEAT
sofomo (CARNE)
Came de MEAT
guisado (CARNE)
Came para MEAT
estofar, (CARNE)
biftec de
Iomo
Remueva [as partes
descongeladas con un
tenedor, D_le vuelta_
Vueiva a poner e!
rests en el homo.
Separe y coloquela de
otro modo,
D_le vuetta, Cub_*alas
Areas calientes con
paps a uminio,
D6te vuelta. Cubra las
Areas cafientes con
] papel atuminio.
i
Saque las porciones
descongeladas con
tenedor. Separe el
rests. Vaelva a poner
el rests en el homo.
D_te vuett_ Cubra las
Areas oalientes con
papet aluminio.
No descongete menos do 1/4 de libra.
Congele on forma de rosca
No descongele hamburguesas de menss de 2
onzas, Oprima el centre cuando tas congele.
Coldqueto enuna parfilla de asado en
m[croondas.
Coi6queio enuna parri_a de asade en
microondas.
Col6queta en una parrNa de asado en
microondas.
Coloquela enuna parri_/a de asado en
microondas.
Came de MEAT
resjunto a (CARNE)
]as costil}as
(rib roast)
MEAT
cuadril en (CARNE)
rueda
C;ORDERO
En cubes MEAT
para guisar (CARNE)
Chuletas
(1 pulgada MEAT
_s espesor) (CARNE)
D61evuelta. Cubra tas
Areas calientes con
papel aluminio.
D_ie vuelta, Cubra las
Areas calientes con
papei alumiaio.
Saque Laspartes
descongetadas Con tenedor,
Vuefva a porter el rests en el
horns,
Separe y coloque tas piezas
de otto mode.
- 47 °
Coldquela enuna parril}ade asado en
microondas.
CoI6quelo on una parril_ade asado en
microondas.
Coldque_oen un plato de hornear para
rnicroondas.
Coldquelas er_una parrilla do asado en
microondas.
Page 48

ALIMENTO
CEFtDO
AJUSTE ! AL SONAR EL TONO
INSTRUCCIONES £SPECIALES
Chuletas
_media (CARNE)
uigada de
espesor_
Hot Dogs MEAT
(CARNE)
Costiltitas MEAT
esti]o CARNE)
Country
Salchichas, MEAT
chorizos (CARNE)
Salchichas, MEAT
a granel (CARNE)
Came de Iomo MEAT
deshuesada (CARNE)
Ajustes para el polio
SepAre{as y coloque taspiezas
de otro modo.
Sep_relas y coloque las
piezas de otto modo,
DAles vue{ta, Cubra _asAre_
calientes con papet aluminio,
Separe!as y cotaque !as
piezas de otto modo.
Saque las partes
descongeladas con tenedor,
D_les vue_ta,Vuetva a poner
et resto en el homo,
D_le vuelta Cubra ias Areas
calientes con papel aluminio,
CotAquelas en una parri!la de asado en
microondas.
CoI6quetas en una par_illa de asado en
microondas
Co_Aquelas en una parri!ia de asado en
microondas.
ColAquelas en una plato para homear en
microondas,
ColAque_asen una plato para homear en
microondas.
CotAque_aen una parritla de asado en
nlicroondas,
[ AUMENTO AJUSTE
POLLO
Entero POULTRY
(menos de (AYES)
!4 i[bras)
Cortado en
_iezas
GALUNAS
CORNISH
(Entera) POULTRY
(AVES)
PAVO POULTRY
Pechuga
(menos de AVES) J
6 itbras)
AL SONAR EL TONO _NSTRUCCIONES ESPECIALES
DA_e vuelta, Termine
descongelando con el lado de
la pechuga hacia abajo,
Cubra las Areas calientes con
pape_ aluminio,
Coloque e_poIIo con et lado de la pechuga hacia
arriba en una parrilla _e asado en micmondas.
Ten'nine la descongelaciAn sumergiendo el polio
en agua fi'ia.
Saque los menudifios cuando el polio este
parcia_mente descongelado.
D_le vuelta. Cubra las Areas
oa}iente con papel atuminio.
Separe las piezas y
col6quetas de otto modo,
DA_e vuelta. Cubra las
Areas caiientes con
papel aluminio,
D_te vuelta. Cubra ias
&teas calientes con
papet aluminio,
}
Co_Aquelo en Lma parrilta de asado en
micmondas,
Termine la desconge]acidn sumergiendo las
>iezas en agua frfa.
CoiAquela en una parrit_a de asado en
microondas. Termine la descongelaciAn
sumergiendo en agua fr[a.
ColAqueio en una pardtla de asado en
microondas. Termine ta descongelaciAn
sumer#ie_do en agua fria,
- 48-
Page 49

Ajustes para eRpescado
AUMENT_
PESCADO
Fi}etes FISH
(PESCADO}
AL SONAR EL TONO
D61esvuelta, Separe
los fitetes cuando
eaten parciatmente
descongetados, de set
3osibte.
INSTRUCCION!ES ESPEC|ALES
Col6quelos en uaa bandeia para homear en
microendas. Separe cuidadosamente los filetes
bajo et agua frfa.
Rodajas
Entero
FISH
(PESCADO)
I
FISH
Sep&relas y col6quetas de
otro modo,
Dale vuelta.
I(PESCADQ
I
]
MOLUSCOS FISH
Came de
Sep_u"ela y d6le vueita,
cangrejo t(PESCADO)
Colas de
langosta
Camarones
FISH
FISH
Dele vue_tay coI6quela de
otto modo.
Separelos y coIdquelos de
otto modo.
; Ostiones
F_SH
Sep_.relos y ce!6quelos de
otto mode.
COCINAR CON LA SONDA DE
TEMPERATURA
La sonda de temperatura ayuda a e_iminar ta
necesidad deadivinar latemperatut'a a{cecinar
asadoe y cazuelas grandes. La sonda est& disefiada
para apagar el homo a tatempe_'atura que usted elija
(entre 90 - 19g_F),
ENCHUFE
,_REA SENSIBLE
SONDA DE
TEMPERATURA
(Inserte a_manes 1/3 de la I
, Sonda de Temperatura en la
comida,) I
!
SENSOR DELA SONDA
DETEMPERATURA
Col6quetas en una bandeia para homear en
microondas. P#_seIaspot agua fria para terminar
tadescongelaci6n,
Col6quelo en una bandeja para hornear en
microondas. Cubra la cabeza y la cola con papal
alum n o No permita que el papel aluminio toque
los lados del homo. Termine la descongelaci6n
sumergiendoto en agua fr[a,
Coi6queIa en una bandeja para homear en
microondas.
Col6quelas en una bandeja para homear en
micreondas.
Col6quelos en una bandeia para hornear en
microondas.
Col6quetos en u_a bandeia para homear en
microondas.
2_ Coloque ta comida en el homo y
enehufe la eonda en ta toma en
[a pared det homo,
3, Cierre la puerta.
4. Toque STOP/CLEAR,
i " 5.
TEMP
START
Toque TEMP.
Marque Ia temperatura deeeada
para la comida,
7. Toque START.
AI finalizar eltiempo de ta
preparaci6n, usted escuchara.
tres tonos de aterta y ta palabra
"END" (FIN) apa_'ecer_ten _a
pantaIlita
NOTA: La plataforma giratoria est,. apagada
cuando usted usa la aonda de ternperatura.
- 49
Page 50

Sugerenc_a8 pare cocina_ con masond_ de
ter,_peratura:
Revuelva sopas_ cazueias y bebidas antes de
servifles
Cubra la came con papal a/uminio despu_s de
coeinar y dejela reposar unos cuantos minutes,
Saque e_papet a_uminio si decide cocinarla per m&e
tiempo.
Pare cazuelas, la punta de la sonde debe ester en el
centre de la comida, Revuetva Ia comida cuando le
reeomienden hacerlo. Vueiva a coloear la sonde.
UNOS CUANTOS "NO"
No perrni_ que ta sonde e et cable de la senna
toquealgut'_epartedelinteriordelhome.
•No permita que lesonde toque elpapel al_minio
(si se usa papel aluminio)_ Usted puede mantener e!
papel aluminio alejado de la sonde fijandoto con
mondadientes o palillos de madera. Saque et papal
atuminio eise forman arcos de chispas.
• No use papel, pet[cula pi_.stica o envases pl_.sticos.
Estaran en el homo demasiedo tiempo y podrian
deformarse,
oNo introduzca a _a:fuerza ta sonde en los alimentos
eongetados.
oNo use la sonda para alimentos que precisen hervir
a fuego lento.
oNo enehufe el extreme puntiagudo de ia Sonde de
Temperature en la toma del horno,
Come sacar y lirnpiar la Sonde de Temperature:
1. Una vez que haya apagado et homo, desenchufe la
Sonde de Temperature usando un guante pare
home o paiio pare asir ces_ ca!ientes.
2. Limpie la sonde frotandoia con una esponja con
jaben y sequela a rondo. Use una esponja plastica
de fregar pare remover _ostestes de comida
adheridos aia sonde.
• Pare _iquidos, fije lesonde con una eucbare o
esp_ttu_a de madera de tat mode q_e la punta de la
sonde quede en el centre del liq_ido,
,, Pare asades, ia puata de la sonda debe iren el
centre de_ mL_sculo m_s grande, pare sin tocar partes
grasas o huesos,
o Los cazuelas que se cocinen usando la Sonde de
Temperat_[a deben consistir en a_imentos
precocidos. No use ca_'nes crudas, vegetales
etudes y satsas tipo crema en cazuelas.
.Las cazuelas secaa no dan buenos resu_tados,
. Descongeie los cazuelas y cornea oongetadas en el
homo de microondas antes de inserter ta sonde,
o Los mezefas de fedoras secas de came no dan
buenos resu{tados,
Compruebe la temperature de ta came de eerdo o
ayes de corral con un termemetro en 2 6 3 puntos
pare asegurar que esten heehas aI termino deseado.
- Los asados puedea verier en tamaRo, forma y
composicien. Use la Sonde de Temperatura come
una guia.
PARRILLA METALBCA DE DOS
POSIC ONES
La Parrilia Mete'lice de dos posiciones fe brinda
espacio extra cuando cocine e[_mas de un recipiente
al mismo tiempo. La parril_a metelica puede ponerse al
raves para dejar espacio papa otros recipientes de
mas altura co_ocados en et piso del homo.
NOTA:
- La pan'ilia debe ester sebre sus euetro soportes
cuan_o la use,
• lnserte la parrilla firmemente entos cuatro soportes
en los parades laterales del homo.
• Ponga le parriila al revue euando use recipientes de
mas altura cel_cades en et piso del homo.
- 50
Page 51

GUiA DE TEMPERATURAS
COMmDA$ SUGERENC|AS
Salsas para Aperltivos 130" F Revuetva antes de servir,
Bebidas 160_F
Alimentes Conge_adoe y 150_F Desconge_e comptetamente los alimentes antes de
Aiimentos Prepar_dos insertar la sonda,
Congelados
Sabras y AIimentos 150°F Descongele comp_etamente toe alimentos antes de
Entatadoe insertar la sonda.
Ptatos Principates y 150°F Cubra parciatn_ente e/plato para ace_erar fa coccion,
Cazuelas Revuelva antes de servir.
C_rnes
Came de res Media = 150°F
AJUSTE DE
TE!_._PERATU RA
Bien hecha - 170_F
La came debe estar completamente descongelada
Col6quela en la parrilla de asado del homo de microondas
en una bandeja de cristaf para hemear, Durante et tiempo
de reposo, la conducci6n de aator en et centro aumentara
la temperatura de 5 a 10_'F.
Ca[r_e de ce[do 170°F
Aves de aorta}, er_teras 185_F La came de Eves c_eaorta) comp_eta tiene muchas
variables que afectan el grado de hechura. Apiique
siempre otra prueba convencionai det grado de heehura
como_ par ejempio, hacer un col're cerca det hL_eso para
vet sila came est_ rosada,
Salsas 150°F Revuelva antes de servir.
MarJecos I60°F _I70°F La came de ayes de corral comp_eta tiene muchae
variables que afectan el grado de hechura.
} Sons 150°F - 160 _ F Si la sopa tiene ingredientes e61idos adicionales_ aumente
i ei a}uste de temperatura.
Vegetates er_!atados o 150°F - 170° F Ct_bra pareialmente el contenido para aeeterar la cocci6n.
Dieoocidos
SegQn se eepecifiquepara cada comida
*51 -
Page 52

Mode1 No.
7211,67600
721.67601
72t.67602
Themodet numberof
yourmicrowaveovenis
foundon the front face
of the cavity,
When requesting service,
atways provide the
Iottowing information:
OVEN
For in-house major brand repair service
Cali 24 hours aday, 7 days a week
1-800o4_REPAJR
(1-800-4-73-7247t
Para pedir servicio de reparaci6n a
domicilio-1-800-676-5811
For the tocaflon a
Sears Parts and Repair Center in your area
Call 24 hours a day, 7 days a week
1o800-488-1222
A
For information on purchasing a _ars
Maintenance Agreement or to inquire
about an existing Agreement
Call 9 arn-5 prn, Monday-Saturday
1-800-827--6655
• Pr_uct Type
• Model Number
, SerialNumber
=Problem Description
America's Repair Specialists
P/NO.: 3828W5A0358
03?97 Printed in Korea
Sears, Roebuck and Co., Hoffman Estates, IL 60179 U.S.A.
 Loading...