

Sears 680.88973 Owner's Manual
owner's
manual
MODELNO,
680.88973
Save This Manual For
Future Reference.
CAUTION: Read rules for safe
operation and instructions
carefu Ily.
SHAMPOOER/
POLISHER
• Assembly
• Operation
• Repair Parts
Sold by SEARS, ROEBUCK AND CO., Chicago, IL 60179 U.S.A.
IMPORTANT SAFETY INSTRUCTIONS J
This Rug shampooer/floor polisher is for household use only.
When using electrical Rug shampooer/floor polisher, basic precautions should be followed.
Including the following.
READ ALL INSTRUCTIONS BEFORE USING THIS APPLIANCE
I
I WARNING I
To reduce risk of fire,electric shock,or injury
• DO NOT USE FLAMMABLE OR COMBUSTIBLE LIQUIDS,SUCH AS GASOLINE,OR USE IN
AREAS WHERE THEY MAY BE PRESENT.
• Do not leave this appliance when plugged in.
• To reduce the risk of electric shock-Use indoors only.
• This appliance is provided with doble insulated.Use only identical replacement parts.See
instructions for servicing of double:insulated appliances.
• Do not inmerse. To reduce the risk of electric shock- Use only carpet moistened by
cleaning process.
• To reduce the risk of fire, use only commecially available floor cleaners and waxes intended
" for machine aplication.
• Unplug from outlet when not in use and before servicing.
• Do not allow to be used as a toy. Close attention is necesary when used by or near children.
, Use only as described in this manual.Use only manufacturer's recomended attachments
• Do not use with damaged cord or plug. If appliance is not working as it should, has been
dropped damaged,left outdoors or dropped into water, retum it to a service center before using.
• Do not pull or carry by cord,use cord as a hand e,close a door on cord, or pull a cord aroun_i
sharp edges or corners.Do not run appliance over cord,keep cord away from heated surfaces.
• Do not unplug by pulling on cord.To unplug,grasp the plug, not the cord
• Do not handle plug with wet hands.
• Do not put any object into openings. Do not use with any opening blocked; keep free of
dust,lint, hair,and anything that may reduce air flow.
• Keep hair, loose clothing,fingers, and all parts of body away from openings and moving parts
. Do not attach or remove brushes with electric cord plugged in.
• Turnoff before unplugging.
• Use extra care when cleaning on stairs.
• Never fill dispenser without removing it from the appliance.
• Never turn the appliance an with the handle in the upright position. Make sure handle is in
operating position.
Disassembly of this unit can be hazardous.
Do not leave the appliance turned on when it is not in motion.
SAVE THESE INSTRUCTIONS
SERVICING OF DOUBLE,INSULATED APPLIANCES
A double-insulated appliance is marked Withone or more of the _ following: The words
"'DOUBLE INSULATION" or "'DOUBLE INSULATED" or the double insulation symbol (square
within a square.)
In a double-insulated appliance,two systems of insulation are provided instead of grounding. No
grounding means is provided on a double-insulated appliance, nor should a means for grounding
be added tothe appliance. Servicing a double-insulated appliance requires extreme care and
knowledge of the system, and should be done only by qualified service personnel. Replacement.
parts for a double-insulated appliance must be identical to the parts they replace.
Polarization Intructions:
To reduce the risk of electric shock, this 3ppliance has a polarized plug (one blade is wider than the
other). This plug will fit in a polarized outlet only one way. If the plug does not fit fully in the outlet.
reverse the plug. If still does not fit, contact a qualified electrician to install the proper outlet. Do
not change the plug in any way.

owner's manual
Dear Homemaker:
You have just invested in a fine Kenmore Rug Shampooer-Floor Polisher.
Before using your new Kenmore machine, please pause for a moment and
carefully read this booklet which contains instructions on how to operate and
care for your machine.Specific instructions are given on rug shampooing,
scrubbing,polishing,attaching and cleaning brushes,etc. This will help you
obtain the best performance and avoid unnecessary service expense for
conditions beyond our control.
FULL ONE-YEAR WARRANTY
i =
Whenusedforprivatehouseholdpurposes,ifwithinoneyearfromthe dateof
purchese,thisShampooedPolisherfailsdueto defectsinmaterialor
workntanship,RETURNITTOTHENEARESTSEARSSERVICECENTER
INTHEUNITEDSTATES,andSearswillrepairit,freeofcharge.
Thiswarrantygivesyouspecificlegalrights,andyoumayalsohaveother
rightswhichvaryfromstatetostate.
Sears,RoebuckandCo.,Dept.698/731A,SearsTower,Chicago,lL.60684
f
WHERE TO FIND IT PAGE
Warranty..................................................................................................... 3
Assembly................................................................................................... 4
Dispenser................................................................................................... 5
Operation................................................................................................... 6-7
Parts Ust..................................................................................................... 6-11
Accessories,Service ..................................................................................... 12
\
DO NOT PLUG IN ELECTRIC CORD UNTIL
BRUSHES OR OTHER ACCESORIES HAVE
BEEN ATTACHED AND SWITCH HAS BEEN
PLACED IN THE "OFF"POSITIQN.
HANDLE,
SWITCH BOX AND CORD
.
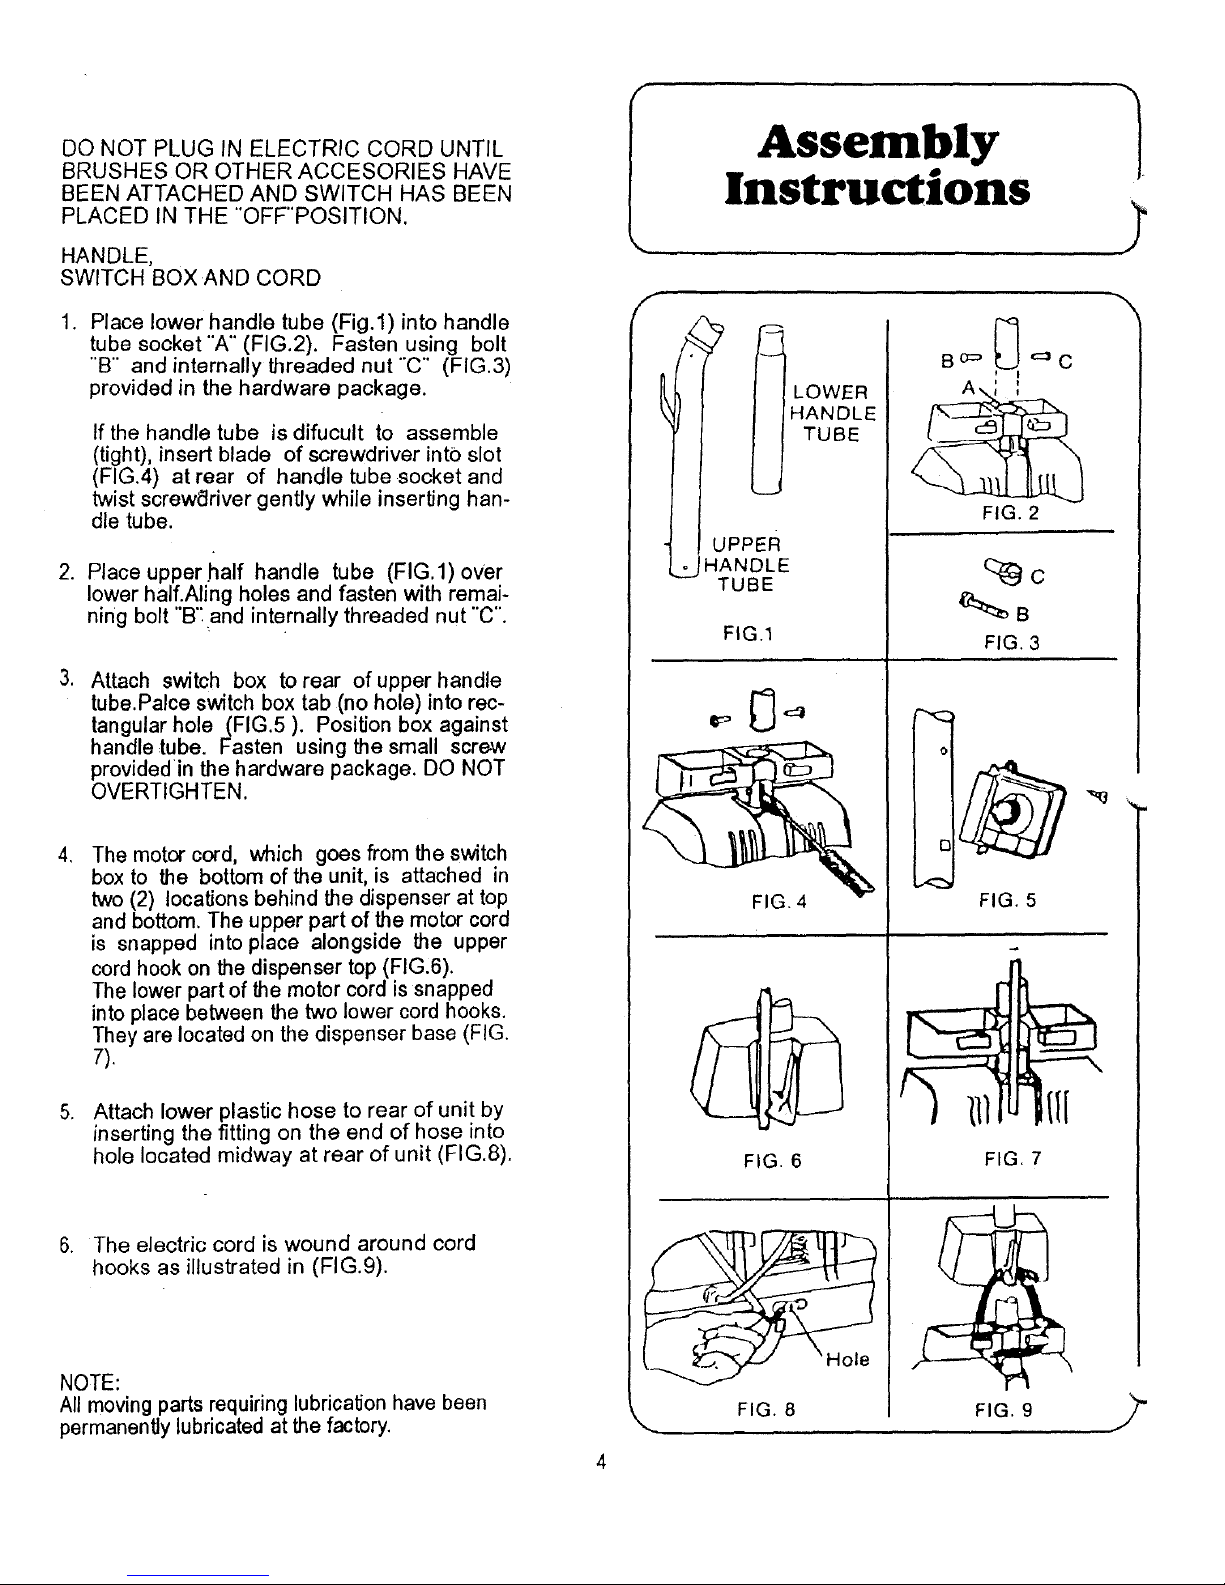
Place lower handle tube (Fig.l)into handle
tube socket"A" (FIG.2). Fasten using bolt
"'B" and internally threaded nut "C" (FIG.3)
provided in the hardware package.
If the handle tube is difucult to assemble
(tight), insert blade of screwdriver into slot
(FIG.4) at rear of handle tube socket and
twist screwdriver gently while inserting han-
dle tube.
2. Place upperhalf handle tube (FIG.l) over
lower half.Aling holes and fasten with remai-
ning bolt "B': and internally threaded nut "'C".
Attach switch box to rear of upper handle
tube.Palce switch box tab (no hole) into rec-
tangular hole (FIG.5). Position box against
handle tube. Fasten using the small screw
provided in the hardware package. DO NOT
OVERTIGHTEN.
,
.
The motor cord, which goes from the switch
box to the bottom of the unit, is attached in
two (2) locations behind the dispenser at top
and bottom. The upper part of the motor cord
is snapped into place alongside the upper
cord hook on the dispenser top (FIG:6).
The lower part of the motor cord is snapped
into place between the two lower cord hooks.
They are located on the dispenser base (FIG.
7).
Attach lower plastic hose to rear of unit by
inserting the fitting on the end of hose into
hole located midway at rear of unit (FIG.8).
6. The electric cord is wound around cord
hooks as illustrated in (FIG.9).
NOTE:
All moving parts requiring lubrication have been
permanently lubricated at the factory.
Assembly
Instructions
TUBE
UPPER
_2JHANDLE
TUBE
FIG.1
FIG. 4
FIG. 6
FIG. 8
B o=" ,_ '=_ C
FIG. 2
FIG. 3
r'-,<
o
I
i E
FIG. 5
FIG. 9
 Loading...