

Page 1
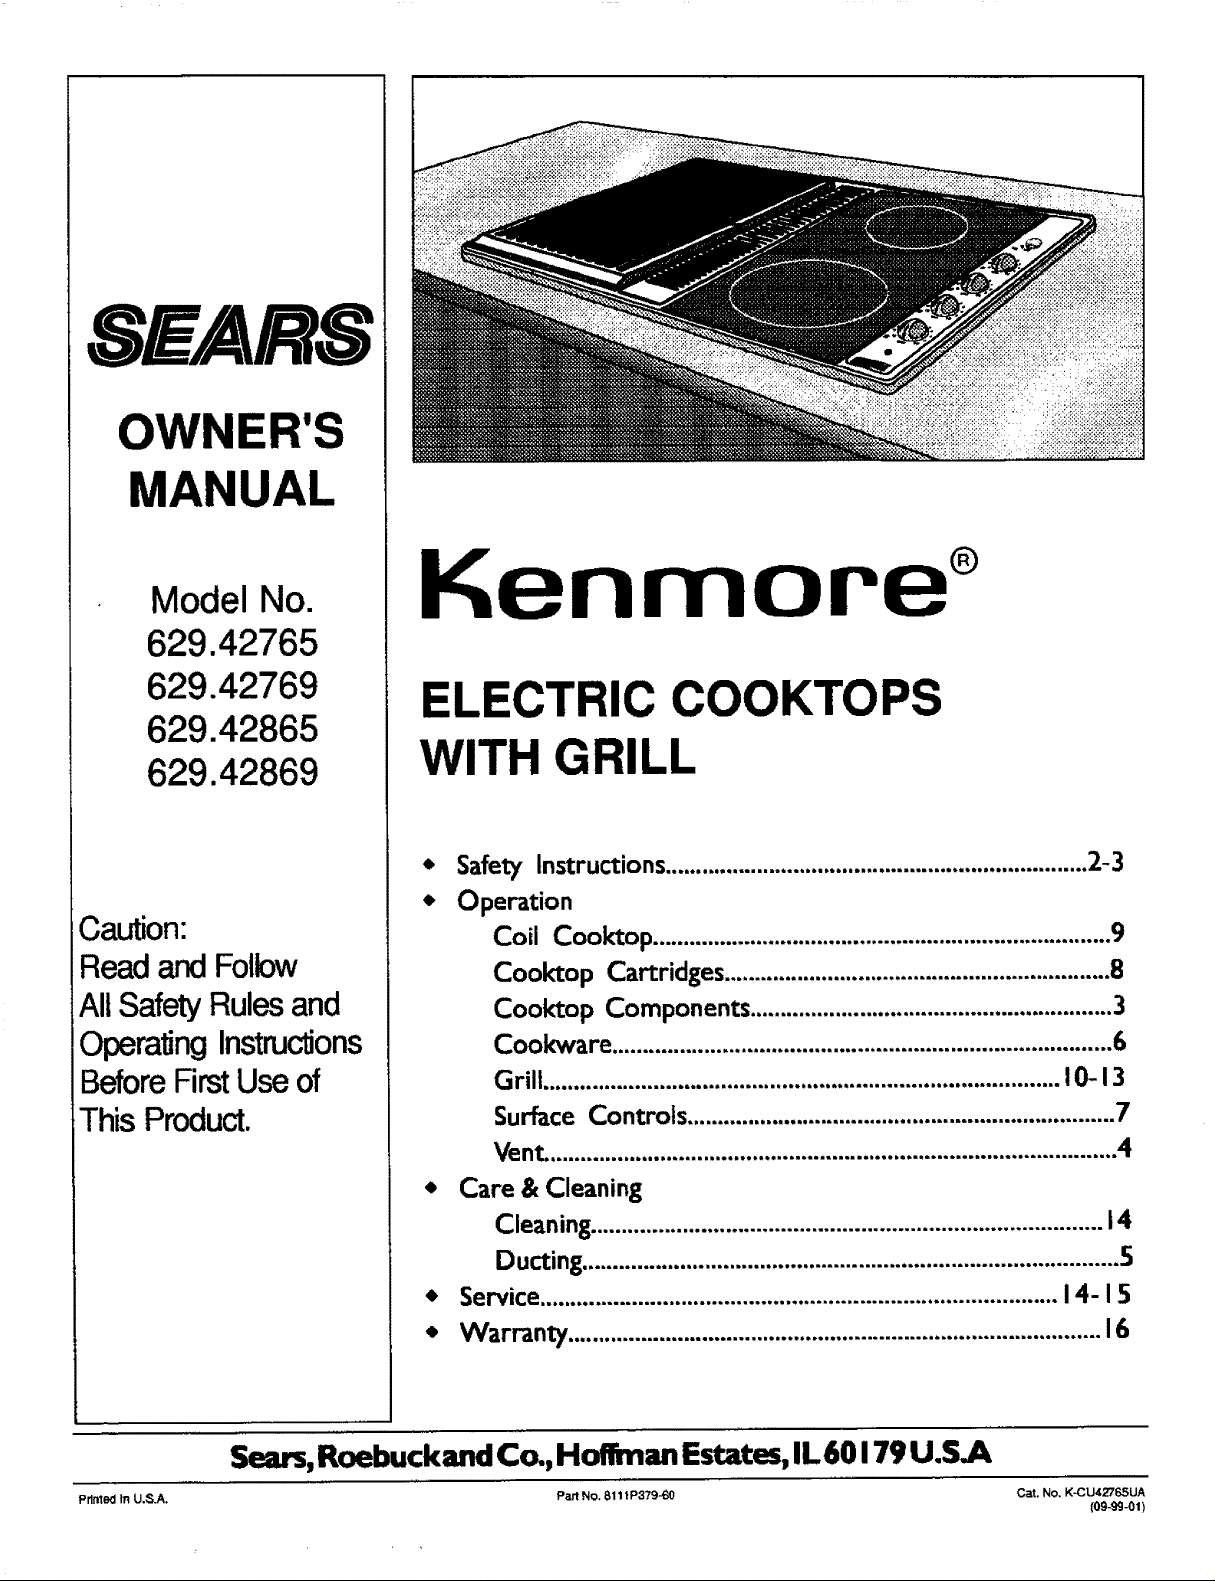
SEARS
OWNER'S
MANUAL
Model No.
629.42765
629.42769
629.42865
629.42869
Caution:
Readar_ Follow
All Safety Rulesand
OperalJngInstructions
BeforeFirstUse of
This Product.
Kenmore
ELECTRIC COOKTOPS
WITH GRILL
* Safety Instructions .....................................................................2-3
Operation
Coil Cookl:op ...........................................................................9
Cooktop Cartridges ...............................................................8
Cooktop Components ...........................................................3
Cool(ware ................................................................................. 6
Grill.................................................................................... I0-13
Surface Controls ......................................................................7
Vent.............................................................................................4
* Care & Cleaning
Cleaning................................................................................... 14
Ducting....................................................................................... 5
Service.................................................................................... 14- I5
* Warranty ....................................................................................... 16
Sears, Roebuckand Co., Hoflman Estates, IL60179 U.S.A
Prlrrled In U.S.A. Part No. 8111P379-60 Cat, No, K-CU42765UA
(09-99-01)
Page 2
SAFETYPRECAUTIONS
Readbeforeoperalingyourcooktop
All appliances -- regardless of the manufacturer-- have the potential through improper orcareless use to create safety
problems. Therefore the following safety precautions should be observed:
1. Be sure your appliance is properly installed and
grounded by a qualified technician.
2. Never use your appliance for warming or heating
the room.
3. Children should not be left alone or unattended in
area where appliance is in use. They should never
be allowed to sit or stand on any part of the
appliance.
4. Wear proper apparel. Loose-fitting or hanging
garments should never be worn while using the
appliance.
5. Do not repair or replace any part of the appliance
unless specifically recommended in this manual.
All other servicing should be referred to an
authorized Service Contractor.
6. Flammable materials should not be stored in an
oven or near surface units.
7. Do not use water on grease fires. Smother fire or
flameoruse dry chemical or foam-type extinguisher.
8. Use only dry potholders. Moist or damp potholders
onhot surfaces may result inburns from steam. Do
not let potholder touch hot heating elements. Do
not use a towel or other bulky cloth.
9. Use properpan size. Many appliances are equipped
with one or more surface units of different size.
Select cookware having flat bottoms large enough
to cover the surface unit heating element. The use
of undersized cookware will expose a portion of
the heating element to direct contact and may
result in ignition of clothing. Proper relationship of
cookware to heating element wilt also improve
efficiency and performance.
10. Never leave surface units unattended at high heat
settings. Boil over causes smoking and greasy
spillovers that may ignite.
11. Glazed cookware -- only certain types of glass,
glass-ceramic, ceramic, earthenware orother glazed
cookpots are suitable for cooktop surface without
breaking due to the sudden change intemperature.
Use only such cookware as you know has been
approved for this purpose.
12. Cookware handles should be turned inward and
not extend over adjacent surface heating elements
to avoid bums, ignition of flammable materials and
spillage due to unintentional contact with the
cookware.
13. CAUTION -- Do not store items of interest to
children in cabinets above cooktop - children
climbing on the cooktop to reach items could be
seriously injured.
14. Do not soak orimmerse removable heating elements
in water.
15. Do not touch surface units or areas near units.
Surface units or heating elements may be hot even
though they are dark in color. Areas near surface
units may become hot enough to cause bums.
During and after use, do not touch or let clothing
or other flammable materials contact these areas
until they have had sufficient time to cool. Other
surfaces may become hot enough to cause bums -
-among these surfaces are the cooktop.
16. Clean only parts listed in this manual and use
procedures recommended.
17. Do not cook on glass-ceramic cooking surface if
the cooktop is broken. Cleaning solutions and
spillovers may penetrate the broken cooktop and
create a shock hazard. Contact an authorized
Service Contractor.
18. Clean glass-ceramic cooktops with caution. If wet
sponge or cloth is used to wipe spills on a hot
cooking area, be careful to avoid steam bums.
Some cleansers can produce noxious fumes if
applied to a hot surface.
19. Do not operate with damaged cooking element
after any product malfunction until proper repair
has been made.
20. Keep all switches "Off" when unit is not in use.
21. On conventional element cooktops make sure that
drip pans are in place. Absence of these pans
during cooking may subject wiring or components
underneath to damage.
22. Do not use aluminum foil to line surface unit drip
pans or grill basin. Installation of these liners may
result in electric shock or fire hazard.
23. This appliance has been tested for safe performance
using conventional cookware. Do not use any
devices or accessories that are not specifically
recommended in this manual. Do not use eyelid
covers for the surface units, stovetop grills, or add-
on convection systems. The use of devices or
accessories that are not expressly recommended in
this manual can create serious safety hazards,
result inperformance problems, andreduce the life
of the components of the appliance.
- SAVE THESE INSTRUCTIONS -
Page 3
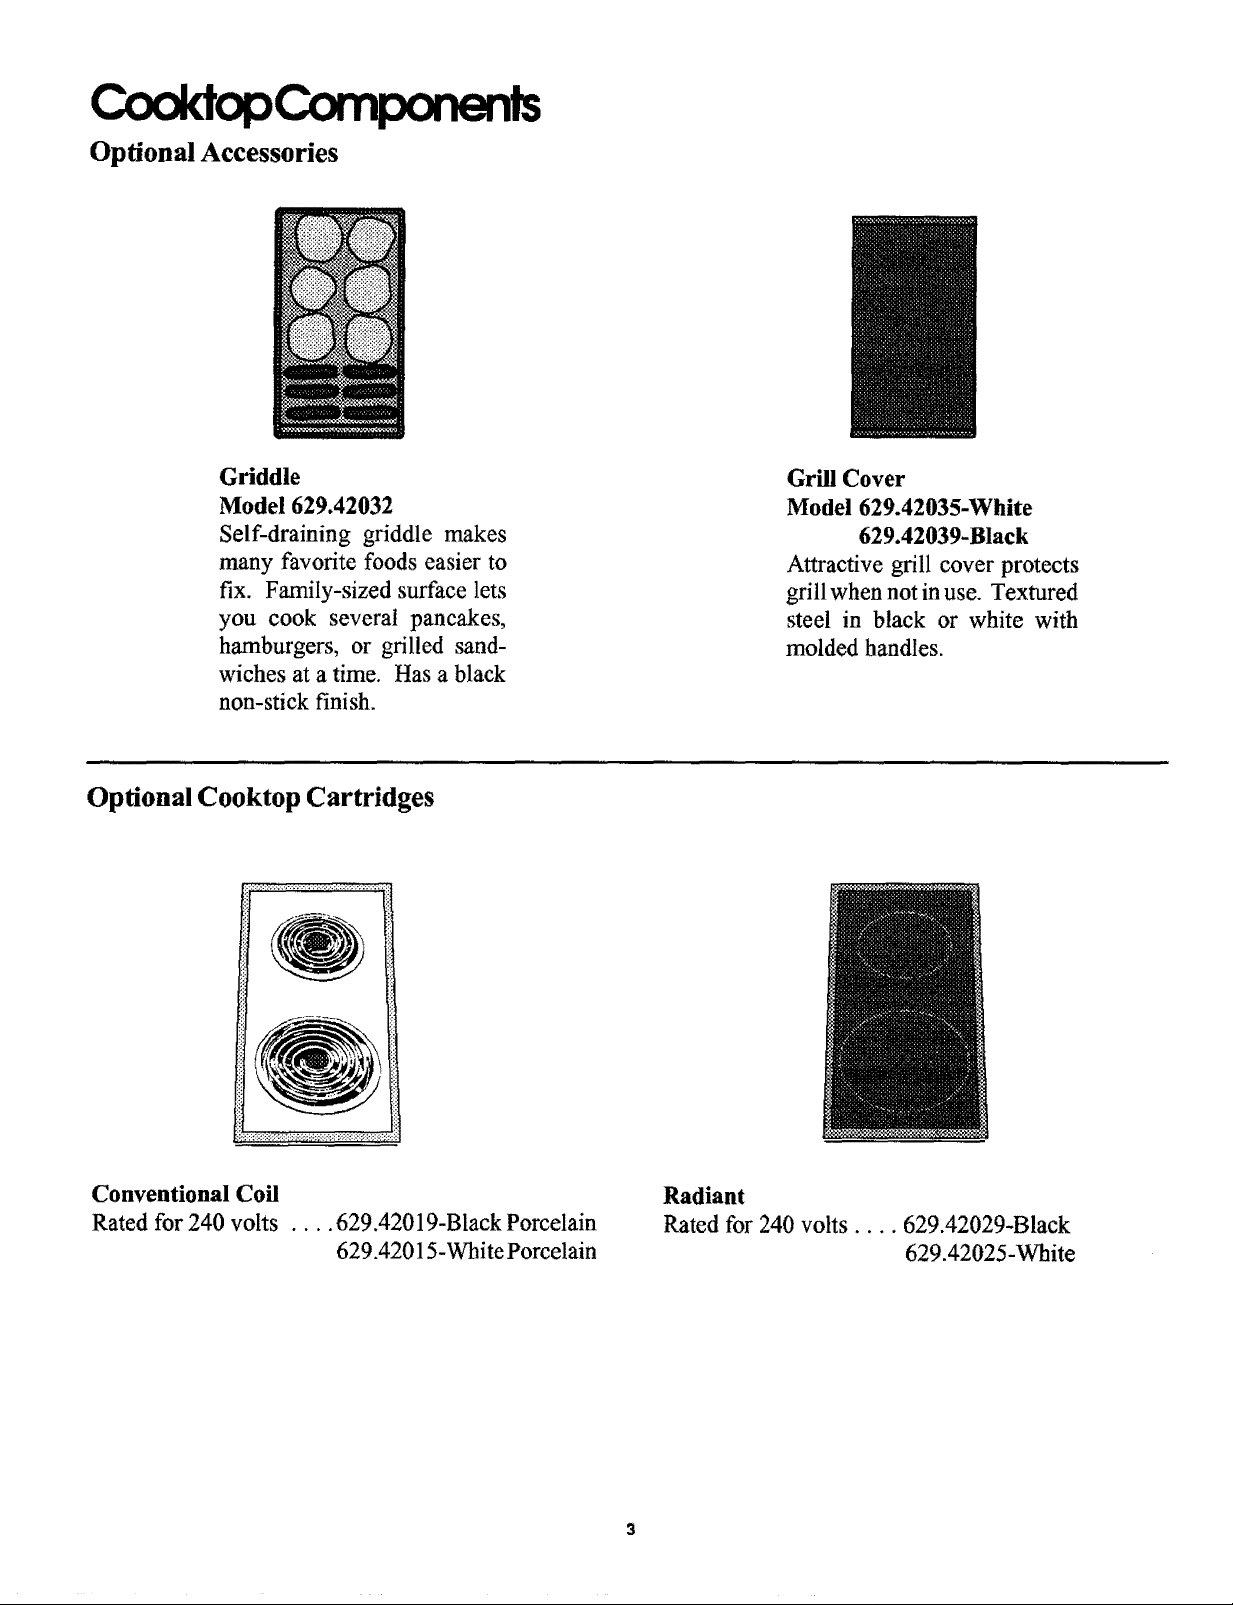
¢-.ooklooCo
Optional Accessories
Griddle
Model 629.42032
Self-draining griddle makes
many favorite foods easier to
fix. Family-sized surface lets
you cook several pancakes,
hamburgers, or grilled sand-
wiches at a time. Has a black
non-stick finish.
Optional Cooktop Cartridges
Grill Cover
Model 629.42035-White
629.42039-Black
Attractive grill cover protects
grill when not in use. Textaared
steel in black or white with
molded handles.
Conventional Coil
Rated for 240 volts .... 629.42019-Black Porcelain
629.42015-White Porcelain
Radiant
Rated for 240 volts .... 629.42029-Black
629.42025-White
Page 4

nfilationSystem
The built-in ventilation system removes cooking va-
pors, odors and smoke from foods prepared on the
cooktop, grill and grill accessories. Regular use of this
system will insure a more comfortable and less humid
kitchen which is free ofheavy cooking odors and fumes
that normally create a frequent need for cleaning and
redecorating.
Using the Ventilation System
• To operate the ventilation system manually, turn
the fan control to ON.
• The ventilation systemwill operateautomatically
when the grill element is in use,
• The fan can be used to remove strong odors from
the kitchen as when chopping onions near the fan.
• Besides using the ventilation system to remove
cooking vapors and fumes, it can be used to cool
baked pies or cakes. To cool an item, set it on the
air grille and laarnon the fan. The air being pulled
over the item will quickly cool it. Be careful not to
cover the entire air grille.
Cleaning the Ventilation System
Air Grille
The air grille lifts off easily. "Wipeclean orwash in sink
with mild household detergents. It may be cleaned in
the dishwasher.
Filter
Turn offventilation system before
removing. The filteris apermanent
type and should be cleaned when
soiled. Clean in sink with warm
water and liquid dishwashing de-
tergent or in the dishwasher.
Important: DO NOT OPERATE SYSTEM WITH-
OUT FILTER.
Filter should always be placed at an angle. As you face
the front of the cooktop, the top of the filter should rest
against the right side of the vent opening and the
bottom of the filter should rest against the left side of
the ventilation chamber near the bottom.
Ventilation Chamber
This area, which houses the filter, should be cleaned in
the event of spills or whenever it becomes coated with
a film of grease. It may be cleaned with paper towel,
damp cloth, or sponge and mild household detergent or
cleanser.
Page 5
DuclJngInformation
The ventilation system is designed to capture both
cooking fumes andsmokewhile grilling. Ifthe system
does not, these are some ducting installation situations
to check:
6" diameter round or 3 ¼" x 10" rectangular duct-
ing should be used. Note: 5" diameter round
ducting may be used if the duct length is 10' or less.
O
No more than three 90° elbows should be used.
Distance between elbows should be at least 18".
• Recommended Kenmore wall cap should be used.
Make sure damper moves freely when ventilation
system is operating.
• There should be a minimum clearance of 6" for
cooktop installed near a side wall.
If there is not an obvious improper installation, there
may be a concealed problem such as a pinched joint,
obstruction in the pipe, etc. Installation is the respon-
sibility of the installer and questions should be ad-
dressed first by the installer. The installer should very
carefully check the ducting installation instructions.
5
Page 6

Coo ,qol
To achieve optimum cooking performance, use heavy
gauge, fiat, smooth bottom cookpots that conform to
the diameter of the element (no more than one inch
overhang). Proper cookpots will minimize cooking
times, use less electrici U, cook food more evenly and
require less water or oil.
Cookpots with thin,uneven bottoms do not adequately
conduct heat from the element to the food in the
cookpots which results in hot spots, burned or under-
done food. Using bad cookpots also requires more
water, time and energy to cook food.
Selecting Proper Cookware
• Select heavy gauge cookpots. Usually heavy
gauge cookpots will not change shape when heated.
• Use cookpots with flat, smooth bottoms. The
two ways to determine if cookpots have a fiat,
smooth bottom are the ruler test and the cooking
test.
Improper Cookware
• Do not use cookware that extends more than 1inch
beyond the edge of the element.
• Do notuse a small cookpot on aIarge element. Not
only can this cause the element to require more
energy and time, but it can also result in spillovers
burning onto the element which cause extra effort
in cleaning.
• Do not use nonflat specialty items that are
oversized, uneven or do not meet proper cook-
ware specifications such as round bottom woks
with rings, griddles, tippled bottom canners, lob-
ster pots, large pressure canners, etc. Large uten-
sils, such as pressure canners or oversized skillets,
should be used only on conventional coil car-
tridgesicooktops if they do not meet this test.
• Glass-ceramic, earthenware, heat proof glass or
glazed cookpots may scratch the glass-ceramic
cooktop and therefore are not recommended.
Characteristics of Cookware Materials
Ruler Test:
1. Place the edge of ruler
across the bottom of the
pot.
2. Hold up to the light.
3. No light should be visible
under the ruler.
Cooking Test:
1. Put 1 inch of water into the cookpot.
2. Place cookpot on the element. Turn control to the
HI setting.
3. Observe the bubble formation to determine the
heat distribution. Ifthebubbles areuniformacross
the cookpot, the cookpot will perform satisfacto-
rily. If the bubbles are not uniform, the bubbles wilt
indicate the hot spots.
• Match the size of the cookpot to the size of the
element. Ideally, the cookpot will be the same size
or slightly larger.
Heavy gauge cookpots with flat, smooth bottoms will
usually work in a similar way. However, there are
some differences in the cooking performance of vari-
ous materials.
• Aluminumcookpotsheatquicklyandevenly. Best
suited for simmering, braising, boiling and frying.
• Stainlesssteelcookpotswillevenlydistributeheat
if constructed of tri-ply or combined with other
metals such as aluminum and copper. Use for
cooking functions similar to aluminum.
• Cast iron cookpots are slow to heat but cook more
evenly once temperature is reached. Use for long
term low heat cooking or for browning and frying.
• Glass-ceramic, earthenware, heat-proofglass or
glazed cookpots can be used if recommended by
the manufacturer for cookpot cooking. Do not use
with trivets. Best used on low to medium control
settings.
• Porcelain enamel-on-steel or porcelain enamel-
on-cast iron should be used according to
manufacturer's directions. Do not allow to boil
dry.
Page 7

SurfaceControls
The infinite surface controls provide flexibility in set-
ting selection when using the cooktop or grill.
To Set Controls
• Since the controls are a push-turn type, they must
be pushed down before turning. To set (from the
OFF position), push down on the control knob and
turn in either direction to desired setting.
• When the control is in any position, other than
OFF, it may be turned in any direction without
pushing down.
• A red indicator light will glow when a surface
heating element is ON.
Control Locations
1. Left rear element or grill
2. Left front element
3. Right rear element
4. Right front element or grill
' ®:1
. ®:1
Suggested Control Settings
The size and type of cookware used and the amount
and type of food being cooked will influence the setting
needed for best cooking results. Electricalvoltage may
also vary, which will affect the needed control setting.
The setting indicated should serve as a guide while you
become familiar with your cooktop.
HI
7-10
5-6
3-4
LOW-2
A fast heat to start cooking quickly, to bring
liquids to a boil, to preheat oil for deep fat
frying. Use for most grilling.
(Medium High) For fast frying or browning
foods, to maintain rapid boil of large amounts
of food, to maintain oil temperature for deep
fat frying.
(Medium-) For foods cooked in a double
boiler, saut6ing, slow boil of large amounts
of food, and most frying.
(Medium Lo) To continue cooking foods
started on higher settings.
Maintaining serving temperatures of foods,
simmering foods, melting butter or
chocolate.
l=mmI
The controls offer flexibility in setting selection. On
settings other than HI, you may adjust the control
above or below the numbered setting for best results.
This applies to settings when using cooktop cartridges
or when using the grill or any of the grill accessories.
Suggested settings are provided as general guidelines.
Page 8

Cod(topCa dges
Installation
Cooktop cartridges, either conventional coil or radiant elements, can be installed on either side of the cooktop. (See
page 3 for all available cartridges and model numbers.)
To Install Cartridges To Remove Cartridges
1. Ifthe grill grates, element, and/orgrill-rocksarein 1. Controls must be OFF and the cartridge should be
place, remove before installing acooktop cartridge, cool.
(See page 10 for removing grill.) Clean porcelain
basin pan of any grease accumulation. (See page
13 for cleaning recommendations.)
.
To install any of the optional cooktop cartridges,
be sure controls are turned OFF. Position the
cartridge terminal plug towards the terminal
receptacle. This receptacle is located at the front
of the left side and at the back of the right side of
the cooktop.
,
Lift up on the "tab" located on the cartridge until
top of cartridge clears the opening on the cooktop
by about 2 inches. Lifting the cartridge too high
while still engaged in the receptacle could damage
the terminal plug.
3_
To disengage terminal, hold cartridge by the sides
and slide away from the terminal receptacle. Lift
out when fully unplugged.
3_
Slide the cartridge towards the receptacle until the
cartridge terminal plug is completely engaged.
4_
Lower the opposite end of the cartridge into the
cooktop until it is flush with the surface. Your
cooktop is now ready to use.
Home Canning
For best results, canning should be done on the conven-
tional coil cartridge/cooktop.
For additional information, refer to use and care
manual packaged with your cartridge.
e
Do not stack cartridges where they may fall or be
damaged. Never store other materials on top of the
glass-ceramic cartridges since this could damage
or scratch the surface.
Page 9

CoilCooktop
Cooking Procedures
• For best results, always use recommended
cookware.
• Different cookpots and different amounts of food
being prepared will influence the control settings
needed for best results. For fastest cooking, start
with the surface control onHi for one minute; then
turn the control to the lower desired setting.
Covering pans, whenever possible, speeds cooking
and is more energy efficient.
• Do not allow pans to boil dry as this could damage
both the cooktop and the pan.
• Do not drop heavy cookware on the cooktop
surface.
Home Canning
RIGHT IONG
Cleaning
The cooktop cartridge does not needto be removed for
normal cleaning.
Never immerse cartridge in water to clean. This can
damage wiring. A drain hole within the cartridge
permits drainage of normal spills into the porcelain
basin pan where it will drain into the grease container.
Bottom of cartridge may be wiped clean with detergent
solution if necessary.
Be sure all control knobs are in the OFF position
before cleaning or removing heating elements.
Heating Elements
Under normal conditions, most soil will burn off ele-
ments. The heating elements unplug for your conve-
nience in cleaning the drip pans. Lift slightly and pull
away from receptacle. DO NOT IMMERSE IN
WATER. To replace elements, push completely into
the receptacle. Make sure the elements fit fiat.
Drip Pans
Follow These Procedures When Canning
• Bring water to boil at Hi setting; after boiling has
begun, reduce heat to lowest setting that will
maintain boiling.
• Make certain canner fits over center of surface
unit.
• Flat-bottomed canners give the best canning results-
• Use canning recipes from a reputable source such
as the manufacturer of your canner and
manufacturers of canning jars.
• Remember that canning is a process that creates
large amounts of steam. Be careful and follow
equipment instructions to avoid bums from steam
or hot canners.
• Remember that if your area has low voltage at
times, canning may take longer than indicated by
the directions.
Tokeep the like-new appearance,clean frequently and
never allow anything toburn on twice. Remove soiled
pans (first remove heating element). Clean lightly
soiled pans with soap and water or clean in dishwasher.
Difficult to remove spots can be cleaned by rubbing
lightly with soapy S.O.S. pads or nonabrasive cleaners
such asBon Arni. To help release bumed on soil, soak
in a solution of 1/2 cup ammonia and 1 gallon warm
water or boil in 2 quarts of water for 20 minutes. (All
drip pans cannot be boiled at once because element
being used must have a drip pan in place.) Do not use
abrasive cleansers, steel wool or cleansers not recom-
mended for use on chrome. A bluing of the drip pans
indicates improper cookware selection and/or using
excessively high heat and cannot be removed.
Page 10

Grilling
Installation
The grill accessory consists of two black grill grates, a grill element, and two grill-rocks.
To Install Grill
1. Before installing grill components, be certain
controls are OFF.
2_
Place the two grill-rocks into an empty basin pan
with their handles running parallel to the front of
the cooktop. These grill-rocks must be used since
they support the grill element.
t
Position the grill element with the terminal plug
towards the terminal receptacle. This receptacle is
located at the front of the left side and at the back
of the right side of the cooktop. Slide the element
towards the receptacle until the terminal plug is
completely engaged. The grill element should now
rest on the handles of the grill-rocks.
t
Place the black grill grates on the top of the
cooktop.
To Remove Grill
1. Be sure controls are OFF.
Remove grill
components once they are cool.
Q
To remove grill element, pull away from receptacle
until it is unplugged. (Note: Lifting the element
more than 2 inches above the cooktop surface
while it is engaged in the receptacle could damage
the terminal plug.)
Installing Griddle
1. Remove the two black grill grates from the grill.
2. Review the instructions for installing and using the
griddle that are packaged with the griddle.
Note: Accessory options are shown on page 3.
10
Page 11

Using the Grill
Grilling Tips
• Before the first use, wash your new grill grates in
hot soapy water, rinse and dry.
• Preconditionnew grates bywiping onathin coating
of cooking oil or spraying with a nonstick coating
such as PAM. This procedure should be repeated
each time.
Preheat the grill on HI for 5 minutes. Preheating
improves the flavor and appearance of meats and
quickly sears the meat to help retain thejuices. The
heating element should glow abright cherry red.
• Use nonmetallic spatulas or utensils to prevent
damaging the nonstick grill grate finish.
• Excessive amounts offat should be trimmed from
meats. Only a normal amount is necessary to
produce the smoke needed for that smoked,
"outdoor" flavor. Excessive fat can create cleaning
and flare-up problems.
• Allowingexcessive amounts ofgreaseordrippings
toconstantly flame voids the warranty on the grill
grates. Excessive flare-ups indicate that either the
grill interior needs to be cleaned or that excessive
amounts of fat are in the meat orthe meat was not
properly trimmed.
• Grease drippings will occasionally ignite toproduce
harmless puffs of flame for a second or two. This
is a normal part of the cooking process.
• NEVER LEAVE GRILL UNATTENDED
DURING GRILL OPERATION.
Suggested cooking times and control settings are
approximate duetovailations inmeats andelectrical
voltage. Experience will quickly indicate cooking
times as well as which settings work best.
• For best results, buy top grade meat. Meat that is
at least ¾ inch thick will grill better than thinner
cuts.
• Score fat on edges of steak, but do not cut into
meat, to prevent curling while cooking.
For the attractive "branded" look on steaks, be
sure grill is preheated. Allow one side of meat to
cook to desired doneness, or until juices appear on
the top surface, before turning. Turn steaks and
hamburgers just once. Manipulating food causes
loss of juices.
O
When basting meats or applying sauces to foods,
remember that excessive amounts wind up inside
your grill and do not improve the food flavor.
Apply sauces during the last 15 to 20 minutes of
cooking time unless recipe specifies otherwise.
Sugar-based sauces, when excessively used, will
carmelize on the grill-rocks and create extra
cleaning.
There are many meat marinades which will help
tenderize less expensive cuts of meat for cooking
on the grill.
Q
Certain foods, such as poultry and non-oily fish,
may need some extra fat. Brush with oil or melted
butter occasionally while grilling.
Should excess grease cause sustained flare-up
1. Turn on FAN manually.
2. Immediately turn grill control to OFF.
3. Remove meat from grill.
IMPORTANT
• Do not use aluminum foil inside thegrill area.
• Do not use charcoal or wood chips in the grill
area.
• Do not allow grill-rocks to become overloaded
with grease. Clean frequently.
• Do not covergrates completely with meat. Leave
air space between each steak, etc. to allow proper
ventilation as well as prevent flare-ups.
• Use tongswith long handles orspatulas for turning
meats. Do not use forks as these pierce the meat,
allowing juices to be lost.
• To help retain meat juices, salt after cooking is
completed.
II
Should grilled foods be prepared and ready before
you're ready to serve, turn control to a low setting
and cover meat loosely with a single sheet of
aluminum foil. Food will continue to cook.
11
Page 12

Grill Guide
Season grill grates. Preheat grill on HI, 5 minutes, for best flavor.
Note: Thischartisasuggestedquide. Cookingtimesandcontrolsettings areapproximateduetovariationsinmeatsandvoltage.
12
Page 13

Cleaning the Grill
Be sure the grill is cool and controls are OFF.
Grill Grates
These are made from cast aluminum and are coated
with a nonstiek finish.
• The grates shouldbe cleanedafter each use. They can
be cleaned with detergentandaplastic scrubber, such
as Tufty, or washed in the dishwasher if burned on
residue is firstremoved. For heavy soil, grates can be
soaked in hot, soapy water to which a cleanser, such
as household ammonia, has been added.
• Do not use metal brushes or abrasive scouring
pads or other scrubbers intended to clean outdoor
charcoal grills. These will remove the finish as
well as scratch the grates. Do not clean in self-
cleaning oven or use oven cleaners on the grates.
Grill Element
Follow instructions on page 10 for removing the grill
element. The grill element should never be immersed
in water. Most soil wili burn off during use. The
terminal block may be cleaned with a soapy sponge.
Do not use abrasive cleansers or materials. Dry
thoroughly before reinserting in the cooktop.
Porcelain Basin Pan
This area is located under the grill-rocks and/or car-
tridges. It should be cleaned after each use of the grill.
• To remove light soil, clean with soapy water or
spray with cleansers such as Fantastik or 409. For
easier cleanup: a) spray with a household cleanser;
b) cover with paper towels; e) add small amount of
hot water to keep the paper towels moist; d) cover
and wait 15 minutes; and e) wipe clean.
• To remove moderate soil, scrub with Comet, Bon
Ami, a soft scrub cleanser or plastic scrubber.
• To remove stubborn soil, spraywith anoven cleaner,
let soak overnight, wipe clean, rinse and dry.
Grease Jar
A greasej aris locatedbelow each grill basin (under the
counter). Check periodically to prevent spillovers.
Unscrew and remove. The grease jar can be replaced
with any heat tempered jar, such as acanning jar, which
has a standard screw neck.
Grill-Rocks
These aremade from cast-iron which havebeen coated
with porcelain enamel.
a The grill-rocks should be cleaned frequently or
after any excessive build-up of grease. To clean
light soil, use detergent and aplastic scrubber, such
as Tufty, or wash in the dishwasher if burned on
residue is first removed. For heavy soil, soak in
hot, soapy water to which a cleanser, such as
household ammonia, has been added. Stubborn
spots on grill-rocks, such as burned on residue
from sauces, can be scrubbed with a stiff bristle
brush.
• An oven cleaner, such asEasy-Off, can beused for
burned on soil. Follow manufacturer's directions;
spray on cleaner and let soak overnight. Do not
clean grill-rocks in the self-cleaning oven.
13
Page 14

Cleaning PartsofYourCooktop
Control Knobs
The knobs on the control panel can be removed with
the controls in the OFF position. Pull each knob
Porcelainized Steel Cooktop
• Wash cool cooktop with warm soapy water and
rinse. Polish with a dry cloth.
straight from the shaft. Wash knobs in warm soapy
water or dishwasher; do not use abrasive cleansers or
materials. To replace each knob, match fiat part of
• Do not use abrasive or caustic cleaning agents
which may permanently damage the finish.
knob opening with the spring on the shaft, returning
in the OFF position.
Control Panel
Use mild cleansers, such as soapy water, glass cleaners
or mild liquid sprays, such as 409. Wipe with sponge,
damp cloth or paper towel. Donot scrub with S.O.S
pads or Scotch Brite pads or abrasive cleansers.
• NEVER WIPE OFF A WARM OR HOT
PORCELAIN ENAMEL SURFACE WITH A
DAMP CLOTH.
NOTE: The porcelain enamel used on your cooktop
is acid resistant, not acid proof. Therefore, acid foods
(such as vinegar, tomato, milk, etc.) spilled on the
cooktop should be wiped up immediately with a dry
cloth.
Before You Call ForService
Check the following list to be sure a service call is really necessary. A quick reference of this manual may prevent
an unneeded service call.
If you do have a problem you cannot fix yourself, call your nearest Sears Store or Service Center for help. When
calling, have this manual handy with the model number. You will also needthe serial number found on the serial plate
on the side of the vent chamber and the purchase date.
If nothing on the cooktop operates:
• check for a blown circuit fuse or a tripped main
circuit breaker.
• check ifcooktop is properly connected to electric
circuit in house.
If ventilation system is not capturing smoke
efficiently:
• check on cross ventilation in room or make up air.
• excessive amount of smoke is being created; check
instructions for grilling, trirmning meats. (See p.
11.)
If grill heating element or cooktop does not get
hot enough:
• check if heating element is plugged in solidly.
• surface controls may not be set properly.
• voltage to house may be low.
• outside wall cap may be trapped shut.
• cooktop may be improperly installed; check ducting
information. (See p. 5.)
• air filter may be improperly installed. (See p. 4.)
NOTE: If either element of the cooktop cartridge fails
to heat - switch the cartridge to the other side of the
cooktop. If it operates on that side, then the cooktop
control switch may be at fault. If it does not heat on
either side - indications are that the cartridge requires
service. In this event, you may speed service by
delivering the lightweight cartridge to an authorized
Sears Center.
All specifications subject to change by manufacturer without notice.
14
Page 15

For the repair or replacement parts you need
Call 7 am-7 pm, 7 days a week
1-800-366-PART
(1-800-366-7278)
0000 O0 O0 O00000tO00000000 O0 O00
For in-home major brand repair service
Call 24 hours a day, 7 days a week
1-800-4-MY-HOME _"
(1-800-469-4663)
O000000000000000000000QOO0000
For the location of a
Sears Parts and Service Center
in your area
Call 24 hours a day, 7 days a week
1-800-488-1222
00000000000000000000000000000
For more information on purchasing a
Sears Maintenance Agreement
or to inquire about an existing Agreement
Call 9 am-5 pm, Monday-Saturday
1-800-827-6655
S=u,s'I
IIIIIIIIII IIIII
The 5er,,iceSideof Sears_'
Page 16

KENMORE ELECTRIC COOKTOP WARRANTY
FULL ONE YEAR WARRANTY ON THE FUNCTIONING OF ALL
PARTS EXCEPT GLASS PARTS
If, within one year from the date of installation, any part, other than a glass part,
fails to function properly due to defect in material or workmanship, Sears will
Dear Customer:
Our constant efforts are
directed toward making
sure your new Kenmore
Cooktop will arrive atyour
home in perfect condition
and will give you proper
performance. As part of
these efforts, we feel it is
our responsibility to pro-
vide you with this war-
ranty for your cooktop.
repair or replace it, free of charge.
FULL 30-DAY WARRANTY ON GLASS PARTS AND FINISH OF POR-
CELAIN ENAMEL, PAINTED OR BRIGHT METAL FINISHED PARTS
If, within 30 days from the date of installation, any glass part orthe finish on any
porcelain enamel, painted or bright metal part is defective in material or
workmanship, Sears will replace the part, free of charge.
FULL 90-DAY WARRANTY ON MECHANICAL ADJUSTMENTS
Fo r90 days from the date of installation, Sears will provide, free of charge, any
mechanical adjustments necessary for proper operation ofthe cooktop, except
for normal maintenance.
If the cooktop is subjected to other than private family use, the above warranty
coverage is effective for only 90 days.
WARRANTY SERVICE IS AVAILABLE BY CONTACTING THE
NEAREST SEARS SERVICE CENTER/DEPARTMENT IN THE
UNITED STATES
This warranty applies only while this product is in use in the United States. This
warranty gives you specific legal rights, and you may also have other rights
which vary from state to state. SEARS, ROEBUCK and CO.
Dept. 720PSO
3333 Beverly Road
Hoffman Estates, IL 60179
WE SERVICE WHAT WE SELL
"We Service What We SeW' is our assurance to you that you can depend on Sears for service because Sears service
is nationwide.
Your Kenmore Cooktop has added value when you consider that Sears has a service unit near you staffed by Sears
trained technicians.., professional technicians specifically trained on Sears appliances, having the parts, tools and
equipment to ensure that we meet our pledge to you - "We Service What We Sell!"
TO FURTHER ADD TO THE VALUE OF YOUR COOKTOP, BUYA SEARS MAINTENANCE AGREEMENT.
Years of Ownership Coverage lsi Year 2rid Year 3rd Year
.......... I................
Kenmore Cooktops are designed, maufactured and
tested for years of dependable operation. Yet, any
modern appliance may require service from time to
time. The Sears Warranty plus the Sears Mainte-
nance Agreement provides protection from unex-
pected repair bitls and assures you of enjoying
maximum cooktop efficiency.
Here's a comparative warranty and Maintenance
Agreement chart showing you the benefits of a
Sears Cooktop Maintenance Agreement.
CONTACT YOUR SEARS SALESPERSON OR LOCAL SEARS SERVICE
CENTER TODAY AND PURCHASE A SEARS MAINTENANCE AGREEMENT.
IIIIILI • ijlllll iiiiiiiiiiiiiii iiiiiii i ii iiiiiiiii i iiiiiii iiiii iiii i i iiiiiiiiiiiiii iiiiii iiiiiiiiiiii
Replacement of Defective
1 Parts otherlhan Porcelain iV MA MA
or Glass
90 DAYS
2 M han, ,Adjus,mo W MA MA
30 DAYS
3 Porcelain and Glass Parts W MA MA
i
4 A.o° Prevonta,ve.= eo-MA MA MA
ance Check at your request
W- Warranty MA- Maintenance Agreement
Kenmore America's Best Selling Appliance Brand
II IIIIIIIIIIIIIII IIIIII IIIIII IIIIIIIIIIIII IIIIIIIII IIIIIIIIIII IIIIII iiiiiiiiiiiiii I IIIIIIIIIIIIIIII IIIIIIIIIIIII
Sold by SEARS, ROEBUCK AND CO., Hoffman Estates, IL 60179
 Loading...