

Sears 397.19591 Owner's Manual

Sears
owners
manual
MODEL NO.
397.19591
1/2
H.P.
•
Assembly
•
Installation
•
Operation
•
Repair Parts
CAUTION:
Read Rules for
~,
Safe Operation
and Instructions
Carefully
COPYRIGHT, 1969, BY POWER TOOL INSTITUTE, INC. ALL RIGHTS RESERVED
CRAFTSMAN GRINDER
THIS SAFETY SEAL OF THE POWER TOOL INSTITUTE ASSURES YOU:
1. That the manufacturer's power tools, including the particular tool associated with the Seal, are
produced in accordance with applicable Standards for Safety of Underwriters' laboratories.
2. That compliance with appl icable safety standards is assured by independent inspection and
, testing conducted by Underwriters' laboratories (UU.
3. That every motorized tool is inspected under power.
4. That every tool has with it adequate instructions and a list of safety rules for the protection of
the user.
5. That the tool manufacturer is a member of the Power Tool Institute and is a sponsor of the
Institute's Consumer Safety Education Program.
Sears, Roebuck and Co.,Chicago,
Ill.
60607 U.S.A.
and Simpsons Sears Limited, Toronto
I
RULES FOR SAFE OPERATION.
Read instructions carefully before using.
1. KEEP GUARDS IN PLACE and in working order.
2. REMOVE ADJUSTING KEYS AND WRENCHES.
Form habit of checking to see that keys and adjusting
wrenches are removed from tool before turning it on.
3. KEEP WORK AREA CLEAN. Cluttered areas and
benches invite accidents.
4. AVOID DANGEROUS ENVIRONMENT. Don't use
power tools in damp or wet locations. Keep work area
well lit.
5. KEEP CHILDREN AWAY. All visitors should be kept
safe distance from work area.
6. MAKE WORKSHOP KID PROOF - with padlocks,
master switches, or by removing starter keys.
7. DON'T FORCE TOOL. It will do the job better and
safer at the rate for which it was designed.
8. USE RIGHT TOOL. Don't force tool or attachment to
do a job it was not designed for.
9. WEAR PROPER APPAREL. No loose clothing or
jewelry to get caught in moving parts. Rubber-soled
footwear is recommended for best footing.
10. USE SAFETY GLASSES. Also use face or dust mask if
cutting operation is dusty.
11. SECURE WORK. Use clamps or a vise to hold work
when practical. It's safer than using your hand and it
frees both hands to operate tool.
12. DON'T OVERREACH. Keep proper footing and
balance at all times.
13. MAINTAIN TOOLS WITH CARE. Keep tools sharp
and clean for best and safest performance. Follow
instructions for lubricating and changing accessories.
14. DISCONNECT TOOLS before servicing; when
changing accessories such as blades, bits, cutters, etc.
15. AVOID ACCIDENTAL STARTING. Make sure switch
is in "Off" position before plugging in.
16. USE RECOMMENDED ACCESSORIES. Consult the
owner's manual for recommended accessories. The use
of improper accessories may cause hazards.
17. GROUND THE OUTLET BOX to prevent possible
fatal shocks. SEE "OPERATION" PAGE 5.
18. BE SURE YOUR VOLTAGE SUPPLY AGREES with
r
the voltage specified on the nameplate. Use the proper
fuse and extension cord to prevent fires and wiring
damage.
19. EXAMINE GRINDING WHEELS FOR CRACKS or
other damage before operating. Replace cracked wheel
immediately. When wheels are replaced, do not
overtighten retaining nut.
20. ALL GUARDS MUST BE IN PLACE and all
adjustments securely tightened before starting grinder.
Protect your eyes and body by wearing shatterproof
glasses and attaching the eyeshields and spark arresters
to the grinder. Do not stand in front of grinder during
first minute of operation.
21. USE ONLy WHEEL FLANGES FURNISHED WITH
GRINDER.
22. MOUNT THE GRINDER SECURELY to prevent
damage. SEE "INSTALLATION" PAGE 3. Do not
force work against the wheels, since thrown wheel
chips may injure the operator or bystander.
23. DO NOT FORCE WORK against the grinding wheel!
Excessive pressure may cause injury to the operator
and damage or breakage to the grinding wheel.
24. BE SURE YOU READ ALL INSTRUCTIONS
pertaining to 115 volt and 230 volt operation before
attempting to change connections.
ASSEMBLY
The key numbers in the instructions refer to the adjacent
assembly instructions.
INSPECT GRINDING WHEELS FOR DAMAGE BEFORE
USING.
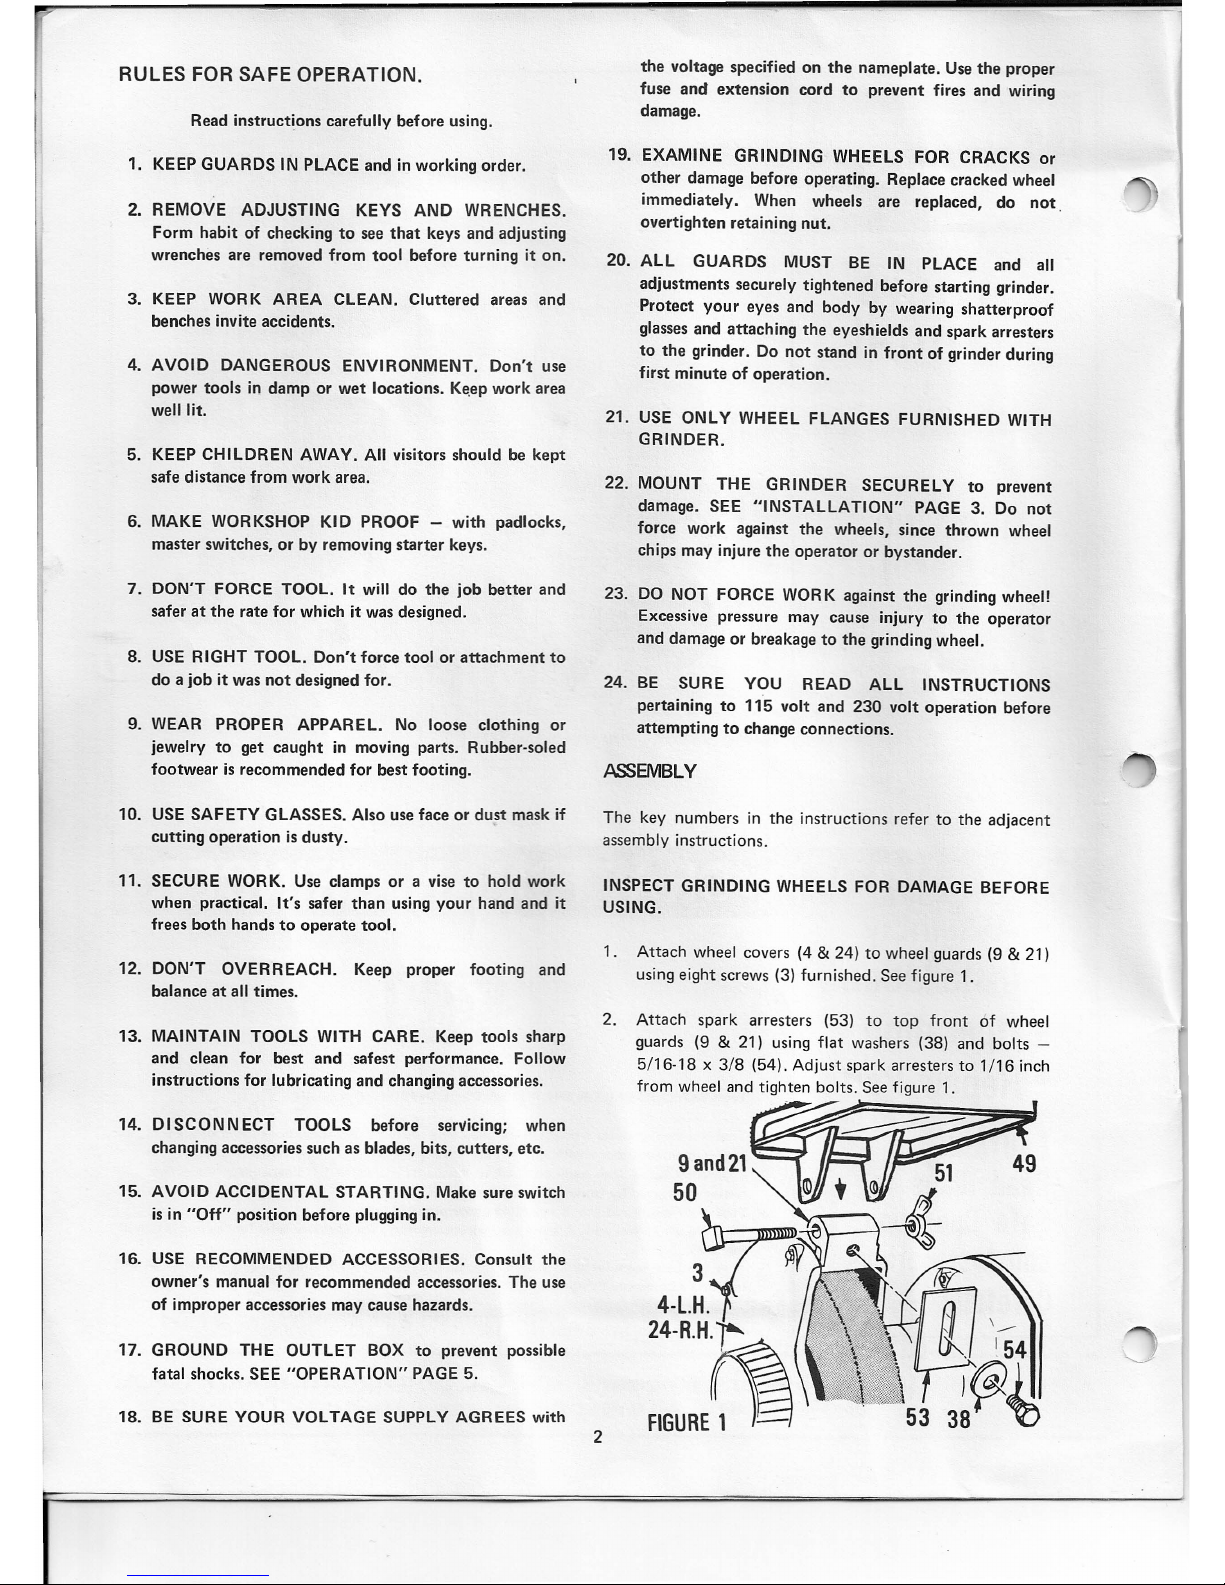
1.
Attach wheel covers (4&24) to wheel guards (9&21)
using eight screws (3) furnished. See figure 1.
2.
Attach spark arresters (53) to top front of wheel
guards (9&21) using flat washers (38) and bolts -
5/16-18 x 3/8 (54). Adjust spark arresters to 1/16 inch
from wheel and tighten bolts. See figure 1.
~
;f
9 and21 51 49
50
m
t ~~
3~ , ~
4-L.~:i .
I
24-R.H.1'
FI6URE~
2
3. Fasten eyeshield (49) to top of wheel guards (9&21)
using bolts - %-20 x 2% (50) and wing nuts (51). See
figure 1.
4.
Attach tool rest arms (37) to inner side of wheel guards
(9&21) using flat washers (38) and bolts - 5/16-18
x
3/4 (39) as shown. Attach tool rests (35&36) to tool
rest arms using bolts (39) and washers (38). Adjust as
desired and tighten. See figure 2.
5. Insert 4 base bushings (33) in slots provided at each
corner of base as shown in illustration. Thick section of
bushing extends below grinder base. See figure 2.
6. Assemble lamp shade cover (18) to metal lamp shade
(17) with screw (19). Clamp this assembly to lamp
holder. For 115 volt operation we recommend either
40 watt "regular" or 50 watt "rough service" bulb in
your grinder lamp. For 230 volt operation use a 230
volt 50 watt "rough service" bulb. (G.E. 50A/RS or
equivalent.) See figure 3.
7. Attach quench tray (40) to front of cover band (15) in
knockout slot provided. Lip at side of tray hooks into
slot. Seefigure 3.
l~
,
15 40
FIGURE 3
8.
The. illustration shows how the washer spacer (56) is
assembled to your grinder when accessories are used.
Seefigure 4.
Accessory
Wheel
6
FIGURE4
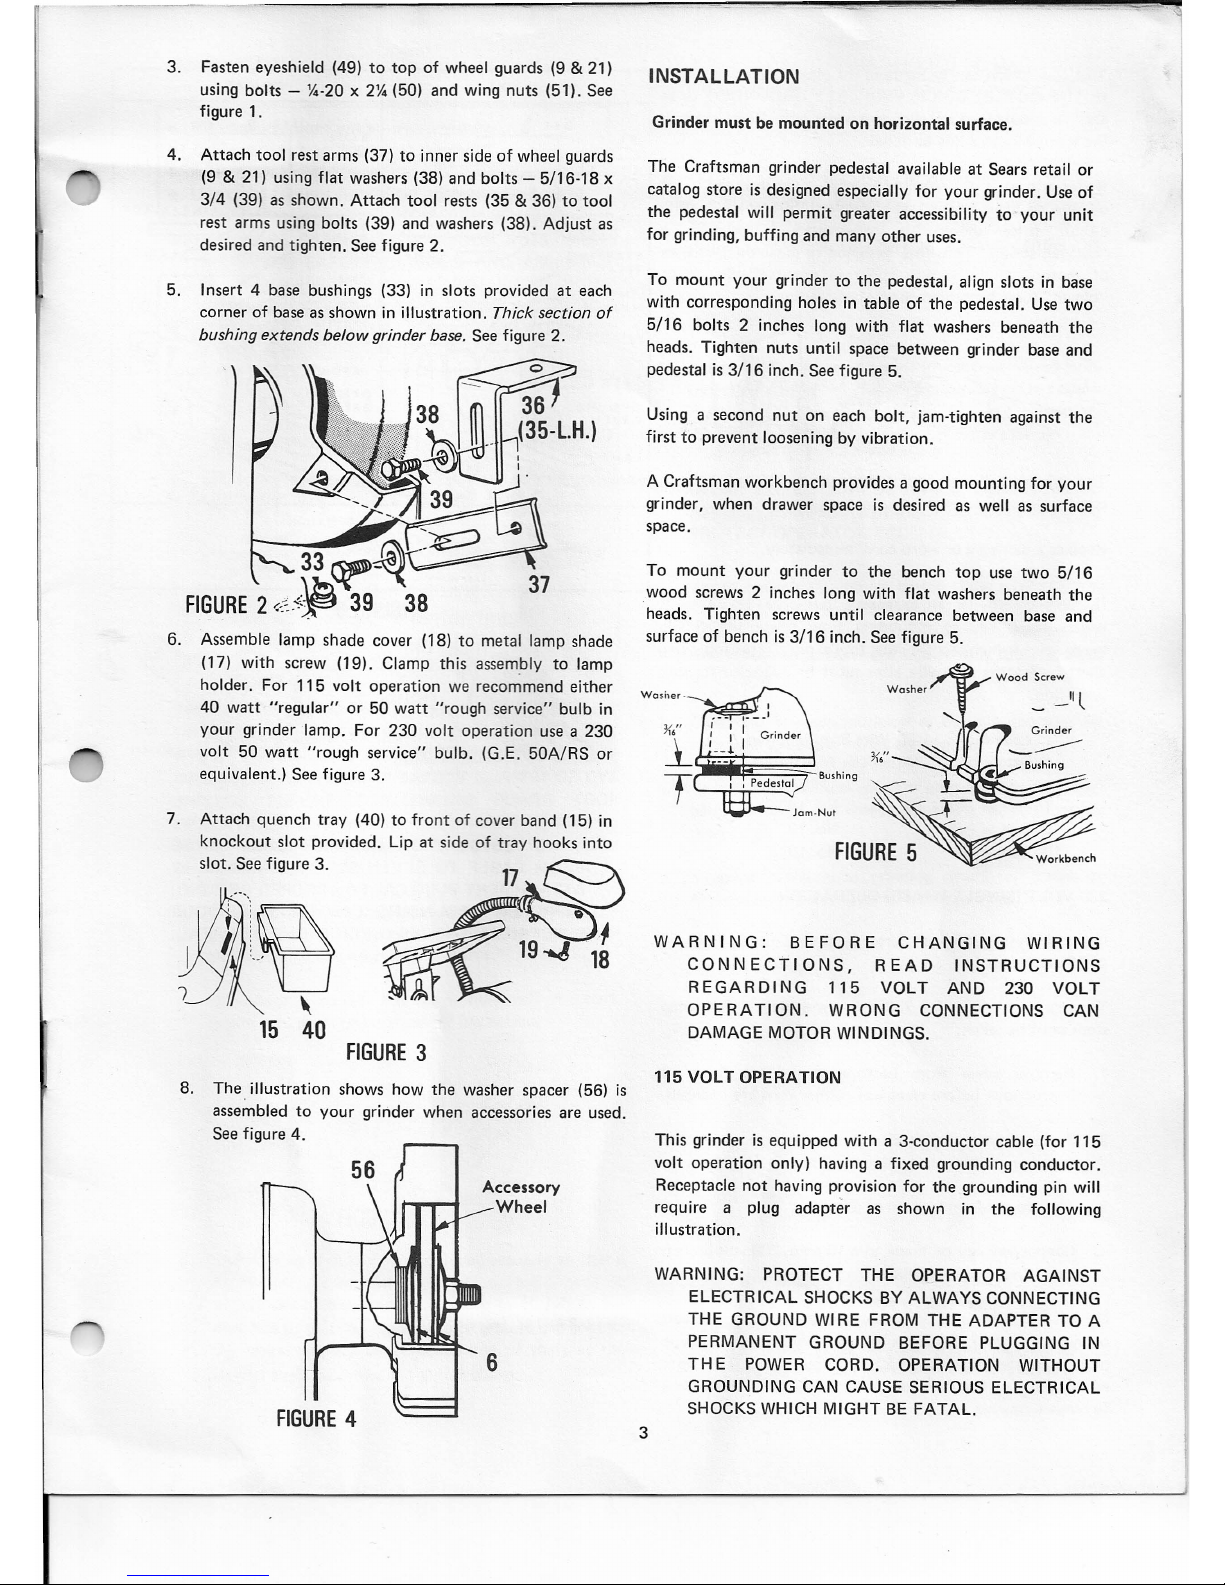
INSTALLATION
Grinder must be mounted on horizontal surface.
The Craftsman grinder pedestal available at Sears retail or
catalog store is designed especially for your grinder. Use of
the pedestal will permit greater accessibility
to
your unit
for grinding, buffing and many other uses.
To mount your grinder to the pedestal, align slots in base
with corresponding holes in table of the pedestal. Use two
5/16 bolts 2 inches long with flat washers beneath the
heads. Tighten nuts until space between grinder base and
pedestal is 3/16 inch. Seefigure 5.
Using a second nut on each bolt; jam-tighten against the
first to prevent loosening by vibration.
A Craftsman workbench provides a good mounting for your
grinder, when drawer space is desired as well as surface
space.
To mount your grinder to the bench top use two 5/16
wood screws 2 inches long with flat washers beneath the
heads. Tighten screws until clearance between base and
surface of bench is 3/16 inch. See figure 5.
Wc sher .
_ -Ill
Grinder
~.~~~~BUShing
WARNING: BEFORE CHANGING WIRING
CONNECTIONS, READ INSTRUCTIONS
REGARDING 115 VOLT AND 230 VOLT
OPERATION. WRONG CONNECTIONS CAN
DAMAGE MOTOR WINDINGS.
115
VOLT OPERATION
This grinder is equipped with a 3-conductor cable (for 115
volt operation only) having a fixed grounding conductor.
Receptacle not having provision for the grounding pin will
require a plug adapter as shown in the following
illustration.
WARNING: PROTECT THE OPERATOR AGAINST
ELECTRICAL SHOCKS BY ALWAYS CONNECTING
THE GROUND WIRE FROM THE ADAPTER TO A
PERMANENT GROUND BEFORE PLUGGING IN
TH E POWER CORD. OPERATION WITHOUT
GROUNDING CAN CAUSE SERIOUS ELECTRICAL
SHOCKS WHICH MIGHT BE FATAL.
3
 Loading...